Community Brag Posts

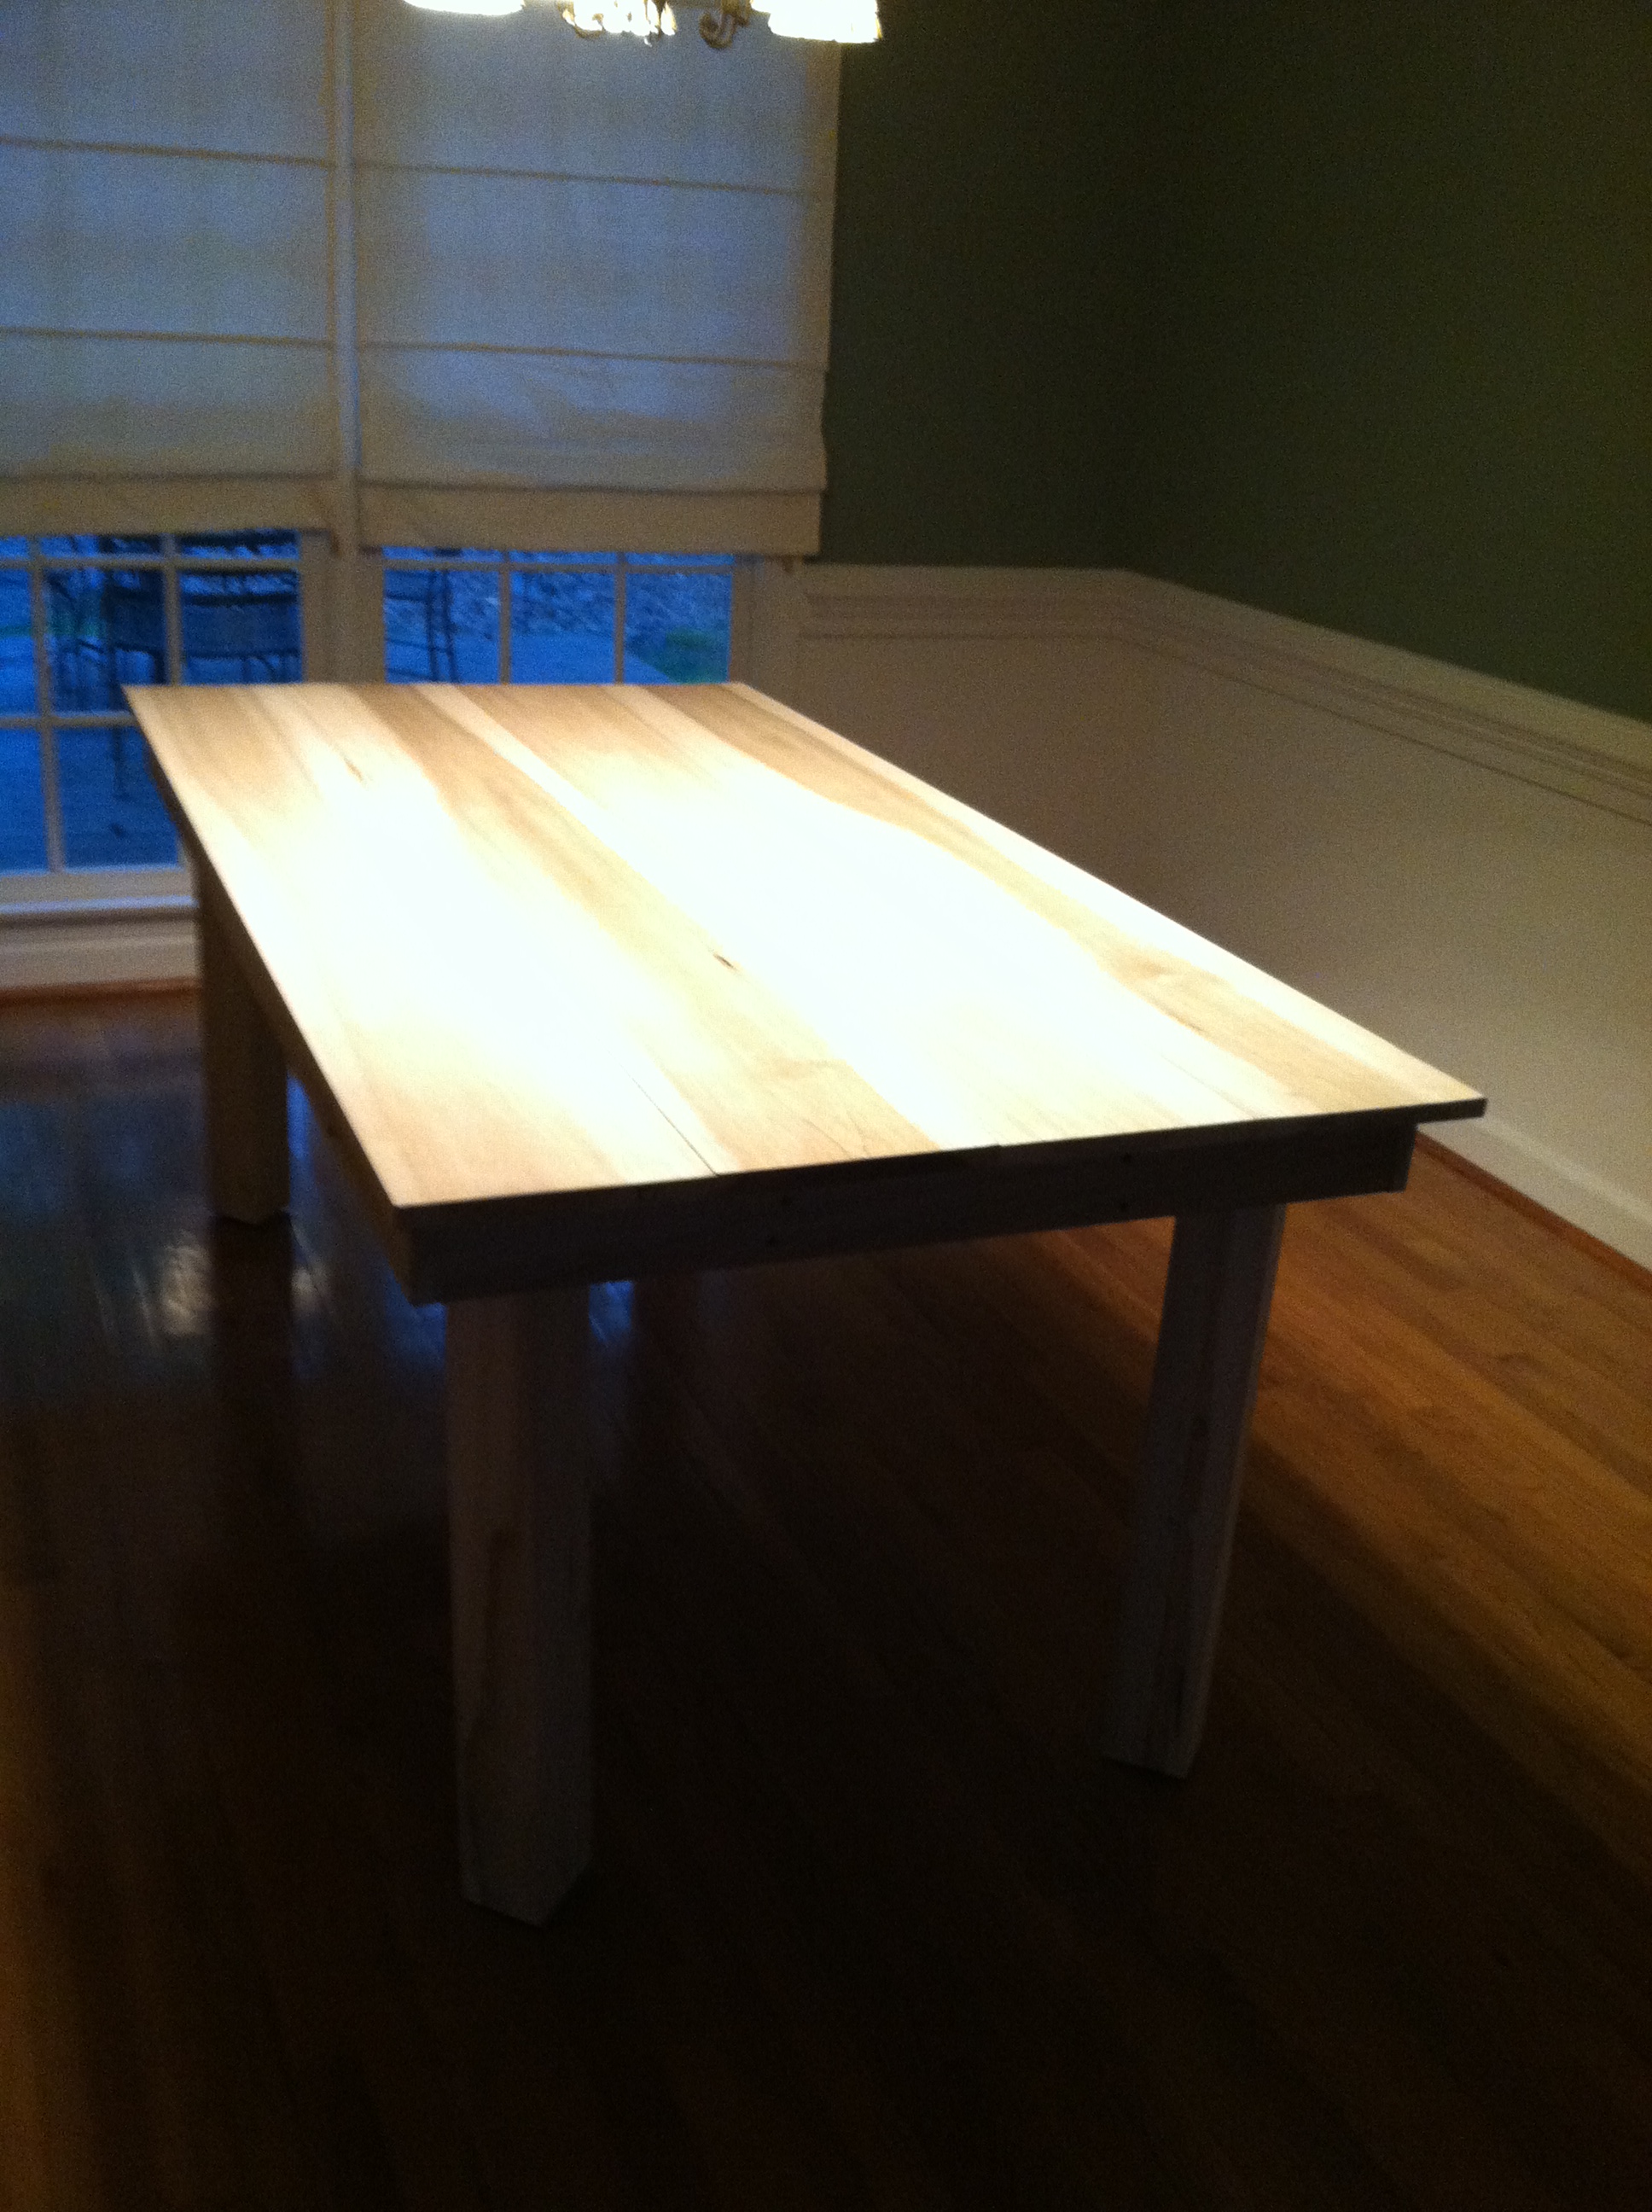
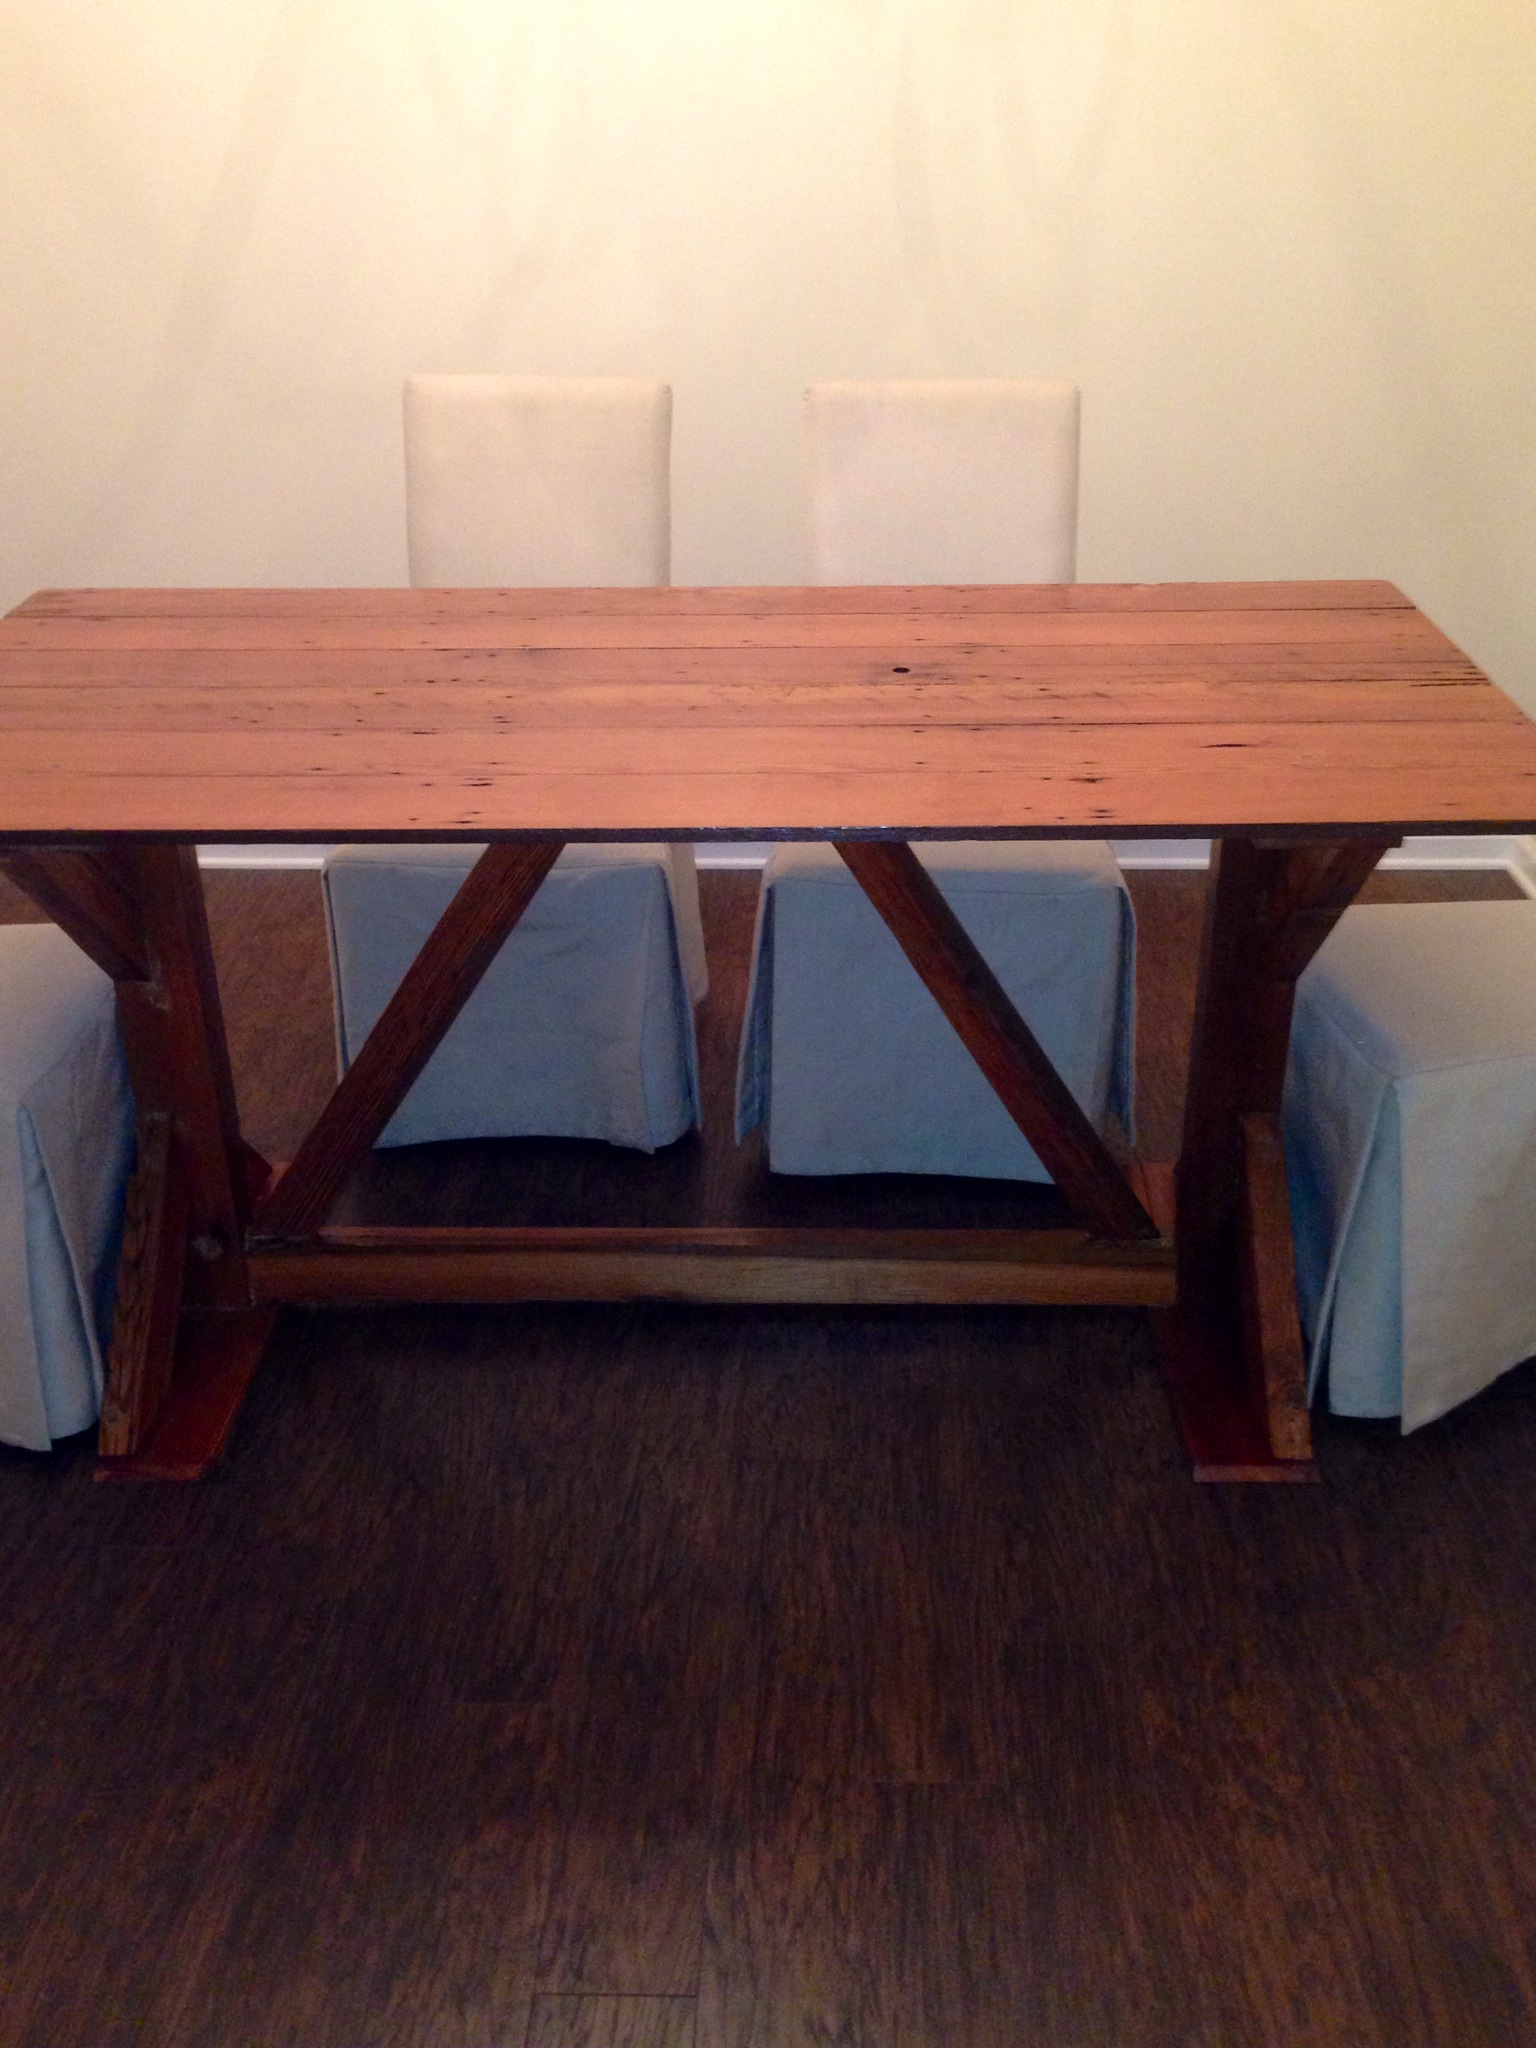
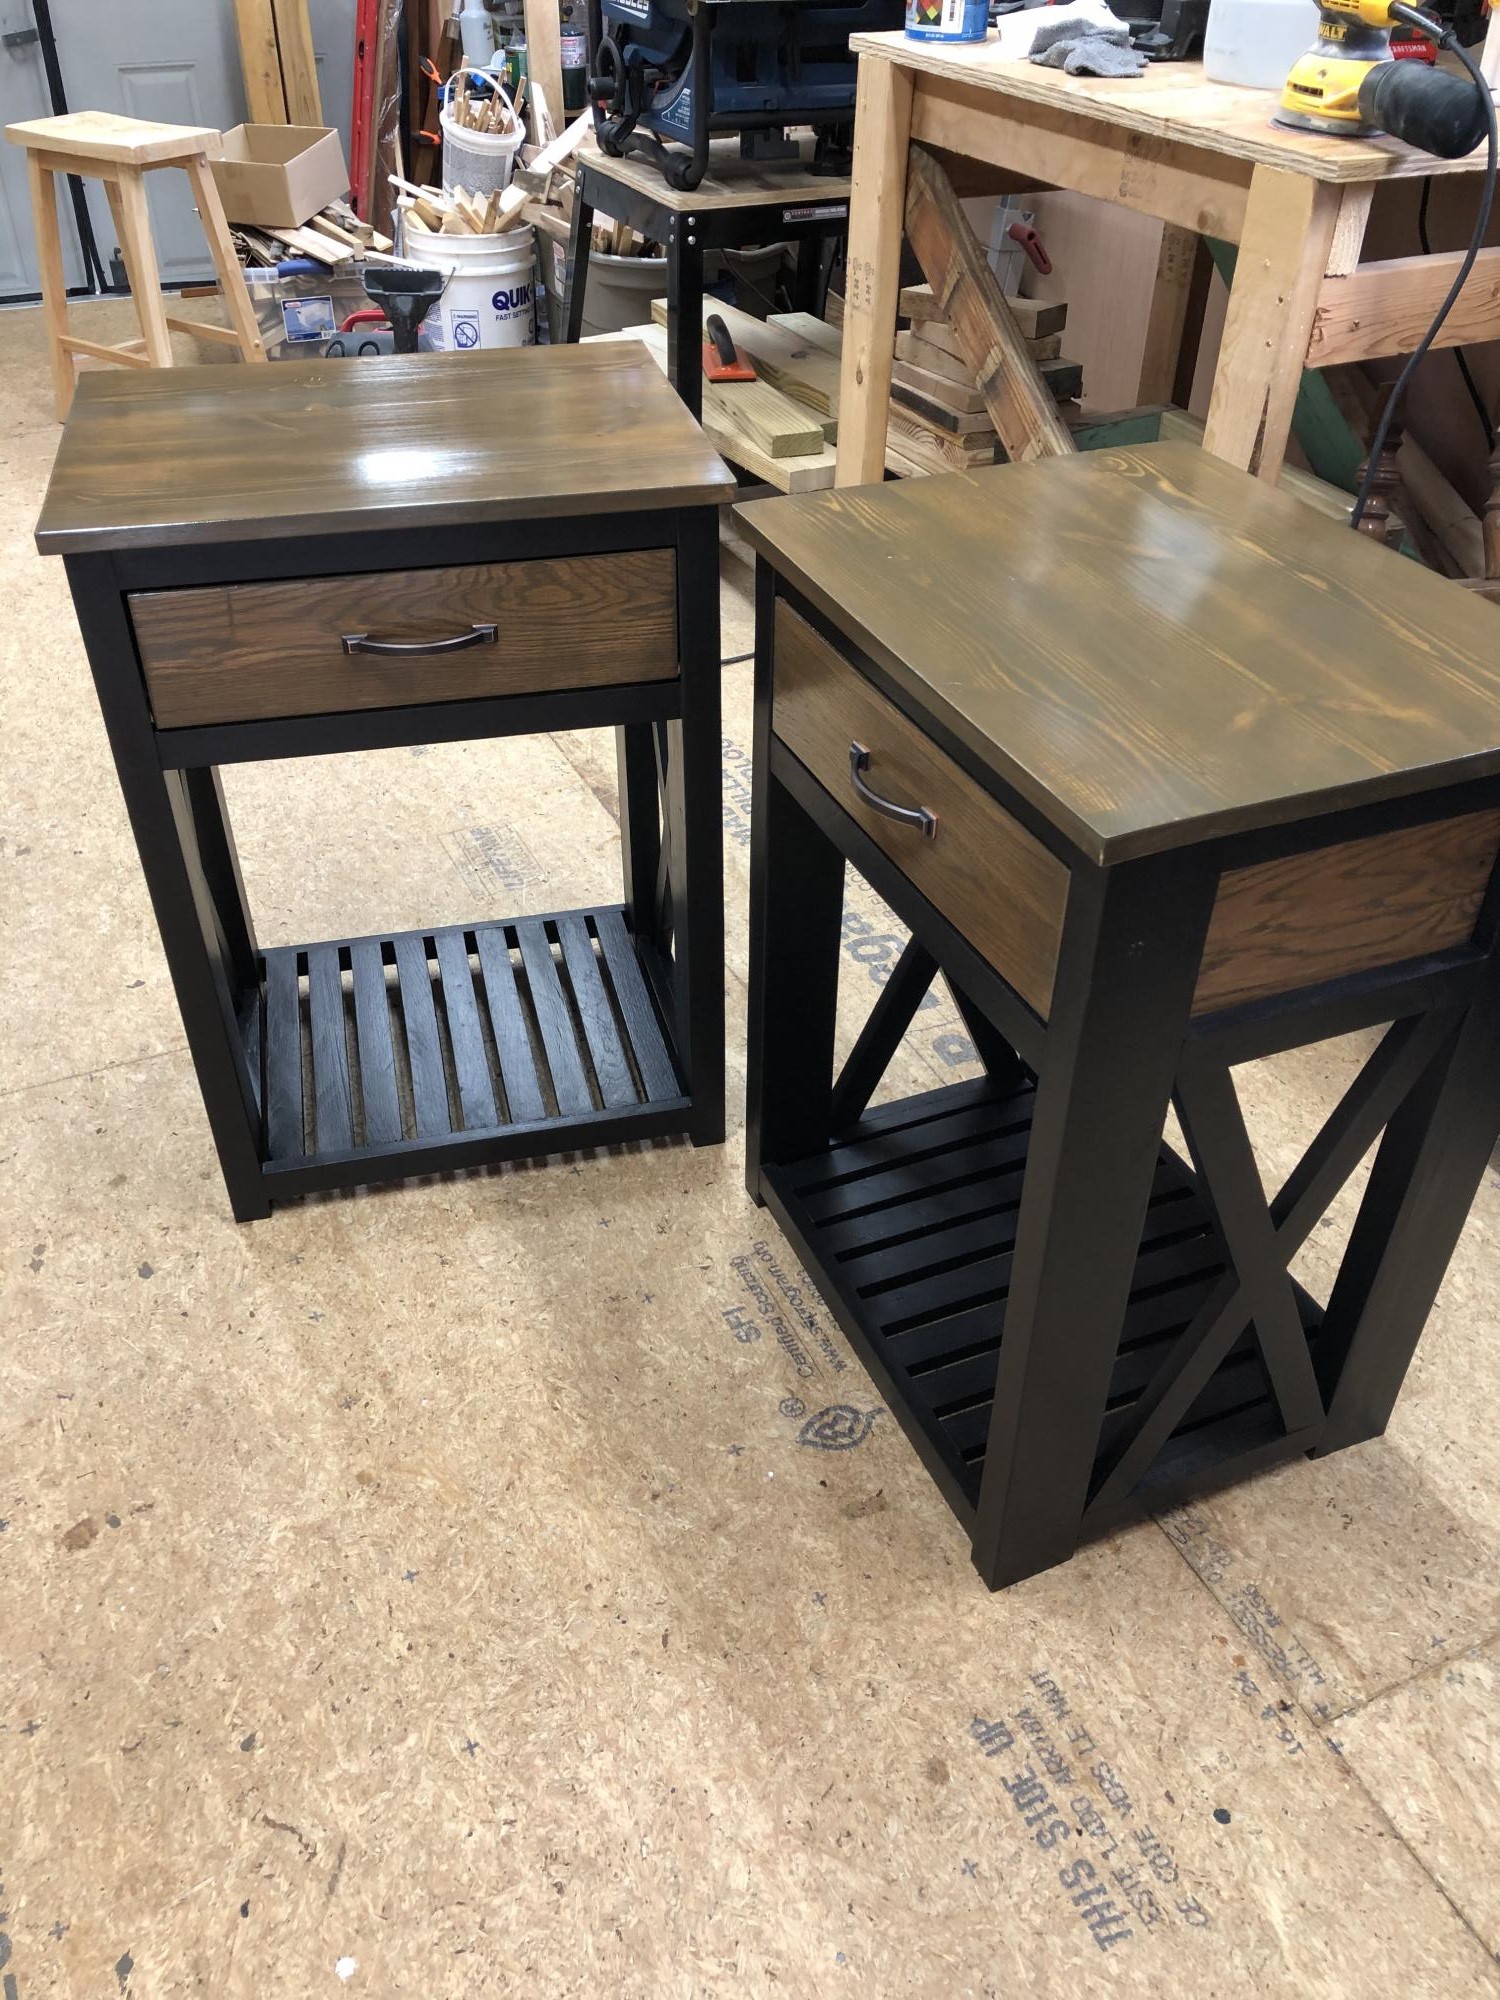
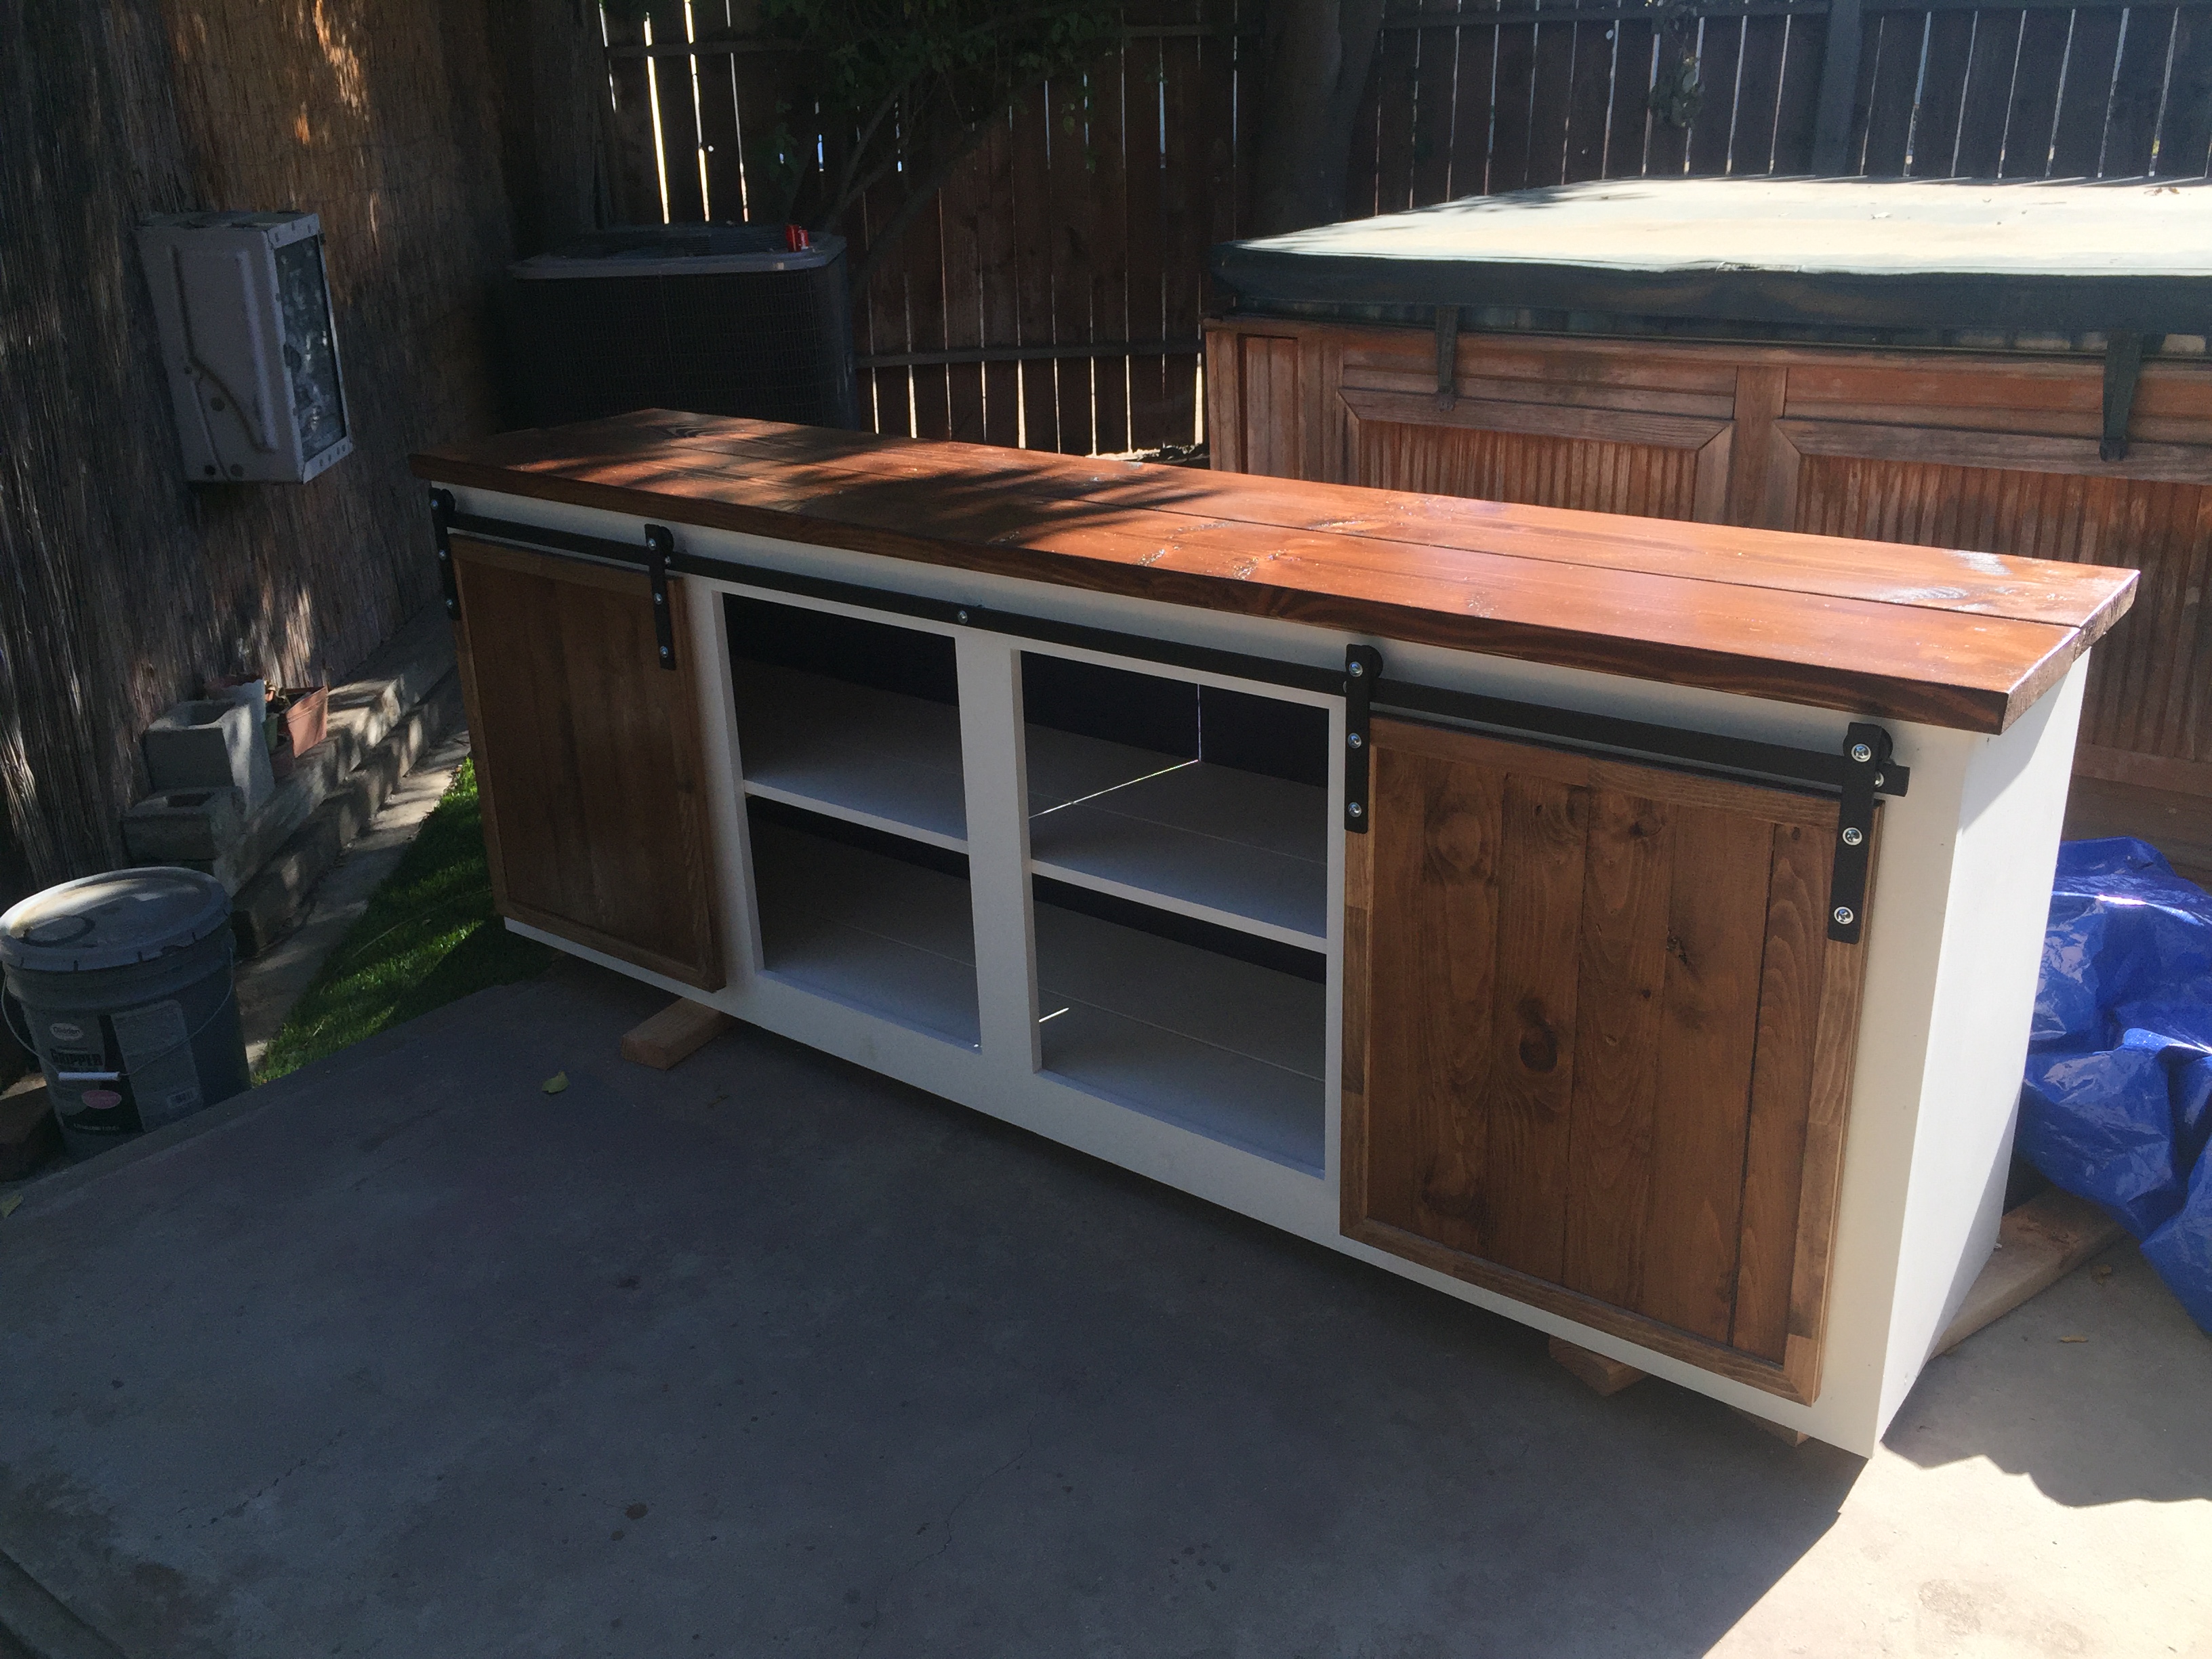
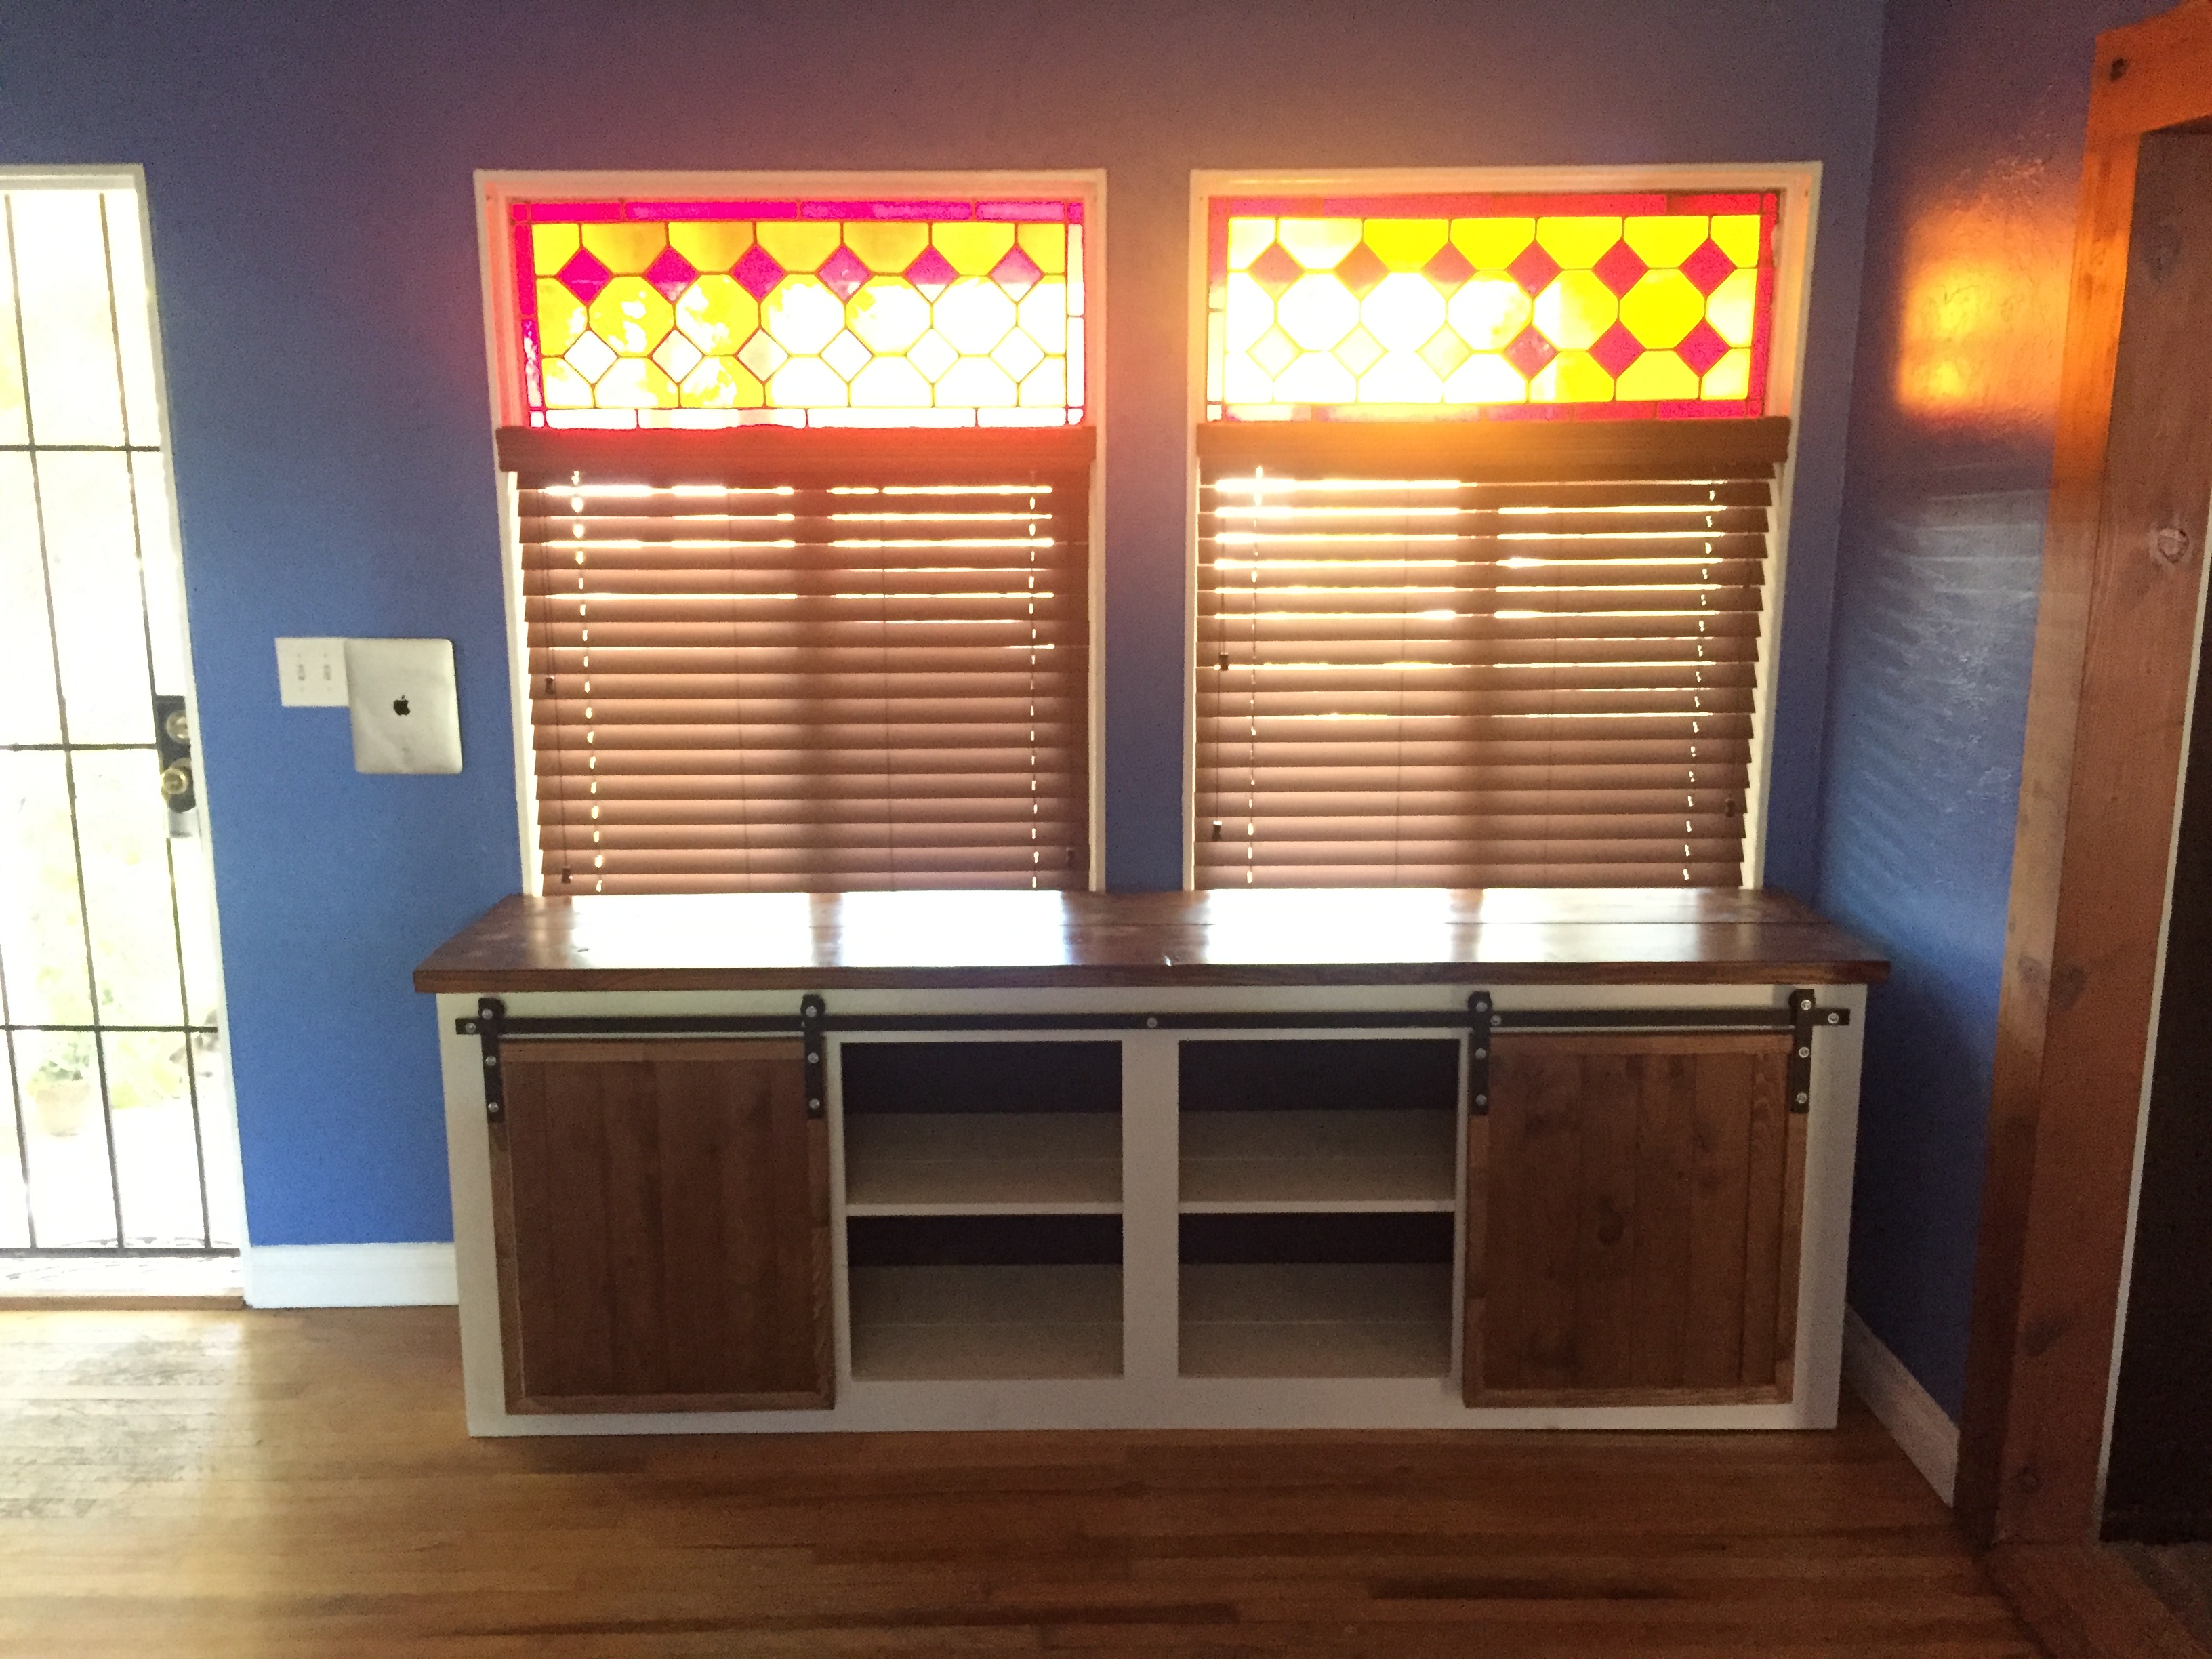
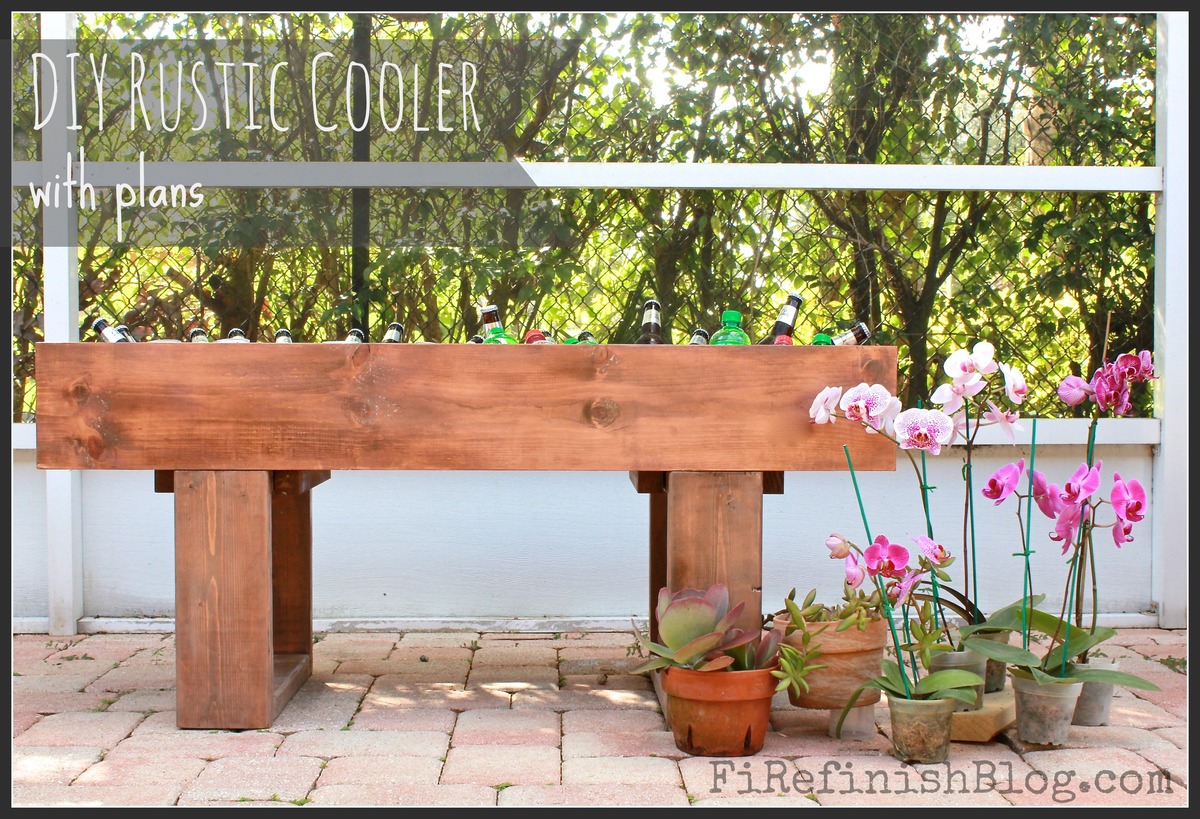
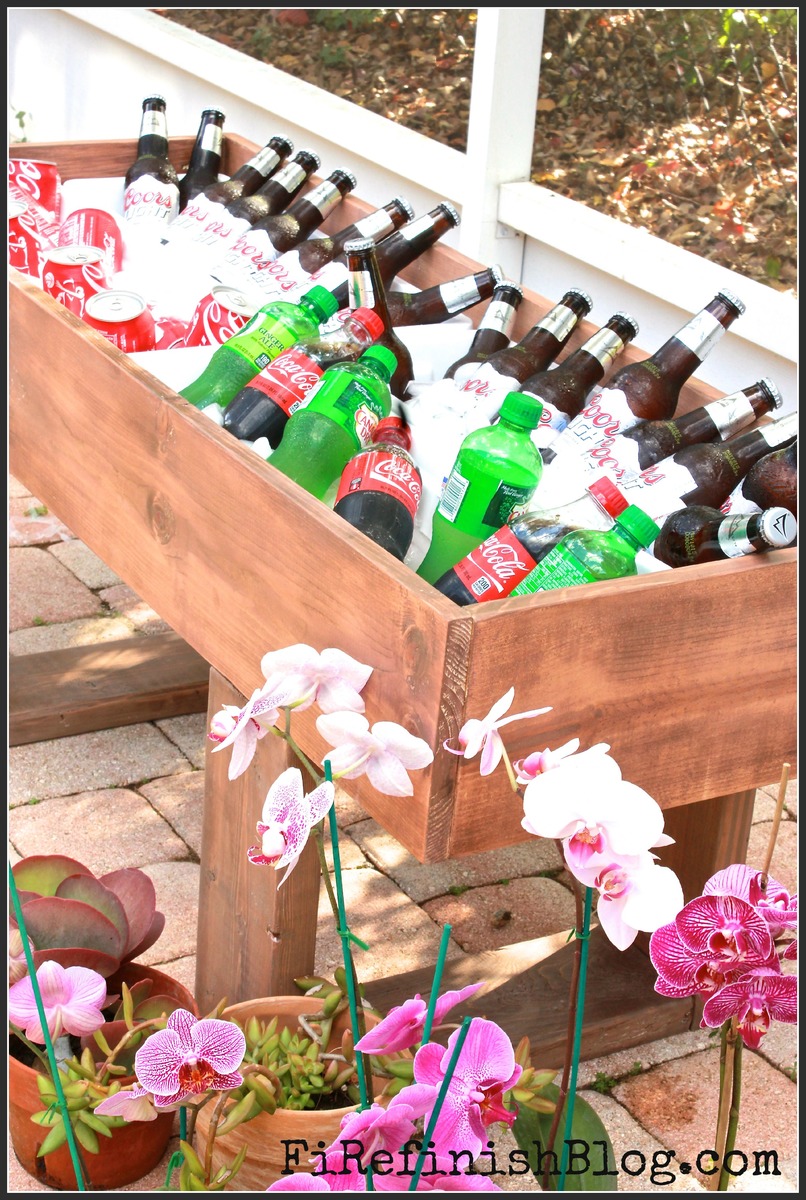
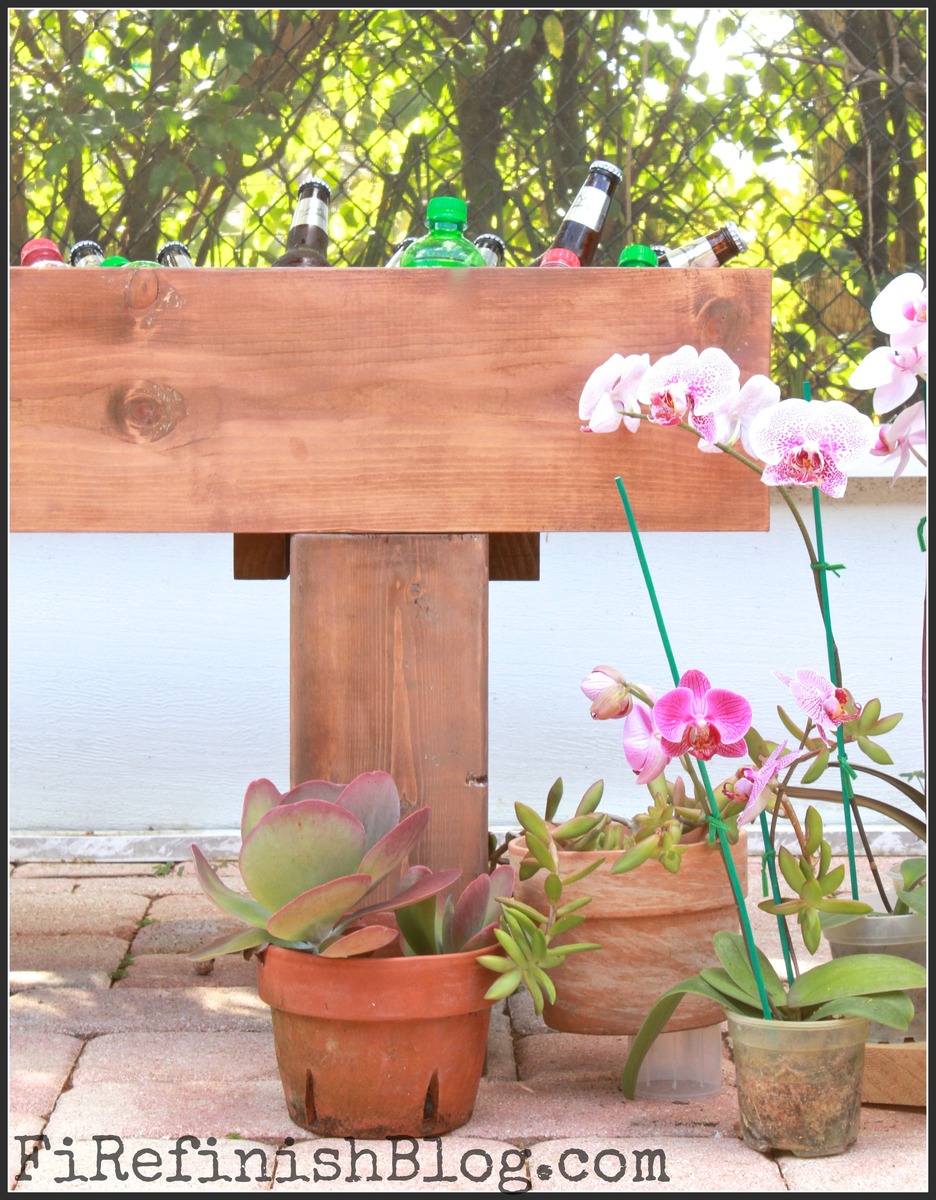
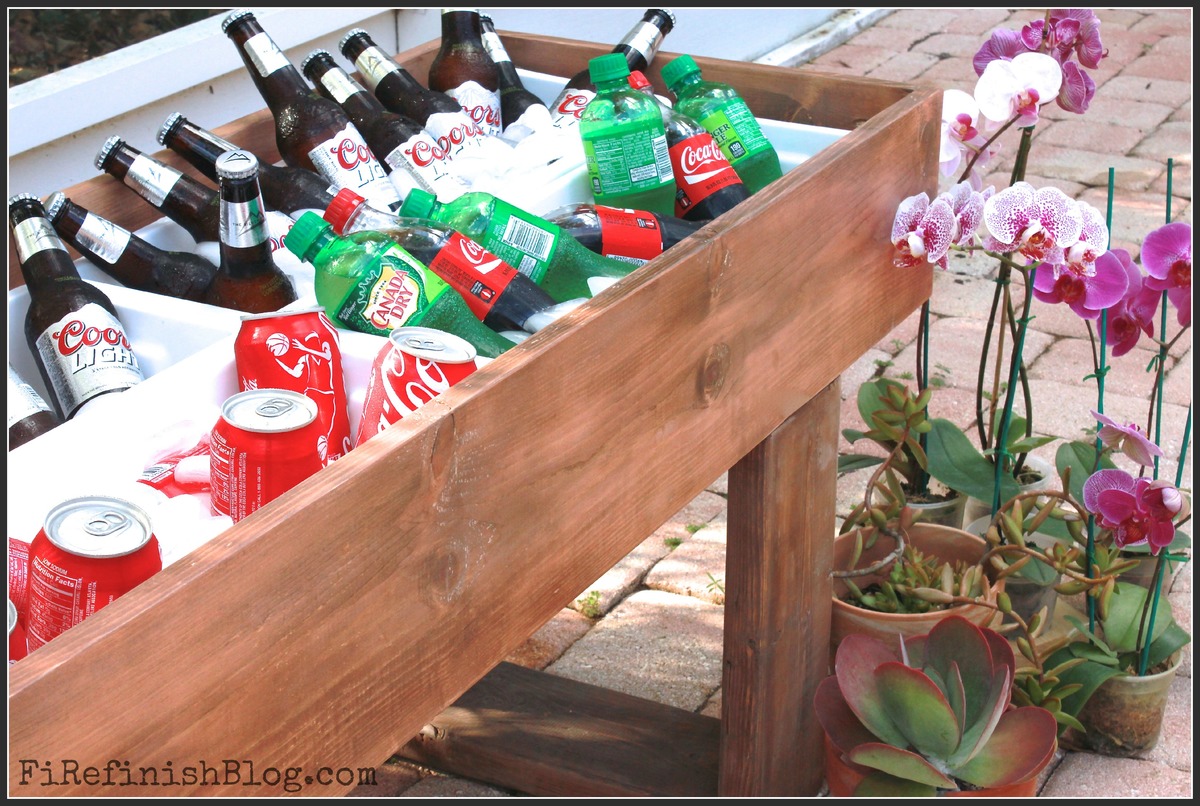
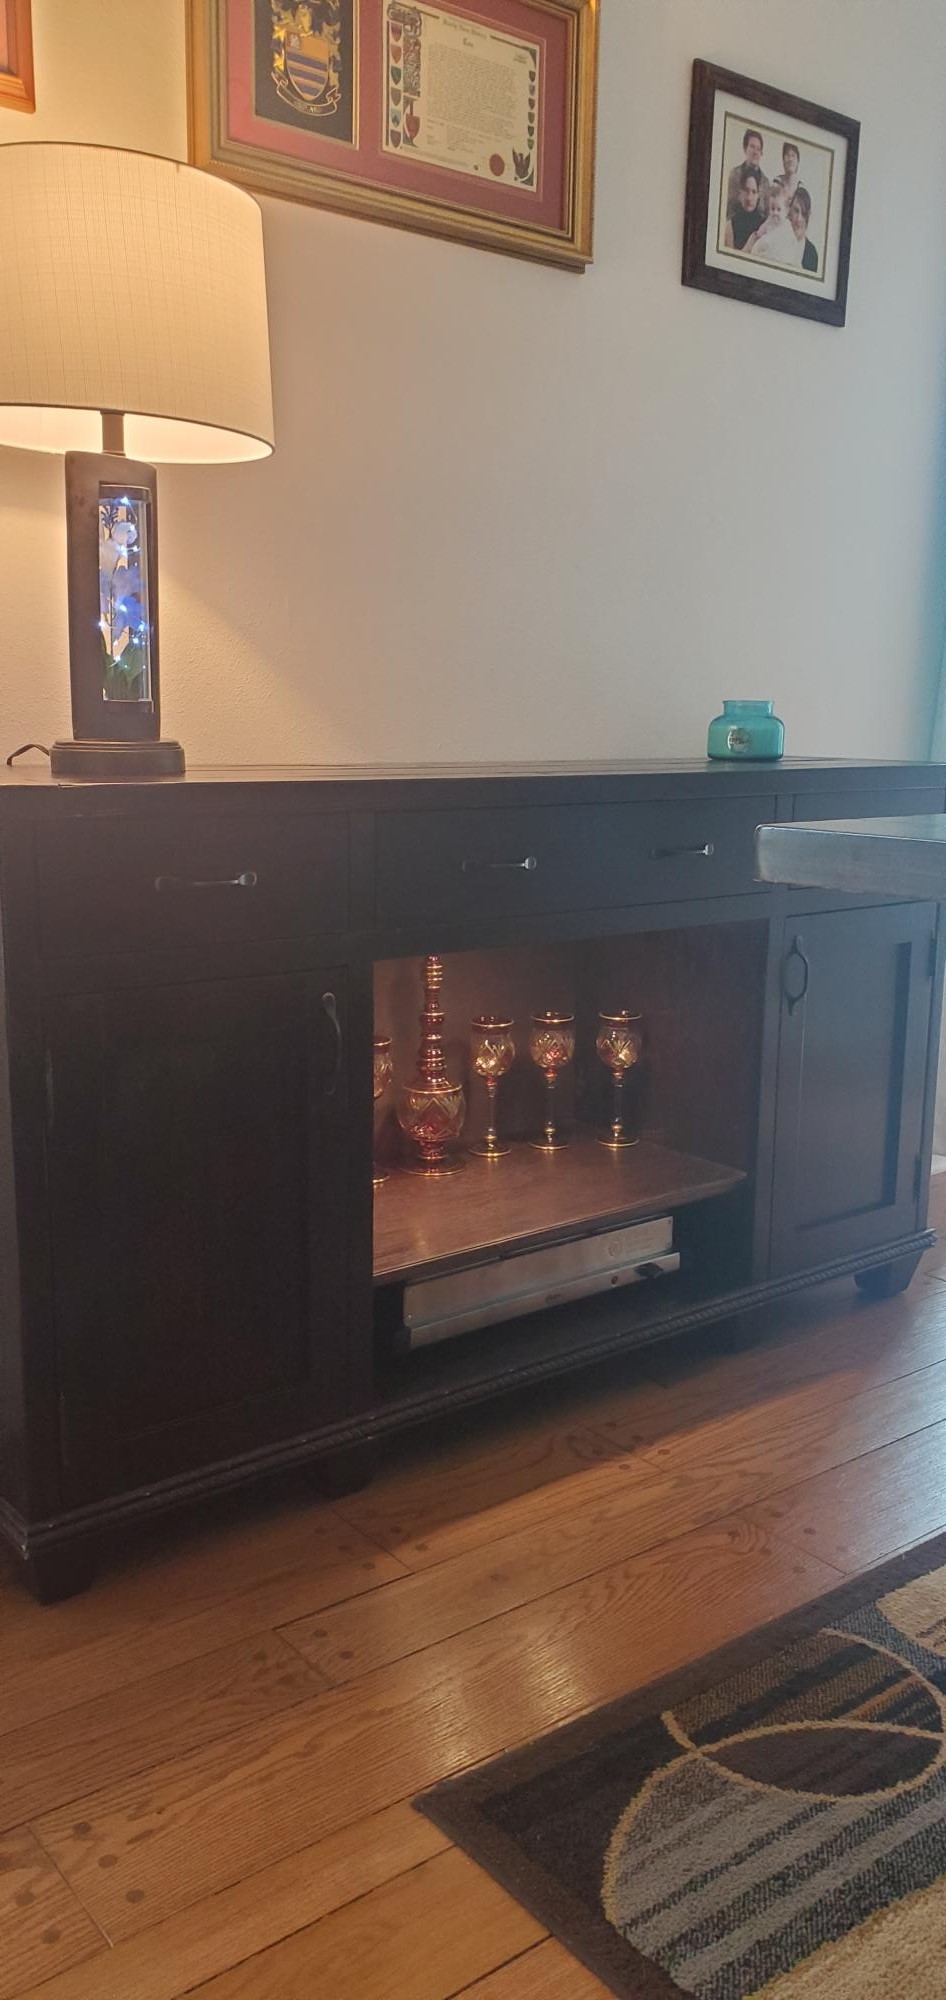
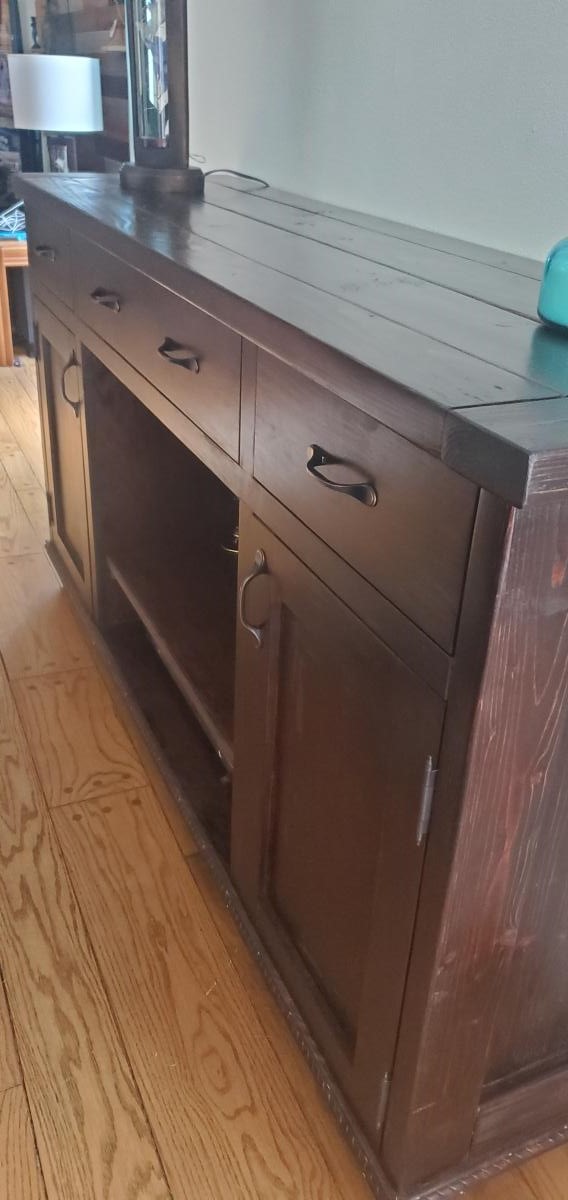
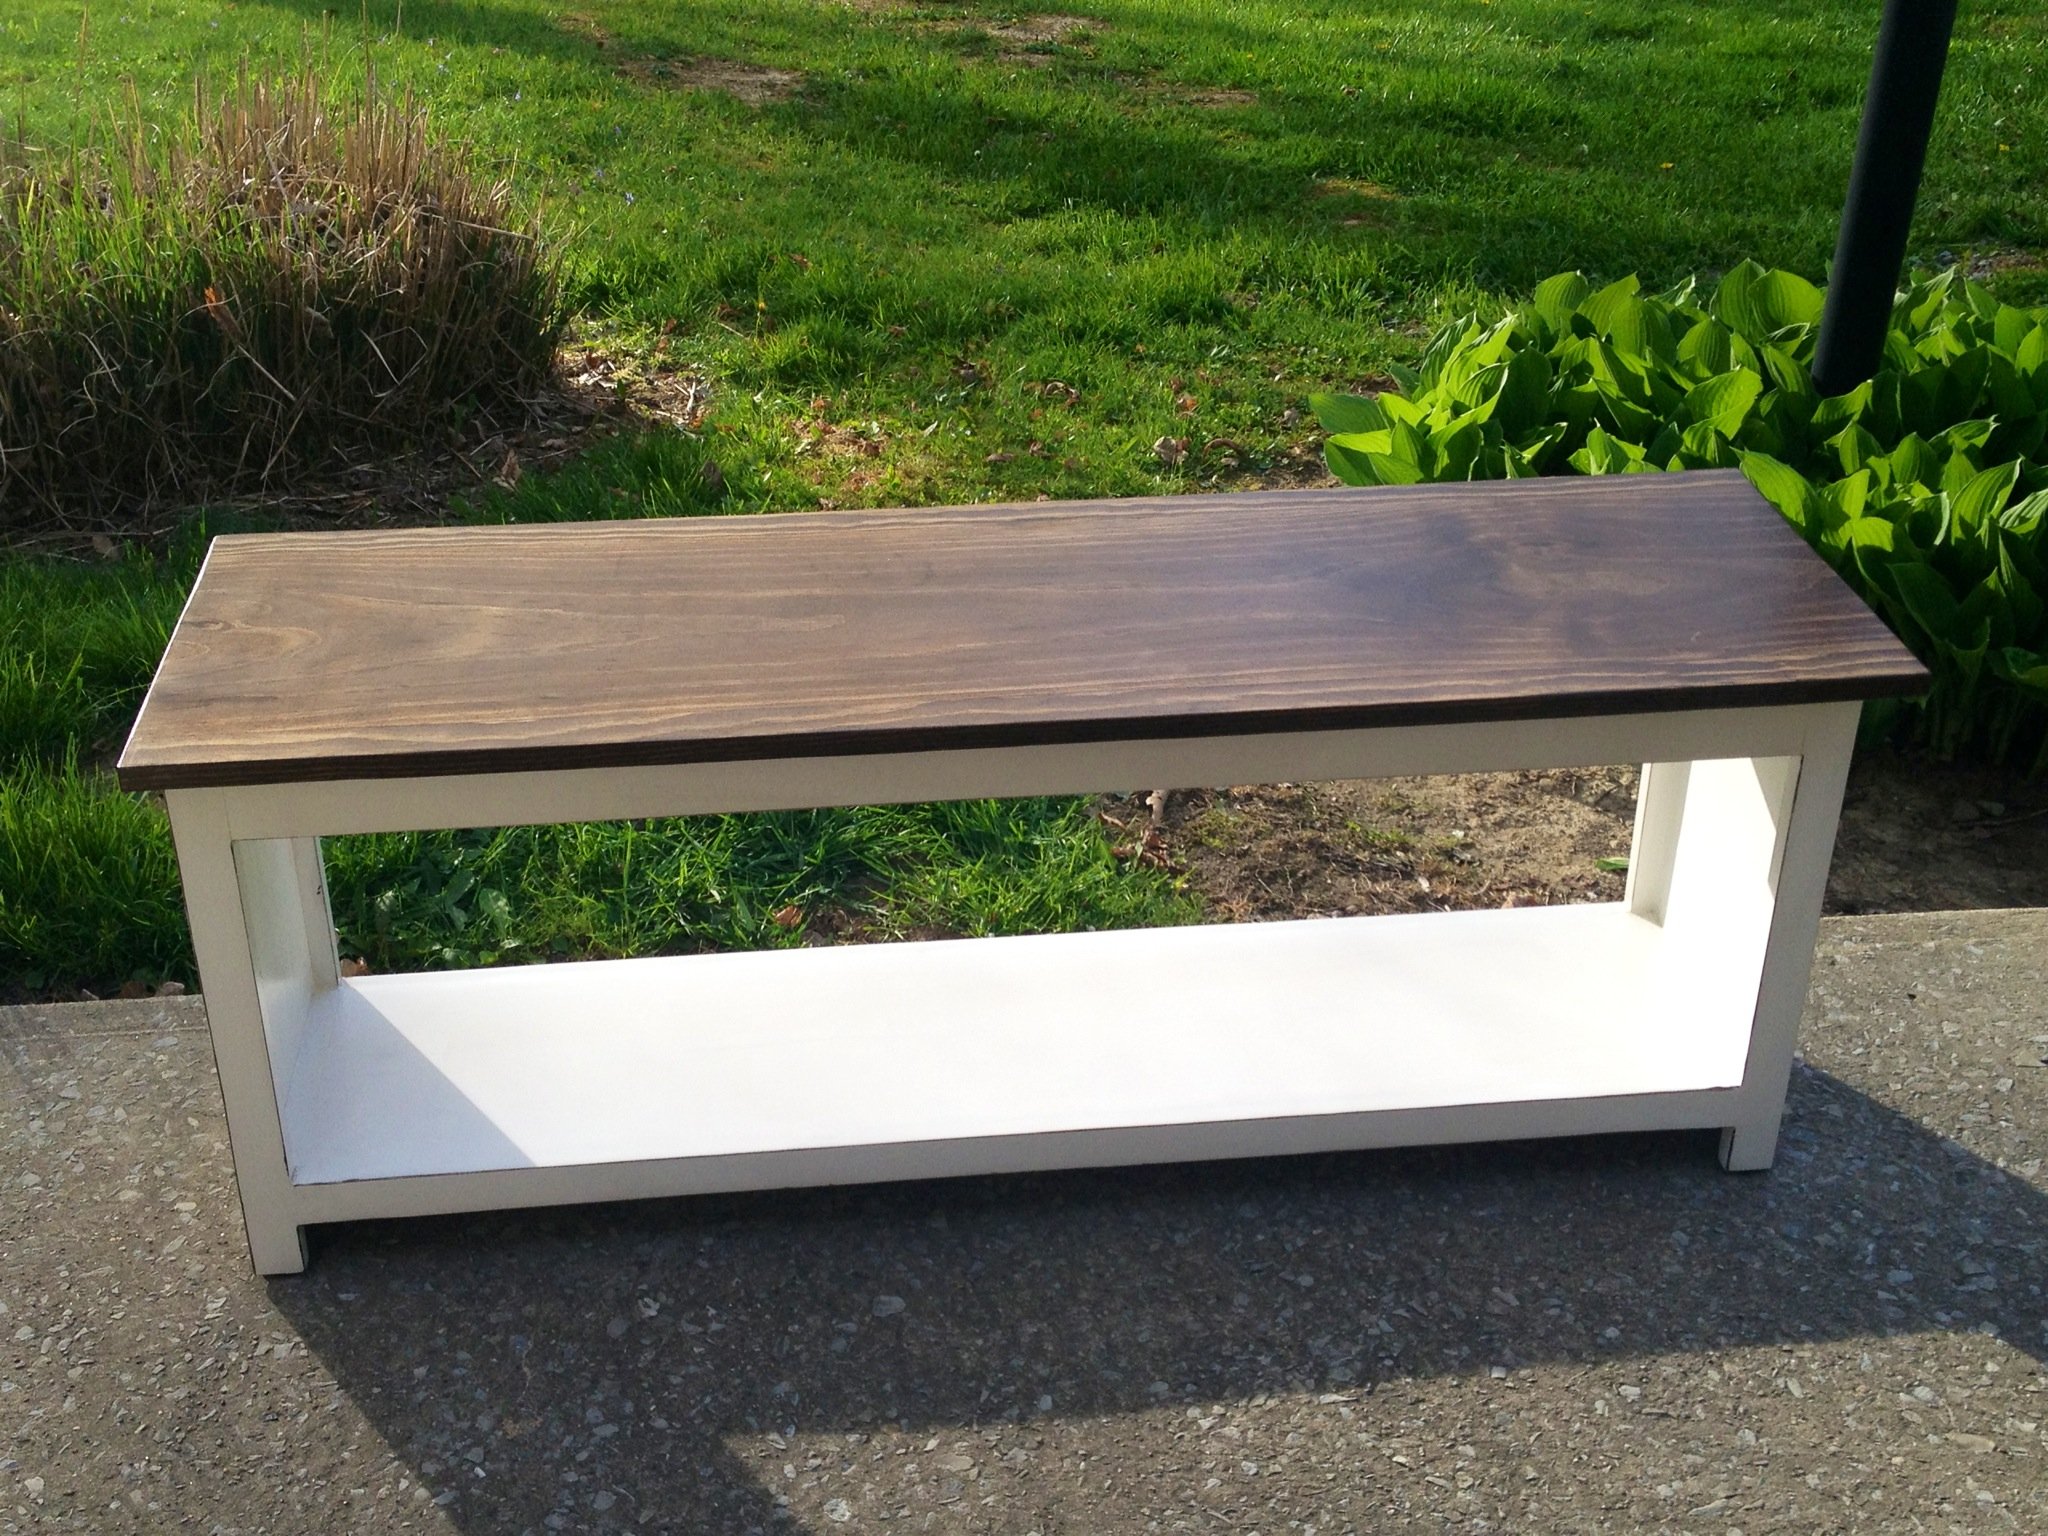
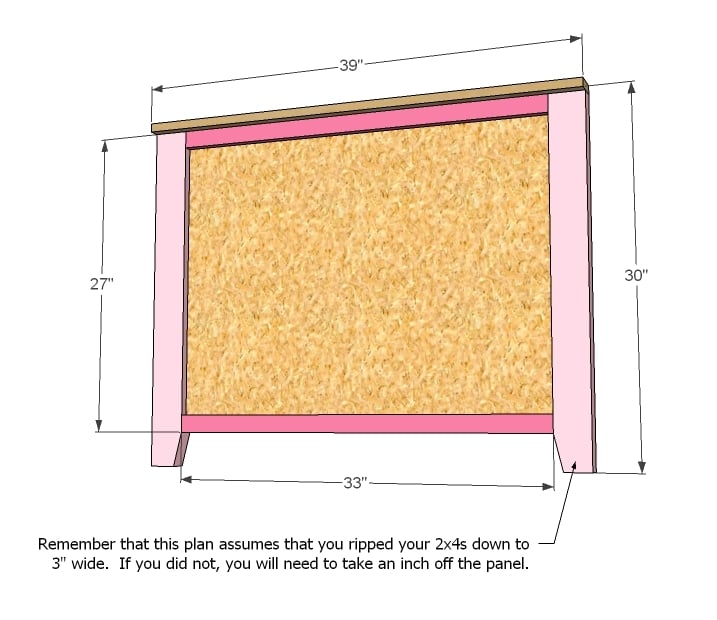
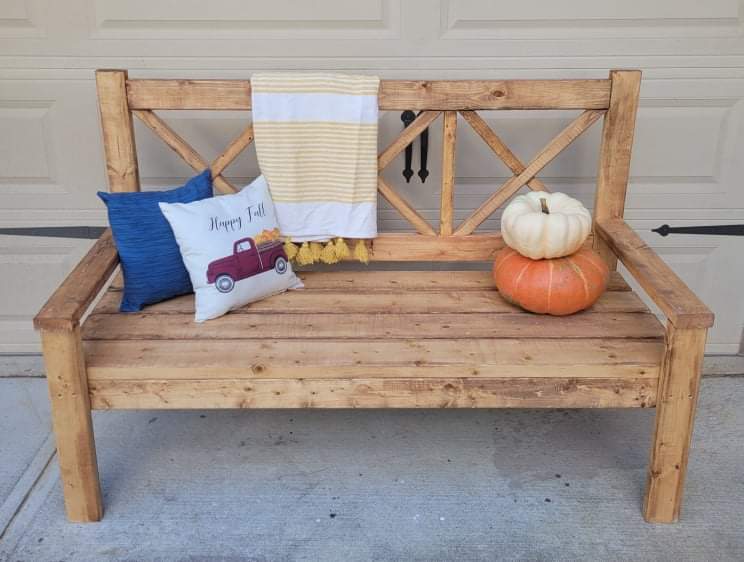
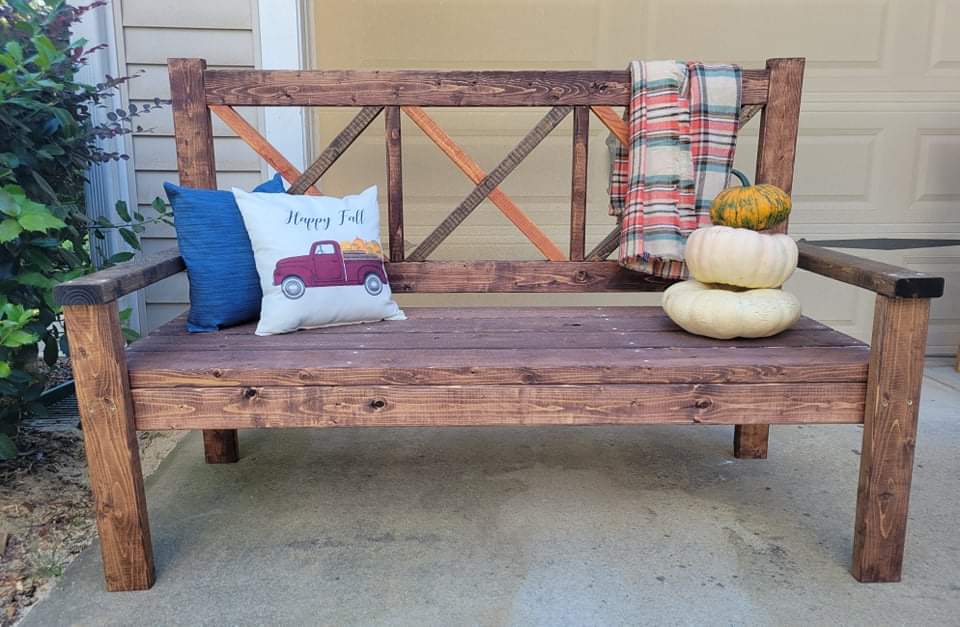
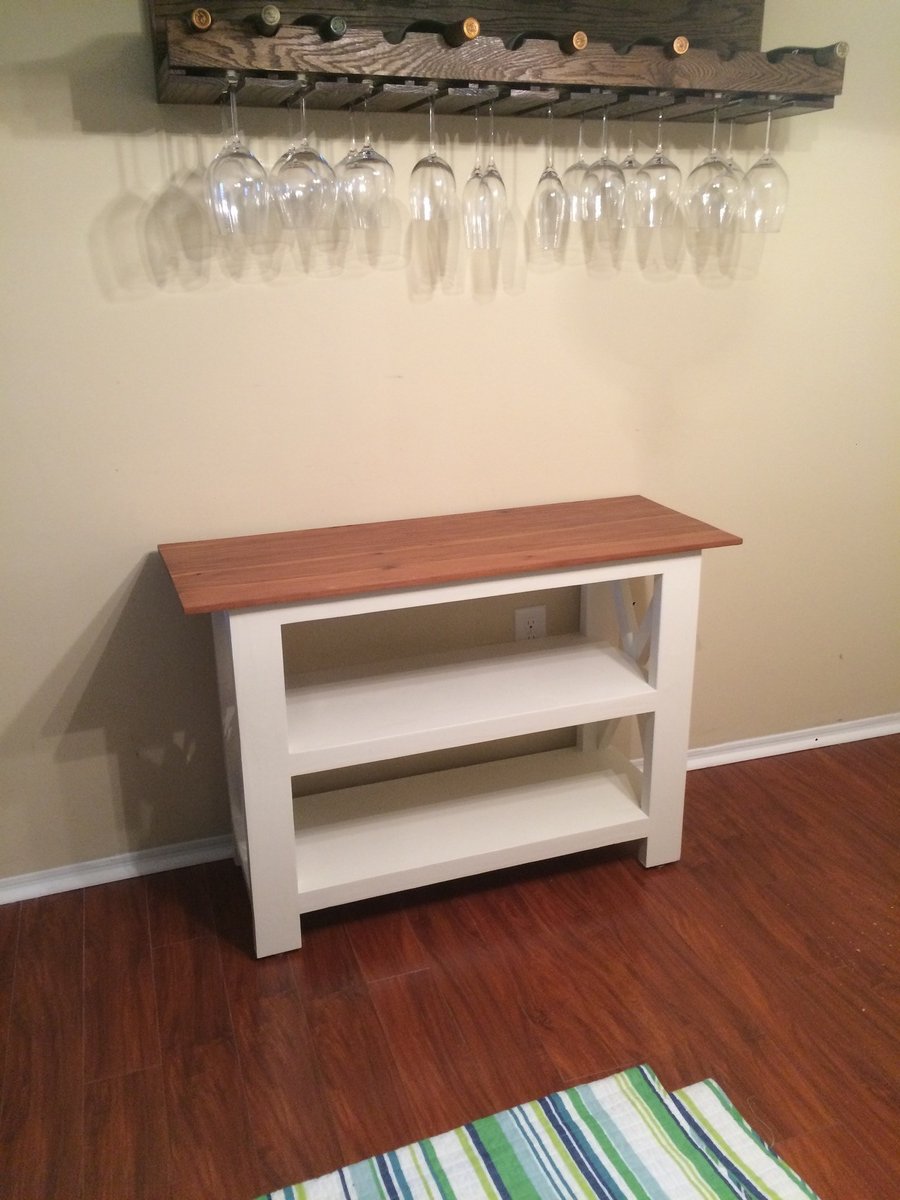
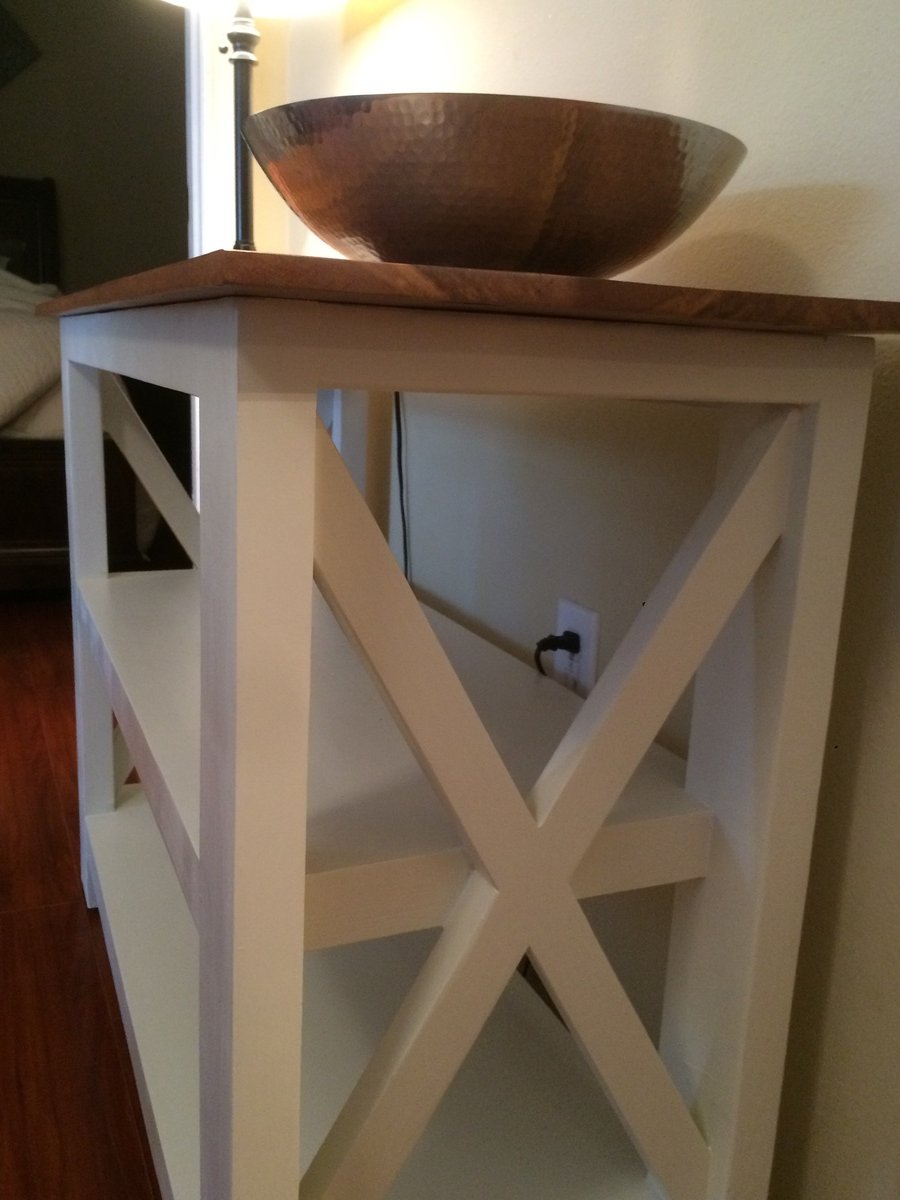
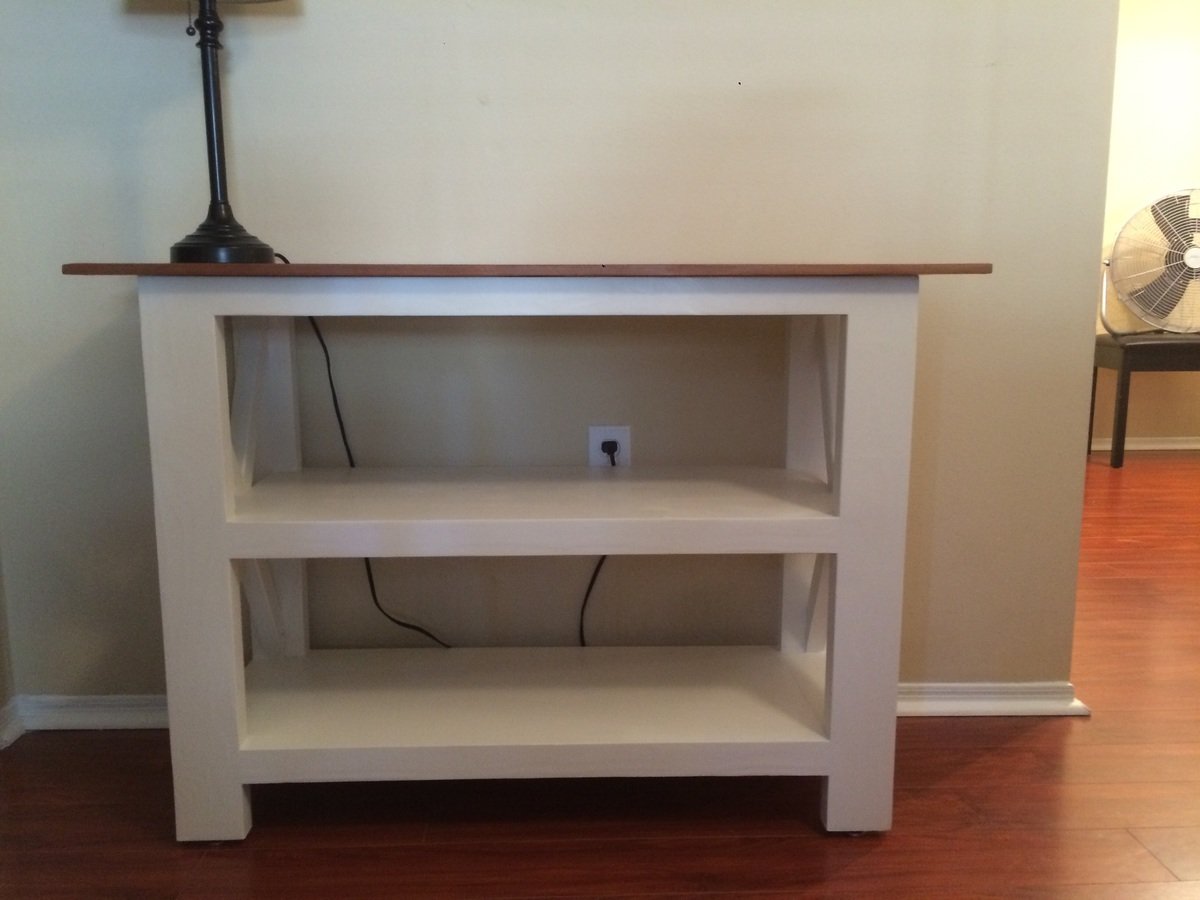
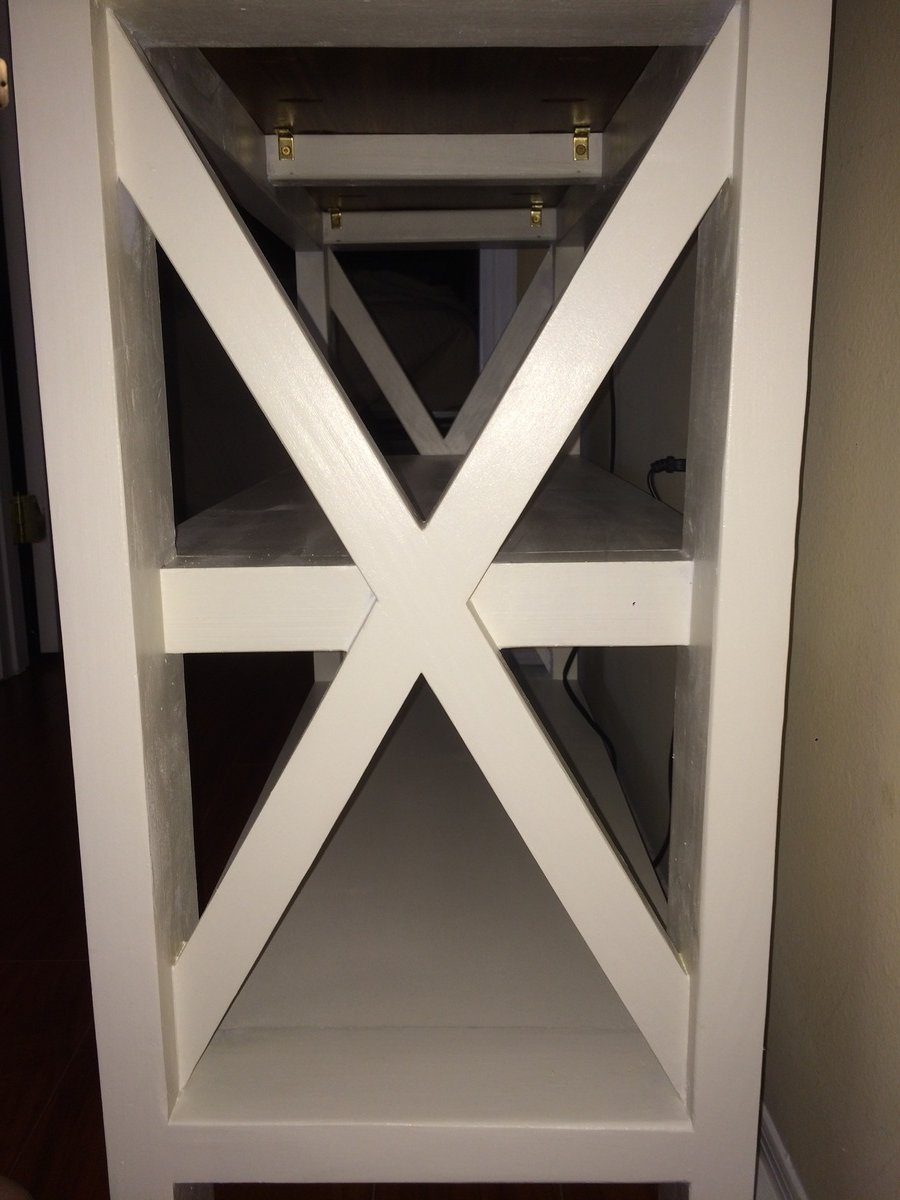
Half-size Rustic X Console

Submitted by Handyman11 on Mon, 03/09/2015 - 10:52

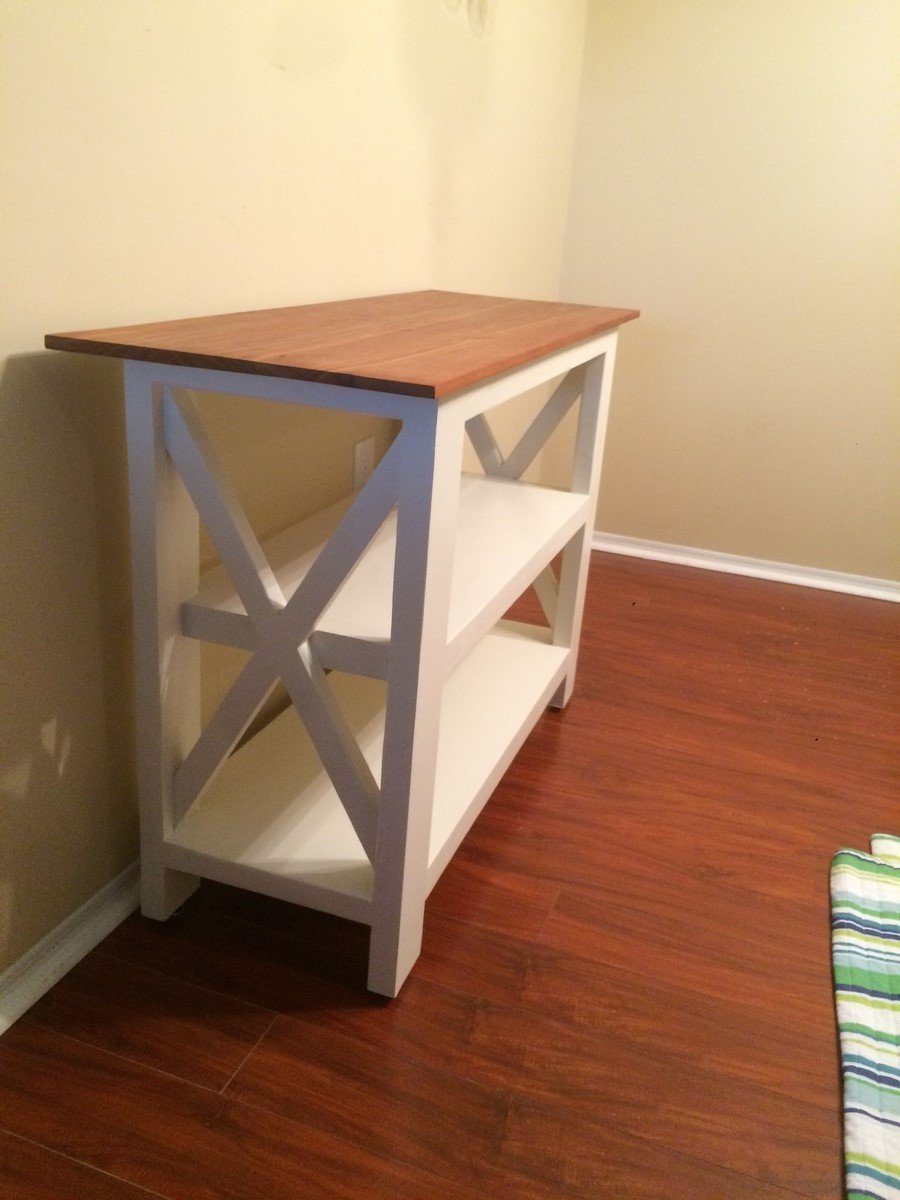
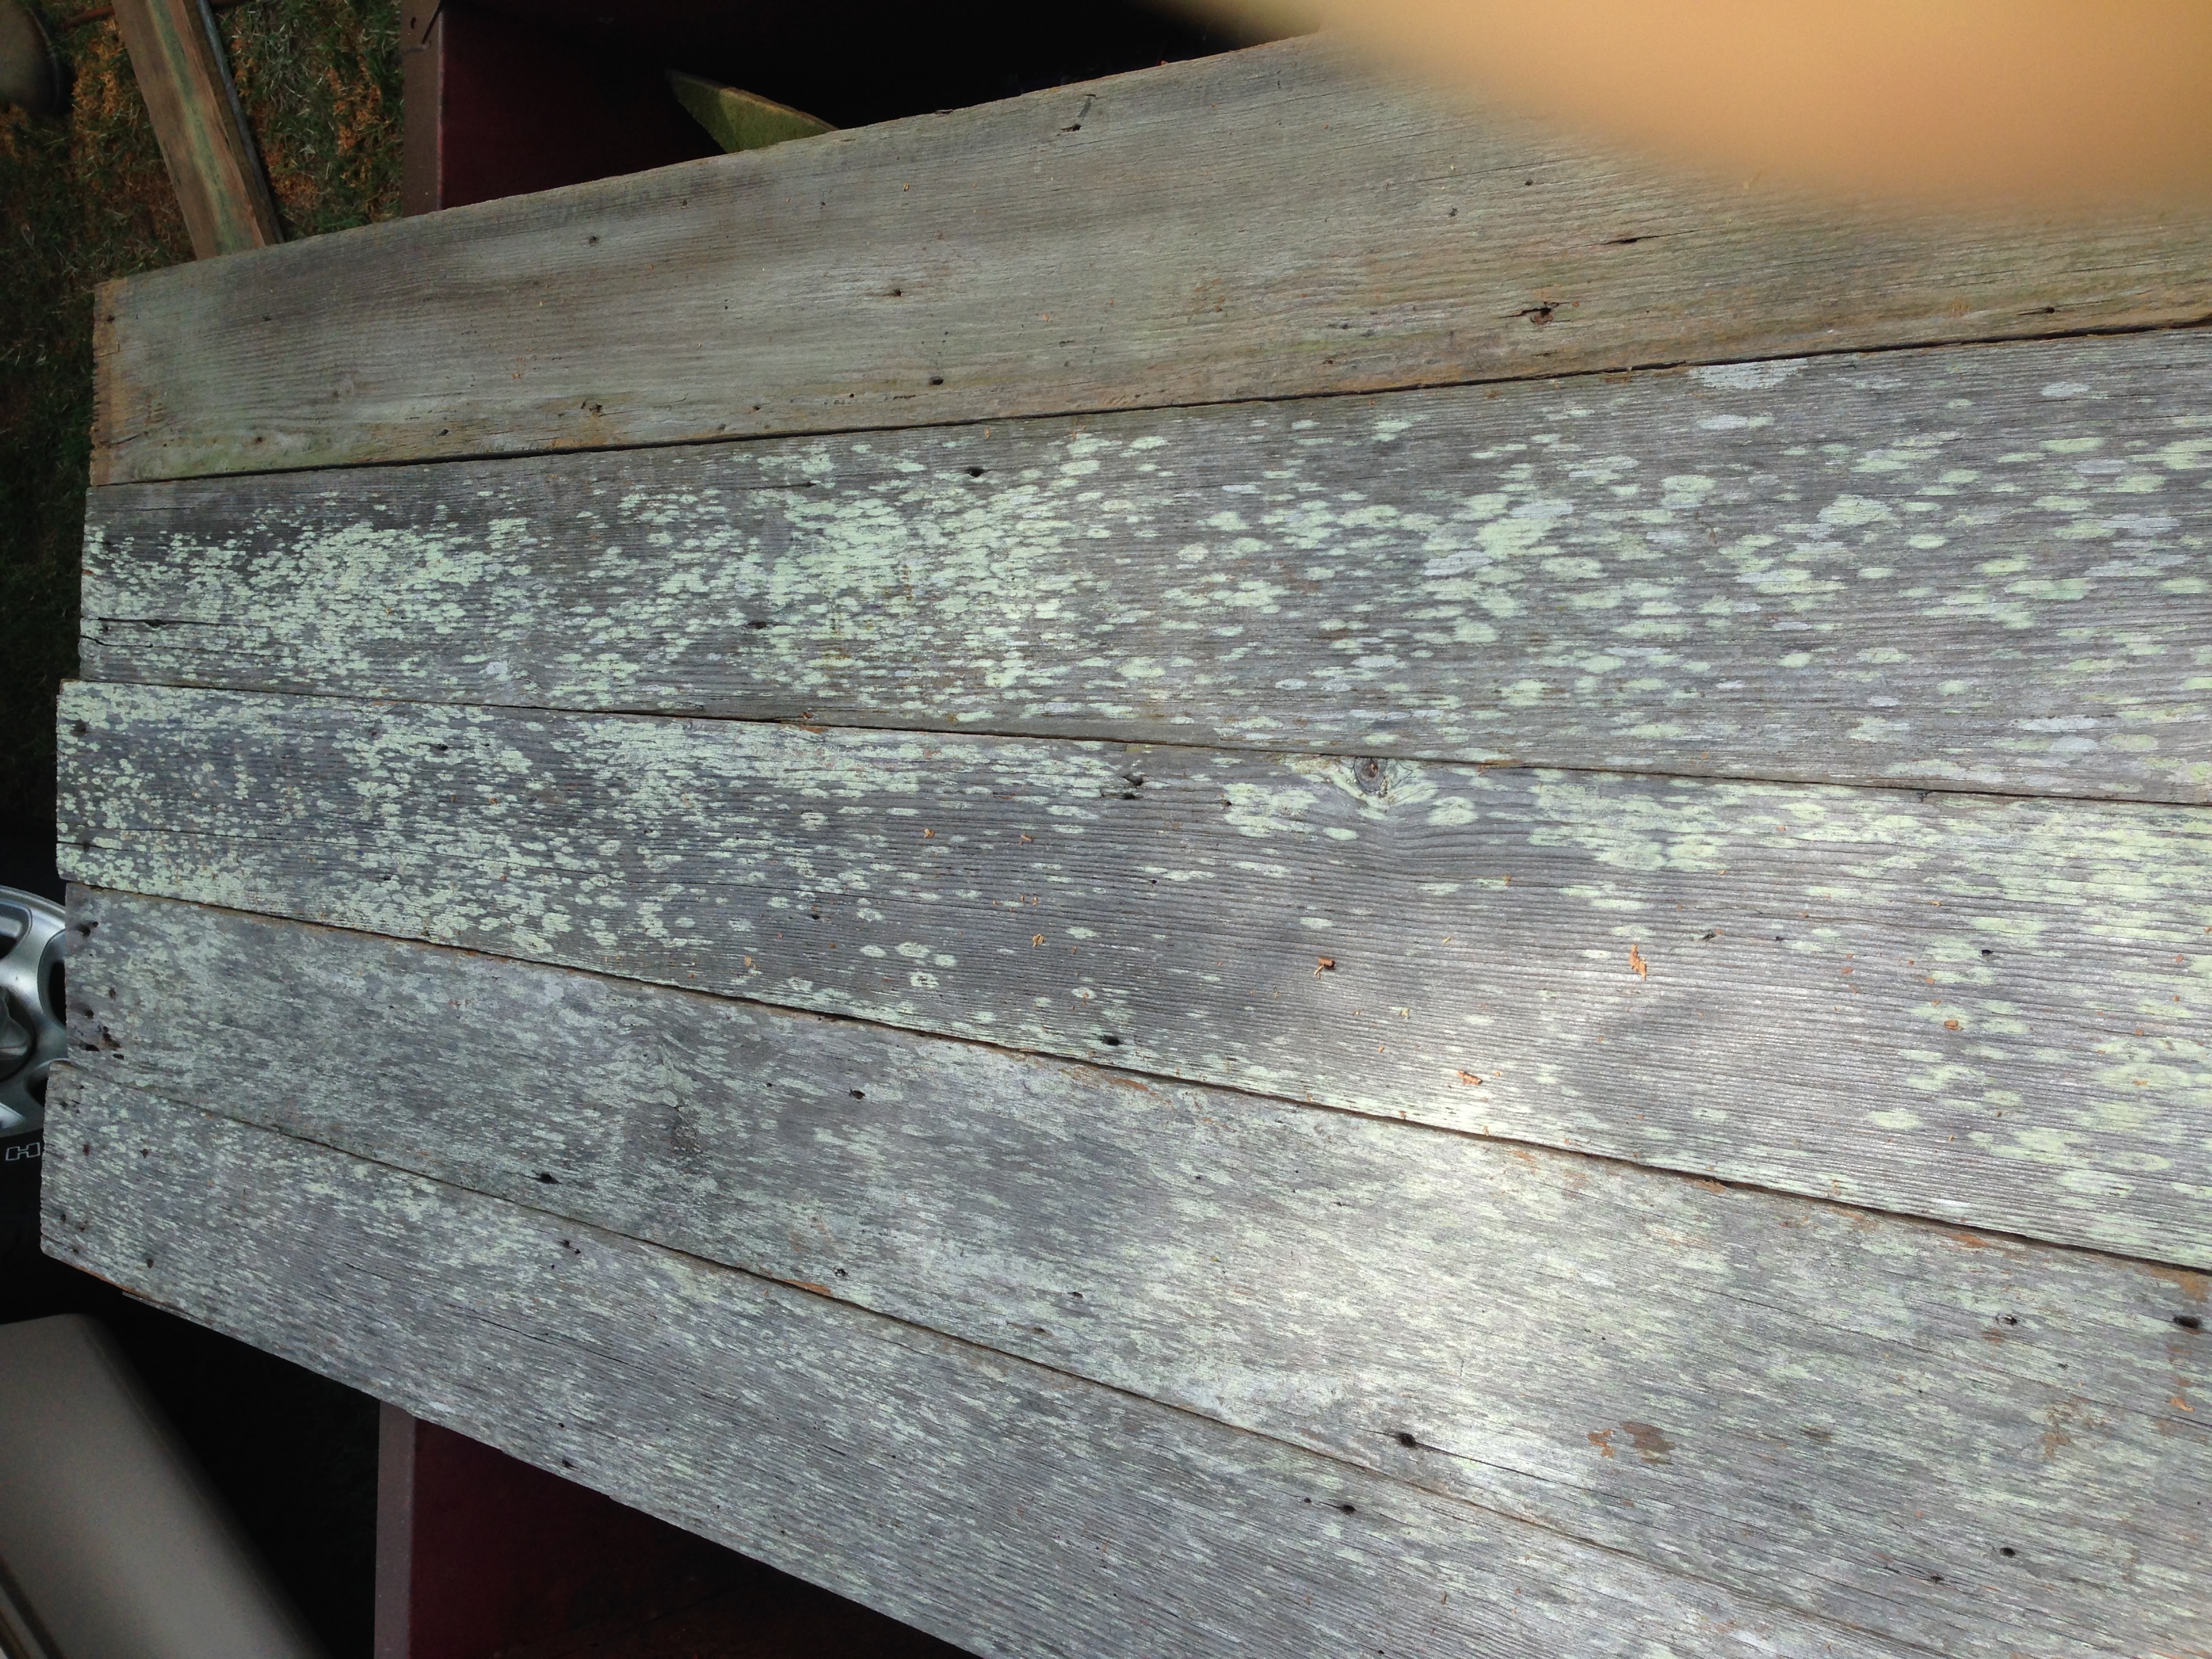
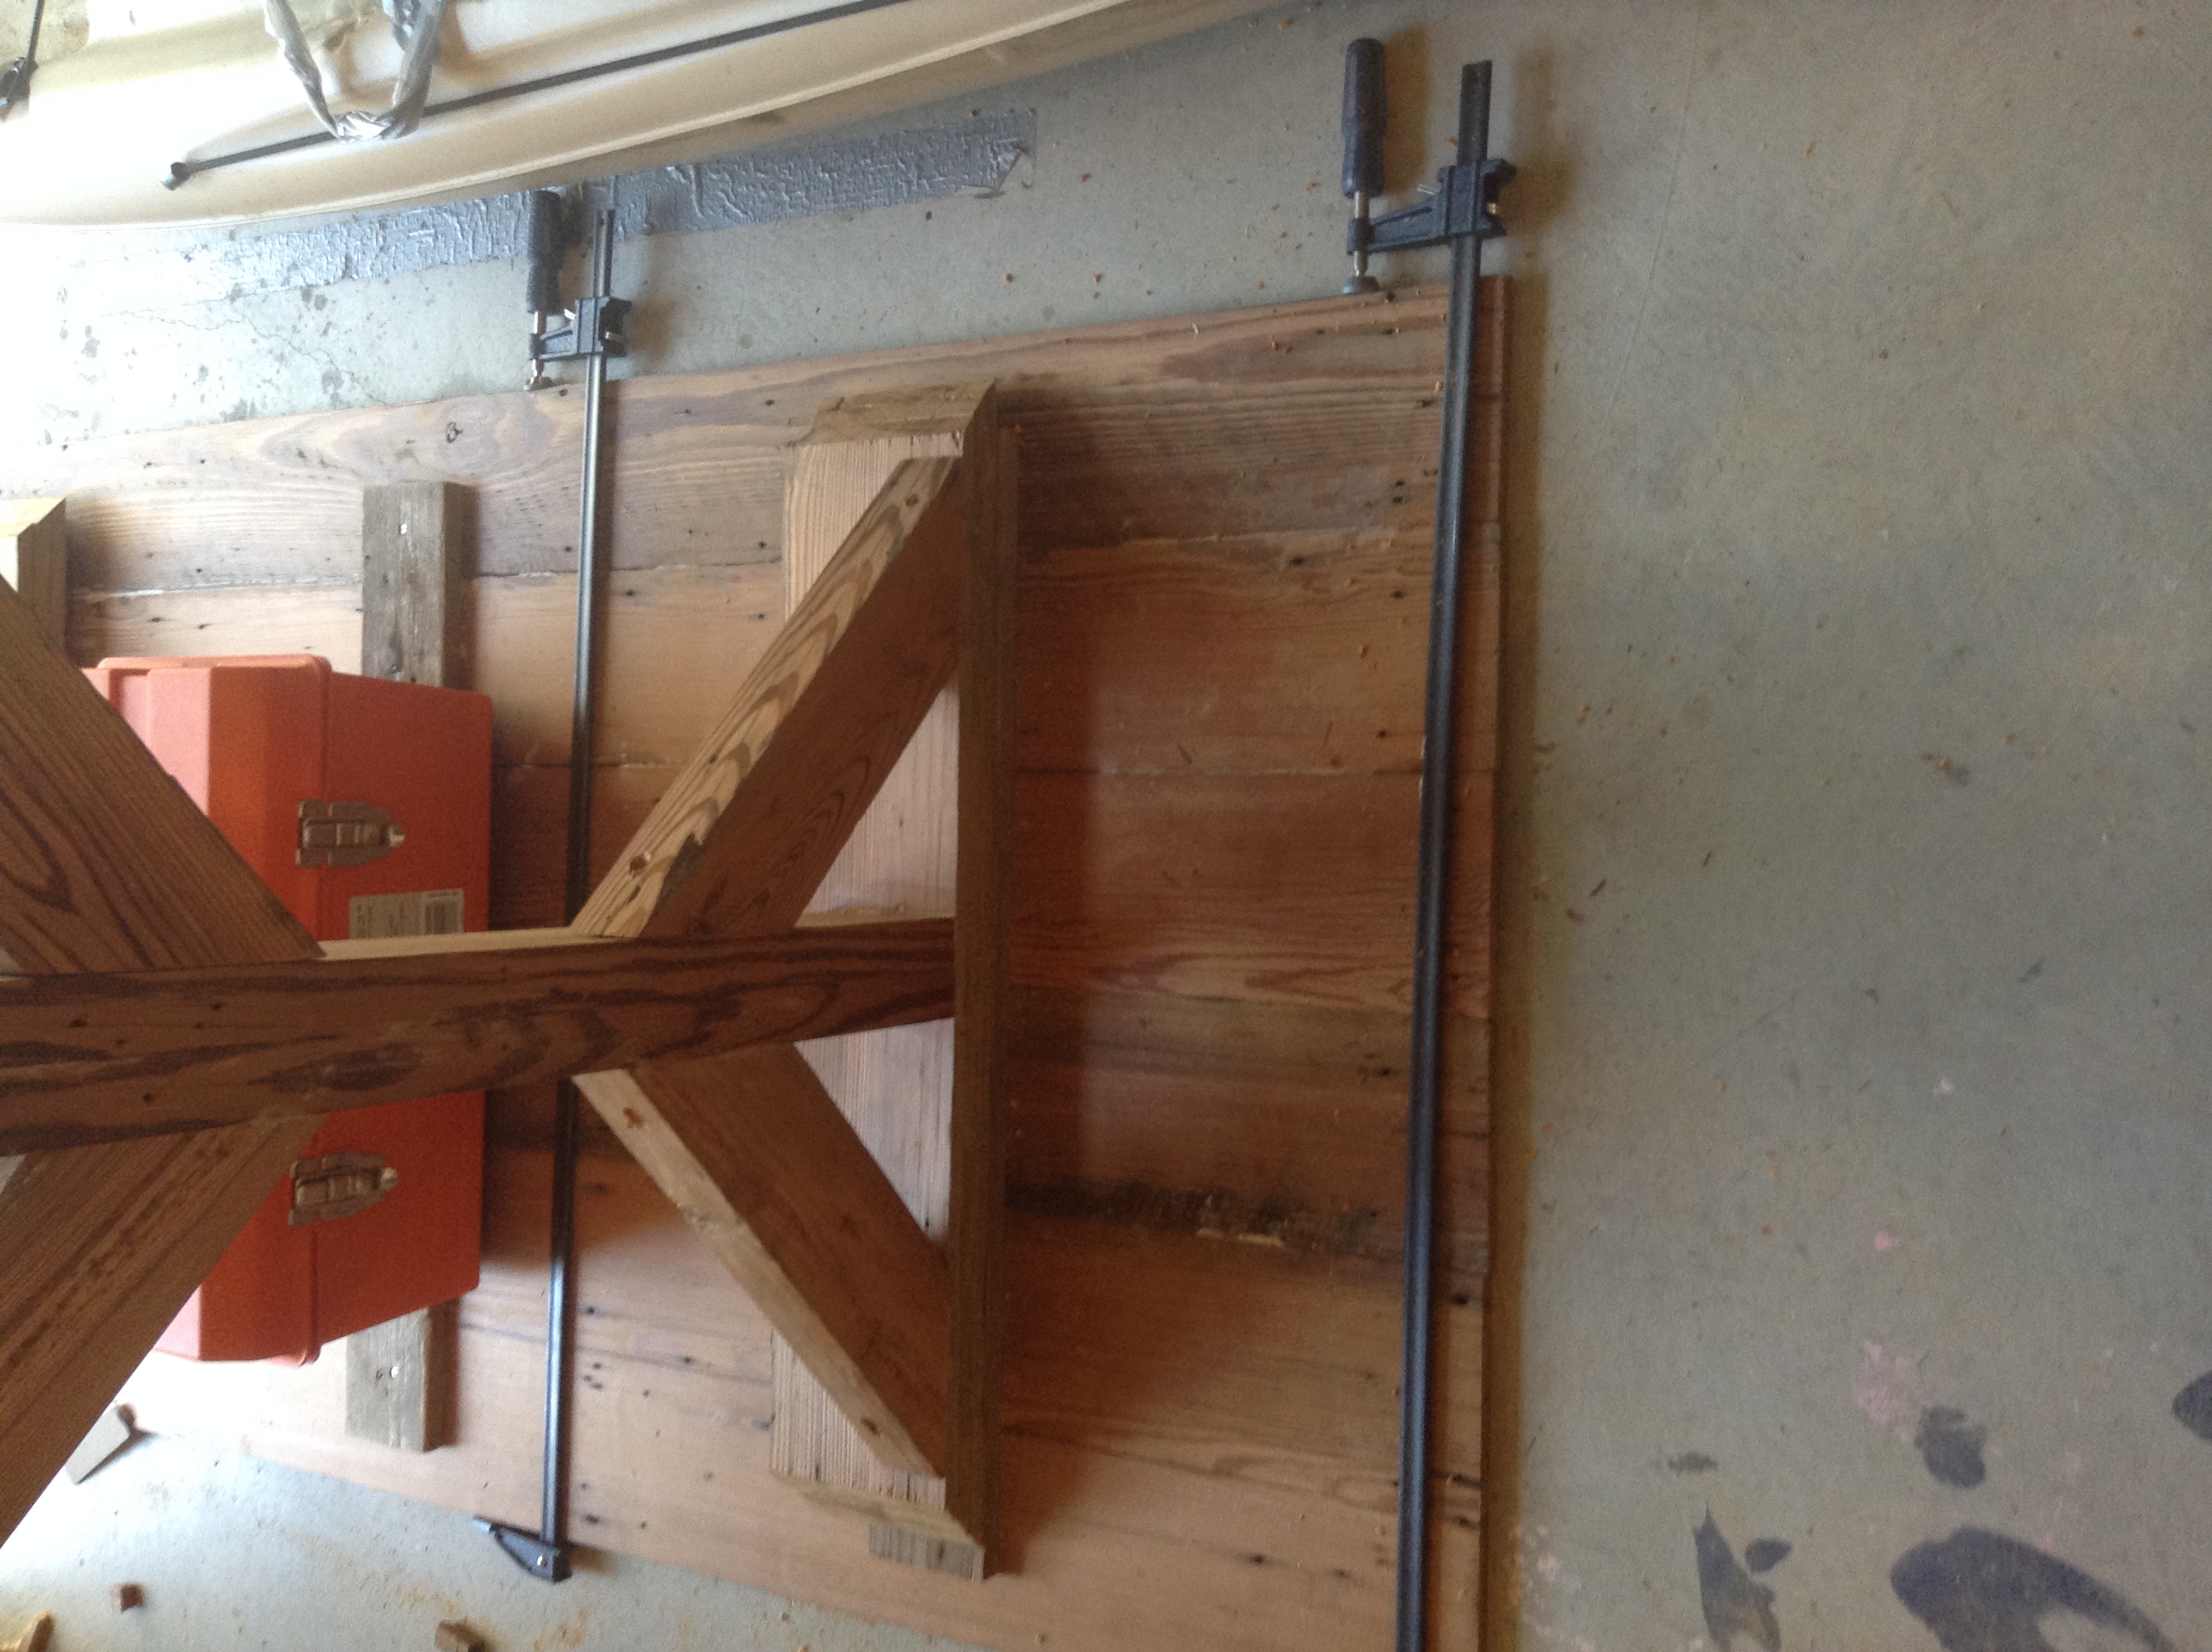
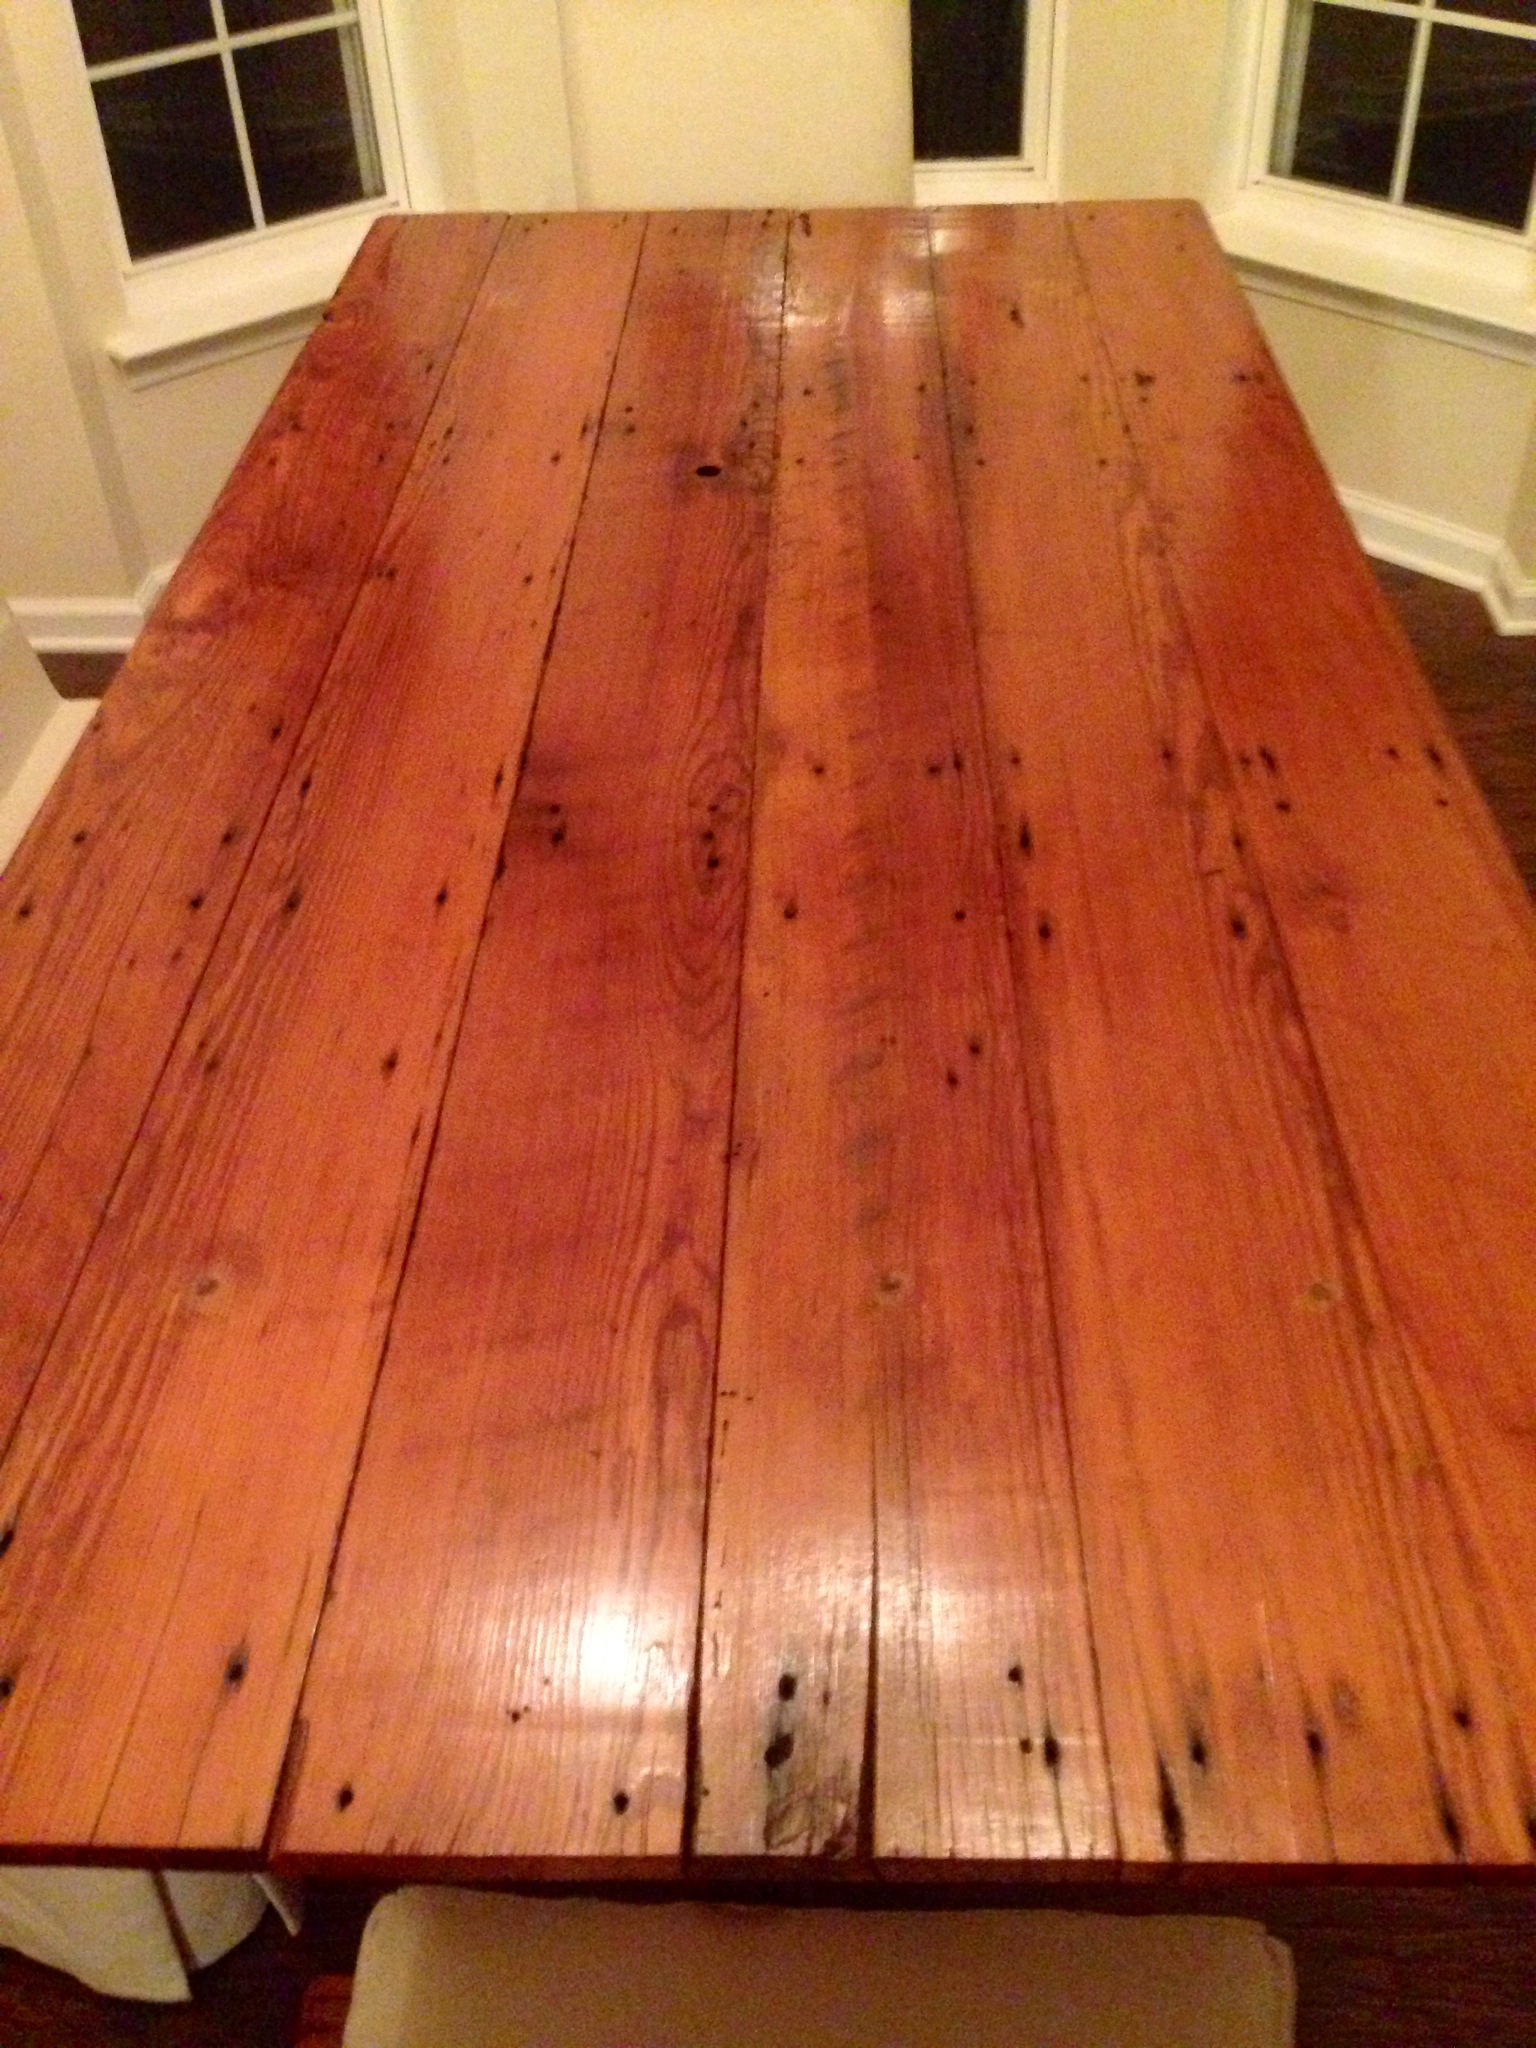
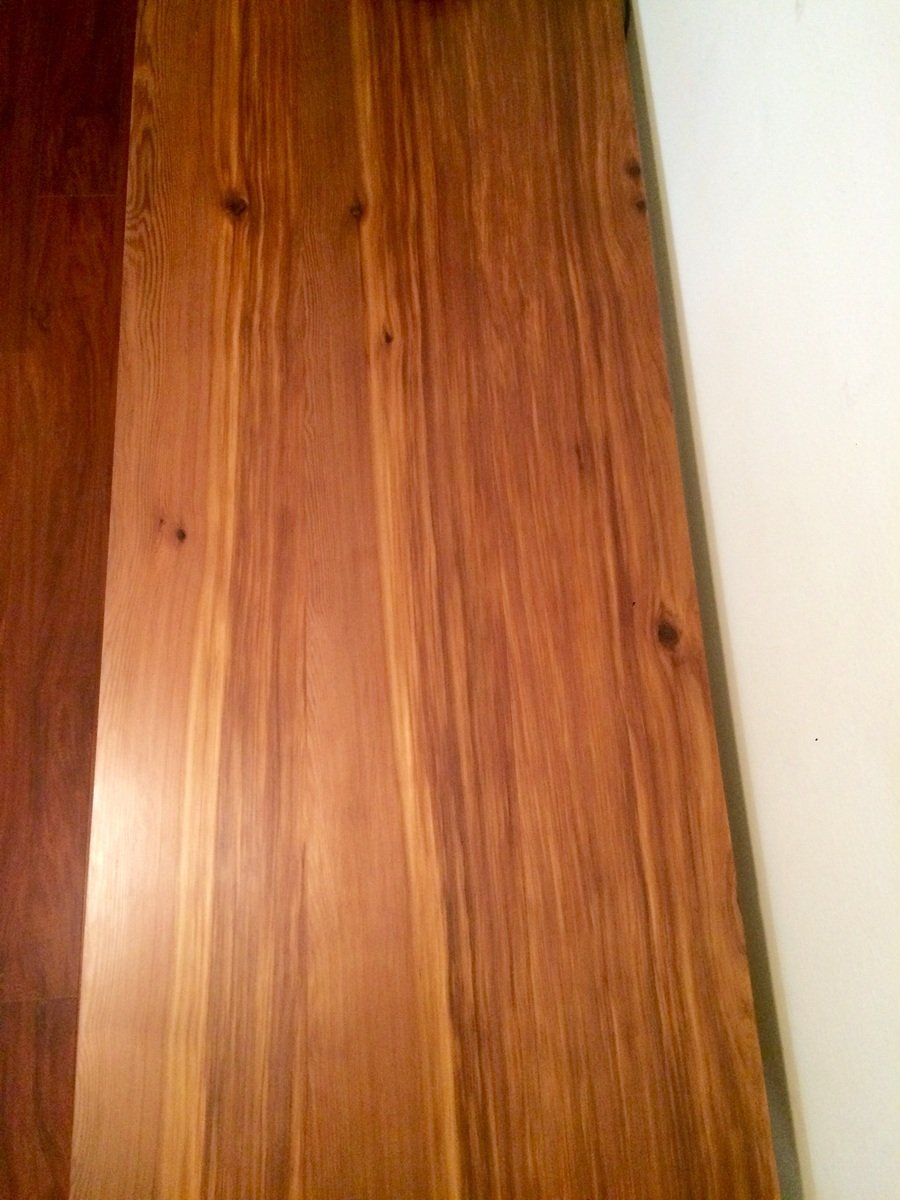
Essentially cut the original plans in half and modified a few things. The major change aside from the size is that is I used cedar plank for the top. I did this because I wanted a more professional look and I simply could resist the beautiful grain of the cedar. Pocket holed and glue cedar prices together after running them through the jointer. Also I connected the top to the frame via L brackets. Sealed the top with 3 layers of satin polyurethane. Apples poly with a 6 in microfiber brush dampened in mineral spirits. Also I painted the majority of the base with a foam roller. Put on slide plates on the bottom to adjust for slight unlevelness. Enjoy!

Estimated Cost
65
Estimated Time Investment
Week Long Project (20 Hours or More)
Recommended Skill Level
Intermediate

New outdoor sofa

Submitted by Anonymous (not verified) on Wed, 06/07/2017 - 17:57

Our new 2x6 outdoor sofa looks great, We liked the look of the 2x6s better then the 2x4s, and we added a taller back to support the cushions better, plus we gave the back a 12 slant for more comfort. Cushions are from Lowe's, 3 fit perfect.

Estimated Cost
140 for PT wood, 140 for 3sets of cushions, $280
Estimated Time Investment
Afternoon Project (3-6 Hours)
Finish Used
The picture is plain PT wood so far, will stain later
Recommended Skill Level
Beginner

Play Kitchen and Refrigerator

Submitted by Brandi35 on Sat, 07/31/2021 - 09:05

Play kitchen for my 2 year old. She especially loves turning the stove knobs and her own magnetic refrigerator! Used the plans as a base model and modified them for my specific needs and wants.

Estimated Time Investment
Weekend Project (10-20 Hours)

Comments

Rustic Table Completed...just needs to be finished! So proud!

Submitted by Octlibre1 on Sun, 04/21/2013 - 16:51

Rustic table plans with slight modification of the width and the legs were mounted differently for a little added flair. So many finishes to choose from....

Built from Plan(s)
Estimated Cost
$115 for poplar wood and $100 for legs made by local artist from poplar
Estimated Time Investment
Afternoon Project (3-6 Hours)
Finish Used
None yet!
Recommended Skill Level
Beginner

X-Frame Farm Table

Submitted by whittlevin on Fri, 03/13/2015 - 12:48

This was my first attempt at a farm table. I found the fancy x plan for inspiration. The length is 6ft. I had to modify all of the measurements. All of the boards came off my grandad's old barn. The posts are laminated together from guide posts from his corral. There is a lot of history and character to the table. I did have to make the bench to match it. I'll post pictures of that soon. Most importatnly, my wife loves it!!!! Happy wife, happy life!!!

Built from Plan(s)
Estimated Time Investment
Week Long Project (20 Hours or More)
Recommended Skill Level
Intermediate

Comments

DBoggs56

Mon, 05/18/2015 - 12:00

Hello, awesome job on the table. Was wondering if you would mind sharing the table top dimensions. I have a smaller space and was thinking of modifying to make something in the 6ft range as well. Thanks

Farmhouse King Bed

Submitted by wangbw on Sun, 06/11/2017 - 15:36

Took a little longer than I anticipated.  By far the hardest part was finding straight boards at Home Depot.  Used Cedar 4x4s for the post to avoid treated wood.  Had to make a few adjustments for our king mattress, but well worth it.   Bed and platform came in right at $300 for the wood, screws, paint, etc.  Thanks for the plans!

Estimated Cost
$300
Estimated Time Investment
Weekend Project (10-20 Hours)
Recommended Skill Level
Intermediate

Platform bed for my daughter

Submitted by Chris 1975 on Thu, 04/25/2013 - 11:58

So after I built the one for my son, my daughter was very jealous.... now she is more jazzed than my son to have hers....

Estimated Cost
$250
Estimated Time Investment
Week Long Project (20 Hours or More)
Recommended Skill Level
Intermediate

Counter height bar stools

Love my new bar stool, now to build 3 more.    I think it turned out great.

Built from Plan(s)
Estimated Time Investment
Afternoon Project (3-6 Hours)
Finish Used
I used dark walnut for the stain for the seat and painted the rest.
Recommended Skill Level
Beginner

Comments

Entryway Table

Submitted by Anonymous (not verified) on Tue, 06/13/2017 - 11:58

Great plans. Made a height adjustment to fit better in the space. I'm pretty new to the game but this was a great project to work with the Kreg Jig. Make sure if you are going to use the Kreg Jig to attach the table top, drill your pocket holes on the under side of the frame BEFORE you install your middle shelf... I made that mistake and had to live with counter sinking 2 1/2 screws from the top. For the door hardward: Home Depot had awning pulleys that allowed you to take the pin out for easy extraction, make sure to find some that have little spacers in the middle so you can keep the wheel from locking up. 


Really excited to keep on building!

Built from Plan(s)
Estimated Cost
$300
Estimated Time Investment
Weekend Project (10-20 Hours)
Finish Used
White Paint
Dark Walnut Semi-Gloss Stain with Poly
Recommended Skill Level
Beginner

Sweet Pea Bunk Bed

Submitted by johnnylaws on Sun, 08/22/2021 - 06:07

So thankful for these plans. Took me weeks of on-again / off-again work - I’m slow and have a busy schedule. At times frustrating and challenging (I think I overestimated my abilities when I chose this project). But totally worth it.

Made the upper story a play area. Added a ladder due to limited space. Storage boxes are awesome and provide ample storage. Daughter couldn’t be happier.

Estimated Time Investment
Week Long Project (20 Hours or More)
Recommended Skill Level
Intermediate

Comments

Closet Tower

Submitted by JoanneS on Sat, 04/27/2013 - 12:03

This closet tower is from the Craft Room Storage Tower plan, and made mostly with left overs from other projects. I wanted a shallow tower storage just deep enough to hang pants and slacks in, and to use a 12" wide door I already had in my garage. At Target I found some kid-size hangers that were just the right size - about 12" wide. Trouser hangers are about this same width, but they weren't available in-store so I went with what they had. The only things I bought for this project are the knob, hinges, some 1x2's, and the hangers. The sides are from a lengthwise half-sheet of C/D plywood, ripped down to 12" strips on the table saw, with 1x2 edge joined at the back to create a "toe kick" to clear the baseboard. The front is trimmed out in 1x2 with a scrap of 1x3 to trim the top. The removable closet poles are from a flagpole, and the ends are held in place with some 1/2" craft boards. The back is 1/4" plywood. The longest part of this project was the sanding, because the plywood wasn't the pretty kind - used lots of wood filler on the knots and as a grain filler, then sanded it a lot. This project took about 9 hrs total, (sanding took the longest), construction with the Kreg jig and nailgun was very quick, and then paint and adding the door and poles. The removable shelf was added as an afterthought and is a scrap of plywood, with some S4S to hold it up, and a 12" scrap of moulding across the front of the shelf. It is 82" tall, 13 1/2" wide, and 14 1/4" deep. It's a perfect pair with the 6-cube tower that I built from Ana's cube tower plans a couple of years ago.

Built from Plan(s)
Estimated Cost
$36 (for knob, hinges, 1x2's and hangers)
Estimated Time Investment
Day Project (6-9 Hours)
Finish Used
Ace Royal semi gloss paint in high-hiding white (left over paint)
Recommended Skill Level
Beginner

Comments

yurra-bazain

Fri, 08/30/2013 - 17:56

This is such a clever build! :) Thank you for sharing in detail how you put this together. =D I love how tall this is and how little floor space it takes up, which is especially a big issue for smaller home dwellers like myself. =D

JoanneS

Sat, 08/31/2013 - 06:23

Yvonne, thanks so much for the nice comment! I just love tower storage, you get so much for such a small 'footprint' in the room. We've replaced our bulky dressers with towers, which makes the room look much more spacious. If you build some, I'd love to see pictures!

There are 2 other items not mentioned above, that I added during this build: I added the 1x3 at the top of the insides, to help keep the joined side boards tighter together at the top (at the time I was thinking the joint might try to pull apart if it got humid). The second thing (you can hardly see this in the photo) is a 12" piece of 1x2 attached across the back, spaced between the 2 closet poles. This was added to help keep the side pieces the same distance apart when attaching the back, and provided an additional place across to nail it. I thought it would help make it more rigid. This piece is used every day, and so far it has held up great. :)

DIY Rustic Cooler

Submitted by raybotelho on Wed, 03/18/2015 - 16:06

A client/friend asked for a rustic cooler she could use for her 30th birthday party. Thats what we came up with.

We have full plans on the blog: http://firefinishblog.com/2015/03/18/diy-rustic-cooler-with-plans/


Estimated Time Investment
Afternoon Project (3-6 Hours)
Recommended Skill Level
Beginner

Comments

Large Porch Bench

Submitted by kimmy227 on Fri, 06/16/2017 - 09:46

I loved building this bench!!  I was able to use only 6 2x4's which cut down the cost a little bit :)  For the stain I used Semi-Transparent Chocolate from HD and Wedgewood in a Solid Stain color from HD as well.  Building the bench itself was really easy but the X's do take some extra work.  I found that using a yard stick vs. a tape measure made the world of difference.  I also nailed the X's in vs. using the kreg jig. 

Estimated Cost
$35-$45
Estimated Time Investment
Afternoon Project (3-6 Hours)
Finish Used
I used Semi-Transparent Chocolate from HD and Wedgewood in a Solid Stain color from HD as well.
Recommended Skill Level
Intermediate
Seasonal And Holiday

Modified plans of planked side board. First ever wood work project.

Submitted by Karin T on Tue, 08/31/2021 - 10:23

I looked forever for a sideboard which matched my planked dining room table and this was it, so decided to build it. It took me 3 months as I had no prior woodworking experience. Behind the drawer panels I actually wrote on the drawers 'Maybe should have started with a birdhouse!'. I could not love it more if I had given birth to it. LOL On to the next project...

Built from Plan(s)

Comments

$10 Planter Box

Submitted by glenndas on Mon, 04/29/2013 - 19:25

I had been looking for pretty wooden planters for the front porch and couldn't find anything affordable when I came across Ana's plans for a planter box. So I just made it a square and made it a bit taller.

I used finishing nails and glue to put the whole thing together. If you make the sides 17 1/4" then the bottom is wide enough for three pieces side by side. I added four pieces the same as the strips that were made to the bottom so that they stuck out into the center of the planter. Then I laid the bottom pieces on top of those. I left them loose so they could be replaced if needed after a few summers of water and dirt. You could also put a liner in. The width is just enough to give space for water to drain out.

Out of 5 pickets I could have made the side strips a bit longer and put a strip across the bottom. But I had a couple other projects in mind for the scraps so I didn't.

With the left over scraps I made the small flower box for a table on my deck. I glued and nailed that together too. So for less than the price of one planter box I made two and the small flower box. If I hadn't cut one piece wrong the first time I could have made a second small flower box.

Estimated Time Investment
An Hour or Two (0-2 Hours)
Finish Used
Left unfinished and I hope they will grey with age.
Recommended Skill Level
Starter Project

Dog Kennel for Animal Rescue auction

Submitted by jasondk on Fri, 03/20/2015 - 09:10

Made this for a animal rescue charity dinner auction. The bottom is made out of all scrap pine i had laying around. The top is made from 1x4 oak.

Painted the base with an off-white and the top was finished with Early American Minwax and topped with a water based poly.

Built from Plan(s)
Estimated Cost
$45
Estimated Time Investment
Weekend Project (10-20 Hours)
Finish Used
minwax early american and poly
Recommended Skill Level
Intermediate

Shot Glass Display Coffee Table

My father-in-law wanted a display case for his shot glasses, but I didn't like the idea of putting that much glass, hanging vertically. So I suggested a coffee table. This is what I came up with. I used 1x4 boards for most of it. ¼" plywood on the bottom, with 2x2 supports underneath, the actual display part is from ½" project panels I had laying around, and the dividers are from ¼" plywood scraps. The legs I picked out from the store (I don't have or need, a lathe). For the top, I used ¼" thick acrylic. I thought about glass, but they have lots of grandkids over all the time, and I didn't want a little hand going through the glass. (Side note on the acrylic, when you cut it, do it by hand, not with a power tool, as the acrylic will heat up and can melt). Other than that, I got a couple hinges and small lock closure for the acrylic, and stained it all. (Sorry for the white background picture, I tried to crop out everything else around the table)

Comments

Simple Bench

Submitted by bhoppy on Wed, 05/01/2013 - 17:06

I modified these plans just a bit. I added 10 inches to make it 48 inches across. I also used a 1x3 on the top face frame instead of a 1x2. The plan calls for just a 1x12 on the top but I wanted it to be wider so I used my Kreg Jig to add two 1x2's to make the top 15 inches deep. I planned on staining the whole thing but made a few errors and had to paint the bottom as it is more forgiving. I loved how Brooke used the coffee staining technique but didn't like the way it was turning out so I just went with distressing the edges and staining the top like she did on her coffee table with the stain I had on hand. It took only a few hours to make the bench and about 3 days to finish it as I worked in the evenings after work.

Estimated Cost
$50-$60
Estimated Time Investment
Day Project (6-9 Hours)
Finish Used
Minwax dark walnut on top. Paint Olympic No-VOC Ultimate Interior Paint in Semi Gloss in white. Sanded edges with 80 grit sandpaper and put stain on then wiped off. I used waterbased polycrylic on whole bench and 3 coats on top.
Recommended Skill Level
Beginner

Comments

Storage Sofa / Convertible to Bed

Submitted by SRA16 on Sun, 03/22/2015 - 09:06

I used the plan for the base idea for my sofa. I decided I'd prefer arms to curl up in and also to add a convertible feature turning an ottoman using the same base plans into an extension option for using the set as a bed or lounge area. Twice the storage, twice the function!

Built from Plan(s)
Estimated Cost
$400-$500
Estimated Time Investment
Week Long Project (20 Hours or More)
Finish Used
I used natural duck cloth for the fabric. Easy to clean and water resistant.
Recommended Skill Level
Intermediate

Comments

sam5657

Fri, 07/23/2021 - 19:33

I was planning on building your storage sofa, but when I saw the one with the arms; I thought that I would rather build that one. In the spot where the plans should have been; it refers you to the storage sofa. The problem is; it doesn't tell you what you need for or how to build the arms. If they are somewhere else; could you tell me what heading that they are under.

Sandra Cahoon

[email protected]

Large porch bench

Submitted by Lukilla on Mon, 09/27/2021 - 13:51

What a fun project, and great bench. We had someone ask us if we could make this for them, and we decided to make 2 while we were at it.....now we just need to find a spot big enough for the second one at our house. Loved this build, and look forward to sipping coffee on it on a cool morming.

Comments

Seasonal And Holiday