Community Brag Posts

Modern Loveseat and Couch

Submitted by Anonymous (not verified) on Sun, 09/26/2021 - 12:00

We were looking for outdoor furniture big enough for our whole family and friends but everything we looked at was over $5000 and really not well made. Ana to the rescue.
We built 2 loveseats and created a couch by doubling the dimensions.
We built the whole thing out of redwood so total wood was about $1000
The cushions were from Overstock and Lowes, approx $300.
There was a too much wiggle room with the cushions so we made a built-in frame to hold them in place. If we built another I would have cut the width down slightly.
We placed a 4X4 and another 2X4 on top of the back to provide more support.
All in all, love the way it turned out.

Seasonal And Holiday

My first DIY project!

Submitted by Celeste808 on Sun, 05/05/2013 - 10:30

Finally Completed!!! Thank you rainy Saturday! So I wanted a new entertainment center of sorts... couldn't find one that was just what I wanted..... so why not just build what I want! Just DIY it. ;)

I used the faux fireplace plan and modified it to have attached shelves on the sides. I also added an extra strip at the top of the fireplace opening so I could mount an LED bar light.

I used 1/4 plywood to make a tile base, penny tile, and 1/2 quarter round to finish out around the entire bottom.

Total project cost was less than $200 including the tile and light!

Best part is the whole thing is movable!

Thanks Anna White for such an awesome plan to start with!

Estimated Time Investment
Week Long Project (20 Hours or More)
Finish Used
MDF & plywood
Recommended Skill Level
Beginner

Comments

spkramer

Wed, 07/03/2013 - 10:24

This whole unit is great. My wife LOVES it, which means I will be building it! Did you purchase the two shelf units or build them yourself? Did you use a pattern or plan? Thanks!

Alisonwunderland

Wed, 07/31/2013 - 13:09

This is amazing! Exactly what I'm looking for! Did you change the depth of the mantel to make sure the shelves would be deep enough to hold things?

Celeste808

Sat, 08/03/2013 - 18:25

I did make the depth of the fireplace deeper so I could have room for the halves on the side. I just sketched out the dimensions I wanted the side shelves and built them along the same lines as the fireplace. Wasn't hard to figure out and just made it to fit the size I needed. The inset of the fireplace does not go all the way back to the wall either, that way the power strip can fit on the floor behind it. Glad you like it and thanks for the compliments!

EAnne

Wed, 07/23/2014 - 14:54

Hi Celeste 808, What a wonderful faux fireplace WITH the bookcases, especially. I'm hoping I can try this in our space challenged bedroom. Did you by any change reply to the chap who asked if you had some kind of dimensions or plans you could pass along to us? I would love to see if we can make it work in the space we have available.
Thanks again for the inspiration,
e

jrybolt26

Mon, 10/28/2013 - 18:25

I absolutely love what you did with this. I am going to have my fiance help me make this for our house. If you still have the dimensions and details of how you built the whole unit I would greatly appreciate it if you could post it.

mommyof2cuties

Sun, 04/13/2014 - 13:00

This is gorgeous & I can't believe it's your 1st project. I would love to build this too. Did you use any particular plans for the side units? If you have any tips or information to share, that would be great! I've actually been trying to make up my own plans using Sketch Up, but that's not working too good, lol. Again, great job & thank you.
Lynda

emswave

Sun, 02/08/2015 - 12:31

I'm dying to know the dimensions you added to the width. Also, the dimensions of the book shelf. I have been trying to draw up plans for the last week and I'm stuck with trying to figure it out by looking at your pictures.

PLEASE HELP!

Thanks!!

mrittgers1

Mon, 07/27/2015 - 09:15

Do you have the blue print of how you built the mantel and side book shelves? I am wanting to go buy supplies to build this tonight!!!


Thank you!

Montessori bed

Submitted by Anonymous (not verified) on Mon, 10/04/2021 - 12:24

Was a little challenging at first but I was able to pull it off and it came out to be perfect

Comments

Corner Shelf for Nursery

Submitted by wojo1 on Thu, 05/16/2013 - 07:21

Super Easy.. I like it better without the doors. Recommend getting a KREG Jig. I have the Jr and it was perfect for this project.

Built from Plan(s)
Estimated Cost
$130
Estimated Time Investment
Afternoon Project (3-6 Hours)
Recommended Skill Level
Beginner

Comments

Double Seat Outdoor Chair

Submitted by Anonymous (not verified) on Mon, 10/04/2021 - 16:29

Very easy and quick to build. It is amazingly comfortable. There are no cushions needed. My wife loves it. I took parts of Ana’s Simple Outdoor Lounge Chair and Modern Outdoor Chair with a twist patterns and modified them to be a double seat instead of a single seat.

Built from Plan(s)

Comments

Ana White Admin

Tue, 10/05/2021 - 09:29

That is so cool how you combined the plans and came up with that! It looks amazing, thanks for sharing!

Tall Wood Planters

Submitted by Anonymous (not verified) on Tue, 10/05/2021 - 19:31

This planter was easy to make. Two days including finish.

Built from Plan(s)

Comments

Loft Bed

Submitted by Jenny Anne on Tue, 03/15/2011 - 08:43

I made this loft bed for my 4-year-old son.  It is plenty strong.  It can easily hold him and his daddy for bedtime stories.  I followed the plans to the letter.  I found this a challenging but attainable second project and only needed help with final assembly.  I'll start working on some bookshelves for under it but need to figure out how to work around the supports I already added (that are omitted in the bookshelf plans).  

Now I have to finish the poor kid's quilt so he can stop using my pink one.
Built from Plan(s)
Estimated Cost
$300
Estimated Time Investment
Week Long Project (20 Hours or More)
Finish Used
primed and painted with satin finish. I still need to cover the final assembly screws and touch up some junctions. One note if you paint this, DON'T paint the sections of the long boards that you'll have to slide in on final assembly. We had to sand that paint off to get them to squeeze in.
Recommended Skill Level
Intermediate

Farmhouse Bunkbeds with Stairs

Submitted by Yodannos on Sun, 06/09/2013 - 13:19

We have a rental unit and decided to fill one room with 2 sets of bunk beds. One is a twin over a full. The other is a full over full. Due to a duct running through one corner, and limited amount of space, I decided to build a set of stairs on the 17" gap. I used the simple bunk bed plans, but modified it to the style of the farmhouse. Also, I changed several of the heights of the foot/head boards. The full over full will have a ladder coming off the end and is in progress.

Estimated Cost
$450
Estimated Time Investment
Week Long Project (20 Hours or More)
Finish Used
Minwax Ebony Stain. Satin Polyeurethene.
Recommended Skill Level
Intermediate

Craft Table Build

Submitted by cathytn2 on Thu, 03/31/2011 - 05:28

I emailed my husband the plans for this desk on a Friday night and said we HAVE to make this desk this weekend.  I can't believe he actually went for it!  Well it turned into about 3 weekends and some nights of painting.  We also had some issues getting straight and square plywood and boards with knots in them.  He also added some extra holes in the sides for me to adjust the shelves.  We used an oil based white paint to finish the desk and looks nice and clean and shiny.  I can't wait to get started on our next project!  Please check out my blog for more details and photos and information on materials used, etc. (kitcats-studio.blogspot.com/2011/craft-table-made-from-plans.html
PS - {I had one more coat of paint on the drawers to finish so ignore the bare fronts of the drawers.}

Estimated Cost
$150
Estimated Time Investment
Weekend Project (10-20 Hours)
Finish Used
We primed everything using Zissner and then used an oil based white paint (about $15/gallon) from Lowe's for the finish. The trick to doing this is a WELL ventilated area, and a good brush. Although we're kind of lazy about cleaning up from oil based paint (it's a chore) so we got a medium cost brush (about $5) and threw it away when we were done with it. I used general handles from Lowes and the color on the inside of the drawers is Valspar Turquoise Tint 5006-10B.
Recommended Skill Level
Beginner

TeXas Kitchen Island

Submitted by Bandera89 on Sat, 05/16/2015 - 15:19

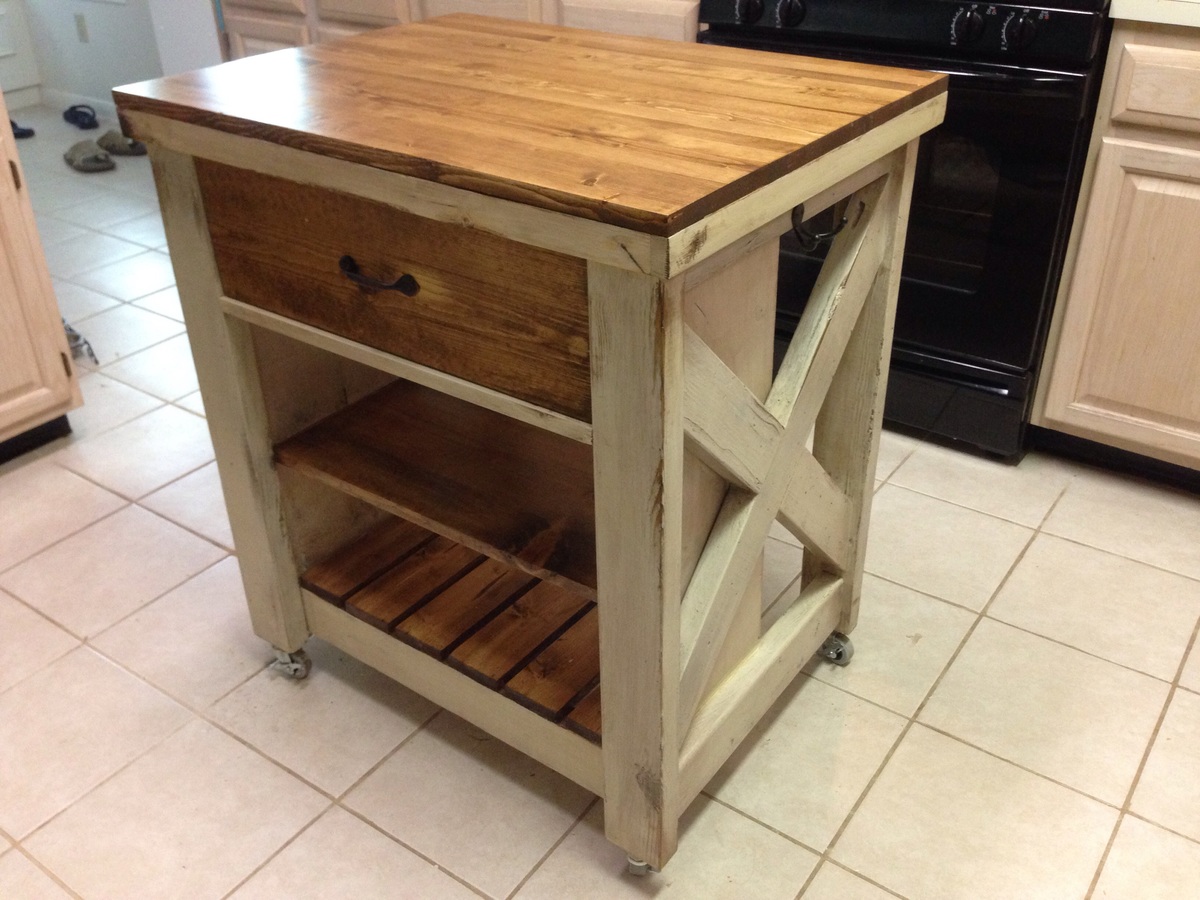
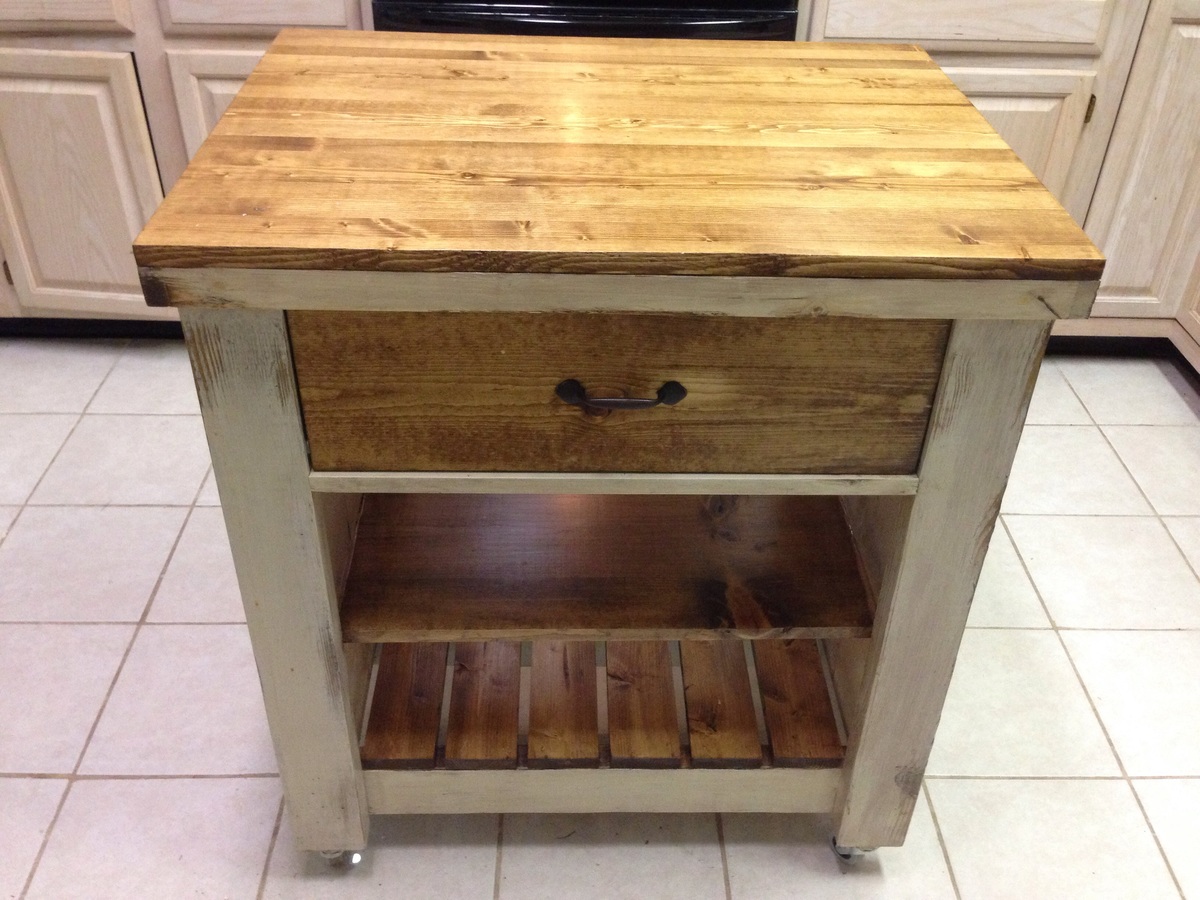
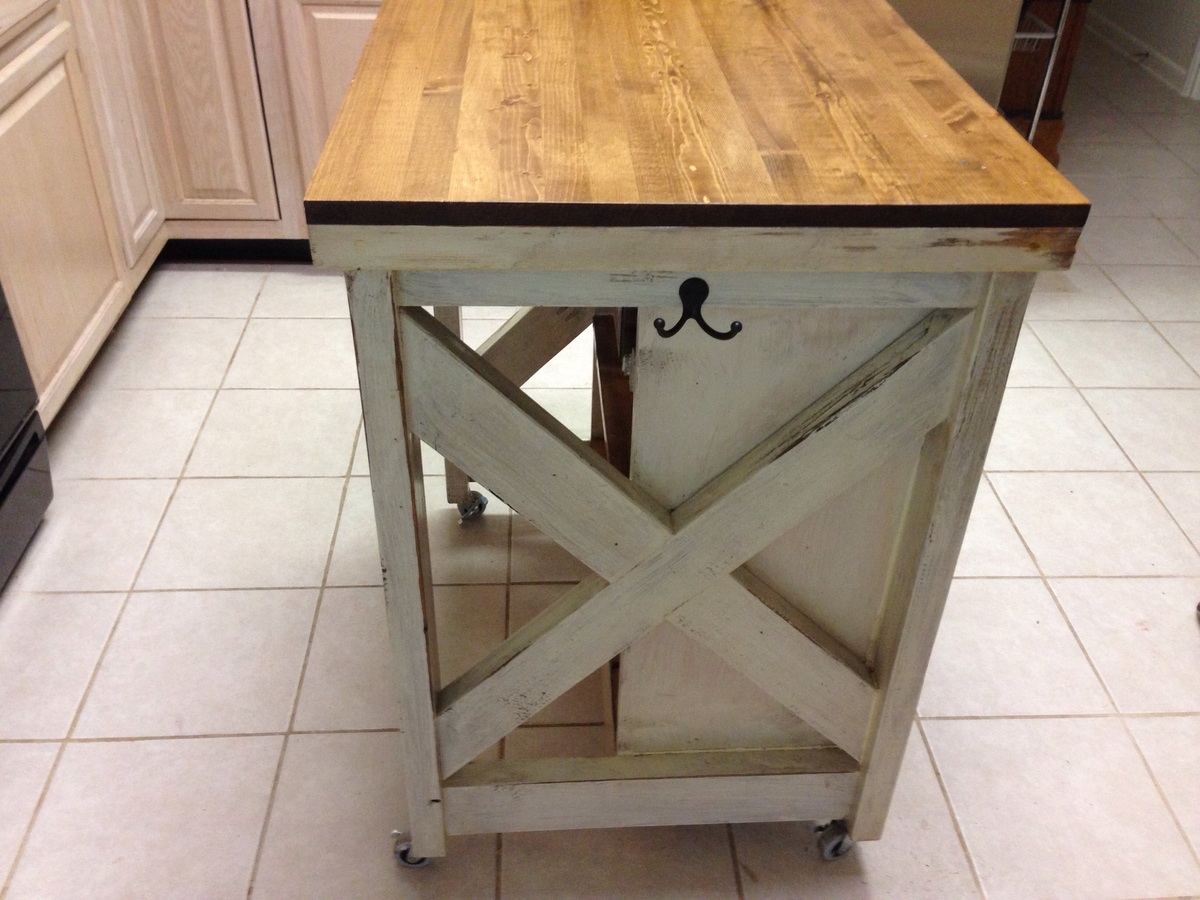
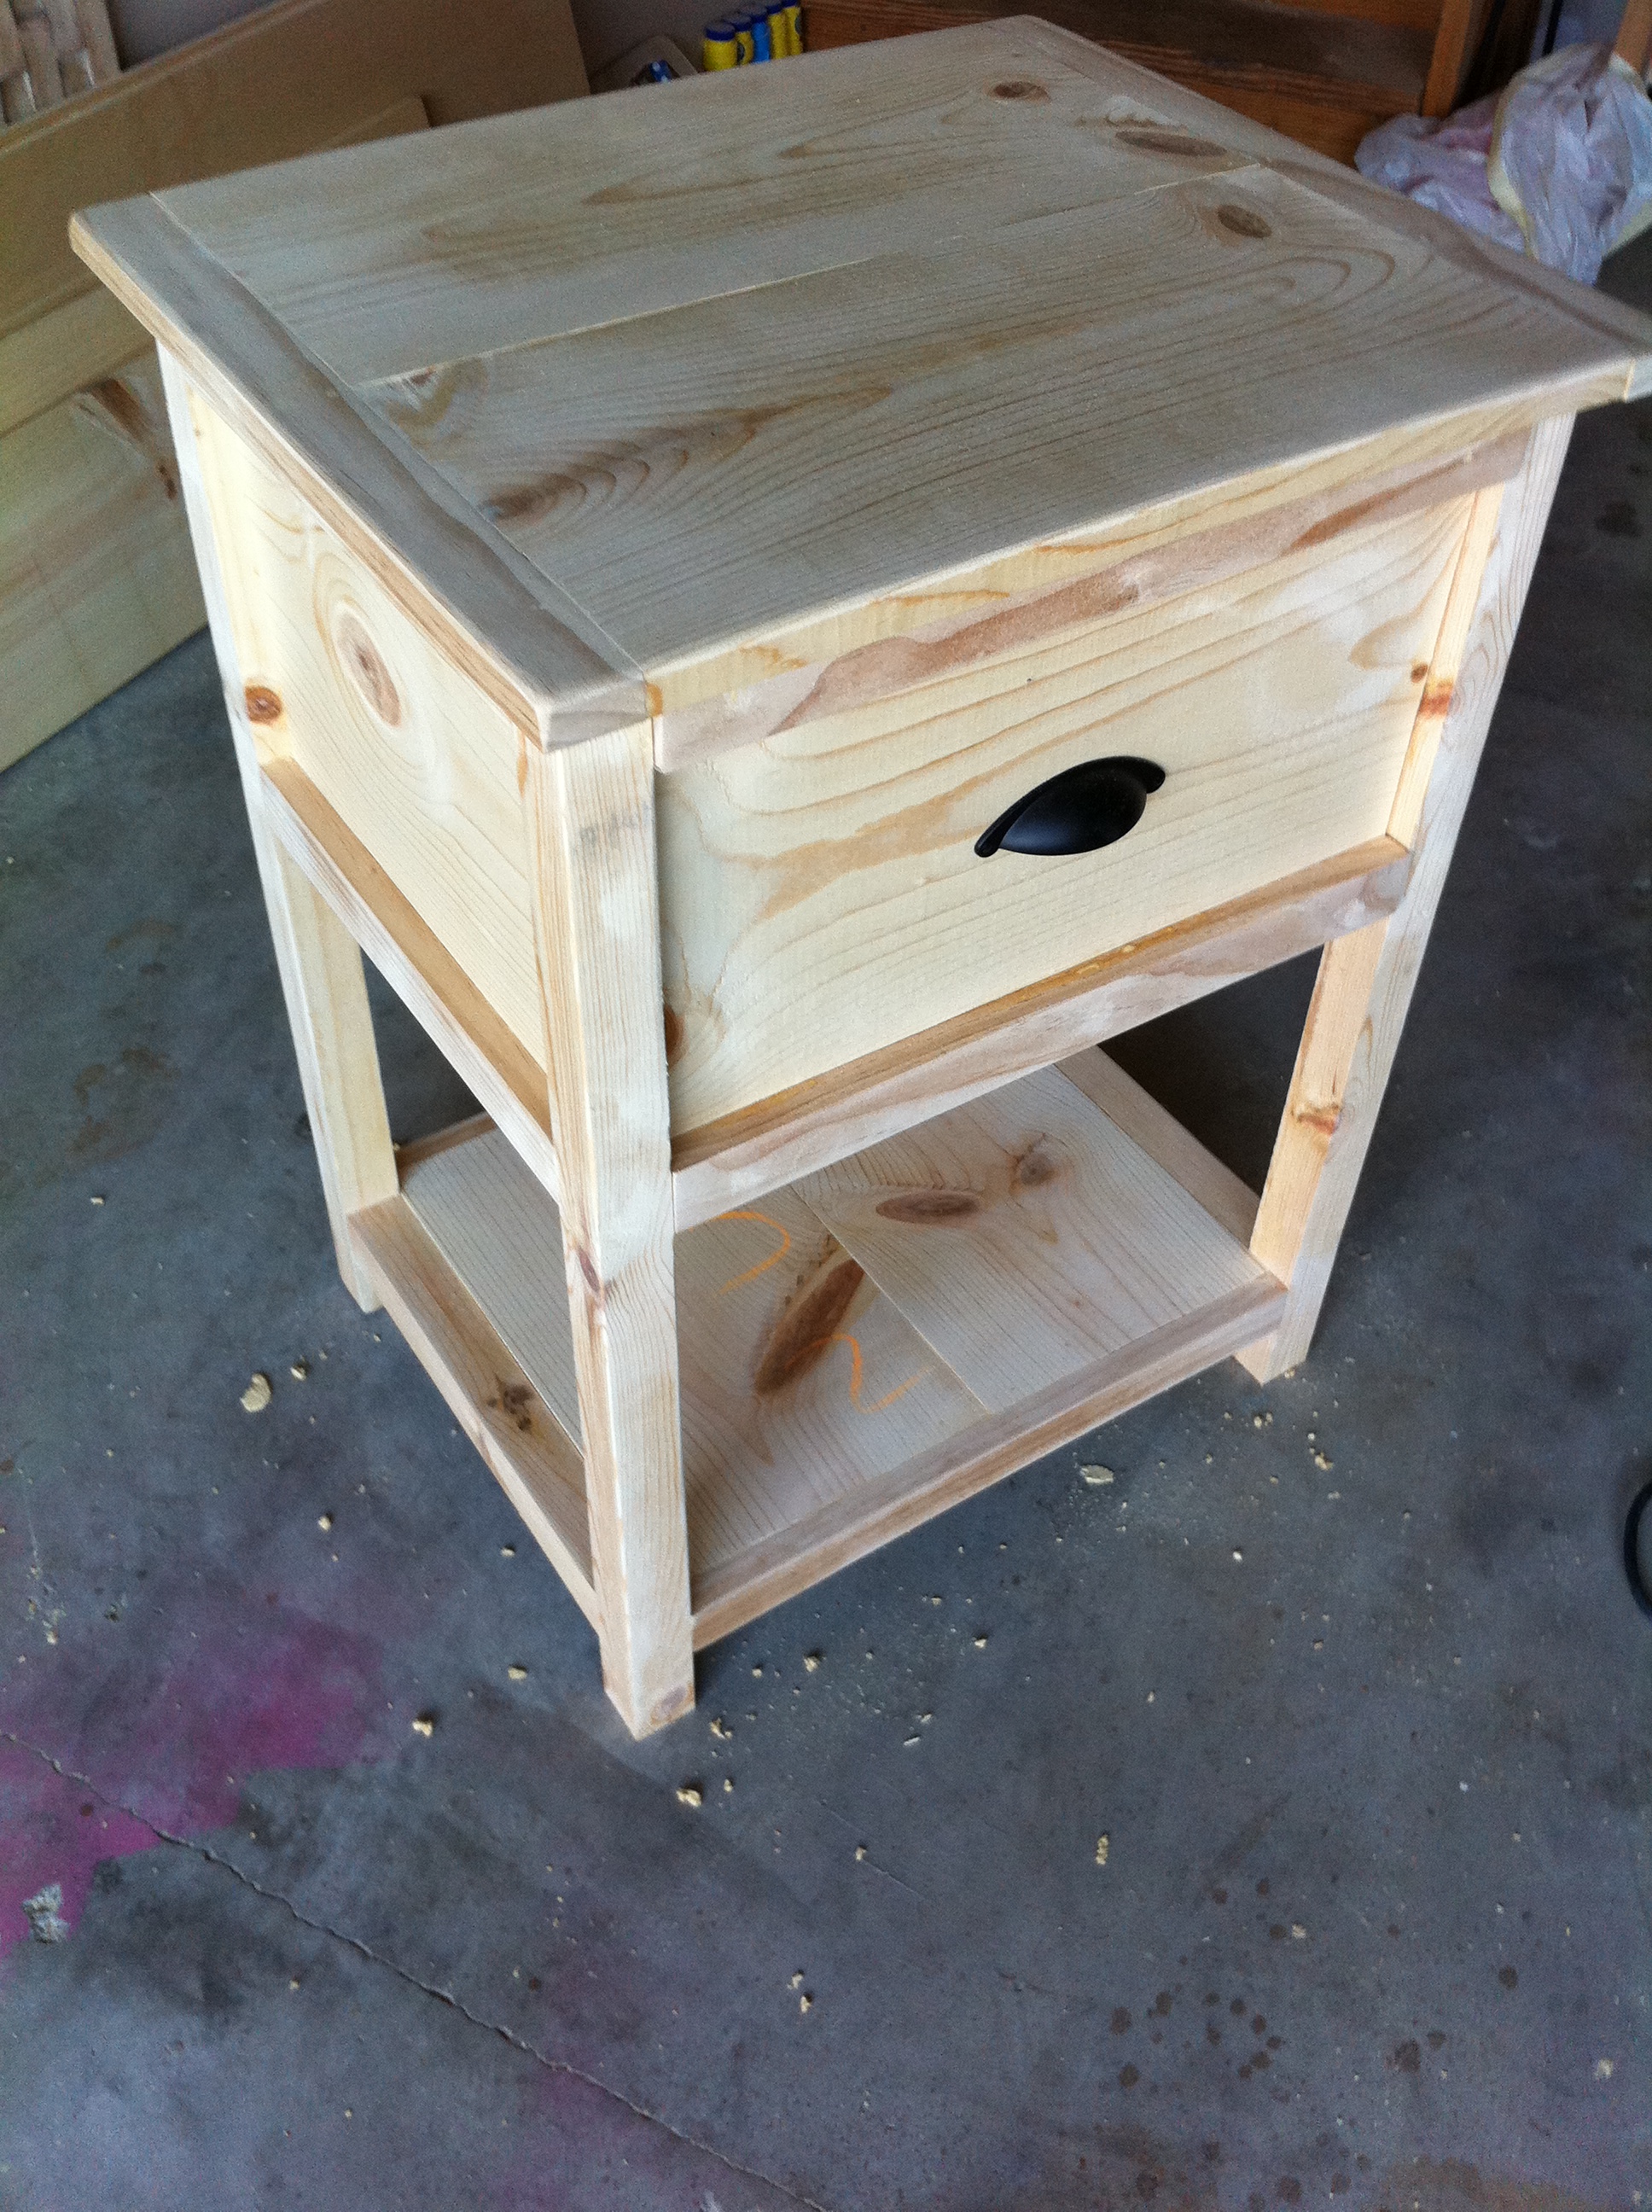
This kitchen island should be your next project. My wife wanted me to build an island for so long, but I never thought I had the skill to get it done. I can truly say this was only my second woodworking project and it was pretty simple. I learned a lot along the way and made a modification to the drawer rails. The key to my success was the Kreg jig. In the end it was a blast to build and I couldn't have done it without Ana's plans.

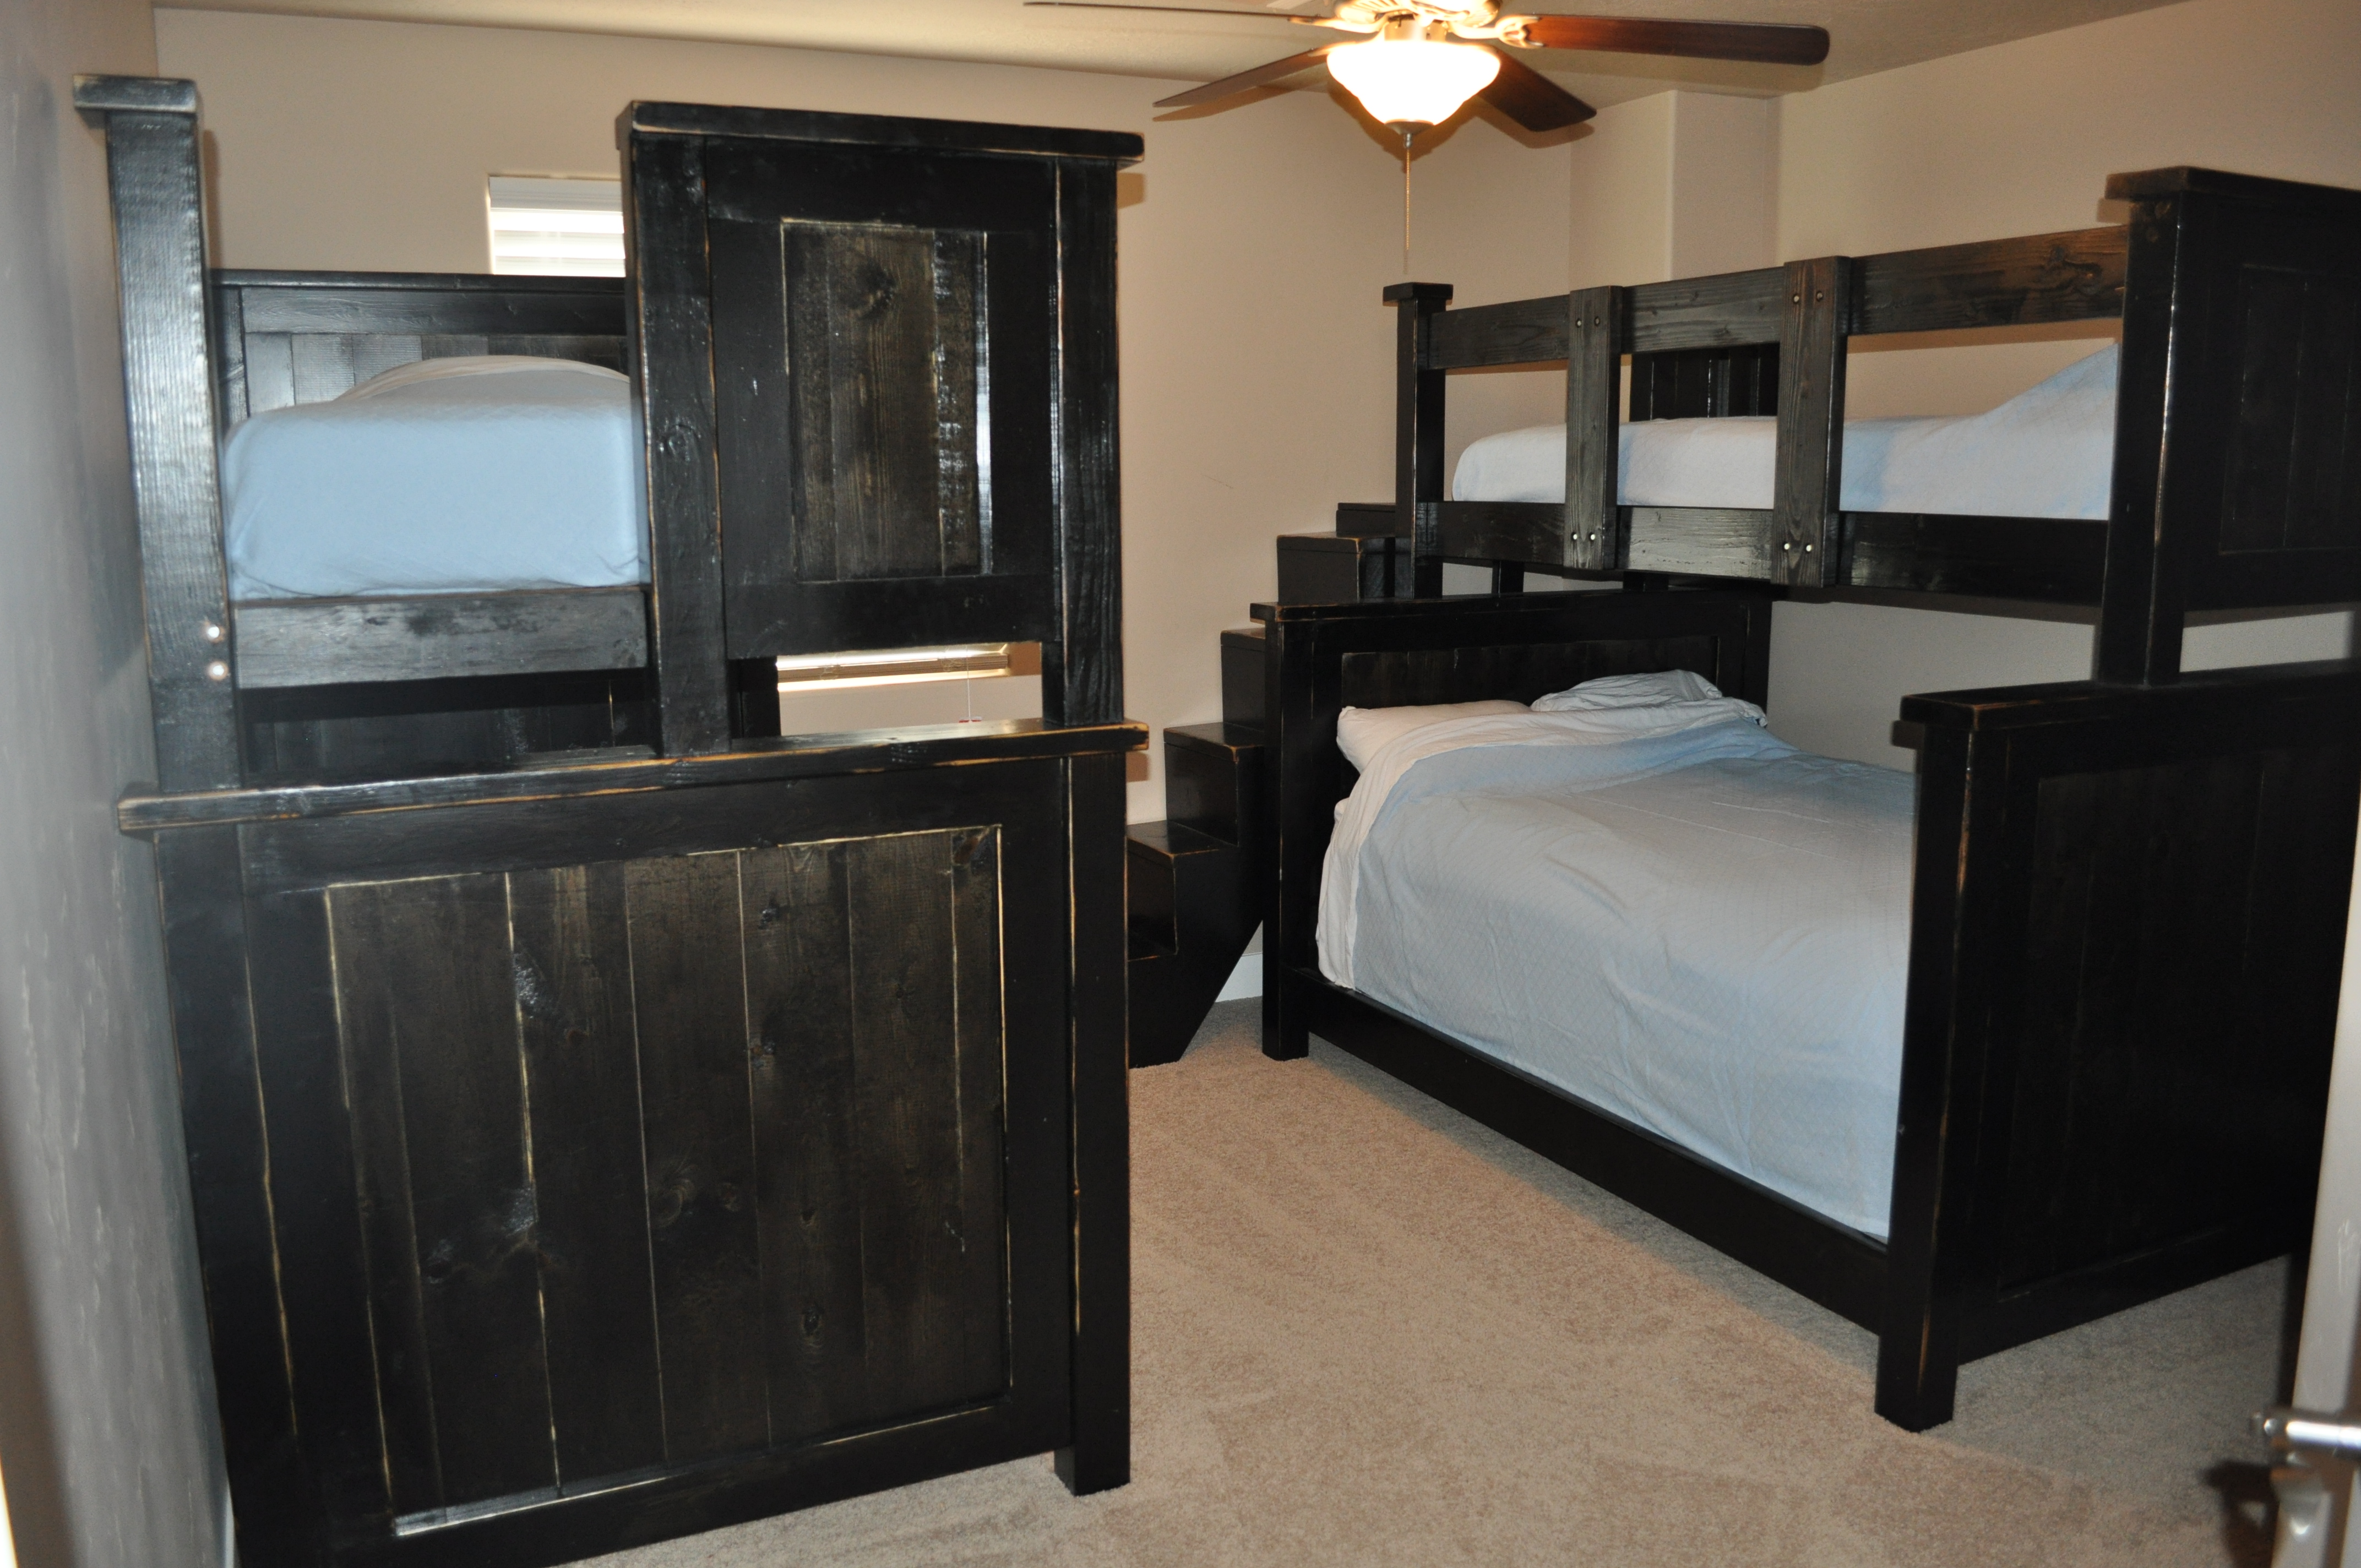
The rolling kitchen island is the central point of the kitchen now, even though we have 75'sf counter space to use. It seems to be used by everyone in the family whether it's getting something out of the fridge or using it for serving. Well worth the effort..

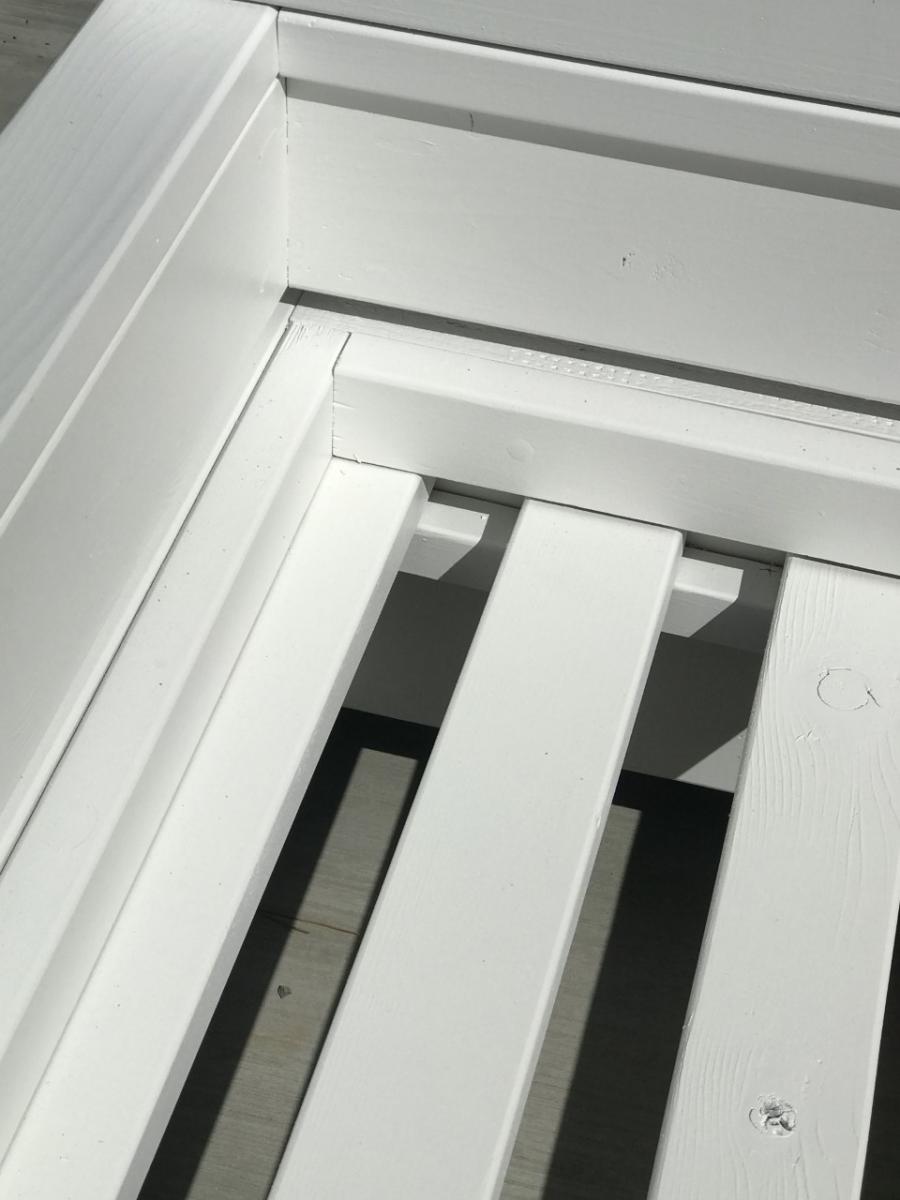
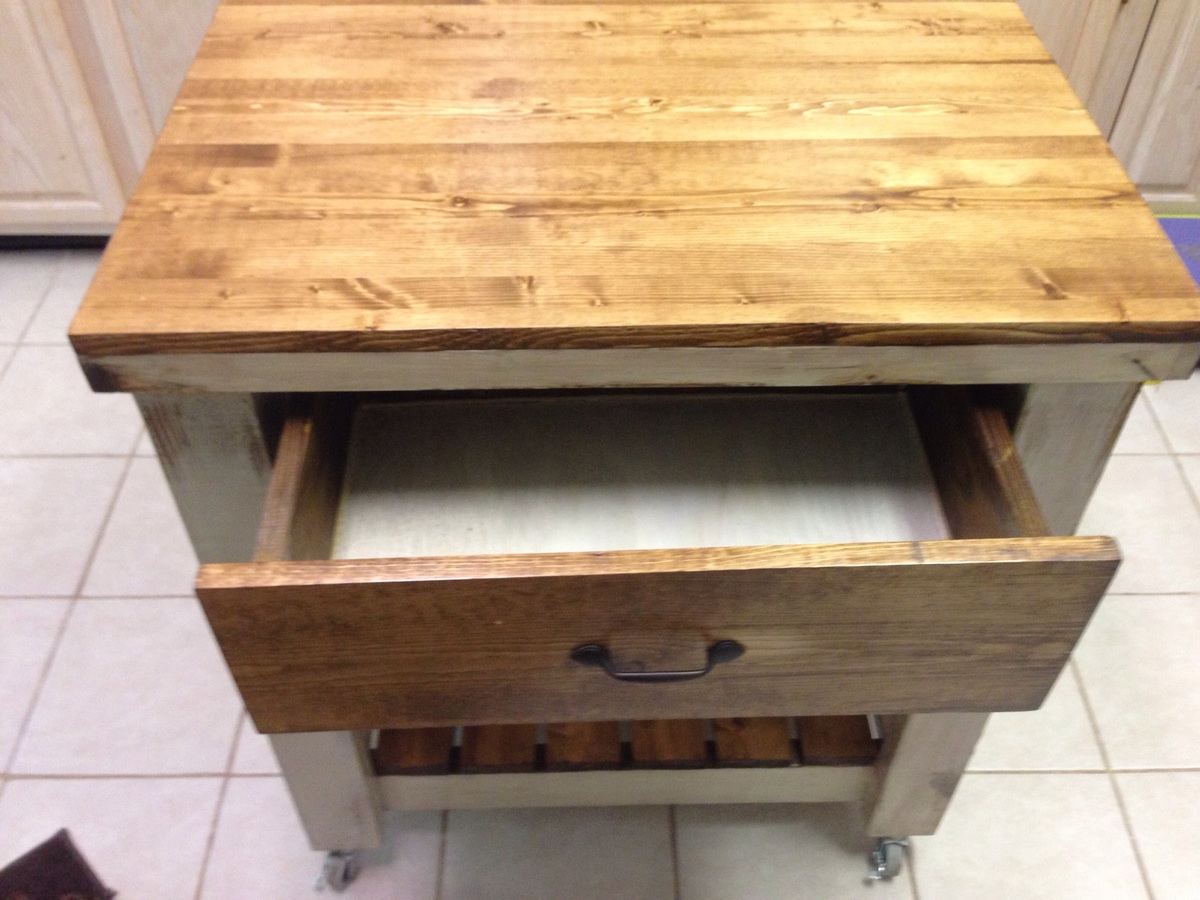
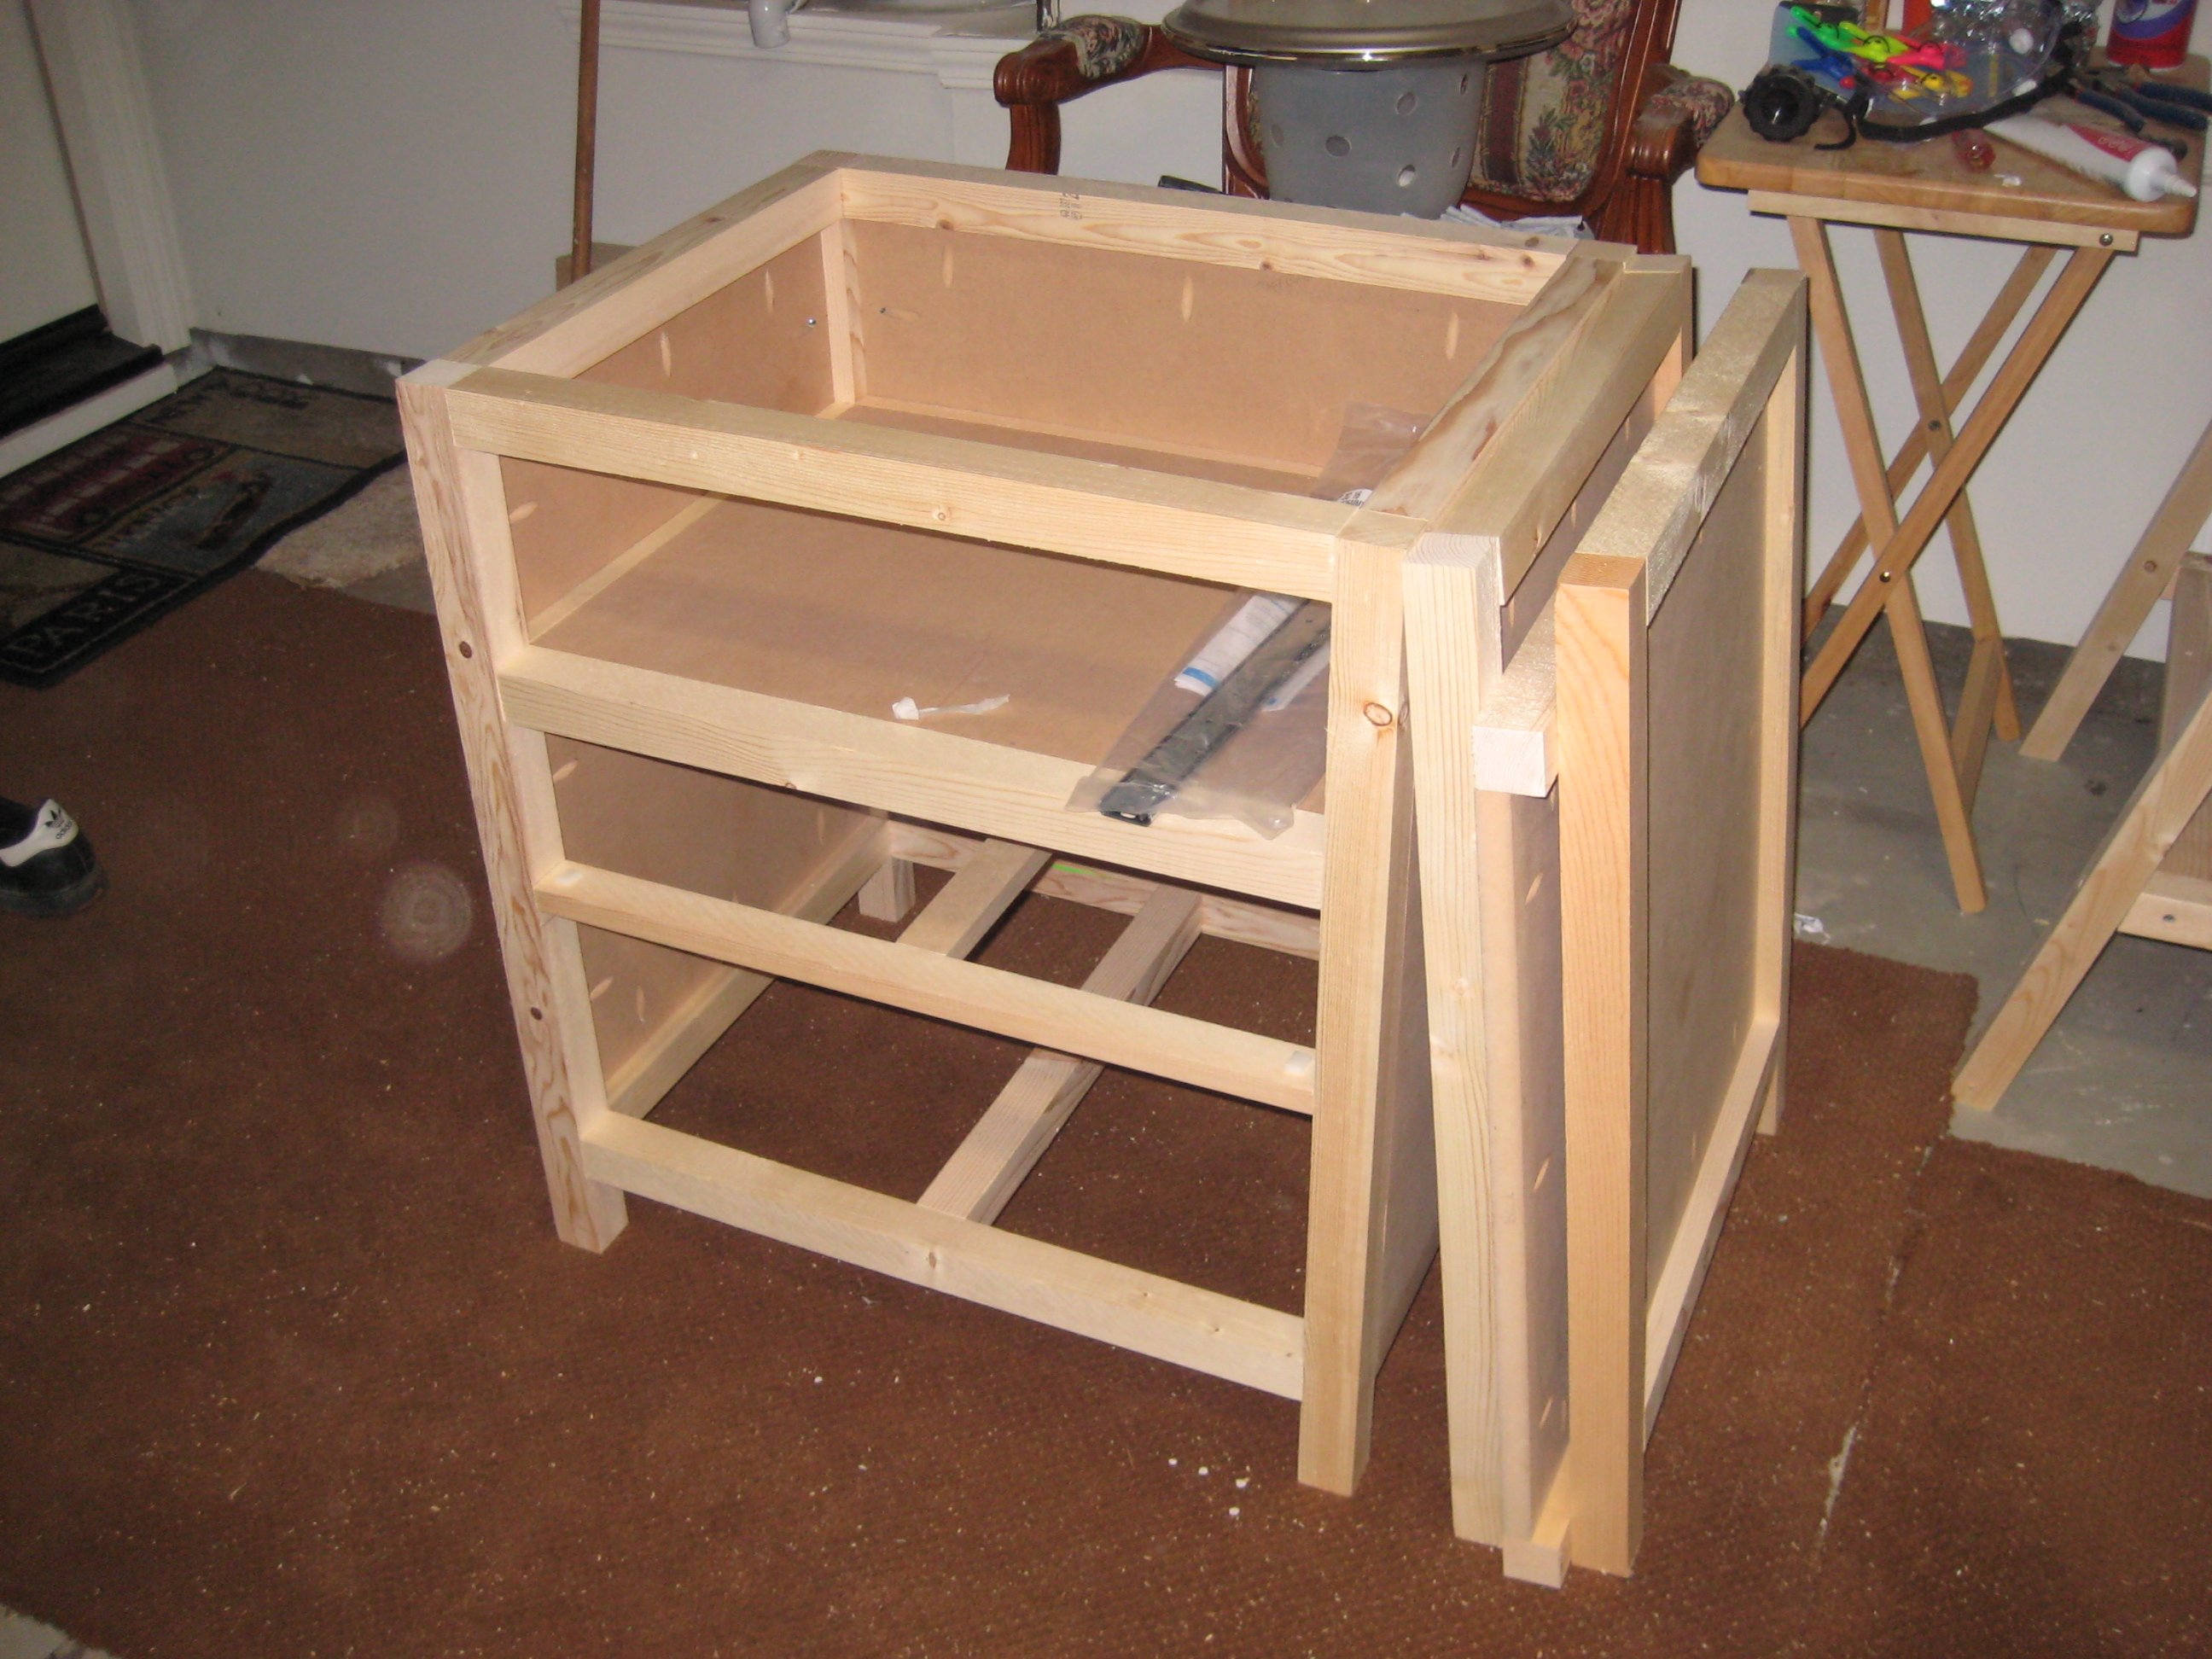
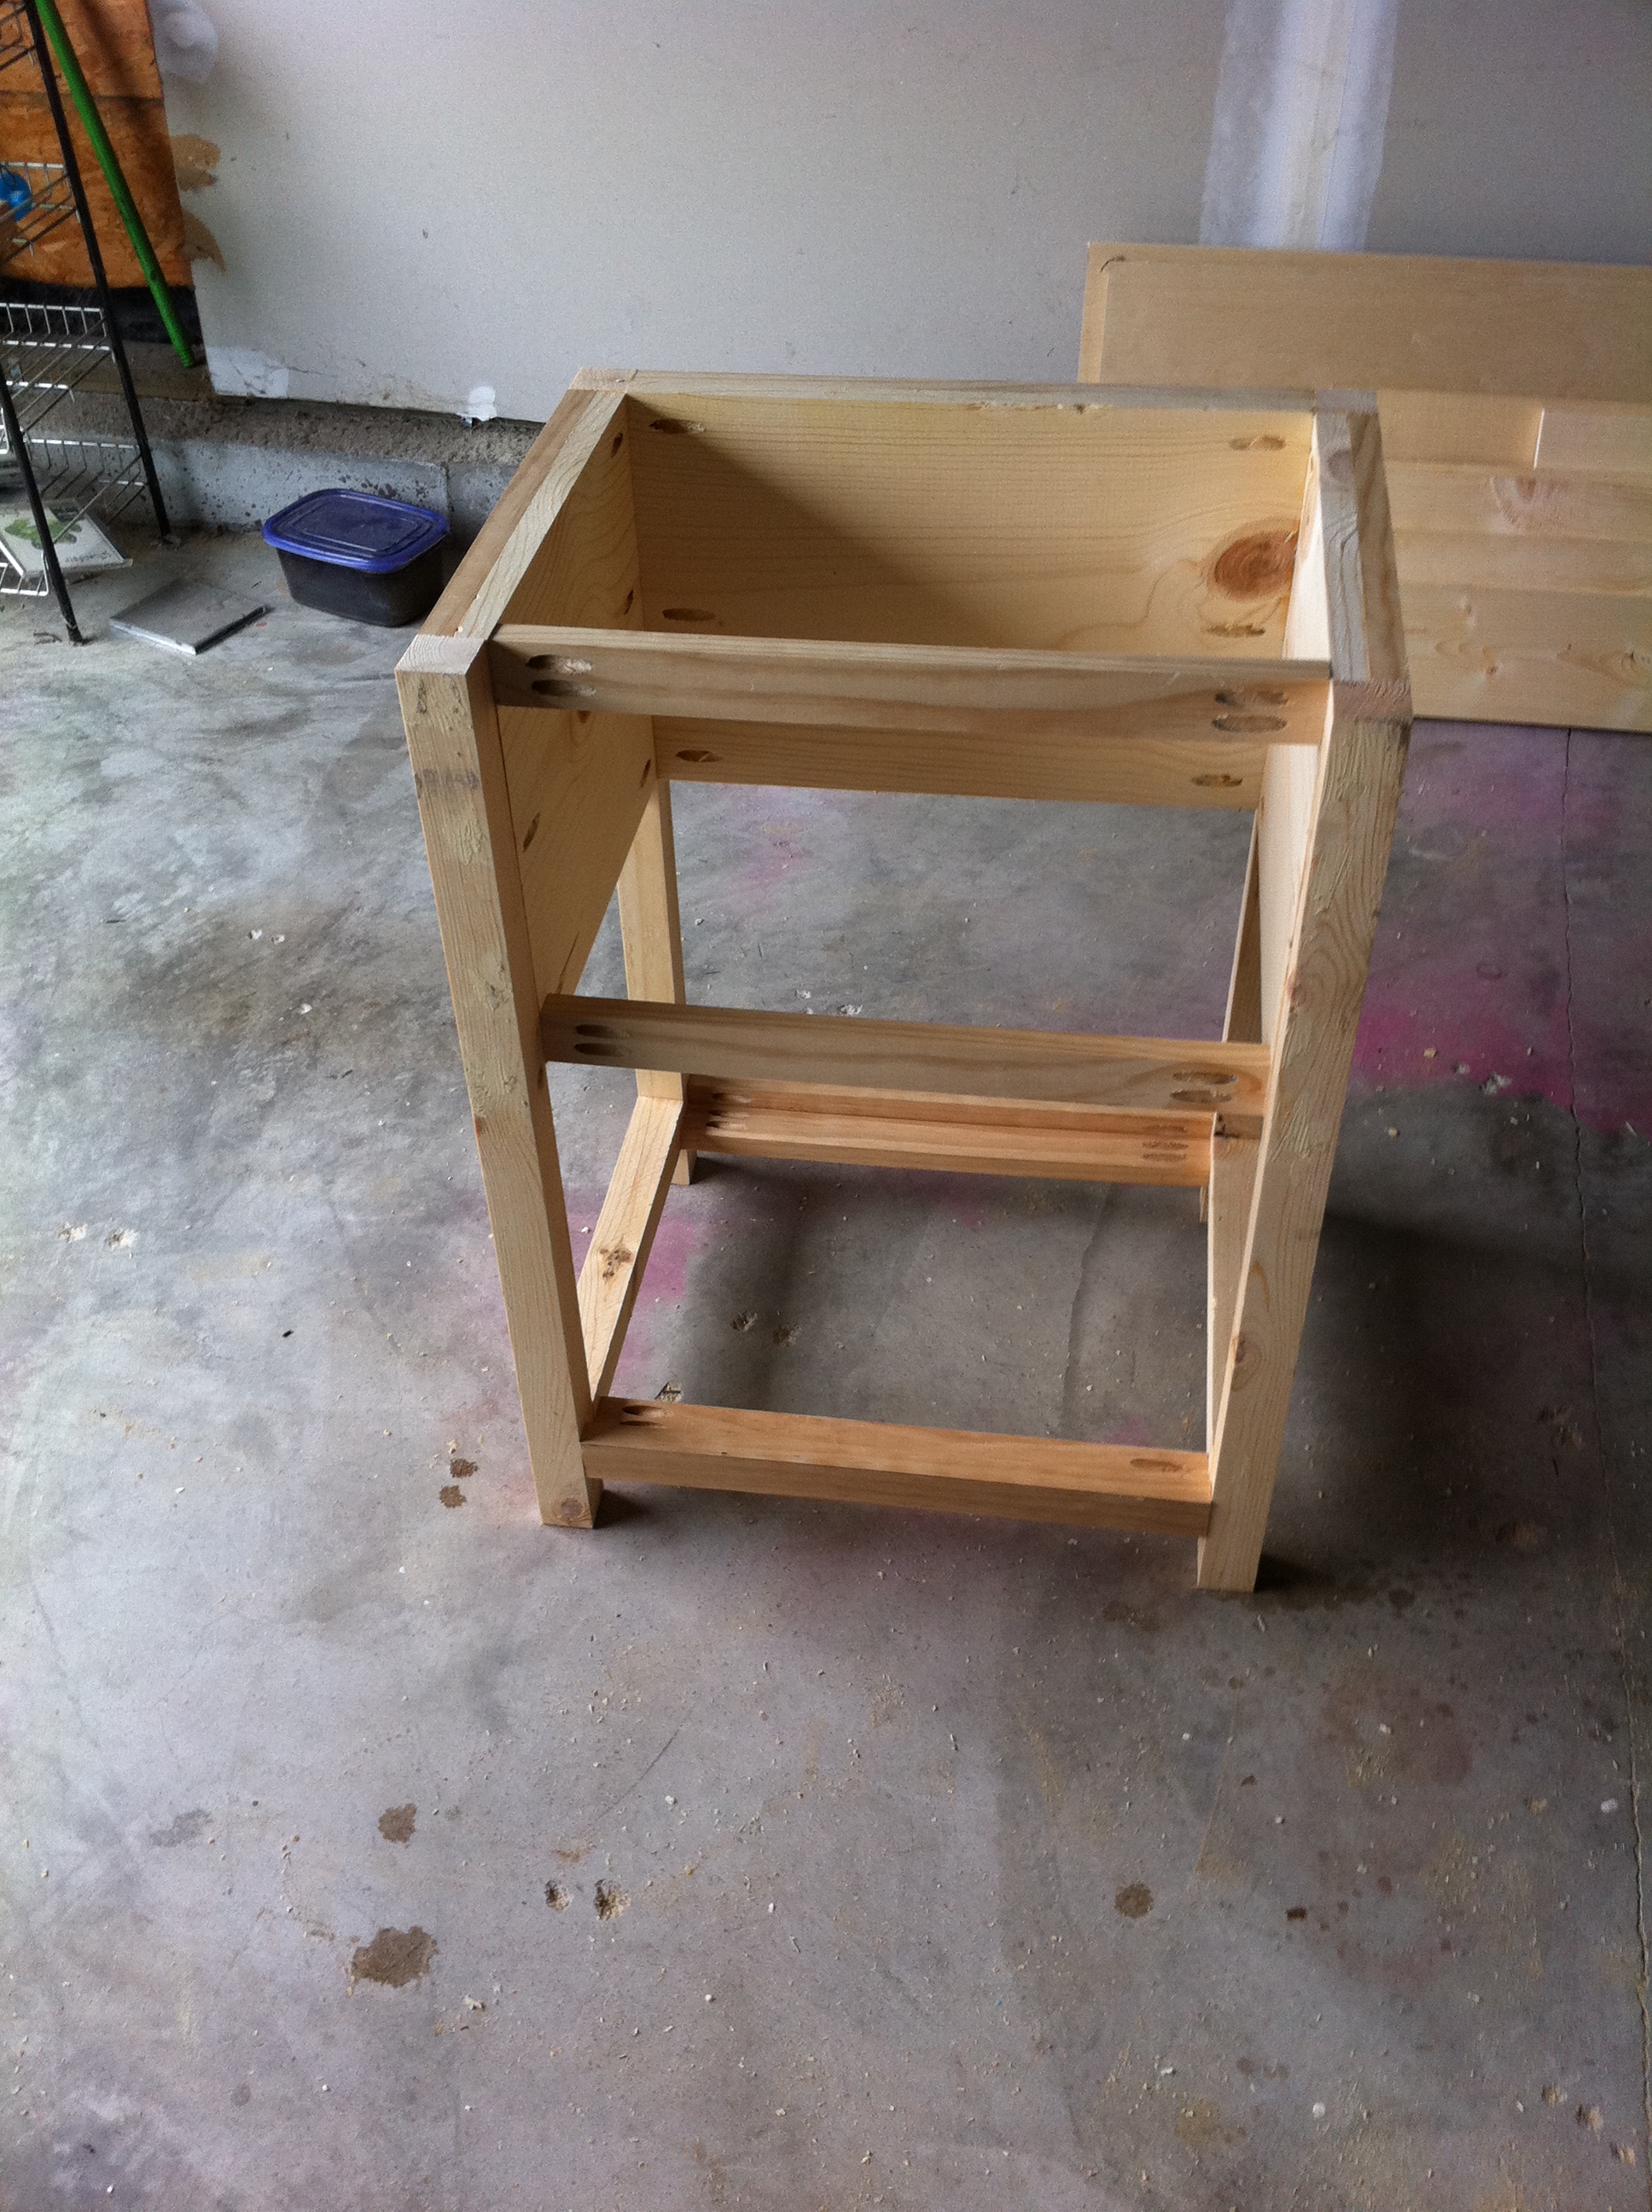
MODIFICATIONS: I made two small modifications to the project.
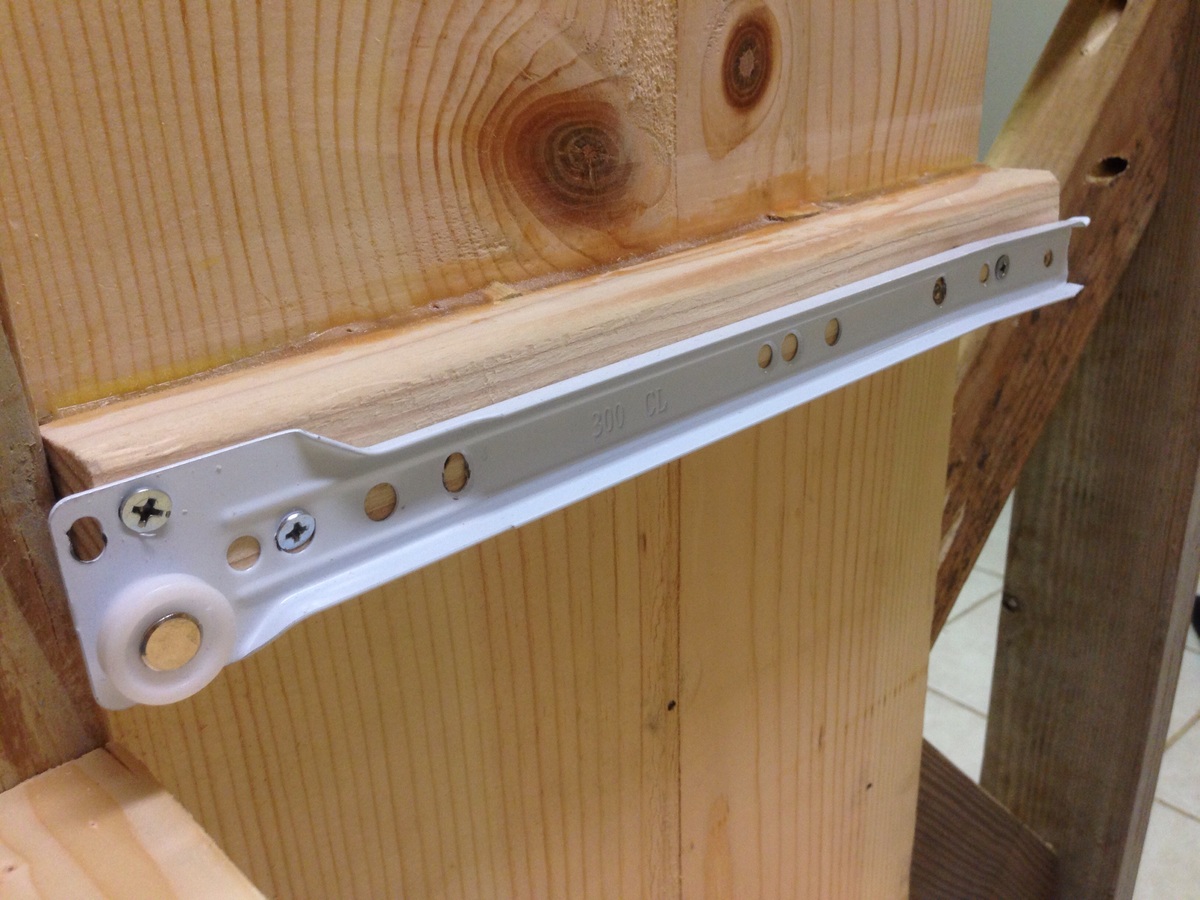
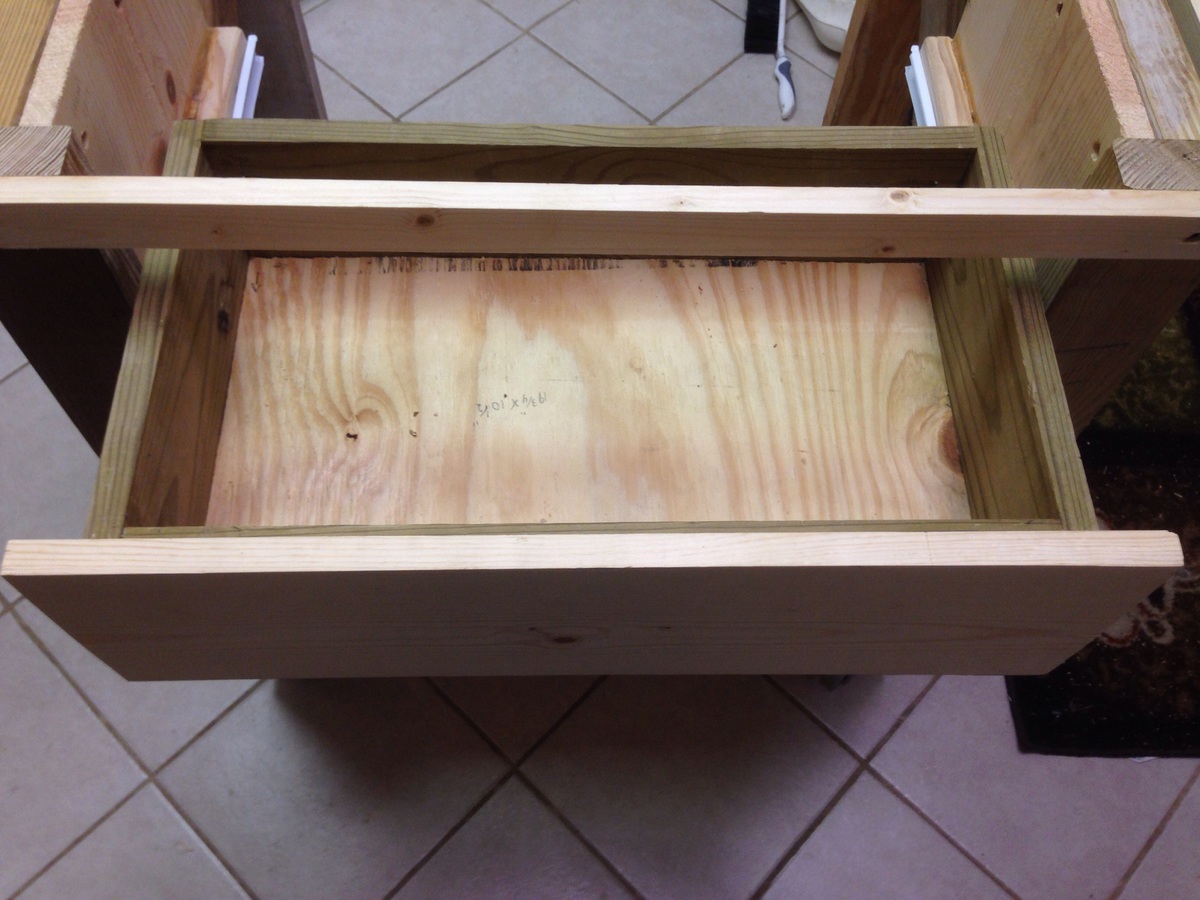
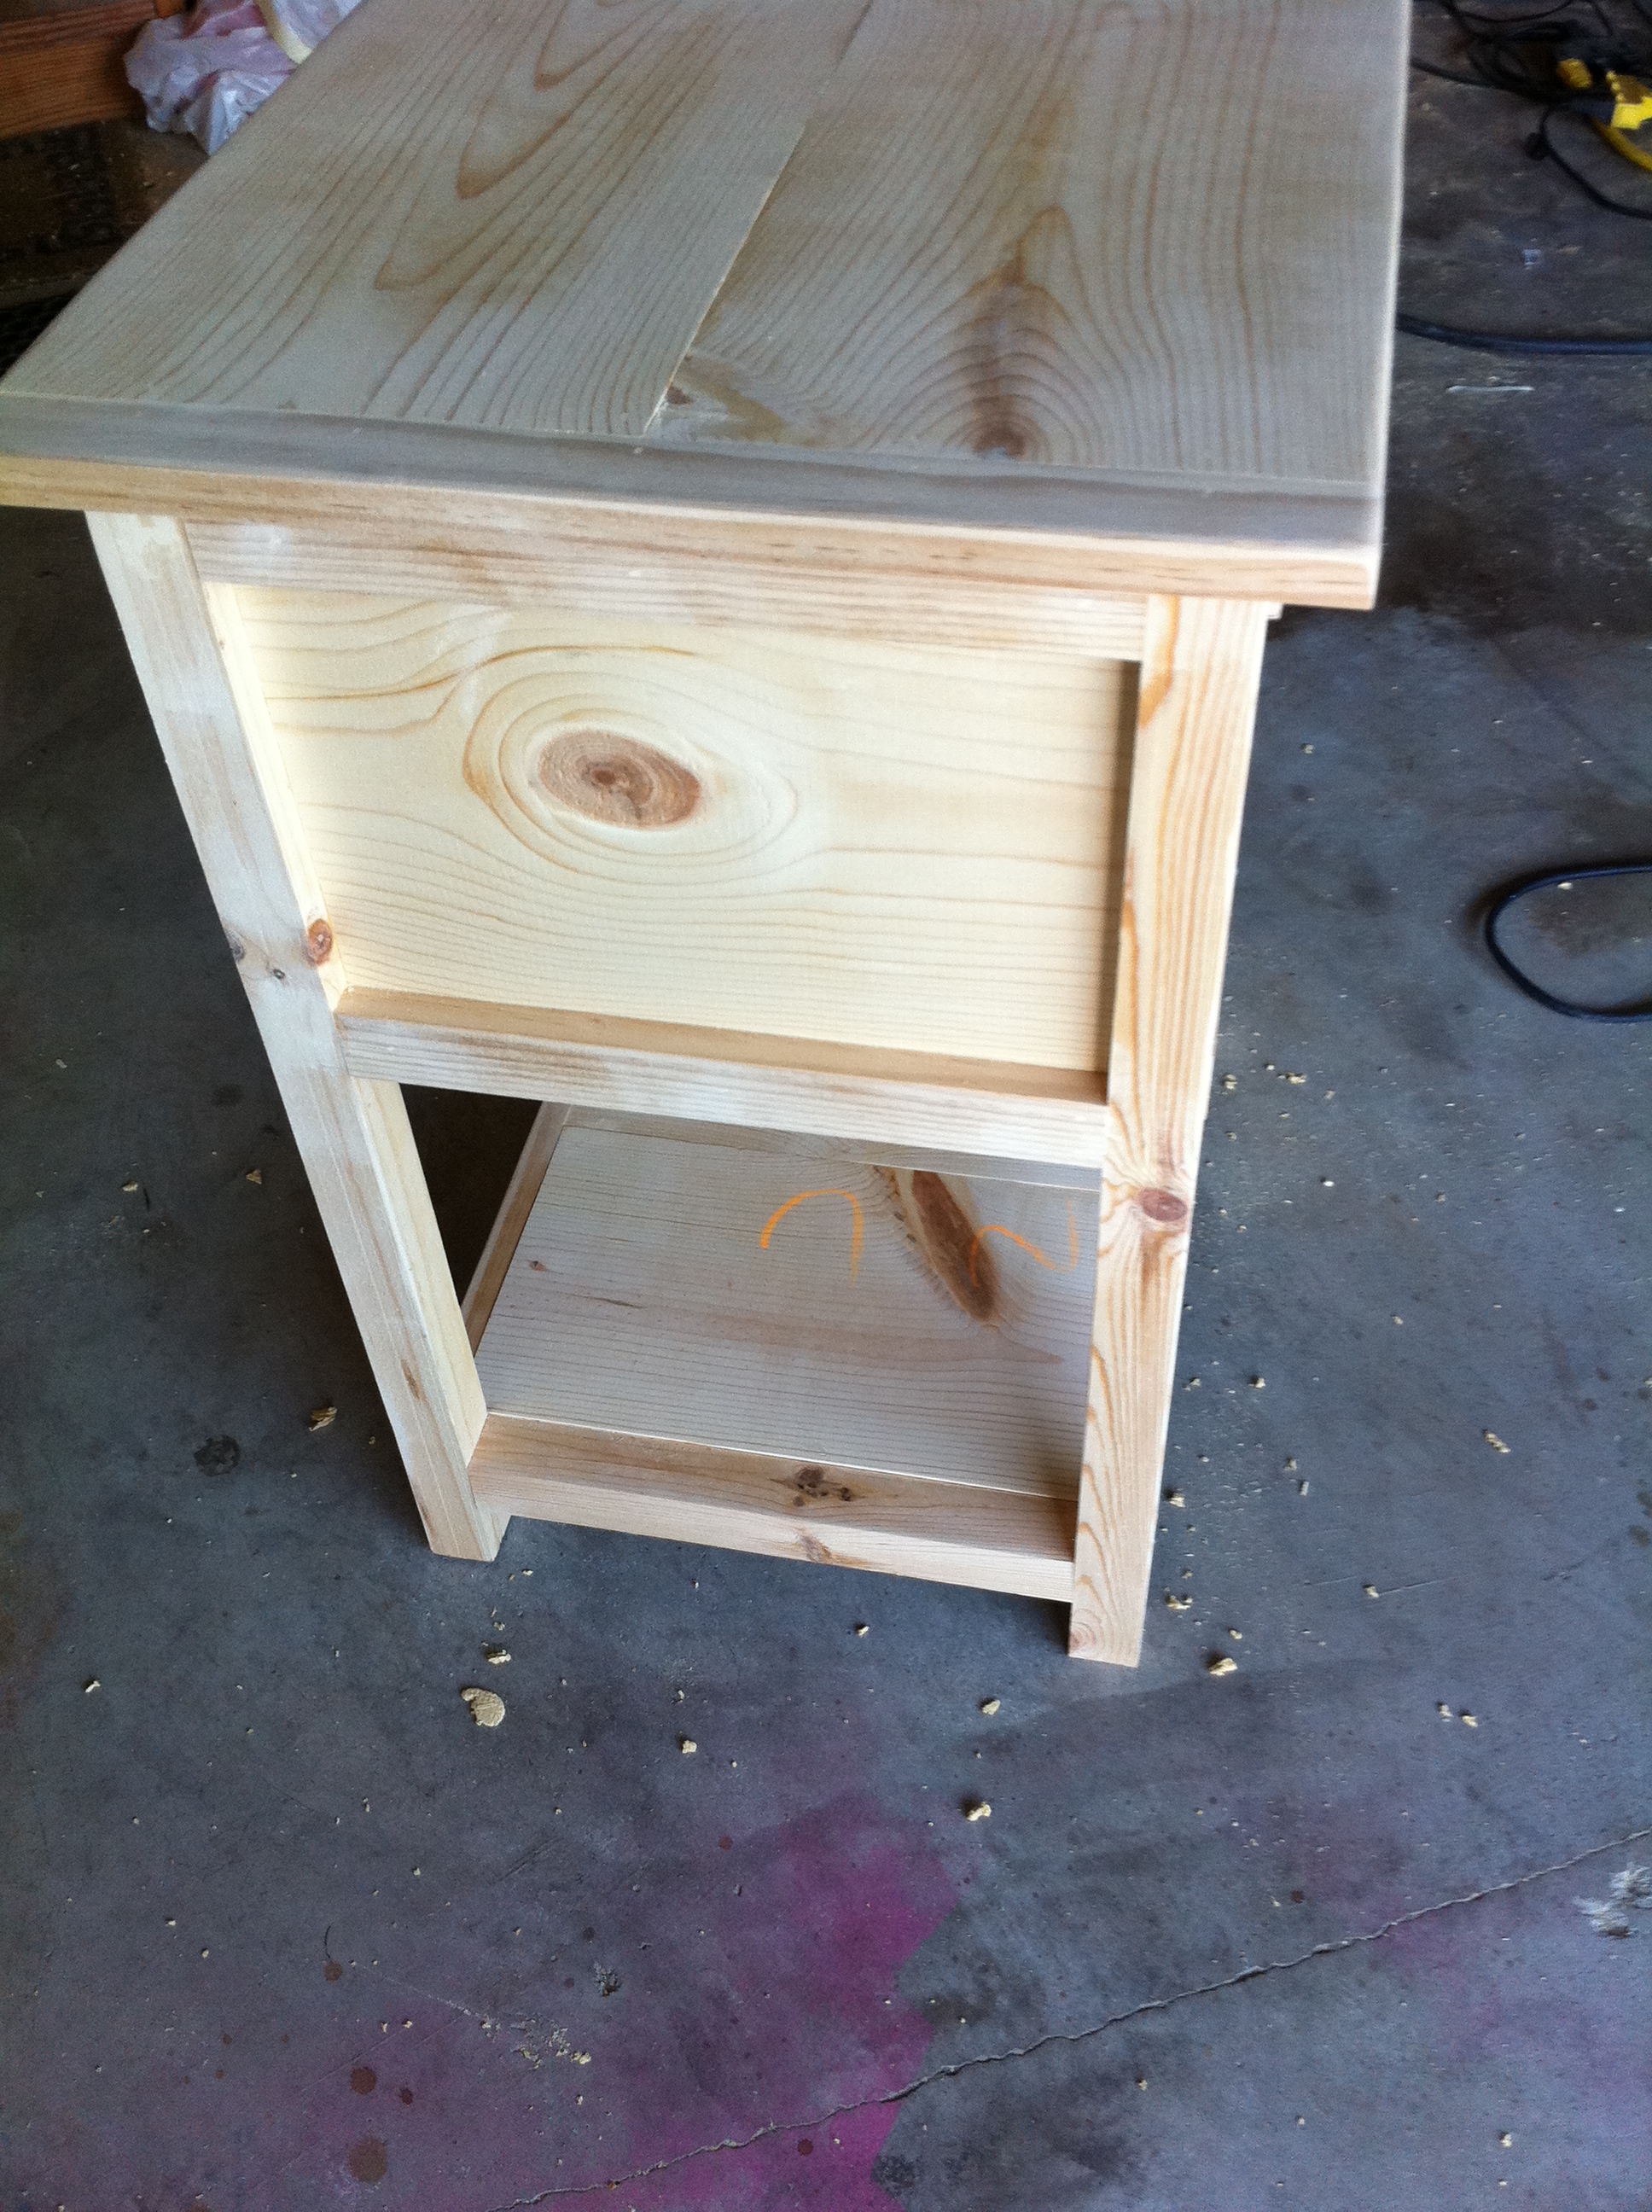
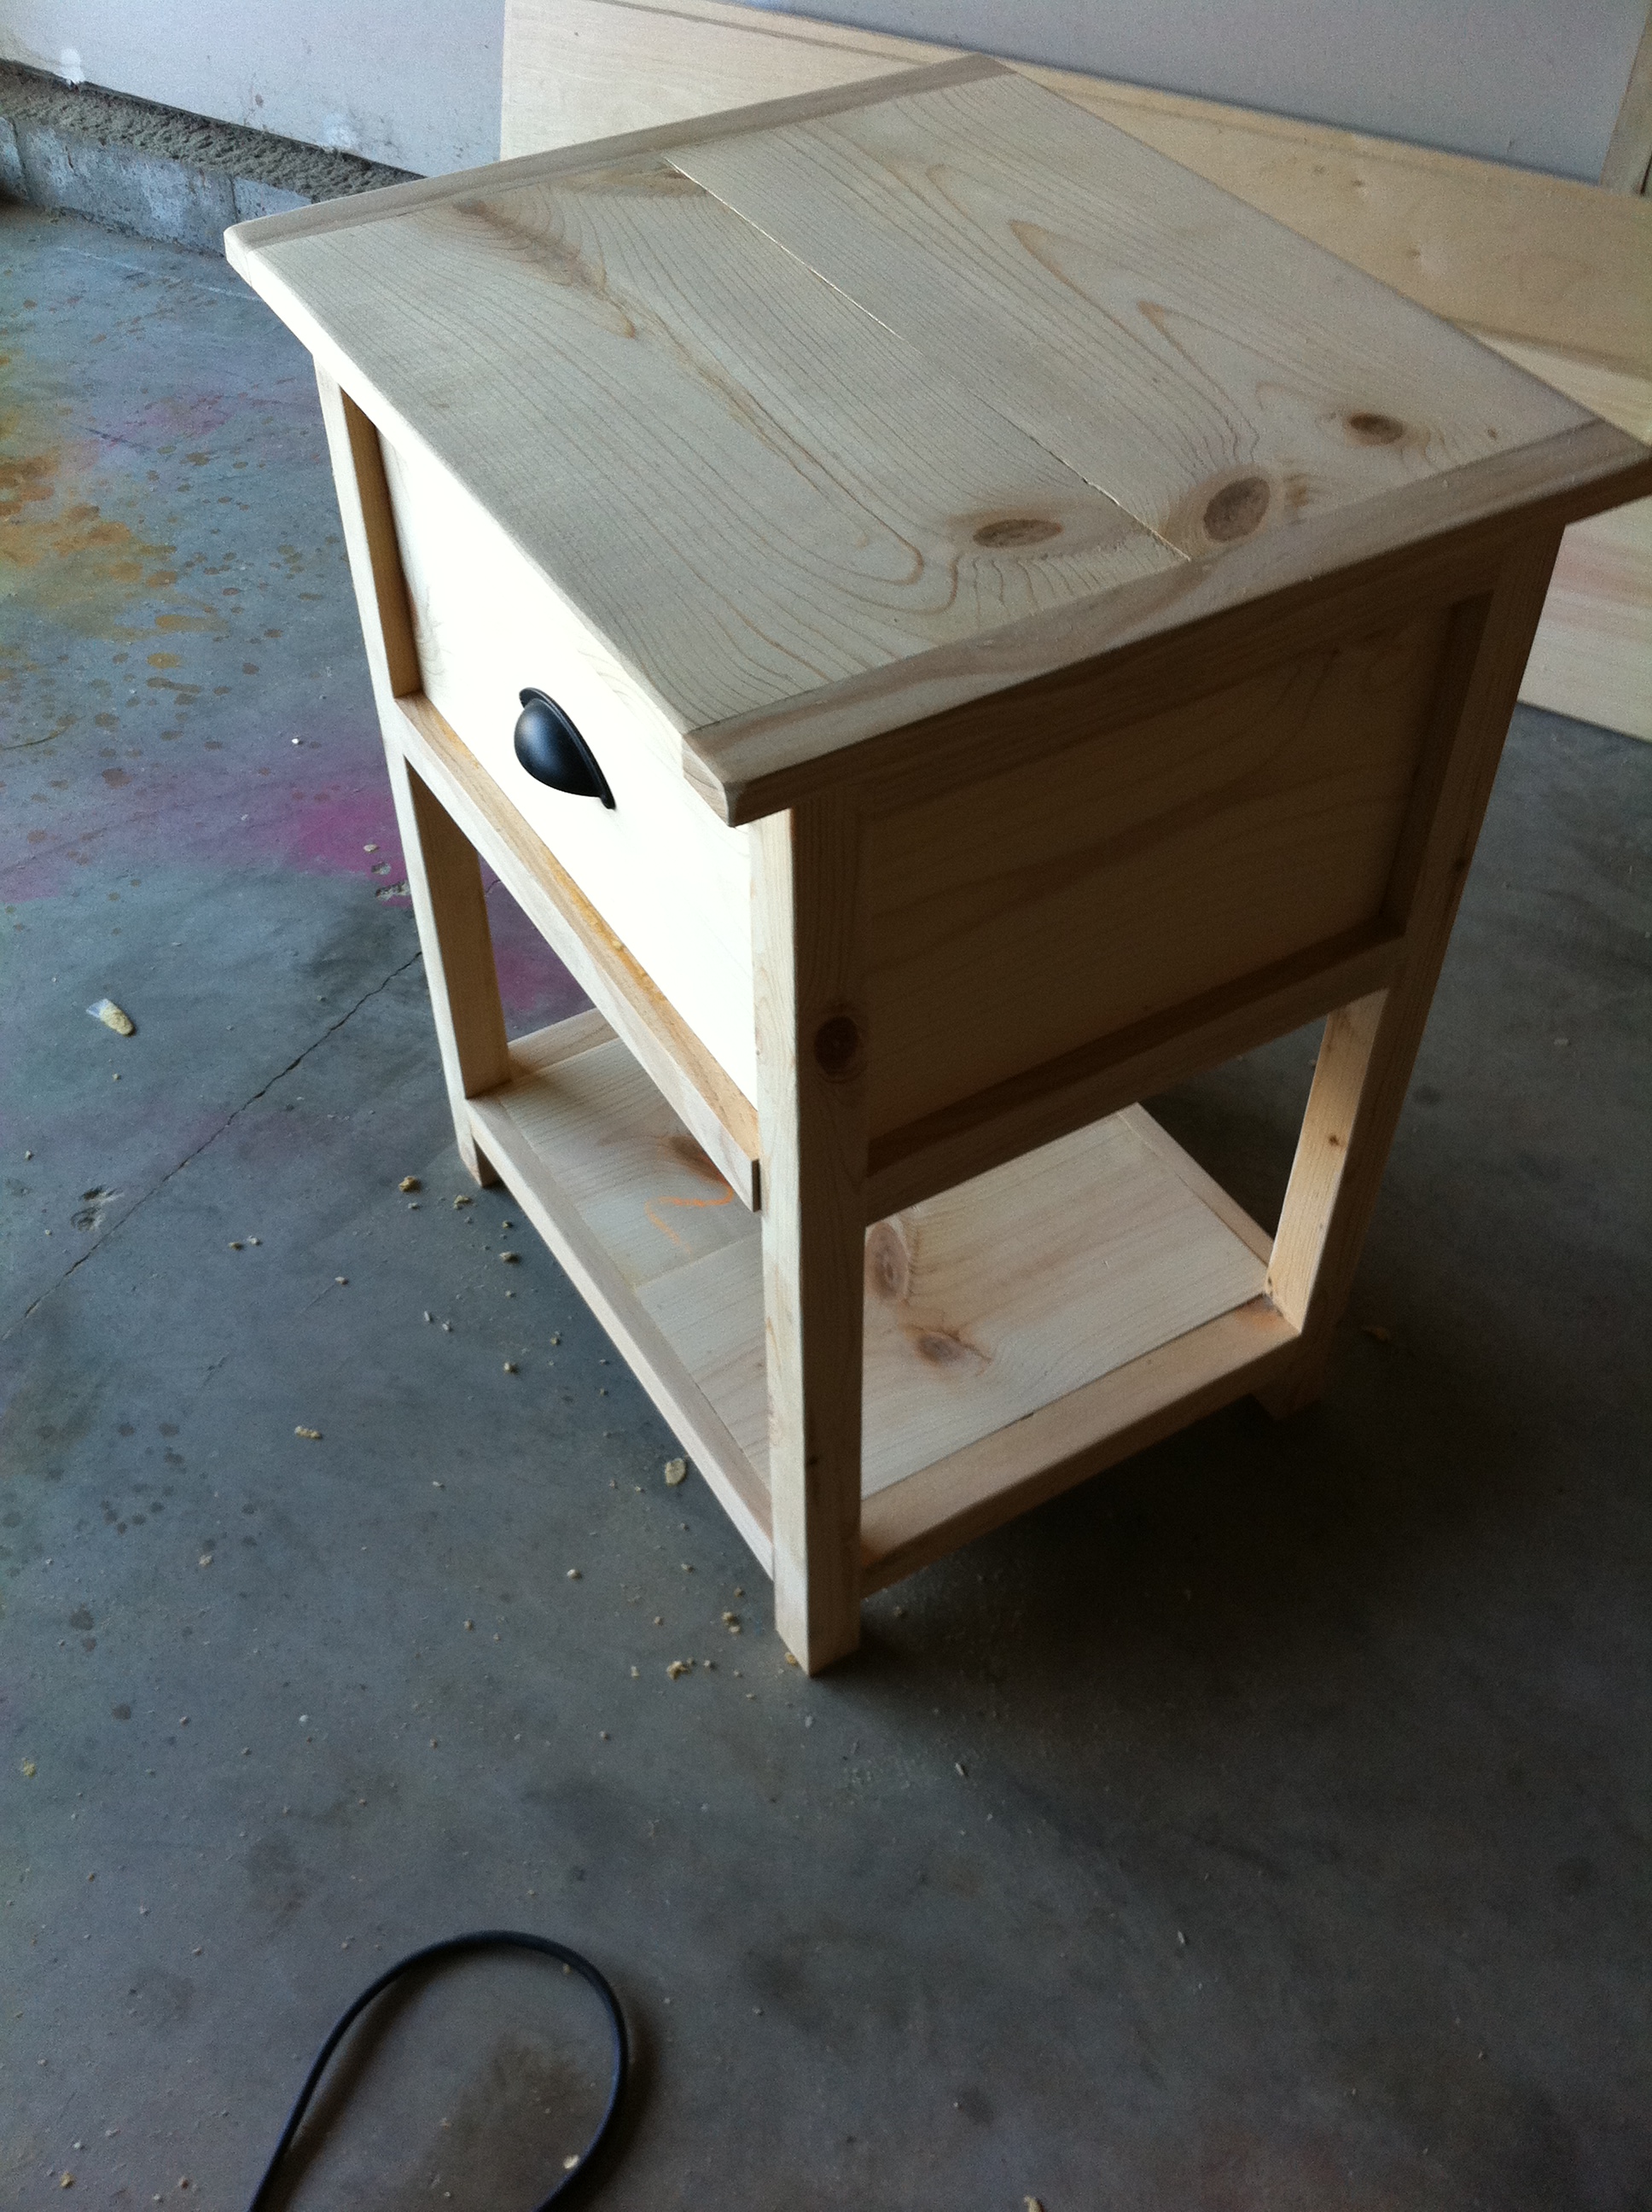
One was the casters. Instead of the plate casters I installed threaded stem casters with a T-nut in the bottom of the legs. The casters are adjustable so it's easy to keep level. The second mod was the drawers. I initially built the drawer with wood rails, but was not happy with the drawer falling to floor, if you pulled it out to far. Living in a humid climate, I could see the original rails swelling and then the drawer would be hard to operate. My solution was to add metal rolling sliders. I had to remove the 2 x 2's on inner cabinet and the 1 x 2s on the drawer itself. I added 1 x 2s on the inner cabinet, mounted 12" metal sliders ($5)) on the 1 x 2s and screwed the other half of slider on bottom of drawer. It may require a small shim behind sliders to make it fit perfect though. I provided photos of this mod. My drawer works perfect now. There is no dragging, no falling out and no wear.

Estimated Cost
$87
Estimated Time Investment
Weekend Project (10-20 Hours)
Finish Used
Stain: Minwax special walnut
Distressed finished:
Paint; Behr Ultra, Cream color, lightly sanded with spec. walnut stain over paint then 3 polyurethane coats. Top had 4 light coats of poly coat.
Recommended Skill Level
Intermediate

Wood Deck Chairs

This was my first solo build project and my first time using a power saw. I was terrified but determined because I've been wanting to make these chairs for years. After failing to convince my husband to make them for me, I decided to make them myself and I am so glad that I did. I am so proud!

I fell in love with the fabric first (Premier Prints' Suzani Chocolate and a striped fabric called Veranda Chocolate for the bottom) and then picked a stain to match. I chose to reinforce the sling by sandwiching the outer fabric with a layer of heavy duck fabric. I also made pillows, which protect your head from that upper wood support.

Also, I ordered some special connecting bolts and nuts made by Rockler that someone else mentioned in their brag post. Unlike the hardware mentioned in the original plan, these bolts are flush with the frame on both the inside and out so the chairs can fold completely flat. Here are the links to them on Amazon:

http://www.amazon.com/Statuary-Bronze-Connector-Bolts-8-Pack/dp/B001DT3…
http://www.amazon.com/Cap-Nuts-Connector-Bolts-pack/dp/B001DT3G9O/ref=p…

The inner frame did need slightly larger holes (3/8 inch, I believe) to accommodate the cap nuts.

Estimated Cost
$100 - I spent a little bit more on wood than others because I bought pre-sanded stock. I also ordered extra fabric to make pillows and chose two different fabrics to make the design reversible. This project can definitely be done more economically if you already have some of the materials and if you find the fabric on sale.
Estimated Time Investment
Weekend Project (10-20 Hours)
Finish Used
Cabot Premium Wood Finish Stain & Sealer (Espresso) - I originally tried a few different stains (one from Minwax and one from Valspar) that we already had but I didn't like the fact that I would have to do multiple coats to get the color opacity that I wanted and then I'd have to do multiple coats of sealer. I'm too impatient for all that so I found an all-in-one product that worked beautifully. I will definitely use this product again!
Recommended Skill Level
Beginner

Comments

Joni

Fri, 05/22/2015 - 09:43

These are just beautiful. Nice job! Thanks for such a nice write-up with all the additional hardware information.

Modified rustic table and benches

Submitted by dkarinen on Sun, 06/16/2013 - 21:09

We built this table for my brother and new wife's wedding present. We modified it to use as an outdoor dining set. Instead of using the 1x10 for the tabletop we used 2x6's and for the legs we used 4x4's. We attached the top boards with a Camo fastening system we used last year on our deck (works great to conceal the screws). I stained the frame in Behr Cordovan Brown and the top boards in Behr Cedar Naturaltone. It was our first attempt at building a table and I think it turned out great, only problem was giving it away!

Built from Plan(s)
Estimated Cost
$300
Estimated Time Investment
Week Long Project (20 Hours or More)
Finish Used
Behr cordovan brown stain and Behr natural cedartone
Recommended Skill Level
Beginner

Comments

storchinsky

Mon, 06/17/2013 - 10:57

Very nice! I'd been considering this plan for my outdoor table, but my husband liked the modern farm table better. Same idea--I am leaving gaps to allow the water to drain. Love the two-tone finish! It's amazing what you can do with plain old 2 x 6s!

Dollhouse Bookcase

Submitted by mnewton on Mon, 04/11/2011 - 12:52

This was my first build. I was conviced to do this once I saw the Pottery Barn price tag. The plans were so easy to follow.

Built from Plan(s)
Estimated Time Investment
Afternoon Project (3-6 Hours)
Recommended Skill Level
Starter Project

Step Stool

Submitted by cjlaw on Mon, 06/22/2015 - 11:55

I was able to make this with some leftover wood from other projects.

Built from Plan(s)
Estimated Time Investment
An Hour or Two (0-2 Hours)
Recommended Skill Level
Beginner

Not so "Rhyan" Nightstands

Submitted by Kimbers on Sun, 05/08/2011 - 19:05

I used the Rhyan end table plan (with a few alterations) to make my nightstands. I changed the dimensions so mine turned out to be 20”D, 25”W, 27”H, I extended the side and back panels all the way to the top to close in the shelf and I made the bottom drawer larger. I decided to use under mount drawer slides but I think I will try out the side mount slides in the future though.

I wanted them to match the headboard and bench that I made for my bed so I added the same molding that I used on those pieces to finish it off.

I pre cut every piece for the main body of the nightstand and predrilled all of the Kreg holes which made it a really quick piece to put together! I purchased the Mini Kreg jig for this project and am so glad I did. Totally worth the money!

Built from Plan(s)
Estimated Cost
About $80 For 2 Nightstands
Estimated Time Investment
Weekend Project (10-20 Hours)
Finish Used
I painted with Rust-oleum painters touch semi gloss white and then sprayed a few coats of polyacrylic on the top.
Recommended Skill Level
Beginner

Greenhouse

Submitted by Anonymous (not verified) on Sun, 01/02/2022 - 12:30

Built the greenhouse from Ana Whites plan
She did the plan really well..

Built from Plan(s)

Comments

DIY POTTERY BARN "ADDISON" STYLE HEADBOARD

It took us about 2 days to cut, assemble, and paint.  


http://www.whisperingwhims.com/2015/03/diy-pottery-barn-addison-style-headboard/

Built from Plan(s)
Estimated Cost
$150
Estimated Time Investment
Weekend Project (10-20 Hours)
Recommended Skill Level
Beginner

Comments

Modified outdoor truss beam table

Submitted by Billyjwest on Tue, 04/03/2018 - 18:43

I made this one three inches taller and two feet longer and decided to miter the top. I also used a LOT of glue and blue Craig screws.

Built from Plan(s)
Estimated Cost
120
Estimated Time Investment
Afternoon Project (3-6 Hours)
Finish Used
Minwax Jacobean for 5 minutes and gloss spar. I filled the plank so It doesn’t hold water.
Recommended Skill Level
Beginner

Guitar Display Case

Hi fellow builders!

It's Jen from The House of Wood! Today I’m sharing this beautiful Guitar Display Case. I've been wanting a place to display my guitar, and this definitely fits the bill, with a glass (acrylic, actually) panel door, motion-sensored battery-powered LED lighting, and gorgeous rosewood guitar hanger. And I designed it so that you can build it out of half a sheet of plywood! Get the build plans for my Guitar Display Case at JenWoodhouse.com.

Estimated Cost
$25
Estimated Time Investment
Day Project (6-9 Hours)
Finish Used
Golden oak
Recommended Skill Level
Intermediate

Hexagon Picnic Table

Very finicky to assemble, but love the finished product!

Built from Plan(s)
Estimated Time Investment
Day Project (6-9 Hours)
Finish Used
Haven't stained it yet, will add photos when stained.
Recommended Skill Level
Intermediate

Copy Cat Bedside Table

I needed new bedside tables to replace mine that were falling apart. I love the whole Stratton line at PB. I wanted to make something similar, but a bit more sturdy.

So, I made this table with a much more solid bottom shelf and a deep drawer with a full face to mimic the sides and the back panels.

Estimated Cost
Wood $20-$25, Drawer Slides $7, Drawer Handle $2
Estimated Time Investment
Afternoon Project (3-6 Hours)
Finish Used
I haven't determined yet.
Recommended Skill Level
Beginner

Comments