Community Brag Posts


Storage Daybed
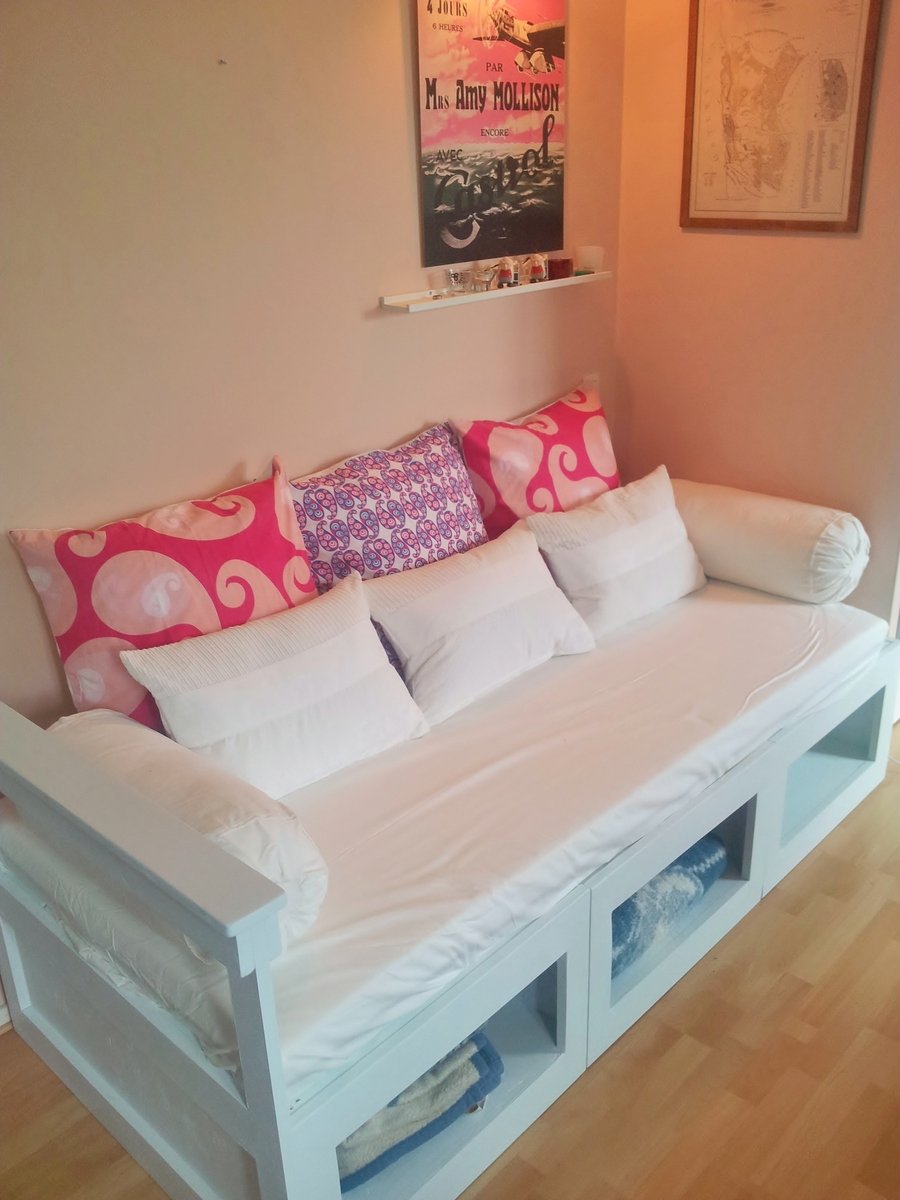
This is the 3 box storage daybed, as you can see I added an armrest on one end as it sits in a corner.
Tips for building this project: Buy a decent circular saw, I used a cheap one and really regretted it. Square your timber, I ended up squaring my timber using a sander, which wasn't as easy as it sounds. Check you measurements, the bottom of one of my boxes was a little short because I didn't double check the measurements and I ended up having to fix it with an extra piece of timber. 2 or 3 saw horses are a real help and lots of clamps.
I used the cutout outline from the link below but had to convert it all to metric since I live in Sweden, also a standard single mattress here isn't as wide but longer then the one used in the linked project. I didn't take this into account and ended up having to buy an extra piece of plywood.
http://ana-white.com/2009/12/plan-stratton-daybed-as-request-by-you.html
I got the single mattress and the pillows from IKEA.
This was a lot of fun and I look forward to spending many hours relaxing on my new daybed.
Built from Plan(s)
Estimated Time Investment
Week Long Project (20 Hours or More)
Finish Used
white paint
Recommended Skill Level
Beginner
Comments
Thu, 08/09/2012 - 10:48
I Feel Your Pain
Nice job on the daybed, I like that you got through all your "dilemmas".
Your saw's bevel function (hopefully it has it) might be nicer than mine but you can try to adjust it.
I have a $50 dollar skil saw and my only complaint is how difficult it is to set the base plate 90 degrees to the blade. I even take care to set the circular saw between two 2x4 when not in use so that setting it on the ground doesn't change the angle of the foot plate to blade. I can cut 90 degrees with a speed square as a guide, but I can't adjust the saw right.
I will be starting assembly of my first furniture project with the wood I cut two days ago. I will see how the pieces go together.
Best of luck on your next project!

Sat, 08/11/2012 - 06:27
Thanks, I'm pretty pleased
Thanks, I'm pretty pleased with it. Yes that was one of my problems as well, trying to get the base plate set at 90, I found that if I leaned on it too much it flexed a bit which isn't good. Also by the end I had a pretty blunt blade or I was getting pinching or something thing because the plywood had some shocking edges with splintering. What I would really like is a proper saw table, but for now that's just a dream. Good luck on your project.
Wed, 08/21/2013 - 10:50
Armrest
Hi there! I was hoping that someone on here had added the armrest! Would you be willing to post a pic of the end of the bed so that I can see how you configured it? Im goint to be starting this project soon for my daughter, and need to strategize some armrest ideas for hers.
Thanks so much!!
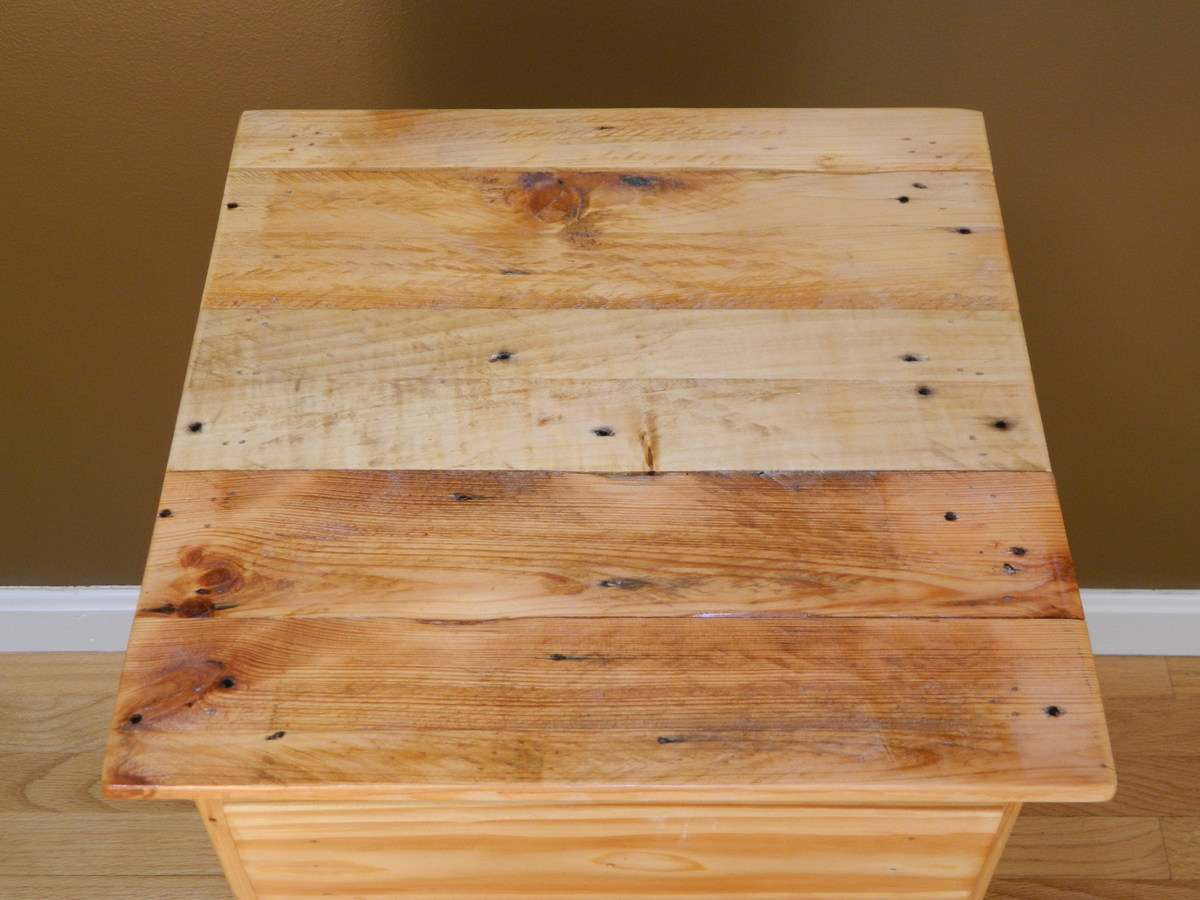
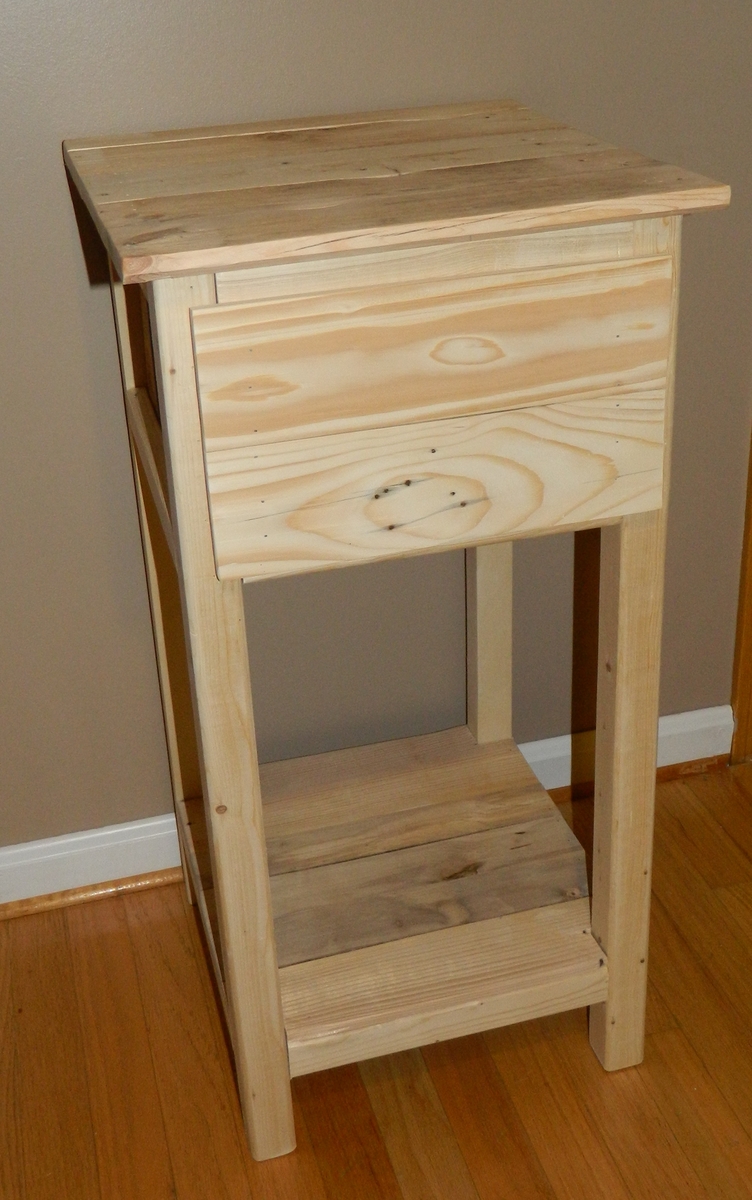
Pallet Nightstand
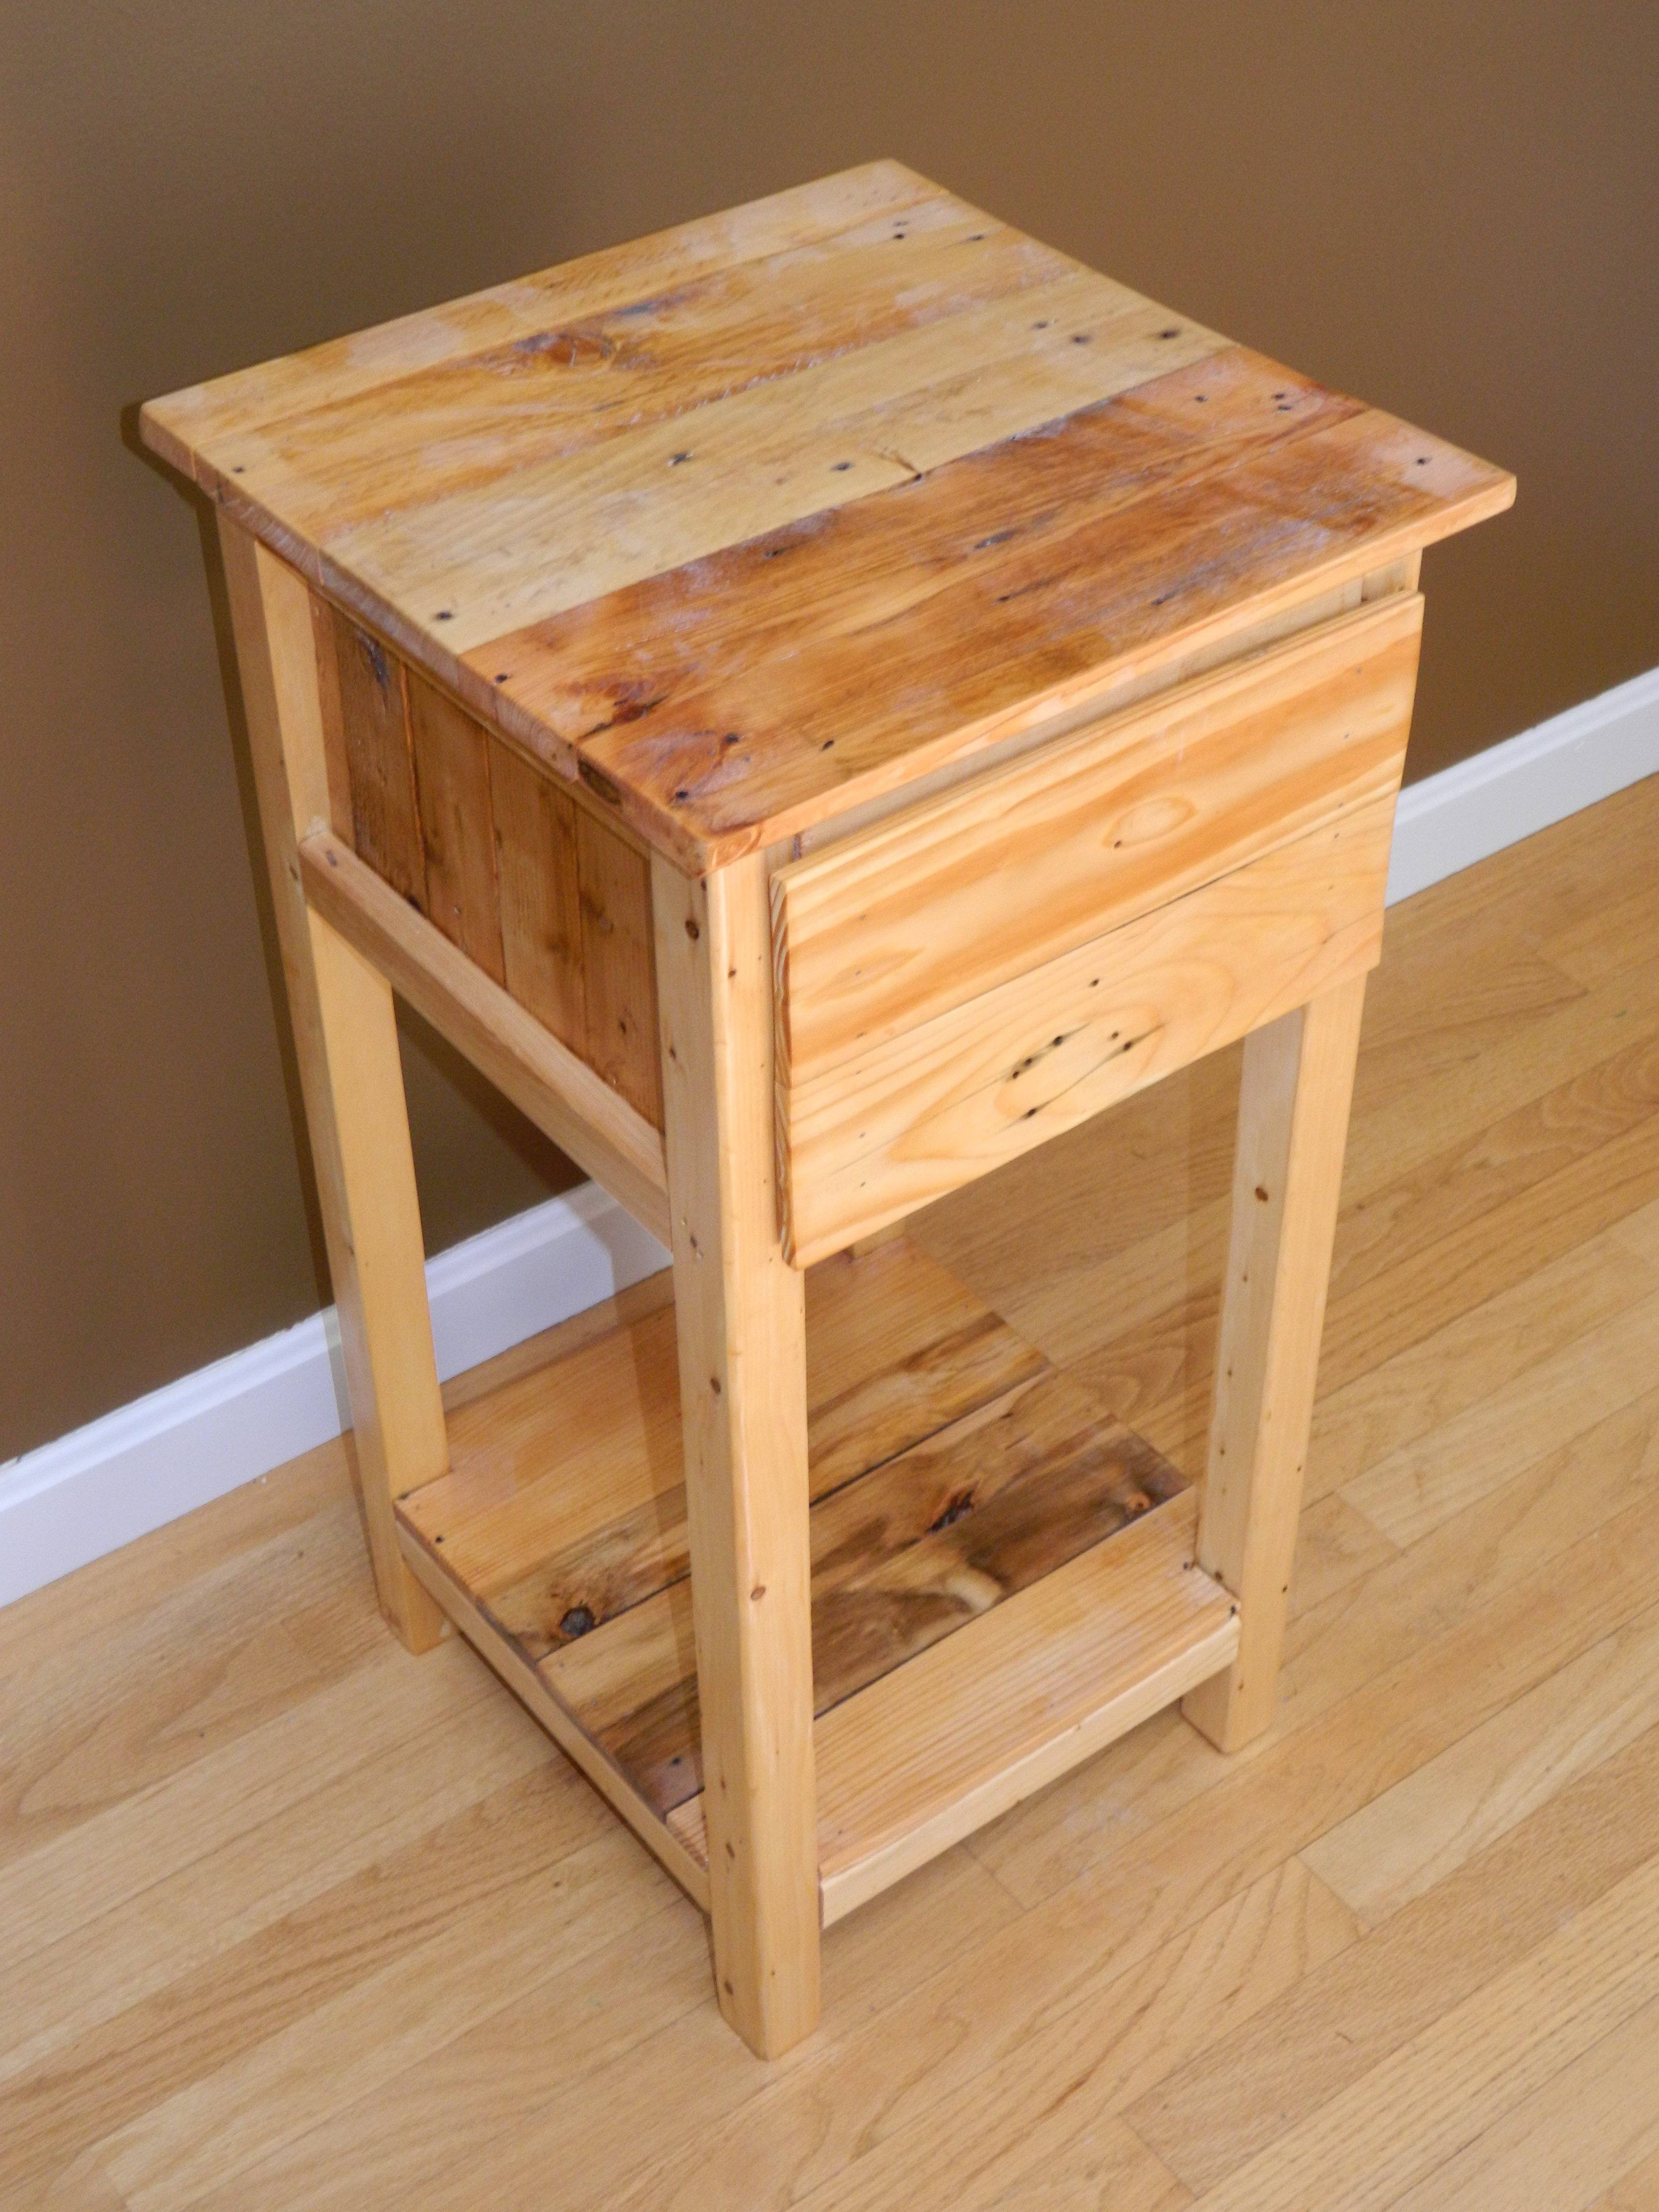
I used pallet wood to create a completely different look for this project. The frame and some of the trim pieces stayed the same, but there were a few edits made to support the pallet top, sides, and shelf. In addition, the drawer design changed a little bit to allow a false front instead of the inset one from the original plan.
More info in the link below!

Built from Plan(s)
Estimated Cost
$20
Estimated Time Investment
Day Project (6-9 Hours)
Finish Used
Minwax Natural
Recommended Skill Level
Beginner
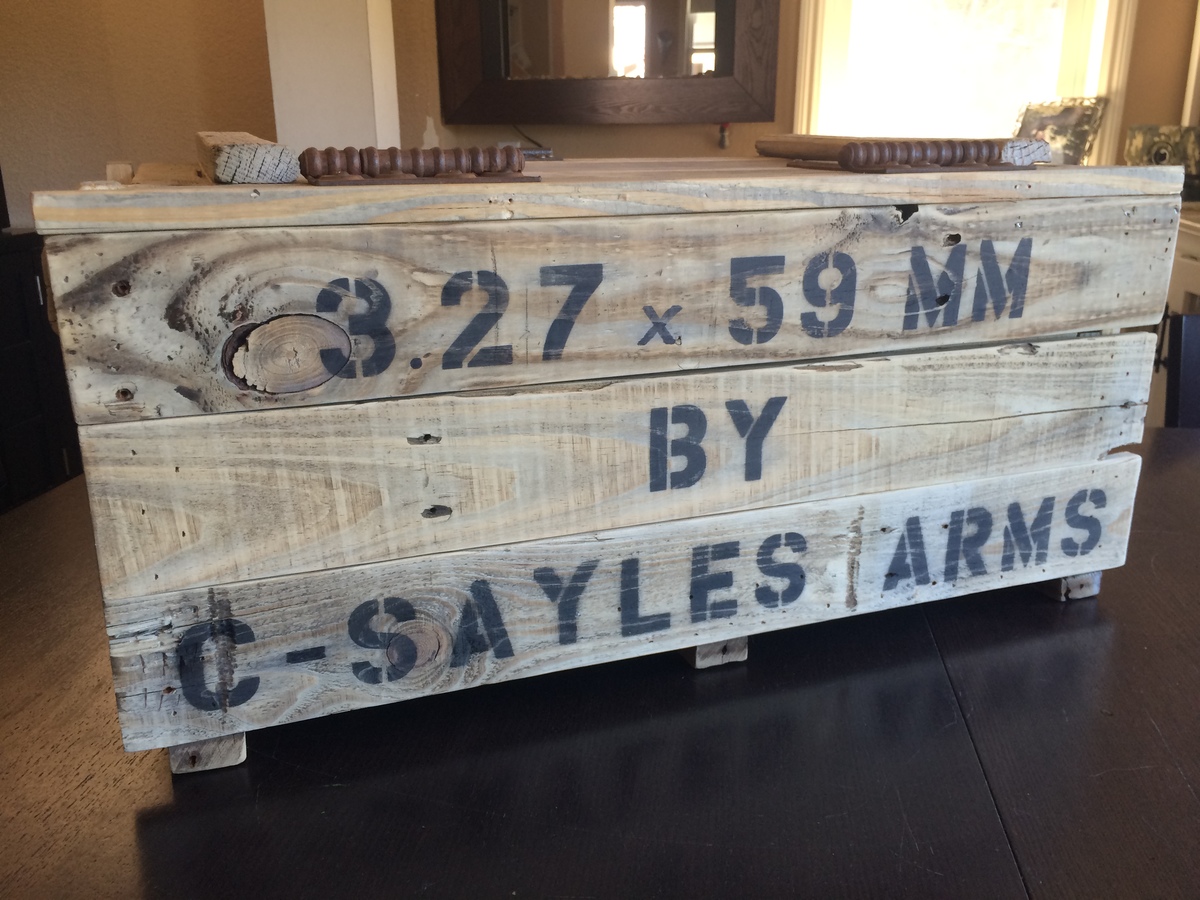
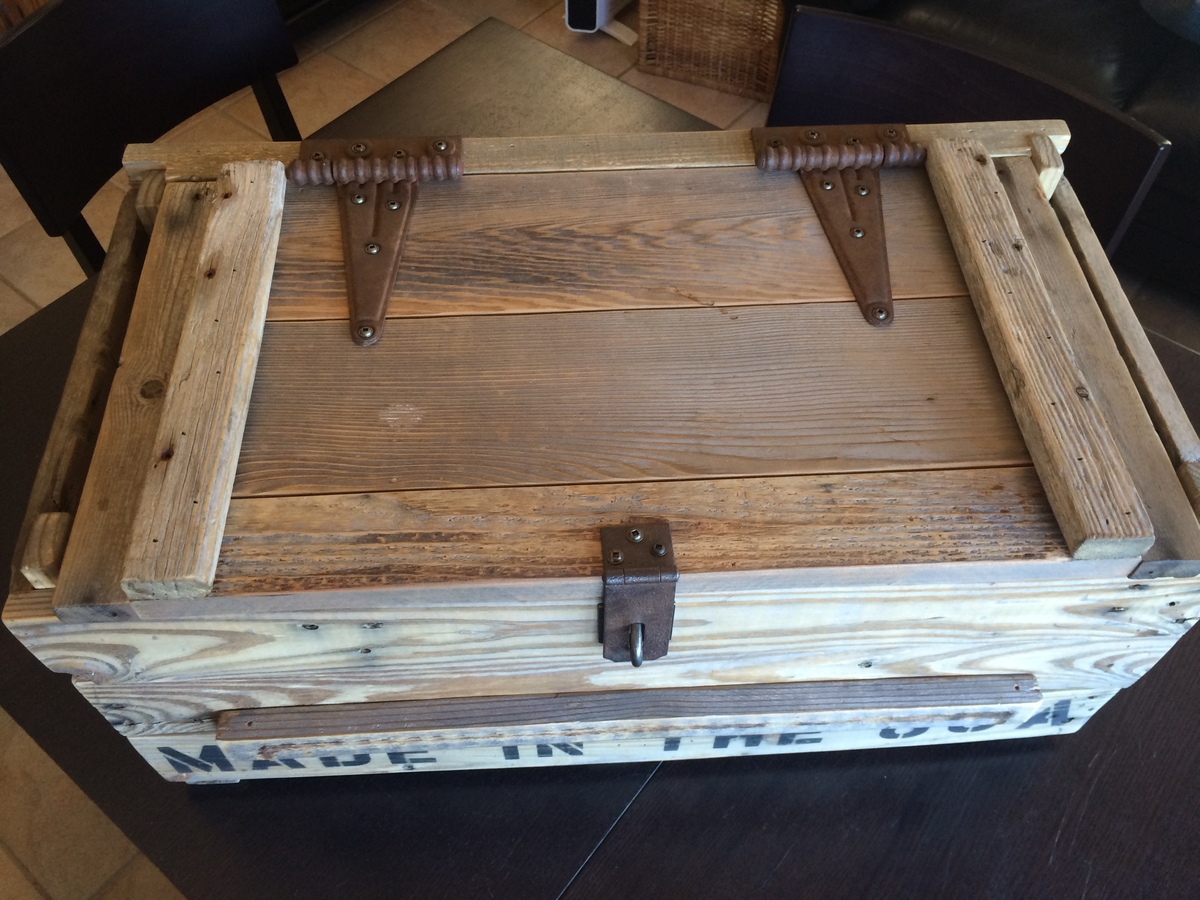
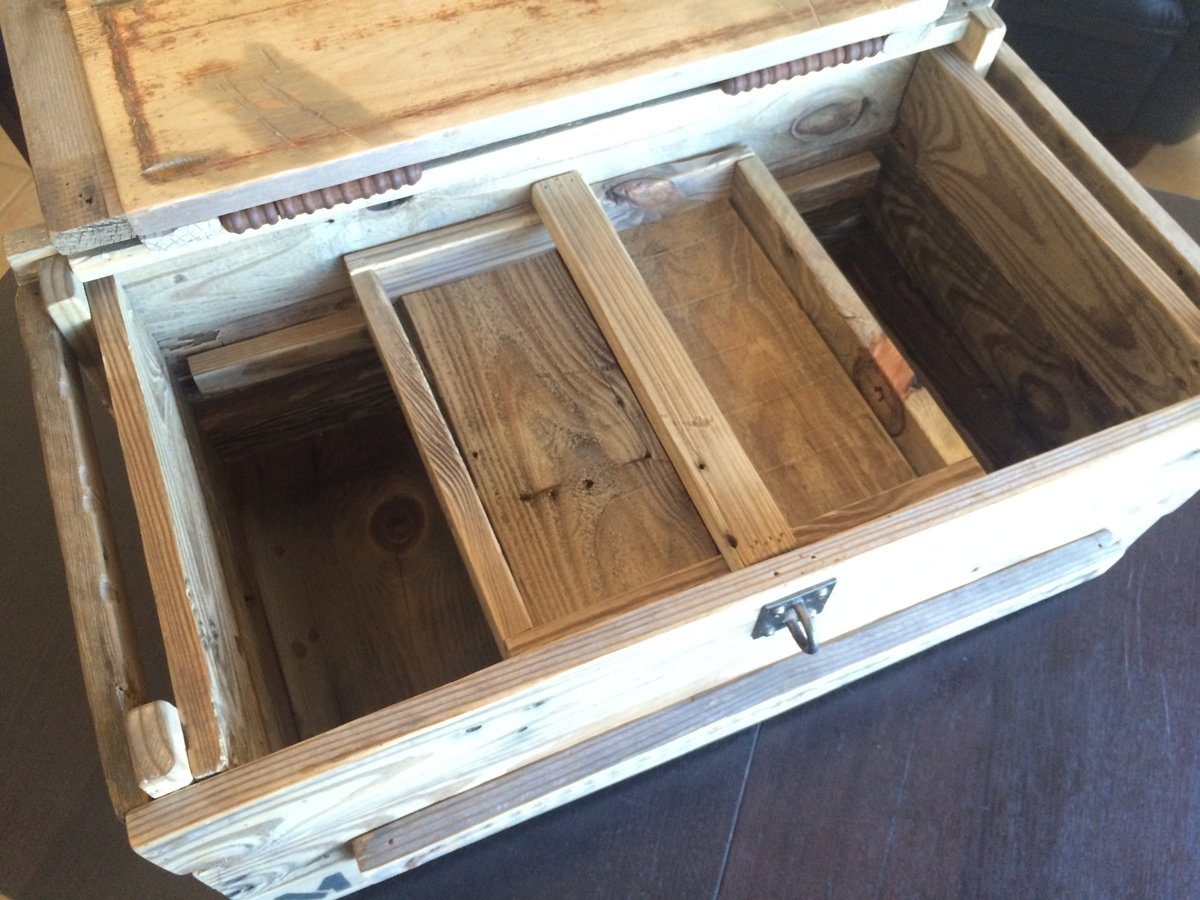
Personalized vintage ammo crate

Created this as a gift for my uncle. I recycled an old pallet for the material. I used his birth date to create the ammunition shell specs and his name as the manufacturing company. I found the vintage hardware on eBay and added a sliding shelf inside. Lettering was created with stensils and spray paint. I distressed the lettering to match the vintage feel of the piece.

Estimated Time Investment
Weekend Project (10-20 Hours)
Recommended Skill Level
Beginner
Comments
Sun, 01/12/2020 - 15:33
Ammo crate
Hiw can i see instructions or dimensions for this crate . id like to try it
Farmhouse Potting Bench
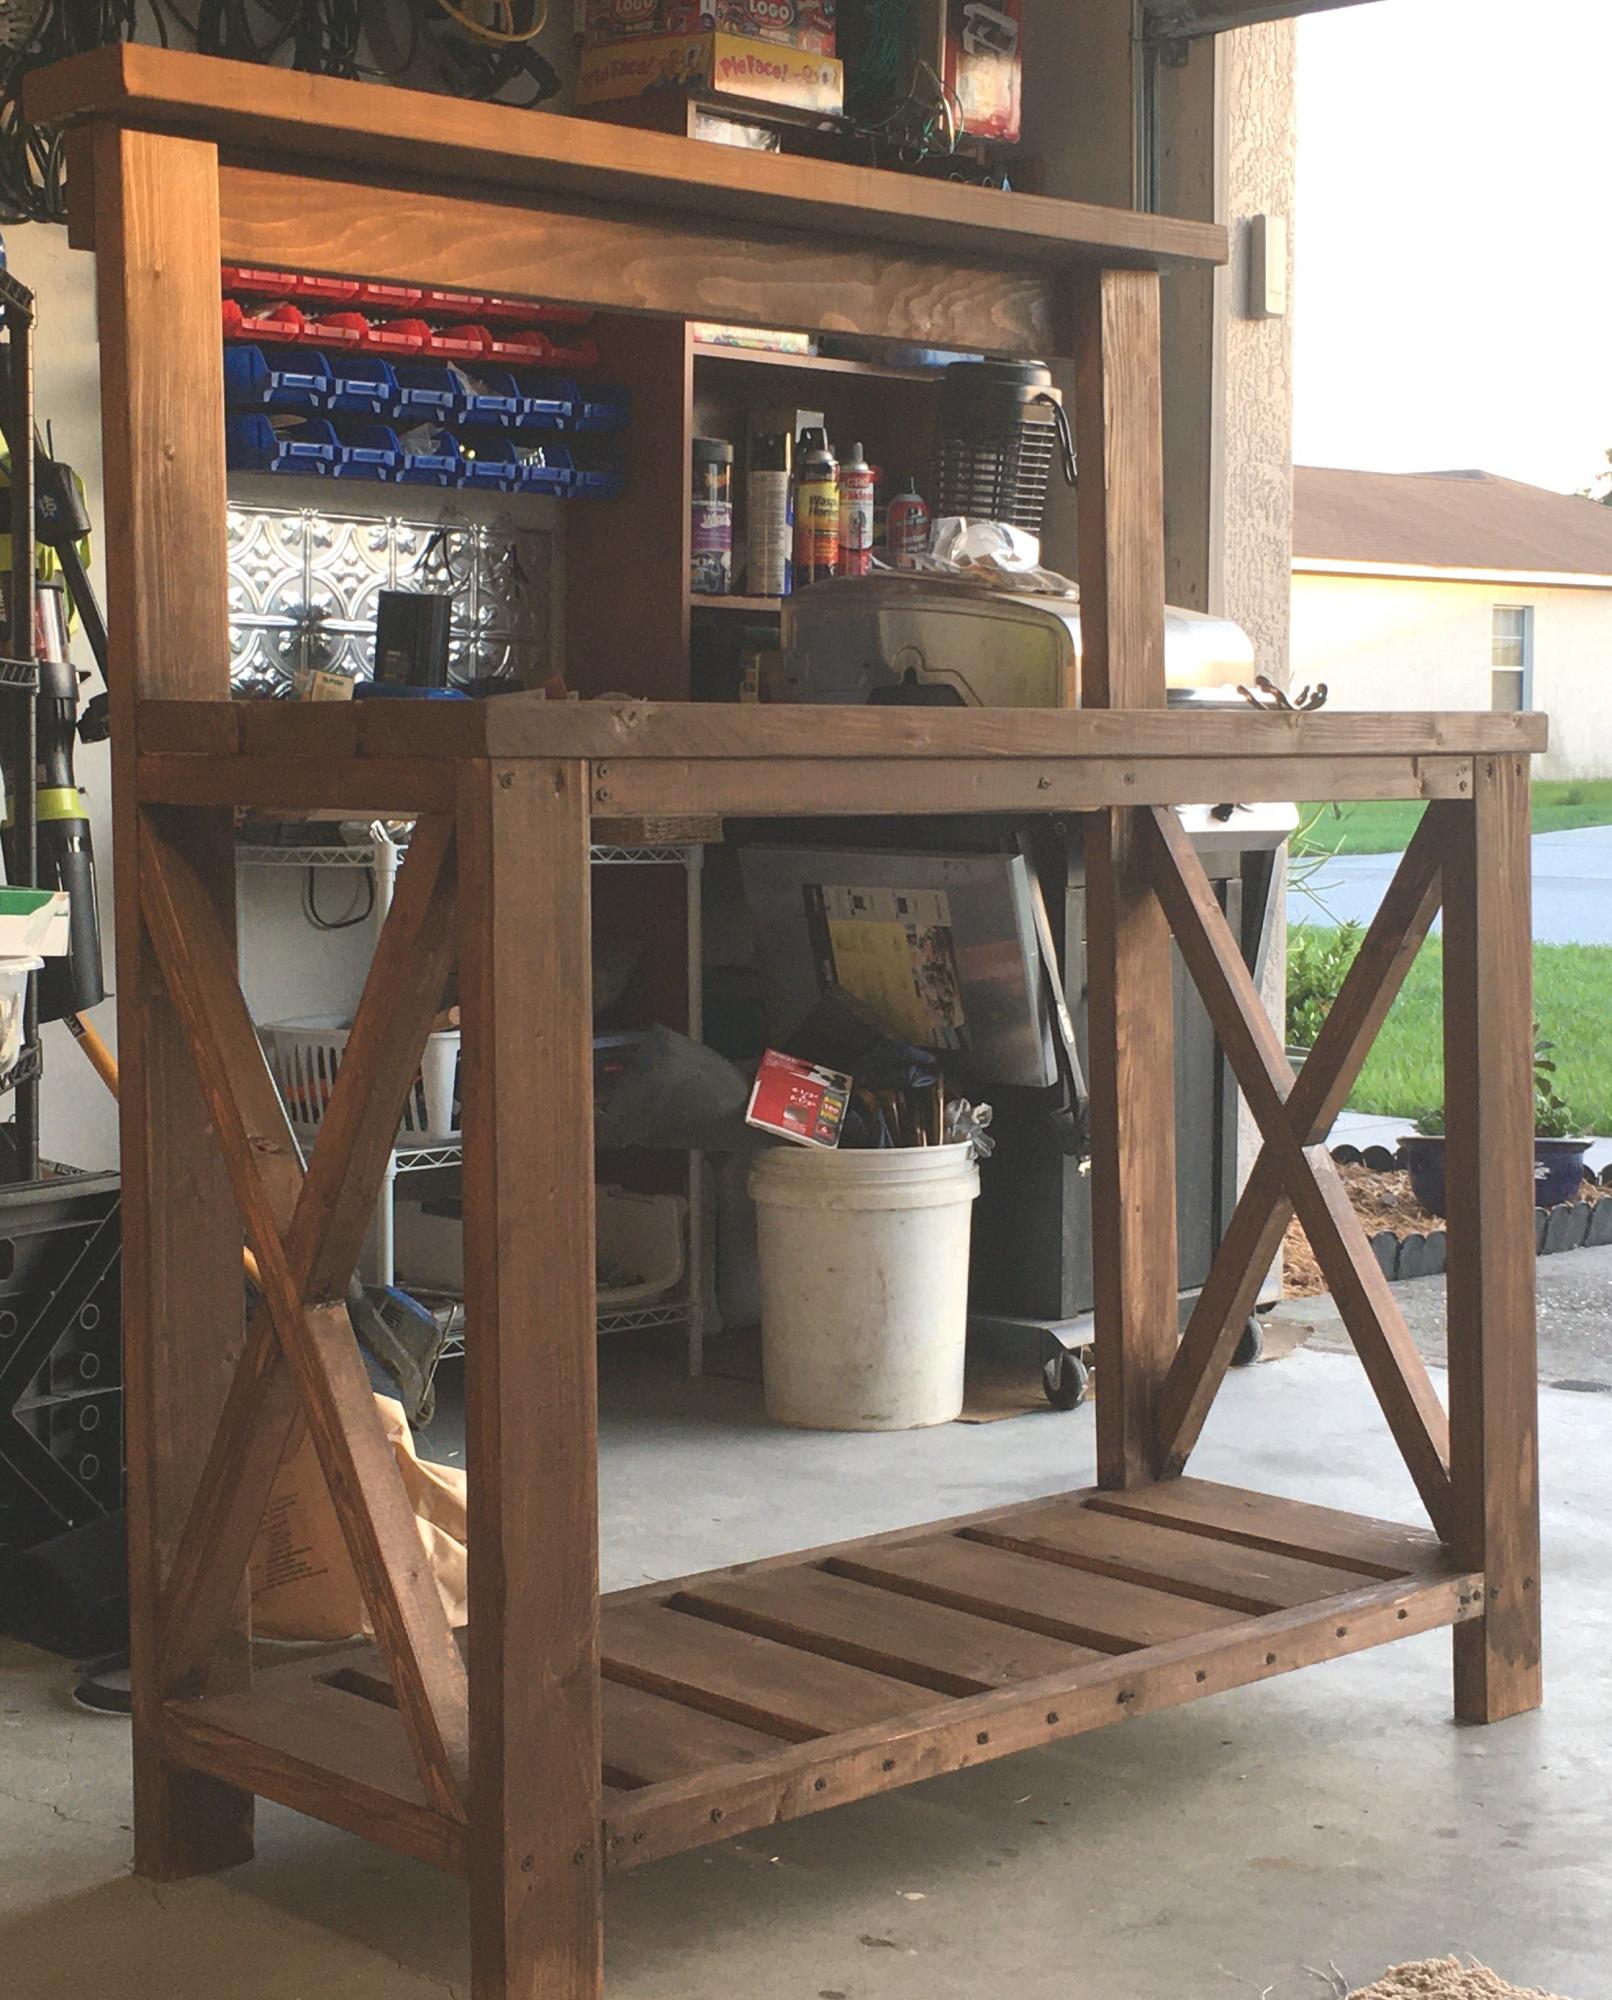
This was my first woodworking project and I absolutely love it !!
Built from Plan(s)
Estimated Cost
50
Estimated Time Investment
Weekend Project (10-20 Hours)
Recommended Skill Level
Intermediate
Comments
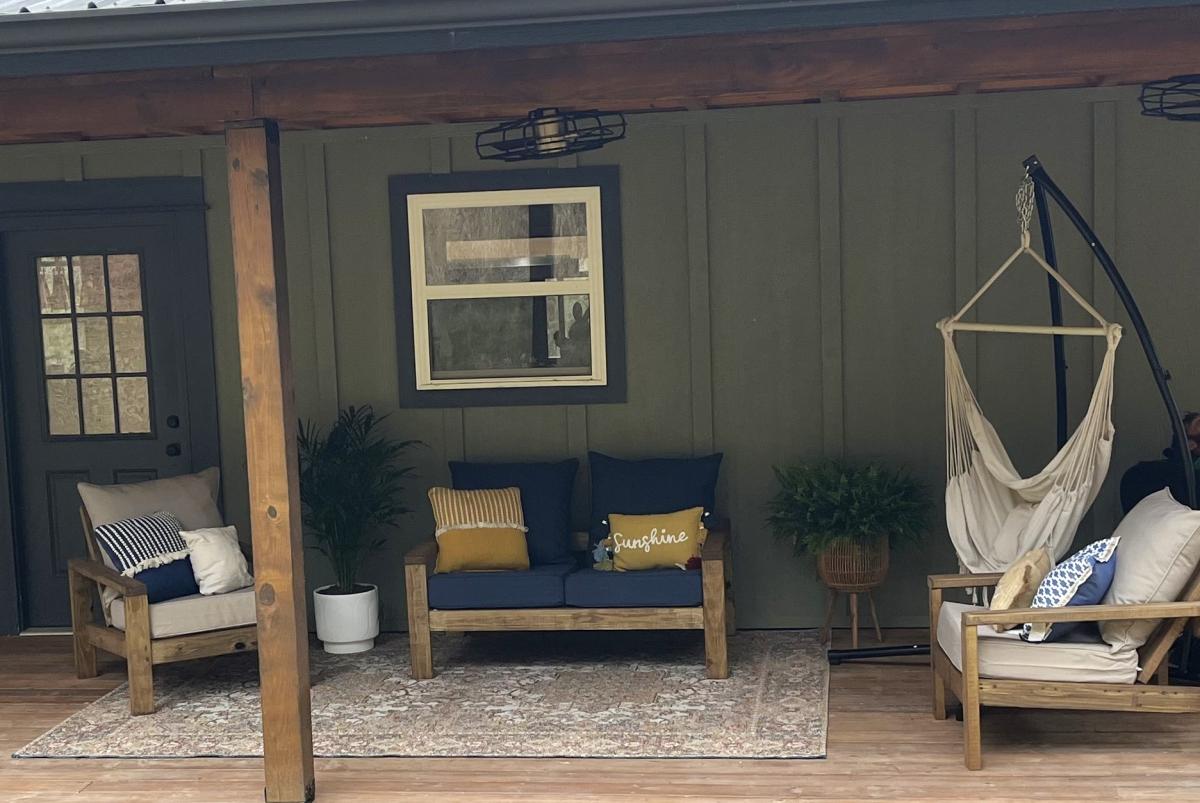
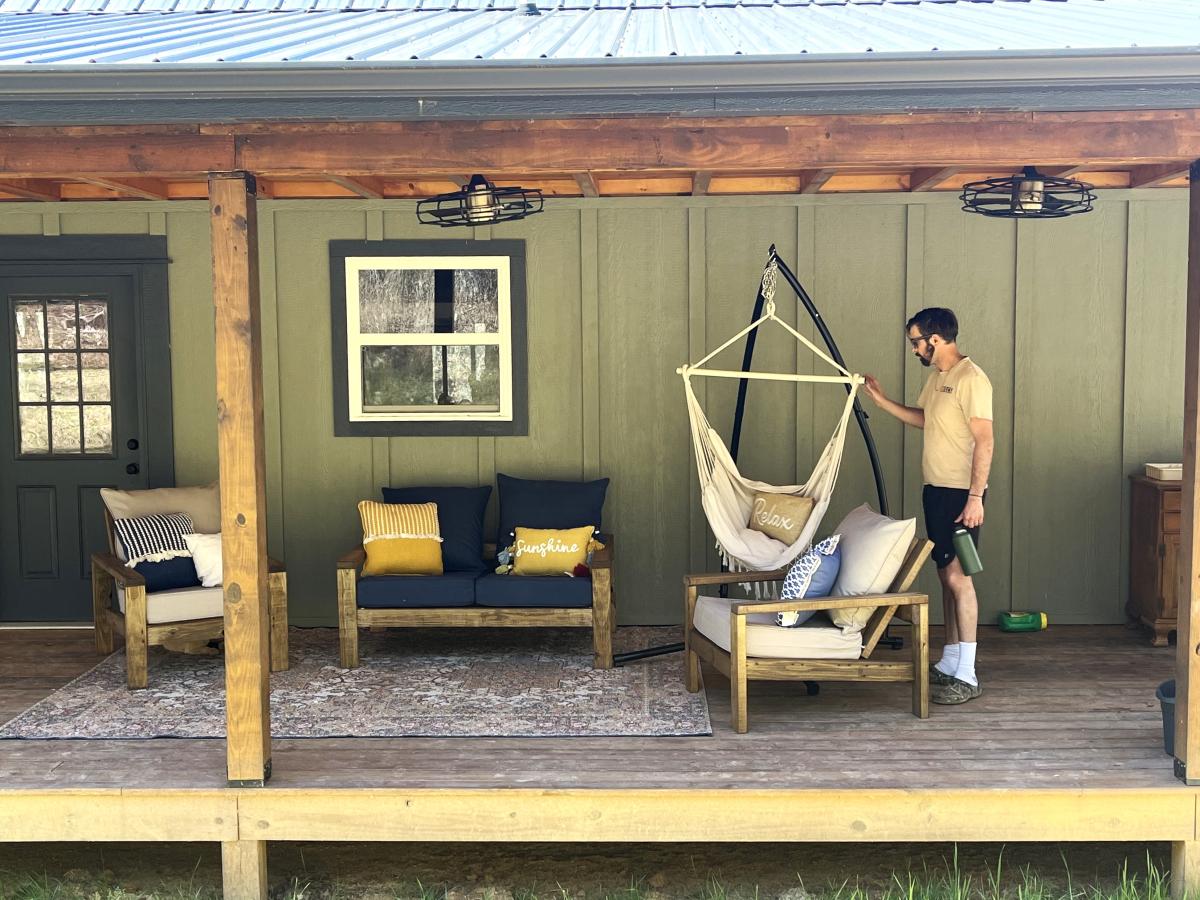
DIY Outdoor Wood Furniture
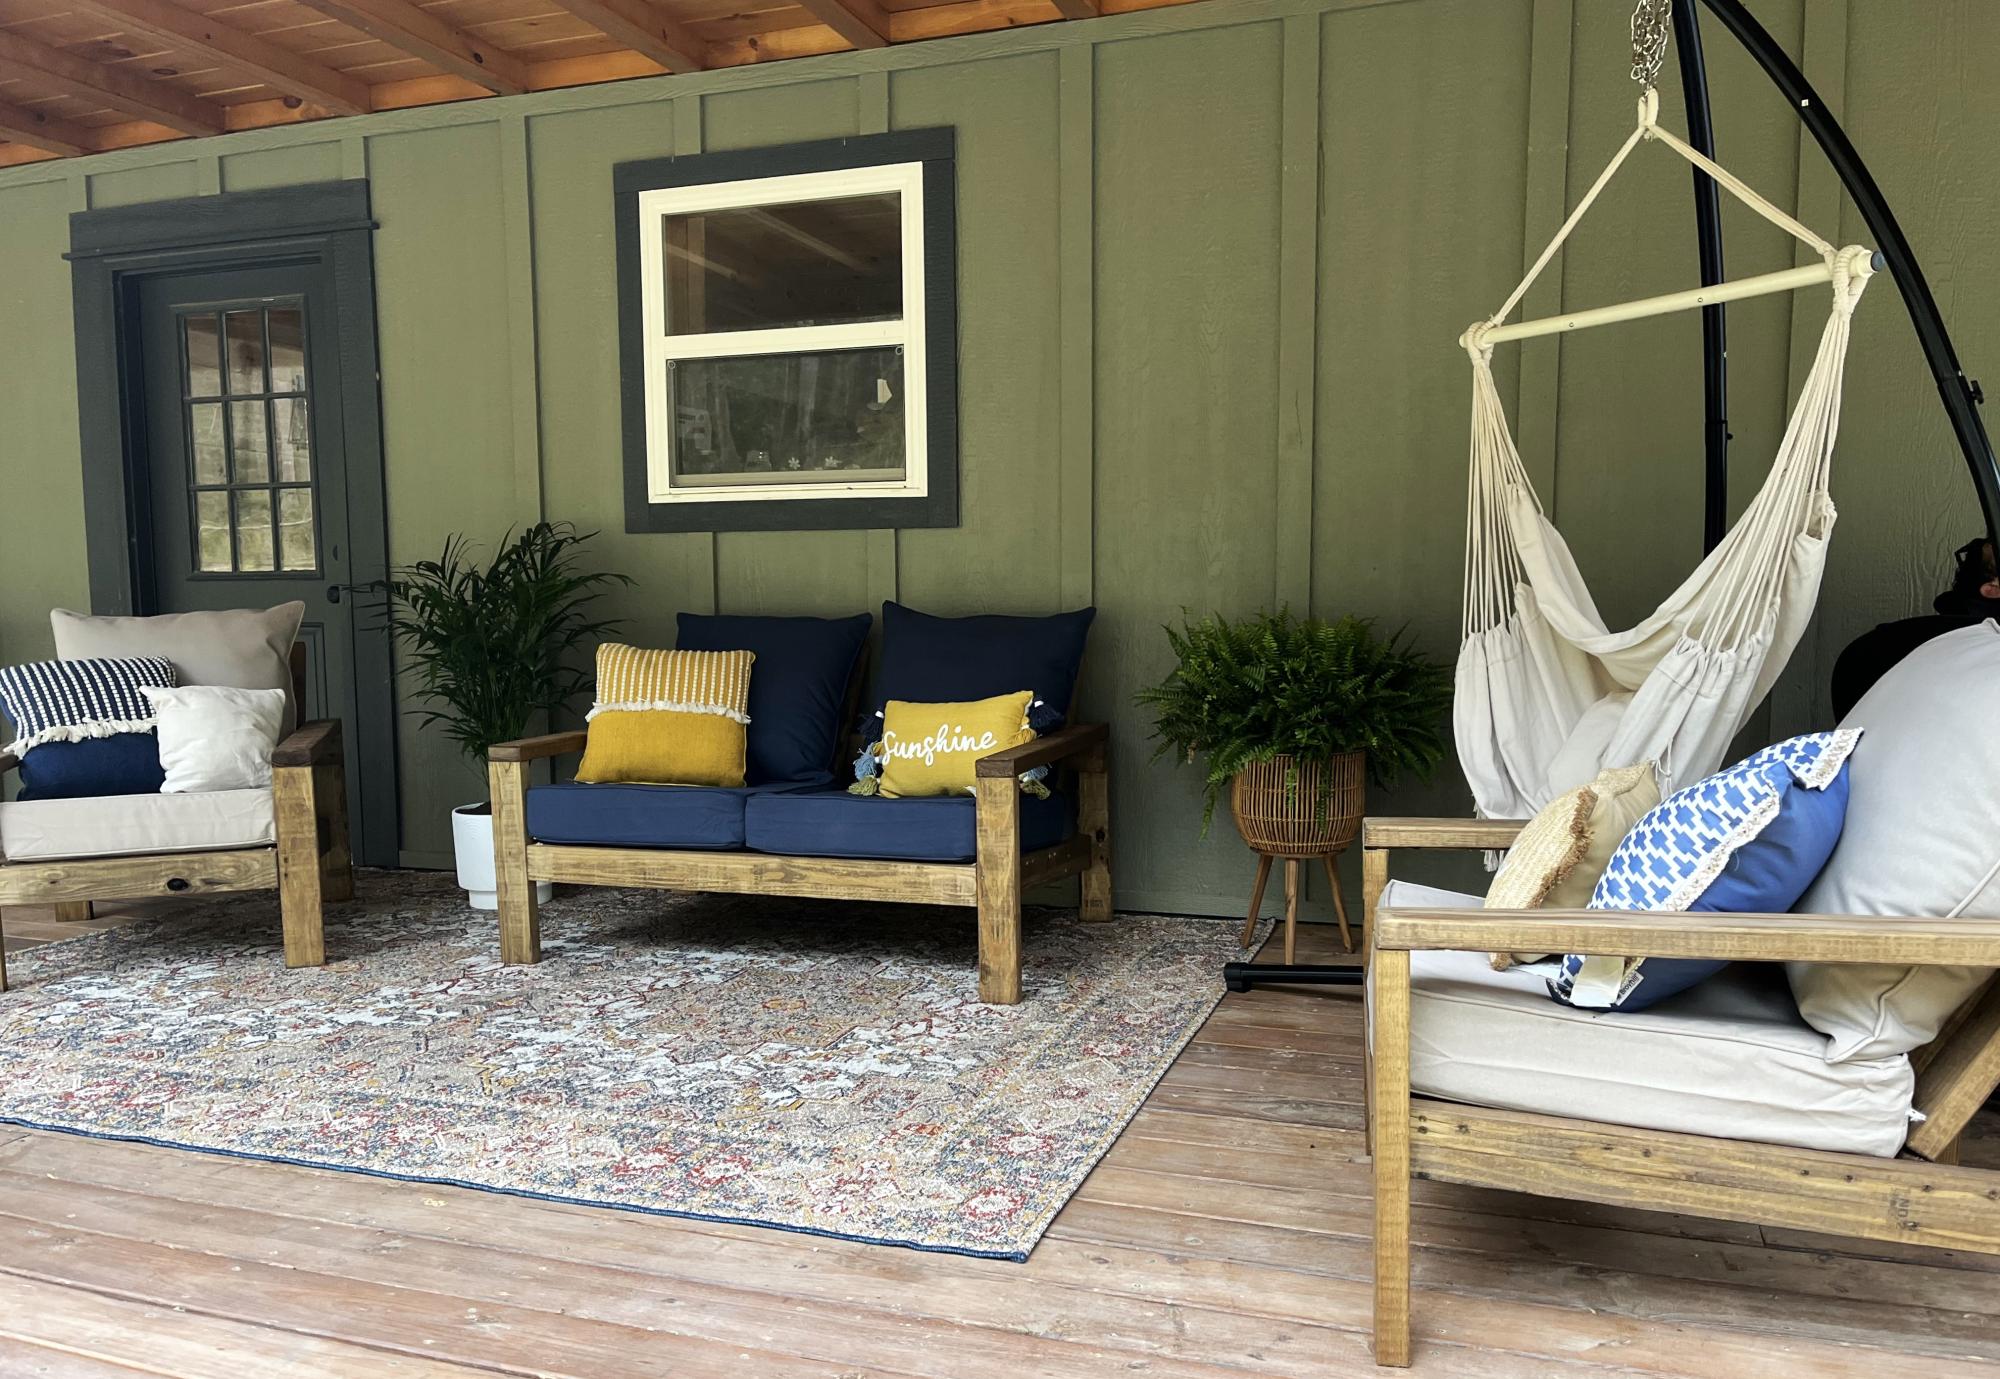
My daughter wanted patio furniture but did not want to spend a ton of money. The total project cost around $400. We used treated 2x4’s for the frame. We found $45 cushion sets, the rug and accessory pillows at Big Lots. I love we used different colors for the chair s and love seat.
Jennifer Poarch
Built from Plan(s)
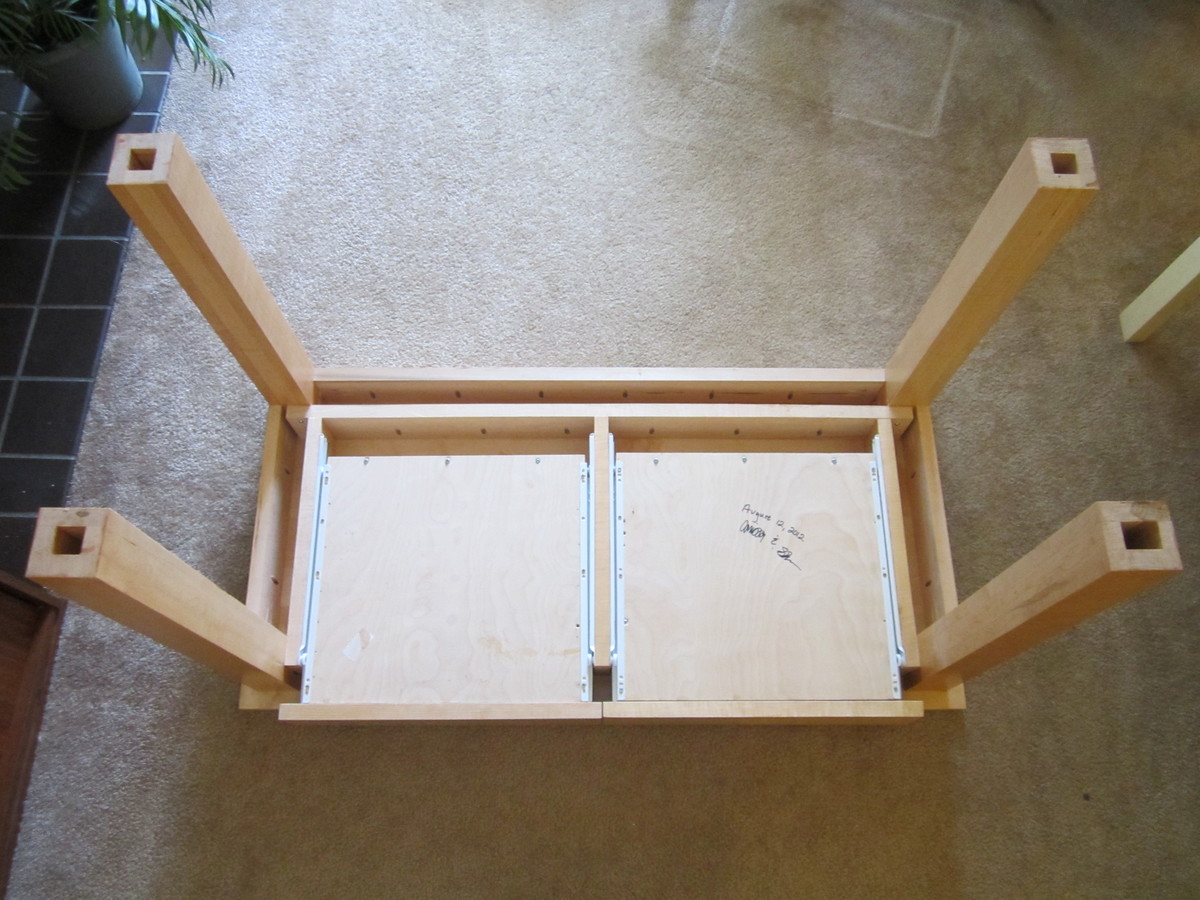
Solid Maple Desk
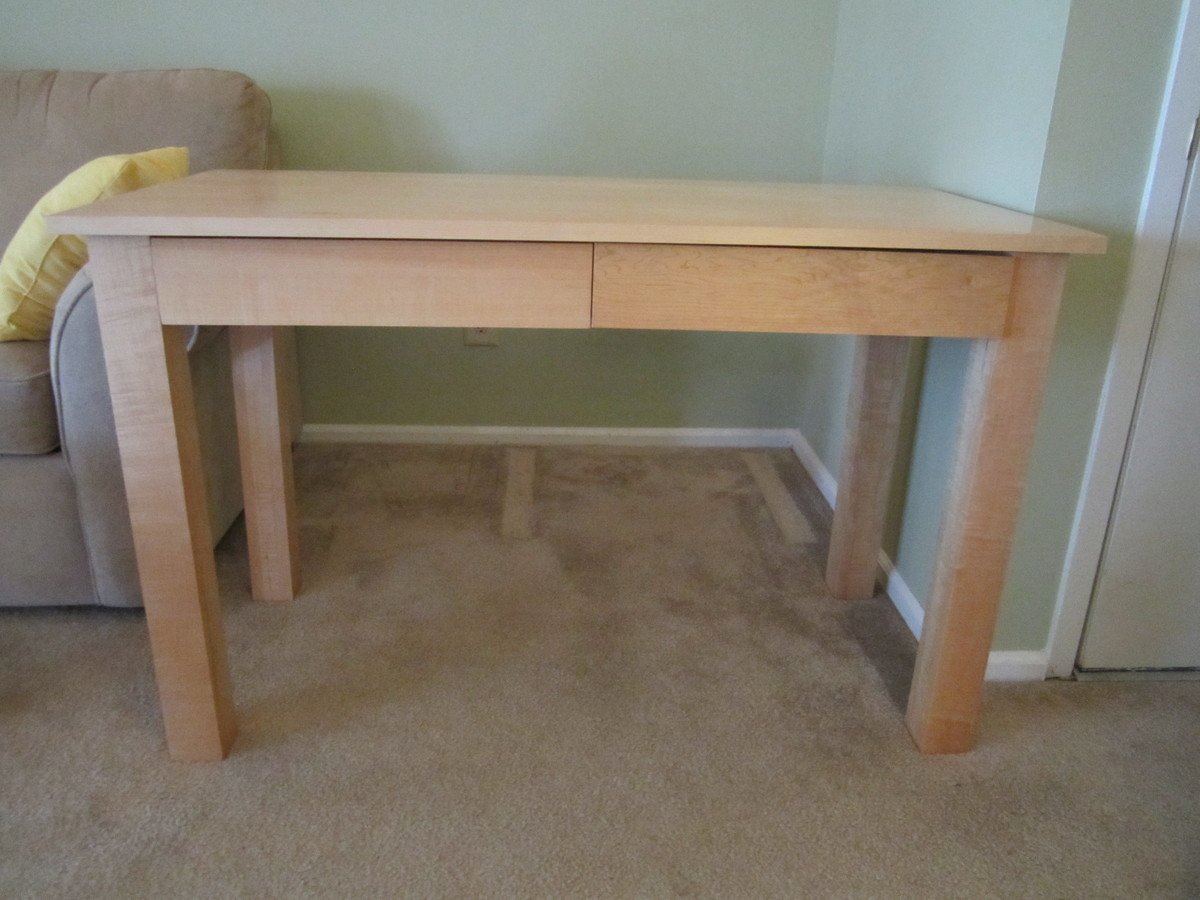
This is a solid maple desk with two drawers finished with shellac and paste wax. I altered the plan by giving the desk and overhang, as well as changing the way the legs were built.
Built from Plan(s)
Estimated Cost
$250
Estimated Time Investment
Week Long Project (20 Hours or More)
Finish Used
Shellac and paste wax. I sanded until the surface was incredibly smooth and then used a high quality brush to apply the shellac.
Recommended Skill Level
Intermediate
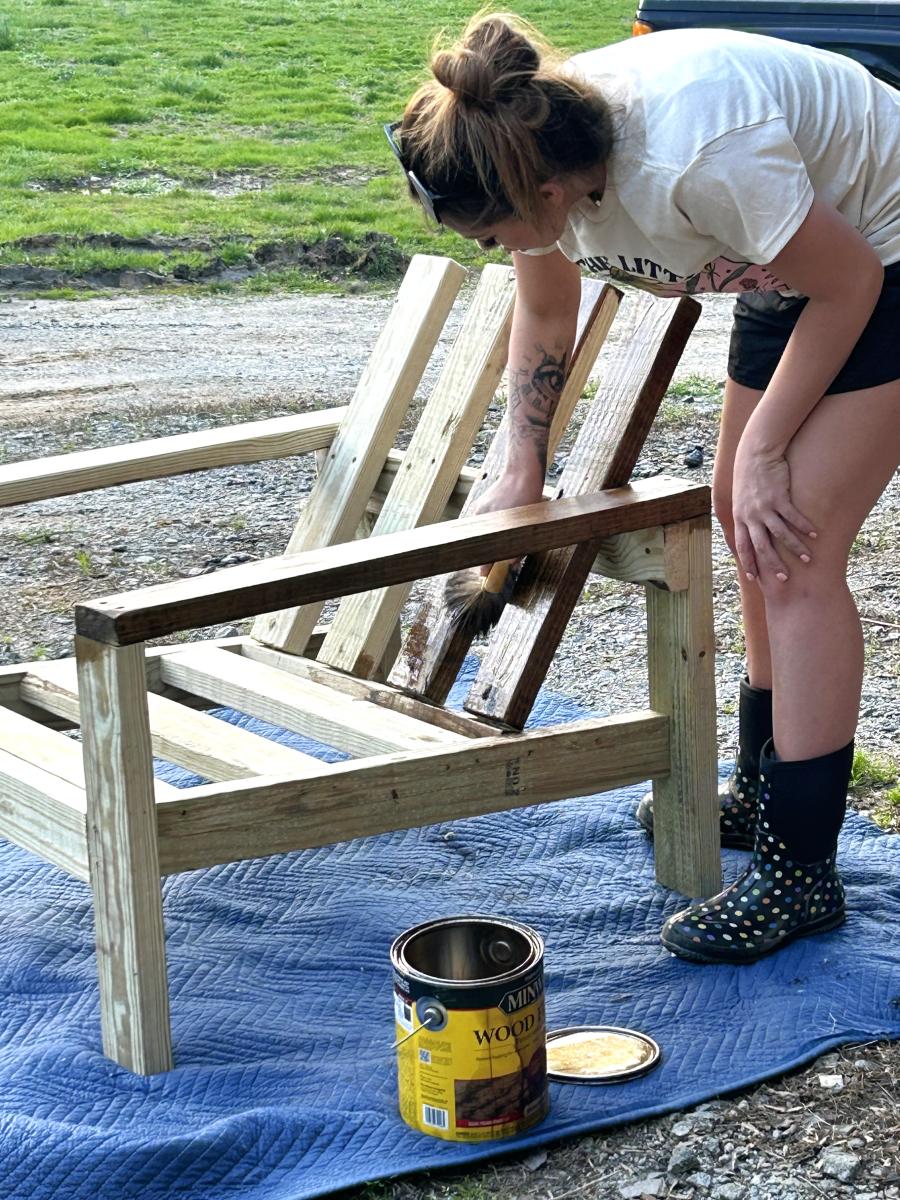
outdoor sofa
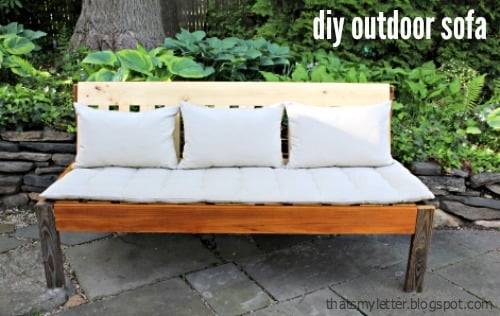
I made this armless outdoor sofa using scrap teak and Ikea cushions.
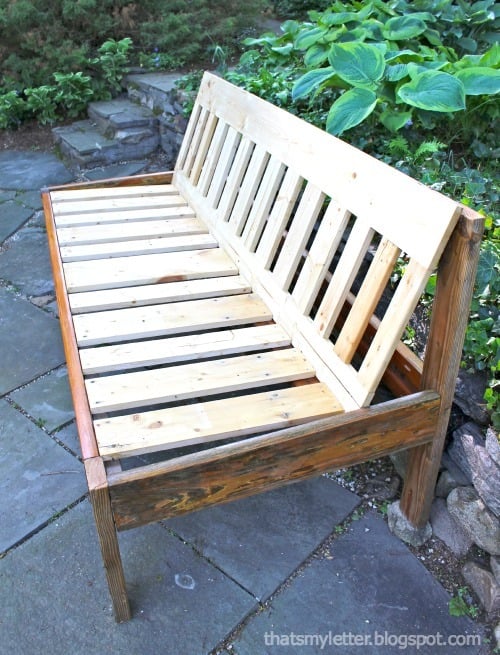
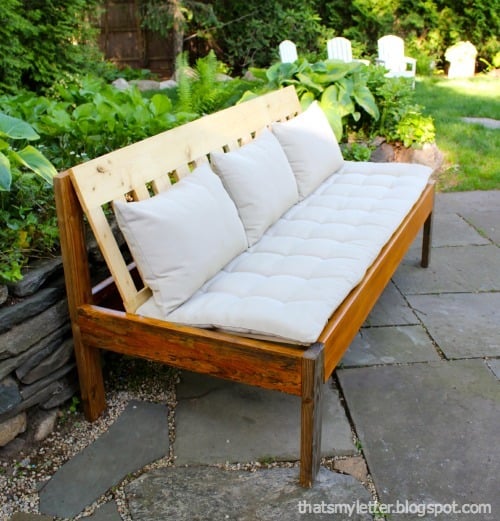
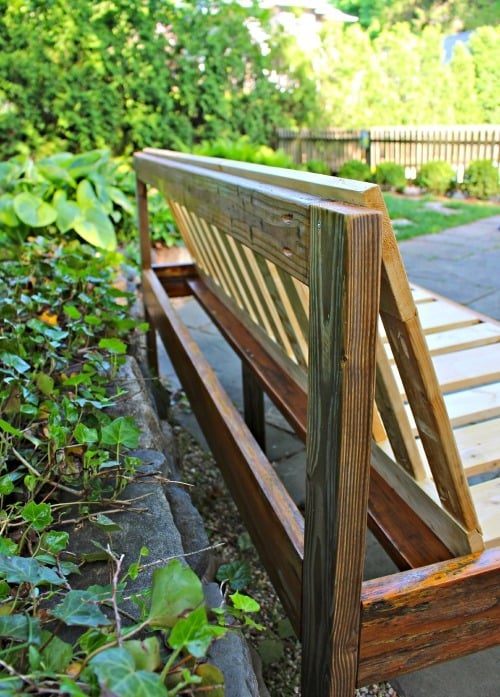
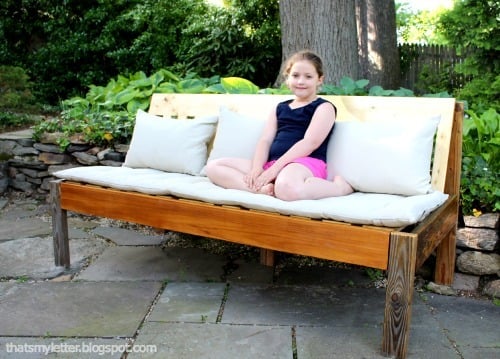
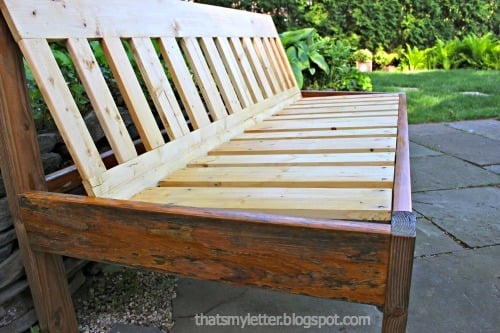
Built from Plan(s)
Estimated Cost
$50
Estimated Time Investment
An Hour or Two (0-2 Hours)
Finish Used
Minwax Helsman 2 coats clear satin poly
Recommended Skill Level
Beginner
Kitchen Helper
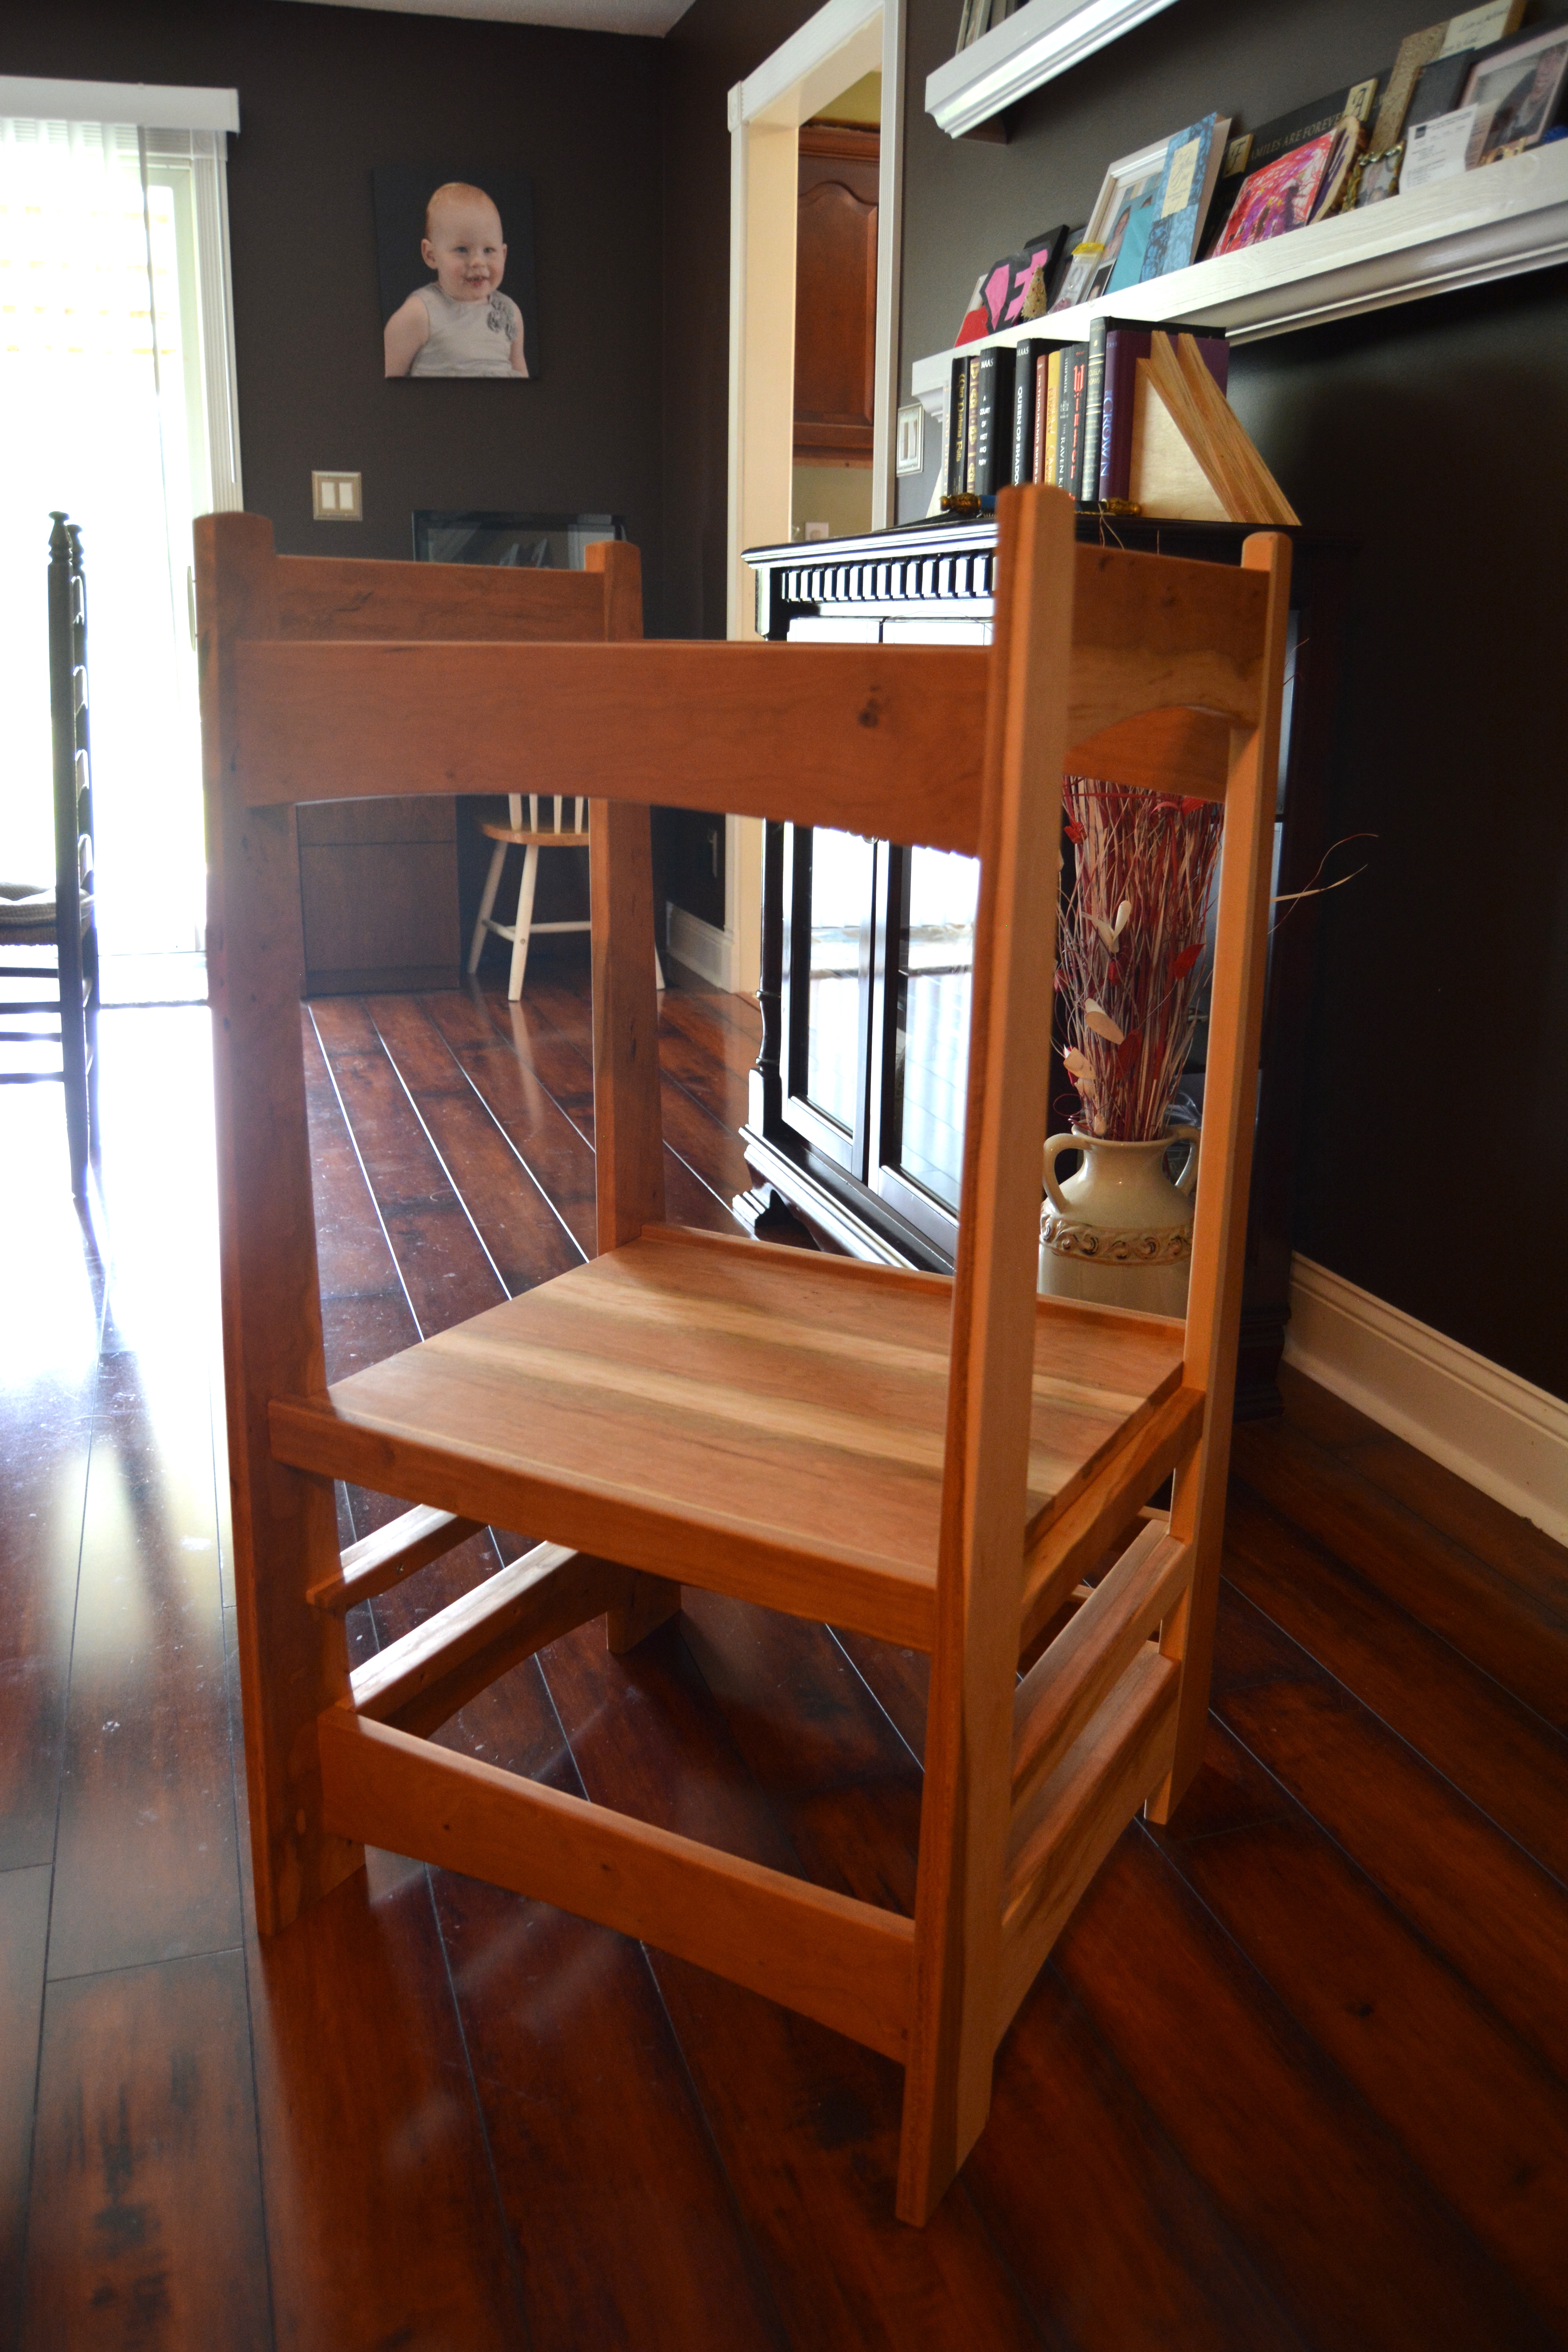
This project has been one that I've been putting off for a while now. My wife was threatening to just go out and buy one so I figured it was either now or never! Our little girl loves to help in the kitchen and standing in one of our old wobbly dining chairs just wasn't cutting it anymore.
I knew that I wanted to build something that would be more like an heirloom piece of furniture instead of one of the cheap knockdown types that you see in stores. I am sure that I could have possibly come up with my own design, but Marc already had already come up with a good design in the arts and crafts style, which is my favorite style of furniture. I saw no reason to come up with a "new" design just to say I did, plus I was lazy, and Marc already had plans hahaha. In all honesty, I think sometimes as woodworkers we get in our own way trying to be "original", when at this point, it's pretty much all been done before.
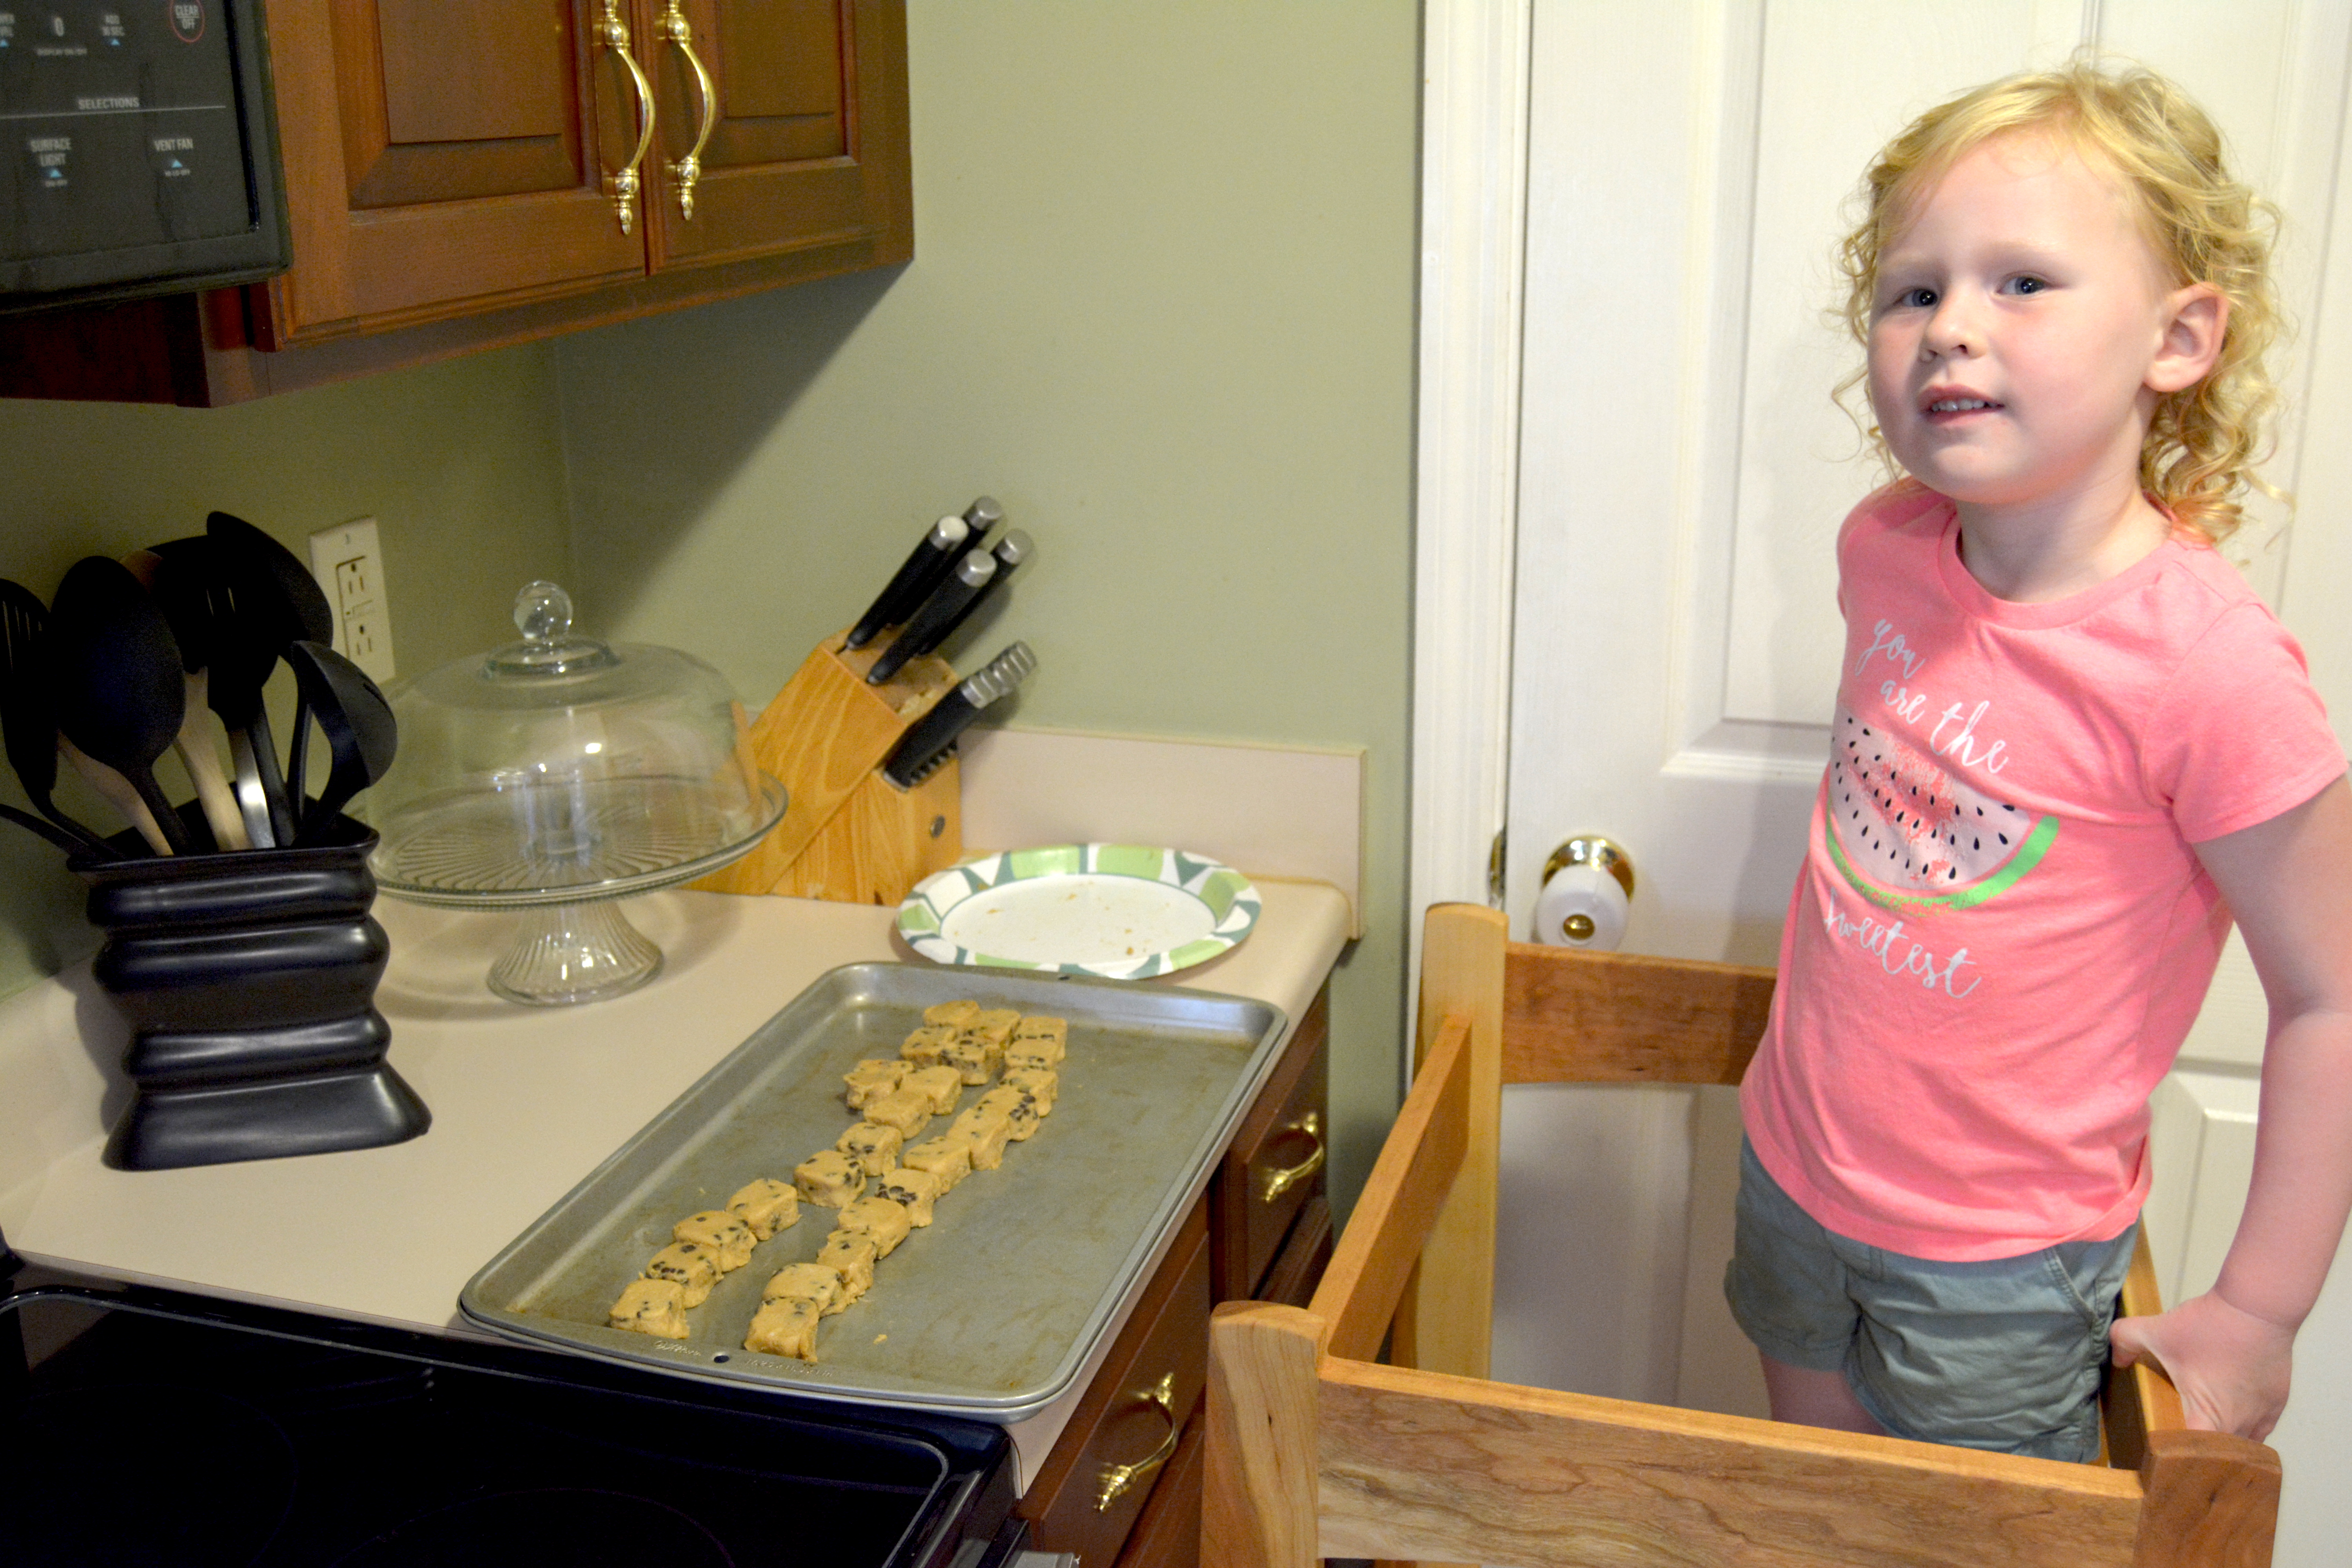
Estimated Time Investment
Week Long Project (20 Hours or More)
Recommended Skill Level
Advanced
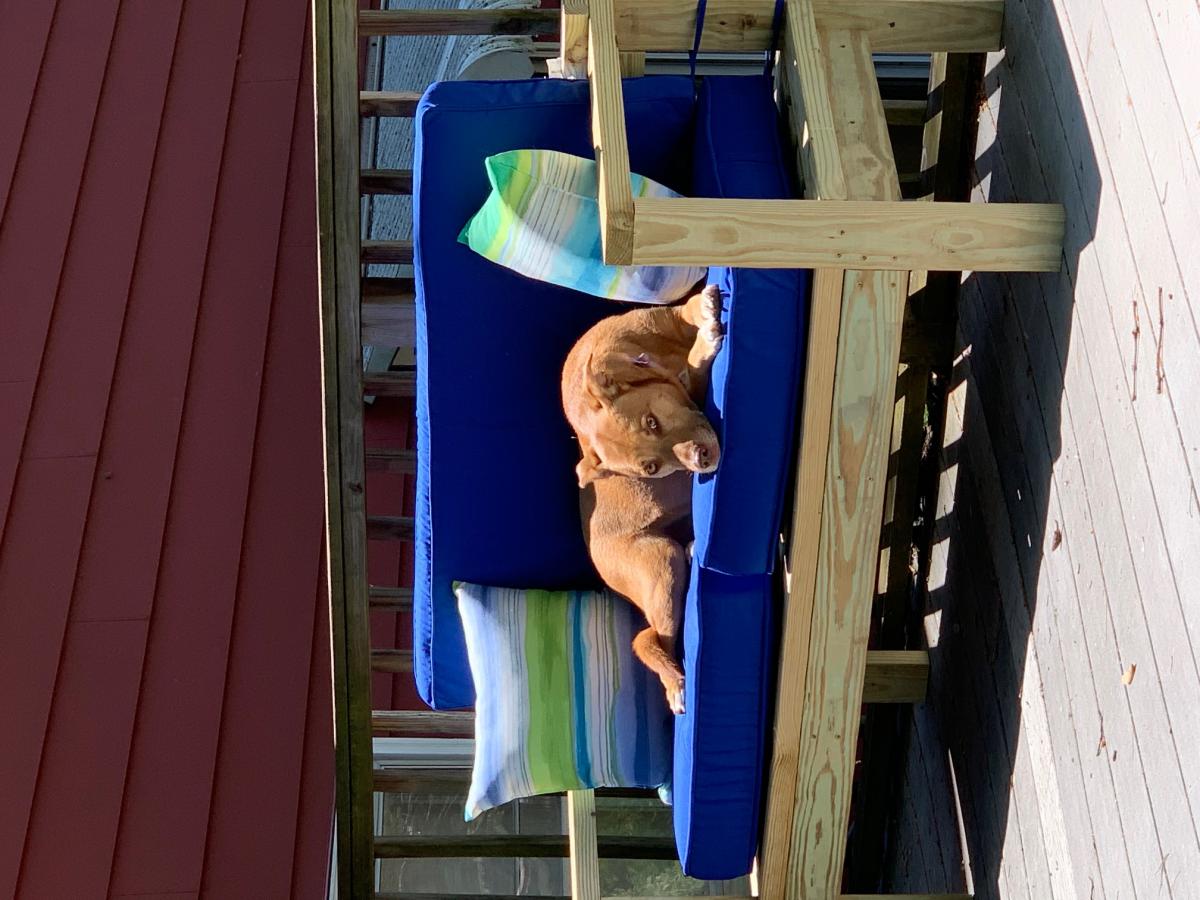
My First Ana Project
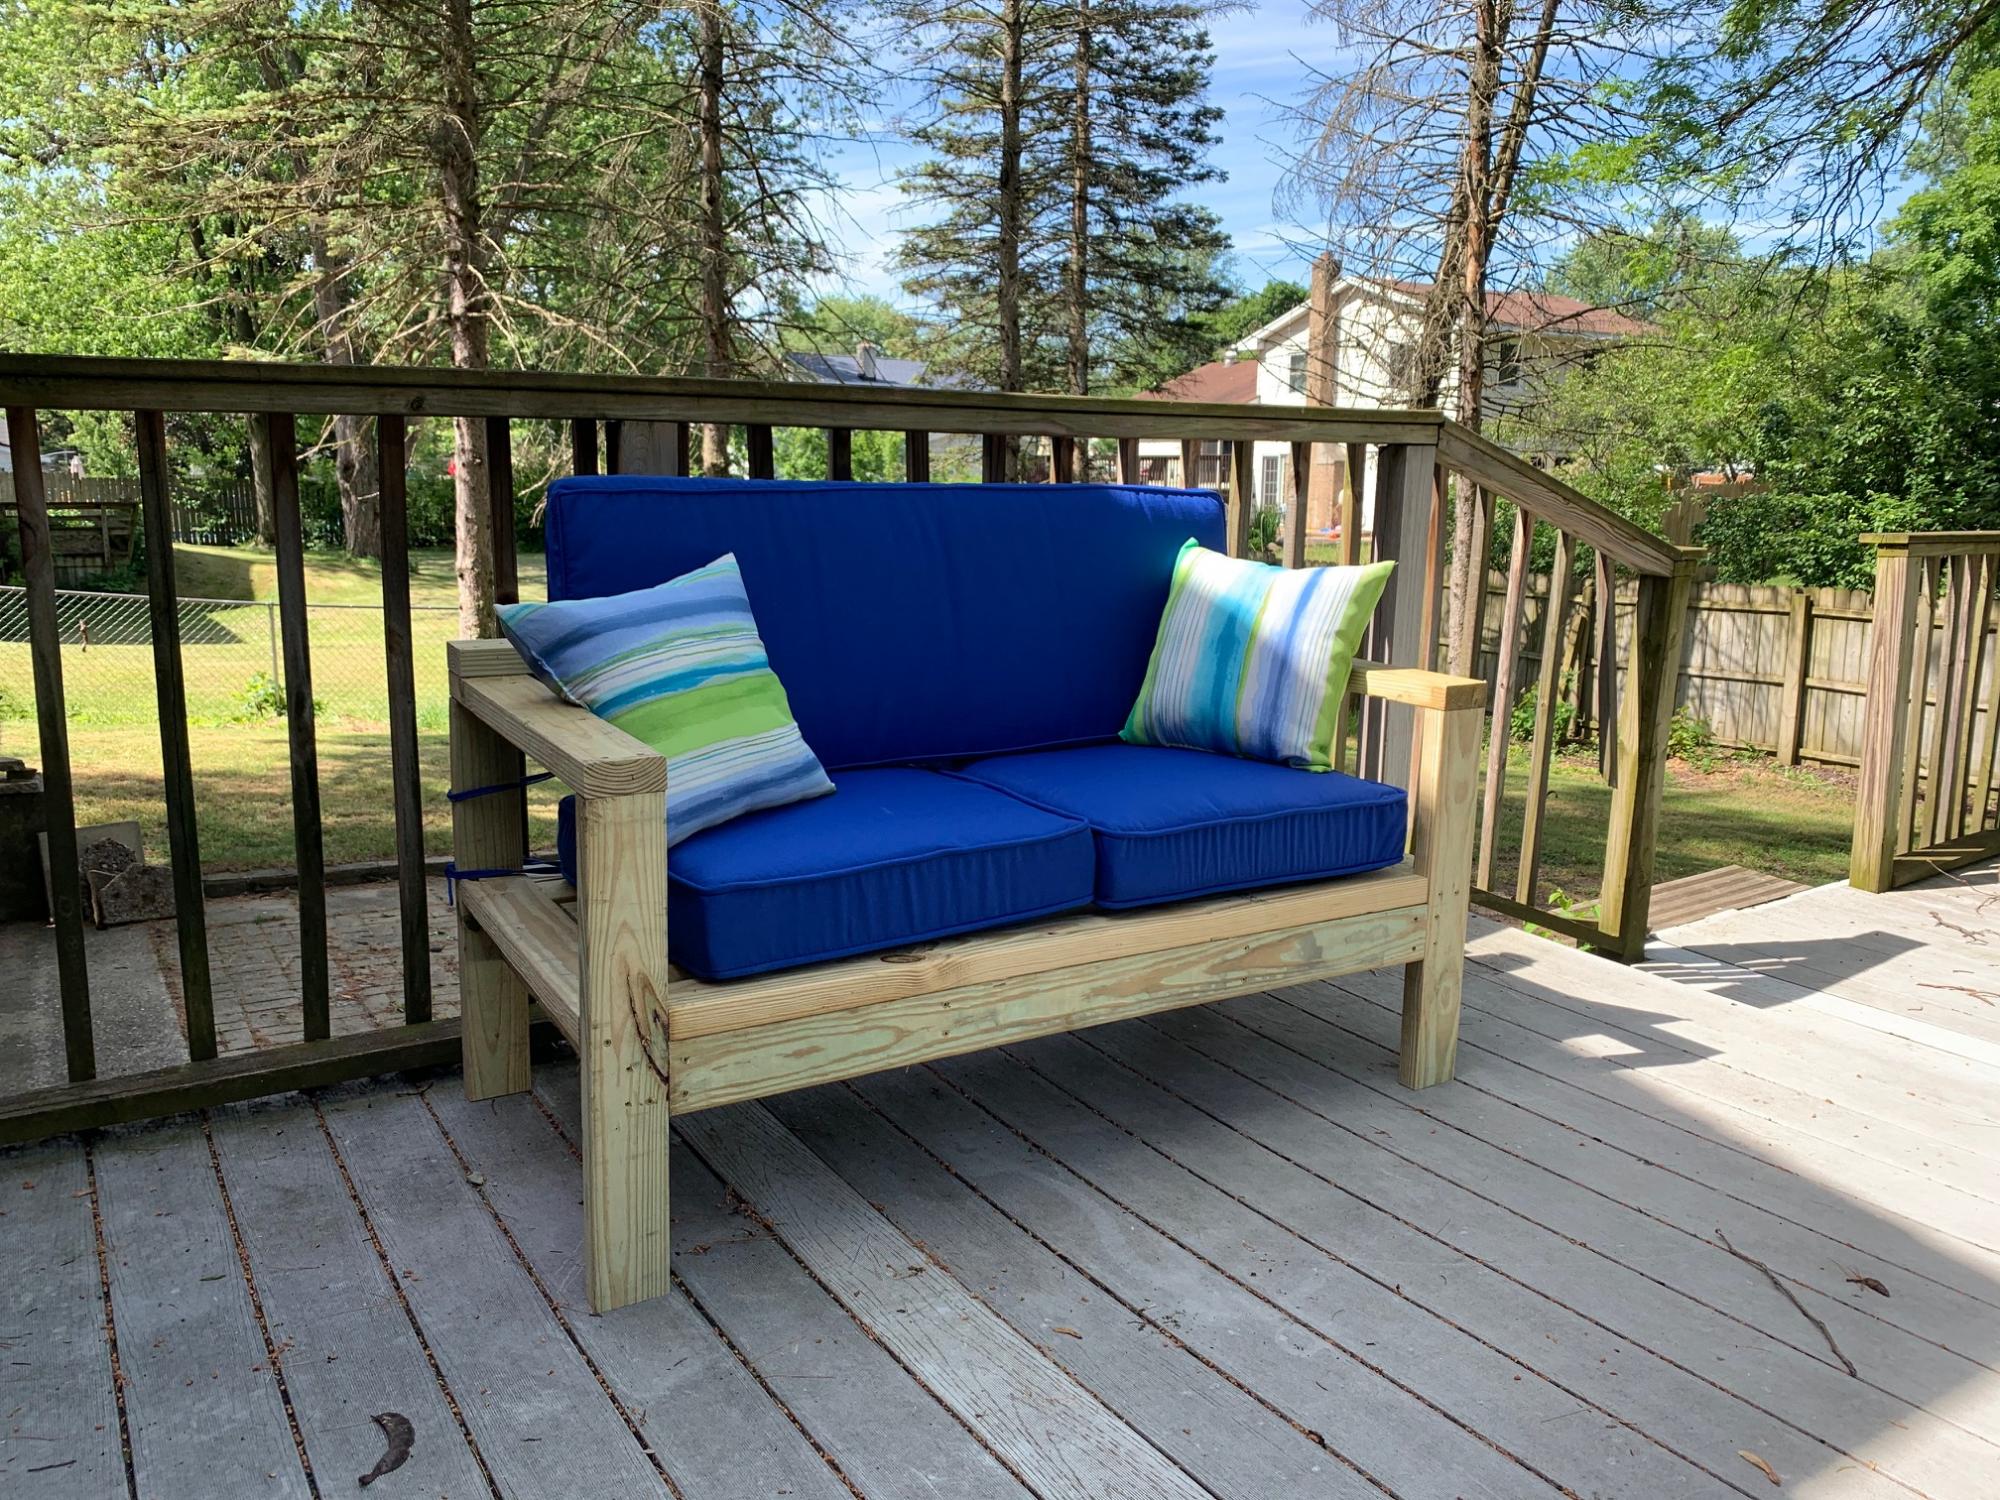
Had some leftover lumber from a friend's deck rebuild and decided to make a love seat for our deck. Modified the 2x4 Outdoor Sofa plans slightly to make it a little smaller but essentially built directly from your plans. My wife loves it! Only downside is we have to fight the dog for room. Thanks! I'll be using your plans again!
Built from Plan(s)
Estimated Cost
$12 for screws, $90 for cushions, lumber was free.
Estimated Time Investment
Afternoon Project (3-6 Hours)
Finish Used
None yet.
Recommended Skill Level
Beginner
Kentwood Twin Bed
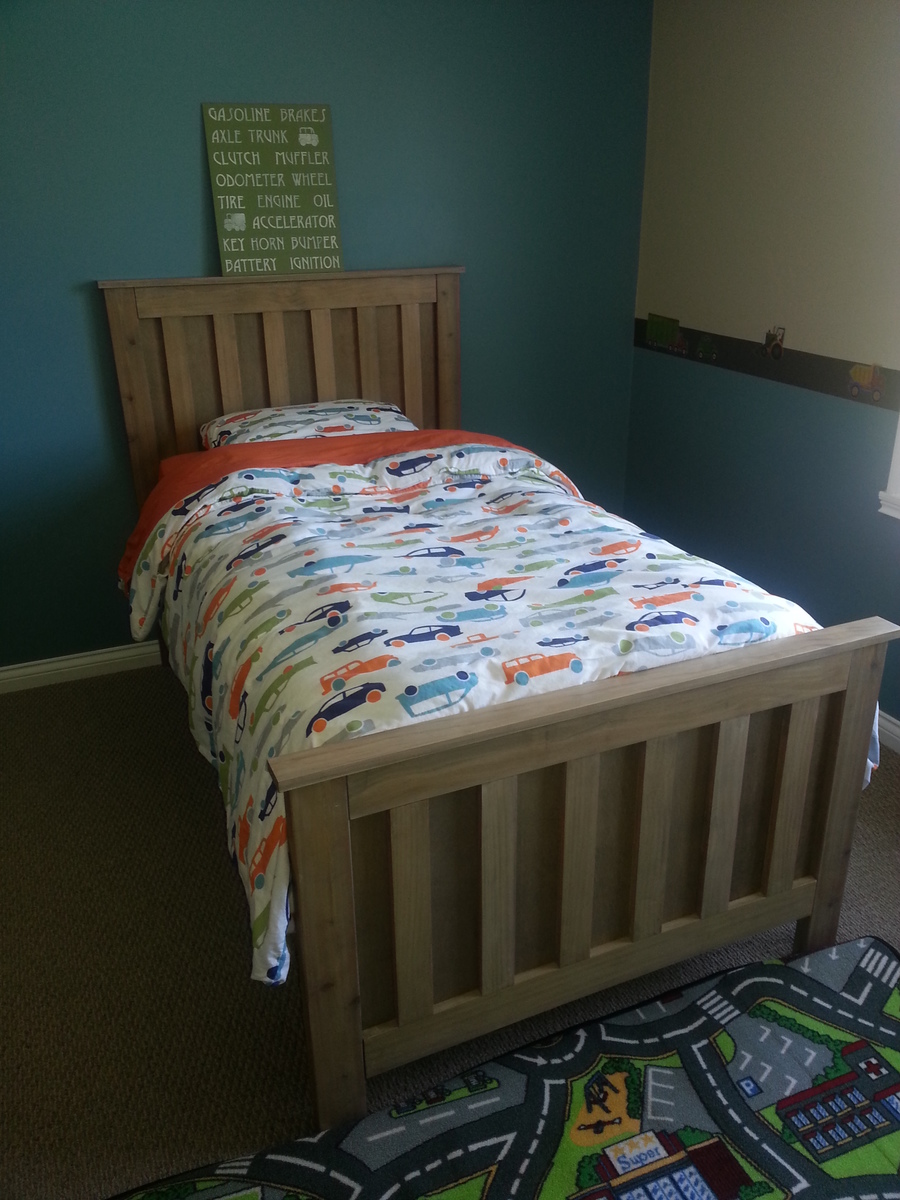
Two year old is being evicted from the baby room by the baby and we decided to build him a big boy bed using the Kentwood Twin Plan. Used only pine and the mattress is supported by slats. The bed looks great and is incredibly solid. Thank you for the plan, Ana.
Built from Plan(s)
Estimated Cost
$100 (bought some stain/poly that I'll use on other things)
Estimated Time Investment
Weekend Project (10-20 Hours)
Finish Used
Largely followed the copycat Restoration Hardware finish instructions on this site. Pre-Stain, Special Walnut, Weathered Oak, White Pickling, then Special Walnut. I applied one coat of poly with a brush, followed by a second coat of rubbed on poly, which I thought gave it more depth.
Recommended Skill Level
Beginner
Work Bench
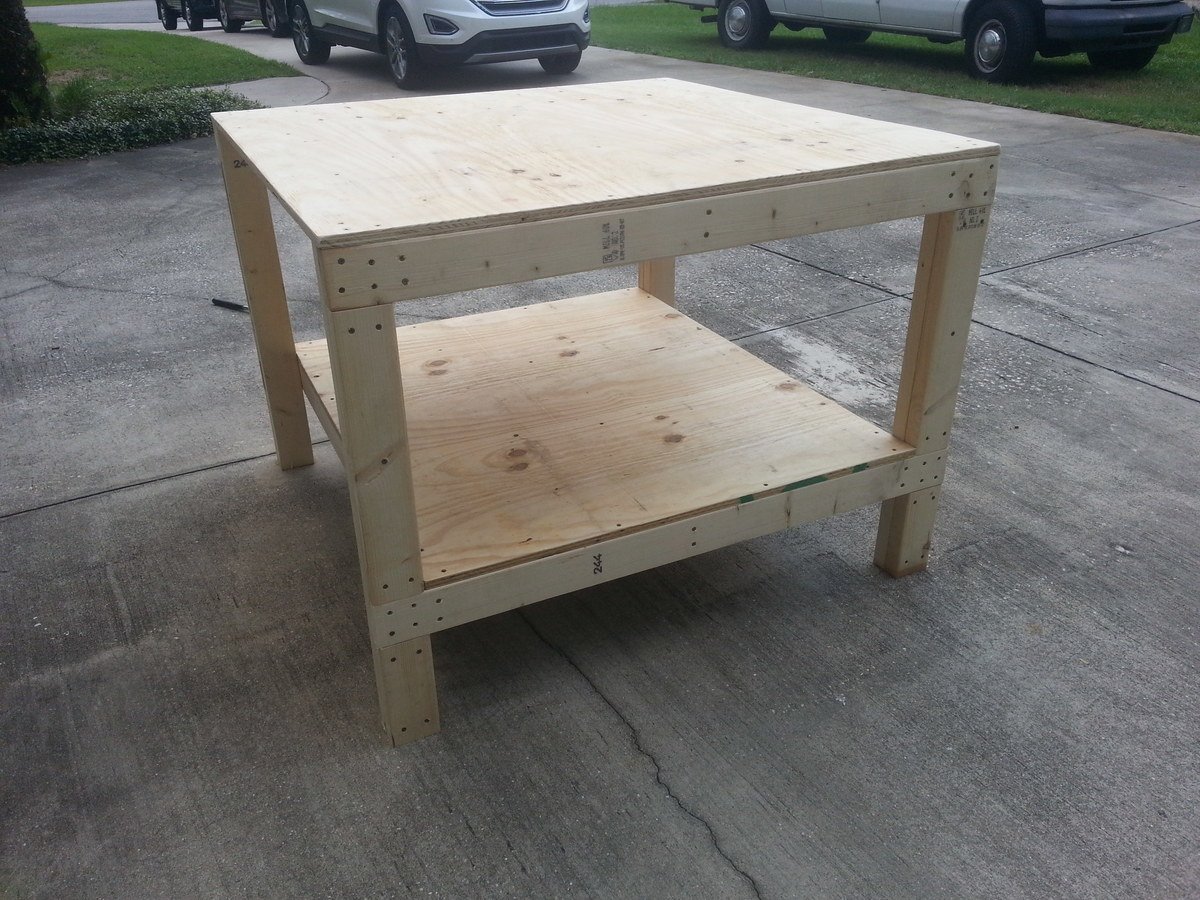
I needed more room, so I changed the dimensions to a 4 x 4 table. Used the same amount of materials. I made the side leg measurements 48" wide and the cross braces 45". My top sheet of plywood is 48" x 48" and the bottom sheet is 48" x 41". The rest of the leg measurements are the same.
A little overkill on the screws, but made it extra sturdy.
I saw this site, copied down the materials list, bought everything I needed and was finished before dinner. I did it all myself, only had my husband cut the plywood, the rest was all me! Woo hoo, so proud of myself!
I rough sanded the edges and corners to get rid of any splinters.

Built from Plan(s)
Estimated Cost
$50
Estimated Time Investment
An Hour or Two (0-2 Hours)
Finish Used
Rough sanded the top, corners and edges.
Recommended Skill Level
Beginner
Tiered planter
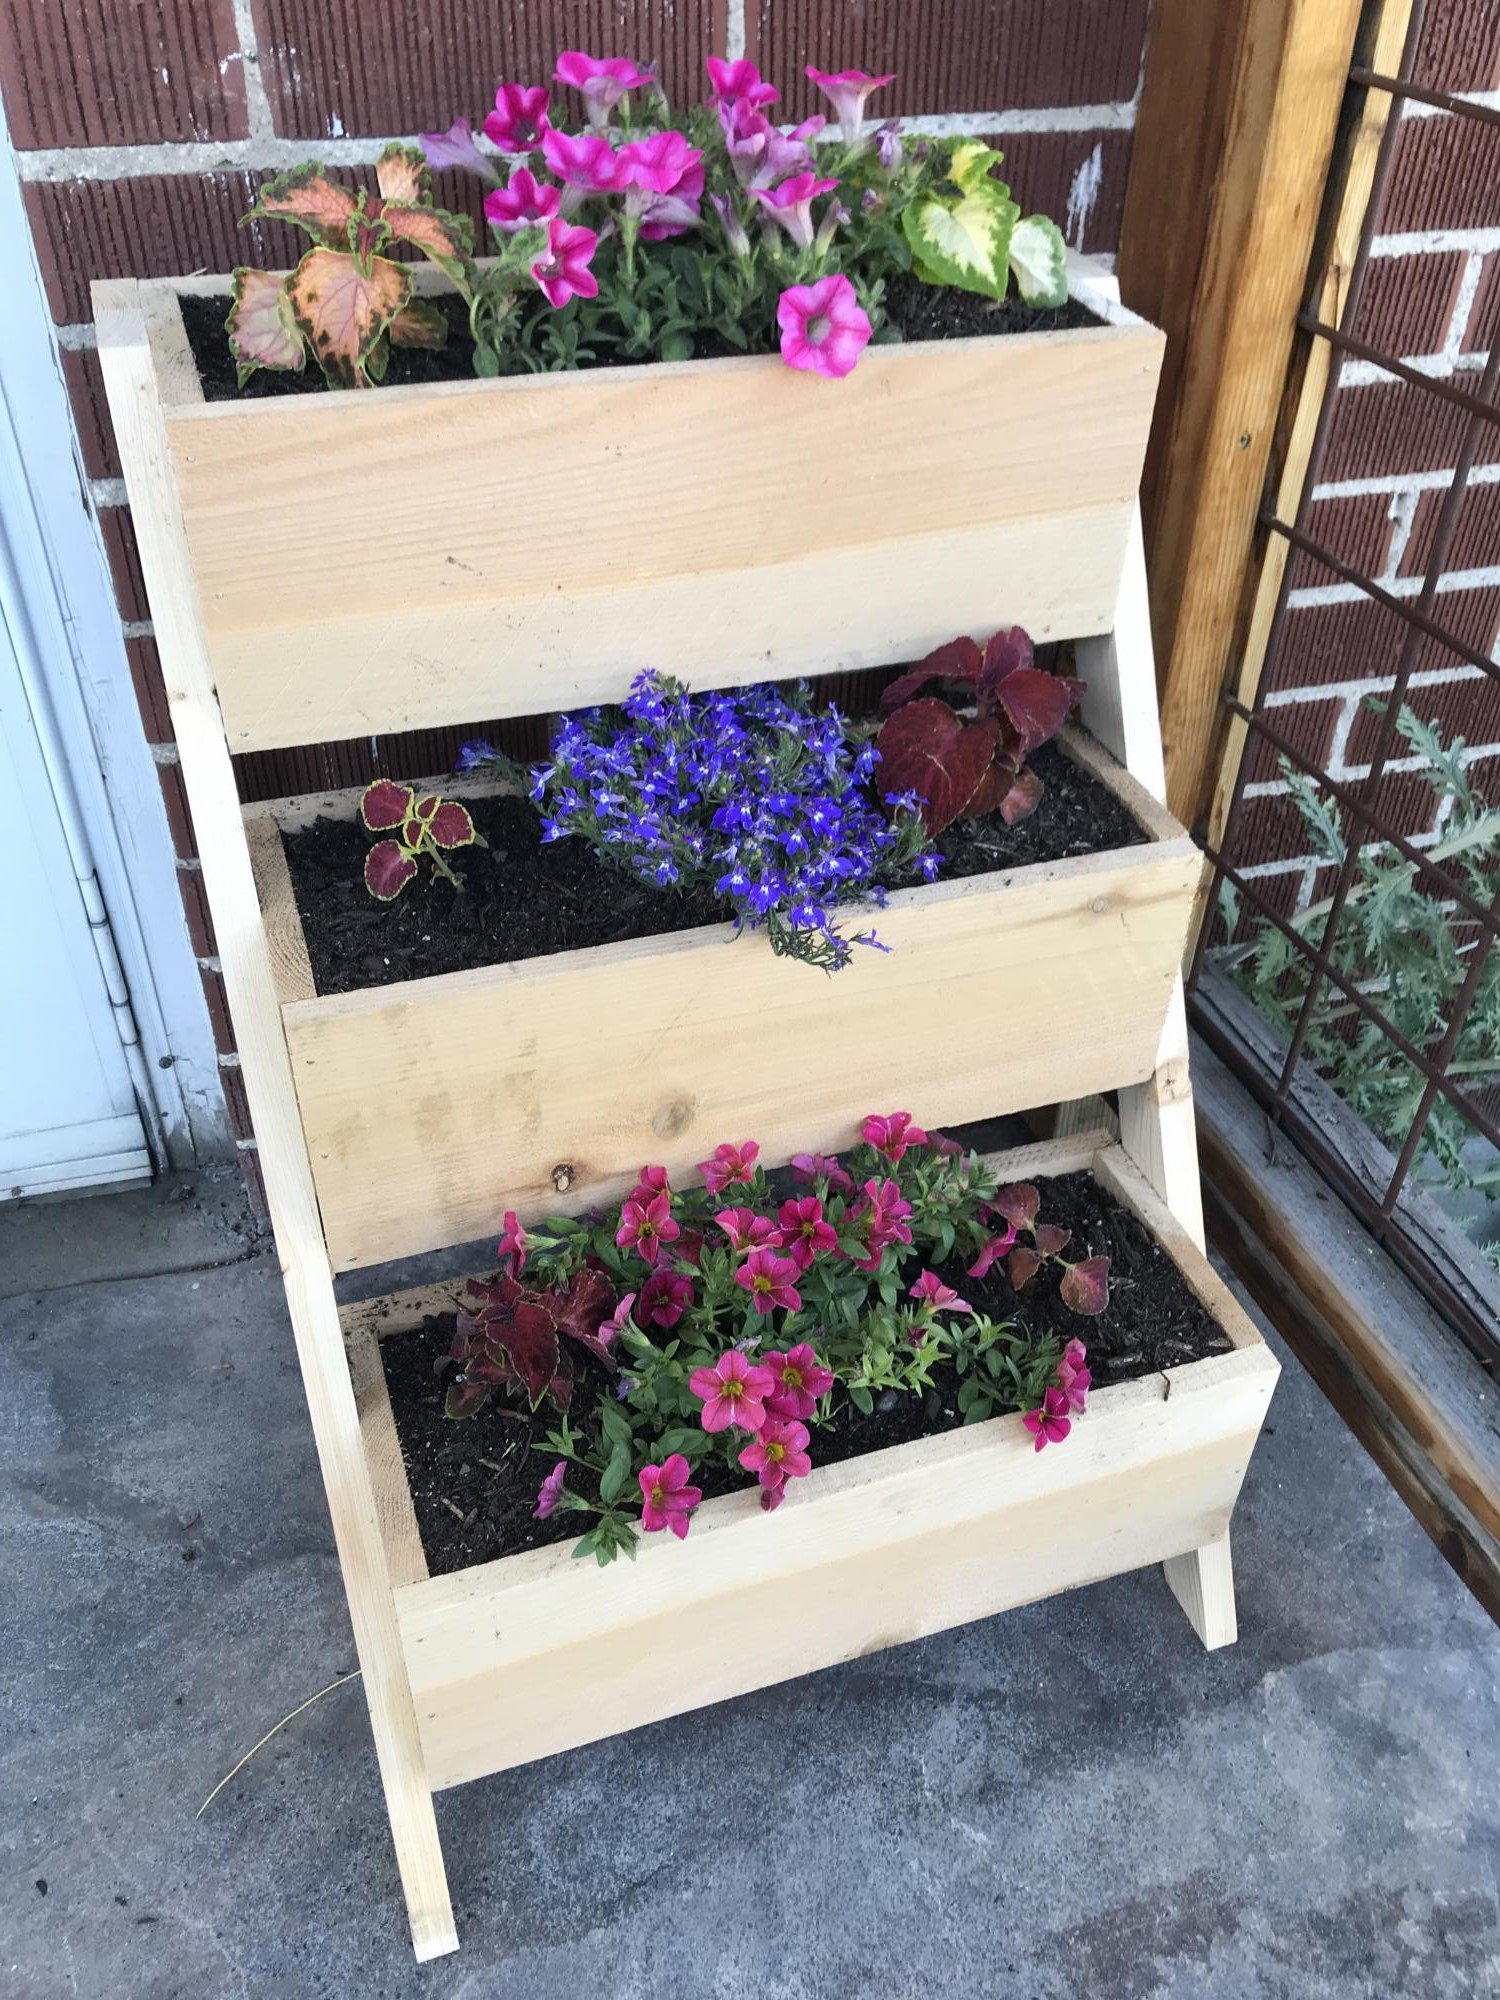
Super easy to build and looks great. We did not stain the wood. Quick assembly.
Built from Plan(s)
Estimated Cost
10
Estimated Time Investment
An Hour or Two (0-2 Hours)
DIY Storage Bench

This bench turned out fantastic. This was our first try with Ana’s plans, but the video reassured us that we could do it. So happy with the results.
Built from Plan(s)
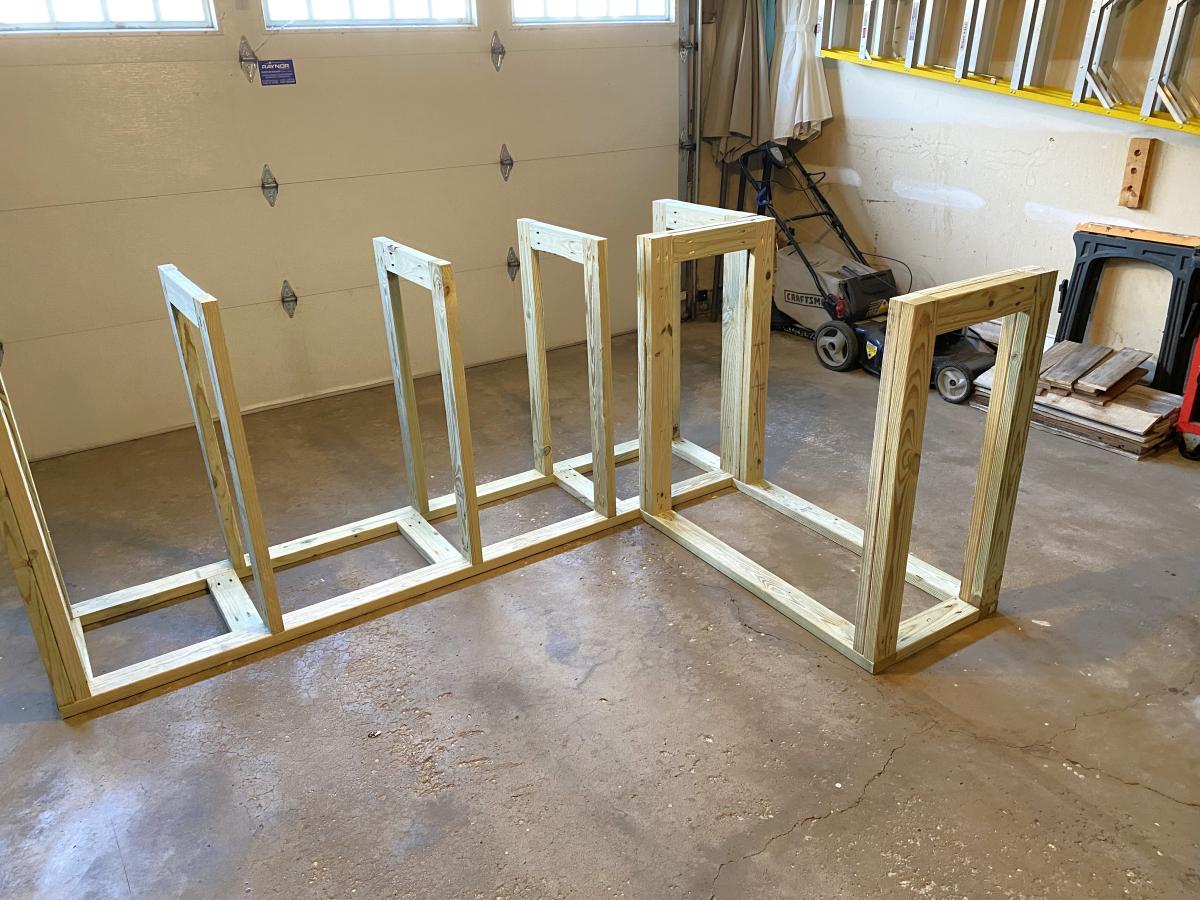
Truss Shelves: Cheap Garage Storage
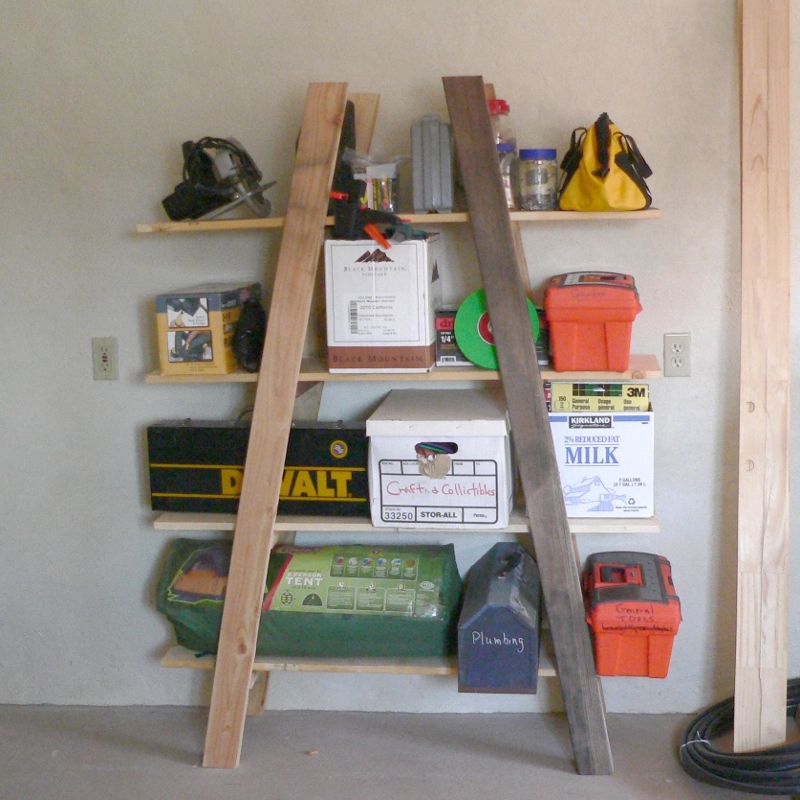
Made of old fence rail (the dark pieces) and cheap 2x4s and 1x12s .
This is not as stable as I hoped, but for an afternoon's project that got all those tools off the workshop floor, it's not bad. I will add a diagonal brace at the back later. Much later.
NOTE: My engineer friend notes that 2 braces at the rear, below the bottom shelf and below the top shelf, would minimize side-to-side wobbling, and 2 braces front to back, both under the bottom shelf, would minimize the front-to-back wobbling, They could be a scrap of plywood, a 1x6 or wider scrap. Just nail them in two or more places on each of the ladders and they make the structure more rigid. Screw them in if you want a shelf unit you can disassemble.
TIPS:
If you are using pockethole screws, start the screws in all the holes before you put the crosspieces on. Stop when you see the tip of the screw come through the first piece.
Clamp scrap 2x4 to the uprights to hold the crosspieces in place as you drill.
To get the shelves in place, lean the ladders against each other and attach the bottom and top boards on one side. Than pull the other ladder out as far as it needs to go and screw that side of the shelves in place.
Don't try this without clamps.
It could have been cheaper if I had used all reclaimed fence 2x4s, and if my errand runner had bought cheaper 1x12s. He bought top-grade when #2 would have worked for half the price,
Estimated Cost
$ 30
Estimated Time Investment
Afternoon Project (3-6 Hours)
Finish Used
None
Recommended Skill Level
Intermediate
Simple Outdoor Bench and Table
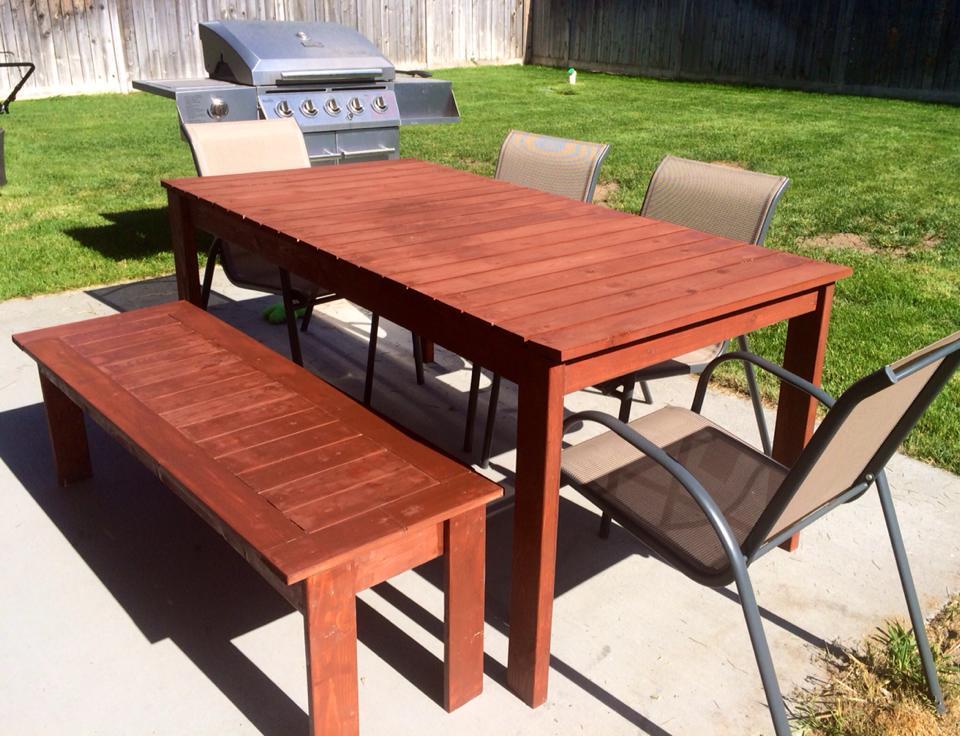
This was my first project, my wife and I started with the table, which took us a little while but ended up being pretty simple. Unfortunately we do not own a saw but discovered that Lowes will happily cut the wood for you. After we completed the table we started working on the bench, which is where we ran into a slight problem. Some how our frame boards ended up being two short, so as a fix we did not put any spaces in between the seat slats and used four 7 inch pieces we had left over to complete the full frame. We also altered the plan to make our bench a little longer than the original its 57 inches instead of 52.
Estimated Time Investment
Weekend Project (10-20 Hours)
Finish Used
Lowes Stain: Brick Red
Recommended Skill Level
Starter Project
RH Inspired Shanty Hutch & Sideboard + glass doors
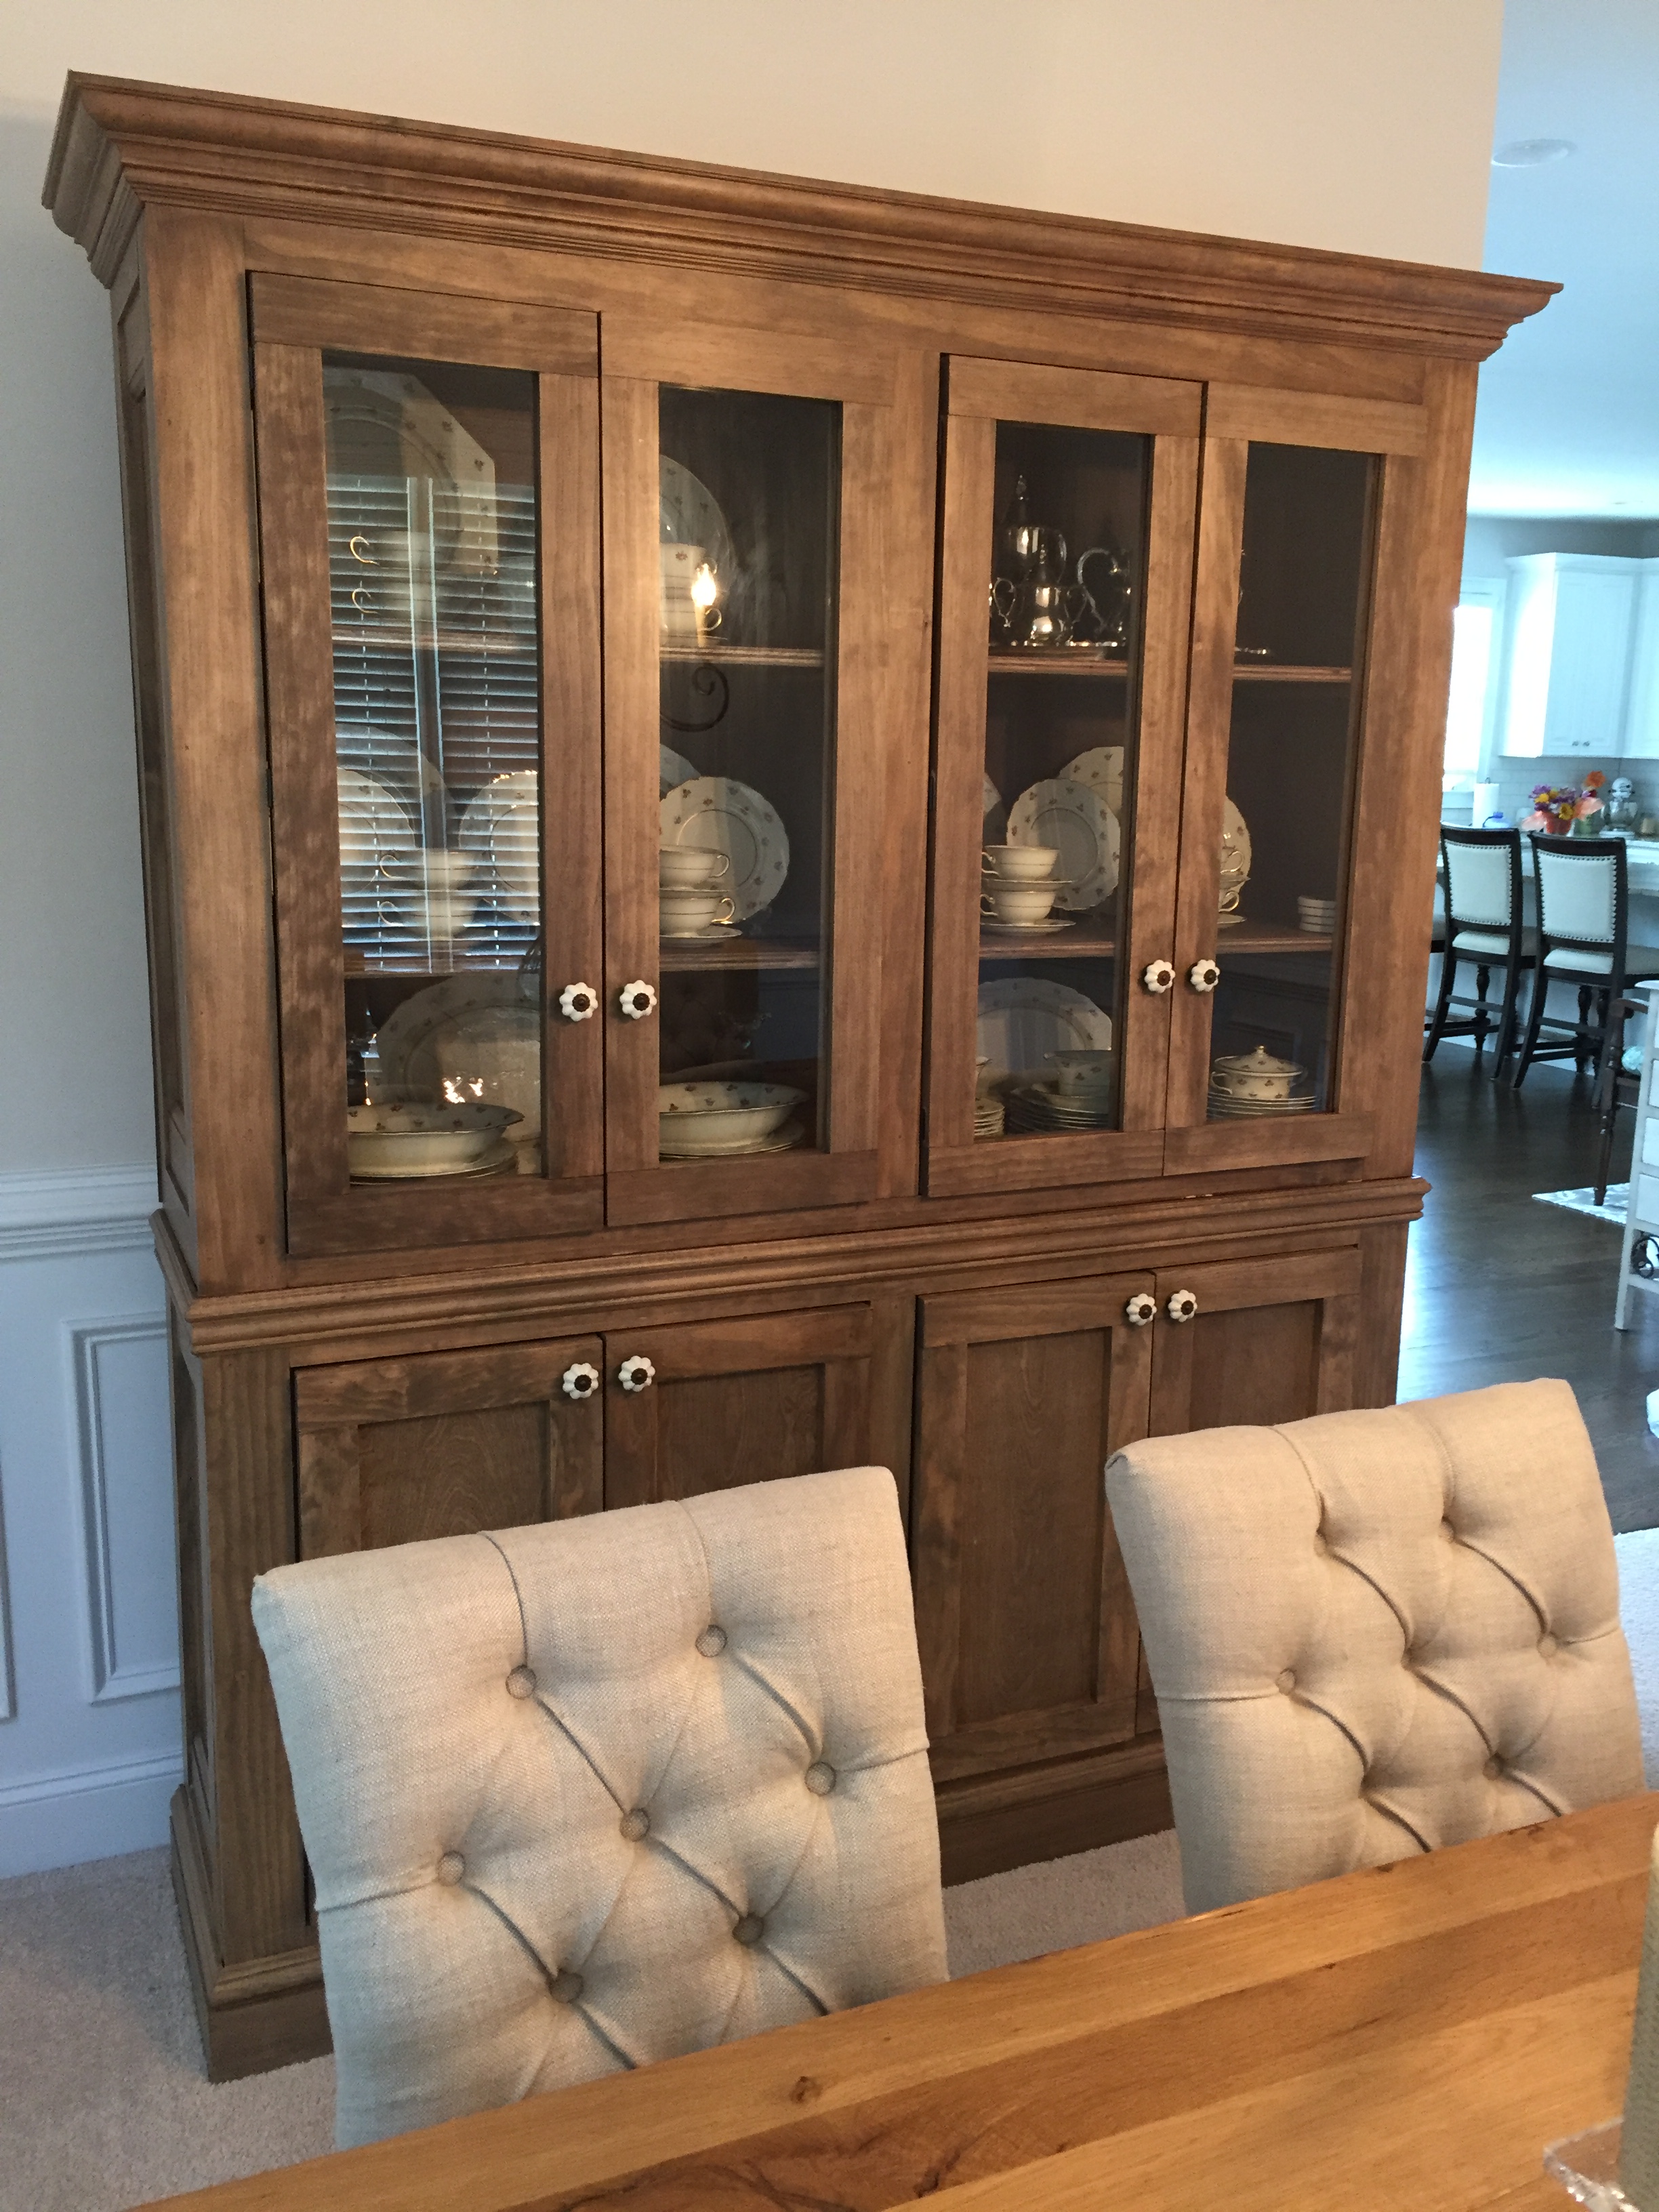
This was my first woodworking project ever - and am thrilled!! Thank you Ana-White.com!! I needed a beautiful china cabinet for a fraction of the retail cost. Once I found plans on this website, I bought some power tools and got started! I only worked a couple of hours each weekend so it took a while to finish.
I modified the Shanty sideboard and Shanty hutch plans in a few ways: Shorter overall width to more comfortably fit my dining room, shorter height (which I now regret), fewer shelves in the hutch, different method to attach shelves, and added glass doors to the hutch. My shelves were not perfectly flush with the cabinet walls (oops) so I couldn't use pocket holes to attach them. Because I detest traditional shelving hardware, I just secured 1/2-in quarter round to the walls and rested the shelves on that.
For the glass hutch doors, I built frames similar to the sideboard doors' frames -- two frames for each door, for a total of 8 frames. On 4 frames, I used a rabbit router bit to create an inset for the glass I bought and had cut at Lowe's. I secured the glass with glazier's points and silicon caulk, then attached an un-routered frame to the back of each door with screws. I chose to keep the screws on the back visible and accessible so that I could easily replace the glass if needed without destroying the door.


Built from Plan(s)
Estimated Cost
$630 plus $70 for fancy door knobs
Estimated Time Investment
Week Long Project (20 Hours or More)
Finish Used
Followed Ana-White staining tutorial and used Minwax Weathered Oak (1st coat) and Minwax Special Walnut (2nd coat). Used matte polyurethane clear coat.
Recommended Skill Level
Intermediate
Comments
Wed, 12/05/2018 - 10:10
Plywood Type?
Looks awesome! Did you use Pine/Maple/Birch plywood? Just wondering - i always have trouble matching my plywood to select pine!
4x4 Truss Beam Table
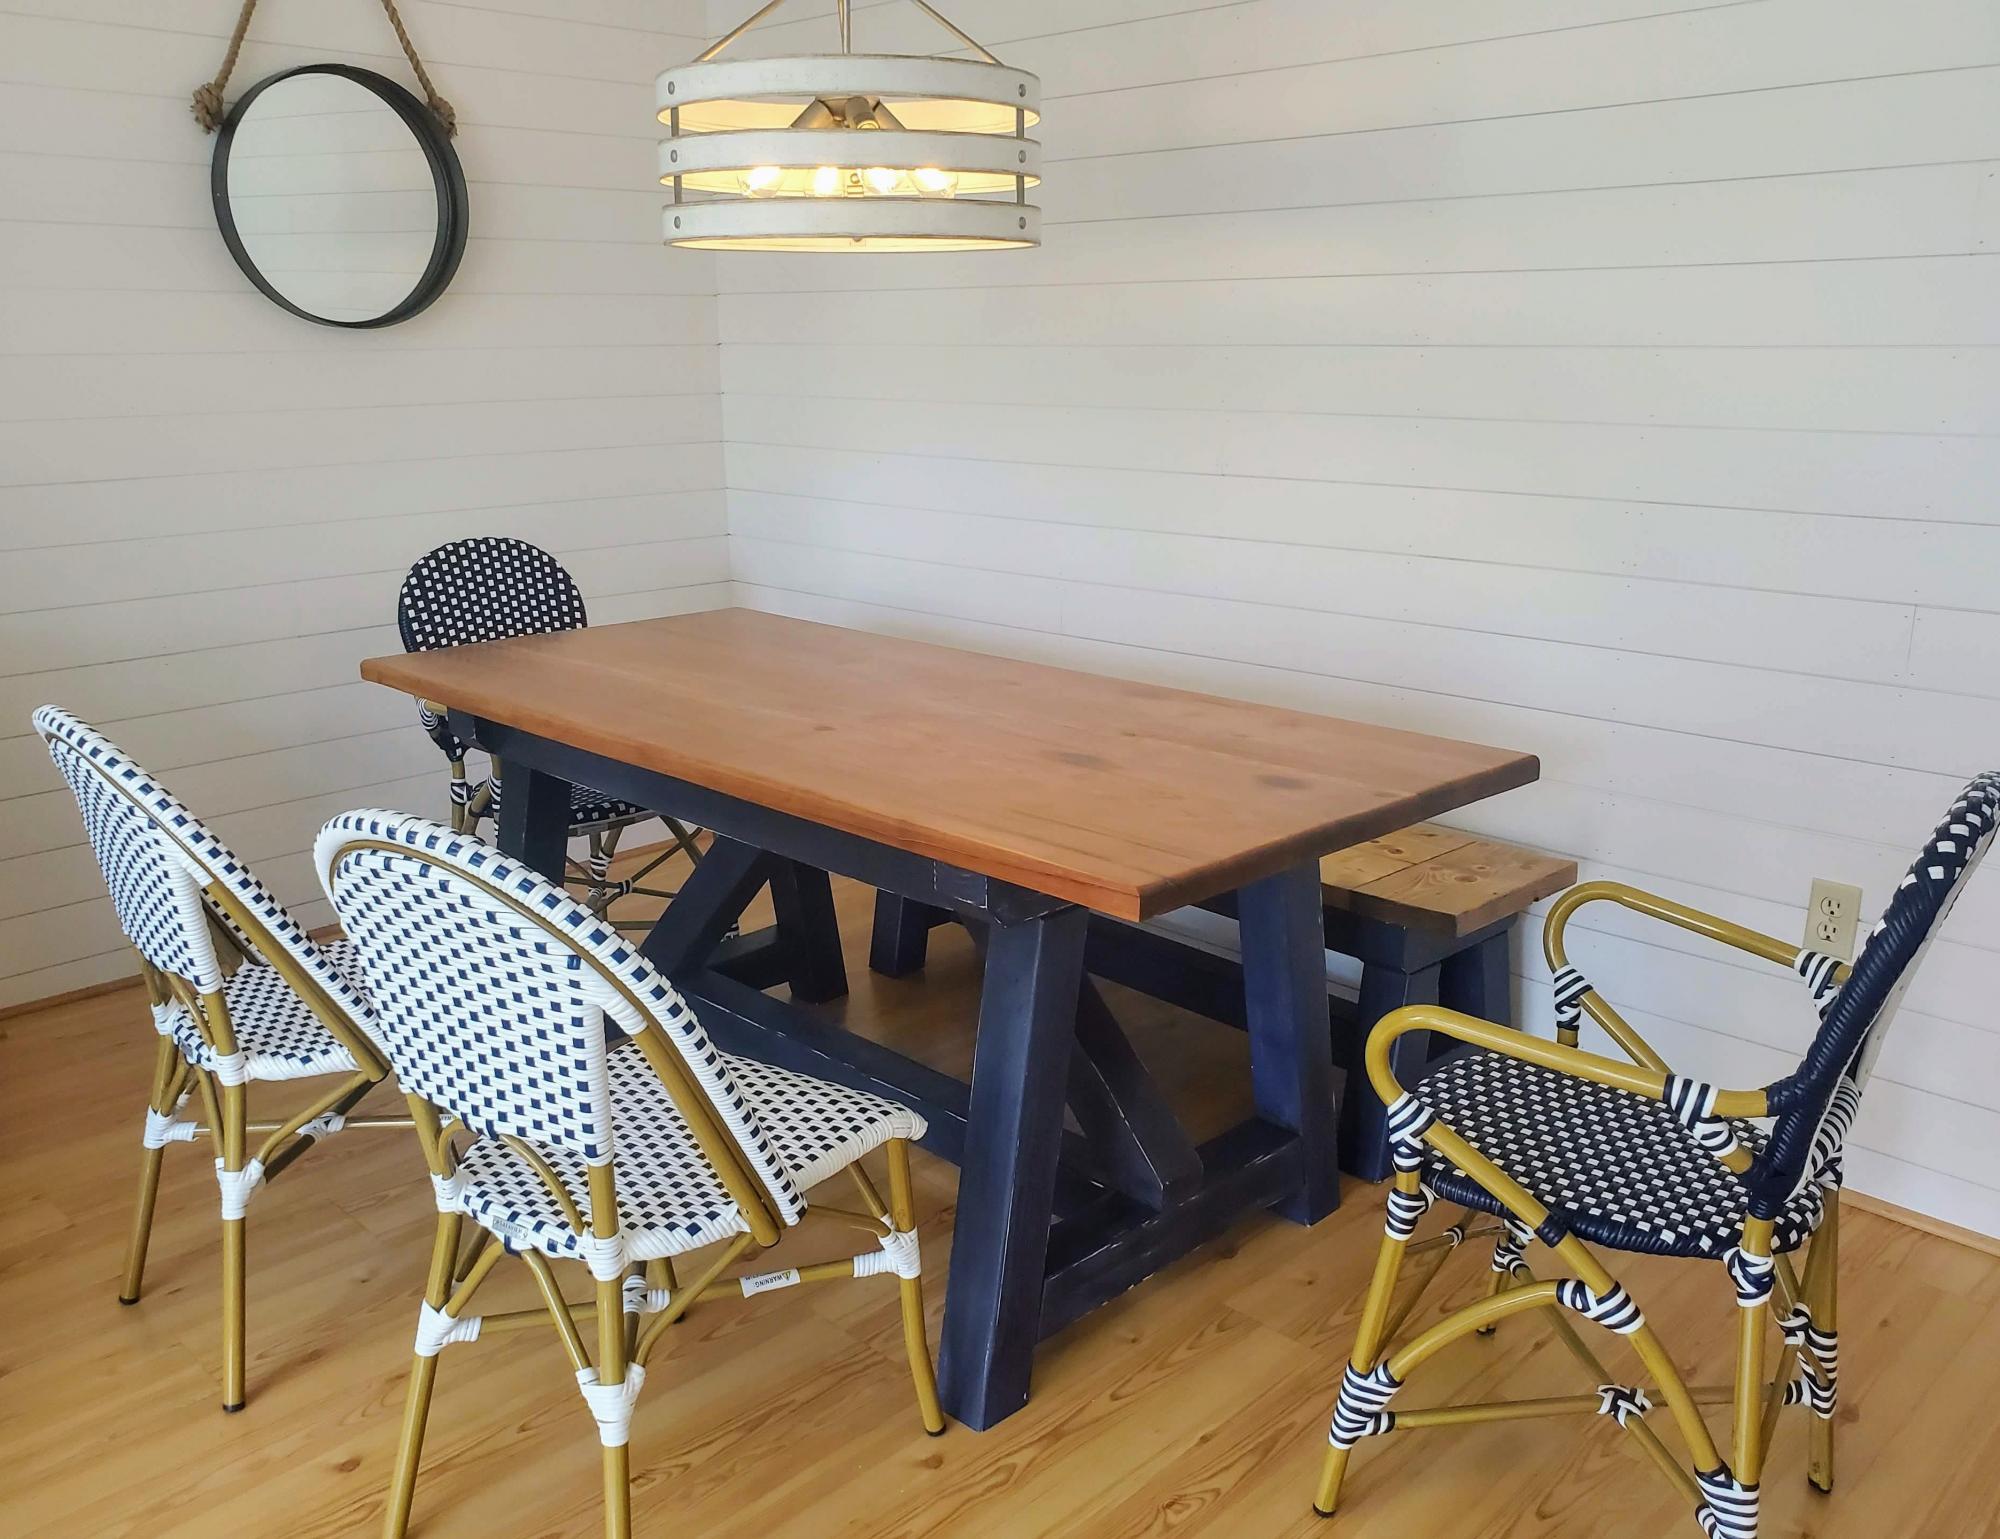
I followed this plan to create our new dining table and bench. I went with a distressed chalk paint for the base, and the top is made from 100 year old douglas fir barn rafters. They look great with our blue/white cafe chairs. Thanks for the great plan!
Built from Plan(s)
Estimated Cost
$400 (mostly from purchasing the reclaimed rafters)
Estimated Time Investment
Week Long Project (20 Hours or More)
Finish Used
Behr Chalk Paint and Dark Wax on Base, combination of Special Walnut and Oaked Grey stain on Top, matte poly
Recommended Skill Level
Intermediate
Outdoor Sofa Sectional
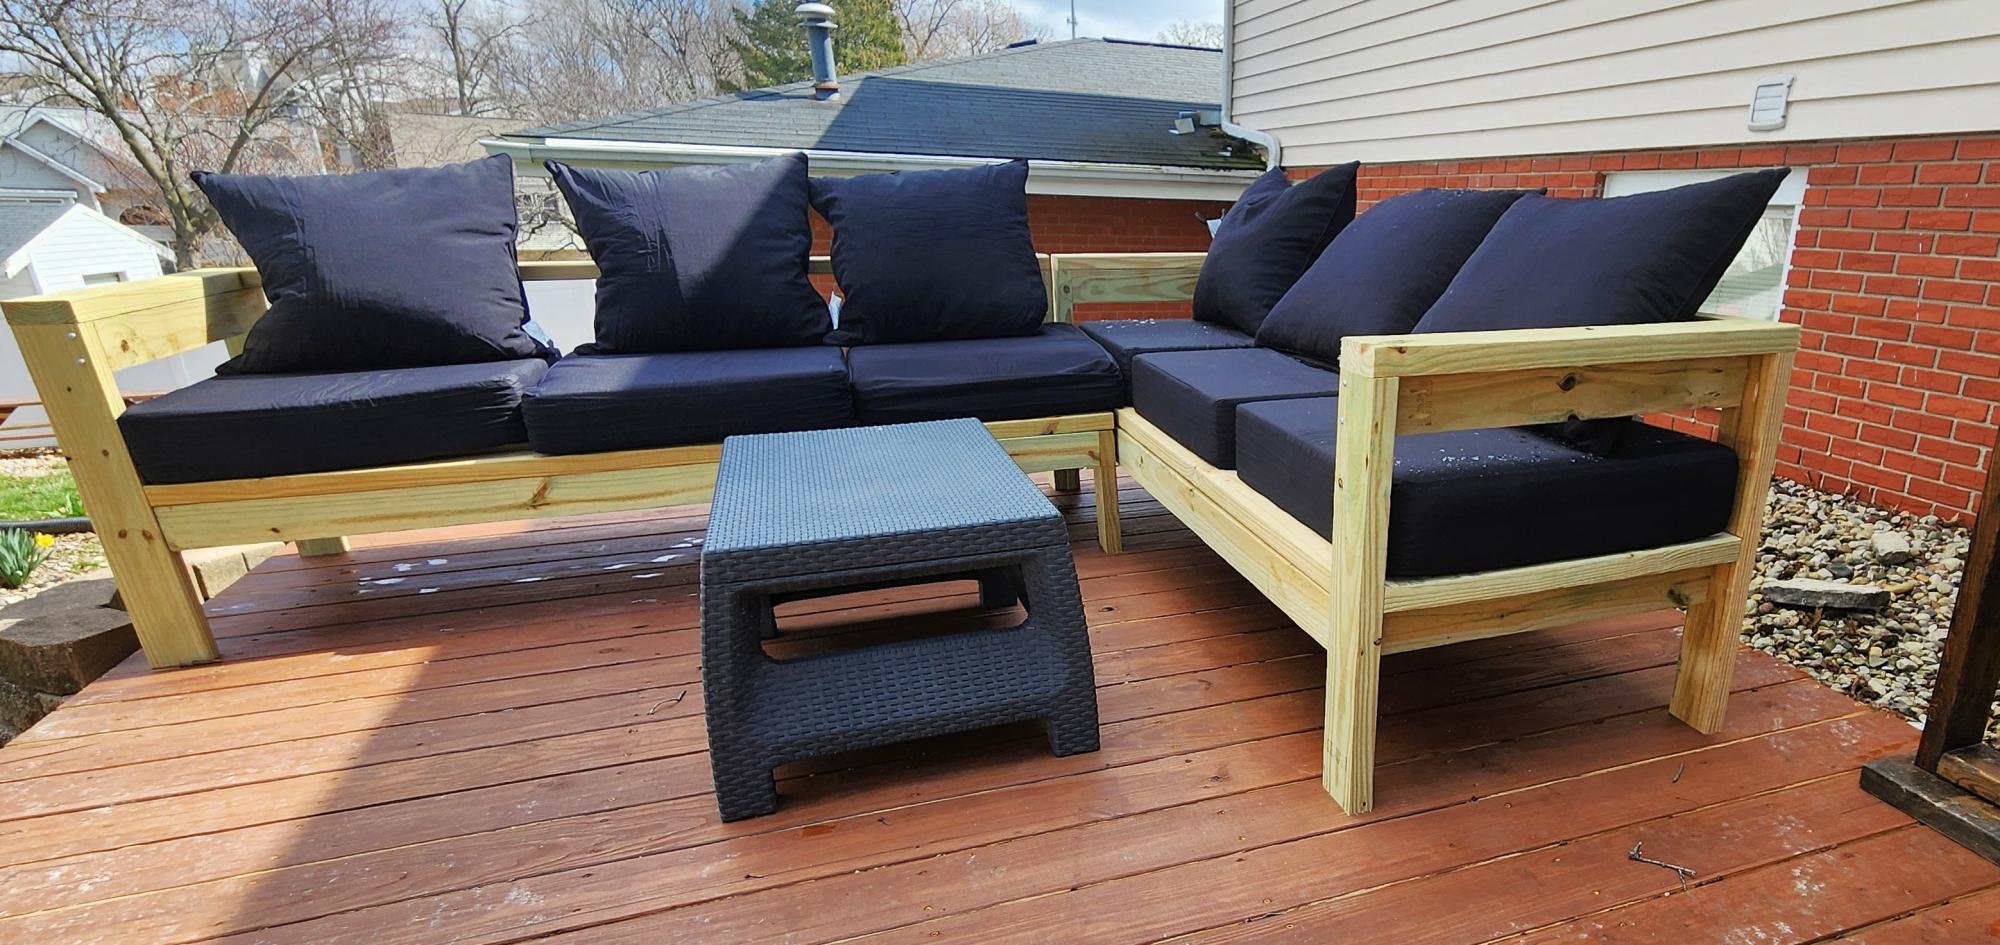
Thanks for the inspired design! Went together simple and quick. Your site rocks.
Garycates
Built from Plan(s)
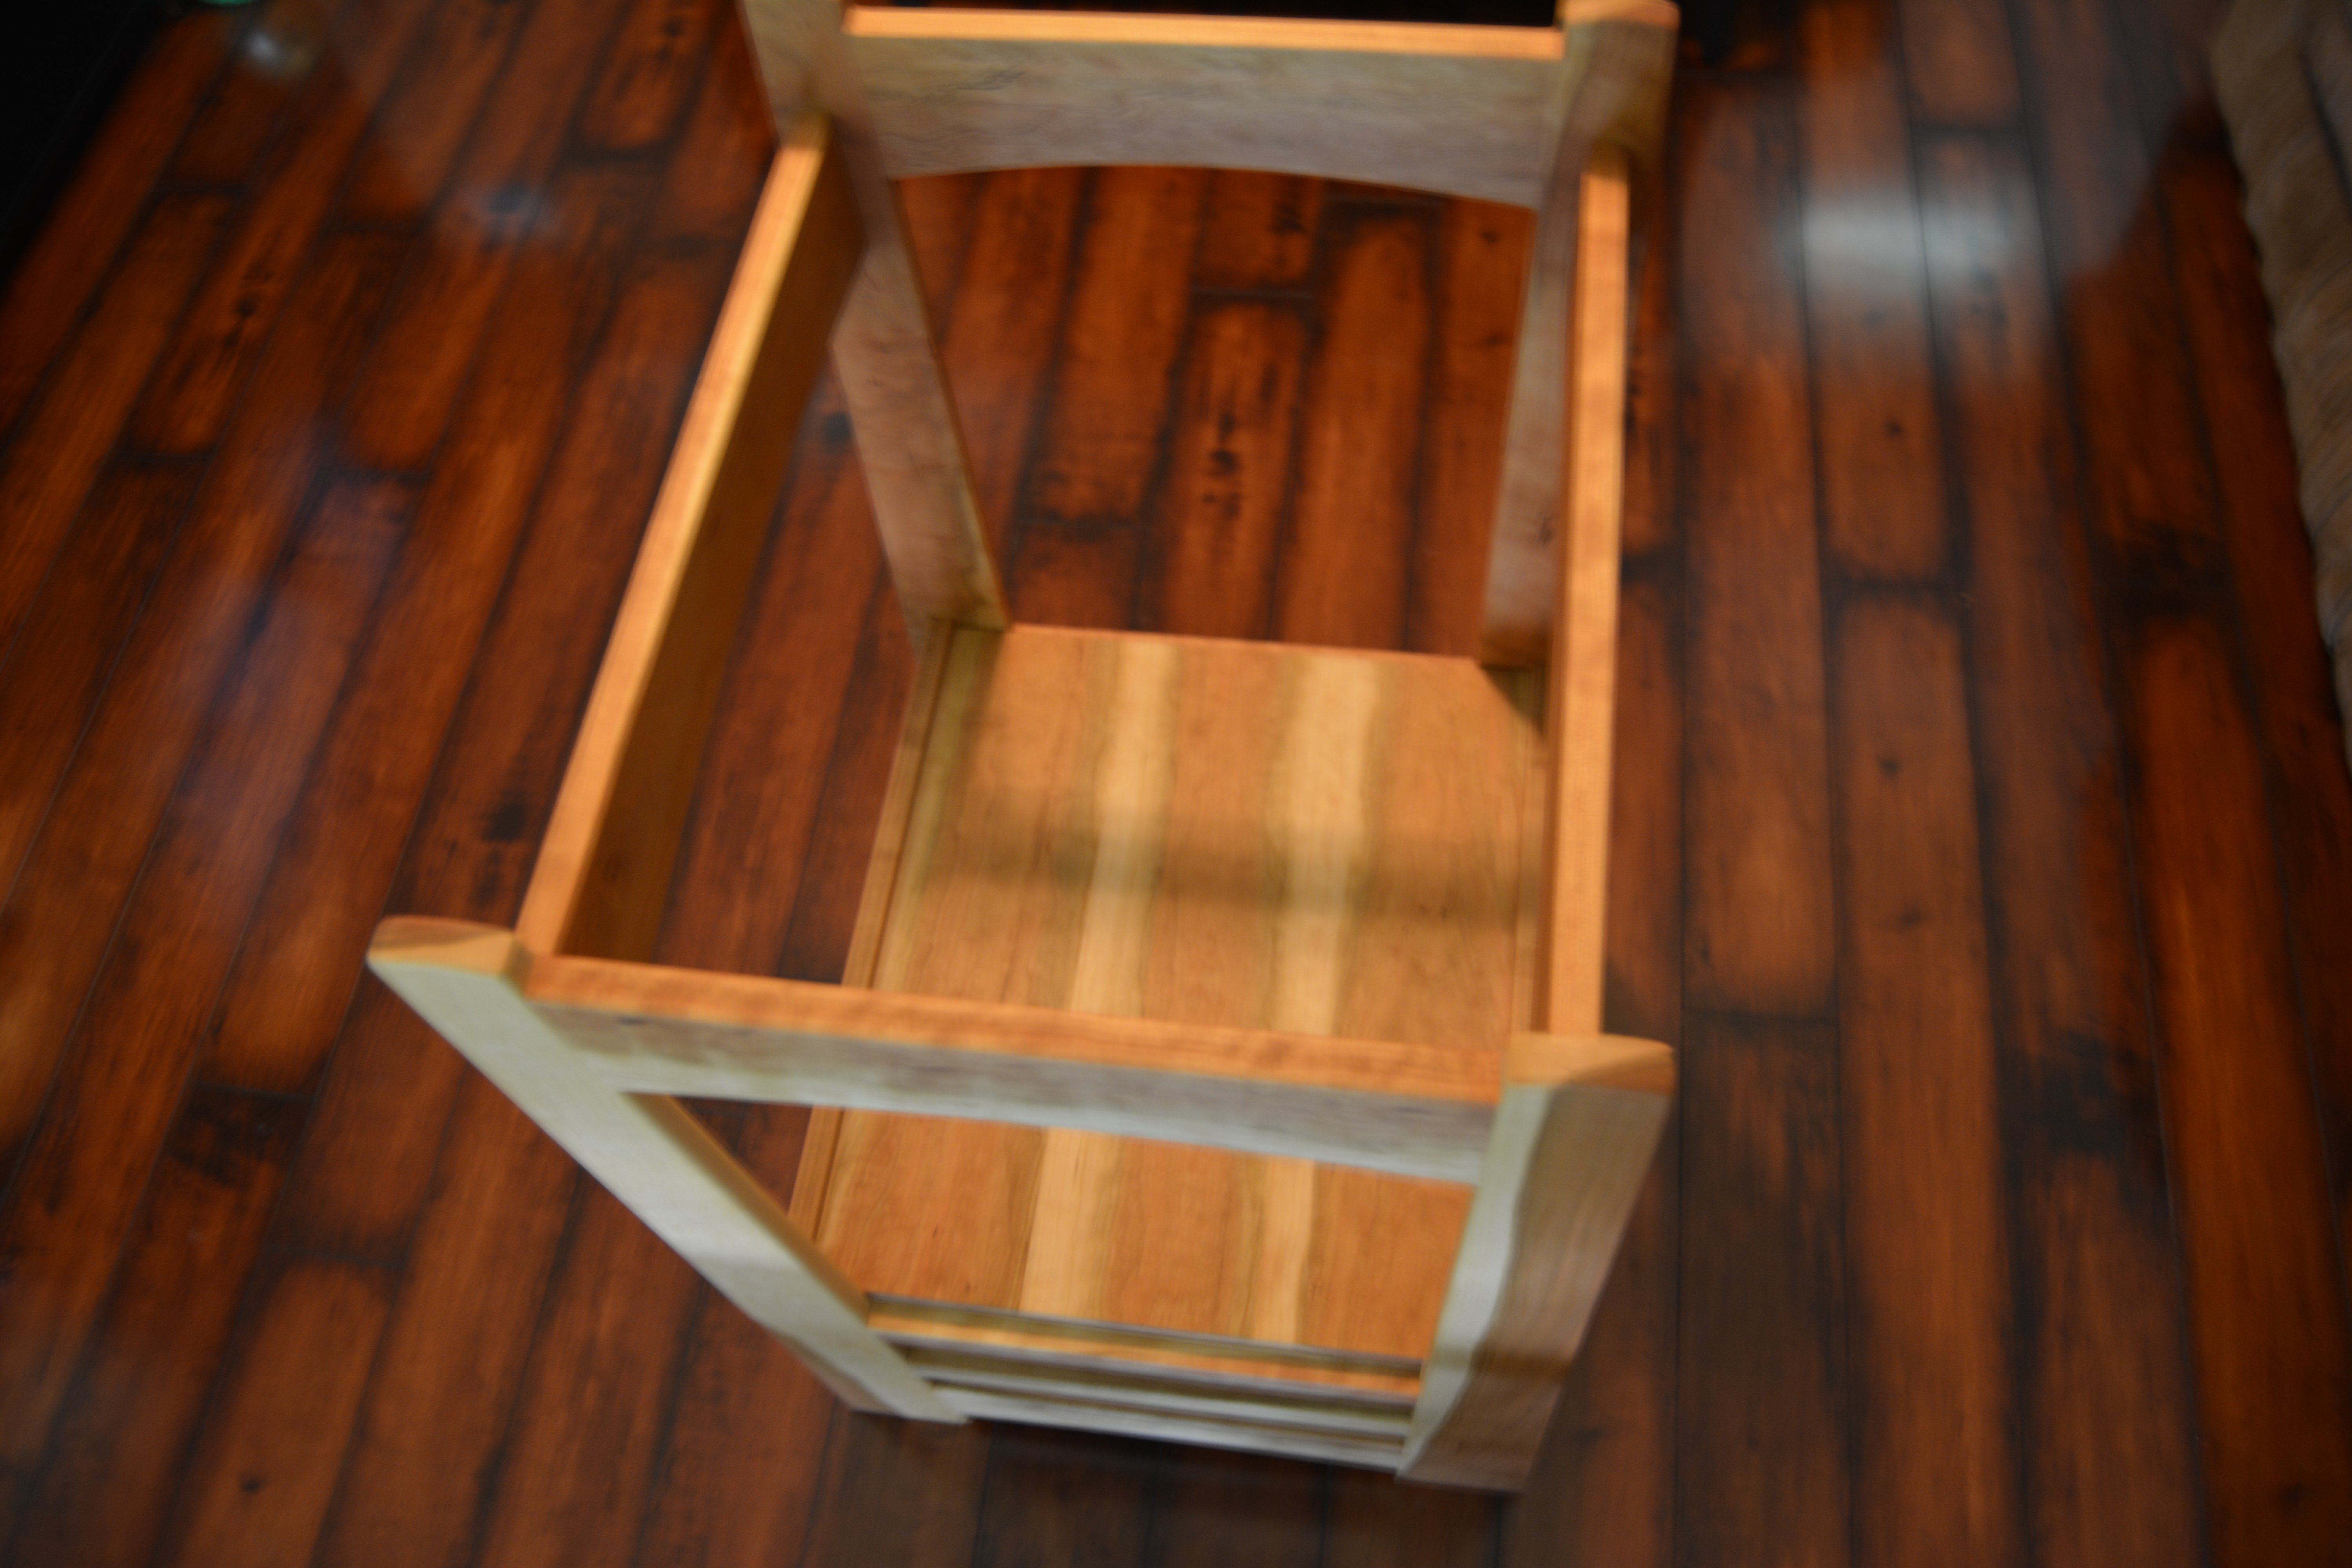
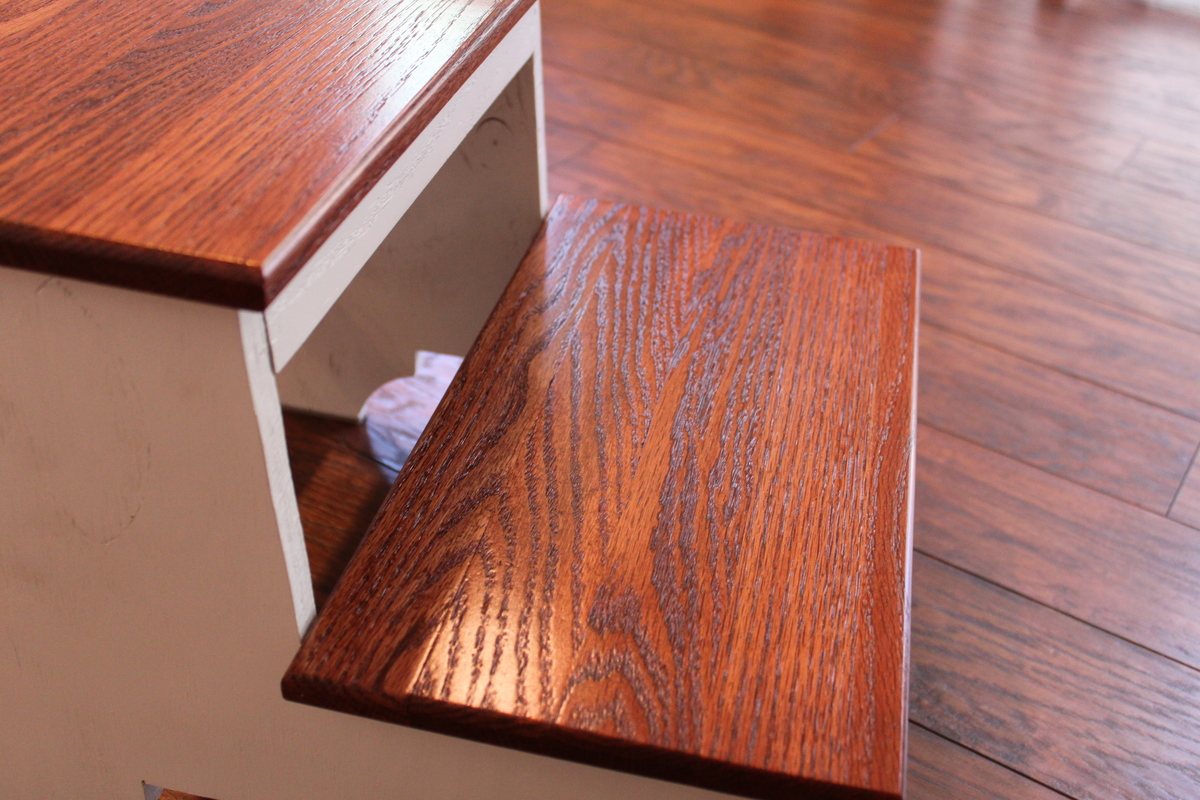
Landon's Mischief Step Stool
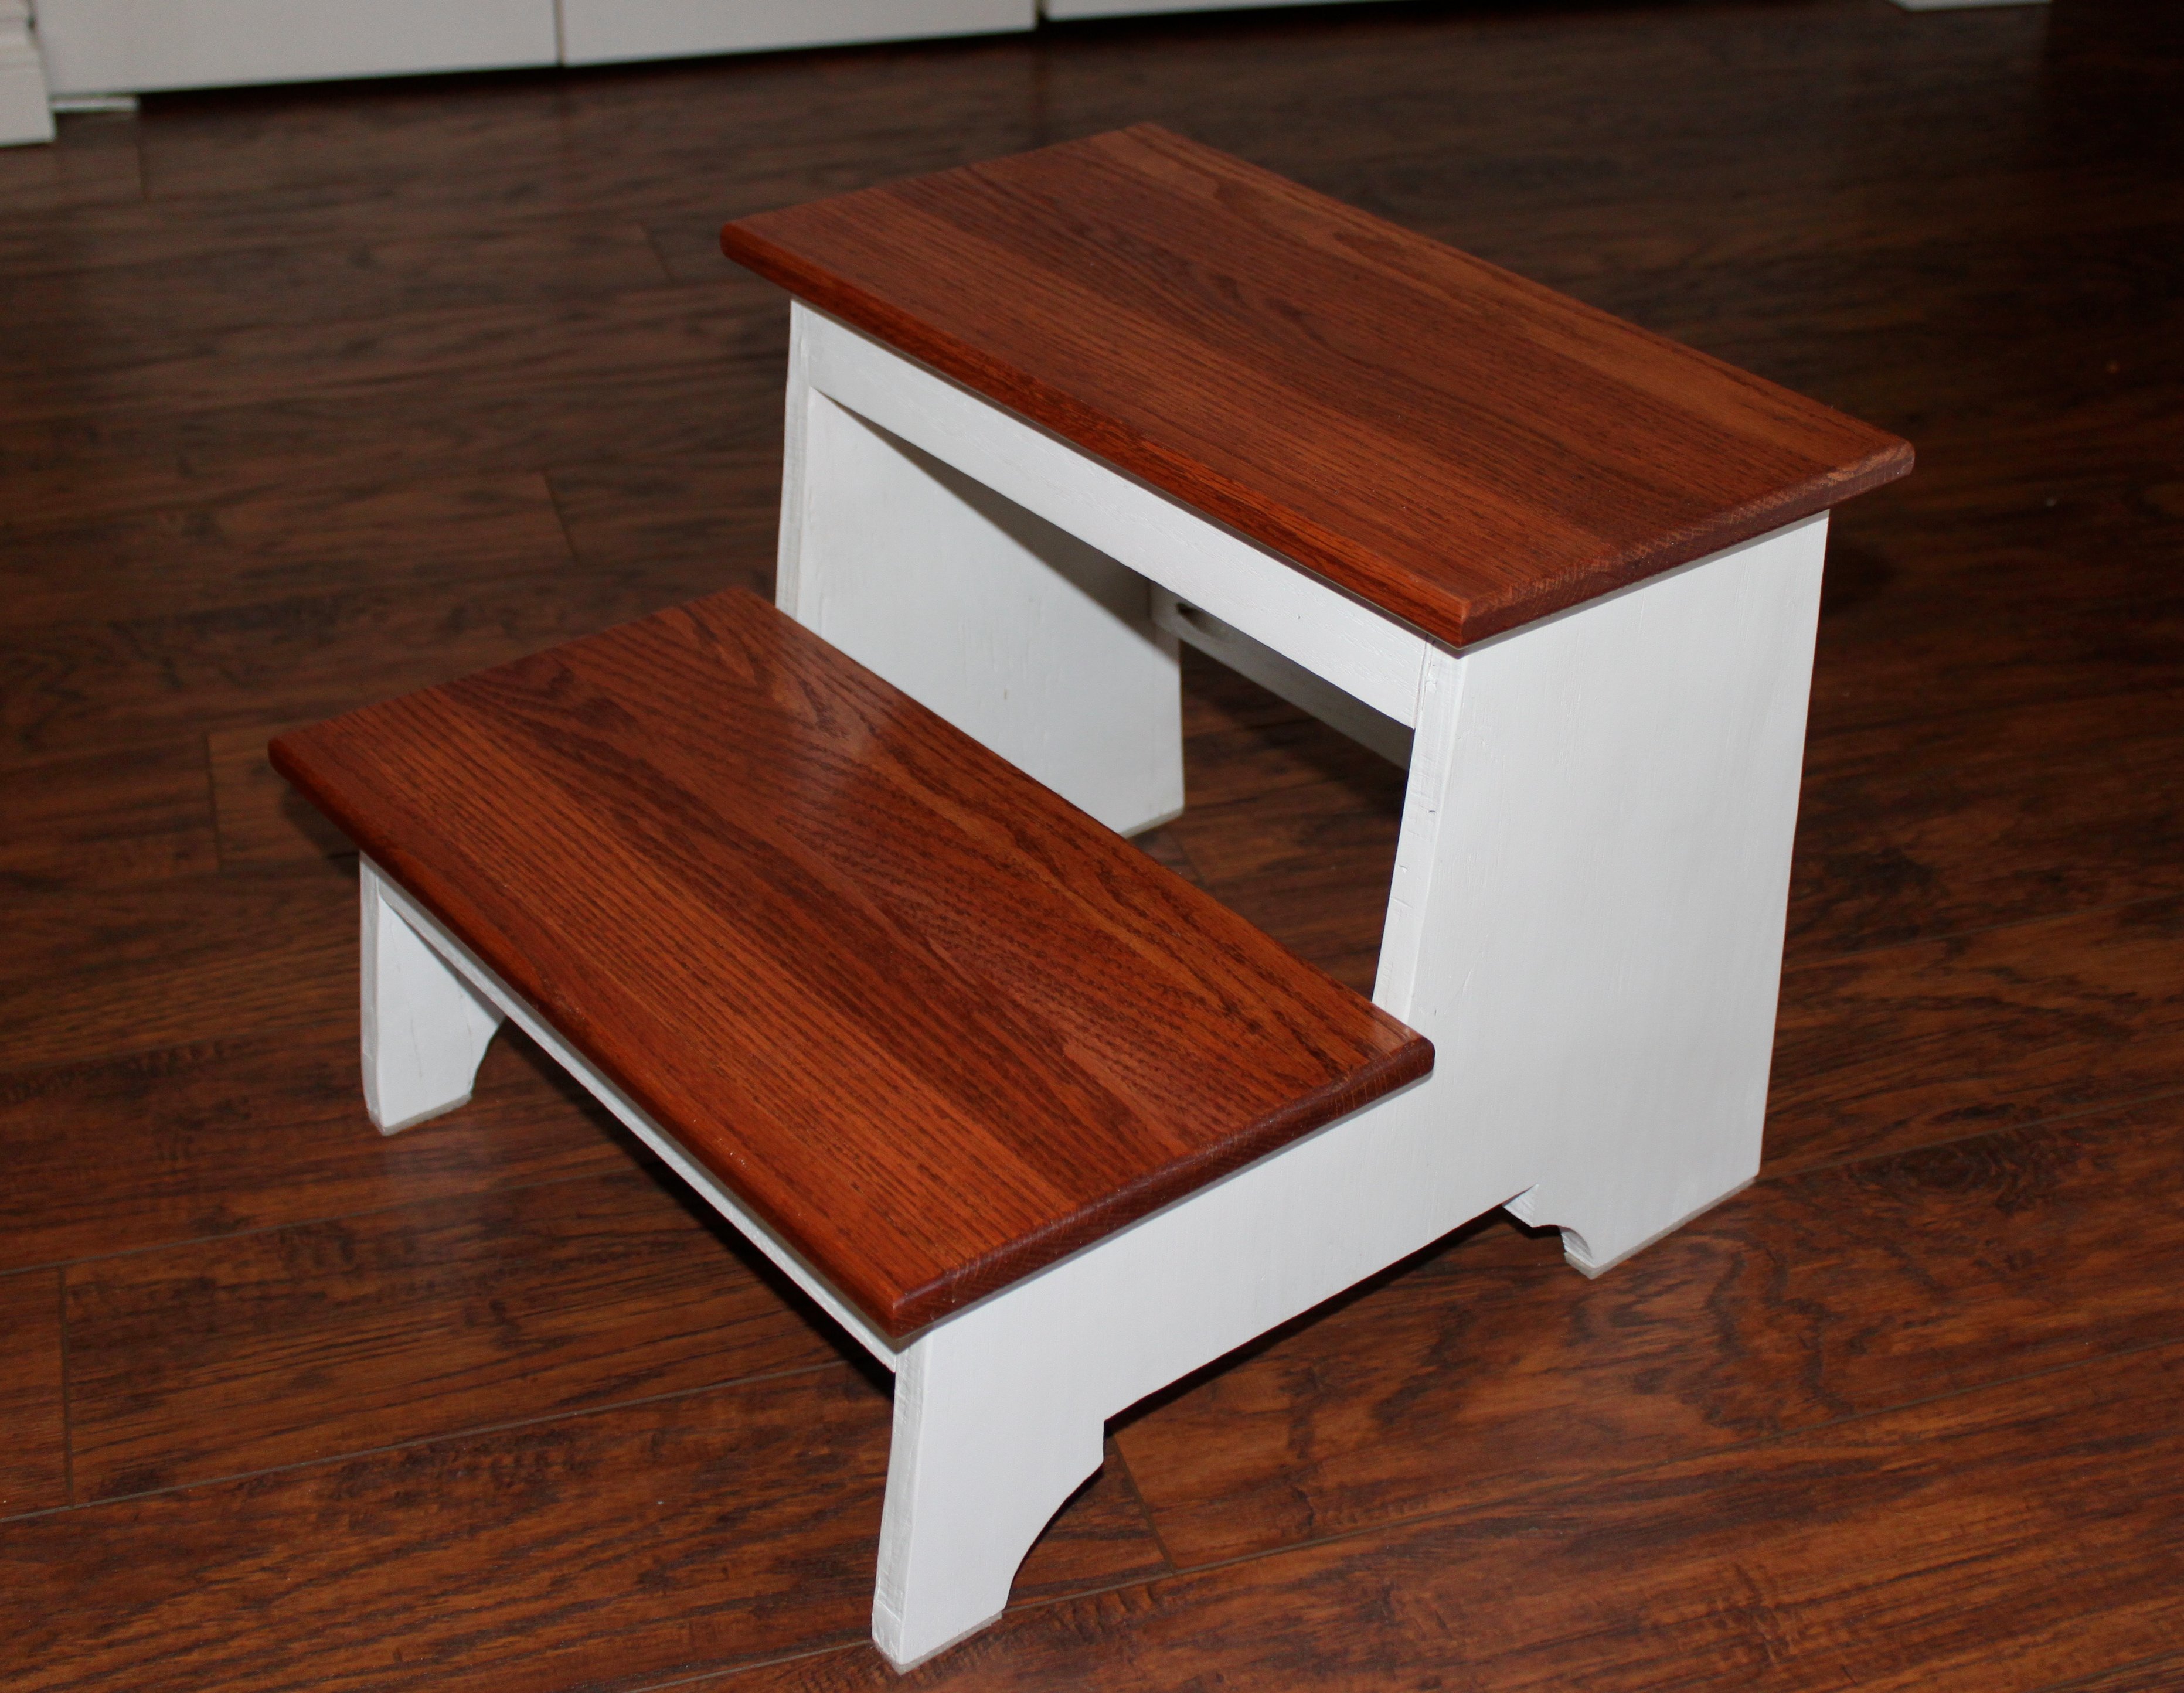
Very sturdy and stylish step stool built for my son in a style to match the kitchen and bathroom in our house.
This entire project was built using scrap plywood from a previous project and reclaimed oak boards that we demoed from our house while remodeling.
The sides were simply cut using a table saw to the rough dimension and then I added the details using a bandsaw. The stairs and rails were rough cut on the tablesaw and then milled using a jointer and planer to the specifications in the plan. Once cut I used a pocket screw jig to drill all the necessary holes before finishing assembly on the base. Each section was finished separately and then I used pocket screws to attach the steps last.
Very easy project that I made slightly more complicated by using reclaimed wood and a 2 tone design. Would recommend pocket screws to ensure strength and durability...I can stand on this and it doesn’t even budge!
Thanks for the plans!!
Built from Plan(s)
Estimated Cost
$10ish
Estimated Time Investment
Day Project (6-9 Hours)
Finish Used
Sides got an oil based primer followed by a high gloss trim latex paint applied using a HVLP Sprayer.
Steps were stained using Minwax Red Chestnut oil based stain.
The whole thing was finished using 2 coats of a clear Poly applied with a HVLP Sprayer.
Steps were stained using Minwax Red Chestnut oil based stain.
The whole thing was finished using 2 coats of a clear Poly applied with a HVLP Sprayer.
Recommended Skill Level
Intermediate