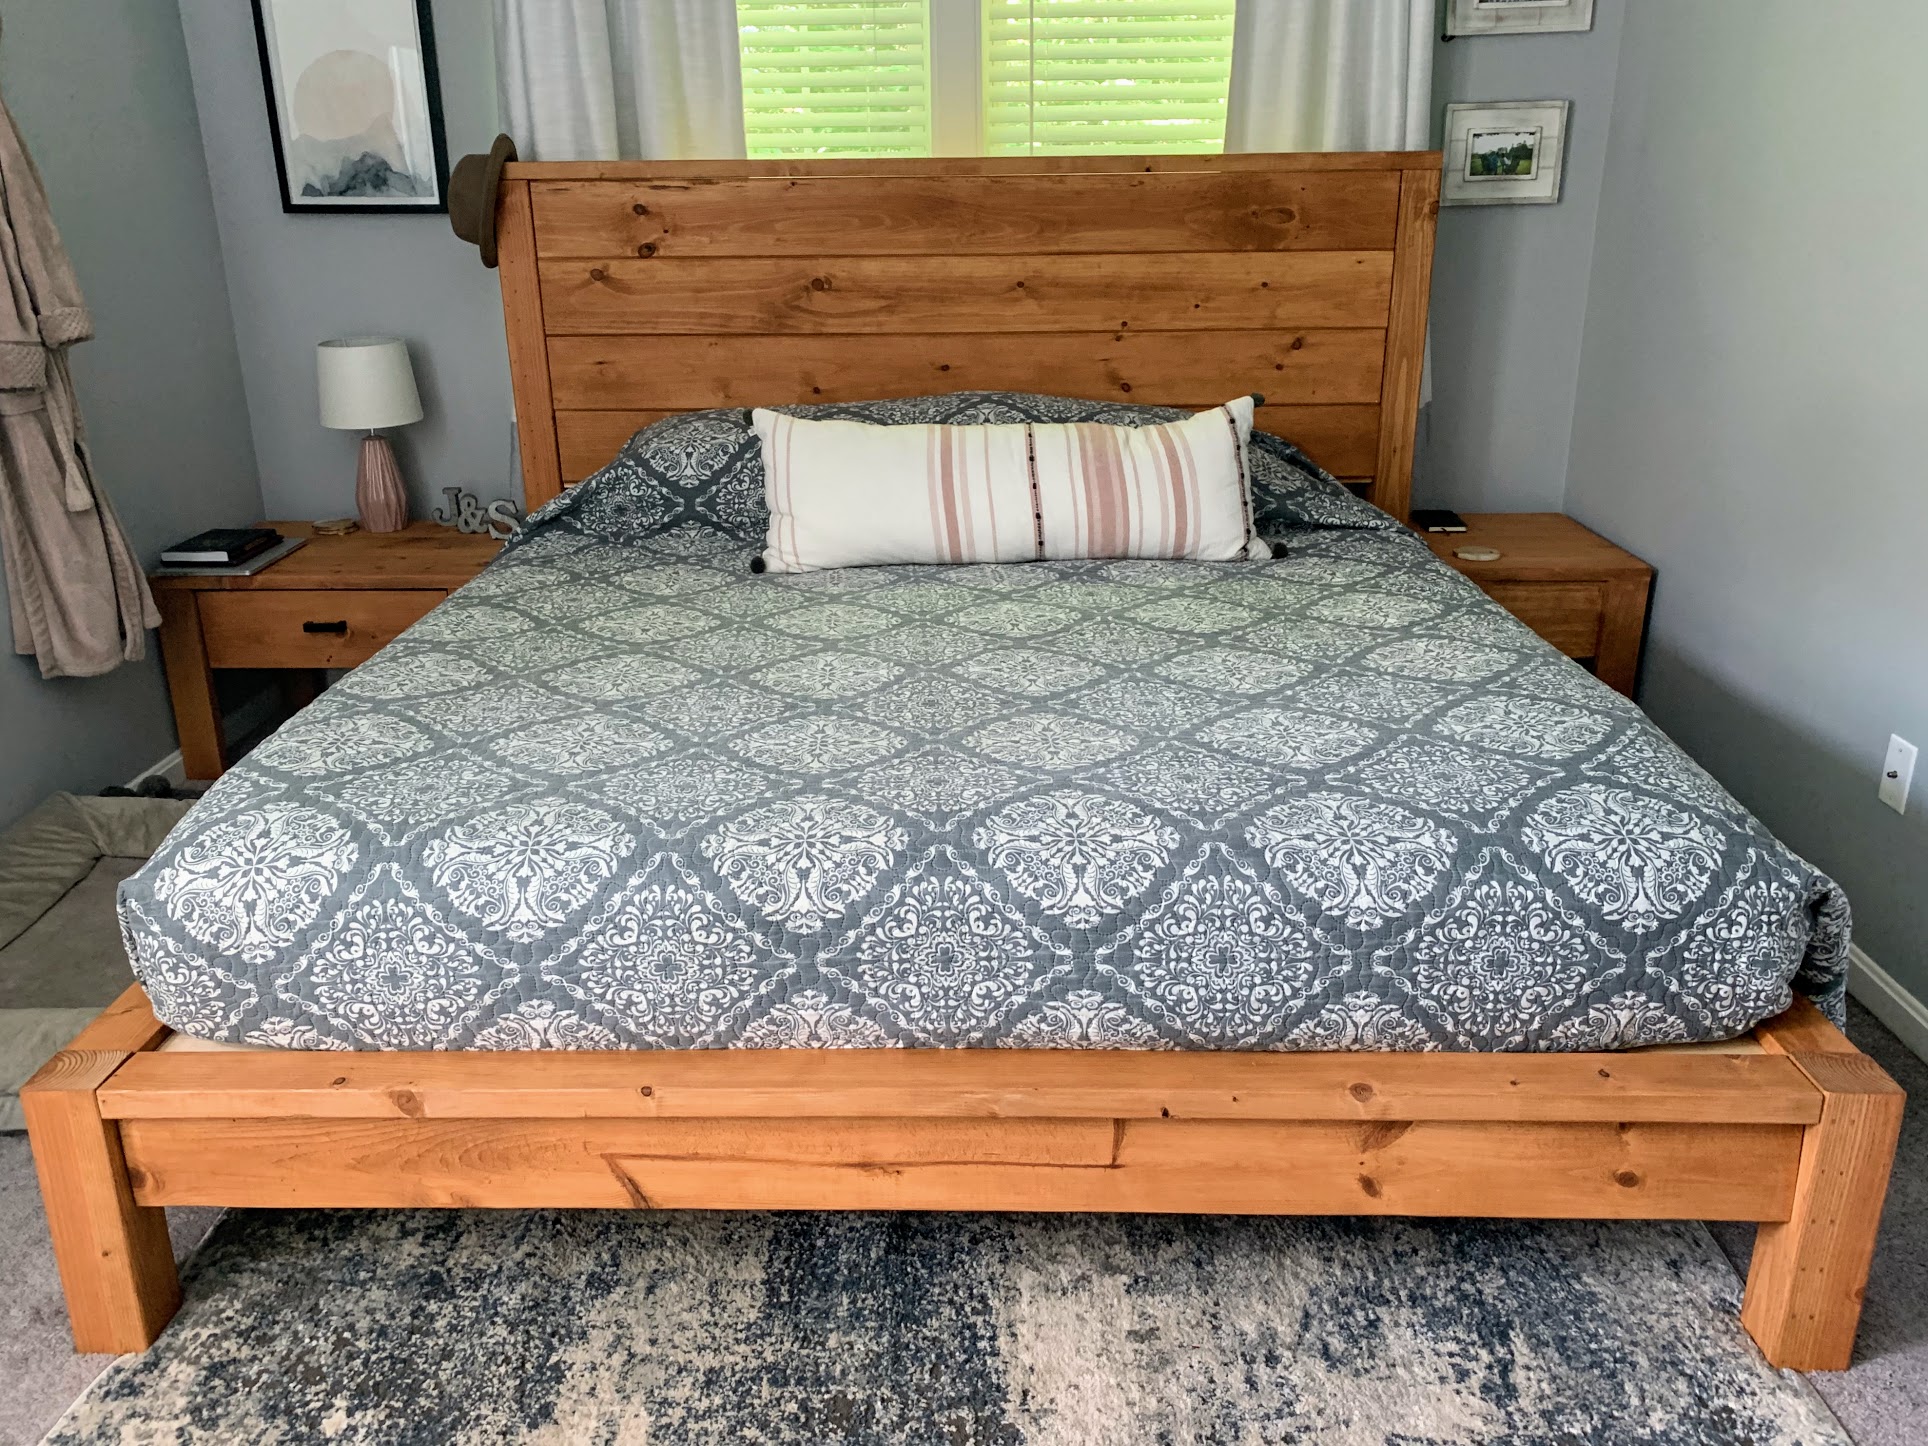
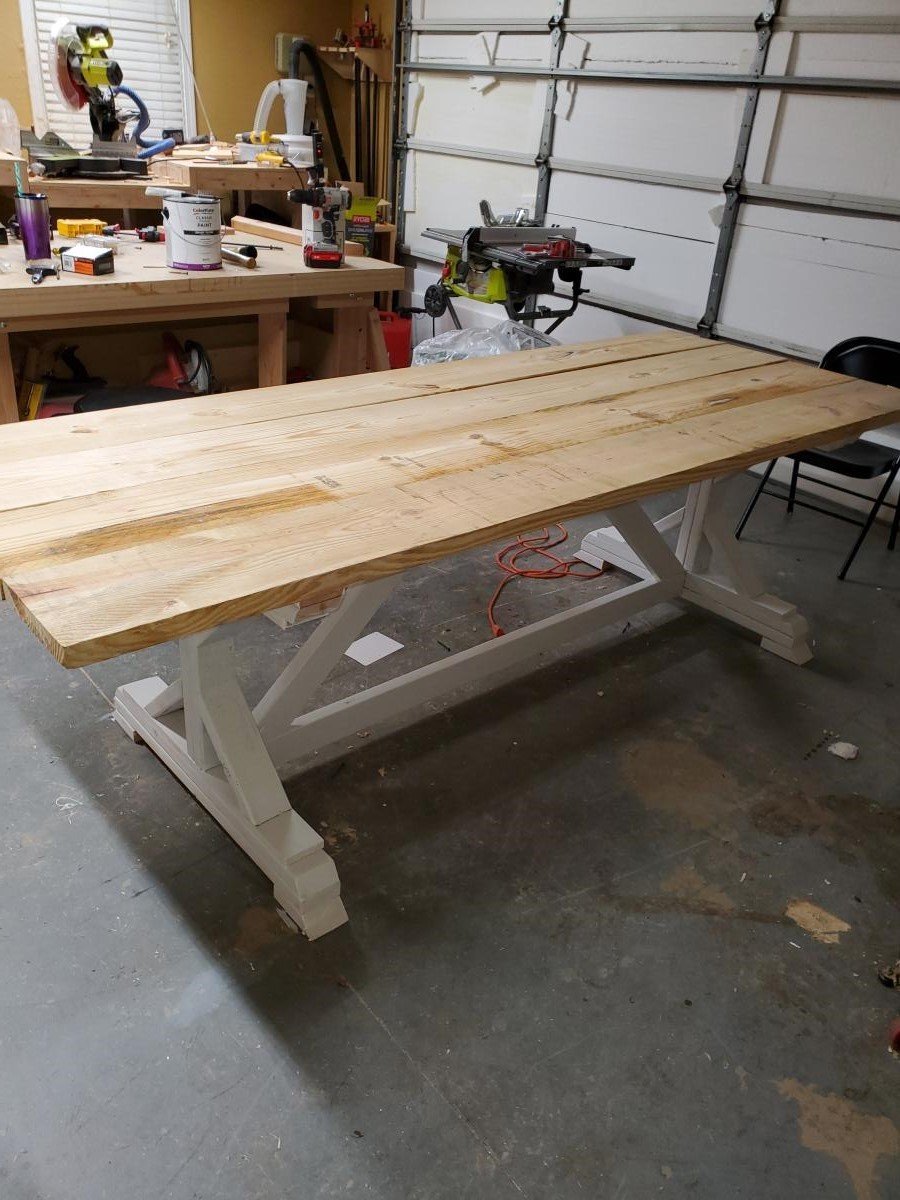
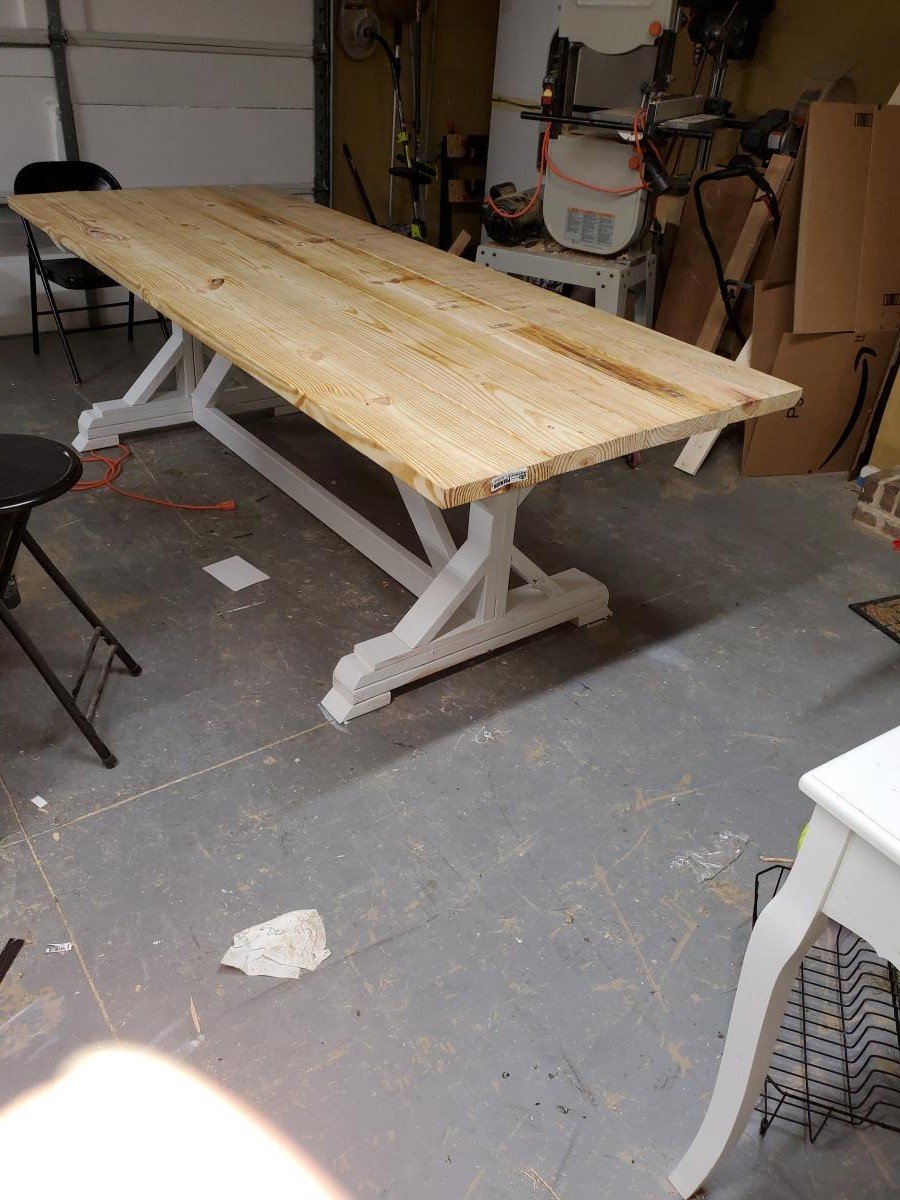
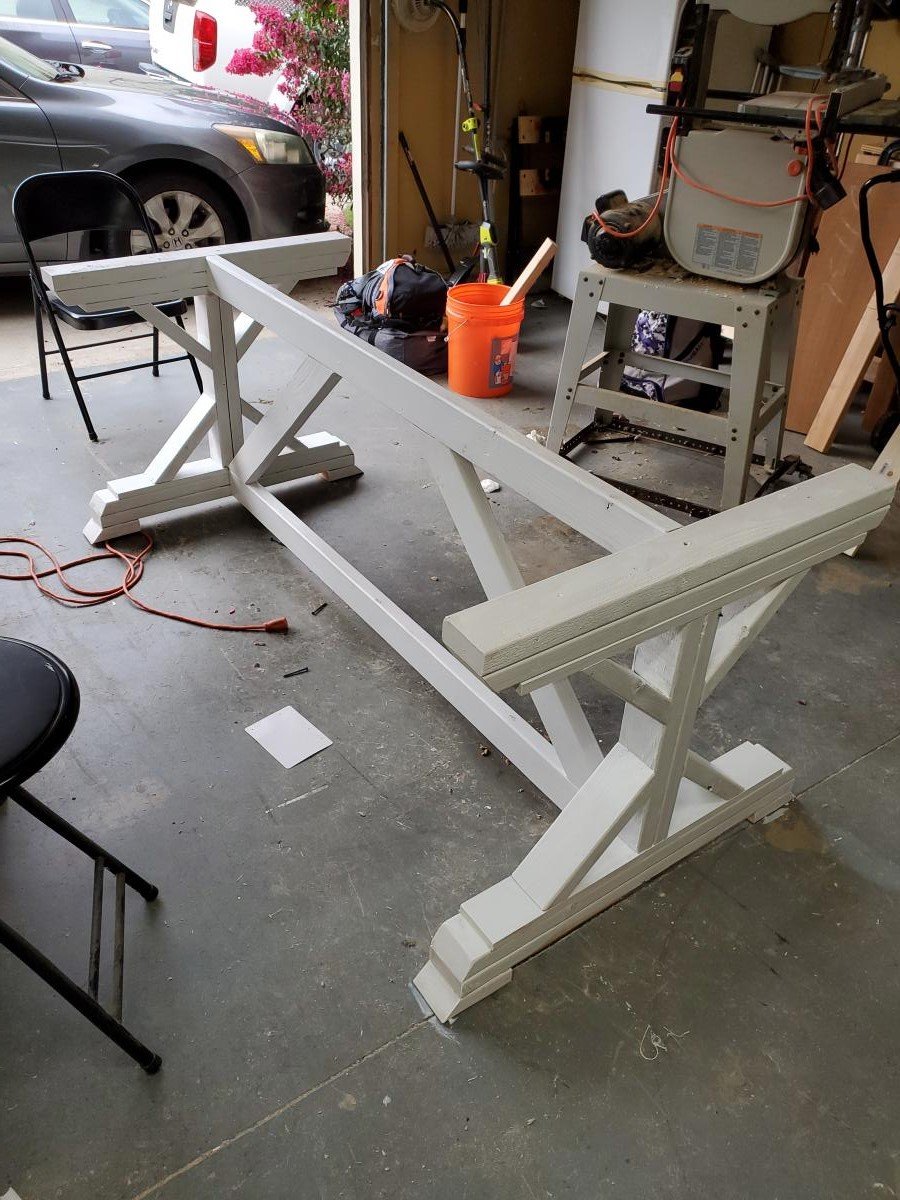
Community Brag Posts

Doggy Bunk Bed

Submitted by LaserTech on Sun, 08/12/2012 - 18:53

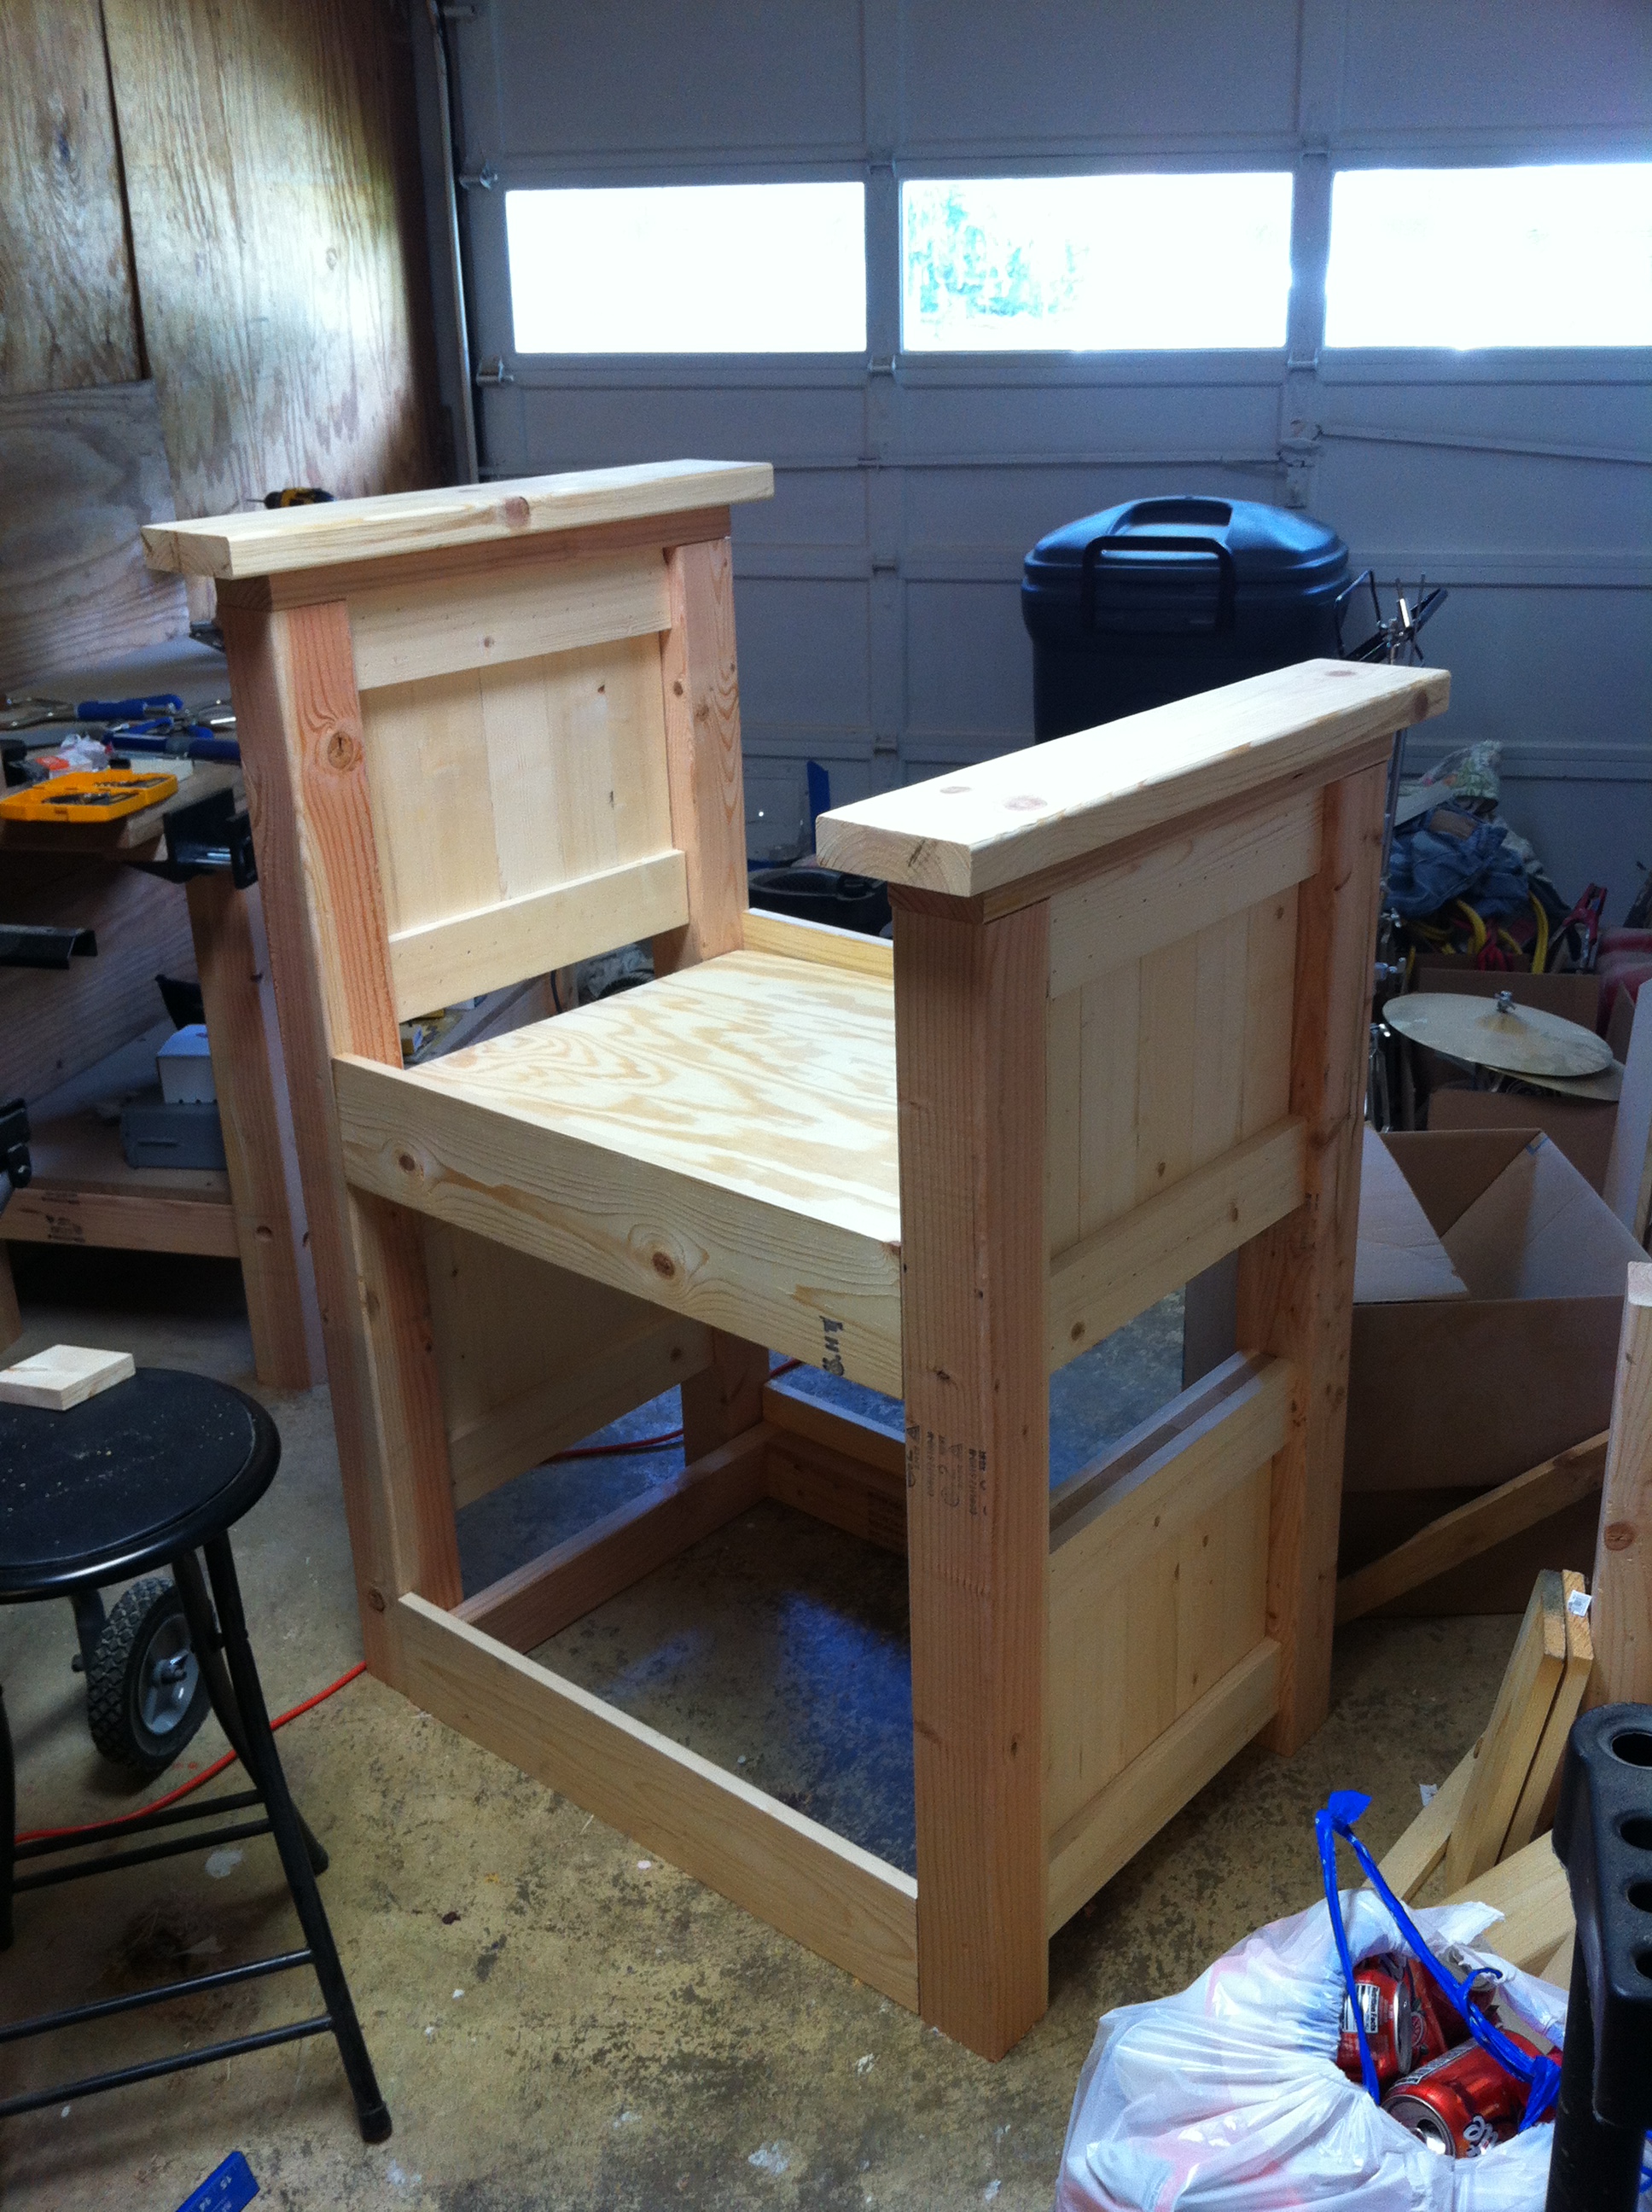
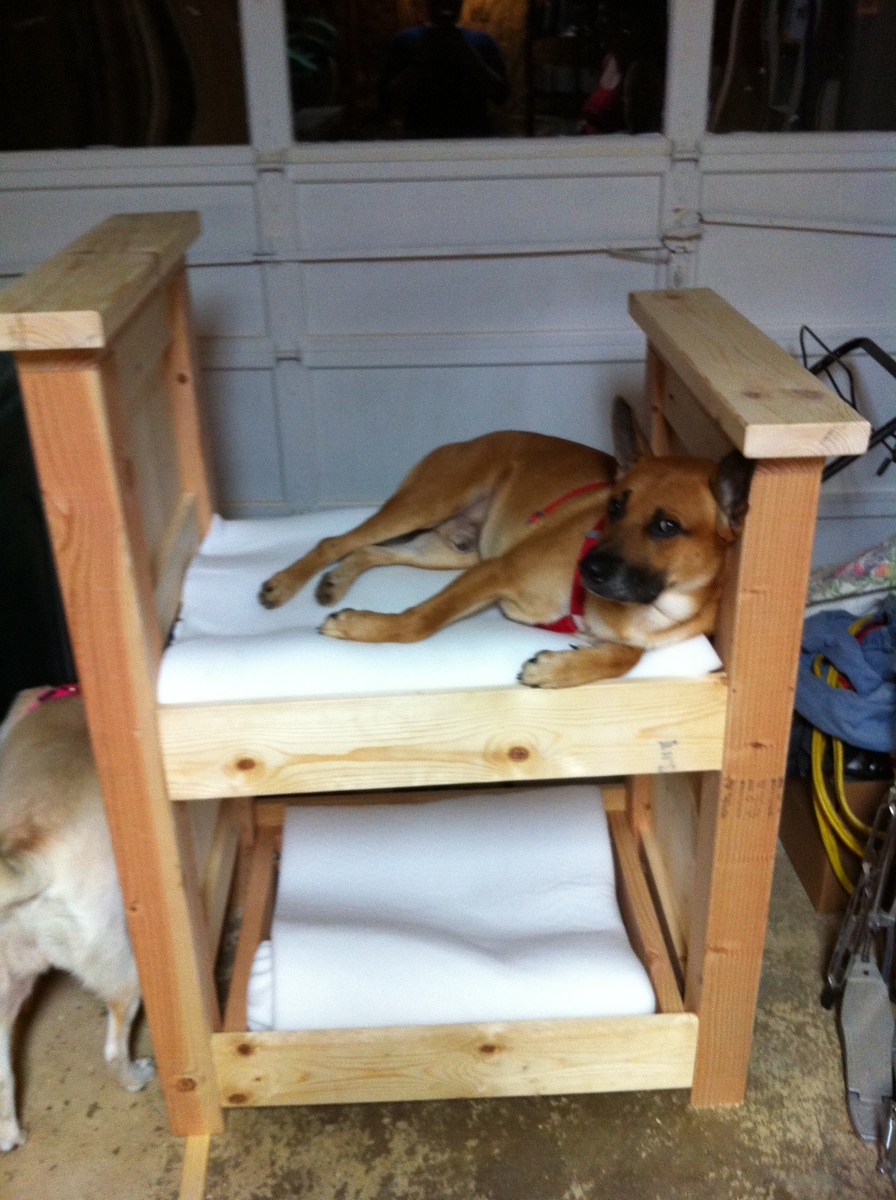
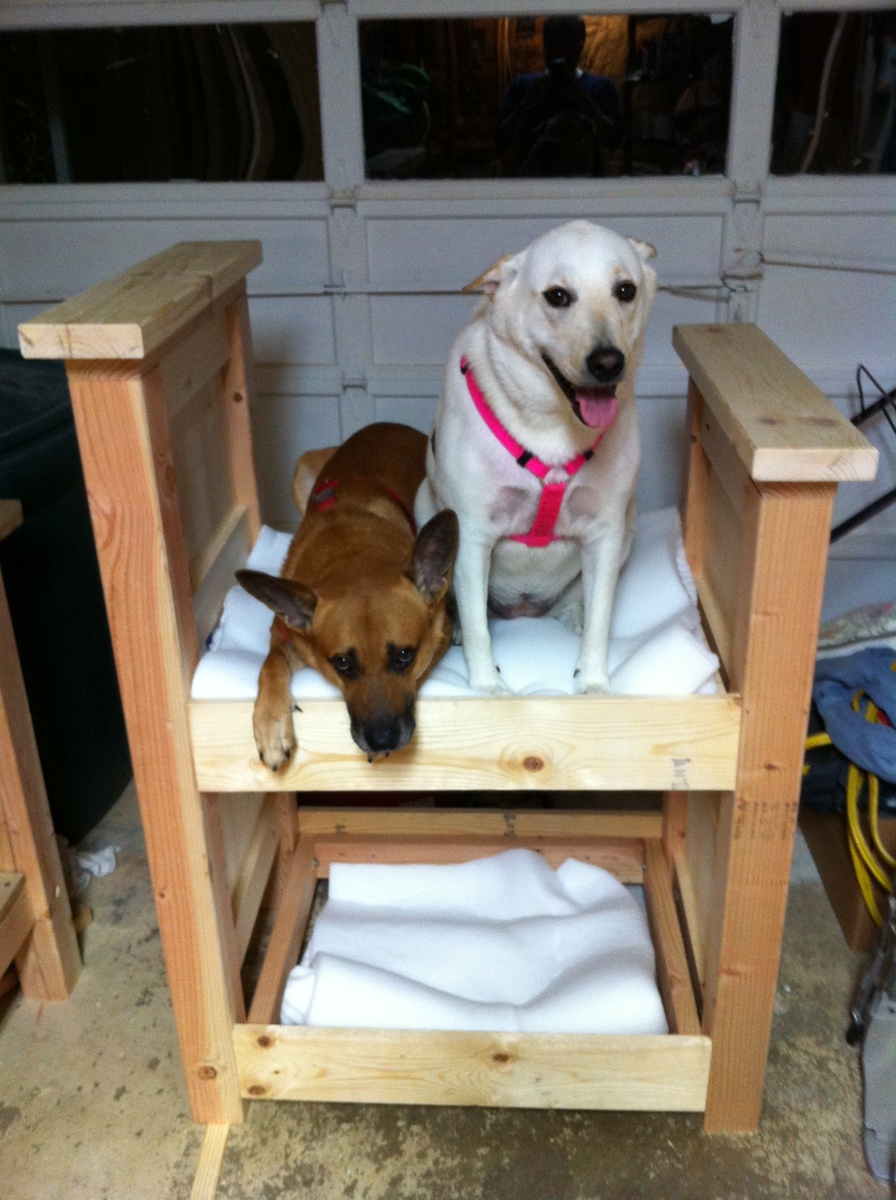
I built this dog bunk bed based on the queen farmhouse bed. As you can see the dogs are already fighting over the top bunk. This bed is very very sturdy and should give many years of use. Yes I spoil my dogs.

Built from Plan(s)
Estimated Cost
$100
Estimated Time Investment
Day Project (6-9 Hours)
Finish Used
Natural
Recommended Skill Level
Beginner

Comments

Roxxy G. (not verified)

Mon, 08/13/2012 - 14:52

I'm so happy I wasn't the only one who looked at these bed plans and thought "my dog NEEDS this"! They both look very happy.

LaserTech

Tue, 08/14/2012 - 17:23

Can you tell they're already fighting over the top bunk! I'm debating on painting it white. I like the natural look though. Thanks for the comment! :)

Jessie Murphy (not verified)

Mon, 12/03/2012 - 11:40

Can you by any chance post the dimensions you used for this bed. I know you used the farmhouse plan, but I'm not good at this at all and need all the help I can get!!

Outdoor seating made with thrown away cushions

Submitted by Anonymous (not verified) on Mon, 06/22/2020 - 18:01

Someone on my street had thrown out 2 couches. The cushions were in perfect condition. So I built chairs and fit the cushions! I built a matching coffee table to fit a glass I had. To finish the space, I added a table to have my morning breakfast.

Estimated Time Investment
Weekend Project (10-20 Hours)
Finish Used
Paint and stain
Recommended Skill Level
Intermediate

Comments

Modern round table

Extended round tanke with a middel section and a cross skapes leg structure. Loves working with the table top. I Sander down the old tanke top, jigsawed out the desired shape, brunt it with a blow torch, Sandnes and oiled with a stain. So satisfied.

Built from Plan(s)
Estimated Cost
5$
Recommended Skill Level
Advanced

Farmhouse Bench in 1 day

Submitted by vickitee on Wed, 06/25/2014 - 08:27

This was my first build from your site! Farmhouse bench.
I was a little confused with the miter saw instructions "bevel cut at a 10 degree angle off center". I had to google to figure out what you meant. In the end the bench looks awsome and I feel very empowered with my tools.
(still need to stain the finished project, bought all the wood and built in 1 day)
Thank you Ana for sharing your plans!! I love your site and I love my Kreg Jig!
Vicki
(Canada)

Estimated Time Investment
Day Project (6-9 Hours)
Finish Used
going to use walnut stain.
Recommended Skill Level
Beginner

Comments

Cedar Spa Bathroom Step Stool

Submitted by Tea Granny on Mon, 06/30/2014 - 20:44

After searching the town high and low for a 10" high wooden stool, I decided to make one. Ana had the perfect stool pattern to modify for our needs - A little shorter, a little wider.....et Voila!

It's the perfect height for little ones to reach the taps in the bathroom, as well as helping out in the kitchen from time to time. And, the cedar smells wonderful.

Finished height: 10"
Top measures: 11.25" x 16.5" (2 boards, cut 16.5" long + a space in the middle)
Footprint: 12.375" x 17.375"

I also lined up the rails (instead of staggering them), similar to the Harriet Higher Chair plans. The joint will be weaker, but I prefer the cleaner lines on such a short step stool.

Thanks Ana for the great plans!

Estimated Cost
less than $15 (cedar)
Estimated Time Investment
Afternoon Project (3-6 Hours)
Finish Used
No finish added, exposed screws.
Recommended Skill Level
Beginner

$12.00 Cedar Fence Picket Planter

I followed the plans exactly. The only difference is I used my Ryobi Airstrike brad nailer instead of stapler. Lowes was slightly higher in price than the $10.00 on Ana's post but at $11.97 it wasn't too far off!

Estimated Cost
11.97
Estimated Time Investment
An Hour or Two (0-2 Hours)
Finish Used
No finish
Recommended Skill Level
Starter Project

Fancy x farmhouse table

Submitted by Anonymous (not verified) on Thu, 10/13/2016 - 19:40

Barnwood fancy x farmhouse table.  

Built from Plan(s)
Estimated Cost
$100
Estimated Time Investment
Weekend Project (10-20 Hours)
Finish Used
Barnwood sanded down to achieve that golden brown, while leaving the aged texture in the cracks. Left natural.
Recommended Skill Level
Intermediate

A-Frame Chicken Coop

We took Ana's original coop plans and diva'd it up a bit to suit our needs and our climate. We added a pop door and decided to split the roof panels into four, three of which open up. We put the hinges on the top of the roof panels so we could easily prop them open. We also added a brace across the bottom of our ladder for support. Since we added a door I believe our ladder is a bit more steep than in the original plans.

Because we put our hinges on top we added lattice strips inside on the top of the door panels that go just under the 2x4 of the roof peak to keep the rain out. We also used a roof cap for the same reason. We went back and added silicone to the strategic places to prevent water leaking into the nesting box while also being careful not to affect the necessary ventilation.

We used OSB for our roof panels instead of T111 because it's what we had on hand and also because we were going to be painting it.

Finally I added handles to each of the hinged panels to make opening easy. And cute!

Built from Plan(s)
Estimated Time Investment
Weekend Project (10-20 Hours)
Finish Used
I used a no VOC exterior paint from Valspar (green) that I found in the mistinted section at Lowe's. The pink (ladder) is Very Berry by Valspar and is not an exterior paint.
Recommended Skill Level
Intermediate

Comments

anniejw17

Wed, 02/27/2013 - 11:11

Love your coop! It's so cute! I need to find a weather vane. We ended up adding a roof cap of sorts - just aluminum flashing really. It does still leak in the nest box, though, which just encourages me to change out the bedding for fresh straw, which is a good thing I guess!

Southern Revivals

Wed, 02/27/2013 - 13:24

Yes mine leaked, too. We added the roof cap and some silicone but that still didn't stop it. So I finally went in and added some screen molding behind the panels in the nesting box. It still isn't quite "leak proof" but it is better. I will share if I figure out how to make it leak proof! Thank You!

billd333

Mon, 01/13/2014 - 09:45

These were great plans, thanks for sharing!
I'm new to having chickens so since it's cold now is Massachusetts I'm holding off on getting a couple of hens. The 2 main questions I have are where did you end up mounting the roost? And where did you end up putting the nesting box? I only put a floor on half so was thinking the roost board could be suspended above the ground on the open side. That leaves the 1/2 floor to hold the nest box?? Please any comments on the roost, nest box, watering and feeding systems are welcome.
thx..Bill

Southern Revivals

Mon, 01/13/2014 - 10:03

Hi Bill,

I am actually in the process of writing another blog post about this coop. I have gotten so many questions about the modifications we did and have lived with it long enough to know what I would have done differently. You doing the 1/2 is great and is one of the things I would do differently if we had it to do over again.

I will post an update here as soon as that post is live. In the meantime, feel free to contact me directly at Jamie @ Southern Revivals.com

Thanks!
Jamie

Used picture ledge directions to build spice shelves

Submitted by Cricquette on Tue, 10/02/2012 - 15:15

Used the instructions for building a picture ledge and instead used the shelves for spices. Only cost $10, already had the stain and polyurethane at home. Didn't do pocket holes, as I don't have a jig, just drilled/screwed directly into the pieces. Would have been done in less than an hour, but the coats of stain and polyurethane took over 24 hours to dry/reapply.

Built from Plan(s)
Estimated Cost
$10
Estimated Time Investment
Weekend Project (10-20 Hours)
Finish Used
English Cottage stain
Recommended Skill Level
Starter Project

modern farmhouse bed frame with matching end tables

Submitted by Anonymous (not verified) on Thu, 07/30/2020 - 10:13

Bed frame - Husband and I built and assembled over a weekend. We love it!
Only variation from the plans were that we used 1x8 shiplap boards for the headboard (because the options were nicer at Home Depot).

Nightstand 1 - This I built myself, it took about 5 hours.
Followed the directions and the drawer worked the first time!

Nightstand 2 - This I also built myself, took about 4 hours.
This one I had about 17" to work with. The only measurement that changed was the front and back cut to 10".

Estimated Cost
Not sure about the bed frame. We purchased some tools for this project.
about $70 per nightstand
Estimated Time Investment
Weekend Project (10-20 Hours)
Finish Used
Minwax Wood Finish
Semi-transparent
Ipswich Pine - 221
Recommended Skill Level
Beginner

Comments

okstout4

Mon, 10/19/2020 - 19:42

Very nice! I'll have to look into this color as Im loving it!

Perfect End Table

Submitted by mykane on Thu, 10/11/2012 - 22:01

This was the first furniture building project for my husband and me. We changed the table height to 28 inches instead of 24 and used plywood for the top, like Jenn did in her post. It took us a little longer than we thought since we are not experts (yet!), but we made it work and love how it turned out! This is such a classic and stylish table. Perfect for a beginning project!

Built from Plan(s)
Estimated Cost
$70
Estimated Time Investment
Day Project (6-9 Hours)
Finish Used
Olympic Latex Flat in Heirloom Lace for the base (primer first, then at least two coats). Varathane Wood Stain in American Walnut for the top. Three coats of polyurethane on the top and then one more coat over the whole thing.
Recommended Skill Level
Beginner

Revised Dog Crate

Submitted by mecoda on Mon, 08/04/2014 - 09:26

First project made from scratch....took me a while but glad it is finished! Will try to do one more of a larger size for my other dog.

Estimated Time Investment
Week Long Project (20 Hours or More)
Finish Used
SafeCoat Durostain (birch and walnut)
Vermont Natural Coatings for the topcoat
Recommended Skill Level
Starter Project

Comments

Foot stool.

Submitted by CKam0011 on Tue, 08/04/2020 - 20:15

Just got into woodworking as a hobby. This is my first project, pretty happy with how it turned out.

Finish Used
Urethane, trim paint.
Recommended Skill Level
Beginner

Pony Wall

Submitted by Anonymous (not verified) on Thu, 08/13/2020 - 06:17

Love your site. The 8’ pony wall I recently made was a great plan. I’m also going to build the outdoor storage plan you have. Thanks for your creativity!

Built from Plan(s)
Estimated Cost
$200
Estimated Time Investment
Weekend Project (10-20 Hours)
Finish Used
Linseed Oil

Double Trash Bin

Submitted by Anonymous (not verified) on Wed, 08/26/2020 - 08:32

This was based on the "Small Kitchen Island" Plans but needed to put 2 - 33 Gal Trash cans in. I used Select Square edged Pine. The depth remained the same as the plans but the width changed dramatically (52" wide). I also increased the height to match the other furniture (3' High). I added 4 - 1 X 2's to the top of the cabinet to secure the top.

Estimated Cost
$350-$400
Estimated Time Investment
Week Long Project (20 Hours or More)
Finish Used
The bottom was paint that matched the other furniture, the top is an Classic Oak Poly/Stain - 3 coats
Recommended Skill Level
Intermediate

Comments

Fancy x farmhouse table

Submitted by Keldani5 on Mon, 09/07/2020 - 03:50

This was a weekend job, had a lot of angles and I had to scribe a lot of them

Built from Plan(s)
Estimated Cost
145.00
Estimated Time Investment
Weekend Project (10-20 Hours)
Finish Used
for the top I used a carbon gray poly stain. The bottom was just a satin white
Recommended Skill Level
Intermediate

Garage Shelves

Submitted by scoricha on Mon, 01/09/2017 - 11:01

I am loving my new garage shelves.  They were my first woodworking project and very easy to do!  I left the bottom right side open to fit my outdoor table and chairs in the winter (I live in Michigan).  I also used thicker plywood than plan because my shelves are a bit deeper.

Estimated Cost
$130
Estimated Time Investment
Weekend Project (10-20 Hours)
Finish Used
none
Recommended Skill Level
Beginner

Vintage Bar Stools

Submitted by danicarby on Fri, 09/26/2014 - 10:45

I did a little search to find a barstool and when I saw these plans on Ana White I fell in love.  They were an easy build and didn't cost a lot.  I made my stools shorter and altered the overall footprint.  I like to plug all visible pocket holes which is easy to do and looks great.

Built from Plan(s)
Estimated Cost
$20 for 2 stools (using cheap furring strips)
Estimated Time Investment
Weekend Project (10-20 Hours)
Finish Used
Sherwin Williams Latex Paint (white), sand with 220 grit to smooth and distress and 2 coats of Minwax Polycryclic Water-Based Clear Satin Top Coat
Recommended Skill Level
Beginner

Shoe Dresser

I had this space in my mudroom that was a perfect spot to make a custom shoe dresser. I adjusted the plans I found on this website to custom make storage for shoes. Now this weird little space is functional.

Built from Plan(s)
Estimated Cost
80
Estimated Time Investment
Day Project (6-9 Hours)
Finish Used
Rustoleum chalk paint Serenity Blue, classic grey and special walnut Minwax
Recommended Skill Level
Intermediate

Comments

My take on the Parson Chair

I bought some cool Parson Chairs to use with my grandparent's 1950s style porcelain top table. Unfortunately, the chairs were way too big to fit between the legs of the table. My friend said she was surprised I didn't build my own chairs in the first place... that's when I remembered seeing a Parson Chair plan on Ana White! I liked the overall design of the chair in the plan, but I wanted to make some changes to make it my own. I made the chair narrower to fit between the legs of my table, changed the angle of the rear legs from 15 degrees to 10 degrees, increased the rear legs from 2x2s to 2x3s and made the back taller. This was my FIRST sewing project and I'm really pleased with the way it turned out!

Built from Plan(s)
Estimated Cost
approximately $150-$175 for two chairs
Estimated Time Investment
Week Long Project (20 Hours or More)
Finish Used
Legs are painted with an eggshell black Martha Stewart paint.
Recommended Skill Level
Intermediate

Comments

mikejillnelson

Wed, 01/02/2013 - 06:25

These look beautiful! Would you mind giving me your opinion on their comfort to sit in? Also, do you mind sharing where and what kind of foam padding you used for the seat? Thank you - and great job!

Knot Perfect

Wed, 01/02/2013 - 18:32

Thank you! They are actually really comfortable to sit in and no one believes I made them! I'm 5' 4", so I should mentioned that I shortened the leg to 14.5" and also shortened the measurement for the depth of the seat to 14". I got a high density foam chair pad from joann.com, but they are also available in the JoAnn store. I cut the chair pad to fit my seat with an electric kitchen knife then wrapped the chair pad with 1/2" batting (got that in the JoAnn store). Hope that helps. Let me know if you have any other questions. Thank you again for your compliments!

amstan103

Wed, 06/26/2013 - 15:44

How much narrower and how much taller did you make the chair? I LOVE your design much more than the original. The narrower frame and taller back make it look much classier in my opinion. Please get back to me when you can. Thank you!!

In reply to by amstan103

Knot Perfect

Tue, 11/26/2013 - 18:03

Sorry I didn't see your question earlier... thank you for the compliments on my redesign :) I posted a new pic with the dimensions for the back and seat. Thank you again and let me know if you have any other questions.

Play Kitchen Set

Submitted by joshlimo on Fri, 01/04/2013 - 08:36

After looking at the price of kitchen sets I decided to make this one for my daughter last Christmas.

The Sink:
I made the sink and the stove identical. I then stole one of my wife's dish towels and stapled it in front of the shelves. I took an aluminum bowl for the sink and cut it out with a jigsaw, I then put clear caulk around the bowl. The faucet was from a hardware store, i found some pipes and put them together until they looked like a faucet. The knobs were from Michael's, I painted them black and put a nut/bolt so they could be turned.

The Stove:
In order to make the burners, i put painters tape on the top of it after it was painted. Then I used a bowl to trace and cut circles in the tape, i then peeled that tape and used black spraypaint on the circles. The burner knobs were also from Michael's.

This project took a while, maybe 2 weeks of working a couple hours every few days, but i was surprised and impressed with my work after I was done.

Estimated Cost
$200
Estimated Time Investment
Weekend Project (10-20 Hours)
Finish Used
light blue paint, black paint for the knobs
Recommended Skill Level
Beginner