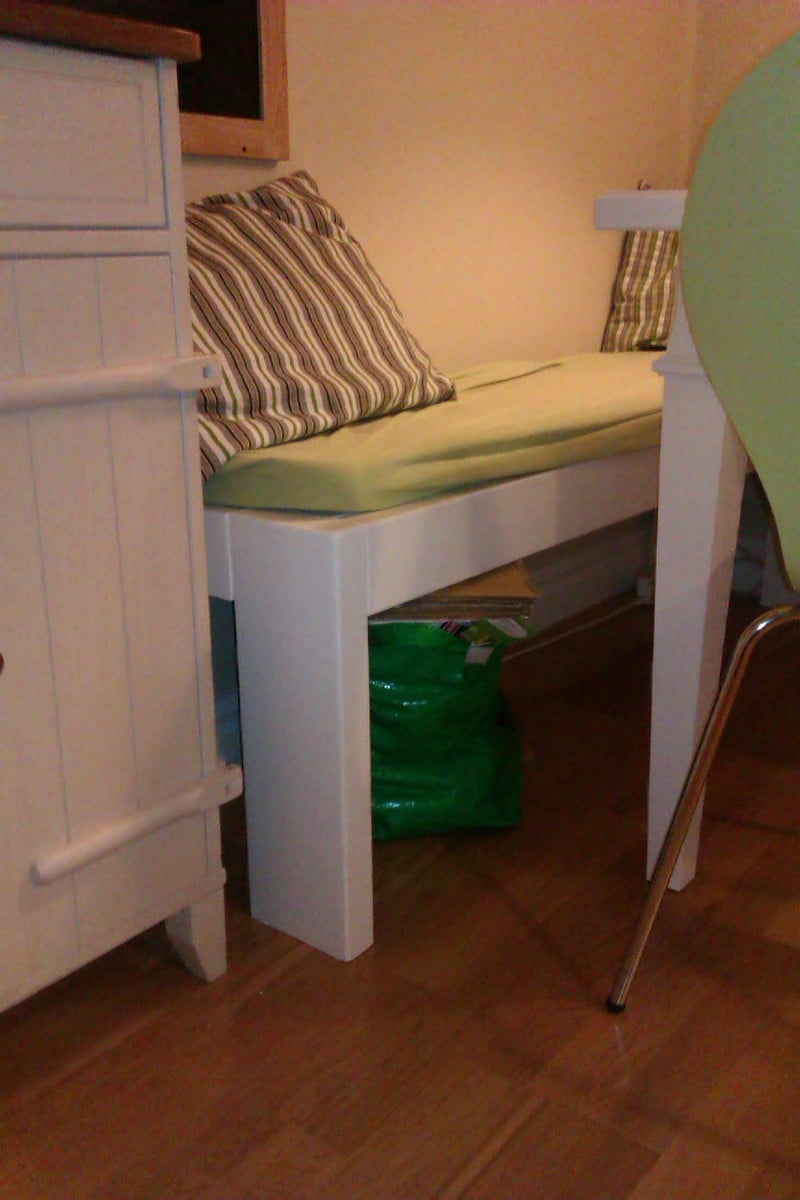
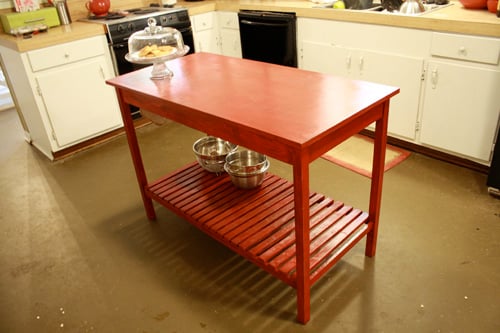
Community Brag Posts

Weatherly Benches

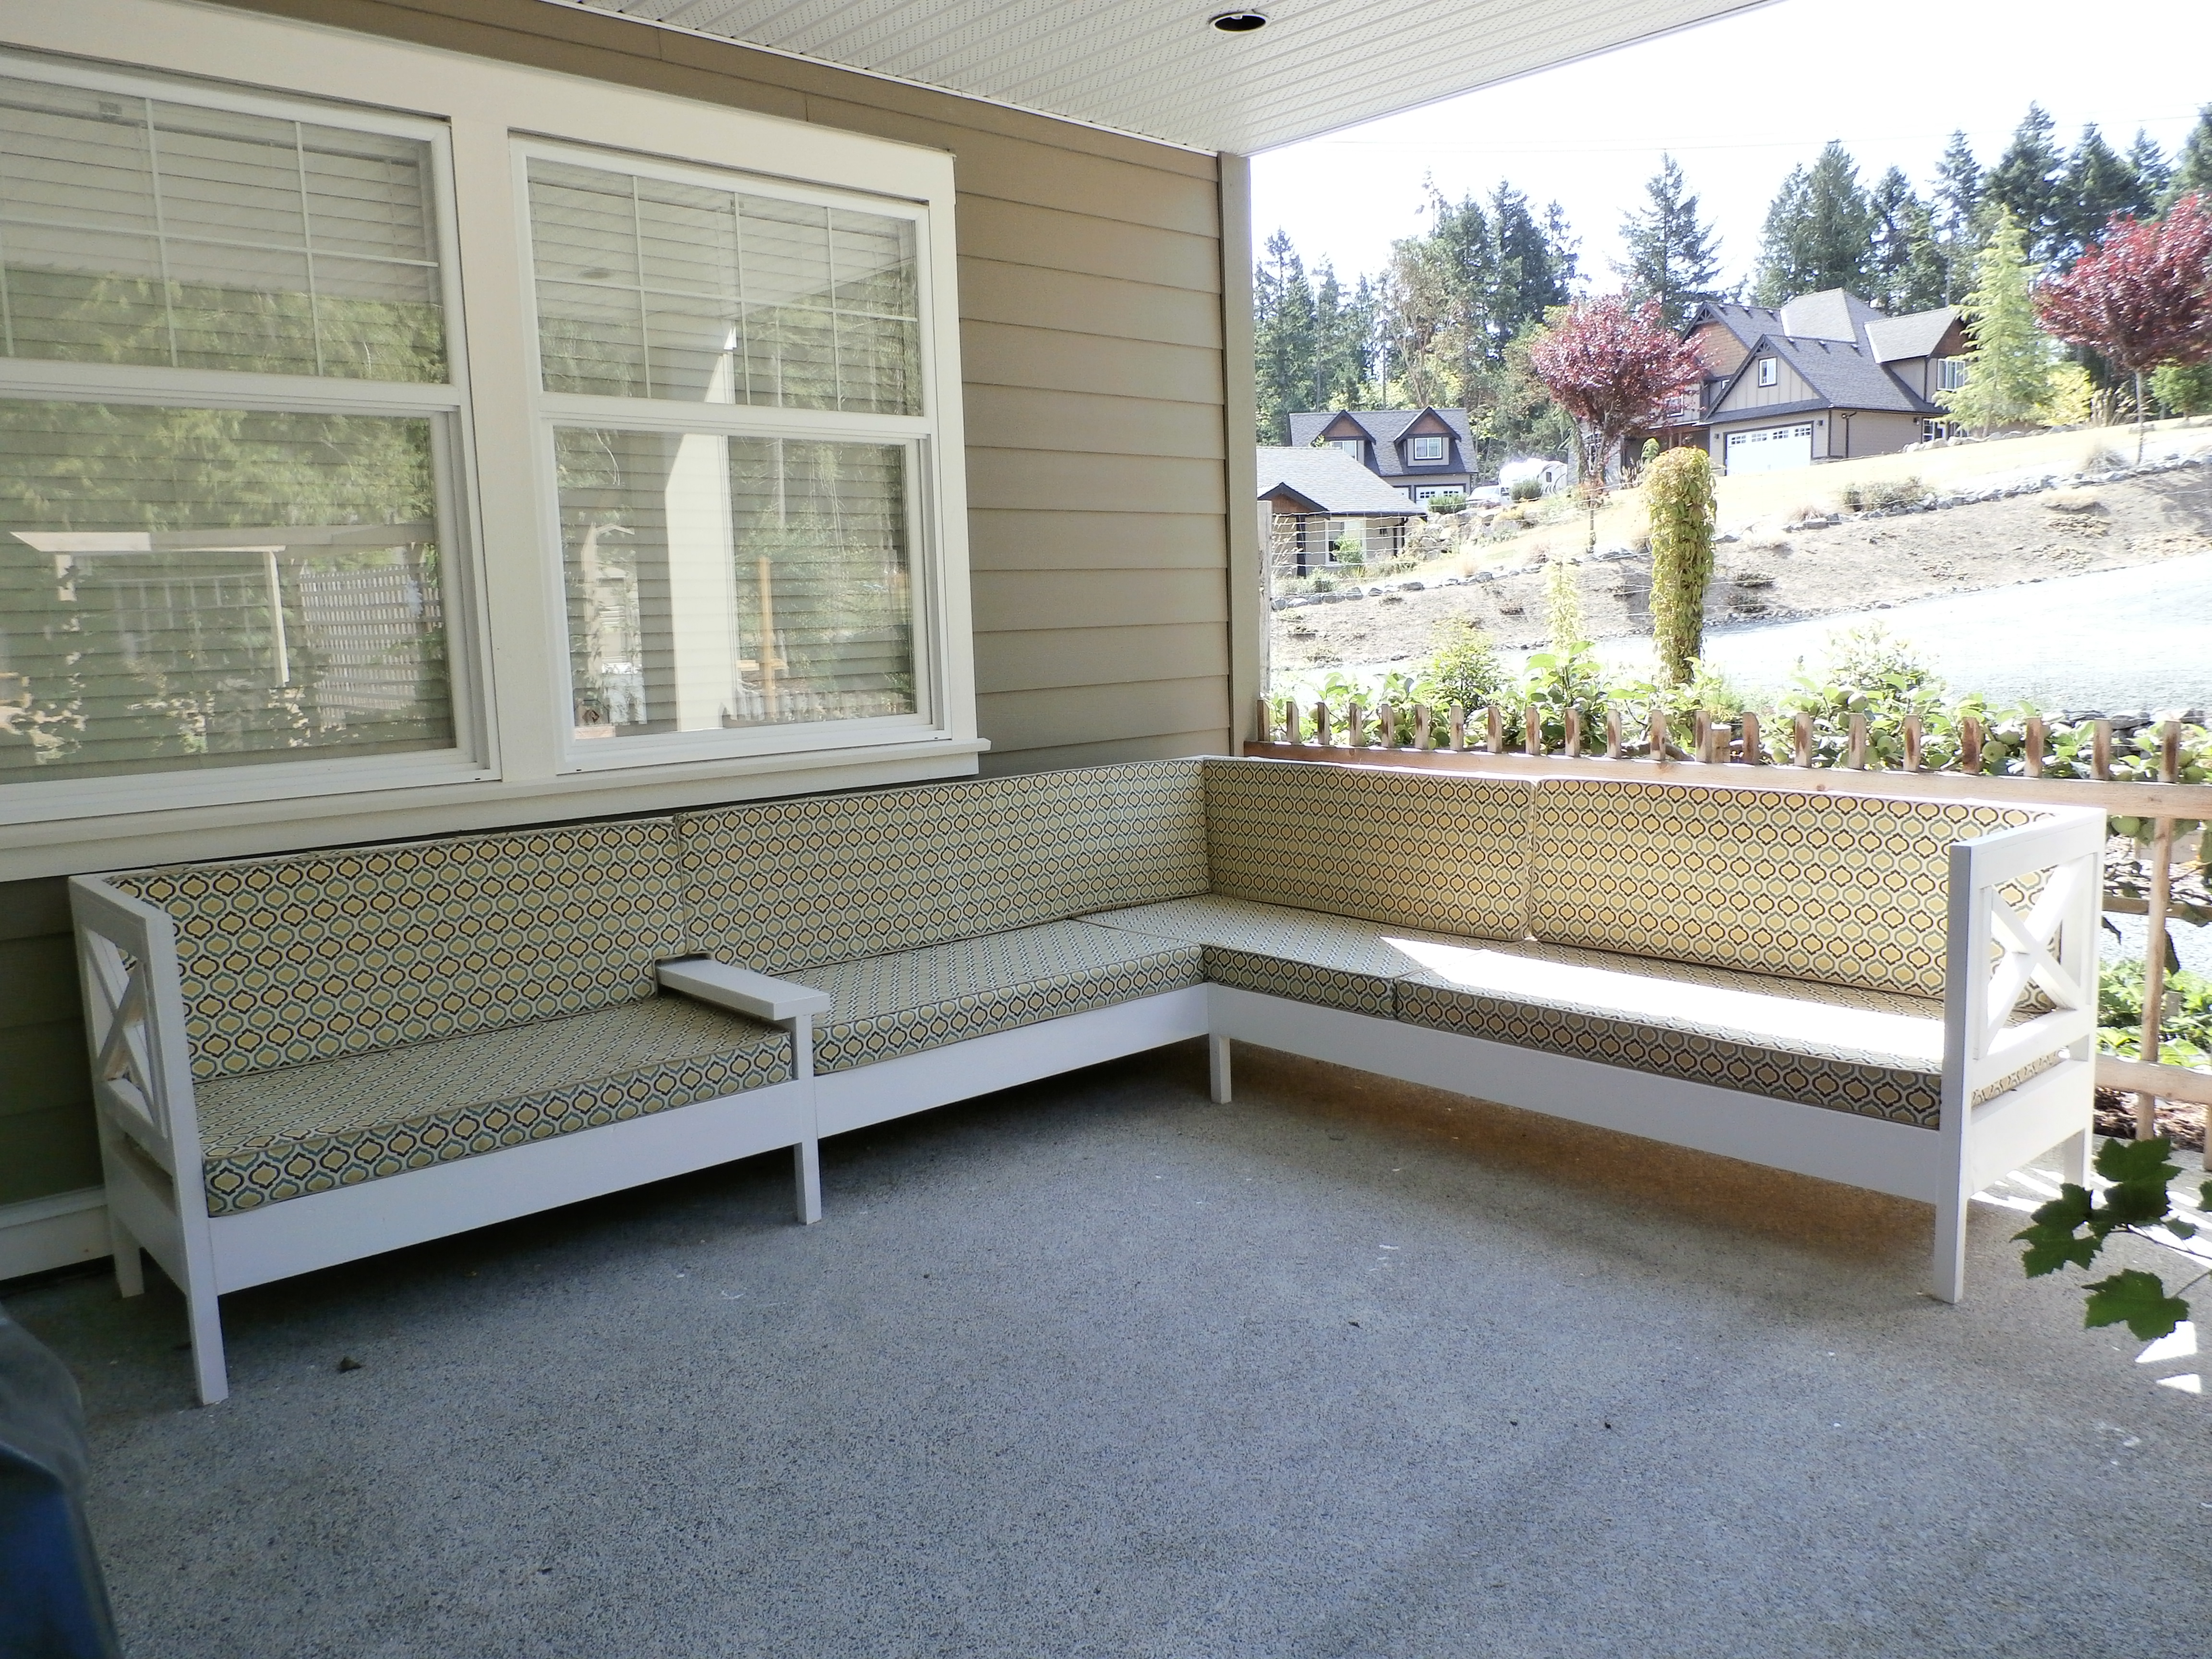
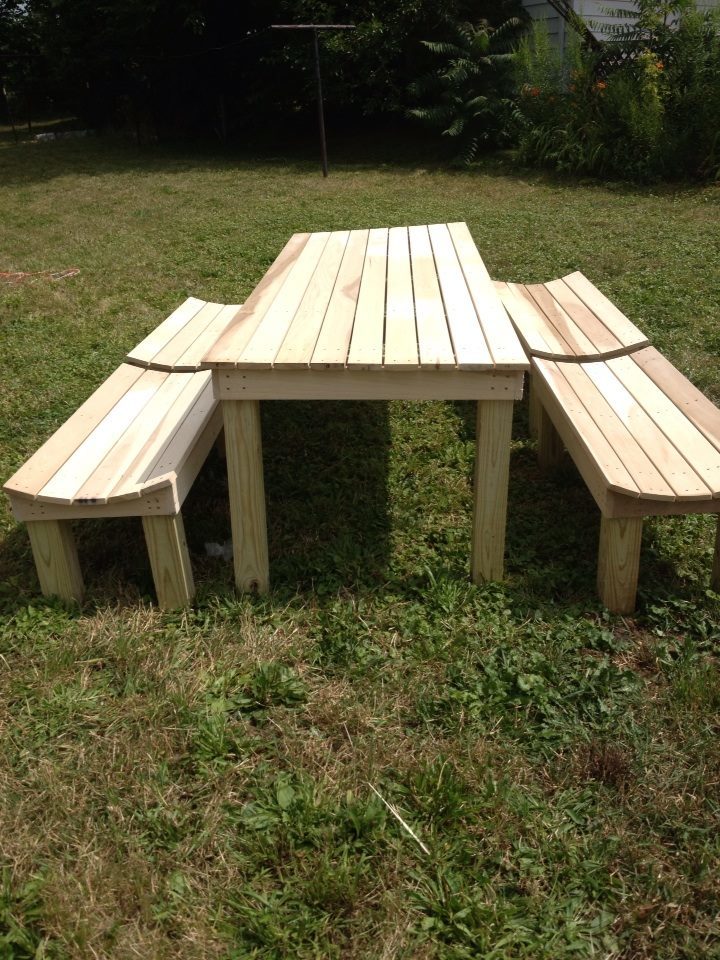
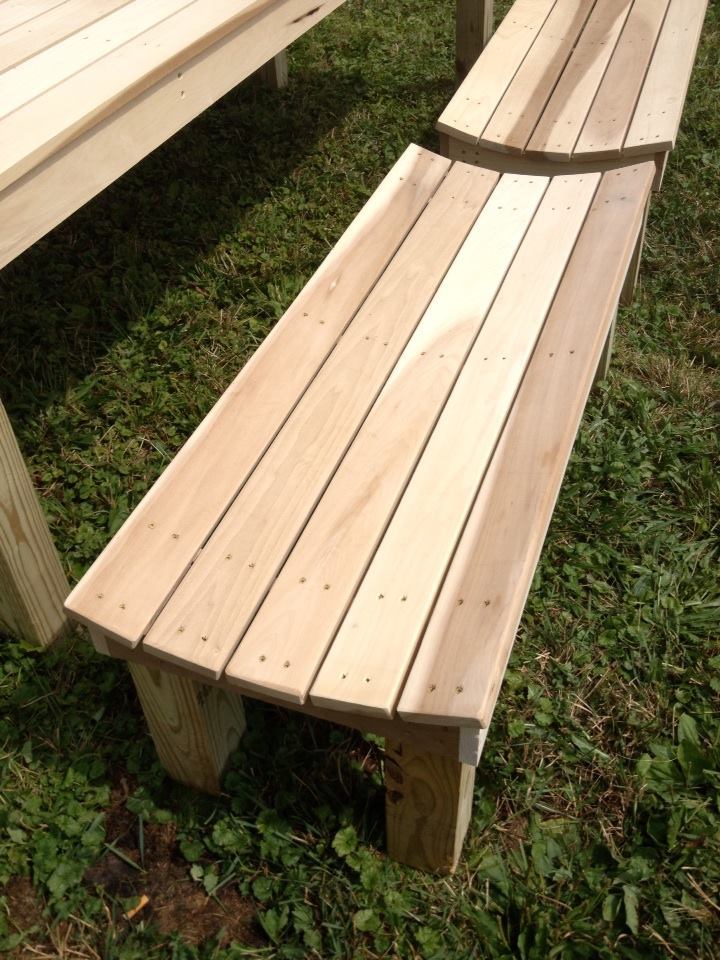
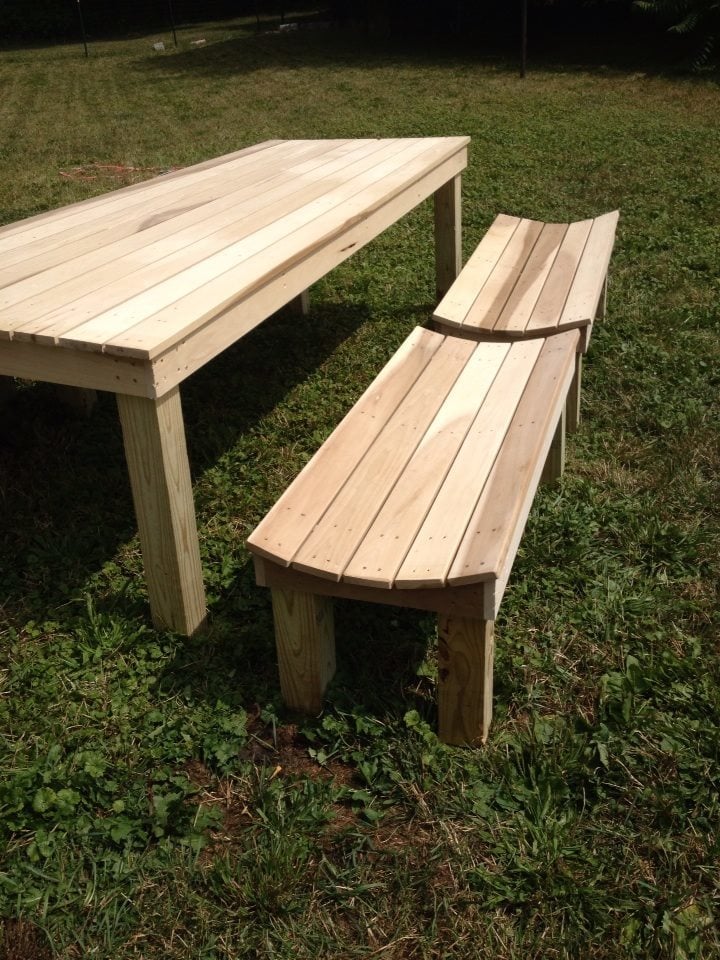
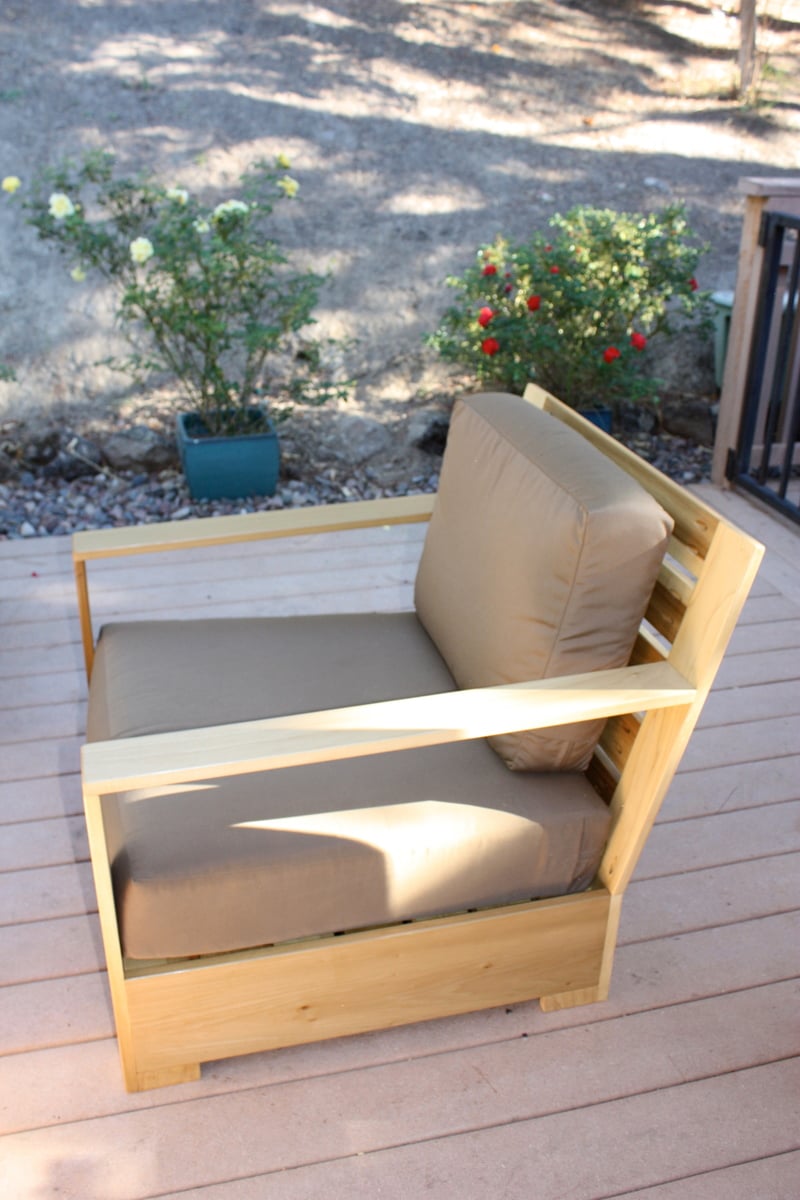
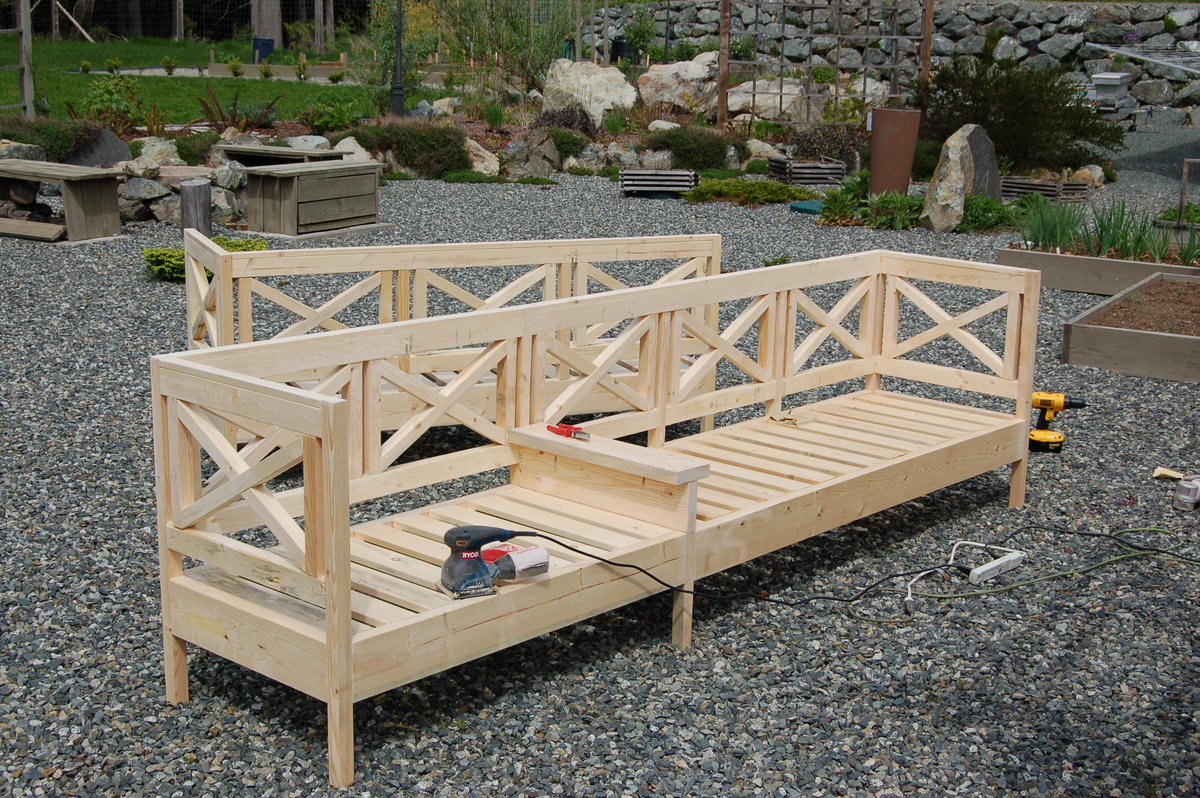
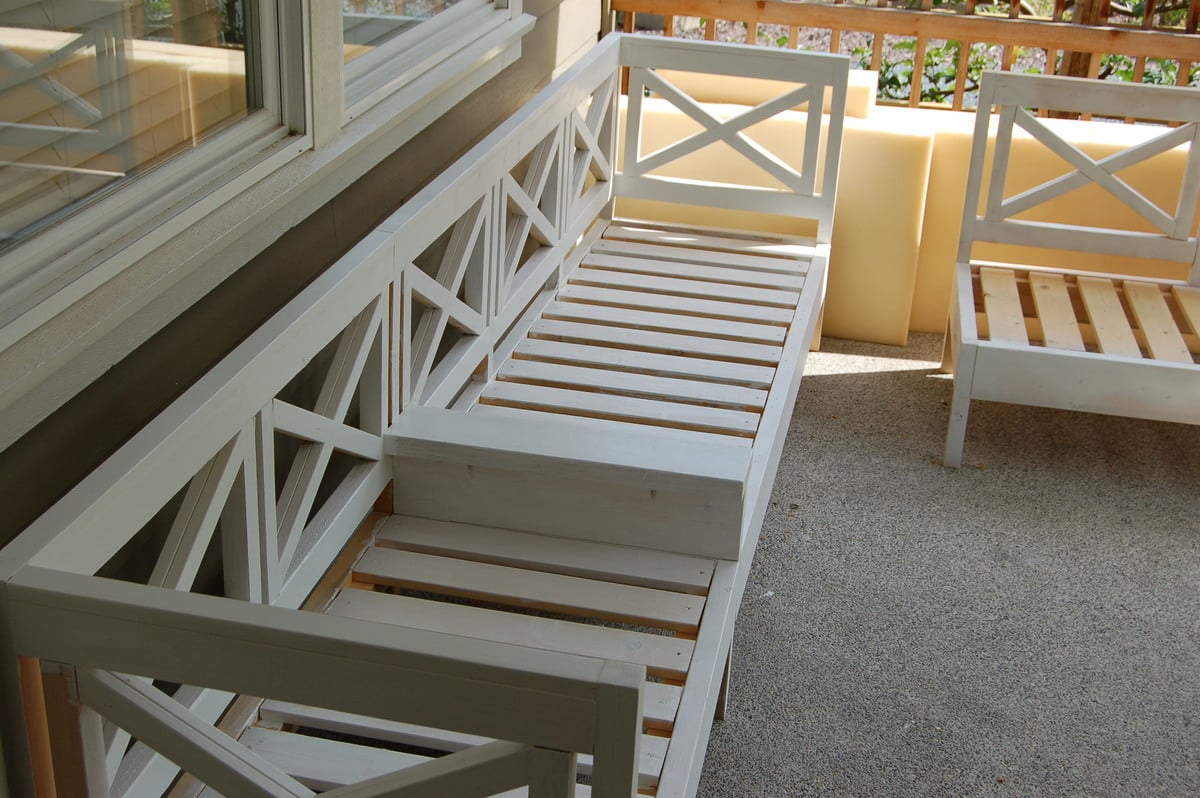
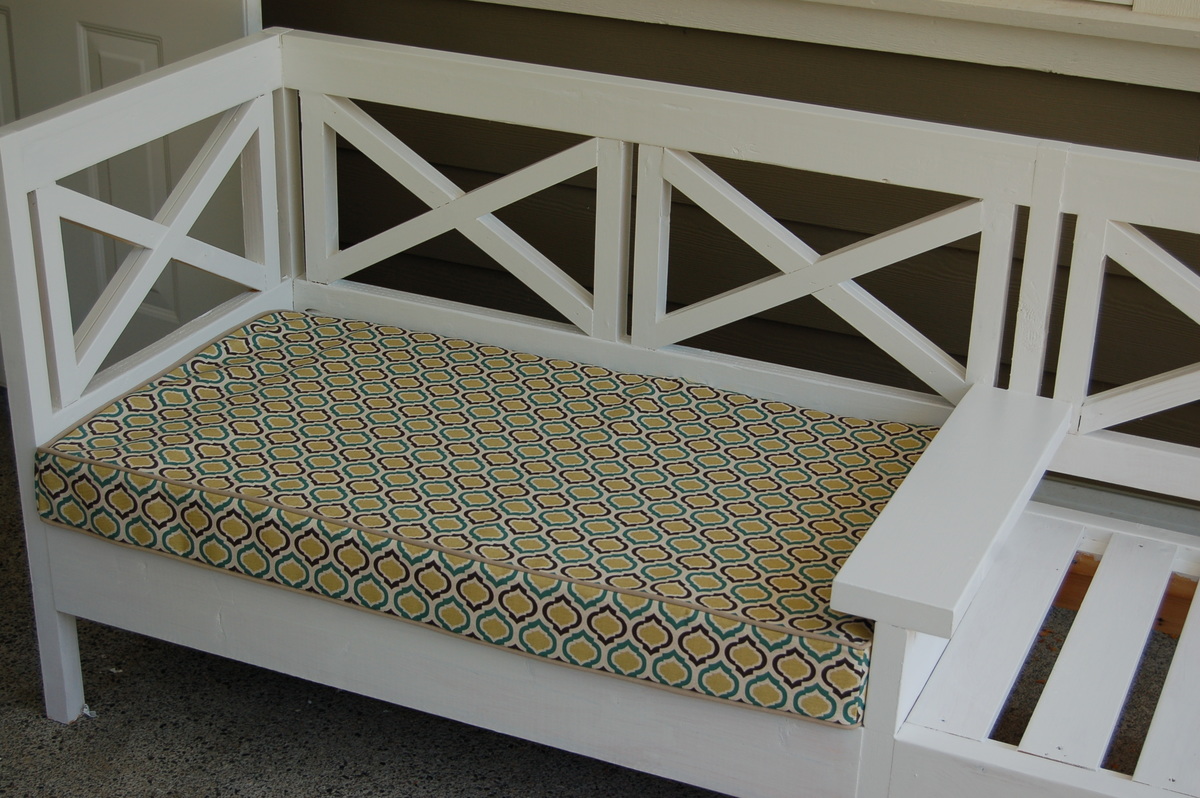
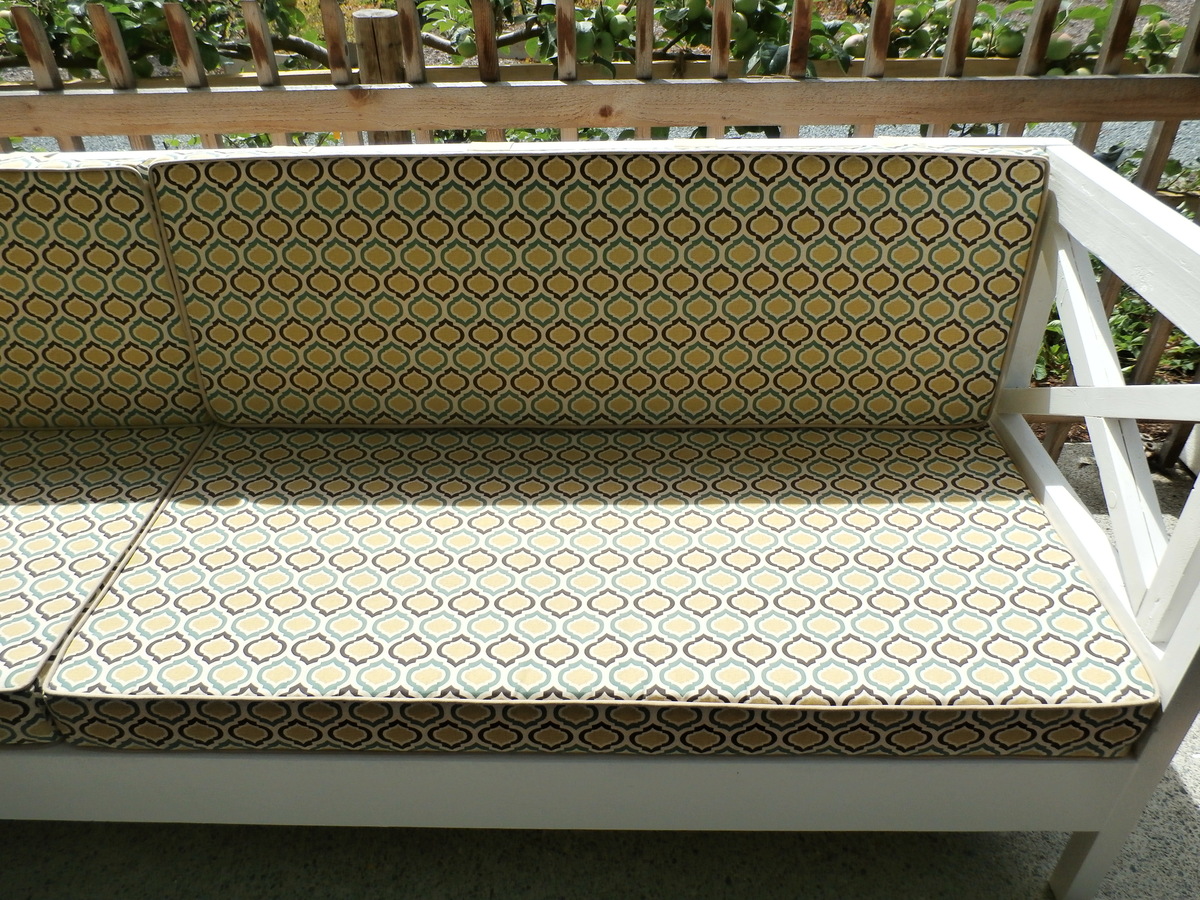
We used the Weatherly plans for this project amending in a couple of places. The two seat version was attached to the three with using just one set of legs and then we added a 2 x 6" upright at the join and put another 2 x 6" on top for a drinks tray! Rather than 8 individual 24" cushions we went with 48 x 24" seats and did the same for the backs.

The cost for materials was only about $70 and the outdoor fabric was twice that amount. As it is under a covered deck we just used 4" foam for the seats and 2" foam for the backrests, costing about $100. All Canadian Dollars.

Built from Plan(s)
Estimated Cost
$70
Estimated Time Investment
Day Project (6-9 Hours)
Finish Used
We coated everything twice with Benjamin Moore Cloud White external paint.
Recommended Skill Level
Intermediate

It took a little bit to finish, but it was worth the wait

Submitted by Anonymous (not verified) on Thu, 07/23/2020 - 19:34

My wife wanted a Farmhouse table for as long as I can remember. When we bought our first house it was the first project I undertook. I finished building it in time for all 15 members of our extended family to come for Thanksgiving but didn't have time to stain it. After the holidays I went back to school and staining it went to the back burner. When I finished my degree three years later it was time to finish the table. The end result was worth the wait according to my wife.

Estimated Time Investment
Week Long Project (20 Hours or More)
Finish Used
Minwax Dark Walnut
Minwax Satin Poly
Valspar Cabinet and Furniture Paint
Recommended Skill Level
Intermediate

Ottoman

This is my 3rd completed project. This has storage, individual hinges was used.

I am still on the sofa after 9 months could not decide if I wanted to make storage.

Built from Plan(s)
Estimated Cost
estimate cast was $55 dollars, and that was due to the coast of the fabric covered top with plastic covering.
Estimated Time Investment
Day Project (6-9 Hours)
Finish Used
I sand the piece with 120, 220, 500 grit. Then stain/protection, it was suppose to be walnut, and it turn out this color. Can't complain, the cats are happy about it.
Recommended Skill Level
Intermediate

Dream doll house

Submitted by JoseO1998 on Fri, 07/25/2014 - 01:51

I was browsing through the plans and came across the dream doll house and my sister-in-law absolutely fell in love with it on ana-white.com's site... My niece has her 5th birthday next month and my sister-in-law asked if I could build her the doll house... Showed it to my niece and she loved it saying she wanted one---how could I say no!!! A lot of time and effort went into this but here's the final outcome... My sister-in-law just saw it and loves it... Hope my niece does as well :) thx Ana White

Estimated Time Investment
Week Long Project (20 Hours or More)
Finish Used
Medium oak minwax stain and minwax polyurethane
Recommended Skill Level
Intermediate

Custom Grandy sliding cabinet

Submitted by Anonymous (not verified) on Thu, 11/03/2016 - 23:10

Built by Cunningham Custom

Built from Plan(s)
Estimated Cost
$1000-$1200 used all premium material
Estimated Time Investment
Week Long Project (20 Hours or More)
Finish Used
Sherman williams ovation paint for the body and minwax jacobean for the top
Recommended Skill Level
Intermediate

iSideTable

I bought my first home in July, and have been looking for furniture to fill it with. Then I found this site, and decided I would build what I want. I plan on making the iTable as well, but for my first project, I thought about starting a little smaller. I also needed side tables for my couches more. So was born the iSideTable ;)

23 3/4" high
10 1/2" wide
22 1/2" deep

Materials used:
1 4x4x8
1 1x4x8

All told materials alone for this project is a miserly $23!!

I have just finished my first coat of Varathane Kona (it's what we have in Canada). I want it nice and dark so I am leaving it on to dry, then applying a second coat.

Built from Plan(s)
Estimated Cost
$30
Estimated Time Investment
Afternoon Project (3-6 Hours)
Recommended Skill Level
Starter Project

Modified Simple Outdoor Dining Table

Submitted by Fred C on Mon, 07/28/2014 - 12:17

When I wanted to build a new outdoor dining set, I immediately turned to the Ana White website to browse the plans. I chose the simple outdoor dining table and this is my much modified version of that plan.

I liked the look of the table and the bench and the vertical slats but I needed to modify the plan to build a larger table that could seat as many as 10 if needed. I also wanted a curved bench top because of aesthetics and because it's so much more comfortable. I soon realized that I wouldn't be able to keep the vertical slats in the bench and get the curve I wanted. Once I went with horizontal lines in the bench I modified the table to match.

I finished building the tables and benches at 3 am on a Saturday morning, just in time for a family BBQ at 6 pm. There wasn't time to apply a finish, but I plan on using a golden pine stain and semi-gloss clear urethane sealer with UV protection.

Poplar was on sale when I went shopping for wood. It wasn't my first choice but the price made it hard to turn down. Because the legs sit directly on the ground I chose pressure treated 4X4 lumber for those.

Although the finished product is much different than the original plans for the simple outdoor table, I hope you enjoy seeing what I was able to build from that starting point.

Estimated Cost
$250
Estimated Time Investment
Weekend Project (10-20 Hours)
Finish Used
As stated, the photos show the unfinished table and benches but they will be stained golden pine and weather sealed with a semi-gloss urethane finish.
Recommended Skill Level
Intermediate

A little shorter, a little wider

Submitted by Anonymous (not verified) on Mon, 11/07/2016 - 17:25

This is the first piece of furniture I've ever made.  Great plans.  I shortened mine 10 inches by reducing the height of the legs, filler pieces, and ladder.  My daughter loves it!

Estimated Cost
230
Estimated Time Investment
Day Project (6-9 Hours)
Finish Used
Paint
Recommended Skill Level
Beginner

Kentwood Twin Bed

Submitted by boneill on Tue, 07/28/2020 - 13:29

Here’s the final pics of my sons Twin sized “Kentwood bed” that me and him built together . The color is “Indigo Cloth”. Was really fun doing this build. Now he’s been in his room all day today and never left and dads laying in his bed lol. I used Maple Hardwood Plywood and whitewood 1x’s, 2x’s

Built from Plan(s)
Estimated Cost
$180
Estimated Time Investment
Day Project (6-9 Hours)
Finish Used
Valspar Cabinet / Furniture Satin “ Indigo Cloth” blue.
Recommended Skill Level
Beginner

Our version of the Rustic X Console Table

Submitted by Jeepmommy on Sun, 10/07/2012 - 20:30

We LOVE this Rustic X Console table! We used a Kona stain and we took the iron hardware and rusted it up with heat, vinegar, salt and hydrogen peroxide.

Built from Plan(s)
Estimated Cost
$130
Estimated Time Investment
Weekend Project (10-20 Hours)
Finish Used
Kona Stain
Recommended Skill Level
Intermediate

rustic x coffee table

Submitted by rebecca.g on Wed, 07/30/2014 - 05:45

My first piece I made from this site. Absolutely love it! Slight modification on the X bars to add more depth to the base to balance the heavy look of it

Estimated Time Investment
Day Project (6-9 Hours)
Finish Used
Minwax english chestnut and polycrylic protective finish
Recommended Skill Level
Beginner

Crayon bed

Submitted by Anonymous (not verified) on Sat, 11/12/2016 - 19:26

My son loves to color so we decided to make him a bed that looked like crayons 


The headboard is mounted on the wall with a french cleat 

The footboard is mounted to the metal bed frame with carriage bolts 

The entire project is made of shiplap board which gives it the drooves in between each "crayon"

Hardest part was getting the crayon tip risht and transferring it to each board 

Longest part was taping, painting, waiting, paiting, removing tape, retaping ....... and continue 

We used behr bright white paint and then paint samples for the colored parts and finished it with general finishes satin top coat


Turned out better than expected especially since this is only my second woodworking project ever and my son loveeesss it !!! 

Estimated Cost
75
Estimated Time Investment
Week Long Project (20 Hours or More)
Recommended Skill Level
Beginner

Ultimate roll away workbench

Submitted by maker4510 on Sat, 08/01/2020 - 05:22

NINE MONTH UPDATE: After using the bench for almost nine months, we’ve made some changes. The first is that our table saw, a Dewalt 7491 didn’t fit in the way the plans called for because of the fence. We ended up cutting down and rebuilding the table to make a platform for the saw, then we built three “tables” around it to leave a gap for the fence operation. We also added a curved piece that can be removed to access the riving knife lever.

The other change we made was to take out the clamp storage that was in one of the cart ends. When we rolled the cart in and out, the clamps would catch and fall off. We put in another shelf instead.

Otherwise, we love the bench. Having the two rolling carts that we can reposition based on where we need a table extension is great. The miter saw stand works perfectly, and our dust collection setup rolls right underneath. We’re also in the process of building a router table that fits in the removable bench room area.

ALSO, sorry for the upside down/sideways pics. It won’t let me remove or fix them.

We made the ultimate roll away workbench with very few changes. Added the clamp hanger on one end as pictured. We didn’t add the shelf under the miter saw, as well be putting a dust collection cart.

We absolutely love the cart.M, now to save up for a table saw. The only change I would like is that I wish the side shelves were a little deeper, more like 10” instead of 8”, so more tools would fit.

Estimated Cost
380
Estimated Time Investment
Weekend Project (10-20 Hours)
Finish Used
None
Recommended Skill Level
Beginner

Modern Farm Bench

Submitted by Mikia on Wed, 10/10/2012 - 00:43

My 8 year old daughter and I decided we wanted a bench to the kitchen. Found this plan here and went to the local lumber yard. My daughter drilled and screwed about half of the bench. So much fun doing this together.

Built from Plan(s)
Estimated Cost
200 SEK
Estimated Time Investment
Afternoon Project (3-6 Hours)
Finish Used
Paint.
Recommended Skill Level
Beginner

Outdoor Table and Benches - First Project

Submitted by linlet_e on Sun, 08/03/2014 - 10:26

First project of my husband. He had no experience at all in making furniture but when he stumbled on this website he was inspired.

I wanted to contribute so I volunteered to stain both the table and benches.

Modification: used 2x4 for the legs of the table

Estimated Time Investment
Weekend Project (10-20 Hours)
Finish Used
For the Table:
Cabot - Australian Timber Oil: Honey Teak.
I used a total of 1 & half cans (946 ml per can). I did it by sections - used paint brush to apply stain, gave it enough time to absorb (a few minutes) and then used a cloth to even out blotches. I also used a very small foam paint brush to stain the areas that are hard to reach - the gaps in between boards. Waited a couple of days to apply coat number 2.

For the benches:
Benjamin Moore Arborcoat - Solid: Spellbound
I used 1 can for both benches (414 ml). Again did it by sections, used paintbrush to apply 1 coat only and used a small foam brush for hard to reach areas. It dried very fast.
Recommended Skill Level
Beginner

Comments

Bar Height Farmhouse Table / Benches

Submitted by Anonymous (not verified) on Tue, 11/15/2016 - 12:07

I wanted to say thank you for the inspiration.

I took the general idea, made it bar height and my own preferred size and beefed it up by doweling together the top pieces.

Given the size, I made the top removable with threaded inserts as well as the removable support beams below.

For the benches, I wanted something sturdy and a look that was similar to the table.  I added in a nickel support rod for the foot rest for both strength and a nice look.

All in all this project took a lot of time, probably more so with my perfectionist ways and wanting to  make the finish perfectly smooth.  It's like glass, which I just love against the dents and dings of the wood.

Some of the challenges were wood that warped.  After putting together the bench tops, the wood warped quite a bit, nothing that a few clamps couldn't undo but a pain nonetheless.

Using black stain really brought out a nice look and I'm taking that same look to the new trim and door that are going into the dining area as well.


I've not seen a bar height (not counter height) table in a full dining table size before, it's what I wanted and I couldn't be happier with the results.   Was it worth all of the time?   That's hard to say, I really love it, but it took a long time to get it to be exactly what I wanted it to be.

Thanks!


Estimated Cost
$180 in lumber, $200 for stain/poly/sandpaper/steel wool/Kreg jig/screws. $20 for furniture screws that look sharp and allow the table base to be easily disassembled. Another $20 for threaded inserts and machine bolts to hold the top to the base.
Estimated Time Investment
Week Long Project (20 Hours or More)
Finish Used
Ebony Minwax oil based stain and Satin Poly.
Pre-stain, one coat of stain, wipe after 5 min, three coats of poly using steel wool (00) between each coat.
Recommended Skill Level
Intermediate

First Big Project!

Surprisingly easy! Have received a lot of compliments and it’s sturdy too! Decided not to stain it because we like the look. Very, very happy with this table, thank you!

Estimated Time Investment
Weekend Project (10-20 Hours)
Finish Used
None
Recommended Skill Level
Beginner

Outdoor Patio Set

Submitted by @m@nd@ on Wed, 10/17/2012 - 15:10

I started this project with just one of the Bristol Outdoor Lounge Chairs. I ended up liking it so much I decided to complete the collection with anther chair, a love seat, and a table. I got the designs for the other pieces from OldPaintDesign.com Poplar was my wood of choice because it is a hard wood that will last but won't break the bank. I also had a really hard time deciding how to finish it. Initially, I was going to paint the wood but liked the natural wood grain of the poplar so much I just simply put a few coats of polyurethane on it to preserve it. I ordered the cushions from Restoration Hardware this fall when they were on sale and even then they were expensive, but I love them. (Brown was the only color on sale.) Finishing the pieces was much more time consuming than I thought it would be.The first chair took much longer and required much more sanding since some of my joints weren't flush. The rest of the pieces combined took me about as long as the original chair. I wised up after completing the 1st chair and did the majority of the sanding before I assembled the boards together. Next, I am going to build an outdoor dining table to match.

Estimated Cost
$1600
Estimated Time Investment
Week Long Project (20 Hours or More)
Finish Used
Minwax Helmsman Satin Spar Urethane - 3 coats.
I used 220 grit sand paper before application and thoroughly cleaned with tack cloth before and in between each coat. I also lightly sanded out any rough spots in between coats.
Recommended Skill Level
Beginner

Comments

spiceylg

Thu, 10/18/2012 - 08:14

What a beautiful job you did. I've loved this set since I first saw it on RH website and requested plans for it. However, I realized with the cost of those cushions and such, my hubby probably wouldn't agree to the cost, at least now. So we built the outdoor sectional and got a great deal on the cushions from Costco. I haven't given up on this set maybe some day in the future when we built our pergola because it's just so beautiful. Again, great job!!!

MrsMcKay

Sat, 05/25/2013 - 14:56

My husband made the chair and it has turned out great, it just needs to be stained. My question is about the cushions... getting them on RH is expensive so If I want to make them myself how do I do that? What is the foam I need? Where can I get it?

Garage Storage Cabinet

Submitted by AndyH on Tue, 08/05/2014 - 18:57

First part of garage storage system complete. 7.5 foot cabinets with whiteboard marker board doors inserts.

Next step to build new bench with storage cupboards to keep dust out and a central dust extraction/containment area.

Then put some tool board and a charging station above the two outlets.

Estimated Cost
$100
Estimated Time Investment
Weekend Project (10-20 Hours)
Finish Used
Minwax Classic Gray
Recommended Skill Level
Beginner

Comments

TaylorMade1205

Wed, 08/06/2014 - 05:51

What plans did you use to build the cabinets? I'm currently re-doing my garage and I was looking for something like this.

AndyH

Wed, 10/08/2014 - 19:20

Hi.  I drew the plans myself to make it fit the space I needed.  Happy to share the google sketchup file with you if you want to send me your contact (if that is allowed on here!).  Sorry for the delay in replying but not logged on here for a while. 

SAWL27

Sun, 12/13/2020 - 05:04

These are perfect for what I'm working on. Do you still have the plans that you're willing to share?

thank you ana you inspired me to begin with this!

Submitted by Anonymous (not verified) on Fri, 11/18/2016 - 18:13

Thank you Ana because you were my inspiration. I would've never dreamed of building my own furniture before I saw you doing it. I loved doing it I loved outside the US and the machines and jigs are difficukt and expensive here but I've managed to get the basics. this is my 5th project and was a lot of work because the woods here are exotic but not dried in kim and come with lots of imperfections but are beautiful..anyways thanks again! 

Estimated Cost
250 usd
Estimated Time Investment
Week Long Project (20 Hours or More)
Finish Used
wood sealer then 240 sand paper then polyurethane high gloss the same finish used for cars.
Recommended Skill Level
Intermediate