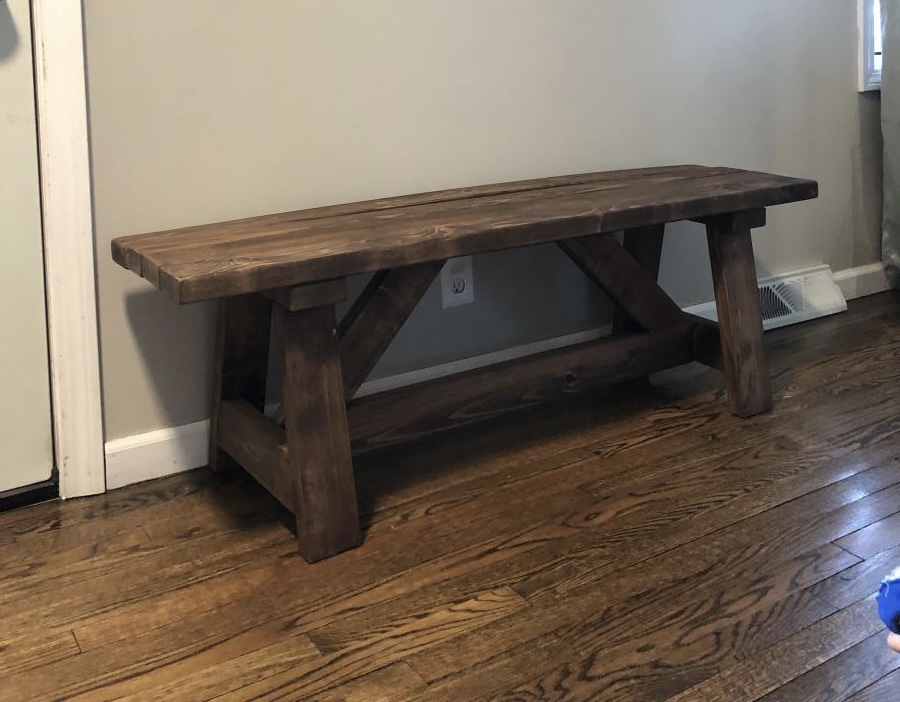
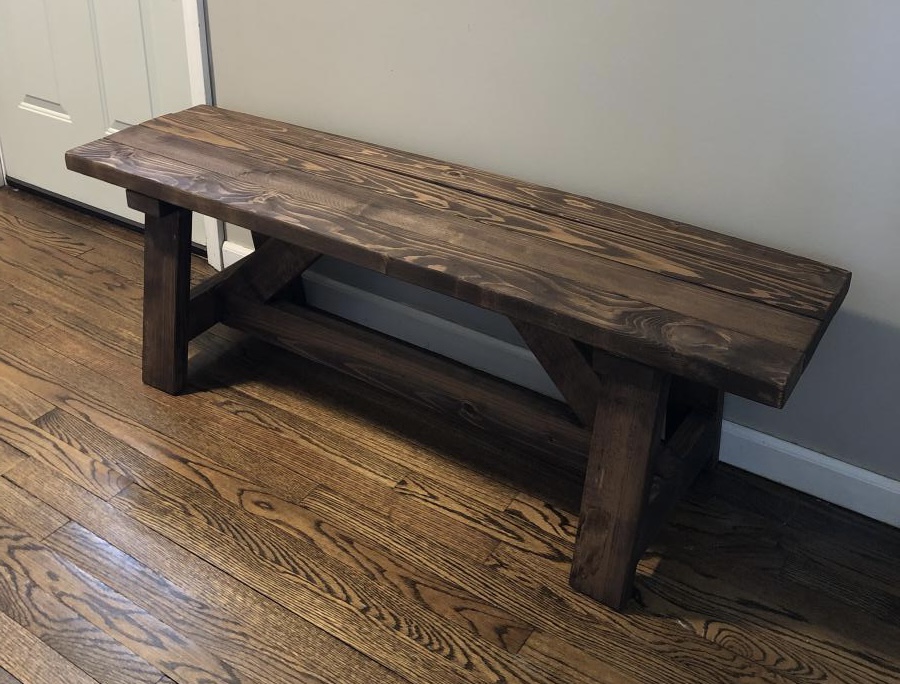
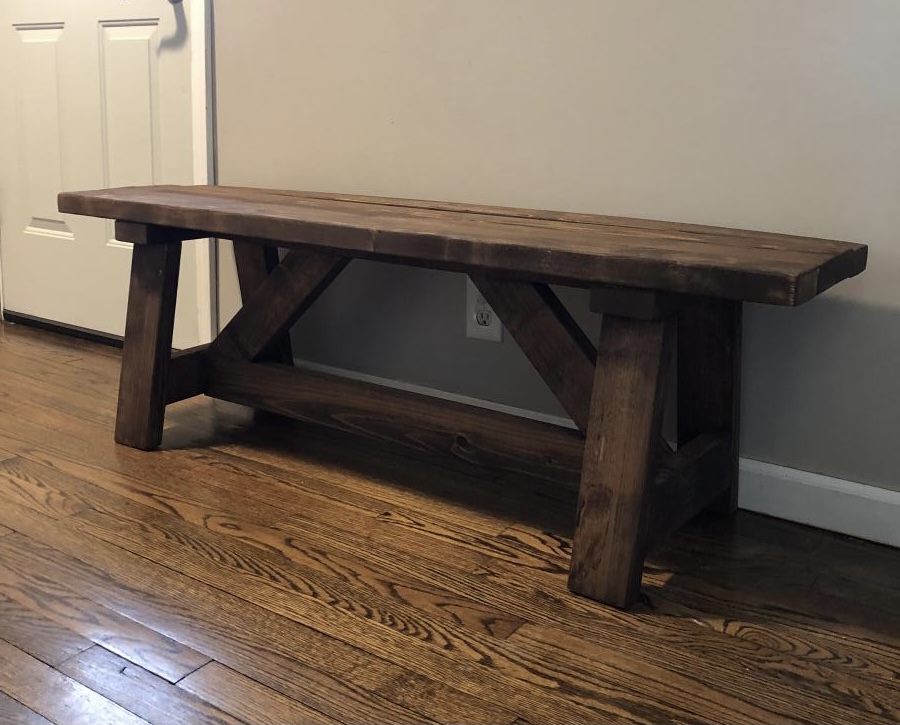
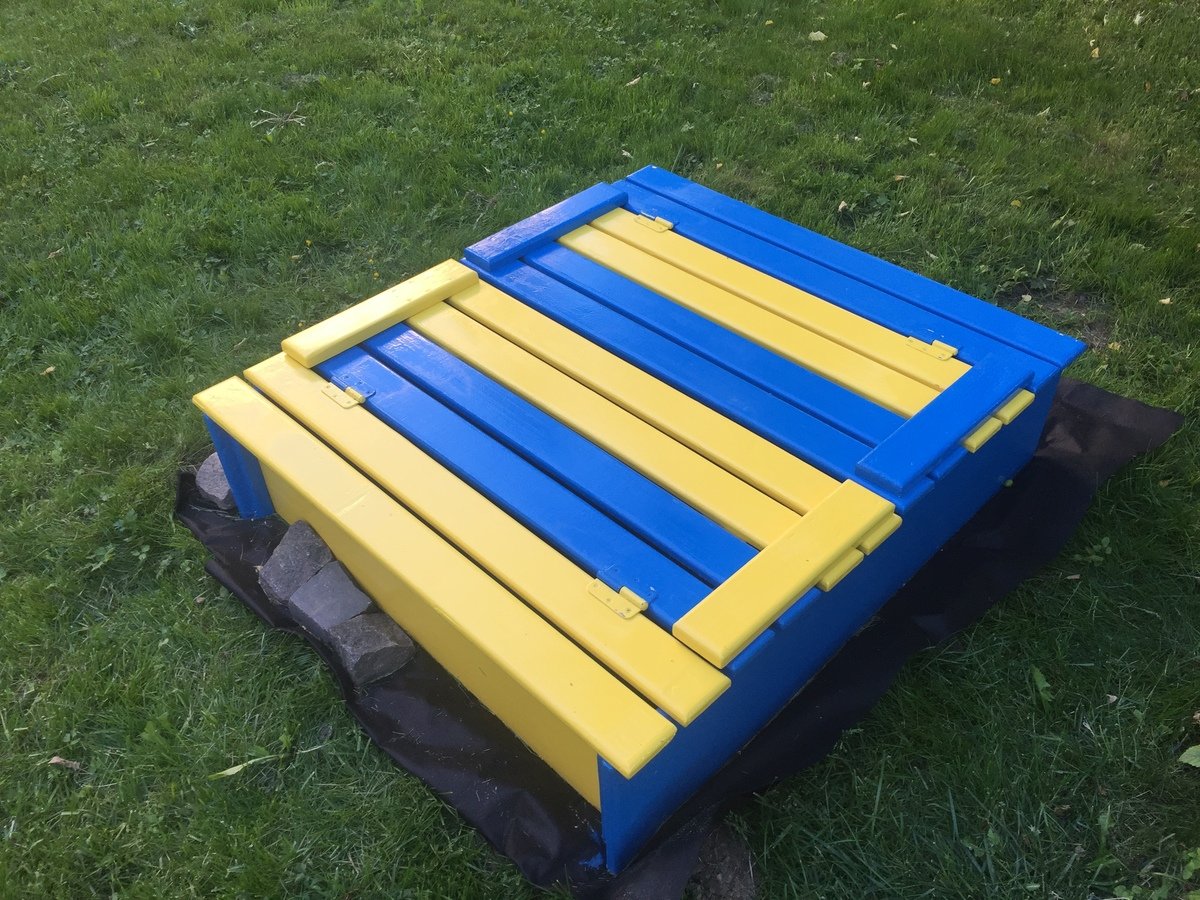
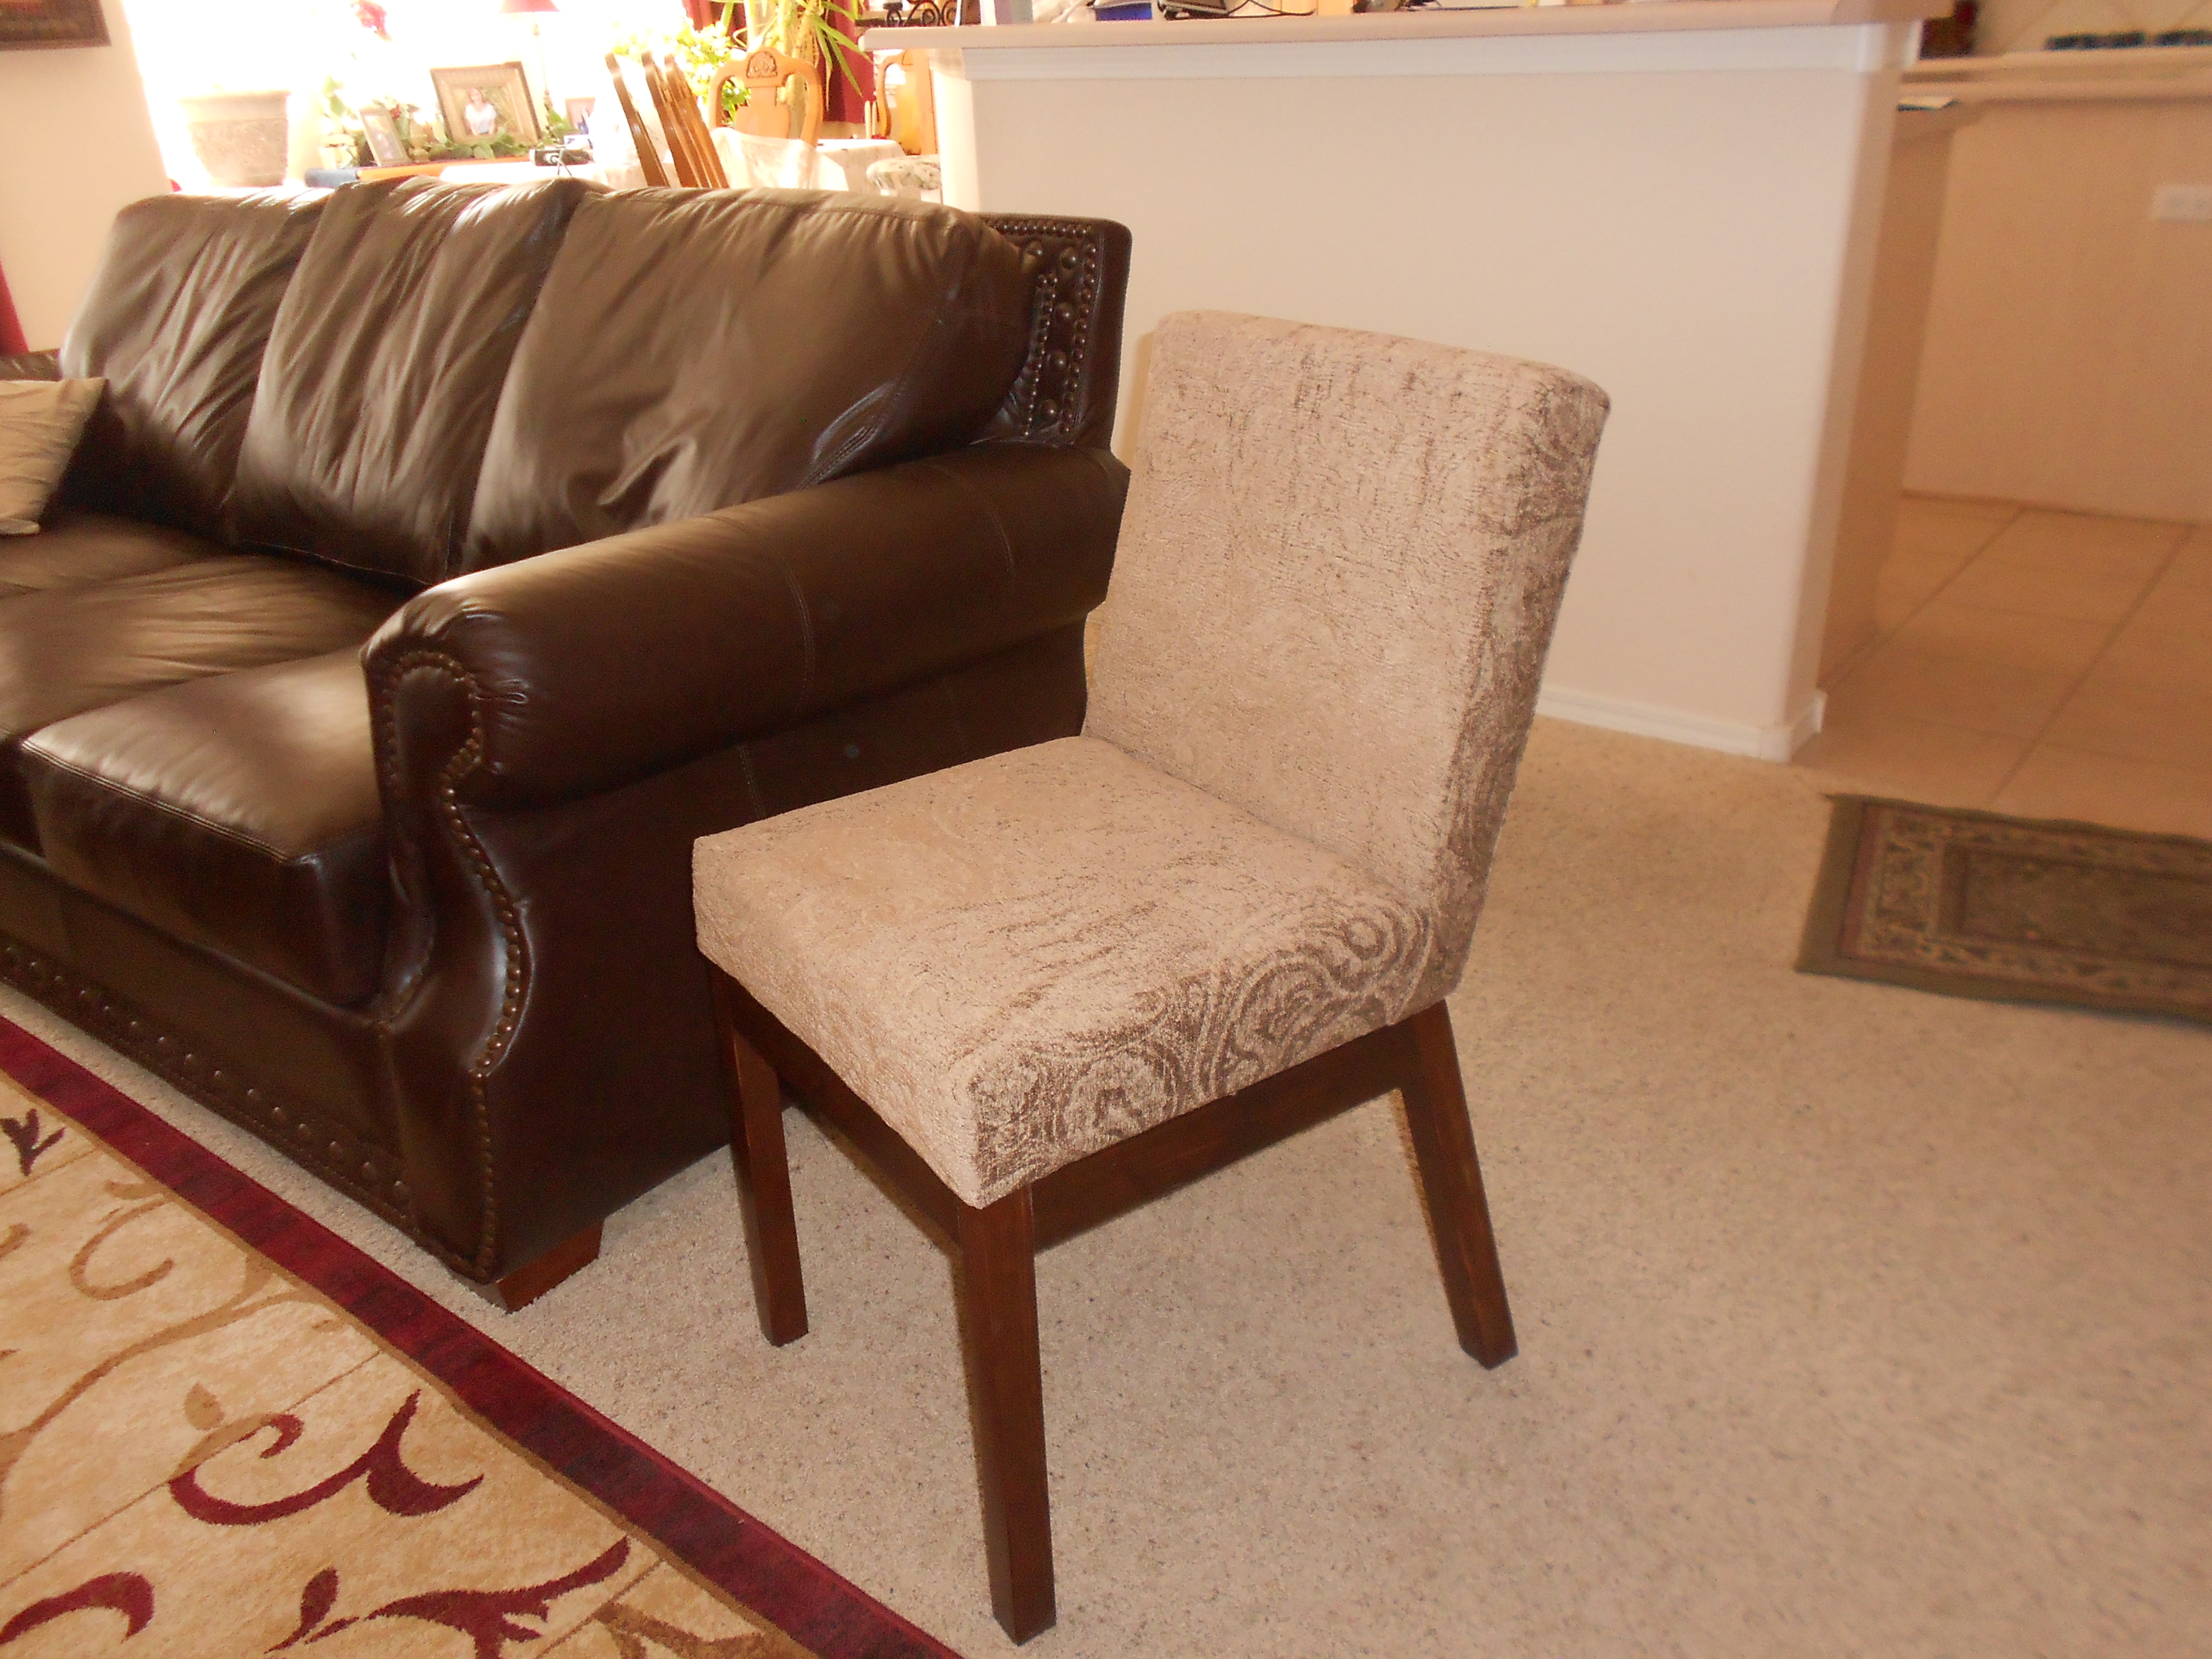
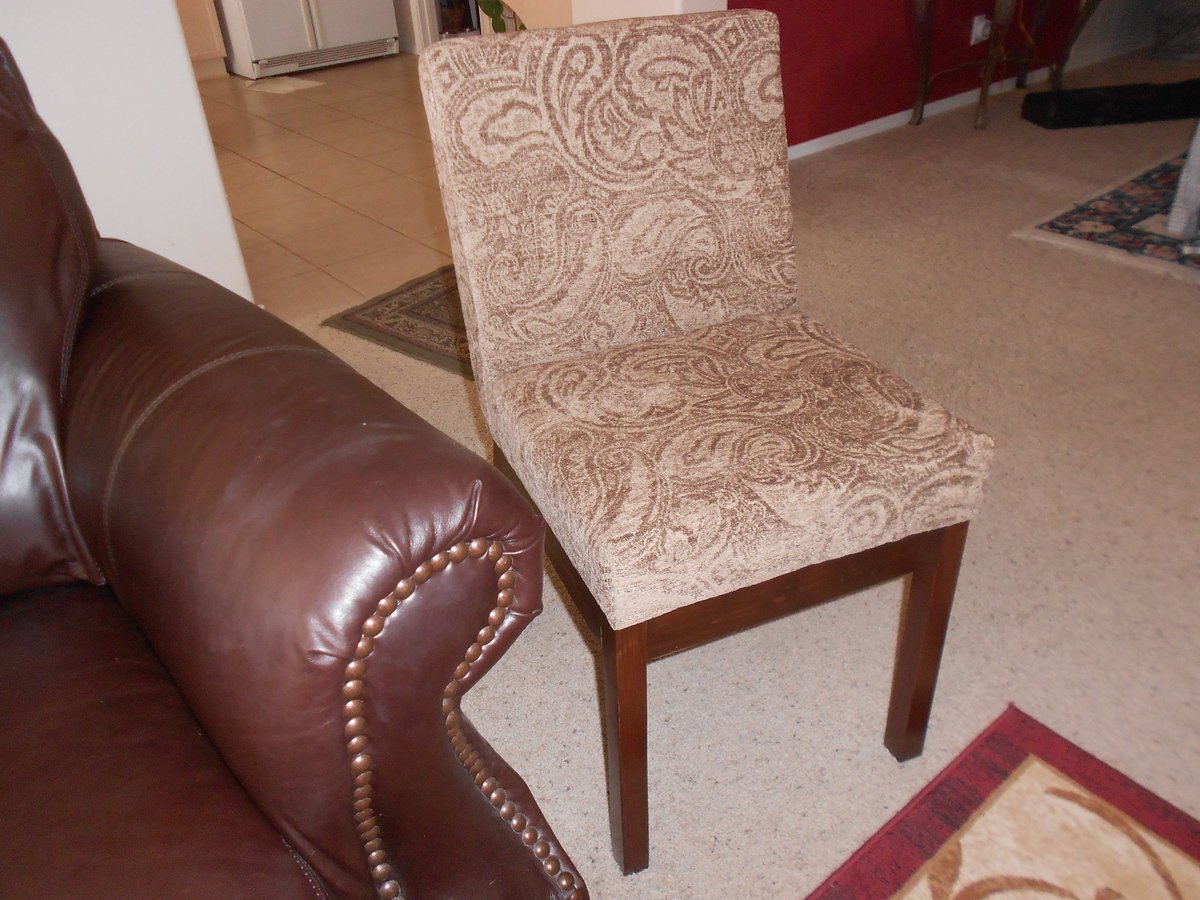
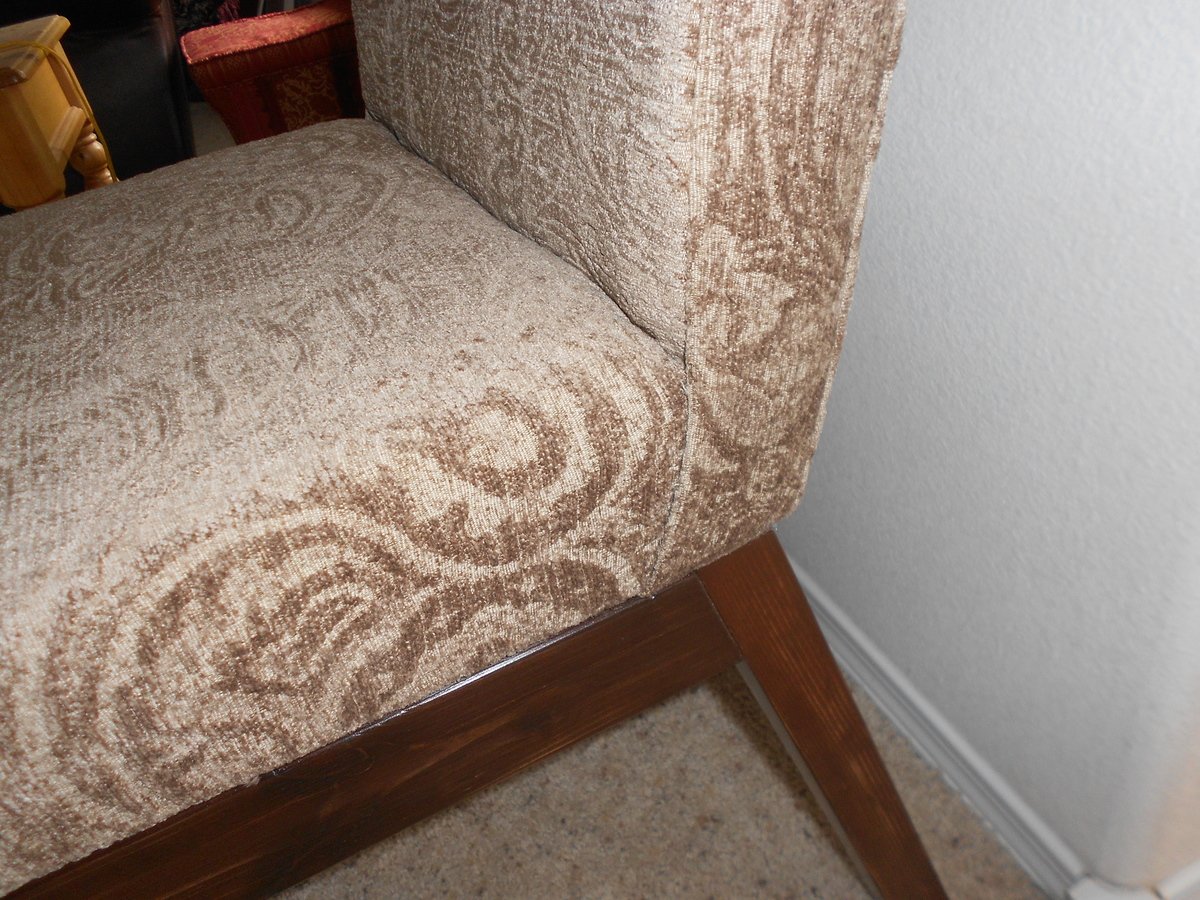
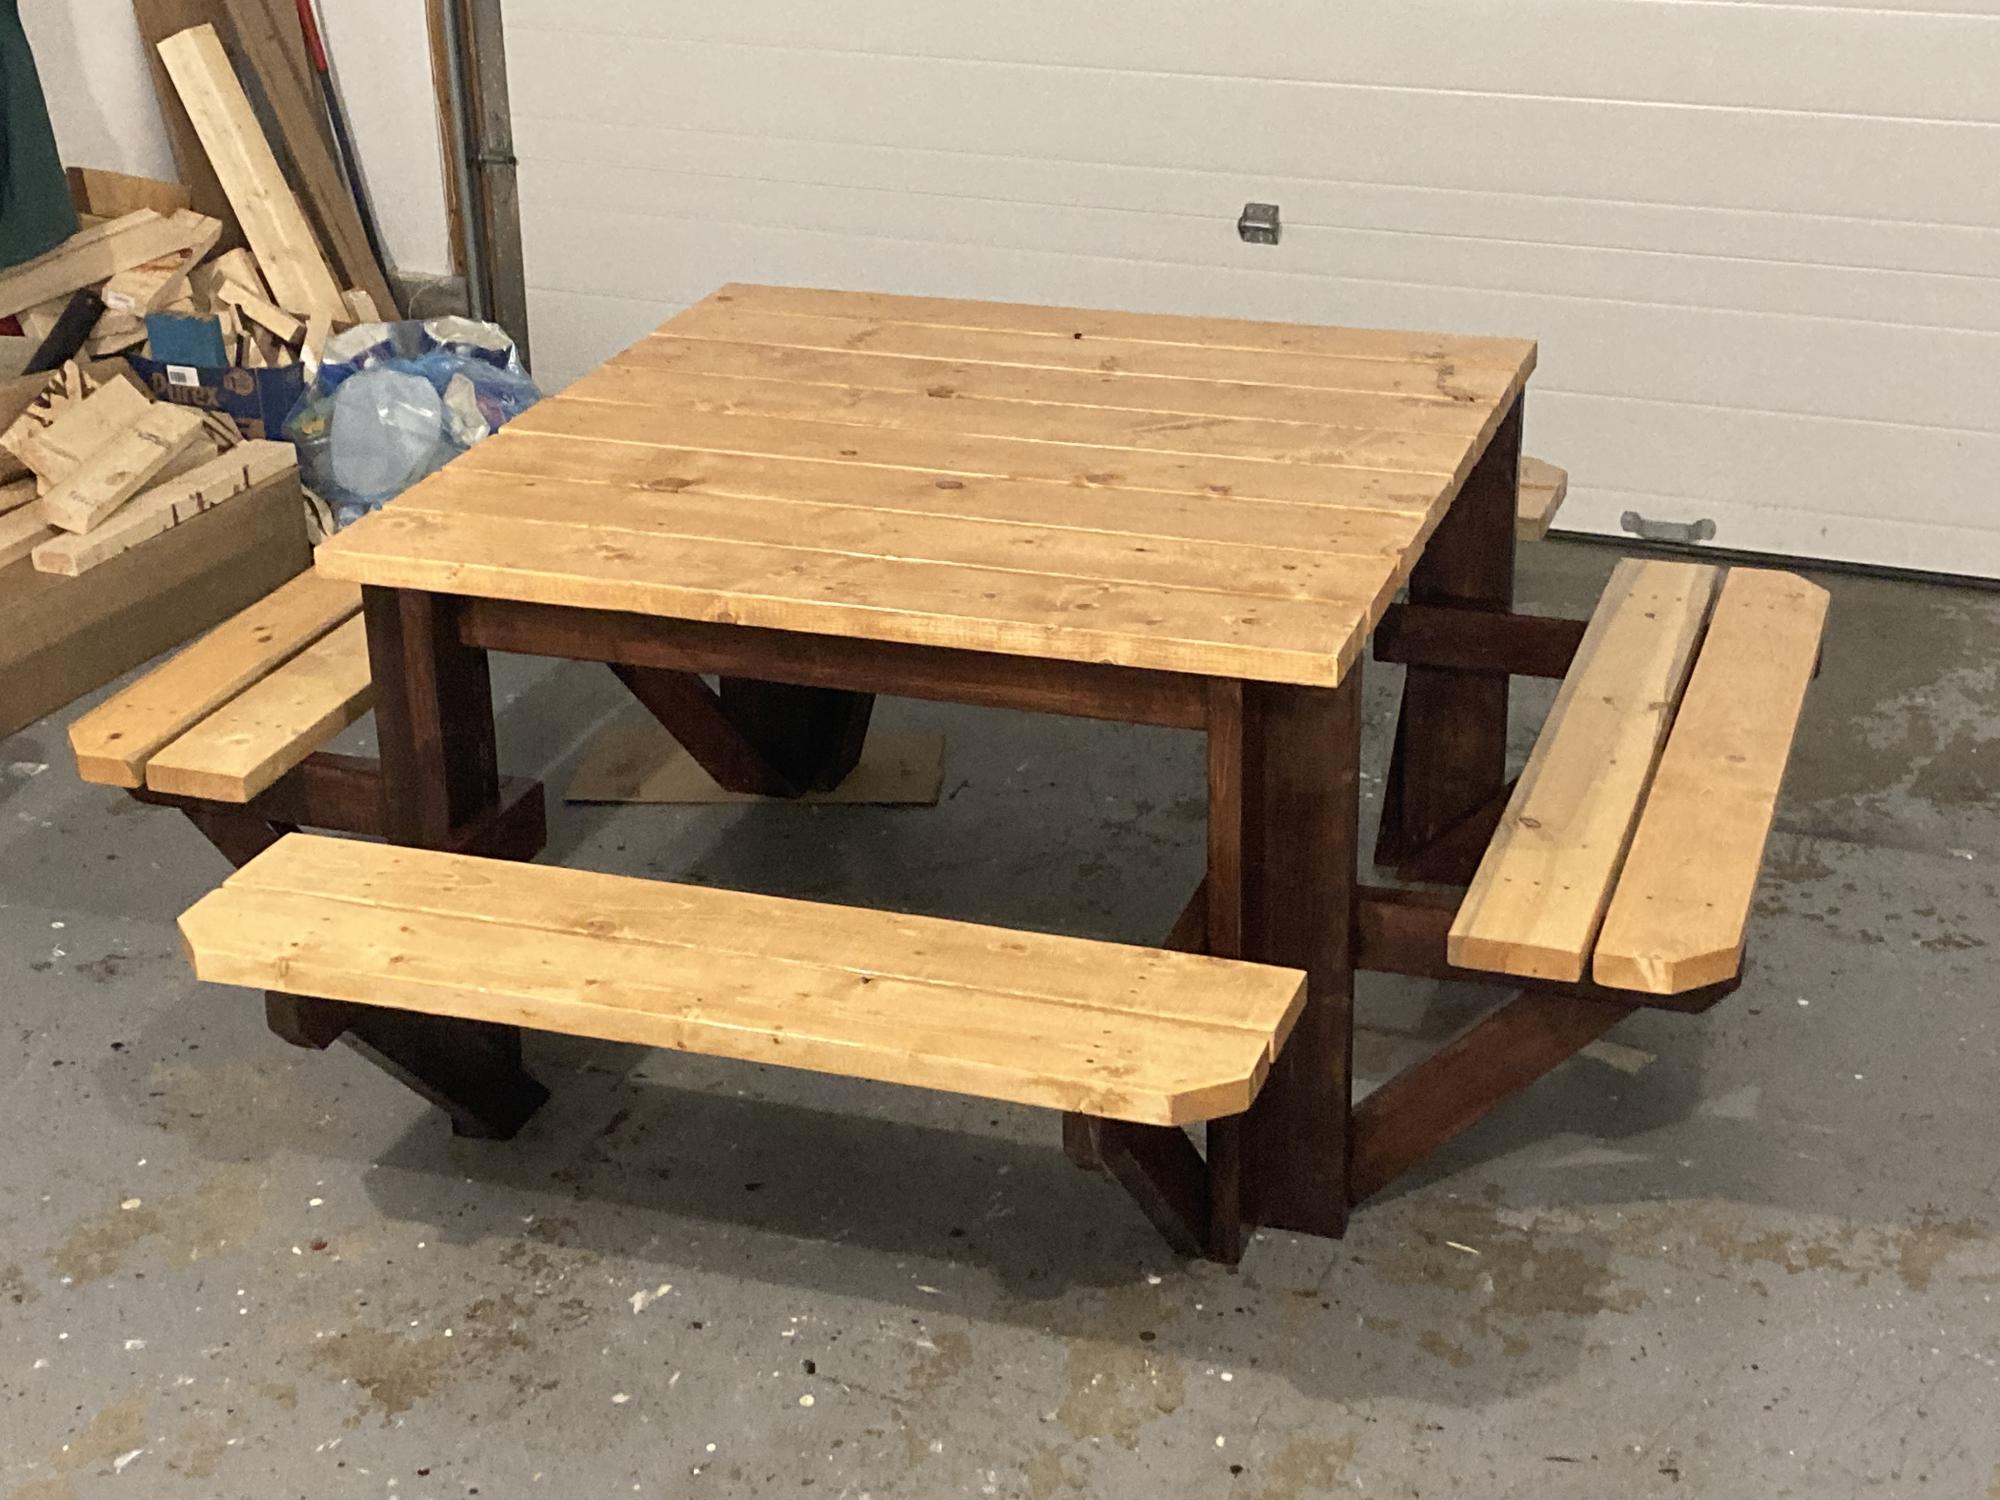
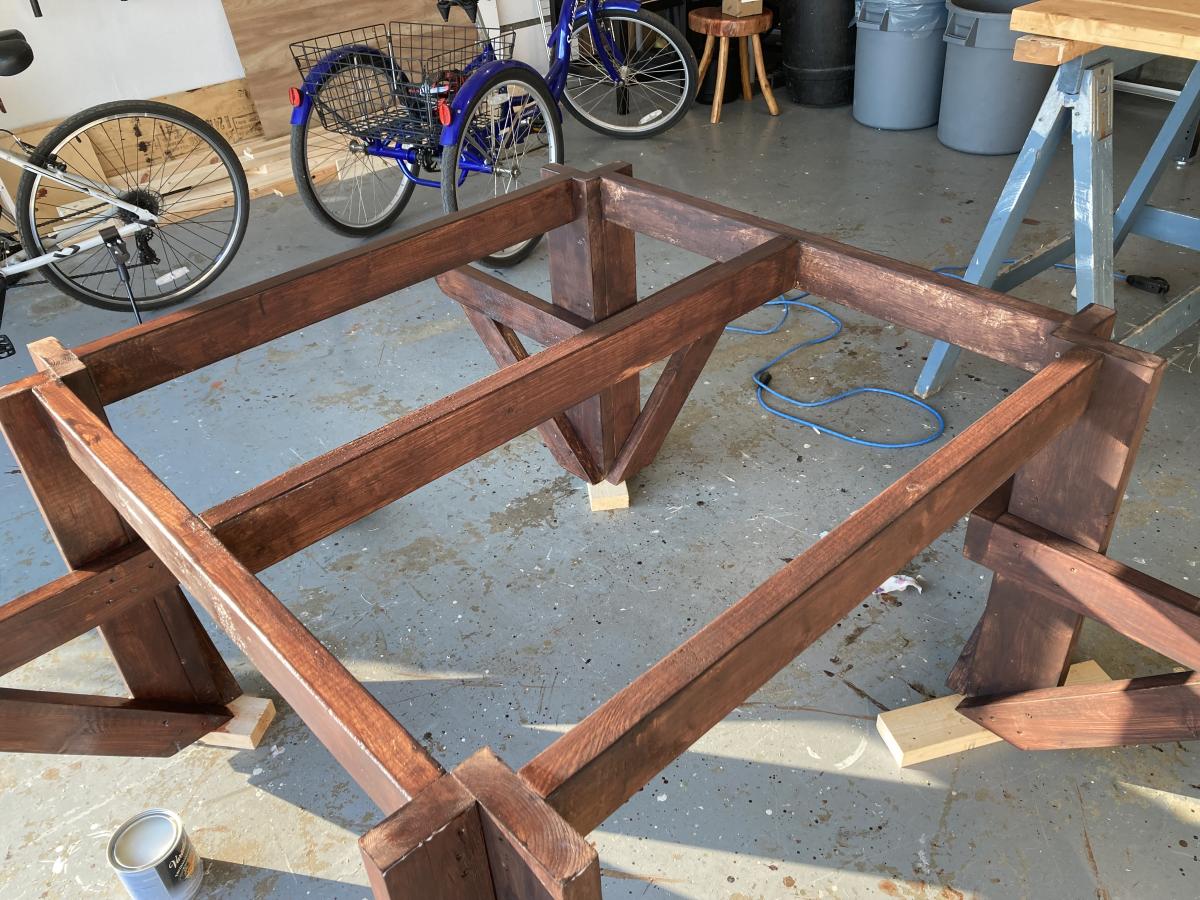
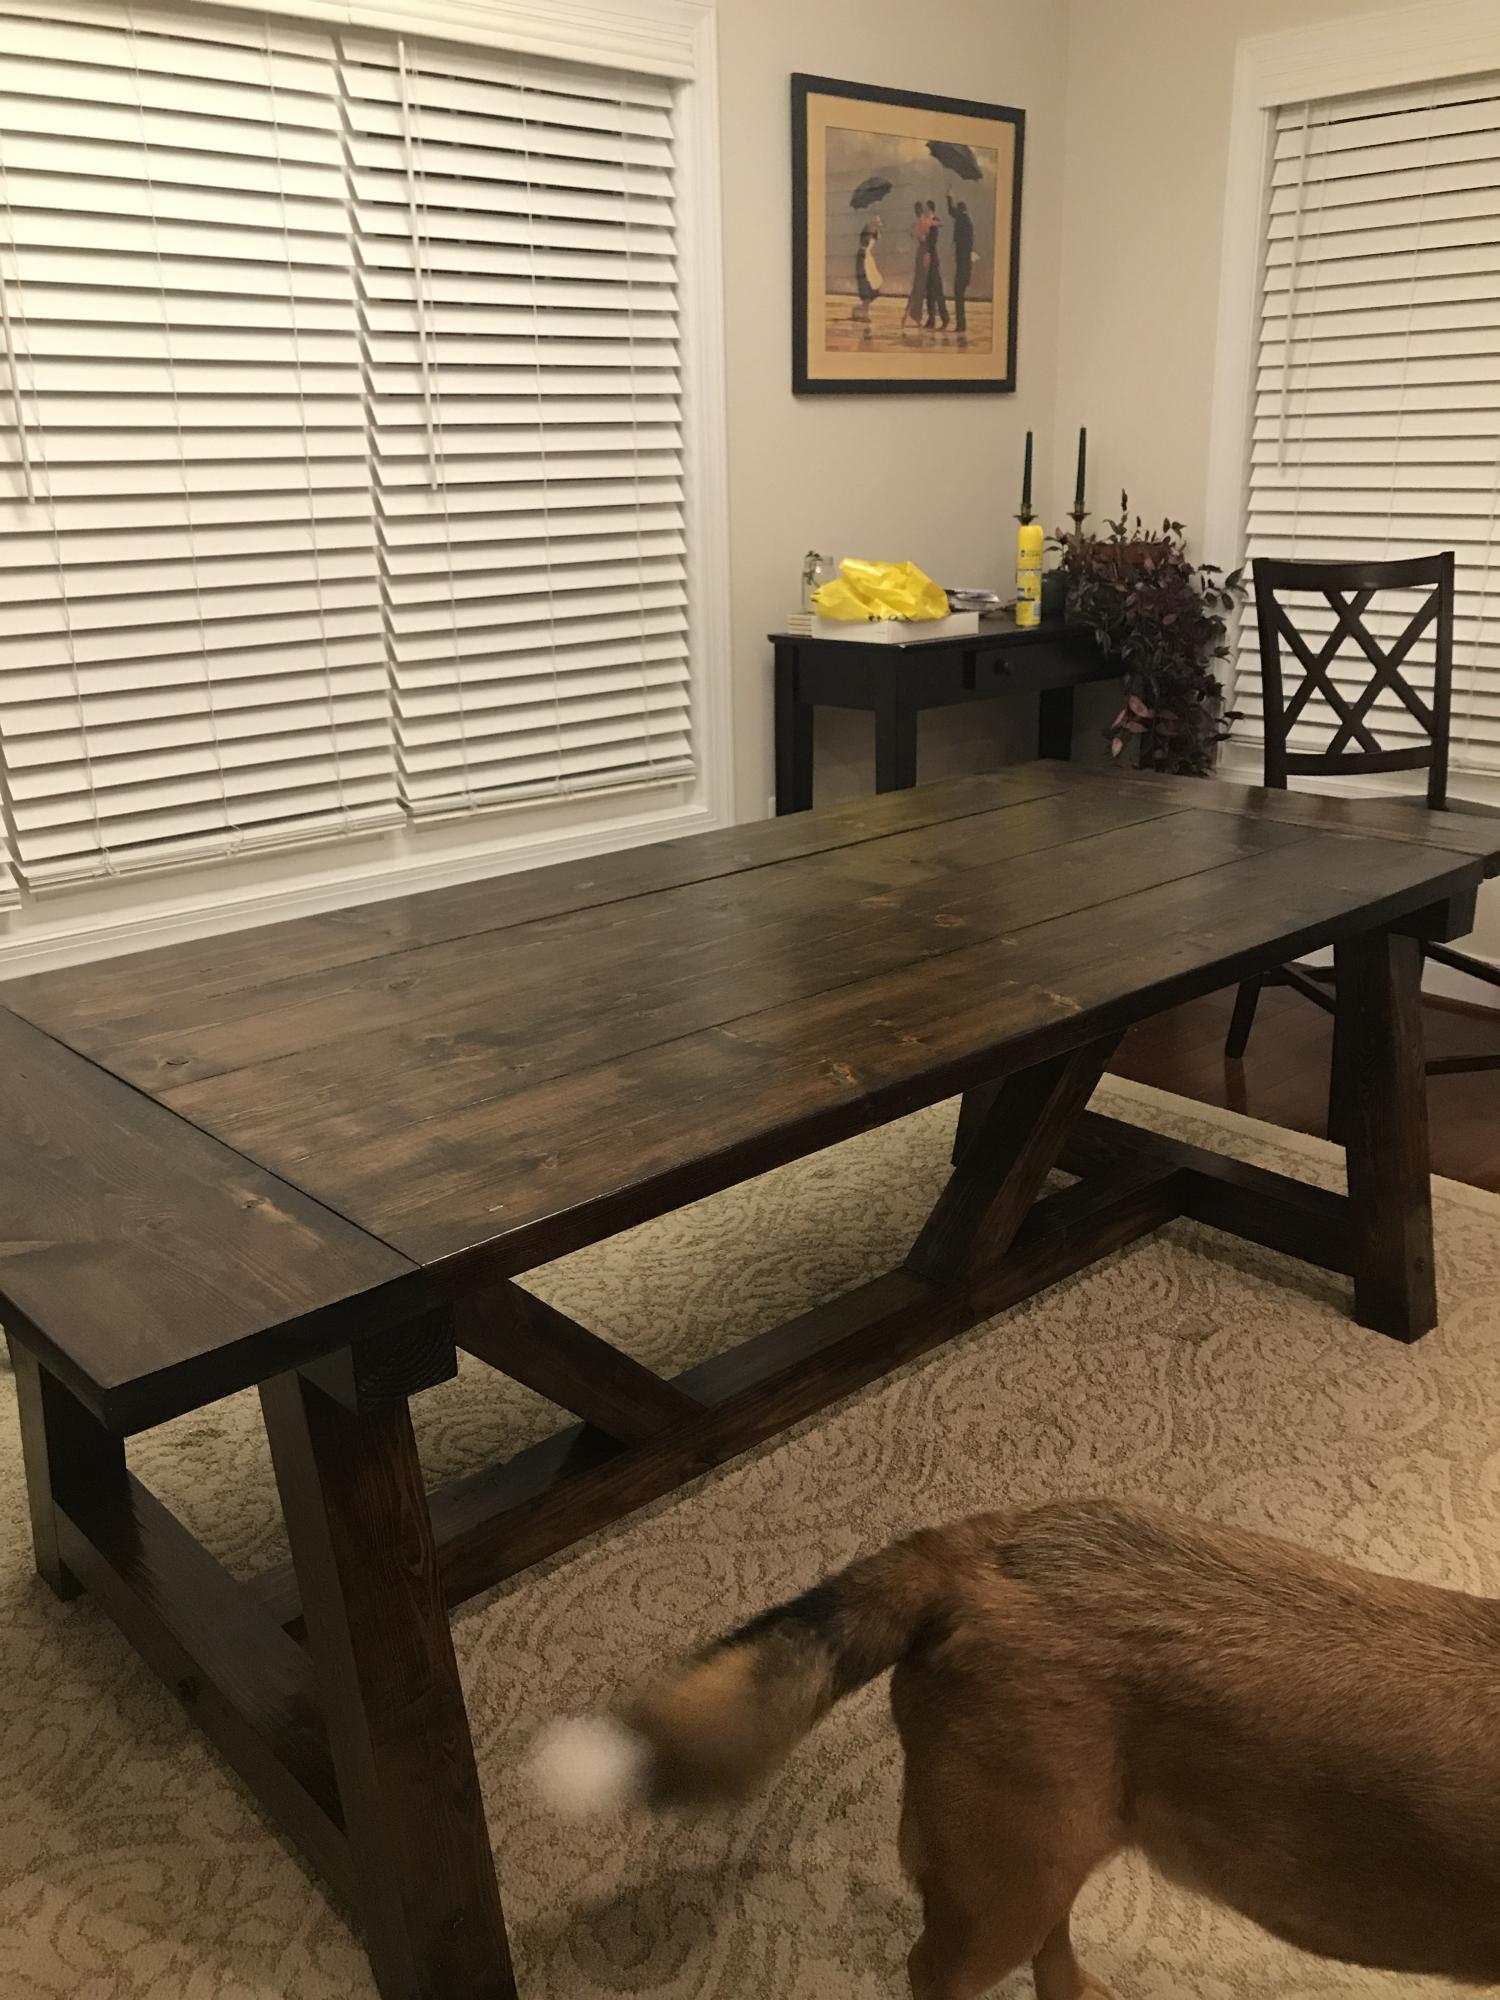
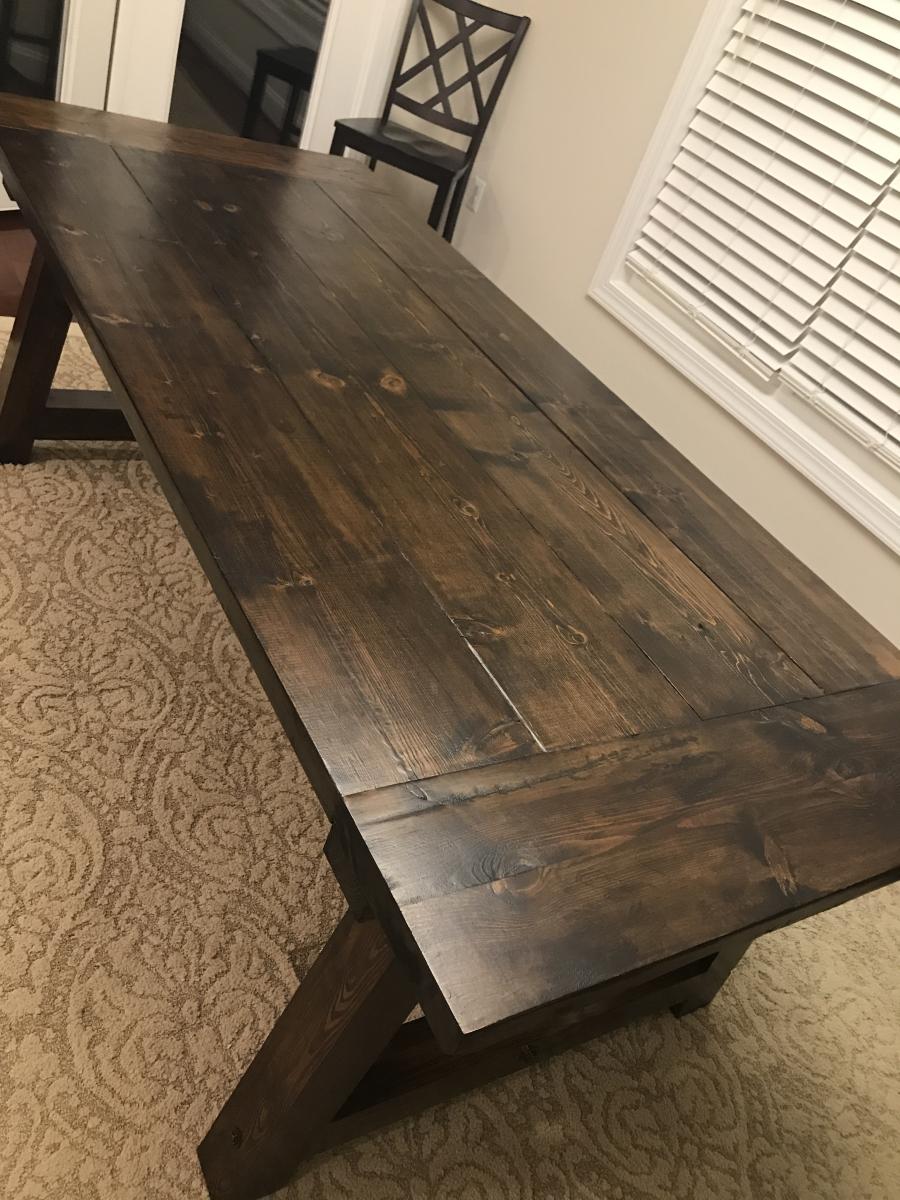
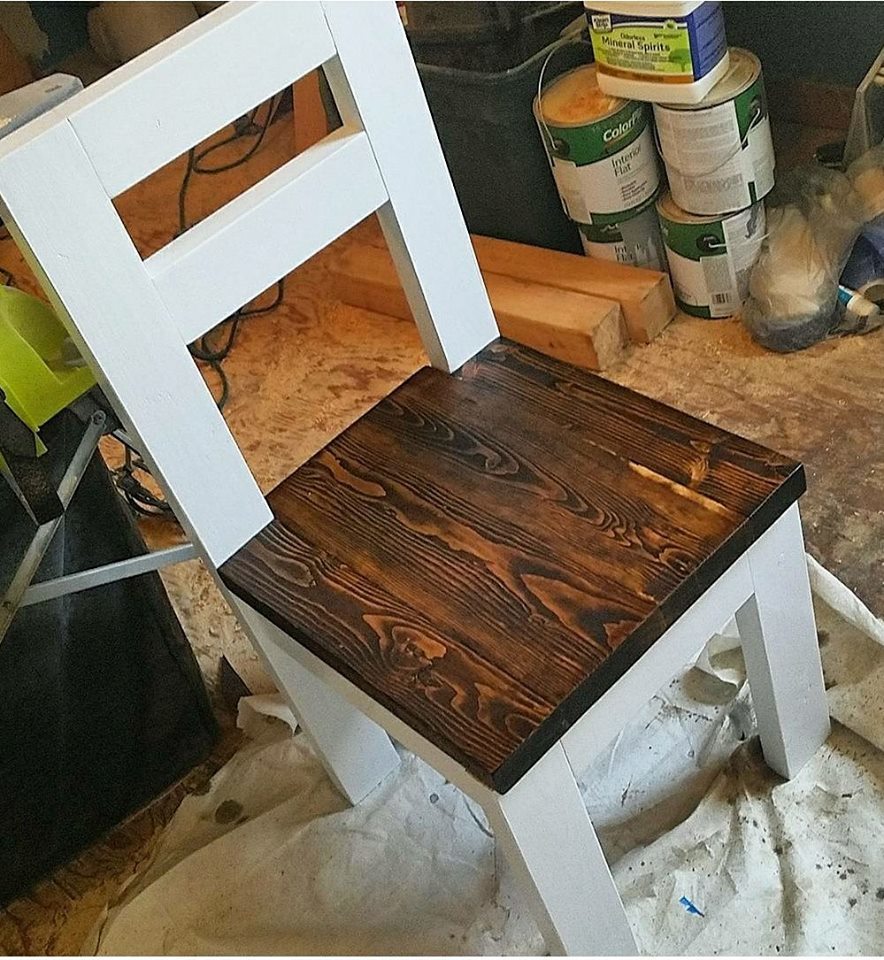
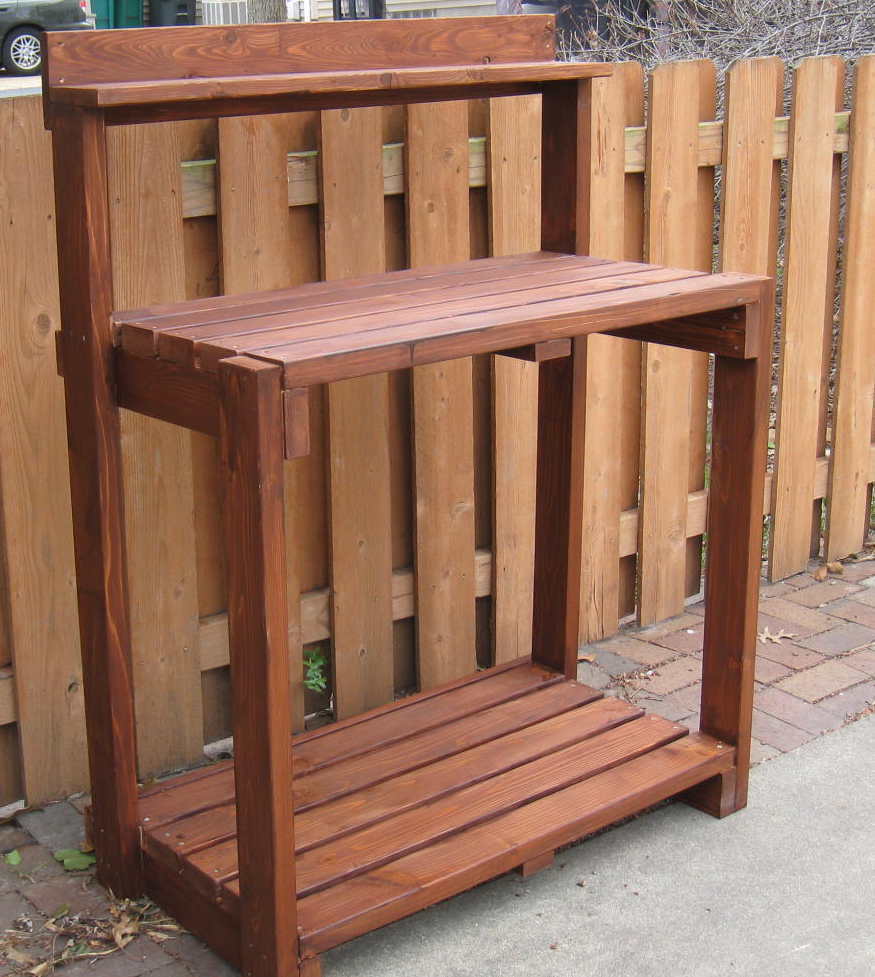
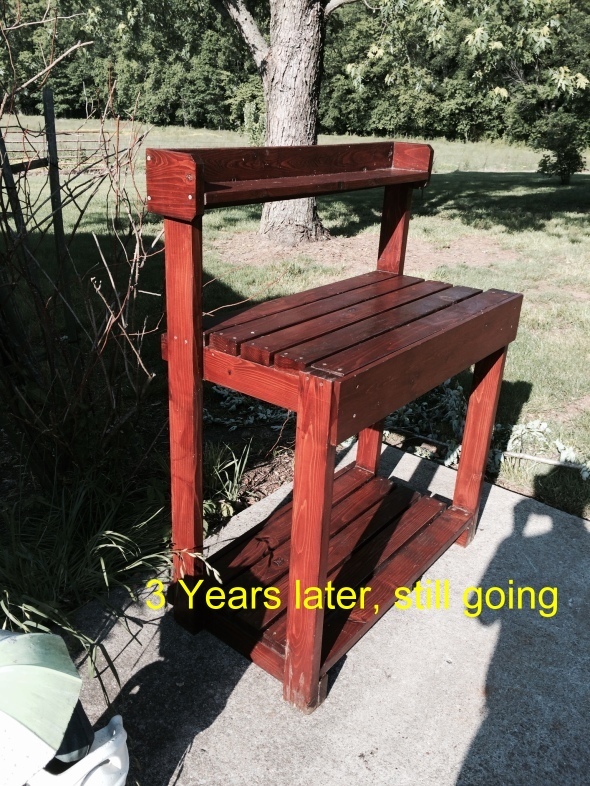
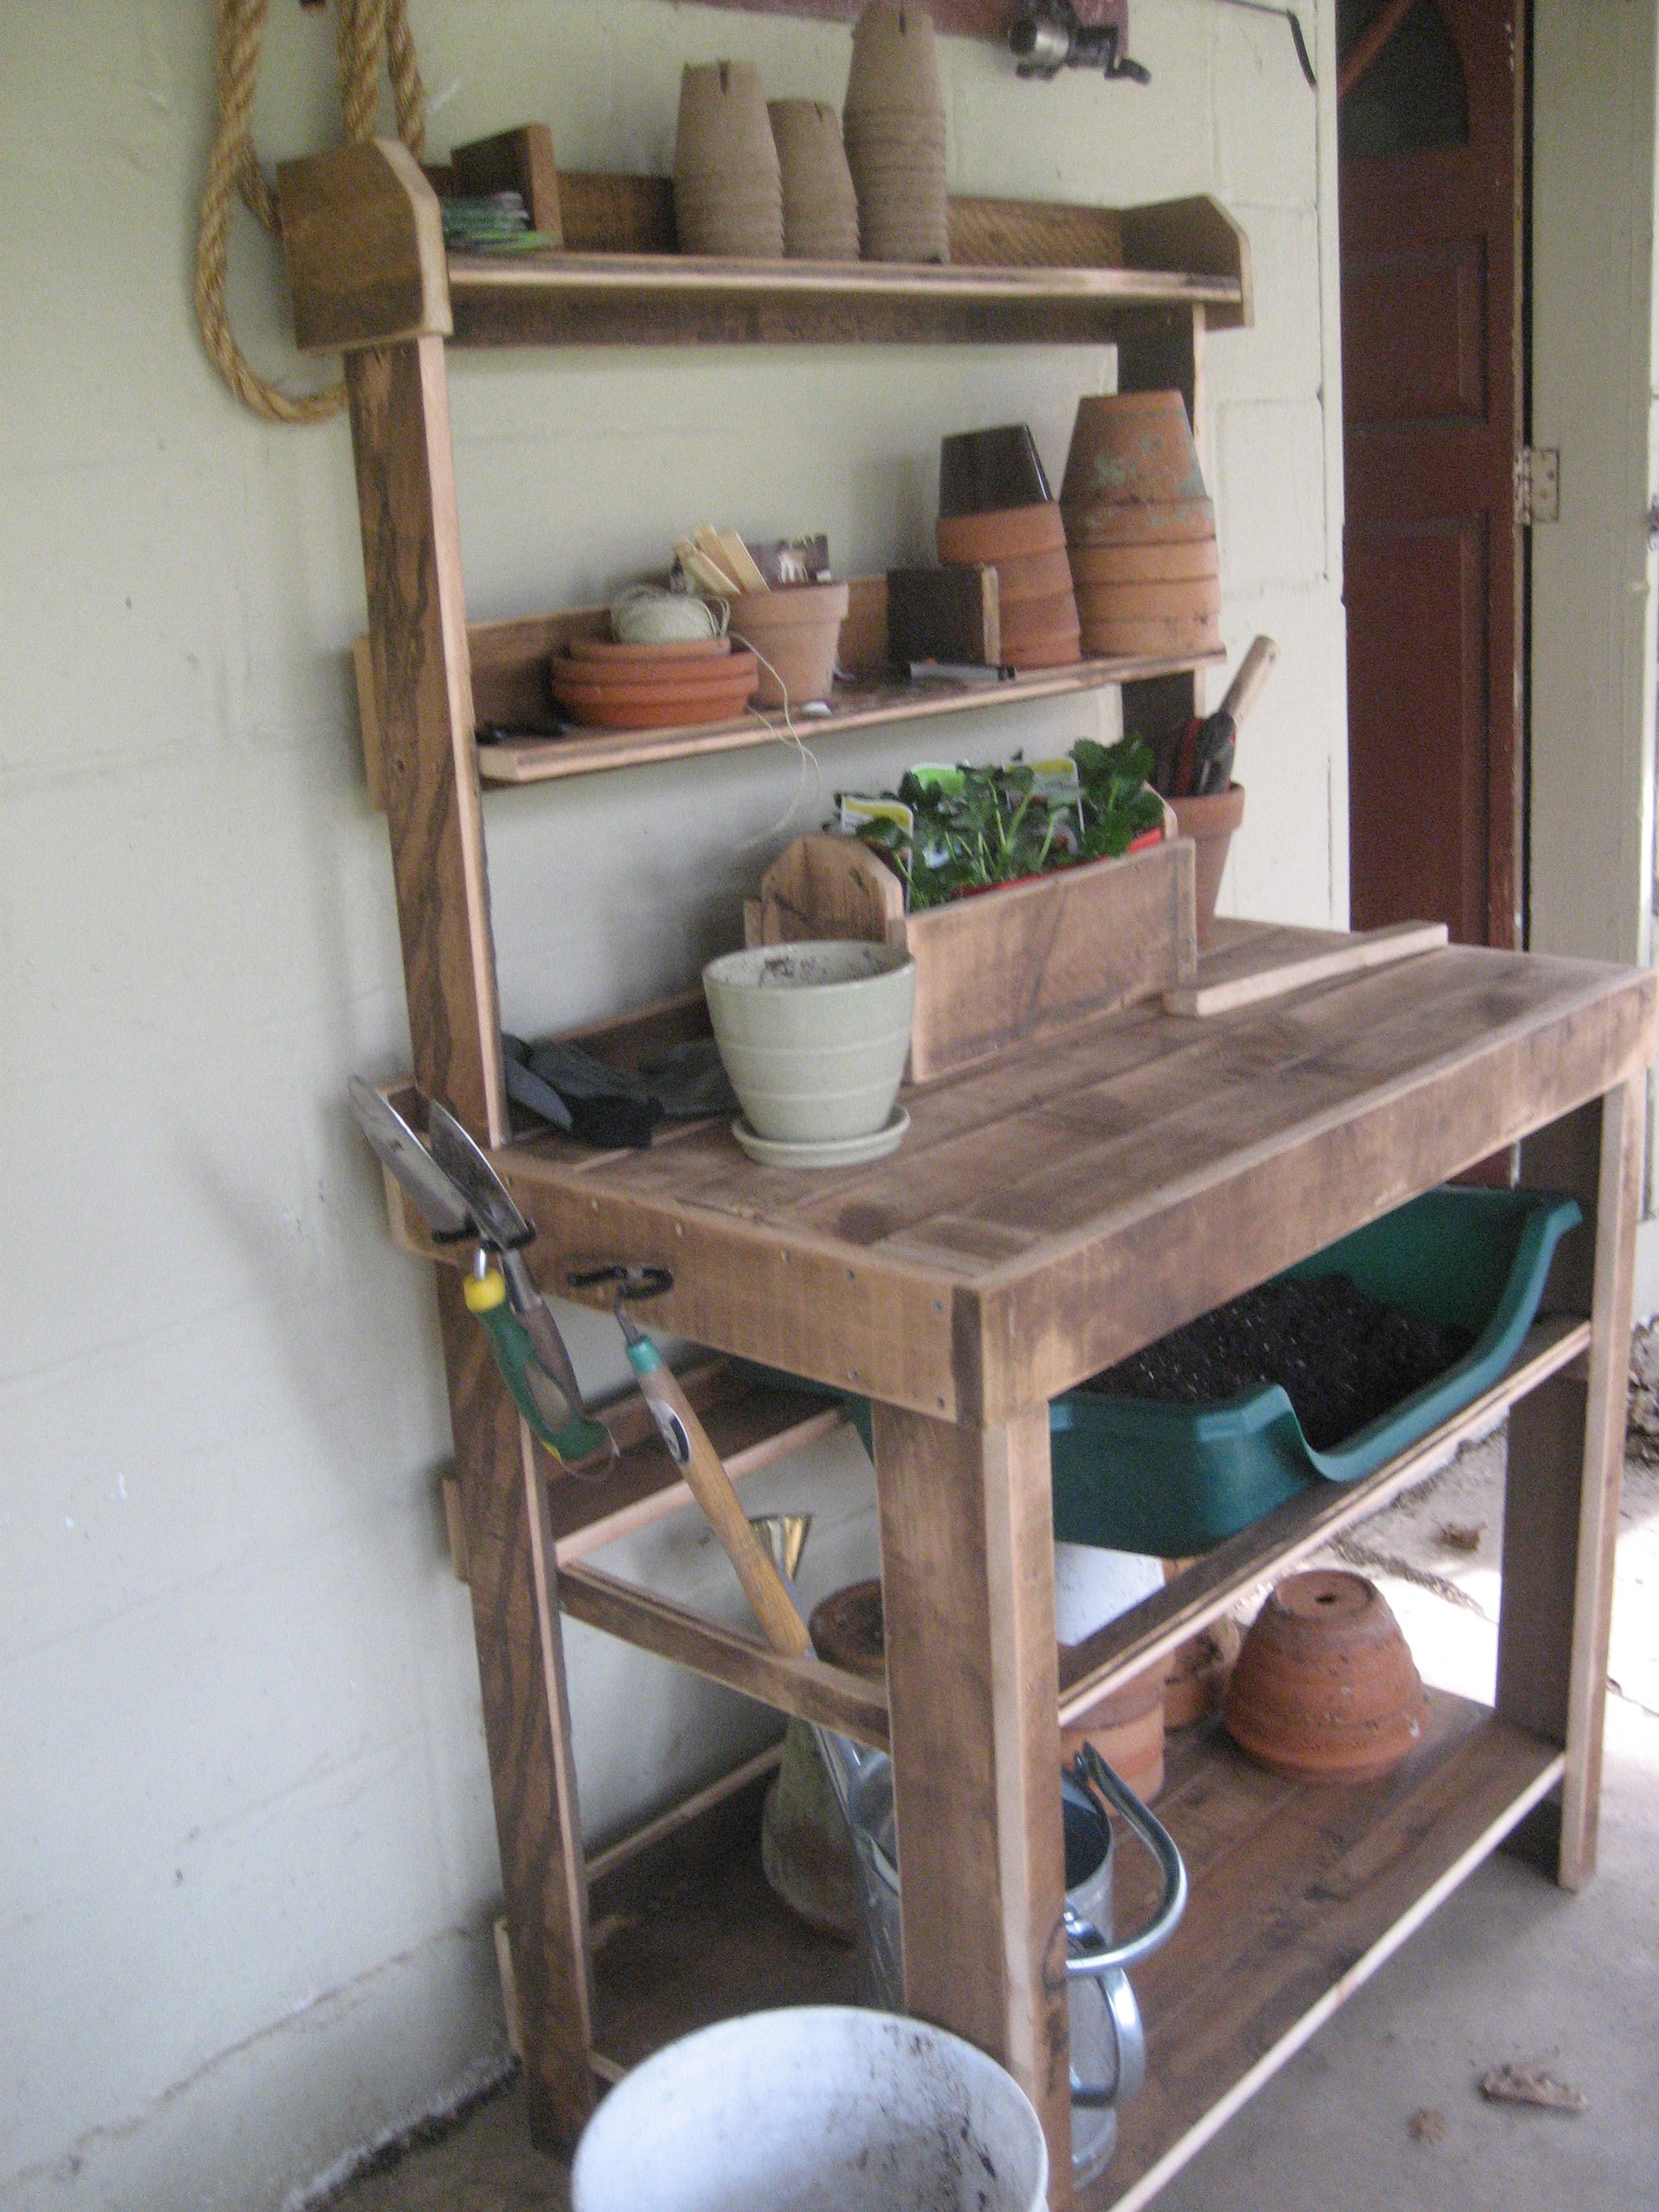
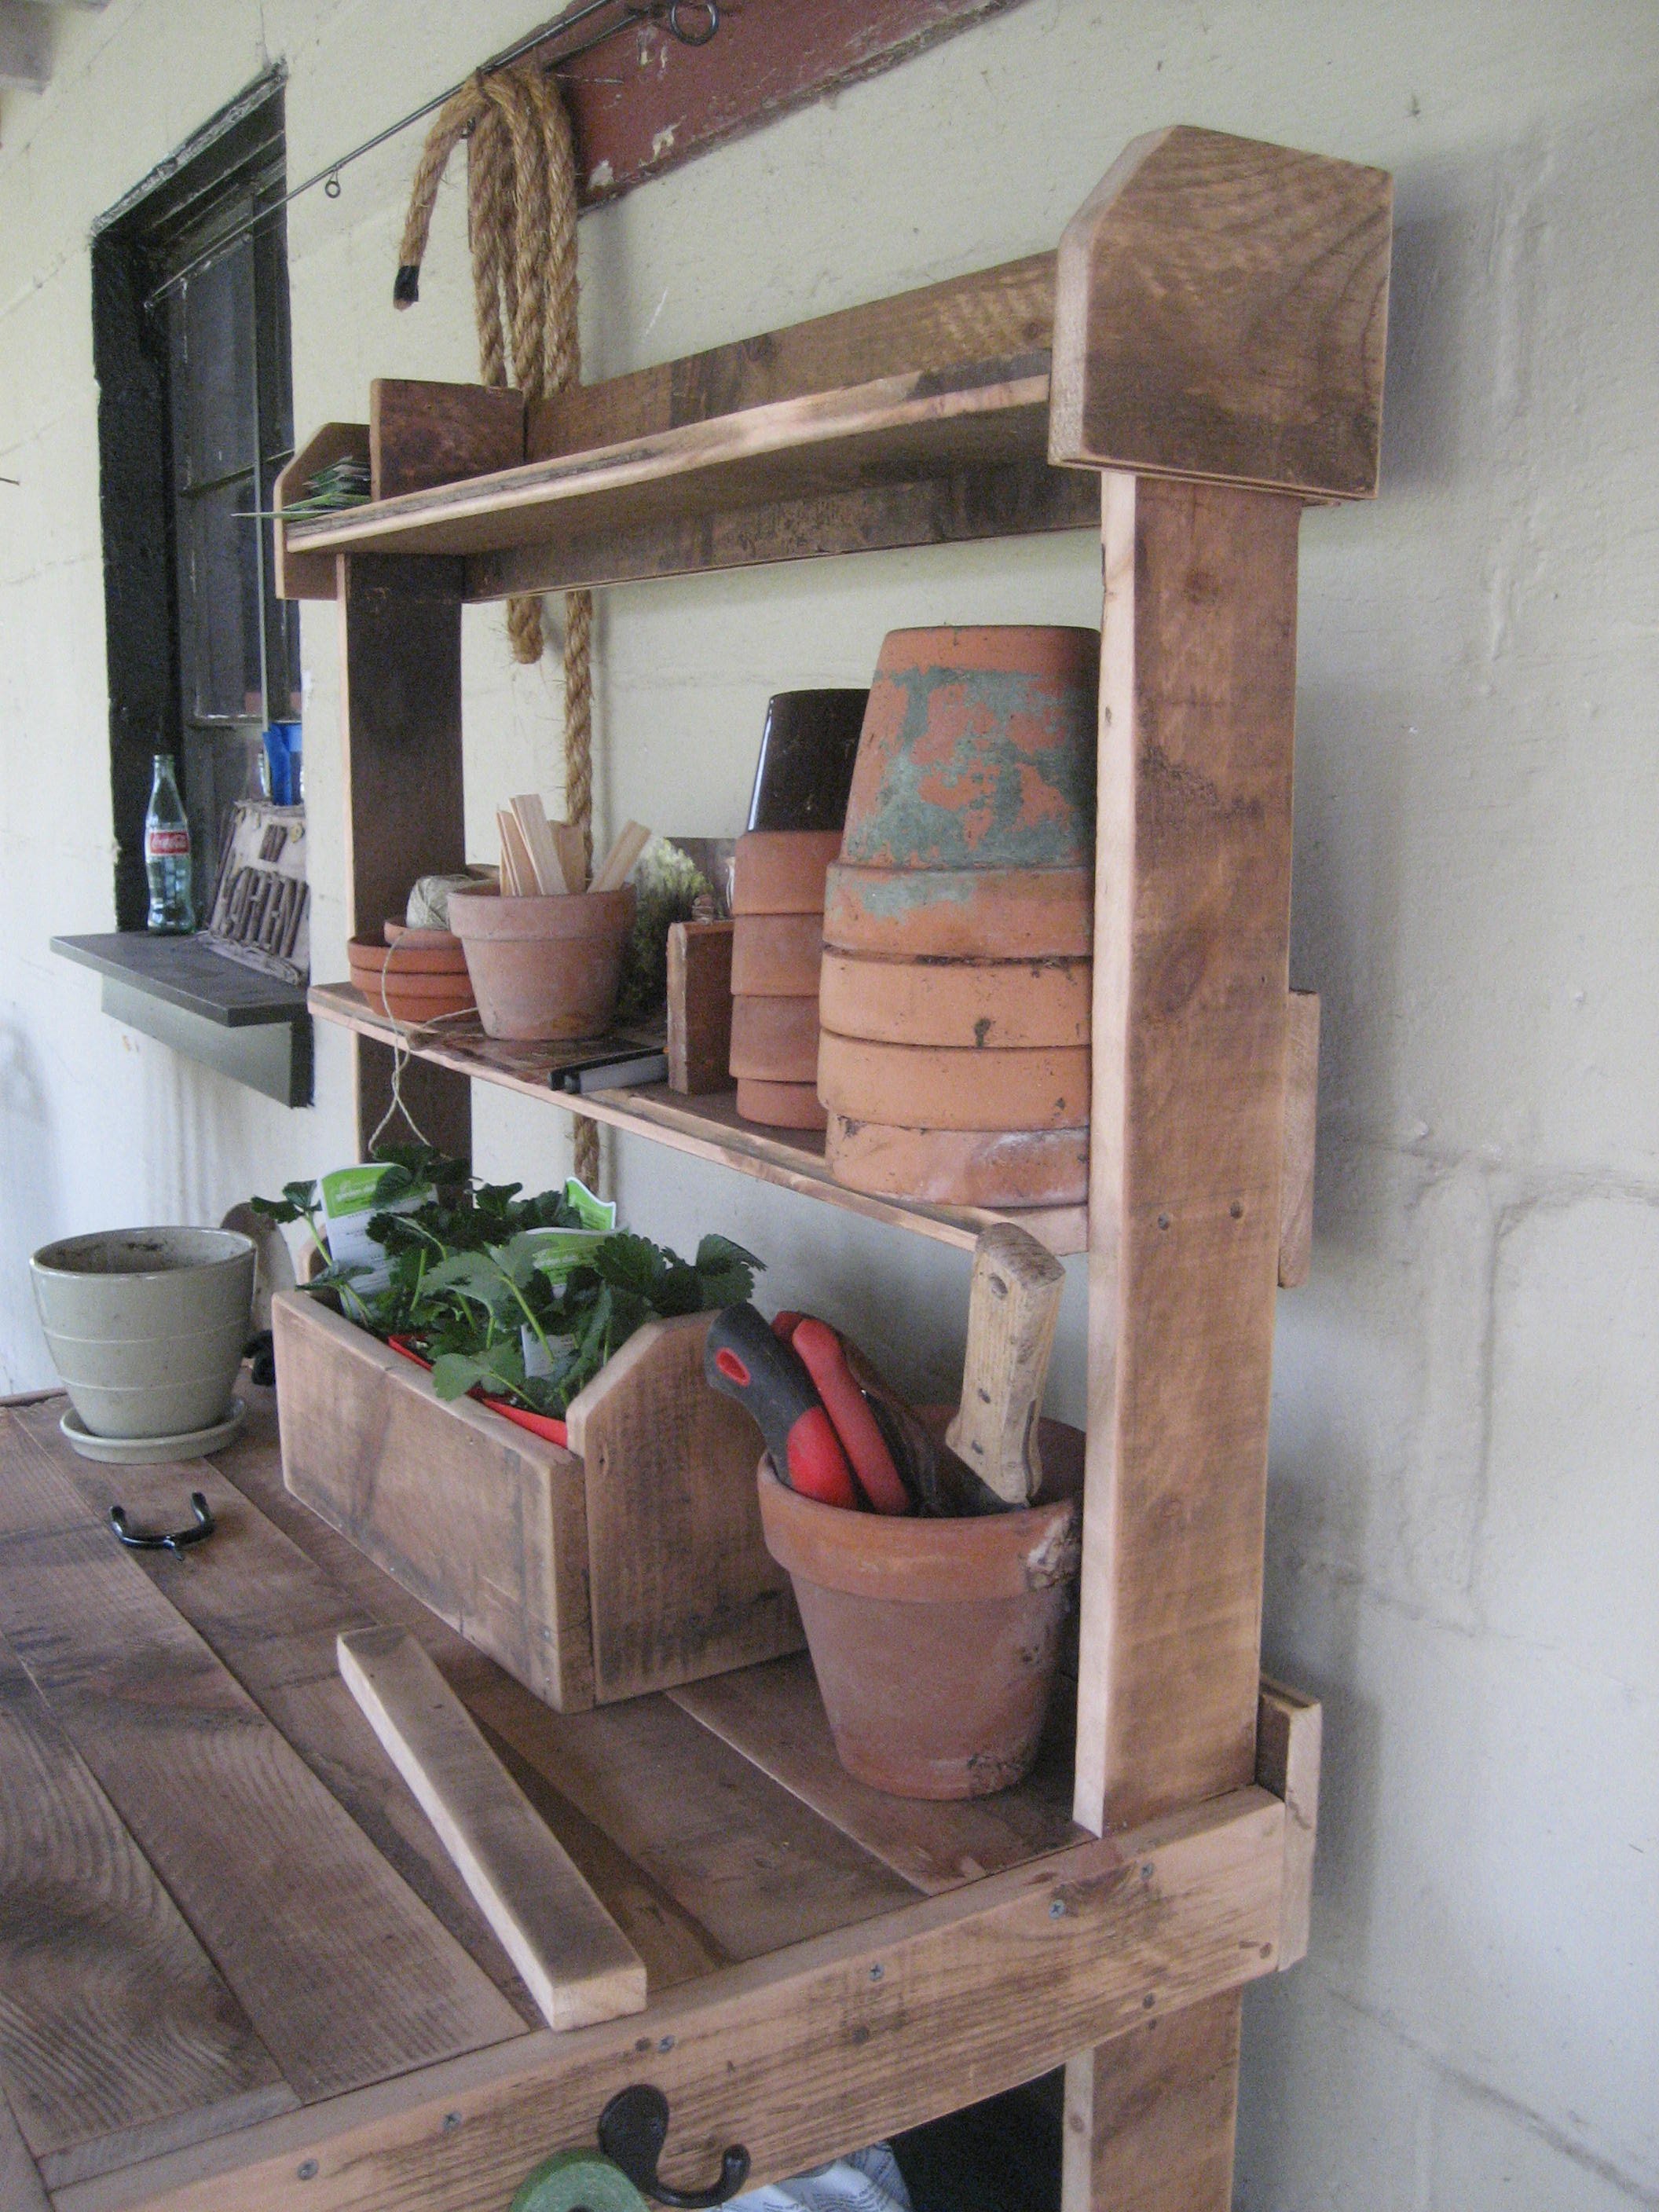
Community Brag Posts

2x4 Truss Bench

I loved making this bench - only 5 2x4s. I used premium studs, sanded before building, wood glue/countersunk screws and filled them in. Used English Chestnut stain and I’ll add polyurethane to ensure longevity. My first build - the trusses/supports weren’t the right size, somehow we’re short? So I cut those out twice. It’s OK because I had excess anyways! Nice snug fit now.

Built from Plan(s)
Estimated Cost
$60
Estimated Time Investment
Afternoon Project (3-6 Hours)
Finish Used
English chestnut varathane stain, polyurethane finish
Recommended Skill Level
Beginner

Comments

Dog Crate with a twist...

Submitted by AlexO on Mon, 05/08/2017 - 19:08

I really liked the Large Wooden Dog crate but wanted the sides to be lower and wanted to make sure there was no easy chew escape.  Not sure if you can see from the photo but the cats have taken over... Will need to make a larger one for the dog!

I followed the plan pretty much other than lowering the panel on the side and replacing the wooden bars with rebar.  The rebar was a bit of a learning curve getting the holes lined up perfectly but I figured it out and I think it came out pretty good!

Used all pine 1x3 and 1x2s.  Picked up a pine panel for the top and the bottom is a 3/4 plywood. Made our own chalk paint for the finish and sealed it with wax.

Oh, forgot, added tongue and groove pine for the back and finished it and the top with Antiguing wax.

Lots of fun and I think I will make a double one next!

Built from Plan(s)
Estimated Cost
Around $100 if you don't count all the practice pieces for the rebar!
Estimated Time Investment
Week Long Project (20 Hours or More)
Finish Used
Chalk paint and antiquing wax
Recommended Skill Level
Intermediate

Emmett & Luka's Hallway Murphy Desk

My wife and I live in a 575 sq ft Manhattan apartment with two young boys so space is extremely limited! Last year when our older son was 6 he had the idea to turn our tiny bathroom hallway area into a work space for his growing homework assignments. It took me a year, but it all fell into place when I found this design. Luckily we live in a quirky old 1844 brick row house and I've been lucky enough to craft a small space in the basement where I can keep my tools and work on projects. Even a small desk like this takes more space than you think!

I had to make it a bit smaller to fit the wall space we have. Then I realized the exterior hinges wouldn't have enough clearance because of the door frame. I found a neat set of interior hinges made by Pojjo but they attached to the sides as well as the bottom so the craft paper section was in the way. Then my wife said, "Can you flip it upside-down?" Absolutely. The only other hack I added was adjustable peg slots for the shelf on the left.

I did a twist on the chalkboard theme by painting the desk in a semi-gloss but the entire hallway in hot pink chalkboard paint--pink is my son's fave color =:-) Hudson Paints has an amazing range of chalkboard paint colors.

We love, love, love this design--thanks, Ana!

Estimated Cost
$50
Estimated Time Investment
Weekend Project (10-20 Hours)
Finish Used
Benjamin Moore Natura "Margarita Green" in semi-gloss; walls Hudson Paints "Sweet 13" pink chalkboard paint.
Recommended Skill Level
Beginner

Comments

New Workshop - Let the Fun Begin!

Submitted by ikeymedesu on Sun, 05/30/2021 - 18:33

I was really into building things and DIY over 10 years ago, but due to work/life I hadn't done anything since 2009. I was going pretty crazy working from home during the pandemic, and decided to get back into home improvement to have something to look forward to. After doing some painting and building a few accent walls out of shiplap and reclaimed wood (and loving it), I decided to turn my single car garage into a shop. This is when I found Ana White, and absolutely loved the plans and videos around the wall storage and workbench. I can't believe how sturdy everything is, how straightforward the plans are, and how well this turned out. It made me want to build all the things, and I'll be taking on many projects in the future. (my apologies for the pictures being in the wrong orientation - can't seem to adjust them)

Estimated Cost
500
Estimated Time Investment
Weekend Project (10-20 Hours)
Finish Used
None.
Recommended Skill Level
Intermediate

Comments

Ukrainian Sand box with built-in seats

Submitted by Anonymous (not verified) on Tue, 05/30/2017 - 05:28

 I live in Lviv Ukraine and painted it in he national colors of Ukraine.

The wood came from a old pallet.

Built from Plan(s)
Estimated Time Investment
Weekend Project (10-20 Hours)
Finish Used
Outdoor enamel paint
Recommended Skill Level
Intermediate

Parson Chair

Submitted by moosmani on Sat, 04/20/2013 - 14:05

This was my first time making a chair. It was easier than I thought it would be. The instructions were very easy to follow.

Built from Plan(s)
Recommended Skill Level
Beginner

My First Greenhouse

This was my first attempt at building a greenhouse. I wanted my cucumbers to be able t climb high so I made the house higher than the plans showed. It's also a little larger too. Since I am in Europe my dimensions are in meters. The overall size is 3 x 6 meters. I also built it on top of 100mm x 100mm lumber (the equivalent of 4x4's). It took 5 sheets of 6mm thick polycarbonate in 2 x 6 meters.

Built from Plan(s)
Estimated Time Investment
Week Long Project (20 Hours or More)
Recommended Skill Level
Intermediate

Comments

Square Picnic Table

Submitted by frmoody on Tue, 08/10/2021 - 07:05

Enjoyed this project although with the price of lumber it was a little expensive to build. The only modification I made was to put a cross brace in the centre of the table top. That allowed me to attach the top boards a little more securely as some of them were a little bowed. I'll add a better photograph once I get it out of my garage and on to the back deck. It is a little heavy.

Built from Plan(s)
Estimated Cost
$240
Estimated Time Investment
Weekend Project (10-20 Hours)
Finish Used
I stained the dark part of the table with Behr water based English Chestnut and the seat and top with Minwax Ipswich Pine followed by four coats of Varathane Exterior Gloss.
Recommended Skill Level
Intermediate

Comments

Charging table litter box

Submitted by Kingsamui on Sun, 03/22/2015 - 22:13

Adapted from plans for Bedside charging table. Made it taller and wider to accommodate a hidden litter box inside. Cut out a cat silhouette for entry through the side. Cabinet is big enough for litter box and extra litter and scoop. Antique painted white finish distressed by sanding and used a coffee glaze over it. 

Estimated Cost
$100
Estimated Time Investment
Weekend Project (10-20 Hours)
Finish Used
White paint distressed the a coffee glaze to antique it.
Recommended Skill Level
Beginner

Comments

Storage Bench/Daybed

Submitted by Anonymous (not verified) on Fri, 06/23/2017 - 20:49

This was my 2nd woodworking project, so I was very pleased with the results. I wanted more seating and storage for my office area. I liked the look of the Farmhouse Storage Bed, so I decided to modify the plans and turn it into a bench. I made the seating area 30" wide and 68" long. Instead of headboard and footboard, I made 2 sides that were about 40" tall (36" 4x4 plus the 2x4 and 2x6). I made 3 24" deep drawers and left the back side open so that I can store electronics that need to be charged in them with the cords hanging out the back of the drawers. It was a lot of fun to make, and I know that my family will enjoy it!

Estimated Cost
$350 for wood and hardware, then paint and cushions
Estimated Time Investment
Week Long Project (20 Hours or More)
Finish Used
Flat black oil-based enamel paint, then finished by lightly rubbing with fine grit sandpaper
Recommended Skill Level
Intermediate

Western jail bunk bed

Submitted by Anonymous (not verified) on Sun, 07/02/2017 - 13:55

Still waiting to add the stained jail sign. But a dad's twist to a mom's honey do project added the porch to the front to catch my youngest if he falls out of bed. 

Built from Plan(s)
Estimated Cost
$400
Estimated Time Investment
Week Long Project (20 Hours or More)
Finish Used
Cedar stain and high gloss finish
Recommended Skill Level
Intermediate

Three Story American Girl or 18" Dollhouse

This was a blast to make, we added 2 roooms and a swing but every thing else was the same!

Finish Used
Paint/Primer
Recommended Skill Level
Beginner

Comments

Reading Fort

Submitted by dhynd on Wed, 04/08/2015 - 08:36

Super easy. Done in less than one hour. Used Target's Black-Out curtains.

Built from Plan(s)
Estimated Cost
$20
Estimated Time Investment
An Hour or Two (0-2 Hours)
Recommended Skill Level
Starter Project

Comments

Farmhouse Table & Bench

Submitted by kvilla on Sun, 05/26/2013 - 14:09

I'm a novice furniture builder and felt I could tackle the Farmhouse Dining Room table and matching Farmhouse bench. With a lot of diligent detail work--especially sanding-my first two projects came out great. Because I was afraid to try the notching part of the plans, I decided to tweek the projects by attaching the stretcher boards with black cabinet screws. I achieved the rustic look I was looking for with both the table and bench!

Estimated Cost
$200.00
Estimated Time Investment
Week Long Project (20 Hours or More)
Finish Used
MinWax "Golden Oak Stain" and Rustoleum's no sand Satin polyurethane were great products!
I used a foam brush to apply the stain & immediately wiped off excess with a clean dry cloth as I was looking for a light oak color. I loved working with Rustoleum's polyurethane because there is no sanding required between coats. I used a good grade synthetic bristle brush to apply the polyurethane. Because I had never used a Kreg pocket hole jig (the $40 one)) before, I made sure to practice a lot before attempting. I also made sure each board was clamped down securely and used the fast speed on my Makita drill for doing the pocket holes. I used the slow speed setting when screwing in the pocket hole screws. I used the plans for the 84-inch long table and long bench and made sure to ask my husband for help with the circular saw. I also watched a lot of videos on how to use a circular saw safely. Both my husband's help and the videos assisted me in feeling more comfortable with the circular saw. The 2x8 boards were super heavy for me (I'm 5'5" and 62 years old) and once I had all the boards securely put together & the frame was attached, I needed help to turn the table upright. Most importantly, I worked slowly and carefully.
Recommended Skill Level
Starter Project

4x4 Truss Table

Submitted by Mermac117 on Sat, 09/02/2017 - 17:43

Took us about a week but have two young toddlers... love the table. Awaiting Chairs from wayfair and my husband is starting the bench this week!

Built from Plan(s)
Estimated Cost
$200
Estimated Time Investment
Week Long Project (20 Hours or More)
Finish Used
Dark walnut
Recommended Skill Level
Beginner

Adirondack Chairs for fire pit

Submitted by Anonymous (not verified) on Wed, 10/06/2021 - 03:51

We have a contemporary house on a lake and the standard Adirondack chairs were not fitting in this setup. However, Anna’s modern Adirondack chair plan was just perfect for what we were looking for. The chairs are comfortable and the result is amazing! Thanks!!

Comments

Seasonal And Holiday

Dining Table

Submitted by Malka on Wed, 09/13/2017 - 00:43

Used the pub table plans, but went regular dining table height so as to make matching dining chairs. Painted in Rustoleum Latex Ultra White, and Stained in Minwax Espresso. Built using Douglas Fir lumber. Table top and chair seats are 2x4's and 2x6's that were biscuit joined. Table has adjustable leg levelers drilled into bottom of legs.

Built from Plan(s)
Estimated Cost
$200 for Table and 4 matched chairs
Estimated Time Investment
Weekend Project (10-20 Hours)
Finish Used
Rustoleum Ultra White paint, Minwax Espresso stain, Minwax Gloss Fastdry poly
Recommended Skill Level
Intermediate

Rory's House

In need of a replacement for my hideous (but large!) wire kennel, I was ecstatic when Ana posted plans for an end table kennel, just like the fancy ones in Sky Mall magazines! Once I got out of my first trimester of pregnancy, I enlisted a friend to help me out with the build. I spent a little too much on lumber (I accidentally purchased the good whitewood, as opposed to furring strips) but I'm chalking that up to pregnancy brain. After a million Kreg Jig holes, the assembly was maybe an hour or less to put all four sides together. We decided to paint the interior prior to assembly, and that was a good choice! I put the sides together with L-brackets, and honestly did a pretty poor job of it. But the main reason was to easily disassemble it should it need to be moved at some point. I splurged on the hinges and gate closure, and love love LOVE the finished product! These were great, well-laid out plans!

Built from Plan(s)
Estimated Cost
70
Estimated Time Investment
Afternoon Project (3-6 Hours)
Finish Used
I sanded it with 100, then 150. I gave the MDF edges a quick coat of DAP to smooth things out, then sanded with 220. It's painted with 4 coats of semigloss white.
Recommended Skill Level
Intermediate

DIY Folding Workbench

Submitted by suzeet305 on Mon, 10/18/2021 - 18:32

I'm a beginner DIYer and I knew one day I was going to have to make a workbench. I made mine 24x48 so I wanted a little more support to hold up the drop down leaf. I searched your site and found another plan with these gatelegs and knew this is what I wanted. I love the way it came out. What do you think?

Built from Plan(s)

Comments

Potting Bench

Submitted by bluejazz on Thu, 03/24/2011 - 12:09

The plans are great.  This went together really fast.  I am cheating a little here, it is not quite complete; I need to add the side blocks on top and my wife would like a another panel added to the front at work height level, just for looks.  But the overall look won't be changed.  I struggled some with finishing (I usually do).  A couple spots  have runs I didn't see.  One will be covered by the front panel I'll add,but another needs sanding.

Just for fun I added a picture of the bench 3 years later. Its held up well to a lot of use and a lot of sitting out in the elements.

Built from Plan(s)
Estimated Cost
$100
Estimated Time Investment
Weekend Project (10-20 Hours)
Finish Used
General Finishes Cedar Exterior 450 Water based stain. I was going to add a spar varnish to extend the life. I decided against that because while it likely would extend the life, I would have to strip it to re-stain. After a couple years, I can simply re-stain without stripping if I don't varnish.
Recommended Skill Level
Beginner

Potting bench

Submitted by DianeS on Wed, 04/06/2011 - 14:04

I used the plan for the simple potting bench, but because I had  a lot of reclaimed wood, I used well supported 1x4's instead of 2x4's, simply because I had an abundance.

Built from Plan(s)
Estimated Cost
10.00 for screws and the potting bin
Estimated Time Investment
Day Project (6-9 Hours)
Finish Used
just sanded a lot.
Recommended Skill Level
Beginner

Comments