Community Brag Posts

Workshop storage success!

I adapted the garden tool storage project to fit my small space. I used some reclaimed wood as well as 2 x 4s since lumber is so expensive right now. I placed the racks up high to open space close to the ground in our little 12' x 16' workshop.

Built from Plan(s)
Estimated Cost
$16
Estimated Time Investment
An Hour or Two (0-2 Hours)
Finish Used
planning to paint
Recommended Skill Level
Starter Project

Comments

Worm Composter Bins with Cabinet

I made the worm composter from Ana's plan and built a cabinet out of old pallets. The stack of worm composters drawers slide in and out of the cabinet on a heavy duty drawer glide set. I used cedar fence board. For 3 bucks a board, it was worth the work to rip them down and sand them. The bottom drawer has a tray built out of old flashing and slopes towards a hose bib in order to collect the worm tea. I designed the drawer insert out of cardboard and cut it out of flashing, using a pop rivet gun to put it together, sealing the seams with flashing caulking. The drawer has a sheet of aluminum window screen under the top square of cedar.

Estimated Cost
50
Estimated Time Investment
Week Long Project (20 Hours or More)
Finish Used
Some free varnish from the County Drop and Swap recycle center
Recommended Skill Level
Intermediate

Chest of Drawers from old work bench

Submitted by AndyH on Tue, 03/24/2015 - 11:06

I had an old workbench (pic shown) and reused the 2 by 4s, 2 by 6s (that were supports under the work surface) and the 3/4 inch ply to make a 3 drawer cabinet.

The bases of the drawers were made from the top of the work bench which took some hefty sanding but I actually put the underside of the worktop as the upfacing side for the drawers as that was cleaner even though has some nail holes in places.

The drawer sides and fronts were made from some left over 1 by 4, 1 by 6  and 1 by 8 from my recent work station build.

All I had to buy was the drawer slides and pulls.

Finished in  Varathane Carrington and 3 coats of Varathane Matte Poly.  The drawers were finished in Minwax Special Walnut.

Estimated Cost
$30 for slides and door pulls. Everything as recycled or leftovers from another project.
Estimated Time Investment
Weekend Project (10-20 Hours)
Finish Used
Varathane Carrington and Varathane Matte Poly
Recommended Skill Level
Beginner

Comments

My first patio furniture build

Submitted by Anonymous (not verified) on Mon, 10/04/2021 - 13:31

The sectional is based from Anna’s design. The lounger was a combination of different design. I love Anna White designs. As a beginner in woodworking, I find her to be easy to follow.

Comments

Guest bedroom with fancy king farmhouse bed, $10 ledges, wooden crate nightstands, and wine bottle lamps

Submitted by henryholub on Fri, 05/24/2013 - 08:03

This the recent remodel of our guest bedroom. Its a modified plan from a fancy farmhouse bed that allows room for tubs to be stored underneath, three of the ledges, and the nightstands are old wooden crates that have been sanded down, painted, and mounted to the wall. We decided to do vinyl stickers as the "headboard" and felt the birds on a wire made for a good look. The lamps we made from wine bottles with labels we liked using westinghouse lamp kits. Thank you Ana White for these plans and ideas!

Estimated Cost
$150
Estimated Time Investment
Week Long Project (20 Hours or More)
Finish Used
"mistint" paints. White for the bed, yellow for the nightstands and lower ledges, and an orange-red valspar paint for the 8 ft ledge.
Recommended Skill Level
Intermediate

4x2 Patio Seating

Submitted by Anonymous (not verified) on Tue, 10/05/2021 - 02:12

Easy to make 4x2 Patio Seating with Ikea style cushions.
Added the diagonal designs on the back.

Comments

Entryway lockers and bench

Submitted by DIYMomof4 on Tue, 08/29/2017 - 19:24

I love Ana's plan for lockers!  This project is so rewarding and was very straight forward to build.  I added a fourth locker and a shoe bench to accomodate my children.  I also added a toekick behind the face frame so things won't get lost underneath.   Instead of using 1 x 12's, I ripped plywood into 4 equal strips.  They came out to be slightly less than 12 inches each as you have to account for the saw blade.  Each locker has three hooks, a place for shoes, and a bin for winter gear.  I made the fabric bins and bench cushion following online tutorials.  I set the hooks according to the height of my children, so even my youngest can hang up her things.  This project took me about a week and a half to complete, including the sewing portion.  It is very sturdy and the 1x4's along the back allowed me to attach the unit to several wall studs.  I placed the 1x4's(with hooks) low enough that the heavy backpacks will also have the shelf for support.    The shoe bench measures 48" in length at the longest point.  It is the same depth as the locker unit and fits perfectly behind the locker face frame.  Thank you so much for your wonderful plan!

Built from Plan(s)
Estimated Cost
$300
Estimated Time Investment
Week Long Project (20 Hours or More)
Finish Used
I used a semi-gloss alkyd paint by Behr. The color is called Flagstaff green and is a bit greener than the picture shows.
Recommended Skill Level
Intermediate

Breadboard Ended Fancy X Desk!

Submitted by pnytail01 on Wed, 09/06/2017 - 07:59

I felt a little bold deviating from the plans when this was my first project.  But I saw another version of this desk with the breadboard ends, and I really appreciated the added craftsmanship this gave off.  Other than the top, I followed the plans to a T.  For the top, I made this from 2x6's with the 4 lengthwise pieces cut to 61" and the ends to 22" (I think I ended up trimming the ends down to match better, but 22 was a good starting point).  As for the finish, I layered stains starting with Minwax's Classic Grey followed by Minwax's Jacobean.  I made two of these desks to put in our home office.  If I think of it once the office is complete and decorated, I'll add another pic!

Built from Plan(s)
Estimated Cost
After lumber, stain, and hardware, I figure I spent about $75 for each desk.
Estimated Time Investment
Weekend Project (10-20 Hours)
Finish Used
1st Layer - Minwax Classic Grey
2nd Layer - Minwax Jacobean
Recommended Skill Level
Beginner

Wood Toy Fishing Game

This was a very easy project from scrap wood I had leftover from previous projects. I modified the box a little. I cut slits in the box so the top slides on nicely. I also stained the box and sealed because I love the look of stained wood. I used early American wood stain.

Built from Plan(s)
Estimated Time Investment
Afternoon Project (3-6 Hours)
Finish Used
early american
Recommended Skill Level
Starter Project

Playhouse - Drew Gaffke

Submitted by Anonymous (not verified) on Sun, 12/26/2021 - 14:46

I combined a couple of playhouse plans for this one. The framing is 2x2 treated pine. The front is real stone. I tried to match our home the best that I could. The floor is made out of composite decking.

Comments

Seasonal And Holiday

Footbridge

Submitted by sooz122 on Tue, 04/26/2011 - 18:36

I wanted to make a footbridge for my mom so she wouldn't get muddy when she crosses a small drainage ditch when goes walking on the trails behind her house. I didn't have a plan and this was my first build and I loved it! I just wanted to give everyone an idea of something to build. Can't wait to build more.

Estimated Cost
45
Estimated Time Investment
Afternoon Project (3-6 Hours)
Finish Used
Dark Minwax Walnut with a couple coats of poly.
Recommended Skill Level
Beginner

Bar Stool DIY

Submitted by Knathu121 on Fri, 01/05/2018 - 20:31

I used 2x4’s to make these bar stools and used Valspar weathered gray stain. I found the plans online by searching “chunky barstool”. It cost me around $85 to make all 4 of them.

Estimated Cost
$85.00
Estimated Time Investment
Weekend Project (10-20 Hours)
Finish Used
Valspar weathered gray
Recommended Skill Level
Beginner

Comments

Bed #2

Submitted by The_big_al on Wed, 06/24/2015 - 22:10

This is bed #2! Bed #1 can be found here: http://ana-white.com/2015/06/DIY_furniture/1st-time-project.

The original plan was to make our daughters bunk beds but during the construction of bed #1 we decided to put the oldest into her own room. This move prompted me to find a way to differentiate bed #2 from bed #1.

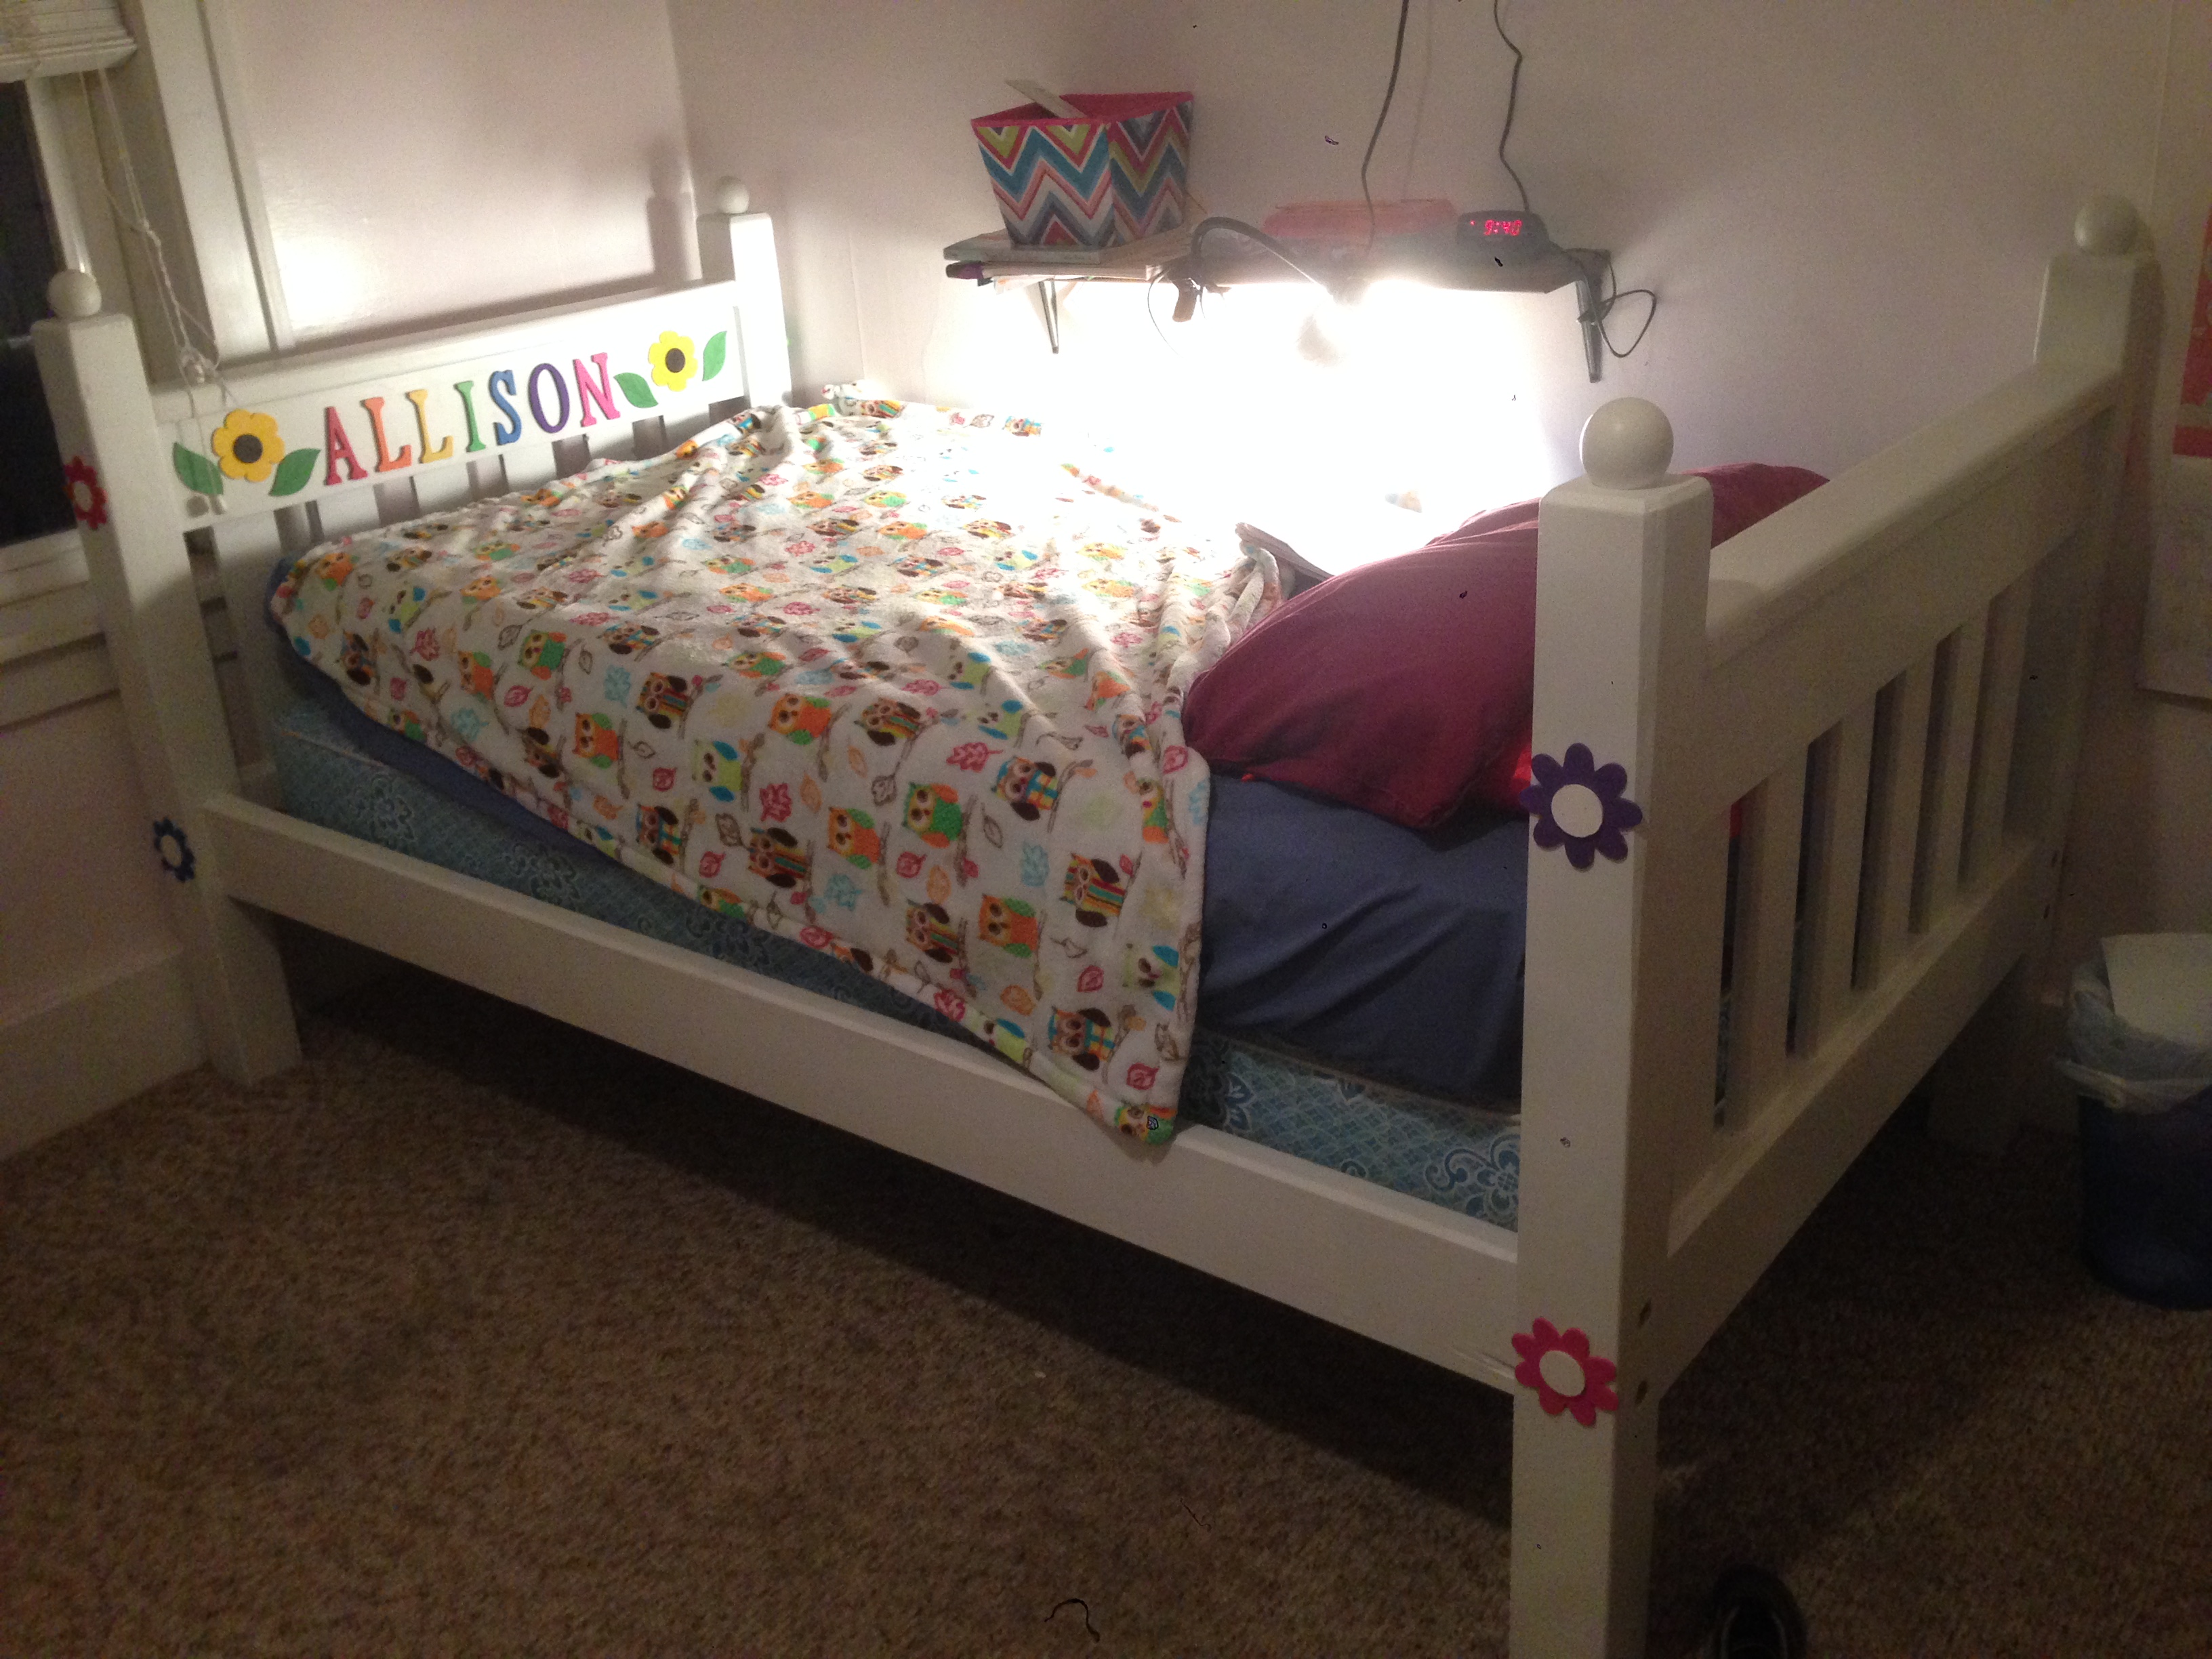
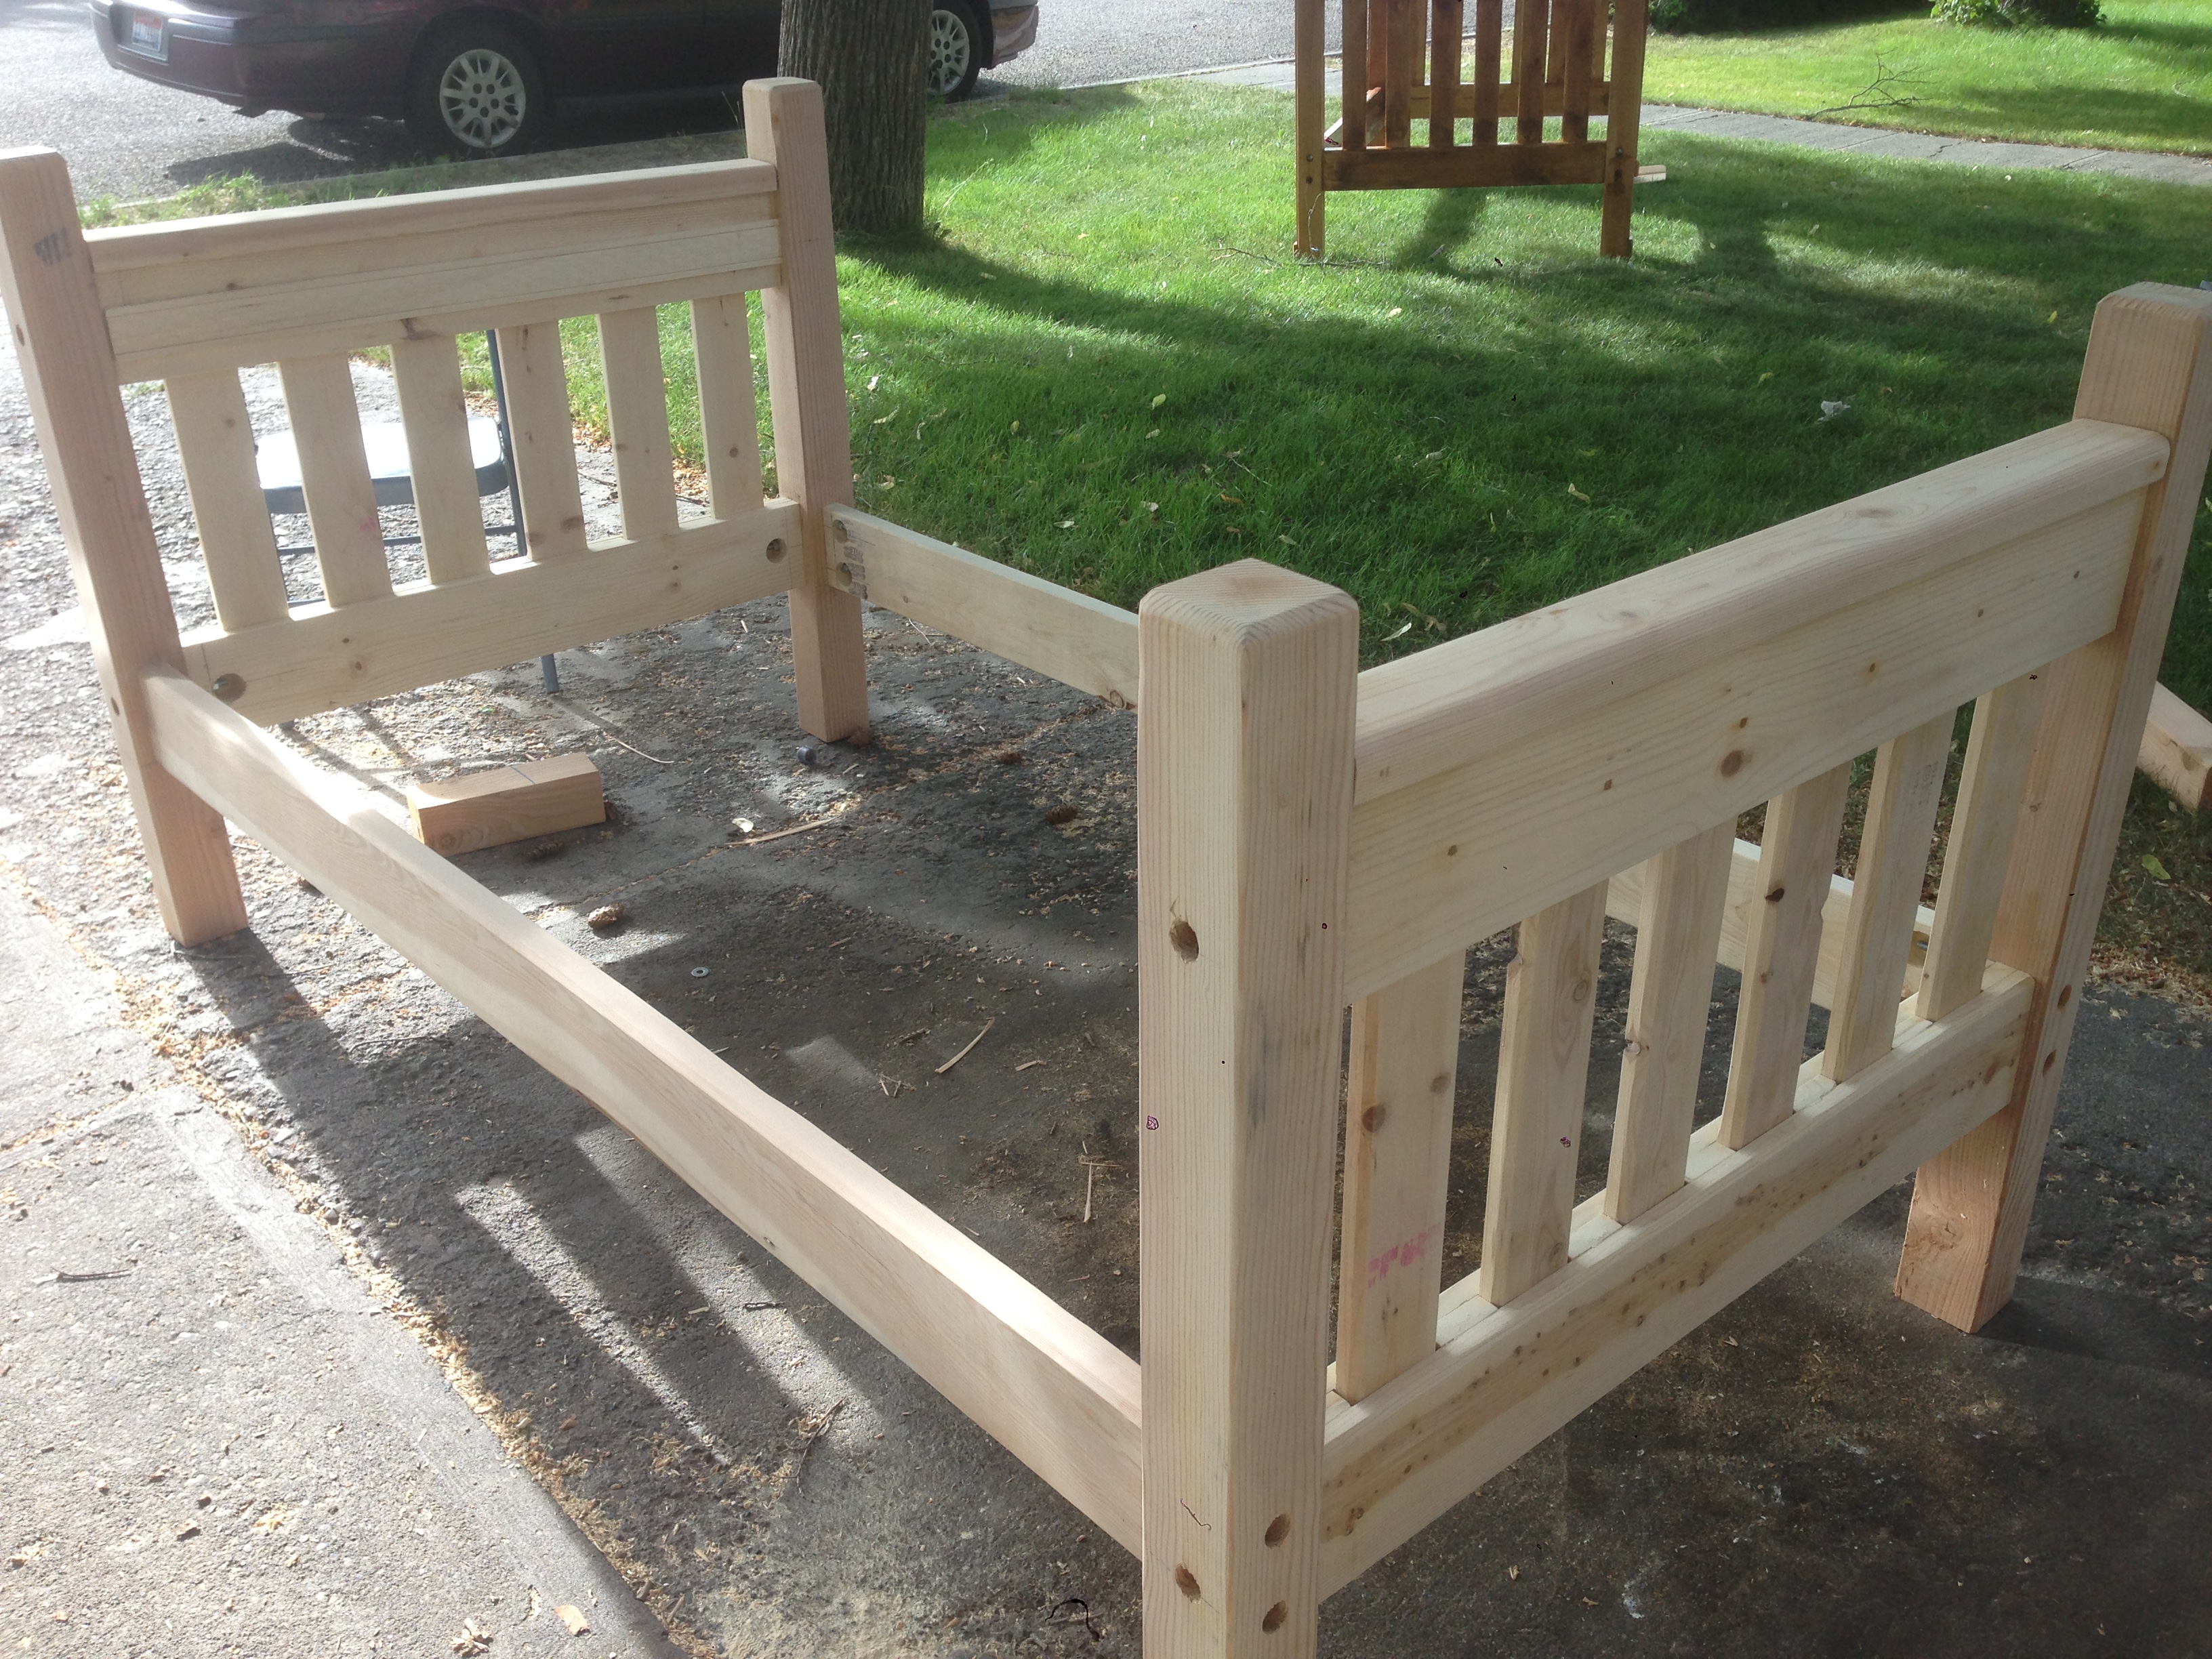
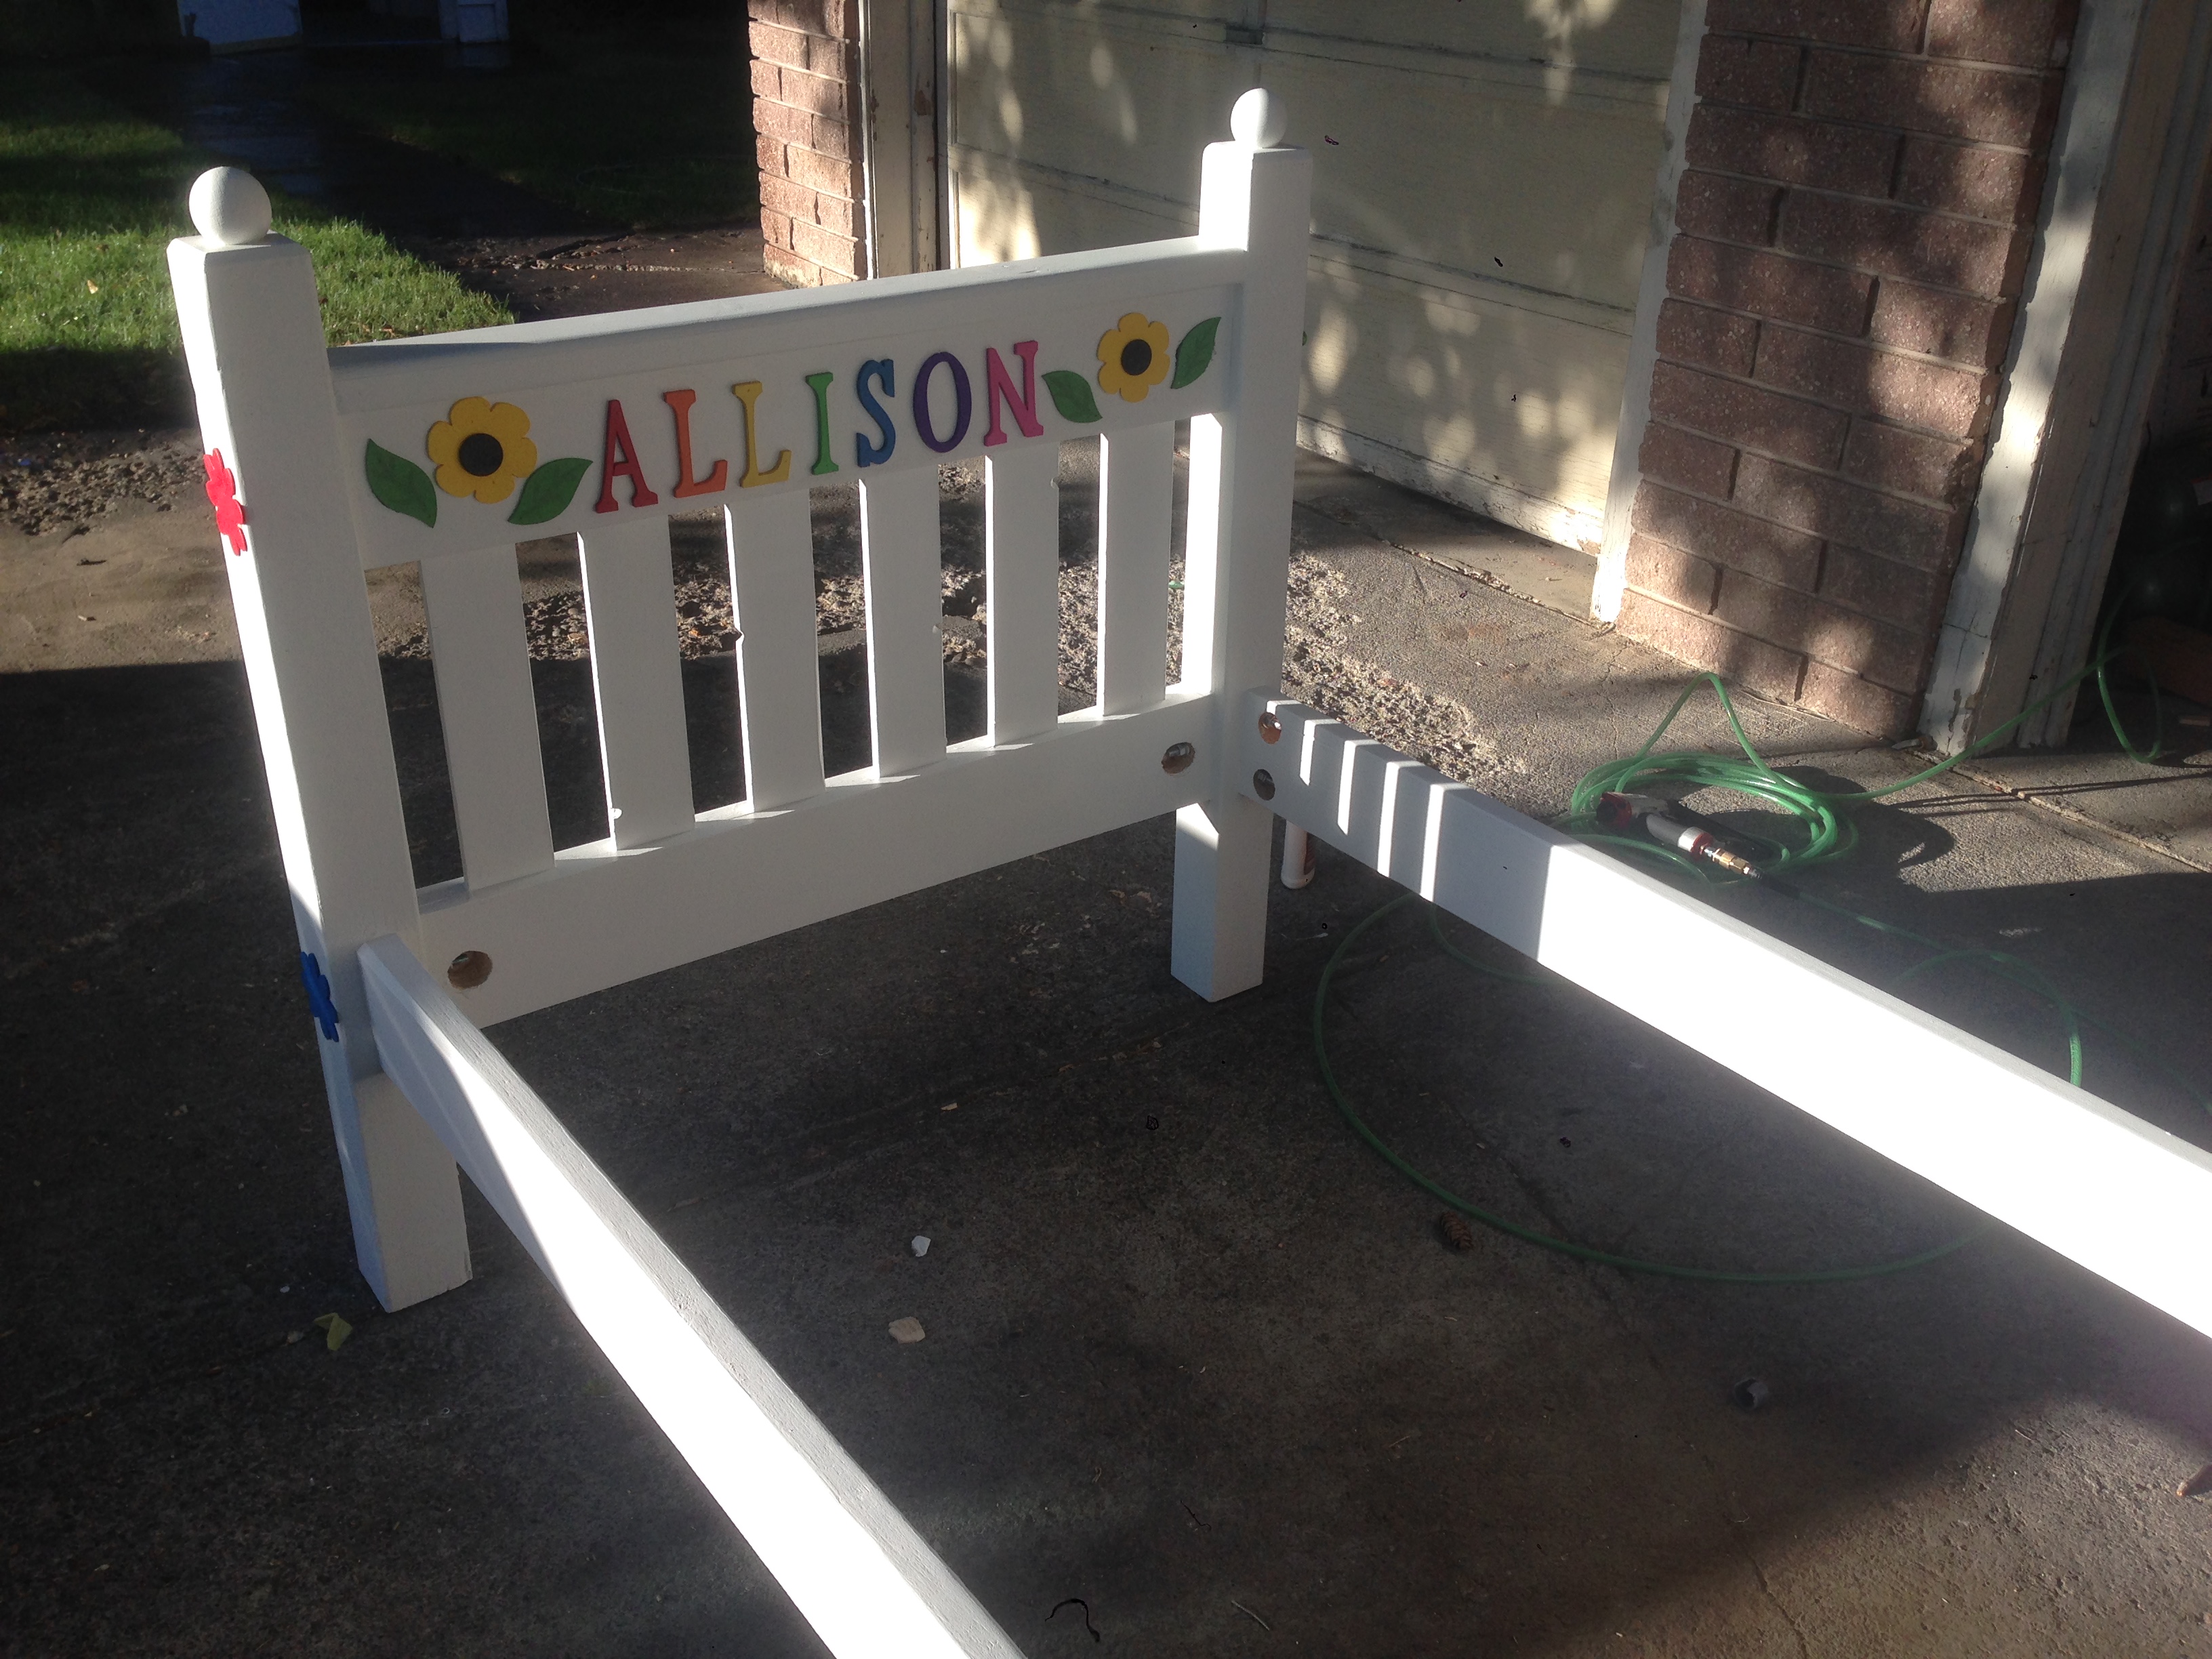
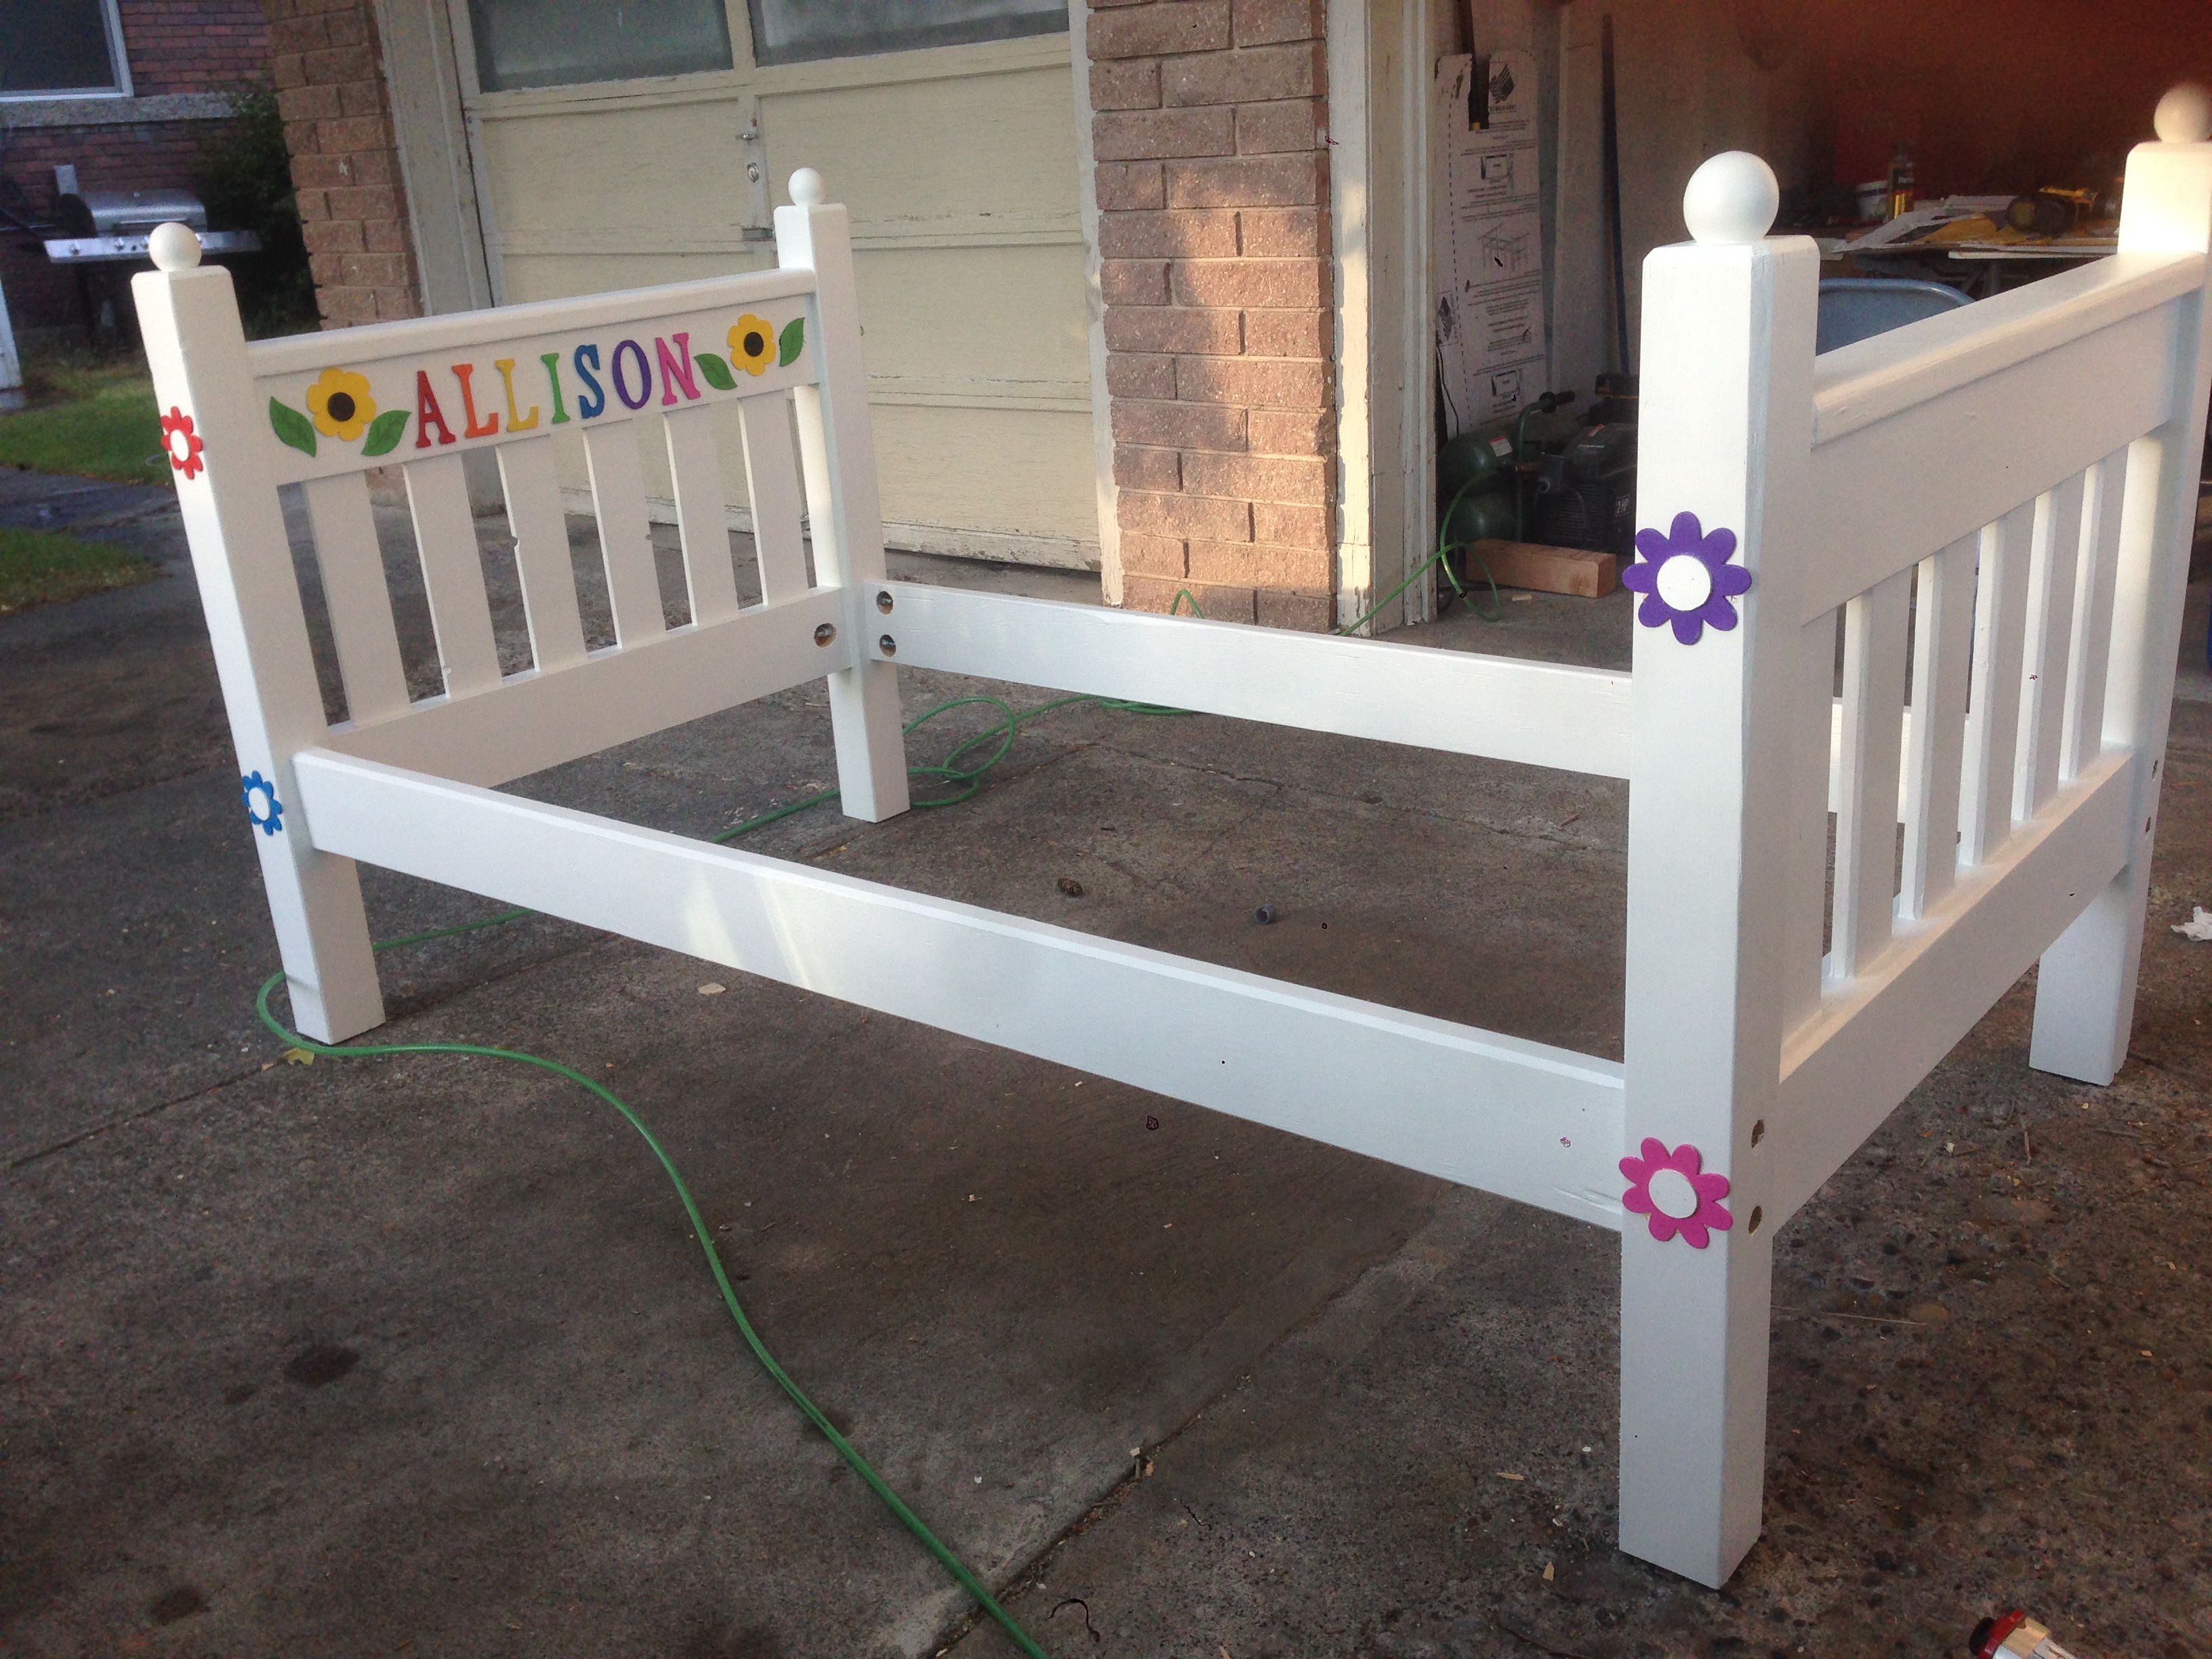
The headboard and foot board were again kept equal sizes although I did not make them as tall. They are taller than the footboard of the original plans. I used the headboard measurement of the headboard for the posts to make the post stand taller than the rest of the head and foot board giving it a slight 4-poster look.

I would also like to point out that I made the entire head and footboard an inch narrower. When I made the first bed, because of the way I attached the side rails to the 4x4 posts, it created a bed frame 3 inches wider than the plans called for. Because of this, the mattress on bed #1 has about an inch or so gap on either side when it sits in the frame. It's not a huge deal, but it was something I wanted to try and correct. So I loped an inch off the total width. I compensated by making the end filler pieces of the slat portion narrower. I would even go so far as to cut an even 3 inches off the entire width and the mattress would sit tight in the frame.

As with bed #1 I decided to use bolts instead of screws to hold the bed together. It makes for a much sturdier bed and it can be dis-assembled in a matter of minutes moved and reassembled without losing any structural integrity. The flowers on this bed hide the holes I had to drill to counter sink the bolts and the holes I drilled to access the bolts to attache the washer and nut. I was able to get just deep enough on the 2x6 side rail that I didn't need to drill all the way through as I had on bed #1. This was something I learned as I began to assemble bed #2 to get it ready for paint.

Built from Plan(s)
Estimated Cost
This bed cost around $150 to build including the trim and paint.
Estimated Time Investment
Weekend Project (10-20 Hours)
Finish Used
As with bed #2 various modifications were made to the plans. I shortened and raised the headboard and footboard. I made it narrower. I did this because instead of the rail attaching to the edge of the post as the plans direct, I attached the side rails in the center of the post. I also did not build the mattress frame as directed. Instead I just ran a 2x2 down each side of the side rail. This was sufficient as the mattress frame was no longer a part of holding the bed together.

I added bevels the wood slats with a router and added the same bevel to the tops of the posts and the the 2x4 cap inbetween the posts. This gave the bed a much more finished look instead of looking like painted raw lumber. The flowers and letters were acquired at a craft store and painted using craft paint and then sealed with a spray on clear lacquer finish. I used a pin nail gun and wood glue to attache them to the bed. Caulking and wood filler to fill in any screw and nail holes was also used to give the bed a complete finished look.
Recommended Skill Level
Intermediate

Gabriel Wall System Hanging Organizer

This was a very fun project to build. I pretty much followed the directions that were posted, but I used 1x6's instead of 1x4's because I wanted more storage space on the shelves. I also used 1/2" iron piping instead of 3/4" and am happy with how it turned out. Since the guest bathroom is gray, we didn't want to stain the wood and chose to do an easy to do "weathered" (directions below) look. Now all we need to do is replace the ugly shower curtain!

Estimated Cost
$40 (paint not included).
Estimated Time Investment
Day Project (6-9 Hours)
Finish Used
"Weathered" look – First, paint a gray undercoat of paint and let dry. Secondly, coat the piece with paraffin wax (especially the edges and corners). Next, paint a top coat of white and let dry. Lastly, scrape off the wax (with a razor blade), to your liking, to give it the "weathered" look.
Recommended Skill Level
Beginner

Comments

tgrott

Wed, 03/30/2016 - 06:41

Love the weathered/distressed look you did.  Can you share your technique for the paint job?

tgrott

Wed, 03/30/2016 - 06:42

I;m sorry!! I just noticed that you did share the paint job!  Thanks! :P

tgrott

Wed, 03/30/2016 - 06:43

I;m sorry!! I just noticed that you did share the paint job!  Thanks! :P

Library Cart (Bookshelf)

Submitted by Kassidy_D on Sun, 01/16/2022 - 18:54

Project #3 very pleased with the outcome!

Built from Plan(s)

Comments

Logan Entertainment Center

Hello everyone! I built the Logan entertainment center for our apartment and it is amazing! I used Ana's plans with a few modifications. This was the first projected I finished and while it's not perfect, I love it and I learned a lot in the process. Because I was learning to build as I went, it might have taken me longer than someone who has more experience. I built this project over several months and it took a long time, but it was totally worth it. Check out more details about my experience over at my blog. 

Estimated Cost
$300-400
Estimated Time Investment
Week Long Project (20 Hours or More)
Finish Used
I did one coat of primer and two coats of Benjamin Moore Advanced paint in Decorator's White.
Recommended Skill Level
Intermediate

Laundry Pedestal

I took this plan from www.Ana-White.com Home Depot cut my wood and I was off and running. I added a few ball feet on the bottom to give it a little pizzaz. I felt so accomplished after my first project... especially after the install guys told me it wouldn’t fit and it DID and it was level. I’m getting ready to make a coffee table now. Thanks for the inspiration, confidence and help!!

Estimated Cost
$150
Estimated Time Investment
Afternoon Project (3-6 Hours)
Finish Used
Satin Furniture paint
Recommended Skill Level
Beginner

Banquette Seating with storage

Submitted by Anonymous (not verified) on Mon, 04/25/2022 - 13:58

You didn’t have plans, so I had to “wing it” without you; however, I couldn’t have done it without all the practice I’ve had from all your plans on this website these past several years!

Comments

Reclaimed lumber Adirondack chair

Submitted by rkyount on Thu, 08/08/2013 - 13:23

For my brother's 35th birthday, I helped him build a fence and side deck on his house. Using the leftover lumber scraps and screws, I adapted the DIH Adirondack chair plans to build this for him. He wanted a big, sturdy chair with a wide arm rest that looks "rustic". I used 4x4 and 2x4 post scraps, deck boards, and fence pickets. I also widened the seat just a bit for comfort. This is definitely the perfect chair for him!

Estimated Time Investment
Afternoon Project (3-6 Hours)
Finish Used
Since it's all treated lumber, we'll just seal it whenever we do the deck with Thompson's Water Seal.
Recommended Skill Level
Beginner

Comments

rkyount

Fri, 08/09/2013 - 14:38

Thanks! I always enjoy building with your plans, and it was a bonus that I didn't have to buy anything to build this, since I used leftover materials.

Fenced-In Walkthrough Garden

Submitted by jmholzma on Fri, 04/29/2022 - 17:08

Used the Garden Enclosure plan as a reference, but wanted a much bigger area to walk through and relax in. Dimensions are about 30'x20'. Took a few months with a break for winter because it was just me working in spare time on weekends, would have gone a lot faster with an extra set of hands. Towards the end realized that drainage in the walk path was going to be an issue so I put in a very basic french drain before I weed fabric and mulched.

Really happy with how it turned out. Cost was pretty high, probably about $1500 all told, between wood, garden soil, etc. But we'll be able to enjoy it for many years.

Built from Plan(s)

Comments