Community Brag Posts

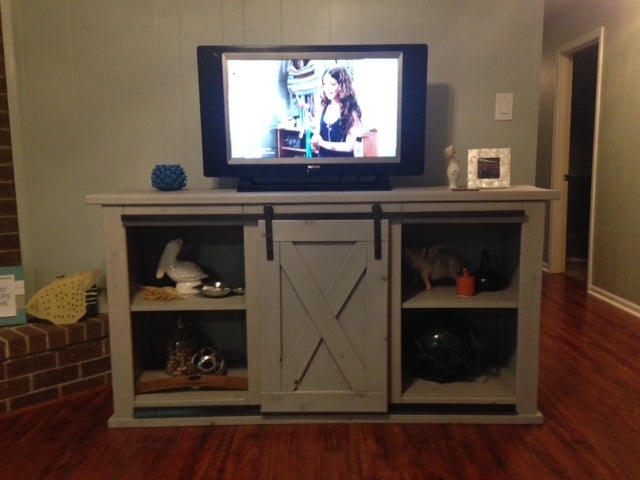
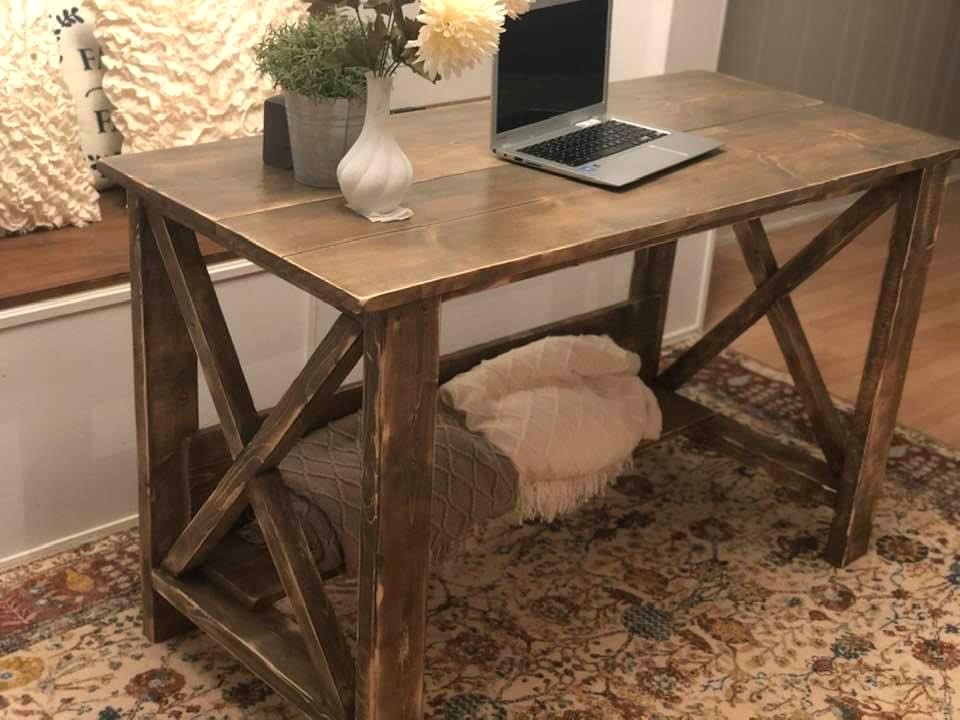
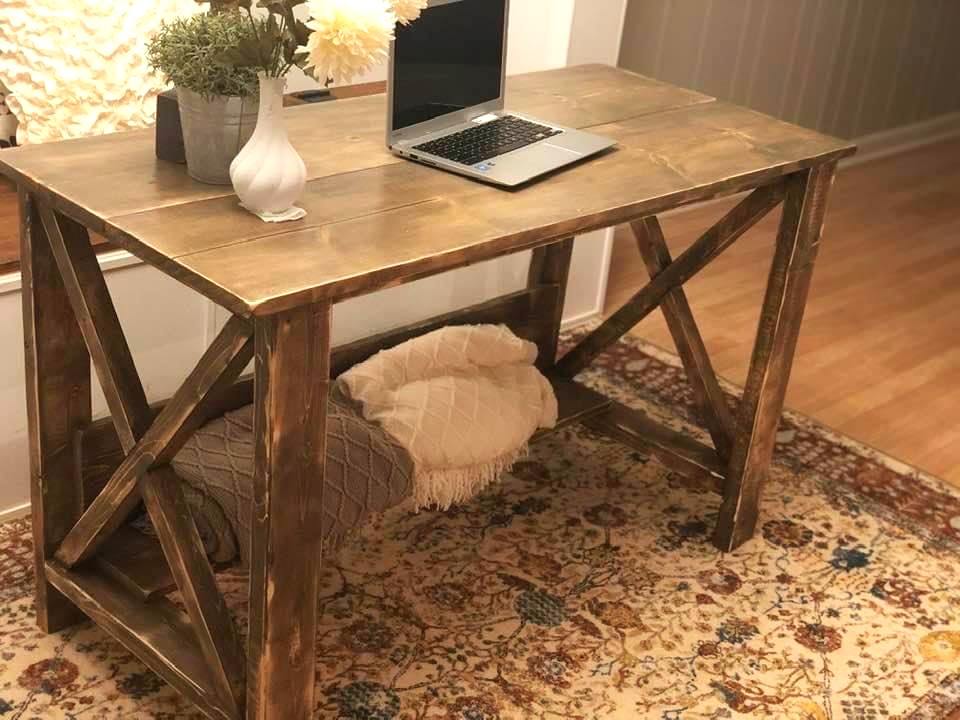
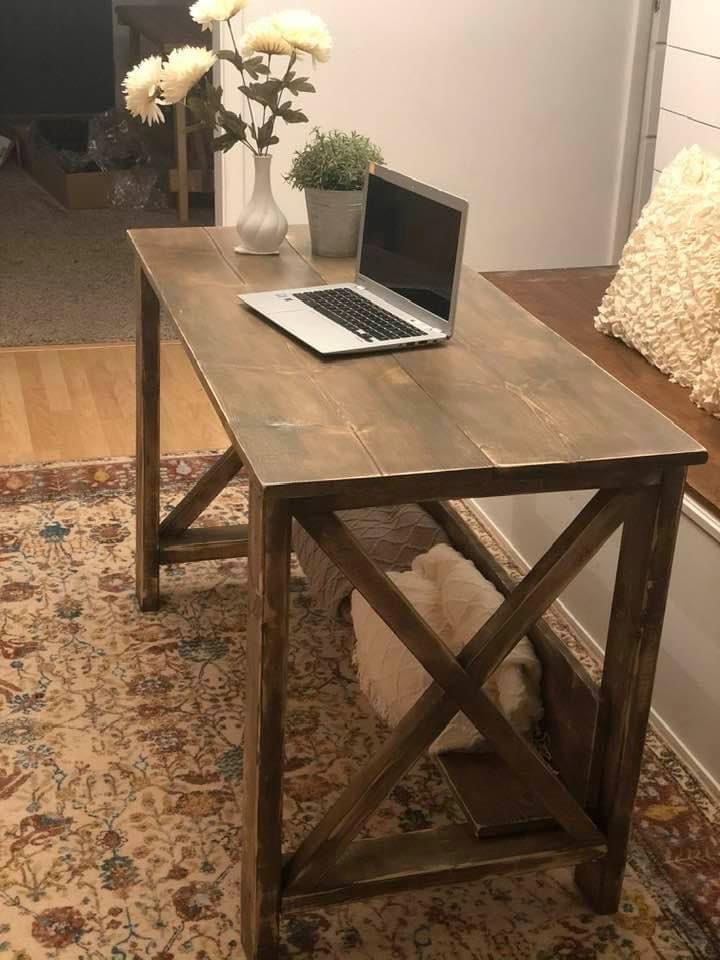
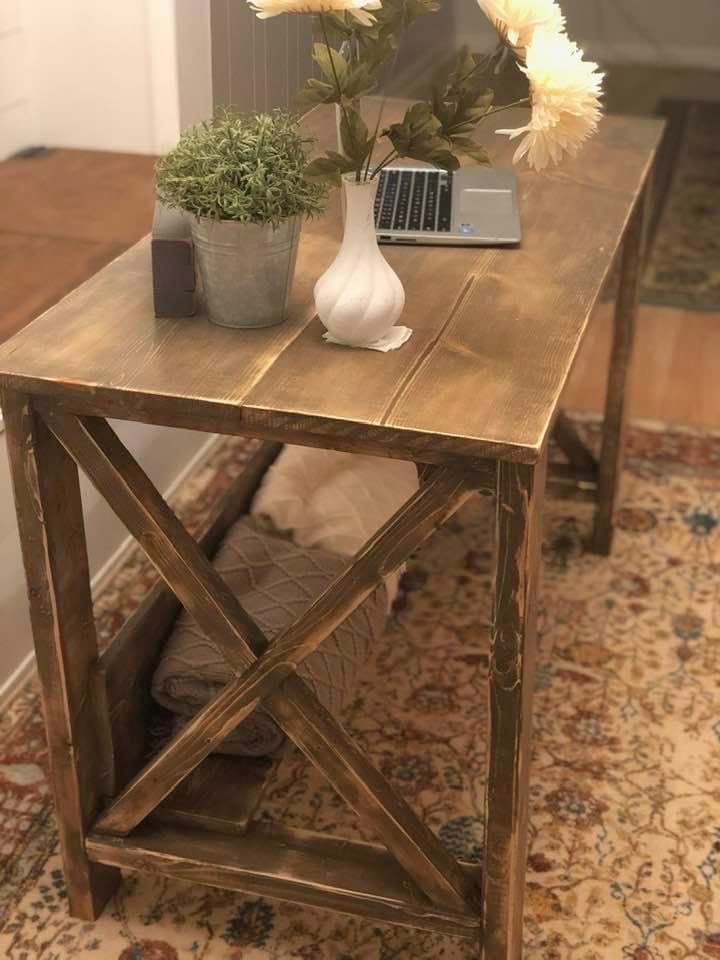
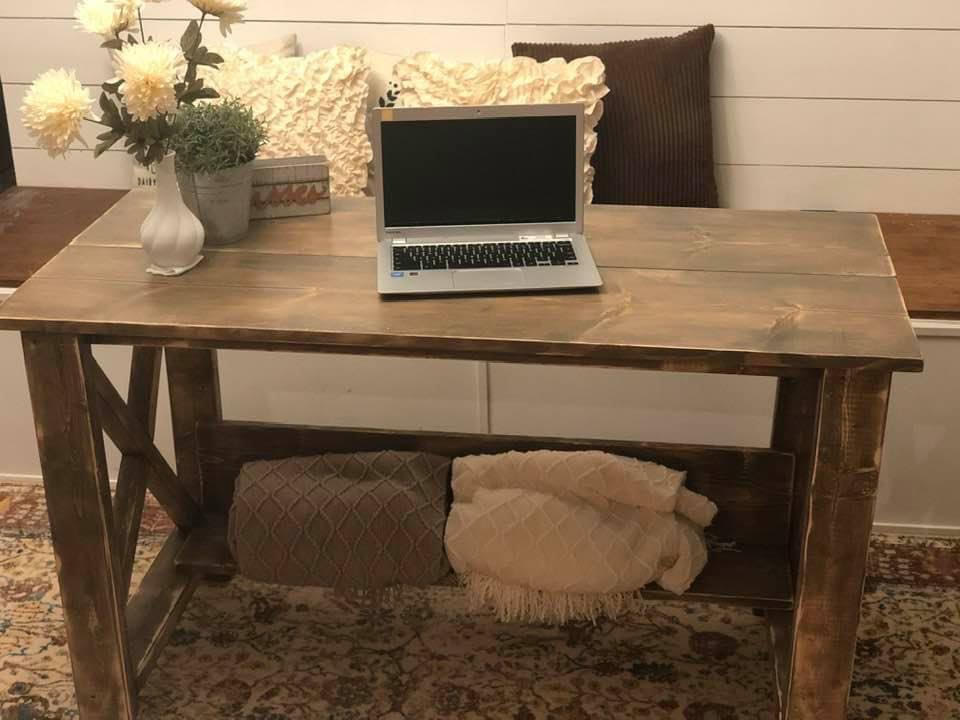
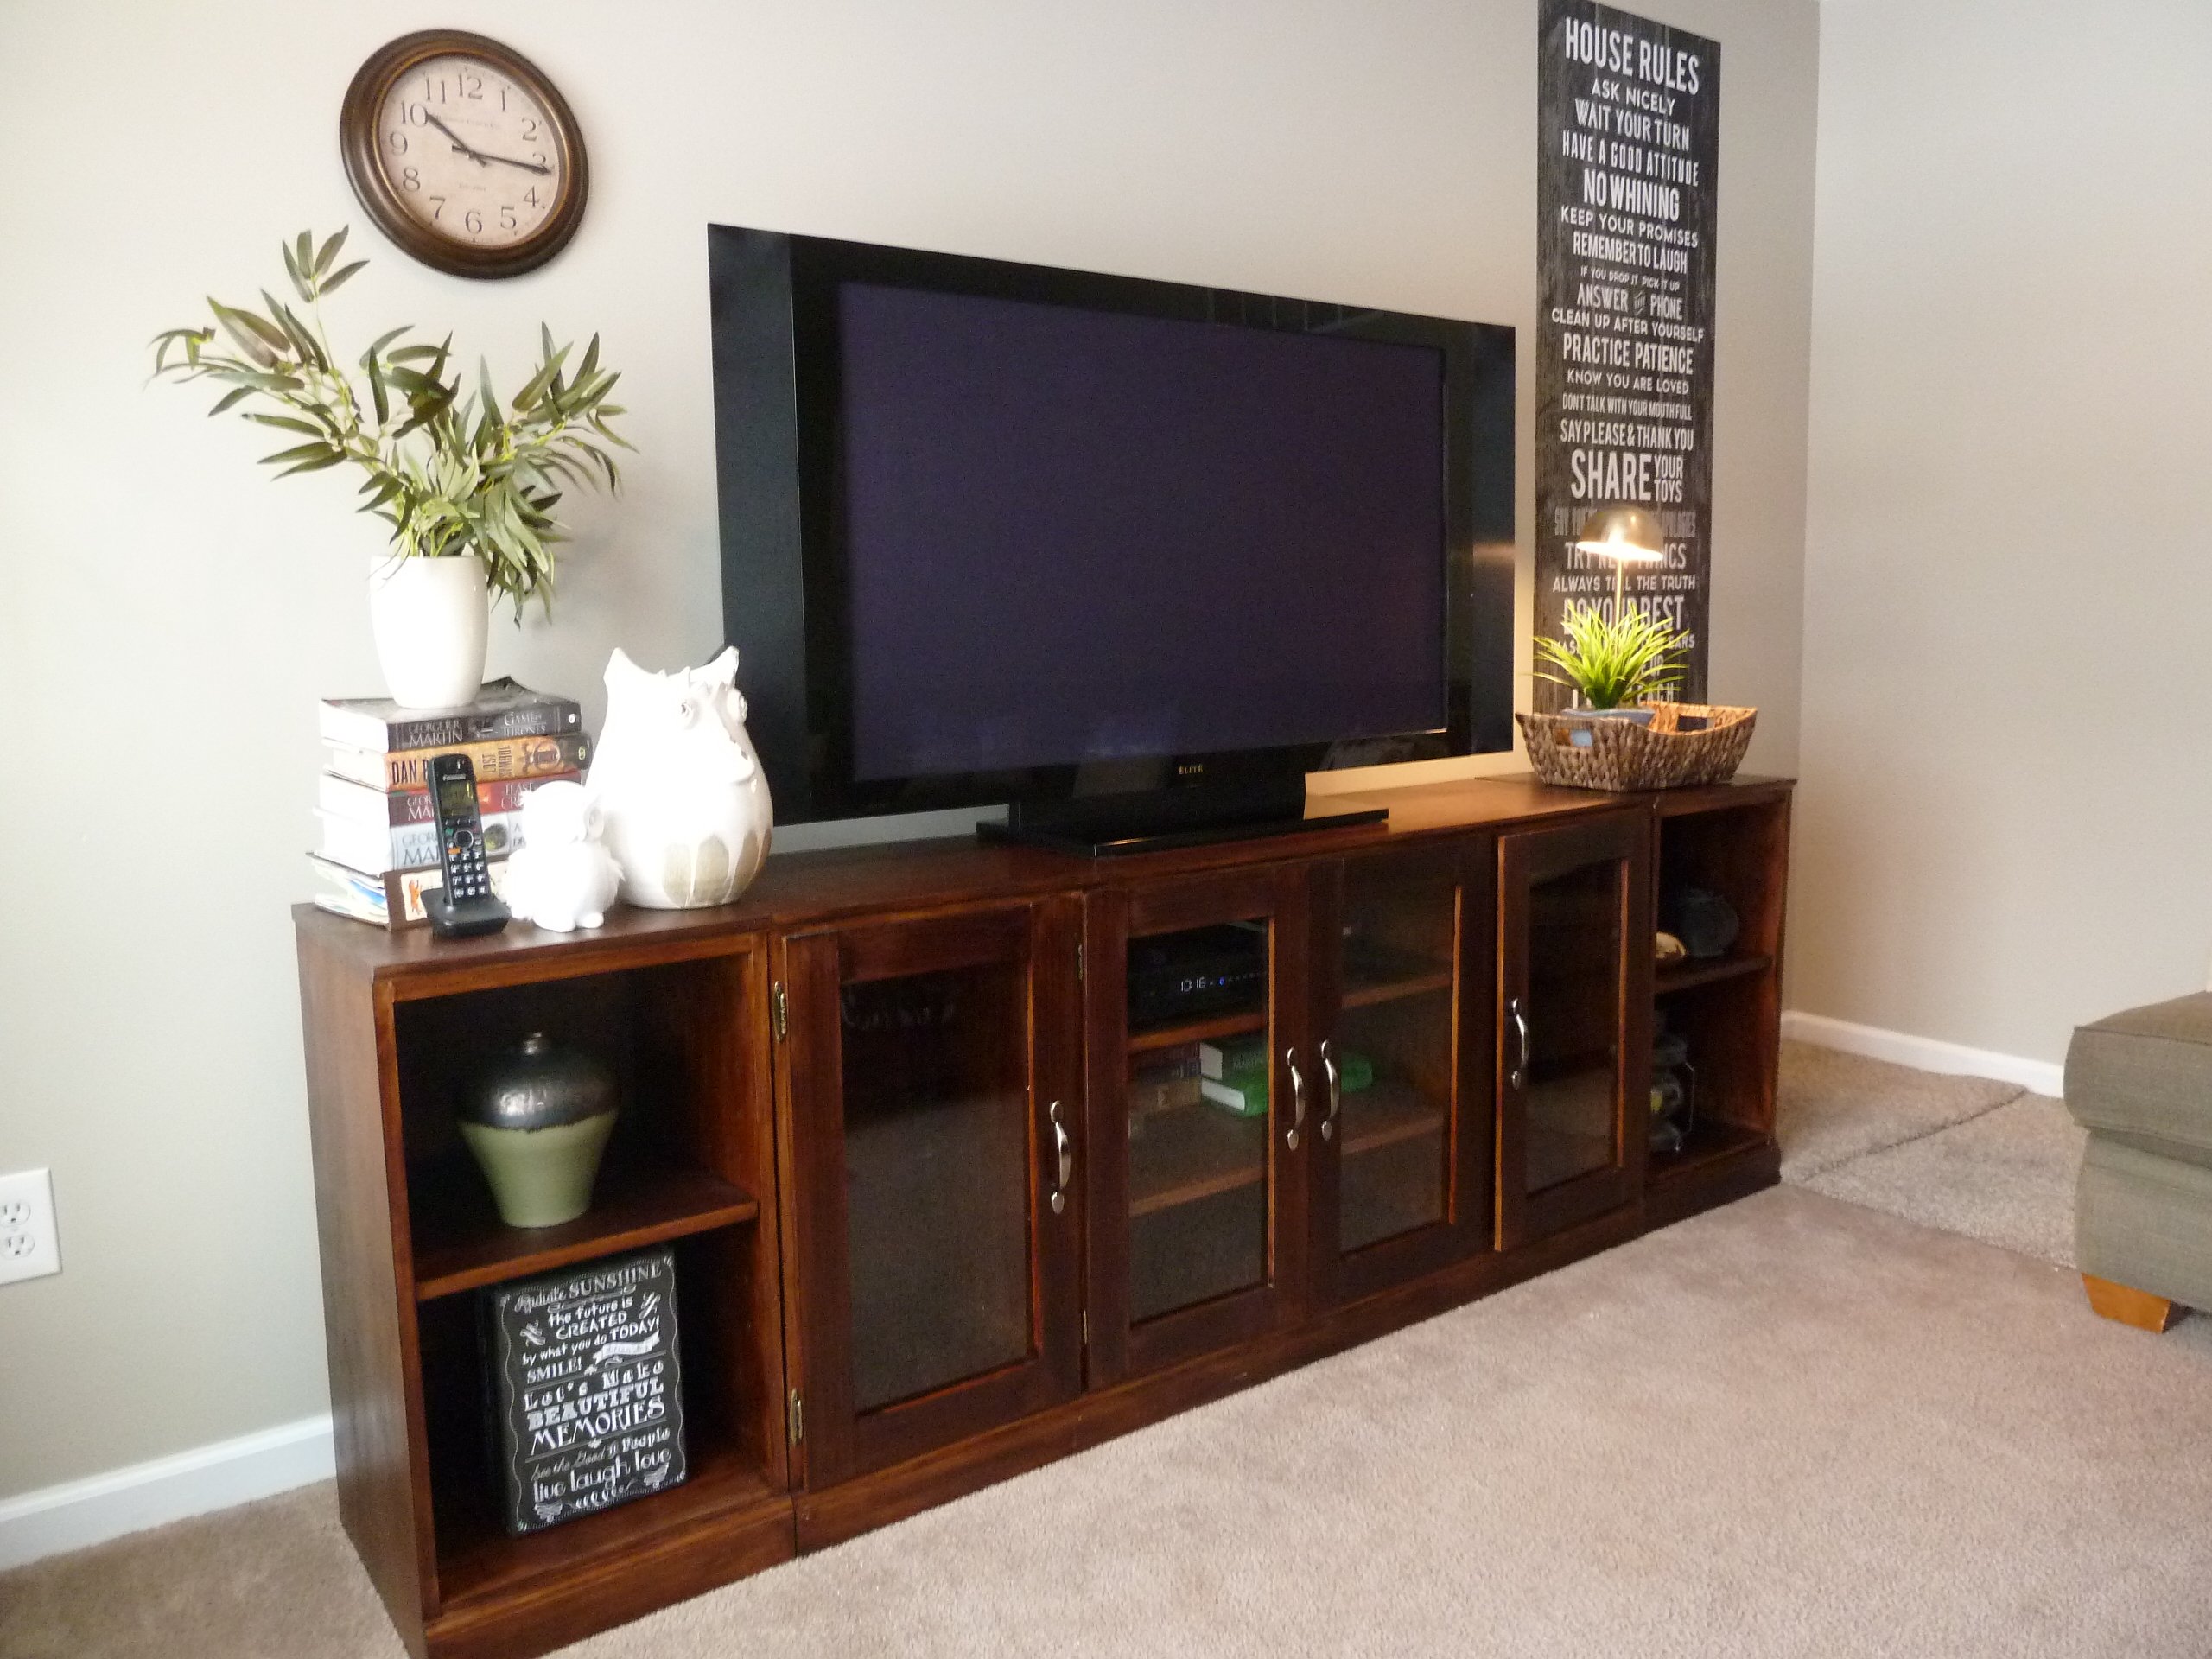
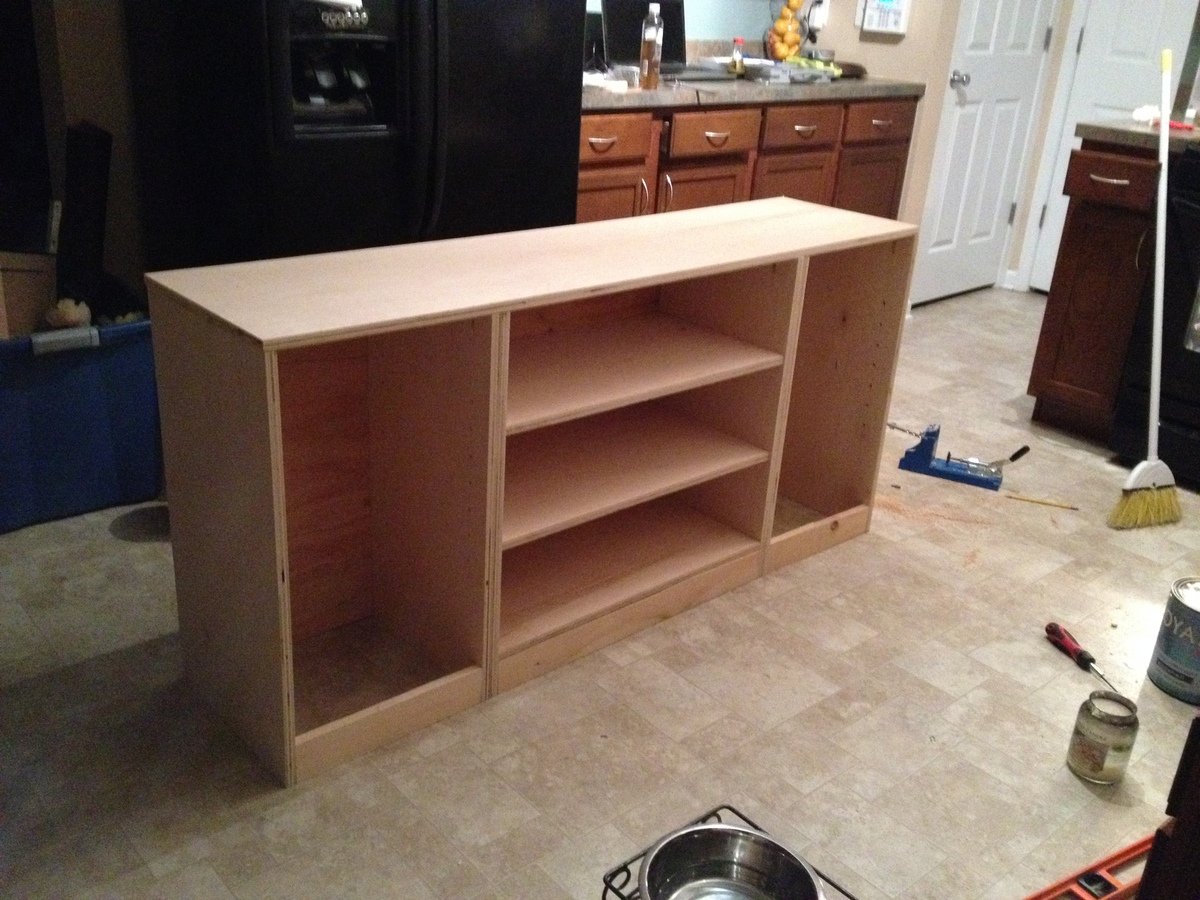
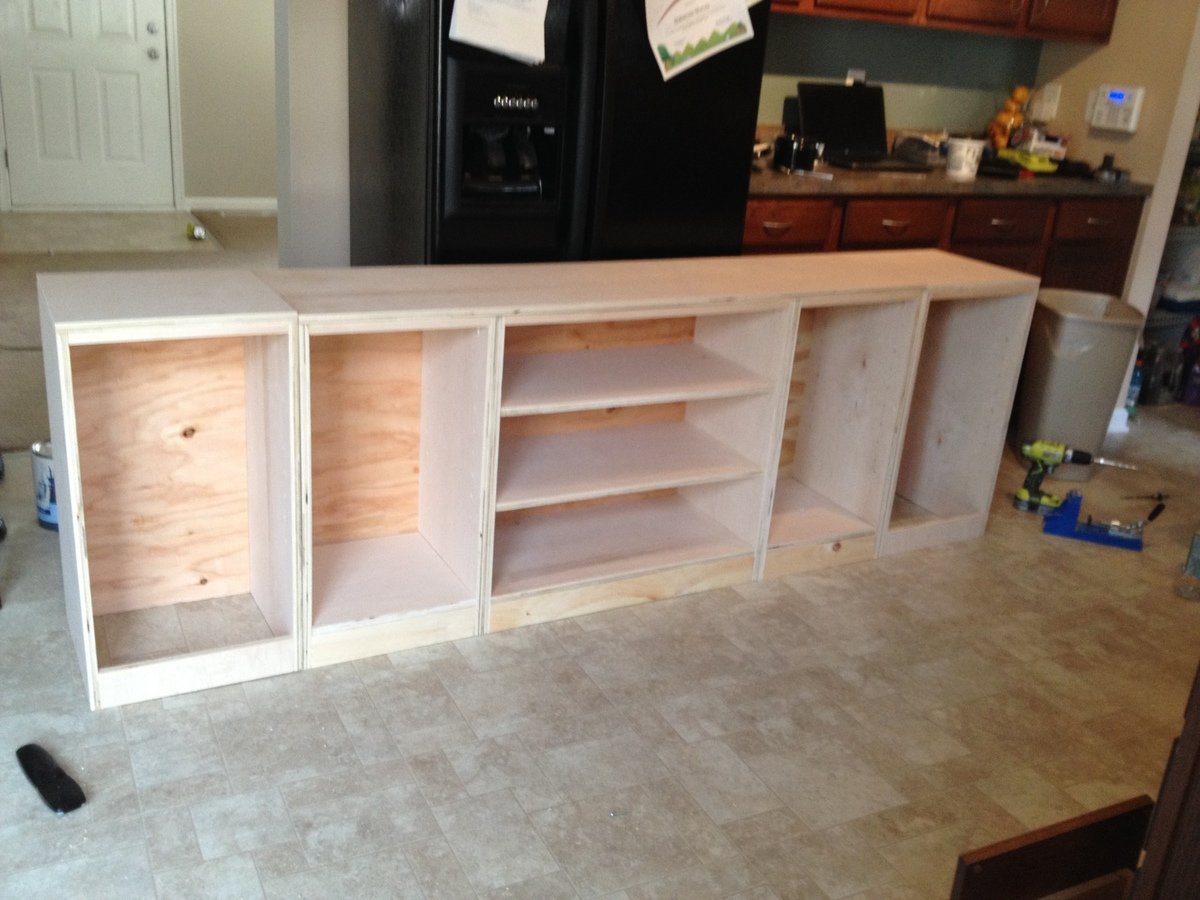
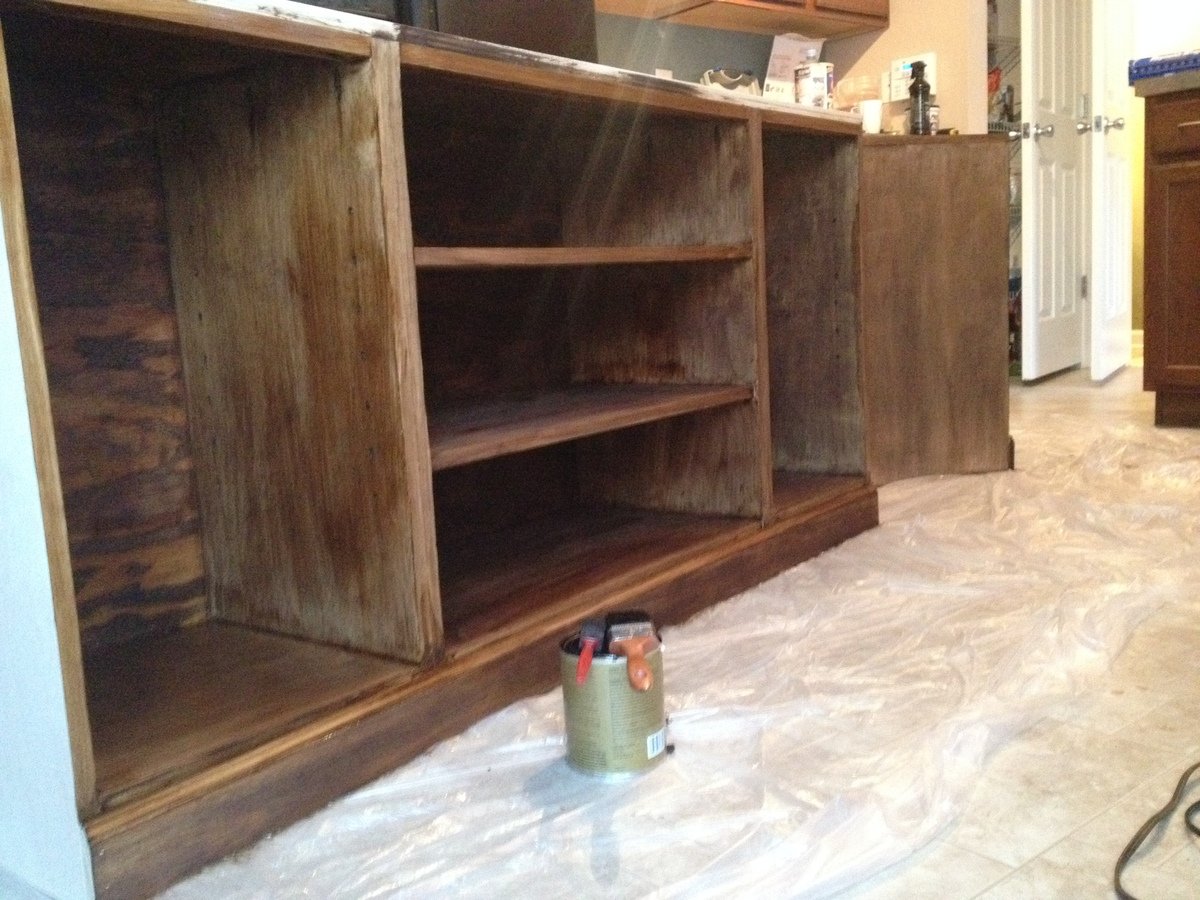
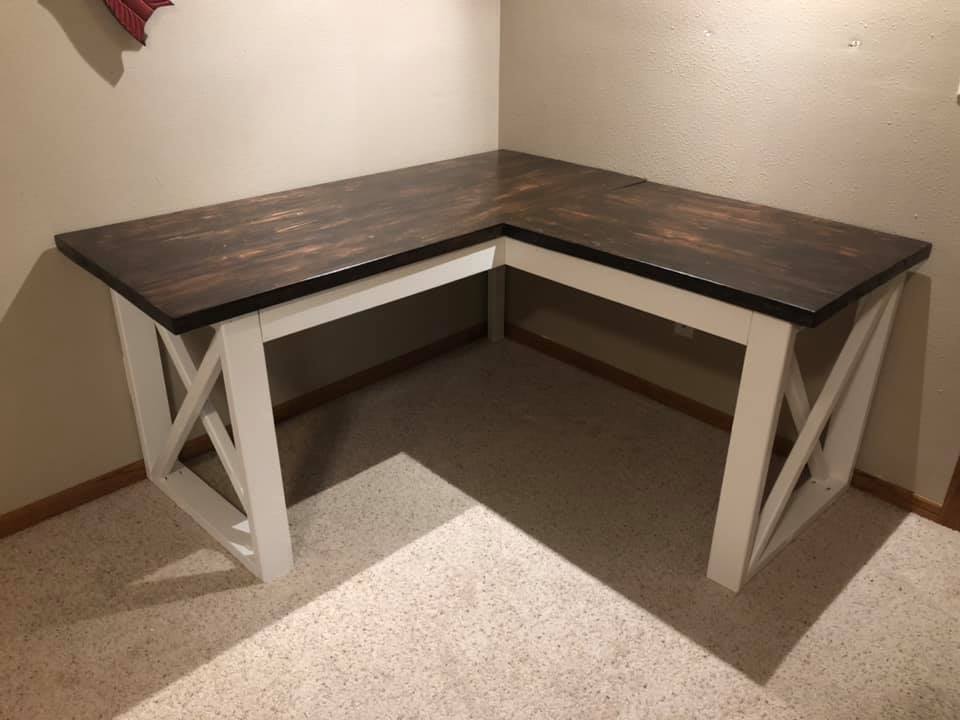
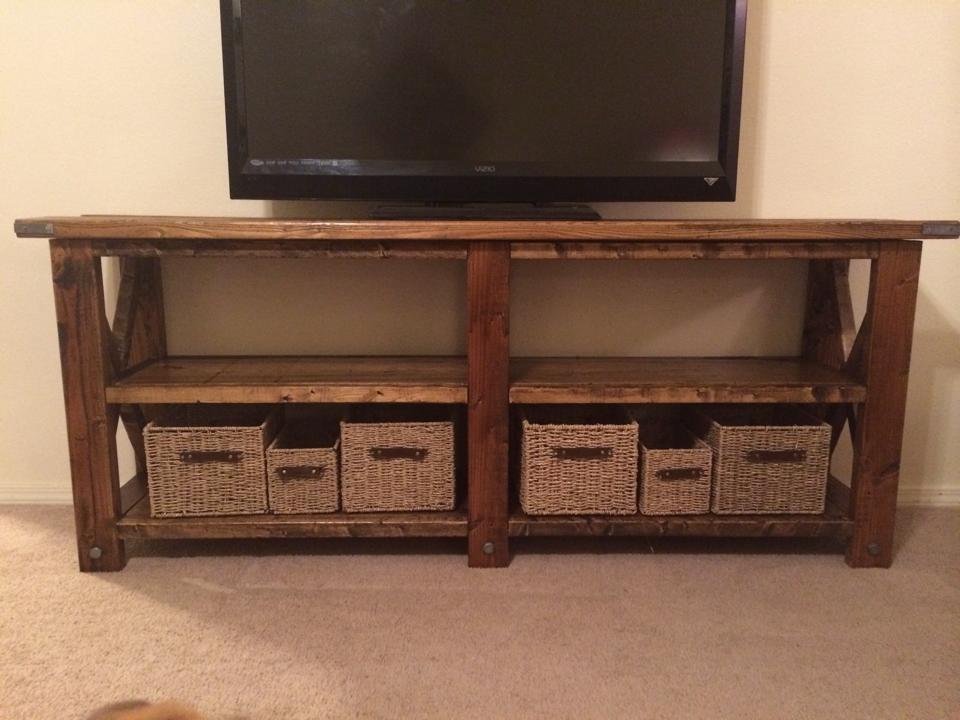
Rustic X TV Console Table

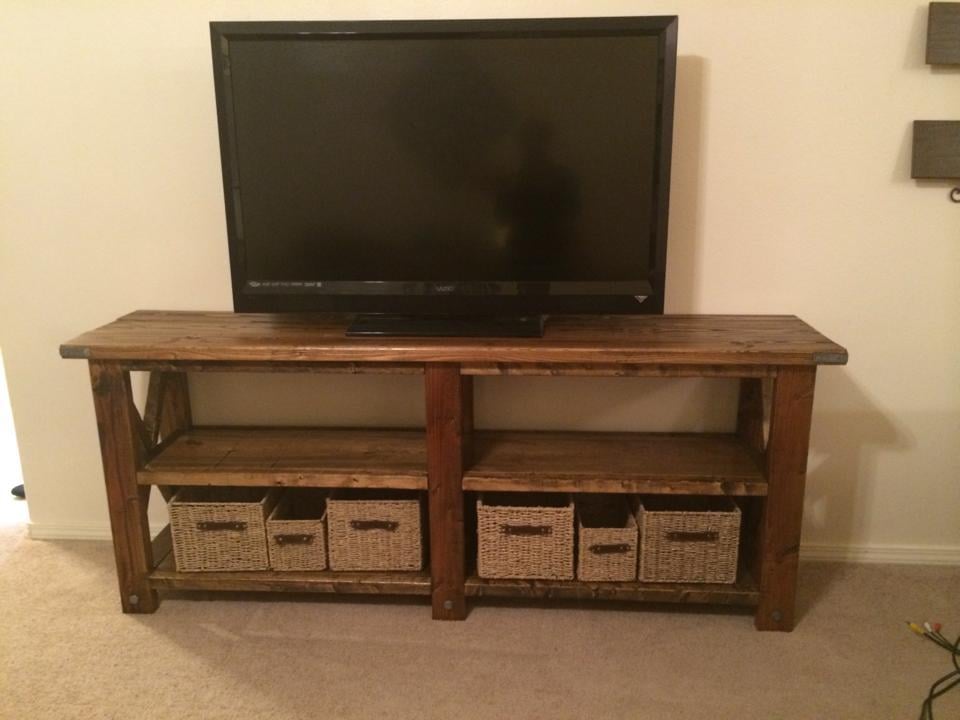
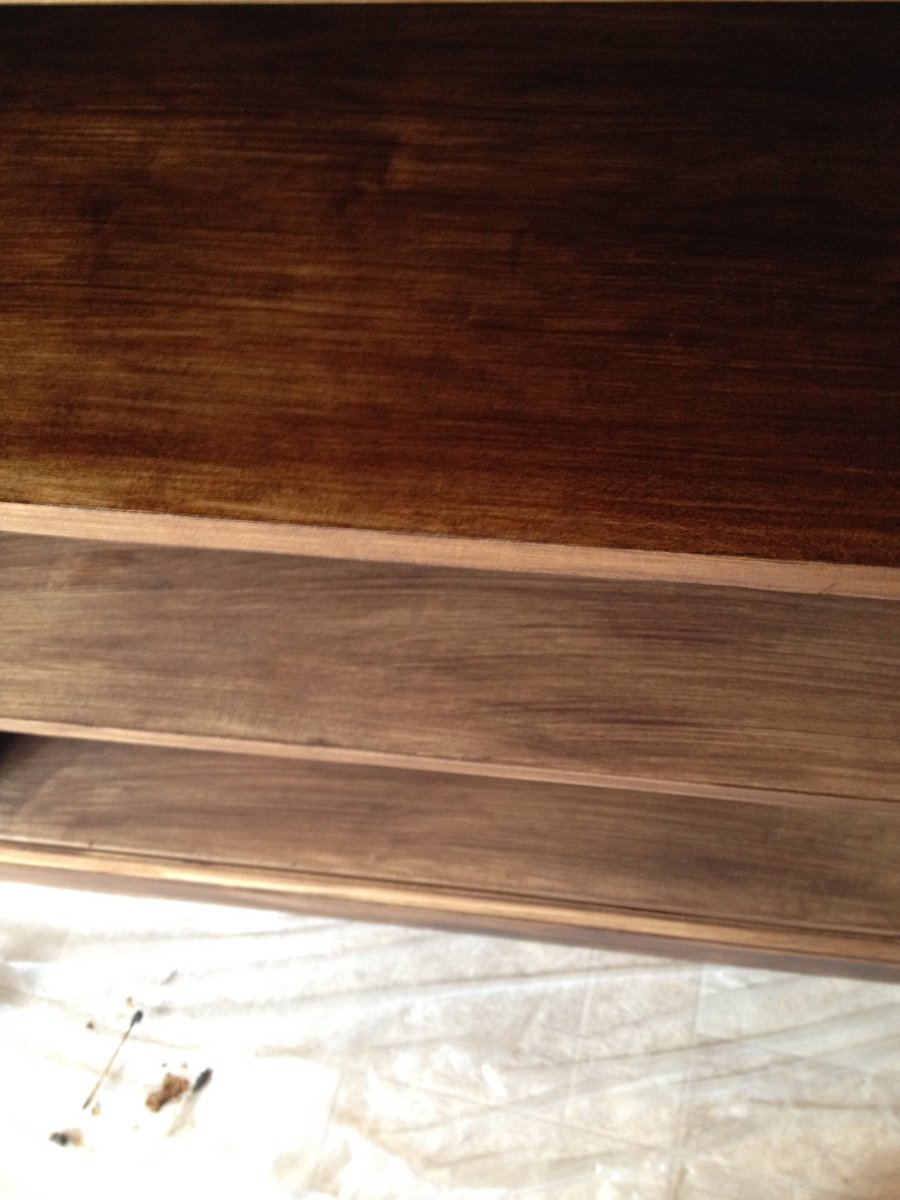
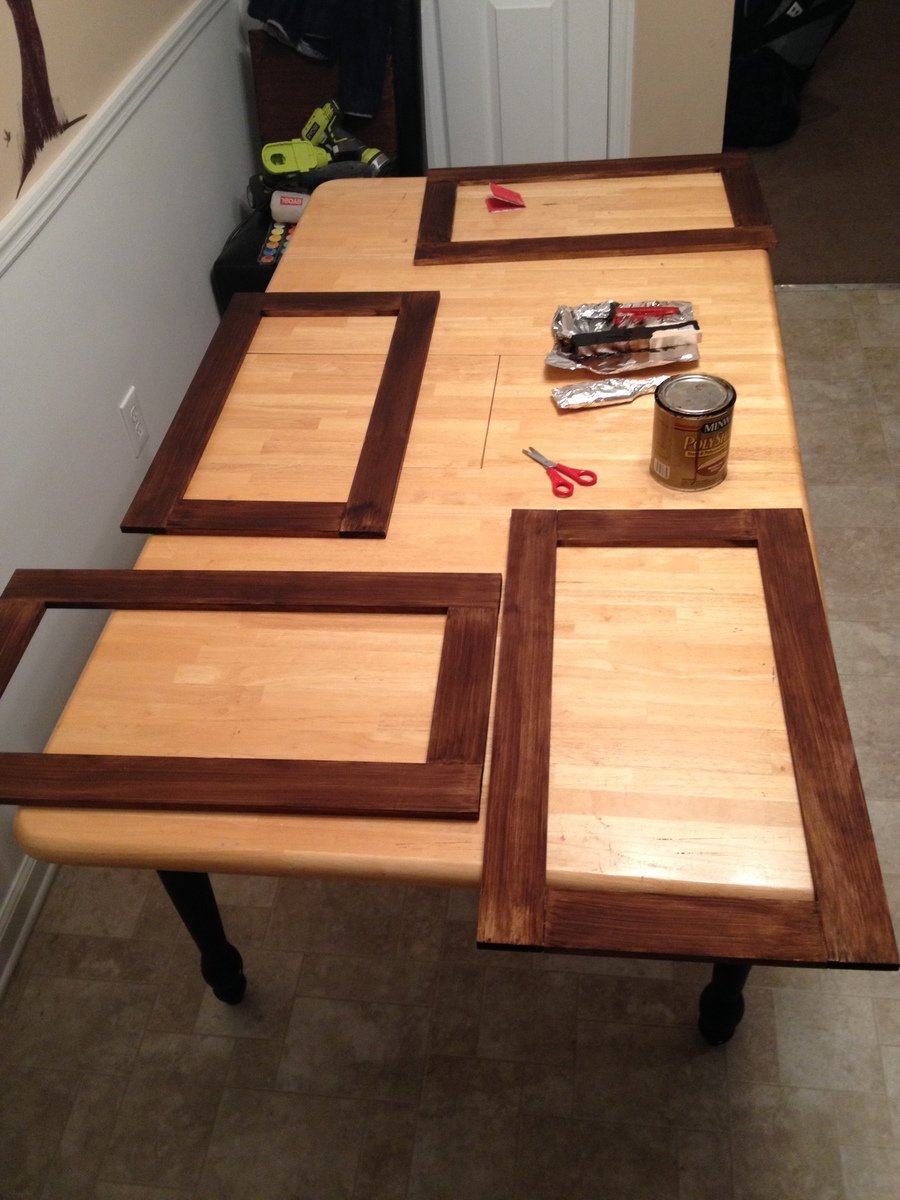
First project attempt. Instructions were really easy to follow. The X's were quite challenging at first, because I only had a Miter Saw. After many trials and errors, I found that building and attaching a 90 degree fence on the saw and then cut the 60 degree angles at the 30, gave beautiful 60 degree cuts. I used Min Wax Special Walnut Stain. I didn't do a lot of sanding because I wanted a gritty rustic feel to it. I used common pine boards. For the hardware, I bought zinc plated L brackets and Large bolts. I used a blow torch to melt the zinc to give it a great look.

Built from Plan(s)
Estimated Cost
$60 in wood, $10 in hardware, $12 in screws,
Estimated Time Investment
Weekend Project (10-20 Hours)
Finish Used
Special Walnut Stain
Recommended Skill Level
Beginner

Double Bed Headboard

Submitted by RobA on Fri, 05/27/2016 - 20:18

so I tweaked this plan and made it a double bed for our spare bedroom.

Estimated Cost
$100 CAD
Estimated Time Investment
Afternoon Project (3-6 Hours)
Finish Used
Miniwax gel walnut stain
3 coats Polycyclic clear
Recommended Skill Level
Beginner

Comments

Modified farmhouse California king

Submitted by bechokoy on Tue, 05/15/2012 - 23:10

Sorry the the photos were taken from my phone so the lighting is making it look darker than it really is.
Basically I followed the plans to a T other than the poplar trim and crown molding.
For the head board I Used 3/4" red birch ply and made some stiles with excess from the sheet and then just trimmed it with poplar molding. instead of stacking 2 2x4 for the sides i just used a solid 4x4 and cut the spot out to old the rails on. I was afraid how the stain would react or how it would look since 2x4 have rounded edges. Thats pretty much it. The finish was a tricky process. since I used red birch and white poplar I had to find a way to get everything to stain evenly. So basically I
Dyed all the wood then sealed then stained then toner then glaze then a little more toner then when i got the color i wanted i put 2 layers of top coat.

Estimated Cost
400
Estimated Time Investment
Week Long Project (20 Hours or More)
Finish Used
Ml campbell stain and dye
Recommended Skill Level
Intermediate

Comments

gugsisreal (not verified)

Thu, 05/17/2012 - 03:41

That is one of the most beautiful finishes I have ever seen on this site.

jdlemmons

Thu, 05/17/2012 - 11:38

I'm doing a bed very similar to this... but i'm only doing 2 larger panels rather than 4 like you have. How do you the insides of the panels? Quarter round and then crown molding? I was thinking I would attach the trim on top of the plywood and then just attach some quarter round on the inside to round it and make it stand out a little more.

Matthew Betts (not verified)

Thu, 05/17/2012 - 17:00

I didn't use any round(but that is the idea to hide the ugly plywood layers that are exposed when cut). Its just 2 3/4 x3/4" whitewood/poplar casing that I had left over from a project i was working on. the frame of the squares was 3/4" birch ply so the casing laid nice and flush with it so it looked nice. the trick is to get the stiles(the frame of the squares to lay flat against the plywood backing other wise the casing won't lay even all the way around.
heres a link to the casing i used
http://www.lowes.com/pd_105664-81562-OML14-7FTWHW_4294801993_4294937087…

heres the link to the crown that i used on the top
http://www.lowes.com/pd_105626-81562-1069-8FTWHW_4294801991_4294937087_…

the trim stuff at the box places are considered paint grade and don't take stain very well. its easiest to paint if you don't have the right setup to finish things. and if you are going to stain I recommend a product called timbermate its stainable wood filler its hard to get but its amazing stuff it blows the minwax stuff out of the water.

Ladder Shelf

Submitted by 3G on Sat, 03/01/2014 - 09:31

Pottery barn Ladder Shelf

Estimated Time Investment
Weekend Project (10-20 Hours)
Finish Used
Black Shine
Recommended Skill Level
Starter Project

Comments

Grandy TV Table

Submitted by Anonymous (not verified) on Tue, 05/31/2016 - 07:34

Love this tv table! It was my husband's first project from Ana's plans, and it turned out really well. The most difficult part was deciding how to make the sliding barn door hardware, since paying $70 for hardware when the wood cost about that much seemed crazy. My husband built it and I stained it, Sunbleached by Varathane. A nice blue-grey.

Built from Plan(s)
Estimated Cost
$100 (or less) for wood. Up to $80 for sliding hardware unless you DIY it.
Estimated Time Investment
Day Project (6-9 Hours)
Finish Used
Sunbleached stain by Varathane, followed by 2 coats of a matte polyurethane.
Recommended Skill Level
Intermediate

Collapsible Christmas Tree Collar with Storage

Submitted by Anonymous (not verified) on Wed, 11/01/2023 - 07:45

All from pallet wood! Hides and protects gifts from toddlers, puppies, & curious adults!

It is a collapsible build to go around a plastic fold up table. 4 sides come apart for easy storage in attic. Great for parties on the go for catering! 

Molly Preato

Seasonal And Holiday

Potting Bench for a Friend

Submitted by Jake on Sun, 05/20/2012 - 17:07

A friend of mine said she needed a potting table (aka bench) so I offered to make her one. Got the plan for the simple potting bench and went to work. The friend wanted a lip on the left and right sides of the top self and she wanted the top shelf to be solid. So adding the lip was no problem and I added the same but smaller on the bottom shelf. I built the solid top from three pieces of wood held together with pocket joints and glue. Worked great. With just a little sanding it is a beautiful flat solid piece of wood. Much better and cheaper than plywood. Since I do not like to rip lumber the final top self was about an inch or so deeper than the plans but that was easily adapted to. It is a good lesson to cut as you go along rather than cutting everything at the onset of a project. You make changes and it effects other aspects of the build. I added a Shaker peg on each end to hang a bar towel or a trowel whatever suits your fancy.

Most important is to continually check for square joints. Especially if you don't have the fancy tools and jigs. I got lucky and my final bench was square and level in all directions.
The build takes about 8 hours (plus a couple of days for priming and painting) using mostly hand tools. If I do another one I am going to substitute lighter and thinner wood. The 2x4 shelves and supports are over kill. I think it will give you a better and nicer looking final product. Keep Ana on The Web,,,,

Built from Plan(s)
Estimated Cost
$30 - $35
Estimated Time Investment
Day Project (6-9 Hours)
Finish Used
I made the potting bench on the agreement that she would finish it. So with the table went instructions on sanding, priming, and painting. Maybe I will have a picture later of the finished product. My cost above does not include the cost of finishing,
Recommended Skill Level
Beginner

Comments

Jake

Sun, 05/20/2012 - 17:10

I also added a face to the exposed lumber ends in the front and for the top and bottom shelves. The bottom face is actually a piece of old cedar fence I found in the garage. Sorry I forgot to mention in my first Brag ...about the potting bench.

Cassidy king bed

Submitted by Krigsvolds on Tue, 03/04/2014 - 13:05

My wife and I loved the look of this bed and decided to try to do it together. I built the frame and she tackled the headboard. In my haste at the hardware store I picked up the smaller packets of shims, a happy accident in my opinion! I decided to put the supports together with joist hangers to make it easier to take apart ,if need be.
We used a nail gun to attach the shims to the head board , and changed to
the pattern a little. Being that we were putting it in a smaller room I made some floating bed side tables as well. What a gratifying project!

Built from Plan(s)
Estimated Cost
$350
Estimated Time Investment
Week Long Project (20 Hours or More)
Finish Used
Rust oleum ebony and weathers grey stains (1 coat)

Minwax polycrylic semi gloss (2 coats)
Recommended Skill Level
Intermediate

Reclaimed Chilton Bed

This rustic farm bed is handcrafted from reclaimed weathered barn wood. The plank design and mixture of tones and textures give it a distinct rustic feel. Each piece celebrates the unadorned beauty of salvaged wood. Our reclaimed barn farmhouse bed is truly transitional. And now the best part, it can be made in any size needed -- King, Queen, Full or Twin.

Built from Plan(s)
Estimated Time Investment
Weekend Project (10-20 Hours)
Recommended Skill Level
Intermediate

Nativity Centrepiece

My wife asked for a table top Nativity Centrepiece as we were hosting Christmas. Was fun and quick to make it small!

Estimated Cost
Free if it's scrap!
Estimated Time Investment
An Hour or Two (0-2 Hours)
Finish Used
Poly & stain
Recommended Skill Level
Intermediate

Loft Playhouse Bed

Loved making this for our girls...Selah & Annaleah. We have 9 ft walls so I made it extra tall. Love it so much!!! Used 4 in boards for the walls b/c they were so much cheaper. The shutters ended up my favorite part.

Built from Plan(s)
Estimated Cost
$350
Estimated Time Investment
Week Long Project (20 Hours or More)
Recommended Skill Level
Intermediate

Comments

Sara L. (not verified)

Mon, 08/06/2012 - 14:26

I really like the paint colors that you used on the bed and the ones on the walls. What paint brand(s) and colors did you use? I really love your room. Additionally, where is your fabric from? Your room is amazing. I know a little girl in TX who would like one just like it :)

SAJAGREEN

Mon, 05/23/2016 - 18:52

Hi! I really like the taller version for my daughter's room, would you be able to share the new measurements, or what you did differently? Thank you! !!

Pottery Barn Printer's Long Low Media Suite

I feel in love with the Pottery Barn Media Suite and new immediately I wanted to build it. I couldn't justify paying close to $2,000 on an entertainment center. I knew Ana would have the plans to help me out. I modified the plans a little bit and instead of building 6 cabinets, I decided to make the inner 4 cabinets one piece, and the 2 outer cabinets removable. This will give me options for when I have to place the Christmas Tree or if we move and cannot fit this huge piece. I also wanted to have as much strength in the middle for our plasma TV. It's about 4 years old and isn't as light at the new TV's are. I loved every minute of building this project and couldn't be more happier! Feel free to search PB website to compare their media suite to my version (savings of $1,700). Feel free to ask any questions!

Estimated Cost
$325
Estimated Time Investment
Week Long Project (20 Hours or More)
Recommended Skill Level
Intermediate

Comments

ctufano

Wed, 07/08/2015 - 08:35

Love how you did yours Christina

I too would like to make one larger unit rather than say 6 of the individual cabinets. Looking at your pictures, it looks like you still made them individually but I'm assuming you attached them (screwed) together? Is that the case? Did you have any issues with the main piece and two ends being different heights when finished?

Am wanting to make a total length of around 104". Means I'll have to tweak some measurements.. In addition, I would like to have one side be a lift top so we can put in a record player and simply lift the top face to access. That wont be too big of a deal.

How did you find the doors were to make? No big deal? i've been curious how the dimensions all play out with the hinges and doors opening etc.

First project. I'm hooked

Submitted by Anonymous (not verified) on Mon, 06/06/2016 - 18:41

Great afternoon project. This was my first build!  

Estimated Time Investment
Afternoon Project (3-6 Hours)
Finish Used
Dark wax on the top, chalk paint on the bottom
Recommended Skill Level
Starter Project

Modified L Shaped Desk

This was my first woodworking project in a couple years. I modified the size to make it about 60" on each side. Now that  I am working from home now due to COVID-19 for the foreseeable future this has been perfect to use in order to have two monitors and enough room on the sides for other work. 

Estimated Cost
70
Recommended Skill Level
Beginner

Comments

In Cabinet Can Organizer

Submitted by Anonymous (not verified) on Mon, 11/13/2023 - 08:30

We were looking for a way to better utilize our cabinet space. Previously, our cans were all pushed in and we couldn't see what we had without moving things around. I Found Ana's tier can organizer and knew it was exactly what we needed. We repurposed a piece of stained plywood we already had and a couple of 2x4 pieces from previous projects. We did buy a 2x4x8 because we wanted to make it a 4-tier shelf. We stained it dark walnut and added felt pads to the bottom. Measures 22" D x 21.5" W. We love it and it makes our space so much more effective.

J Daughenbaugh

Built from Plan(s)

Twin fancy farmhouse bed

Submitted by Beaker on Fri, 05/25/2012 - 12:20

A twin version of "Mom's Fancy Farmhouse Bed" that includes a matching footboard. Kreg jig used all around. The bed takes about 6-7 hours to cut everything and put it together. Staining takes quite a bit more because of the dry times needed.

Estimated Cost
$150
Estimated Time Investment
Weekend Project (10-20 Hours)
Finish Used
Minwax English Chestnut
Satin polyurethane (2 coats)
Recommended Skill Level
Intermediate

Comments

Debbie440

Mon, 12/30/2013 - 11:01

Did you do anything to the footboard to hide the pocket holes? I made the headboard and want to make the matching footboard, but I wasn't sure how the inside of the footboard would look.

Classic Bunk Beds in White

Submitted by Radcrafter on Mon, 03/10/2014 - 16:07

Simple, easy to build and oh-so functional. Loved these plans because of the ease of building and the budget friendly supply list.

The frame for the bunk beds were completed over the course of a weekend and the next week was spent sanding and painting.

The plan allows you to build a strong, sturdy bed that can be easily disassembled/reassembled as necessary. It worked great being able to carry the 4 separate panels into my daughter's small room and then screw everything together. I also liked that feature along with the ladder integrated into the bed.

An Important Tip (one Ana recommends all the time) - Be sure to read the comments section on the original plan. Lots of important information there, especially if you need to buy 8' boards instead of the 10' listed in the plan (like I had to) and a few of the missing cuts are noted in the comments.

You can read more about my build experience here... http://radcrafter.com/2014/03/adding-the-bunk-bed-bedroom-makeover-pt-2/

Built from this plan: Classic Bunk Beds: http://ana-white.com/2010/09/classic-bunk-beds-cleverly-designed.html

Estimated Cost
$100-200
Estimated Time Investment
Week Long Project (20 Hours or More)
Finish Used
Behr Semi-Gloss in Ultra Pure White (no tint)
Recommended Skill Level
Beginner
Back