Wood Farmhouse Bed
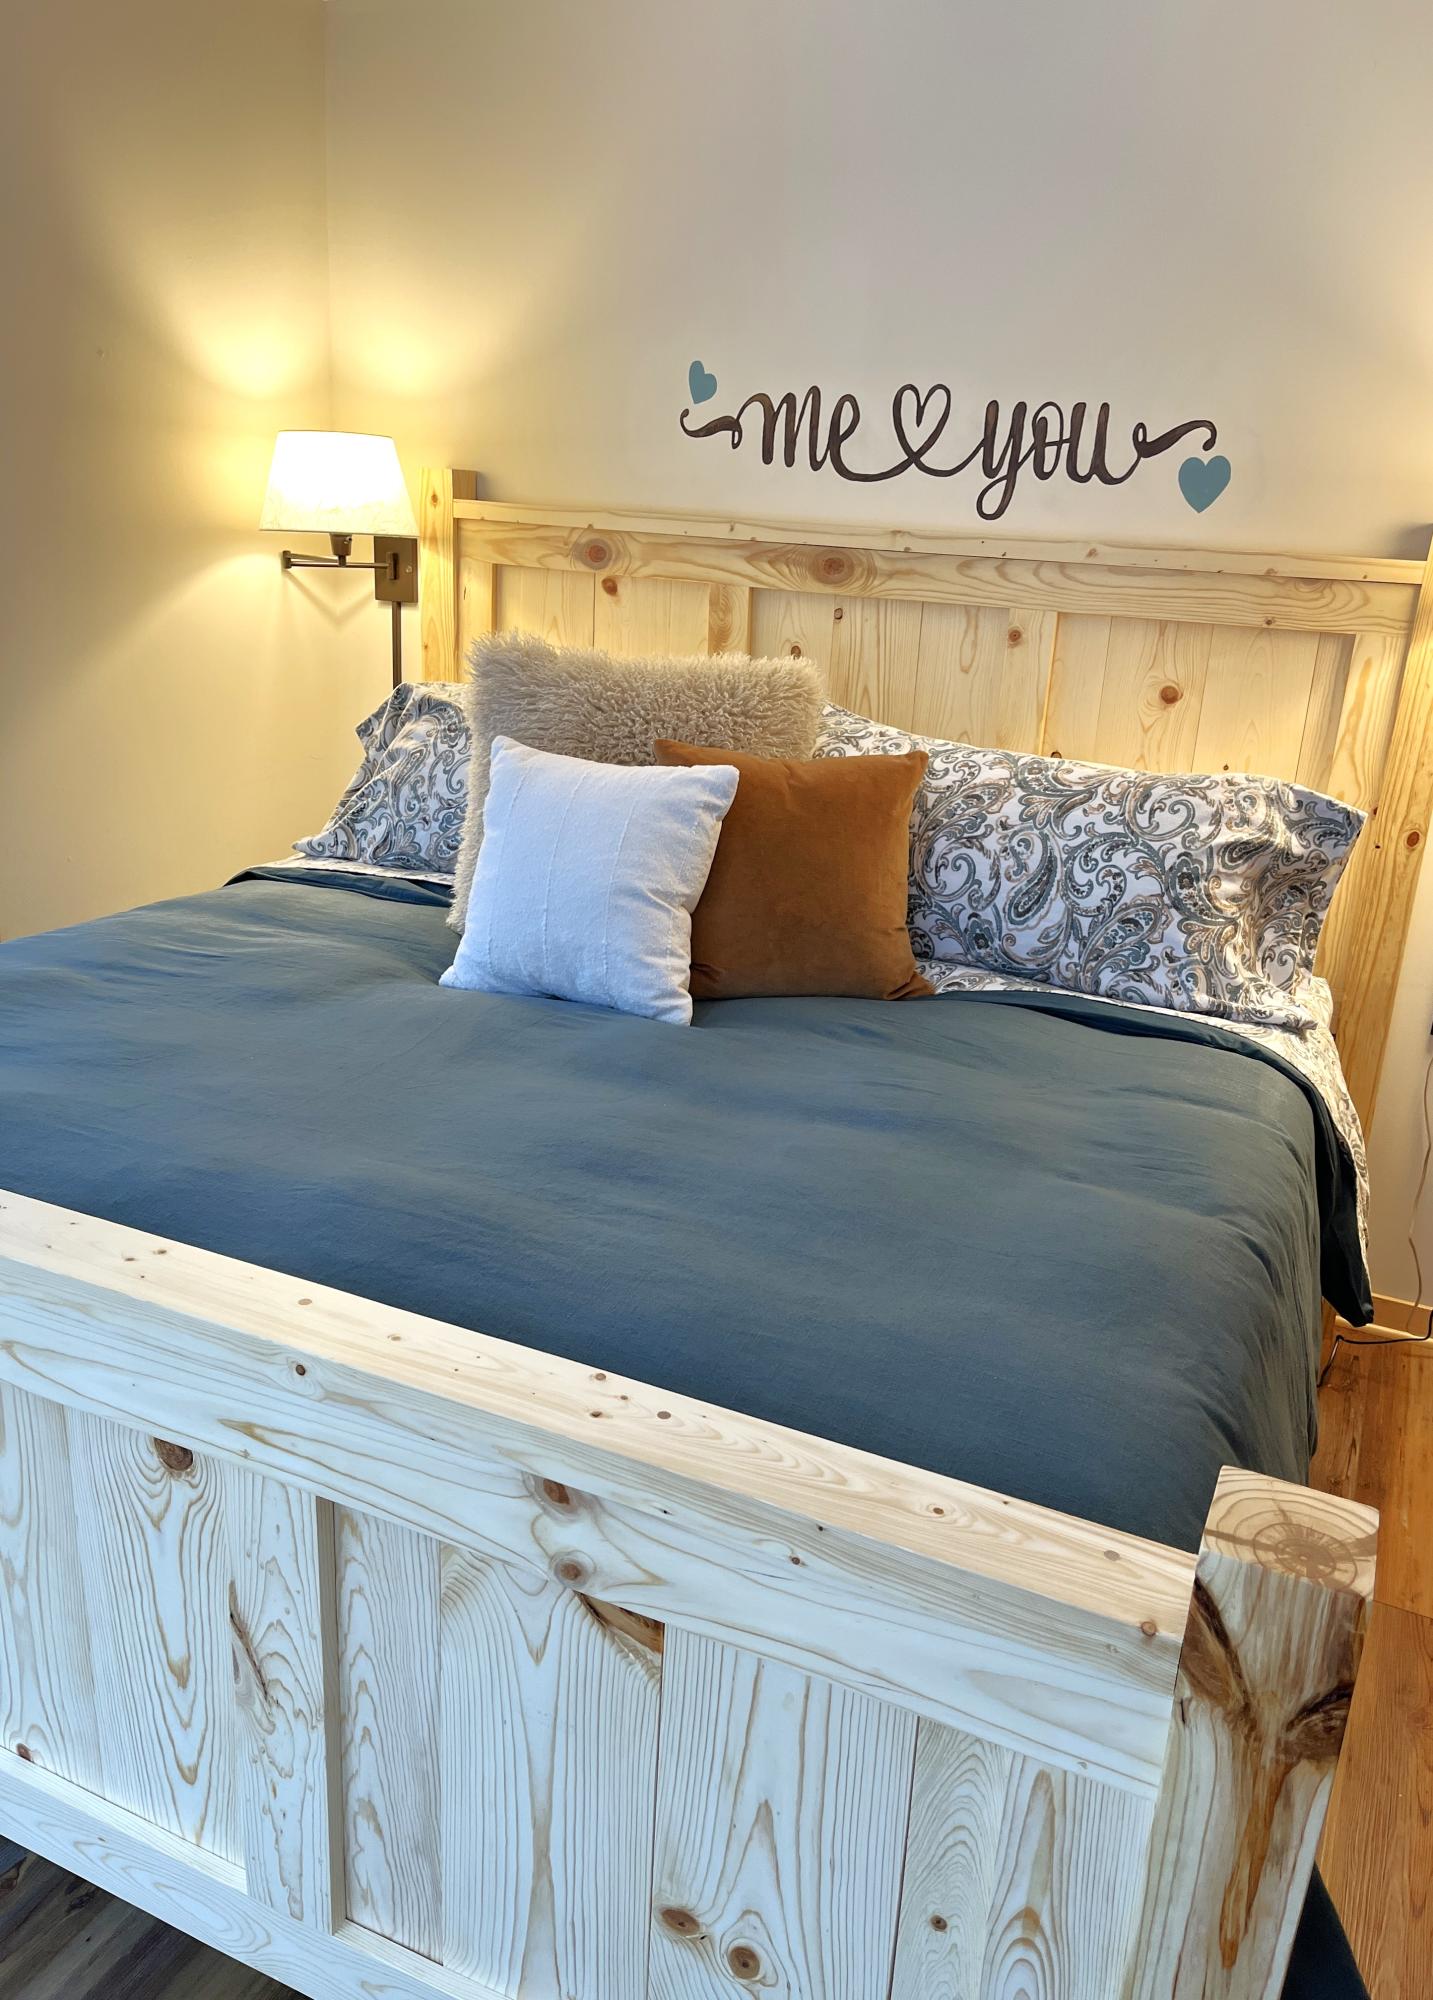
Made the Farmhouse Bed to fit our new adjustable bed. Thanks to Ana White and all her free plans, I’ve been able to build SO many things!
Jessica Benson
Built from Plan(s)
Made the Farmhouse Bed to fit our new adjustable bed. Thanks to Ana White and all her free plans, I’ve been able to build SO many things!
Jessica Benson
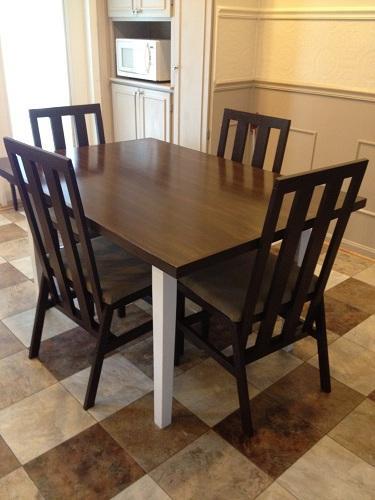
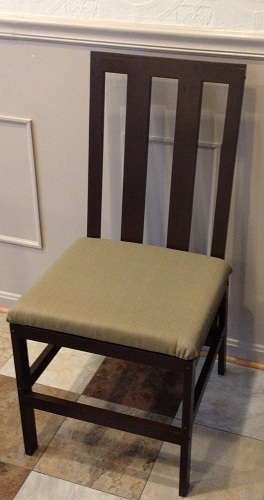
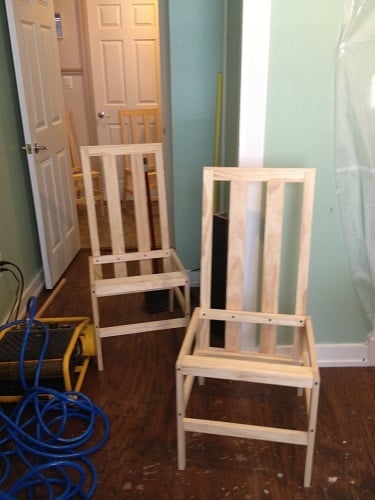
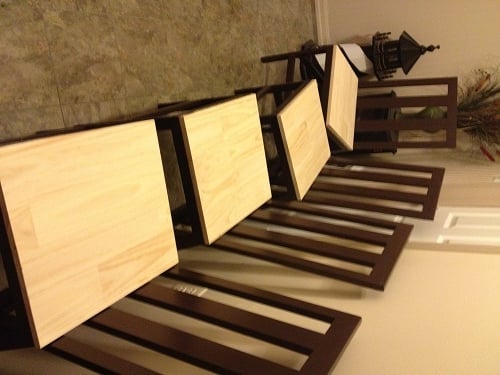
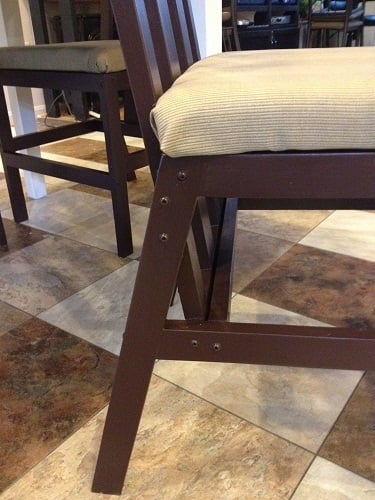
Finally I was able to replace my wobbly little dining chairs with solid wood chairs, thanks to Ana’s Harriet Chair plan. For this build, I made a few mods from Ana’s plan: added a padded seat, made the chair 2” wider, and substituted a slatted back. Used select pine 1x2 instead of 2x2 (really liked that look in the inspiration chair) and used 1x3 for the 2 inner slats on the backs. Also added a few more cross supports. Instead of predrilling pocket holes and hiding the screws, I chose to use the round washer head self-tapping screws and left them visible. This saved time on having to pre-drill and fill screw holes, but also thought the exposed screw heads made a nice decorative element. The seats are covered with 1” thick high density foam, batting, and outdoor fabric. The first of the 4 chairs took longest to make (I made and corrected all my mistakes on that one). The remaining 3 went a lot faster (took about 11 hours total for building the 4 chairs, and 12 hrs total for finishing them). The changes/steps I used are documented in a .pdf file in the second plan post linked above. Ana, thank you for all your wonderful plans. You rock!!!
Sun, 07/15/2012 - 11:15
Very nice. Your chairs are very beautiful. I love the modifications. Well done!
Sun, 07/15/2012 - 16:00
I would be interested in pdf file if you wouldn't mind posting it!!! The chairs look awesome.

Sun, 07/15/2012 - 17:26
Thank you so much! I just posted a plan of the modifications, which includes a .pdf file of the full plan with the steps and photos (still haven't learned sketchup yet). I sure hope it worked! The .pdf file is located about 2/3 of the way down through the plan post, right below General Instructions. Let me know if the .pdf opens for you? :)
Mon, 07/16/2012 - 08:22
You did a great job on these - the modifications you made, the fabric and the paint are all wonderful.
Mon, 11/26/2012 - 14:57
Colsen, thanks very much for the comment! Happy Holidays! :)
Wed, 07/10/2013 - 02:31
Thank you! We still love them and they are holding up great! I made a storage bench to go with these, but it still needs a few tweaks before blogging that one.
Mon, 11/11/2013 - 08:50
Did you also make the table? If so how/which plan did you use? The whole set together looks fantastic!
Mon, 11/11/2013 - 10:58
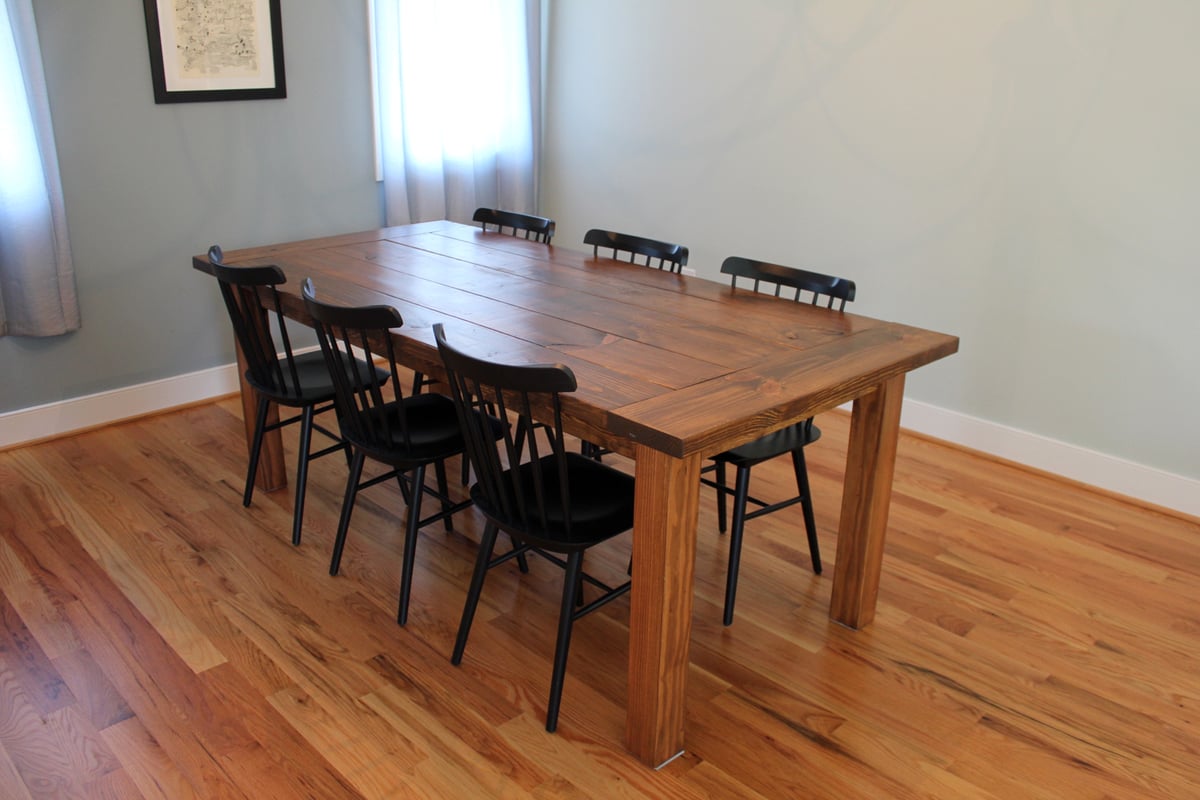
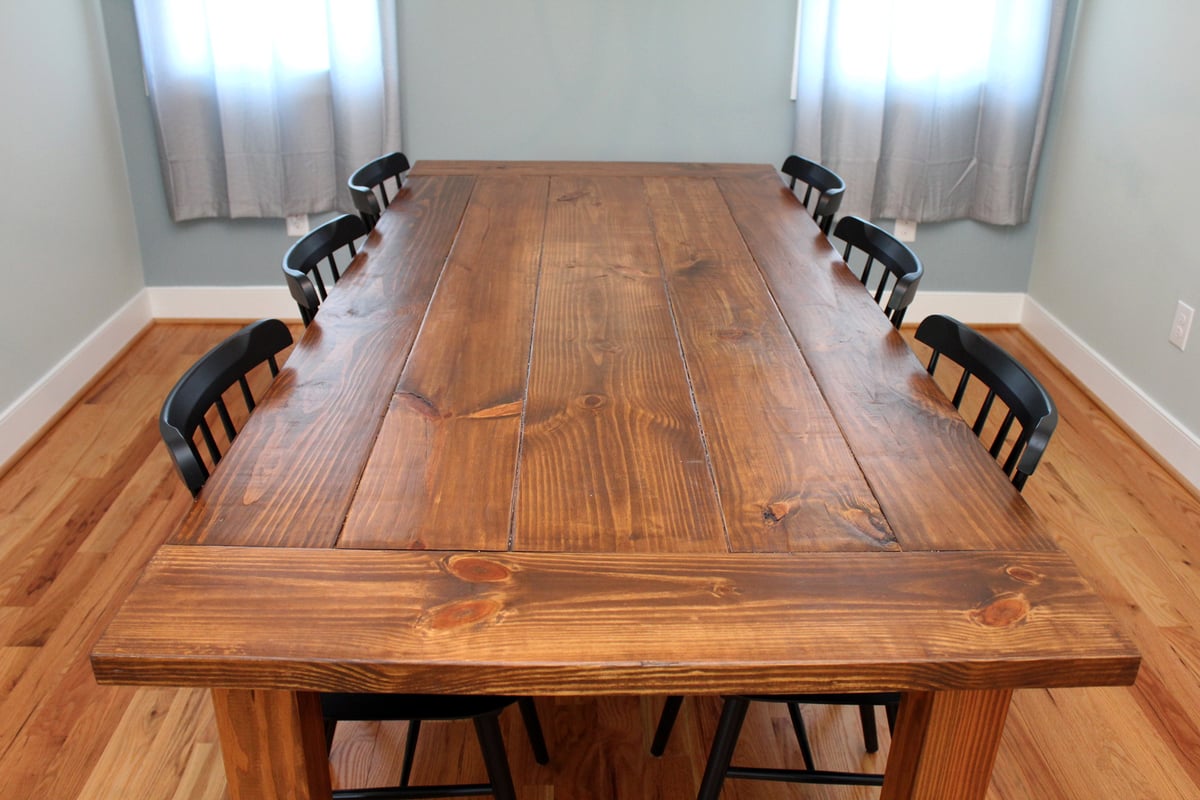
Hi AdamR, Thank you very much for the nice comment! Yes, we did the table also. Here's the brag post:
http://ana-white.com/2011/05/my-new-almost-farmhouse-table
This was done under my original username JES. I had locked myself out of that username and had to create a new one ;)
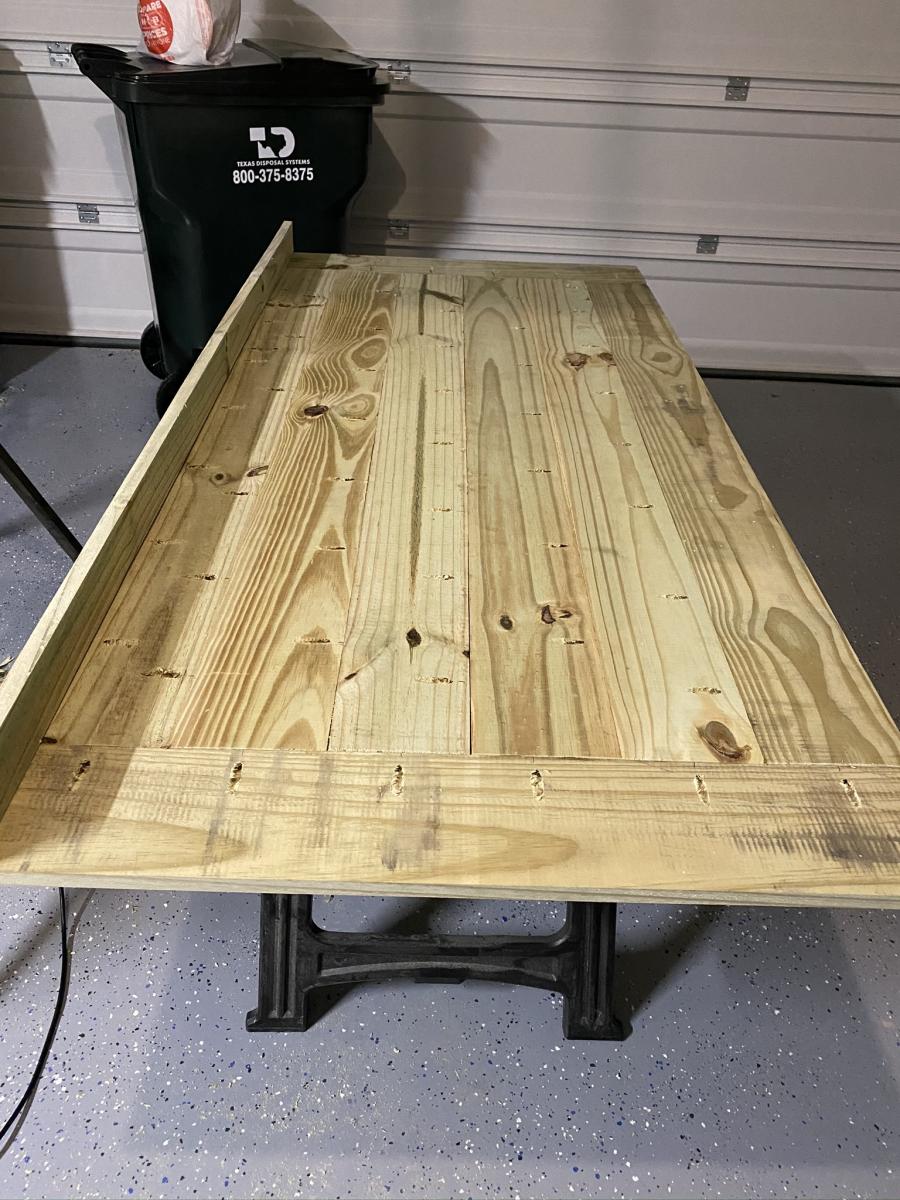
We used our existing table and painted the legs, and added a new top. The tabletop finished dimensions are 56" long x 38 1/2" wide.
Joanne
Mon, 11/11/2013 - 19:38
This is what I have been looking for. I know my wife doesn't want any indents or grooves but it seems like everyone build tables out of boards. I don't have a jointer or planer to even the boards out.
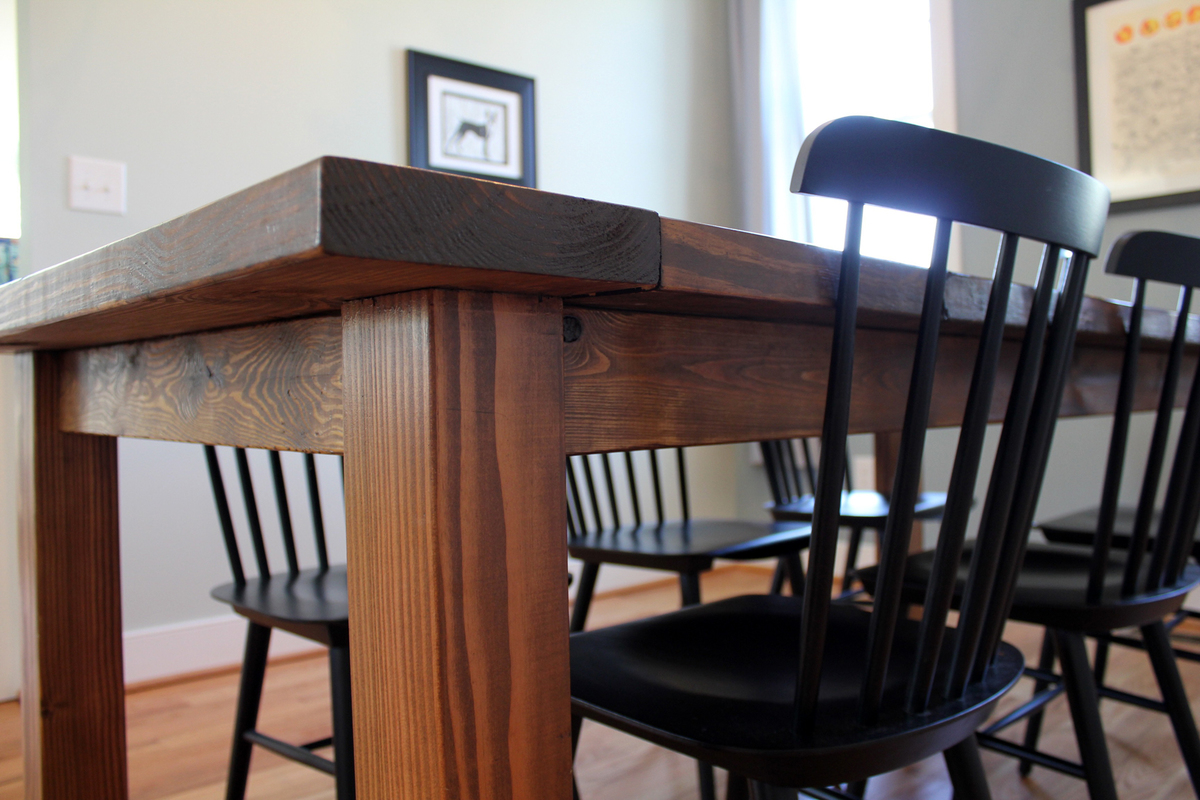
Question 1 - the 1x2 trim...to be clear you attached the 1 inch side to the table right?
Question 2 - how has the 3/4 thickness working out? Thick enough?
Question 3 - anything you would have done differently?
Thank you so much for your help. I build some small custom shelves for my son's room, found this site and now got a major bug to build stuff we have been looking for. I actually joined the site just to ask you about the table so thanks again!
Adam
Tue, 11/12/2013 - 07:07
Thanks again for the nice comments, Adam!
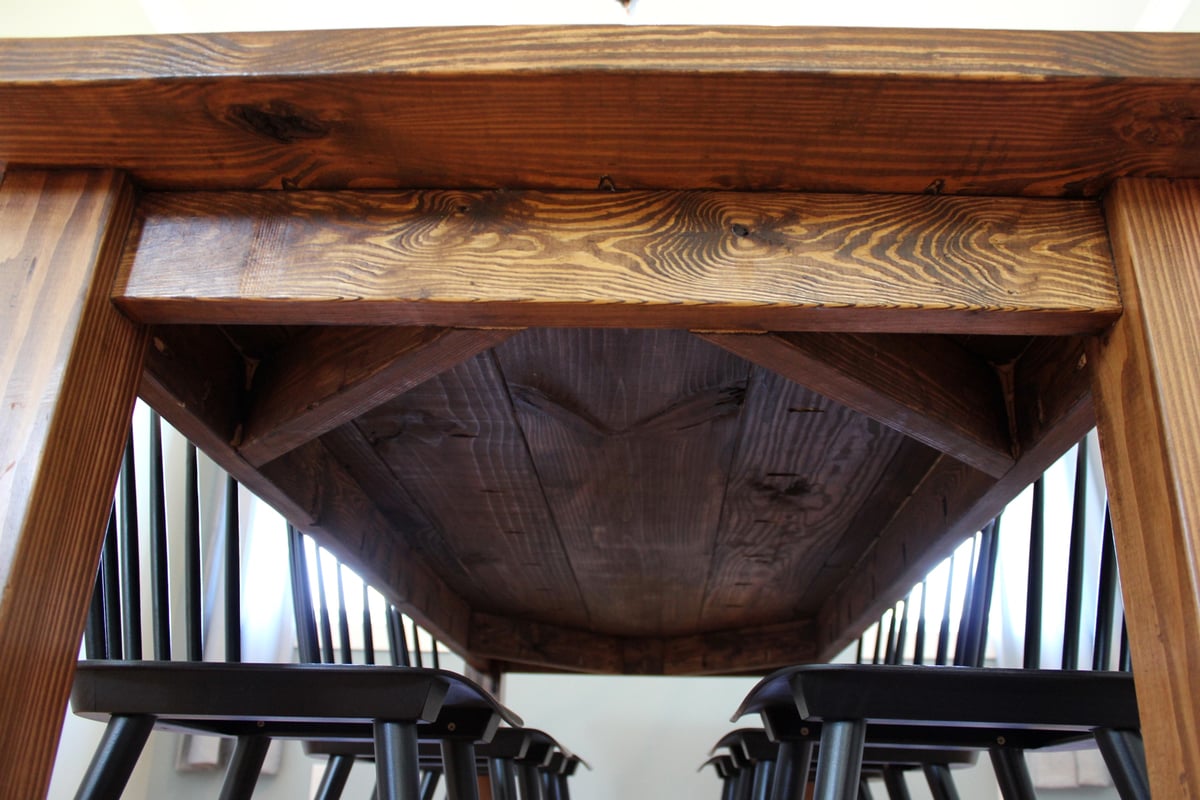
On the 1x2 for trim, I attached with the 2" side to the edges of the plywood (the 1x2's were actually 1 1/2" wide and 3/4" thick). This gives the illusion that the table is 1 1/2" thick. On this one I used finish nails and glue to attach the trim. If I had it to do over again, I'd have attached the trim boards to the plywood edges with pocket holes from under the table, so there would be no nail holes to fill.
3/4" thickness for the table top works fine. Our original table had a top thinner than 3/4", so we attached this new top directly on top of it. I didn't think I could get the leg assembly off that old table without damaging it.
If you wanted a more 'beefy' feel to the whole table top, you could stack 2 pieces of plywood, glued and fastened together from the bottom with screws. The 1x2 for the edges would still cover it.
Once you catch the wood working bug, you'll want to build everything you see! :) I hope you post a brag picture when you build this. I'd love to see pictures! :)
Joanne
Wed, 11/13/2013 - 06:02
First off thank you for all the info! I see now why you picked the larger trim, I didn't catch it the first time around that you put the new wood right on top of the old table. My kitchen table has the exact opposite problem the legs are weak (plus my wife hates the top too) hence why I will be doing both top and legs. Still debating on one 3/4, two 1/2 or two 3/4 inches for table thickness.
I am going to build the kids trestle table this weekend first. Just the get a project under my belt besides some book shelves. lol
http://ana-white.com/2011/09/kids-trestle-style-play-table
My Kreg Jig will be here Friday, picking up wood on Sat....hopefully I will have a unfinished kids craft table ready to roll by Sunday then the Kitchen table will be my Thanksgiving weekend project.
Thanks again for all of your help.
Adam
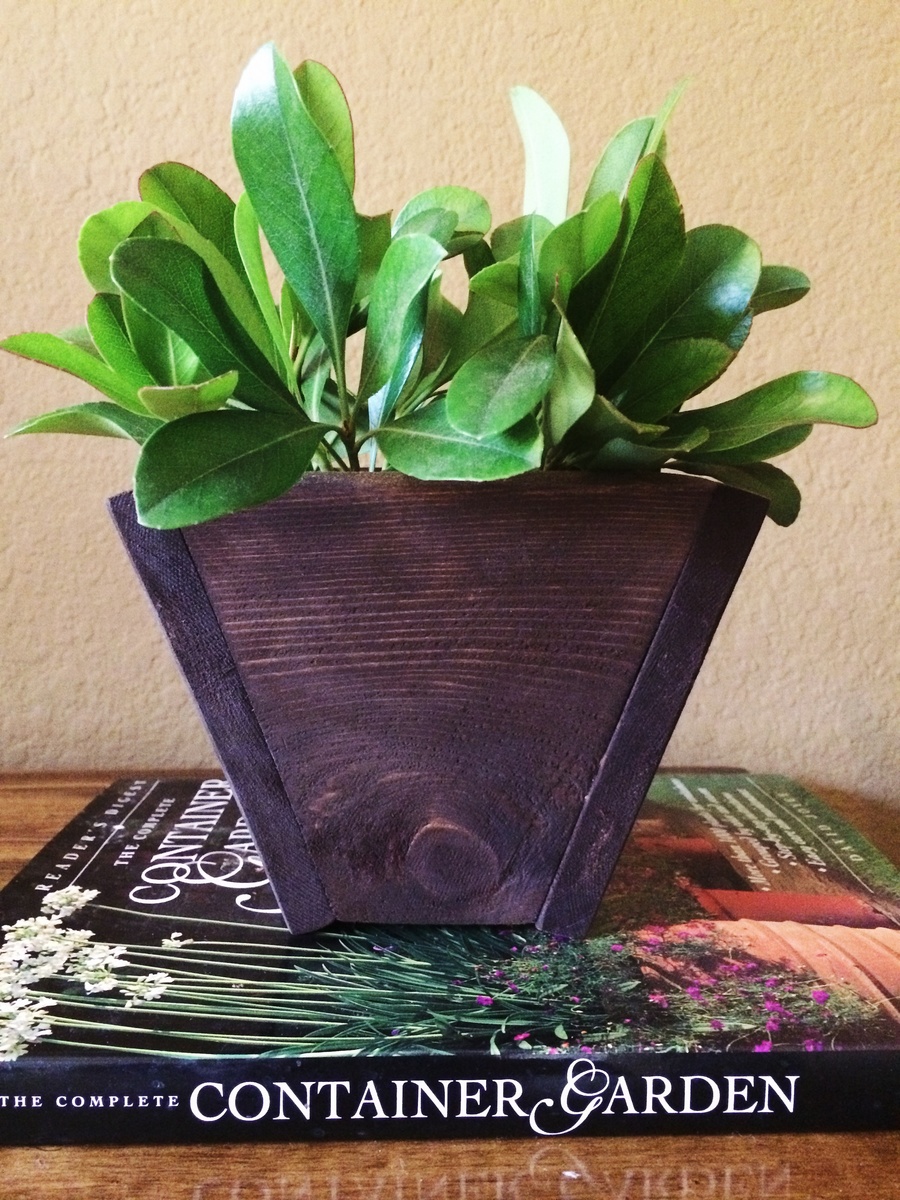
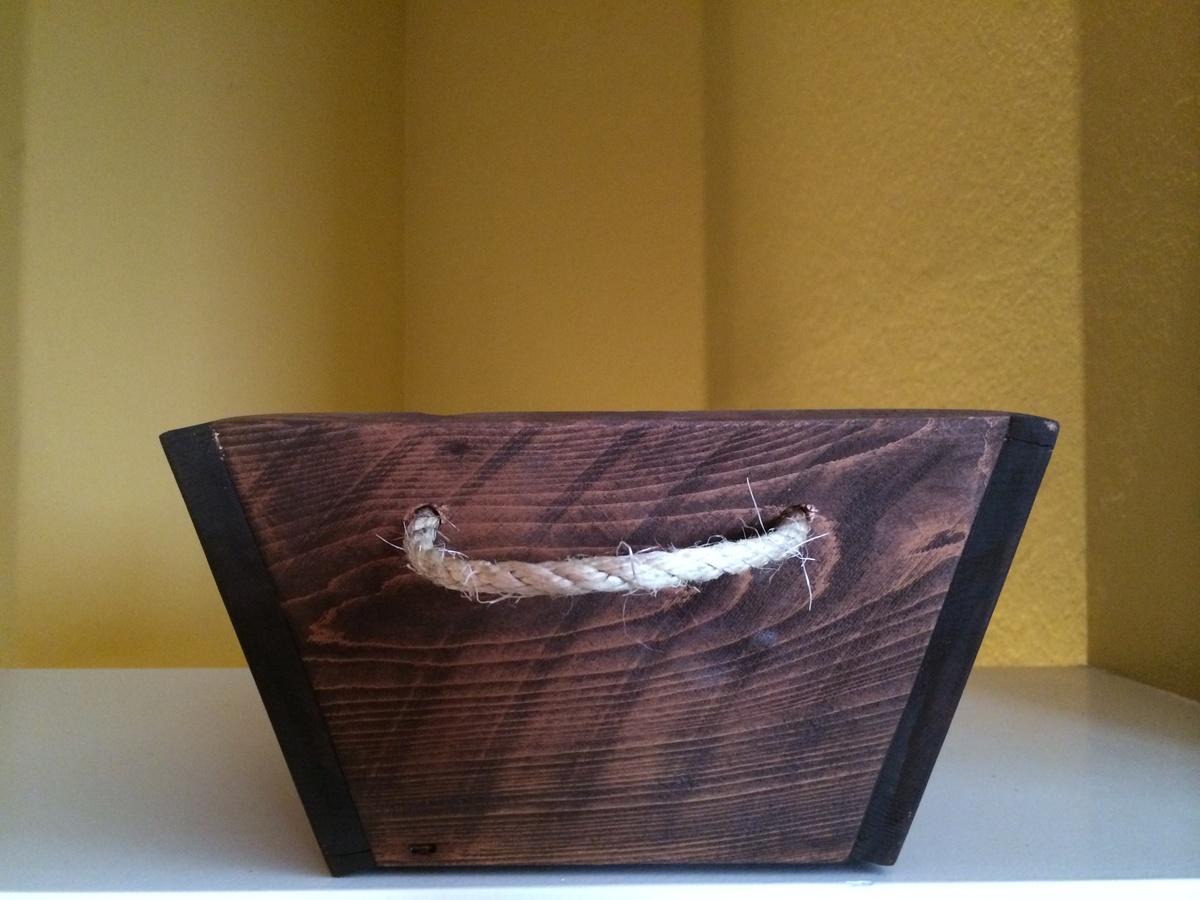
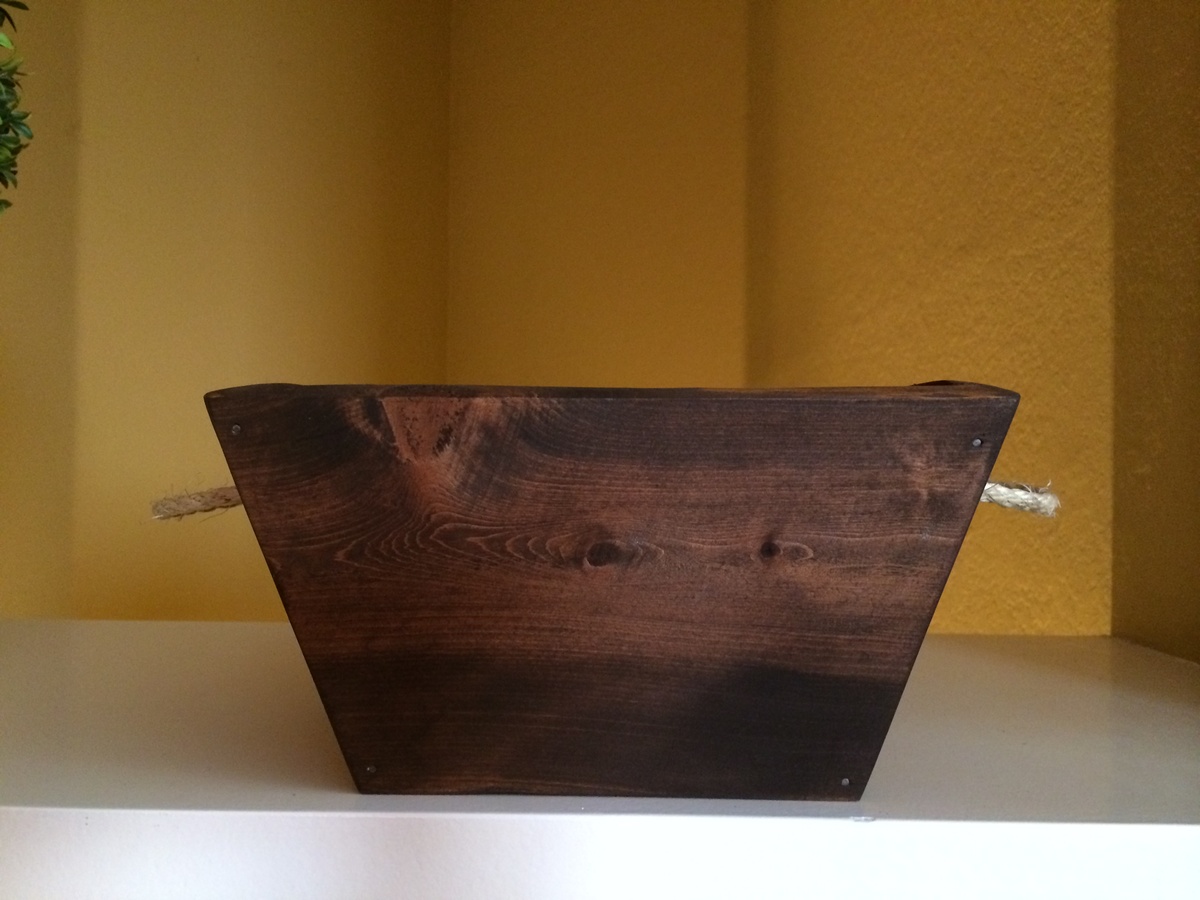
This was a super fun and simple project, and the planters can be used for anything!! Thank you Ana! I followed Ana's plans and used mine as an Easter Basket gift that could then be used as a planter. I also modified the plans to be the size I wanted for a smaller planter that I also gifted as an Easter Basket. I believe I made the smaller one measuring each side out to be 2 or 3 inches. Next, I measured the bottom opening and made a custom fitting removable piece for it. Like Ana mentions, I also did not attach the bottom piece as it already allows some room for drainage and simplicity for changing out soils. To attach the pieces together, it was not as quick of a project as it was for Ana because I currently don't own a nail gun. Owning one would definitely make this project a breeze! For the finish, I did sand the cedar posts with 80 grit as I didn't want anyone to get splinters (also because I was applying stain with a sponge and rough wood makes it sort of difficult). The stain is Rustoleum's Dark Walnut. I did not leave the stain on very long as the wood is very porous. This is one of my favorite projects thus far because it made gift giving and our Easter Baskets much more unique!

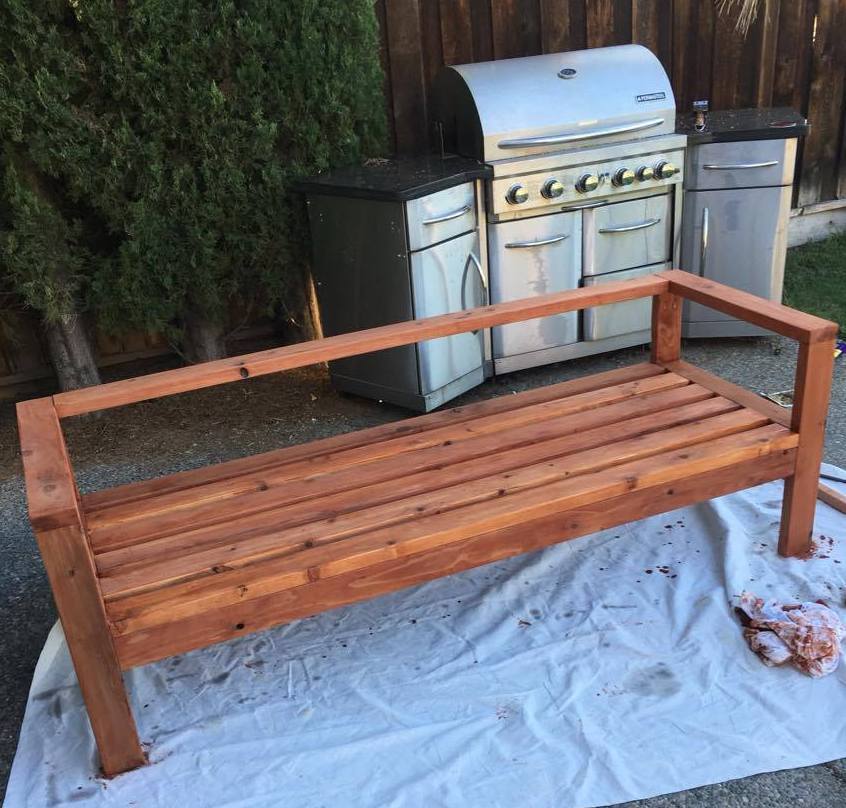
This is my attempt at the 2x4 outdoor sofa. The entire sofa is made out of 2x4 Redwood, so the cost was a little high at $150 for the wood. I'm still waiting on cushions, but I went overboard and bought them custom made so the total for those came out to $520. Overall, I could have easily bought a complete set online but hey, this is more fun!
My one concern is the back support. I'm thinking of building something angled in, but haven't thought of the best approach yet, that will still look good.
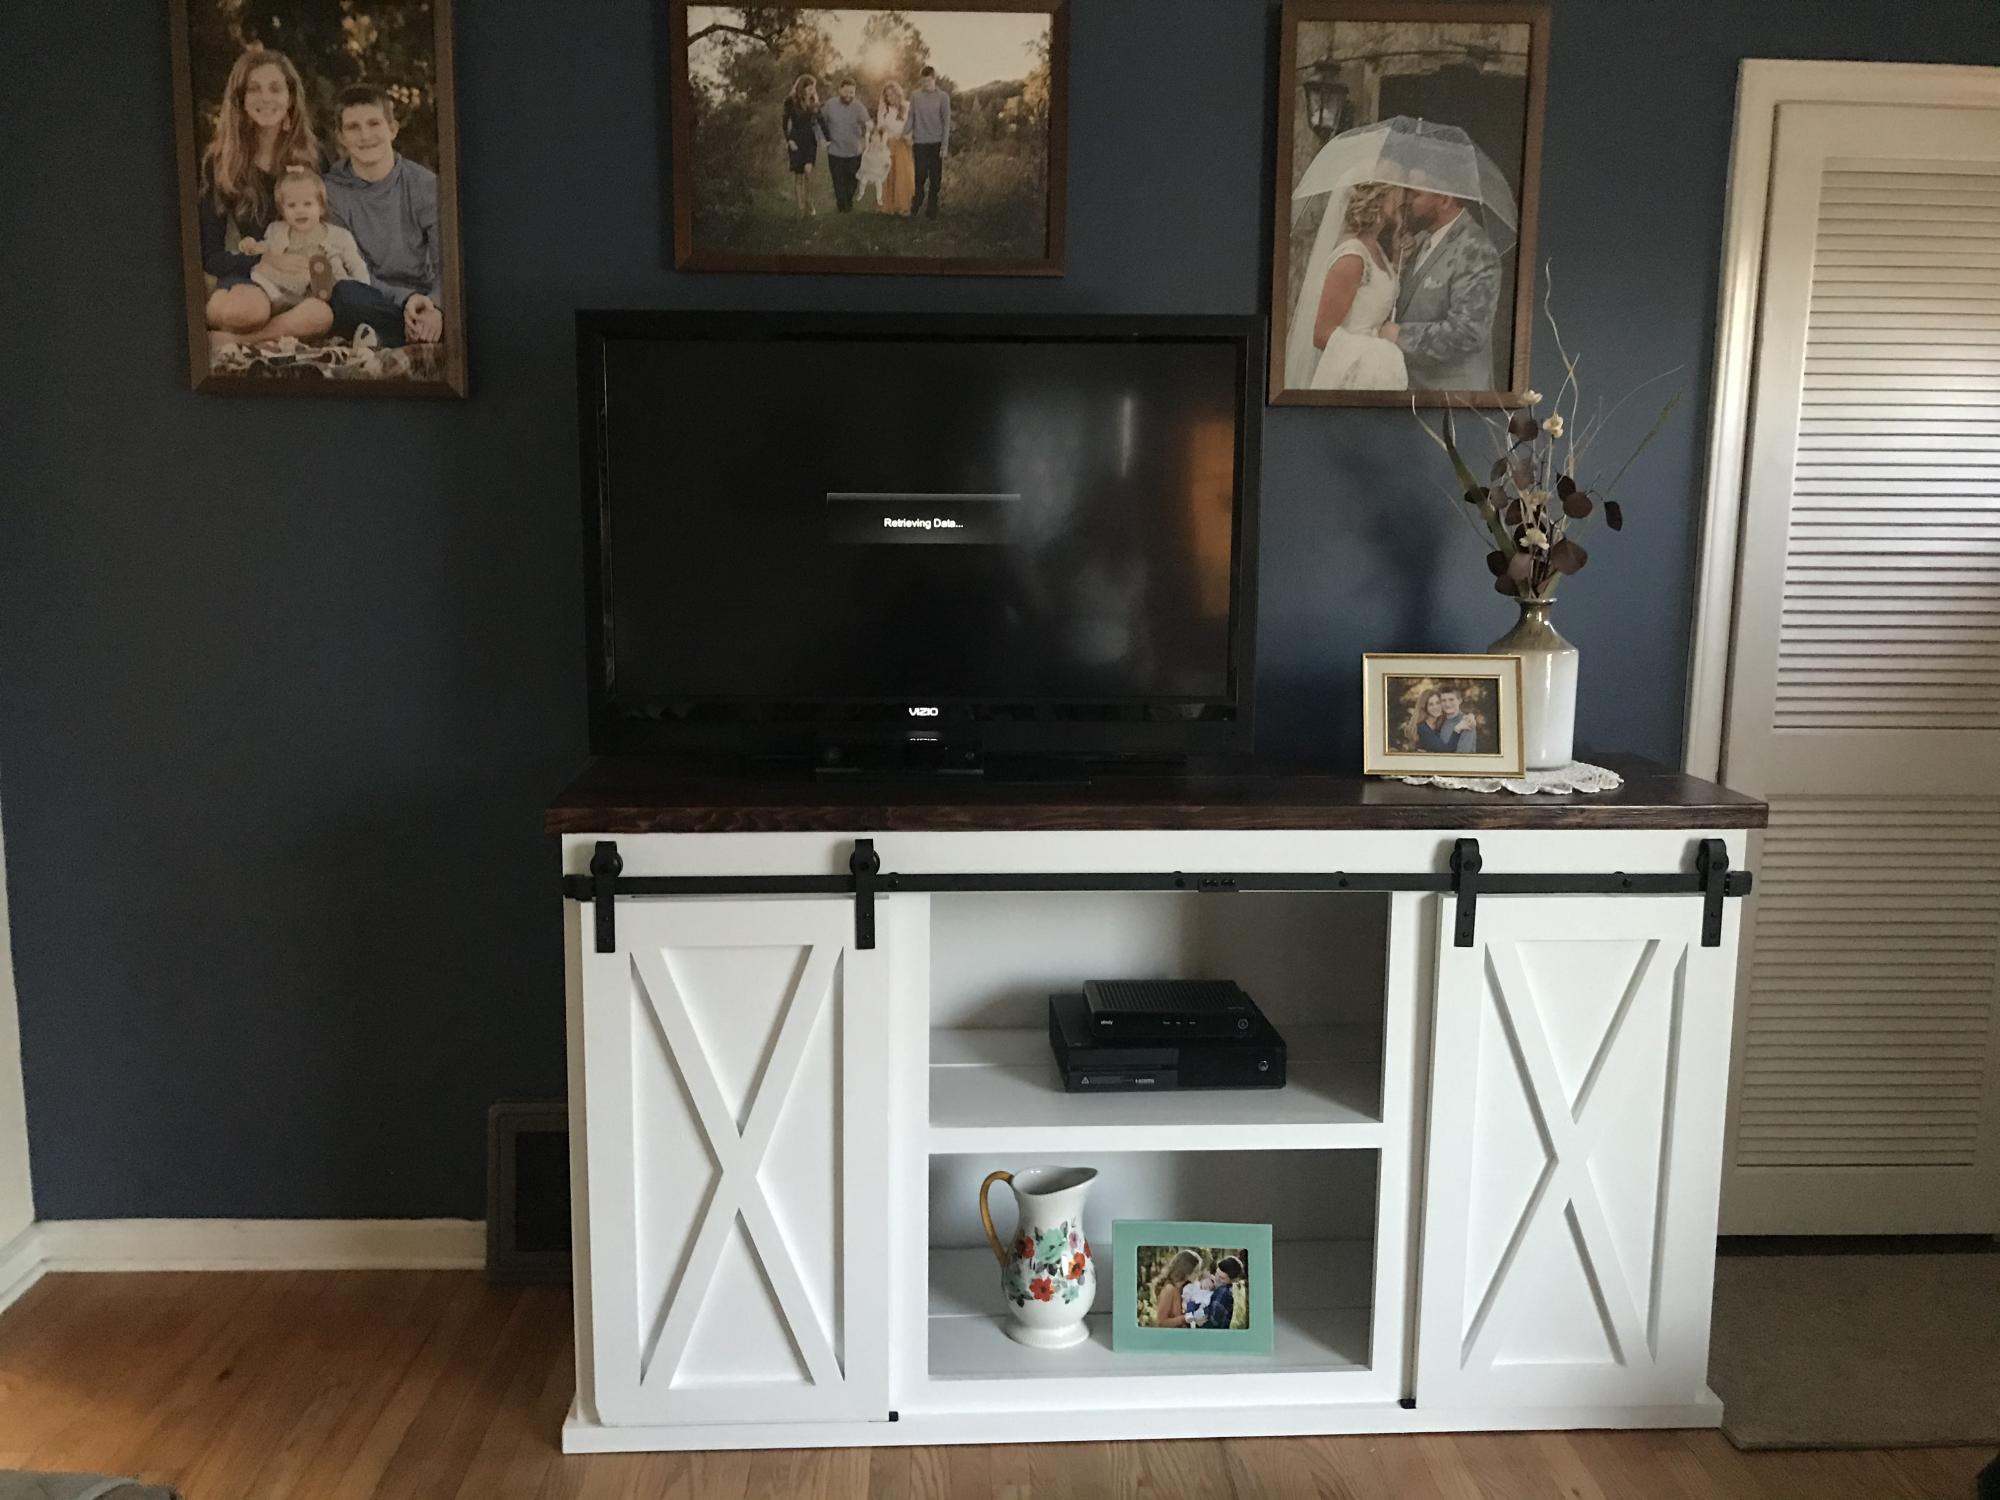
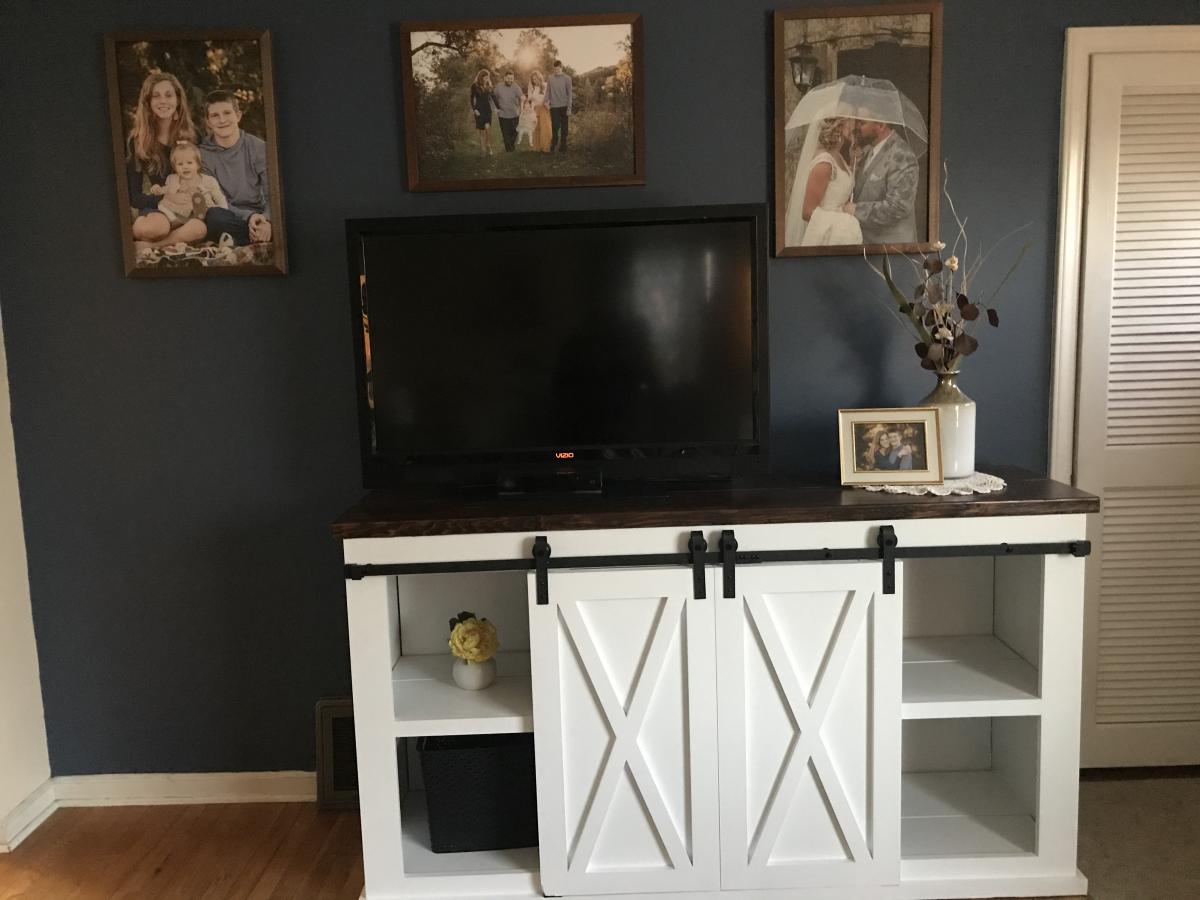
I built this unit based on the Grandy Barn Door Console plans. I adjusted it down to 66”. The top is Dark Walnut with Satin Poly. All lumber was purchased at Menards.
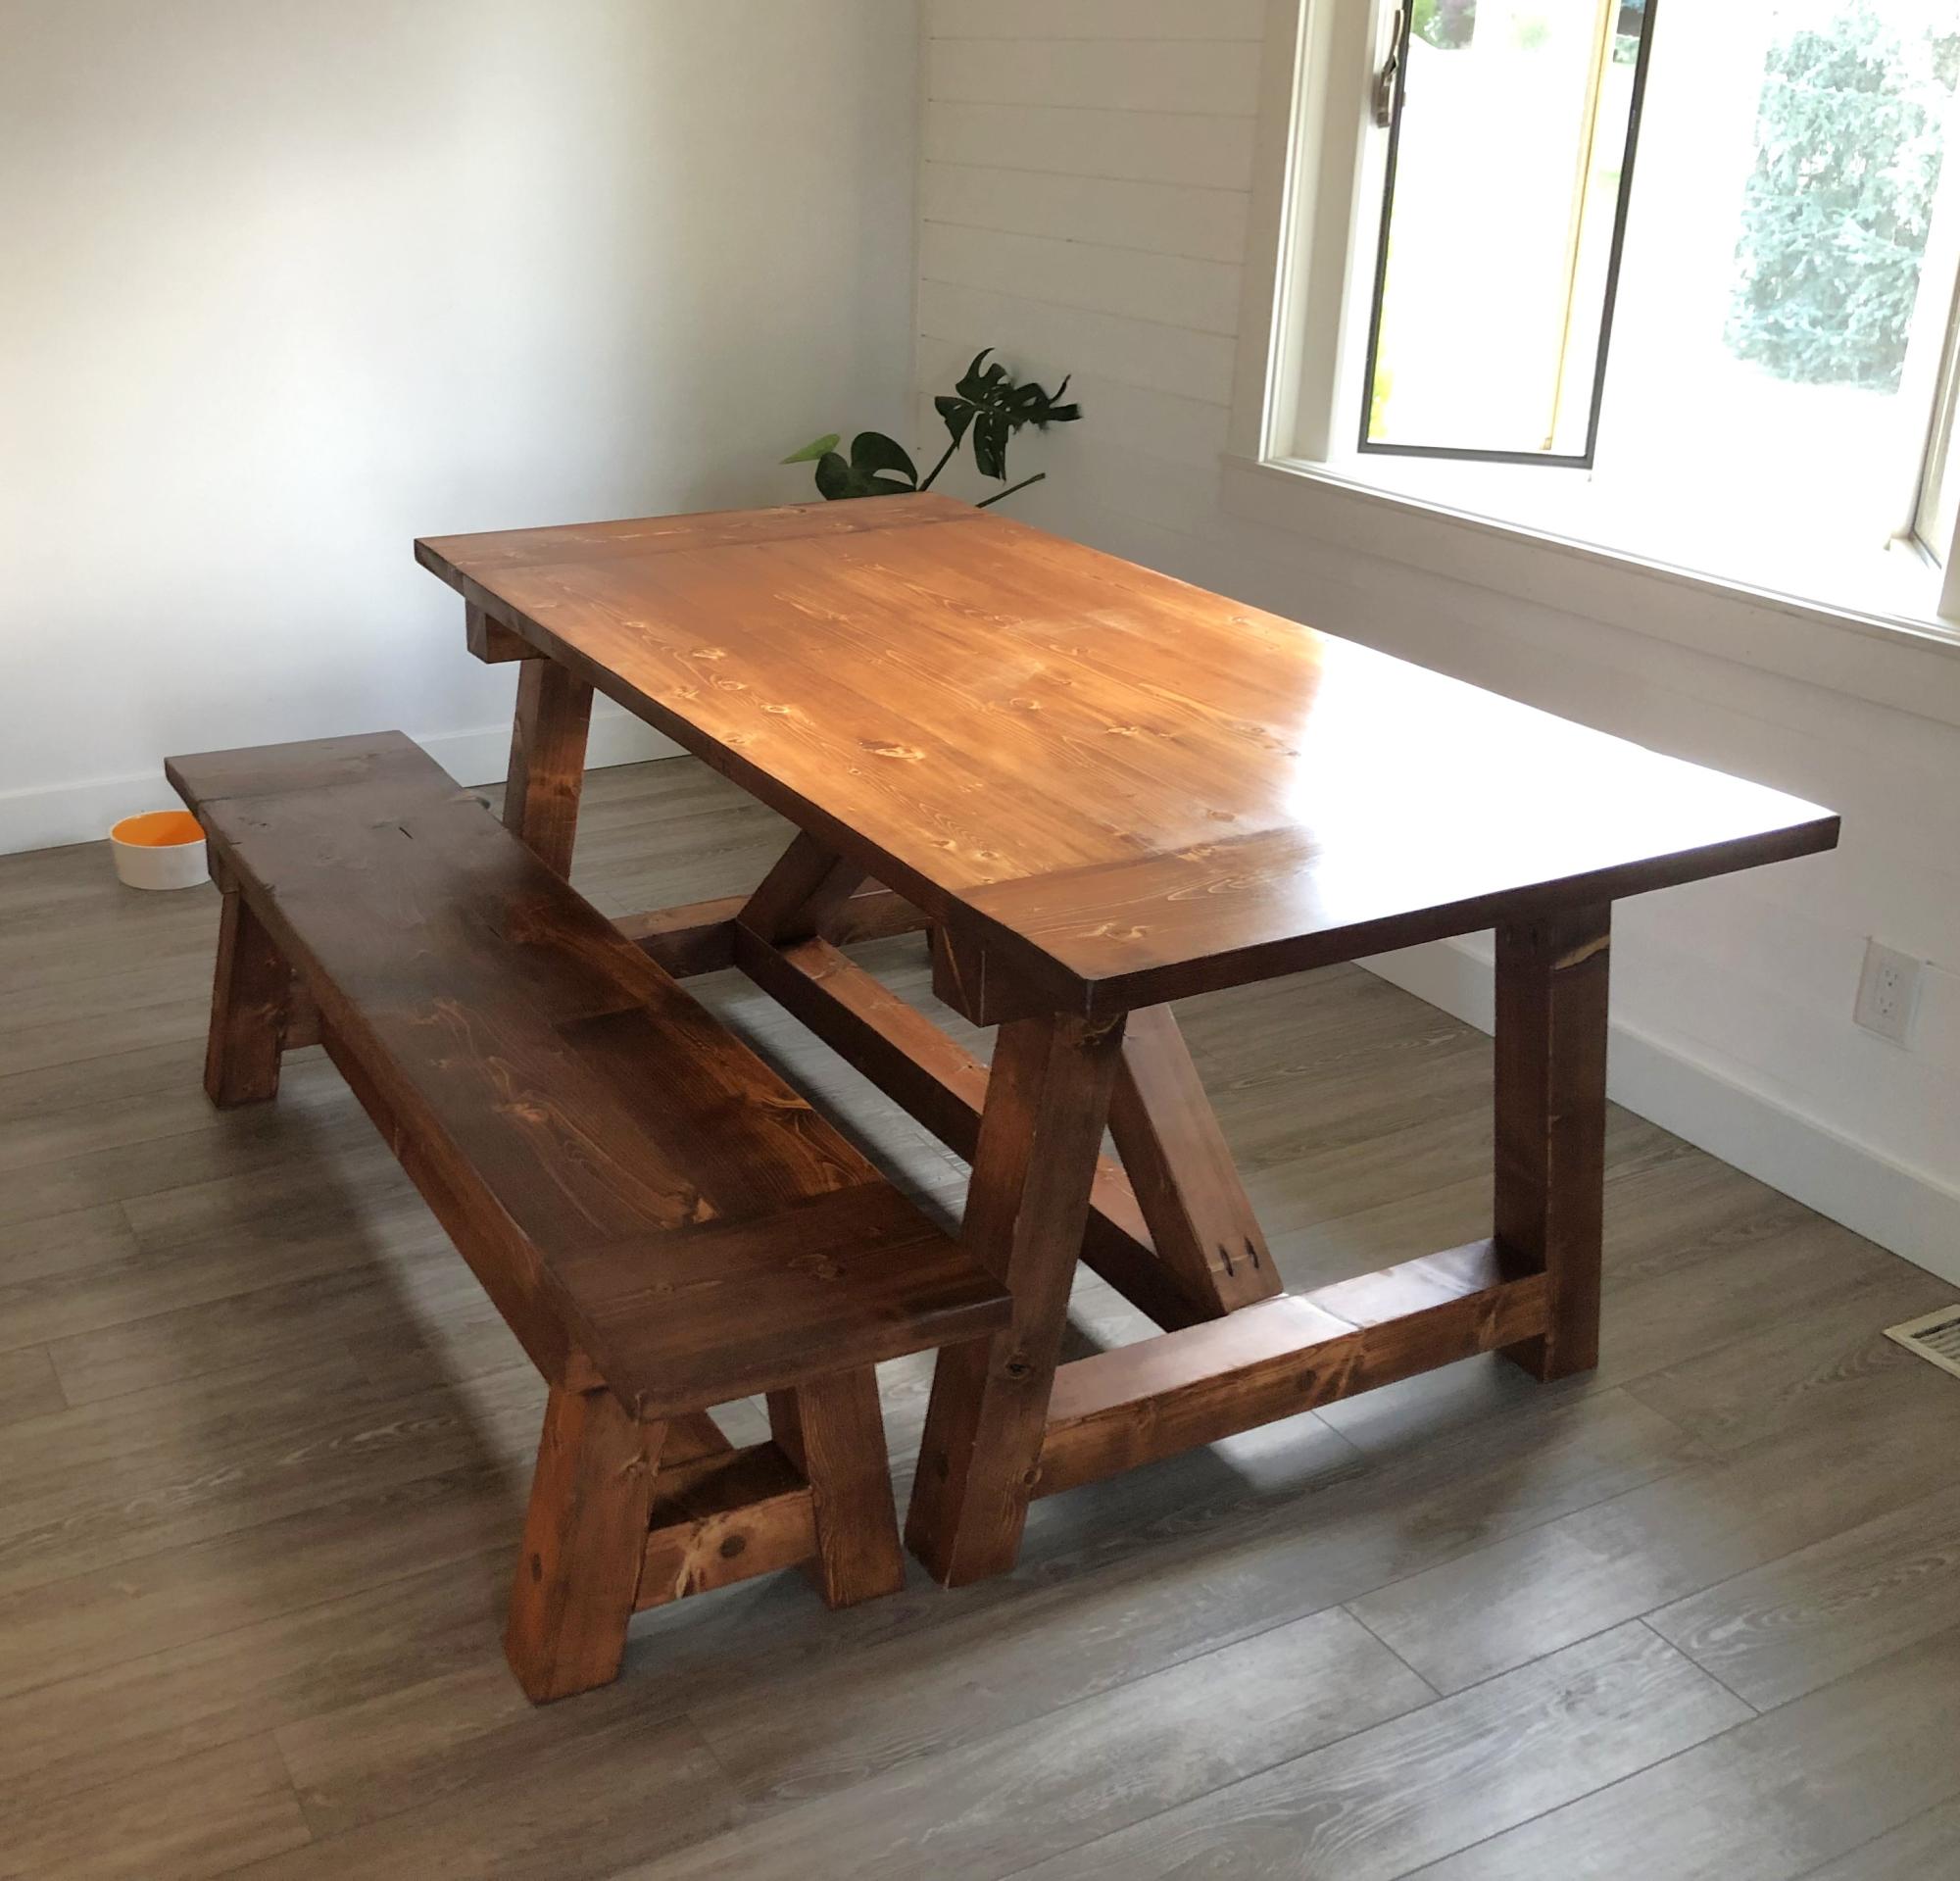
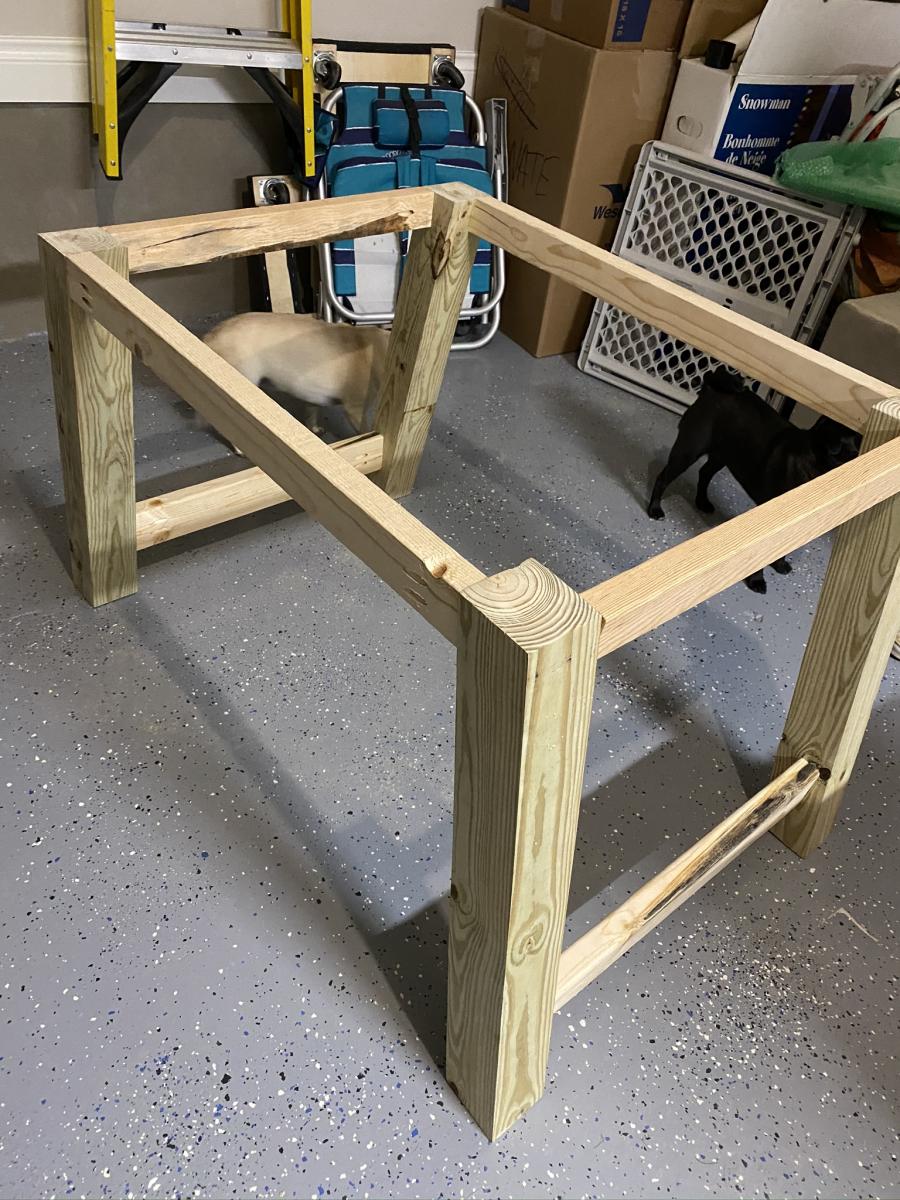
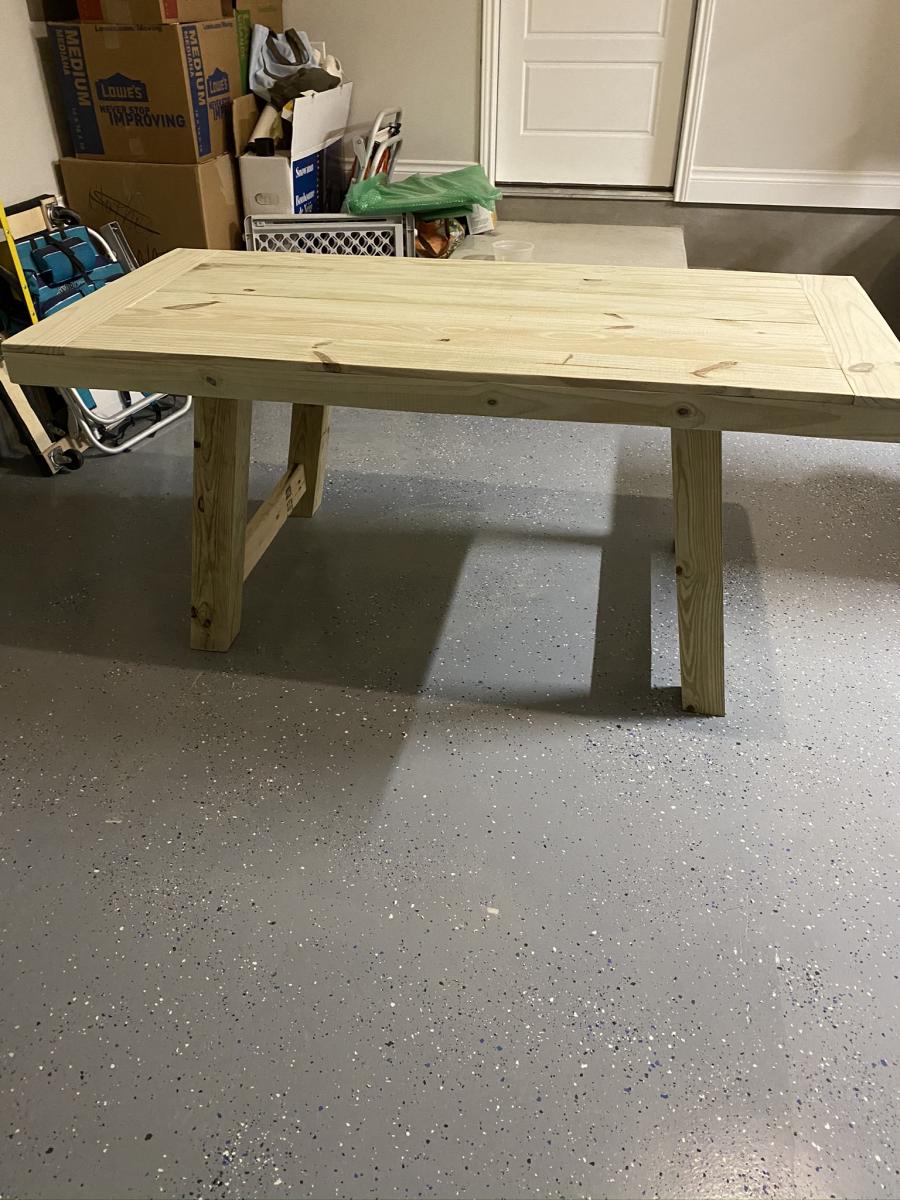
I built this Truss Table for a house warming gift for my daughter.
Rick Briere
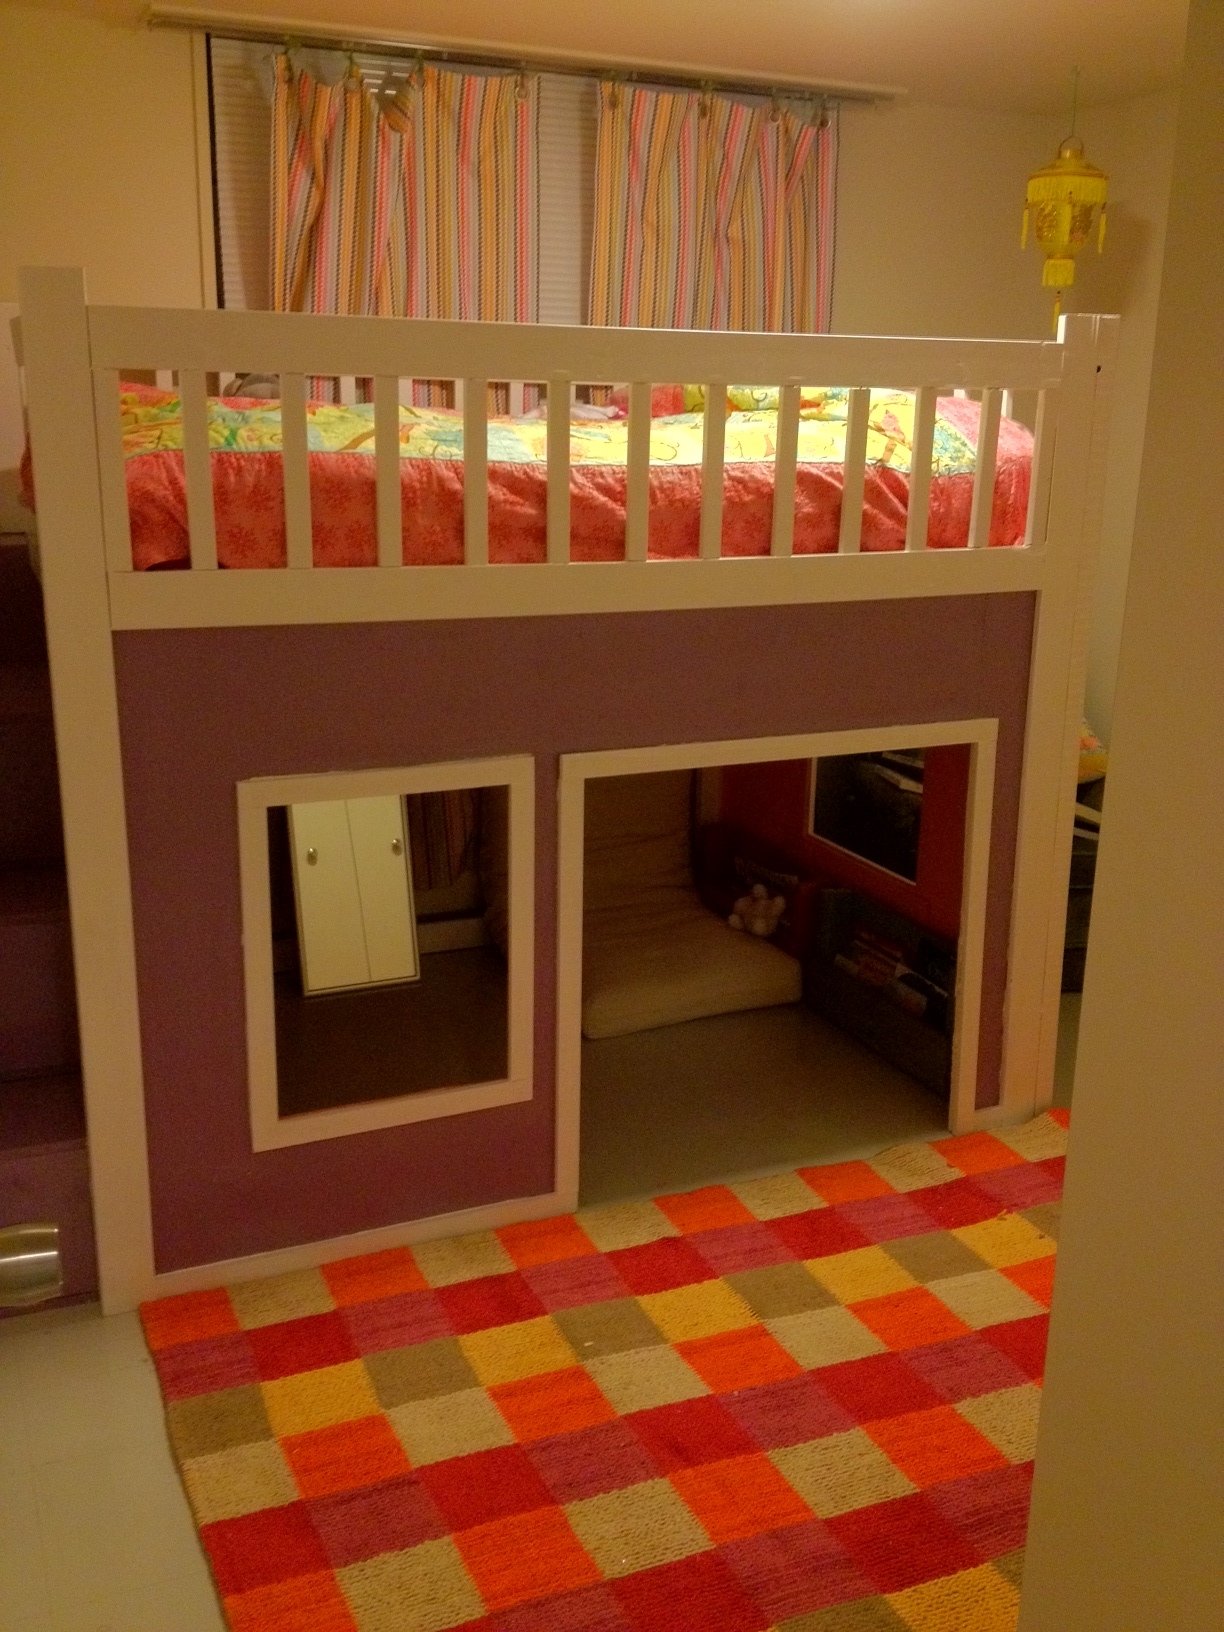
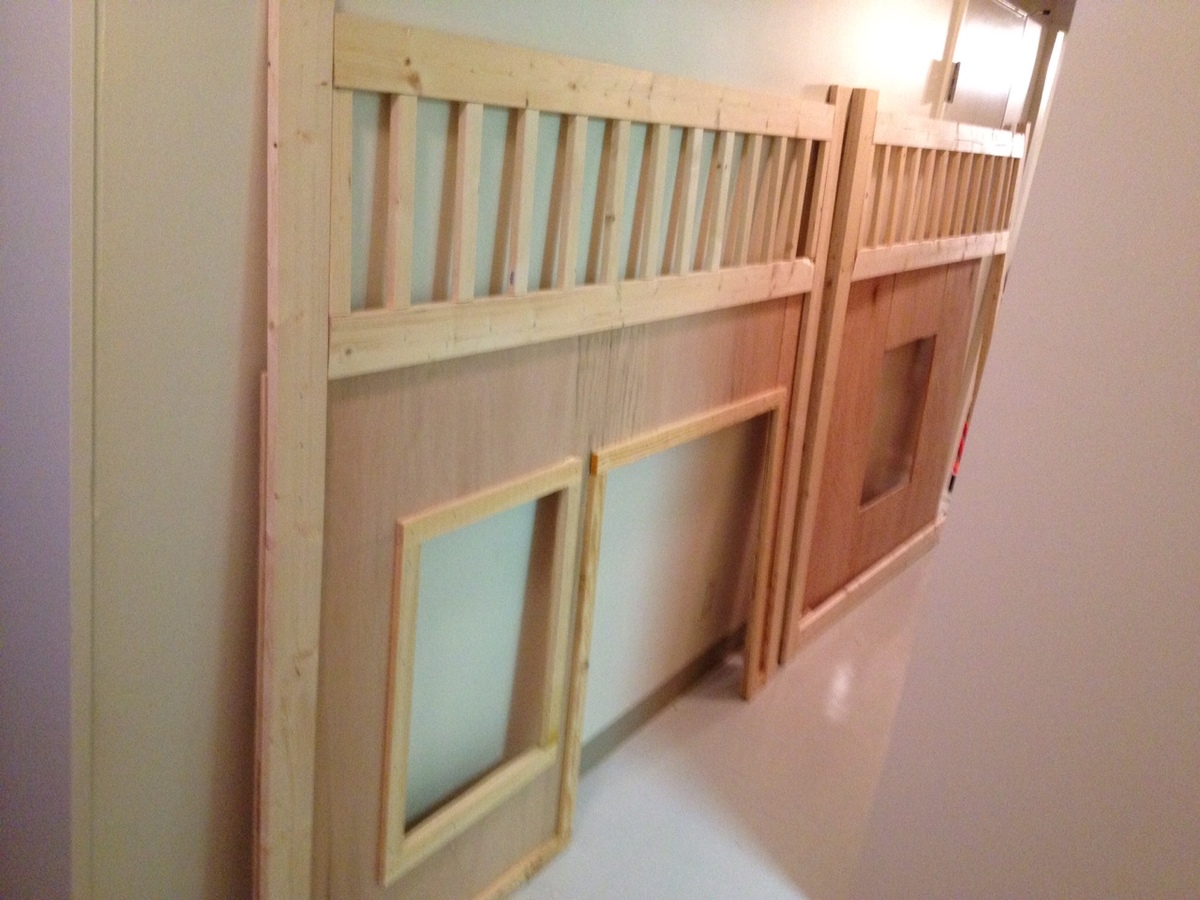
So living in Japan makes some of these projects interesting. 1) The largest pieces of plywood are 36"x48". 2) Paint is only sold in pre-mixed colors, so choices are limited. 3) Everything is expensive. 4) Packaging is impossible for me to read. That being said, I set out to make a playhouse loft bed for my daughter's birthday. My wife and daughters were in the states so I had nothing else to do in the weekends and evenings. I modified the plan for a full size bed and did not follow the sizes of windows and doors exactly since I was actually piecing it together since the plywood is not the full size.
That is not exactly true, I did climb Mt. Fuji one Saturday. Also found some interesting Wasabi Kit Kat at the store.
So this took a little over a week to complete, working whenever I could. I painted the inside pink, and the best color they had at Homes was basically pepto bismol. My daughter won't mind, but I did not want to see that on the outside everyday. The outside is purple and trim is white. The purple was an oil-based paint that smelled worse than any paint I have ever used before. I decided to make cubby storage stairs so that my daughter could get to them from the inside. I just finished this last night, and my family returns today for the surprise.


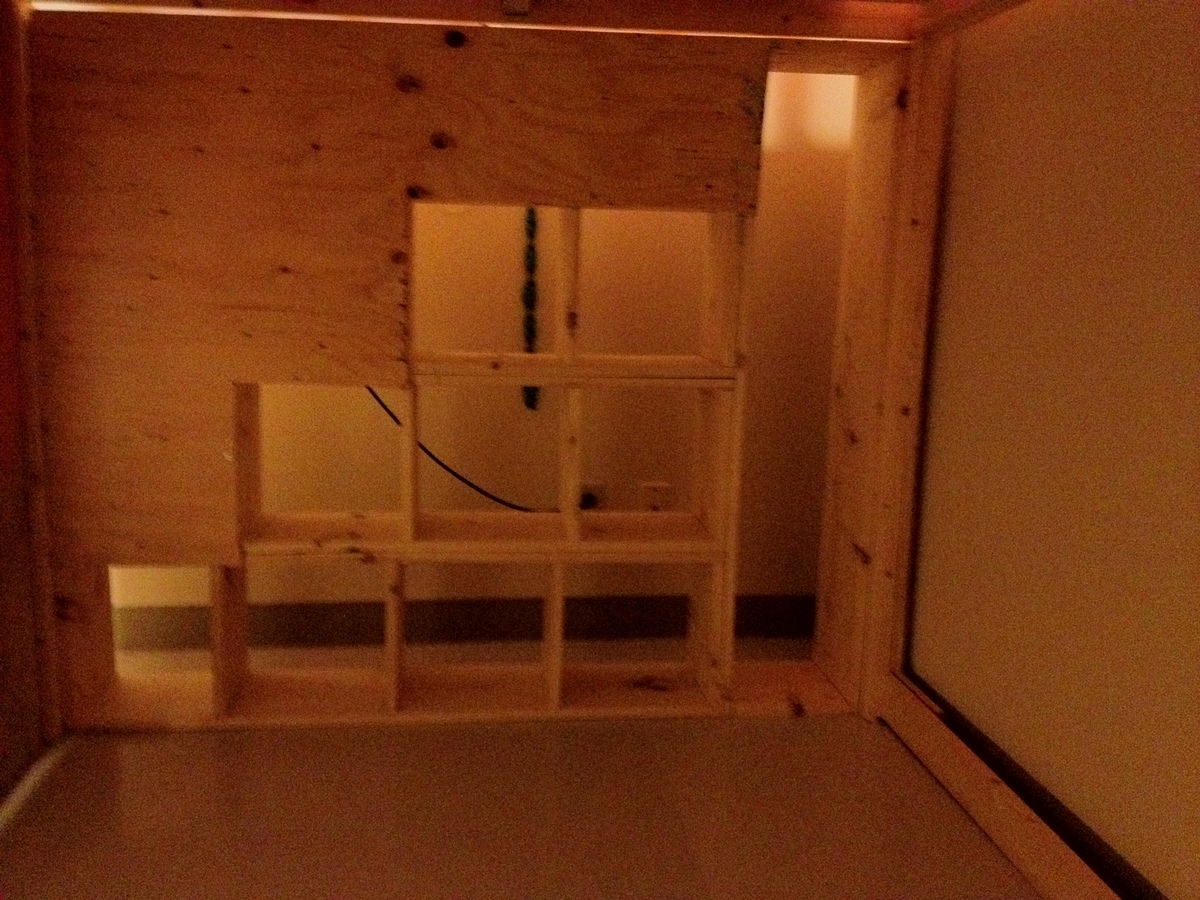
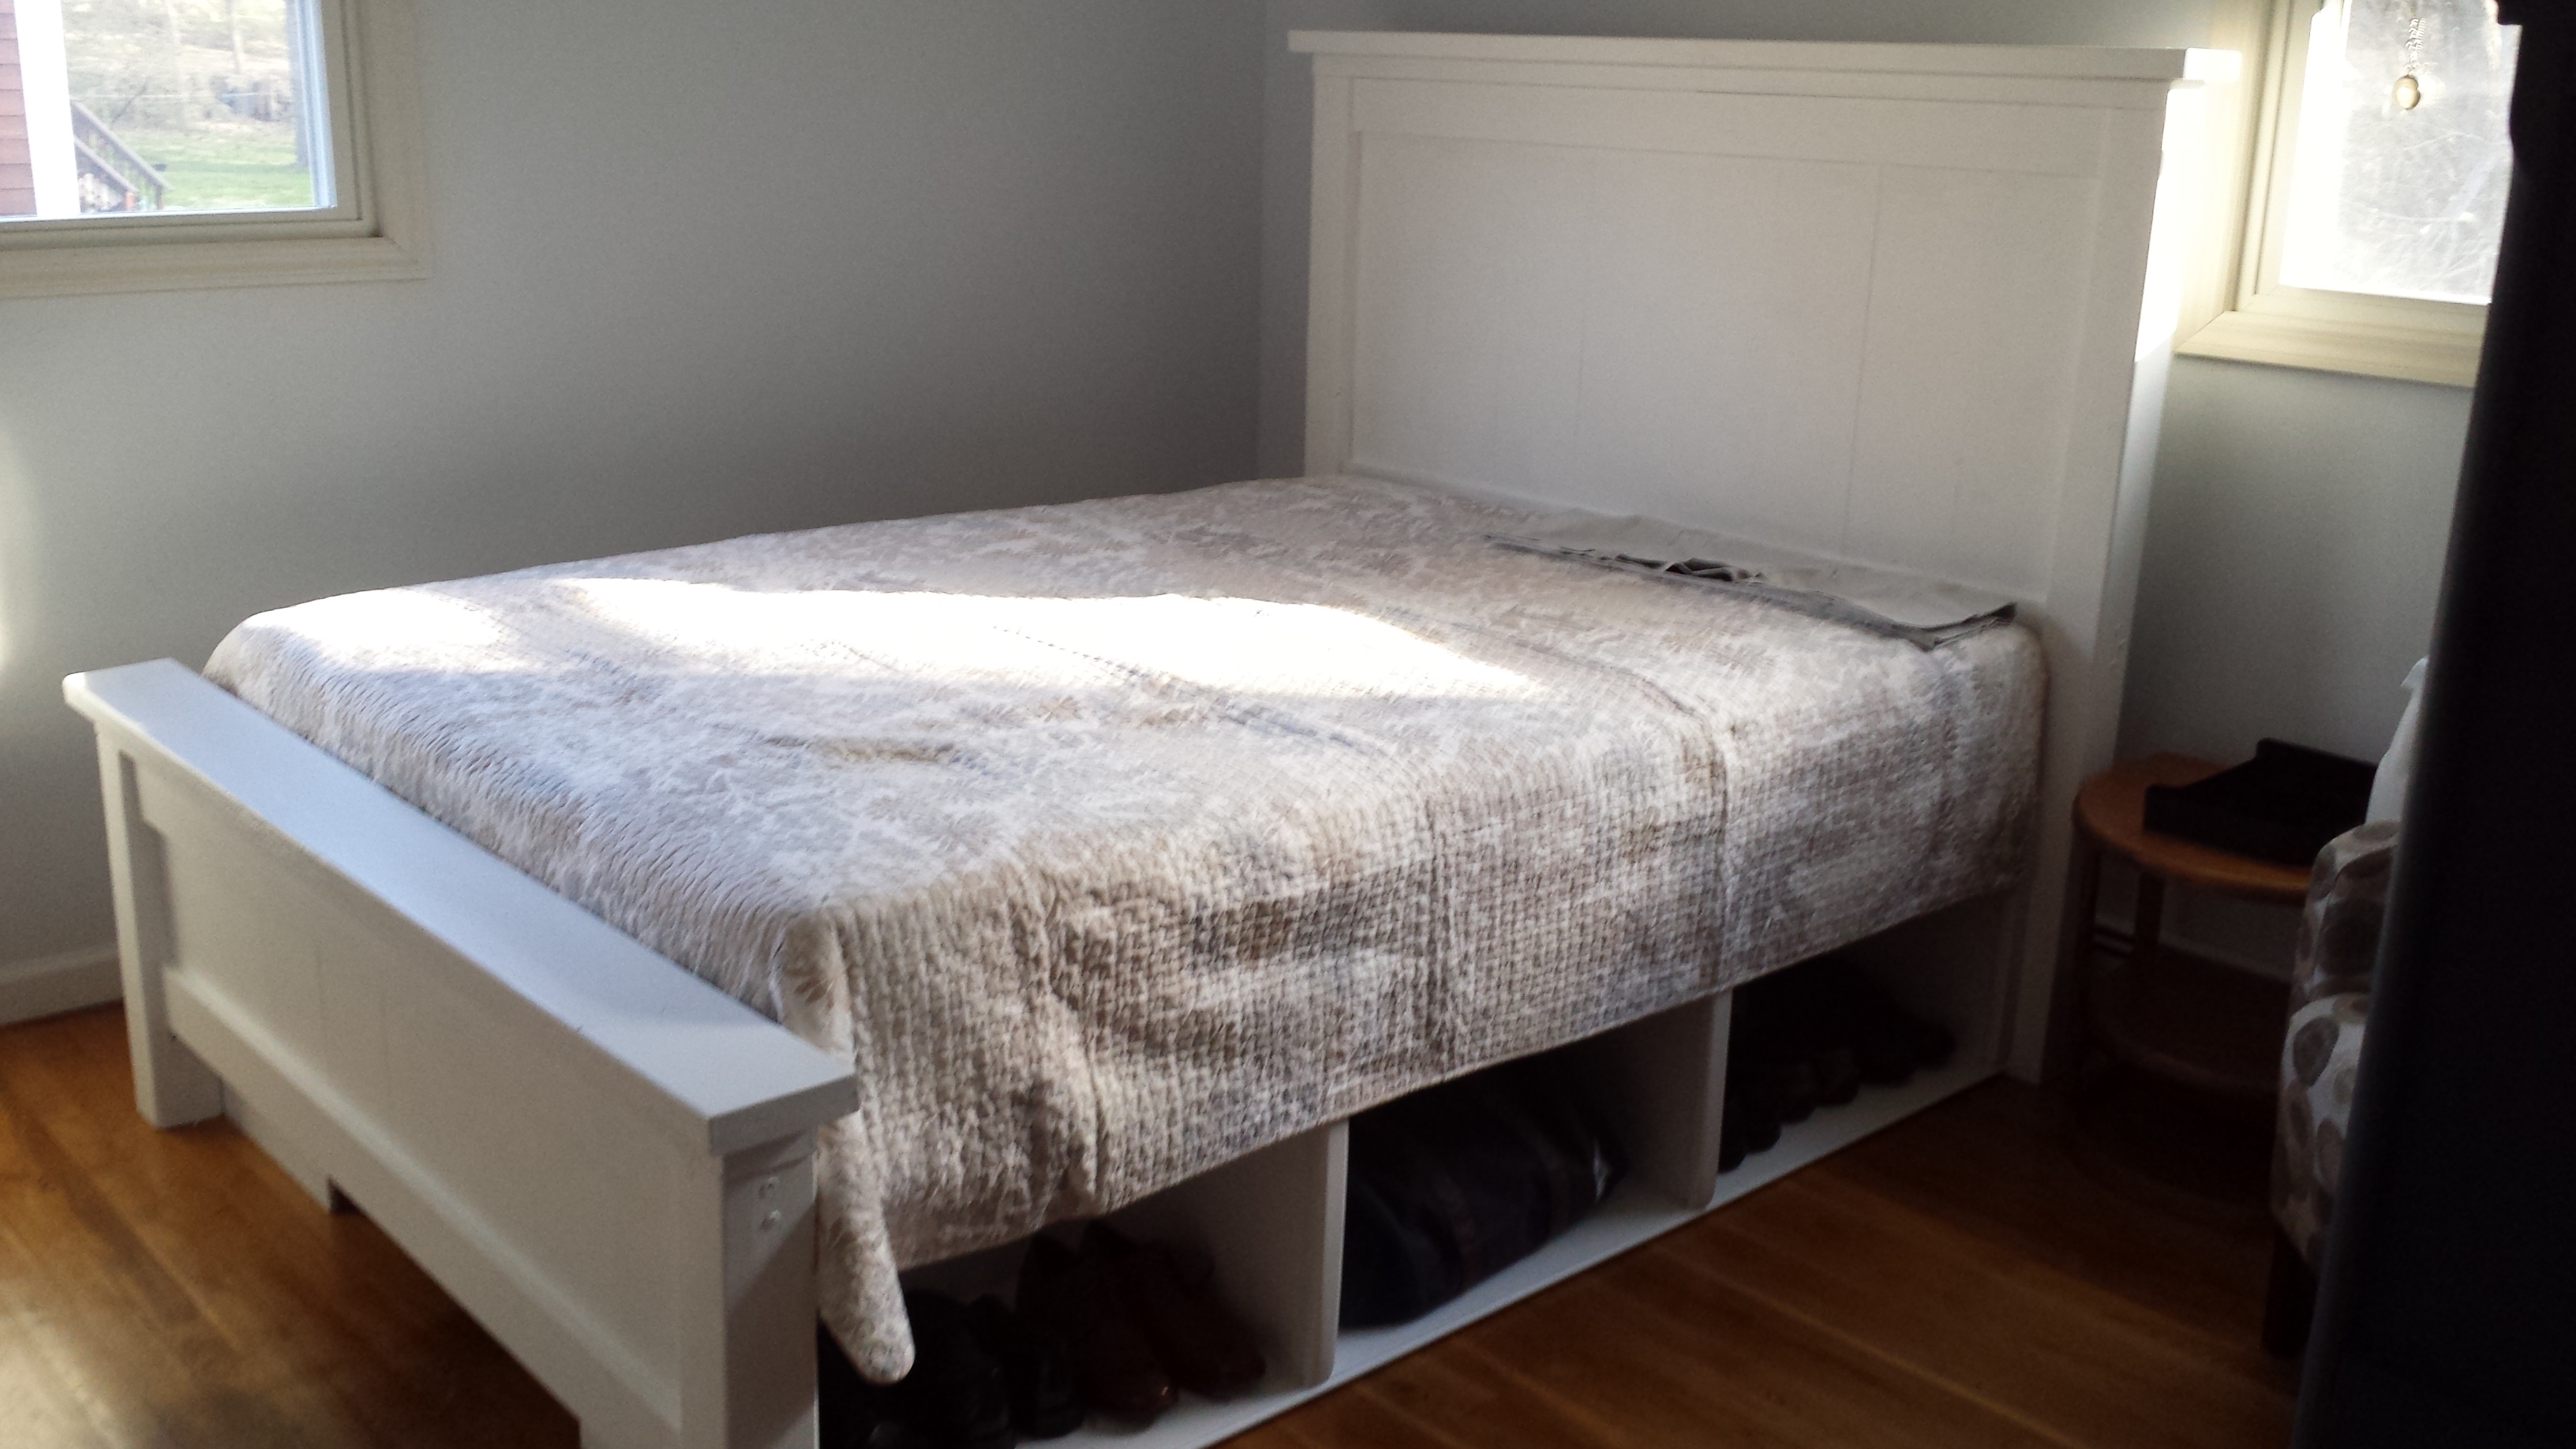
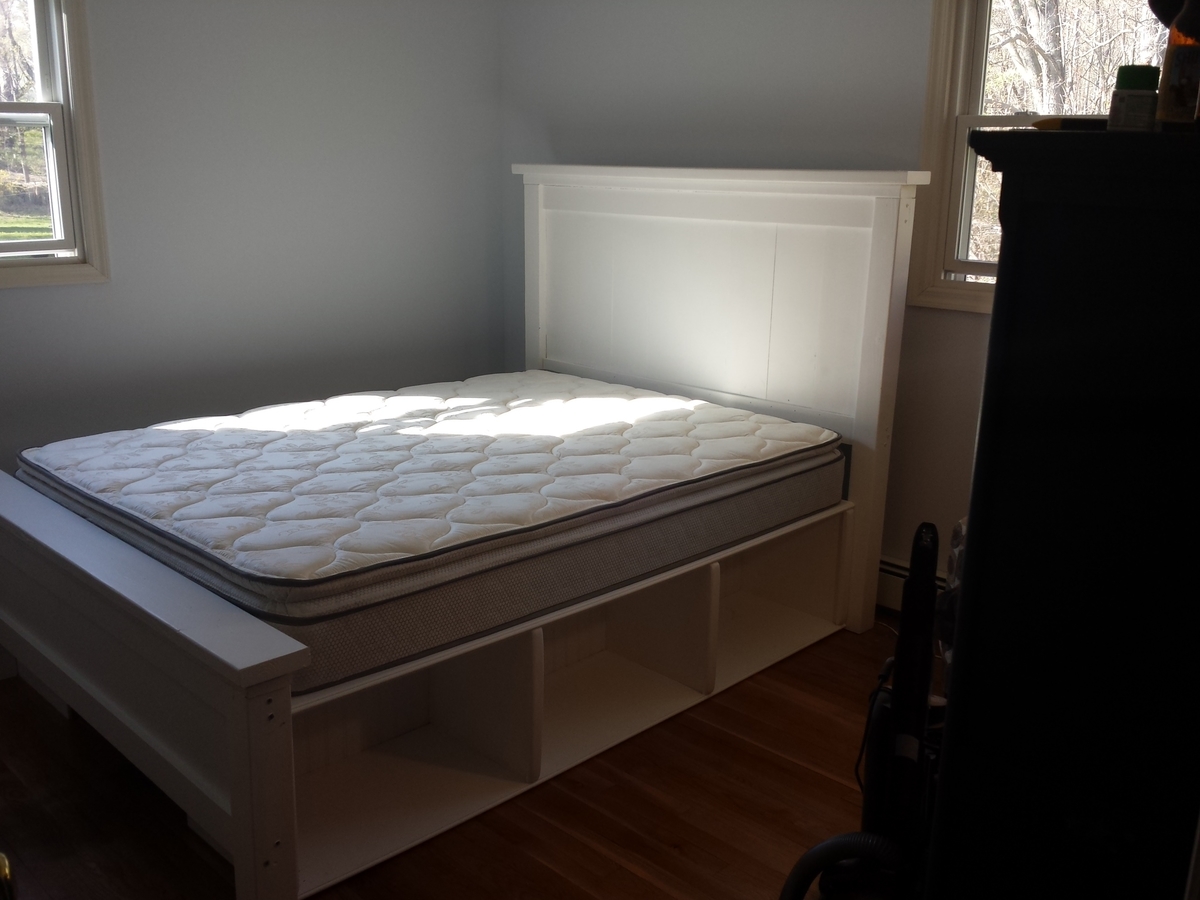
I began looking for creative ways to combine storage with a bed for our new guest room. My old office used to take up this room, we needed a Cat free guest room.
I have never really built anything. I figured why not start with something large to give me to confidence to try other projects. My rationale was; the bigger the project, the larger room for error without it being too noticeable. I assumed I would have some trial and error periods throughout this project. I was right.
I have a table saw I inherited from my grandfather. I quickly realized how many more tools were required to build a bed frame. I need a hobby so I bit the bullet. I purchased a brad nailer, circular saw and sander.
I decided to make this project during the spring time, I don't have a garage to work with so I was moving a lot of tools outside for cutting and sanding and then back into the basement for paint. It was a lengthy process and took me a good month with my free time (an hour or two every couple days) to get this project complete.
I followed the original Farmhouse Queen Plans and also a post from another helpful member BirdsandSoap which was labeled Farmhouse storage bed with hinged footboard.
The boxes that rest on the floor were actually my biggest challenge. It was not easy cutting the plywood to size by yourself without the proper instruction. I figured it out and made it work. The main issue I found was when I put on the side panels and middle inserts, the wood was not completely level... again perhaps I should have been a little more patient and careful with my construction but I had no assistance so keeping everything exactly where I needed it to stay was difficult. You cannot tell in the photo but the box bows up a little on either end... maybe a quarter inch at most.
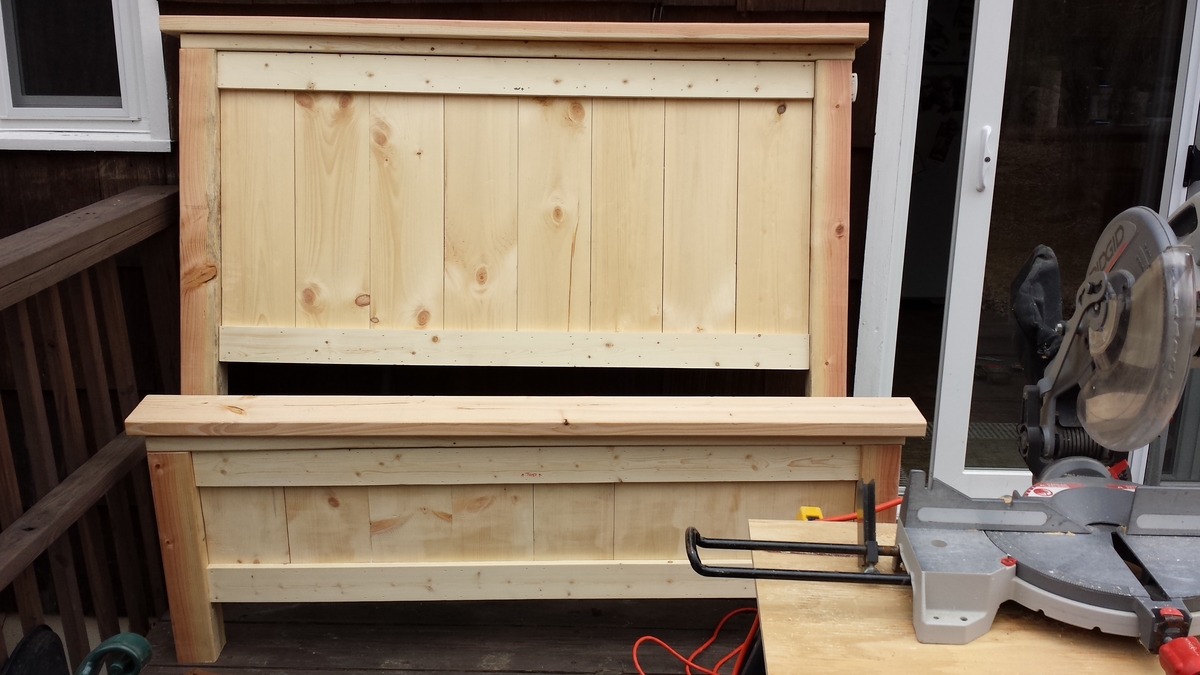
The headboard and footboard where a breeze. After my box issues, I made sure to pick out some of the best Pine wood I could find. I bracketed the headboard and footboard to the boxes with no issues.
The most time consuming part was the sanding and painting. My wife wanted it white, I would have probably preferred to have it stained. Either way, for my first project, I believe it came out well (enough).
I think for my second project I will pick something smaller in order to give my self a second shot at leveling and being a little more precise with my cuts.

Wed, 05/07/2014 - 22:14
Looks great, nice job! I'm sure you are the only one who will ever notice the bowing!
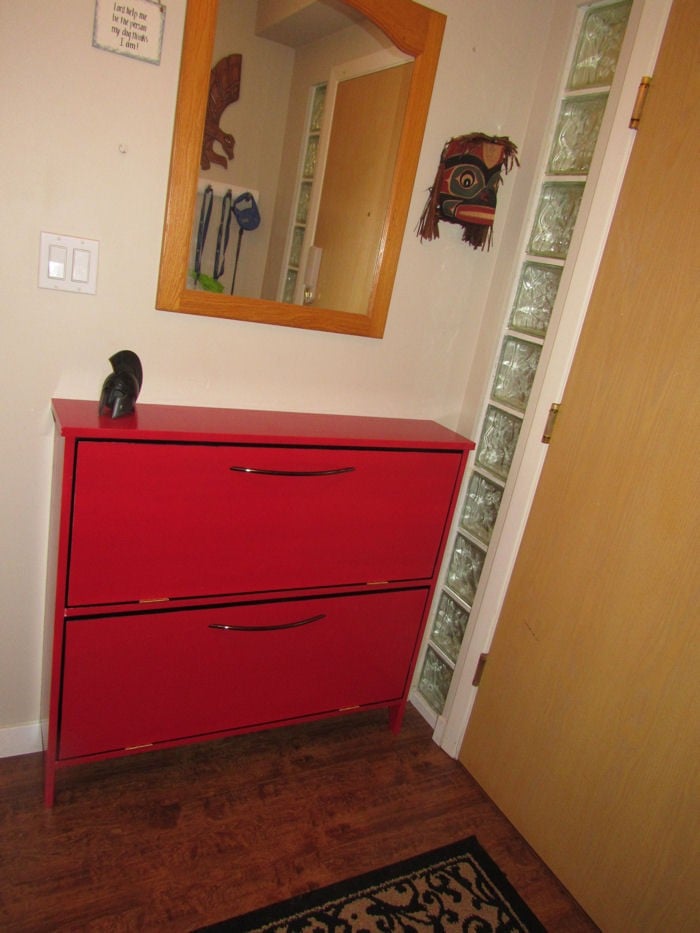
Loved a shoe cabinet at Mobler Furniture, but hated the 300 dollar price.
Figured Ana would have a plan: She Did. We used the Shoe Dresser plans but I built the gables in one piece to eliminate the need for separate feet. The overall length is only 38 inches. I built it counter height.
Because we used wood that we had laying around from previous projects, the drawers, and the unit are made of pine, while the top is made of oak. Total cost for the wood was 30 canadian dollars.
Rather than buy catches, I ran an extra support rail under the top, which made attaching the top easy, but also served as a "bump" for the closing door - it adds a satisfying clunk when closing the doors. I did the same for the second door too.
The handles were purchased for a project in our previous house and used here instead.
We used paintbrushable Tremclad matte black for the interior (23 bucks - used less than half the tin.)
We used 1.5 cans of spray Tremclad red enamel for the exterior (8 bucks a tin)
We hit it all with two coats of Zinsser sealer first - 14 bucks, used half.
Total hit was well under a hundred bucks.
Took me a couple days to work out the details, a day to construct, and about three days to paint, one for the undercoat, one for the black, one for the red.


Ana thank you for these plans! My second ever woodworking project and love adirondack chairs.
Perfect for my small Brooklyn backyard :)

Mon, 05/25/2020 - 11:47
It's beautiful! I love the wood tone in your setting! Thanks so much for trusting us to build our plans!
Wed, 05/27/2020 - 05:34
You made it so clear and easy! Especially the video/
Will build another one to make it a pair soon :)

Modified the top of Ana’s plan for a Hall Tree and very happy with how it turned out.
Steve Nadler, High Springs Florida

When I bought our house the previous owner had asked me if I wanted him to leave all of the scrap wood he had beside the house I said "Sure"
Looking at the pile I was amazed at how much was actually there.
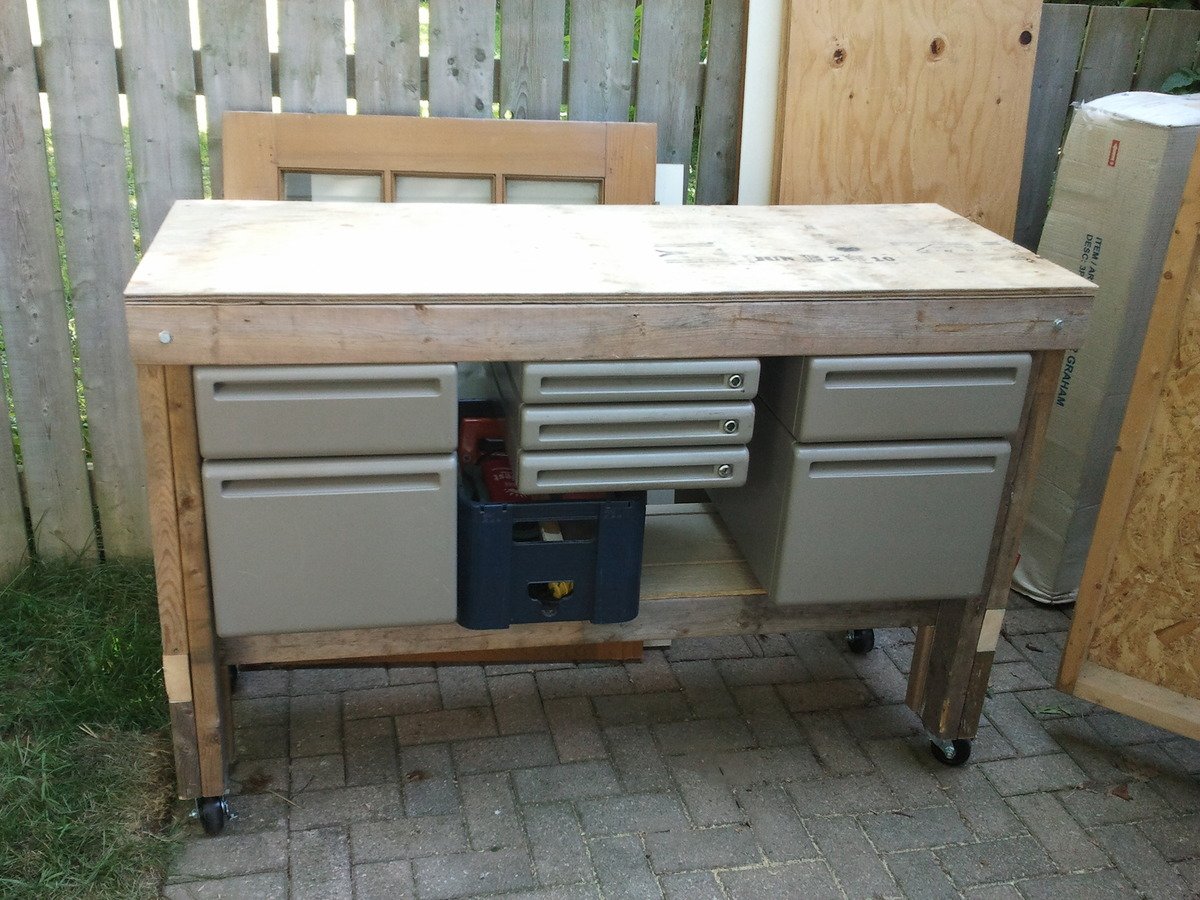
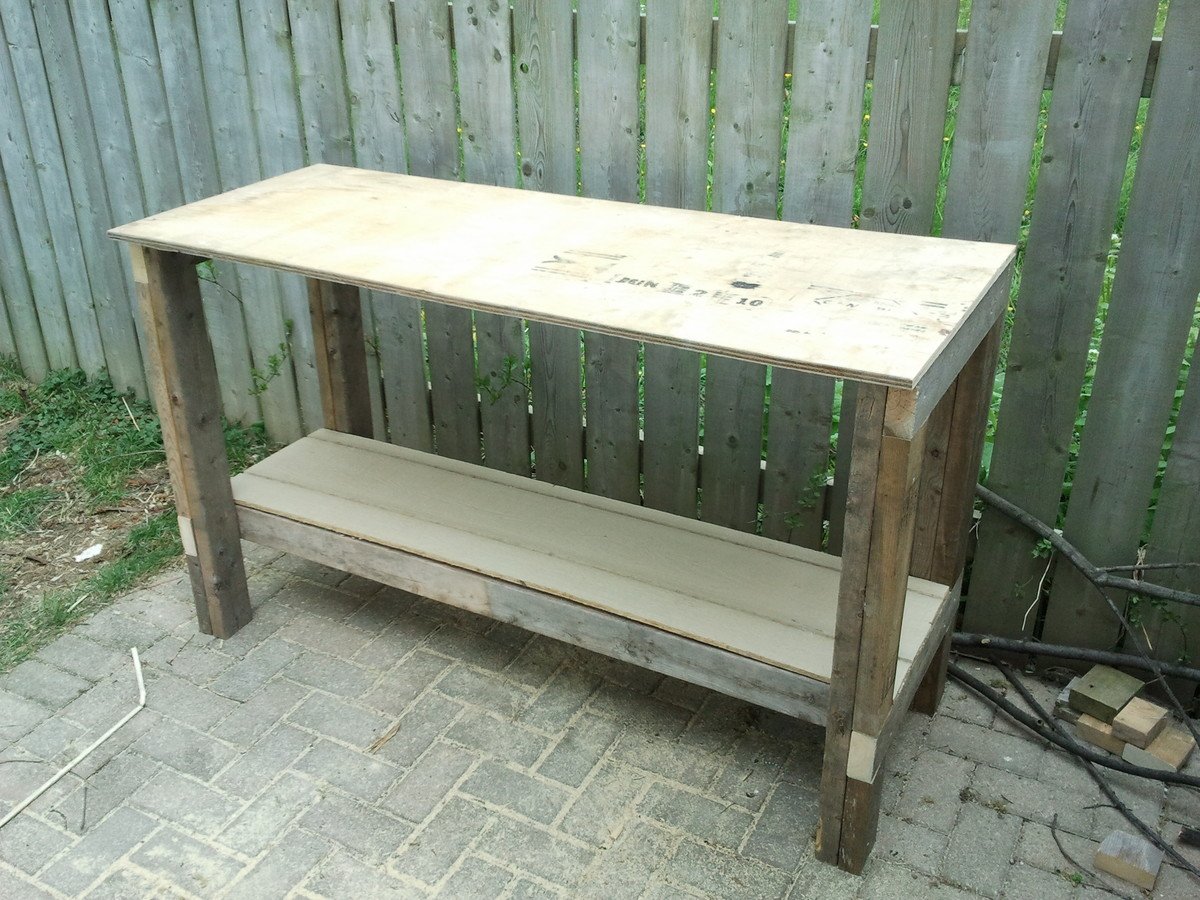
This workbench is from the Mastercraft Essential Workshop book. I built one of these when I was younger with two sheets of plywood for a top and a back on the shelf so nothing falls out. My lack of sheet good scraps forced me to modify the design. Fits nicely into my mini shed workshop.
Note that the picture doesn't show the front 2x4 under the plywood top.
UPDATE:
My office cleaned out some old junk and gave me these modular drawers. I new they would make an excellent storage system for my workbench. Overkill...yes...but they were free so I couldn't resist.
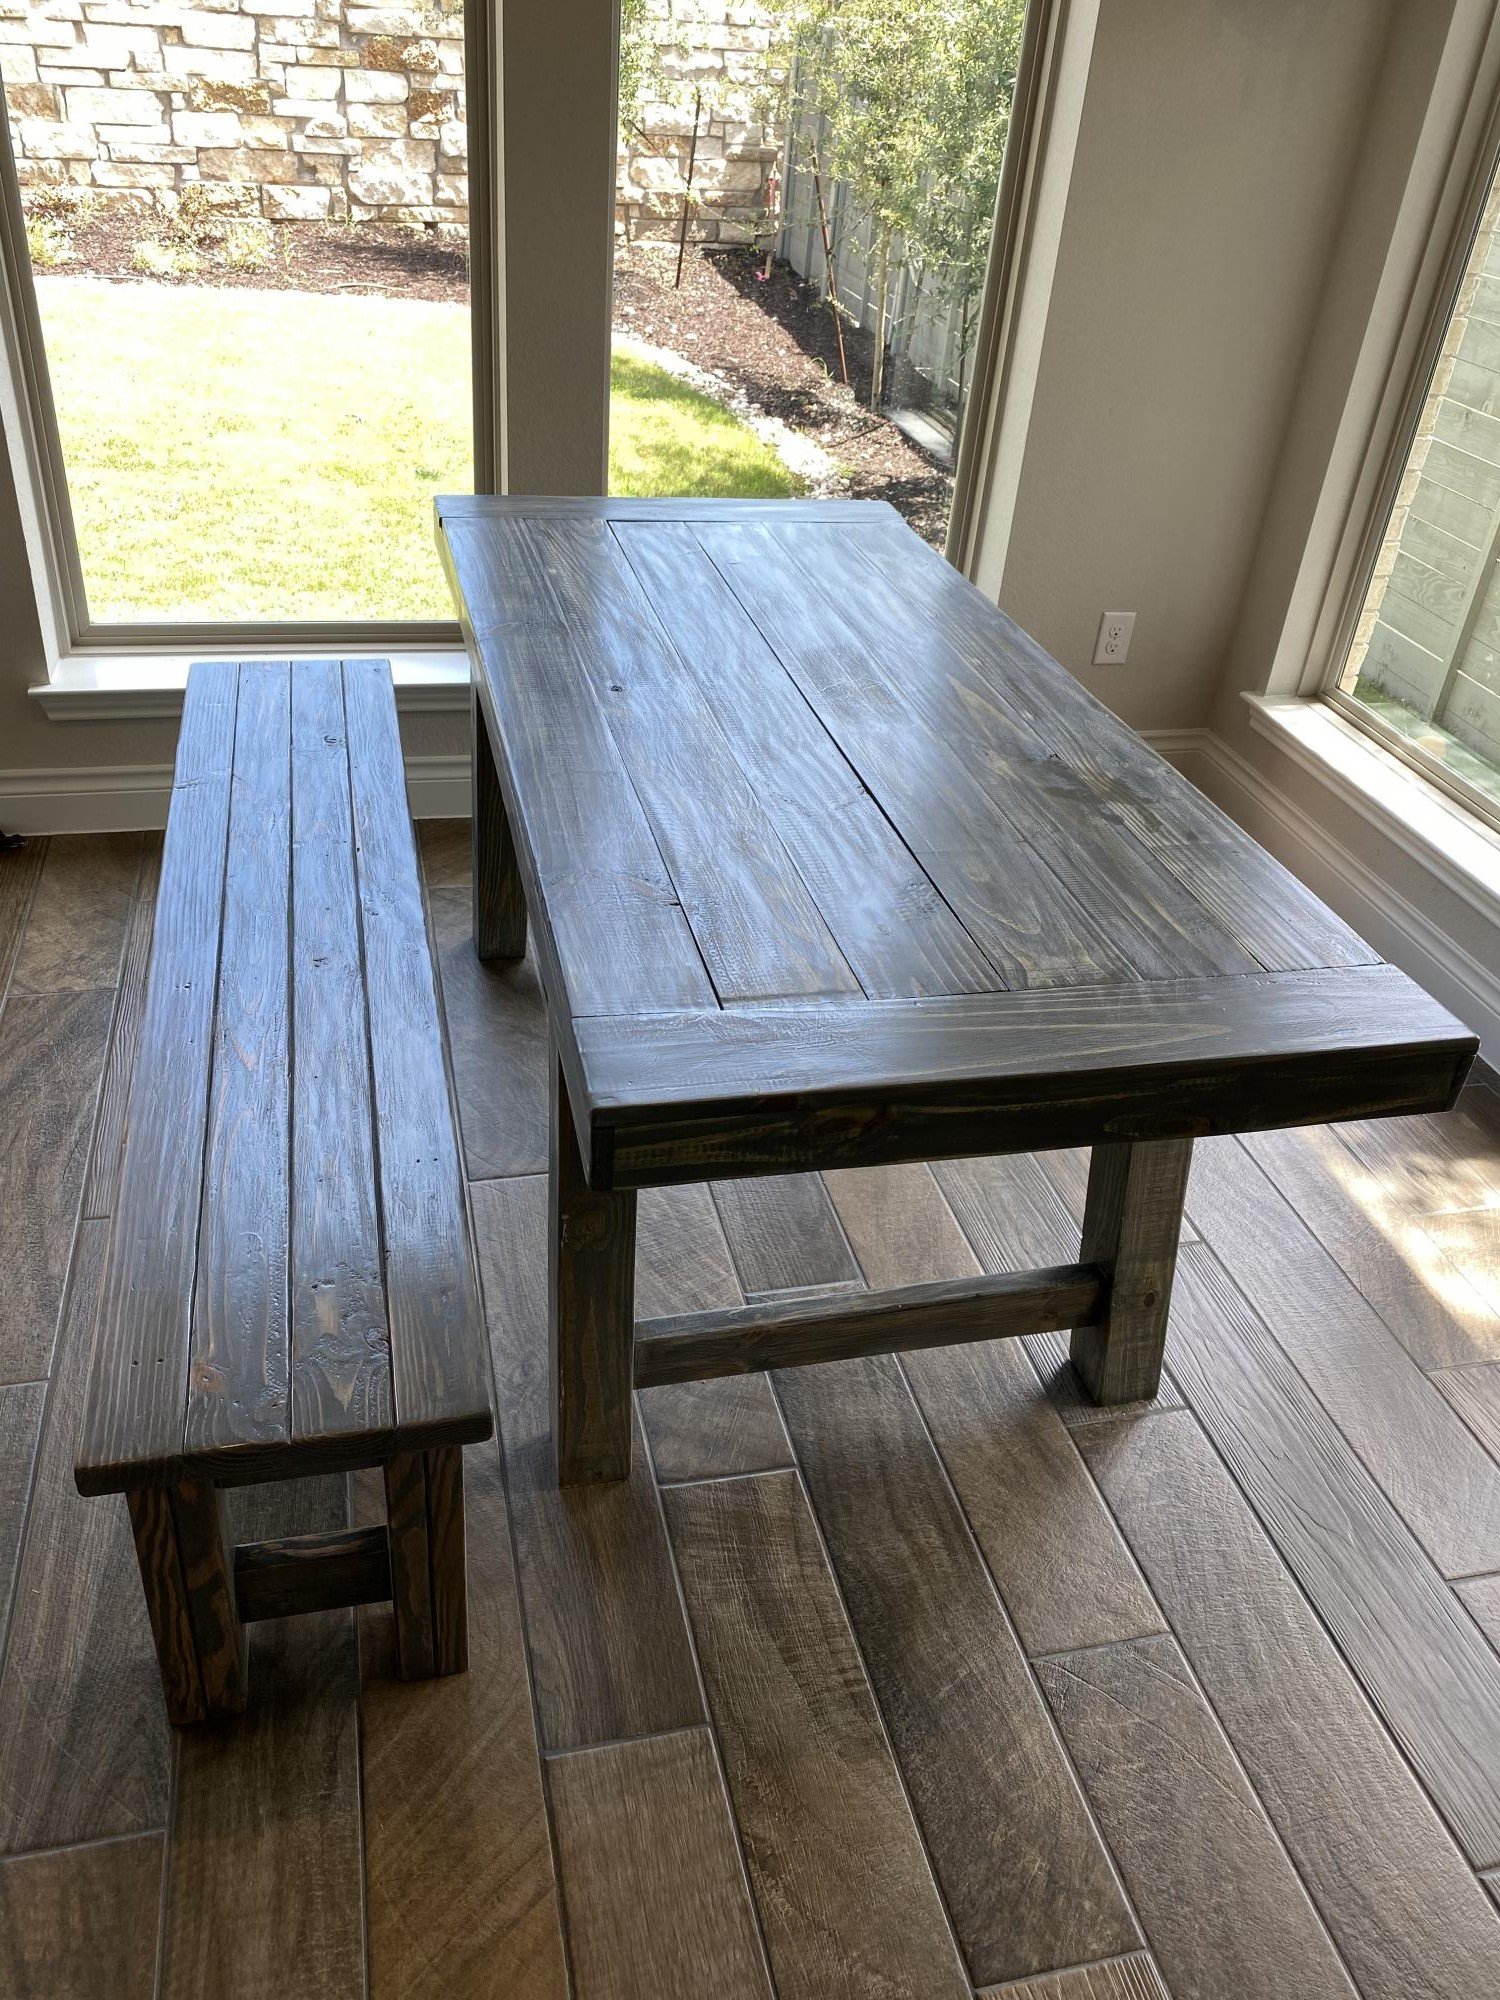
Modified to remove the end braces so that chairs can be pushed in on the ends of the table. Full report on my blog!
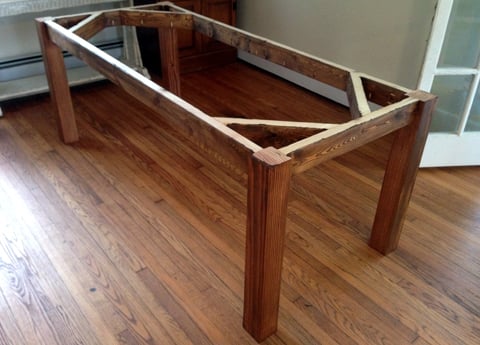
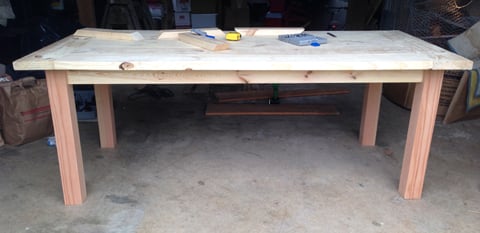
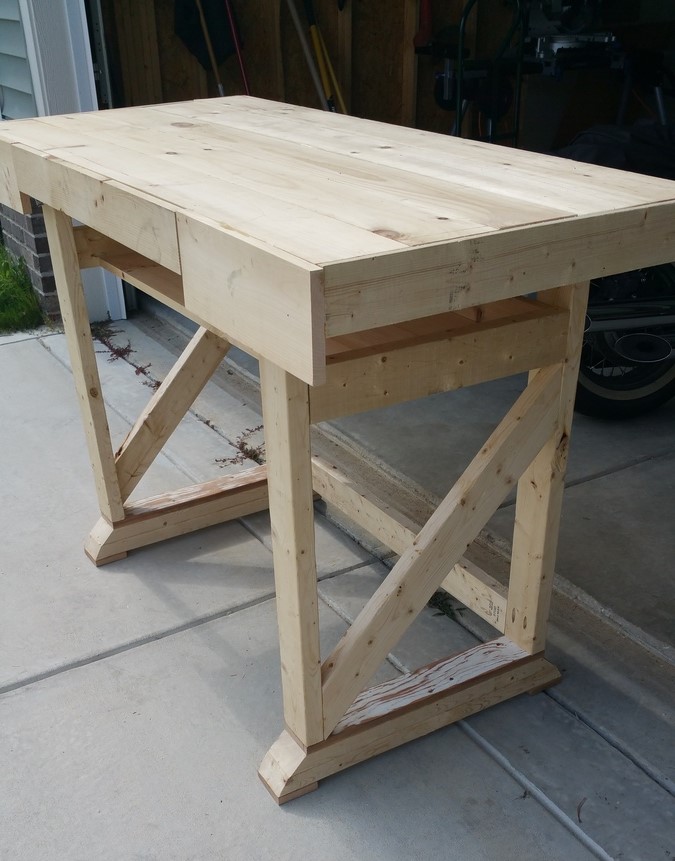
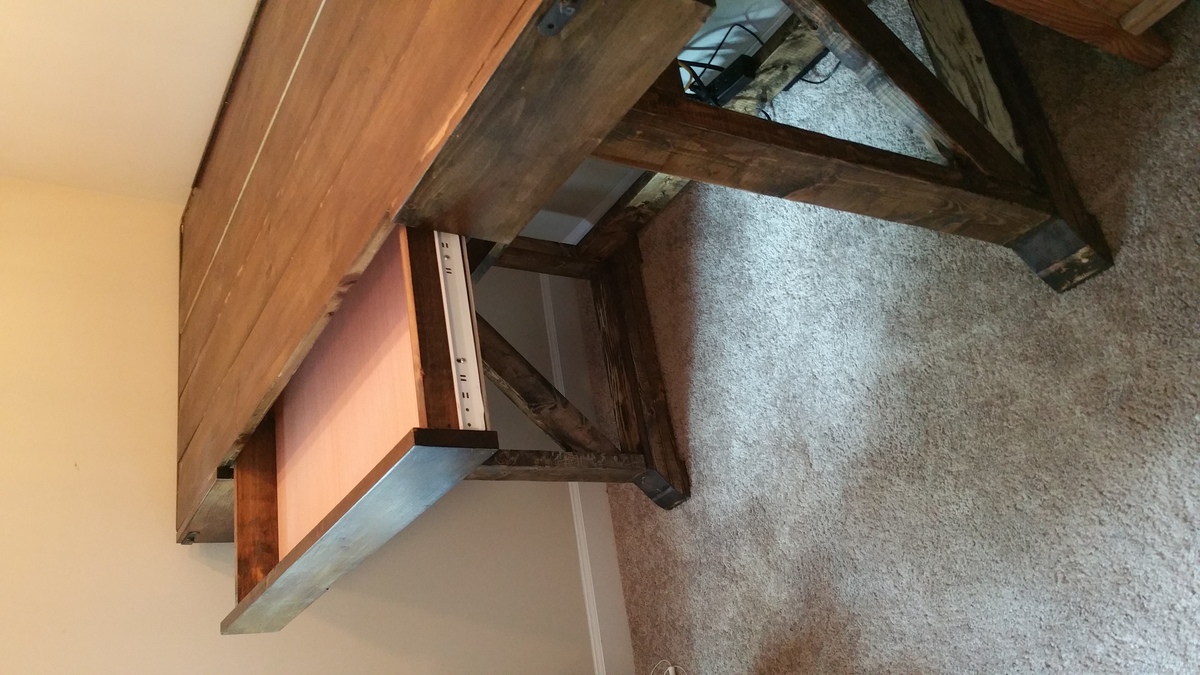
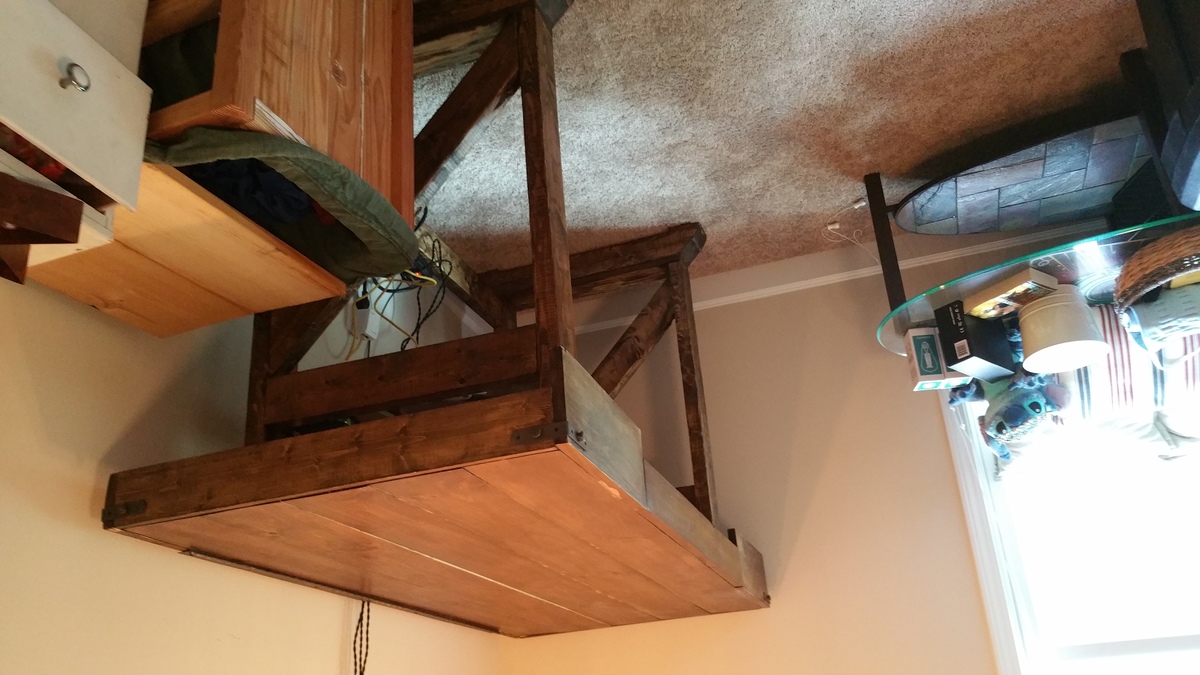
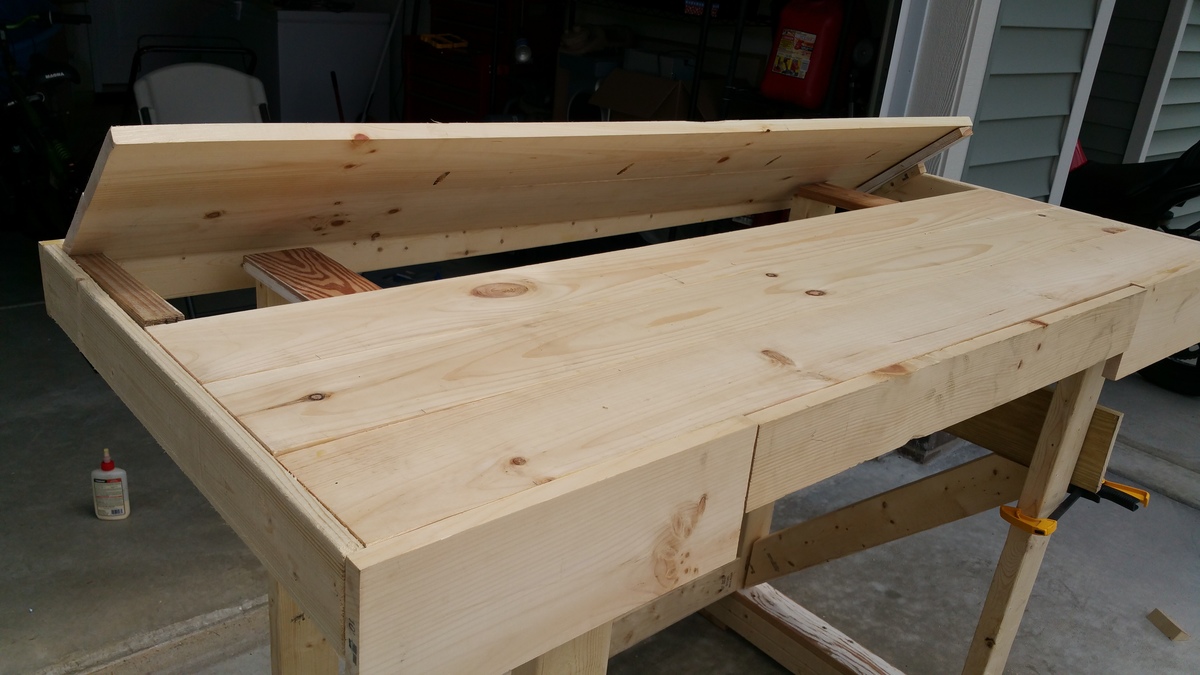
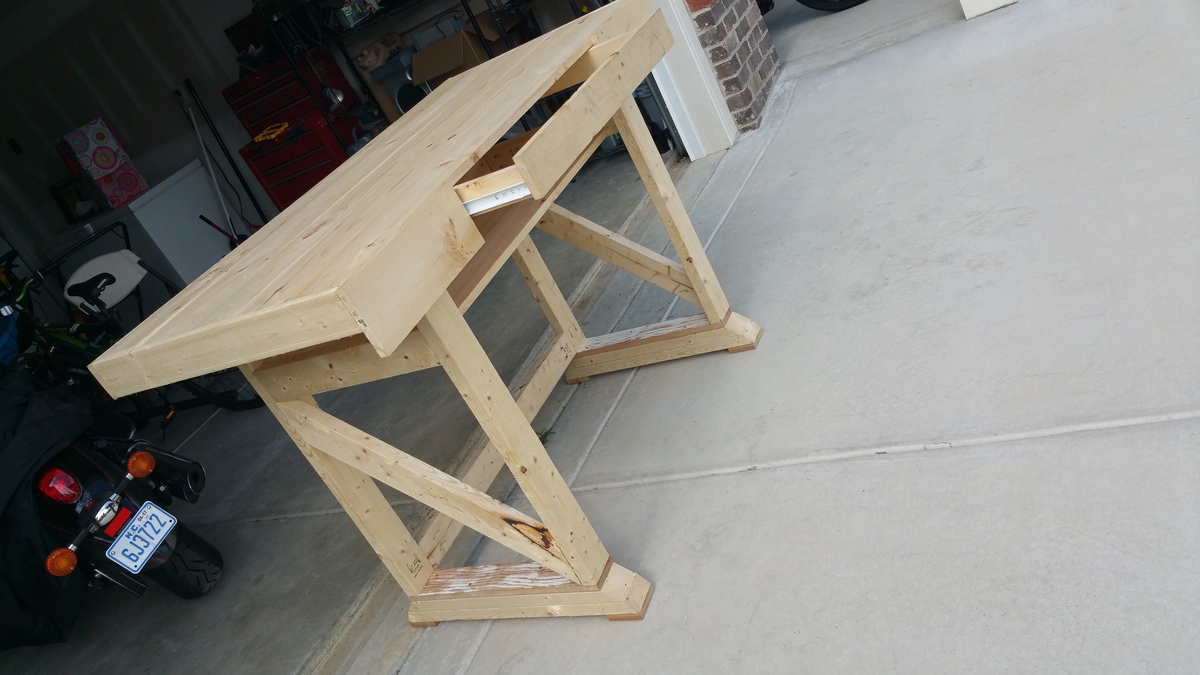
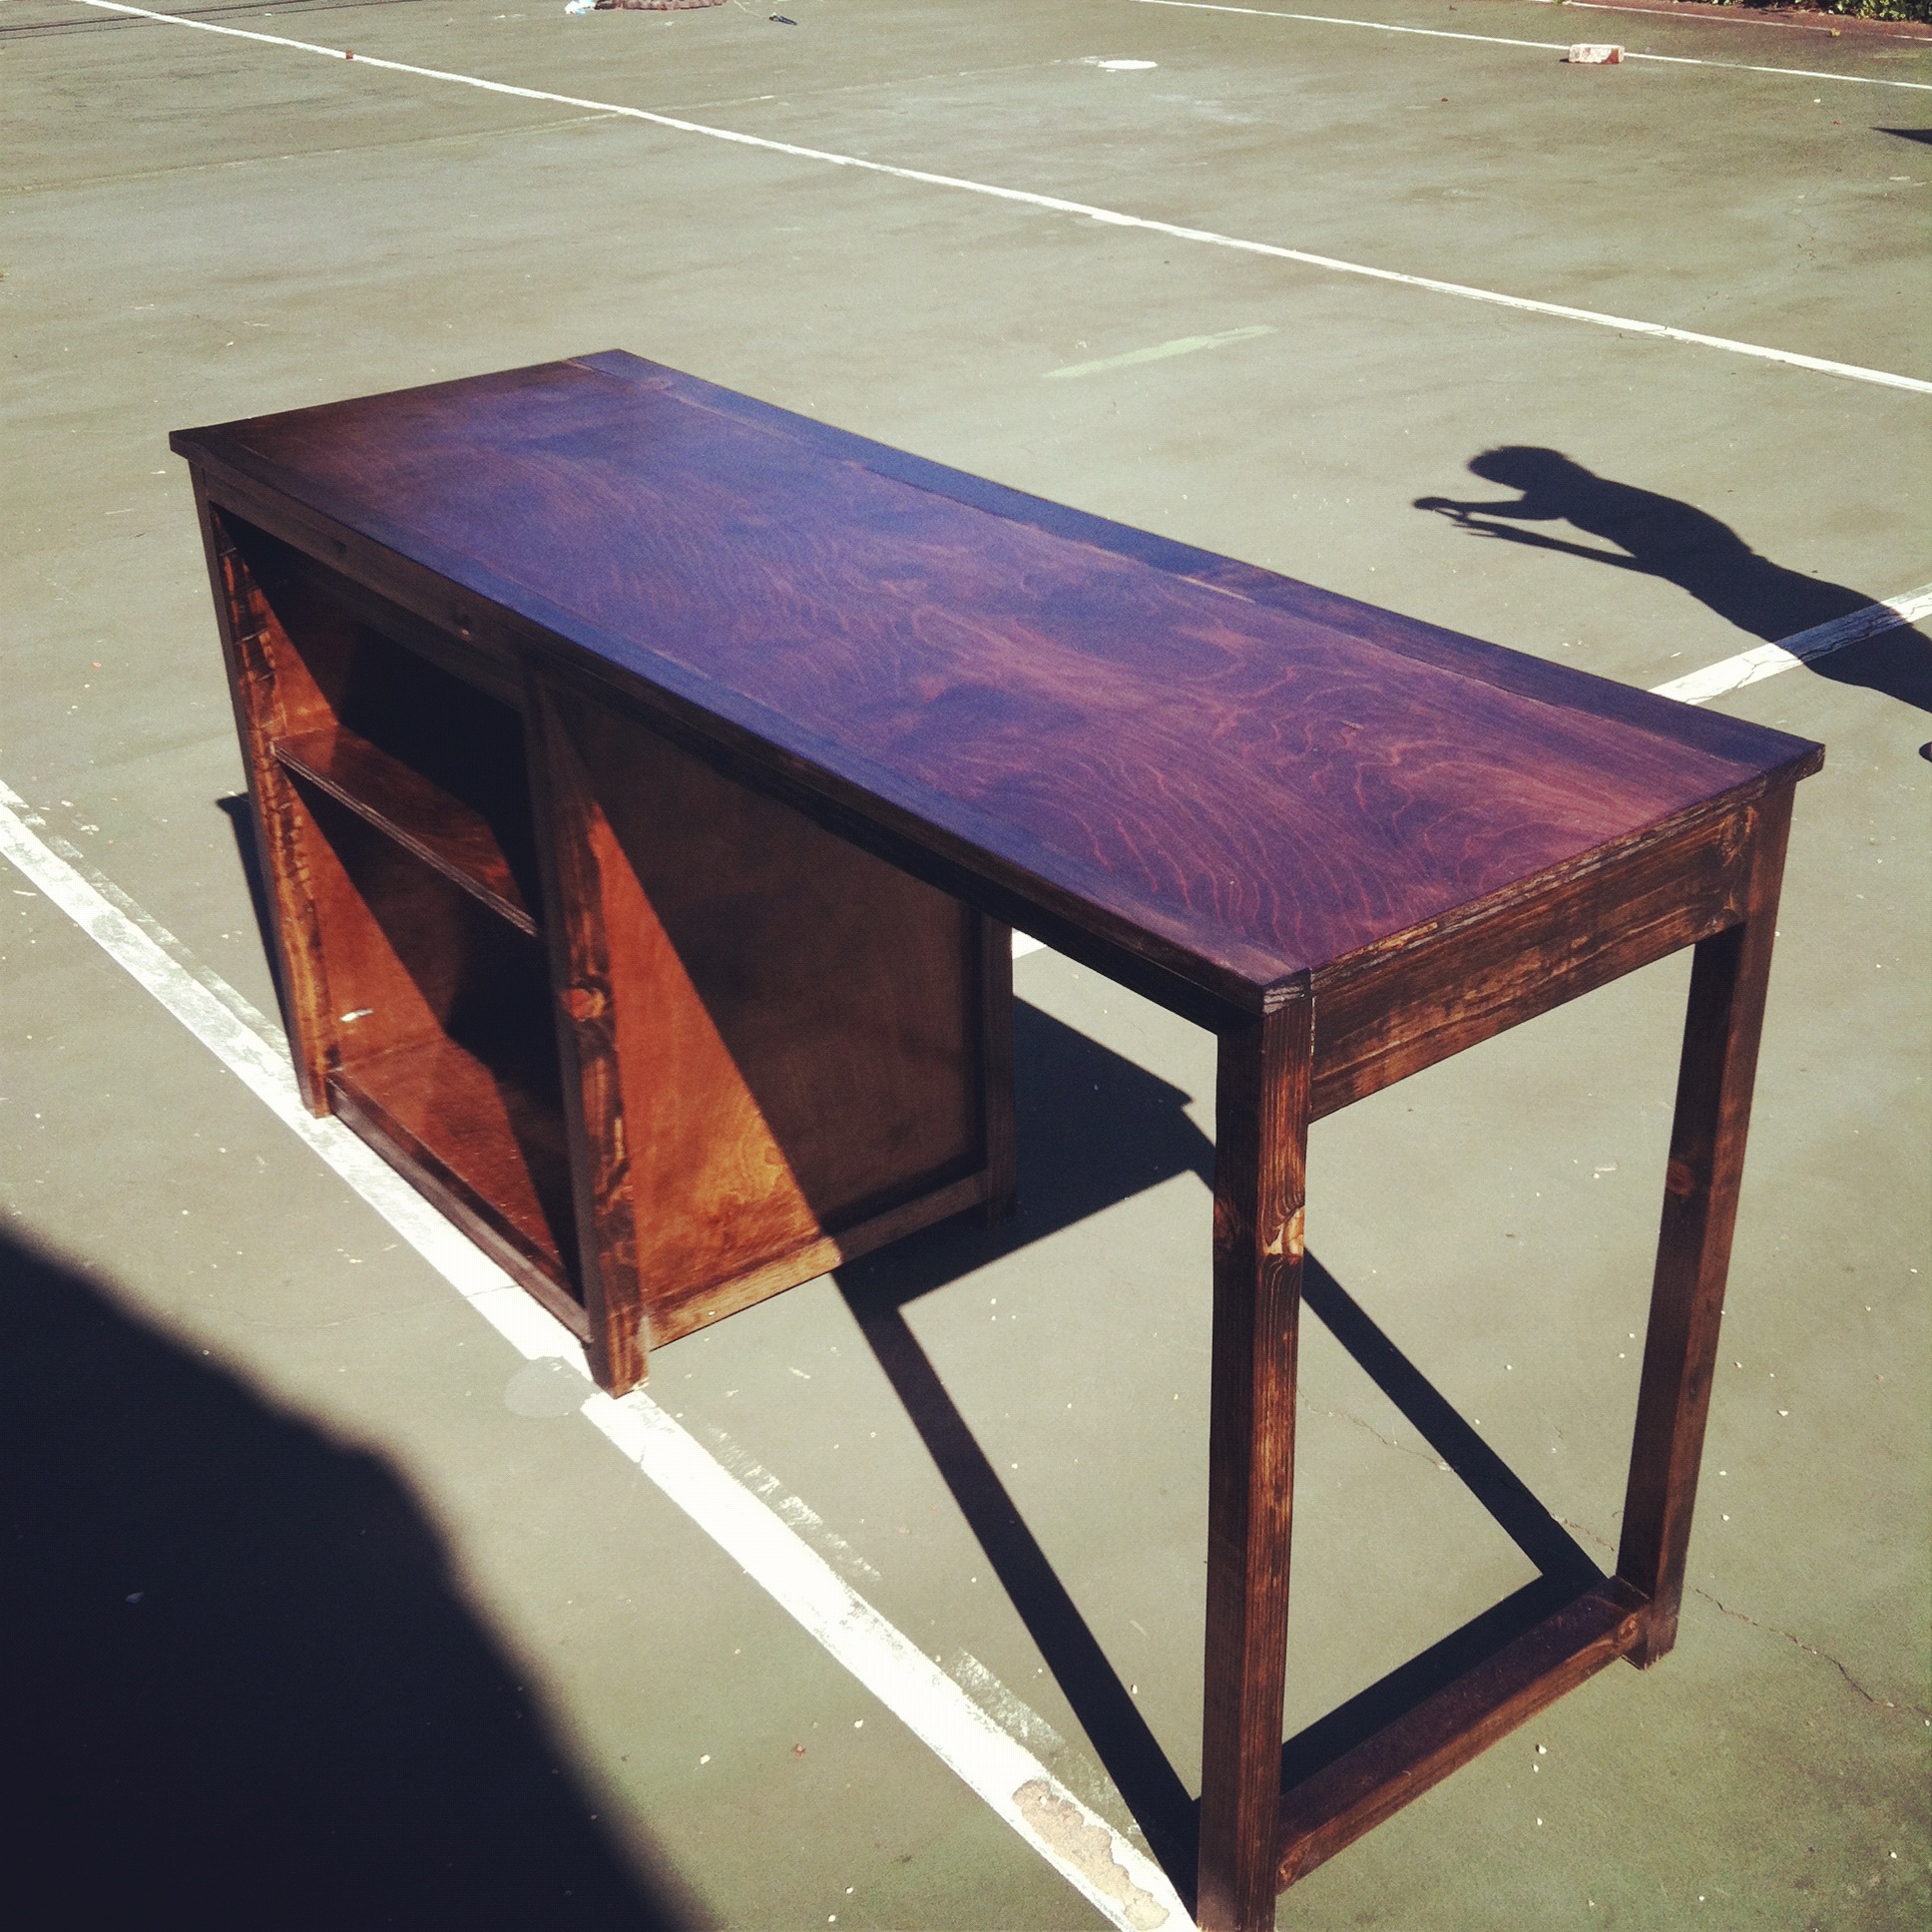
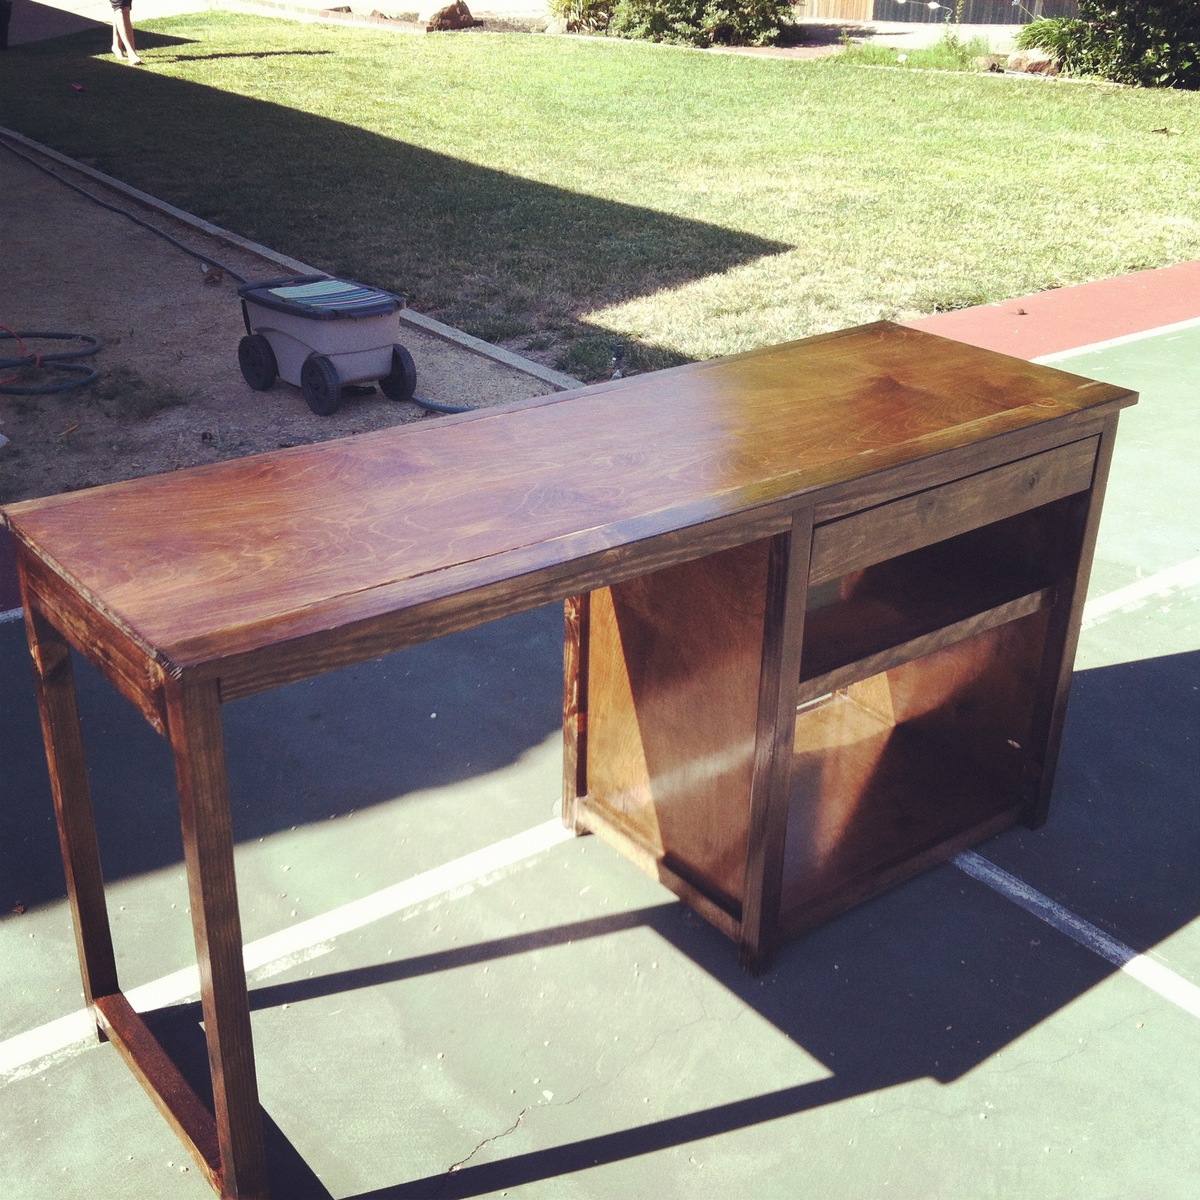
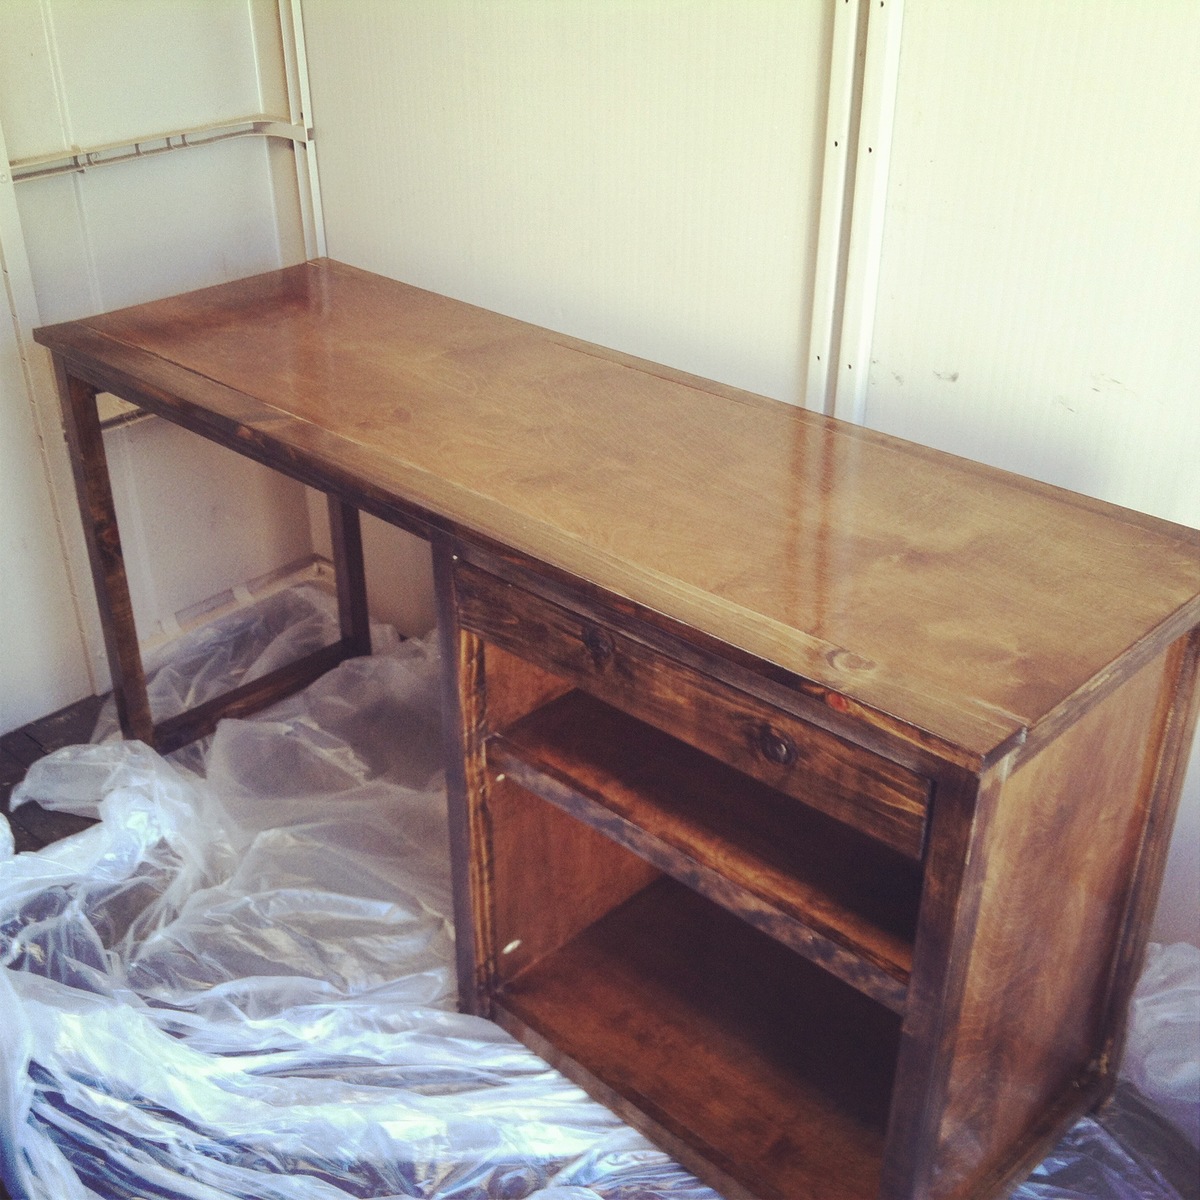
I modified the work bench console to make a standing desk. I have a lot of textbooks so I made the desk 63 inches by 29 inches, using 1×6s instead of 2×4s. I also added a drawer to the front, and eventually I'll finish a back lift up compartment for storage of firearms. Since the desk is bigger I added a cross board in the legs for extra stability. I also made the shelf a lot higher to store textbooks I wasn't using in the moment. The way it's built I could use it as a console or bar table in the future. The stain is miniwax dark walnut with a polyethlyene sealant. Hope you like it!
The website keeps rotating the pictures, sorry.

First time building a bed. The plans were spot on and easy to follow. Used my left over flooring to make the headboard planks.
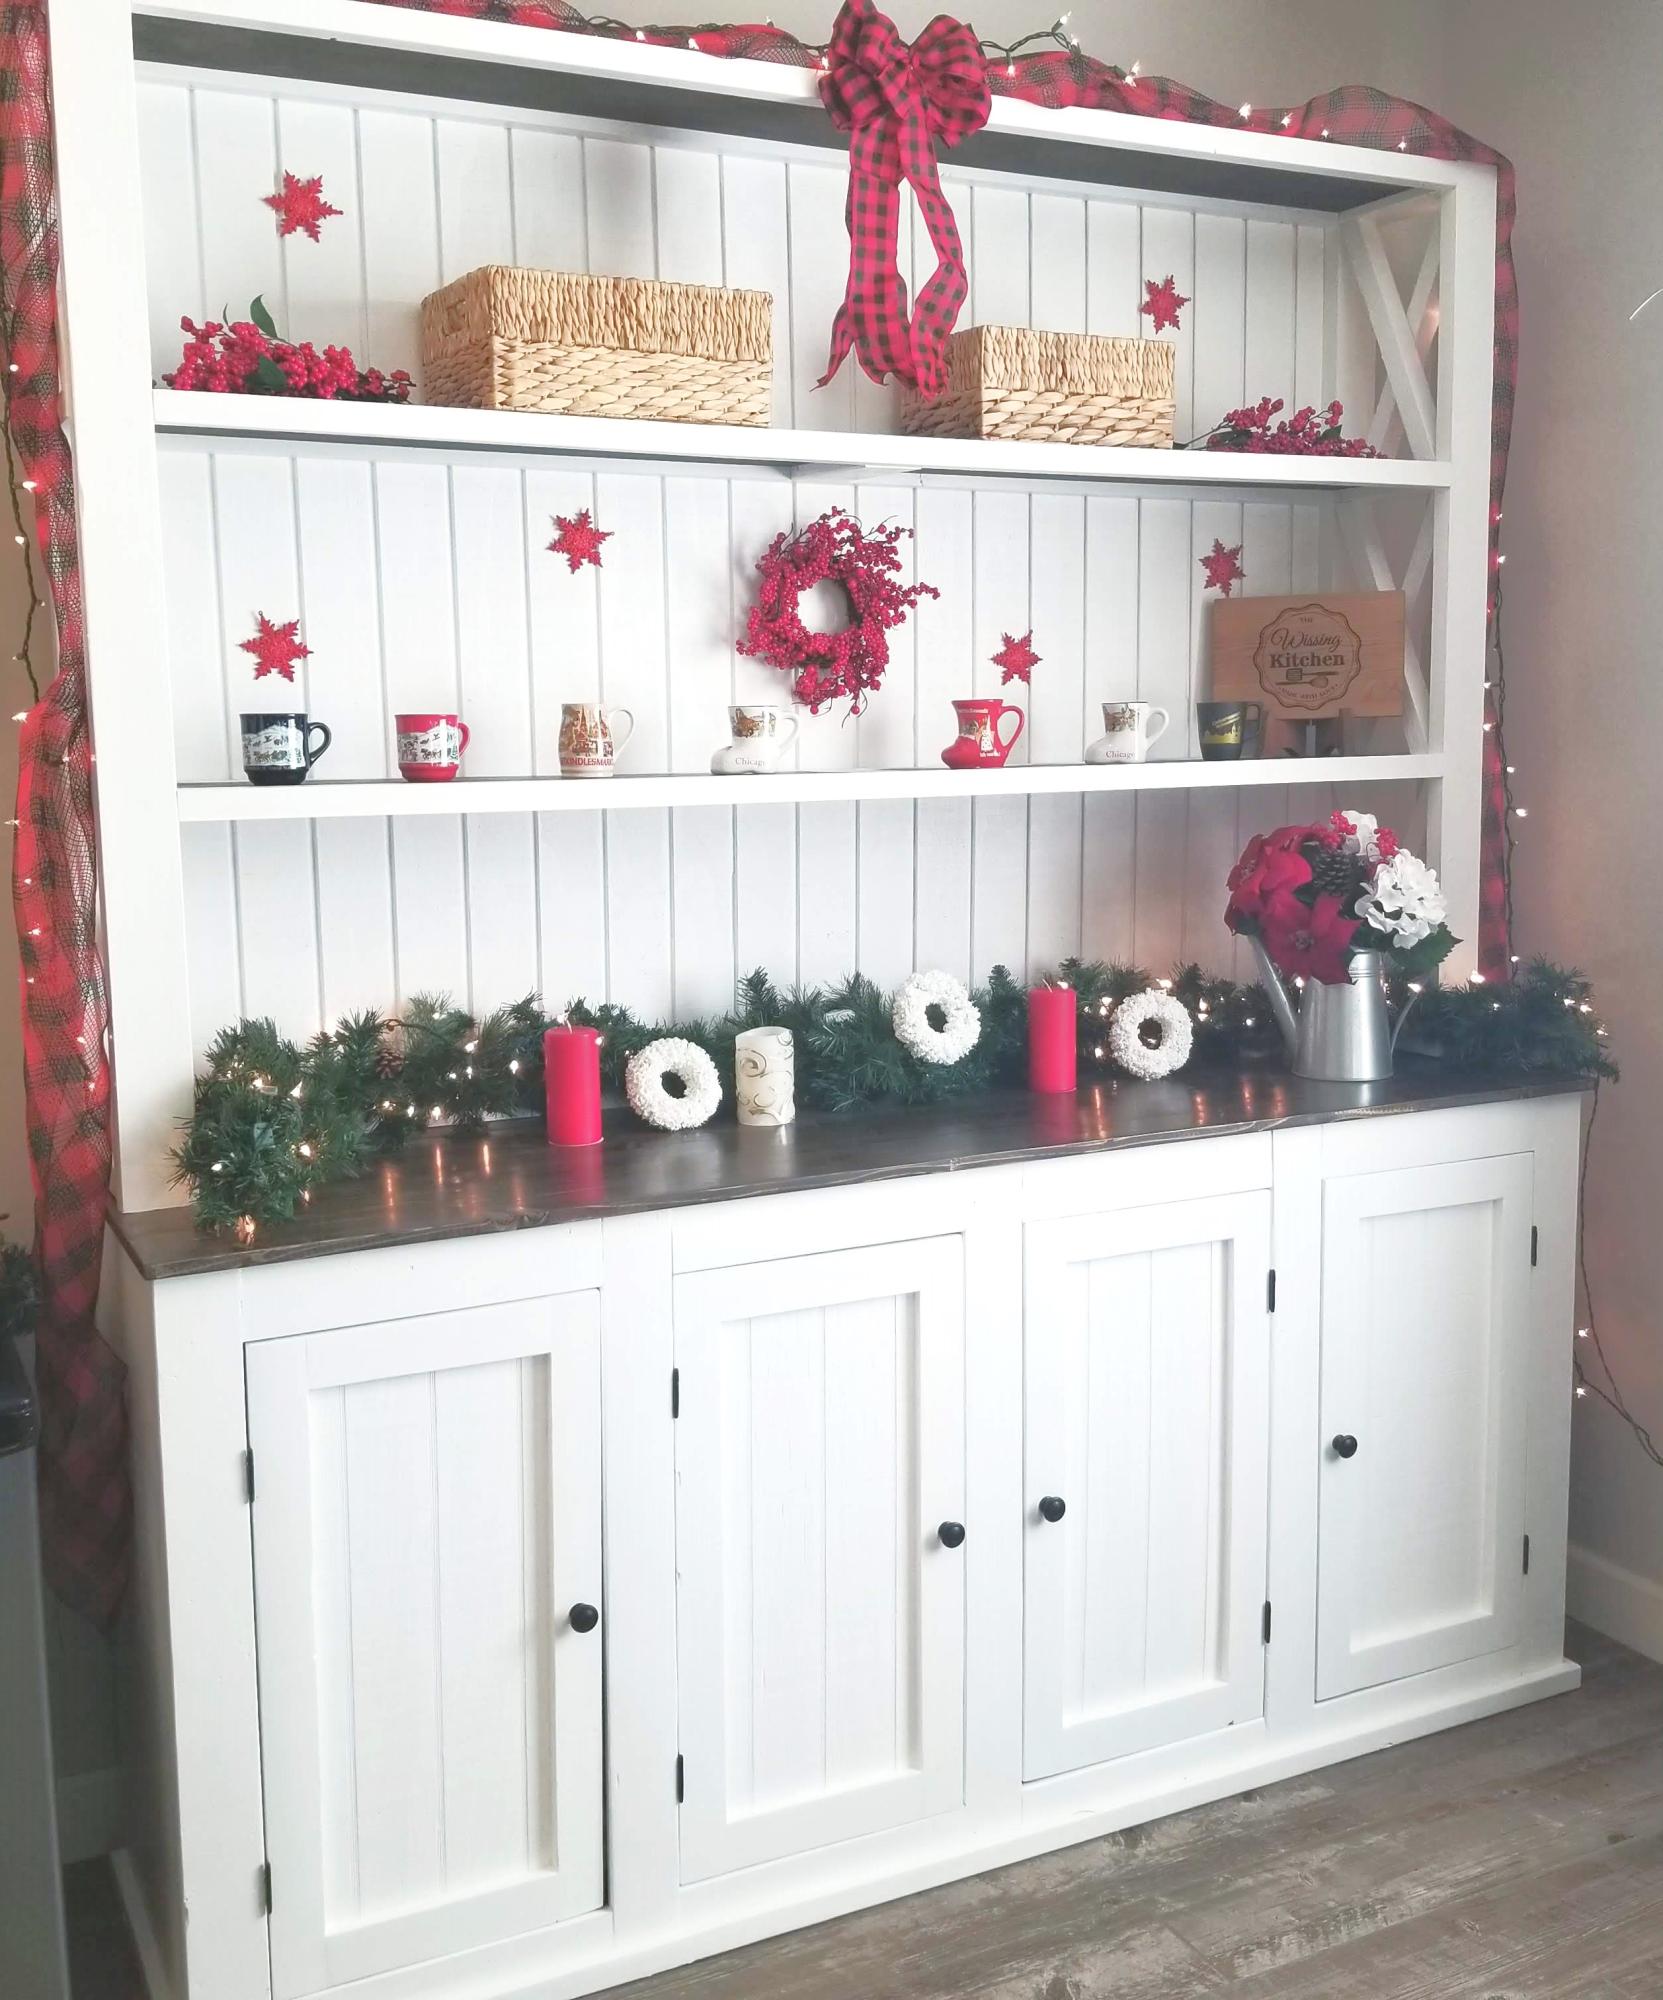
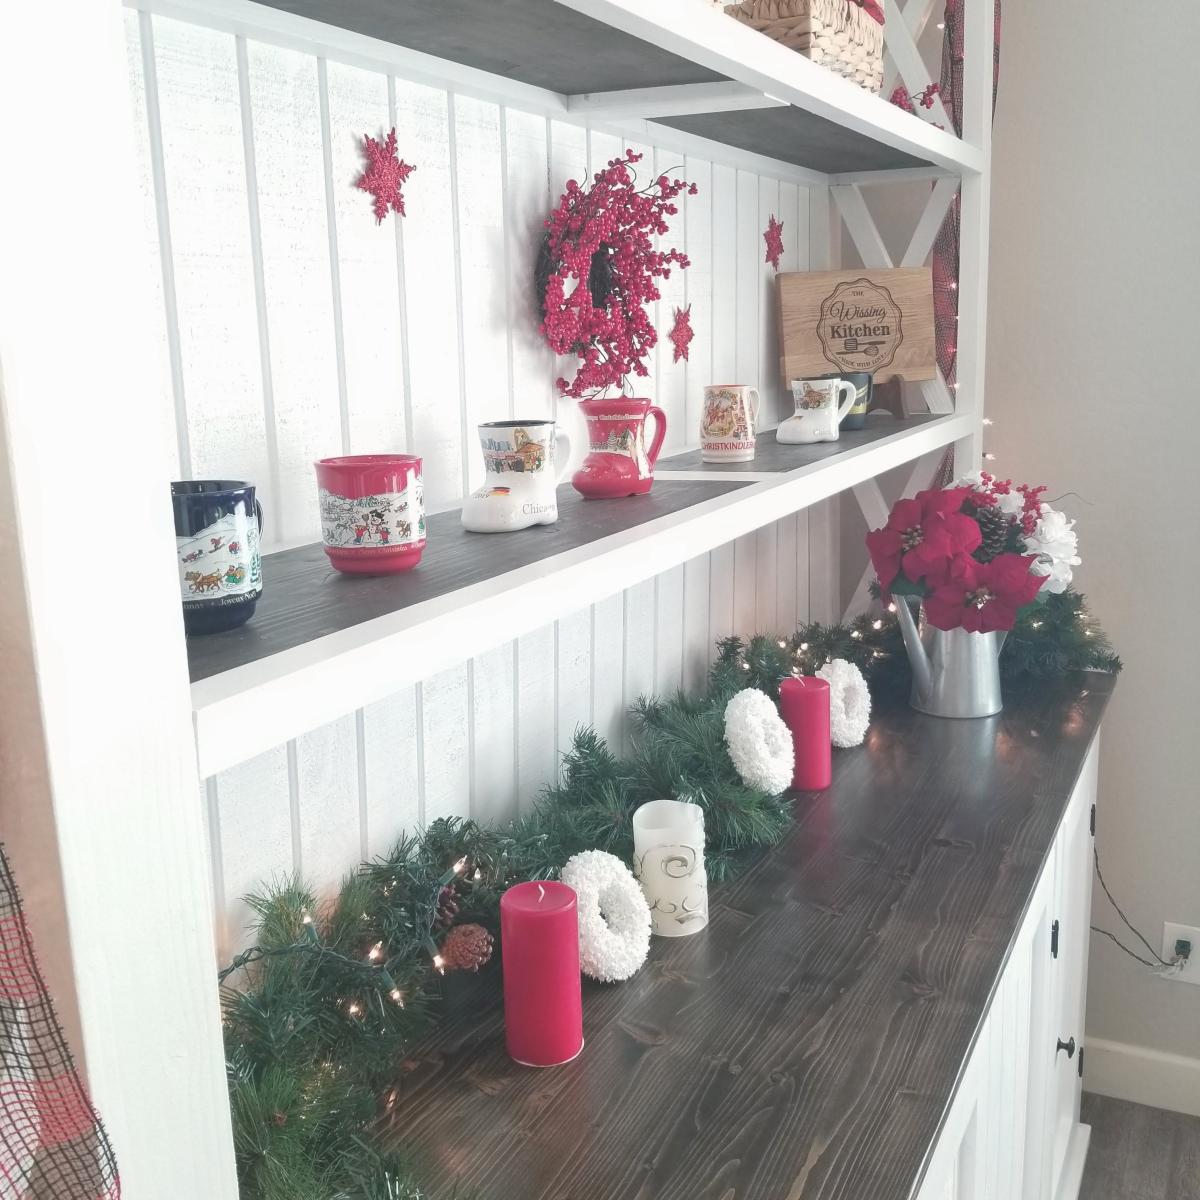
Sideboard and hutch project for my wife.
Awesome desk made from the Channing Desk plans on Ana-White.com! I had such a great time building this desk with my girlfriend. It was our first of many builds together.
thanks again ana-white.com
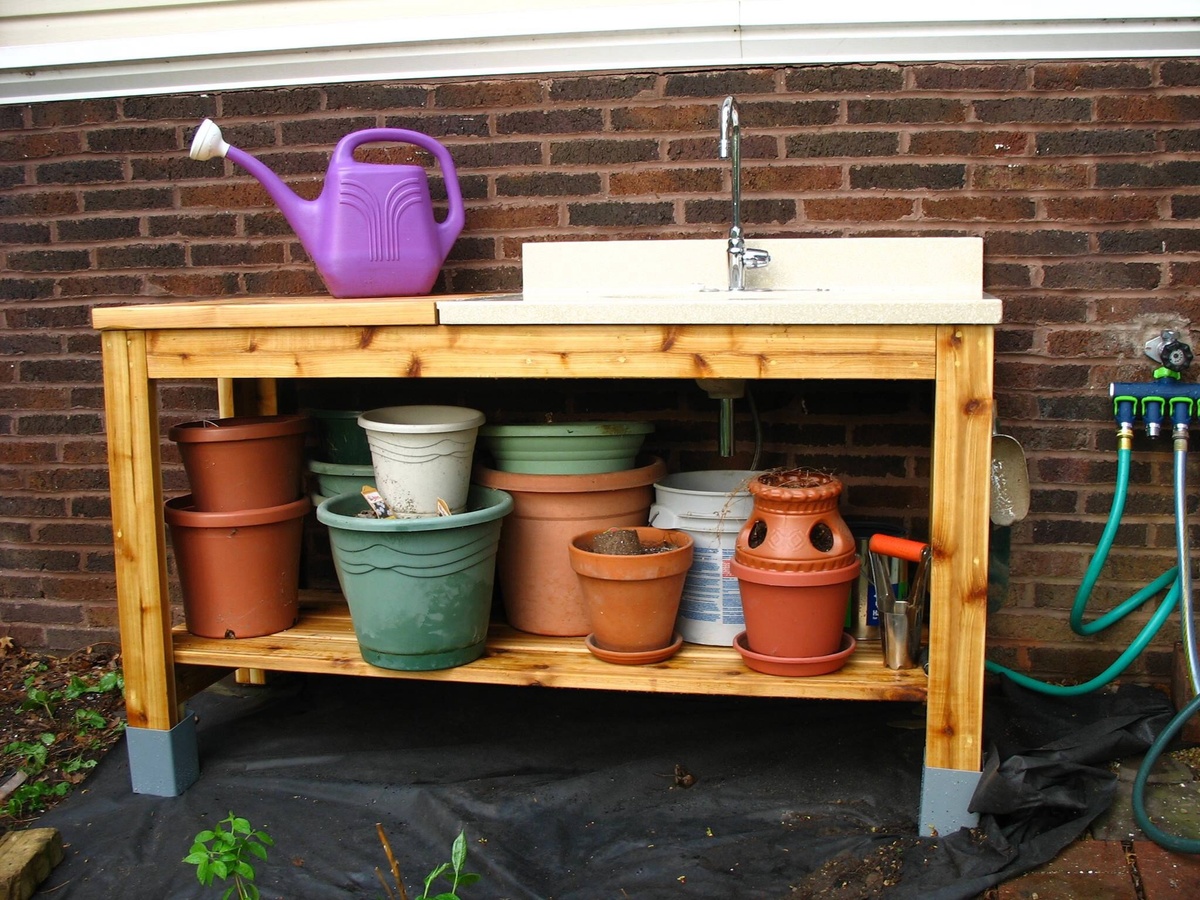
I adjusted the depth of the bench to accomodate a bath vanity top with sink (from the Habitat reStore). The width was adjusted to allow for 2 feet of workspace to the left of the sink. The overall height was adjusted to my wife's height. The front legs were made longer than the rear to account for the slope of the yard location.
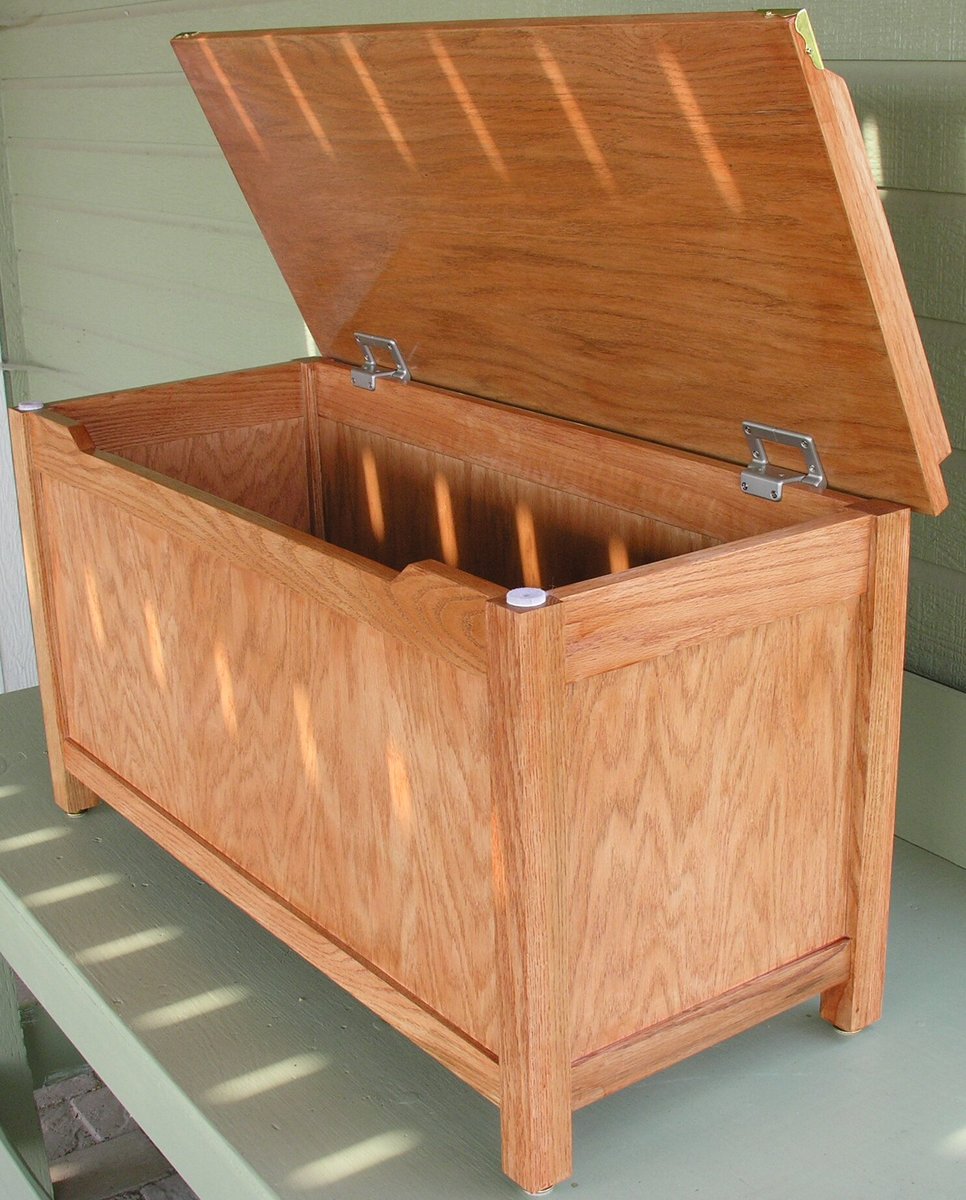
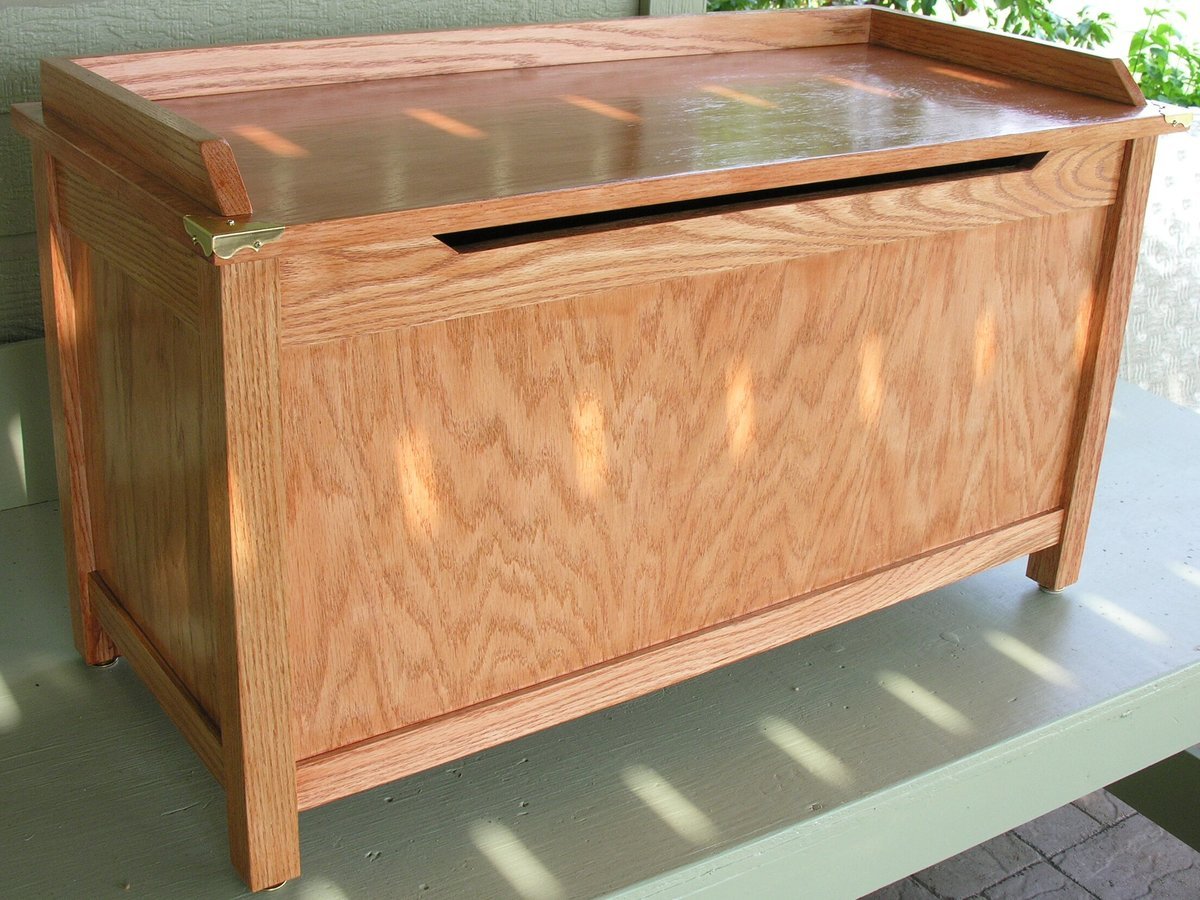
Thank you very much for this marvelous plan and idea. I built one for each family of grandchildren and love the finger-saving torsion hinges and front lid relief. I did end up trying biscuit joints (except for where the 1x2 boards join to the legs) as it left the inside of the box looking cleaner, especially if stained instead of painted.
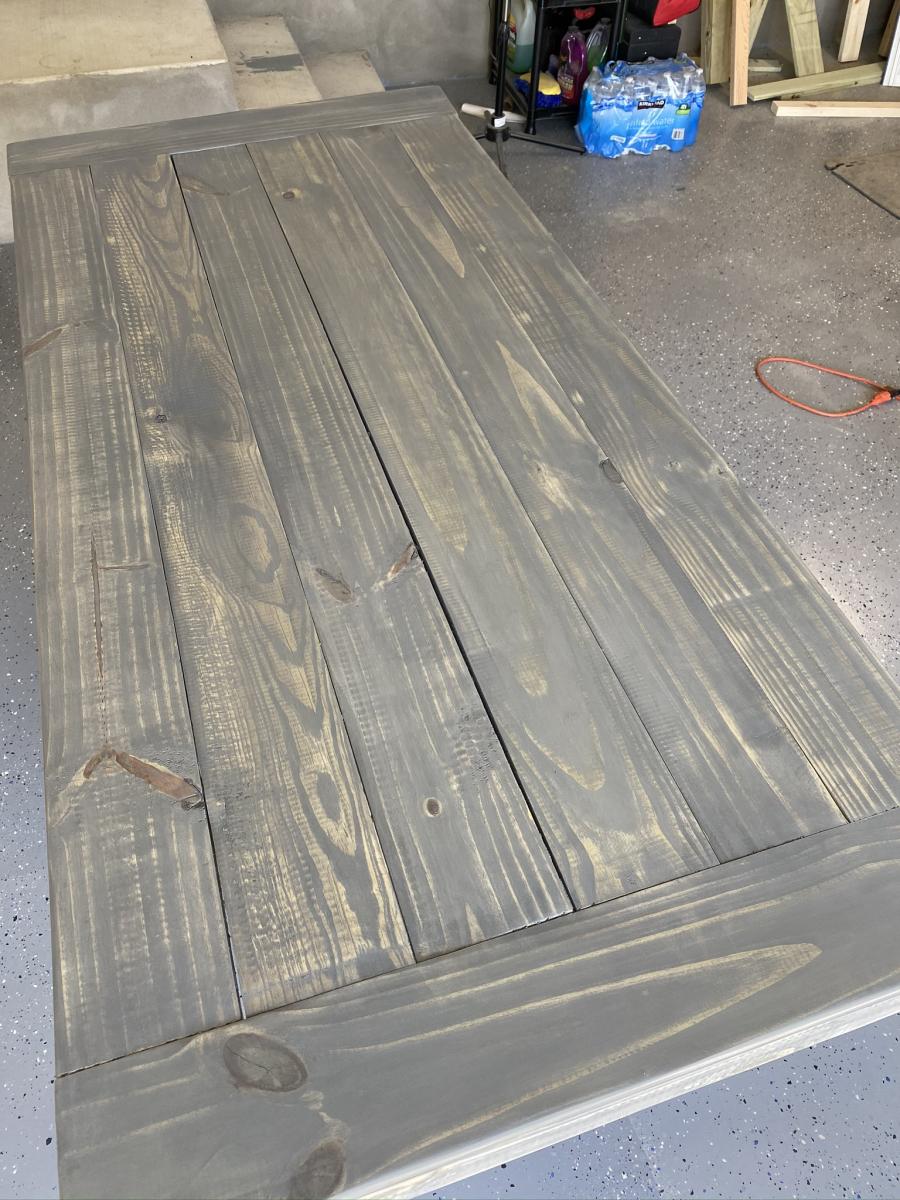
Great plans and a great build. I used 4x4’s for the legs and decided to go with the Farmhouse Bench instead. The color I went with is Weathered Grey. I applied it with a brush and immediately wipes it off with a clean rag, then 2 coats of poly to finish it off.
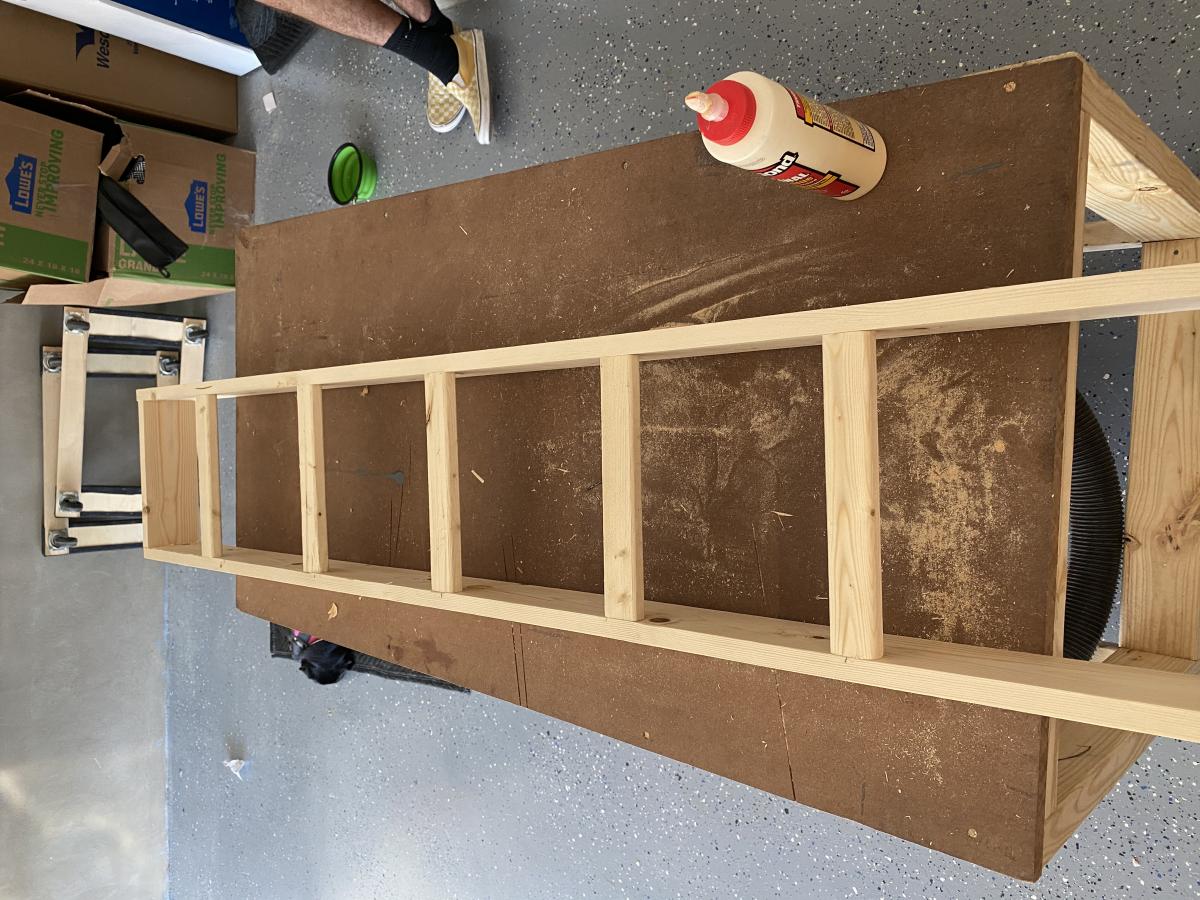
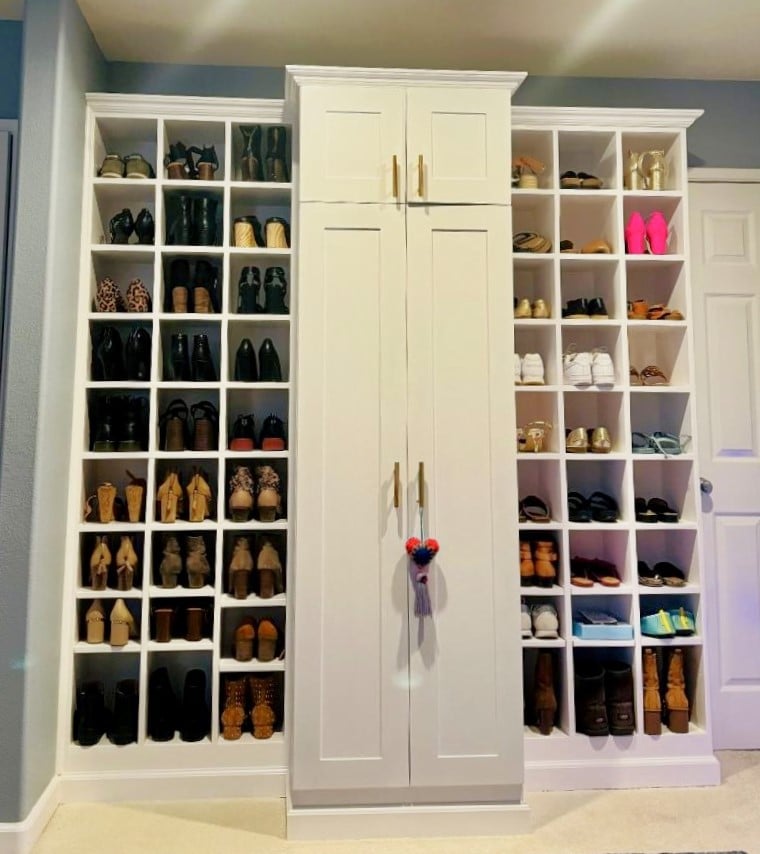
I made 2 shoe shrines then decided to add a cabinet between them for long dresses . Was going to put cabinet doors on the shoe shrines but decided it looked good displaying her shoes. I followed the shoe shrine plans from Ana's web site I found the plans easy to follow although once I was finished I realized it would have been much easy to make the outside frames first and then square them rather then build the insides and then put the outsides on last. It's challenging to keep them square when following the plans . The whole project was allot more work then I anticipated I used my sprayer to paint it I filled all the pocket holes and used wood filler to make the cubbies all one seamless look. Then added crown molding to the top. The doors are the faker shaker doors . I have made real shaker doors on other projects I cant tell the difference between the fakers and the real shakers . Happy with how it came out.
Mark DePonzi

