Outdoor furniture for my daughter

Made two chairs, side table, coffee table/ bench from Ana’s pattern
Built from Plan(s)
Made two chairs, side table, coffee table/ bench from Ana’s pattern
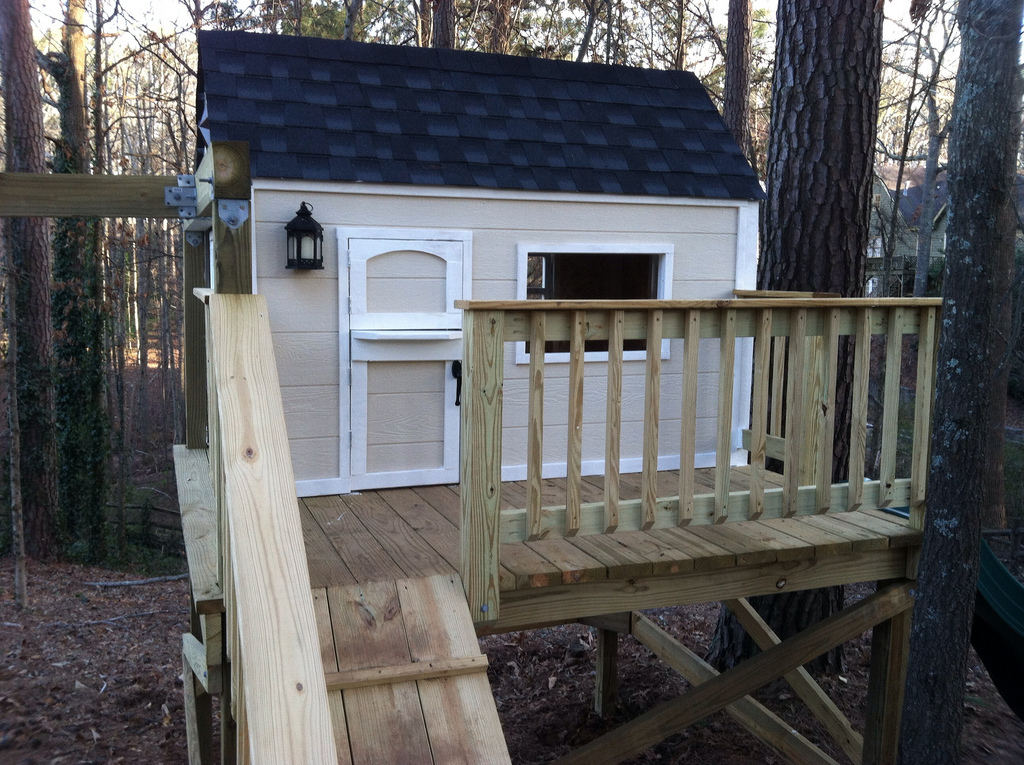
We built this in early 2013. We ended up turning the house 90 degrees on the deck, because the slide worked best off the backside of the deck due to the various heights around the deck. The sloped back yard caused some challenges, but in the end it's a very sturdy deck with the cross beams attached. Thanks for posting these plans online for us, our 3 daughters are loving the playhouse and swingset! Here are some more pics of the project: http://www.flickr.com/photos/11031534@N00/sets/72157633009259873/
Fri, 03/22/2013 - 16:39
Love this - my grandson's back yard is too small to build something like this; which is why we had to settle for his loft bed airport/clubhouse.
Thu, 06/27/2013 - 05:24
I'm planning on building two A-Frames and no playhouse, so my questions are focused there.
Did you do any modifications to swing portion of the plans?
Is it sturdy enough for an adult to swing on as well?
It looks like you put the posts in the ground, did you cement them in too?
How high off the ground is the bottom of the support beam for the swing?
Is there any issue side-to-side swaying?
Pretty straight forward plans.
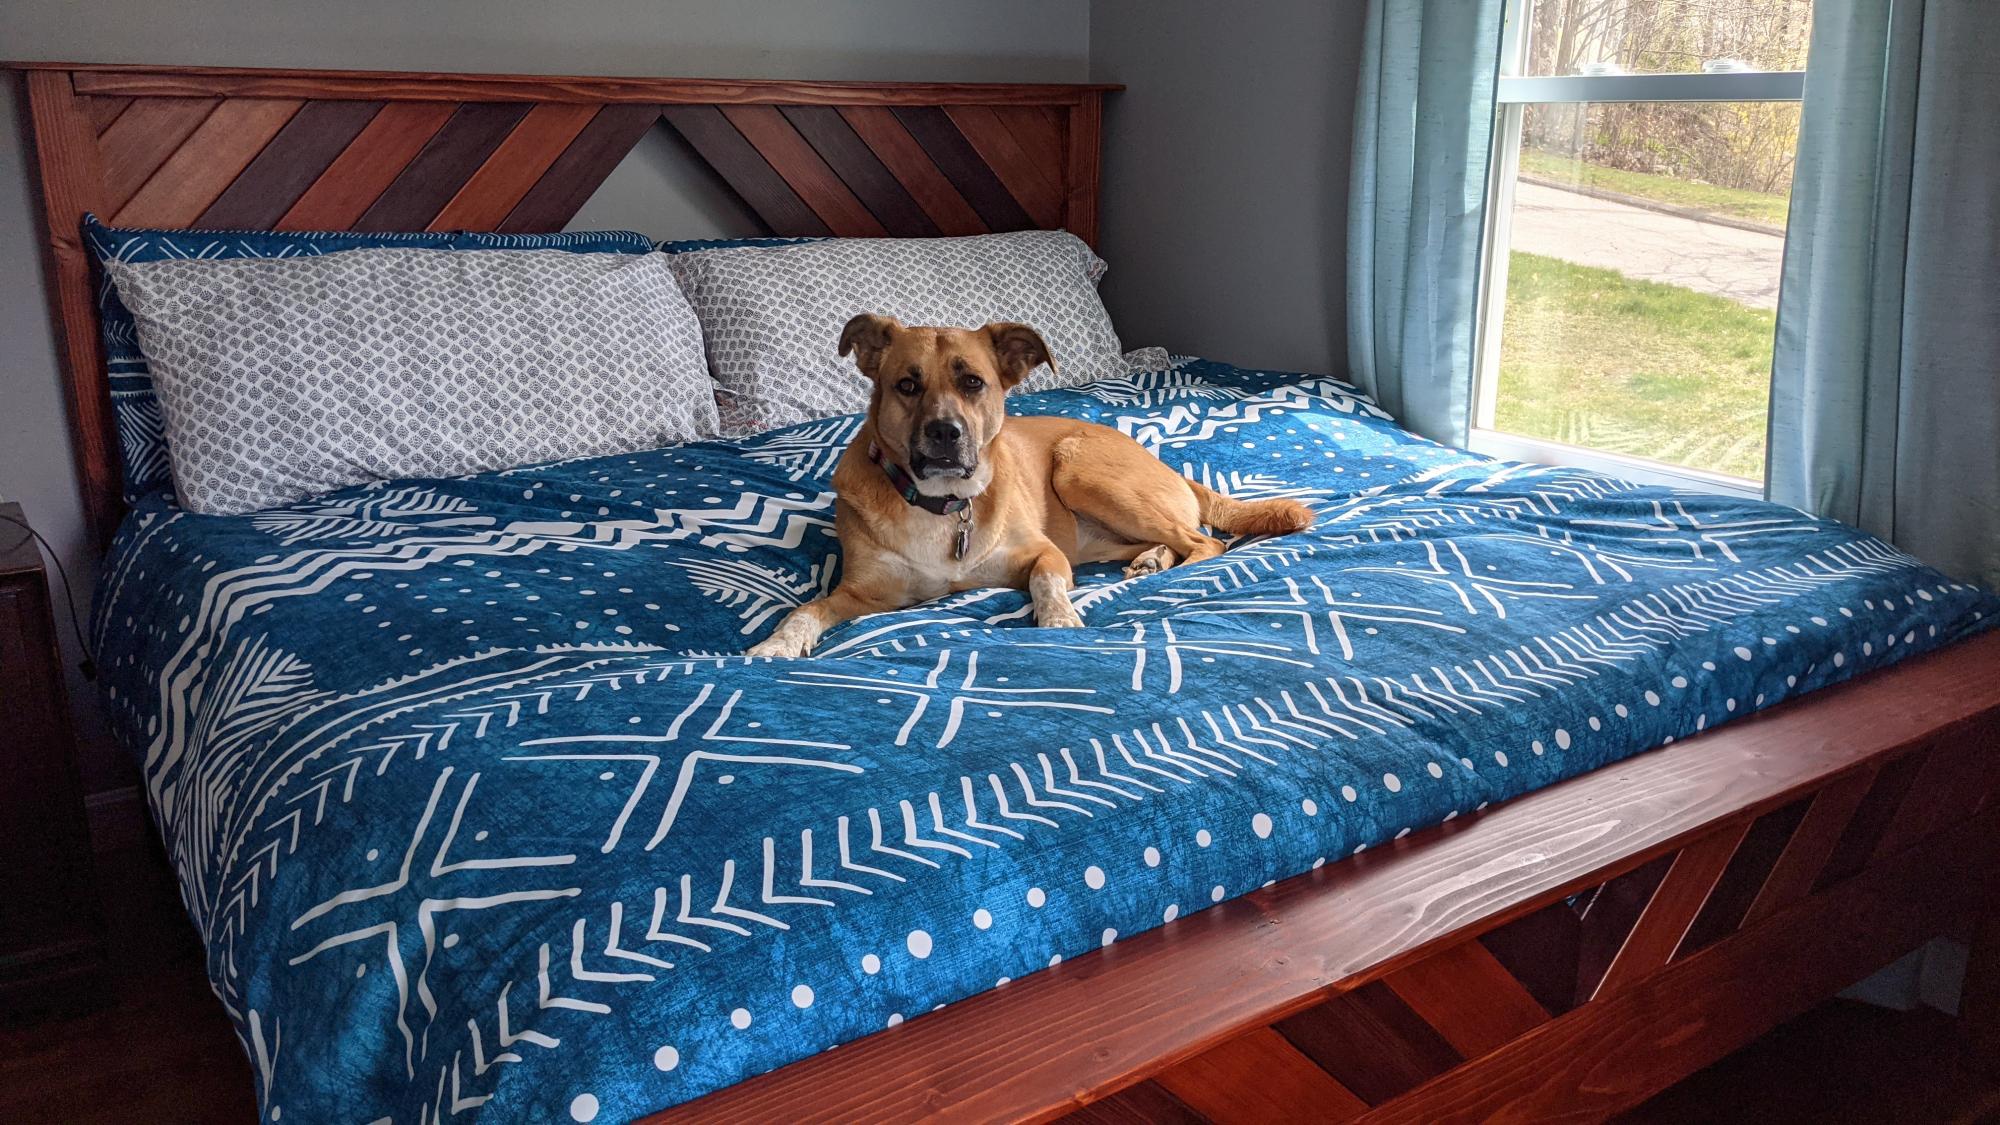
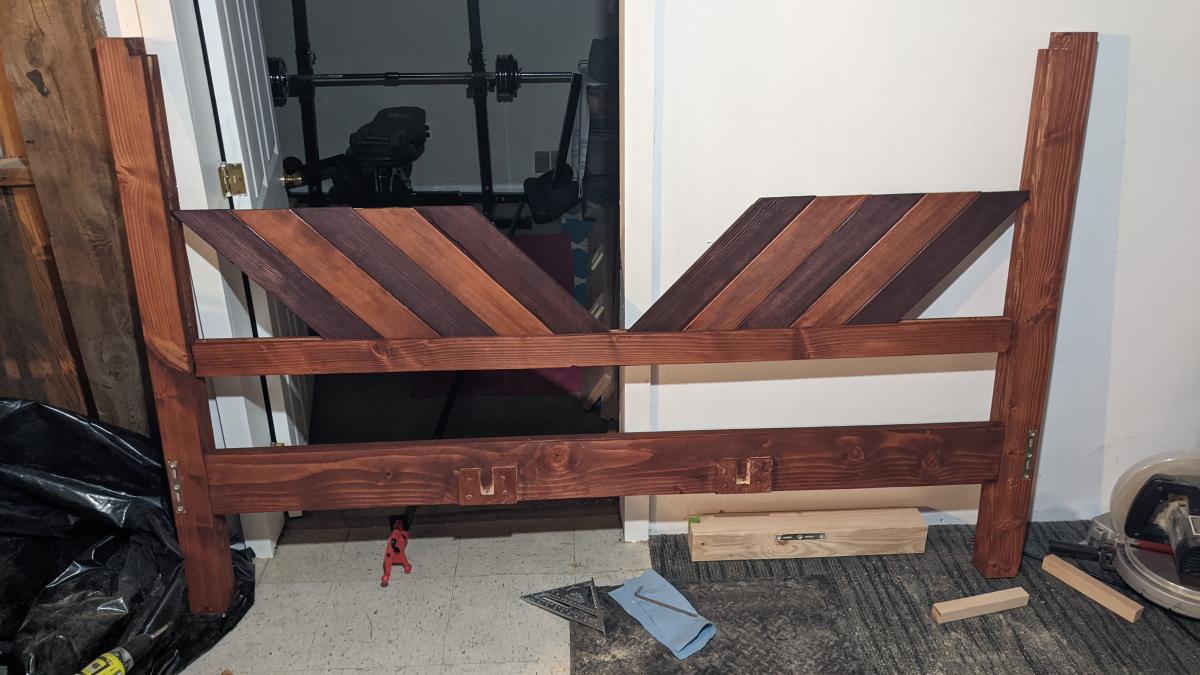
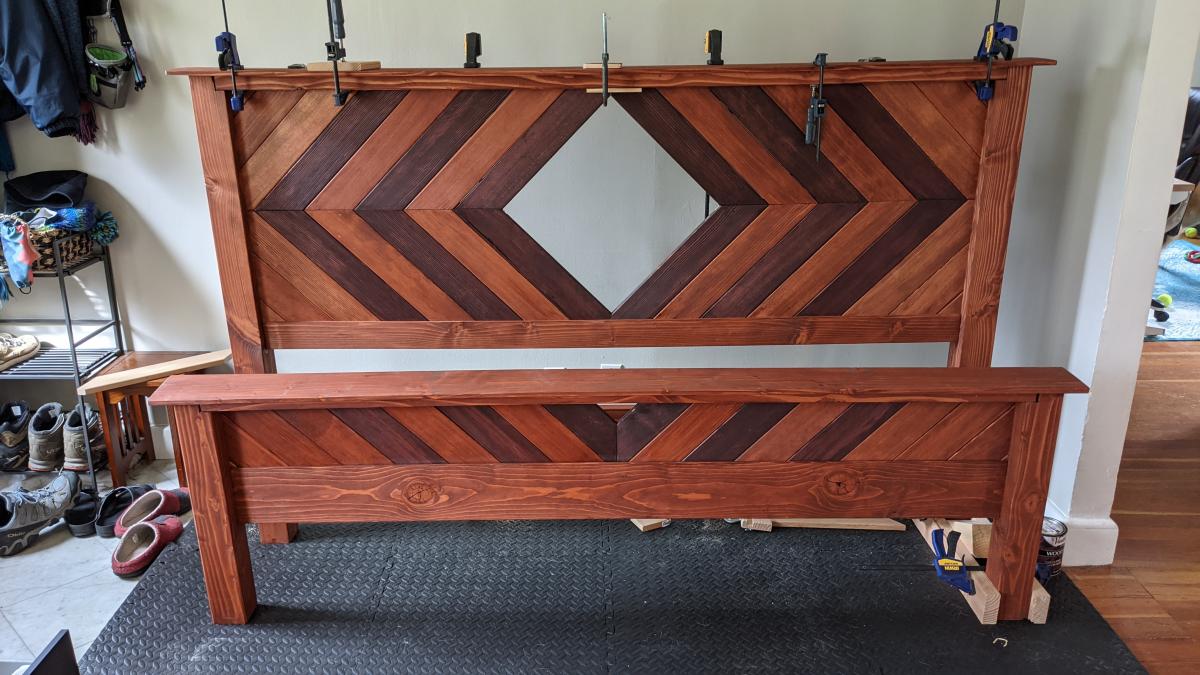
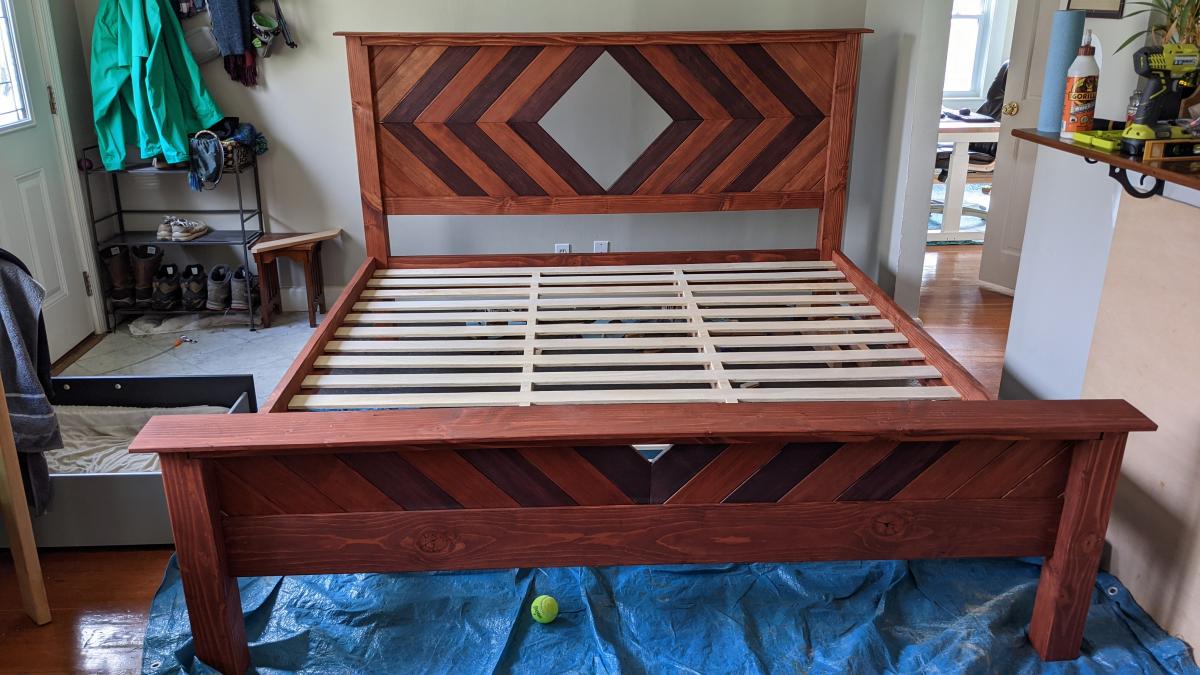
We ended up deviating more than we were originally intending from the Farmhouse Bed plans. We started off planning to modify so that it was able to be disassembled (used metal brackets and to fit storage drawers at the foot of the bed. The my finance got a router, so we ended up with a lot of mortise and tenon and tongue and groove joints, and a fancier headboard. I LOVE the end result but we were definitely in over our heads at times!


Sun, 07/30/2023 - 09:26
awesome modifications, looks wonderful. Enjoy.
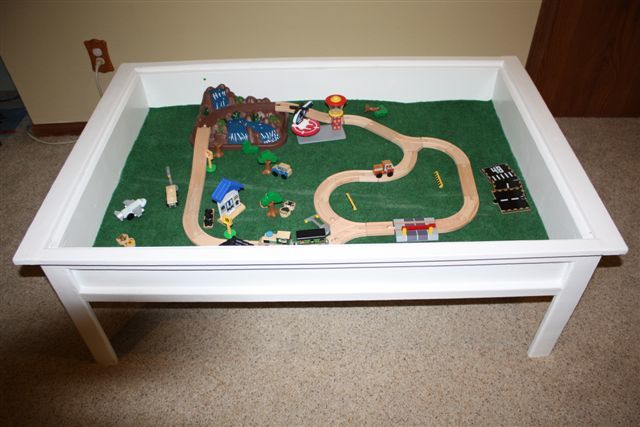
I made this train/activity table for my niece's 2nd birthday. I did omit the bottom shelf to allow more leg room when sitting/kneeling on the floor. The one BIG issue I encountered was that I cut the top inset to fit perfectly. Then I painted it.... the pieces no longer fit due to the extra paint thickness. UGGGGG! So, I had to go back to sanding to get that nice fit again.
I put in a scrap of indoor/outdoor carpeting for "grass" for the train set to sit on. This is not glued in, so it can be removed if they decide to use it for something other than the train. I painted it using cabinet paint to give it a little extra protection against scratches and scuffs since it will be used by a two year old. I painted the inset white on one side, but I put chalkboard paint on the other side. This way, it's like three tables in one! An activity table, chalkboard table, and a train table! She loves it!
I need to get a picture of it with the top on so you can see the white and chalkboard sides. It was a really fun build!
I may build the smaller Lego version for my own house - not to play with Legos, but to keep the dog's tail from knocking over any beverages I set down! It also would be a nice place to store the laptop when not in use.


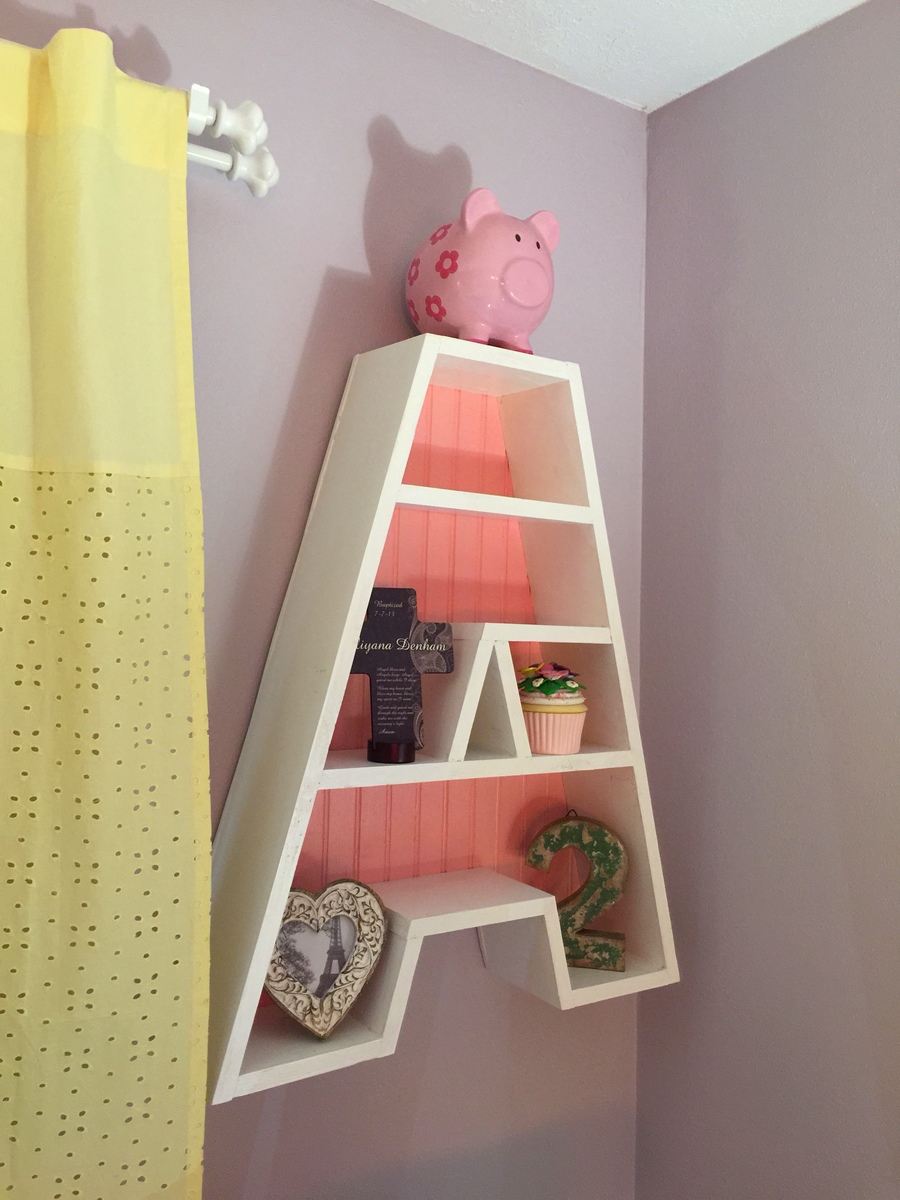
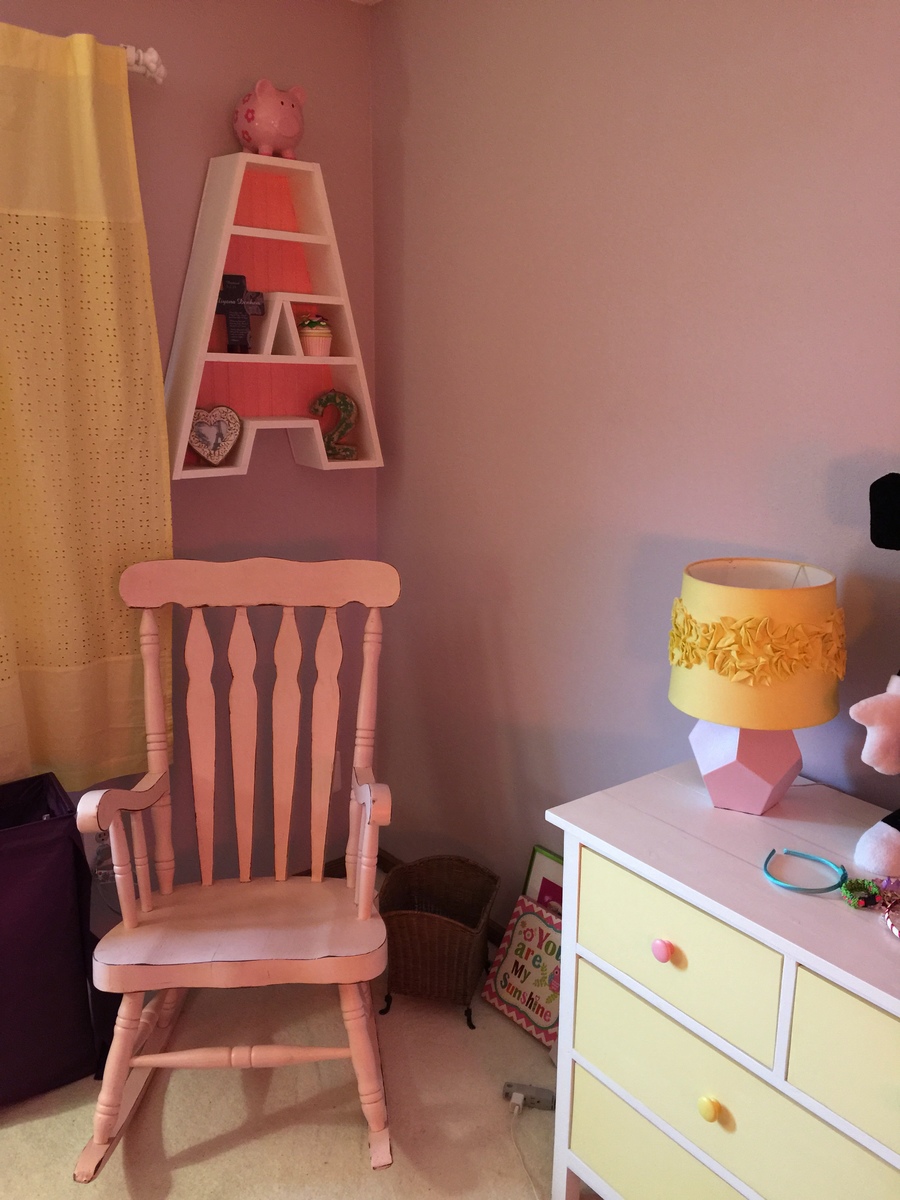
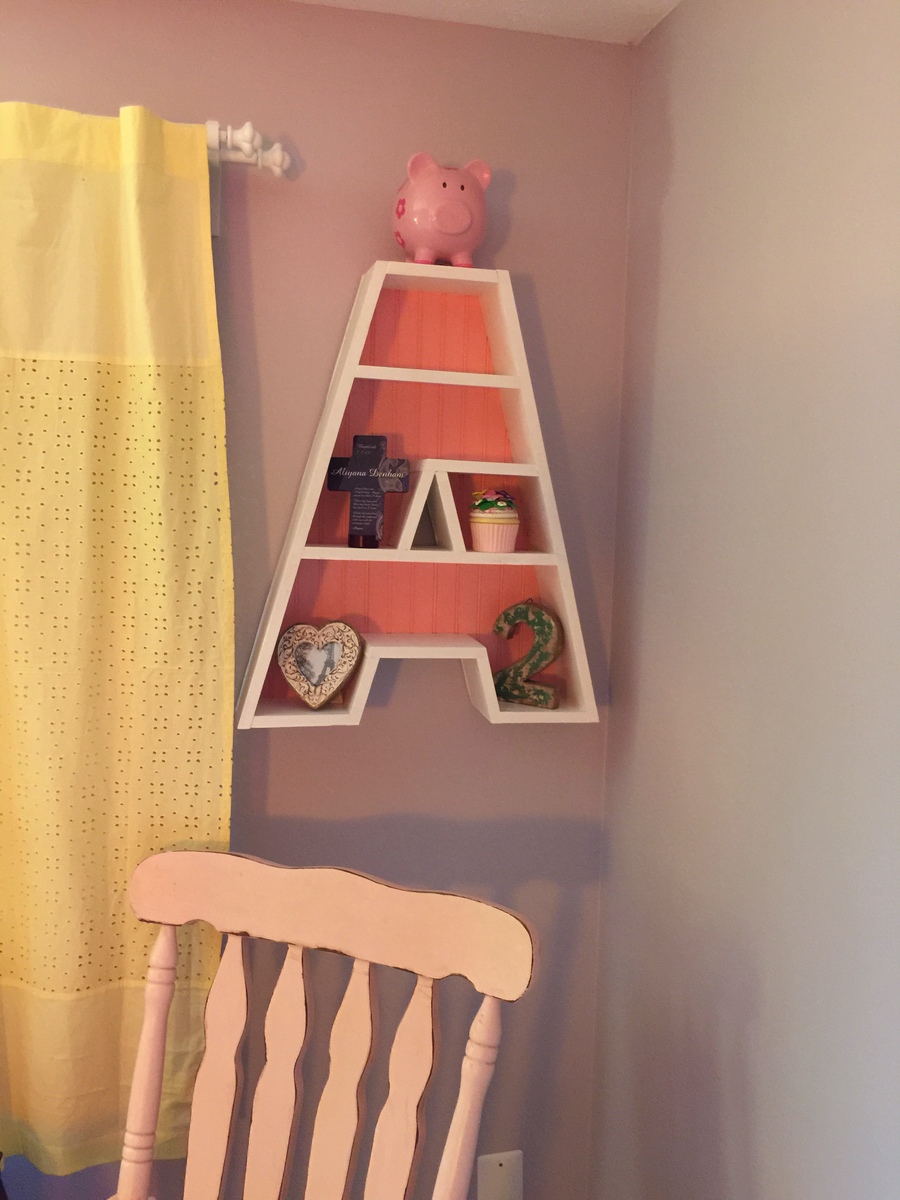
With another baby on the way in a few months, we decided to move our 2+ year old daughter across the hall into her first big girl room. I built big sister the Kendal Extra Wide Dresser, Traditional Wood Toddler Bed, Letter A Shelf and a Dollhouse Bookcase and matched the colors with her new comforter, lamps and princess canopy tent from the Land of Nod outlet.
This is a pretty easy project to build with the right tools. For the backing, I used beadboard plywood that I had leftover from the headboard of the toddler bed. The one tricky thing was how to actually hang the bookshelf. The weight of wood for the shelf is somewhat heavy and that's before anything even goes in/on top of it. After a few trips to the big boxes, I decided on using a heavy duty mirror hanger, which so far, has worked great.

Fri, 02/06/2015 - 11:28
What a lucky little girl! You inspired me to make-over our little girls room now that she is 4. What a gift to create all these beautiful items for your home. PS - Love your outdoor sectional too!
Tue, 02/24/2015 - 13:05
It took a lot of work, but it was well worth it. The best part about completing a room make-over is her reaction to having all new stuff. Our daughter has not once wanted to go back to her old nursery room. p.s. I cannot wait for the cold/ice/snow to end so we can start enjoying the sectional again.

Fri, 02/13/2015 - 12:36
This is soooooo cute! I bet your little girl loves this! Great job!
Tue, 02/24/2015 - 13:01
She loves all of new big girl room furniture, which mostly came from your plans!

Outdoor Couches made from the plans on the website. Added 2 2x4's on back top to add support when leaning back. Also added vertical supports on the back to help with added weight.
Stained and Sealed with Natural Cedar Stain and Sealer

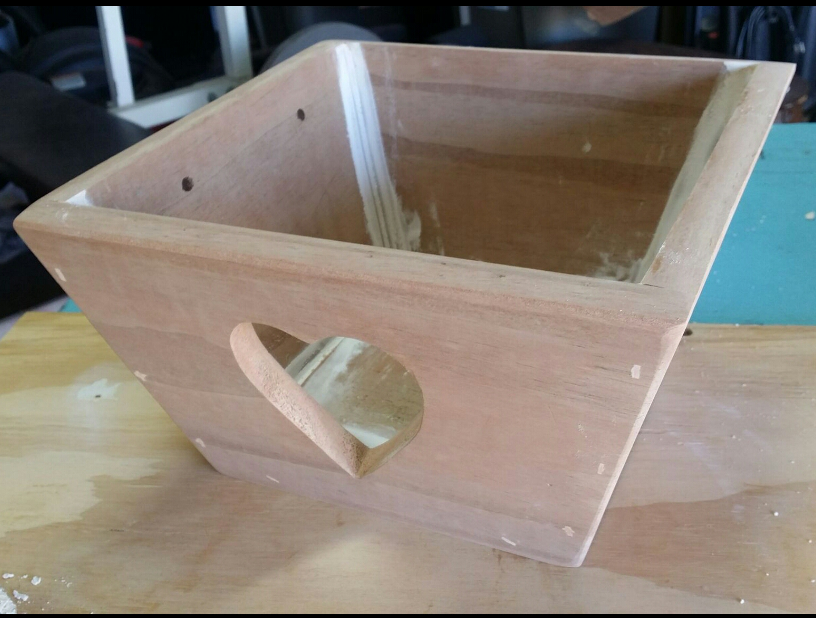
Having a home for your feathered friends will encourage the birds to keep visiting your backyard. If you have a garden, you want to attract birds to establish a healthy balance. Birds consume thousands of insects, especially in the spring when they’re feeding their young. To help support this environment, I’m made DIY Birdhouse Plans from scrap wood. If you have scrap wood laying around, you could easily build this birdhouse for your backyard.
A simple bird nest box with correct dimensions will help a mother bird with a reliable place to live in and raise her young. This helps mother nature to keep the cycle of life in order.
See my website for additional pictures and how I've built it, THeDIYPlan.com

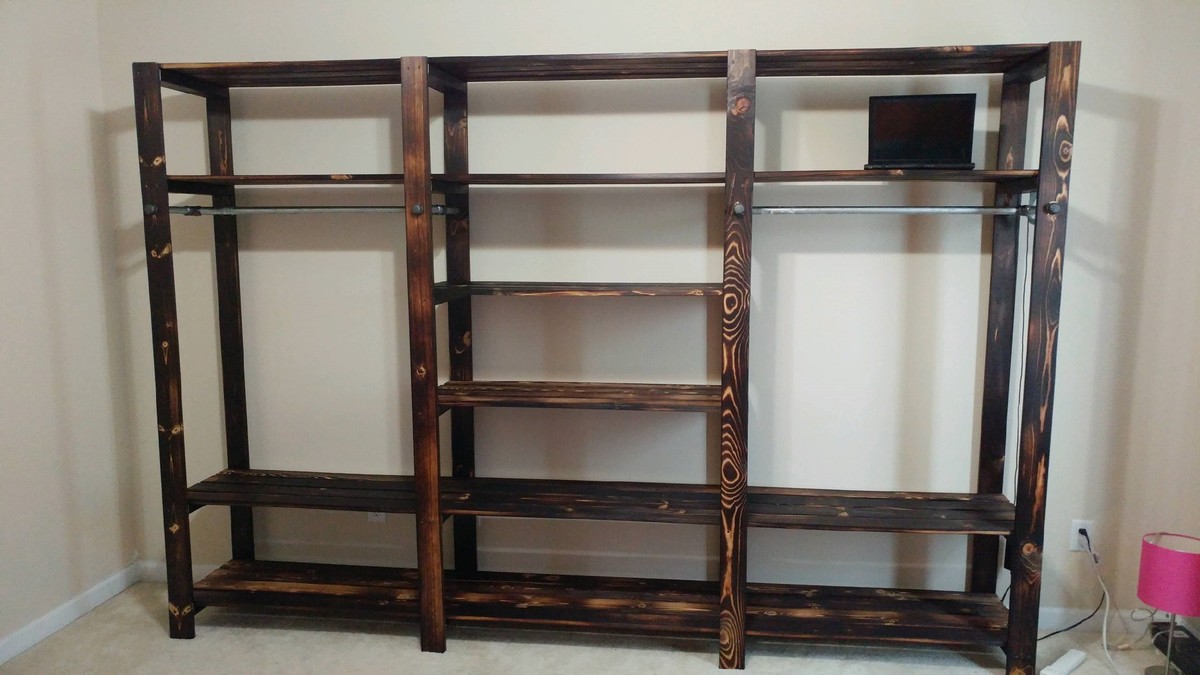
This was my first furniture build so there was plenty of trial and error but overall a good learning experience. The middle walls were made using the same notching techniques as the plan, but with one big notch and several 2x4s.
Building was the fun part, finishing was not. Started with a belt sander and after digging into the wood too many times I tried an orbital. Had to resand due to swirl marks from the orbital sander. Hand sanded from 100 grit to 220 grit, applied gel stain and noticed the wood grain had completely disappeared. Seems like the pores were too closed from the fine sand paper so took it back to 150 grit and it was all good.


Wed, 02/11/2015 - 23:10
This kind of necessary information is quite supportable to publish over online place. Keep writing.That was points of fact!
Please Visit: http://desertleather.com/Categories/Captain-America-Jackets
Fri, 03/20/2015 - 22:32
I really appreciate for this guided info, it’s much better for the proven analysis in the recent times.
Visit: http://www.leathersshop.net

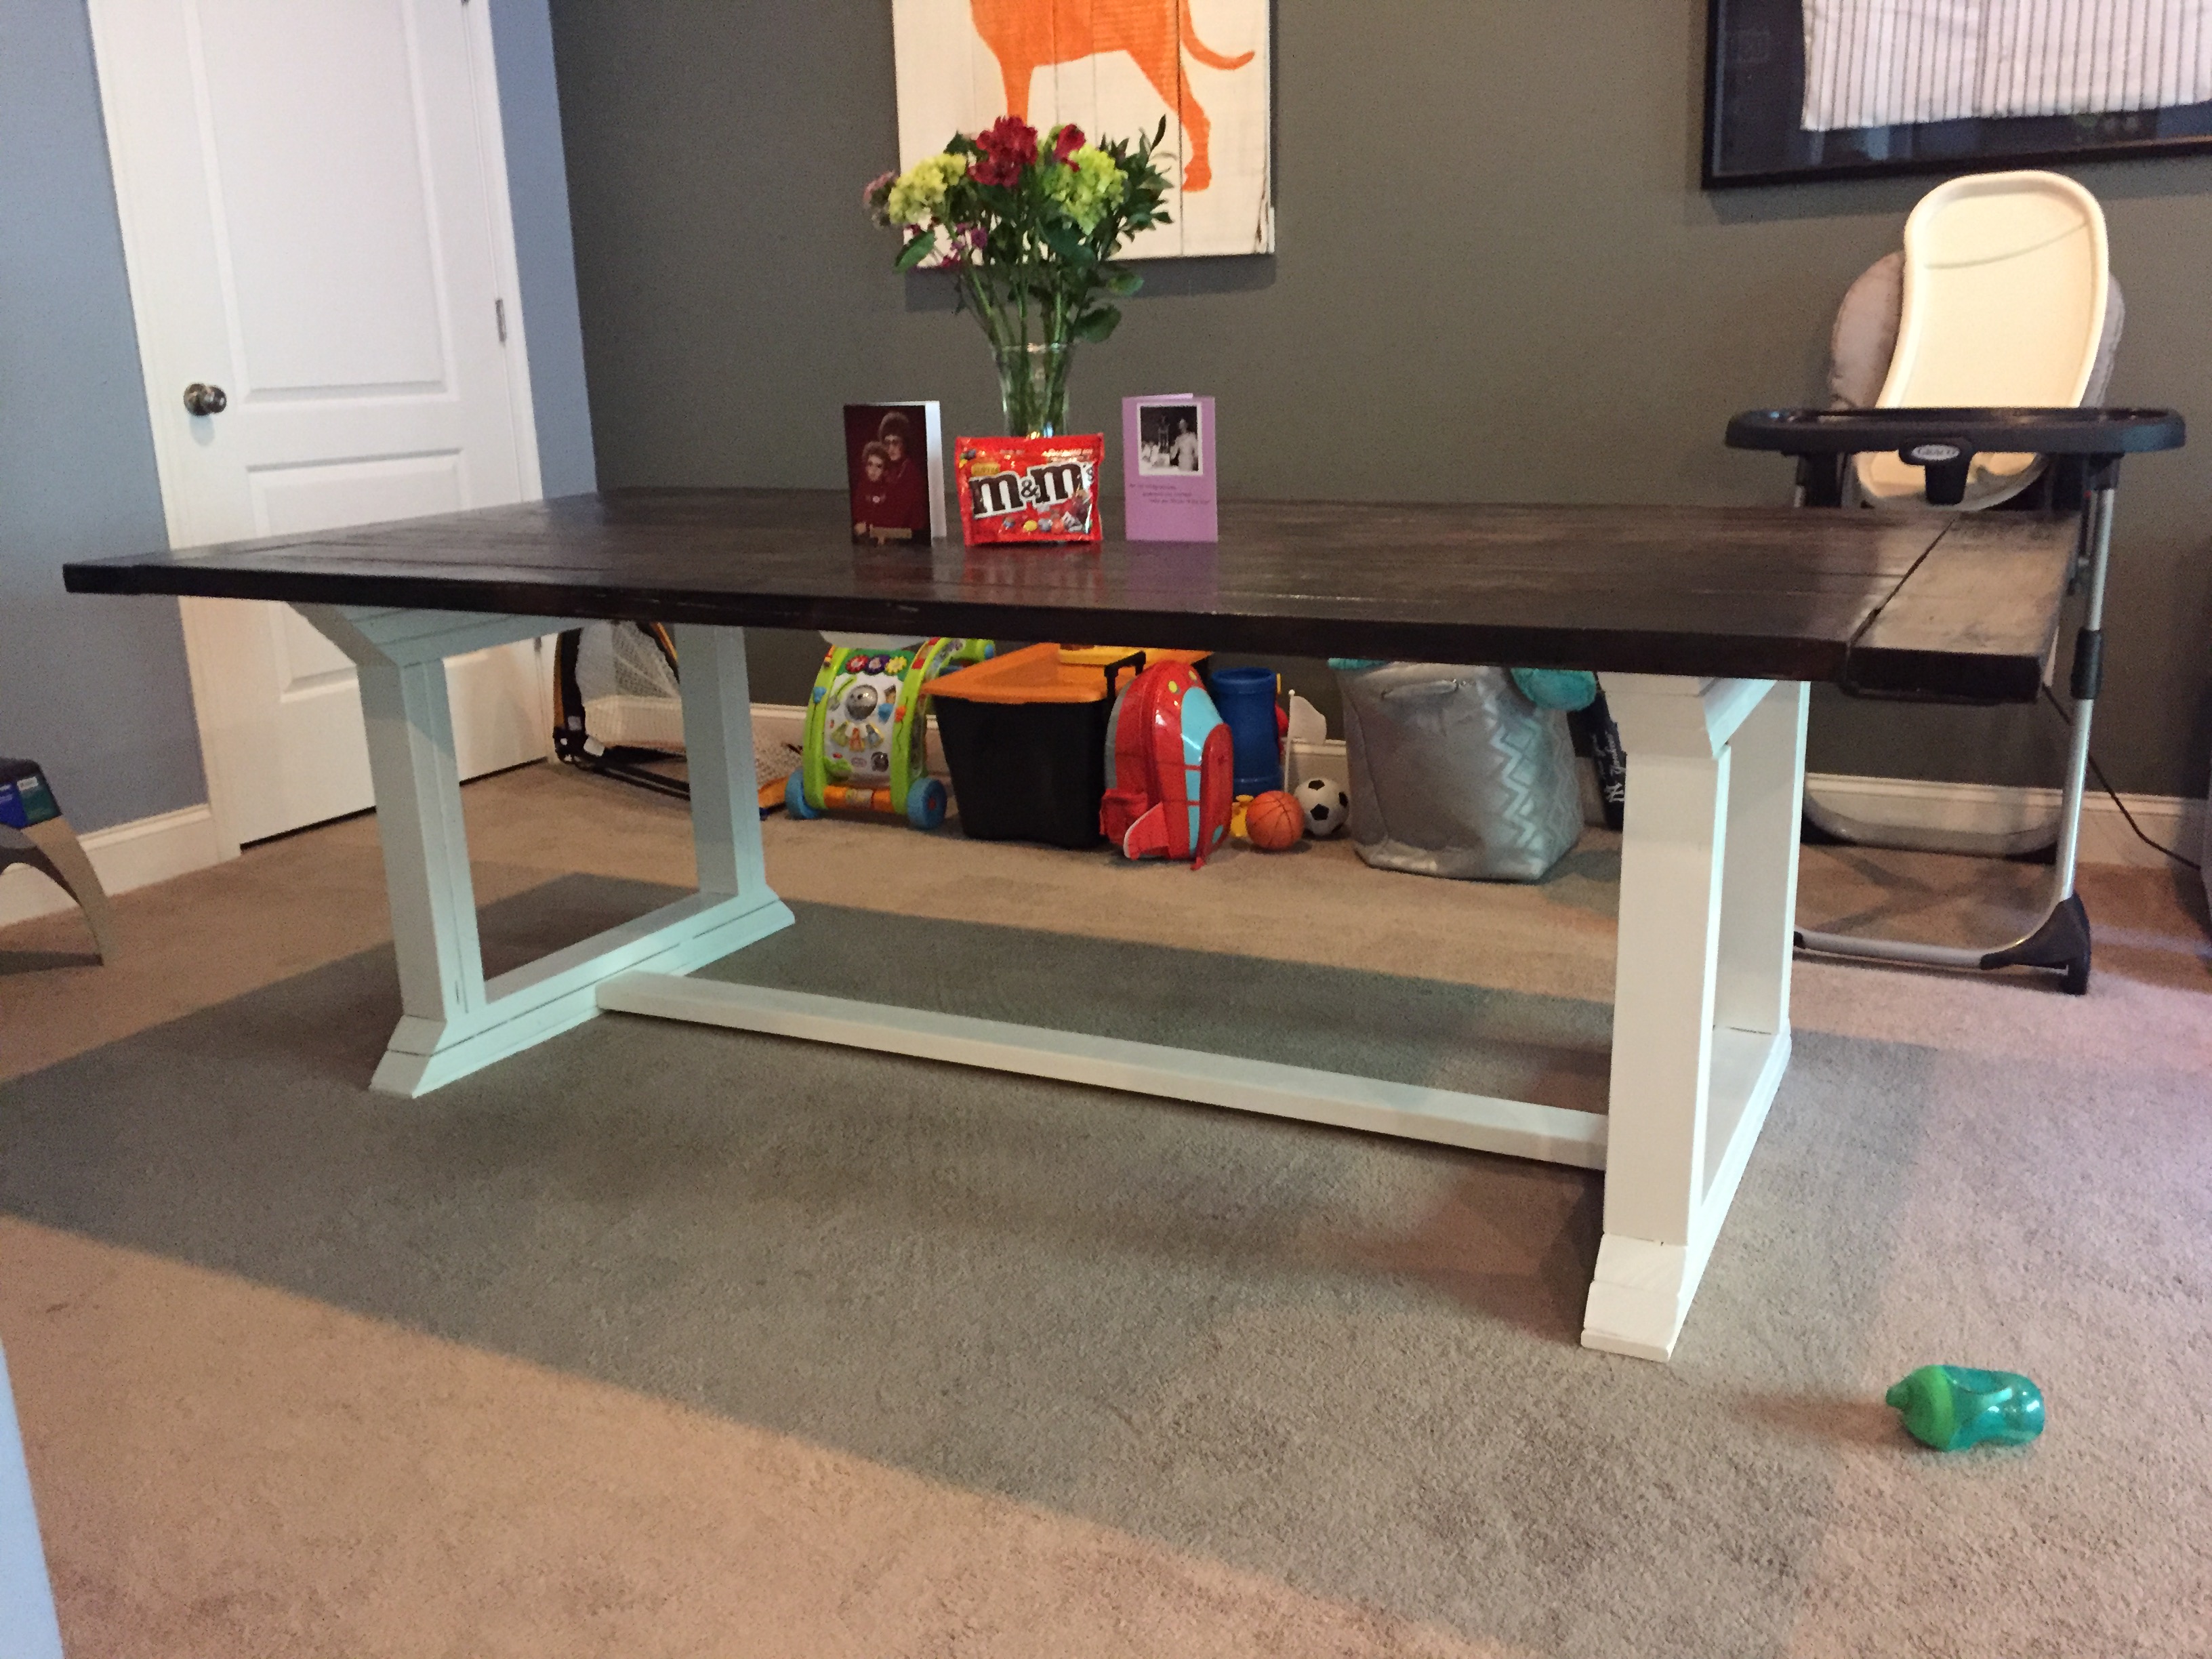
I adjusted the size to be a total lenght of 71 inches by 40 inches wide.
I put all the boards through the table saw to create the flat edges whcih allowed for the flush table top. Had difficulties with the X cuts, but turned out nicely.
Used a mix of 2 stains to reach the grey, almost barnwood look. Love the way it looks.
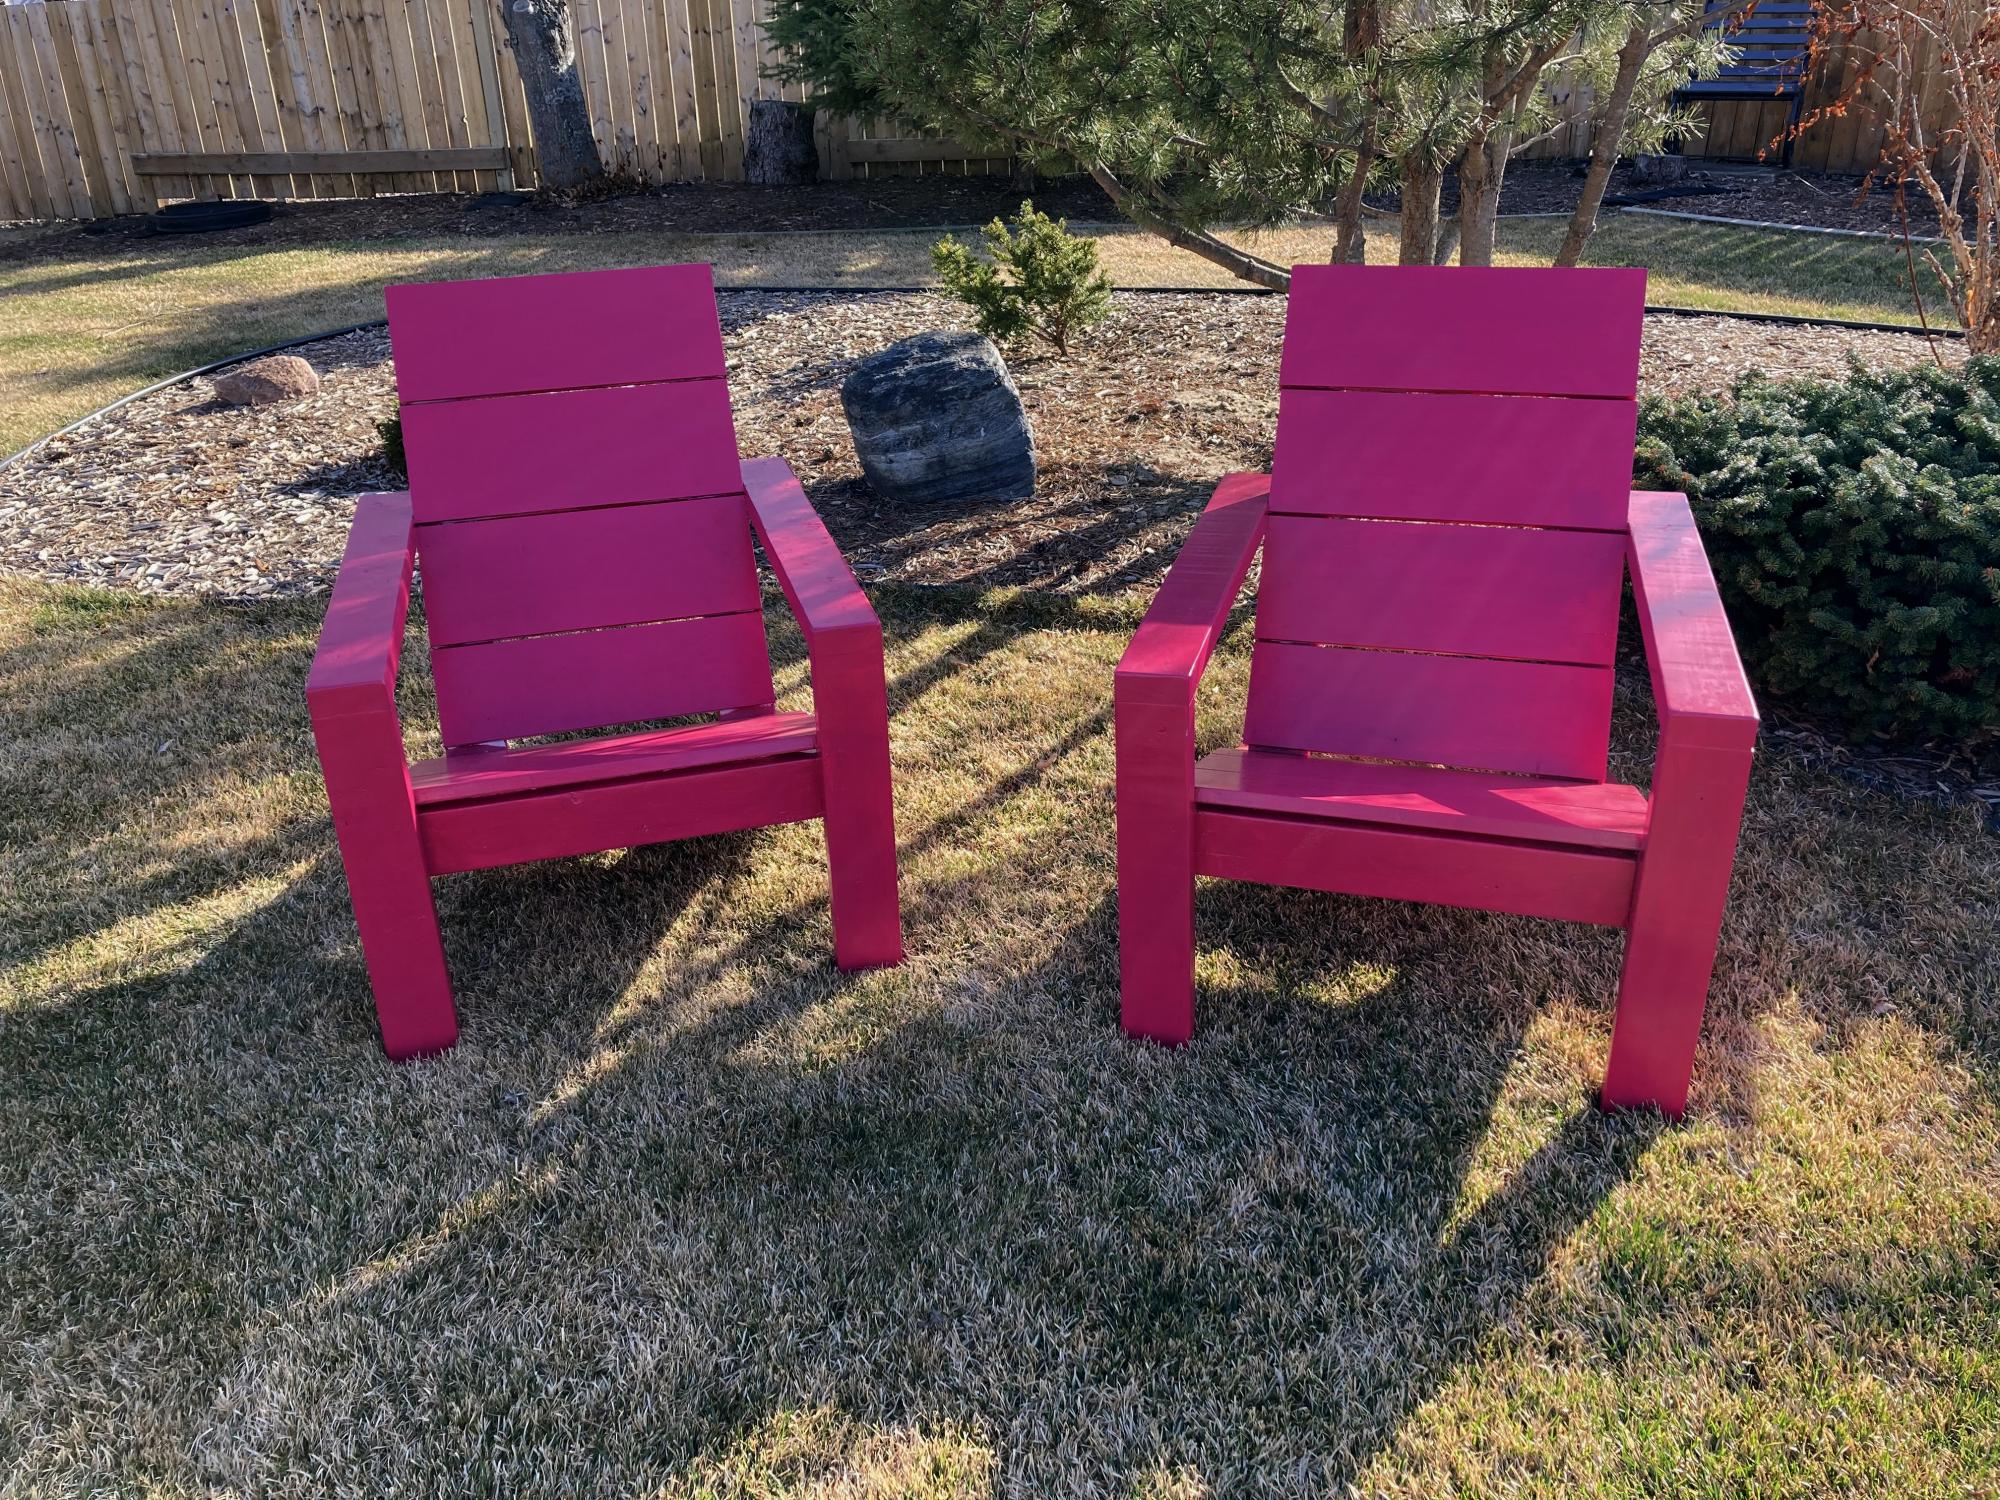
This was a nice simple build. The only problem where I live (near Edmonton, Alberta) is that the price of lumber has gone crazy. I think it is the same everywhere. 2 x 4's are running about $8.50 (CAD) each. I can see myself building a few more of these as the neighbours like them. Chose to go with a funky magenta colour to add some colour to the backyard. Very comfortable to sit in but I think I will add some cushions. I should have taken Ana's advice and painted the boards (especially back and seat) first. Once assembled I had to go in with a small brush to get the sides.
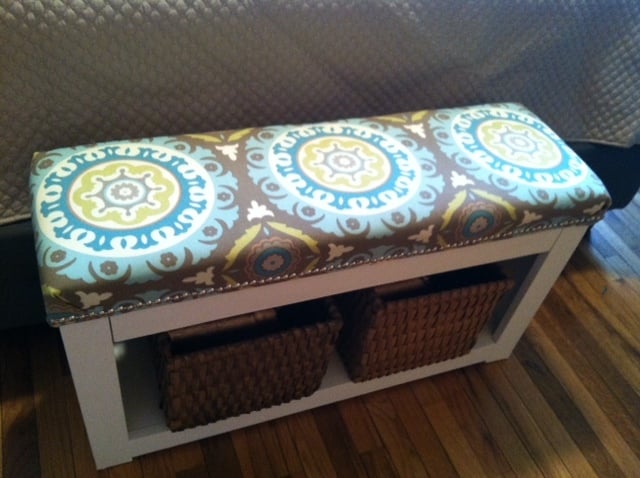
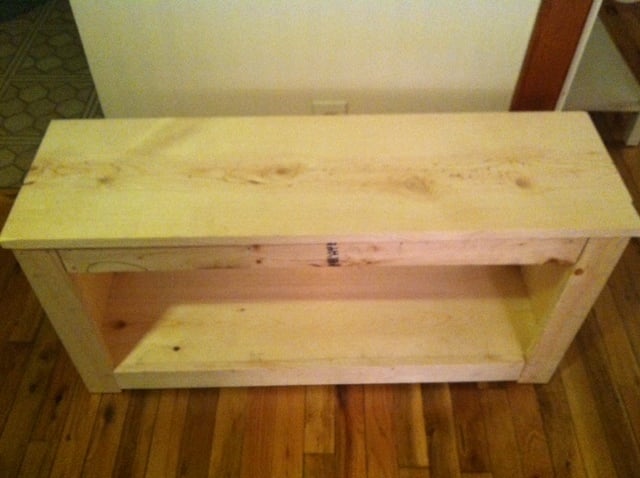
I LOVED creating this bench! It was quick and easy.
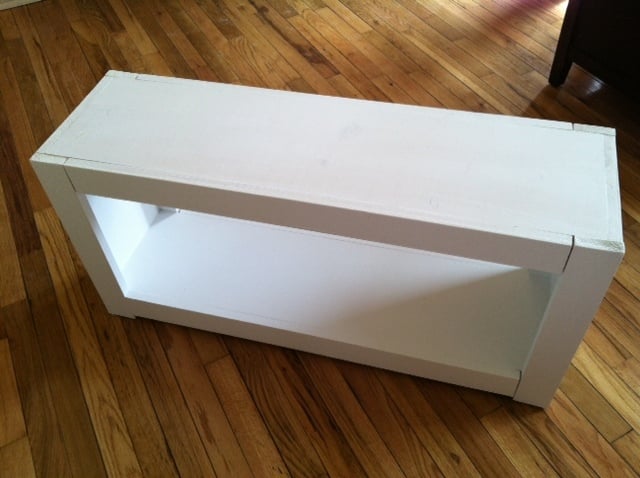
I really wanted an upholstered top with nailhead trim so even though the plans didn't call for it, I did it anyway :) I left off the top piece after building the rest of the bench, and upholstered it with 2" foam and batting. I used outdoor fabric because my dogs may be using the bench to get on/off the bed, and I figured it would be easier to keep clean! Luckily, my local Jo-Ann store just put out a plethora of outdoor fabrics, and they were 50% off (as was the foam!). After the upholstering was finished, I used nailhead trim because I LOVE the look. Then, I attached the top by turning it upside down and setting the bench upside down on top of it, and nailing the two together.
I decided to paint the bench white instead of staining, and I'm so glad I did. I feel that it gives the piece a certain sophistication, and it goes perfectly in the bedroom.
100% happy with this piece!
Mon, 04/01/2013 - 09:03
Thanks so much! I am super happy with how it turned out. Have fun creating!
Mon, 09/16/2013 - 06:58
I am totally obsessed with Ana's plans and was planning on building the Spa Bench - saw yours upholstered and am now going to try that!! Did you still use the 1x12 as the top piece that you upholstered? I think by your other pictures I see the overhang - so I will give it a shot!! You did an amazing job on yours!
Mon, 09/23/2013 - 06:02
Hello lovinit9! Yes, I followed Ana's plans. The only thing I did differently was that I upholstered the top before I attached it to the bench. Then I attached it by nailing it from beneath (the inside of the bench, nails going upwards). After it was all together, I then put on the nailhead trim. I hope that helps and good luck to you!
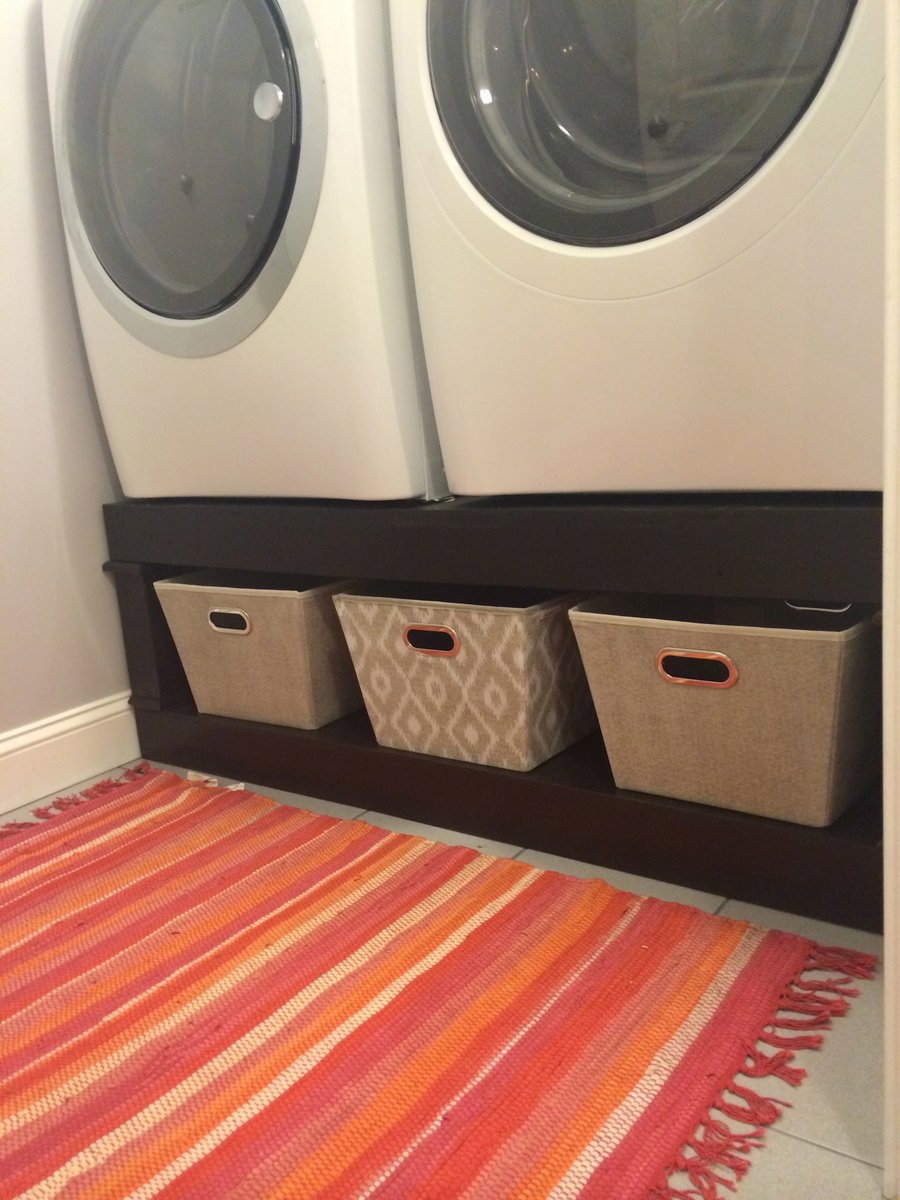
This was very easy to do. The hardest part was creating the miter edges for the trim and having them line up nicely. I would consider the trim a must, I just felt it made the project look finished. I had a difficult time finding *cute* baskets to fit underneath... It measures 10" and will fit a standard laundry basket but I was going for a different look. I picked these up on sale at office max, not exactly what they were intended for but they work great and keep the laundry room nice and tidy. Happy building!!
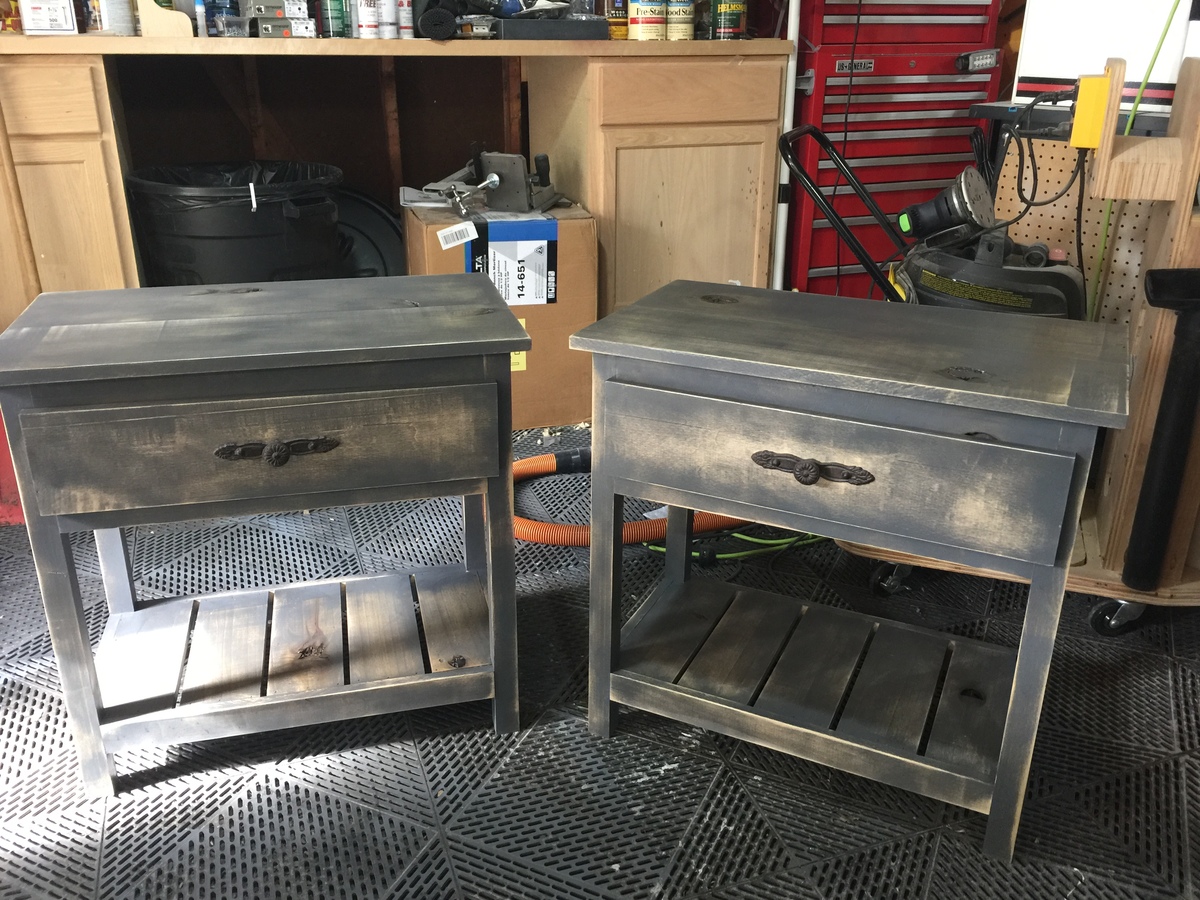
Needed new nightstands for our new house....these worked out perfectly.

We made the providence benches a little bigger to fit our space perfectly and painted them RED for pop. Soooooo many compliments from our neighbors!
Great project. I didn't have all the tools and/or skills to make some things exact or perfect, but I am very happy with the finished project and more importantly the wife loves it! Thanks so much for sharing. I still need to add x, but I ran out of time.

I used the Outdoor Set plans to start with the sofa, but I didn't like the height of the back. I adjusted it with pallet boards and copied the curved shape of our Adirondack chairs. The bench was made entirely from upcycled wood, including pallets and landscape ties. All the cushions were made with fabric (waterproof) shower curtains. The most expensive part was the 4" foam for the cushions. I used Varathane Diamond Wood Finish, so it will all last for a really long time.
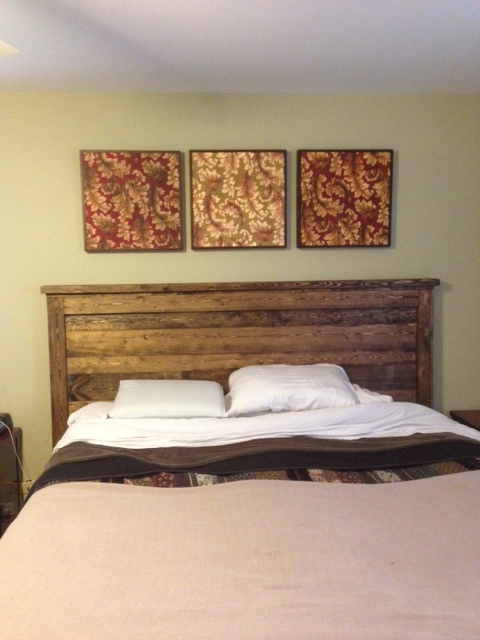
I used pine wood and minwax walnut stain. I did run into a minor issue with a few of the slat boards being warped so I ended up screwing on (3) 1x3's onto the back, perpendicular to the slats, so the boards sat flat and their edges were flush. This also added more stability to the project. One coat of stain did the trick for the color we were going for. For such an easy project, this makes a big difference in the look and feel of our bedroom.

I made the planter and had my kids buy small gifts, we made it a family gift for my wife. she loves it!!
Thanks for the ideas and plans!
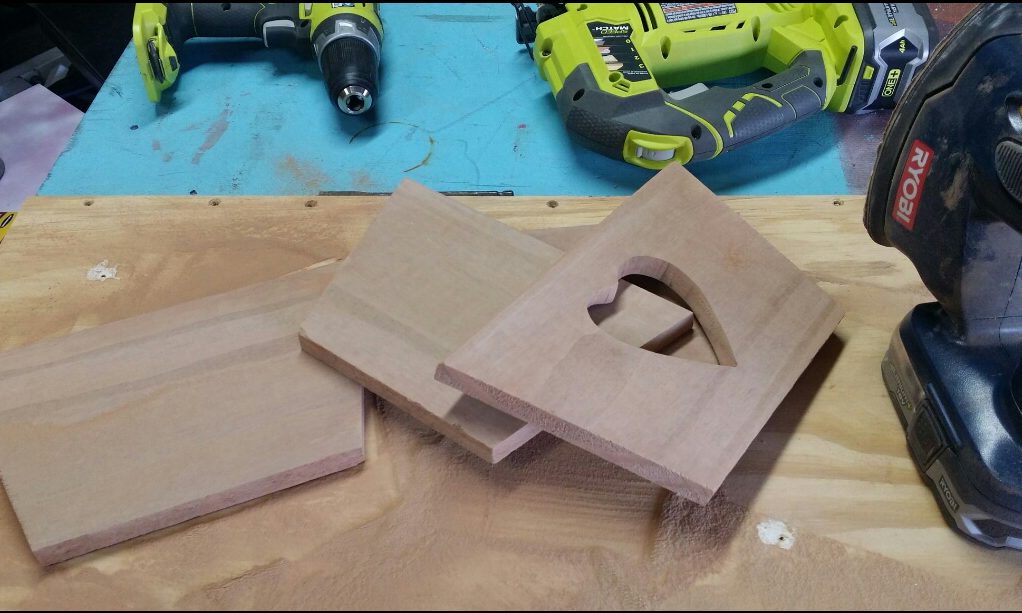
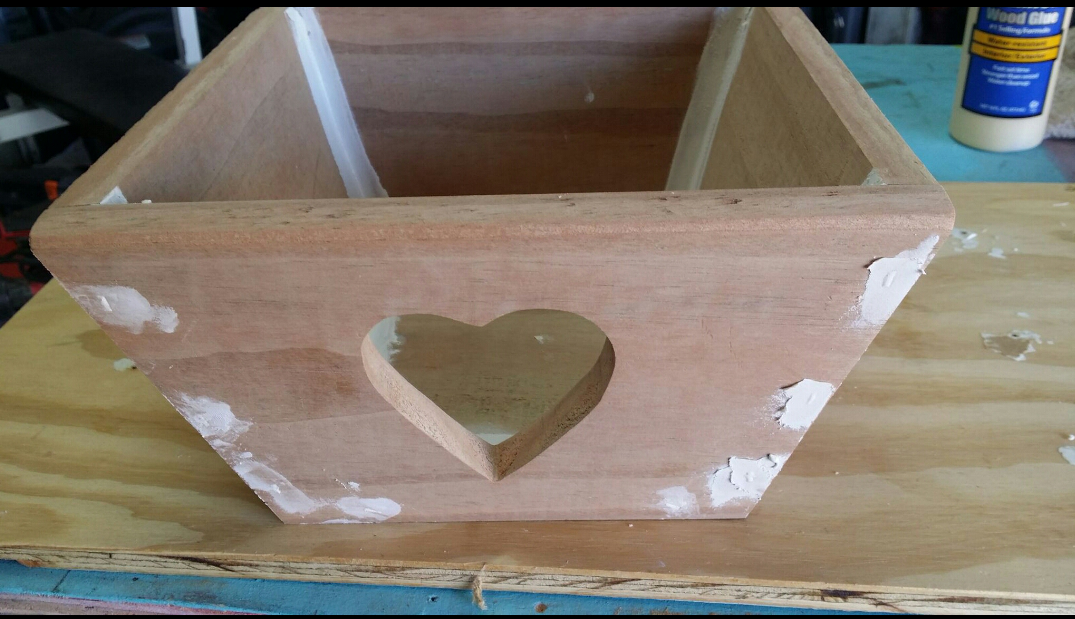

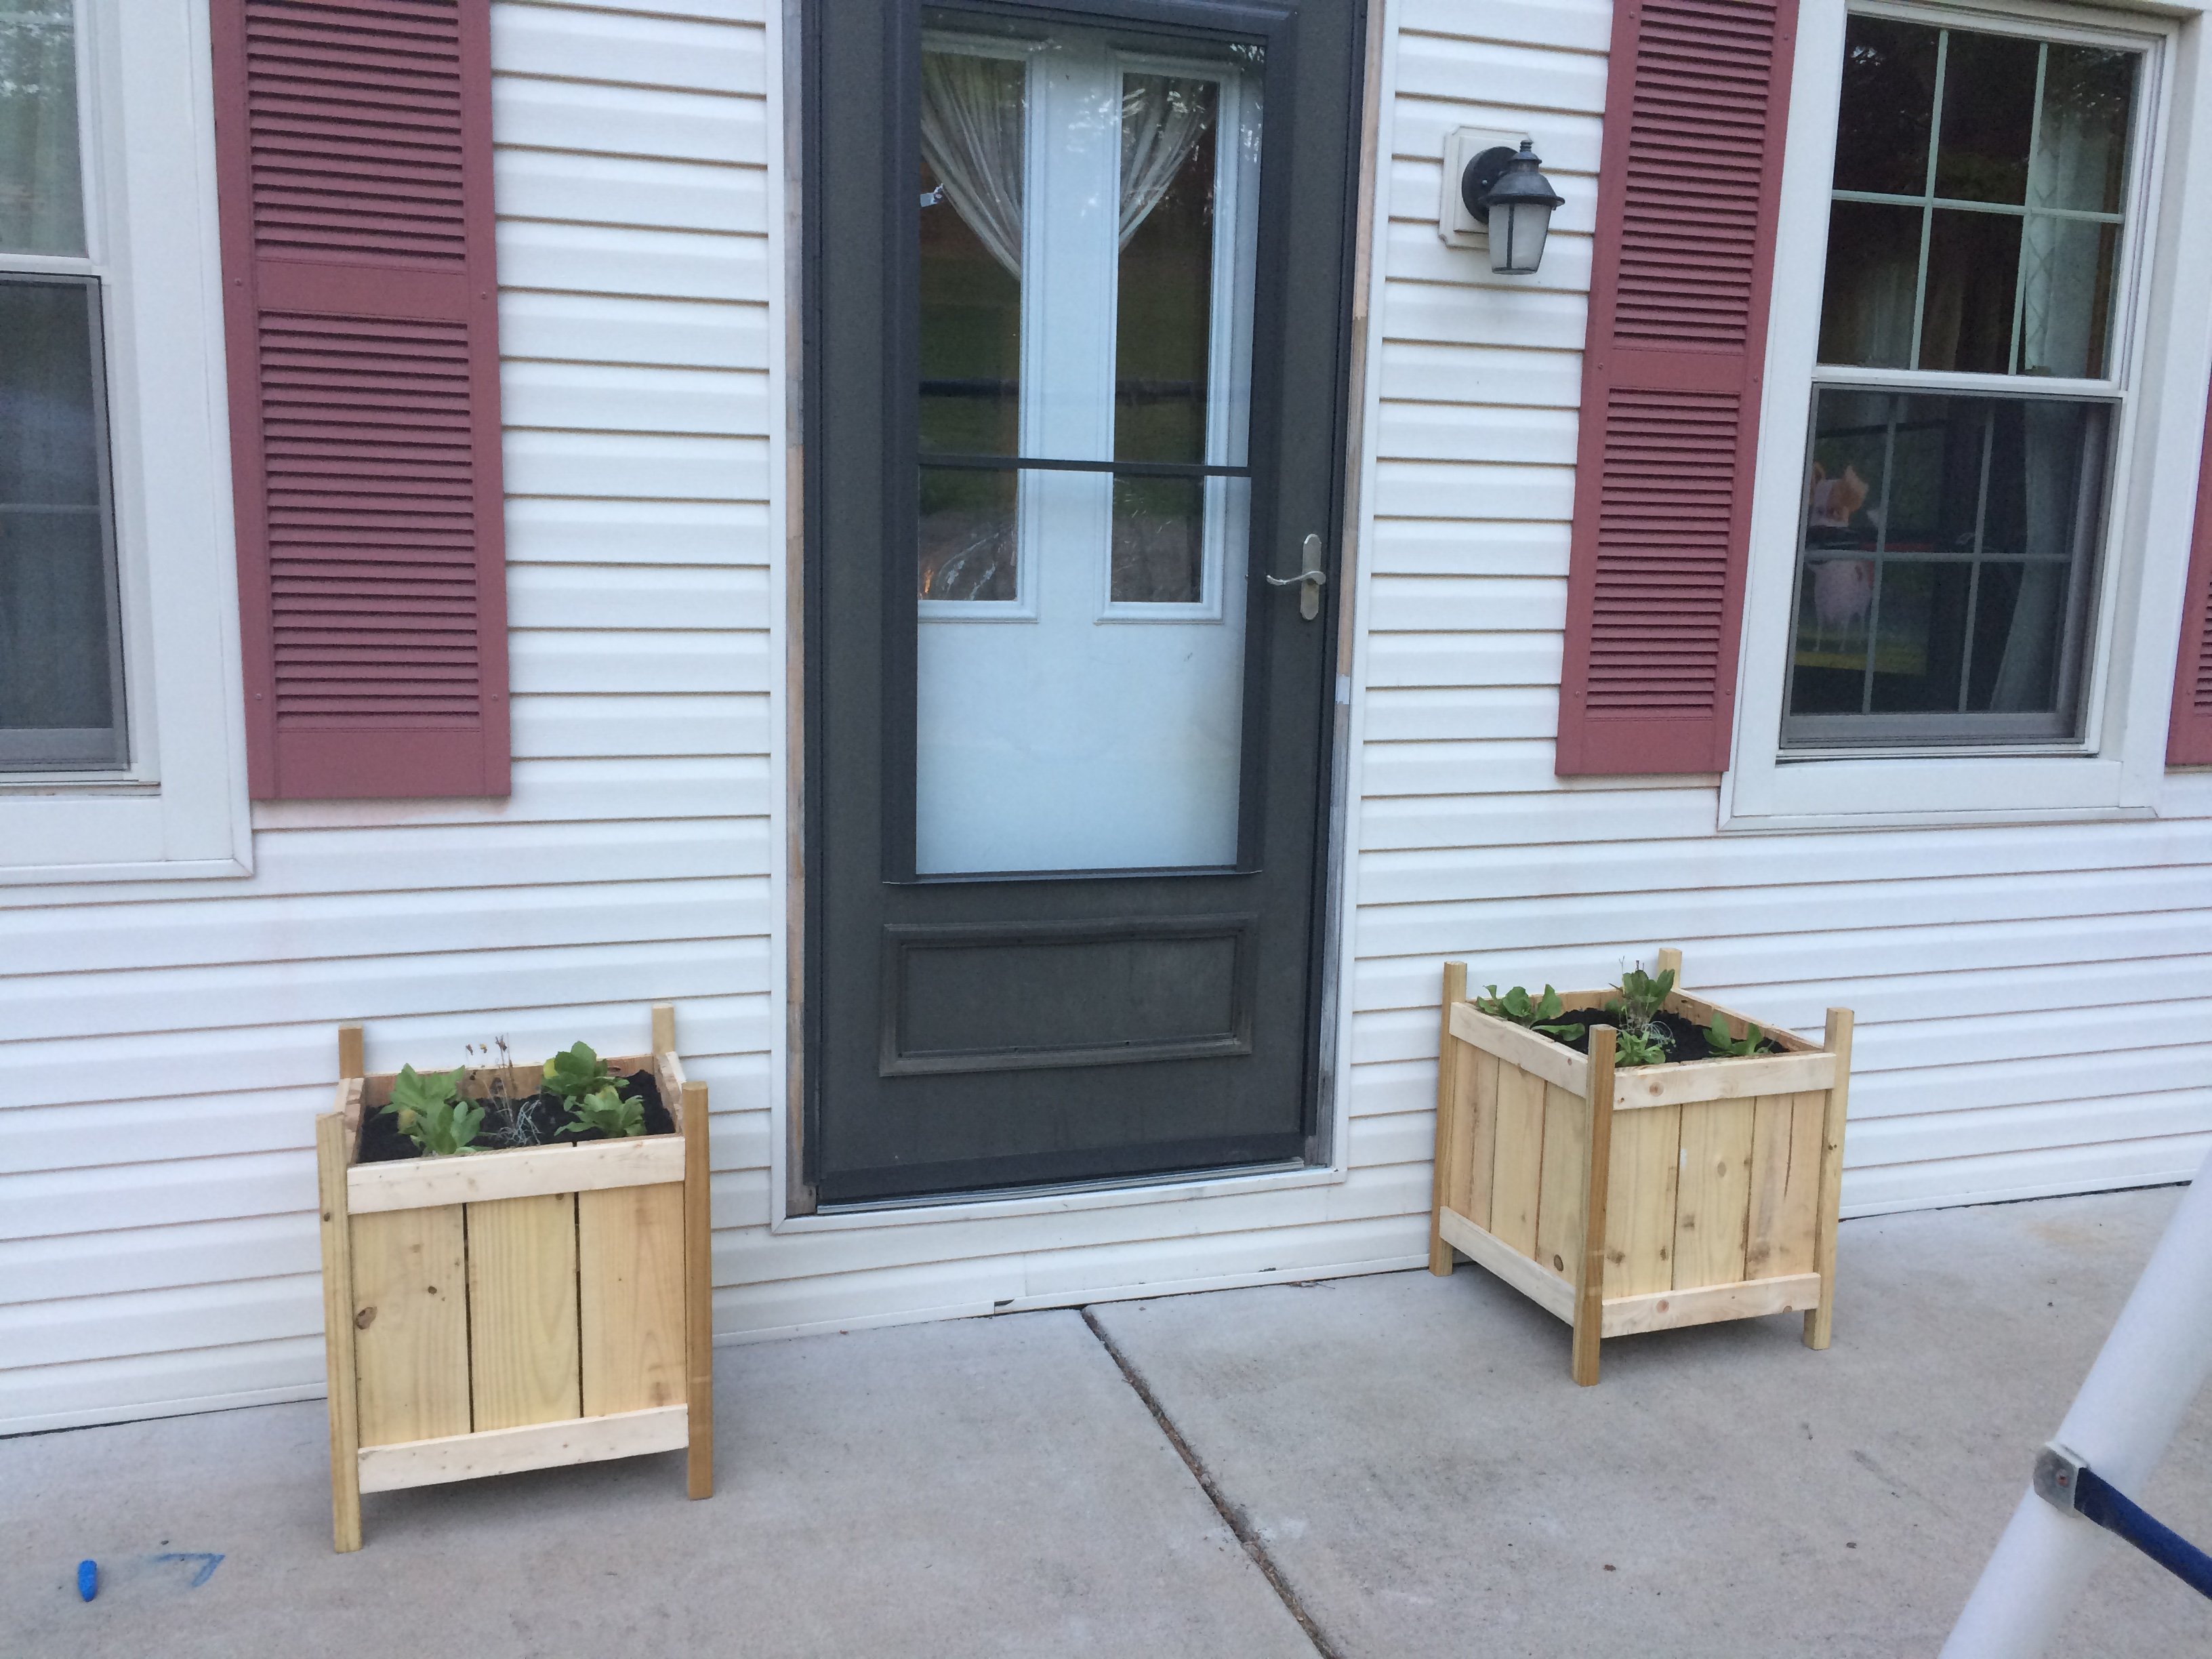
I made 2 for my bare front patio

I built the dresser to match the canopy bed.

Comments
Ana White Admin
Mon, 04/12/2021 - 20:00
Lovely!
Wonderful hang out spot, thanks for sharing!