Community Brag Posts
Dress-up Storage finally!

I made this for my girls' huge collection of dress-up clothes. I had to modify the plans a little to fit more costumes, and also to try to fit the longer length. I was hoping the longer dresses would hang without filling the bottom quite so much, but to make it tall enough for that the little one wouldn't have been able to reach the hanger bar.
I ended up with 4 foot boards all around - 6 pieces of 1x12 cut to 4 feet long, including the shelf at the top.
The eight year old cut the letters out of scrapbook paper and we glued them on with elmers glue then varnished over it.
All in all it looks great and holds 4 big plastic totes worth of dress-up (11 Halloweens/4 little girls/5 flower girl dresses and miscellaneous other outfits).
Now I'm just hoping they'll learn to use hangers and it will stay neat and tidy!
Construction was very easy and went well - took us longer to shop than it did to build!
Painting on the other hand took a long time, mostly just to wait between coats. I used spray paint and some polyurethane to gloss it up.
Estimated Cost
$50
Finish Used
spray paint, polyurethane
Recommended Skill Level
Beginner
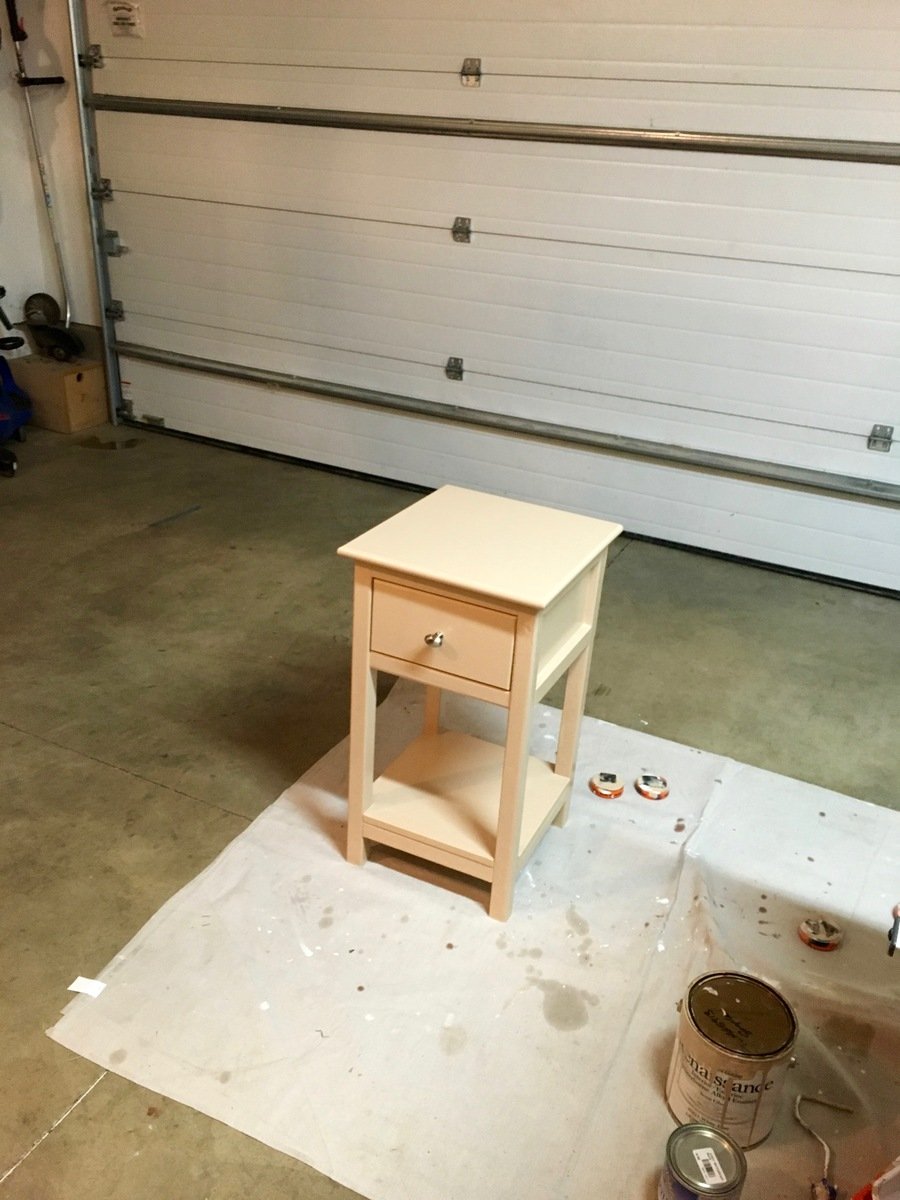
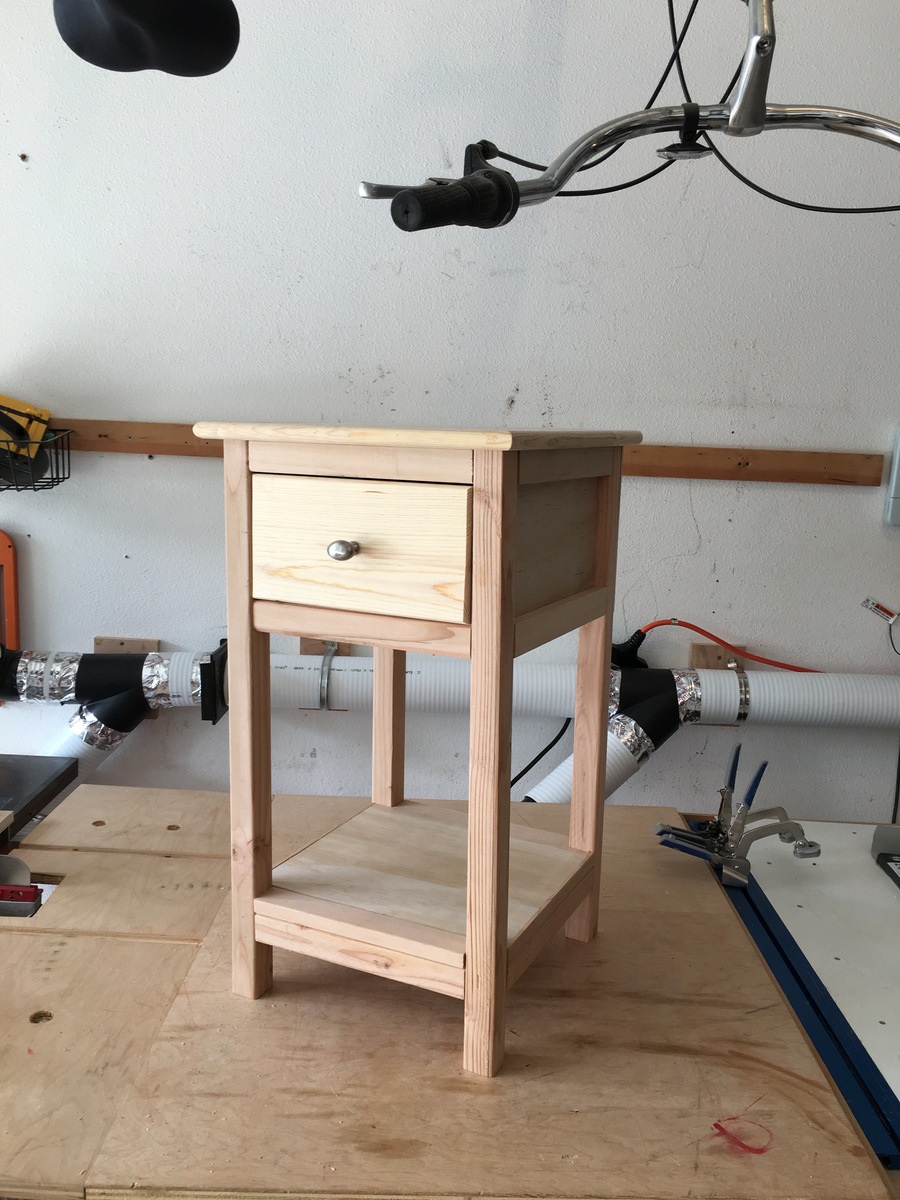
Easy night stand!
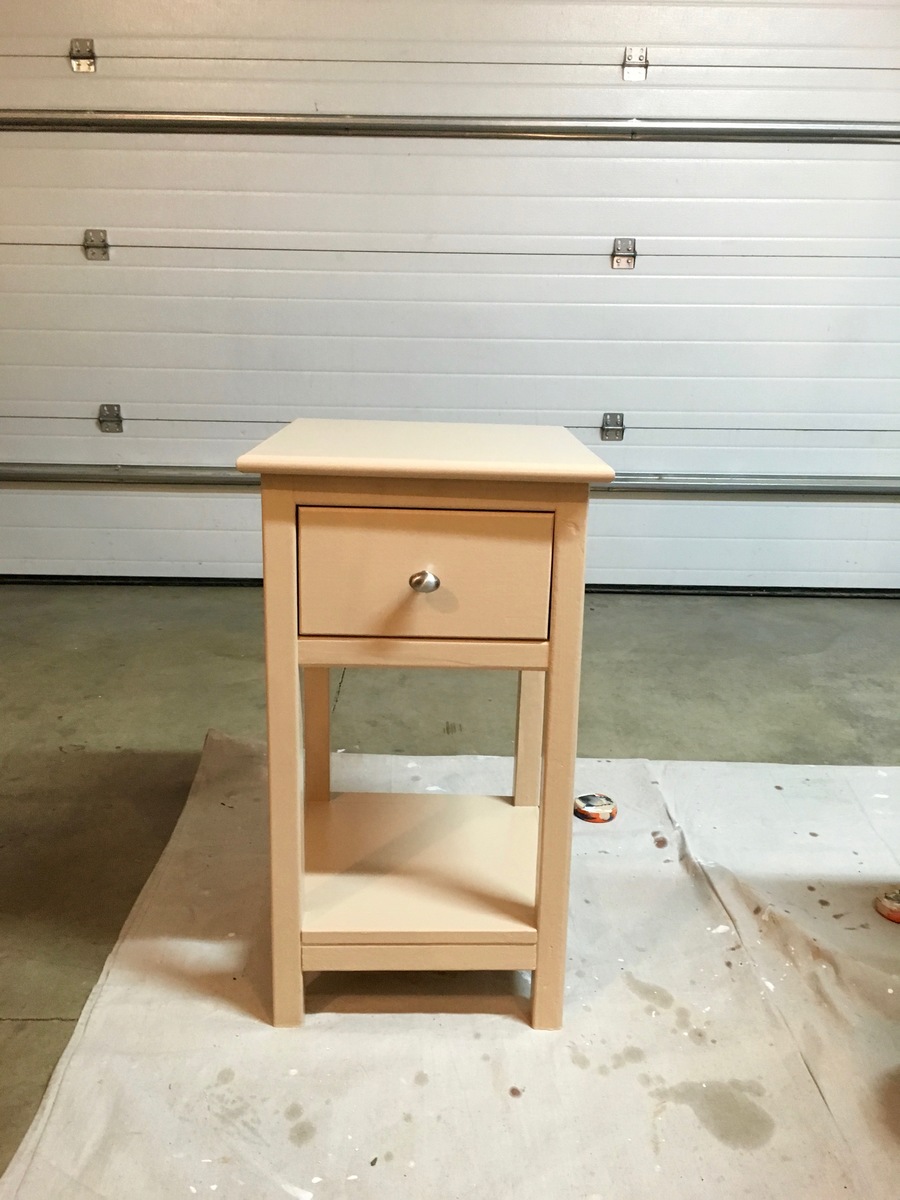
I made this fast and easy table, I was using as a small night stand in a small bunk room at my work for a coworker. I used scraps that I had and had him choose a paint I had on hand! Covered the top with polyacrylic to add some protection!
Built from Plan(s)
Estimated Cost
Free, since I used stuff on hand, otherwise 40-50???
Estimated Time Investment
Afternoon Project (3-6 Hours)
Finish Used
I used two coats of an old based primer and than two coats of paint, which was Renaissance Alkyd paint. 3-5 coats of polyacrylic on the top surface.
Recommended Skill Level
Beginner
Comments
Reclaimed beauty
All wood used was reclaimed. Some tabletop pieces were warped, but added character to the table. Took about four 6-hour days with interruptions in between. I bought the stain from the Habitat store for $1.50 and the poly was left at the house we recently moved into. The stain was brushed on then rubbed in with a rag. I originally used about six coats of oil-based poly and when that didn't seem to work, I applied 2 coats of Polycrylic.
Built from Plan(s)
Estimated Cost
$20
Estimated Time Investment
Weekend Project (10-20 Hours)
Finish Used
Colonial maple stain with water-based satin poly.
Recommended Skill Level
Beginner
Modern Park Bench Plan
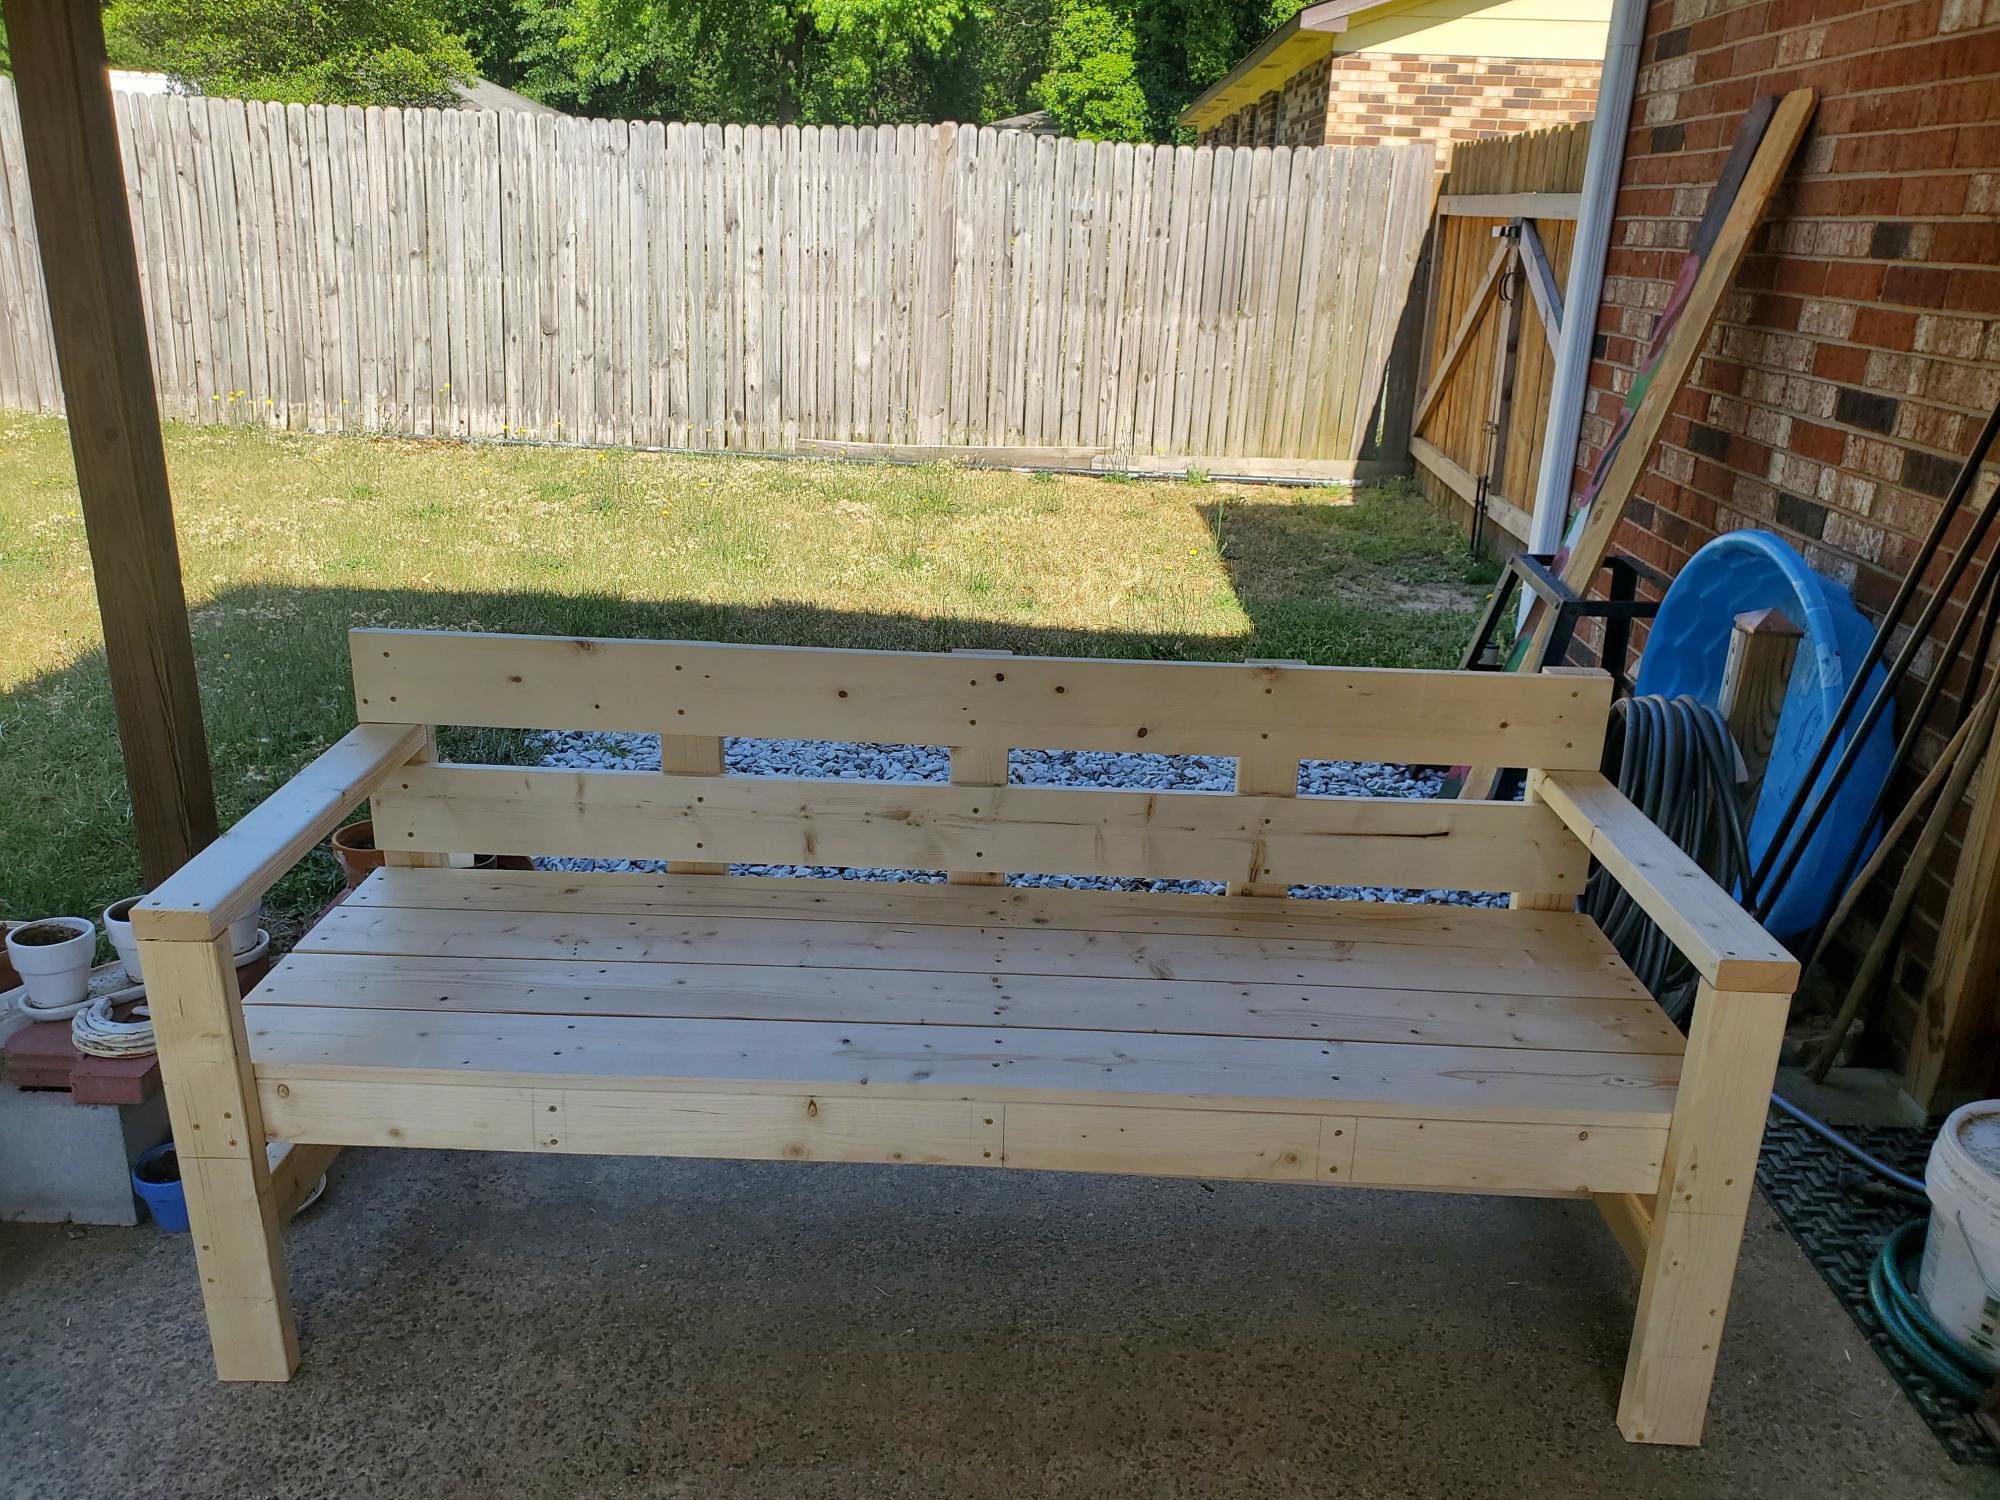
I love the plans for this bench! Very well thought out plans, easy to cut the wood and easy to put together. Thank you for all the hard work in coming up with all of these great plans!
Reanna Tovar
Built from Plan(s)
Comments
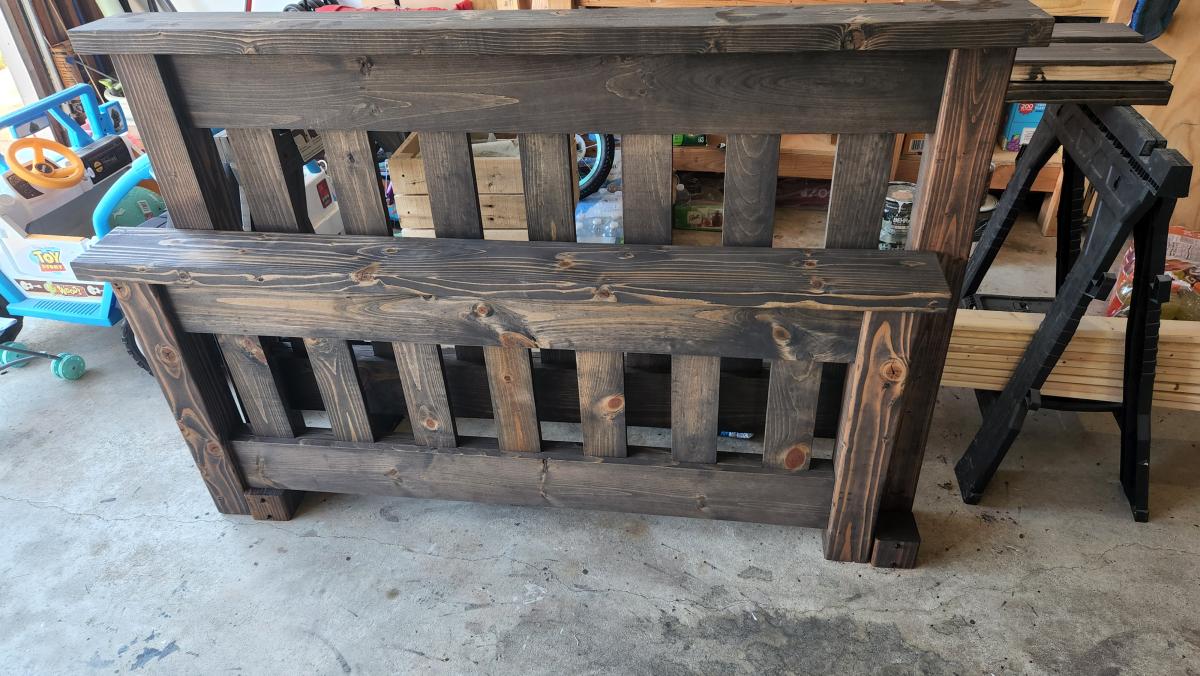
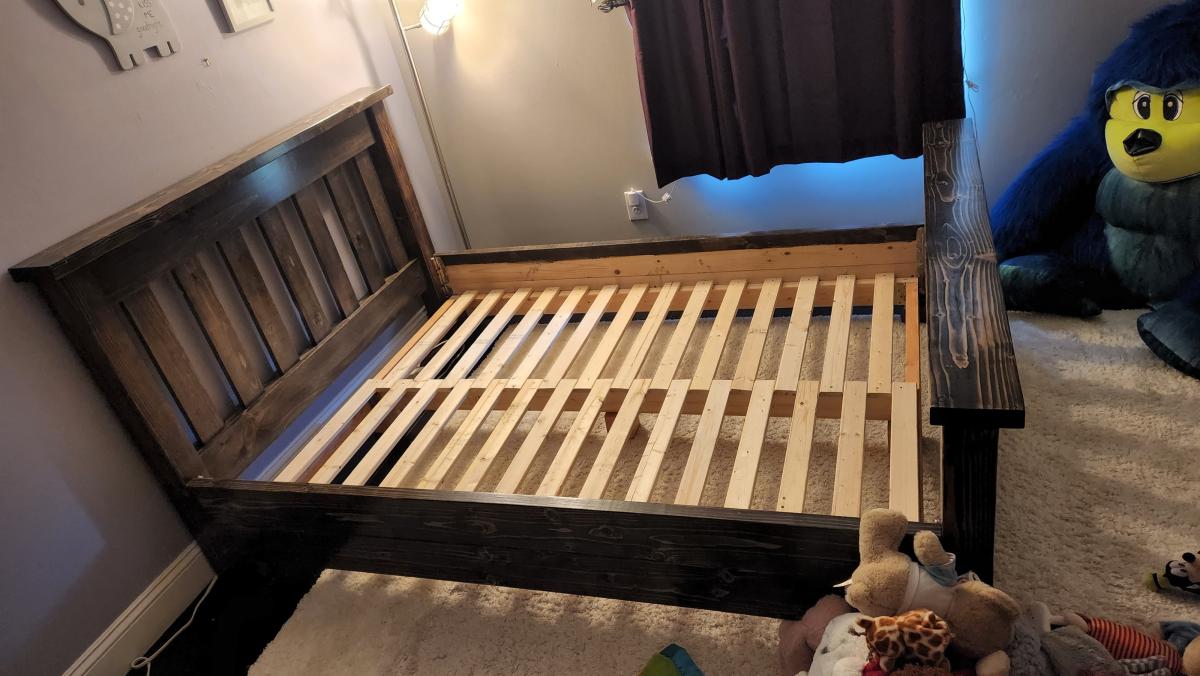
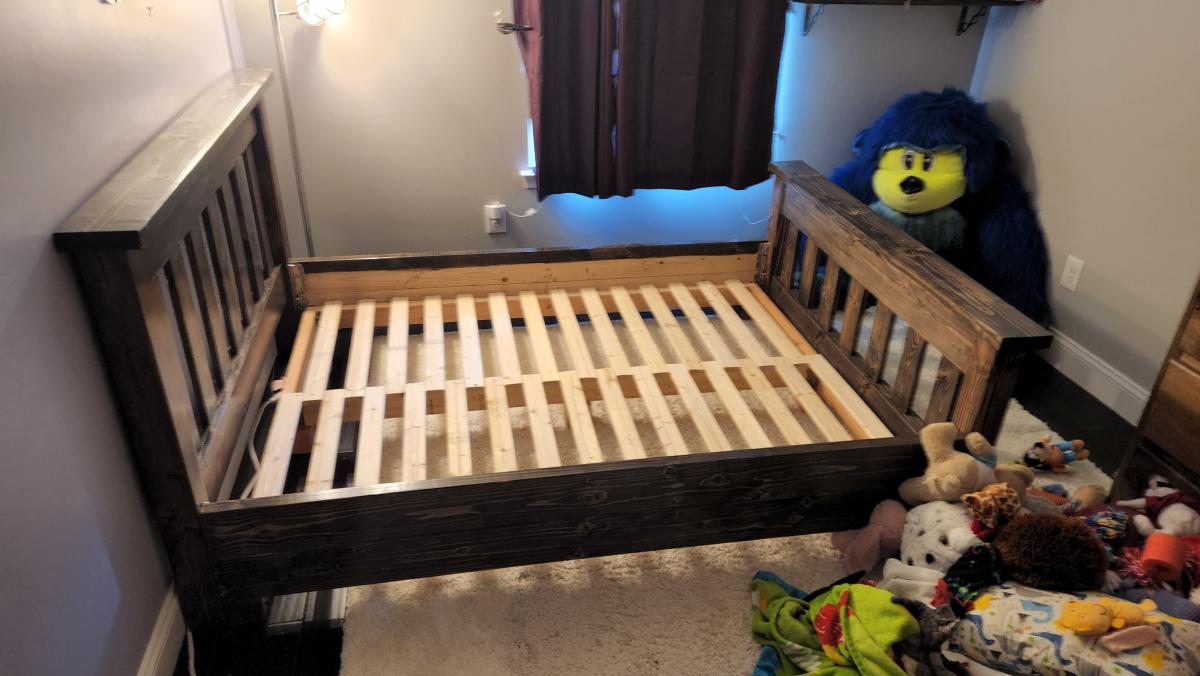
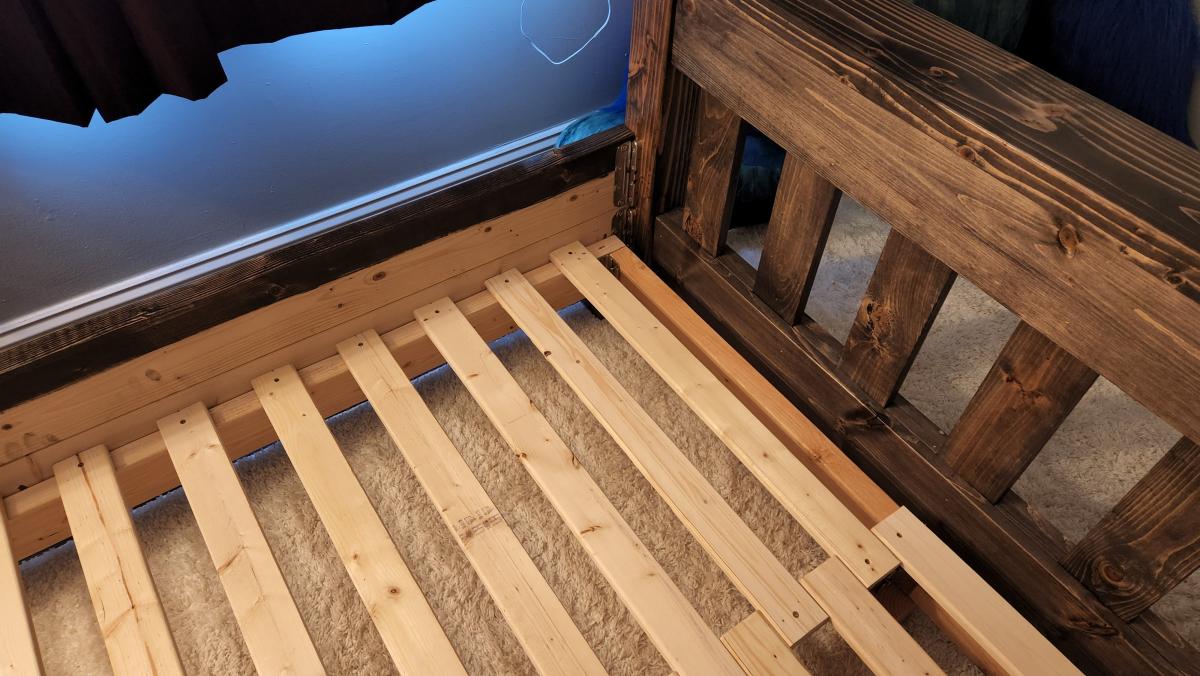
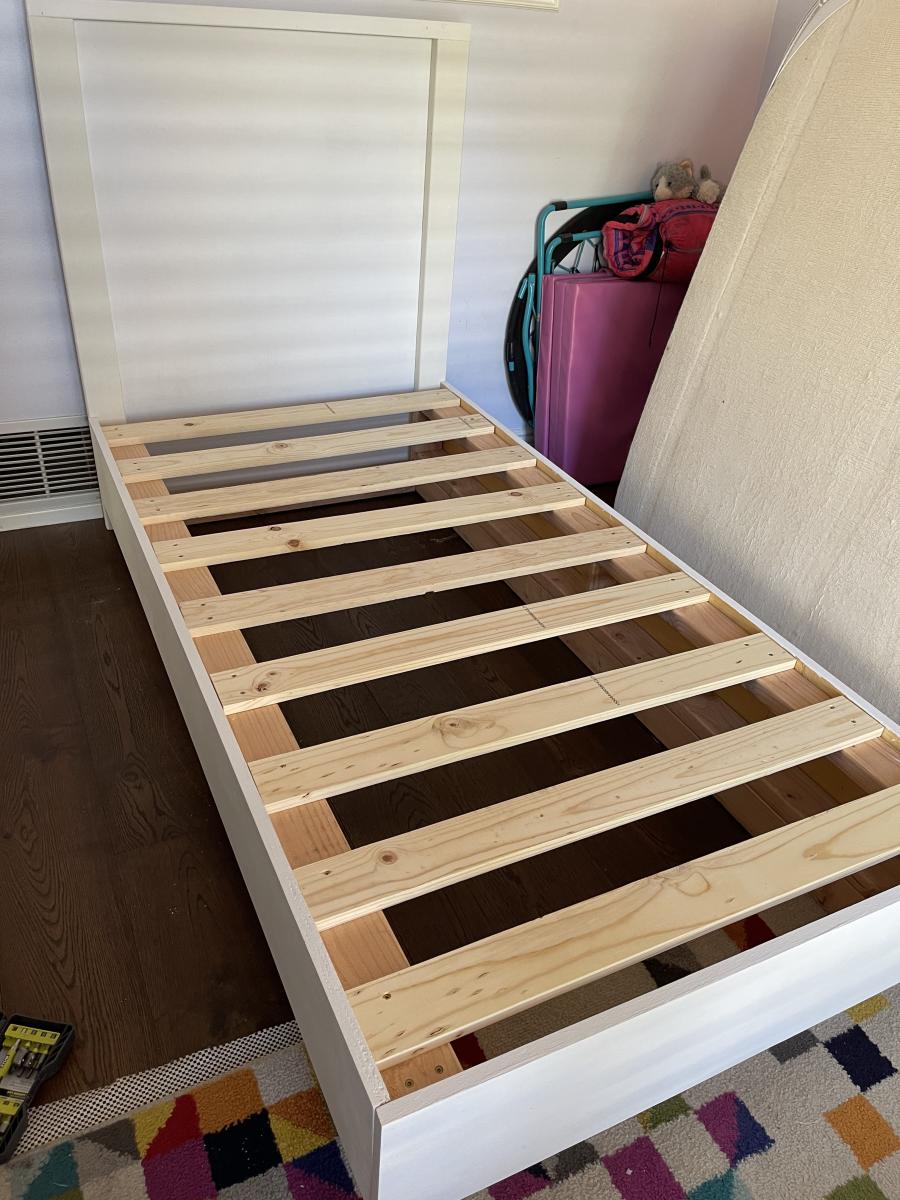
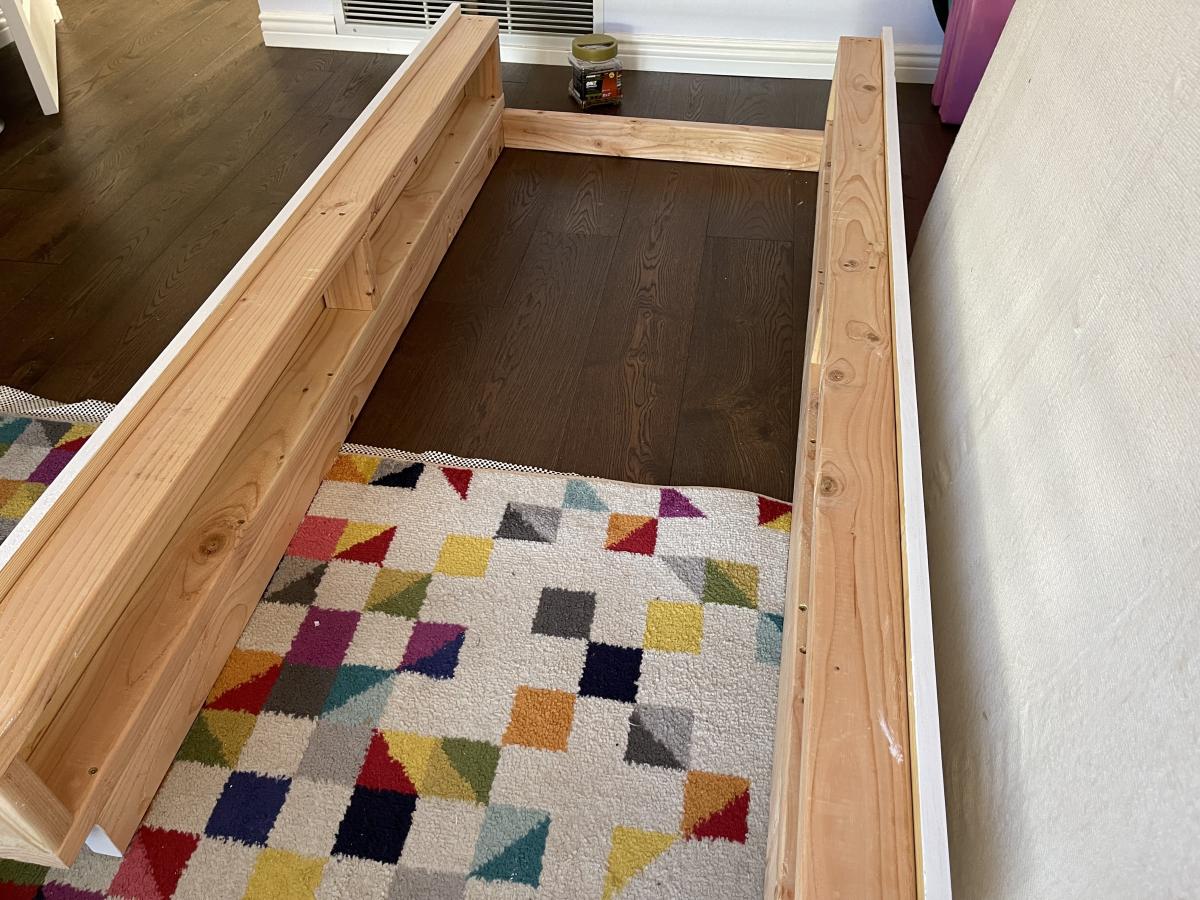
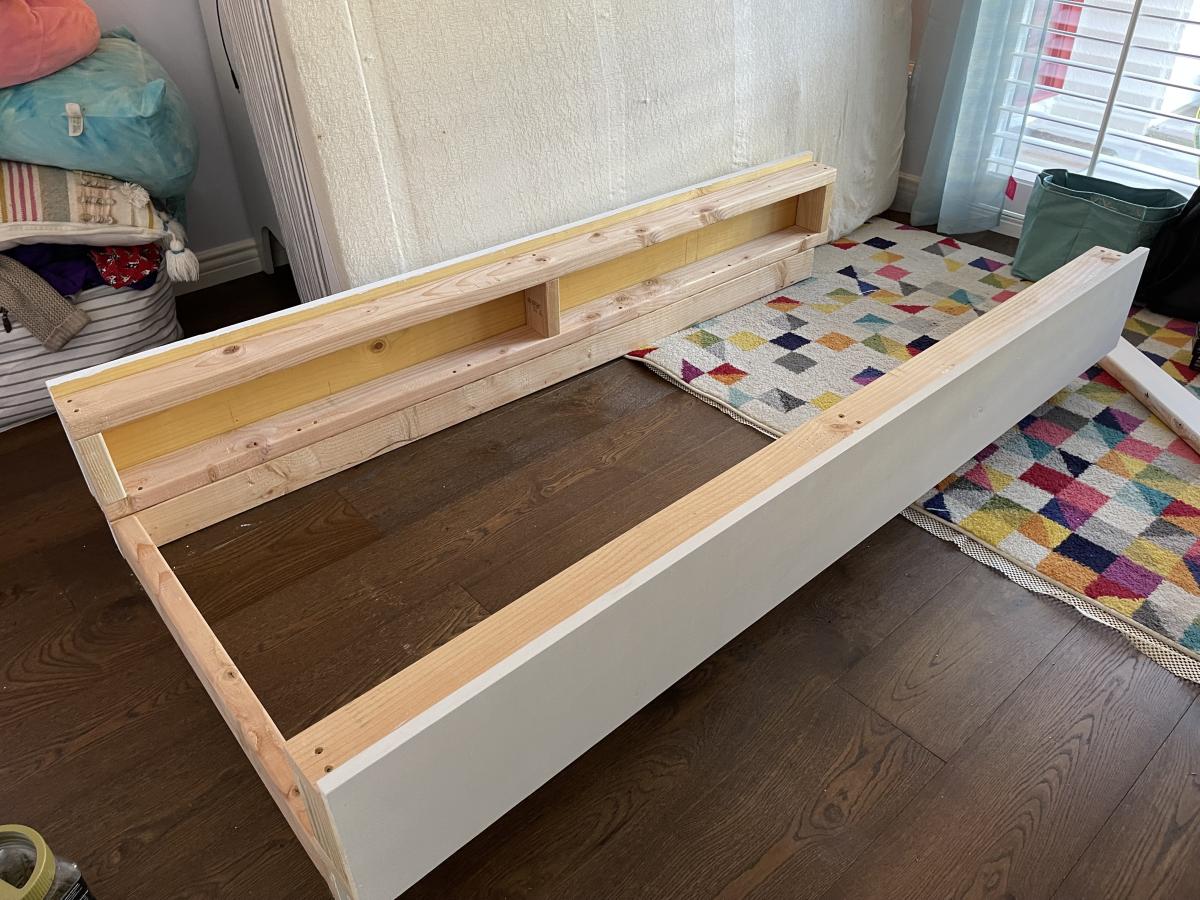
Simple Bed Modified
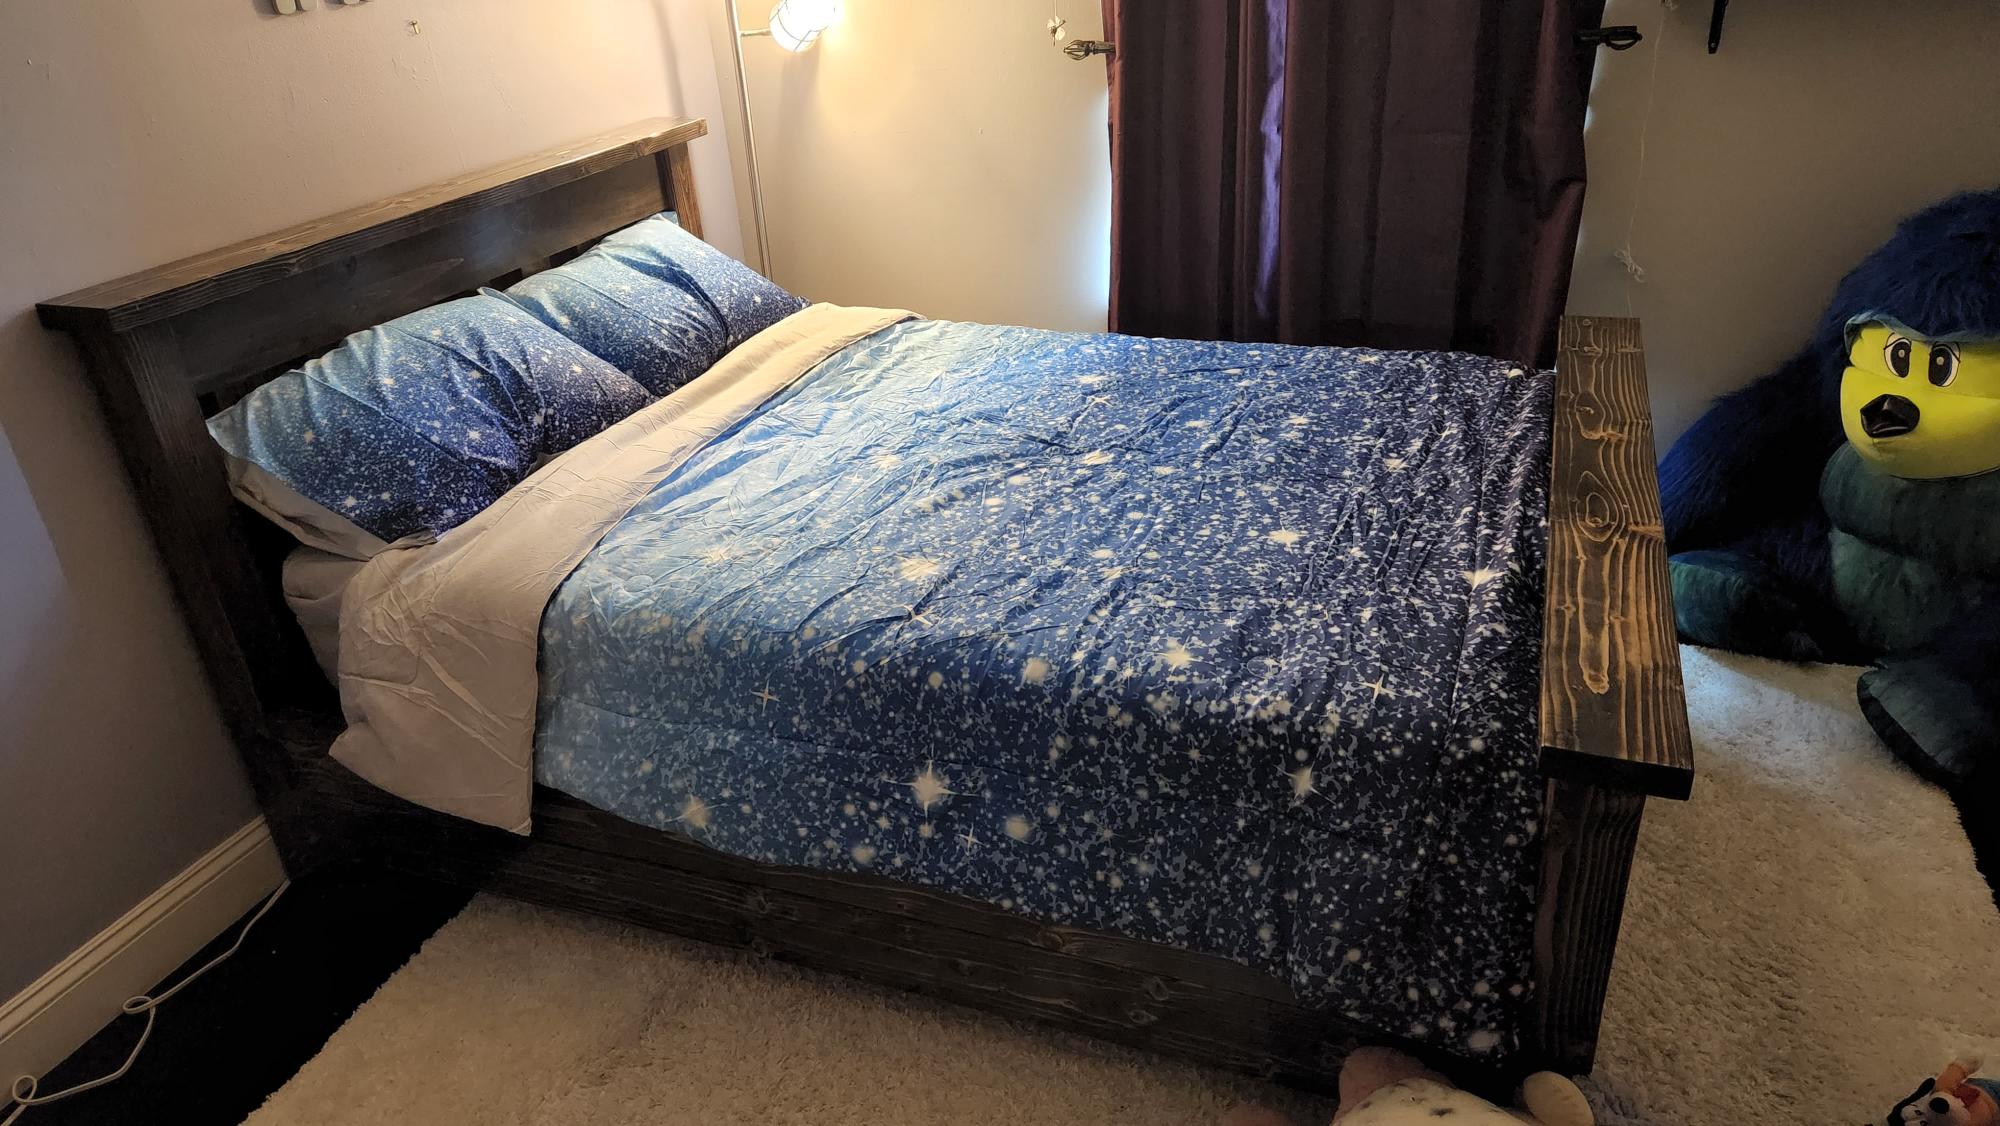
My daughter needed to get out of her Toddler Bed so I built this quickly. Used 2 2x6 for each rail, and cut down the height of the headboard and footboard. Also as always I use Rocklers 5" Surface Mounted Brackets for all beds. I have the rails also sitting on 3 inch blocks to support the extra jumping this bed will endure by a 4 yr old.
Built from Plan(s)
Comments
My custom cedar potting table
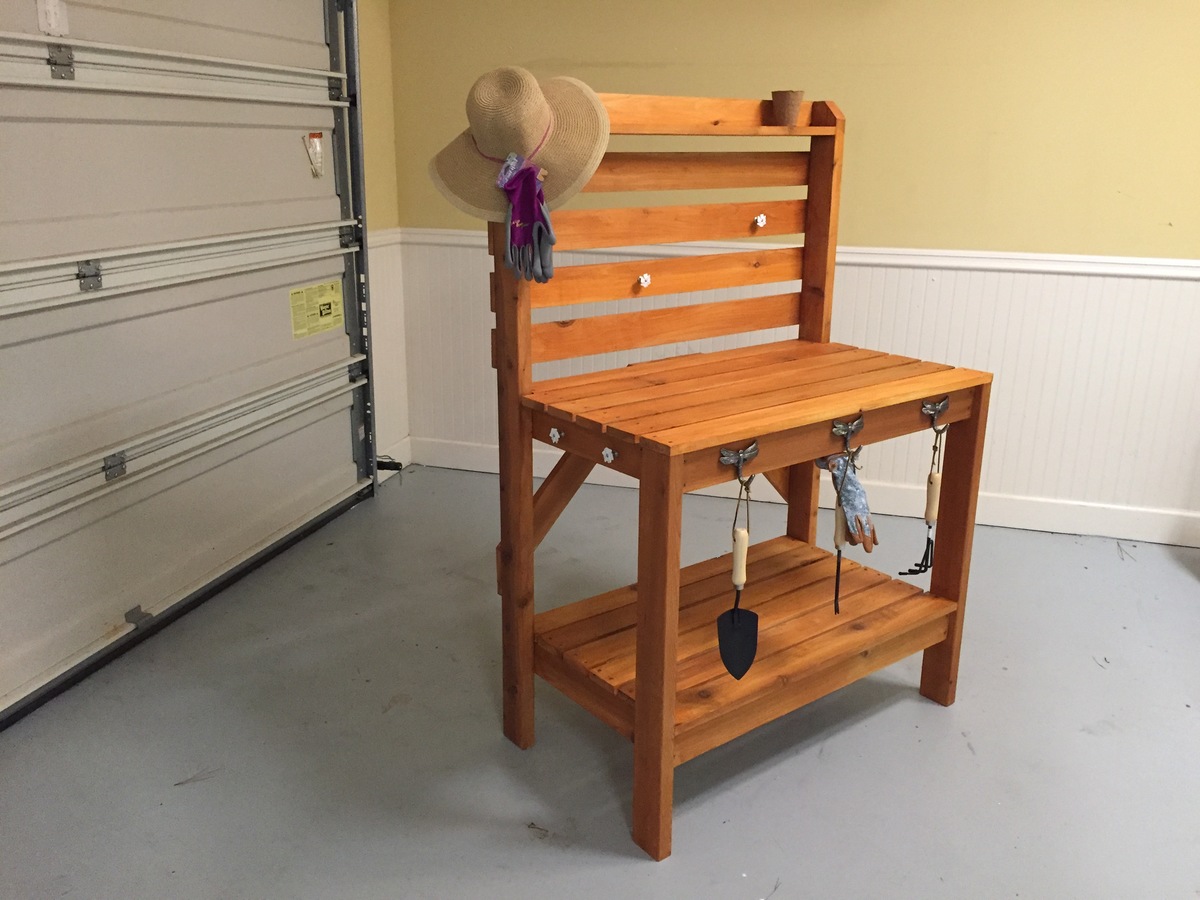
Christmas project for the back. Built it from cedar from big box store.
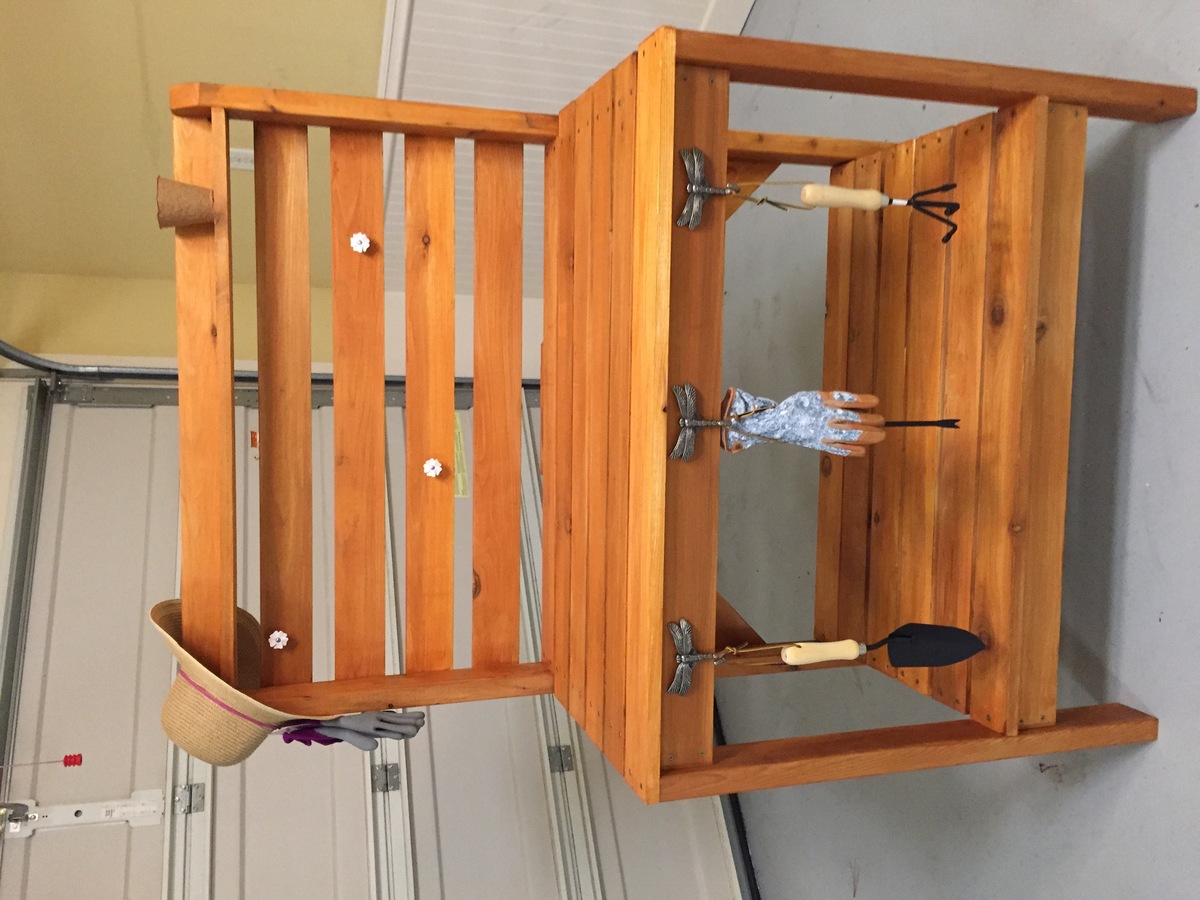
Built from Plan(s)
Estimated Time Investment
Weekend Project (10-20 Hours)
Finish Used
Transparent cedar Valspar exterior stain sealer
Recommended Skill Level
Beginner
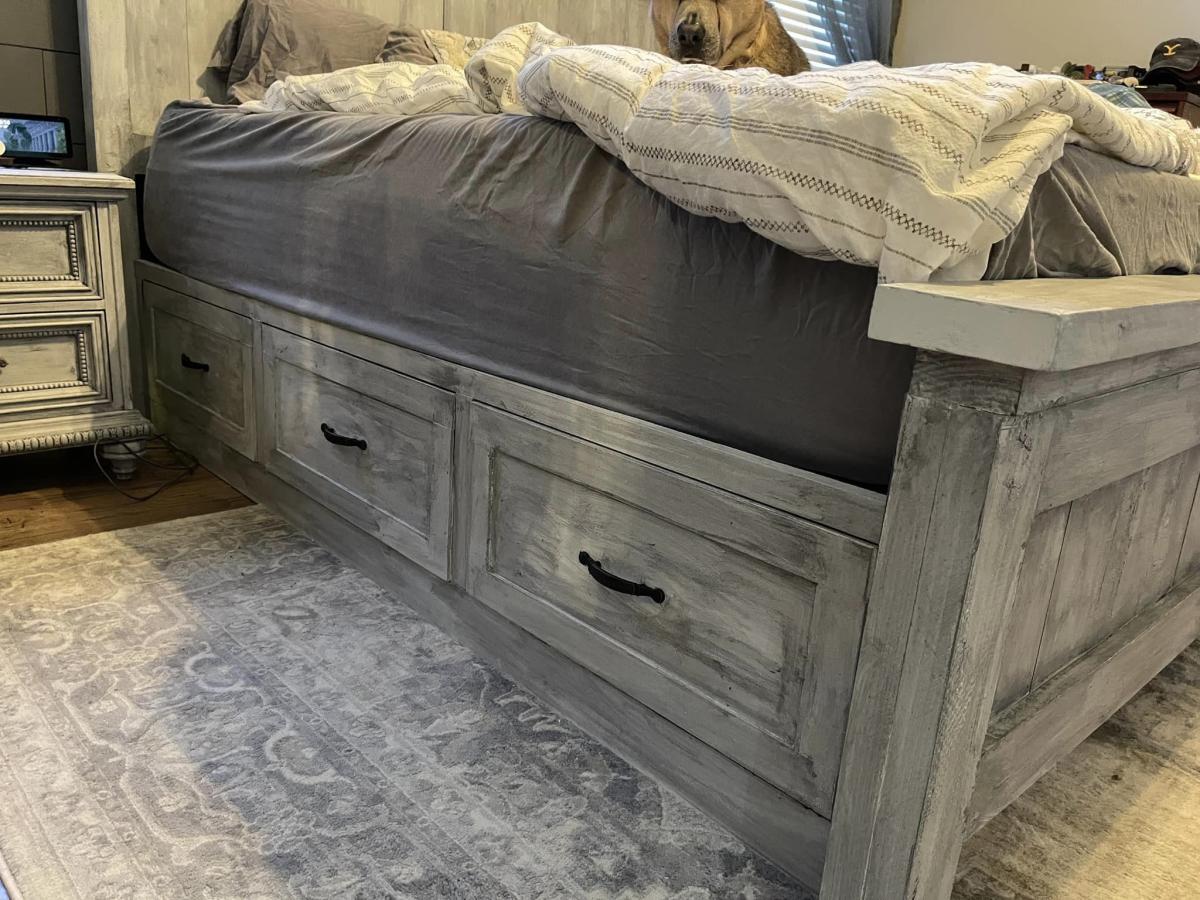
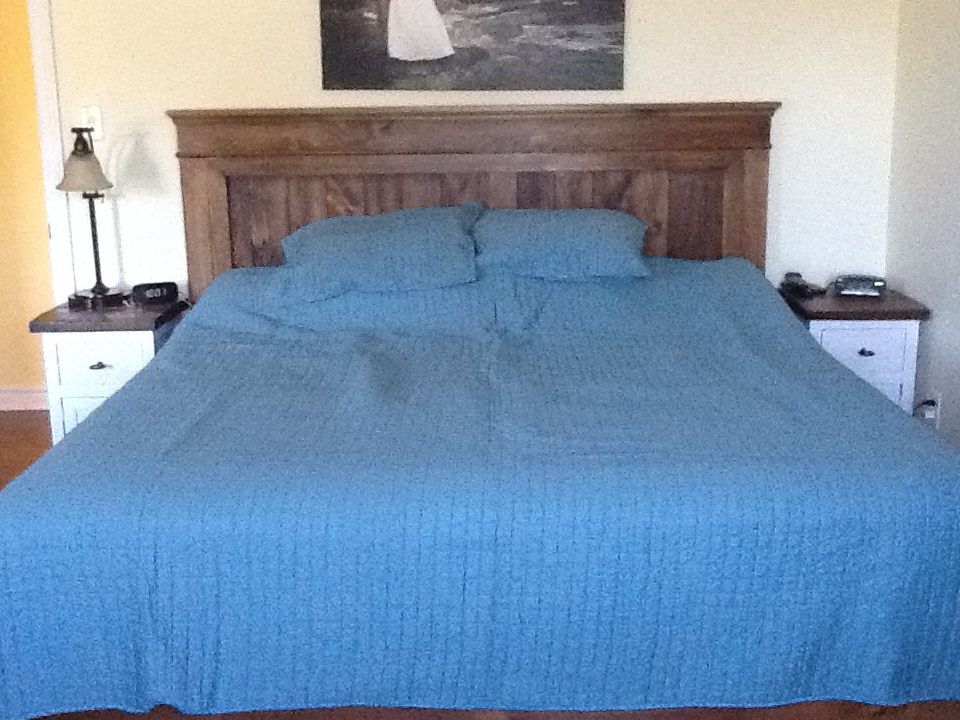
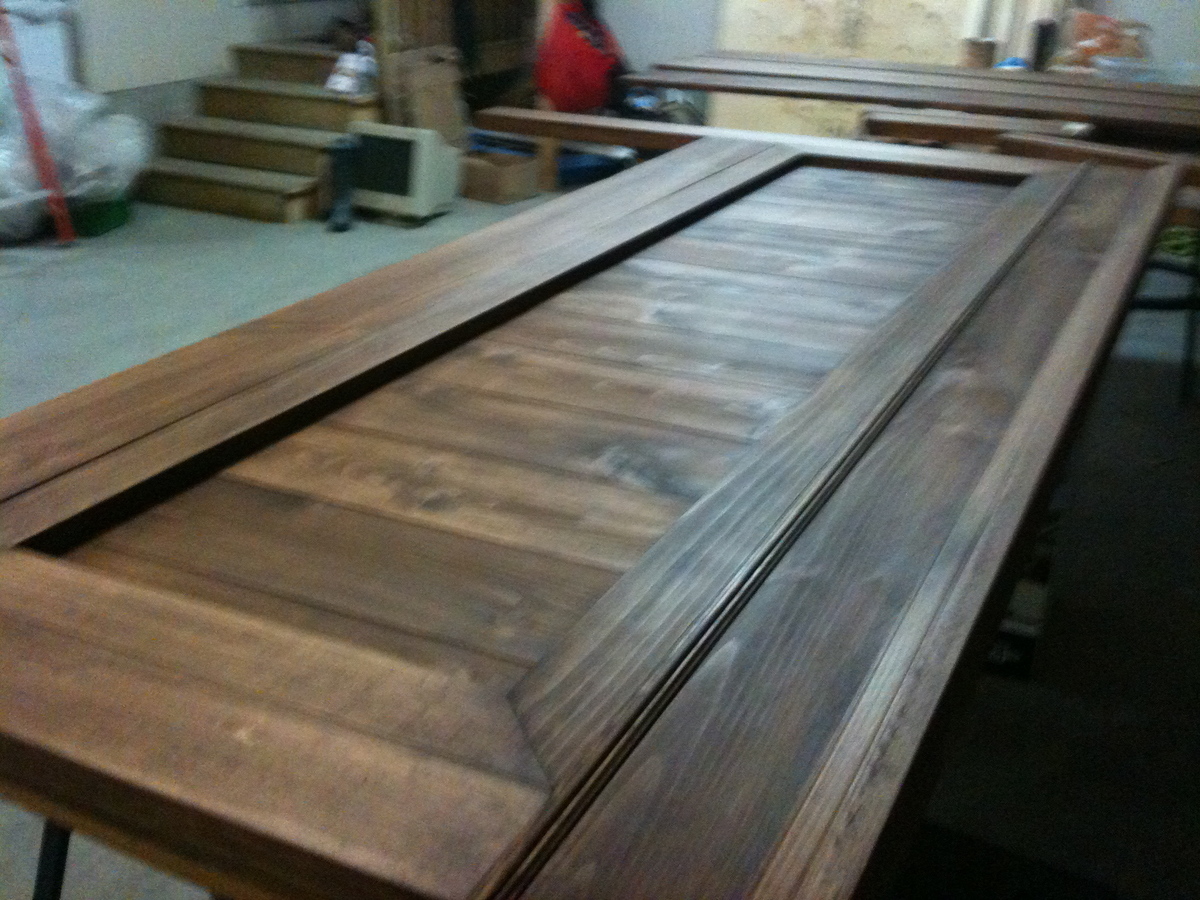
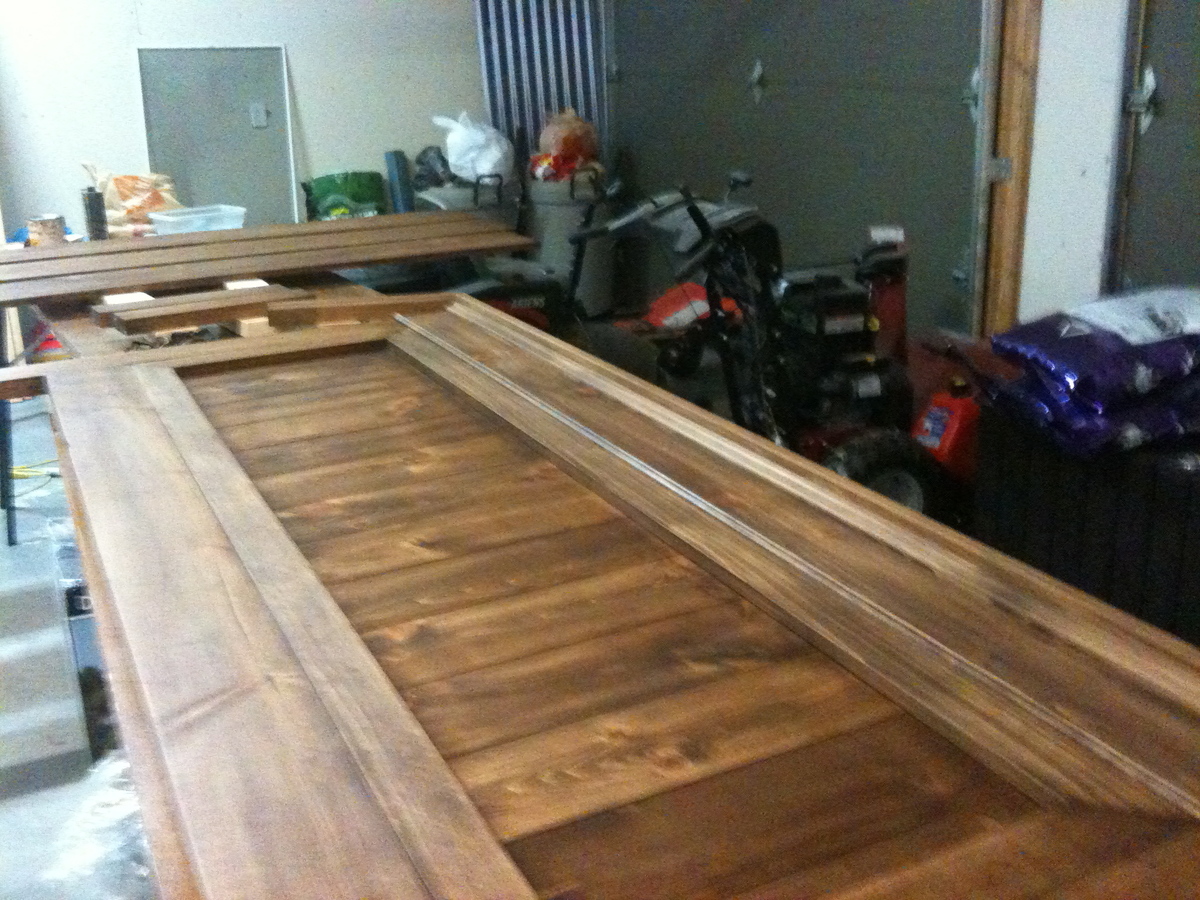
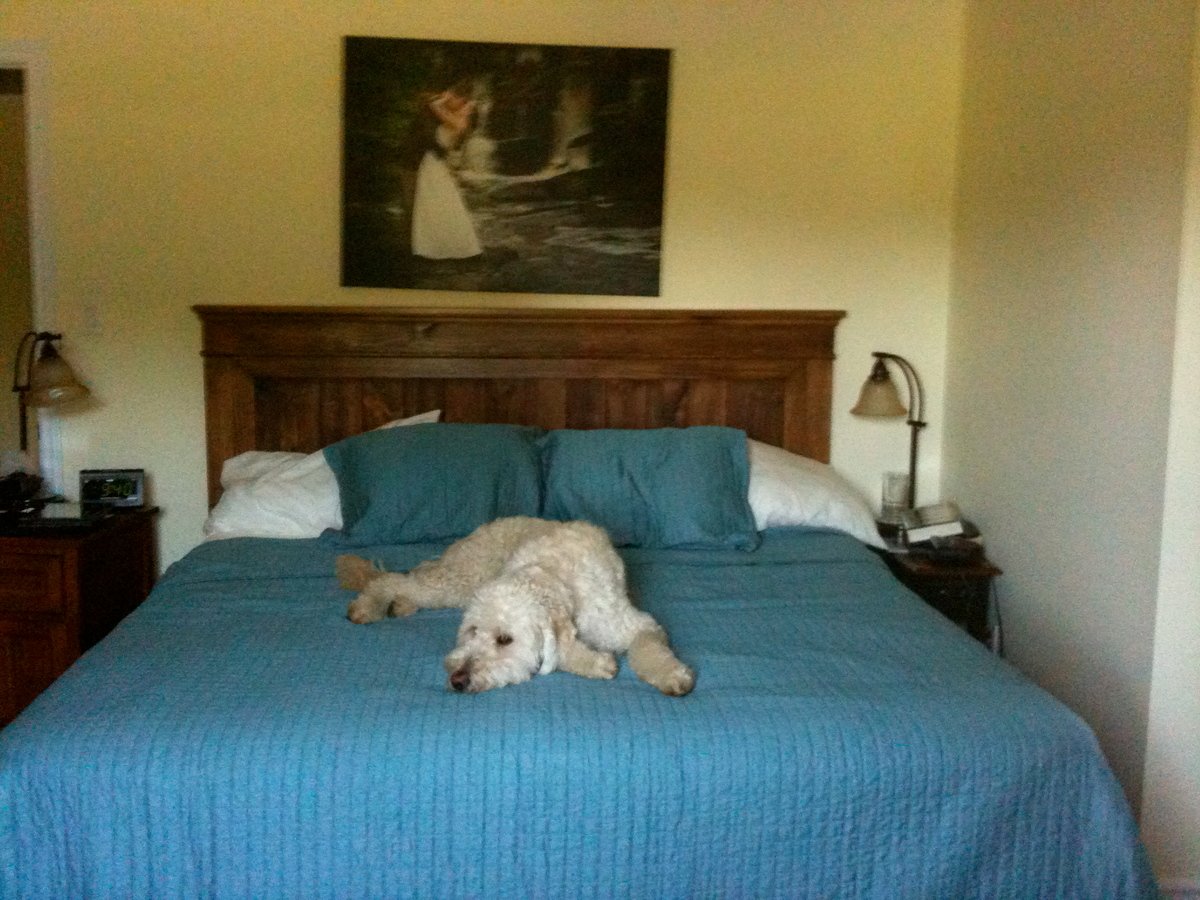
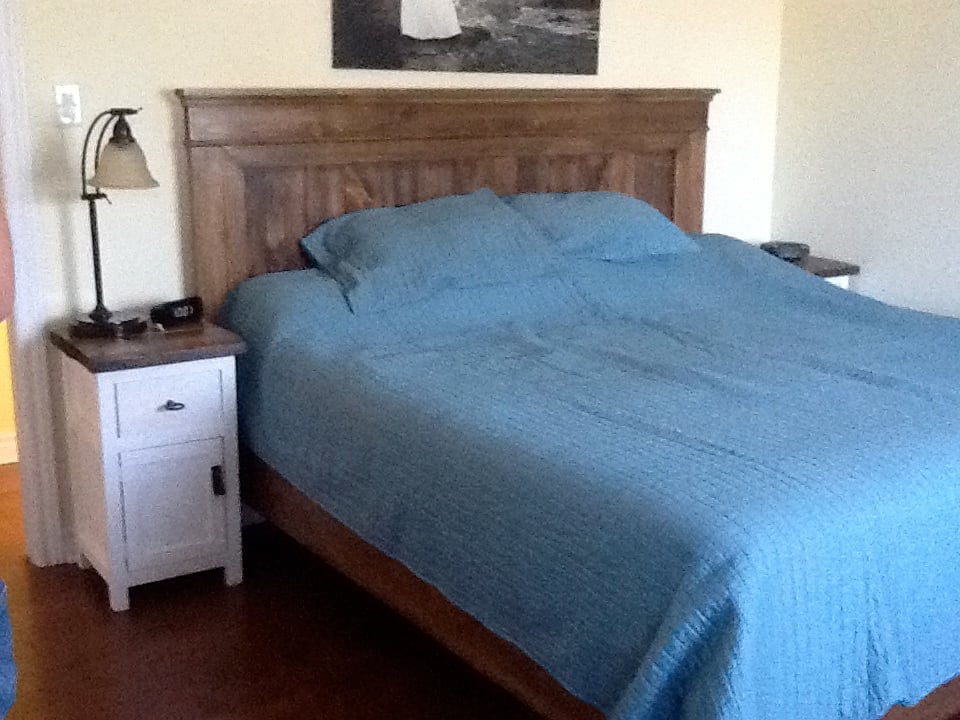
King Farmhouse Bed
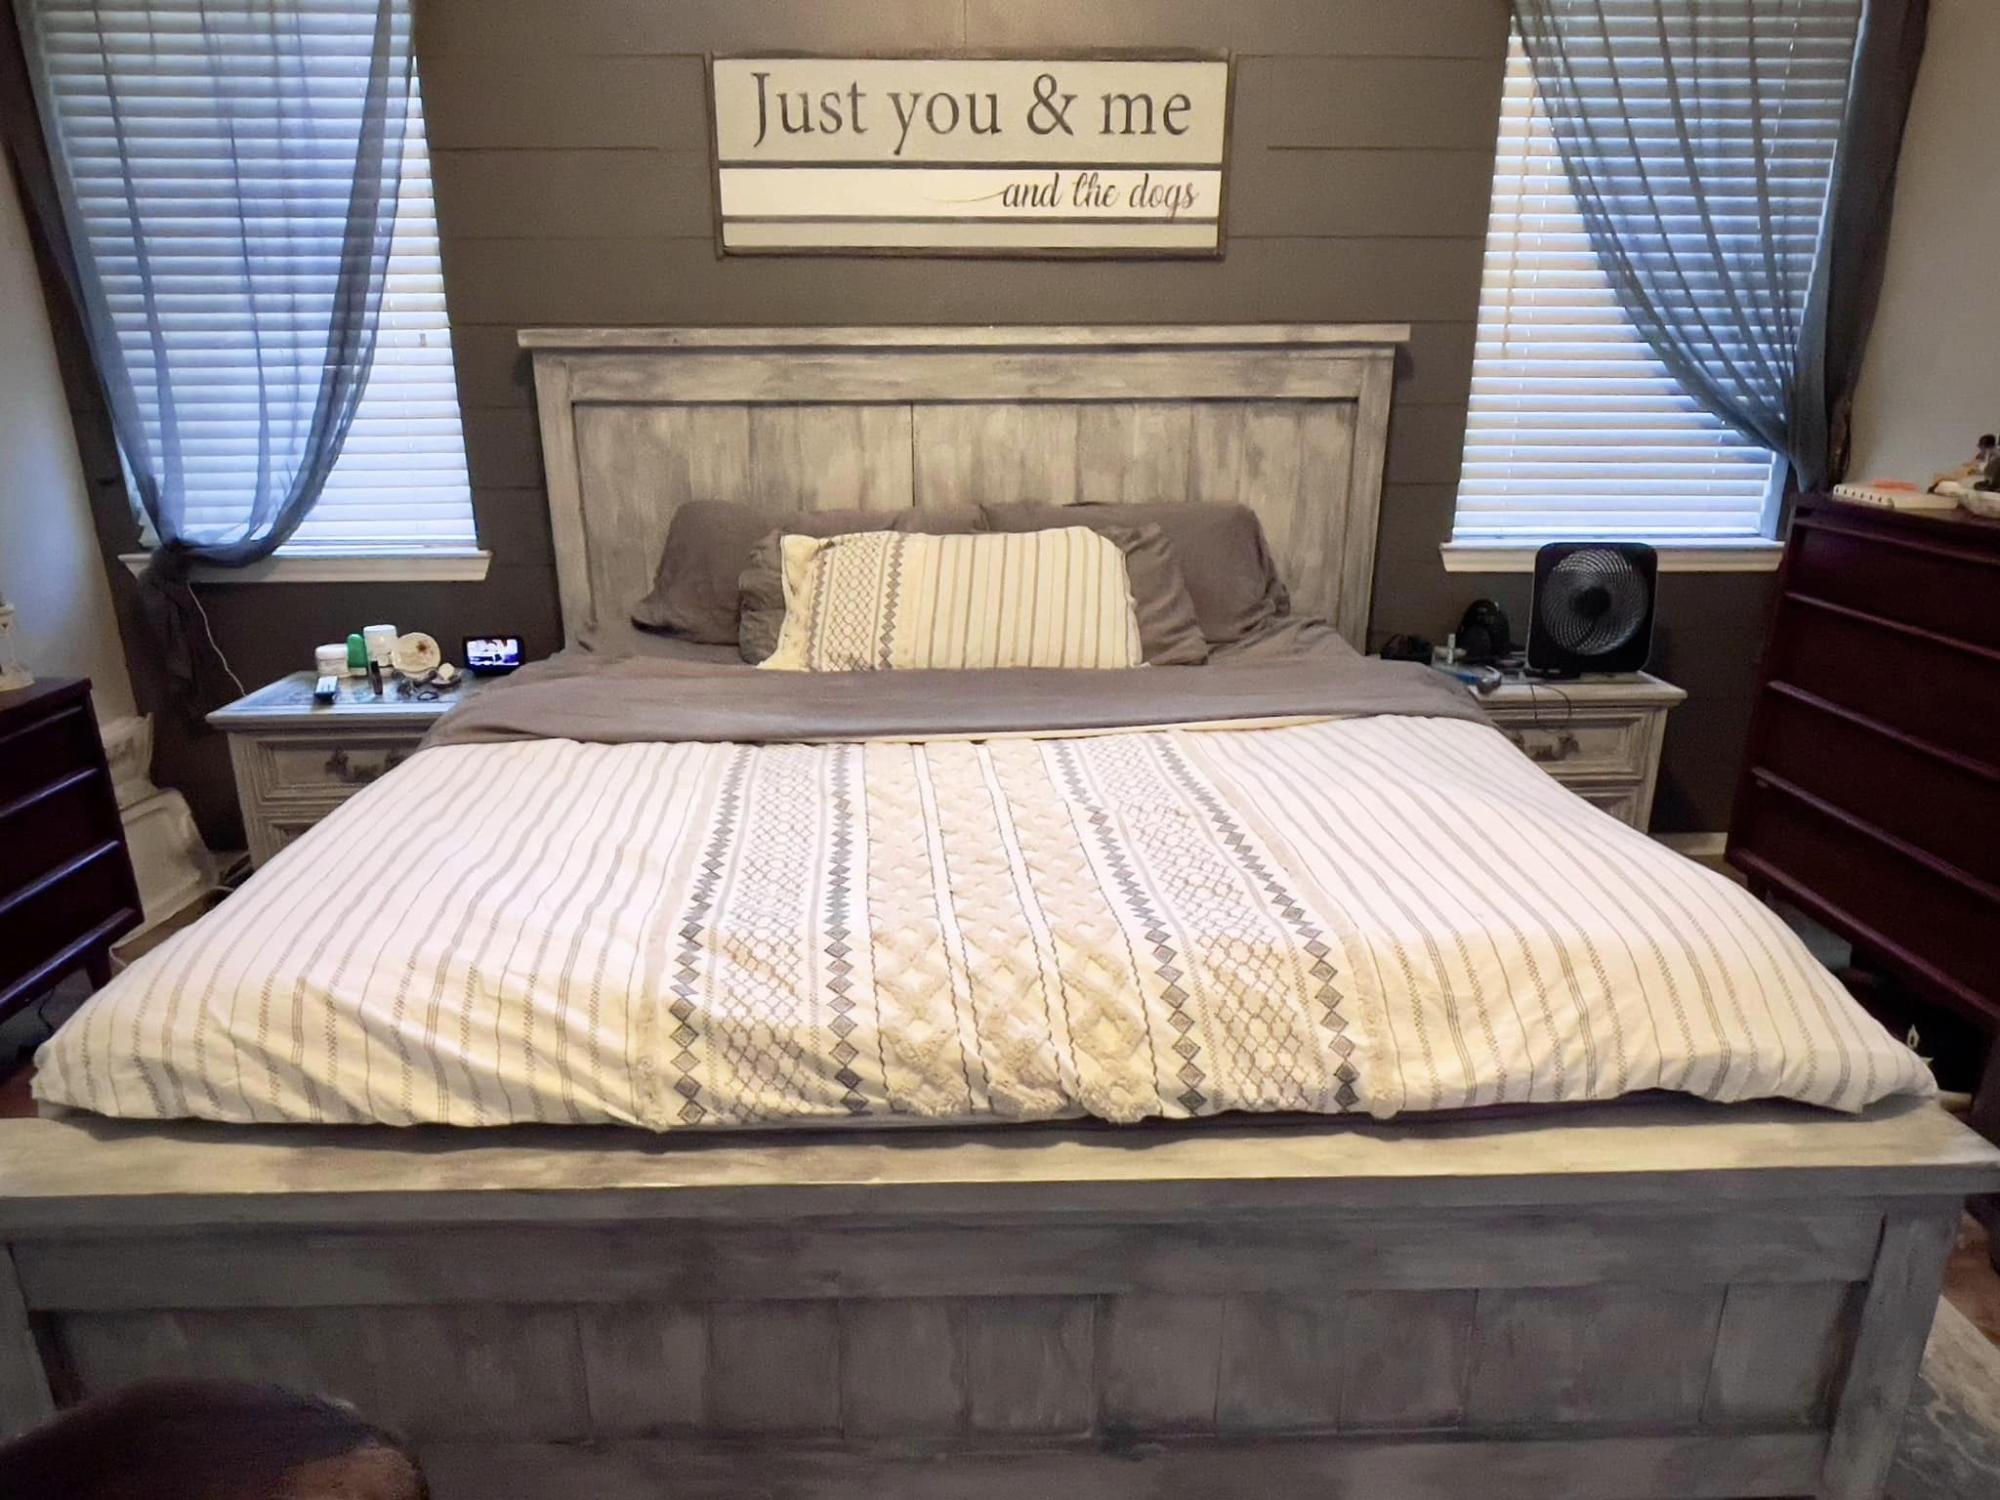
This is a King size farmhouse bed that I made based off of Ana's plans. I love it! I painted it a light gray and then glazed over it with a darker gray. Thanks for looking! - Wendy
Built from Plan(s)
Comments
Tue, 10/04/2022 - 08:13
Gorgeous Storage Bed!
WOW, this is amazing, job well done! Thank you so much for sharing!
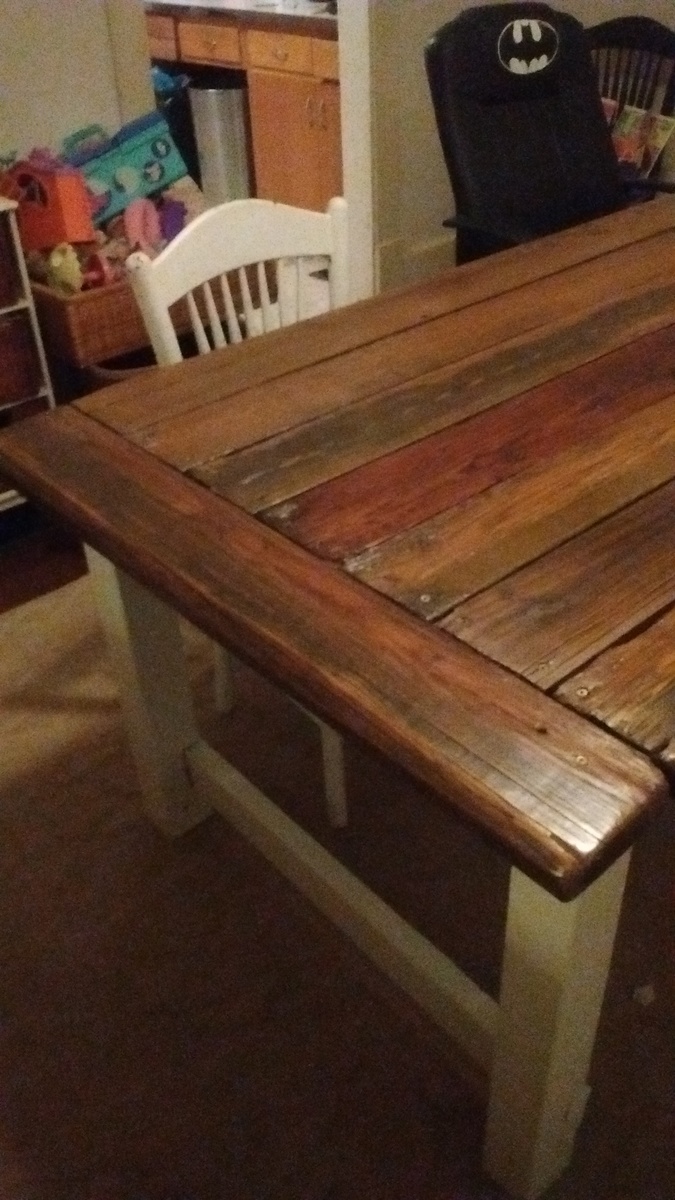
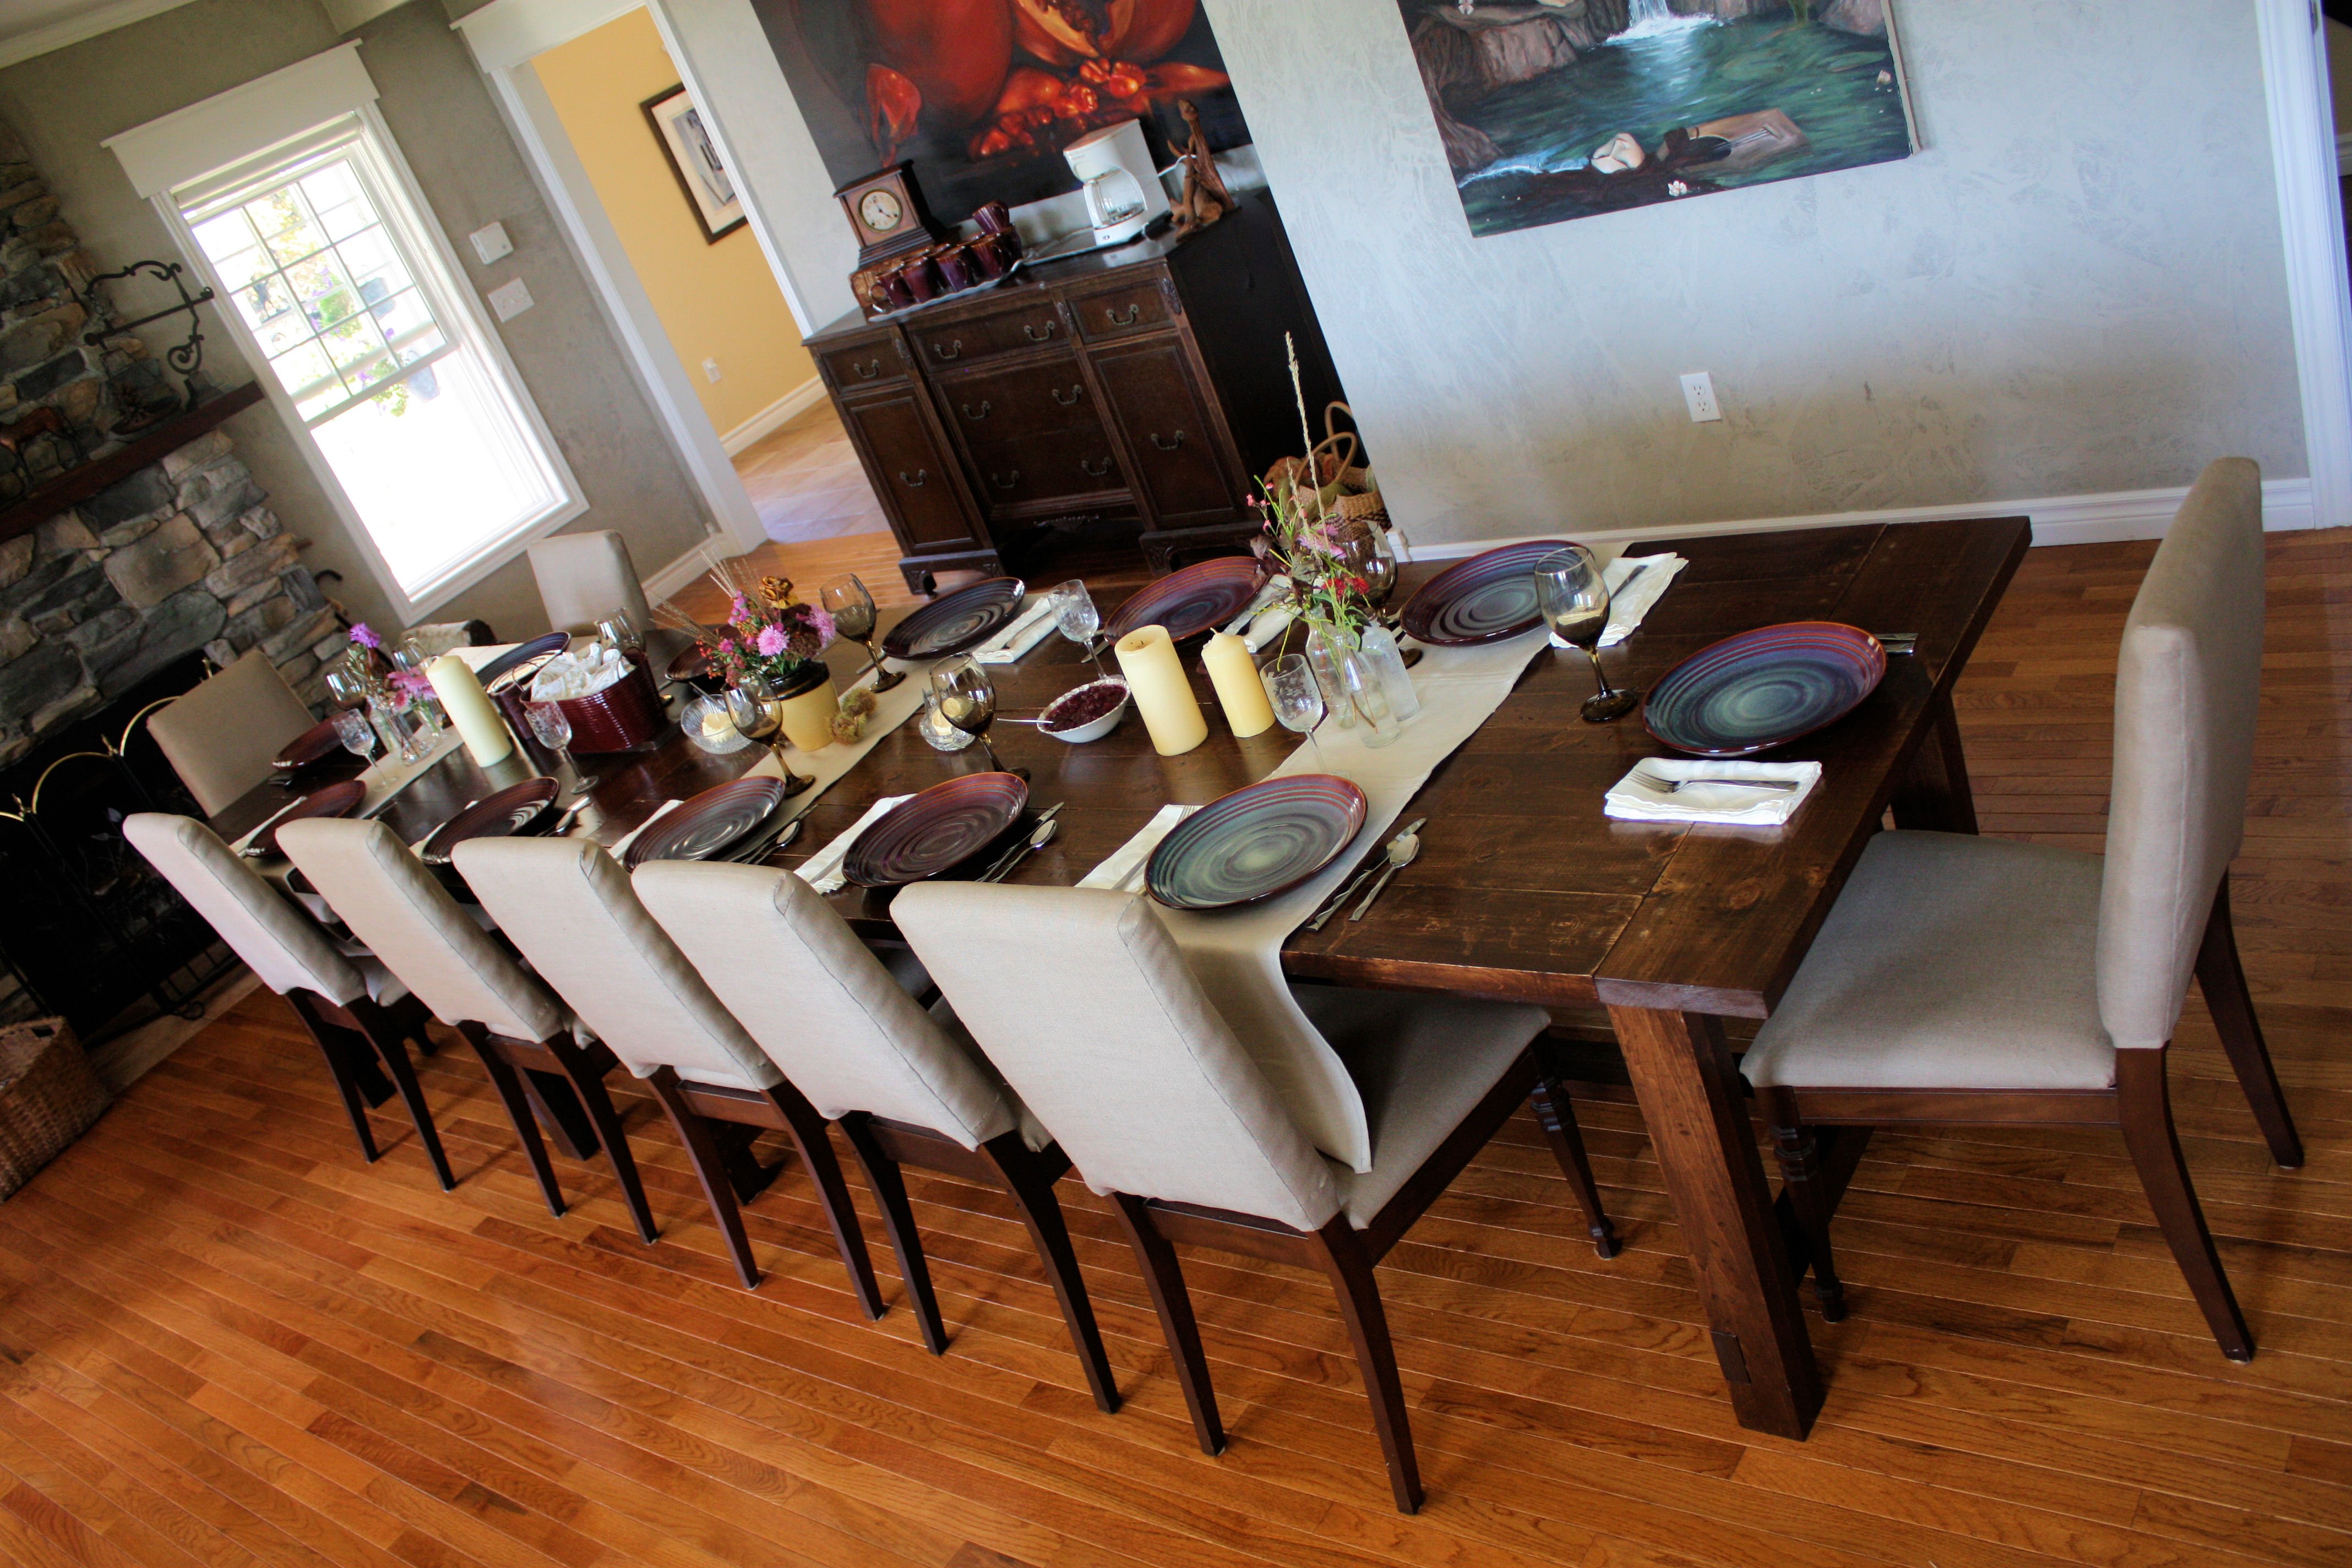
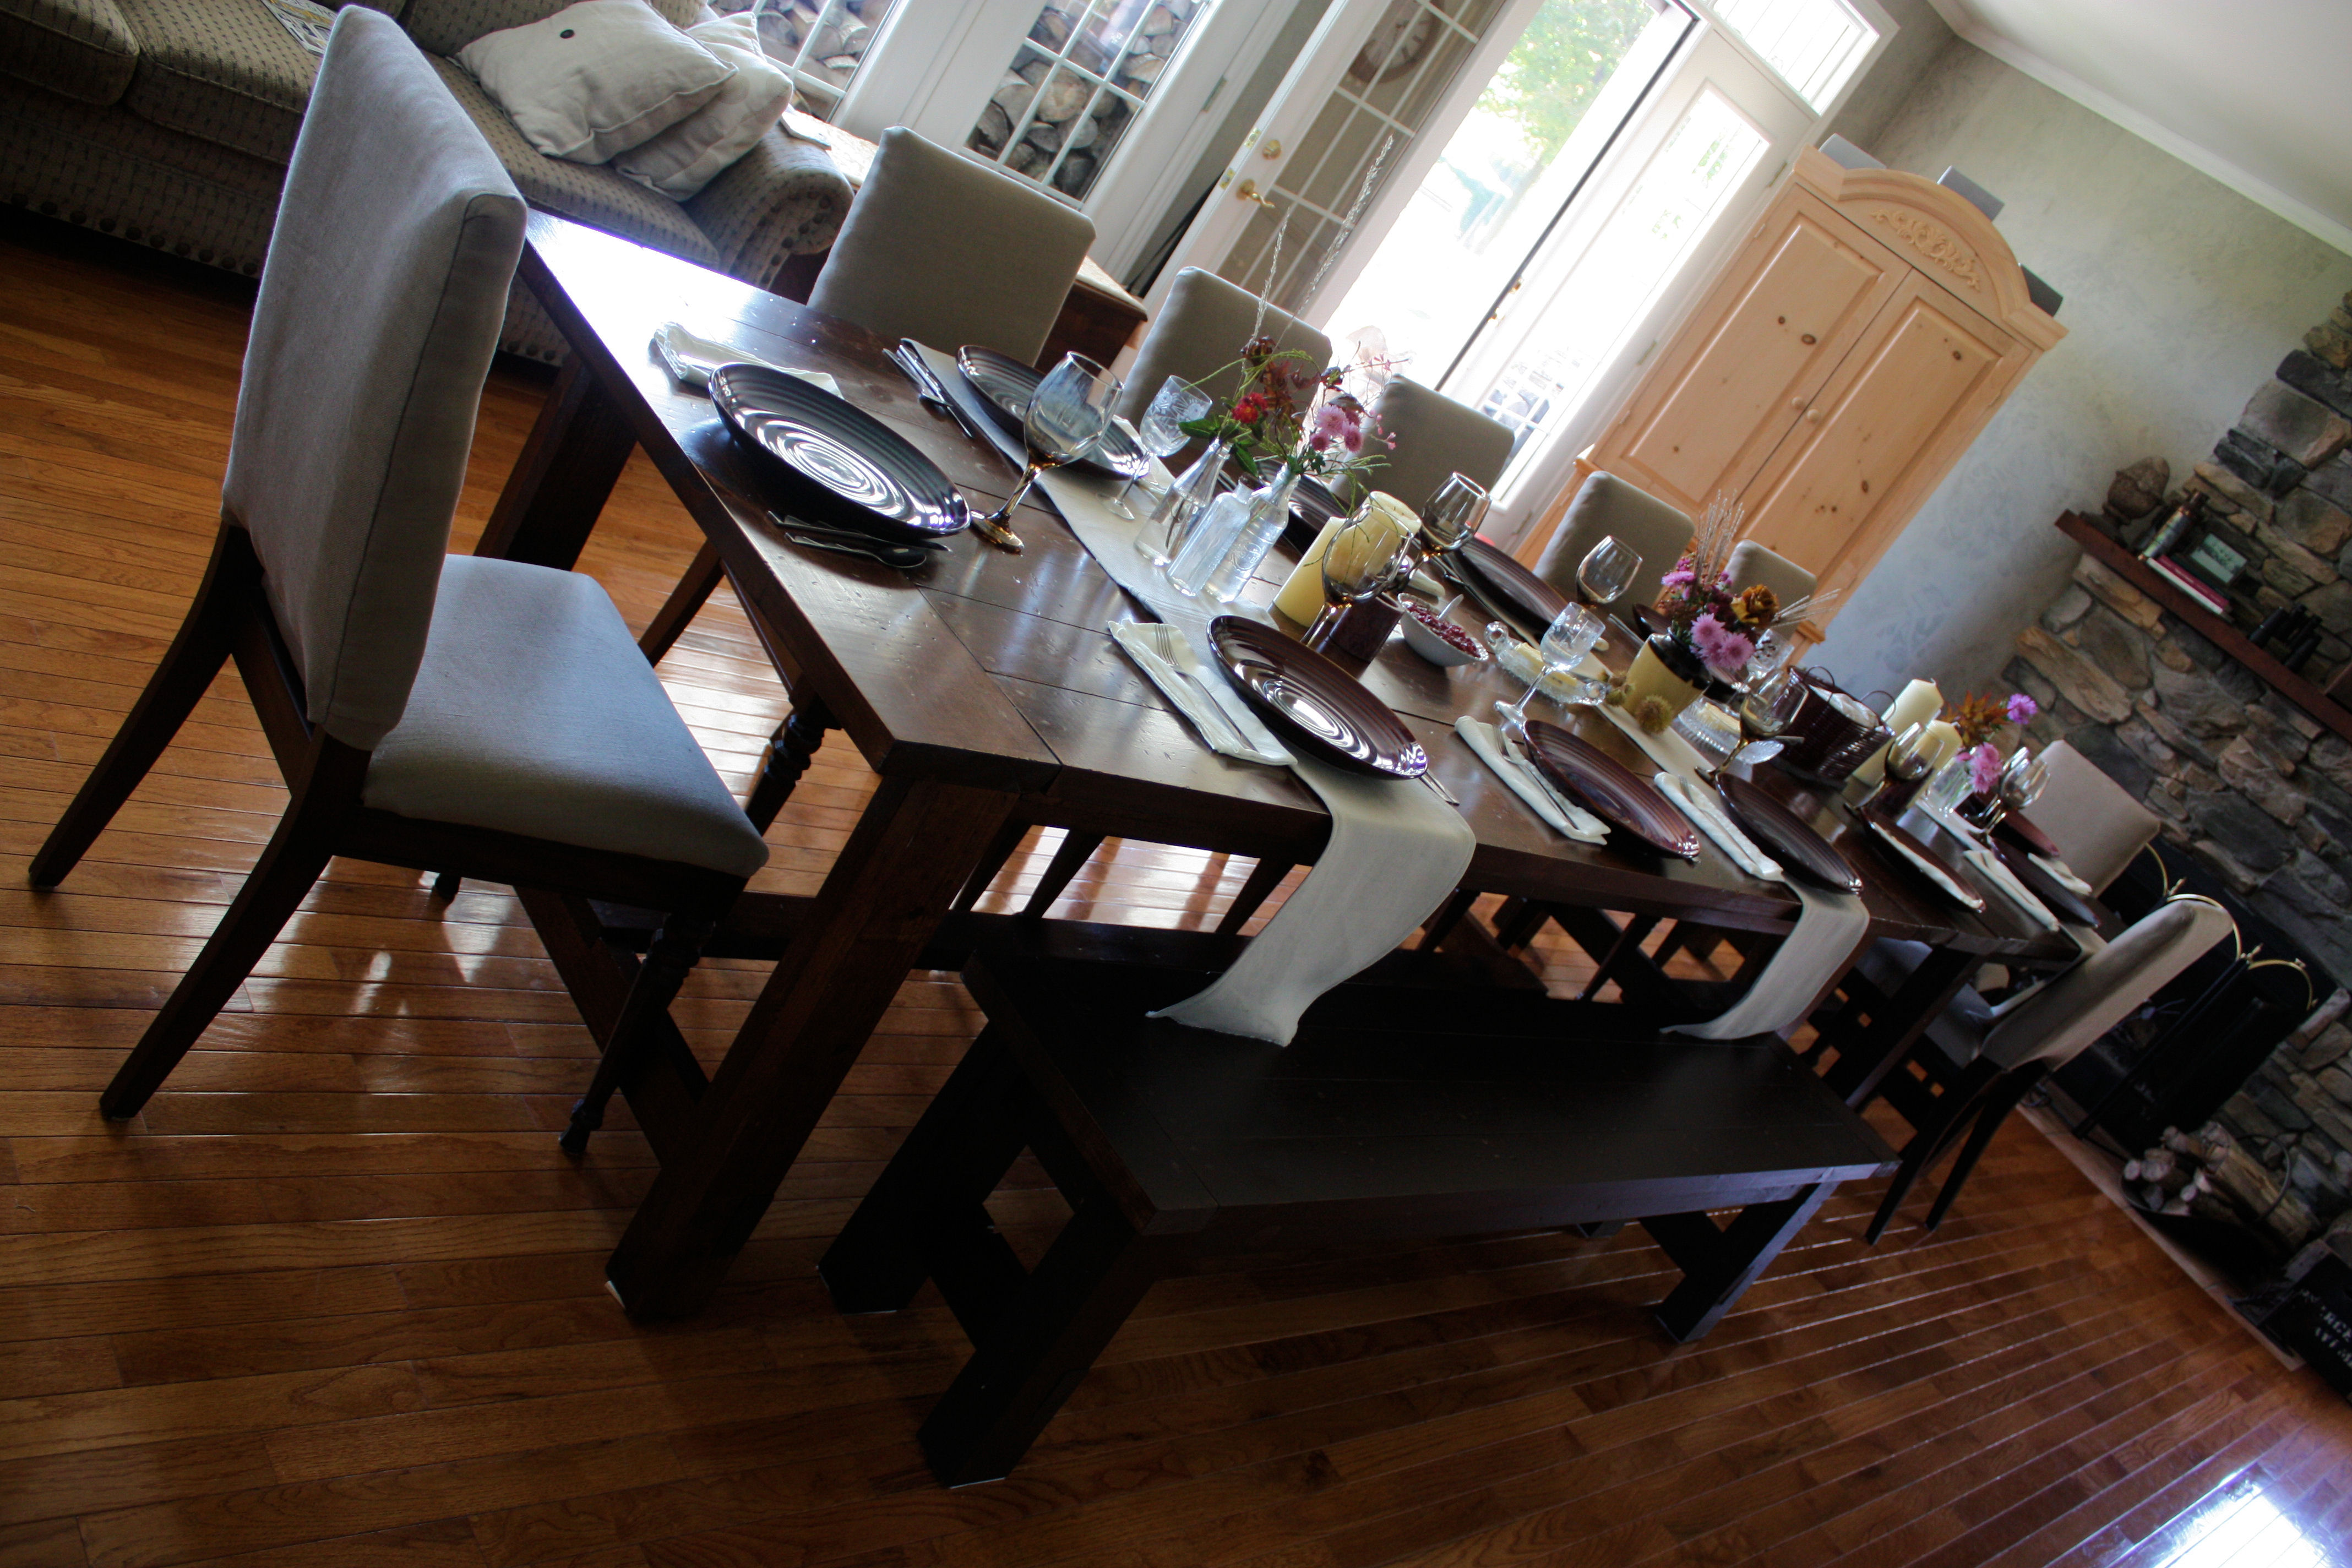
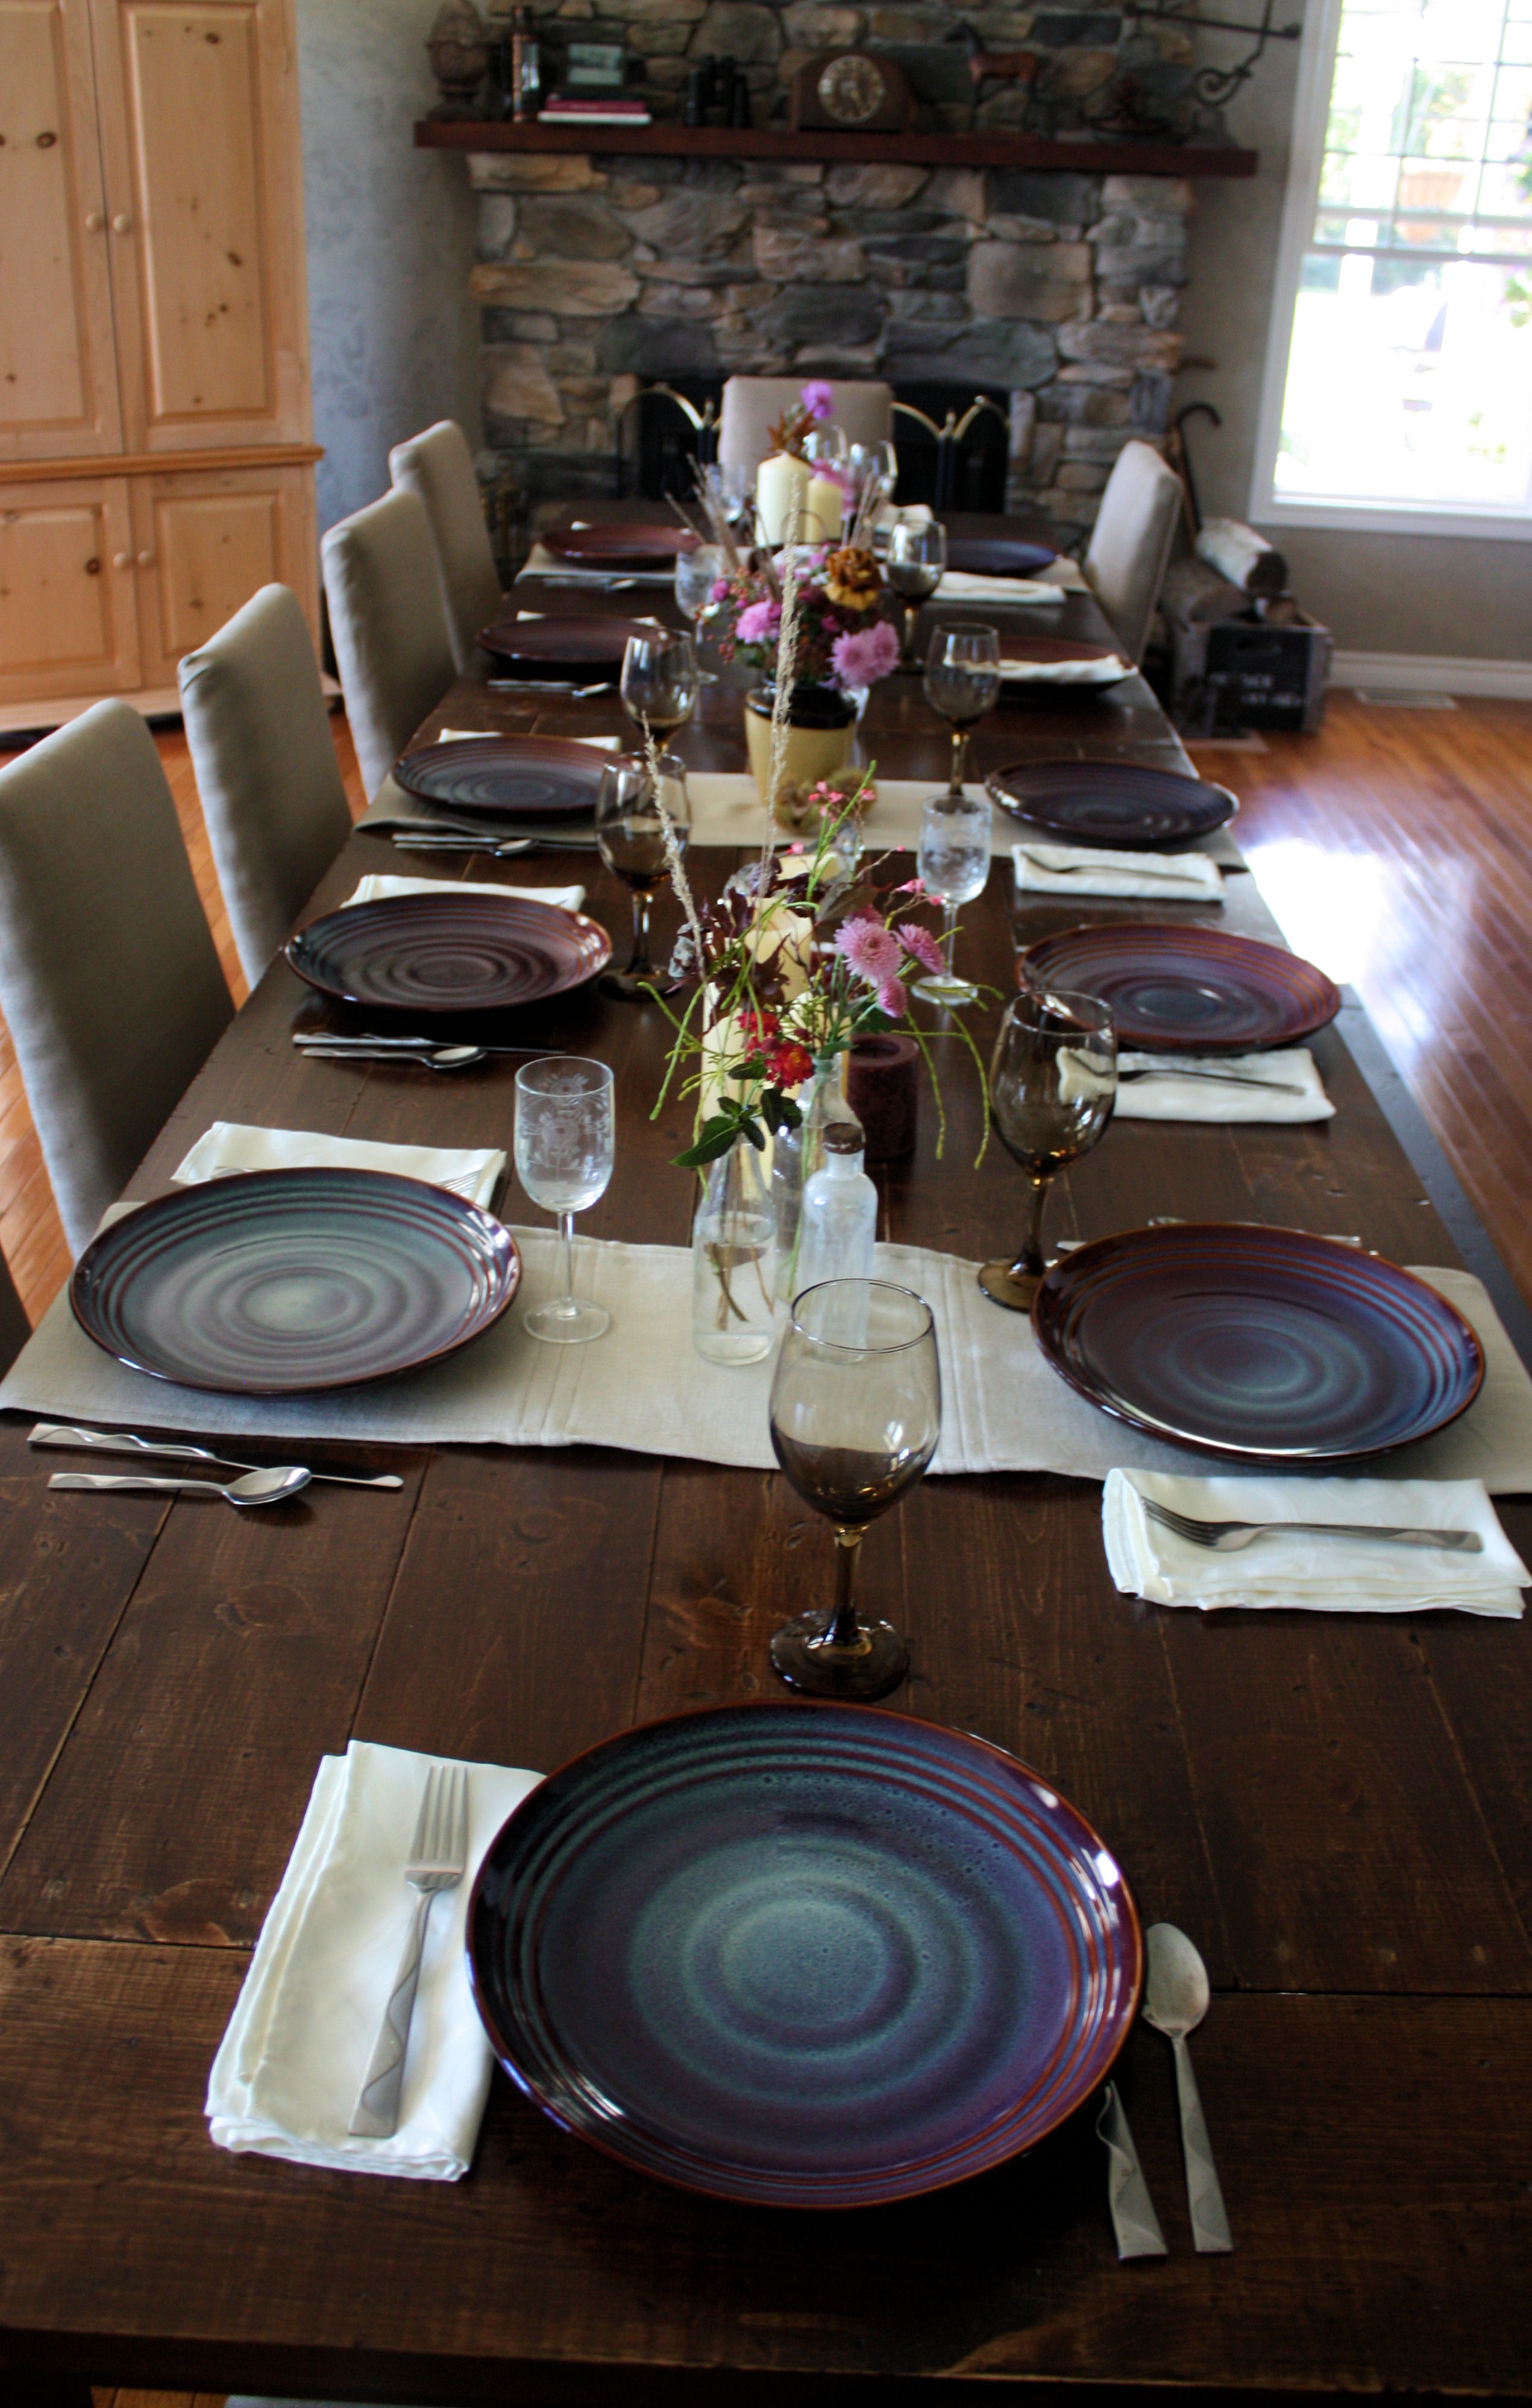
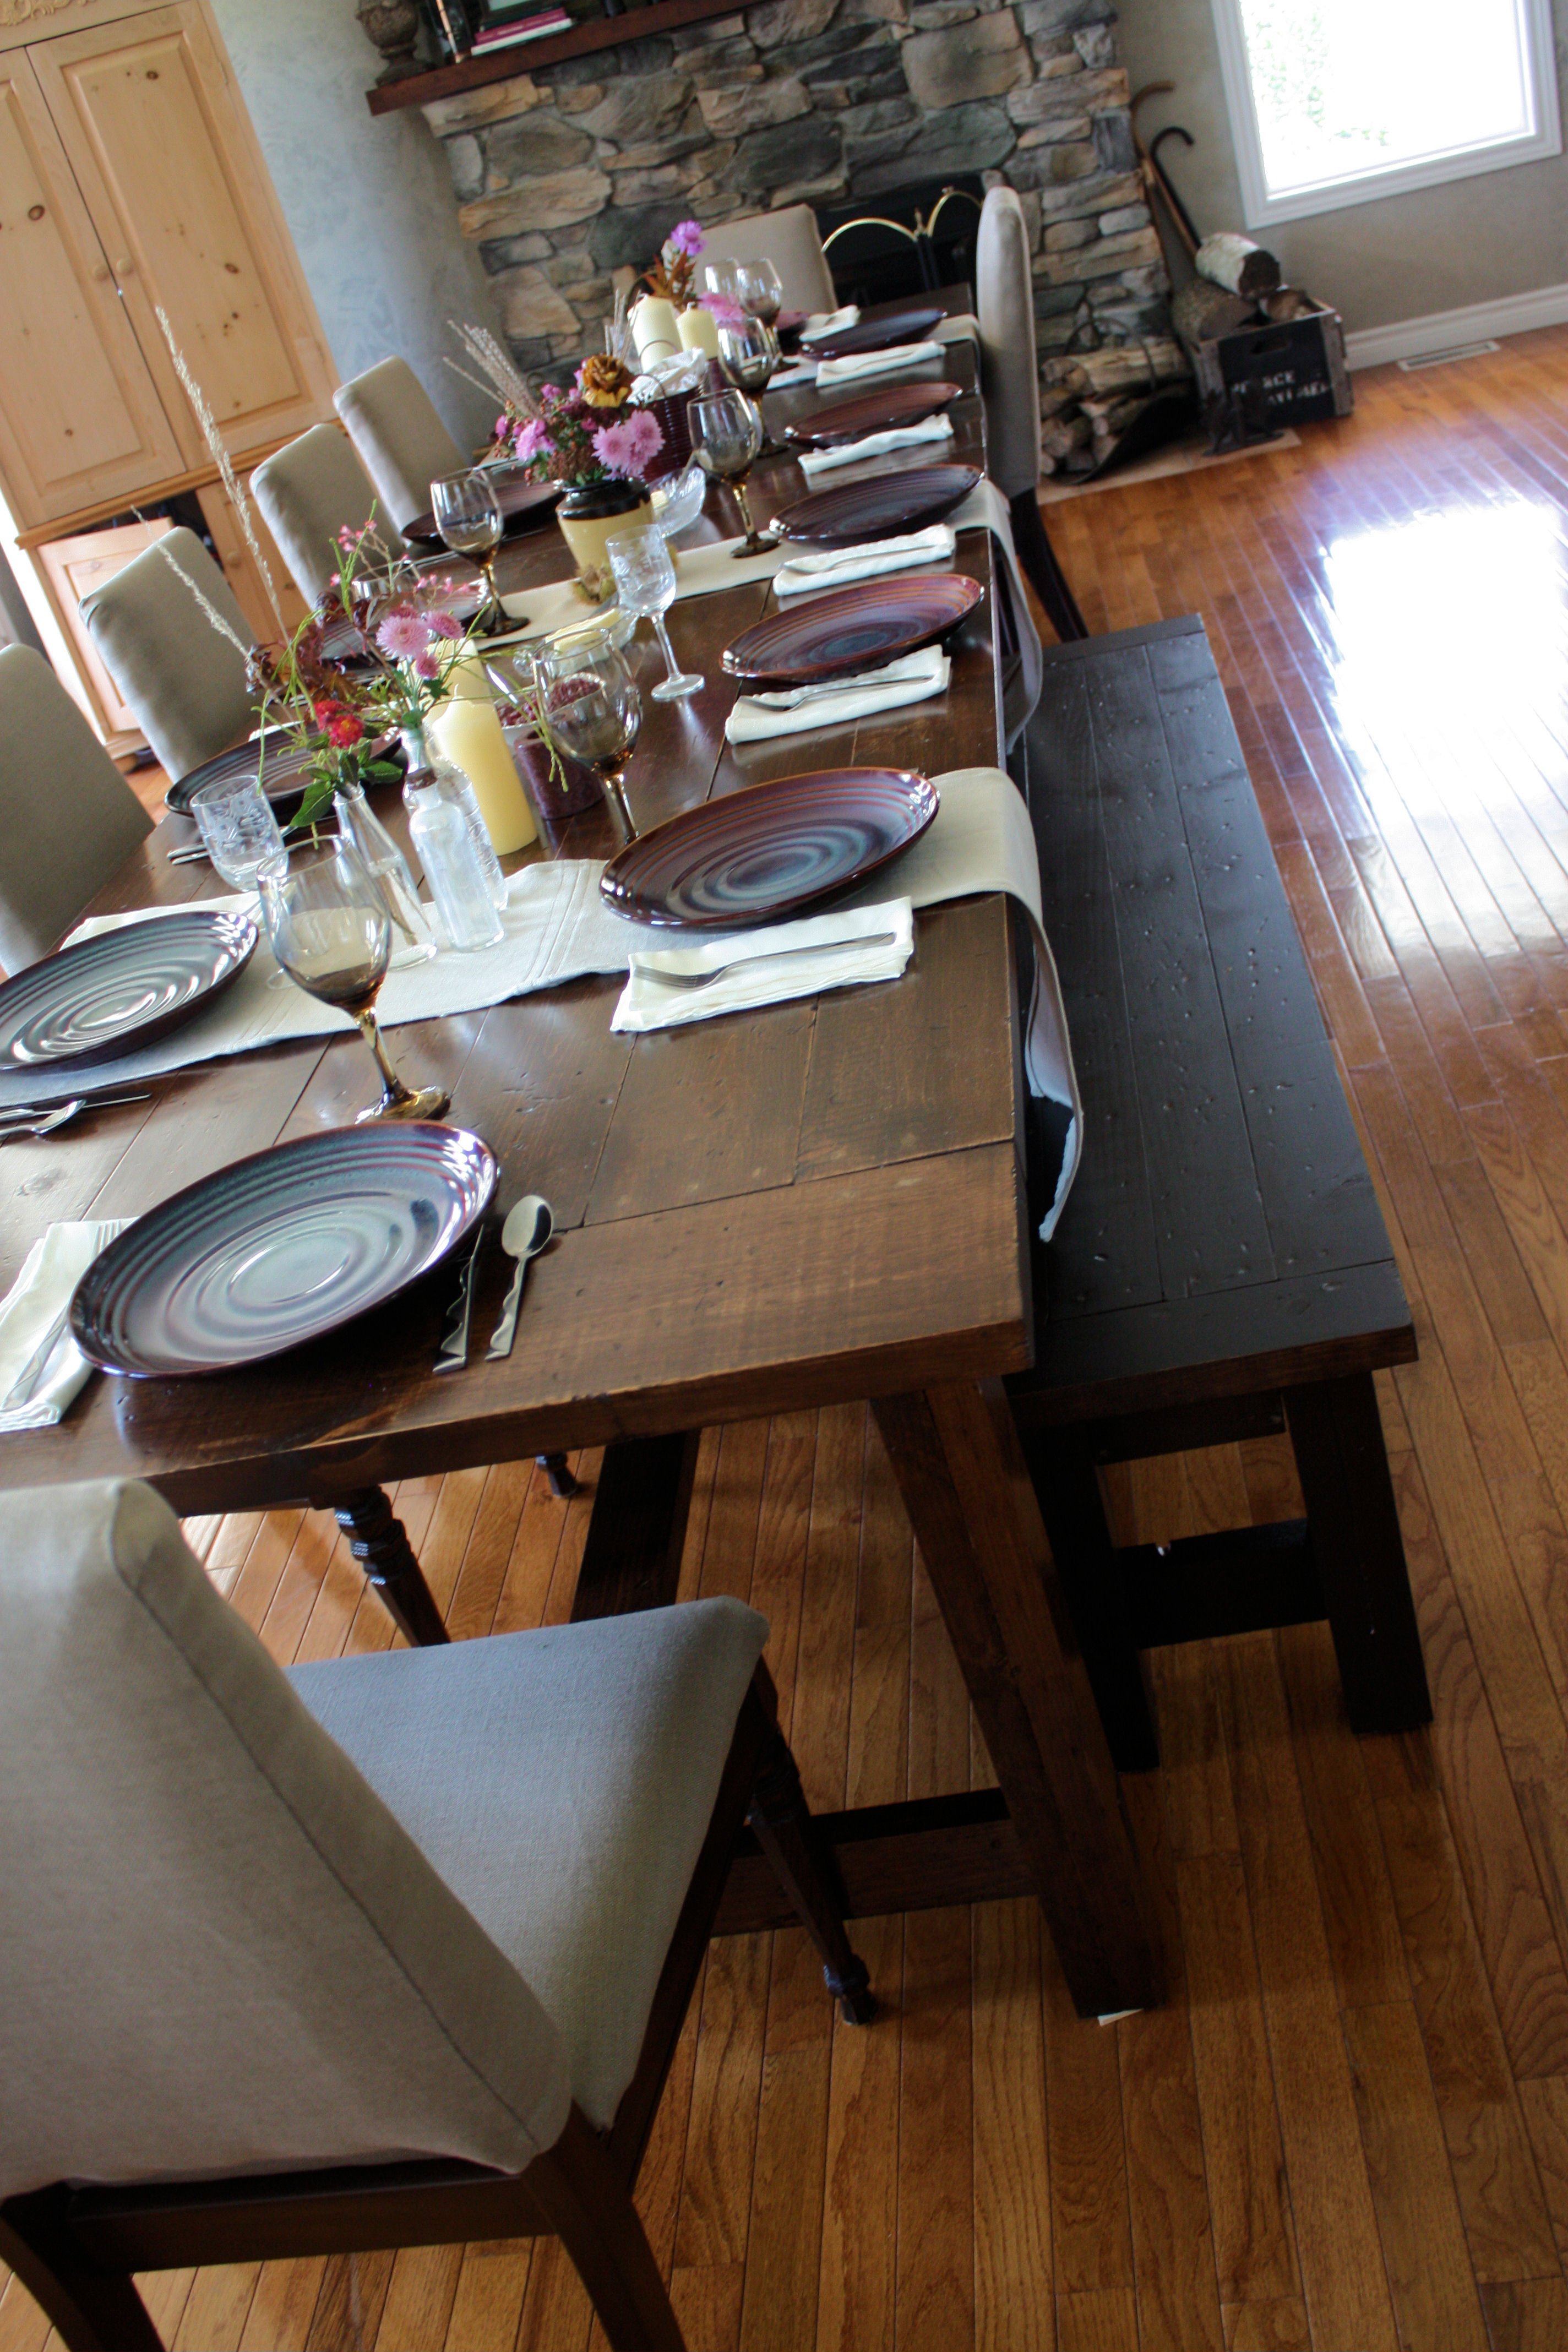
Farm House Table and Benches
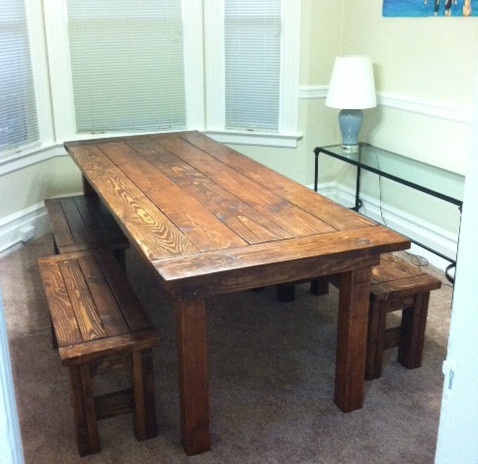
I wanted a big rustic farm table, didn't want to drop thousands on one from a store, so I decided to make my own!
I built it in the (formerly empty) dining room, with tarp on the floor and plastic to seal the doorways.
Was a big project and my first project so I started with the benches as this site and users recommended.
I used the farm house bench plan - just shortened the dimensions so that I could have two benches on either side of the table. Then I merged the two table plans so that I could have the top with the bread boards but legs that attached underneath (like the rustic table) so that they could be removed when we move. I'll work to upload my plans too.
Used Minwax Wood Stain in "english chestnut" and Deft Satin Wood Brushing Lacquer (instead of a Polyurethane).

Built from Plan(s)
Estimated Cost
approximately $300 (for wood, finish, sand paper, stain, screws..)
Estimated Time Investment
Week Long Project (20 Hours or More)
Finish Used
Minwax "English Chestnut" and
Deft Satin Wood Brushing Lacquer to finish.
I prepped the wood by sanding it down to 220 (could have done an even better job sanding, and sanded the table and bench tops even finer).
Used a sponge brush to apply the wood stain, wiped off rather quickly (only a few minutes on the wood).
Used brush to apply Deft Sating Wood Brushing Lacquer. Used spray can of Deft when I ran out of liquid. Didn't go on as thick. Although using a brush is more of a hassle, it had a better coat.
Recommended Skill Level
Beginner
Comments
Sun, 09/25/2011 - 12:18
Great Work
Your use of short benches makes the set more family and guest friendly. I usually hand rub my finish, I think i want to build this and probably use 0ak 2X12's (know it will be heavy).
Suggestions?
I will use it on a Florida roofed concrete deck for an outdoor dining area. Typically more formal dinners. Deck overlooks beautiful cove.
Thu, 10/13/2011 - 11:00
Can you explain how you
Can you explain how you merged the plans to add the bread boards? I would love to do the same!
Tue, 03/06/2012 - 01:30
Would love to see the plans
Would love to see the plans for this!
Looks amazing!!
Are the table legs 4"x4"?
Fri, 06/01/2012 - 09:09
Exactly what I am looking for
This is exactly what I am looking for in a table to build. We want bread boards on the end and we don't want stretchers on the bottom. How did you combine the two to do this. Can you send me a copy of your plan? [email protected]
Fri, 06/08/2012 - 12:59
farm table
i would the plans for that table my daughter loves and wants me to build her one
send to [email protected]
Mon, 06/11/2012 - 13:19
Farm Table
We love this table! Could you please send plans to [email protected]
Thanks so much!
Mon, 06/11/2012 - 13:21
Farm Table
We love this table. Please send plans to [email protected]
Thanks!
Fri, 06/15/2012 - 10:00
Exactly what I'm wanting to do.
Your table turned out awesome!
I already have old boards waiting on plans to be turned into a table. Any chance you could send the plans for your table to [email protected]?
Sat, 08/04/2012 - 13:35
Plans for this table.
Could you please send me the plans for this table? I love it and would love to attempy making it. Thanks so much!
Sun, 09/23/2012 - 14:37
Plans
Hi, Can you please send me the plans to make this table?
Thanks!!
Alex ([email protected])
Sun, 09/30/2012 - 18:34
Love this
I love this table. Can you please send the plans to [email protected]
Sun, 11/04/2012 - 11:07
Farmhouse table
I would love to attempt this!Would you please share your plans?
[email protected]
Thanks so much
Sun, 11/04/2012 - 17:17
Loving the farmhouse table
This table is exactly what I've been looking for!! Could you please share your plans? [email protected] Thank you.
Sun, 11/04/2012 - 17:25
Loving the farmhouse table
This table is exactly what I have been looking for! Could you please share your plans? [email protected]
Tue, 01/01/2013 - 06:09
Can you send plans for this
Can you send plans for this table build to [email protected] thanks.
Wed, 01/02/2013 - 15:53
table plans
Your farm table and benches were exactly what I was looking for. Please send me the plans if they are available. Thanks
Wed, 01/02/2013 - 19:18
Love the Table Plan
I would love your table plan. This is absolutely gorgeous!! Please forward table plans to [email protected]
Wed, 01/02/2013 - 19:23
Farmhouse |Table
I would love a copy of the plans for this gorgeous table you made. I am inspired.
Fri, 01/18/2013 - 18:01
plans please!
Could you please send plans? I love the look of your table!
[email protected]
Sat, 03/16/2013 - 20:12
Beautiful table!
Can I please please please have the plans? I have a very narrow dining area and this table is PERFECT. Thanks
Sun, 05/12/2013 - 14:30
Plans
I would REALLY like the plans for his version as well. I am going to combine them. Can someone ask him to post or his he sending via email? If so, [email protected]
Thank you SO much!!!
Wed, 06/26/2013 - 13:09
Awesome!
Thu, 06/27/2013 - 13:34
Plans?
Fri, 06/28/2013 - 10:49
Plans
Great table! I too would like plans - please send to [email protected]
Thanks!!
Mon, 07/15/2013 - 09:48
plans
just bought a cabin and need all sorts of furniture. I love what you did and would sure love to have your plans and how you merged the two----both for the table and especially for the benches. Trying to do a 10' table for huge family gatherings. Thanks so much! You rock!
Tue, 07/23/2013 - 14:28
Perfect
This table and bench set is exactly what I am looking for. You did such a great job!
Do you have plans that you wouldnt mind sending to my email? [email protected]
Mon, 08/26/2013 - 13:09
Merged Plans
Hi! I noticed MANY requests for the merged plans. Did you post them somewhere or can you please email the plans to me at [email protected]?
BIG THANK YOU! Tina
Fri, 09/06/2013 - 13:49
Pretty please can I get the plans?
I would love the plans for this table... could you please email them to [email protected]?
Thank you so much!
Beth :D
Fri, 01/09/2015 - 19:54
Plan Guidance
Hi everyone,
Well I didn't see all these comments! Sorry to have ignored your requests for plans!
This is the bench I made (I did four of these, and adjusted the measurements so they were each about 40" long)
http://ana-white.com/2011/01/farmhouse-bench
I was going to do this table, because it matches the benches, but decided I wanted a table with removable legs so it would be more maneuverable when we move!
http://ana-white.com/2009/12/plans-farmhouse-table-knock-off-of.html
I ended up using more of this plan in terms of how I assembled it, but adjusted the plans to have the tabletop include breadboards (the plank on top perpendicular to the long tabletop planks) and I used 4x4s for legs, plus the top was from 2x8s not 1x10s. I put in the optional cross supports too, and additional supports under the breadboard to connect it to the table frame and table top slats.. this is more info than you need, all to say, plans are flexible and you can do what you want!
http://ana-white.com/2010/03/plans-very-rustic-table-and-cool.html
Sorry I don't have detailed notes. I was very picky about the dimensions (based on space) and how high I wanted the table (about 1.5" taller than a normal table). I also measure the distance between the underside of the table and the tops of the benches so I could cross my legs under the table (an odd requirement).
Happy Building!
Sat, 03/21/2015 - 17:34
Plans for table from two plans
could you send me the plan for this rustic table that was made from the farm house and rustic table if they are available? Email to [email protected]
Sat, 03/28/2015 - 12:45
plans please
can you please send me the plans [email protected]
i love it!!!
Wed, 04/01/2015 - 15:10
love the color
I like the english chestnut stain. That works so well with this type of lumber. Great job. I plan to use the same stain on the Tryde coffee table I am building. Thanks for sharing your work!!!
Sat, 08/08/2015 - 12:30
plans please!
Thu, 08/13/2015 - 19:17
Previous comment is NOT spam
Sorry! I accidentally hit the spam button but I really would like the plans for the table. Sorry for the confusion!
Thu, 08/13/2015 - 19:23
Third time's the charm
Ok, now I feel really silly. Obviously, this is my first time leaving a comment. I love the table. It is exactly what I've been looking for. Could you email the plans to [email protected]?
Thanks!
Fri, 01/08/2016 - 17:38
Table and Bench Plans
Fri, 01/08/2016 - 17:40
Table and Bench plans
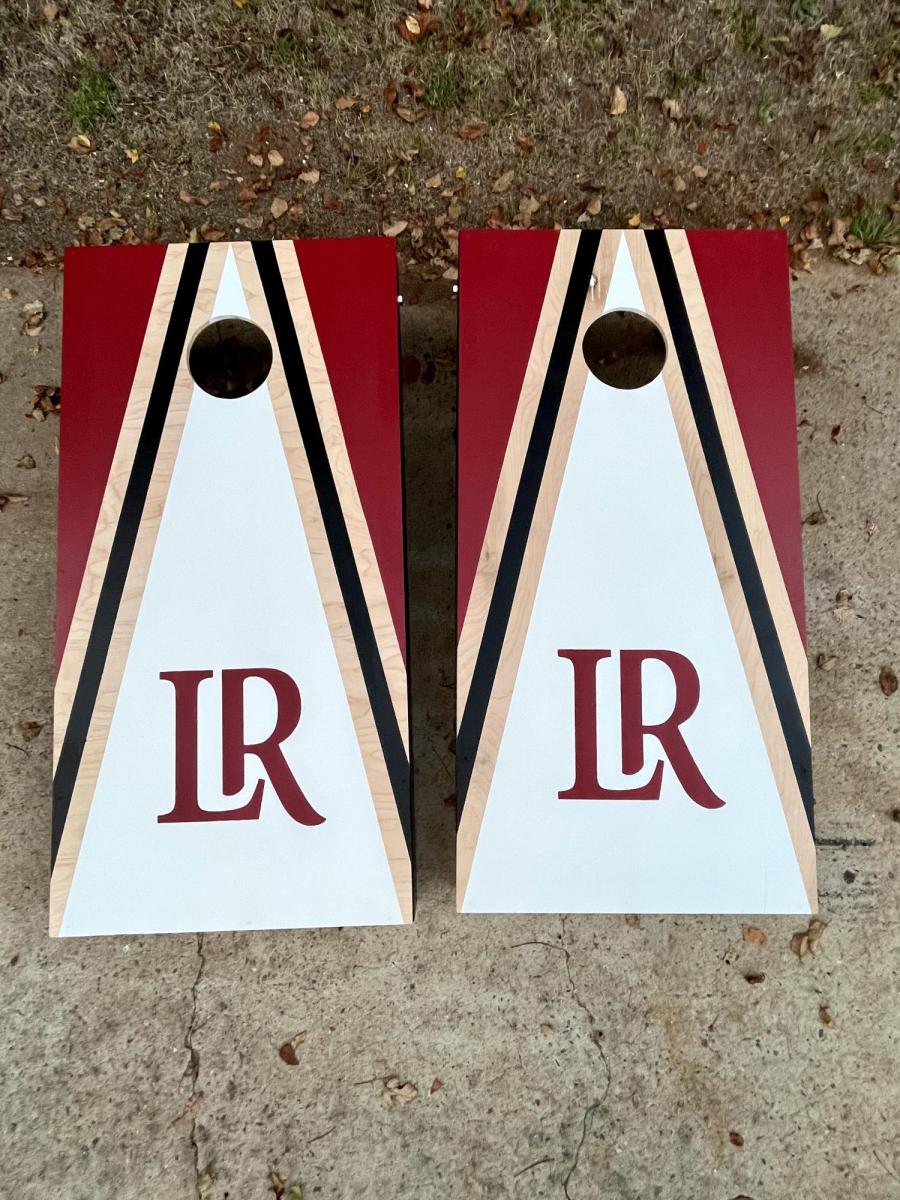
Cornhole Boards with Custom Initials
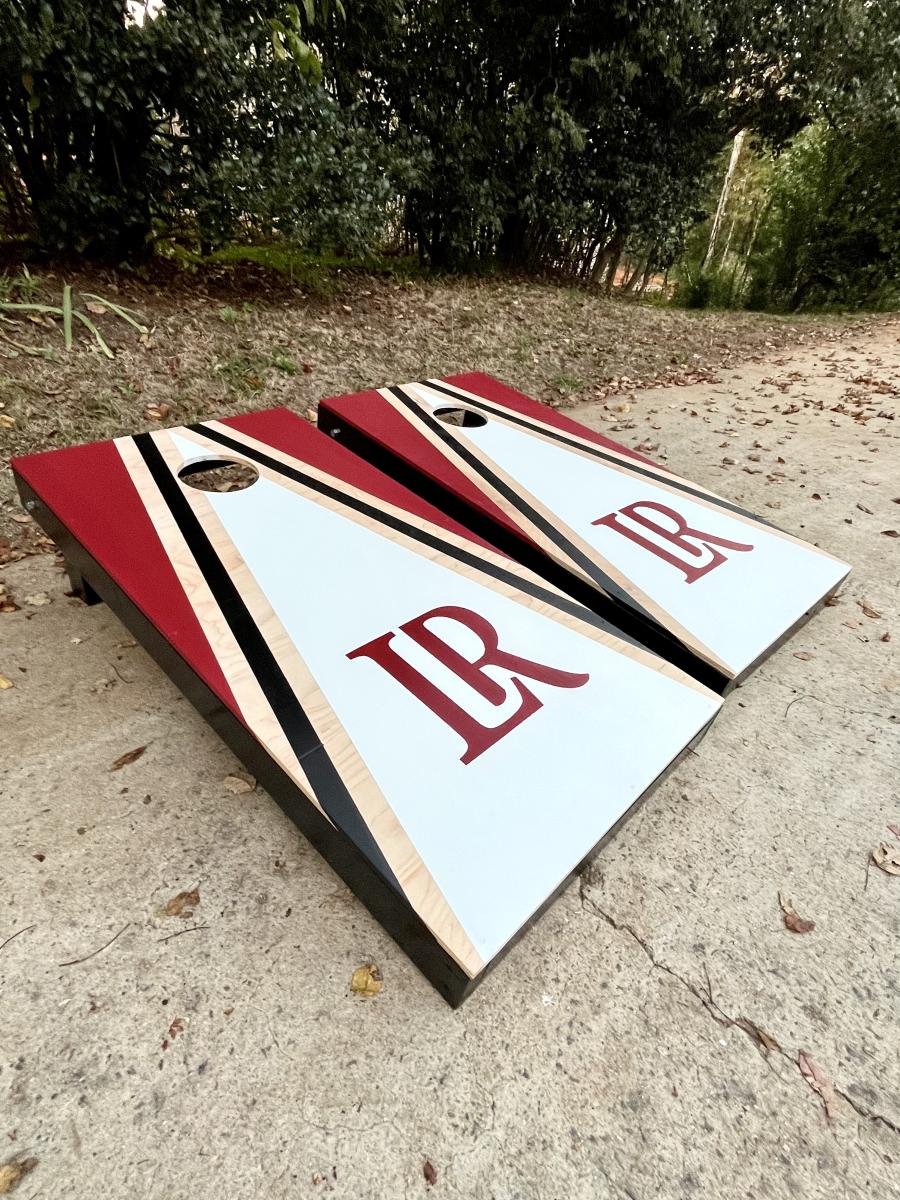
Thank you for helping me make my first set of cornhole boards! Super easy steps to follow and I love how they turned out!!!

Built from Plan(s)
Comments
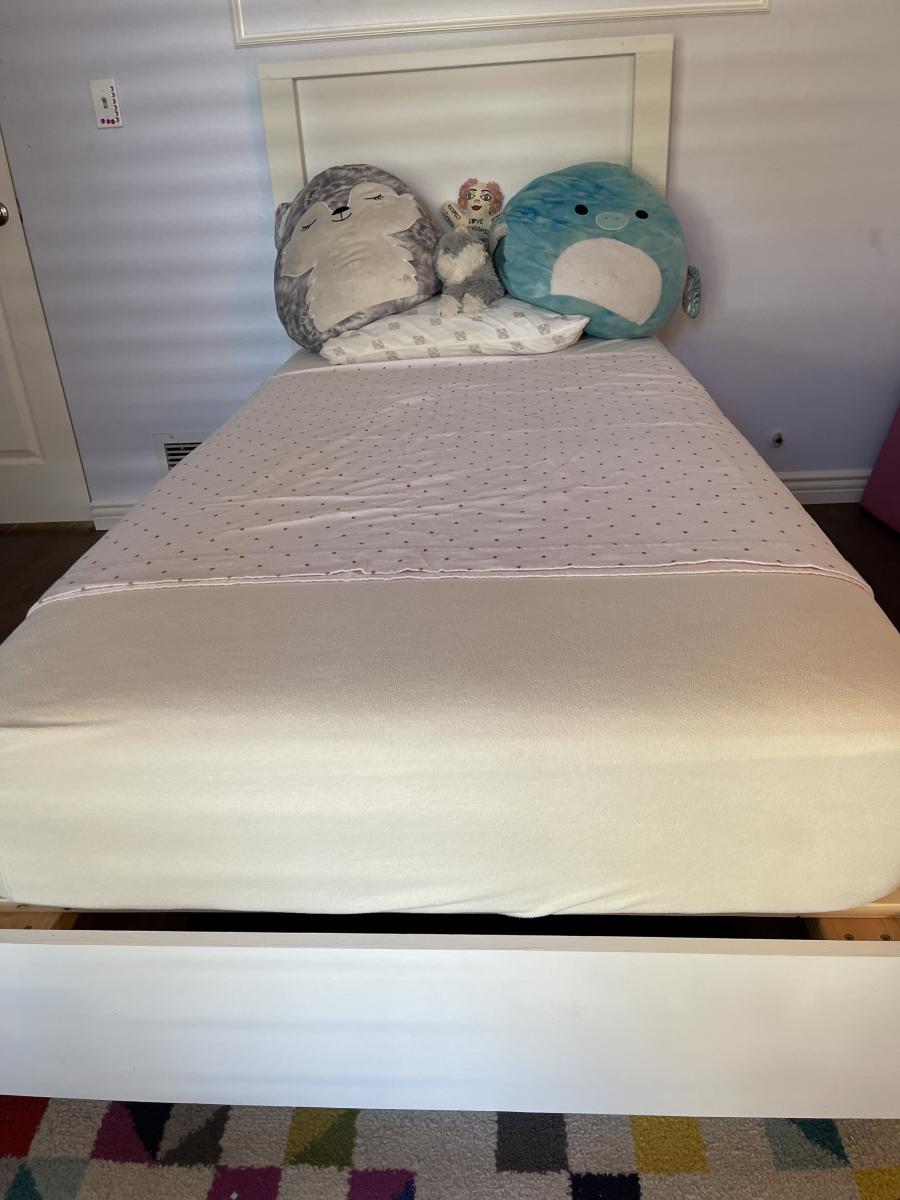
Floating bed
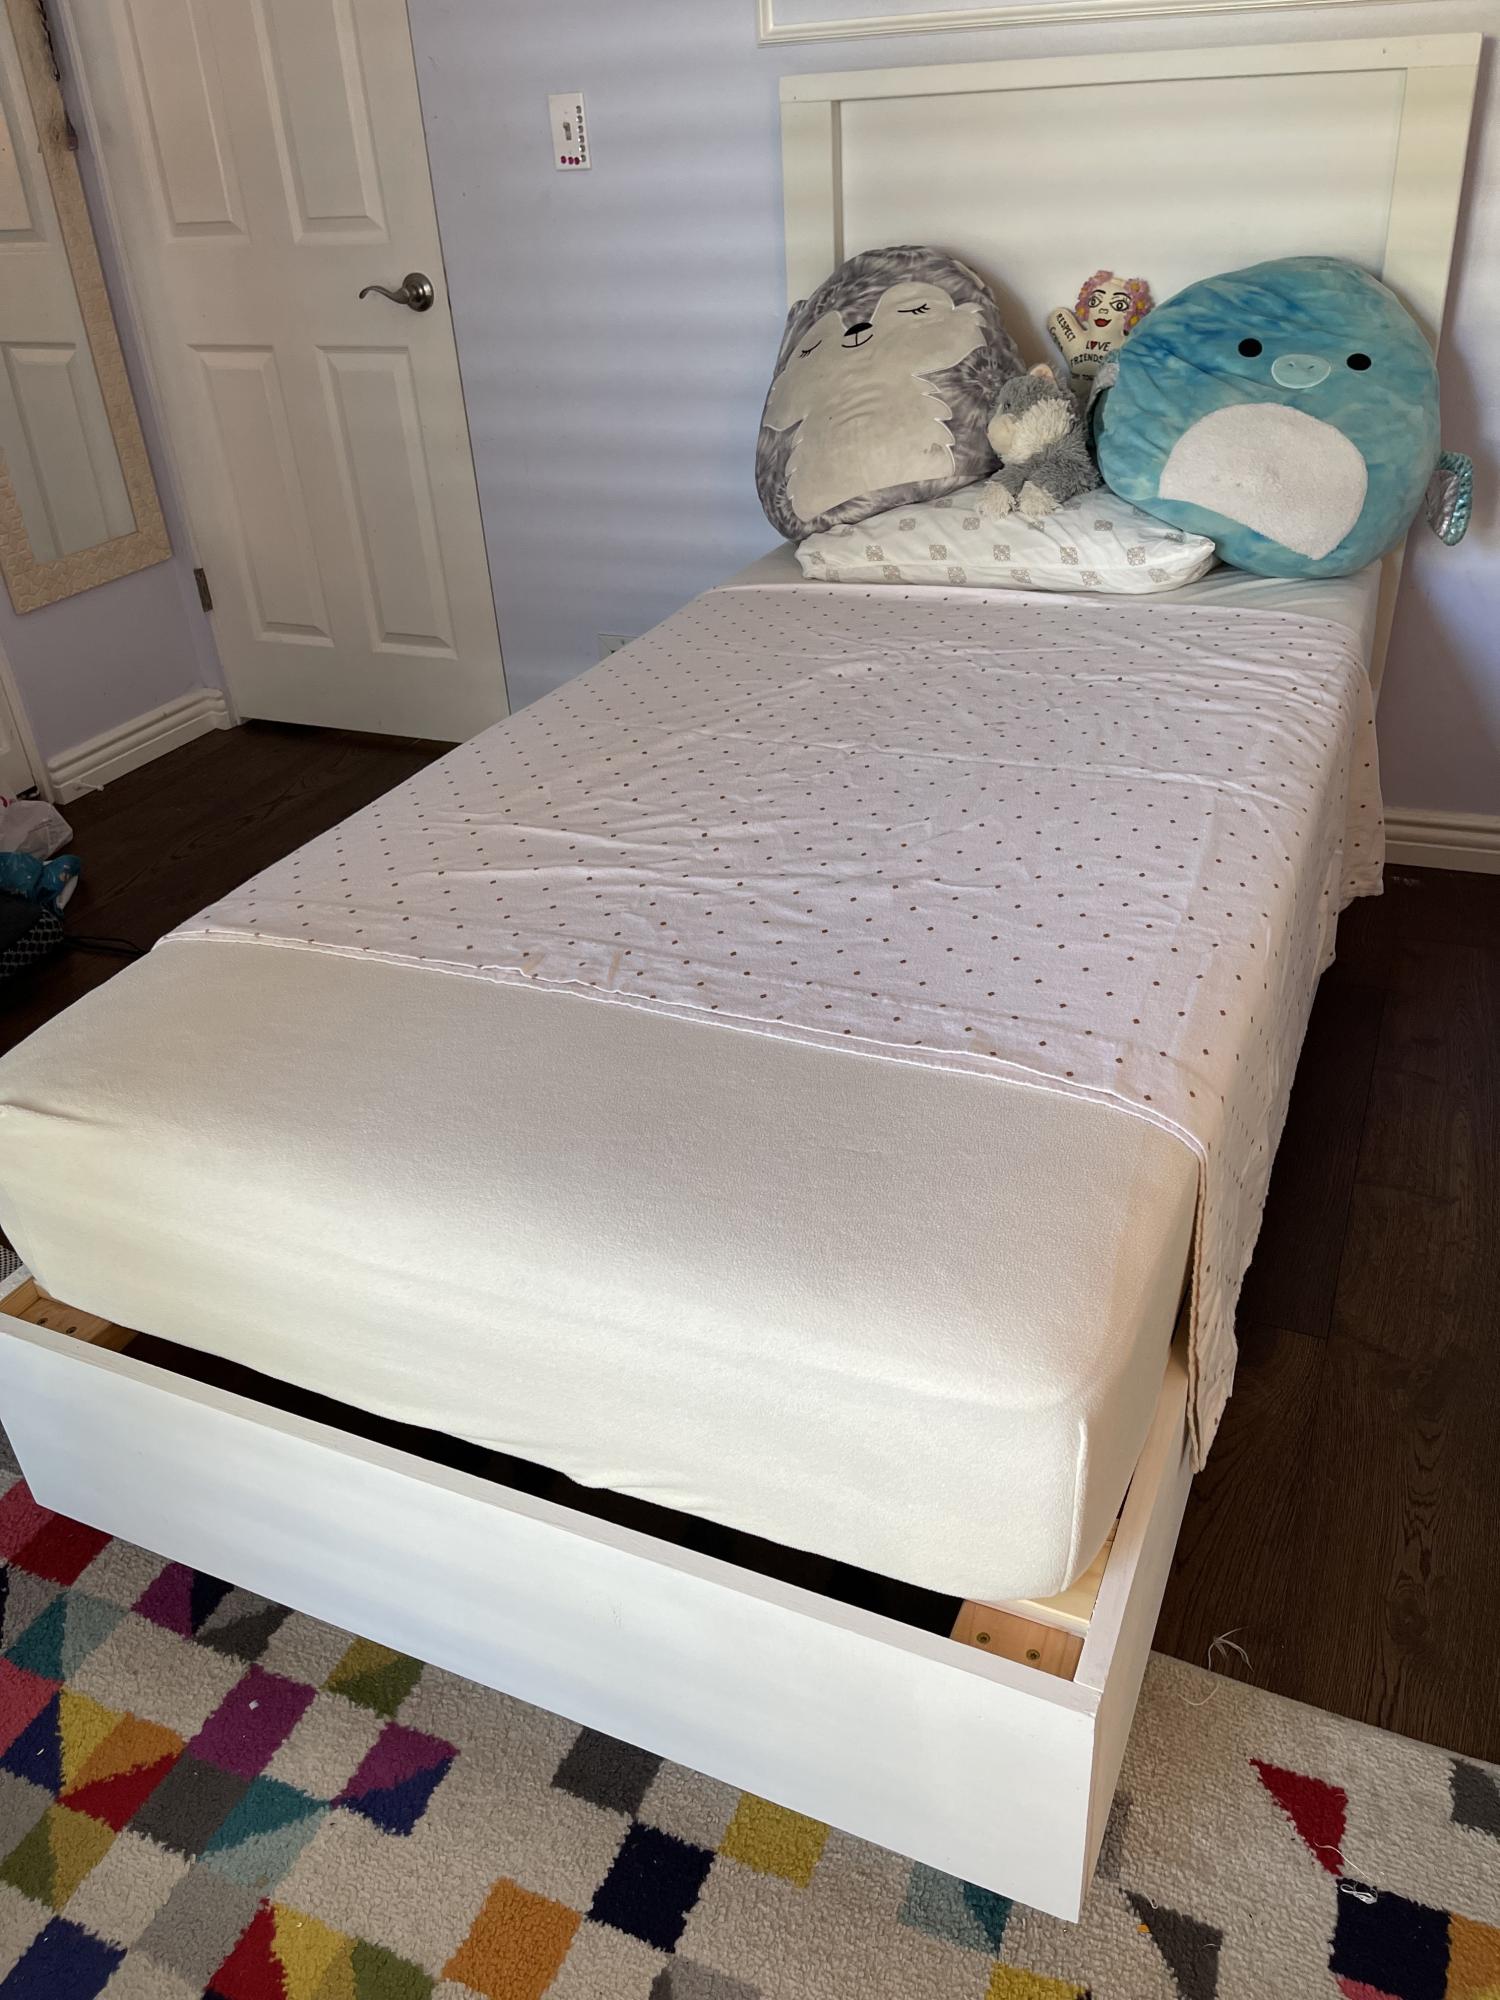
I built a floating bed using Ana's plans. In my case, I built a twin size bed which now my daughter enjoys every night. The bed turned out beautiful and very sturdy.
Built from Plan(s)
Comments
King Fancy Farmhouse
We wanted a king sized bed but had been holding off because I wasn't ready to buy all new bedroom furniture.
We love our new bed and we love how our bedroom is coming together!
We followed the plans, but adjusted the height for our new mattress, and then omitted a bit of the extra trim.
We managed to build the bed as a platform bed, for less than what we would have paid for the box spring!

Built from Plan(s)
Estimated Cost
225
Estimated Time Investment
Weekend Project (10-20 Hours)
Finish Used
I stained this with Varathane Walnut Gel stain, and finished it with a wipe on poly.
Recommended Skill Level
Beginner
Comments
Modified to fit Wine fridge
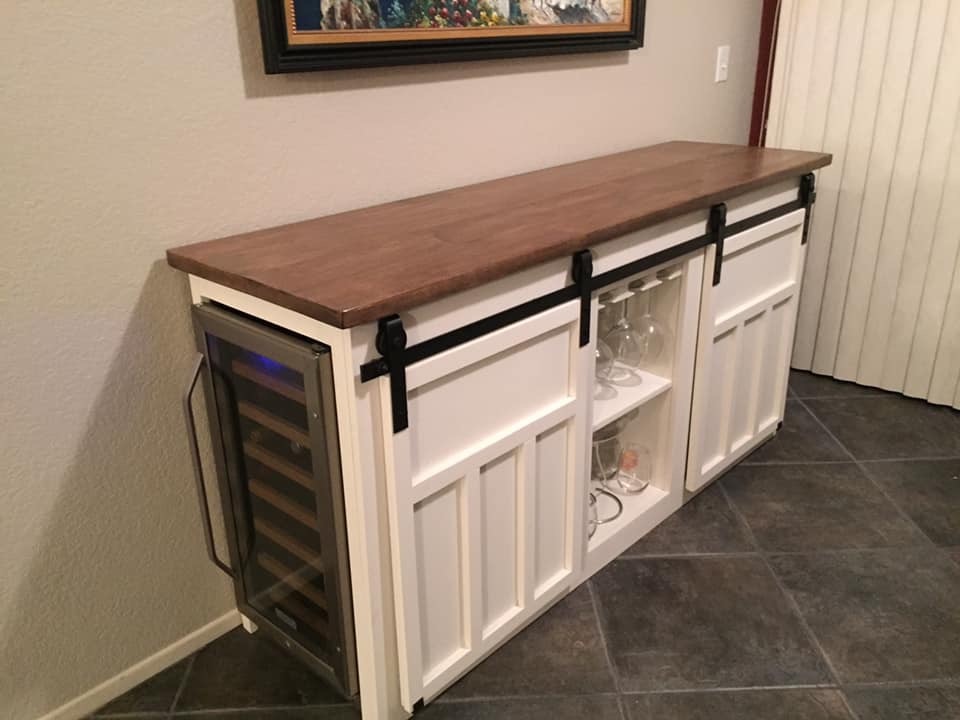
Used Maple on top with pine for the frame. Thanks Ana-White!
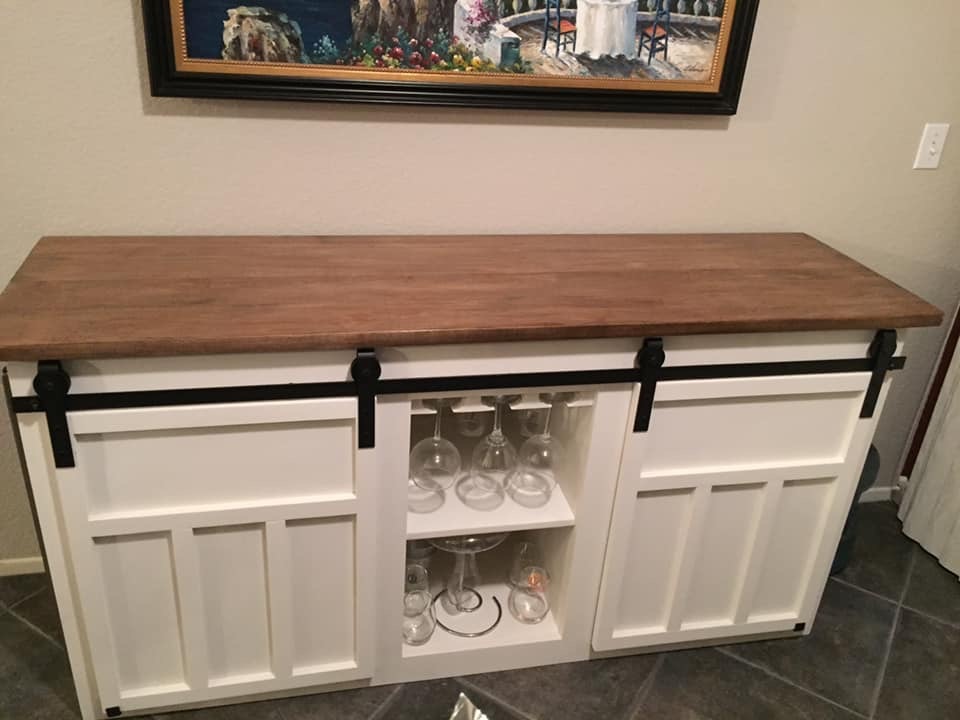
Built from Plan(s)
Recommended Skill Level
Beginner
Comments
Mon, 07/01/2019 - 14:05
Oh wow, I love this version…
Oh wow, I love this version of this console! You did such a great job customizing it to your needs ☺
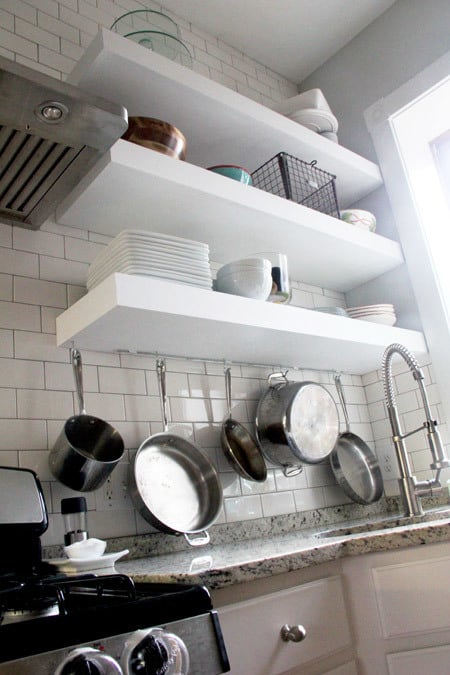
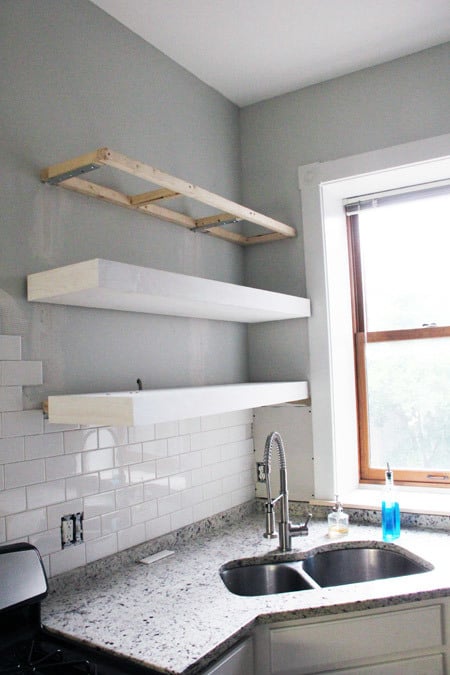
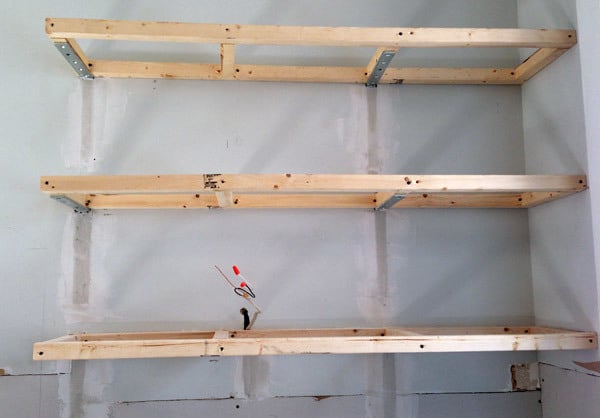
Bigger, Stronger, Kitchen Floating Shelves
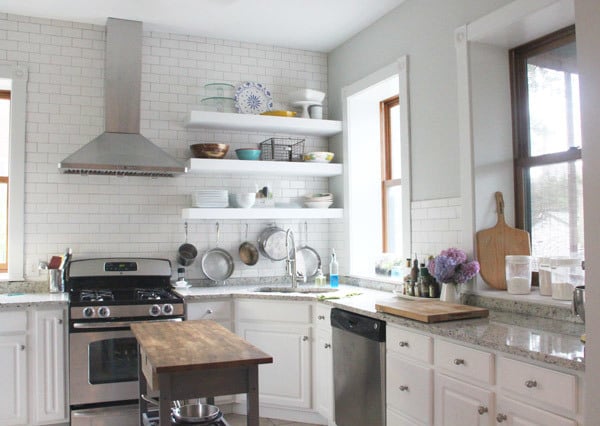
When we recently bought our 150+ year old house, we were pretty happy with just about everything (not stopping us from coming up with projects!) except the kitchen. This kitchen hadn't been updated in about 15 years, had dark brown walls, boring square white tiles with white grout, and TONS of cabinets. Everywhere. I felt like the walls were closing in!
So before we ever signed a piece of paper I had a vision of open shelving. Wide, white floating shelves to put our every day items at arms reach and display the few items we rarely use but think are beautiful.
I loved Ana's plans, but I needed these shelves to hold 12 dinner plates, 12 bowls, 12 salad plates, 4 pasta bowls, and...well, right there that about 40 pounds of stuff. And the basic plans just didn't seem heavy-duty enough.
Enter our contractor, John, who I asked for help because, while they were my vision, they were his handy-work. My husband and I didn’t even attempt to build them on our own. John is a perfectionist and we knew he’d make this plan work…perfectly.
As usual, this was no sweat for John. To build the frames he used 2 x 2′s and secured them with 10 x 1 1/4″ angle brackets. During assembly, John made sure to position the center supports to match the wall studs in front of which the frame would hang. Once assembled, he removed some dry wall and attached the brackets directly to the studs.
We could store baby elephants on these shelfs, they wouldn’t budge.
Since I knew what needed to be stored on that first shelf (our every day items), we used the measurements to equally distance the three shelves (not including the first shelf of course—it needed more space above the counter top). Then we sealed up the dry wall. Another help with support was butting the shelves right up to the corner, putting another screw in another stud.
We moved the lighting electric up for new under cabinet lighting—so easy pre-tiling.
For the actual shelves—I like to think of them as “sleeves”—John used 3/4″ sanded plywood for the tops and bottoms of each shelf, then 1 x 6 clear pine ripped down to desired thickness for the fronts and one side (the other side is against the wall, so was left open). The primed sleeves spent a few days on the screened in porch while I tiled around the frames, they were pretty heavy and very solid.
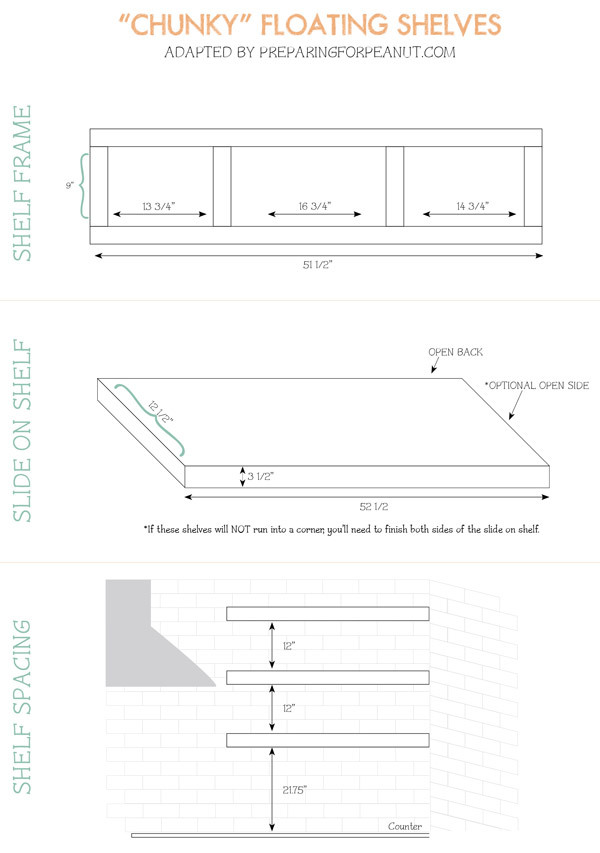
I’ve made an attempt to lay out the measurements involving our floating shelf project. These are to scale and give a good idea of how our plans differed from Ana’s.
We LOVE our shelves and get so so many compliments. The seemingly small and simple changes (tile, shelves, new window trim, paint, and soon flooring) made a HUGE impact and not that huge of a cost. And we don't miss the upper cabinets at all.
Thanks for the head-start and inspiration Ana!

Built from Plan(s)
Estimated Time Investment
Weekend Project (10-20 Hours)
Finish Used
Primer and white paint
Recommended Skill Level
Advanced
Comments
Sun, 10/20/2013 - 09:42
Angle brackets for floating shelves in kitchen
Where did you get the heavy duty angle brackets? Having a hard time finding them. If you have the link, that would be great! Thanks!!

Mon, 10/21/2013 - 08:41
Angle Bracket alternatives
I'm not sure where to get big angle brackets like that, but you might want to try a local lumberyard instead of a home center. Even when they don't have a product they often know who does. The angle brackets embedded in the drywall is a clever idea I never thought of using.
Tue, 11/25/2014 - 20:08
Contractor
What city was this work done in? I live in Seattle and I am looking for a contractor.
Adapted to Printer Stand
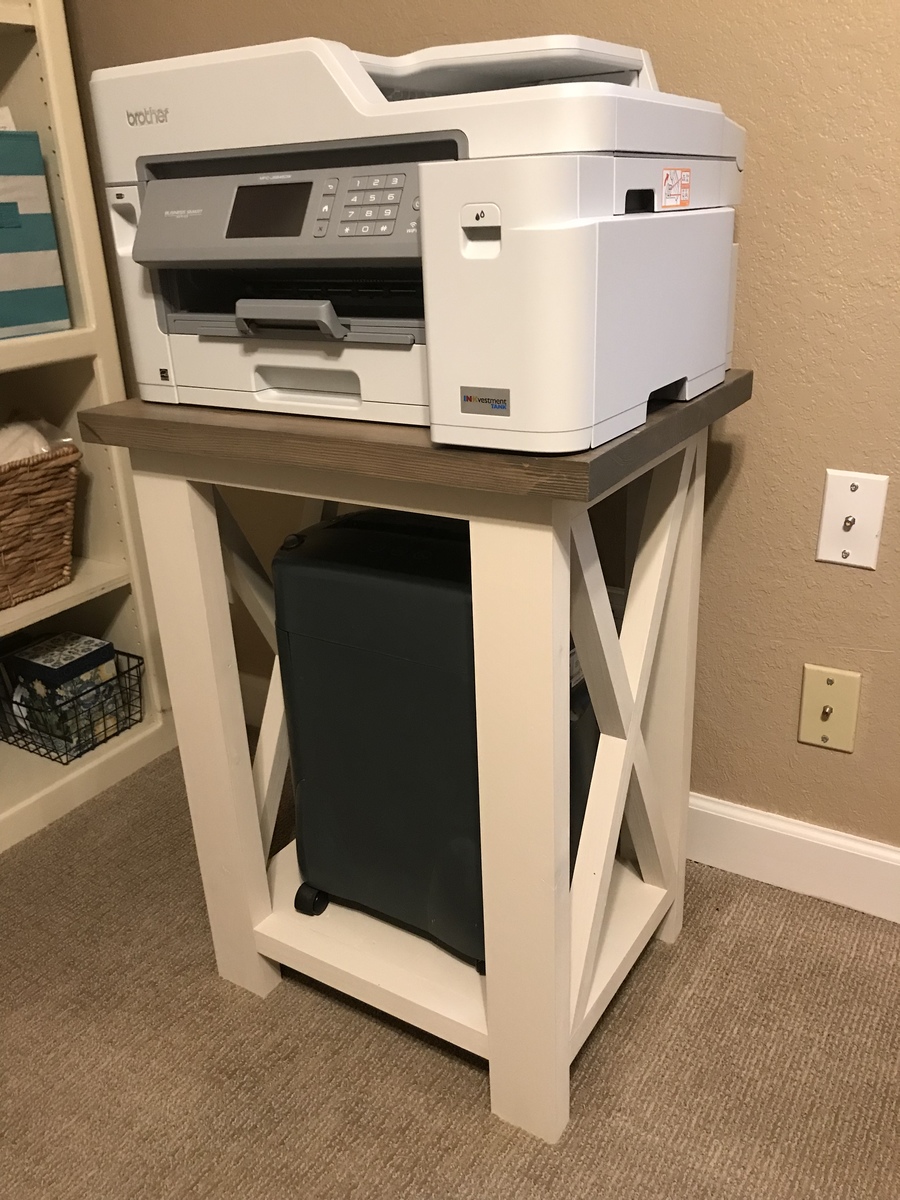
I adapted the plan to make a stand for our printer and shredder. Except for one board, I was able to use scraps so my total out of pocket was $9! I did plane the 2x material to 1 1/4”, and also used 2x material for the base to add a little strength to hold the shredder. Thank you Ana White, for generously sharing your plans!


Built from Plan(s)
Estimated Cost
$9
Estimated Time Investment
Weekend Project (10-20 Hours)
Finish Used
Top - mixed brown and gray rustoleum stains. Finished with poly acrylic
Base - latex eggshell trim paint (custom mix leftover)
Base - latex eggshell trim paint (custom mix leftover)
Recommended Skill Level
Intermediate
Super Big Farmhouse Dining Table and Bench
I worked on both the kitchen table, the dining table as well as the bench seat and all eight parson chairs together, so it took over a week to make this. I think if you were just doing the table you would be looking at a weekend project. Go hard or go home, unless you are home...
The kitchen table was just a case of shortening Ana's plan to about four feet. I made a quick and dirty table leaf to attach the two tables. For more info see my blog. There is also info on making those Parsons chairs too.
My Blog: http://landlocked-art.blogspot.com/2011/10/farmhouse-dining-table-and-b…
Built from Plan(s)
Estimated Time Investment
Week Long Project (20 Hours or More)
Finish Used
Two tables, or one super table
Recommended Skill Level
Beginner
Comments

Tue, 10/11/2011 - 09:41
Wow! So creative and gorgeous, too!
Great job! You did a fantastic job and I love the chairs a bunch bunch bunch!
Fri, 10/14/2011 - 07:27
How to make the chairs
Hey Indiana,
Thanks! You can find out how to make those chairs yourself here:
http://landlocked-art.blogspot.com/2011/10/build-your-own-parson-ish-ch…
Sun, 10/16/2011 - 19:06
What color did you use for
What color did you use for the stain and what was your finishing process?
Tue, 11/08/2011 - 16:07
Farmhouse table
Your table is absolutely beautiful! May I ask where you got your beautiful tableware??
Sun, 01/08/2012 - 18:22
Wood and Stain
Very nice! What kind of wood is that and would you mind sharing the stain color?
Tue, 08/25/2015 - 17:01
How do you make the leaf
Love the idea and plan on borrowing it, but we were just curious how do you make the leaf that connects them?
Another question, when you made the breakfast table, did you cut the table top pieces to 48" or did you cut them 36" and made the whole table 4 ft with the end pieces added? Also, for the breakfast table, would it seat 6 people comfortably? Thanks and what a wonderful job!
Extra wide shoe bench and cubby area
Modified the cubby plans to just be 5 cubby's wide. My wife wanted white so I dressed it up a bit with the bead board, trim and crown moulding.
Built from Plan(s)
Estimated Time Investment
Week Long Project (20 Hours or More)
Finish Used
Early American Stain/Lacquer/ Sherman Williams Extra White
Recommended Skill Level
Intermediate
Comments

Wed, 12/30/2015 - 11:11
I love your entryway! The
I love your entryway! The white is great, the moulding really makes it beautiful! Thanks so much for sharing it!
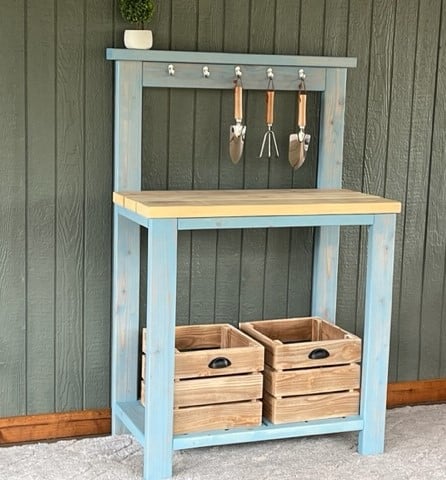
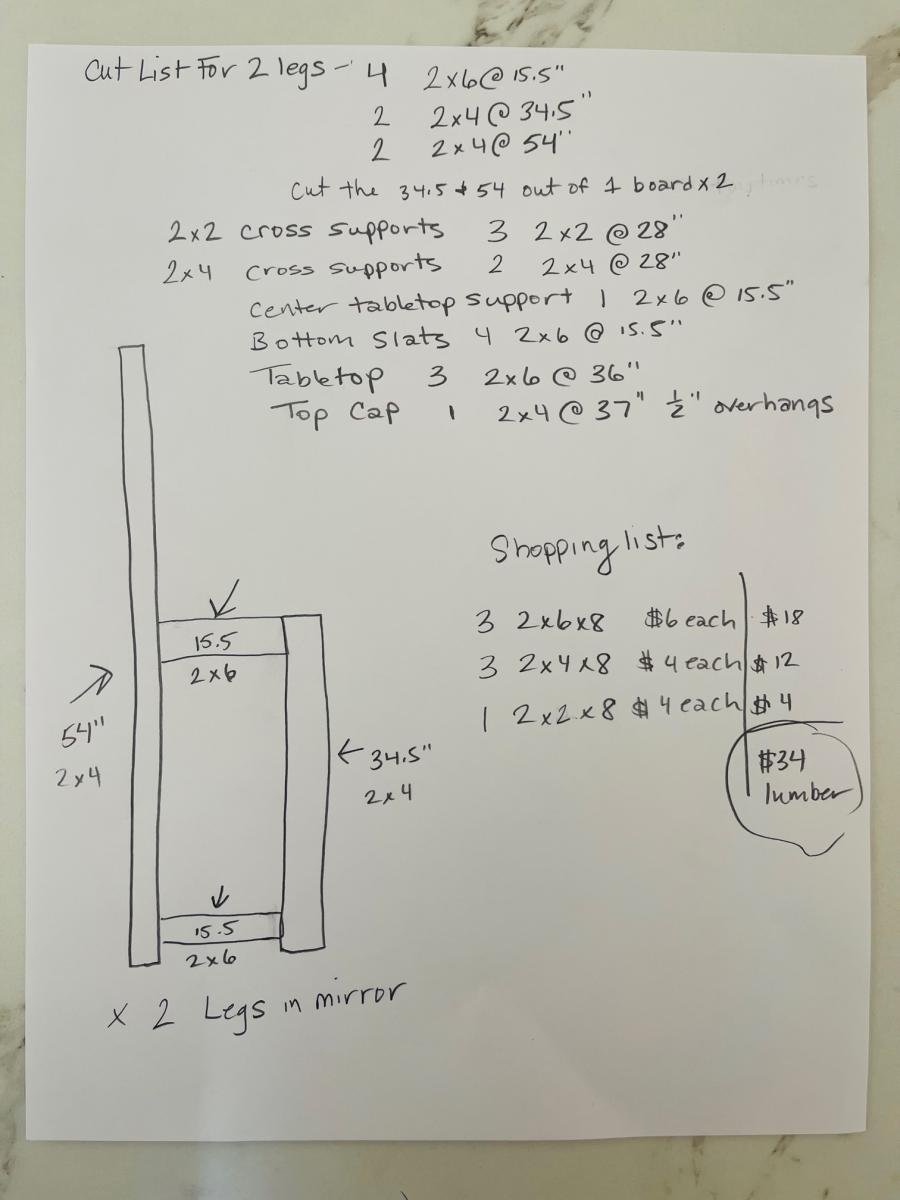
Compact Potting Bench
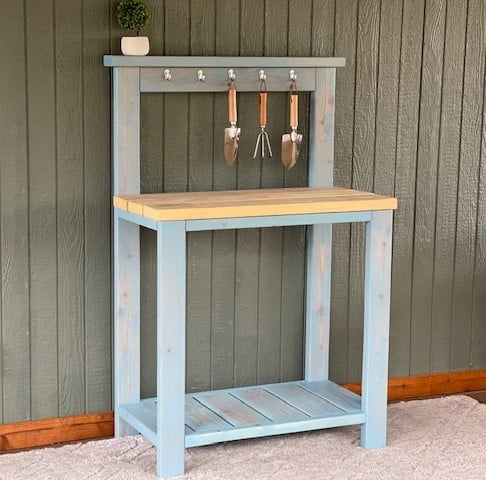
I used Ana's Farmhouse Potting Bench plans and modified it to be more compact and left out the x detail. I built it for under $40 in material.
Modifications for Shopping and Cut List - Construction and placement is same as Ana's original plan, so make sure you look that over.
Shopping List
3 - 2x6x8
3 - 2x4x8
1 - 2x2x8
Cut List
FOR 2 Legs
4 2x6 @15.5"
2 2x4 @34.5"
2 2x4 @54"
(cut the 34.5 and 54 out of 1 board and repeat)
2x2 Cross Supports
3 2x2@28"
2x4 Cross Supports
2 2x4@28"
Center Tabletop Support
1 [email protected]"
Bottom Slats
4 [email protected]"
Tabletop Boards
3 2x6@36"
Top Cap Board
1 2x4@37" leaving 1/2" overhangs
Built from Plan(s)
Treehouse/Playhouse

Thank you! You've helped me look like a true carpenter who knows what he's doing! My whole family is impressed with my woodwork lately, and now I'm addicted. I've done your seesaw, bar table and stools plus the treehouse in 2 weeks. Thank you for sharing your plans!


Built from Plan(s)
Estimated Cost
$500.00
Estimated Time Investment
Week Long Project (20 Hours or More)
Finish Used
Spar urethane
Recommended Skill Level
Beginner
Wood Tilt-Out Trash Bins
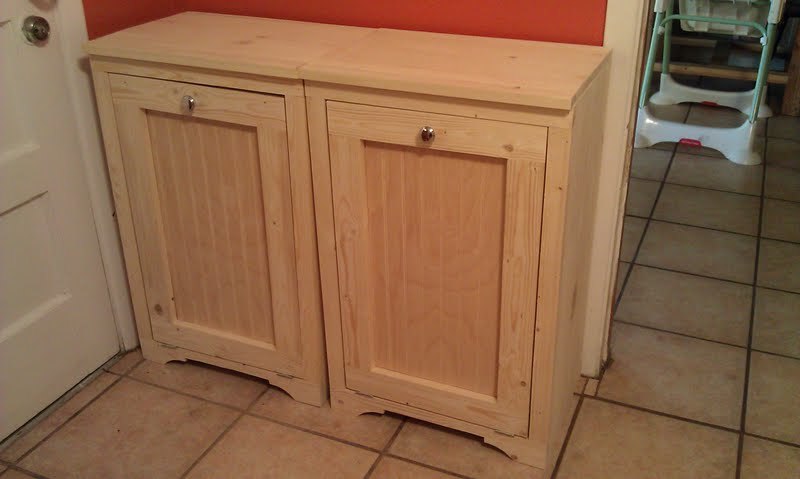
These two trash bins were very easy and fun to make. Plans were very easy to use and made the project very easy to build.
Built from Plan(s)
Estimated Time Investment
Afternoon Project (3-6 Hours)
Finish Used
No finish yet.
Recommended Skill Level
Beginner
Comments
Mon, 11/21/2011 - 17:04
where's the plans for the project
I can't find the plans for this project.Where do I click?
Mon, 11/21/2011 - 19:01
Wood tilt-out trash bins
Click on where it says From Plans: Wood tilt out trash bins. its a link =)

Tue, 11/22/2011 - 07:26
NICE!
This came out really beautiful! I'm thinking of building two like this for our hampers which we keep in our bedroom. We really don't have another place to put them and this is so much nicer looking! Of course, I'd have to modify it so the clothes can breathe. Certainly worth looking into...
Fri, 02/24/2012 - 08:31
You gave me an idea!
Seeing these 2 sitting side by side gave me an idea for our trash & recyclables. My husband & I want to make one of these for our trash, but now I am thinking it would reduce the clutter from the recyclables. Thanks for posting. They look great!
Sat, 12/15/2012 - 10:54
Wood Tilt out trash Bin
This was a great project. Very easy to follow...until I got to the door. There are no instructions for the door and no link to a video. Now I have to try and "wing it" which I think is going to make my trash bin, which is a christmas present for my wife, look like trash. I only have this weekend to do this but maybe someone else will be saved by adding the directions for the door. otherwise, thanks for the great step by step.
Tue, 06/16/2015 - 18:29
Dual Tilt Out Trash/Recycle Cabinet
Does anyone make and sell these? I am looking for a dual trash cabinet.
Tue, 06/16/2015 - 18:29
Dual Tilt Out Trash/Recycle Cabinet
Does anyone make and sell these? I am looking for a dual trash cabinet.
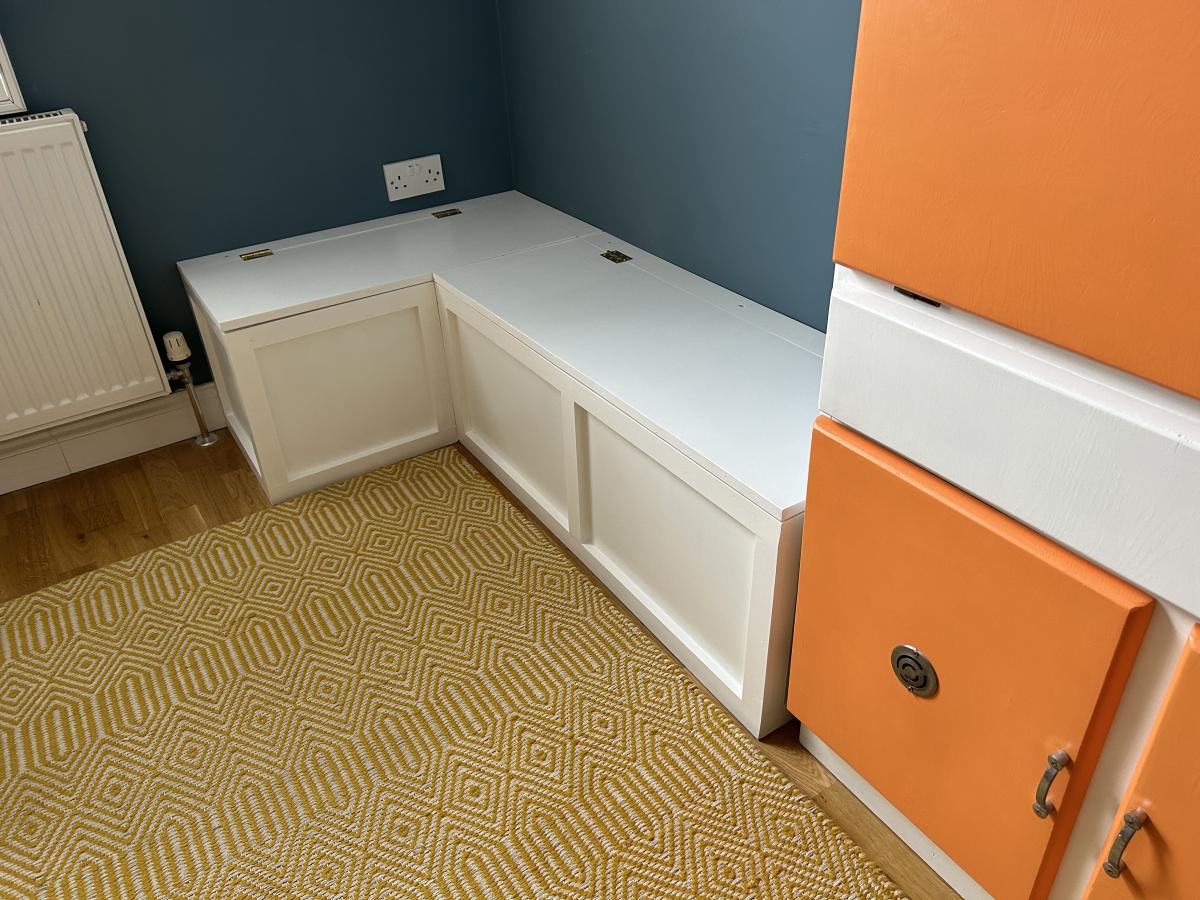
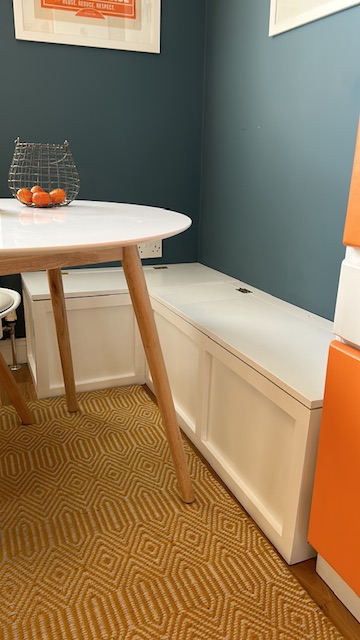
Banquette Bench with Flip Up Storage
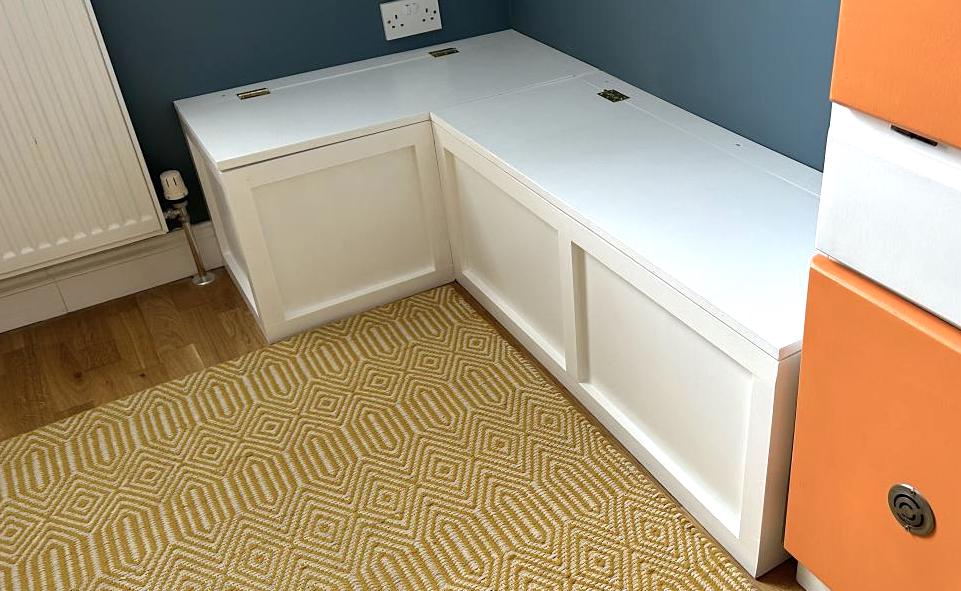
Thank you, Ana, for the banquet bench plan! I’ve never done any form of carpentry before, but with your plans, the right tools and some perseverance, this labour-of-love is my new pride and joy and has added some much needed storage to my small kitchen.
Angela (London)
Built from Plan(s)
Comments
Mon, 04/24/2023 - 10:34
Fabulous banquette!
You did an amazing job and it fits your space perfectly! Thanks for sharing.
Comments
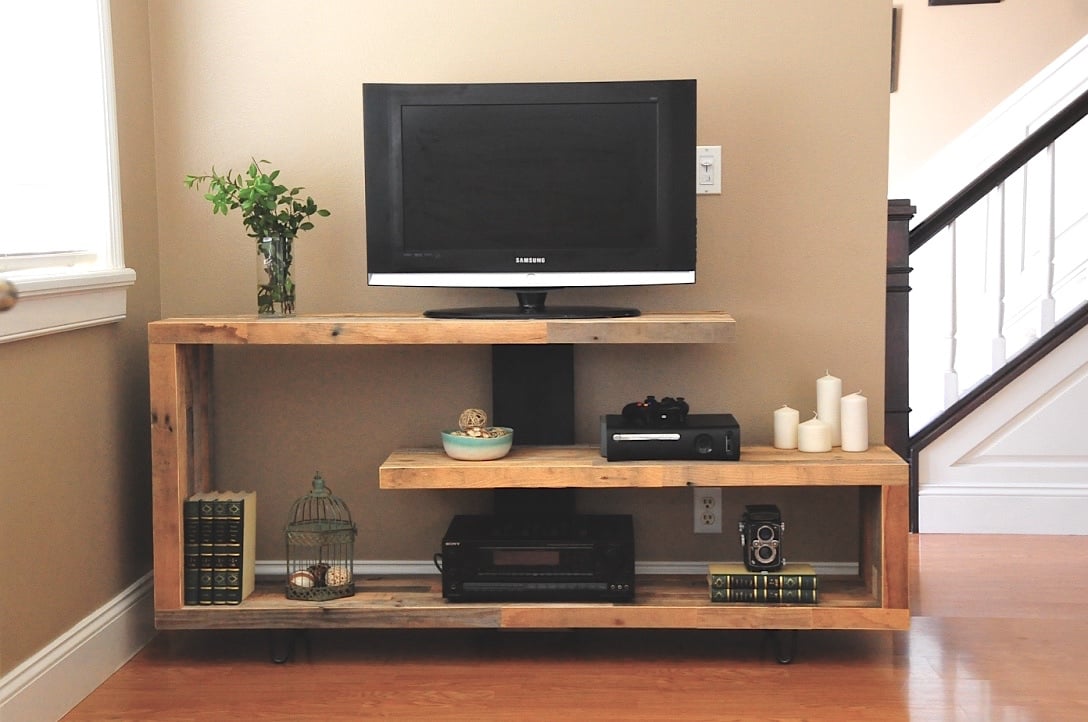
Ana White Admin
Sun, 09/06/2015 - 11:40
You did it again!
Knocked it out of the park with this one Brad! Love!!!
roshangautam
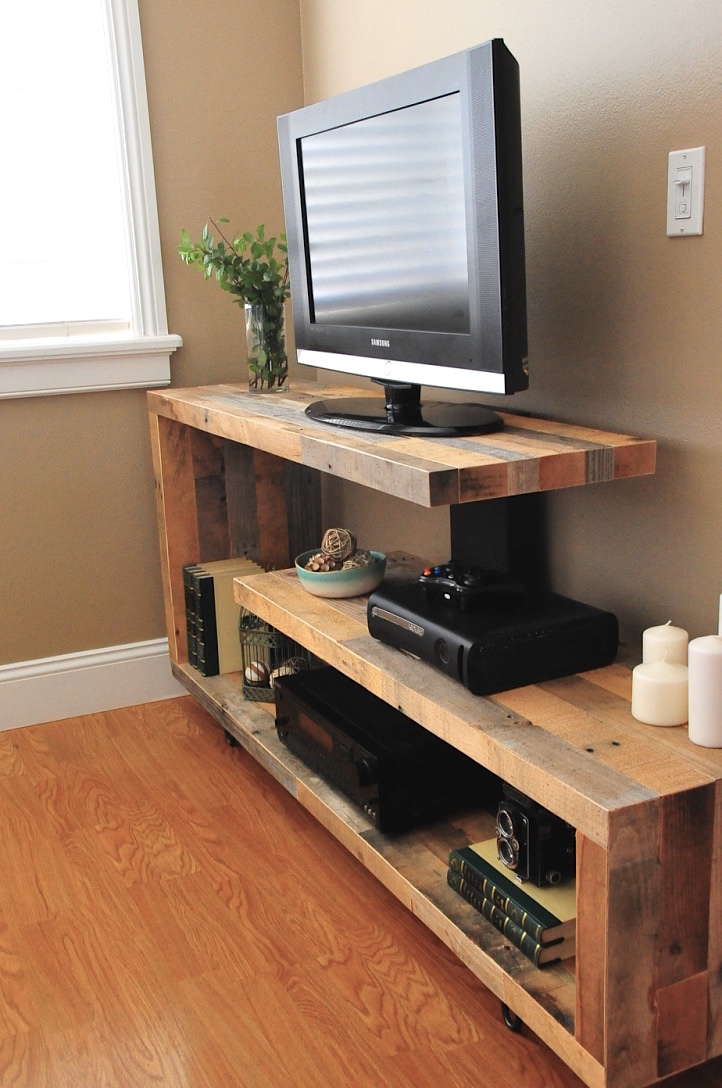
Mon, 11/23/2015 - 07:49
Missing Plan
Can't find the DIY plan here ? Am i missing something ?
Templar
Mon, 12/02/2019 - 22:10
Hi there Im new to site and…
Hi there Im new to site and also have the issue of not seeing the plans for this Rustic Modern TV Console. Are they available and Im doing something wrong or??
zoneoneboy
Sat, 06/27/2020 - 05:03
No Plans for "Rustic Modern TV Console"
I am logged in and I do not see the plans for the "Rustic Modern TV Console"