king size bed
![](/sites/default/files/20170205_135548.jpg)
I started this just for fun and ended up doing so much more
We ordered 2 custom bookshelves using the configurator. Each is 48" x 72" and 11.5 in deep. We primed and painted the pieces first, then assembled using pocket screws. A little touch up required. We attached a back of 1/4 in plywood for a cleaner look, and attached to wall, added baseboard trim. Attached a small facing piece to top edge only. We love them!
I wanted a table that was this shape and functionality, but smaller to fit my living space. So I measured the area that it would be going into and changed it by 18 inches. This was a 2 weekend project as I was getting sick so It was not done as quickly as I wanted. But once I was better I finished it in about 16 hours. Spread across 4 days.
We saw the plans for this table and I had to have it. We followed it to a T! The only thing we did different is made it a foot shorter and added rustic nails on top.
I built this table for my sister-in-law's townhome. I also put the stone on the fireplace.
Here is one of the coffee tables I built for a customer. Honey Stain, gloss polyurethane. Took about 4 hours total. Fun build
I have been wanting to build a window cornice for the laundry / mudroom and decided it was finally time. This project was very easy and inexpensive. Luckily, I was able to use some leftover MDF and only had to purchase and 8ft piece of trim. Everything things else I already had. 1. Using left over MDF the front and sides of cornice were measured, mitered and glued together using Loctite power grab (very strong glue). 2. Once glue dried, L brackets were placed on the corner insides for additional reinforcement. Probably not necessary since Loctite power grab is some super strong glue, but I did it anyway. ;) 3. Attached top piece of cornice using nail gun and #18, 1 3/4 inch nails. 4. Mitered trim pieces and glued on using Loctite power grab. 5. Paint cornice. 6. Attach L brackets onto top window frame. 7. Mount cornice onto L brackets. Once in place, I used #6, 1/2 inch wood screws to secure the cornice onto the L brackets. Again, this was an easy and a fun starter / beginner project. :) For more info, please check out my window cornice blog post. Thank you.
Thu, 04/04/2013 - 17:08
This is lovely! The trim looks perfect and it goes great with the blinds! Love it!
Im so proud, this was my first big proyect. The instructions are just perfect like a nice recipe :)
Thirty High School Students spent several weeks in the classroom building a dozen of the Adirondack chairs. By the time they were completing the last of the chairs, they pretty much could build them from memory. They really had no trouble building the chairs and learned how to use all of the tools in the school shop.
II fell in love with this desk and all it's storage! It was the perfect size for my space and it was super quick to build! I used mdf for the top painted in homeade chalkboard paint! Used the post from shanty to chic for the rolling storage cubes. It all came out perfect!!! This is my third real build all done for my youngest sons new room.
I built this table using a modified version of the Ana White, Fancy X Farm Table plans. The coolers are two, 36 inch plastic planter boxes. If you have any questions, please let me know.
While browsing I ran across Ana's Mantel Molding Headboard (Pottery Barn Addison knockoff) and had to have one!
I stuck to her plans except that I used 3/4" boards instead of the 2x4's, made it wider (81") for a King size bed, used some different molding elements and gave it a professional looking finish with my airless paint sprayer. Most people who see it cannot believe it is not store bought.
This of course kicked off a whole remodeling effort including two additional DIY projects that came out great. Looking in the photos they are the boxed shells above the bed and the grass-cloth framed mirror. The bedroom is now one of our favorite rooms in the house!
This project was not built from one of Ana's plan but I thought it may inspire others to begin working more with reclaimed lumber and metal. The desk top is built from solid reclaimed oak. I was able to use these reclaimed planks to build a "breadboard style" top. The legs are 1/2" thick hairpin legs. I sanded the wood slightly and sealed it with two coats of oil based polyurethane. What I love most about this piece is the hanging shelf for a printer/scanner/fax.
Mon, 02/23/2015 - 08:05
This is so awesome! Beautiful job. Where did you get the legs? And how did you attach the shelf?
In reply to reclaimed oak desk by CSaintD
Mon, 02/23/2015 - 21:37
Check out Etsy. You can find four legs for around $50-$60. The legs come with a mounting plate with screw holes.
In reply to Check out Etsy. You can find by timberandsoul
Tue, 02/24/2015 - 08:59
Thank you!
Mon, 02/23/2015 - 10:23
The website looks fantastic!!!! As always, thanks for sharing your amazing creations!
Ana's plans are so easy to follow. This sectional was a breeze to build.
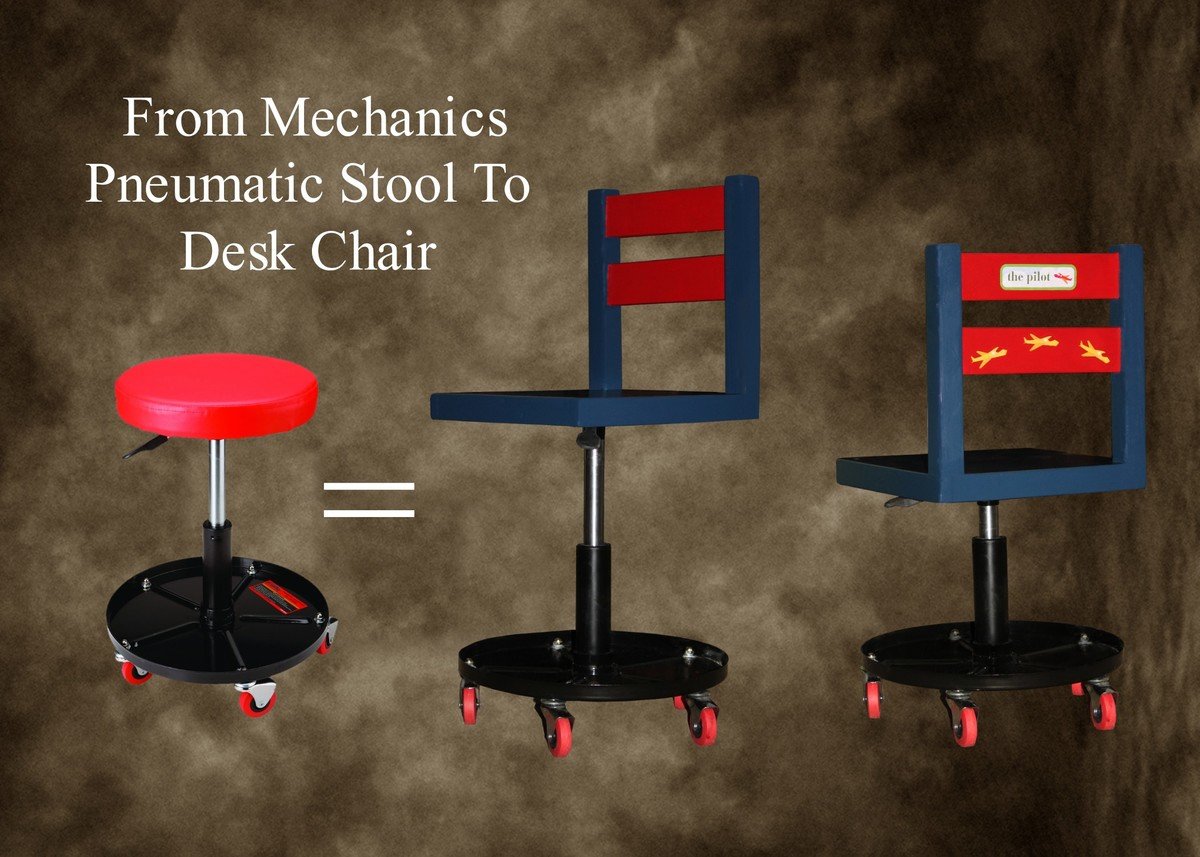
After making my grandson's Airport Loft Bed, he said he needed a different chair for the desk inside. But, he wanted wheels and he wanted it to go up and down and turn. All of the kid's rolling pneumatic chairs online were way too expensive and they didn't go low enough to fit under the desk; so I decided I would have to build it - just had to figure out how. Fortunately about that same time, I got an ad for Harbor Freight with a Pneumatic Stool on sale for $19.00 with the coupon.
The stool could have been used as is, but I wanted to maintain the wood look and have a back to the chair. I built the seat from wood scraps - removed the cushioned seat from the stool and just fastened the new wood seat, which is 13" square. It adjusts from 15" to 20" and holds up to 300 pounds; so he shouldn't outgrow it. As a bonus, he can store some of his airplanes in the rack at the bottom.
Made this from the Owens nightstand plans. Very simple to build, as long as you have built drawers before! I painted it to match my sons bed I made for him recantly.
I added a board on the height of the beds to make it easier for an older person (me!). The plan came together beautifully, and I did all the work myself.
It's the first thing I've built on my land in the Cape Breton highlands, Nova Scotia, Canada. We staked it down because it gets really windy here! Great design, thanks Ana!
I fell in love with this bed as soon as I found the plans on the web site. It took me a little while to go ahead and build it - I'm the worst procrastinator!! I had to adjust the measurements to suit my Australian size king mattress so I measured and remeasured my mattress and procrastinated some more. The instructions were very easy to follow. I think the hardest thing was deciding on how I was going to finish it. I finally decided the dark stain and I absolutely love it! I added support blocks in the middle of the bed for peace of mind (I was scared that it would collapse) but this baby is sturdy as anything.
Sun, 04/14/2013 - 08:17
I wanna know how you get it to stick to the ceiling. j/k, nice work!
Mon, 04/15/2013 - 02:30
I know right!! Clever or what!! Seriously I have no idea why the photo kept rotating and I have no idea how to fix it ;)
Seeing the plans for this, we knew what we wanted as the coffee table for our living room to go with our antique sofa and bench. We wanted a shabby chic look, so I experimented with the Minwax pickling water based stain. A few months later, I built matching Kentwood end tables.