Community Brag Posts
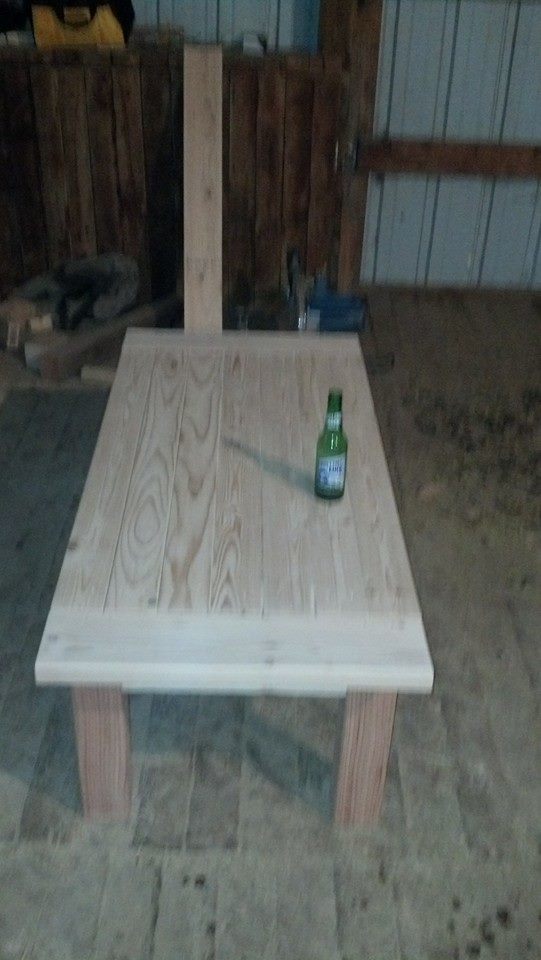
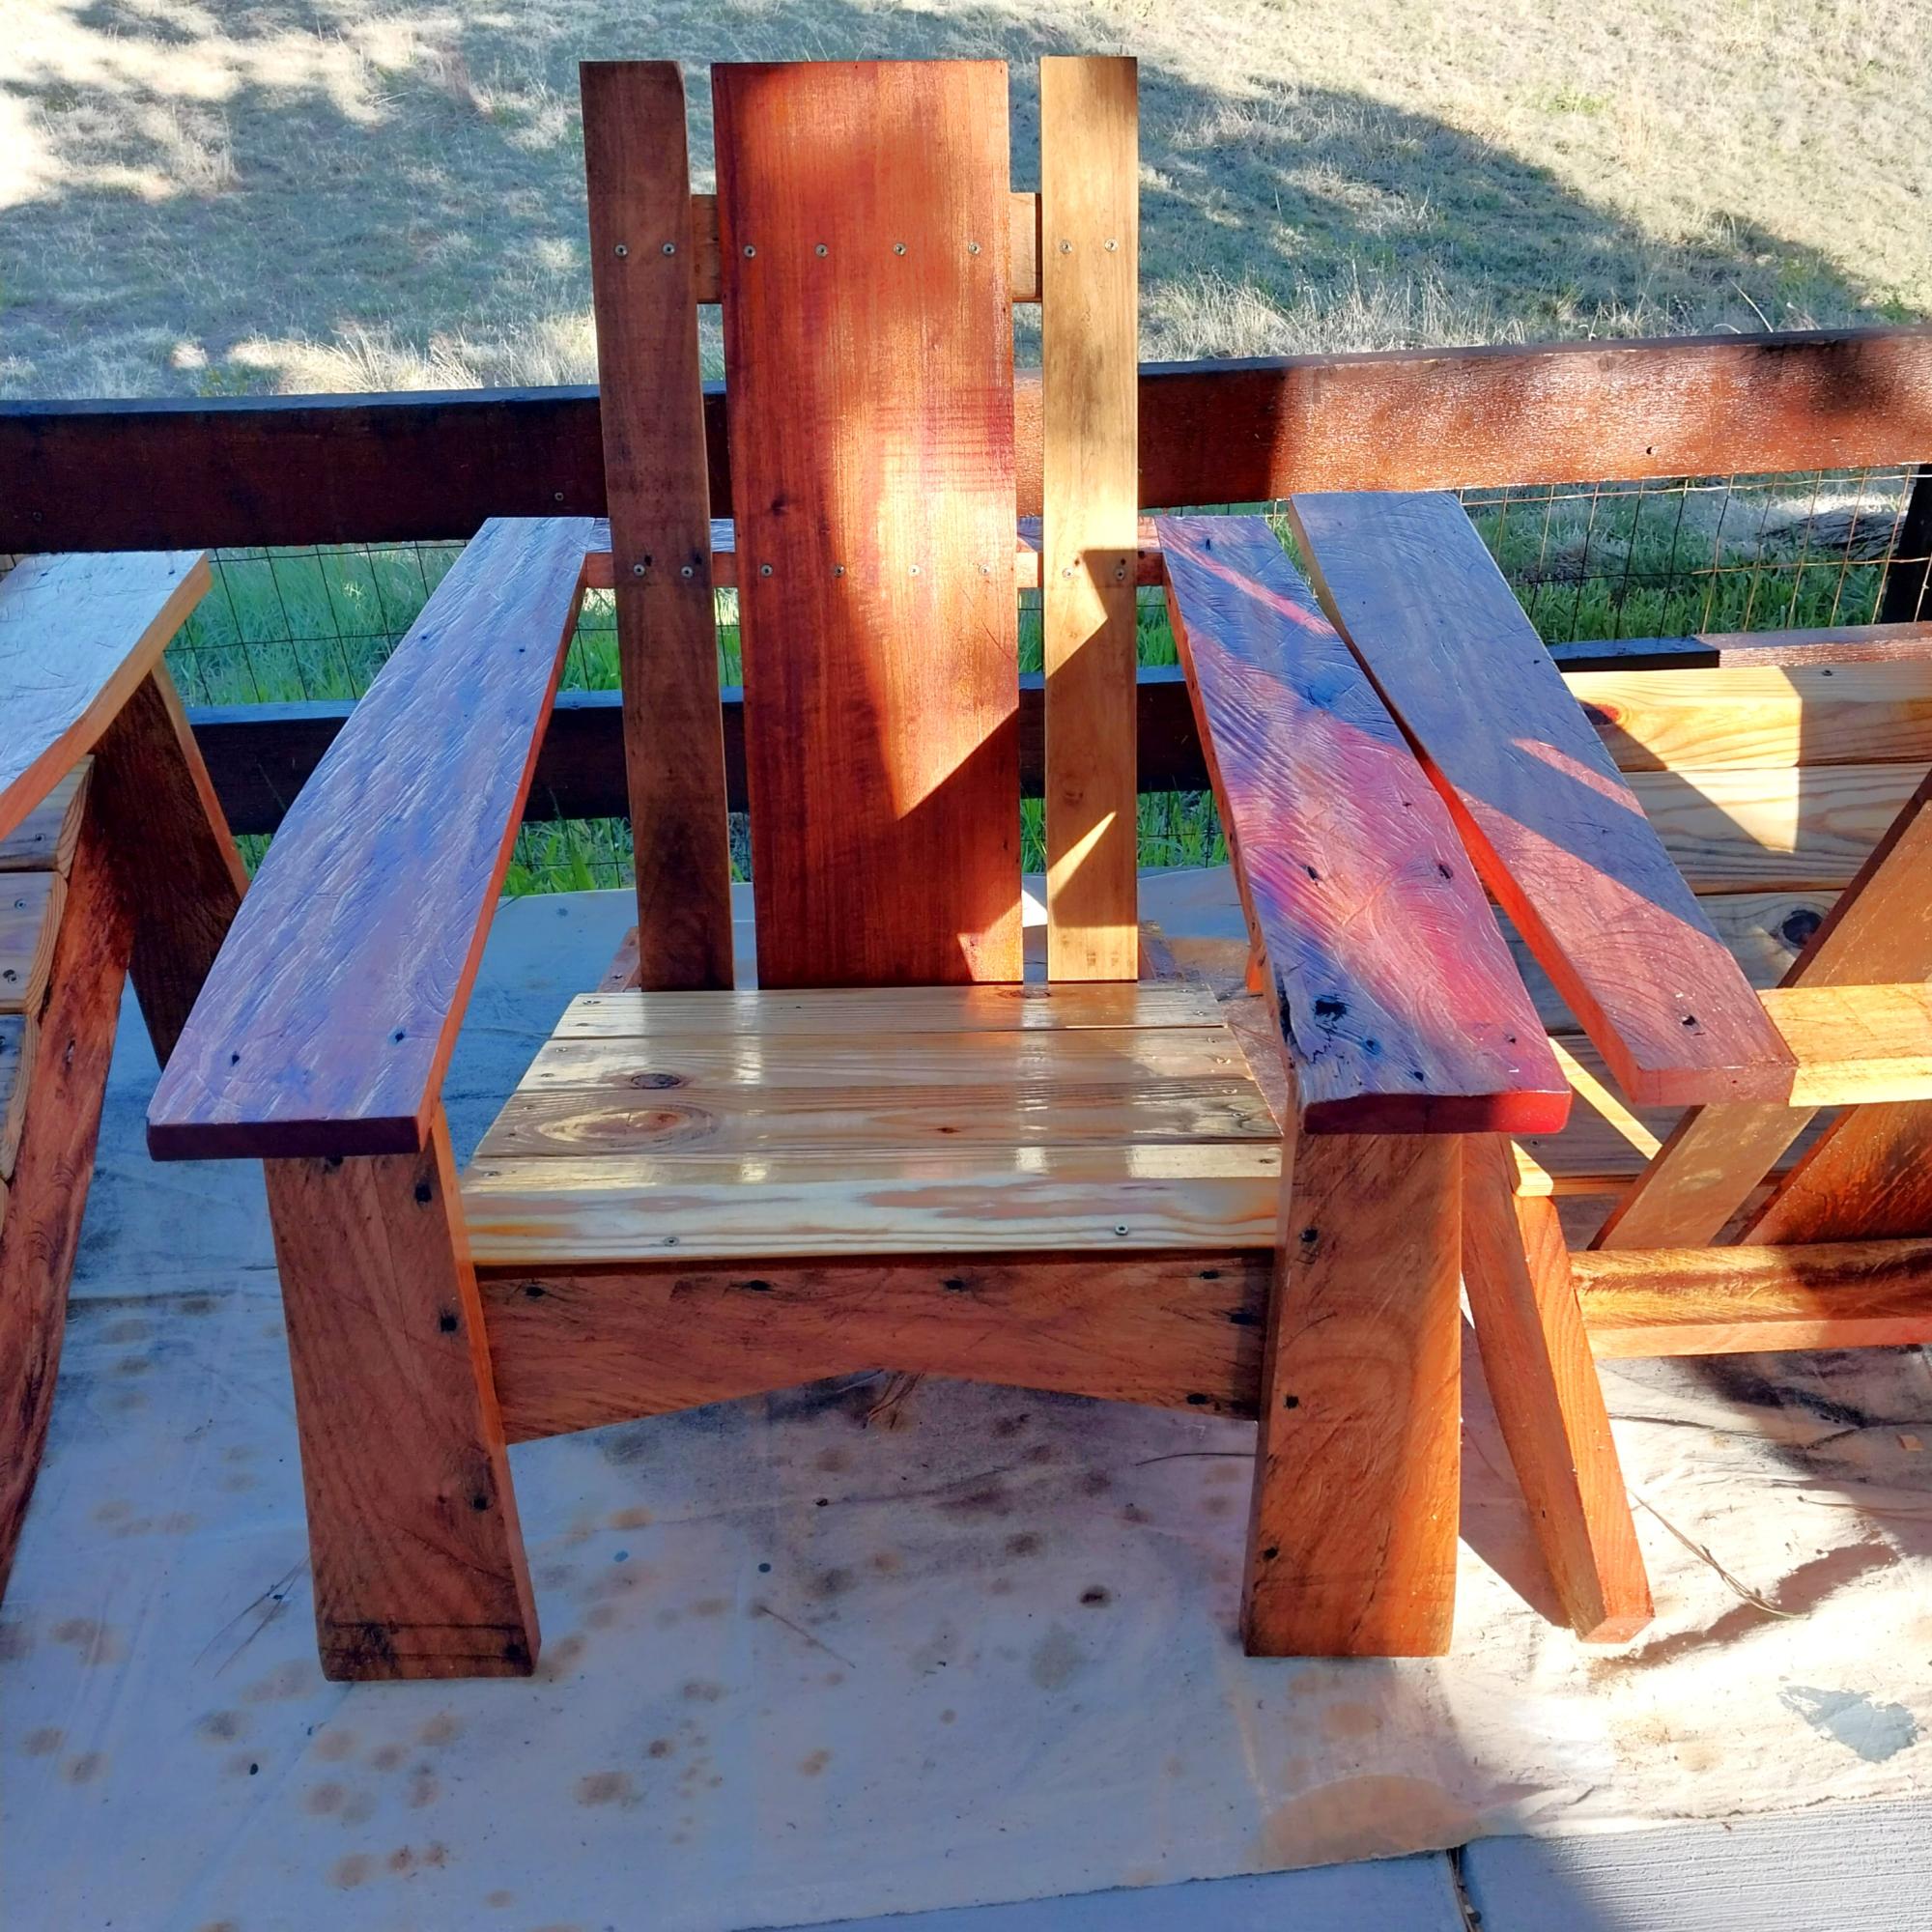
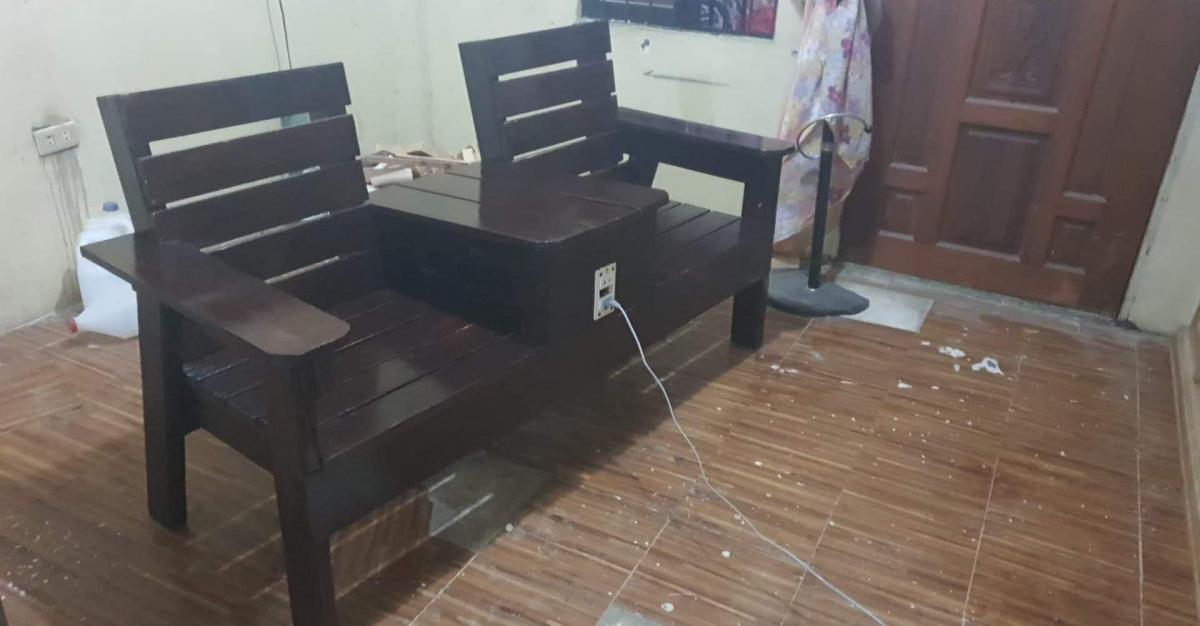
Modern Outdoor Chair from Pallet wood- OH MY
It's a Friyay! and we have a bunch of used pallets at work the boss is wanting to get rid of. Well he is on vacay so ....
We (me and my office manager) had to alter the directions a bit but the end result is great. This was our first project and tools were very limited. Even so its a win win and we will be making more. Thank you Ana!
Built from Plan(s)
Estimated Cost
FREE
Estimated Time Investment
An Hour or Two (0-2 Hours)
Finish Used
none yet but paint is being considered
Recommended Skill Level
Beginner
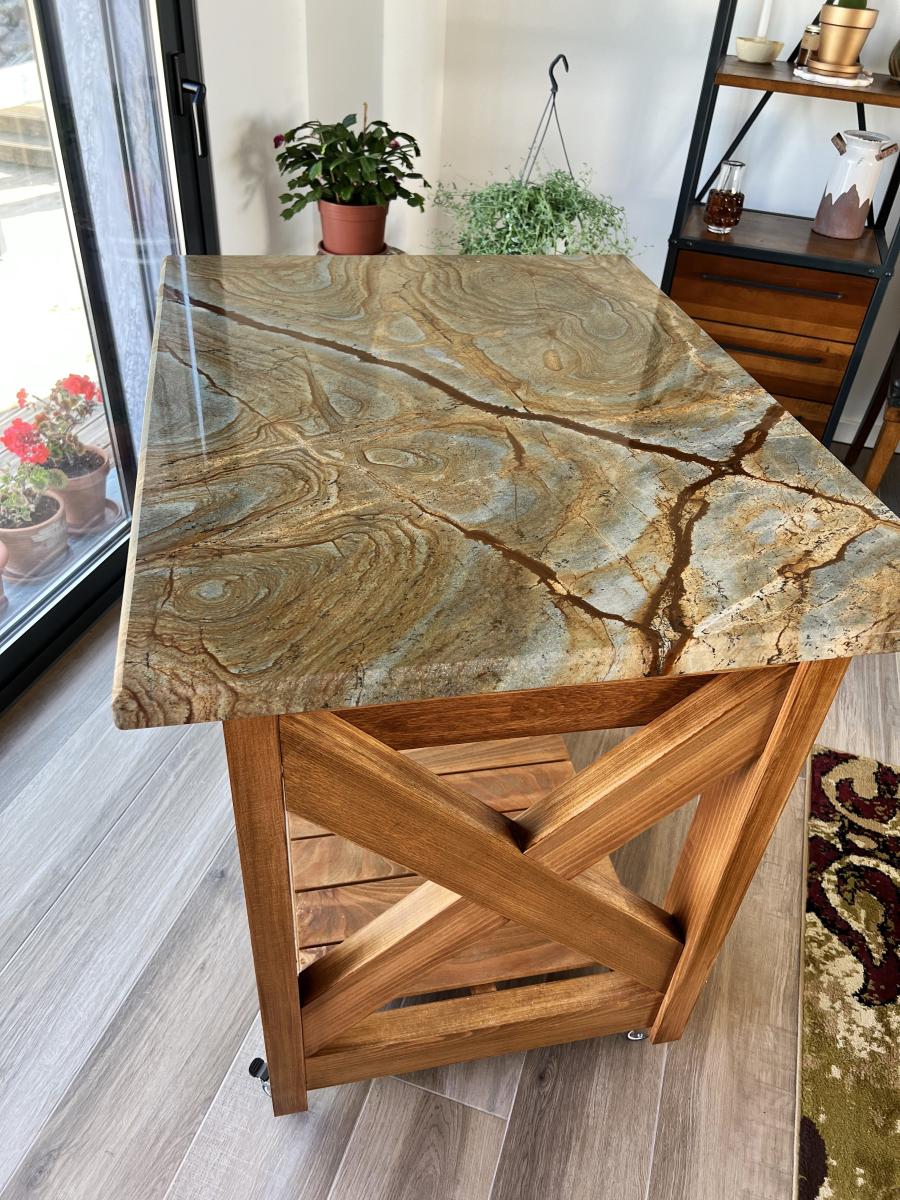
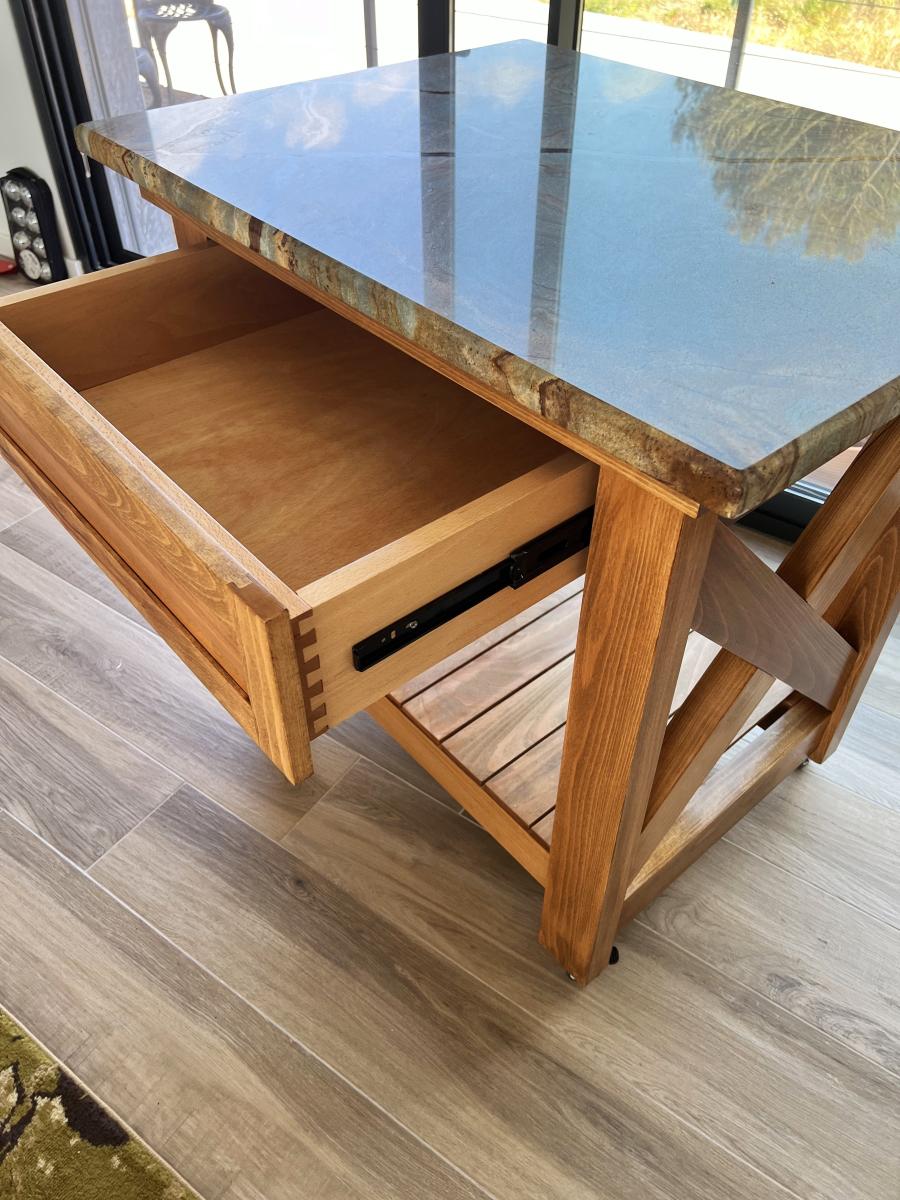
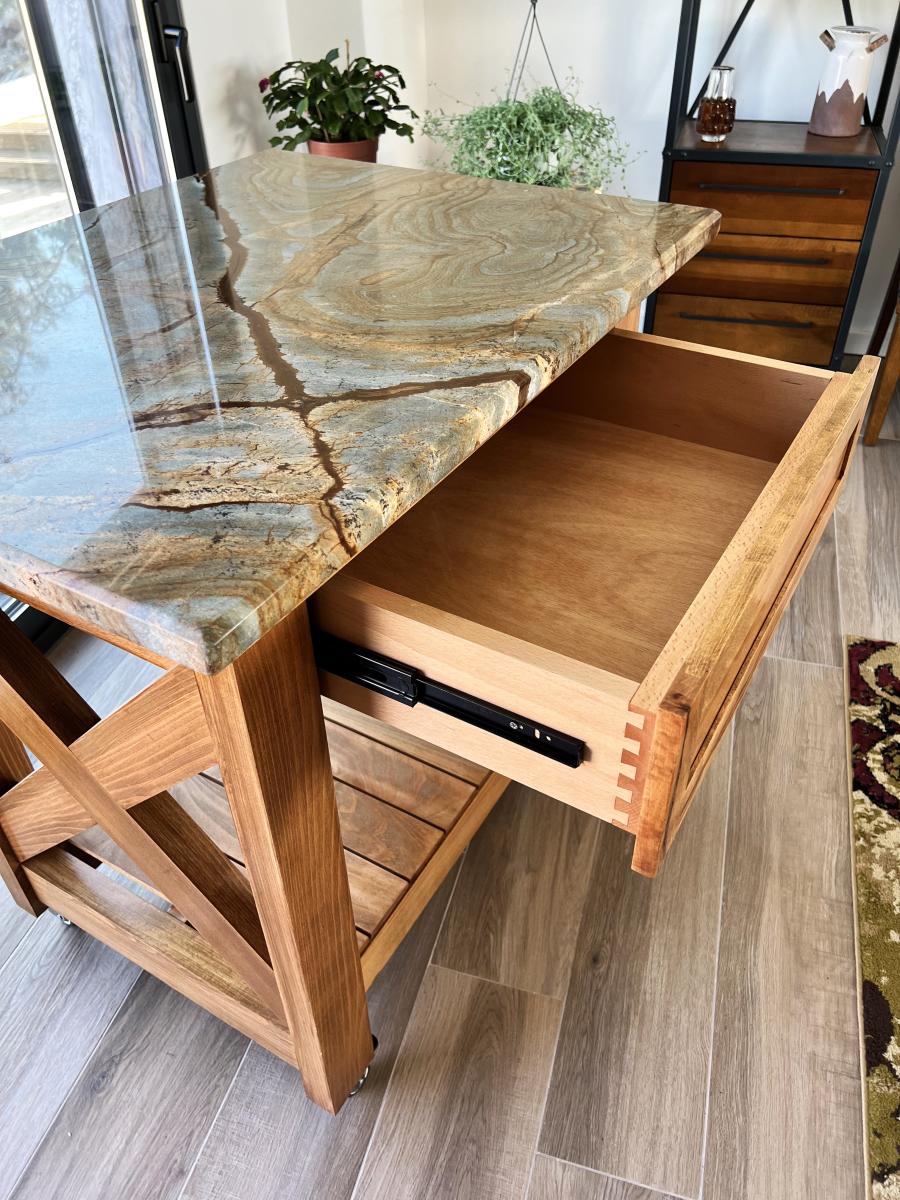
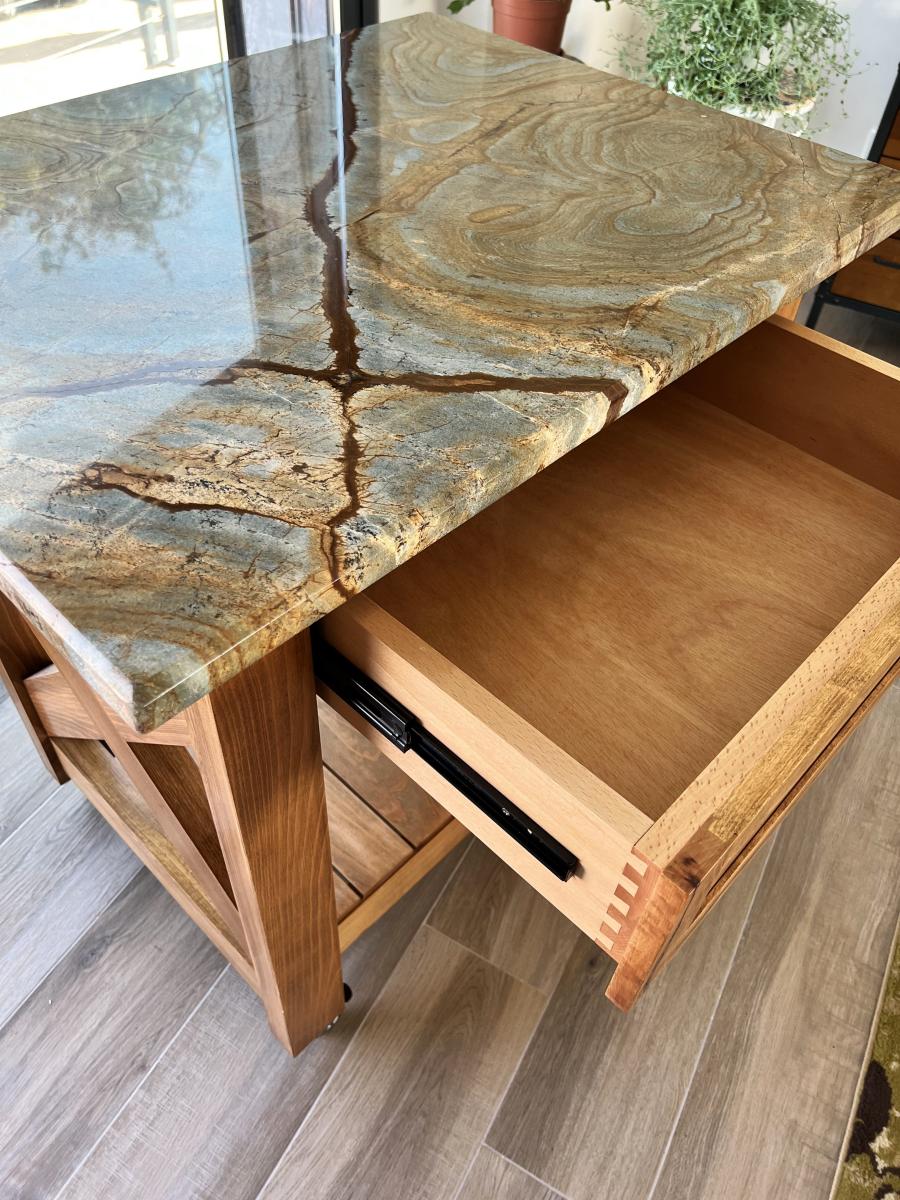
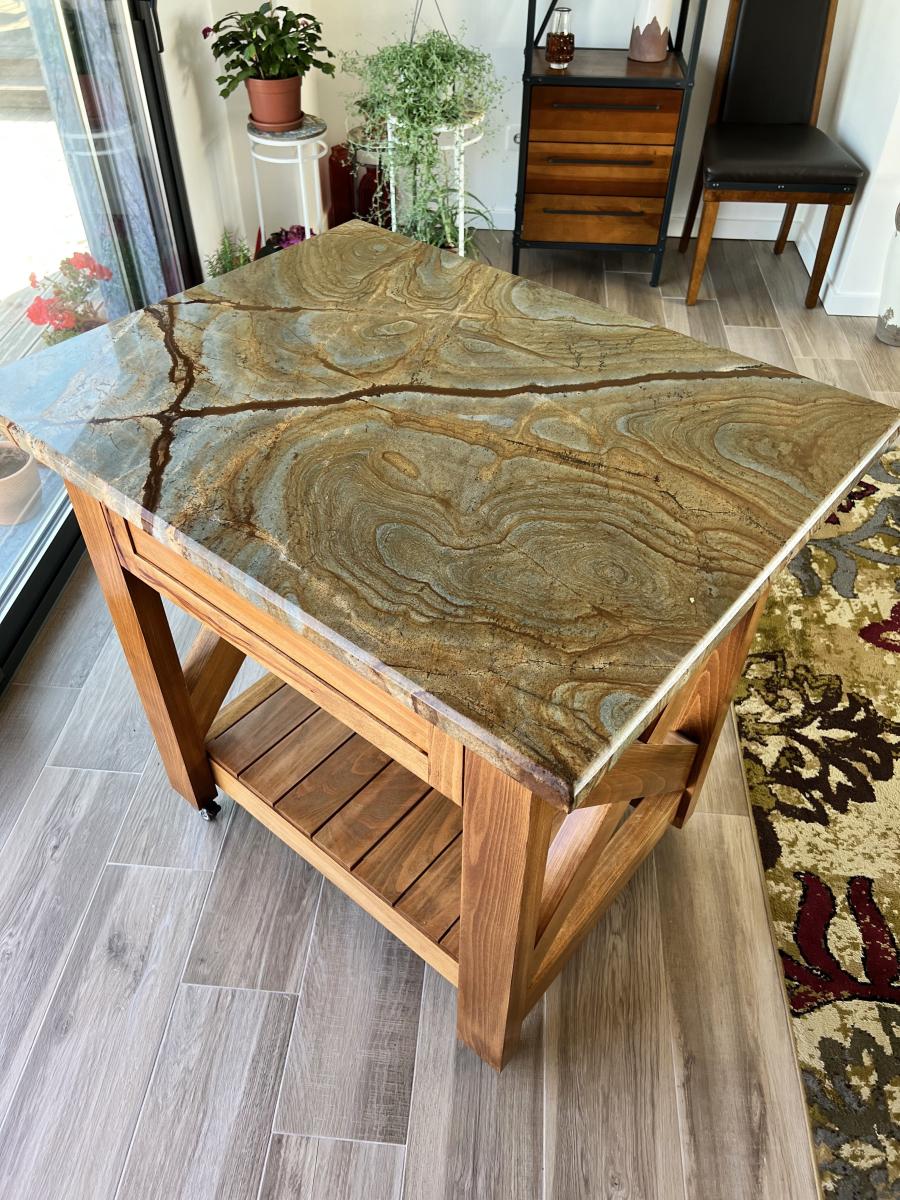
Custom Island with Granite Top
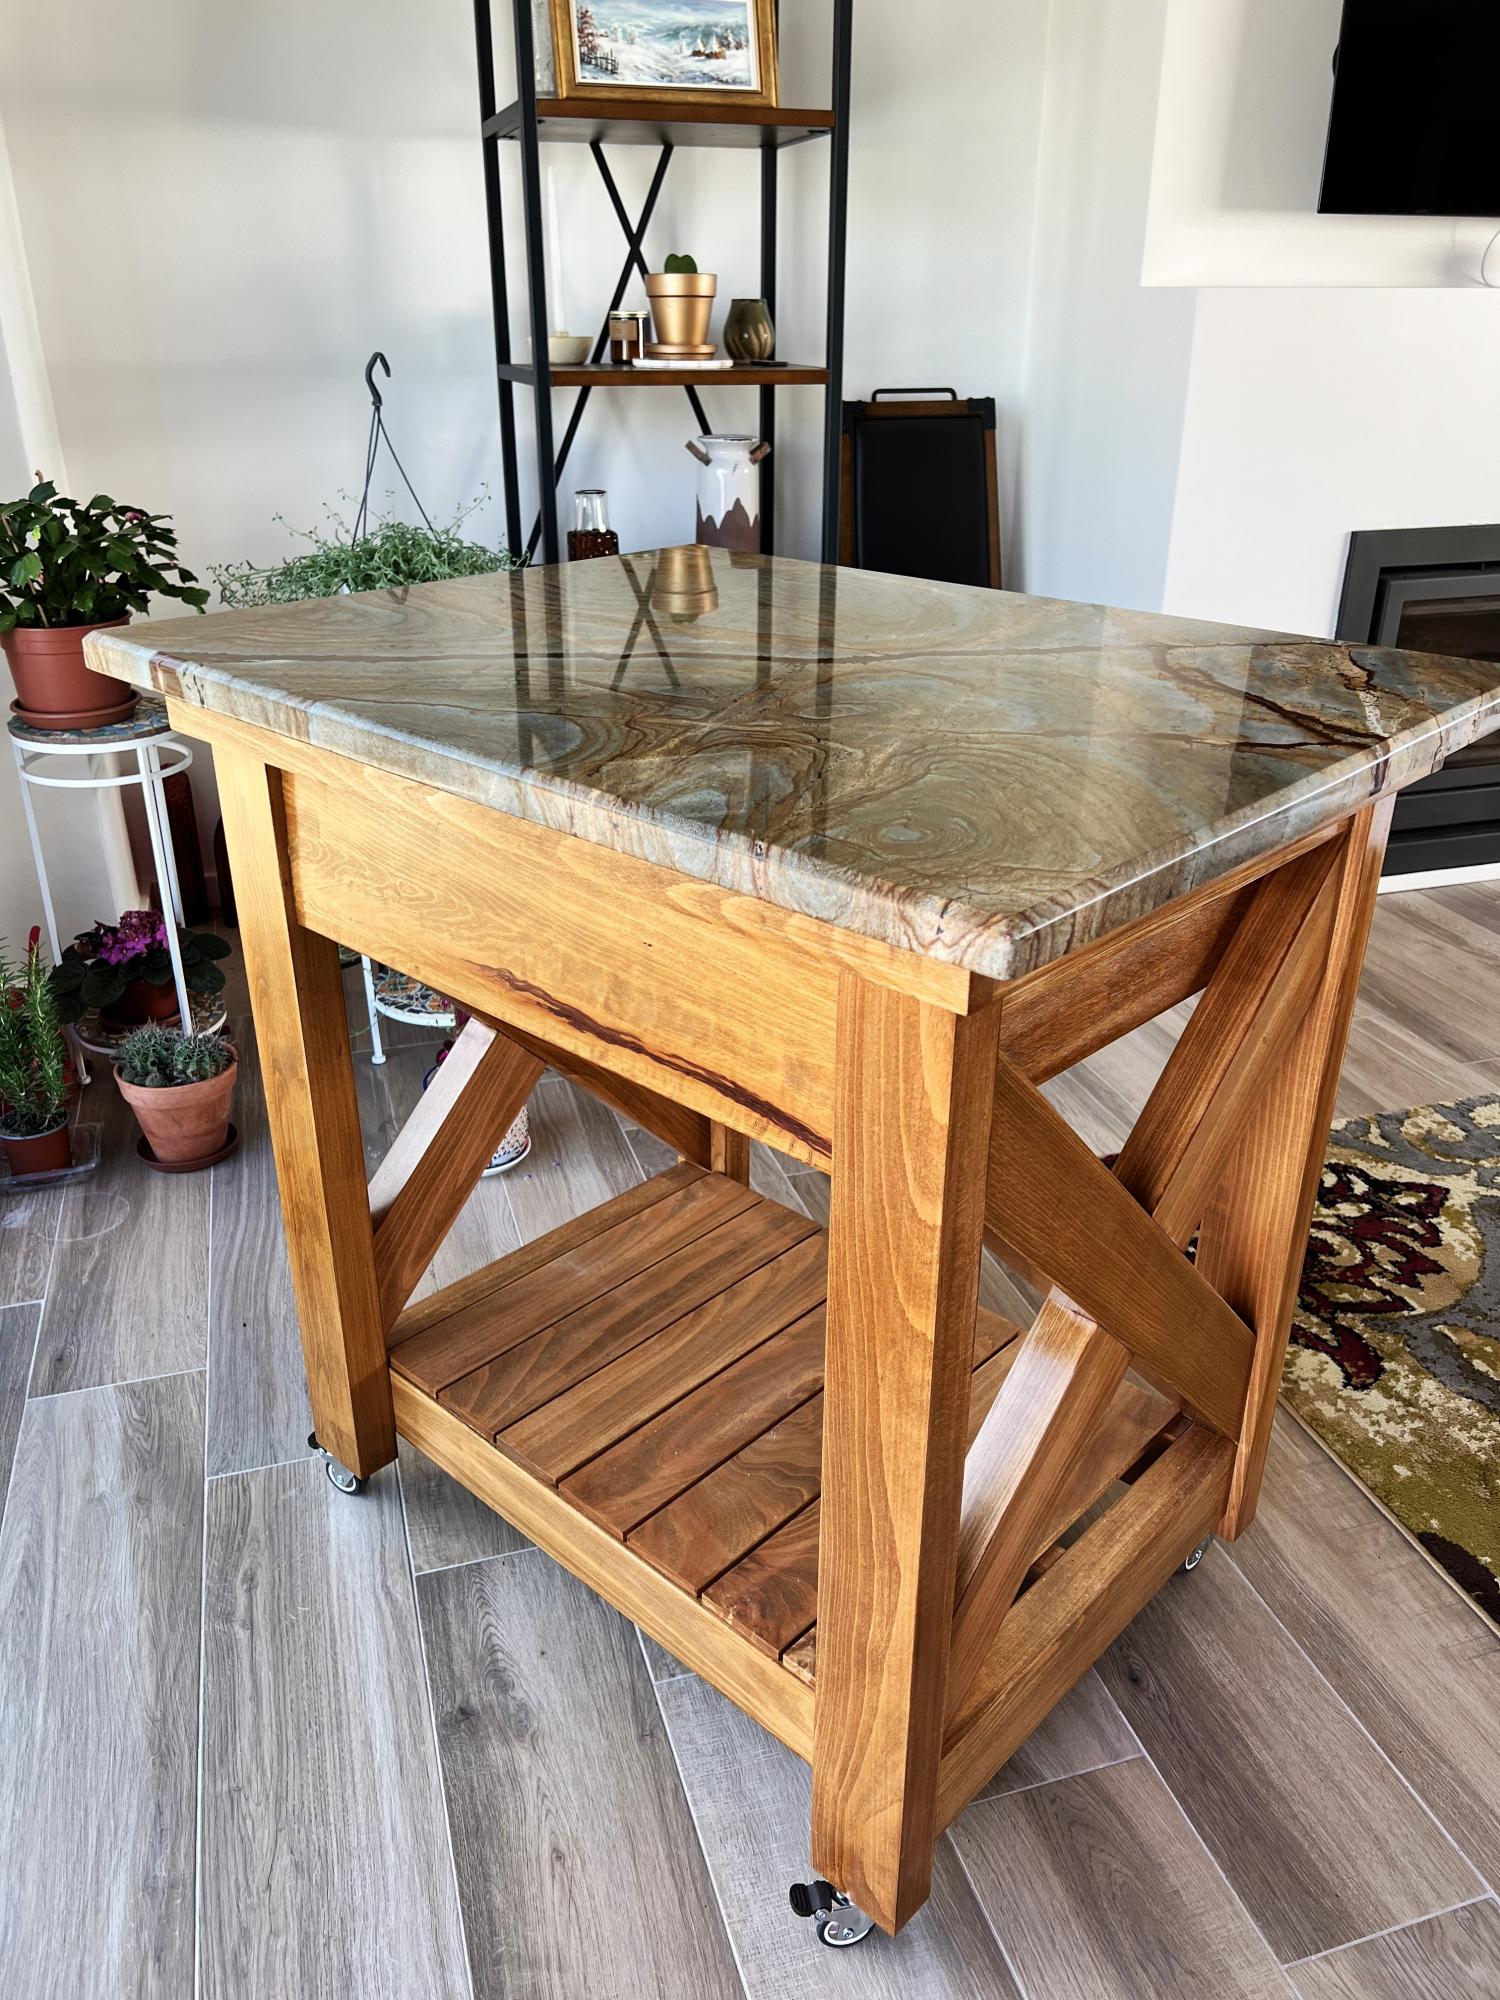
I made a few changes to the original plans for this island. I had to convert all measurements to metric to begin with. I live in Portugal and standard size woods, such as 2x4s are simply not available. I found a lumber yard that had some extremely nice German Oak which was a pleasure to work with. Although, this did add some weight to the finished project. All wood needed to be jointed and planed to ensure straightness. The "X" cross braces are full length. I used my router to remove half the thickness where they intersect so that they interlock with each other.
The granite top was a remnant we brought with us when we moved here and was sized and shaped previously. Instead of using pocket screws to join pieces together I opted for doweling all pieces and did not use screws at all, except when attaching the tracks for the drawer.
Fortunately, the overall plans did not require much alteration to accommodate the granite.
I would have liked larger wheels but these allowed for the island to match the countertop height in our kitchen.
Christopher Mathrusse
Built from Plan(s)
Gift caddy/crate

I Love this plan! I had to modify mine a little form Ana's because the reclaimed wood I got was already cut in small pieces. I love how it turned out! I ended up giving it as a gift and made several more for the same purpose. You can see those on my blog!
Thanks Ana for another awesome plan!

Built from Plan(s)
Estimated Cost
Free! Scrap wood
Estimated Time Investment
An Hour or Two (0-2 Hours)
Finish Used
I used a wood aging finish, steel wool in vinegar.
Recommended Skill Level
Starter Project
Tryde Coffee Table
This was my second project from Ana White and it turned out just as well as the Tryde Side Tables. The finish used was exactly the same as the side tables; however, just regular Cedar was used instead of Red Oak.
Built from Plan(s)
Estimated Cost
$60
Estimated Time Investment
Weekend Project (10-20 Hours)
Finish Used
Began with 1 coat of standard wood conditioner, 1 coat of dark walnut stain and applied 5 coats of polyurethane, sanding it with 220 grit sandpaper after each coat had set.
Recommended Skill Level
Beginner
Sliding Barn Door Console
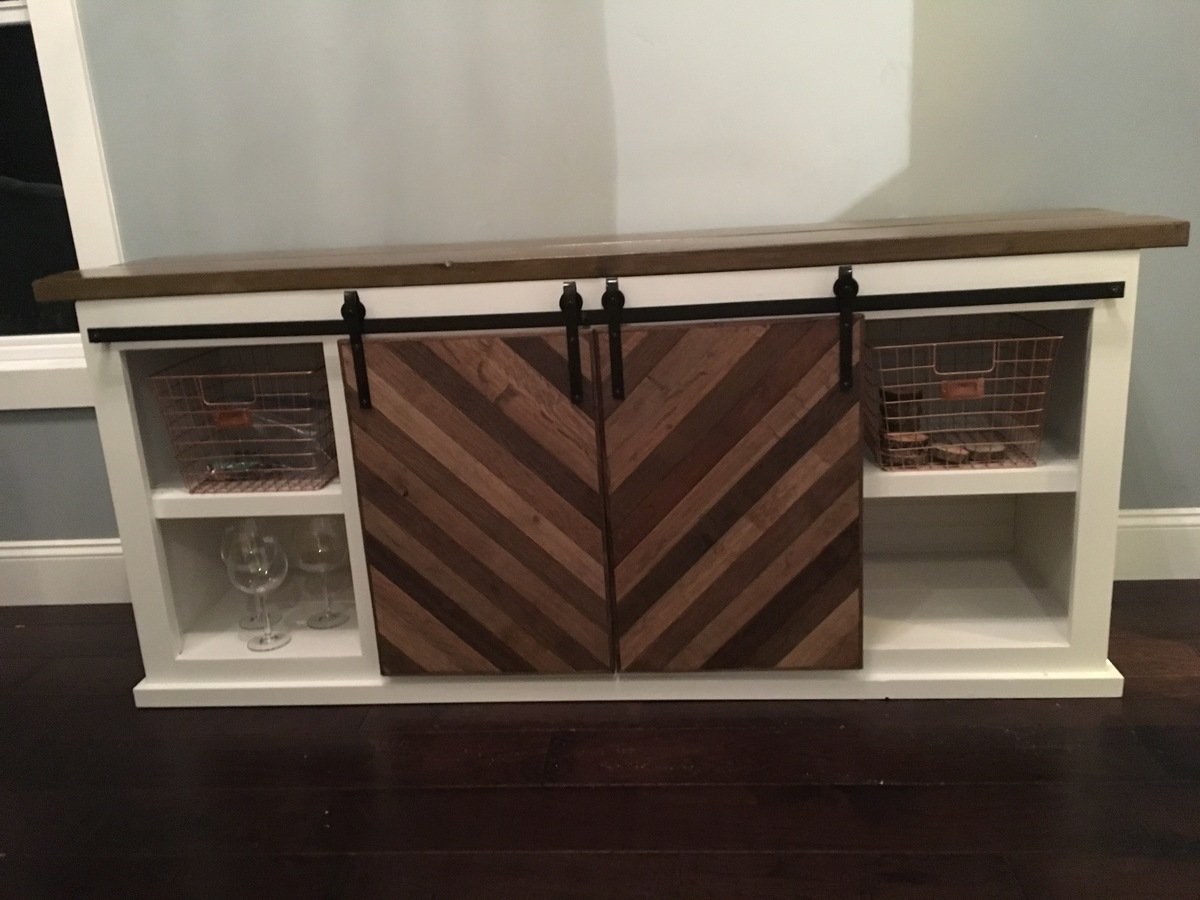
This was a fairly easy build, but the hardware was a challenge. Very exciting that it actually worked. Followed hardware instructions linked in comments
Built from Plan(s)
Estimated Cost
$200 +
Estimated Time Investment
Weekend Project (10-20 Hours)
Finish Used
Paint for frame, top is varathane sunbleached with rustoleum glaze on top.
Recommended Skill Level
Intermediate
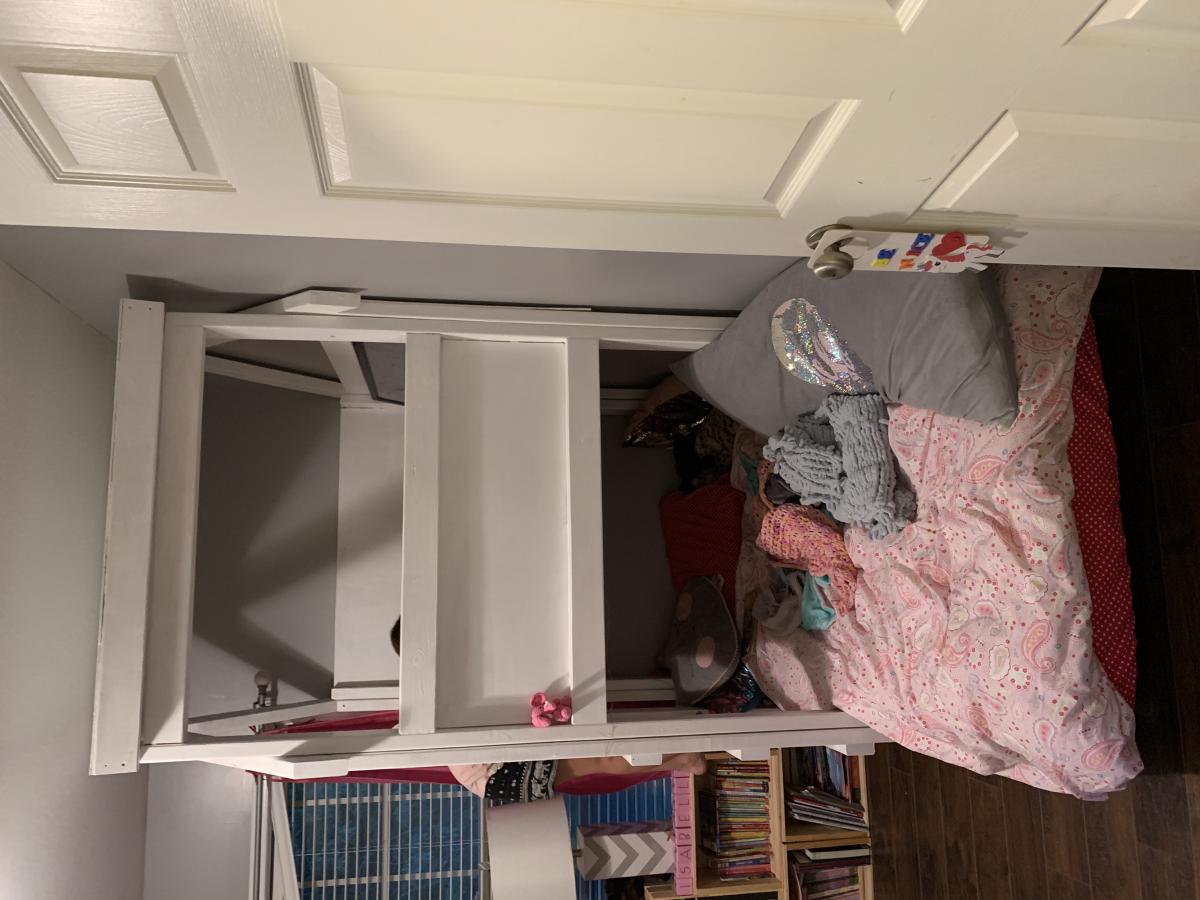
Indoor playhouse bed tower
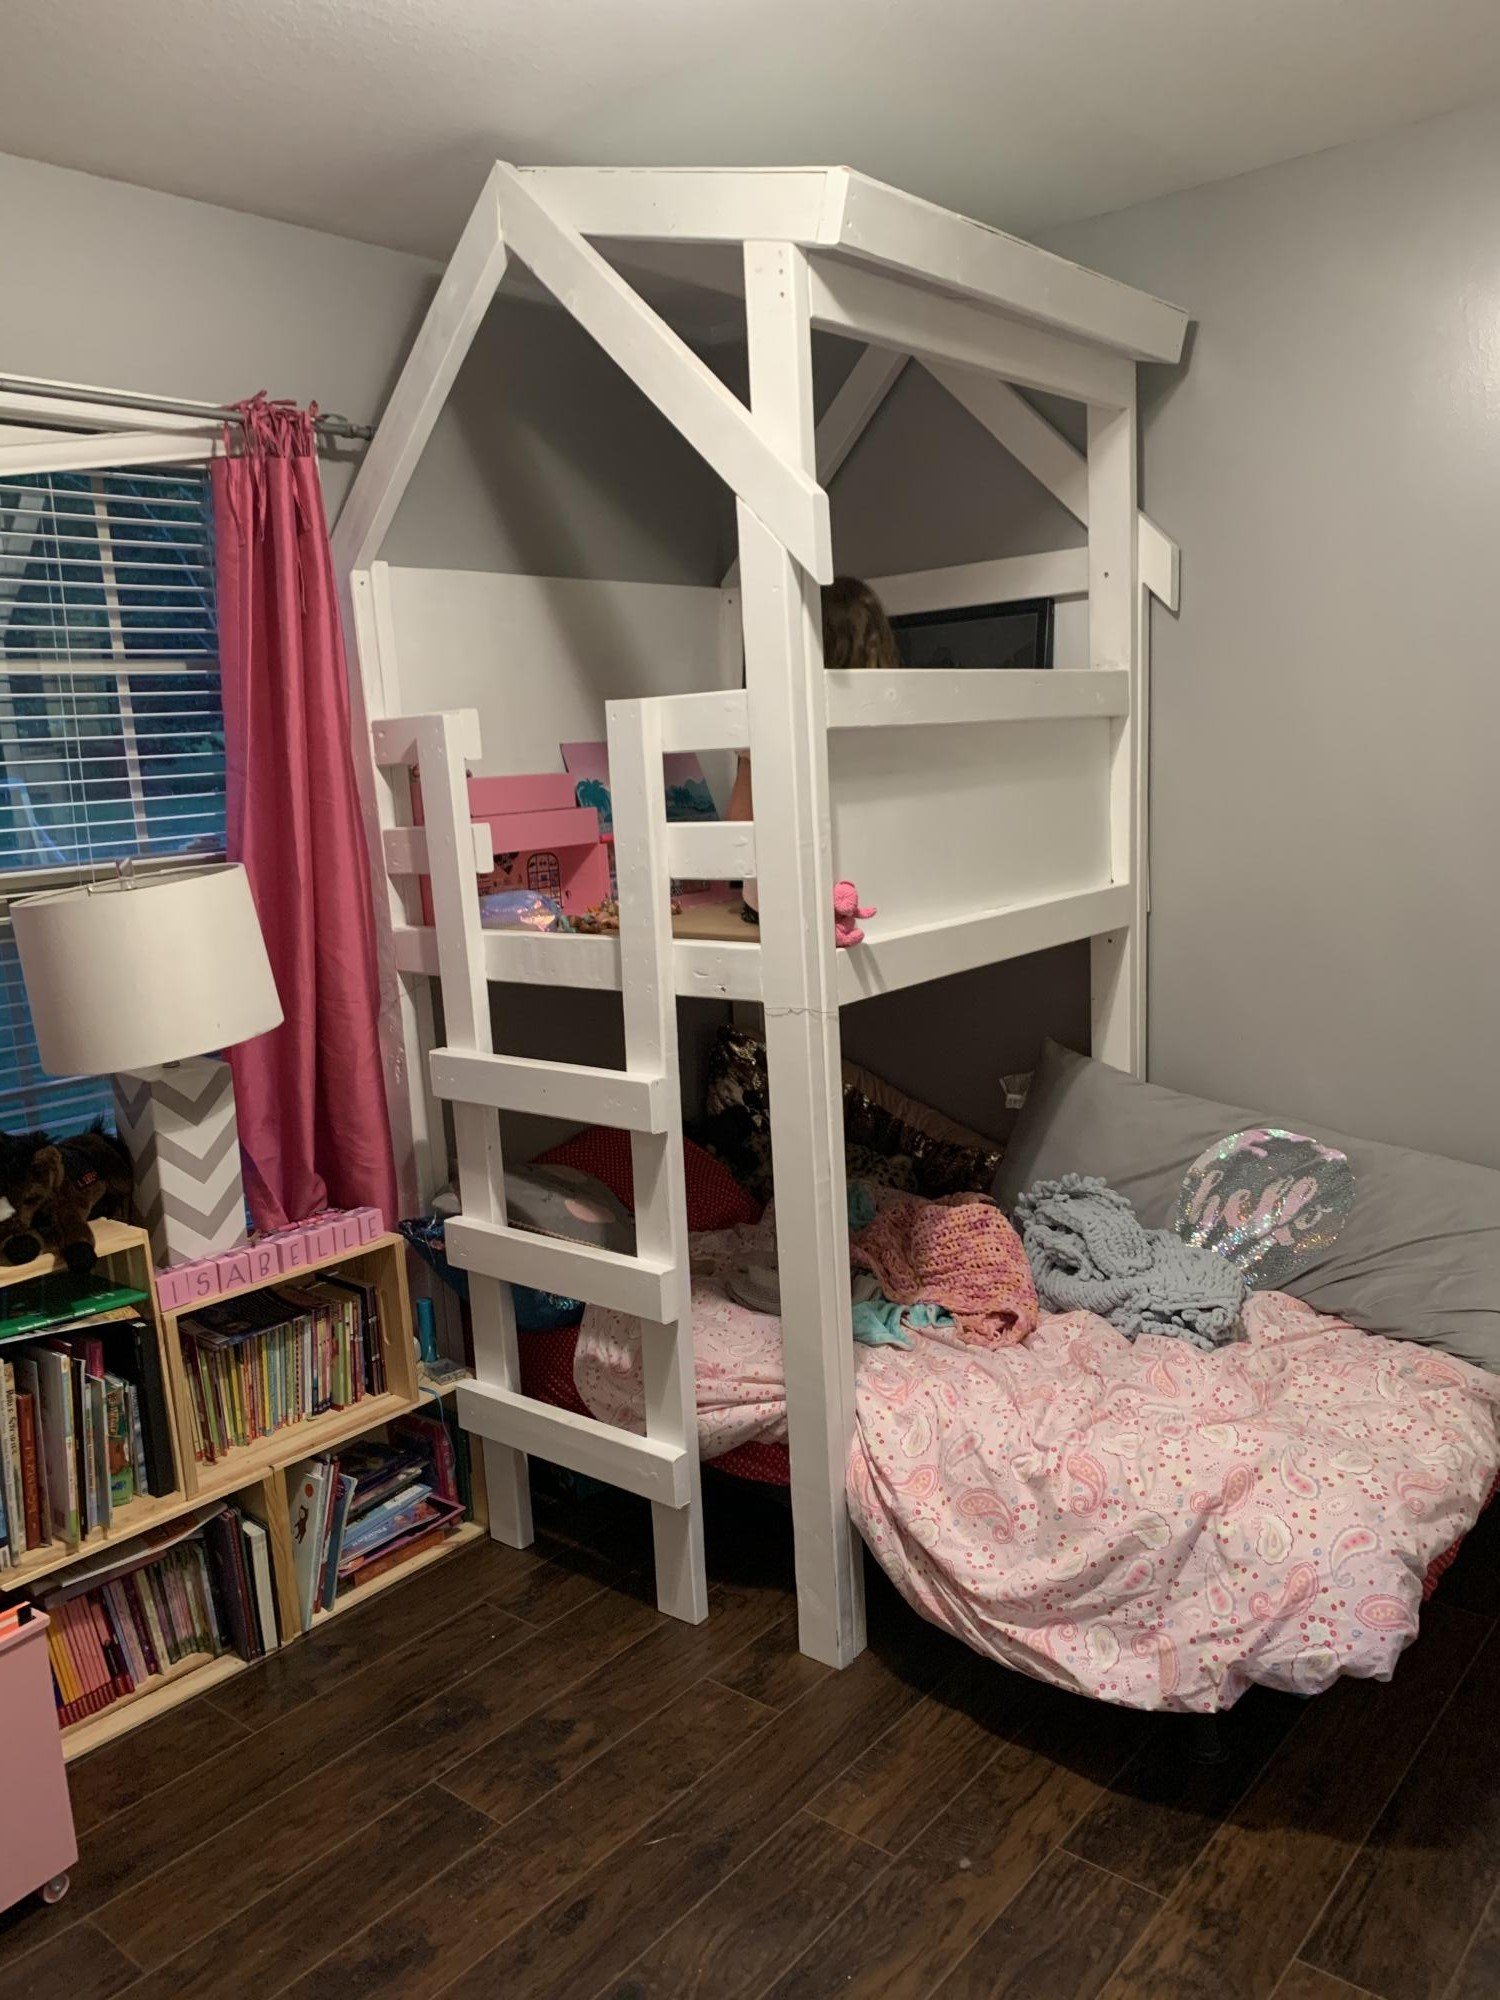
Indoor playhouse above twin bed. Cost about $190. Took two full days. Built using the plans off this site. The inside play area is 42in by 39in. The plans have the mattress on the ground. I have a dog that sheds like crazy so I have her mattress on a metal frame but plant to build a low to the ground platform bed.
Built from Plan(s)
Estimated Cost
190
Estimated Time Investment
Weekend Project (10-20 Hours)
Finish Used
I painted it white with just a Valspar ultra white primer and paint in one. I may do trim in another color later.
Make sure to get perfect 2x4s!!! No twists bends splits etc!
Make sure to get perfect 2x4s!!! No twists bends splits etc!
Recommended Skill Level
Intermediate
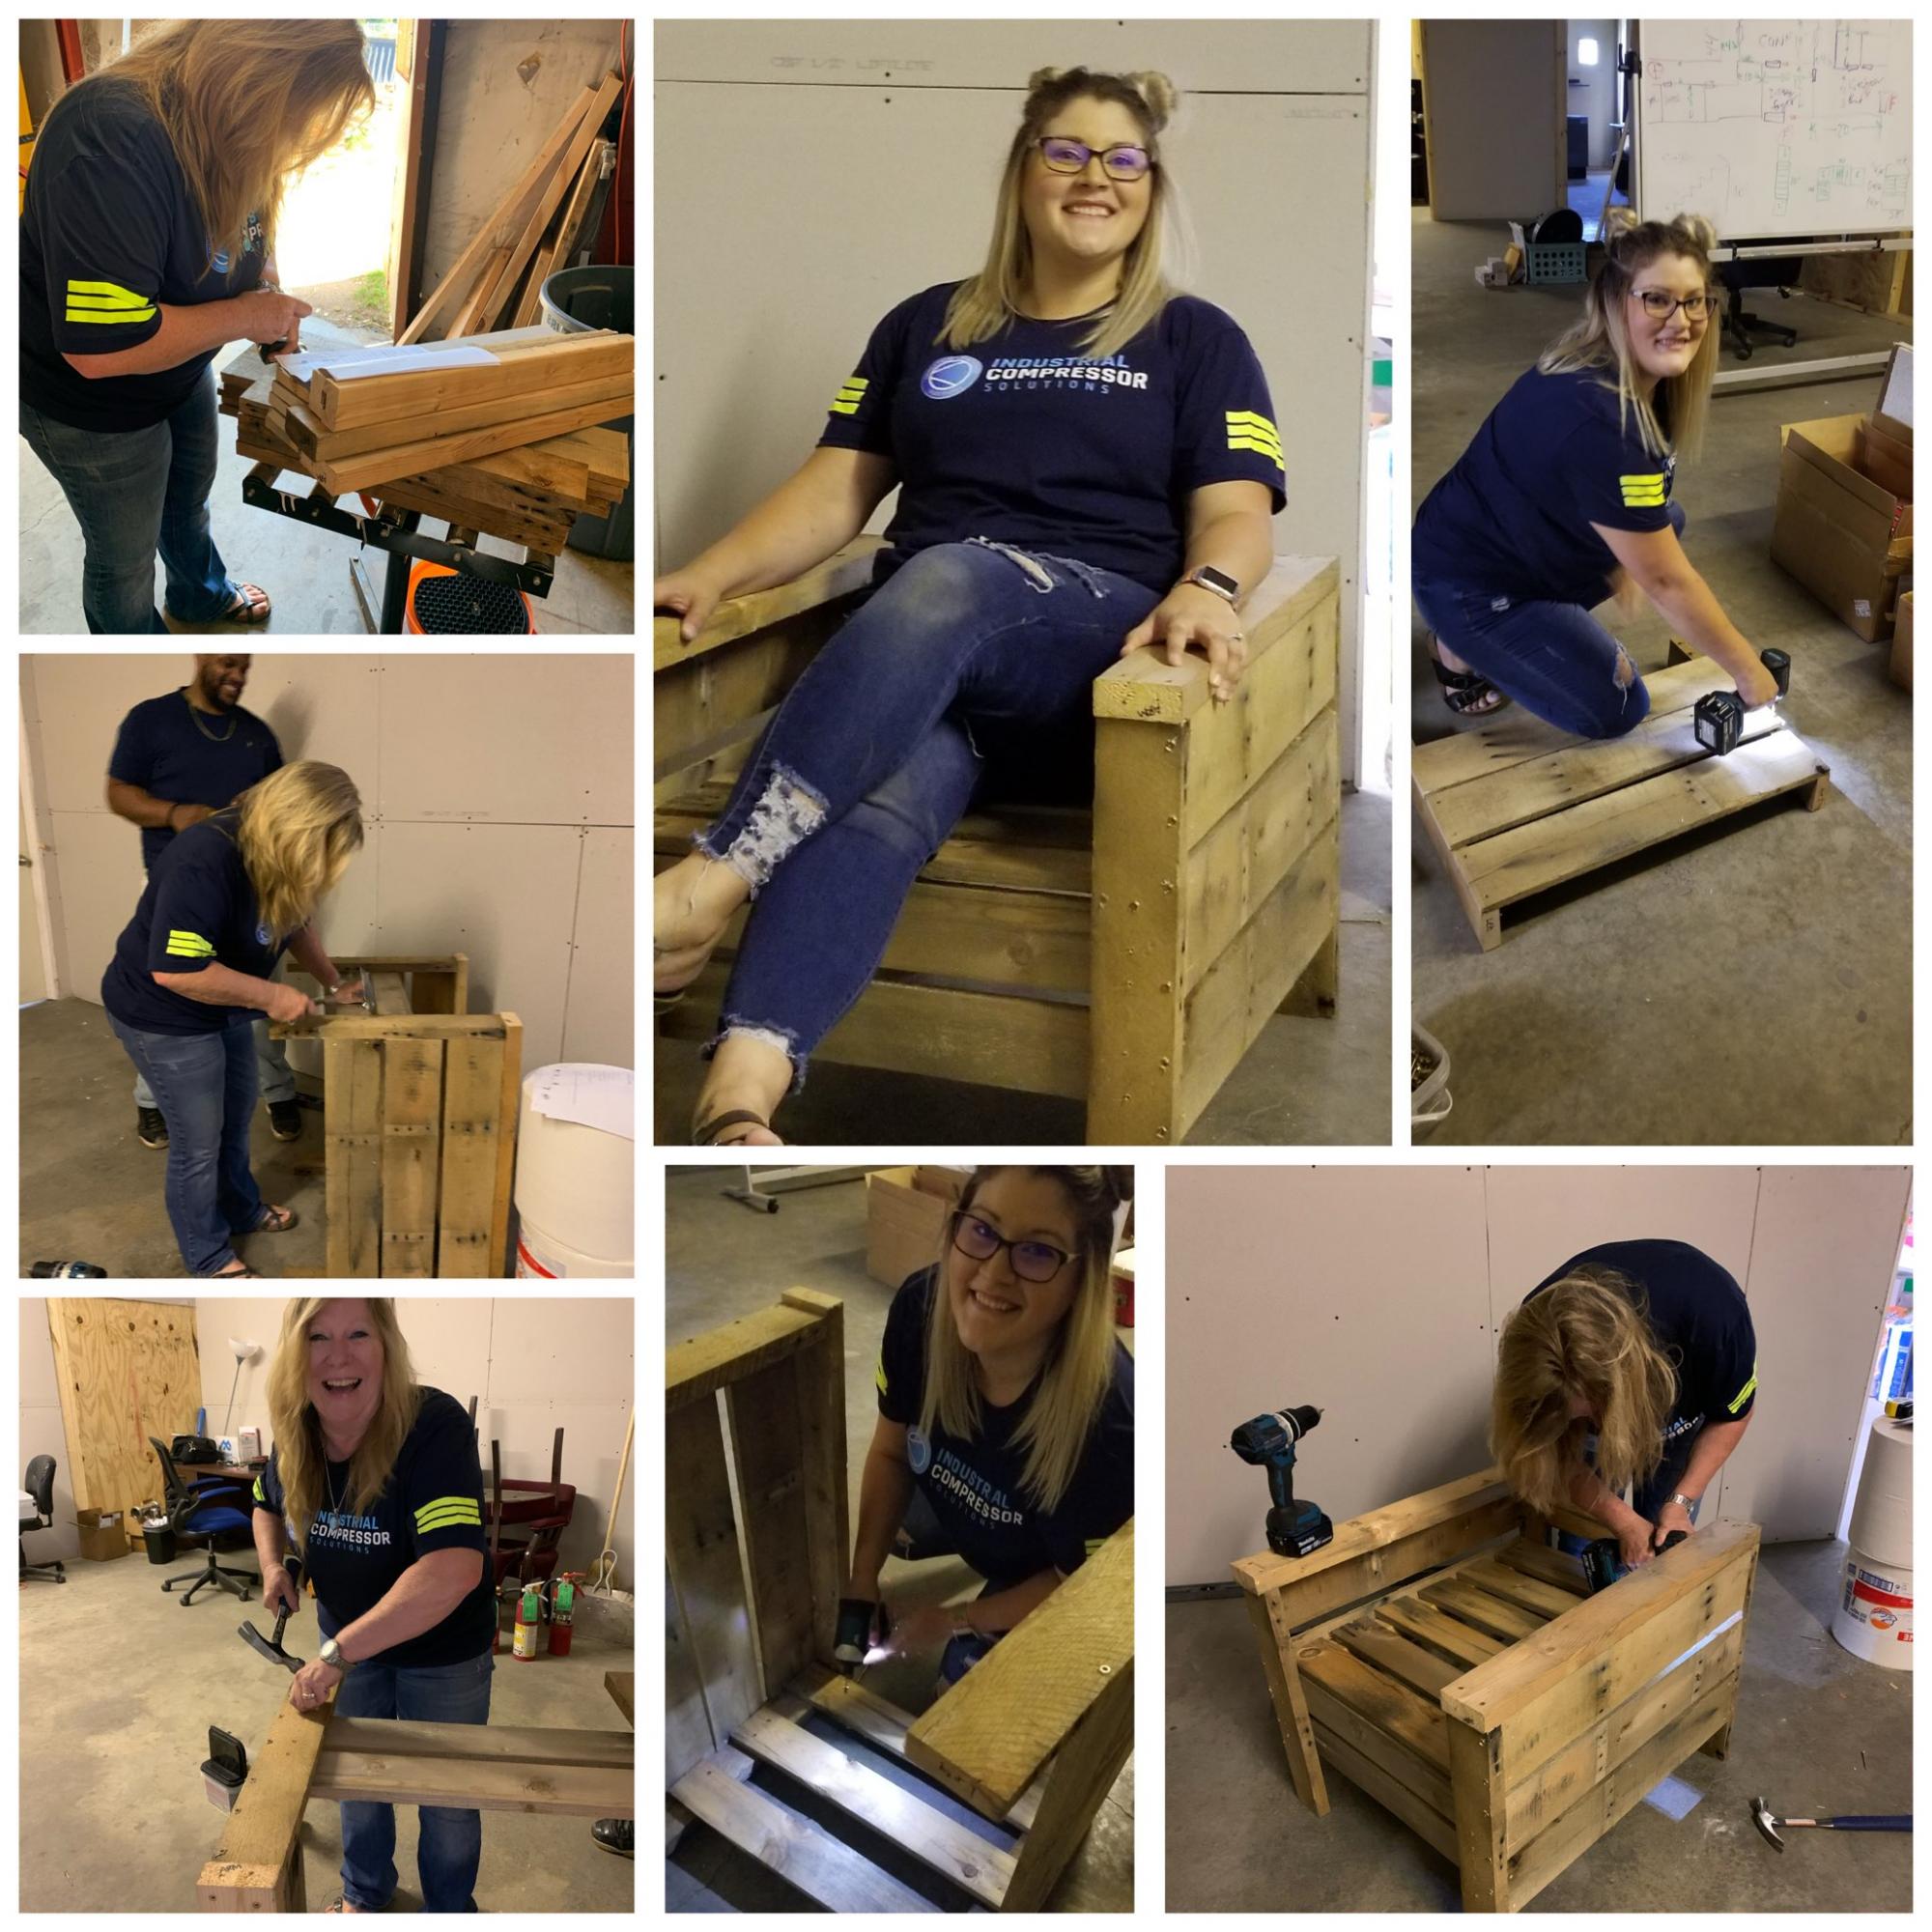
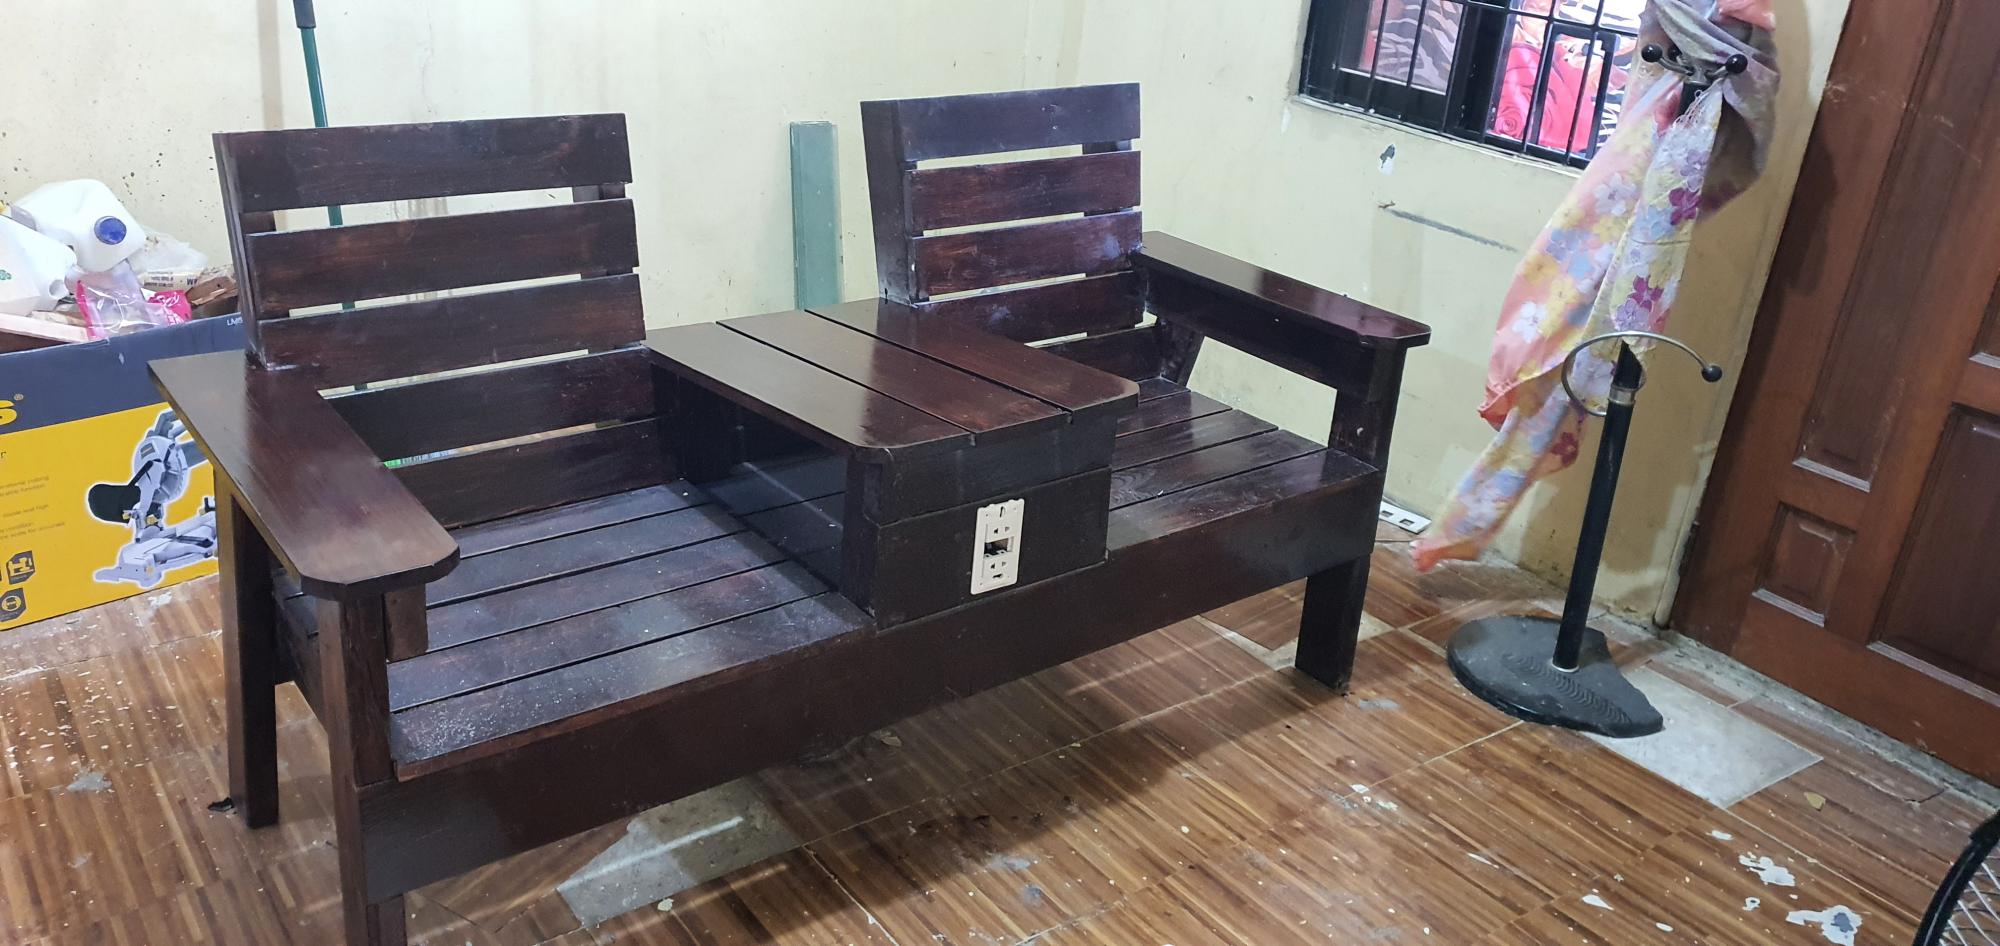
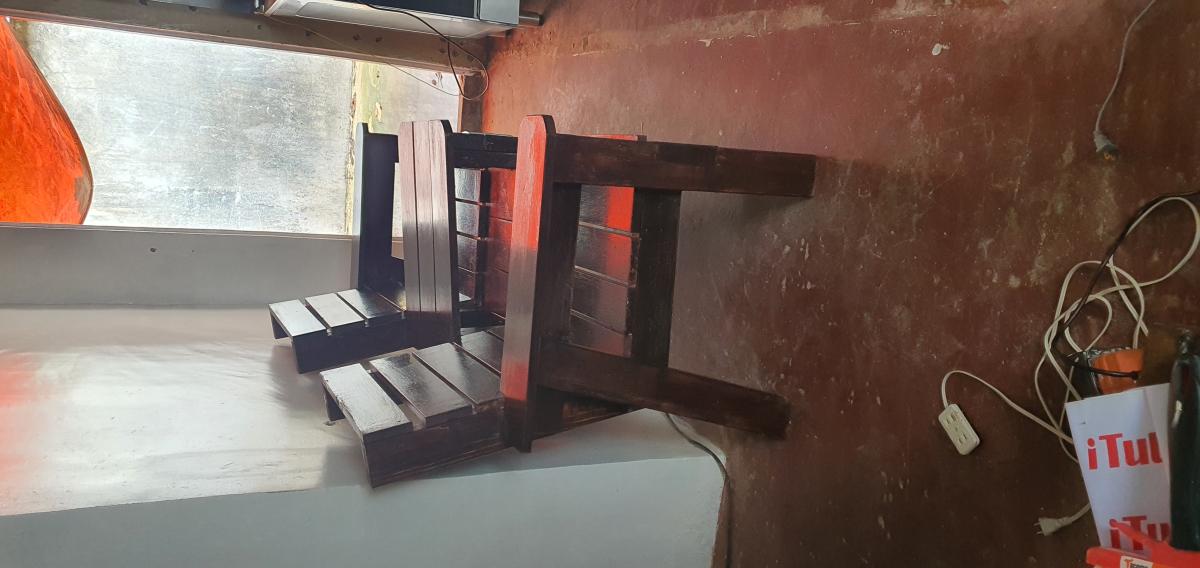
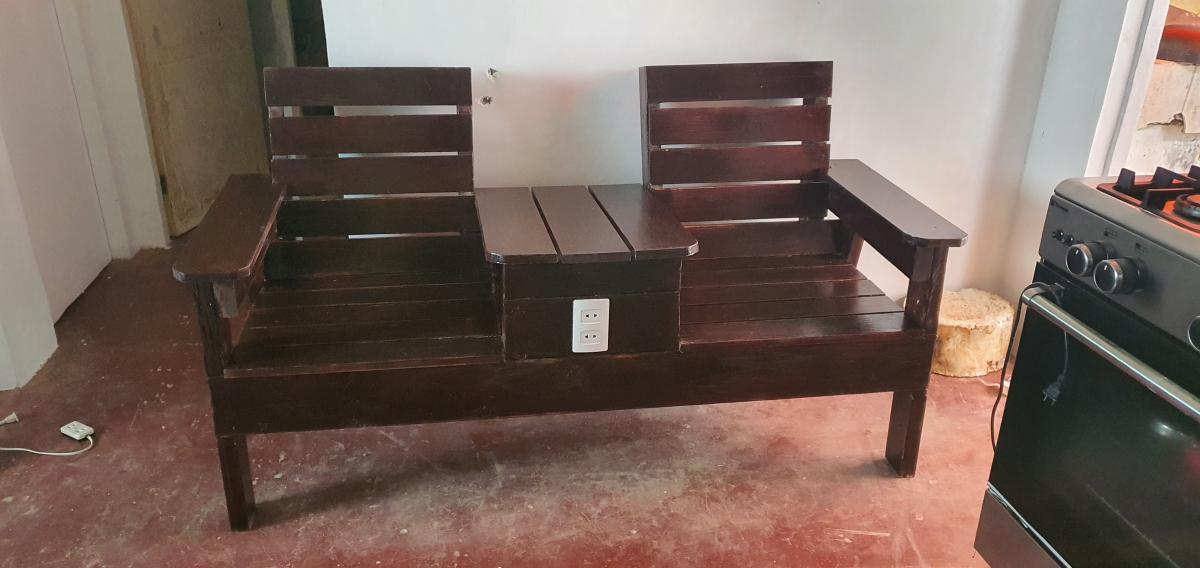
Outdoor Sofa - A First Woodworking Project!
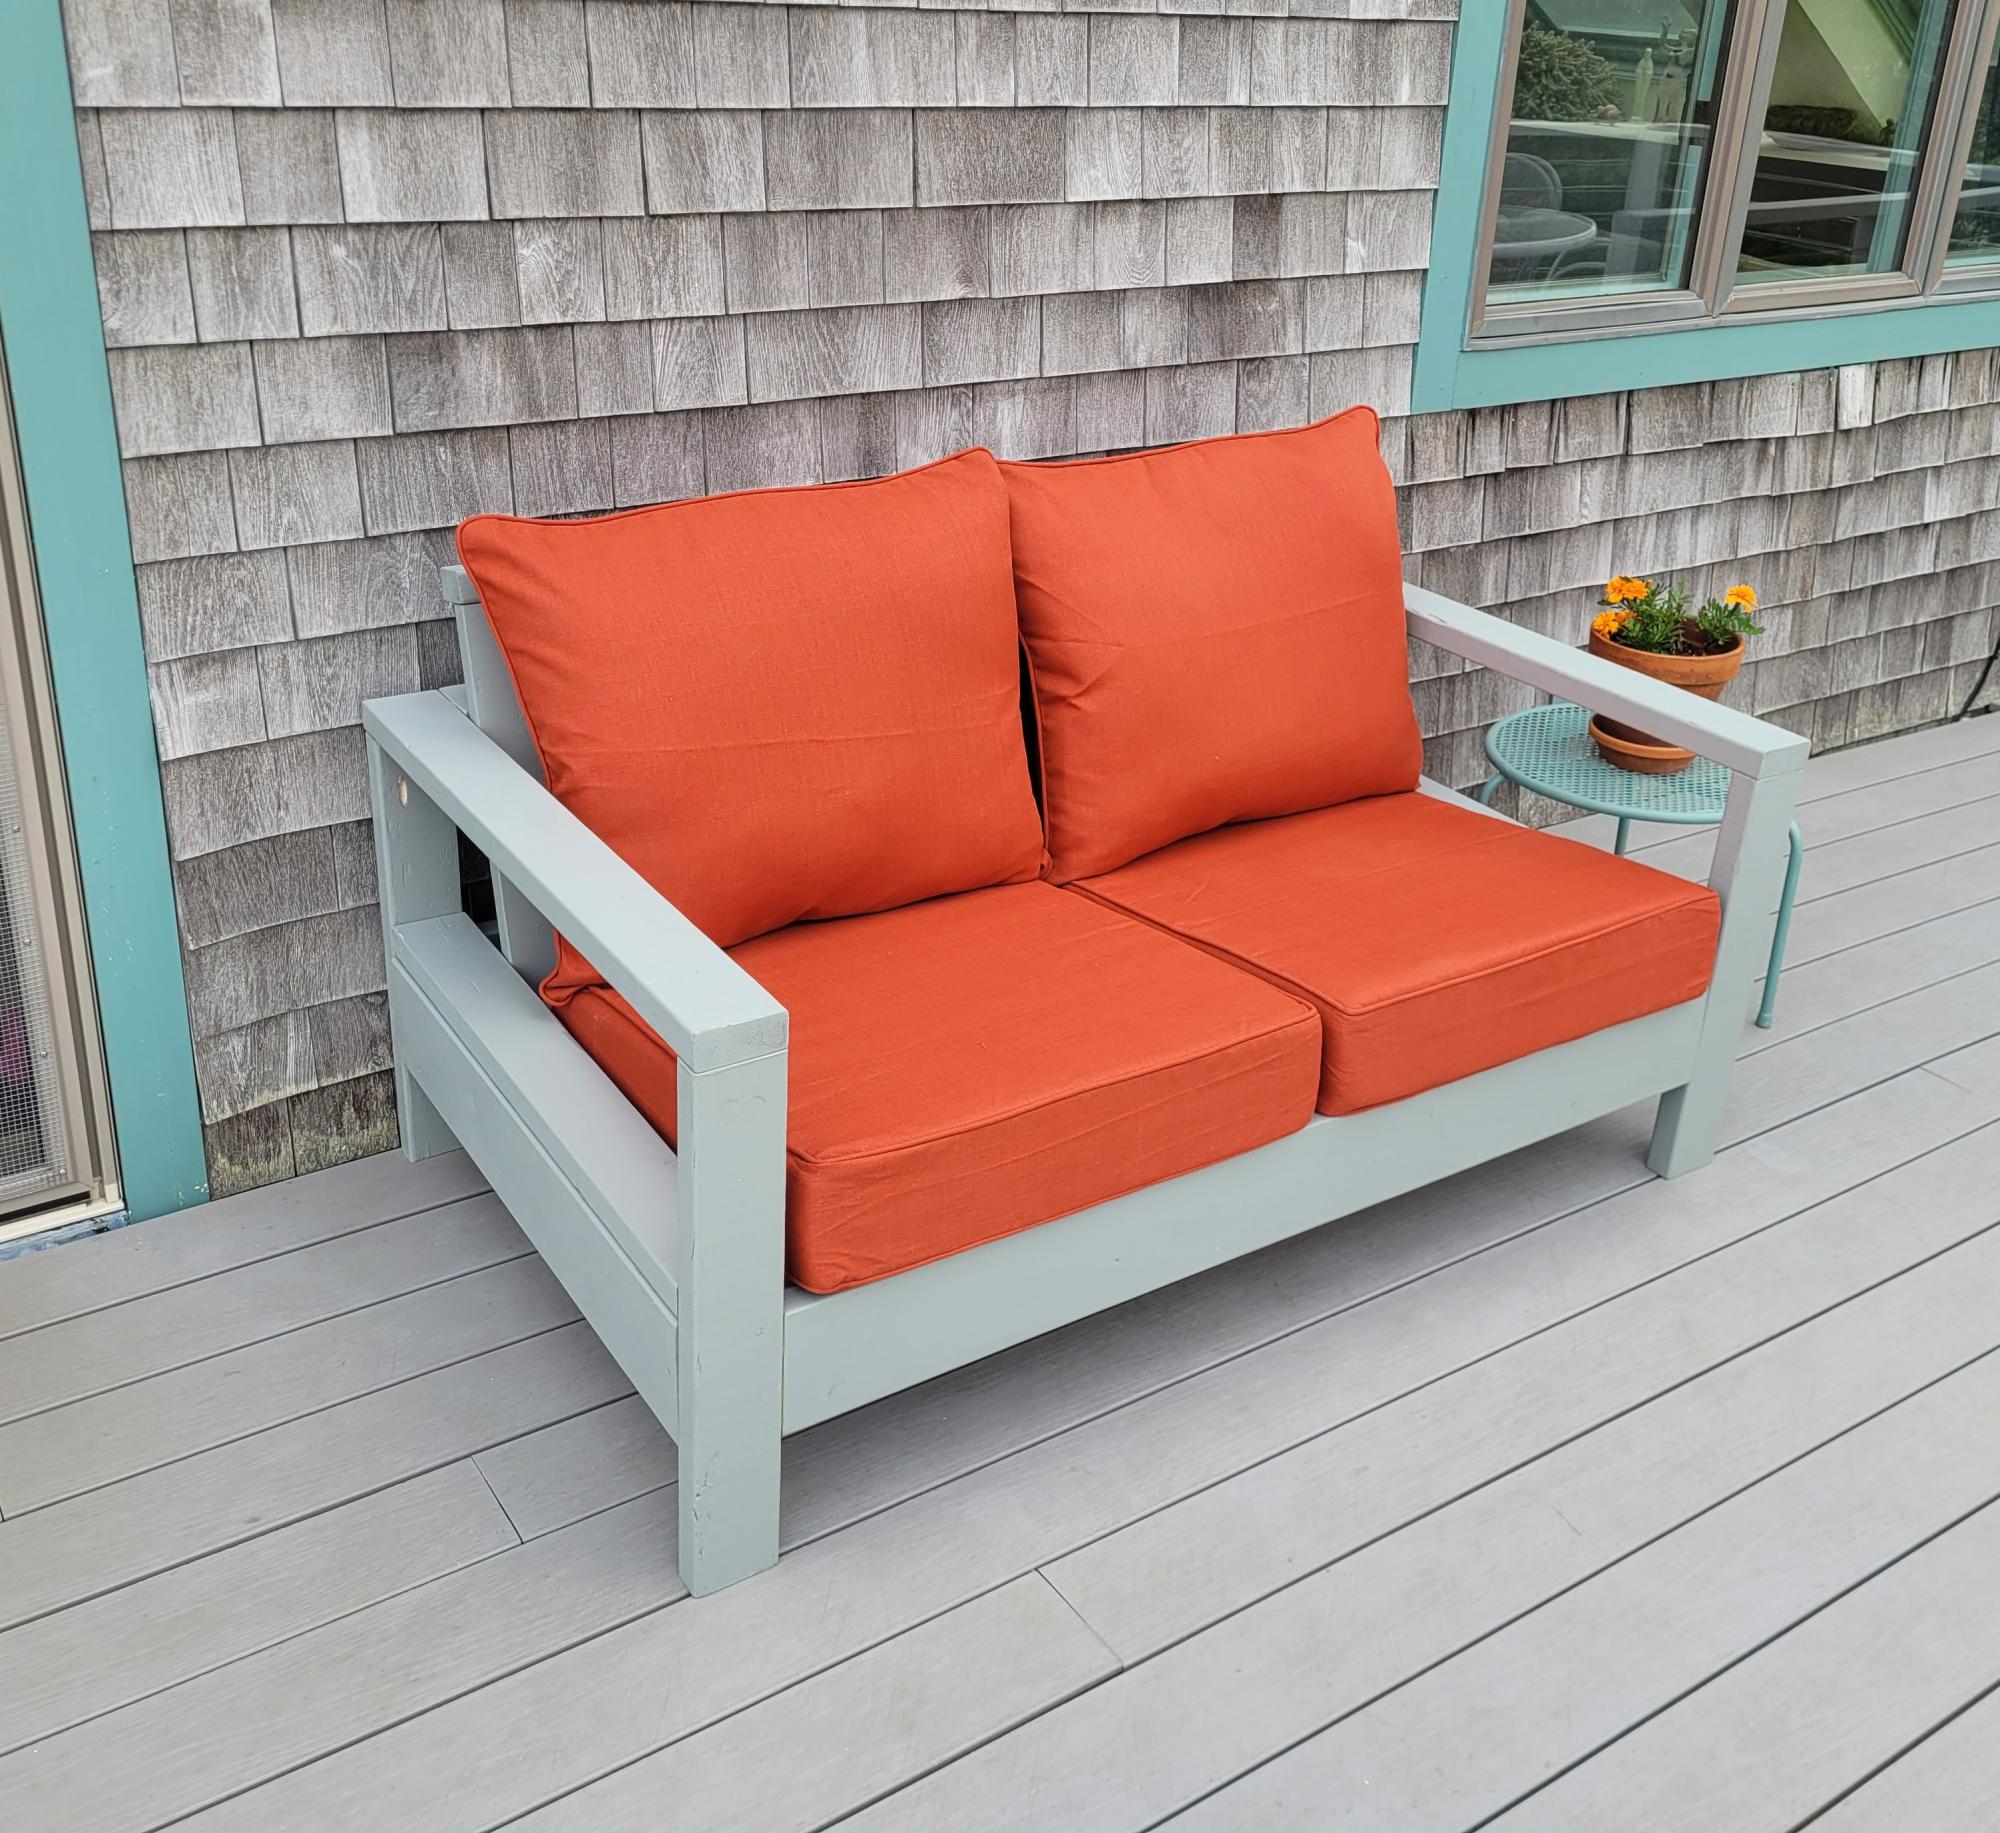
My first time building anything. Came out great. Thanks for the great instructions!
Annie K
Built from Plan(s)
The simpliest shelf stand

I suppose this is the simpliest shelf stand ever :) Pls note that side boards should stand on bottom board (in order to provide tensile strength). Also pay attention that the construction shown will not be safety standing near the wall. You should screw it to the wall. Well, that's all. The top valance is made of floor plinth. PS. Sorry, English is not my native language, but I hope you can understand my post. Blog link leads to russian language page.


Estimated Cost
approximately 825 russian rubles (25 usd) each one
Estimated Time Investment
Afternoon Project (3-6 Hours)
Finish Used
Belinka rosewood glaze 2 coats
Recommended Skill Level
Starter Project
Compact Utensil Organizer
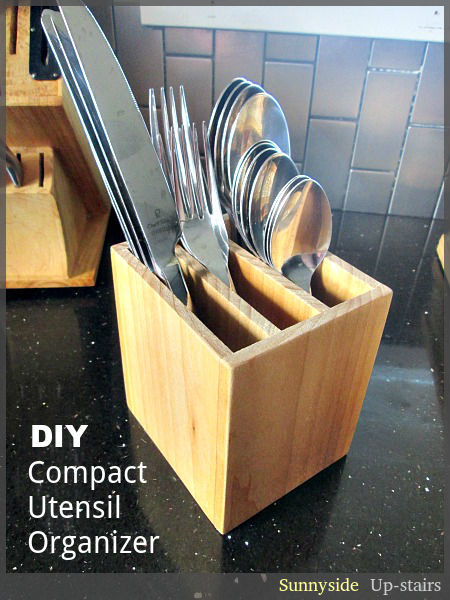
I made a counter top utensil organizer for our little kitchen and love how it solved a few utensil difficulties for us. I wish I could post plans, but all I can offer for now are photos and a brief explanation on my little blog: http://sunnysideup-stairs.blogspot.com/2014/07/compact-utensil-organize…
Estimated Time Investment
An Hour or Two (0-2 Hours)
Finish Used
Cutting Board Conditioner (beeswax, carnauba wax, oil blend)
Recommended Skill Level
Starter Project
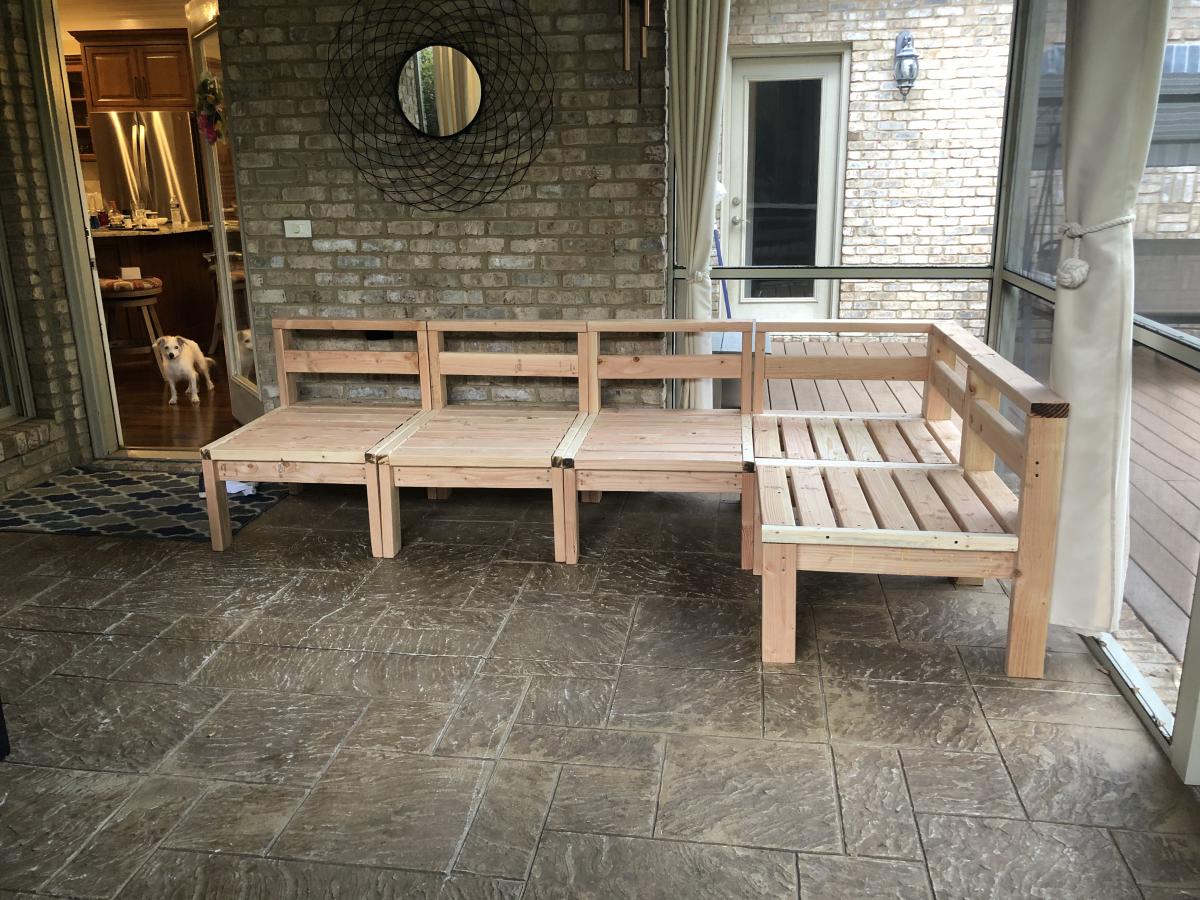
Simple Modern Outdoor Sectional
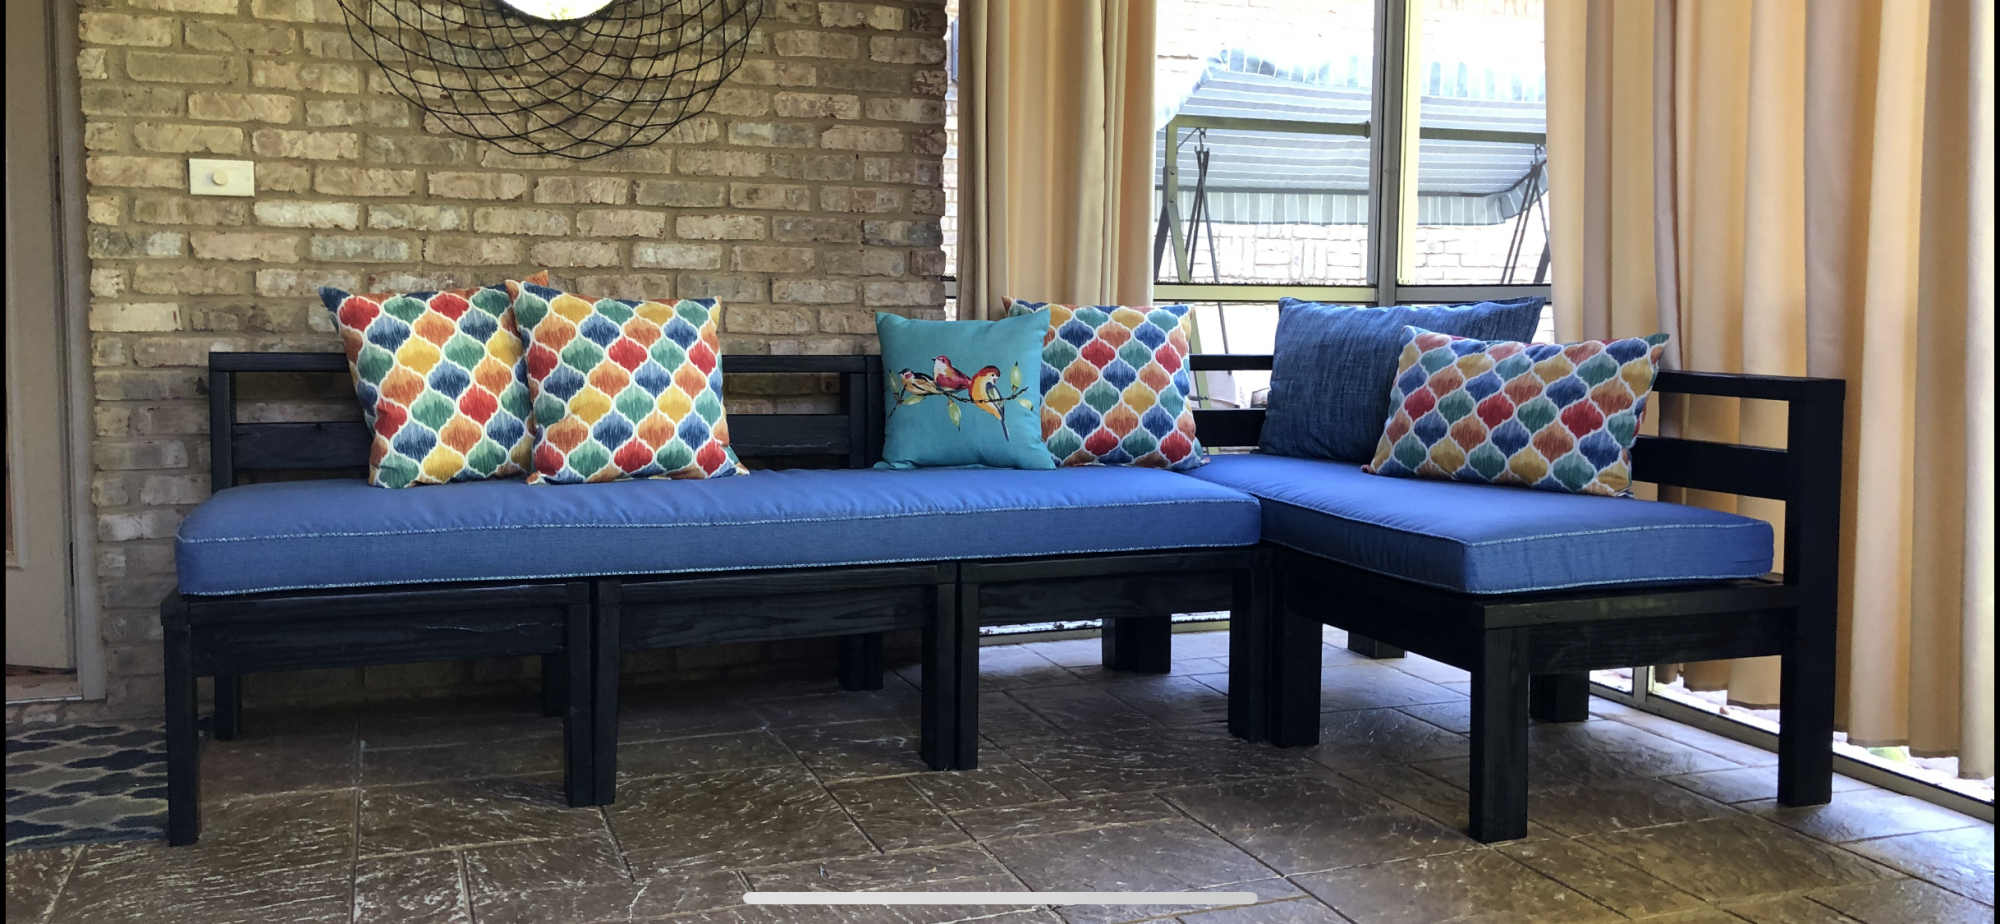
Ten-day project (construction plus sewing) that concluded with exactly what we needed for our space. No big issues with the plan and really pleased with the result. Making the cushions was only possible through upholstery sewing experience. Thank you Ana White!
Estimated Cost
$400
Estimated Time Investment
Week Long Project (20 Hours or More)
Finish Used
Rustoleum Gloss Black Spray Paint
Recommended Skill Level
Intermediate
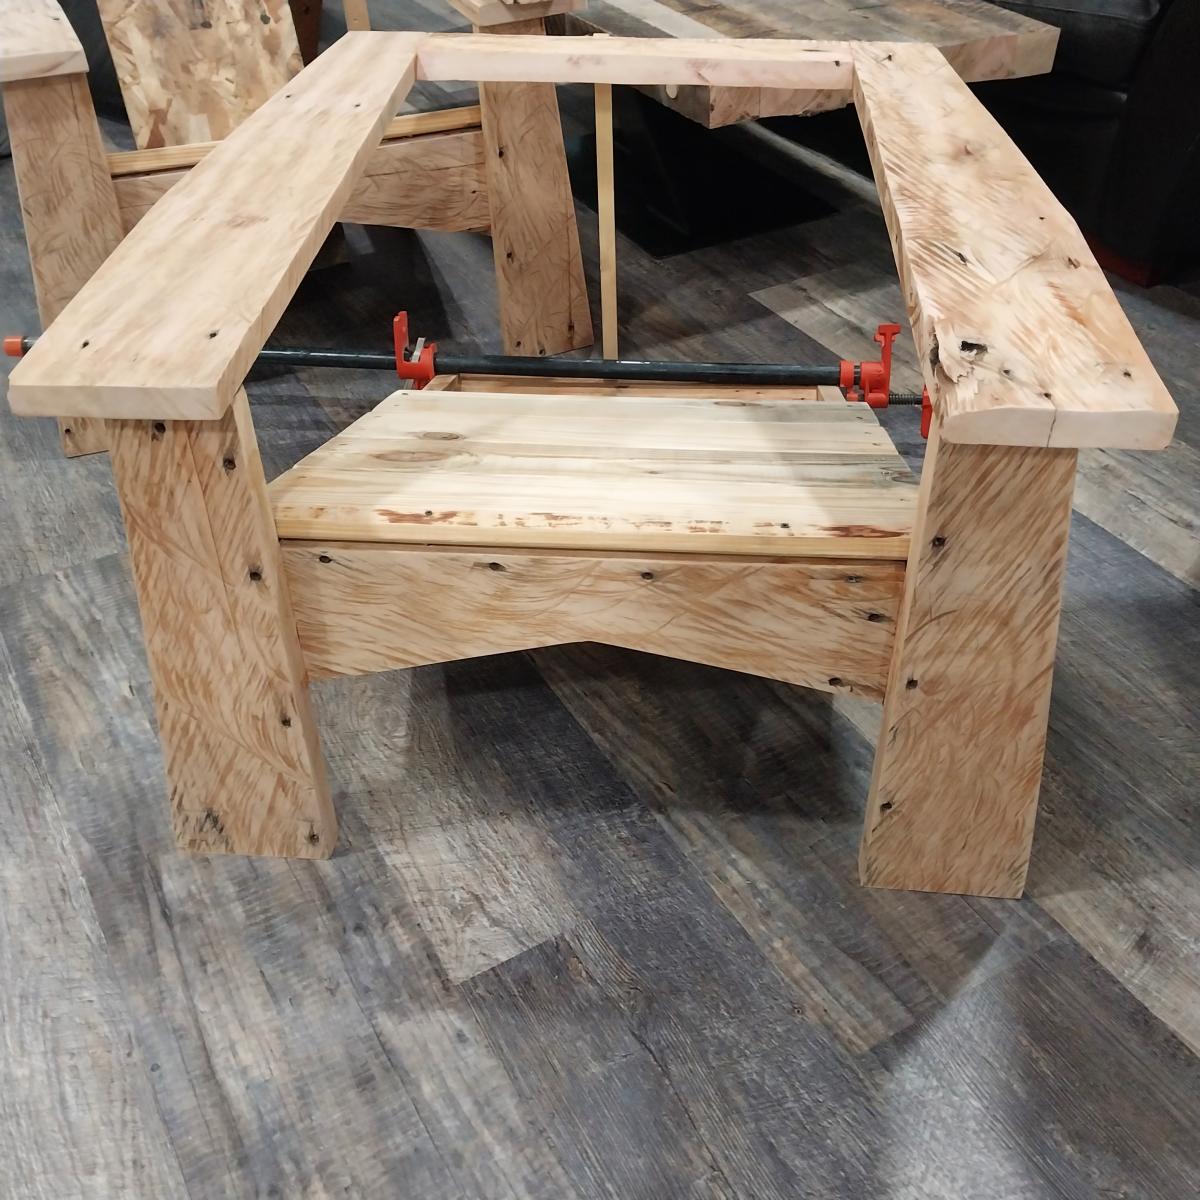
Custom Adirondack Chair Exotic Wood
I have followed Anna for several years and really liked the Adirondack chairs so I finally got around to making mine, the plans are the same but I made some modification so I could use as much of the recycled mahogany I had. The wood came to me from South America in the form a crates, I kept as much of the original patina as I could as well as the chainsaw kerf marks. The seat was the only part where I used a different wood and that is kiln dried beetle kill pine.
Built from Plan(s)
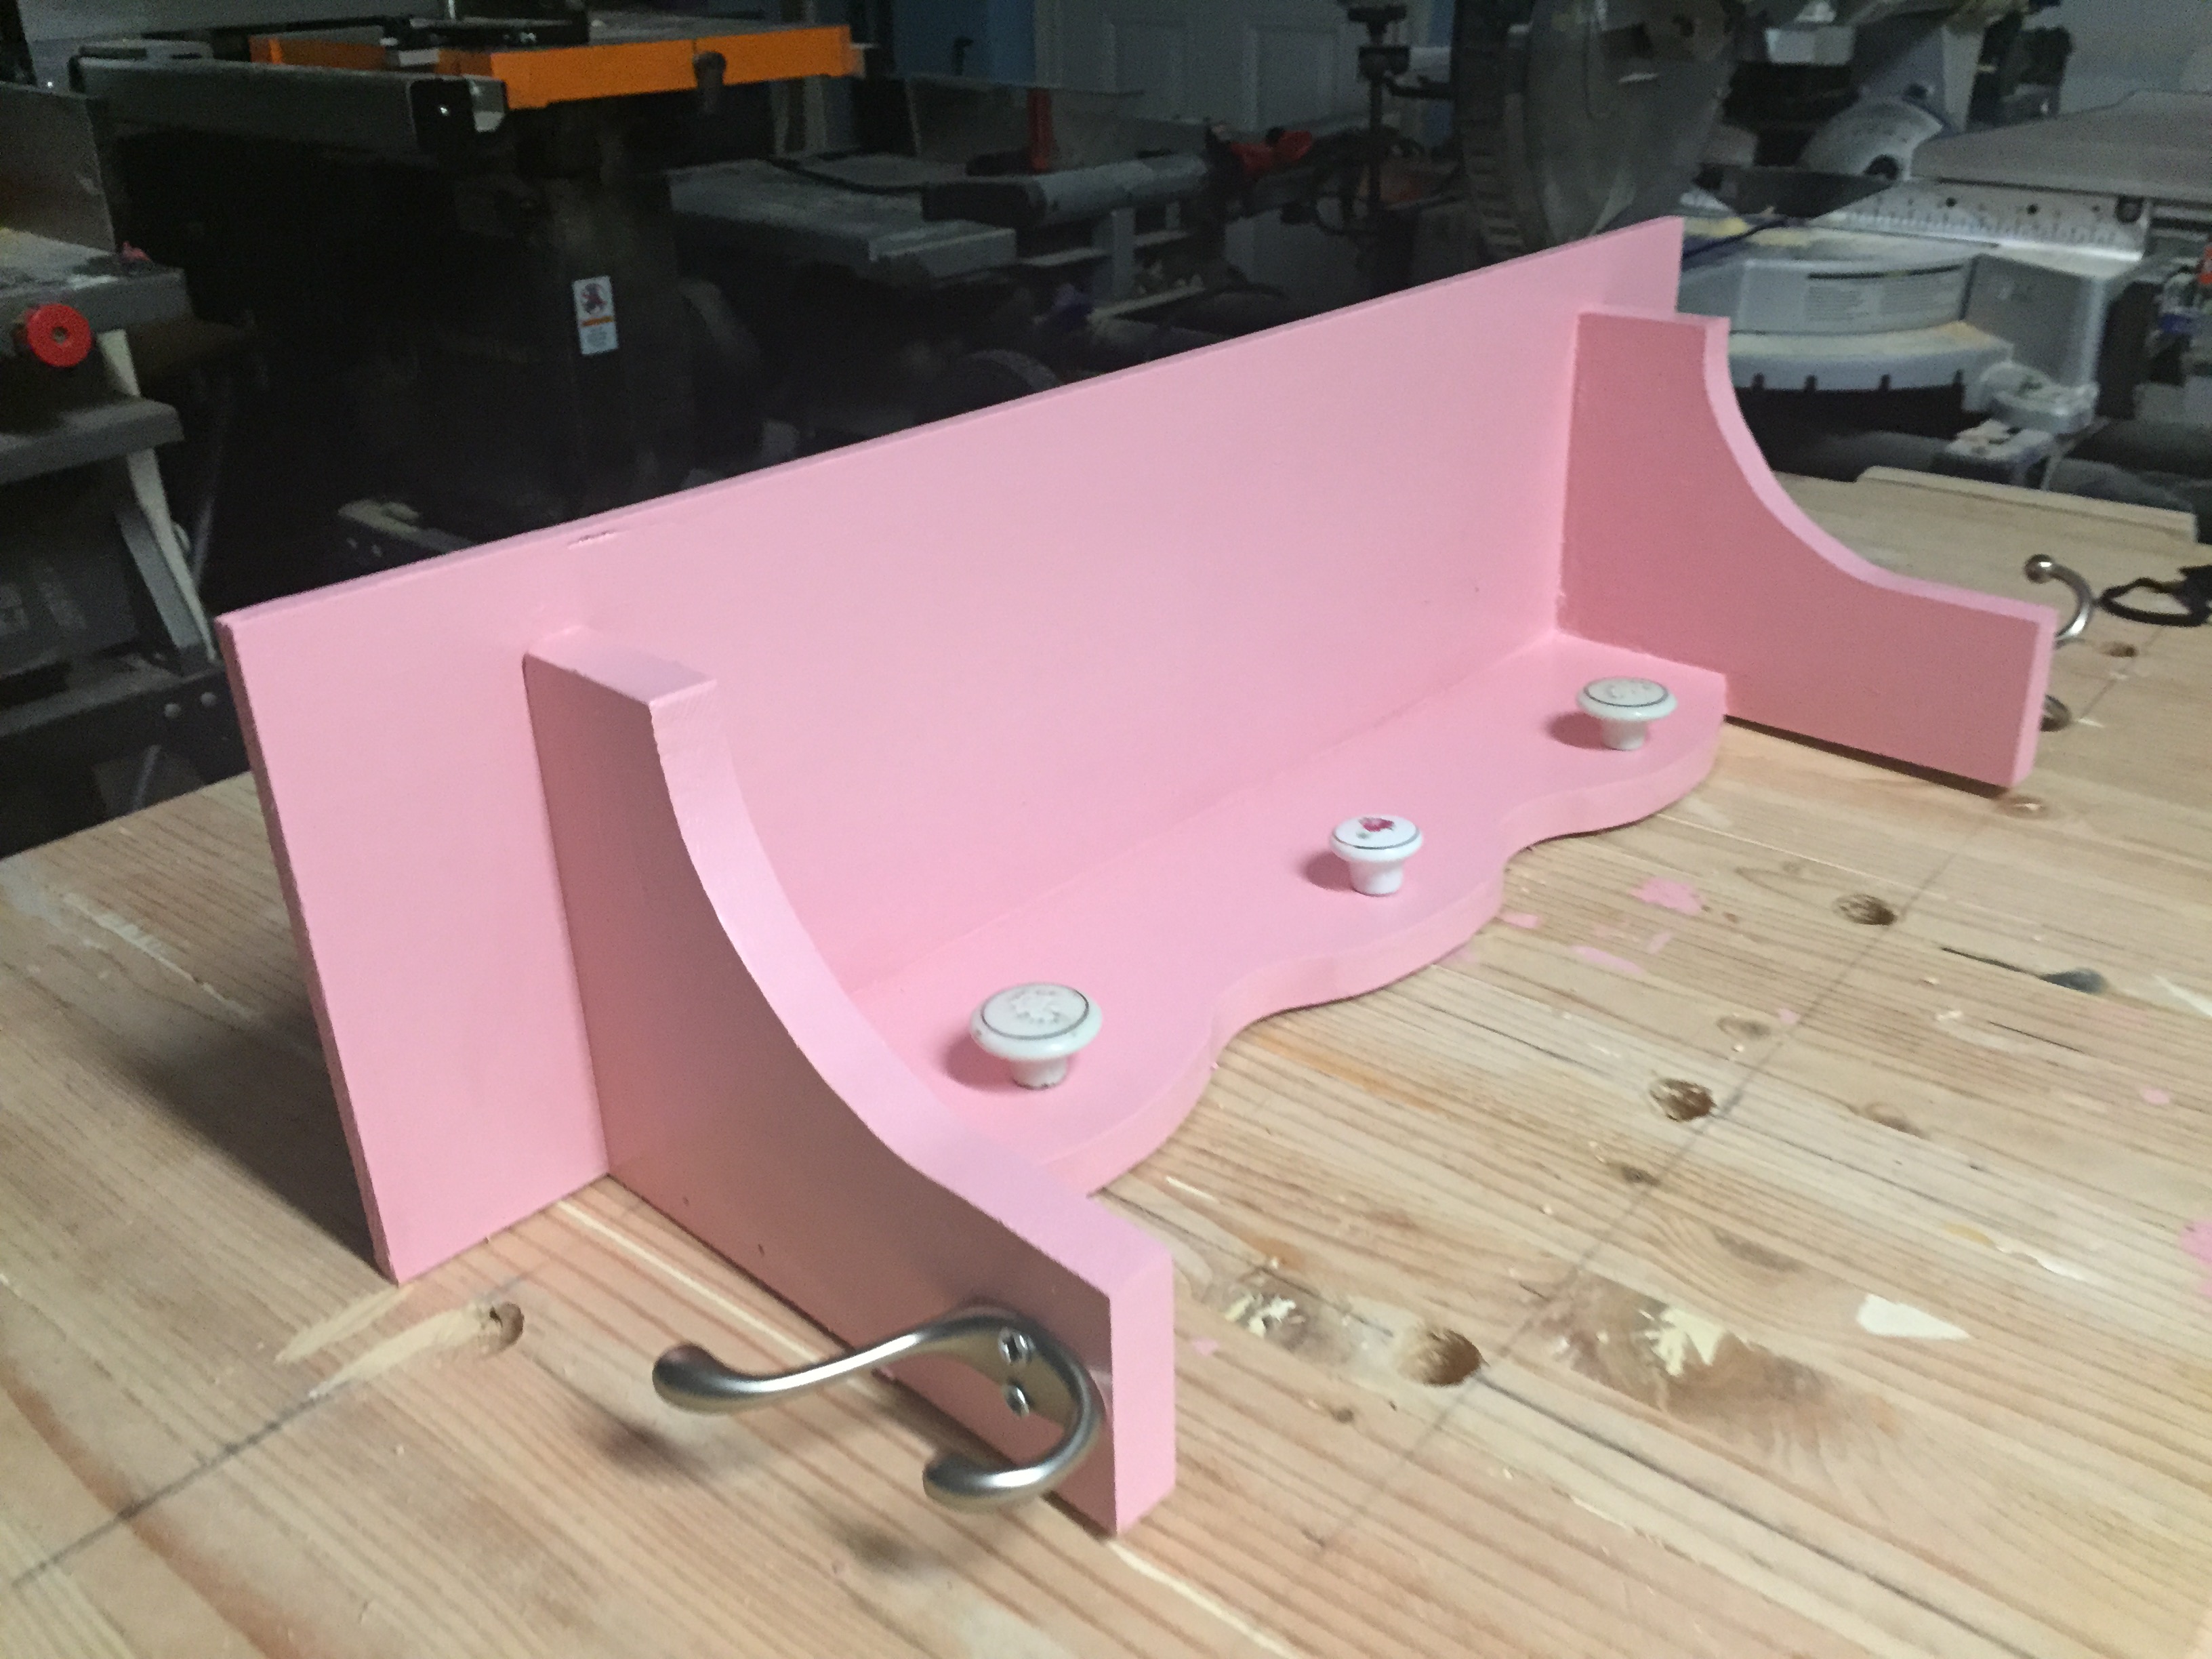
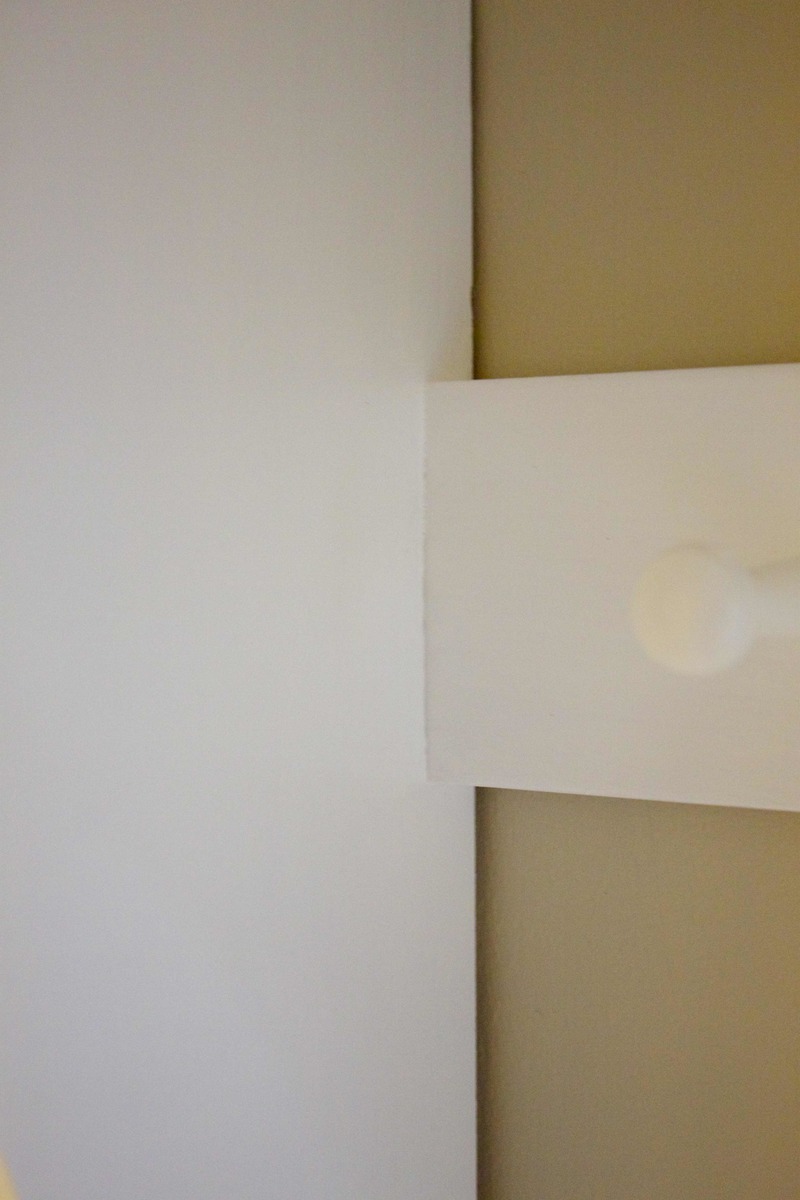
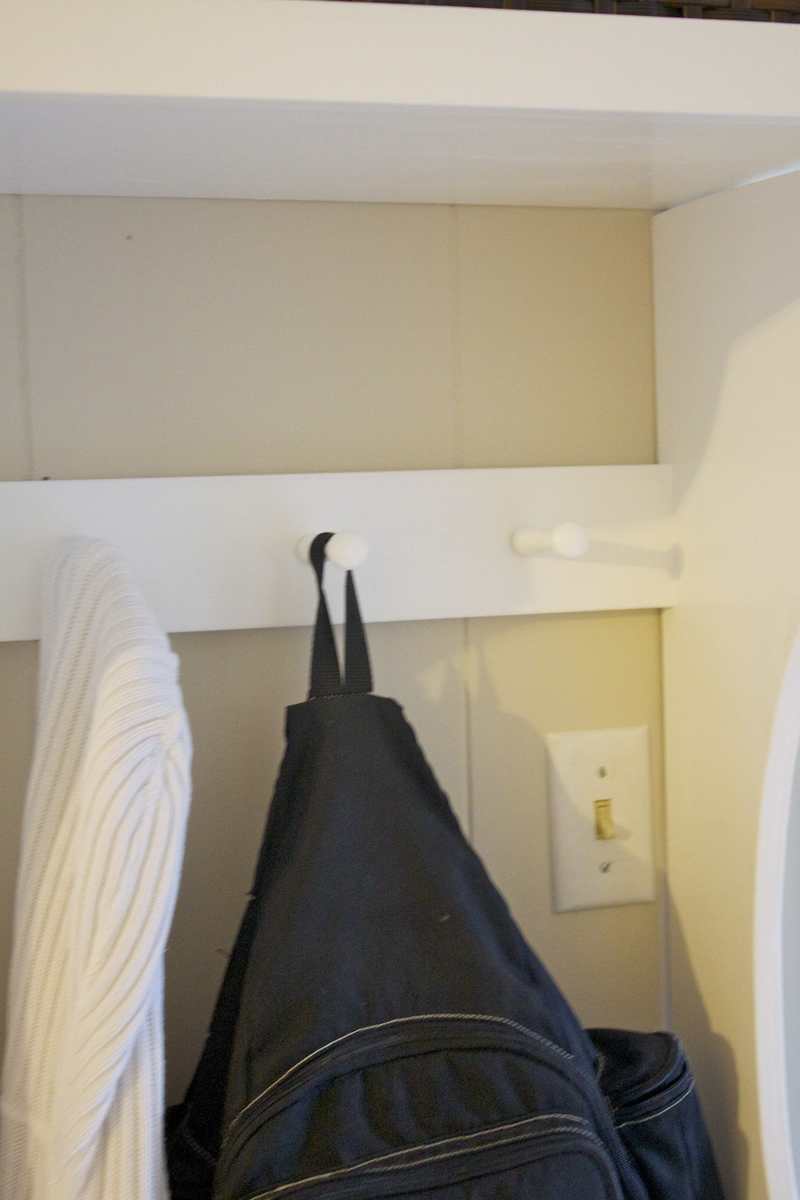
My Smiling Mudroom Wall
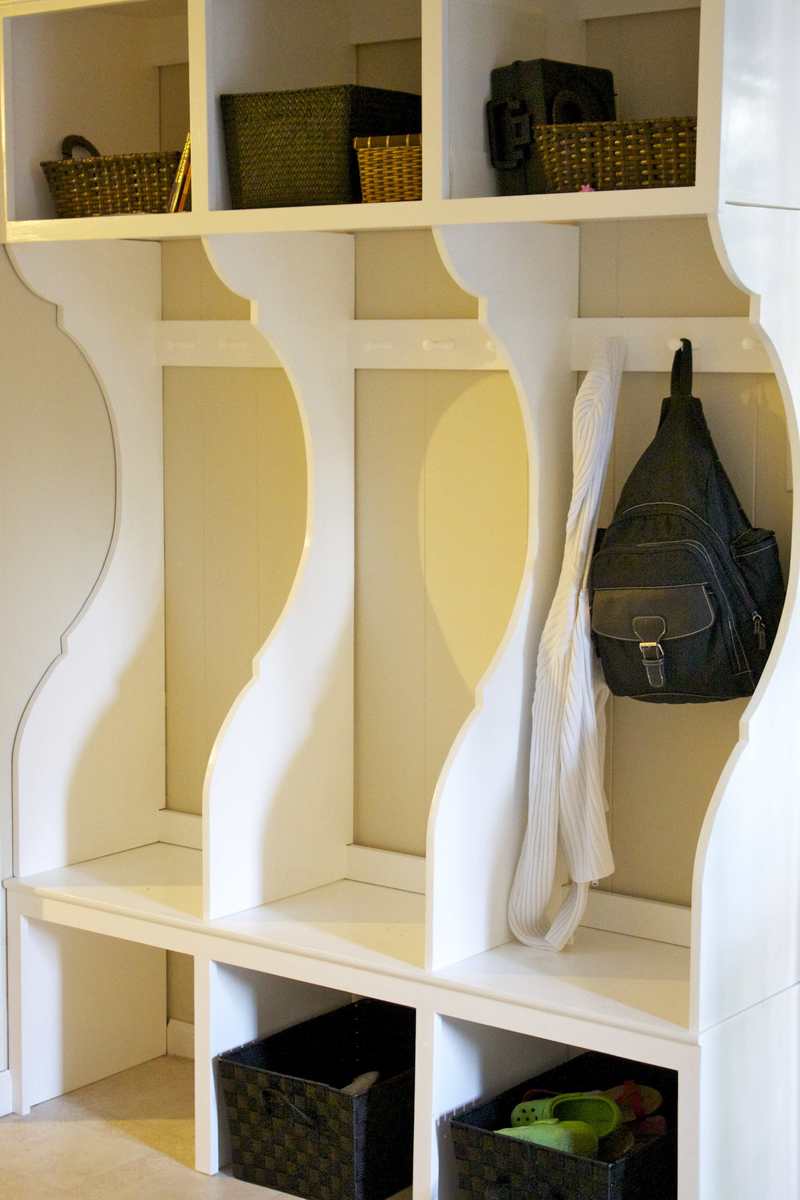
Such a useful and attractive way to keep the mudroom area organized. Especially needed in our house which has no dedicated mudroom--just an area carved out by the kitchen door where we need to stash our coming and going type stuff. Loved the plans!
I made a few alterations to the originals to customize the plans to our particular needs, which are outlined in the blog post on our site, http://littlehouseinthesuburbs.com/2012/09/my-ana-white-mudroom.html.
Built from Plan(s)
Estimated Time Investment
Week Long Project (20 Hours or More)
Finish Used
I used one coat of latex primer and two coats of latex paint, white, sanding between coats.
Recommended Skill Level
Beginner
Comments
Sun, 09/23/2012 - 15:47
Smiling Mudroom
I love it! It is beautiful. Makes my boring mudroom frown! :D
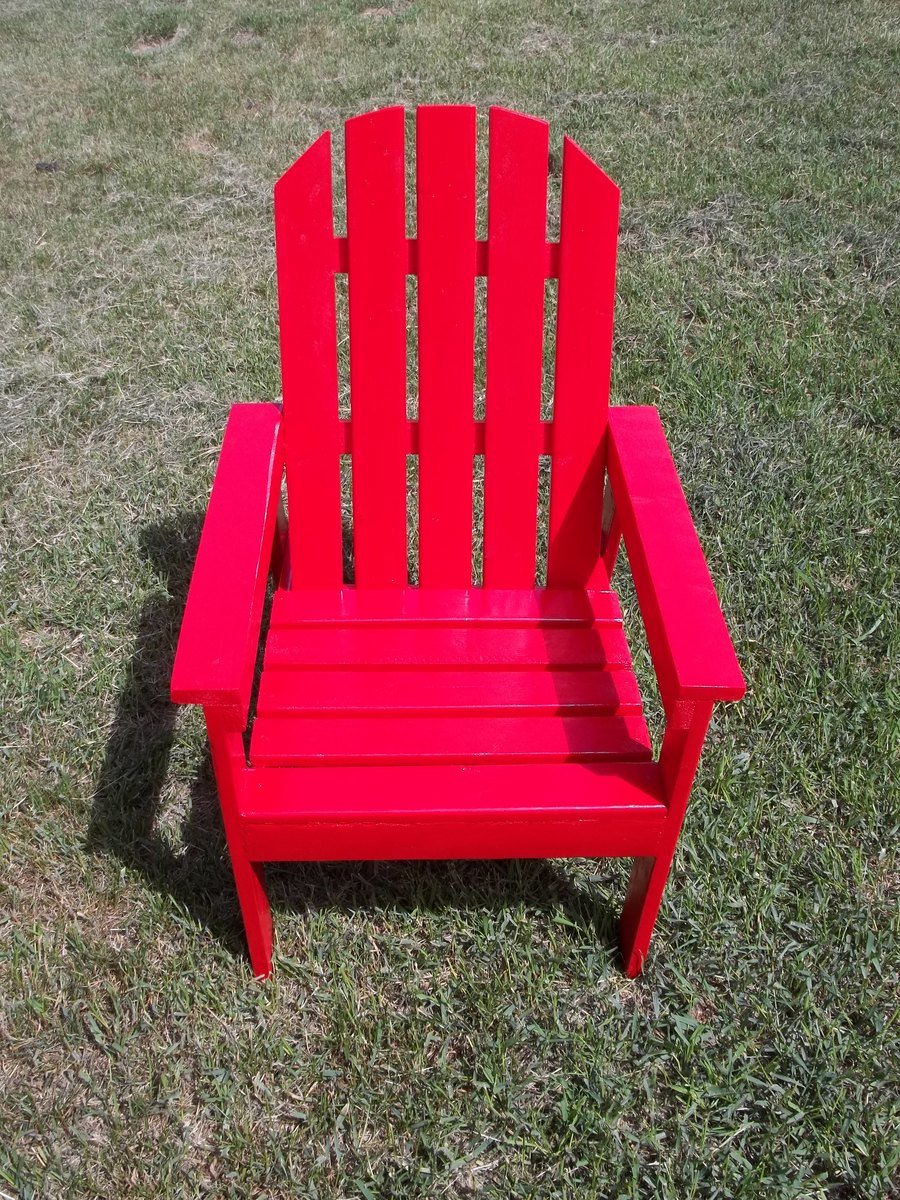
Kid-Sized Adirondack Chair for Charity

I made this cute kid-sized Adirondack chair to be auctioned off for charity. The pattern I used for this can be found in Ana's book, The Handbuilt Home.
This chair costs less than $5 for the wood!
If you want to see more details and pictures about how I built it, check out my blog post.
Estimated Cost
$5 + paint
Estimated Time Investment
Afternoon Project (3-6 Hours)
Finish Used
Rustoleum Gloss Apple Red
Recommended Skill Level
Beginner
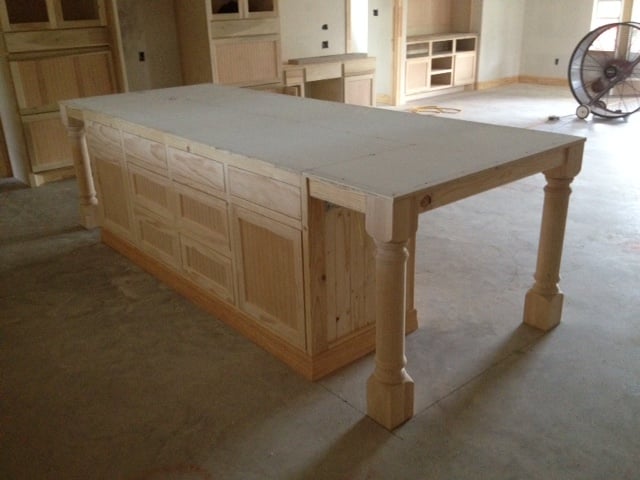
Custom Kitchen Island - Is this the biggest version of an already big plan?
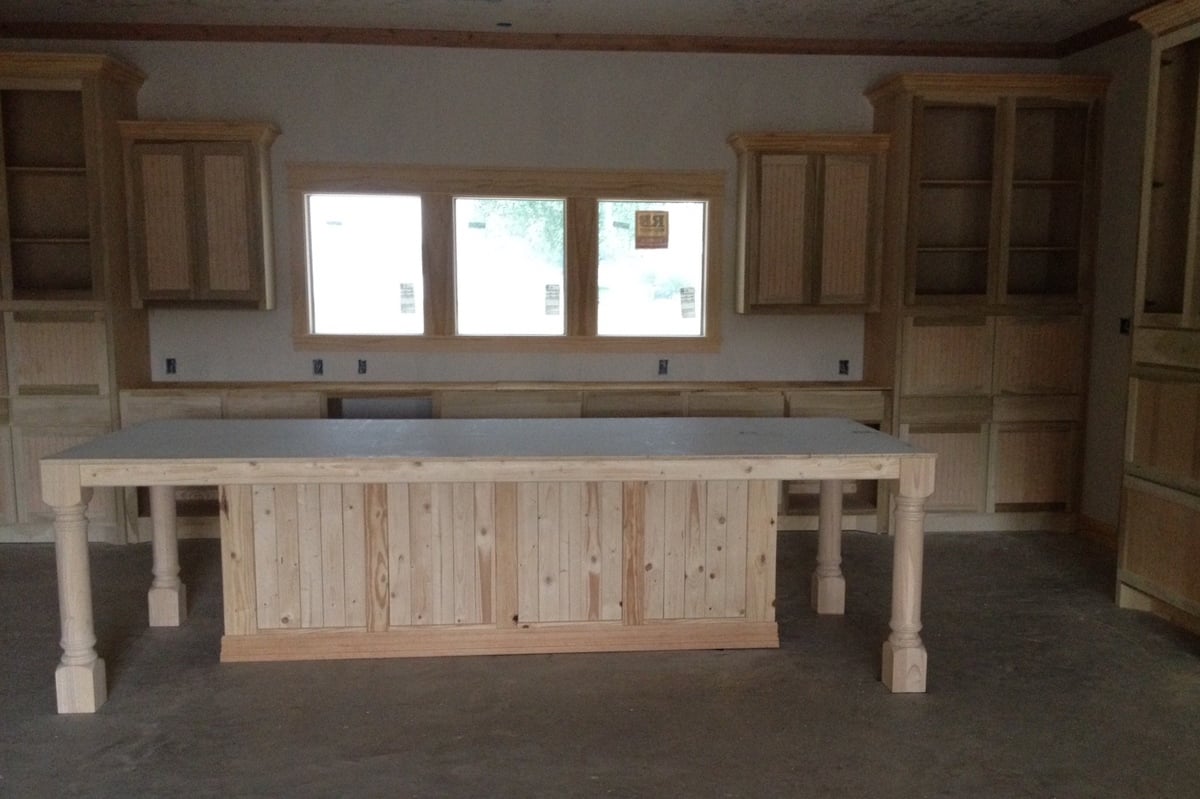
I'm building a house for a client who wanted a country farm house feel. The kichen cabinets are custom frames with beaded board inserts.
Custom Kitchen Island
The custom kitchen island is unusually large for this size home at 10' 6" x 4'. The base cabinet 90" x 25 1/2". But, there is no dining room. I wanted the island to not look like the rest of the cabinets. Then I found Ana's design. I reworked the design to fit my space and the buyers preferences. Trash pullout, larger drawers ect. My plan was so far from typical site built trim that I decided I would build it myself or it would really be a budget breaker. I do have experience in all aspects of building but, this is my biggest trim project. Time? I'm sure I have 40 + hours in it. Money? The columns alone were $500. I'm sure I have $1,500+ in it. Don't even ask how many cool tools I had to add to my collection just for this project!
I built the custom kitchen island in pieces in the shop, and assembled it in place. Very heavy, no way to move it after assembly. The stain went on today. I'm happy with the way it turned out. Thanks for the inspiration Ana!
Built from Plan(s)
Estimated Cost
$1500 to $2,000
Estimated Time Investment
Week Long Project (20 Hours or More)
Finish Used
Sherwin Williams, custom color.
Recommended Skill Level
Advanced
Comments
Fri, 10/21/2016 - 08:13
Amazing Job!
WOW! This is absolutely breathtaking! Just think of the memories that will be created around this beauty. The cabinets are great, but the console island steals the show! Job well done!

Sat, 10/22/2016 - 10:42
Incredible build - Custom Kitchen Island
Incredible build! Please share a photo of it done too!
Farmhouse Storage bed
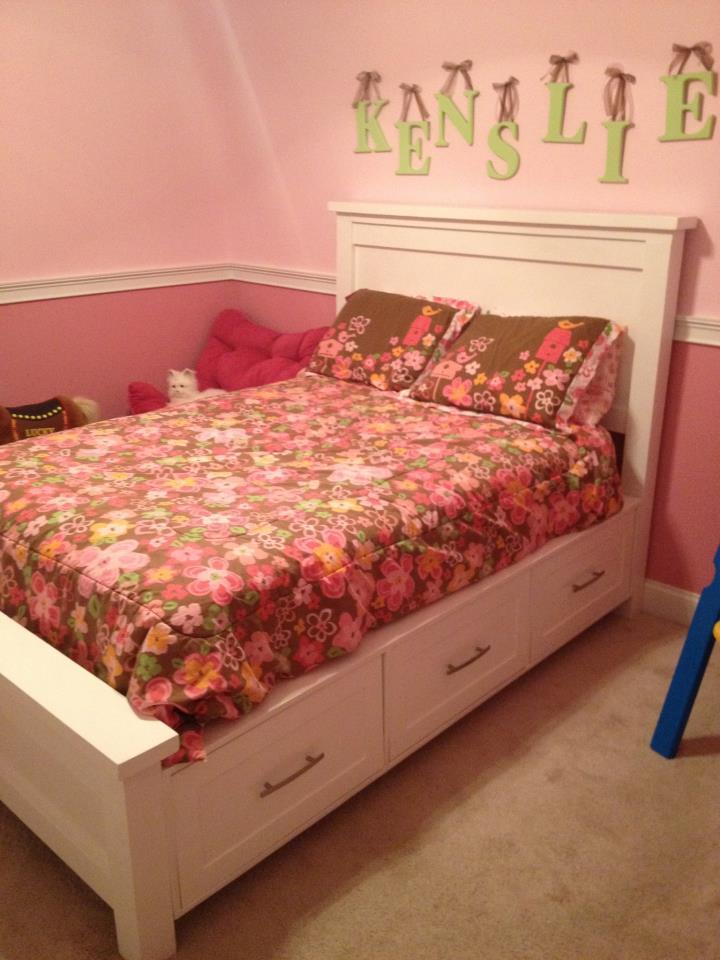
Decided to build this bed for my 3 yr old to free up some space in her room. It was a big success.
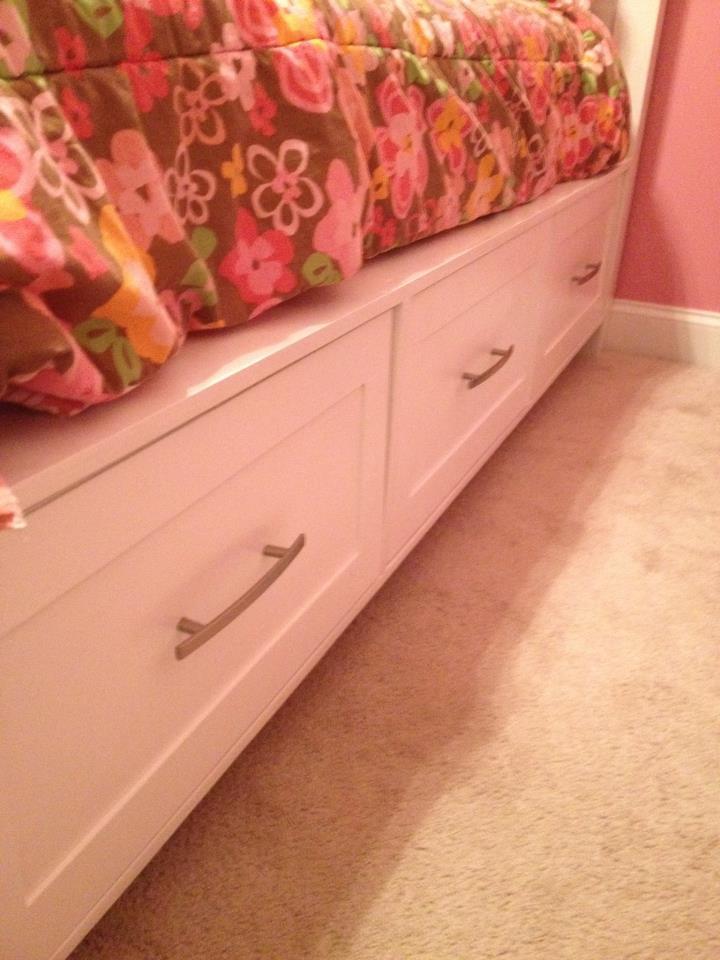
Built from Plan(s)
Estimated Cost
$400
Estimated Time Investment
Week Long Project (20 Hours or More)
Finish Used
White
Recommended Skill Level
Intermediate
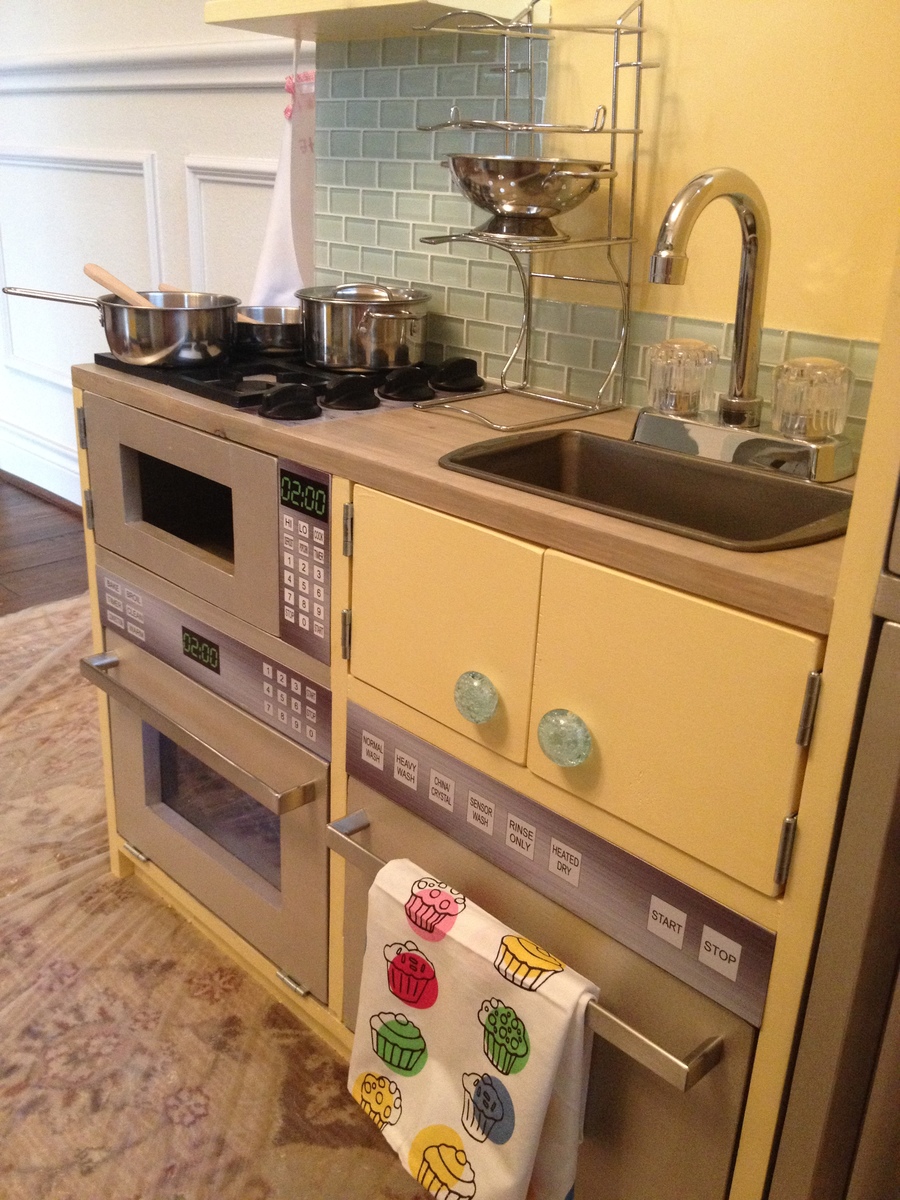
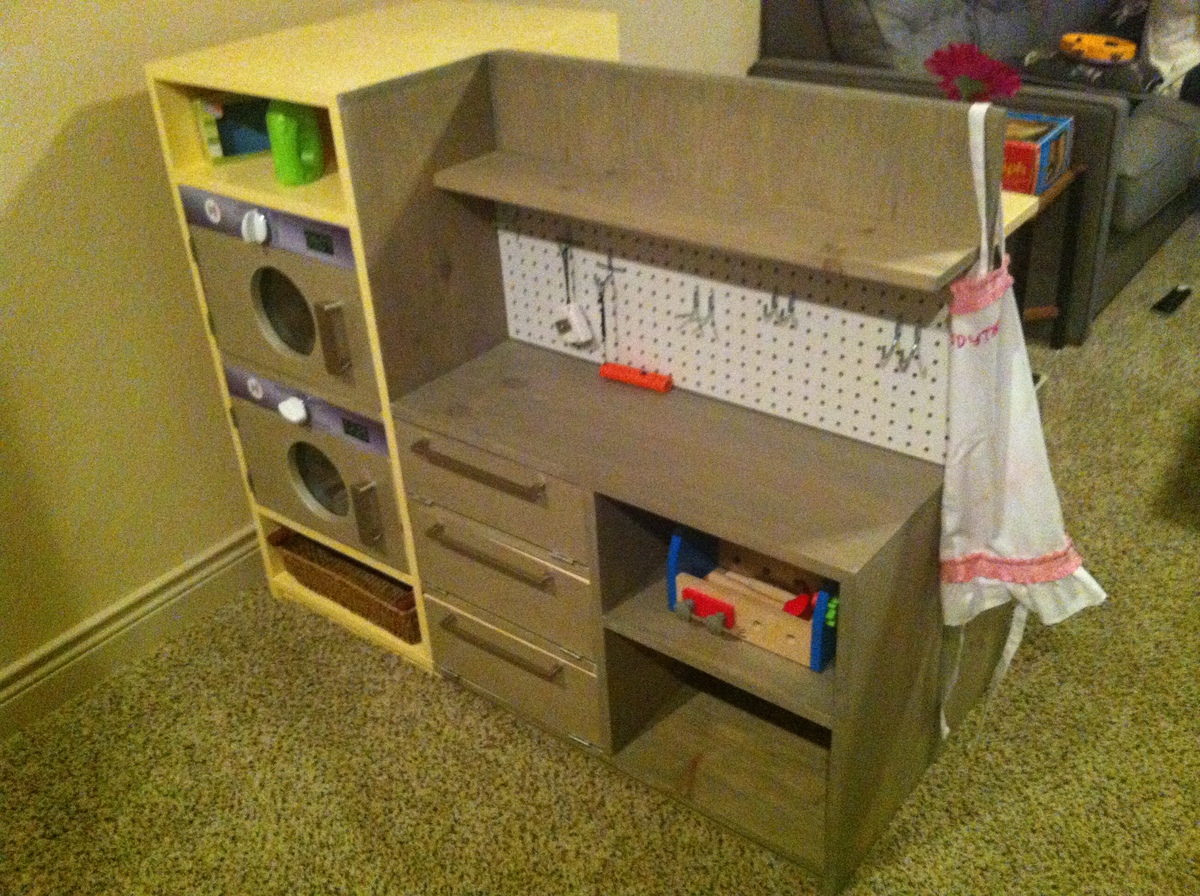
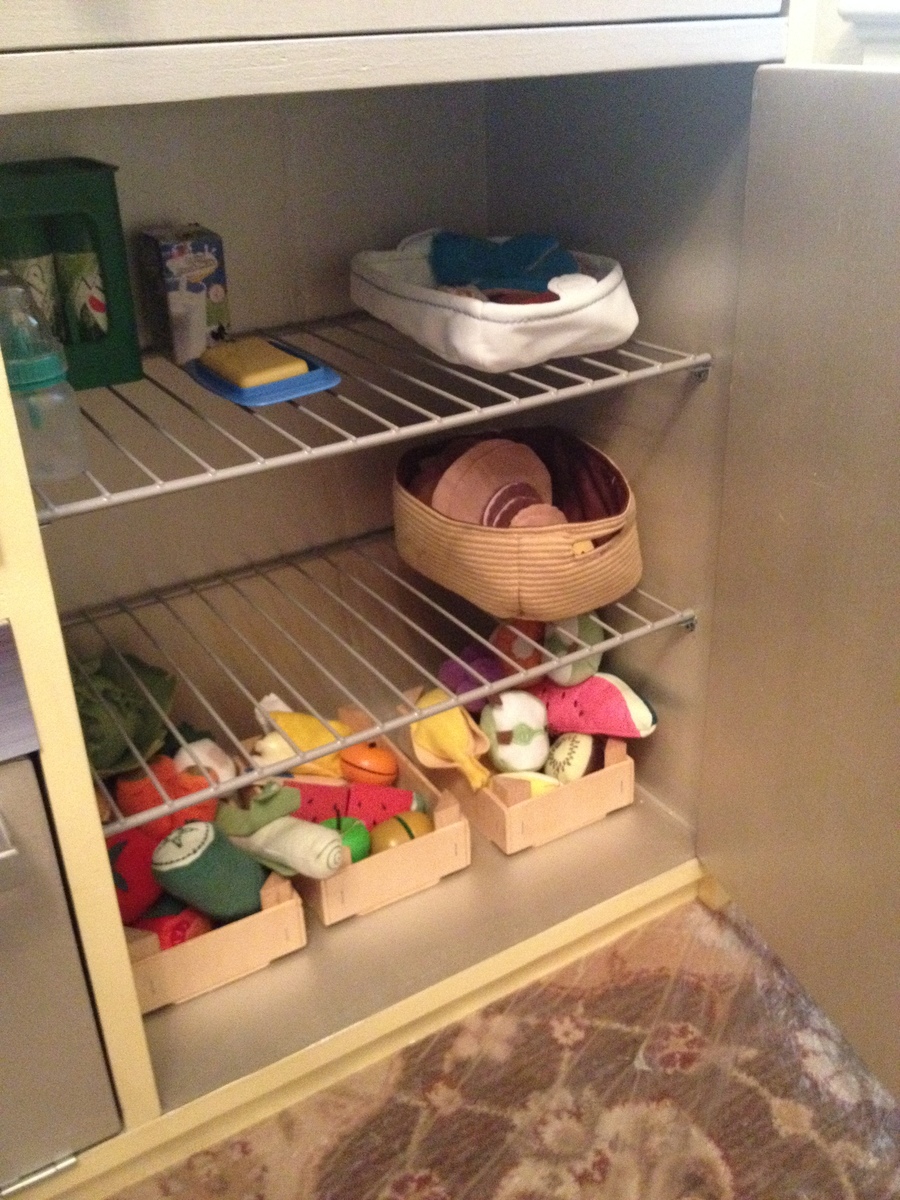
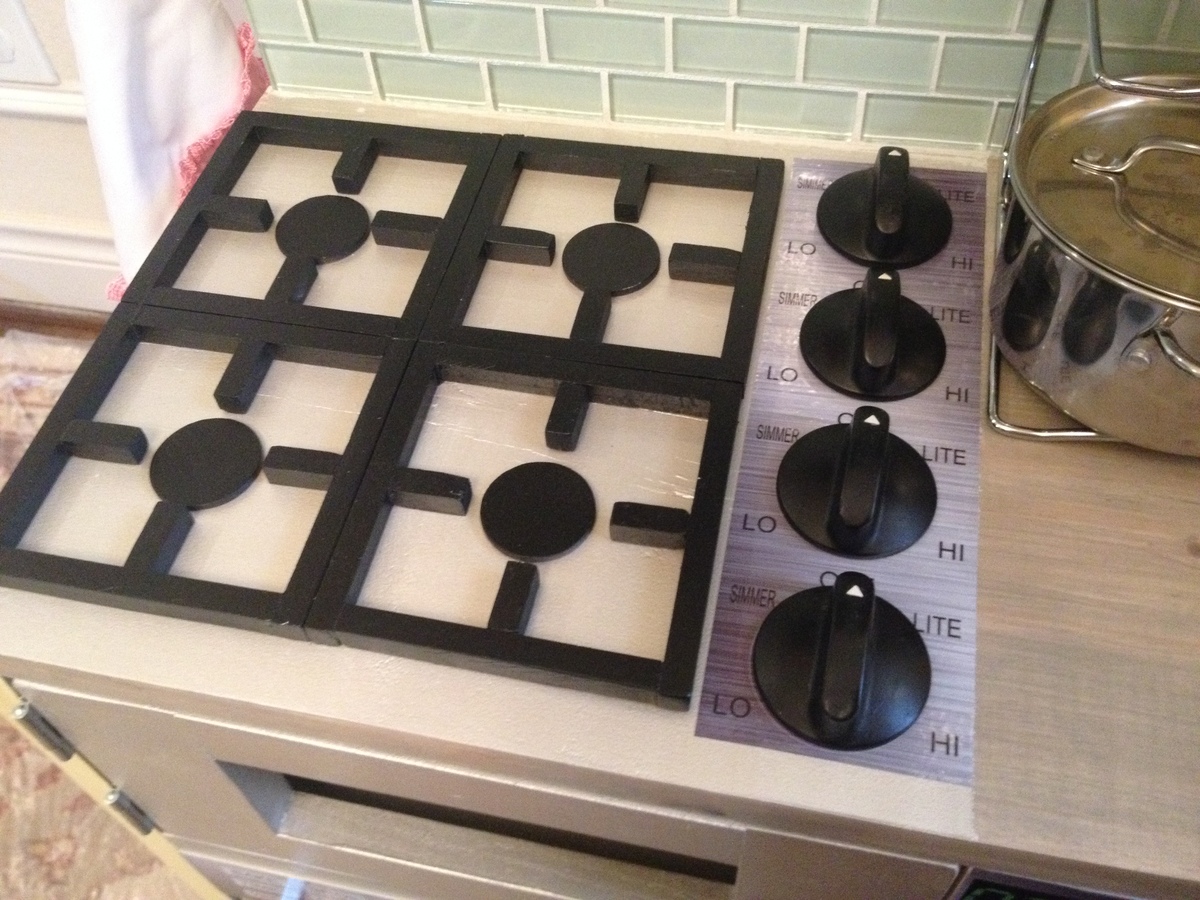
E's play kitchen AND garage workbench and laundry
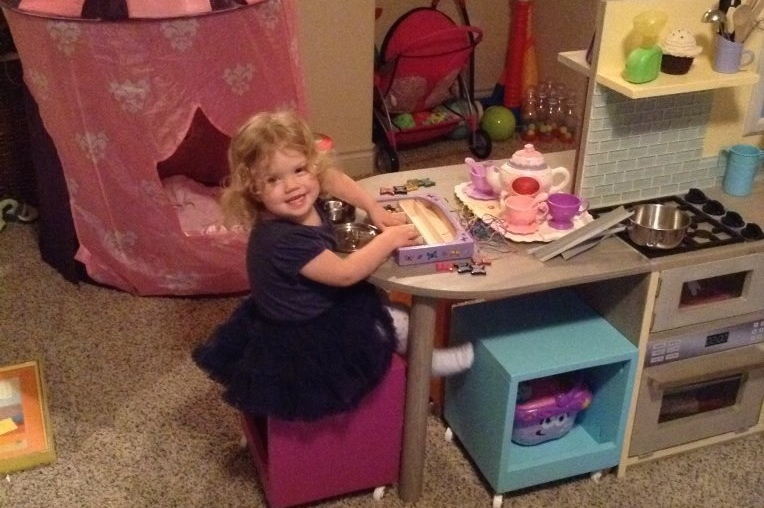
What's better than an Ana White play kitchen? 2 Ana White play kitchens back-to-back!
Slightly modified, we made 2 play kitchens, turning one into a garage workbench and laundry. We managed to just get the kitchen & garage done for Christmas morning (minus a latch & plexi for the microwave). We later added a window view above the sink, and a table and 3 storage stools to join the two units on one end. In a long mixed-use playroom with little wall-space available, they jut out from the wall, dividing the TV side of the room from the toy storage side.
Dad was excited to help put the garage-side together and bought his little girl some peg-board to hang her tools on, and installed garage lighting. As pull-out drawers cut into the storage space, her "tool cabinet" doors just fold-down. Grandpa sent her a full tool-set with power drill for her new workbench. Big brother helped piece the gas burners together and chose paint colors.
Little miss finger-painted in the garage next to me while I worked on this first woodworking venture, but she was not a bit interested in the contraption until we added the stickers! A local sign vendor we use was so tickled to be involved, he had the stickers printed in under an hour and for just $25 (which saved hours and hours of detail painting)!
Next up: the ana white dream dollhouse (which perhaps we should've started with).

Built from Plan(s)
Estimated Cost
Buying parts retail, last minute, we probably could've purchased a PB kitchen --but not custom to fit our space - and not with a garage and laundry and table and 3 storage stools!
Estimated Time Investment
Week Long Project (20 Hours or More)
Finish Used
We used Valspar's 2 step metallic finish for the stainless appliances - honestly, lots of extra coats that were probably not needed since the gray base coat was super sweet with our yellow kitchen. We used leftover Behr stain from Dad's garage workbench for the wood countertops, and the rest of the paint is Sherwin Williams. Cabinet knobs from World Market; appliance knobs from a salvage yard; handles from Ikea; fridge shelves a cut closet shelf; real tile backsplash; gas burners from dowels; real faucet from ebay; loaf pan sink (left removable because we knew she'd immediately fill it with water).
Recommended Skill Level
Intermediate
Comments


Beautiful steps
Directions worked like a charm, thank you, Ana for what you do!
Built from Plan(s)