Community Brag Posts

FARMHOUSE MEETS SHABBY CHIC

FARMHOUSE MEETS SHABBY CHIC

Estimated Cost
$250
Estimated Time Investment
Week Long Project (20 Hours or More)
Recommended Skill Level
Intermediate

Comments

Closet Carpenter

Wed, 07/06/2011 - 16:43

Ana White and her blog holds a bitter-sweet bond with me because I love all the plans and content and never have enough time to build/refinish the antiques I have collected in the six short months I discovered her. THANKS A LOT!!

Open Top Toybox

Submitted by Mightyd40 on Fri, 08/09/2013 - 21:28

My daughter needed a nice toy box for Nonnie and Poppa's house so I made her this one. I used Jamie's plans to hand painting and found it to be the hardest part of the project haha. It was probably just bc I was nervous I'd mess it up right at the very last step. I think it turned out nice.

Built from Plan(s)
Estimated Cost
$100...used top choice pine(should've used fir) and needed paint/screws
Estimated Time Investment
Weekend Project (10-20 Hours)
Recommended Skill Level
Beginner

Customized Hutch

Submitted by fortasha on Sat, 09/05/2015 - 14:48

A client couldn't find exactly what she was looking for - so we perused the Ana-White site and came up with this combo. She customized size and colors to match her decor and I did the rest.

Estimated Cost
$260 for supplies
Estimated Time Investment
Weekend Project (10-20 Hours)
Finish Used
Mix of Old White and Pure White from Annie Sloan for the base and Hutch and Minwax Dark Walnut mixed with Ebony for the top and shelves.
Recommended Skill Level
Intermediate

Greenhouse

Submitted by Anonymous (not verified) on Thu, 05/05/2022 - 15:31

Build this greenhouse using your plans, by myself over 2 weekends. Turned out great!

Built from Plan(s)

Comments

Farmhouse Table and Benches

Submitted by Keri Lee on Sat, 07/09/2011 - 09:35

It isn't perfect, but it's beautiful and made with love!

Estimated Cost
$100
Estimated Time Investment
Week Long Project (20 Hours or More)
Finish Used
I used MinWax stain in Dark Walnut and three coats of MinWax Fast-Drying Polyurethane in Satin finish to seal the stain. For the paint, I just used some white, satin Olympic no VOC paint right off the shelves at Lowe's. It was left over from painting my house. To date, I have not sealed the paint and I may not bother since it's holding up just fine. As far as my "technique" is concerned, I just followed Ana's tips about sanding between coats. I applied the stain and poly with a small white sponge roller. I used a paint brush for the legs since I feel like I get better results, even though it takes more time.
Recommended Skill Level
Beginner

Comments

Guest (not verified)

Tue, 07/12/2011 - 13:53

this looks awesome. What wood and stain did you use. I think we may try to do this.

Guest (not verified)

Tue, 07/12/2011 - 20:59

Same question! That is a beautiful finish; I'd love details on how you achieved it!

Guest (not verified)

Fri, 09/30/2011 - 04:31

This is EXACTLY what I was hoping to do with the table we just built. Would you be willing to share your finishing process here? Beautiful job.

Guest (not verified)

Tue, 10/18/2011 - 14:18

Im dying to know what the name of the color of stain you used for your table. It's beautiful! The color of the white part would be nice too:)

Keri Lee

Fri, 11/18/2011 - 14:03

Thank you so much for all your compliments! I apologize for not responding to your questions sooner, I never realized I had comments on this post! I used MinWax stain in Dark Walnut and three coats of MinWax Fast-Drying Polyurethane in Satin finish to seal the stain. For the paint, I just used some white, satin Olympic no VOC paint right off the shelves at Lowe's. It was left over from painting my house. To date, I have not sealed the paint and I may not bother since it's holding up just fine. As far as my "technique" is concerned, I just followed Ana's tips about sanding between coats. I applied the stain and poly with a small white sponge roller. I used a paint brush for the legs since I feel like I get better results, even though it takes a little more time.

Dorm Desk

Submitted by Pastordirk on Mon, 08/12/2013 - 09:05

Double book-shelf on dorm desk plans

Built from Plan(s)
Estimated Time Investment
An Hour or Two (0-2 Hours)
Recommended Skill Level
Beginner

King-size Headboard from old panel doors

Submitted by RetroFit on Tue, 09/08/2015 - 13:26

There's lots of versions of headboards made from doors. We wanted ours to let light in and still be able to open/close the windows. Since the doors were hollow-core the cutouts had to be re-inforced after cutting out those sections. Also, this was made from 3 different sized doors so 2 of the 3 had to be cut in half from top to bottom moved to the outsides to retain symetry.

Estimated Time Investment
Week Long Project (20 Hours or More)
Recommended Skill Level
Intermediate

Upholstered chunky leg bed

Submitted by amil04 on Tue, 07/24/2018 - 08:40

I followed the plans but modified for a king size. I upholstered my bed in a linen colored upholstery fabric and added the nailhead trim to the headboard. This is the most sturdy bed I have ever owned. I don’t know if I will ever be able to buy from a store again!!

Estimated Cost
$200
Estimated Time Investment
Weekend Project (10-20 Hours)
Finish Used
Upholstery fabric and walnut stain on the legs
Recommended Skill Level
Beginner

Interior barn door to match new bed!

Submitted by Texan59 on Thu, 05/12/2022 - 18:21

After completing the farmhouse bed, I decided that the closet door had to go. Using the same basic idea of materials, tongue and groove pine and 1x4 square edge boards. I'm very pleased so far as the door came together really well, again the lumber quality that the big box stores have is,less than ideal. Need to do my final sanding before adding a whitewash finish and matte clear poly and the hardware!

Comments

Lady Bug Table

Submitted by heidii on Tue, 07/12/2011 - 10:07

This was my first try with an Ana White plan. It was tons of fun, and my husband came up with an awesome paint design. Here it is:

Built from Plan(s)
Estimated Cost
$15 plan + $15 spray paint
Estimated Time Investment
Weekend Project (10-20 Hours)
Finish Used
I used spray paint and then lacquer. It would be simpler with regular paint because you wouldn't have to tape so many times.
Recommended Skill Level
Beginner

Comments

heidii

Tue, 07/12/2011 - 10:09

Use a piece of cardboard or sturdy paper to make the cut-outs for the spots.

Rustic coffee table

Submitted by W.Warren on Wed, 08/14/2013 - 19:27

It came out looking pretty good. We followed the plans. Treated entire area with a pre-stain conditioner. Then applied 3 coats of Minwax PolyShade. Voila!

Estimated Time Investment
Day Project (6-9 Hours)
Finish Used
Minwax Polyshade brown, oak maybe.
Recommended Skill Level
Beginner

Sweet Pea Bunk Bed for Viktoria

I spent the last 8 months building 2 bunk beds from the Ana White site.  This little girl sweet pea version for my granddaughters and a cabin version for my grandsons.  This took alot of time but their smiles made it all worth it.  I am thankful for the website and plans you provided. It allowed someone like me to build something that my granddaughter loves and hopefully will remember forever.  Many, many thanks!!!!

Finish Used
primer and paint
Recommended Skill Level
Intermediate

Wife's Kindergarten Classroom

Been a while since I had time to actually build anything worth posting about! My wife wanted some items for her Kindergarten classroom this year, so built several items, most inspired by the Farmhouse family.

Estimated Time Investment
Day Project (6-9 Hours)
Recommended Skill Level
Beginner

Comments

jennyboo

Sat, 06/12/2021 - 11:23

I am moving from 15 and half years of third grade to a first year of first grade. I NEED tables for my kids. I plan on building my own. I am building mine as a "2 seater." Would you please share the dimensions of these student tables? I love the teacher desk too. I built something similar for my home.

Essential Bed Frame

Submitted by Anonymous (not verified) on Thu, 05/26/2022 - 15:29

I had to move quickly from Washington to Ohio for a job ( which I've since quit!). I flew here in January, with two suitcases. I ordered a nectar mattress and needed a frame. Built it, stained it vintage blue, love it!

Comments

Canopy Doll Bed

Submitted by canesa on Fri, 07/15/2011 - 00:03

I built 2 canopy doll beds and matching nightstands for my neighbors. I modified them by flipping the plans over, raised the top shelf and turned the bunk into a canopy. I wish I could take credit for the fabulous sewing skills but that is my friends talent!

Estimated Cost
They bought all the supplies so i'm not sure on this one.
Estimated Time Investment
Day Project (6-9 Hours)
Recommended Skill Level
Beginner

Petite Planters for the Potager

Submitted by JoA on Mon, 08/19/2013 - 06:23

After building a large planter from Ana's plans and my salvaged fence wood I thought 2 smaller planters for the entrance to our kitchen garden would be nice. The complete instructions are on my blog, Let's Face the Music. Jo

Built from Plan(s)
Estimated Cost
$12 each
Estimated Time Investment
Day Project (6-9 Hours)
Finish Used
Benjamin Moore Exterior Semi-gloss in Bunker Hill Green over exterior primer.
Recommended Skill Level
Beginner
Seasonal And Holiday

Doll bed

I made this dolls bed with my daughter, and she really enjoyed it :-) Had to do some adjustments from Inch to centimenters before I started. Thank you for a great site!

Estimated Cost
NOK 300,- (included fabrics)
Estimated Time Investment
Day Project (6-9 Hours)
Recommended Skill Level
Beginner

Living Room Set

Submitted by Anonymous (not verified) on Sat, 06/04/2022 - 12:31

Just finished this set up. All Poplar and Birch Ply.

Comments

Doll House Book Shelf

Submitted by msemishko on Sat, 07/16/2011 - 18:28

We're having a baby girl, and this was the perfect project for me. For my first project, I am pretty pleased with it.

Built from Plan(s)
Estimated Cost
$97
Estimated Time Investment
Weekend Project (10-20 Hours)
Recommended Skill Level
Beginner

camp loft bed

Submitted by Kat-Lynn on Tue, 08/20/2013 - 07:54

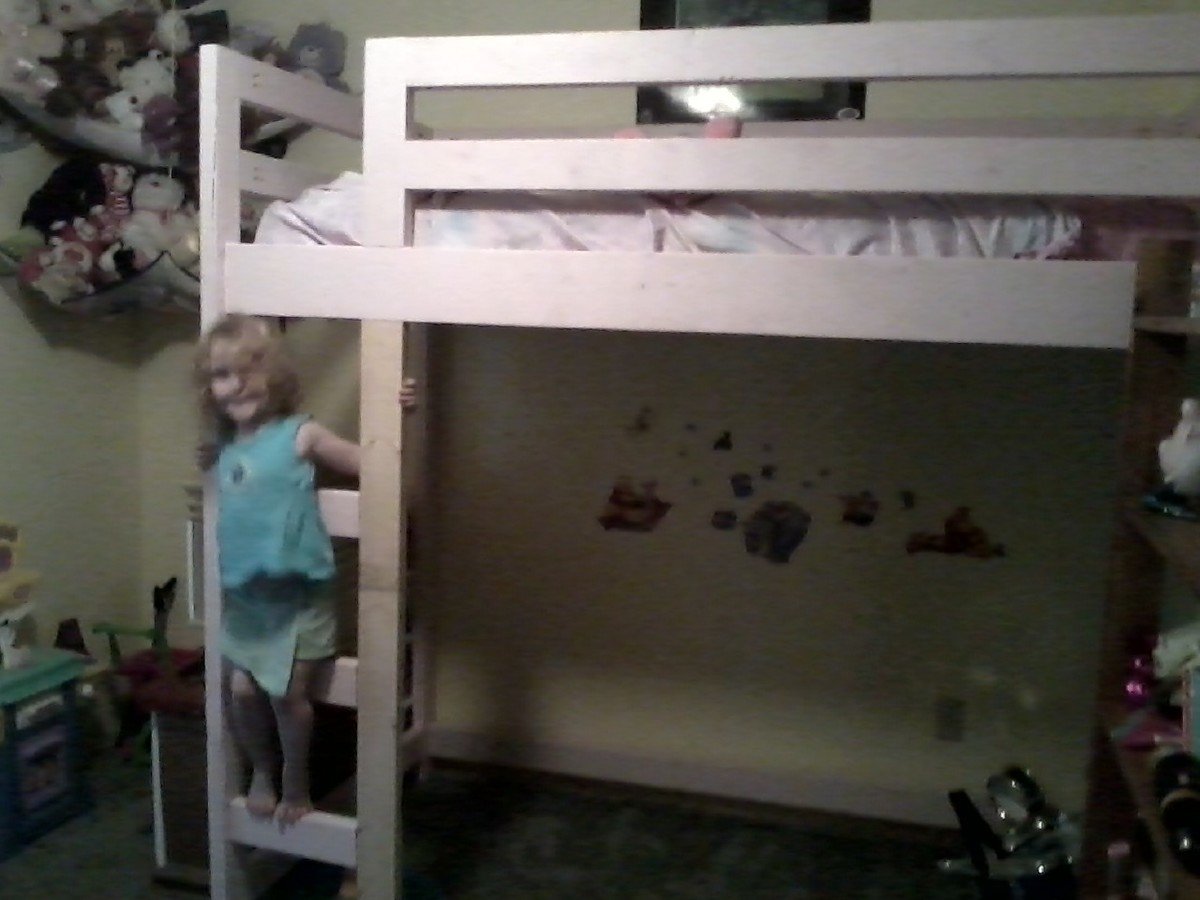
I decided to make this bed when my little girl decided that she didn't want a little girl bed (toddler size) and wanted a big girl bed. Because of the size of her room and the fact I wanted her to be able to move the bed to a different wall if she wanted to in the future I added a front ladder rather than on the end. I also added 6 inches extra clearance under the mattress and 2 inches to the side railing height so she could have a pillow top mattress in the future.

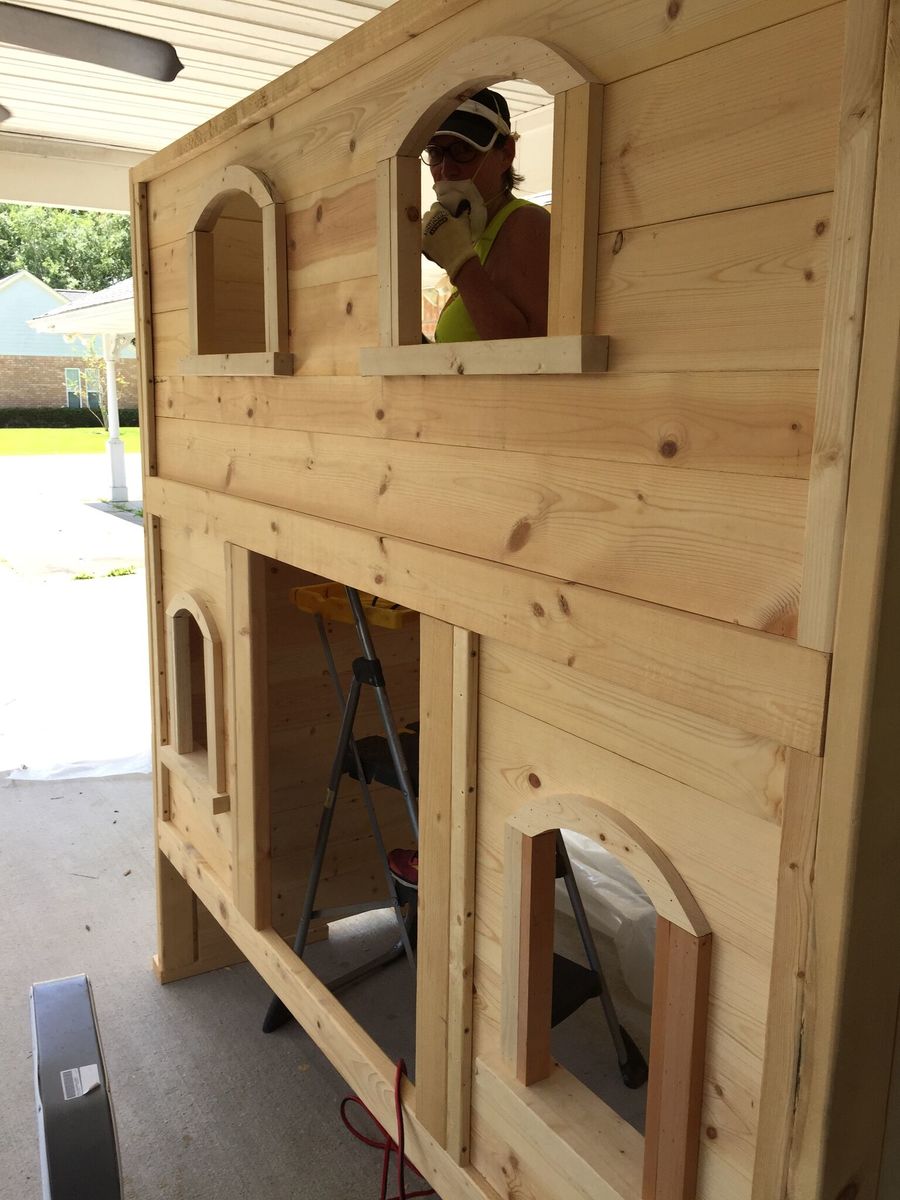
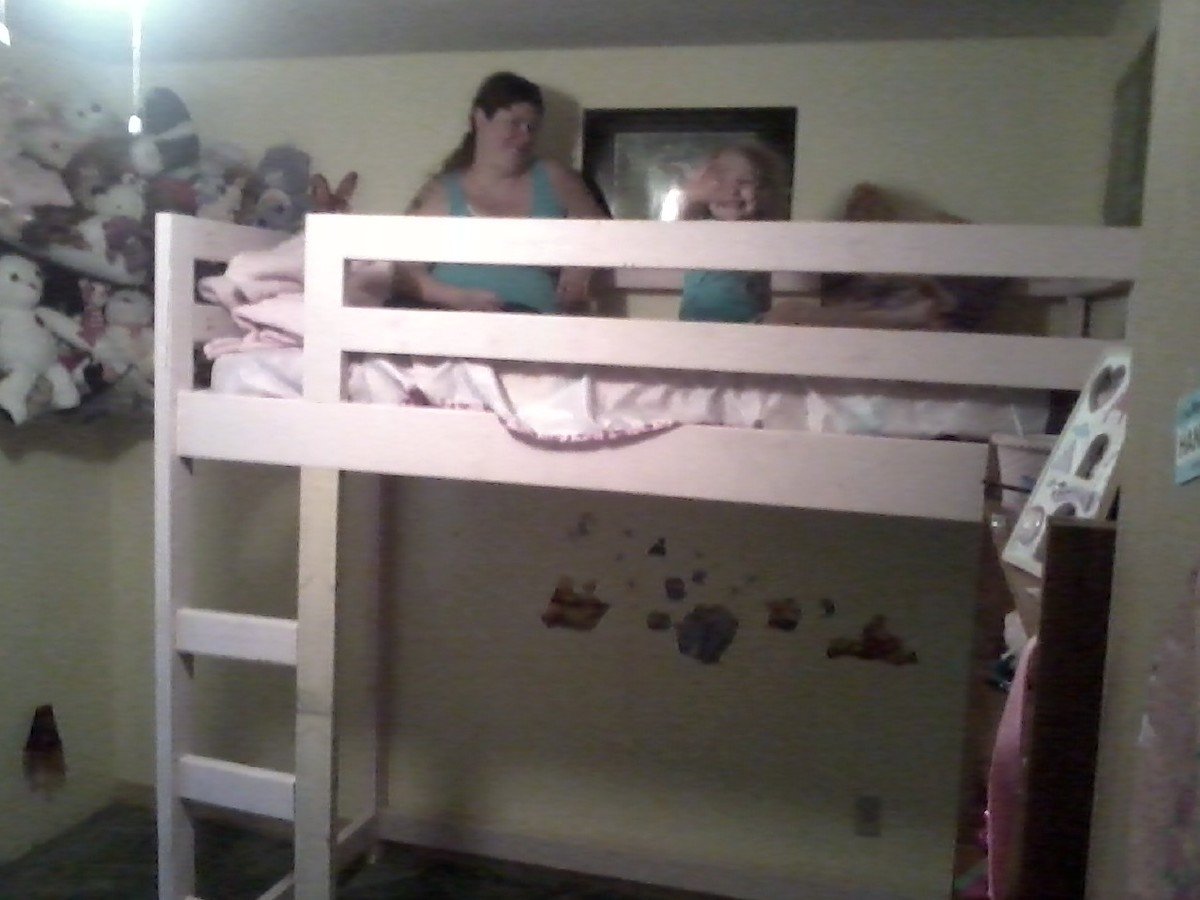
As you can see in the second picture I was up there with Hannah so I know it can easily handle the weight.

In Ana's description it talked about the kids playing by themselves and not wanting to come out of the room. Well it's the truth. Hannah has been in there the majority of the time since we finished it yesterday afternoon. The first words out of her mouth this morning were "Momma thank you for making my new bed." Made all the work so worth it!

Estimated Time Investment
Day Project (6-9 Hours)
Finish Used
Painted. I only did one coat, without primer, so you can still see some of the wood grain.
Recommended Skill Level
Beginner