Community Brag Posts

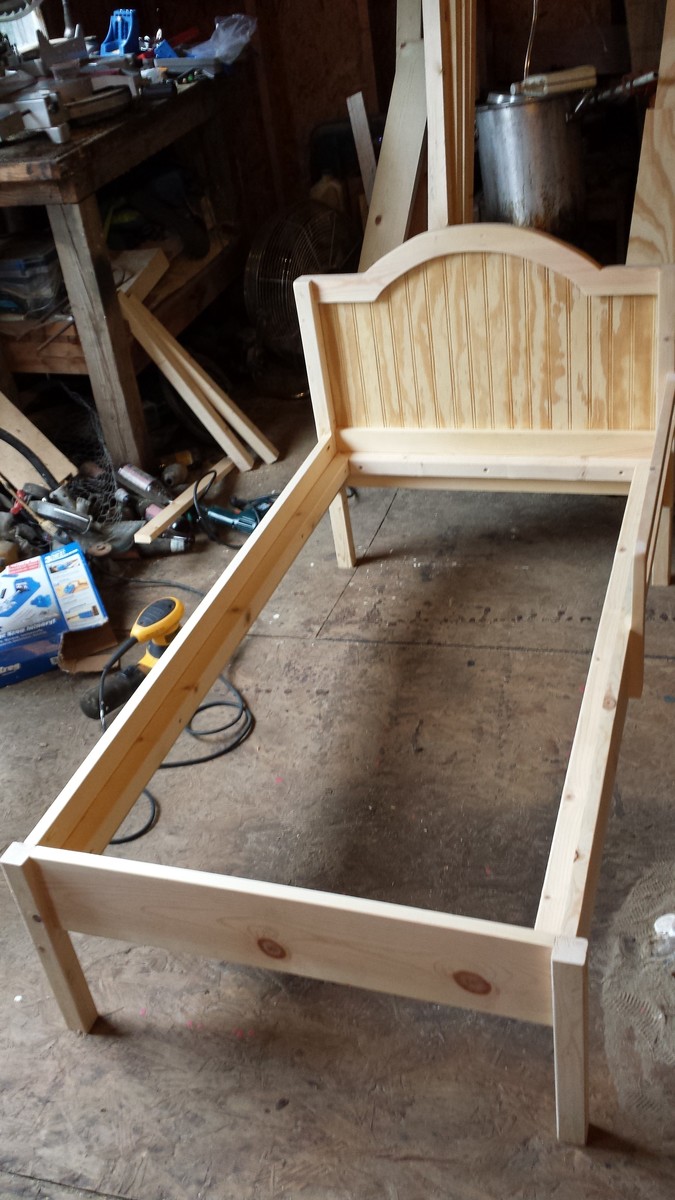
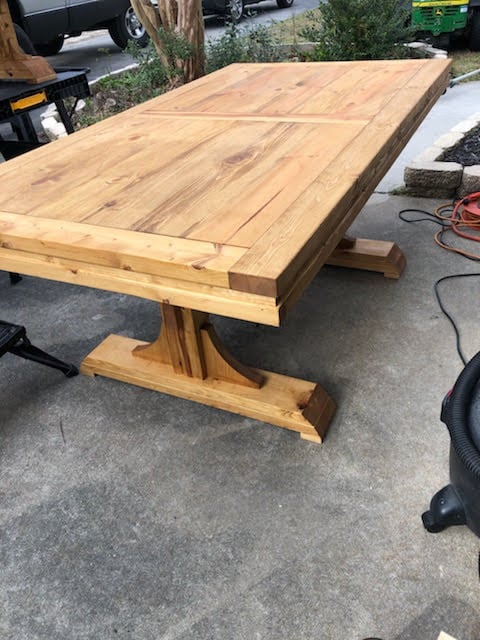
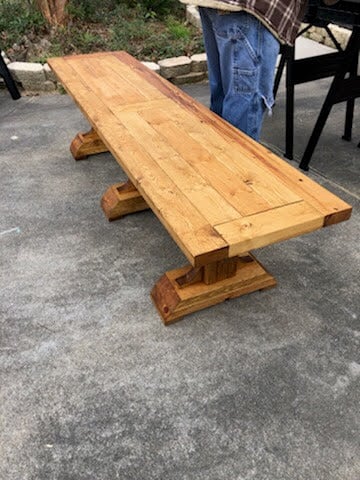
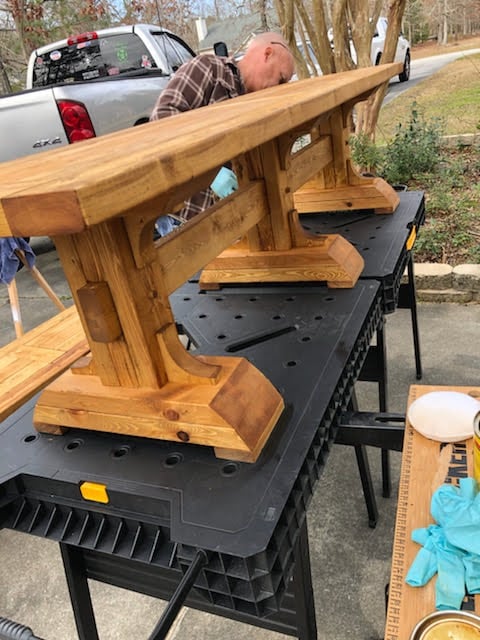
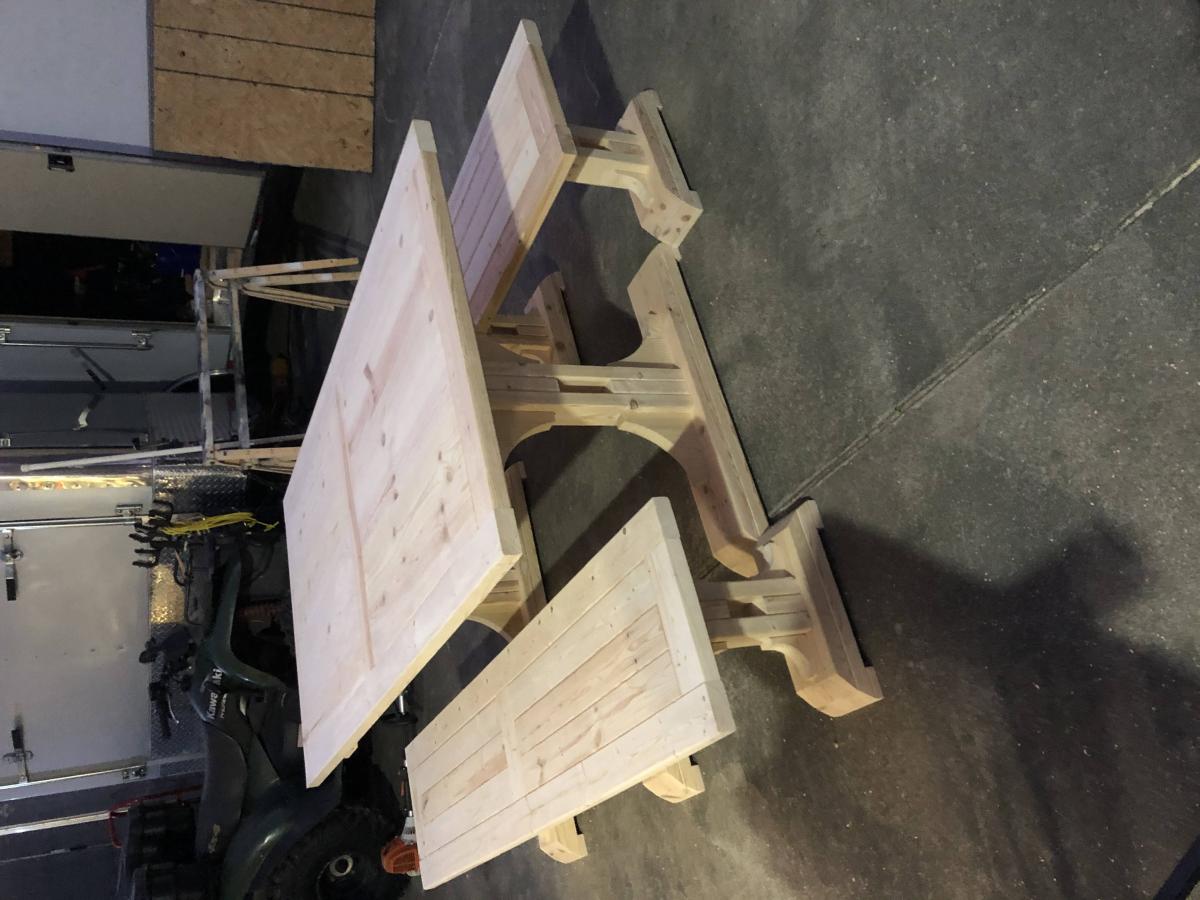
Rustic Mountain Style Bed Frame

Submitted by Anonymous (not verified) on Mon, 07/01/2024 - 09:40

Here is a bed I recently made. My inspiration was a bed we saw at a local high end furniture store in the mountains that has price of $4,800. I bought my wood at a local saw mill for $125. I used a wood planer, table saw and miter saw to build the bed. It turned out great.

G Russell

Toddler Farmhouse Bed

I can't believe I built this bed! It's the project I'm most proud of so far and my daughter loves "my big girl bed!" I recently got a jigsaw and tried it out making the arch. It didn't turn out perfect but I'm probably the only one who notices it. I built the rails using 1x2's from the "Traditional Wood Toddler Bed" plans on this site and altered them to fit this design. I added a third rail to it because there was too much space between the mattress and rail when my daughter lies on the bed.

I found a bunch of free wood on Freecycle from someone local so I didn't have to spend a ton of money on this.

Thanks for the plans, Ana!!!

Built from Plan(s)
Estimated Cost
$30
Estimated Time Investment
Afternoon Project (3-6 Hours)
Finish Used
White paint.
Recommended Skill Level
Beginner

Comments

reclaimed wood headboard boat wood style

Submitted by gvandy on Tue, 07/29/2014 - 05:20

I copied the boat wood painting technique using the colors of my daughters room and it turned out wonderful. It really is as easy as it looks on the tutorial! You can see more of my stuff on anexceptionalife.com

Estimated Cost
$85
Estimated Time Investment
Weekend Project (10-20 Hours)
Finish Used
We stained the entire headboards with Early American minwax, and then used 5 colors to layer the paint using a block of wood and letting each color dry between coats. We did what we liked and covered any mistakes with another color. Super easy. we finished with helmsman clear poly in satin and did 2 coats with no sanding in between.
Recommended Skill Level
Beginner

Farmhouse table

Submitted by Boles on Thu, 07/30/2020 - 10:52

This was our first project off of here. Made this to go along with our complete kitchen remodel.

Estimated Time Investment
Weekend Project (10-20 Hours)
Finish Used
semi gloss white for the bottoms and dark walnut stain and clear coat for the top

The Traditional Wood Toddler Bed

Submitted by jputz2014 on Fri, 08/01/2014 - 05:39

This is The Traditional Wood Toddler Bed. Built straight from the plans. Worked out great and my daughter loved it!

Built from Plan(s)
Estimated Time Investment
Afternoon Project (3-6 Hours)
Finish Used
Unfinished for now. Daughter cant decide on a color.
Recommended Skill Level
Beginner

Mini Rustic X End Table

Submitted by Anonymous (not verified) on Mon, 11/14/2016 - 08:07

Made a miniature rustix x end table. You can find the video of me making it here: https://www.youtube.com/watch?v=GPL-mh5rWJ4

Built from Plan(s)
Estimated Time Investment
An Hour or Two (0-2 Hours)
Recommended Skill Level
Beginner

Comments

First build

First build to sell. Has a few faults of my own doing. But, sold it in 24hrs. 😁

Estimated Cost
$60
Estimated Time Investment
Afternoon Project (3-6 Hours)
Finish Used
Watco Danish Oil. Medium Walnut. Sanded with 120 grit.
Recommended Skill Level
Beginner

Media console

Submitted by landseer on Fri, 10/12/2012 - 08:18

I needed a media console for my tv and this was perfect. The only thing I changed was to put a shelf instead of drawers so I can put cable box and DVD player. My wife liked it so much I had to make another one for her.

Estimated Cost
$100
Estimated Time Investment
Day Project (6-9 Hours)
Finish Used
Bottom dutch boy duraclean semigloss. Top minwax red oak stain plus clear coat.
Recommended Skill Level
Intermediate

Comments

Jesi (not verified)

Fri, 10/12/2012 - 12:02

This is amazing! Great job!

followed the basic plan shortened the foldout arms a bit

Submitted by Jon Barnes on Mon, 08/04/2014 - 11:40

I followed the basic outline in the original plan for the main part of the project. I did secure more with some 2x4 I had. I had plenty of 2x4 laying around and felt this would be a good time to use some of it. I shorted the arms a bit. I think mine are 23 1/2in on each side. Still plenty long enough for most projects. I added a small shelf in the middle. I am not thrilled with exactly where I have it. But I have it just floating on the rail so If I want/need to take the shelf out , it is just real easy to do so. I would say just because I was being extra carful with the cuts that it took me about 6 hours in total to complete it.

Built from Plan(s)
Estimated Time Investment
Afternoon Project (3-6 Hours)
Recommended Skill Level
Beginner

Simple Outdoor Dining Table

With a few modification in mind, I set out to build an outdoor table using cedar wood with the ability to remove the legs and move it indoors. With a few simple modification to the original plan, I was able to come up with this cool table for a ground level deck. I went with a B and better grade for the table tops because I wanted a clean and modern feel but brought in a little rustic element with the knotty 4x4 legs (also cheaper :)).


Tips @ charitybuils

Built from Plan(s)
Estimated Cost
$300
Estimated Time Investment
Weekend Project (10-20 Hours)
Finish Used
Sikkens Cetol 1 Natural
Recommended Skill Level
Beginner

Pottery Barn Inspired Shoe Dresser

When Ana posted the plans for her shoe dresser last year, I knew I wanted to build it for my entryway, but I was intimidated by the "Intermediate" rating she gave it. This year, after putting a couple other builds under my belt, I felt confident enough to finally tackle it.

Turns out it wasn't quite as bad as I thought. The wooden dowel hinge was a little tricky. I had to sand down the bottom of the doors to get them to open wide enough, but other than that, the plan is pretty straightforward.

You can find more details and pictures on my blog.

Built from Plan(s)
Estimated Cost
$75
Estimated Time Investment
Week Long Project (20 Hours or More)
Recommended Skill Level
Intermediate

Comments

Bookshelf

Submitted by Kast on Wed, 08/06/2014 - 15:47

Love this bookshelf. I do think it just a bit tall.

Built from Plan(s)
Estimated Cost
110
Estimated Time Investment
Weekend Project (10-20 Hours)
Finish Used
Radiant Orchid by Valspar for bead board in satin finish. Quail Egg by Valspar to match her bed and dresser
Recommended Skill Level
Intermediate

12 foot - Triple Trestle Table

Submitted by Anonymous (not verified) on Sun, 11/20/2016 - 06:48

Thanks so much to Ana and Shanty2Chic for the plans!  I modified the design to exclude the arches - my hands are too weak to make the cuts, but I replaced them with black strapping that matches other features in the house.  I also extended the table to 12 feet long in order to perfectly fit the windows overlooking the lake.  I absolutely love it and will definitely be making more things for our new home.  Thanks again!!!

Built from Plan(s)
Estimated Cost
$200
Estimated Time Investment
Week Long Project (20 Hours or More)
Finish Used
Minwax combination of Provincial, Weathered Wood, and Classic Grey
Recommended Skill Level
Intermediate

2 Piece Kids Wood Outdoor Chair

Submitted by Anonymous (not verified) on Mon, 07/22/2024 - 10:54

I made a pair of these beach chairs from recycled lumber. I extended the back rests by one board. They will add to my grandson’s tree house furniture. The frame is treated with Australian oil stain and the boards are rolled on acrylic paint decorated with sprayed on marine shapes aided by paper cutout templates.
Ana White plans are excellent! Thank you!
Noel

My Rustic "X" Console Table

Our spare bedroom was in need of some furniture and when I saw this plan for the rustic "x" console table, it was a perfect fit. And as mentioned in the blog, this was perfect for displaying the handmade quilts our grandmother made for us. When I first read the plans, and the materials list, my husband wasn't too sure about furniture made out of 2x4's and 2x6's but when all said and done, the table came out beautifully and we are both enjoying it. Thank you so much for the wonderful plans!

Built from Plan(s)
Estimated Cost
$80
Estimated Time Investment
Week Long Project (20 Hours or More)
Finish Used
I used one coat Minwax water based pre-conditioner applied with sponge applicator, followed by two coats Minwax water based whitewash pickling stain applied with sponge applicator, followed by three coats Minwax water based satin poly applied with a brush. The whitewash requires a 2-3 min set time, then wipe excess. I think I spent four hours alone staining just on a single coat of the whitewash. I thought it was going to take forever to finish but I am very pleased with how it turned out :)

For the hardware, I used 4" L-brackets and bolts sprayed with Rustoleum hammered spray paint.
Recommended Skill Level
Intermediate

Comments

spiceylg

Mon, 10/22/2012 - 05:43

I love this table. For some reason your pictures really seem to show the large scale of this piece. Not sure where I'll put this but have to make it! Great job and beautiful quilts!

THHandcrafted

Mon, 10/22/2012 - 06:37

Thank you! And yes, this is a bulky piece. I didn't really realize how bulky until it was going together. But at that point, I knew I'd find some place for it :) Luckily we had a pretty large room that was mostly empty so I think the scale of the table fit the room size.

kenvermillion

Mon, 10/22/2012 - 12:09

I noticed you did the x's slightly different than the plans, as they have two cuts on both ends and attach perfectly. any advice on doing this?

THHandcrafted

Mon, 10/22/2012 - 18:00

For me, the x’s were the most challenging part of the project. I scratched my head and stared at the table side for a while thinking of how to make the x’s so they would meet the center of the table corner. Here’s what I came up with. Figure out your angle. There are a few ways to do this. You can do this by using an online angle calculator where you enter the height and width of your opening and it will give you the angle, you could use a protractor and hold it up to the corner to figure out the angle, or make a template out of paper and transfer that onto your wood. I will admit, I think figuring out the angle is the toughest part, at least for me. Once you have your angle, cut both ends of your wood parallel to one another at that angle. Then measure and mark the center point of your cut. The next cut is through the center point and 90 degrees off of your existing cut . I find it easiest to lay my carpenter square on my cut side then draw a line 90 degrees through the center point mark. A few things I learned along the way, the more square you can get your corners the easier it will be to cut and fit your x’s and make some practice cuts with some cheap 2x2’s then transfer your measurements over to your final 2x2’s. Hope this helps. Happy woodcrafting!

karejensen

Fri, 07/26/2013 - 09:11

Were you able to find black L brackets or did you have to paint them? I'm trying everywhere to find them and I've had no luck! Any help you can give me of where to look for them would be great. Thank you so much and what a beautiful job!

X Bookcase

Submitted by pcarroll on Sat, 08/09/2014 - 12:09

X Bookshelf. Followed Ana's great plan, only change was to spare 1x4s that I planked for shelves. Finished with antique white milk paint. Very happy with result.

Estimated Cost
70
Estimated Time Investment
Weekend Project (10-20 Hours)
Finish Used
Antique white milk paint (love it).
Recommended Skill Level
Beginner

Comments

Entry Table

Submitted by Jloudon89 on Wed, 11/23/2016 - 14:25

Wife wanted an entry table for when you walked in the house.  Loved the plans we saw from the site, so just modified slightly and here it is.

Built from Plan(s)
Estimated Cost
$60
Estimated Time Investment
Day Project (6-9 Hours)
Recommended Skill Level
Intermediate

Triple Pedestal Farmhouse Table and Bench (modified)

Submitted by nunzi1313 on Thu, 08/13/2020 - 14:34

Thank you so much for sharing your plans! We love to DIY and your plans give us direction. My husband and I built this table for my oldest daughter. We modified the length of the table and benches to fit her dining room.

Estimated Time Investment
Weekend Project (10-20 Hours)
Finish Used
Minwax Wood Finish Golden Oak 210B
Odie's Oil
Recommended Skill Level
Intermediate

Step Stool From Ana's Book!

Submitted by dmcarwin on Tue, 10/23/2012 - 23:23

I am so excited about Ana's new book, I love it! This is my first project from her book and I am planning to do many more.

This was a fun build, the angles were not bad, except for the top angle on the two sides, I had trouble getting it on my miter saw, because the board was so long...

It all worked out in the end and my kids and I are really enjoying having it!

You can get more information on the build and finish at my blog:
http://mylove2create.blogspot.com/2012/10/vintage-step-stool.html

Estimated Time Investment
Afternoon Project (3-6 Hours)
Recommended Skill Level
Intermediate
Back