Community Brag Posts

First build--shoe cabinet!!

Submitted by Anniecat on Fri, 05/16/2014 - 23:40

Had a horribly messy front entrance so really needed this shoe cabinet. It's dimensions suited my space better than an Ikea one, and accommodated more shoes. This being my first project, I am glad I started with this instead of a loft bed, since I made alot of mistakes (& corrections) along the way. Although some of the problems occurred because of pieces that ended up being convex. I chose to fill in the gap between the two boards on the front of each bin. It worked out really well.
Really love the Kreg Jig! So worth the investment.

Could not figure out how to properly use magnet catches. Did apply one to one side of the top drawer but it doesn't work too well--pulls the bin too far in. 

Built from Plan(s)
Estimated Cost
$80
Estimated Time Investment
Week Long Project (20 Hours or More)
Finish Used
Used latex primer (which I hated because it behaved like an alkyd & destroyed a couple of brushes) & high gloss paint for high durability.
Recommended Skill Level
Beginner

Farm Table, Bench and Chairs

Submitted by Anonymous (not verified) on Thu, 08/18/2016 - 20:58

Easy to follow plans, made the table, Bench and four chairs as a set. I used valspar new black paint in a flat and top coated with valspar Woodrow Wilson linen. Hand sanded for the distressed look. I jointed the edges of the table top, rounded the outside edges and stained with minwax provincial oil base stain then top coated with six coats of minwax helmsman high gloss poly. 

Estimated Time Investment
Week Long Project (20 Hours or More)
Recommended Skill Level
Intermediate

Twin Bed Frame with Geometric Art

I was given this bed frame by a neighbor whose children had outgrown it and wanted to make a few changes before putting it in my son's room. I took the original frame (built from Ana's Farmhouse Bed woodworking plans) and stripped most of the existing finish. Then, I stained over the stripped paint to give it the distressed look. Next I created the DIY geometric wood art to fit in both the headboard and the footboard. To do this I cut down scrap 1" thick lumber to varying widths and arranged it into a geometric pattern. This was such a fun project and I absolutely LOVE how it turned out! I wrote out every step of the process in this blog post: https://mamaneedsaproject.com/diy-twin-bed-frame-with-geometric-wood-ar… Thanks!

Built from Plan(s)

Farmhouse Nightstand

My husband and I put together this nightstand together over a period of a week. We have a curious and energetic 3 year old boy so had we been able to stay on project we could have finished over the weekend. It was our first time doing any build that had a drawer and our first time doing pocket holes. Our bedroom now has the farmhouse queen bed, a refinished matching dresser and finally the farmhouse nightstand. It was a learning experience but we are very proud of the outcome. Thanks Ana! It's a very rewarding experience to be able to do something like this. I wouldn't have started any of this without your inspiration. Looking forward to many more builds :)

Estimated Cost
$60
Estimated Time Investment
Weekend Project (10-20 Hours)
Finish Used
Semi gloss Espresso
Recommended Skill Level
Beginner

3rd and 4th Projects - Modern Farmhouse Table w/Benches

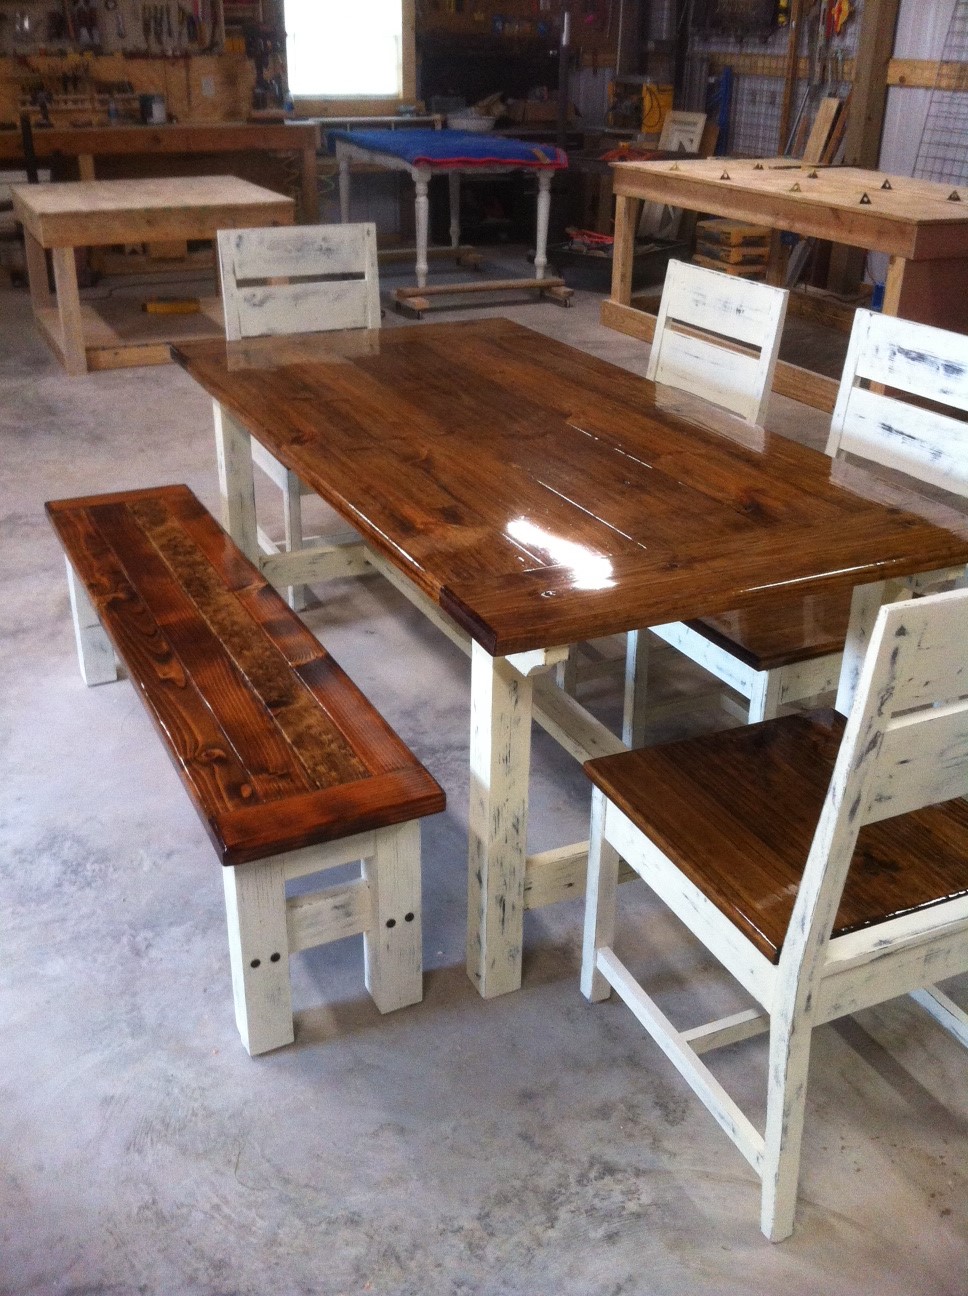
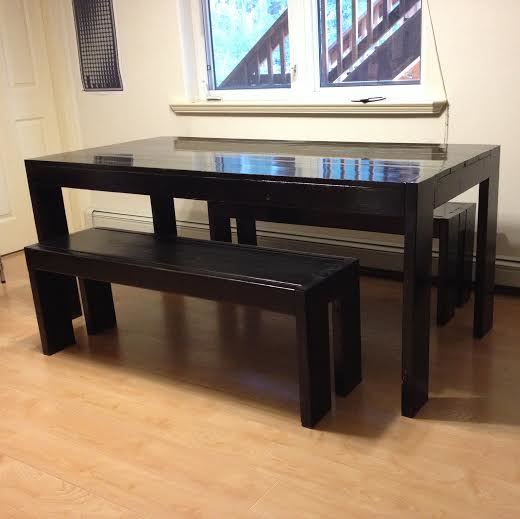
I worked on the benches and table for three weekends. All are finished in Ebony by Rustoleum. I used the non-Kreg plans for the benches and the updated Kreg jig plans for the table. I spent a lot of time at Home Depot selecting straight, flat boards for the table top. I literally dug through all of their 1 x 6's and laid them out on the floor in the store to find a good fit. I finished the benches with three coats of Minwax semi-gloss, and I finished the table with three coats of Minwax gloss. I prefer the higher gloss so I may put a coat of gloss on each bench so they all match. I also put some heavy duty furniture felt on all of the legs so they slide easily across the wood floor without scratching! I've been using a sad hand-me-down table and folding chairs for the past couple of years. I couldn't be more pleased with how this turned out.

I live in Alaska and the lumber for the benches cost about $35. The lumber for the table cost $65. I spent about another $100 on wood conditioner, stain, polyurethane, screws, sand paper and a brush. So all total, I have about $200 invested.

Estimated Time Investment
Week Long Project (20 Hours or More)
Finish Used
Rustoleum Ebony
Minwax semi-gloss (benches) and gloss (table)
Recommended Skill Level
Beginner

Baby Change / Kitchen Island

Submitted by Anonymous (not verified) on Sun, 08/21/2016 - 06:01

Made this baby change for our newborn. Later it can be used as kitchen island or grill table. The top has a removable fence.

Built from Plan(s)
Estimated Cost
70 USD / 60 €
Estimated Time Investment
Weekend Project (10-20 Hours)
Finish Used
Amber linseed oil (Linos Bernstein) for the top and the shelves
White linseed oil (IKEA Behandla) for the frame
Recommended Skill Level
Beginner

2x4 Sofa w/ Chaise and coffee table

Submitted by andrew_w on Wed, 06/03/2020 - 10:25

Just completed this to make the most of the little hot weather we get in the UK. Great plans to follow thank you. Built around a cushion set for a rattan corner sofa which was then filled with 3" firm upholstery foam

Estimated Cost
£200 including upholstery
Estimated Time Investment
Day Project (6-9 Hours)
Finish Used
Ronseal Natural stain
Recommended Skill Level
Beginner

Buffet Table

I built this project with a friend and it took me longer than I wanted, only because I'm new to woodworking and don't know hardly anything about it. After what I thought should only take a couple of hours, I finally completed the Buffet Table for my wife. I thought I was going to complete the whole thing under $250 but I soon learned that things are little more expensive in the small town of Delta Junction Alaska. I think my total cost was $450 but it was well worth it to complete this and finally my wife can put it to some good use.

Built from Plan(s)
Estimated Cost
$450
Estimated Time Investment
Week Long Project (20 Hours or More)
Finish Used
Flat red paint and then blotched a minwax stain on it.
Recommended Skill Level
Beginner

Comments

gprice

Sun, 01/11/2015 - 06:48

How do you go about getting the plans for this beautiful piece of work

mommap7200

Fri, 10/16/2015 - 14:55

Any chance you have plans to make this? I see someone else has something similar to this and I love the style and everything about it, but I don't know how to make plans. Could you please contact me with the plans if you have them? I would LOVE them. Thanks so much.

[email protected] (if you need my e-mail address to send them to me)

Our Reading Couchette

My husband built our daybed and I upholstered it. I made 3 large pillows and the mattress was covered by sewing the fabric as if it were a fitted sheet. This way it can easily be removed for cleaning or swapped out for a regular sheet if our daughter needs to sleep here. We cut the legs off an old table for the front legs of the daybed. We love reading on it and we are so pleaded with how it came out.

Built from Plan(s)
Estimated Cost
$250
Estimated Time Investment
Weekend Project (10-20 Hours)
Finish Used
Black paint and upholstery fabric
Recommended Skill Level
Intermediate

Comments

Leaning Bathroom Ladder Shelf

Submitted by Jminor83 on Thu, 06/20/2019 - 10:53

My wife saw your post for this shelf and knew it would be perfect for our half-bathroom.  She showed it to me and I agreed.  I built it in a few hours one afternoon.  Stained and sealed a few days later and it fits perfectly.  Now we just need to wait (impatiently) for everything to cure so we can actually begin to use it.  We'll try and share another final photo when in full use.

Estimated Cost
Already had all supplies on hand. If I had to price it....
$5 for 2 2x4s (sides)
$10 for 1 1x10 (shelves - ripped to shorter widths as needed)
$6 for 3 1x2s
(+screws/nails/glue/stain/sealer)

Total $21
Estimated Time Investment
Afternoon Project (3-6 Hours)
Finish Used
One coat of stain, followed by two coats of polyethylene. Light sanding with sanding sponge to smooth everything out once dried. Going to wait a week for everything to cure before placing anything on the shelves.
Recommended Skill Level
Beginner

Modern adirondack chairs

Submitted by Anonymous (not verified) on Sat, 06/06/2020 - 12:16

I have built a number of Ana White projects and I just love this one. It was a COVID 19 self isolation project.

Thanks Ana!!

Michele from Canada

Comments

ozblack

Sat, 06/20/2020 - 13:46

Hi JennB,

These chairs were built out of cedar and stained with Minwax Wood Stain - Ebony color. Due to the whole COVID 19 situation I wasn't able to get 1 x 10s so I used 1 x 6s for the seat and back. I think they turned out pretty great!

Seasonal And Holiday

Canned Food Storage

Submitted by Anonymous (not verified) on Mon, 03/04/2024 - 11:46

Made this for my dry closet. Super easy to construct and it works perfect. I just wish there was something similar to use for paper towels.

Built from Plan(s)

Podium for My Wife's Classroom

This is my first try at building furniture. I've built larger things in the past like decks and a fort for my nephews, but never furniture. Even though I used the plans to build the main box, I did change up the bottom and added some new stuff. I added wheels to the bottom my wife could easily move it around her classroom. I didn't want to put a square base on it because I thought it might hit her ankles when she was standing close to it. So I sort-of notched it out to give an opening for her feet and I used some scraps to create a short shelf at the bottom. I also added more trim that the plans call for. I cut strips of the pine plywood for the base molding and topped it with quarter round. I used corner trim for the front corners, the self inside and the bottom notched shelf. I also used screen trim for the back of it. I think it came out nice and I've very pleased with it. I used 2 coats of Minwax PolyShades American Chestnut on it.

Built from Plan(s)
Estimated Time Investment
Weekend Project (10-20 Hours)
Finish Used
Minwax PolyShades American Chestnut
Recommended Skill Level
Beginner

Oak Interpretation of Hailey Platform Bed

Submitted by Anonymous (not verified) on Sun, 08/28/2016 - 06:16

My husband took oak from my grandma's farm from rough cut lumber to the finished product. We started with Crab and Fish's modification of the Hailey Platform Bed plan for a king sized bed, then modified the plan further to meet our needs. Our bedframe splits in half for moveability. We designed the headboard. I think our bed turned out amazing!

Built from Plan(s)
Estimated Cost
$50 for hardware, stain, and poly. Wood was free from my grandma.
Estimated Time Investment
Week Long Project (20 Hours or More)
Finish Used
Stain-Minwax golden oak. Poly-Zar Ultra satin.
Recommended Skill Level
Intermediate

Farmhouse Hall Tree

Submitted by ladybug'13 on Tue, 06/09/2020 - 12:38

I made this design based on some pictures I'd seen online that I liked and the entry bench with drawers. There is one large large drawer for my kiddos to hide their stuff. The back is framed with 1x4s and 1x2s and the horizontal boards are 1/4" tongue and groove. I put lower hooks for the little ones to hang their stuff. I love how it turned out and it really helps contain clutter.

Built from Plan(s)
Estimated Cost
$75
Estimated Time Investment
Weekend Project (10-20 Hours)
Finish Used
Off-the-shelf white paint, varathane briarsmoke then minwax dark walnut stain over, distressed to add that rustic look with poly on everything.
Recommended Skill Level
Intermediate

Cyndi media Console

Used the Cyndi media console plans but changed the doors, and made 2 fold out doors in the middle that drop down for use as a shelf when your going through your dvd's. Used many screws & glue. Think I going to include a trim around the top later, to give it depth.

Estimated Cost
$100
Estimated Time Investment
Weekend Project (10-20 Hours)
Finish Used
Inside Stain Outside paint
Recommended Skill Level
Intermediate

First time builder....

Submitted by Belle on Thu, 05/29/2014 - 05:35

After finding Ana's plans on how to make these outdoor chairs we decided to give it ago one long weekend. The plans are easy to follow and the end result is the most comfortable chairs, we've spent hours relaxing in them. It took 4 hours to make two chairs and the rest of the weekend painting them. The only thing that I would have done differently is to paint the wood prior to assembling the chairs. My partner then decided to use the left over wood to make a matching table (not shown)

Built from Plan(s)
Estimated Time Investment
Afternoon Project (3-6 Hours)
Finish Used
We primed the chair and then used Cuprinal Silver Birch
Recommended Skill Level
Starter Project

Comments

Debbie440

Fri, 05/30/2014 - 15:41

I made this chair too. I was looking at others to get ideas about what kind of cushions to buy. I really like yours.

In reply to by Debbie440

Belle

Thu, 06/05/2014 - 09:01

I hand made the cushions, had to dust off the sewing machine. The foam and the fabric were more expensive to buy than all the wood. We're going to make the two seater sofa next and I'm going to buy pre-made, it's not the same but we live in an isolated area with limited shopping..

Grandy console table

Submitted by Anonymous (not verified) on Tue, 08/30/2016 - 06:39

I bought a piece of remnant silestone for the top.  It was a pretty simple build but the hardware was the hardest part.  Use wheels with bearings and 1/4" flat bar.  Otherwise it was not moving smoothly.  Love the finished product!

Estimated Cost
$400 mostly for the cost of the Silestone
Estimated Time Investment
Weekend Project (10-20 Hours)
Finish Used
Paint
Recommended Skill Level
Beginner