Community Brag Posts

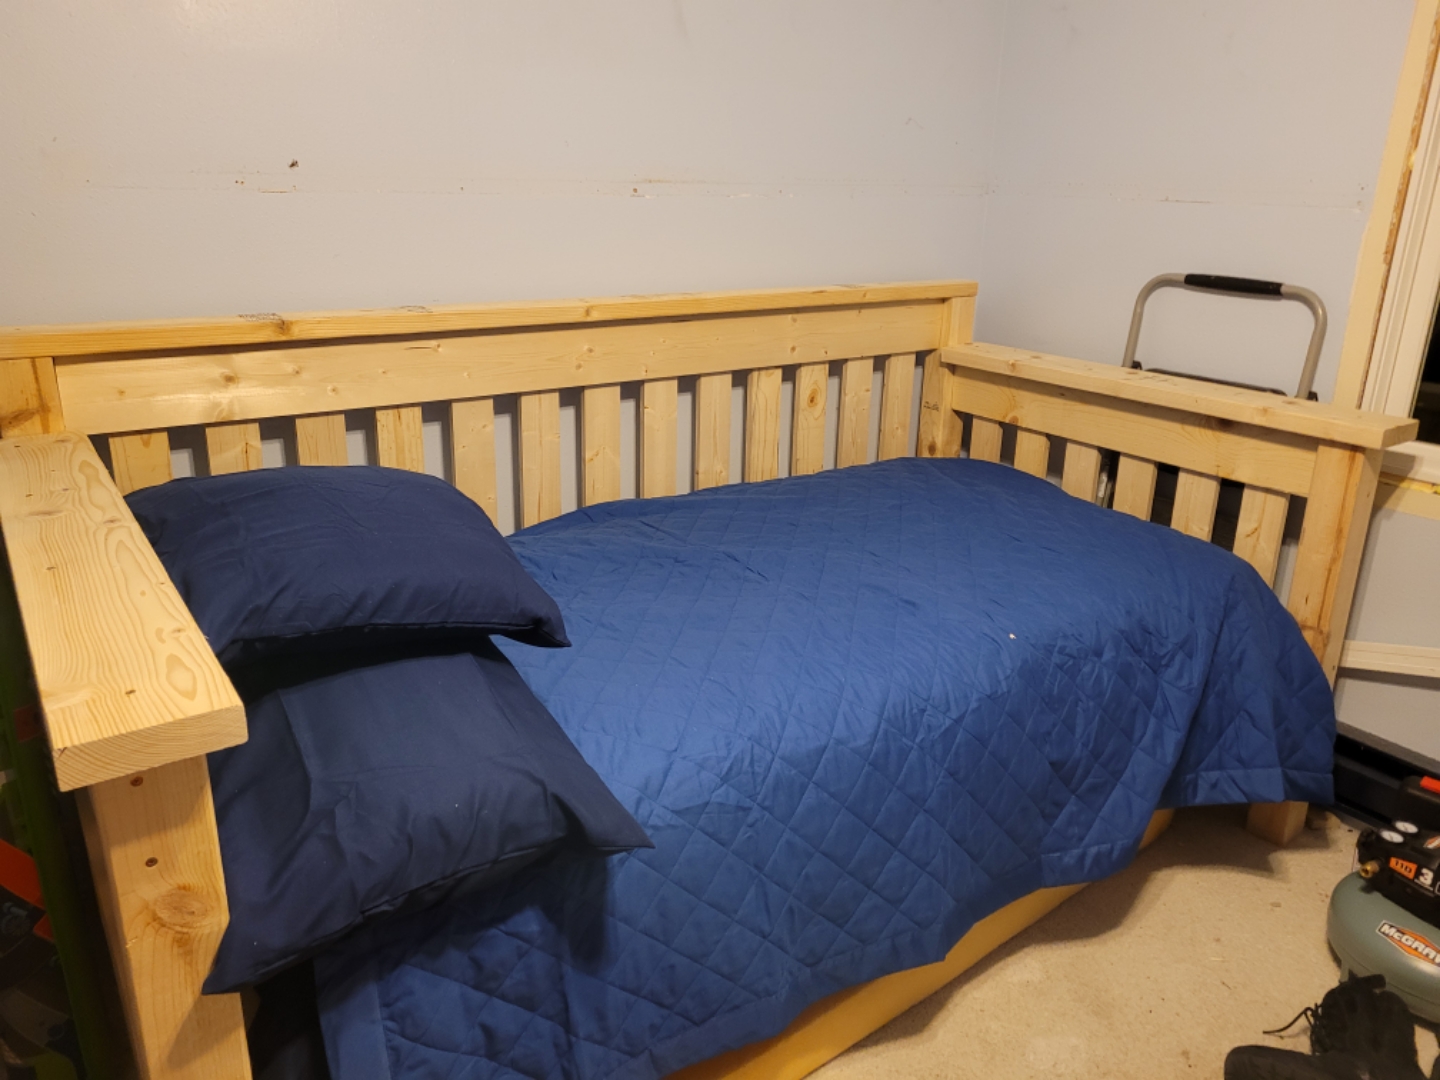
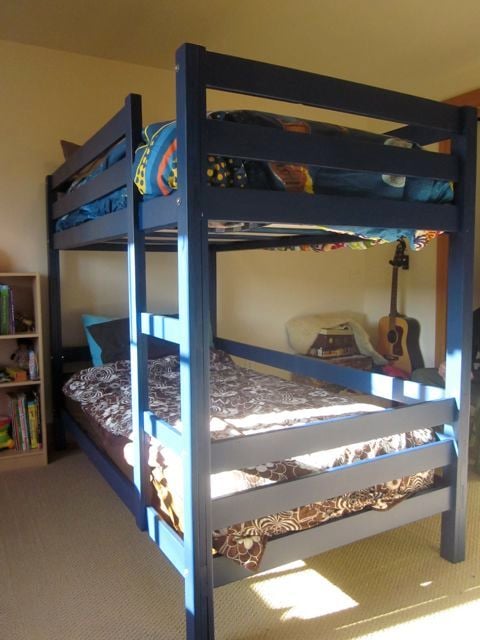
Sweet Pea Bunk Bed (turned Beach House)

I was shopping around for a bunk bed for my 2 and 4 year old girls. I didn't want the standard, cheap metal frame for $200, but I also didn't want to spend $2,000 on a big box store bed (made in China) with a 300% mark-up! I stumbled upon Ana's site and was HOOKED! I found the "Sweet Pea Bunk Bed" and immediately printed the plans.

I was a little hesitant to take on such a project because I am...by no means...a carpenter. I found a few mistakes in the instructions, but was able to work through them. I decided against the tin roof, pergola, and flower boxes, but instead went with a "beach house" theme.

My girls LOVE LOVE LOVE it! They especially love the windows and the little shelf where they can put their favorite toy at night when it's time to sleep. I also let each of our kids (plus mom and dad) put hand prints on the rails of the upper bunk so my daughter on the bottom bunk has something to look at. Added a push button light too.

My adivce to anyone thinking of doing this bunk bed: Read through the instructions thoroughly first. Do NOT take shortcuts. Cut, sand and paint EVERYTHING before assembling.

I work full-time and take a few night classes (for fun), so this project took me 4 weekends to build (including a 3-day weekend, thanks to a holiday). Enjoy!

Estimated Time Investment
Week Long Project (20 Hours or More)
Finish Used
Paint
Recommended Skill Level
Intermediate

Comments

ewalshwray

Mon, 07/08/2013 - 19:33

Great job! It's super cute, I bet your girls love it. I love the blue and green paint colors.

Bench and side tables

Submitted by torito on Tue, 06/30/2015 - 11:27

Bench was made using the plans on the site. I modified the plans to create these accompanying 15" x 15" side tables. cut list for each table:

7 2x4 at 15" each (stained for the top part of the table).
4 2x4 @13 1/2" each (for legs)
5 1x4 @ 15" each (used for the top of the table)
2 1x4 @ 8" each (used for the top of the table)
4 1x4 @ 17" each (for legs)

Time varies depending on if you cut, sand, stain, and treat the lumber for outdoor use. The estimated time below is does not include time for the stain/weatherproof treatment.

Estimated Cost
1 table: $10 - $15
bench: $45
Estimated Time Investment
Weekend Project (10-20 Hours)
Recommended Skill Level
Beginner

Comments

moon369

Sun, 08/02/2015 - 14:08

Love your color scheme. I'm going to attempt making this bench. Did you use both glue and nails and if you used nails, where did you nail it in and did you try to hide the nails later? I'm a complete nubie in terms of wood work. Thanks!

8 foot long shelf with a little twist

Submitted by Daniel_ram on Mon, 01/03/2022 - 17:25

I just made this shelf using 2x4s 8 ft long wood. It is very strong and looks great. My garage size required the shelf to be max 16 in deep, so I used a 1 plywood sheet divided by 3 equal parts for the upper 3 shelfs. Since I made a 4th shelf, I used 3 1x2s for the 4th bottom shelf instead of a new plywood sheet and avoided having extra 2/3 of the sheet around and also saved like 30$ since the 2x1s were only 2$ea. That touch makes it look a bit stylish too so a win win. If you do that, here's a tip: use the outer 2x4s as rails - make sure that the cleats on the lower shelf are placed a bit lower ~ 1in. In such way, you can place the three 1x2 rails at the same level as the outer 2x4s and this you end up having 5 rails total in the shelf. Do use the wooden screws with star head if you can, they were muuuuuch easier to use compared with the regular ones. Note, this shelf is very strong, probably too strong for my needs. For a 8ft long, and my storage needs (camping, Christmas stuff, other lighter things), I'd probably use 2x2s instead of 2x4s. That would save costs, specially since wood isn't cheap these days( I spent ~$150 in materials Jan 2022).

Comments

30inch Simple Stool

I'm doing a lot of projects in the shop this summer (starting with planing 240 fence pickts :S) and so I decided that this stool would be an excellent edition (better than plastic chairs) to the shop.

I increased the length of the legs to 30 inches (from the plan length of 23) and its quite solid with the increase.

I don't have a miter saw, so I did this with my table saw and the outcome was very good. Be sure you use a square to make sure your miter gauge is calibrated before making the cuts.

I used 1x2 and 2x2 (2) furring strips from orange that cost $3.12 and $1.47 respectively. I had some 1x12 scraps around and trimmed one down a bit and glued/screwed 1x2s on either side to make it wide enough.

I didn't fill the holes because filler is a bit pricey for the shop stool.

I think I'll make a round top for it eventually, but for now it does just fine.

Built from Plan(s)
Estimated Cost
$6.50
Estimated Time Investment
An Hour or Two (0-2 Hours)
Finish Used
Two coats of an interior paint I had in the closet.
Recommended Skill Level
Beginner

Comments

A-Frame Chicken Tractor

Submitted by Tonya P on Tue, 07/09/2013 - 19:46

New to raising chickens, but eager to jump right in to it.
We bought a pre-made coop for the main home for our new chicks and it's very nice, not something I could do myself since I'm not yet at that level, but I saw this chicken tractor and thought it would come in handy for what I have in mind so I made up my mind to build it.
The lumber, chicken wire, staples, and wheels are all store bought new and came to about $75. The materials we had on hand were the screws, hinges, plastic coated metal shelving (used in the nesting area, I thought that would make it easy to clean), paint, and the corner piece of vinyl siding for the roof cap (hubby's brilliant idea, and I painted it green with spray paint for vinyl).
I did not try to build it quickly, I don't really know how much time it took me, but if I had to guess I'd guess total time would amount to about 3 afternoons, by myself.
I wanted to leave the top on the one side open with the option to slap on the other boards if/when the need arises. I have the other t1-11 panels that can sit right in those areas because I stapled the chicken wire in a way that would allow it.
I also added a flip up panel as seen in the pictures for access. I didn't want a small door that I would have a hard time getting to things in there. I'm so glad I added this feature, it sure gives plenty of room for me to maintain the food and water dispensers as well as get in there and catch the little chickies :)
I wanted it green to blend into the wooded background in our backyard. I didn't want to take any beauty away from the cedar greenhouse and fencing we added last year, and this tractor would be moved from time to time and I felt this green that we had on hand was perfect to help it blend in rather than stand out.
This thing is heavy! I have a hard time moving it around and usually need my husband to move it so I won't hurt myself. I am considering some options... I don't like the rope I have on it to pull it, any suggestions would be appreciated.
As with the other items I've made with Ana's plans, this was fun and pretty easy to make. I love this site! Soon I will take on my next project, I've bought and gathered the materials, I'm anxious to get started :)
Thank you for looking :)

Built from Plan(s)
Estimated Cost
$75 - $85 for the new materials listed
Estimated Time Investment
Weekend Project (10-20 Hours)
Finish Used
Green exterior paint we had on hand.
Recommended Skill Level
Intermediate

electronics geek mantle and built in's with toy boxes.

Well as any parent knows children have a lot of toys and pretty much take over every room in the house. Children also have fixation with pushing any button they see. So with that in mind I had to get creative. So one day while on break from work I walked next door to home depot (a bad and expensive place for me to work next door to) I walked by the discarded wood pile that is all 70% off like I normally do. Well to my surprise they had 20 10ft 1x12's sitting there. Some had dings and minor splits but I jumped on it and scored them all for $125.00. So when I found the time I started with building my bookcases with built in toy boxes then tore down that crappy old mantle that was up over the fireplace and got to work on a new one. We are mounting the TV over the fire place so I had to get creative and figure out (here comes my geeky side) where I was going to put my fairly large center channel speaker for my surround sound. well as you can see I just decided to build around it. I think it came out pretty cool and my little girl loves her toy boxes. I'm also happy I can now raise all my electronics out of the reach of curious little fingers.

Estimated Cost
$125.00
Estimated Time Investment
Week Long Project (20 Hours or More)
Finish Used
high gloss white latex paint
Recommended Skill Level
Intermediate

Vanity

Submitted by Anonymous (not verified) on Sat, 01/15/2022 - 18:01

Wanted something different, thought it came out ok..

Built from Plan(s)

Comments

Princess Castle Loft Bed

Submitted by Mageiweb on Thu, 07/11/2013 - 18:27

My Husband built this bed in about two weeks time (in addition to working 70+ hours at his real job). This past week I have helped with all the painting and decorating. As you can see he modified the plans to omit the slide. We hung soft white rope lights under the bed to illuminate the inside of the castle. My husband paired the rope lights with a remote control light switch so our daughter can turn them on and off safely. We are incredibly pleased with the results of our hard work as well as our sweet Natalie! Thank you Ana White for this amazing site of yours!!! My husband has also built from your site the clubhouse loft bed (PBK version) for our son, a computer desk, as well as the rustic X console table for me!!! We LOVE your site!!!! Thank you again!!!

Estimated Time Investment
Week Long Project (20 Hours or More)
Finish Used
Satin finish, paint and primer in one
Recommended Skill Level
Intermediate

Kids desk area

Submitted by Morg3148 on Tue, 07/07/2015 - 10:26

Here's the kids new desk area that I built. One desk for each kid, one Mac for each kid.

Estimated Cost
$50 per desk
Estimated Time Investment
Afternoon Project (3-6 Hours)
Finish Used
Stain, poly
Recommended Skill Level
Beginner

Daybed with Storage Trundle

Submitted by Crafty-Mom on Sat, 01/27/2018 - 10:38

This was my first project from Ana's website and I'm hooked! I'm a beginner, but thank goodness for my Dad's help because I have a lot of learning to do!

I wanted the drawer to be 1 drawer instead of 3. I feel like it looks cleaner (without having to adjust 3 drawers constantly to make it look good when you push them in). I was thinking the bed could actually be used as a trundle bed in the future too! I use this to store toys right now and it is Awesome!

I increased the bed size to fit a twin mattress and increased the height of the bed slightly so that the drawer would be a little bit deeper. We also added a back to the bed and carried around the trim to make all sides look the same. We added a bumper to the back and sides of the inside of the bed so the drawer is easy to push in and fits in snug. Finally we reinforced the bottom of the drawer with more 1x4 boards so that if a child does sleep in it, it would be more sturdy. I now have kids come over and jump into the drawer (literally) and I'm glad we reinforced it.

The changes we made did add to the cost and our time (as well as being newbies), but I think it's worth it and the bed turned out beautiful!

Estimated Cost
$180
Estimated Time Investment
Weekend Project (10-20 Hours)
Finish Used
Behr Marquee (I'll have to find the name of the white color we used). We almost went with chalk paint, but after talking to the HD guy, he talked me into this paint and I'm glad we used it! So much cheaper and turned out beautiful.
Recommended Skill Level
Beginner

Comments

Nisssc

Mon, 10/12/2020 - 07:51

This looks great! Any suggestion if I want cubbies instead of a trundle? Also, cubbies only on side as bed would be against the wall. Thanks for the inspiration!
Sandy

Michael Collection Bookcase Unit

Submitted by DTeague on Fri, 05/20/2011 - 08:43

Couldn't wait to show it off, I'll post another picture when I have it in the room! This goes with the Michael Collection twin platform bed. The open area you see will be covered by the bed. Its a bit dusty still and the top isn't completely finished but I'm so excited how it has turned out!

Estimated Cost
$75.00
Estimated Time Investment
Week Long Project (20 Hours or More)
Finish Used
Minwax Red Mahogony and Minwax Clear Satin Wipe on Poly
Recommended Skill Level
Intermediate

Sturdy Workbench Modified

Submitted by Seth on Sat, 07/13/2013 - 21:55

This is a modified version of the sturdy workbench. I made it six feet long, about three feet wide (I can't remember exactly), and 36'' high. Since I'm 6'2'', I needed a bench that didn't keep me constantly bending over.

I used Douglas Fir framing lumber and 3/4'' plywood for the surface. The plywood was a cheap replaceable option since hardwood is extremely expensive in my area. The wood warped a bit after I built it, so its clearly not perfect. But who cares, its a workbench after all...

I used left over paint / stain I had laying around in the garage. The gray is a custom mix interior paint, and the stain is Minwax Golden Oak. I used 1 coat of stain, and three coats of Poly.

Built from Plan(s)
Estimated Cost
$100
Estimated Time Investment
Afternoon Project (3-6 Hours)
Finish Used
Minwax golden oak 1x, conditioner 1x, and poly 3x.
Recommended Skill Level
Starter Project

Comments

Build to suit your needs.

Submitted by a179603 on Sat, 07/11/2015 - 09:32

First, if you don't have one, the pocket hole jig is the only way to go. I spent years cutting dado slots for shelves. What a game changer. I stayed with the over-all dimensions of the Dawson Media Console. Like so many, I made the inside areas fit our current and future needs. I could not be more pleased. Oh, I invested in an HVLP fan  sprayer for this. Again...how did I not already own this? The project turned out perfectly. From fit to finish it's excellent.

Finish Used
Used Martha Stewart black chalk paint. No wax stain underneath. Sprayed 3 coats of Minwax oil based poly. Sanded with 800 grit paper between coats. Used seeded glass in doors.
Recommended Skill Level
Intermediate

Mission style daybed

Submitted by Anonymous (not verified) on Sun, 01/30/2022 - 17:25

I made two foot boards for the ends and stretched the headboard for back. I also made the corner posts longer to accommodate a trundle bed underneath.

Built from Plan(s)

Comments

Classic Bunk Beds in Blue

My neighbor needed bunk beds and was fustrated that she couldn't find what she wanted for under $500. She knew that I built my entertainment center and asked for my help.

We picked out the classic bunk beds because they came apart in to small pieces that would be easier to handle since we live in three floor townhouses. She also really liked the ladder that didn't take up more floor space.

Building was fairly straight forward. It was a little hard to read the direction at times, so we had to depend on the photos at times.

The best part is that we spent under $150 for supplies not including the bedding and mattresses. That is a screaming deal.

Thanks for posting this plan. It turned out great.

Built from Plan(s)
Estimated Time Investment
Week Long Project (20 Hours or More)
Finish Used
Blue Paint
Recommended Skill Level
Beginner

reclaimed wood table

Submitted by lisaw on Mon, 07/15/2013 - 17:55

We took apart our old rotting picnic table, saved what wood we could salvage, sanded it all down and had enough wood to build this table. We added an extra board for the tabletop to make the slats sit closer together. It was easy to put together and would have taken less than two hours had it not been for all the sanding we had to do. Now we have a sturdy outdoor coffee table for our patio.

Estimated Cost
0
Estimated Time Investment
Afternoon Project (3-6 Hours)
Finish Used
We did not sand all the old finish off completely so we could keep that "reclaimed" look. We then brushed on a teak oil finish that has a hardener in it to protect the table from the elements.
Recommended Skill Level
Starter Project

Bookshelf

Loosely based on a few different plans found on internet and books, made this bookshelf out of oak plywood and oak boards.  

Estimated Cost
$300? Can't really remember
Estimated Time Investment
Week Long Project (20 Hours or More)
Finish Used
Minwax Red Oak stain
Recommended Skill Level
Intermediate