Community Brag Posts


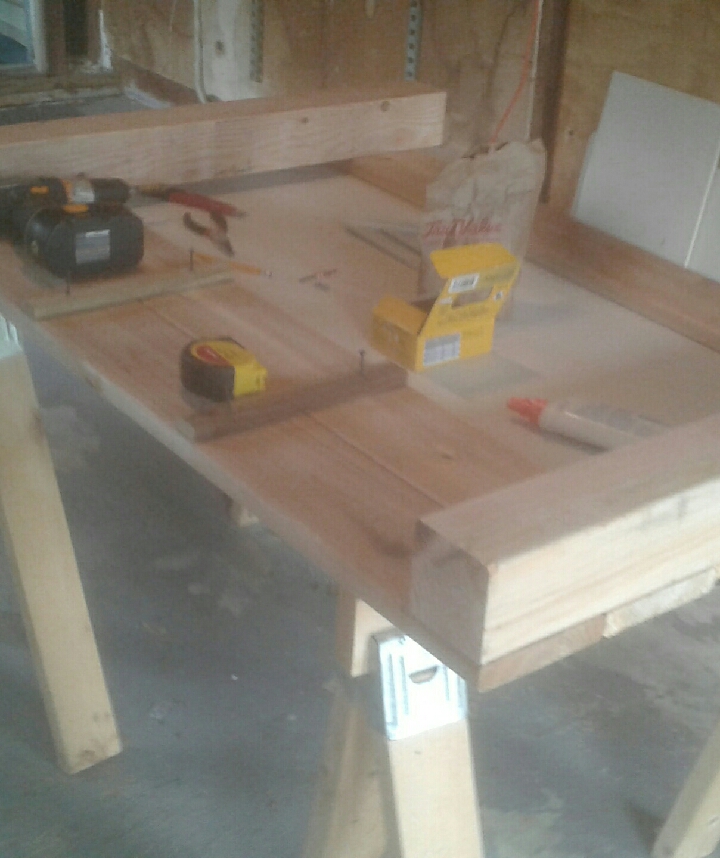
Workbench
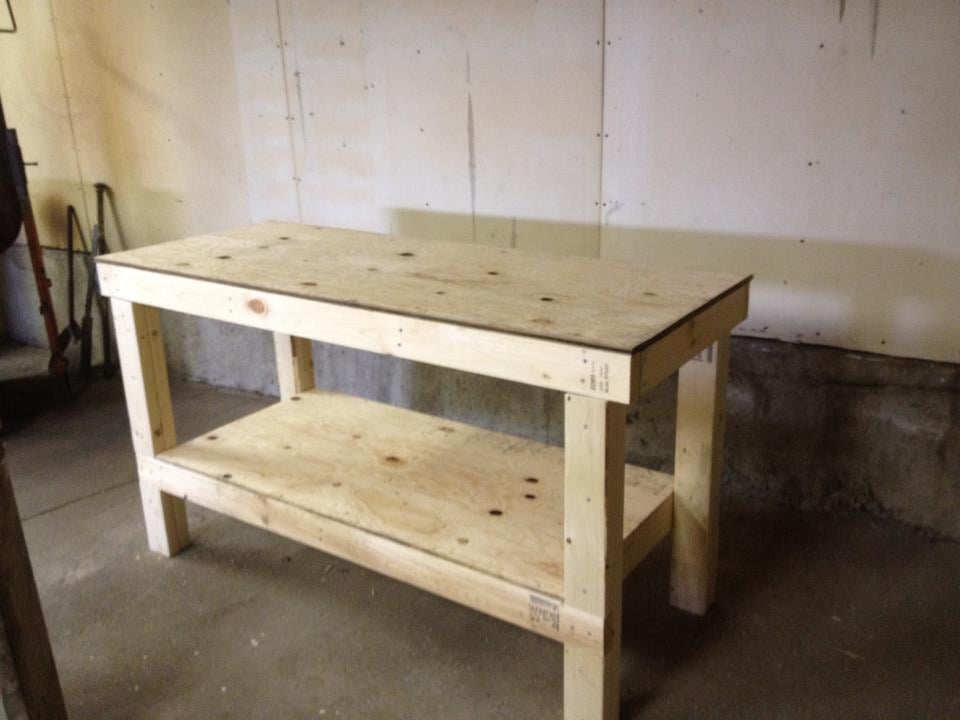
Easy to build! Took about 3 hours!
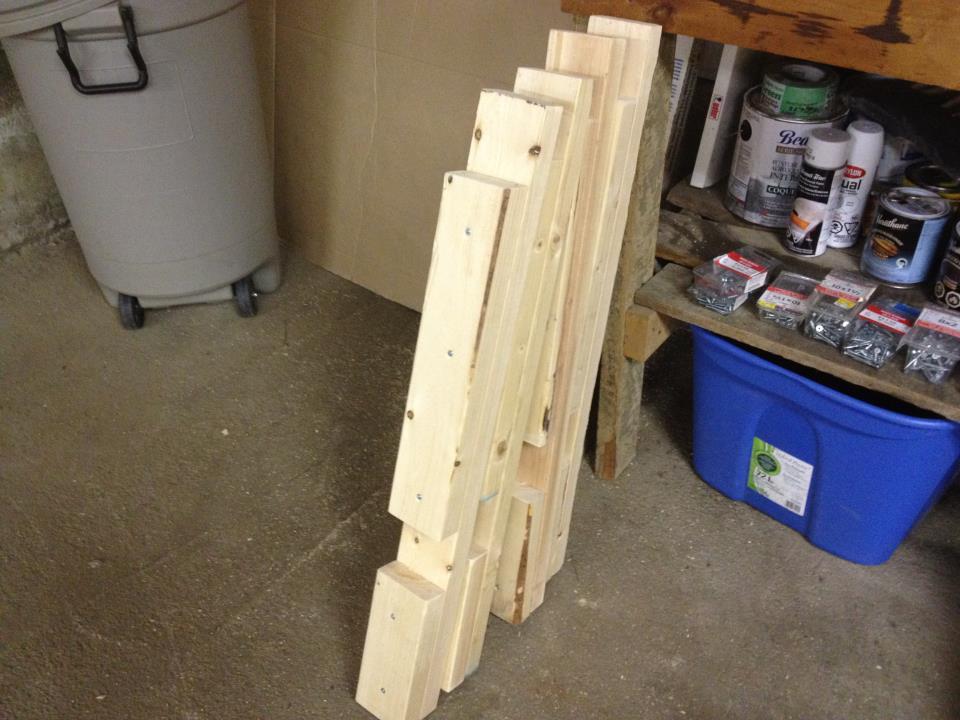
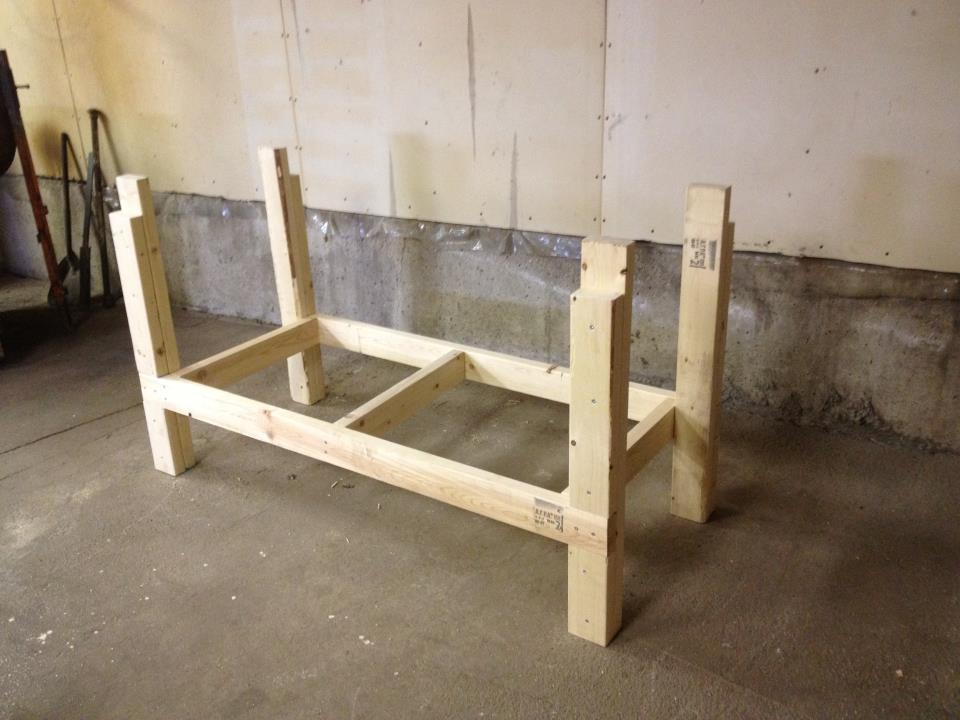

Built from Plan(s)
Estimated Cost
$75
Estimated Time Investment
Afternoon Project (3-6 Hours)
Finish Used
Floor Verathane
Recommended Skill Level
Beginner
Comments
Sat, 05/19/2012 - 05:15
Great Workbench
This is fantastic, just what I need to build. Would you mind sharing some measurements such as height, width and depth.

In reply to Great Workbench by deannaf
Sat, 05/19/2012 - 16:58
Dimensions
I think all the dimensions were in the pattern.
Mon, 05/21/2012 - 05:19
oops thanks I feel a bit
oops thanks I feel a bit embarrassed. Going to the plan now, thanks for sharing your awesome build
Counter Height Garden Boxes

Used 36 inch legs instead of 32".
Also used two 6x1 inch boards for each side of the box.
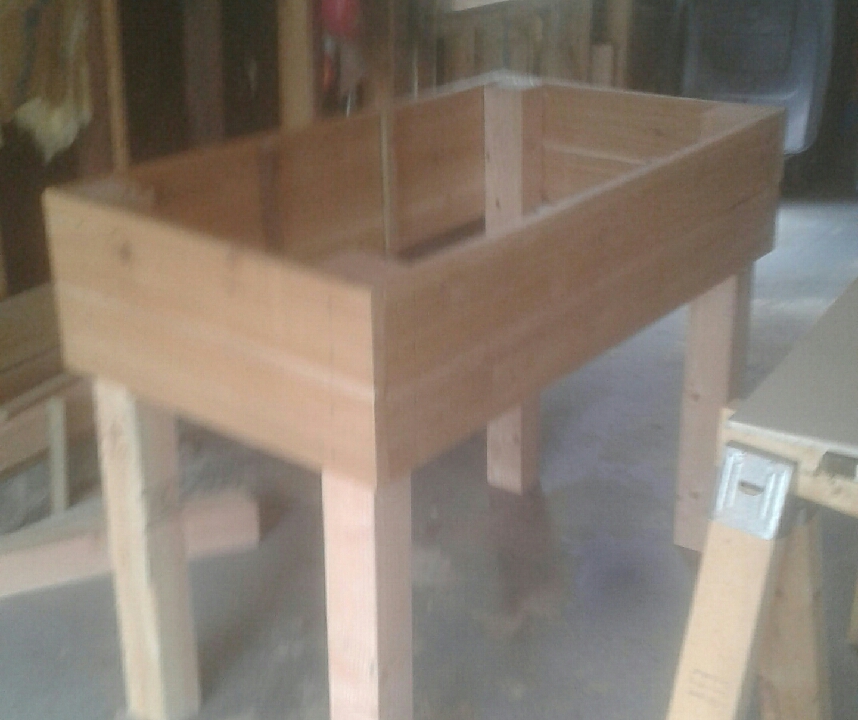

Built from Plan(s)
Estimated Cost
$100 a box
Estimated Time Investment
Afternoon Project (3-6 Hours)
Recommended Skill Level
Beginner
Potting Bench/Stand
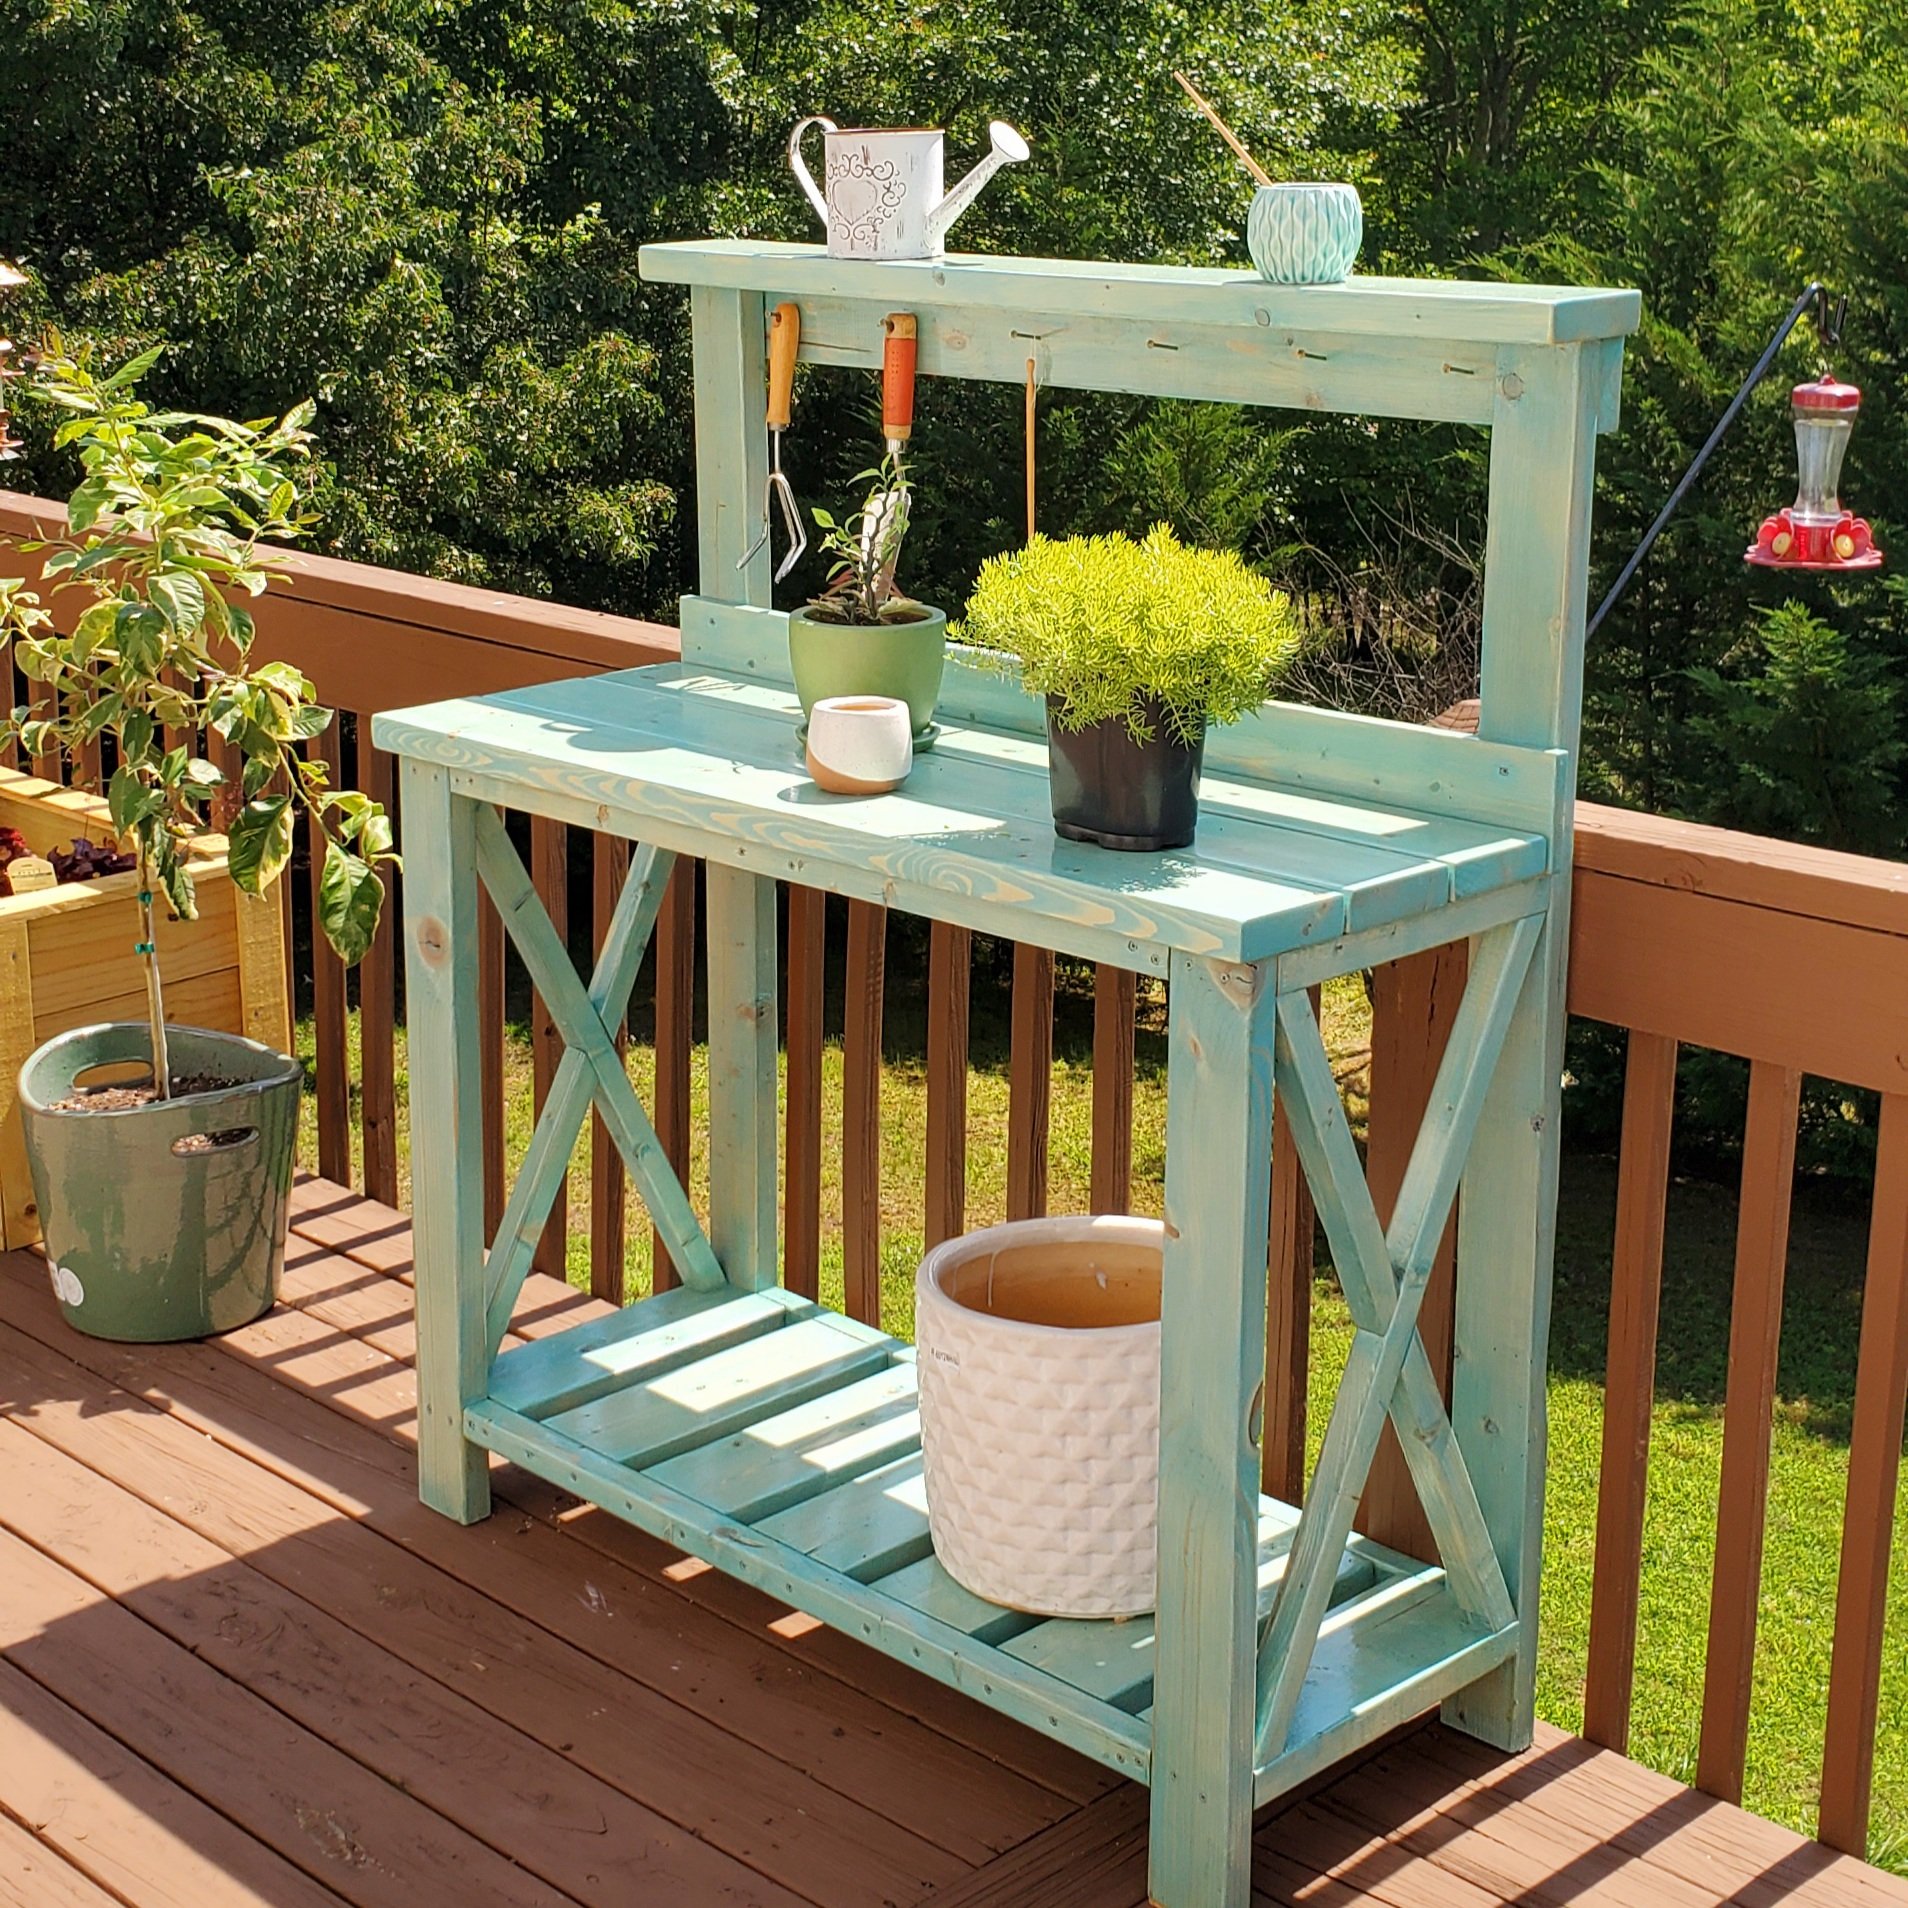
Built this for my girlfriend's birthday present. Added a 1x4 backsplash and a 2x6 for the top shelf to give a little more shelf room instead of the 2x4 called for in the plan. Stained with Varathane "Vintage Aqua" color and then 3 coats of Helmsman Spar Urethane for outdoor durability. Set the whole thing on caster wheels (not pictured) so she can move around the deck as needed.

Built from Plan(s)
Estimated Time Investment
Afternoon Project (3-6 Hours)
Finish Used
Varathane Vintage Aqua
Helmsman Spar Urethane
Helmsman Spar Urethane
Recommended Skill Level
Intermediate
Seasonal And Holiday
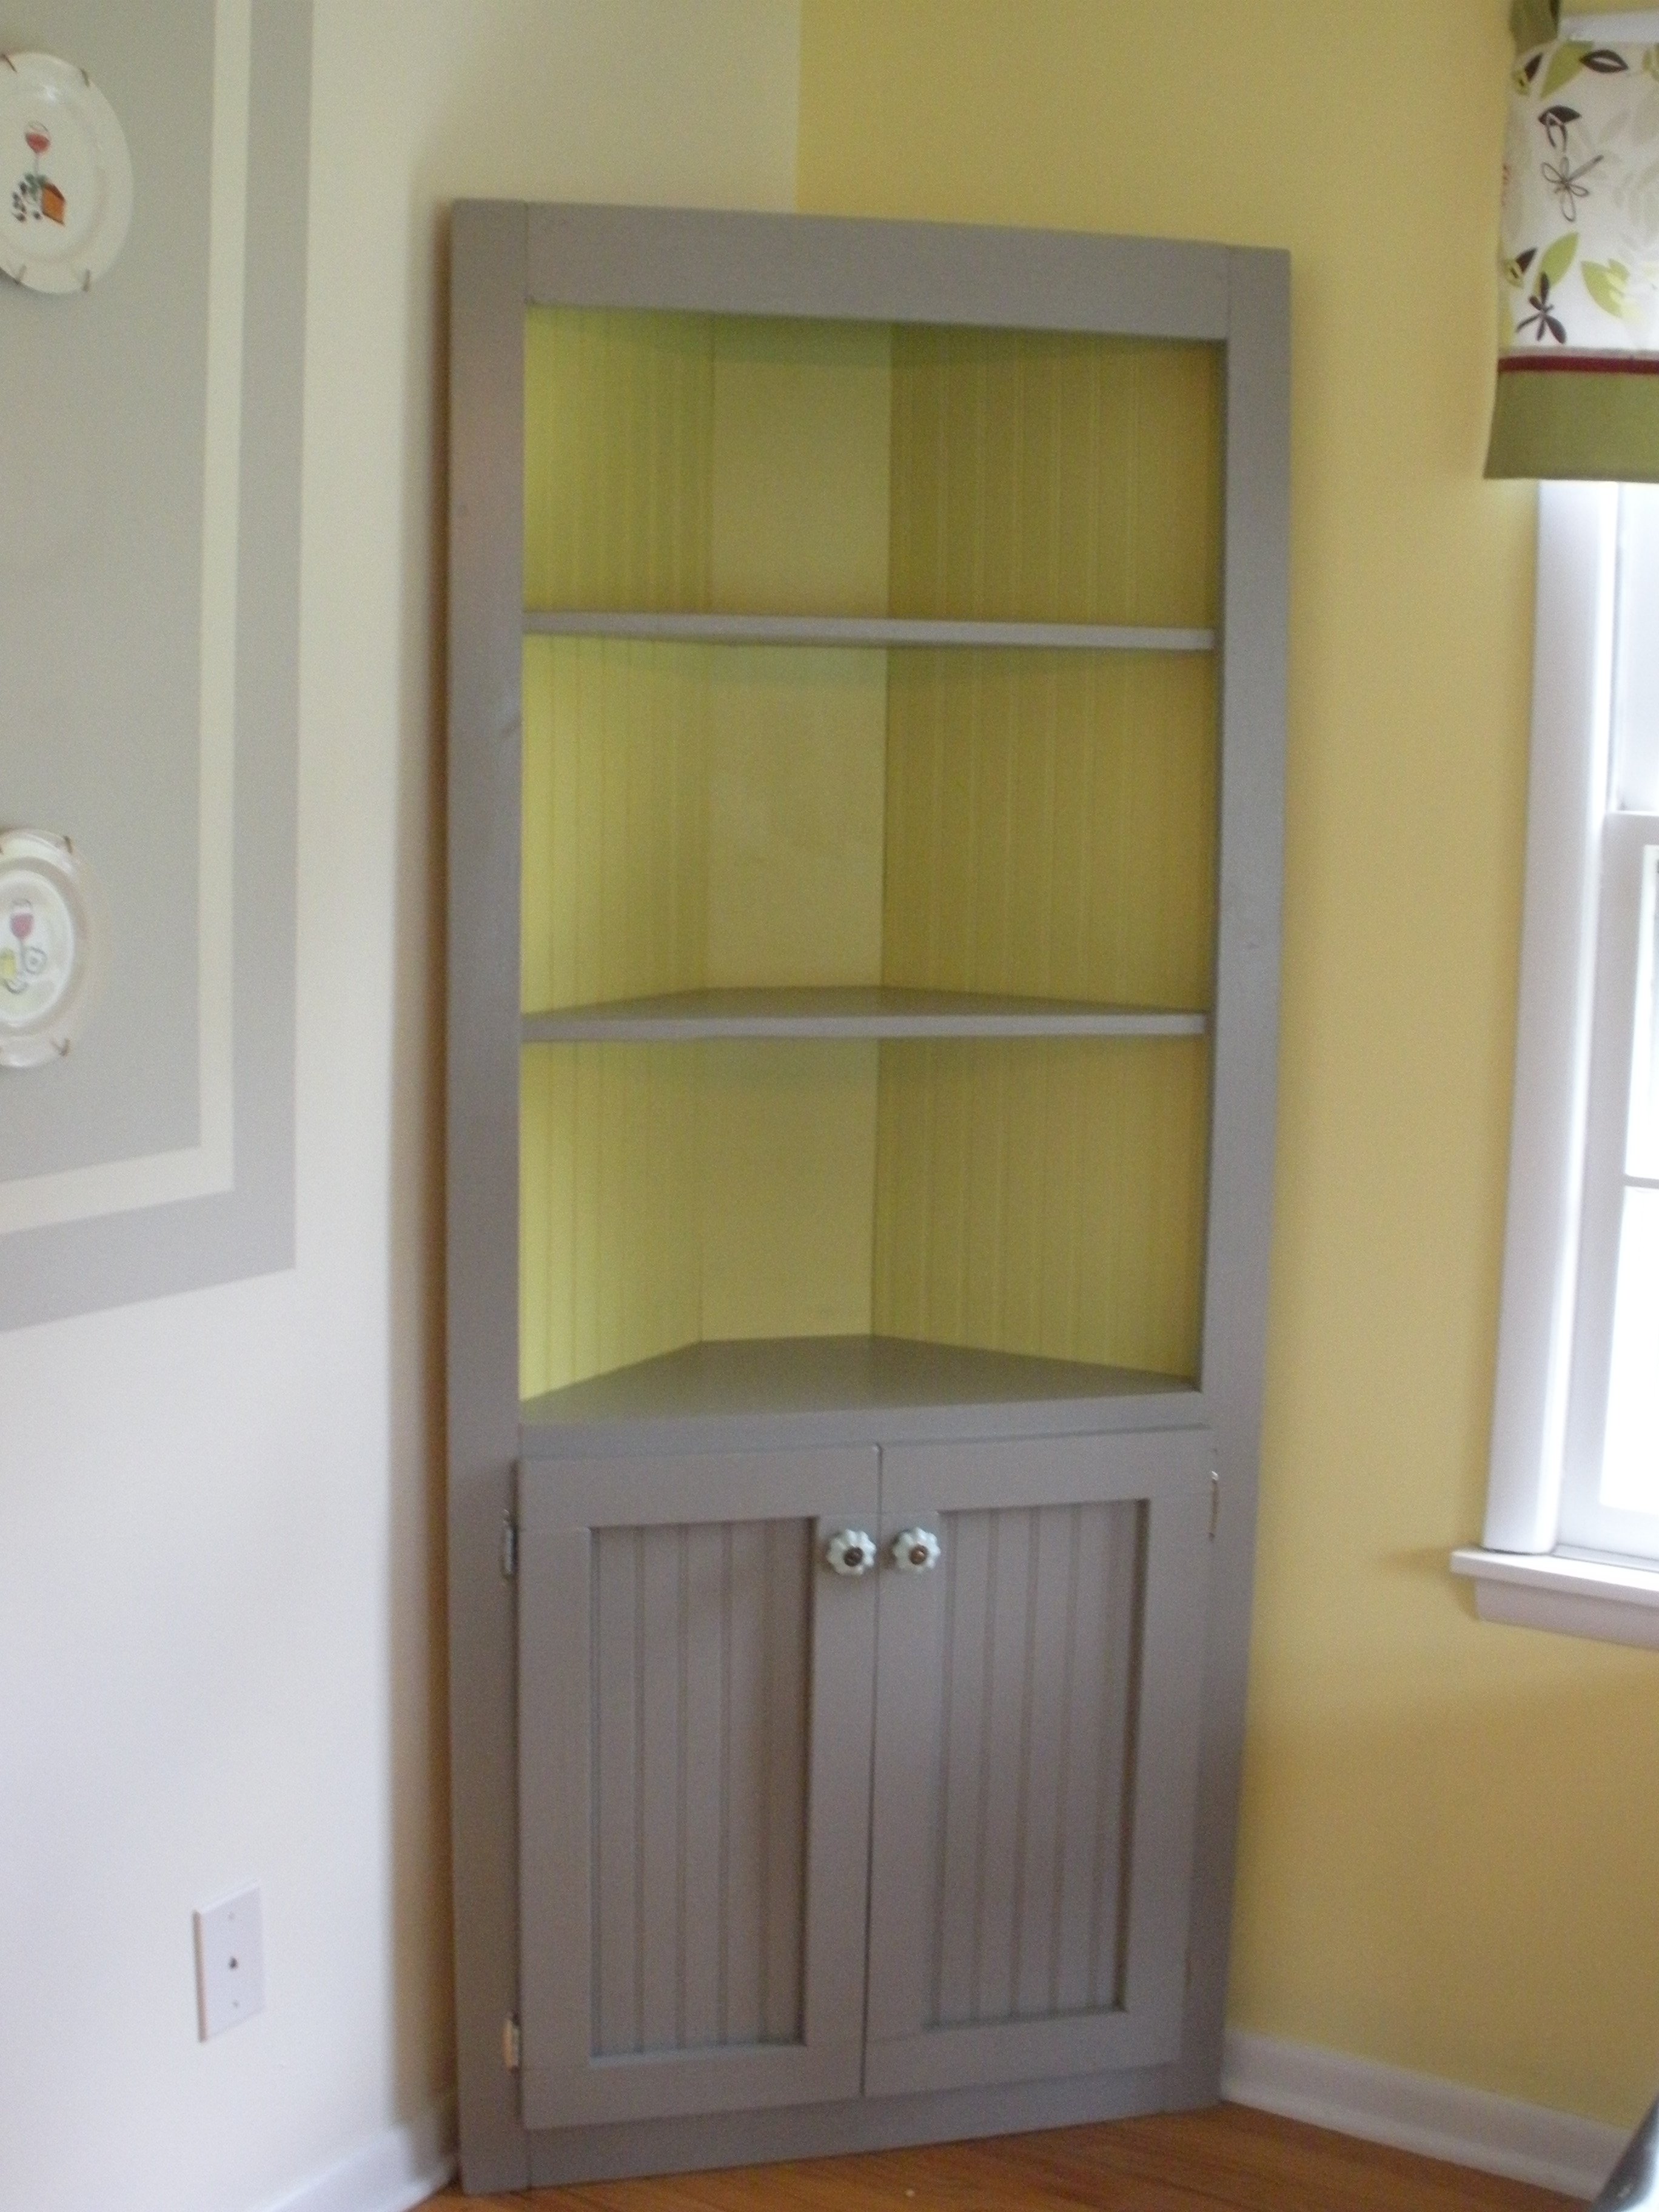
Corner Cupboard

Estimated Cost
100$ before paint/hardware
Finish Used
White Paint
Recommended Skill Level
Intermediate
Rectangular Industrial Coffee Table

I modified this plan from square to rectangular to fit my space. It is exactly what was needed! Modified size: 27.5" x 55"

Built from Plan(s)
Estimated Time Investment
An Hour or Two (0-2 Hours)
Finish Used
Minwax Polyshades Black
Matte Poly top coat
Matte Poly top coat
Recommended Skill Level
Beginner
Comments
Sat, 11/07/2020 - 11:19
Love the rectangle version!
Looks perfect in your space! Thanks for sharing:)
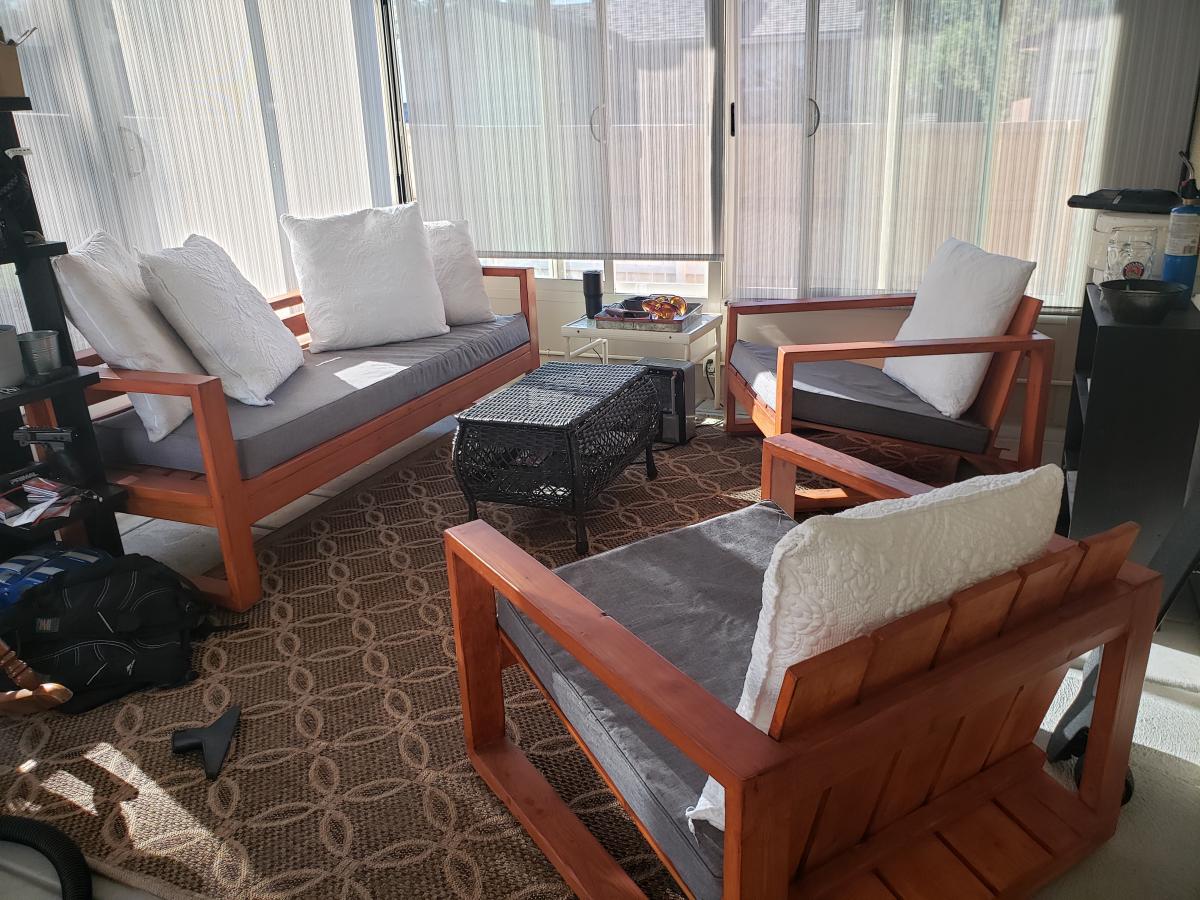
2x4 sofa and chairs

Well, I had just bought a house. We had no furniture for our sunroom, so I took it upon myself to build some while materials were still cheap.
Hindsight, the chairs rear end should have been a level seat instead of trying to build an Adirondack style club chair. I modified the ends to match the modern style so they would match the chairs.
The sofa turned out great, all are solid and built with pocket screws. Sealed with redwood deck sealer, should last forever!
For the covers, we had them made from covers and all, and went to the local Joann and bought 4" thick foam.and wrapped it with with polyfill. Can't tell that they were made in a backyard, but they've been great for 18 months so far!

Built from Plan(s)
Comments
Cute corner cabinet!
This project took me the majority of a three-day weekend to complete, but it was well worth it! I had the lumber store cut the beadboard panel for me so that it would fit in my car. This was also the first time I built something with doors on it, which was a bit of a learning curve, but came out alright in the end. I used pocket holes to build the face frame, and attached the shelves to the frame first before attaching them to the 1x8 back. I used 1 1/4" pocket hole screws and 2" wood screws. I left off the trim at the top and didn't bother to cut out the footer, but I think it still looks pretty cute.


Built from Plan(s)
Estimated Cost
$110
Estimated Time Investment
Weekend Project (10-20 Hours)
Finish Used
Accent color: Appletini from Valspar
Main color: Earthy Mushroom Taupe from Glidden
Everything was given a good sanding and a healthy dose of primer before painting.
Main color: Earthy Mushroom Taupe from Glidden
Everything was given a good sanding and a healthy dose of primer before painting.
Recommended Skill Level
Beginner
Comments
A bathroom cabinet for all that stuff!
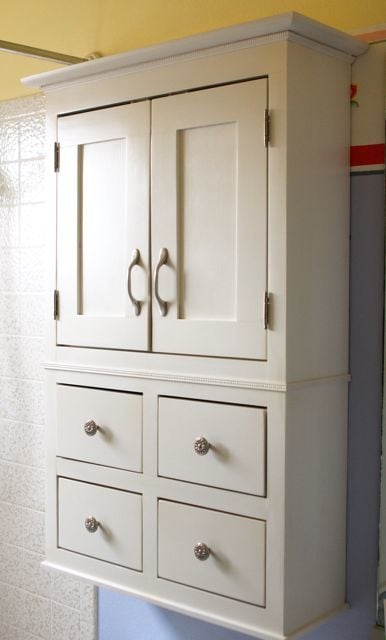
Overall measurements: 24x40. I followed the same basic steps as the nursery armoire, but on a much smaller scale and with a 1x3 added to the back for hanging the cabinet on the wall. I sketched this out on my own and built it to fit above the toilet in my girls' bathroom.
For the first time, I used my table saw to route a space for the 1/8" MDF cabinet backing and drawer bottoms. I will probably use the same method again, but the MDF has to be absolutely square for it to work.
Also a first for me, I used a shelving jig to drill perfectly spaced shelf pin holes on the inside of the cabinet. I love the jig and the accompanying drill bit (from Woodcraft -- orange and blue do not carry it) and I'm looking forward to using it a lot more in the future.
The white latex paint finish is covered in Krylon "crystal clear" spray, which is (sadly) not actually crystal clear. I really like its durability and ease of application (re-coat after only one minute!), but will only use it on darker colored projects in the future. I'll have to sand, paint again, and recoat with my old standby, Minwax Polycrylic, to get rid of the yellow tones in the "crystal clear" Krylon spray.
Built from Plan(s)
Estimated Cost
$125
Estimated Time Investment
Weekend Project (10-20 Hours)
Finish Used
Spray primer followed by Sherwin-Williams ProClassic semi-gloss white (which I applied in several thinned coats). Krylon not-so "crystal clear" topcoat.
Recommended Skill Level
Beginner
Charcuterie Board

Made a this for my step-daughter and her husband for Christmas. Love your projects, and am learning to do everything on my own which is so empowering thank you for sharing and encouraging all us girls we can do it!

Built from Plan(s)
Comments
Playhouse

A fun project that my girls loved. Through a flat sheet on top for fun!
Built from Plan(s)
Recommended Skill Level
Beginner
Small Space Sewing Table

I had so much fun building this and has already proven to be helpful. Thanks for the wonderful plans! Can't wait to begin my next building project for this small space.

Built from Plan(s)
Estimated Cost
70.00
Estimated Time Investment
Weekend Project (10-20 Hours)
Finish Used
Using for storage of sewing machines and cutting materials and mats.
Recommended Skill Level
Beginner
Love this!!! Thank you!!!
This was a fun family project! Thank you!!
Built from Plan(s)
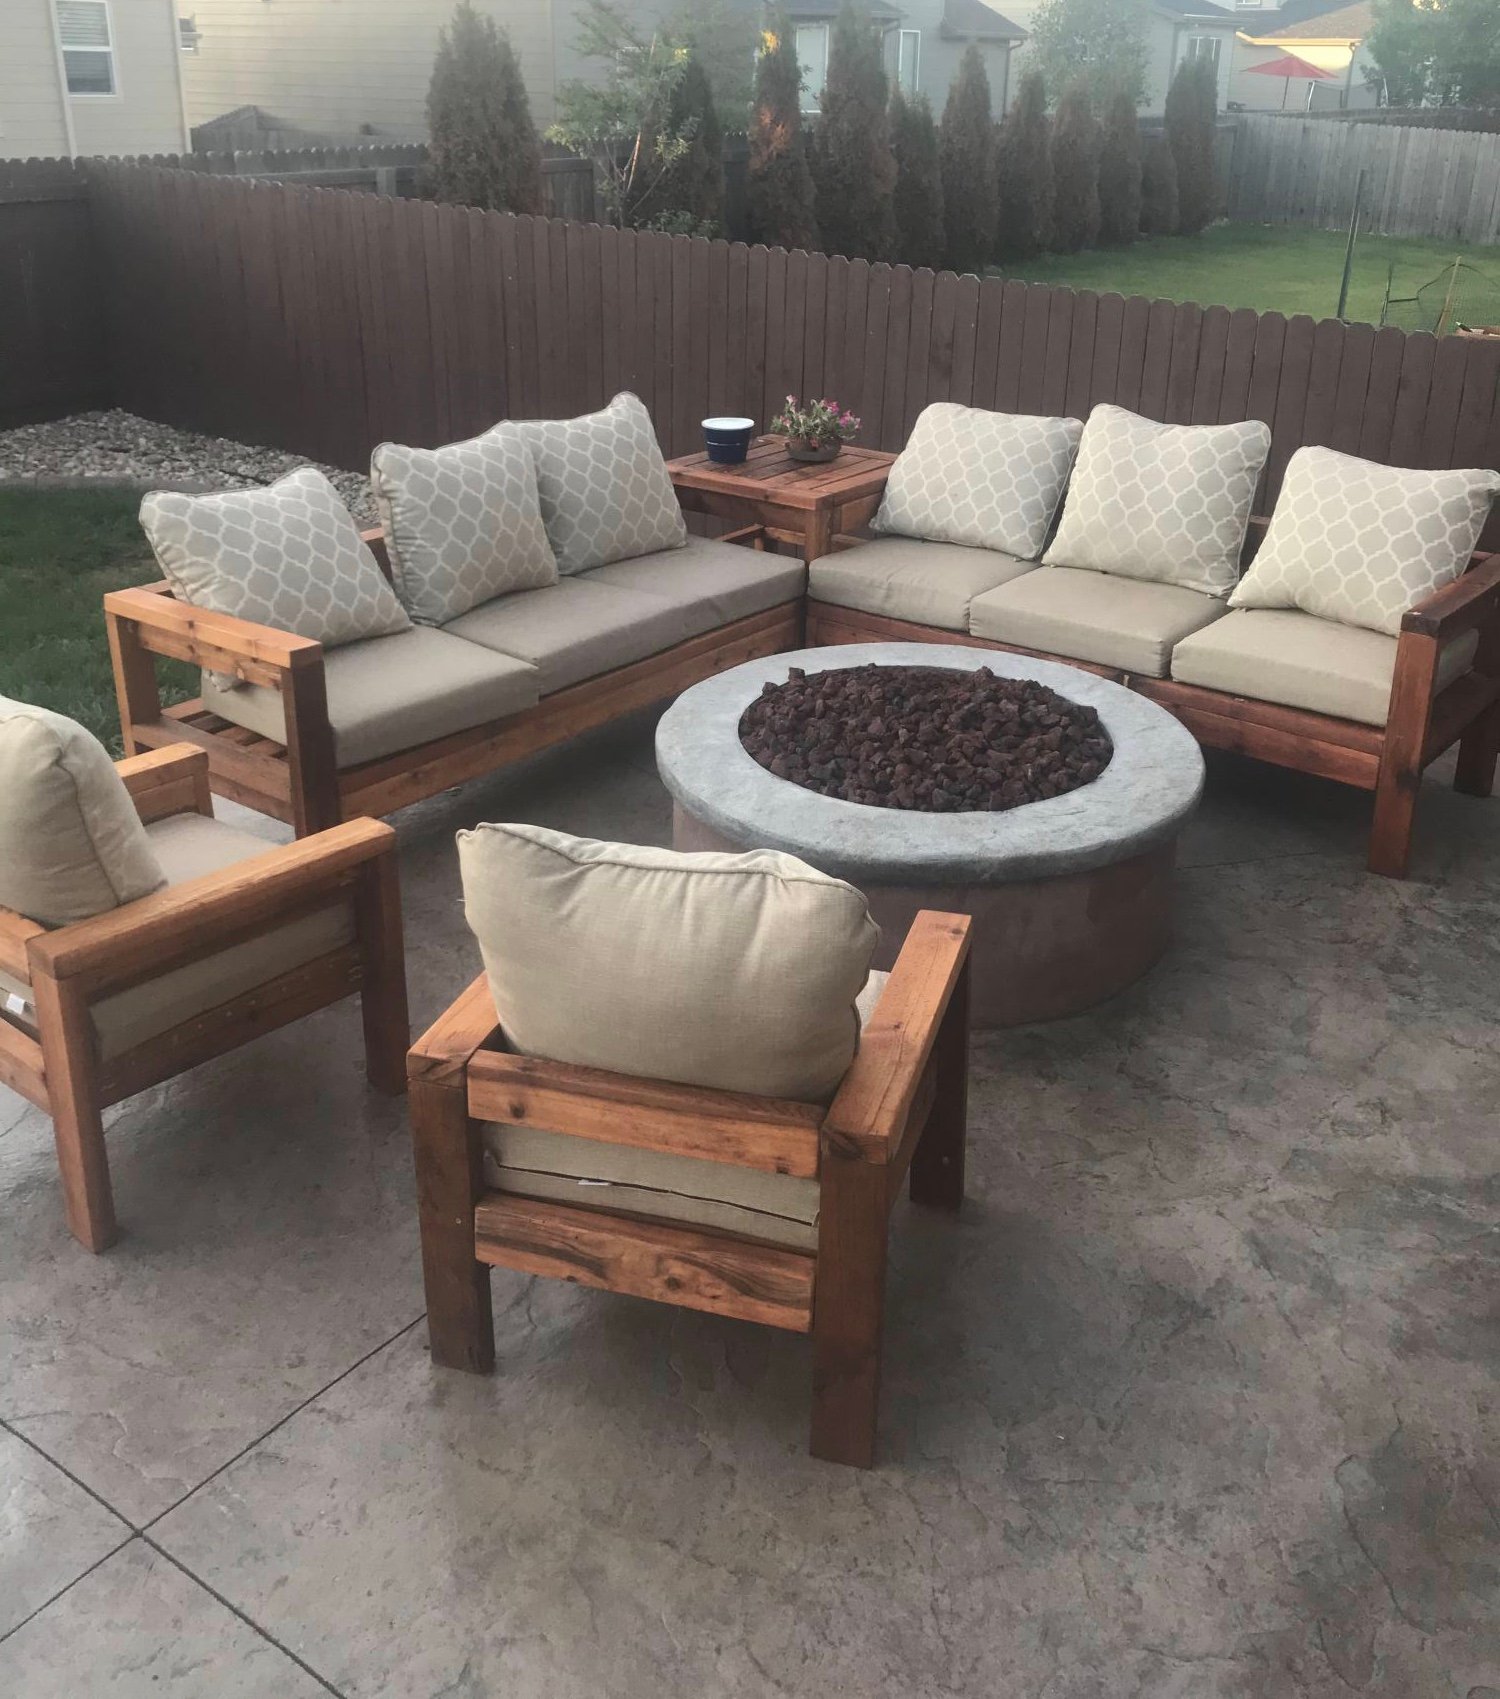
2x4 Outdoor sectional

Loved this project. The third one I have completed from Ana’s projects. Took about 3.5 hours to complete both. I used 2x4 cedar. I did add an additional piece on the back of both sectionals as I found the cushions I bought would slip down the back.
Built from Plan(s)
Estimated Cost
$350 without cushions
Estimated Time Investment
Afternoon Project (3-6 Hours)
Recommended Skill Level
Beginner
Simple Composting Toilet Outhouse
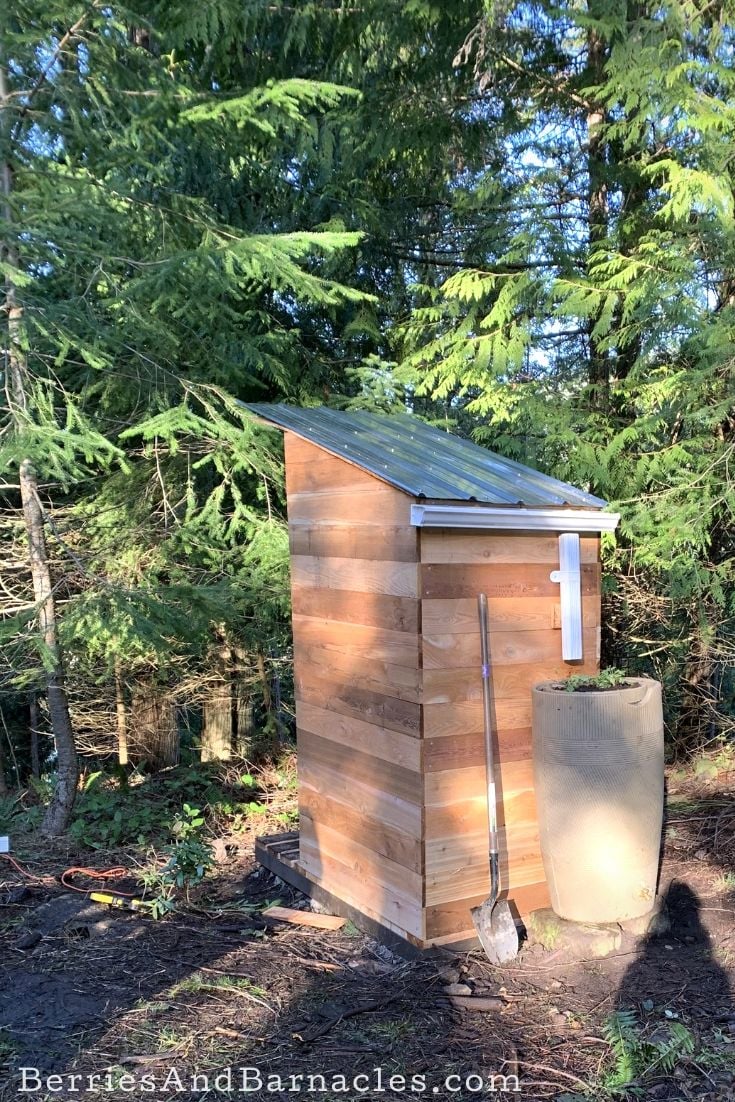
We built this composting toilet as one of the first things we did on our piece of vacant land. (How can you build anything else without somewhere to go when nature calls?)
An eco-friendly design was important to us, so we used cedar fencing instead of plywood. Otherwise, we followed Ana White's simple outhouse plans. It came out perfectly! It even has a rain barrel for hand washing.

Estimated Cost
800
Estimated Time Investment
Weekend Project (10-20 Hours)
Finish Used
We stained the outside with a semi-transparent stain and varnished the inside with an outdoor varnish.
Recommended Skill Level
Beginner
Oversized X end tables
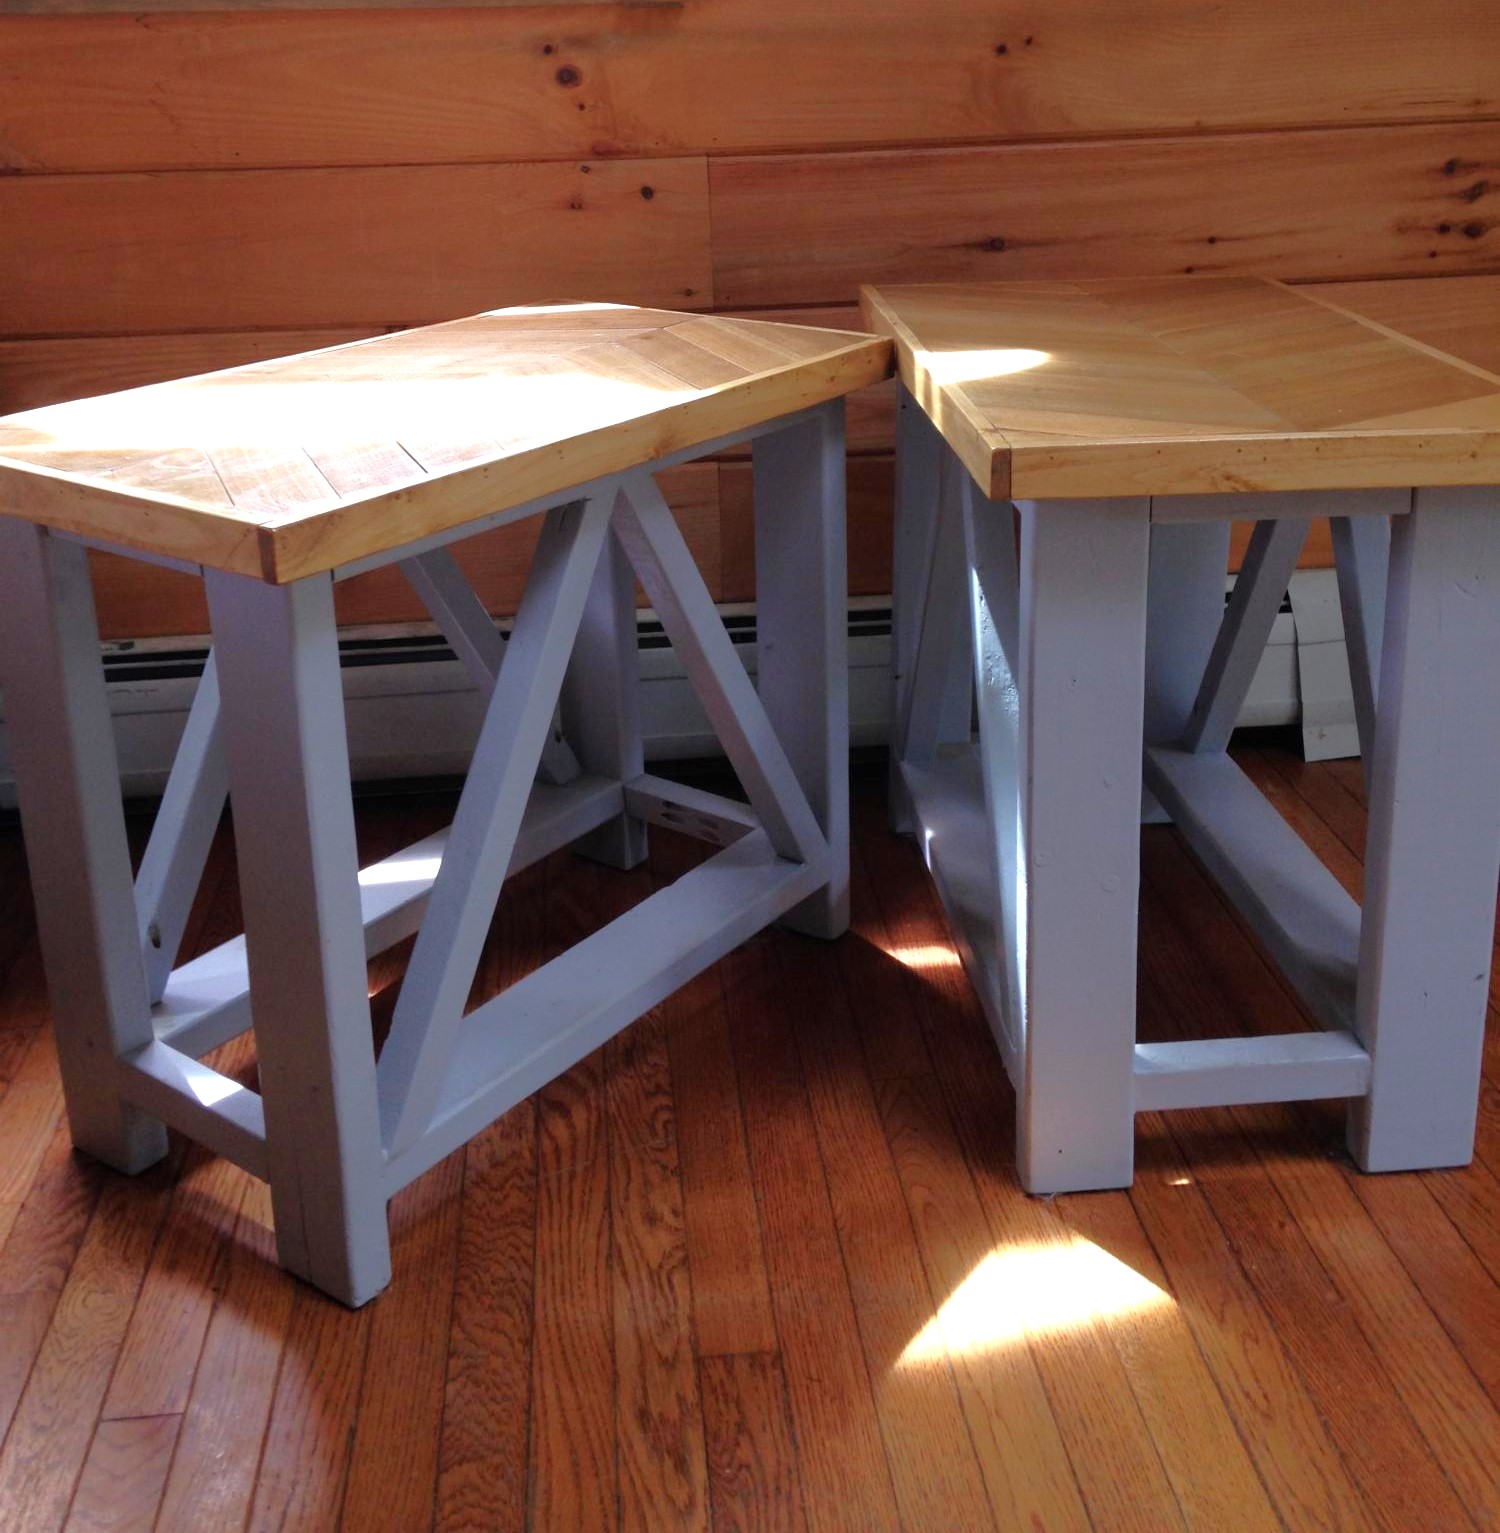
From the rustic X end table plan, I made mine slightly taller and a little more narrow to fit my space. Also decided to do a chevron top


Built from Plan(s)
Estimated Time Investment
Weekend Project (10-20 Hours)
Finish Used
grey paint (Anonymous from Behr) on the bottom, fruitwood stain on the wood top
Recommended Skill Level
Intermediate
Ana White Greenhouse
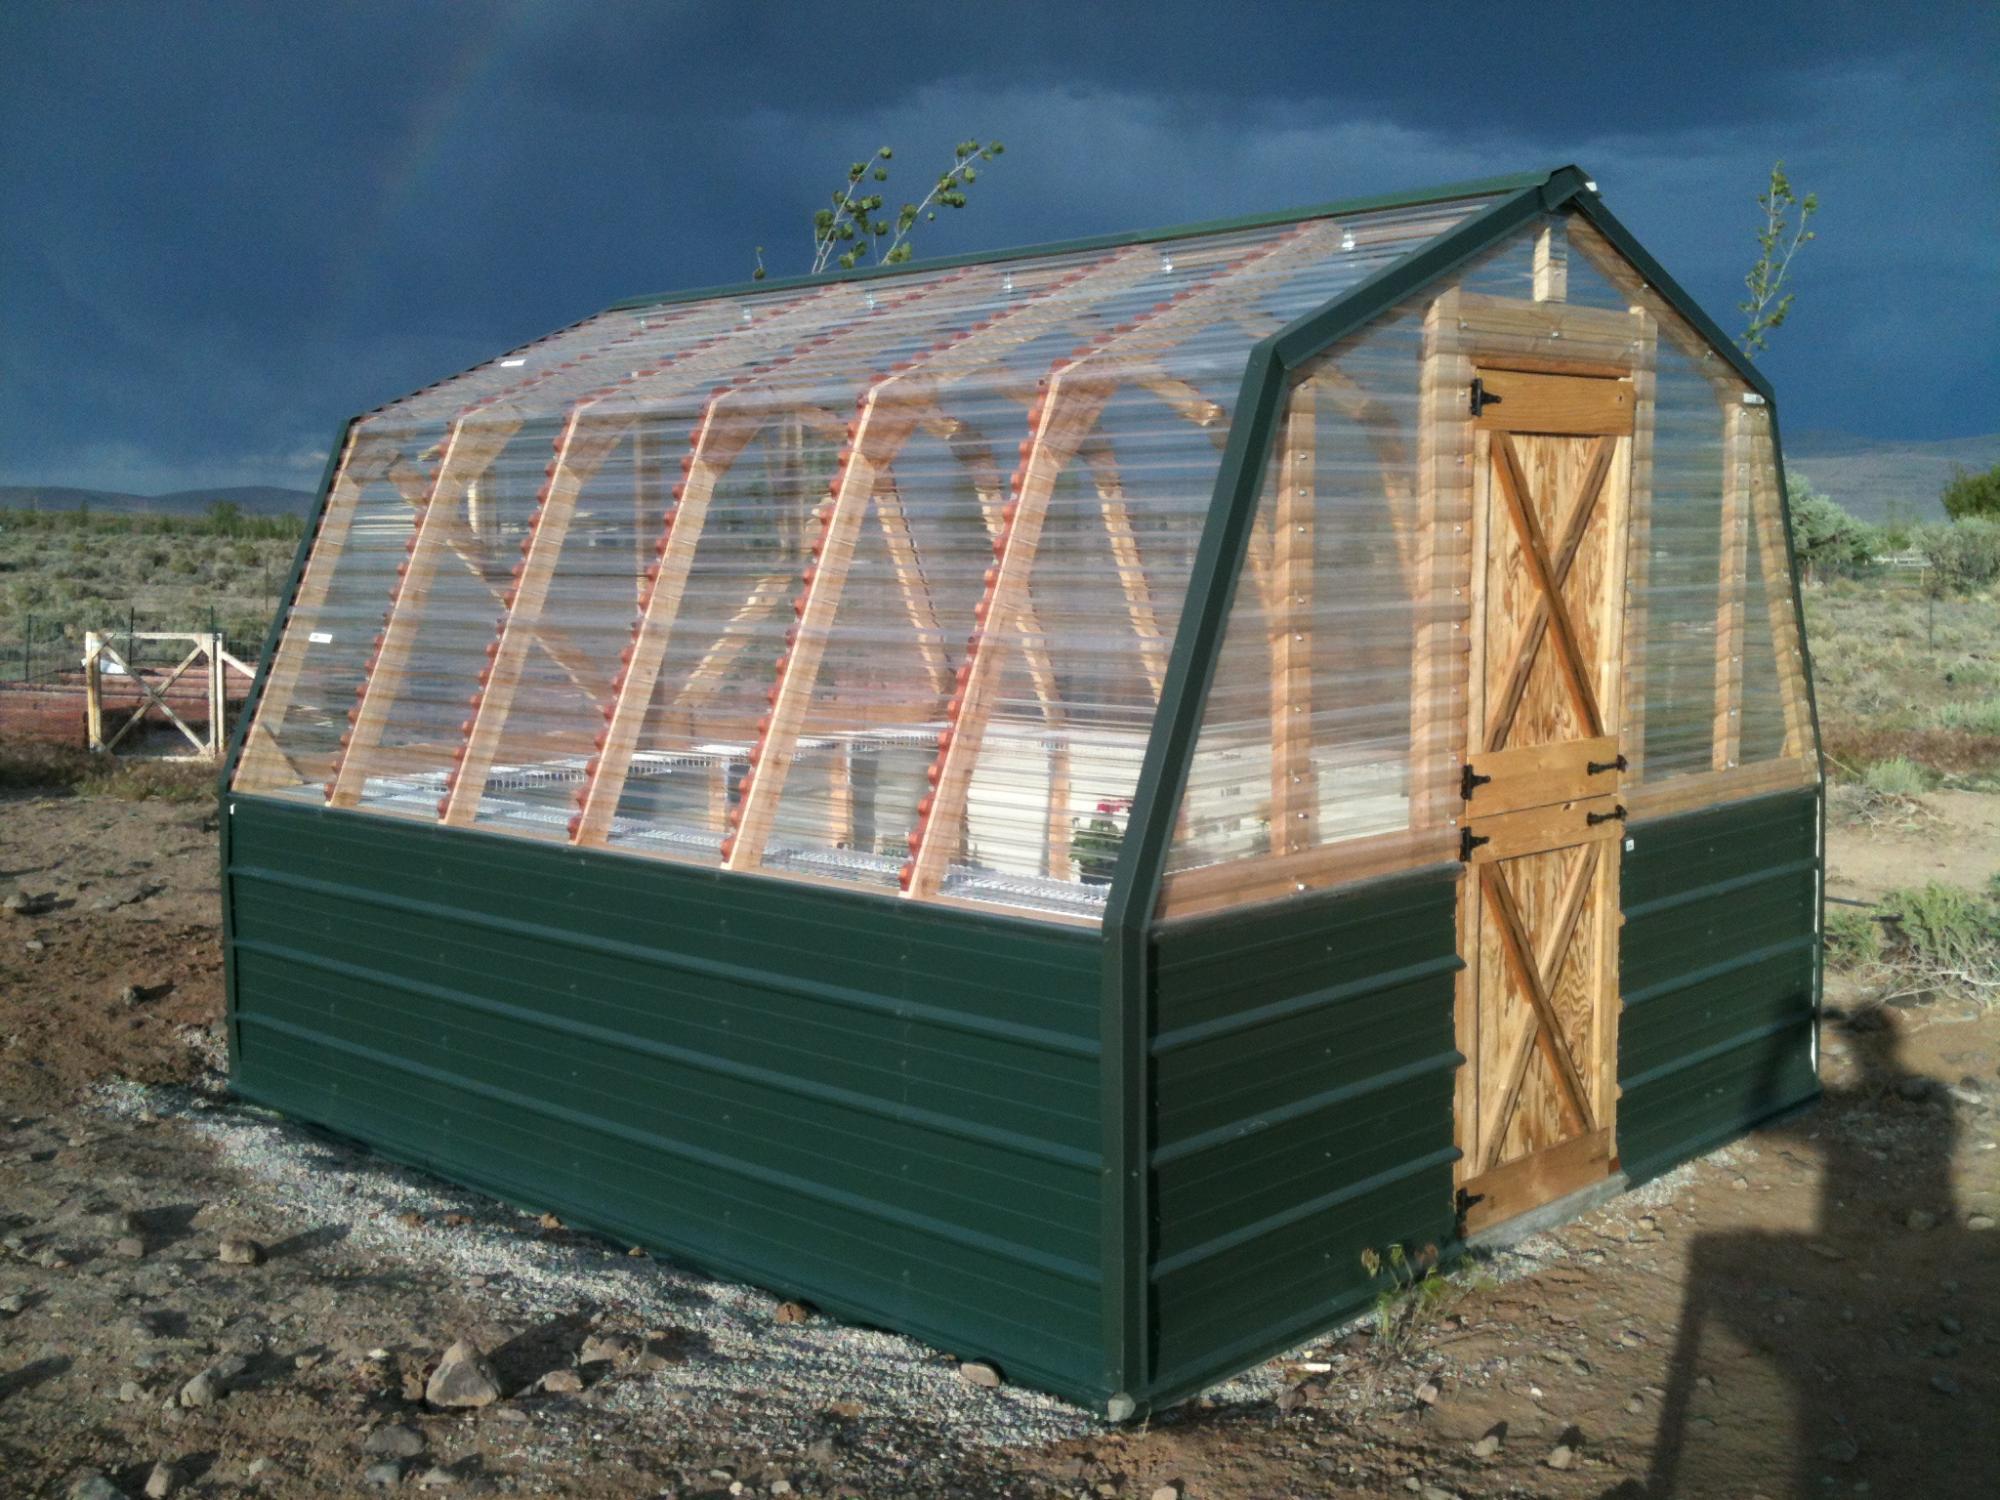
We built the first one about 8 years ago, and then the wind flipped it over and scattered it all over the back part of the property. I then dug footings and anchored the second one down; I was able to save the Dutch Door I made for the first one. Thanks for the plans!!!
Built from Plan(s)
Comments
Fri, 04/08/2022 - 10:35
Beautiful Greenhouse!
That's not going anywhere! Thanks for sharing, it looks amazing!
Seasonal And Holiday
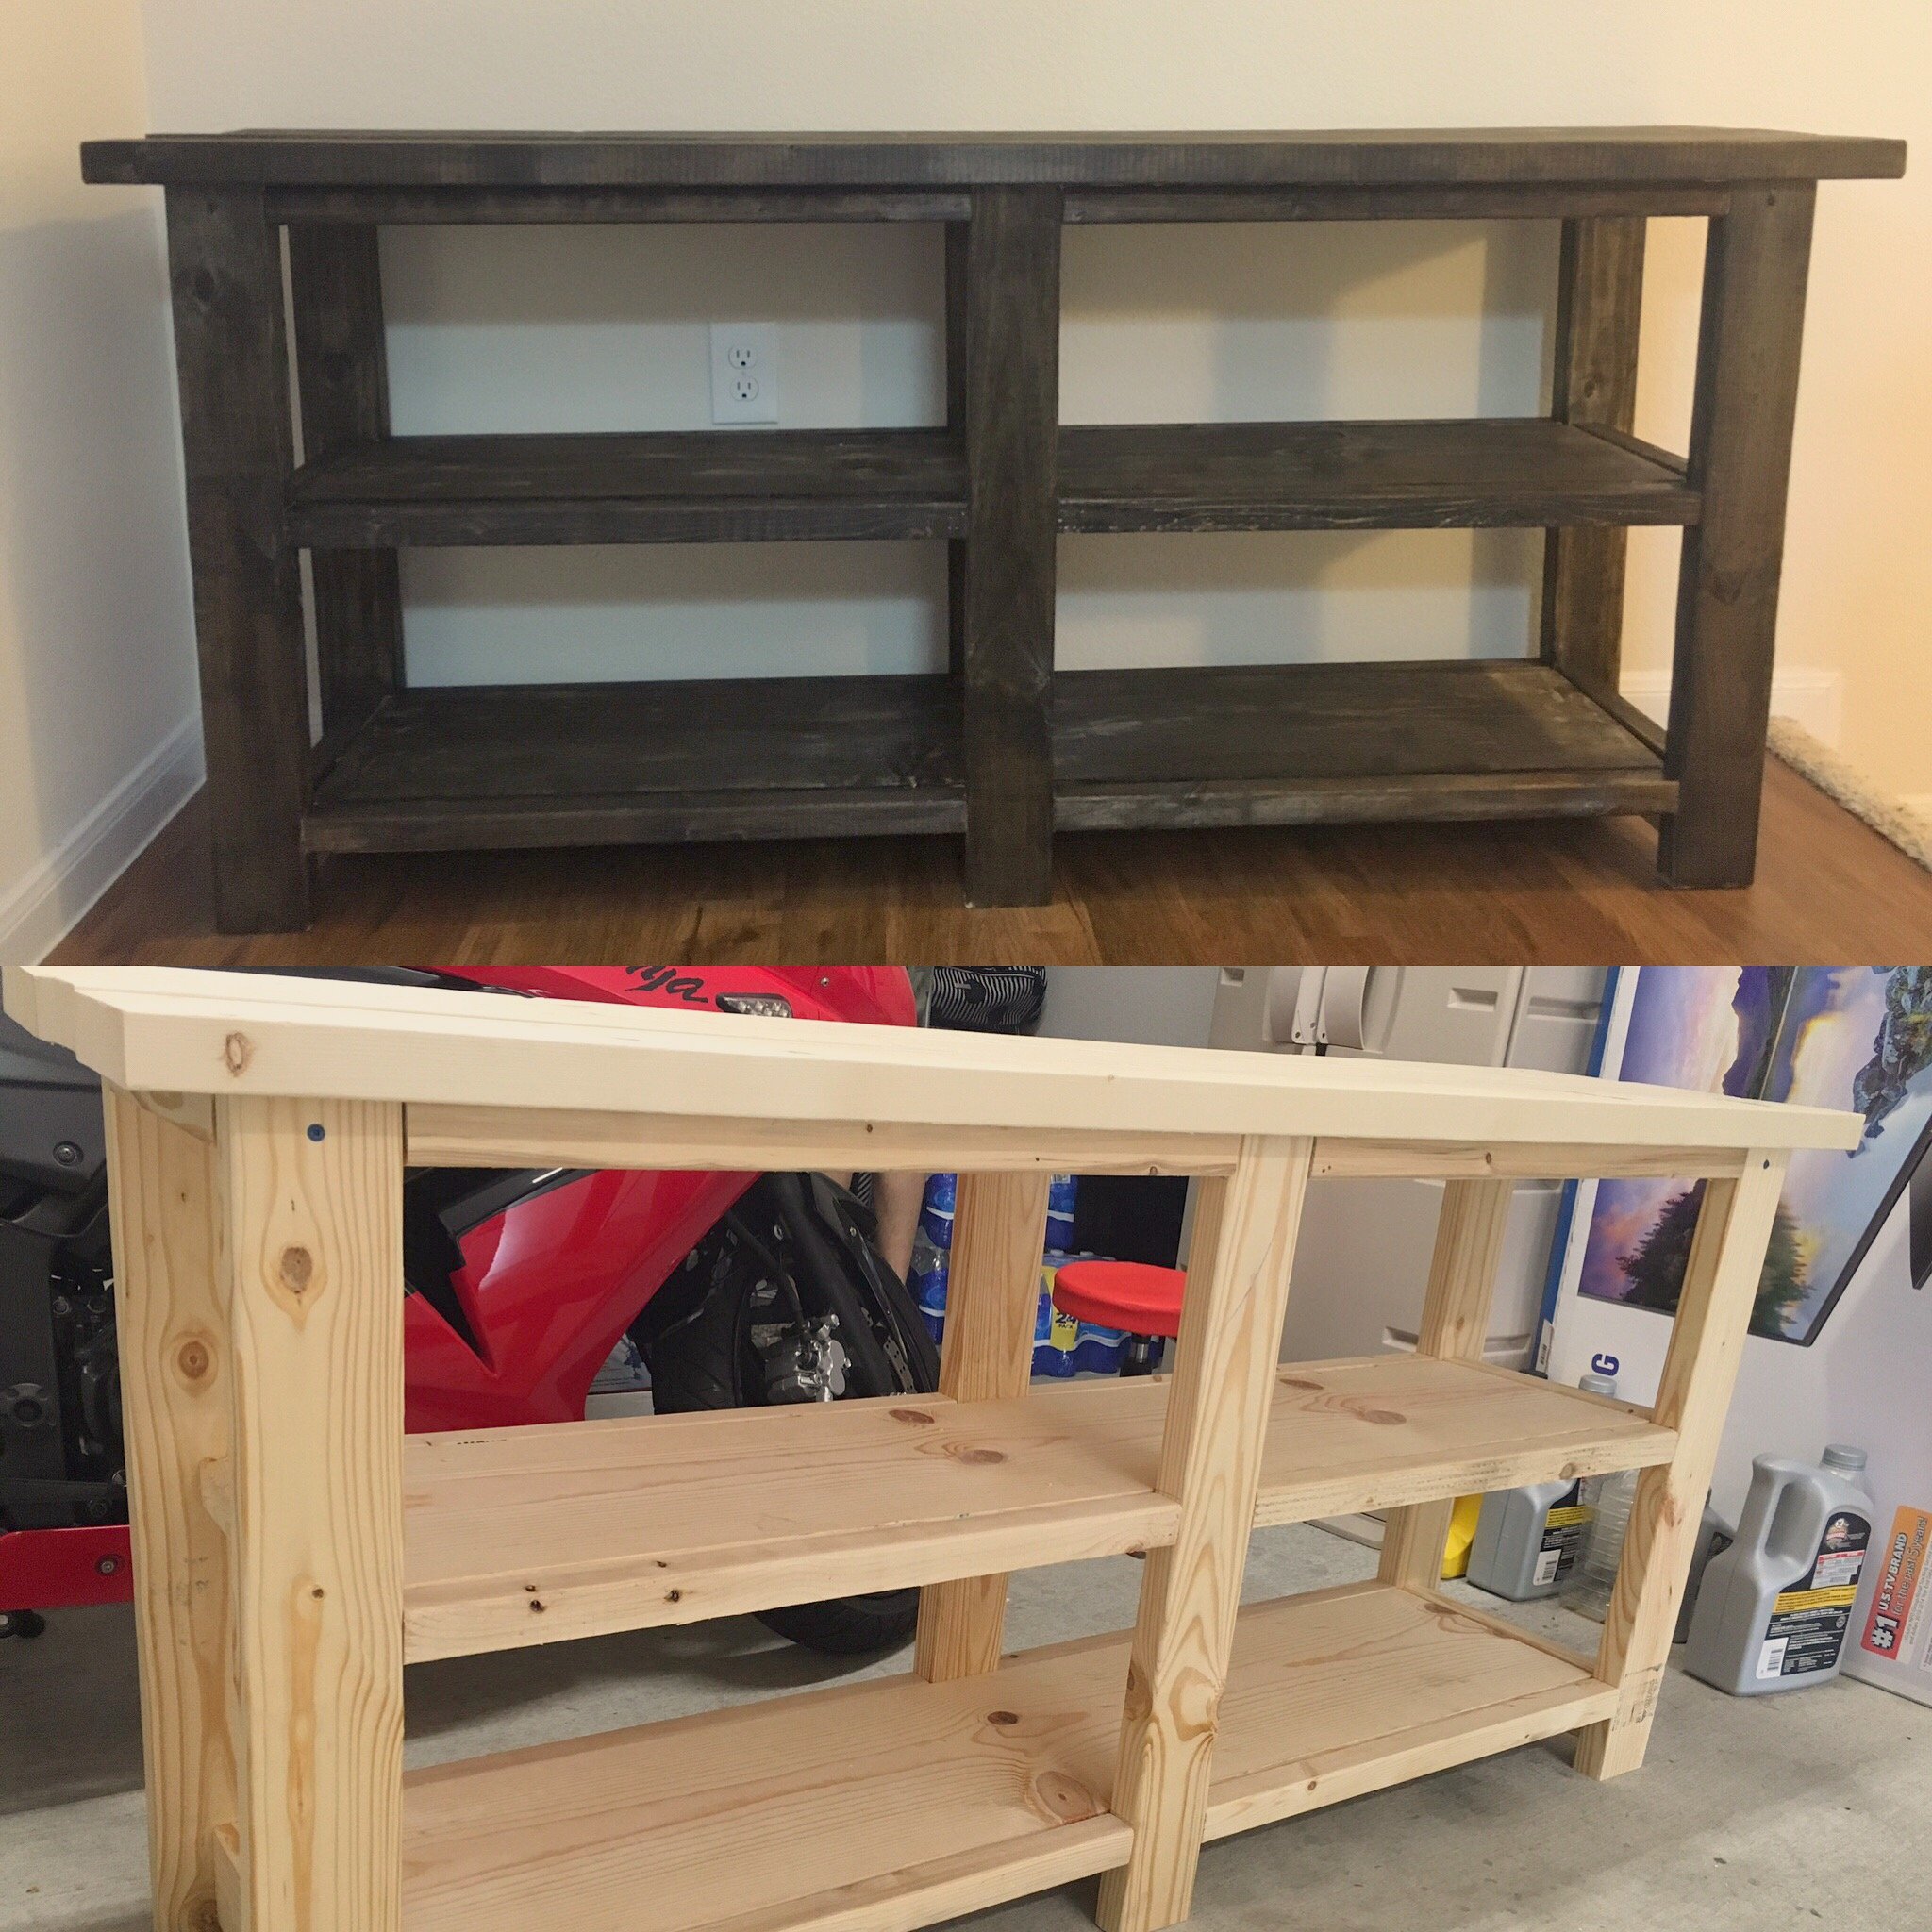
Simple Console Table
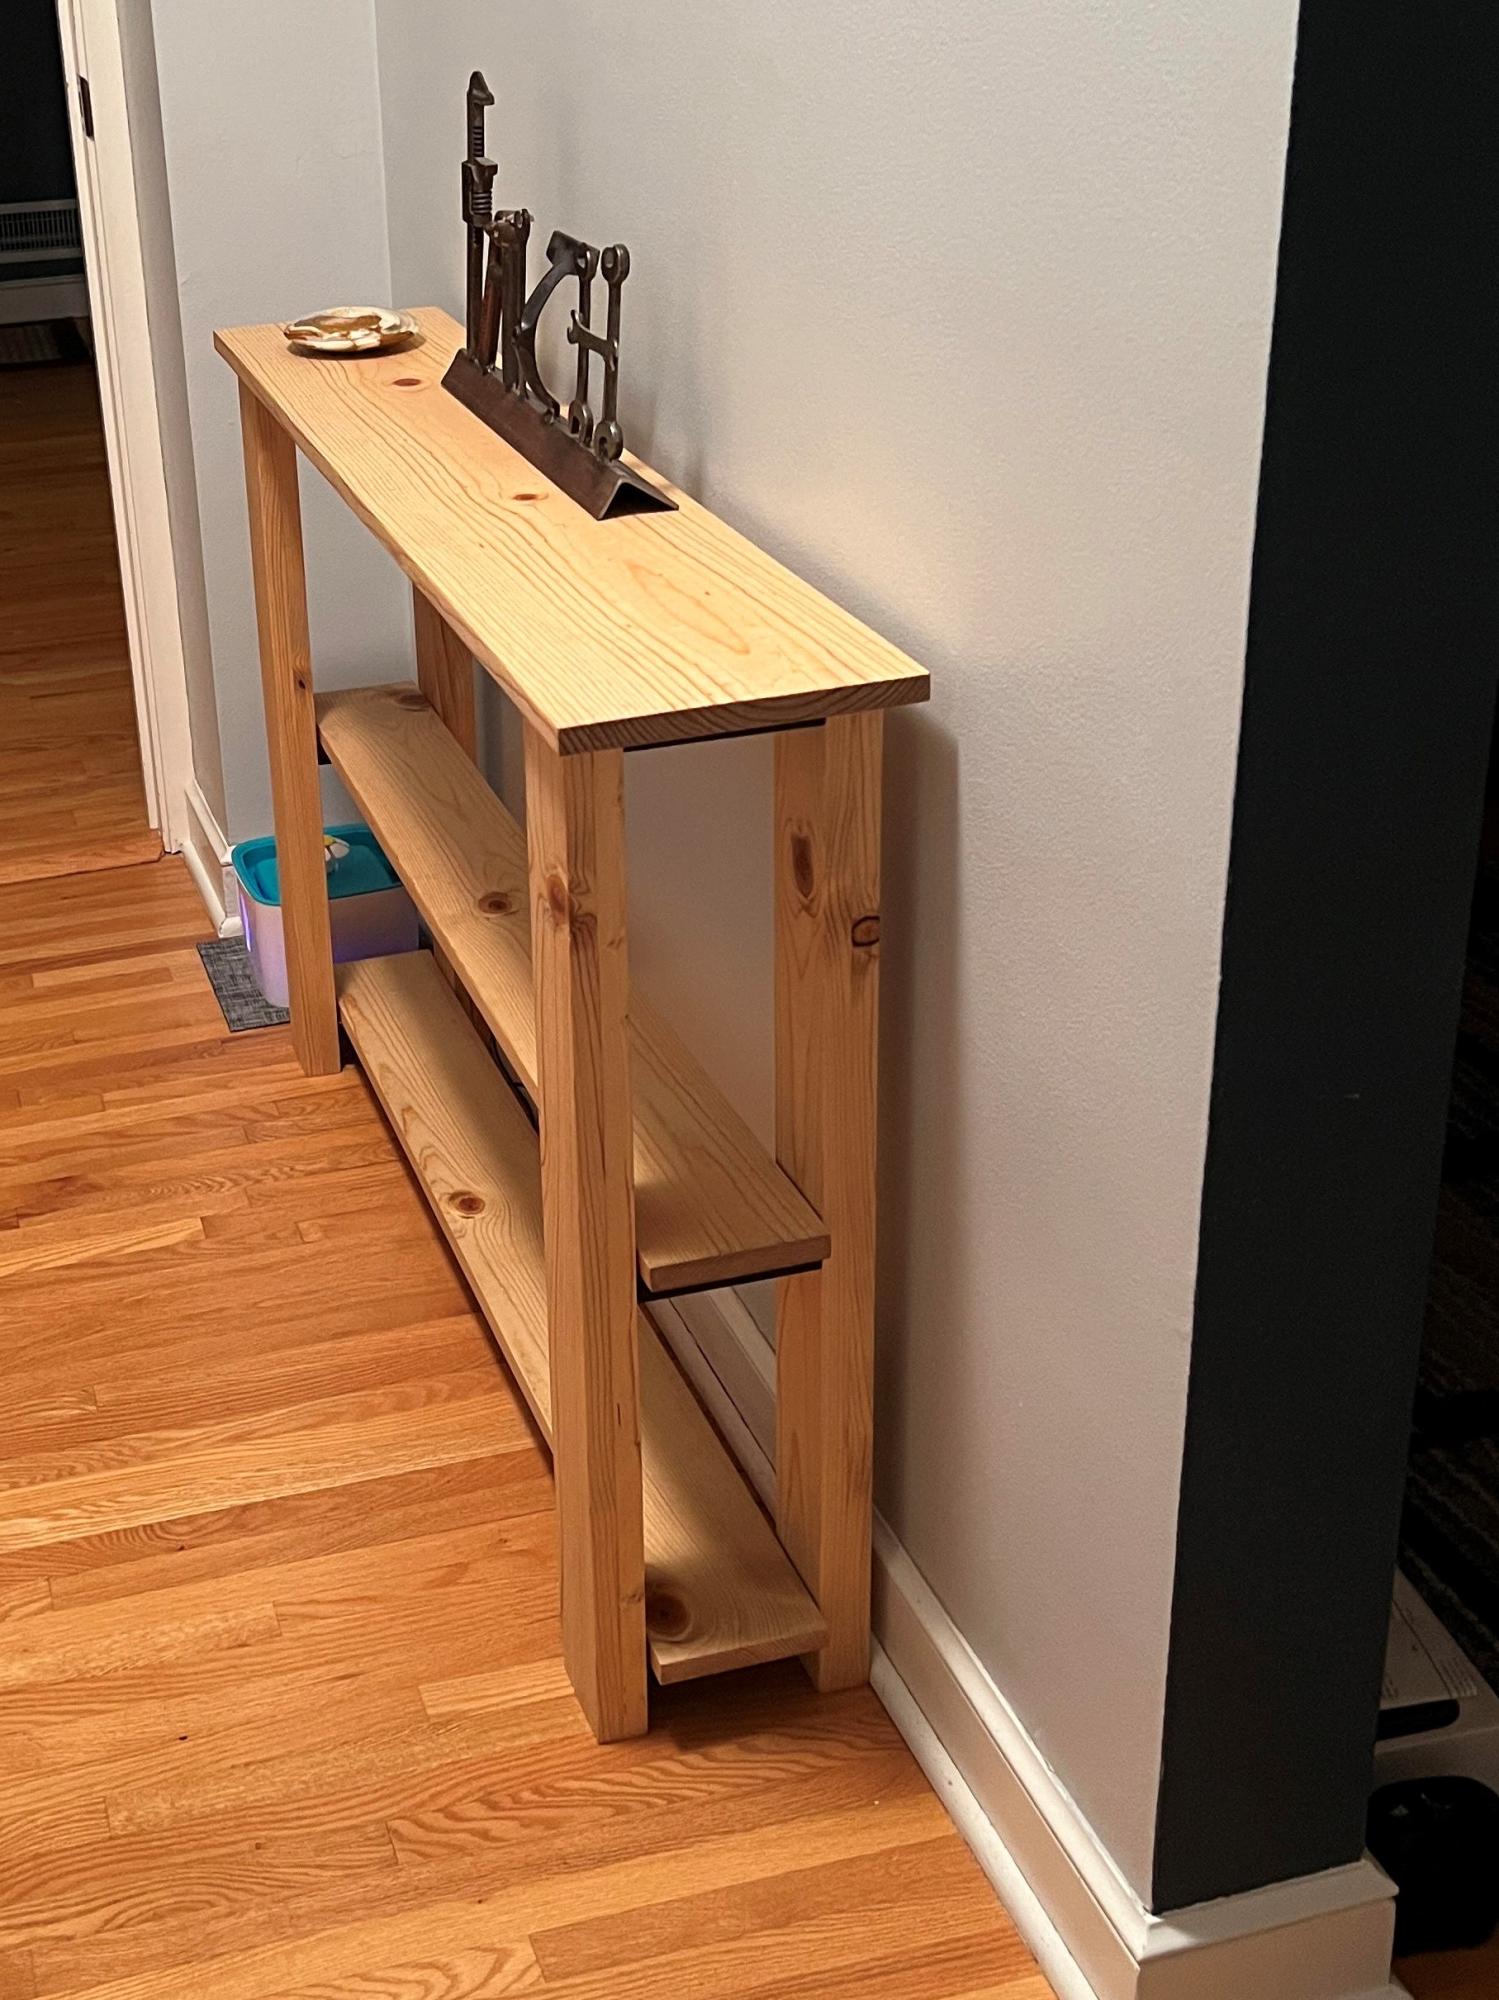
I used dimensional lumber for a little nicer look and laminated two boards for the legs. I used light walnut danish oil to finish. I adjusted the width and got It the perfect width for my hallway.

Built from Plan(s)
Sand box with benches

This sand box was very easy to build and it works great. The only thing I would change is cutting the "arm rests" at 7 1/2" instead of 6 1/2". I did that for the second set of arm rests (when I downloaded the plans many weeks ago the cut list was wrong). It made putting that section together a lot easier.
I easily spent more on the hinges (at $5 per hinge x 8 hinges) than I did on the wood itself.
My 1 and 1/2 year old loves playing in it and now I need to build a toy box for him to put all of his sand toys in!
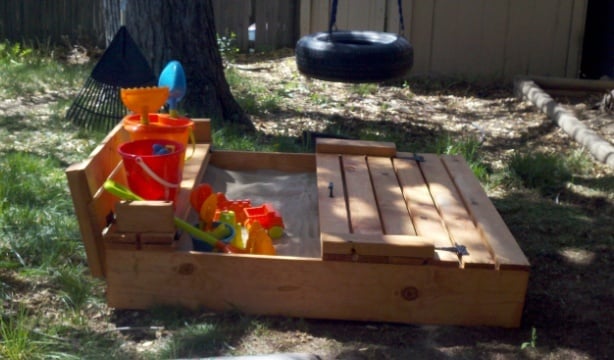
Built from Plan(s)
Estimated Cost
$115
Estimated Time Investment
Afternoon Project (3-6 Hours)
Finish Used
Redwood colored stain
Recommended Skill Level
Starter Project
Comments

Sun, 04/29/2012 - 00:06
It's been zen-raked!
It's been zen-raked! haha.
Those little benches are adorable. I wish I had seen this plan before I built ours.
Mon, 09/17/2012 - 10:29
Covered Sandbox
I just want to say that I asked for my husbands help, and his advice increased the price significantly.
He does not like to paint, and will spend the extra dollar to purchase pressure treated wood. So I sent him with my materials list and the wood he purchsed was $60.00, plus $22.00 for hinges and $10 for a box of deck screws. Actually, I am a artist and had wanted to paint the project to look like a big frog.
Floor to Ceiling Laundry Room Shelving

After watching Ana White's video on easy garage shelving on FB, I knew right away it was the perfect technique for adding shelves to my laundry room. The project was easy and turned out great! I did the majority of the work by myself, although my Hubby did help me with some heavy lifting at the end (we had to add the shelving before the front frame due to the walls on either side). The shelving unit itself took only a few hours to build. I painted it the following day making it a weekend project. We have considered adding trim to the front to give it a more finished look, but right now, it is serving its purpose. I will definitely use Ana's technique again. It was simple and straightforward! I loved it.


Built from Plan(s)
Estimated Cost
$85-90
Estimated Time Investment
Afternoon Project (3-6 Hours)
Finish Used
Valspar's Linen
Recommended Skill Level
Beginner
Rustic Console Project
This was my first project building something from this site. I absolutely love it! We didnt add the X's because the miter saw was at my dad's house, which I was kind of sad about, but I think it still looks good. Not too bad for mine and my husbands first build!
Built from Plan(s)
Estimated Cost
$75
Estimated Time Investment
Weekend Project (10-20 Hours)
Finish Used
Minwax Jacobean
Recommended Skill Level
Beginner