Easy Barn Style Greenhouse
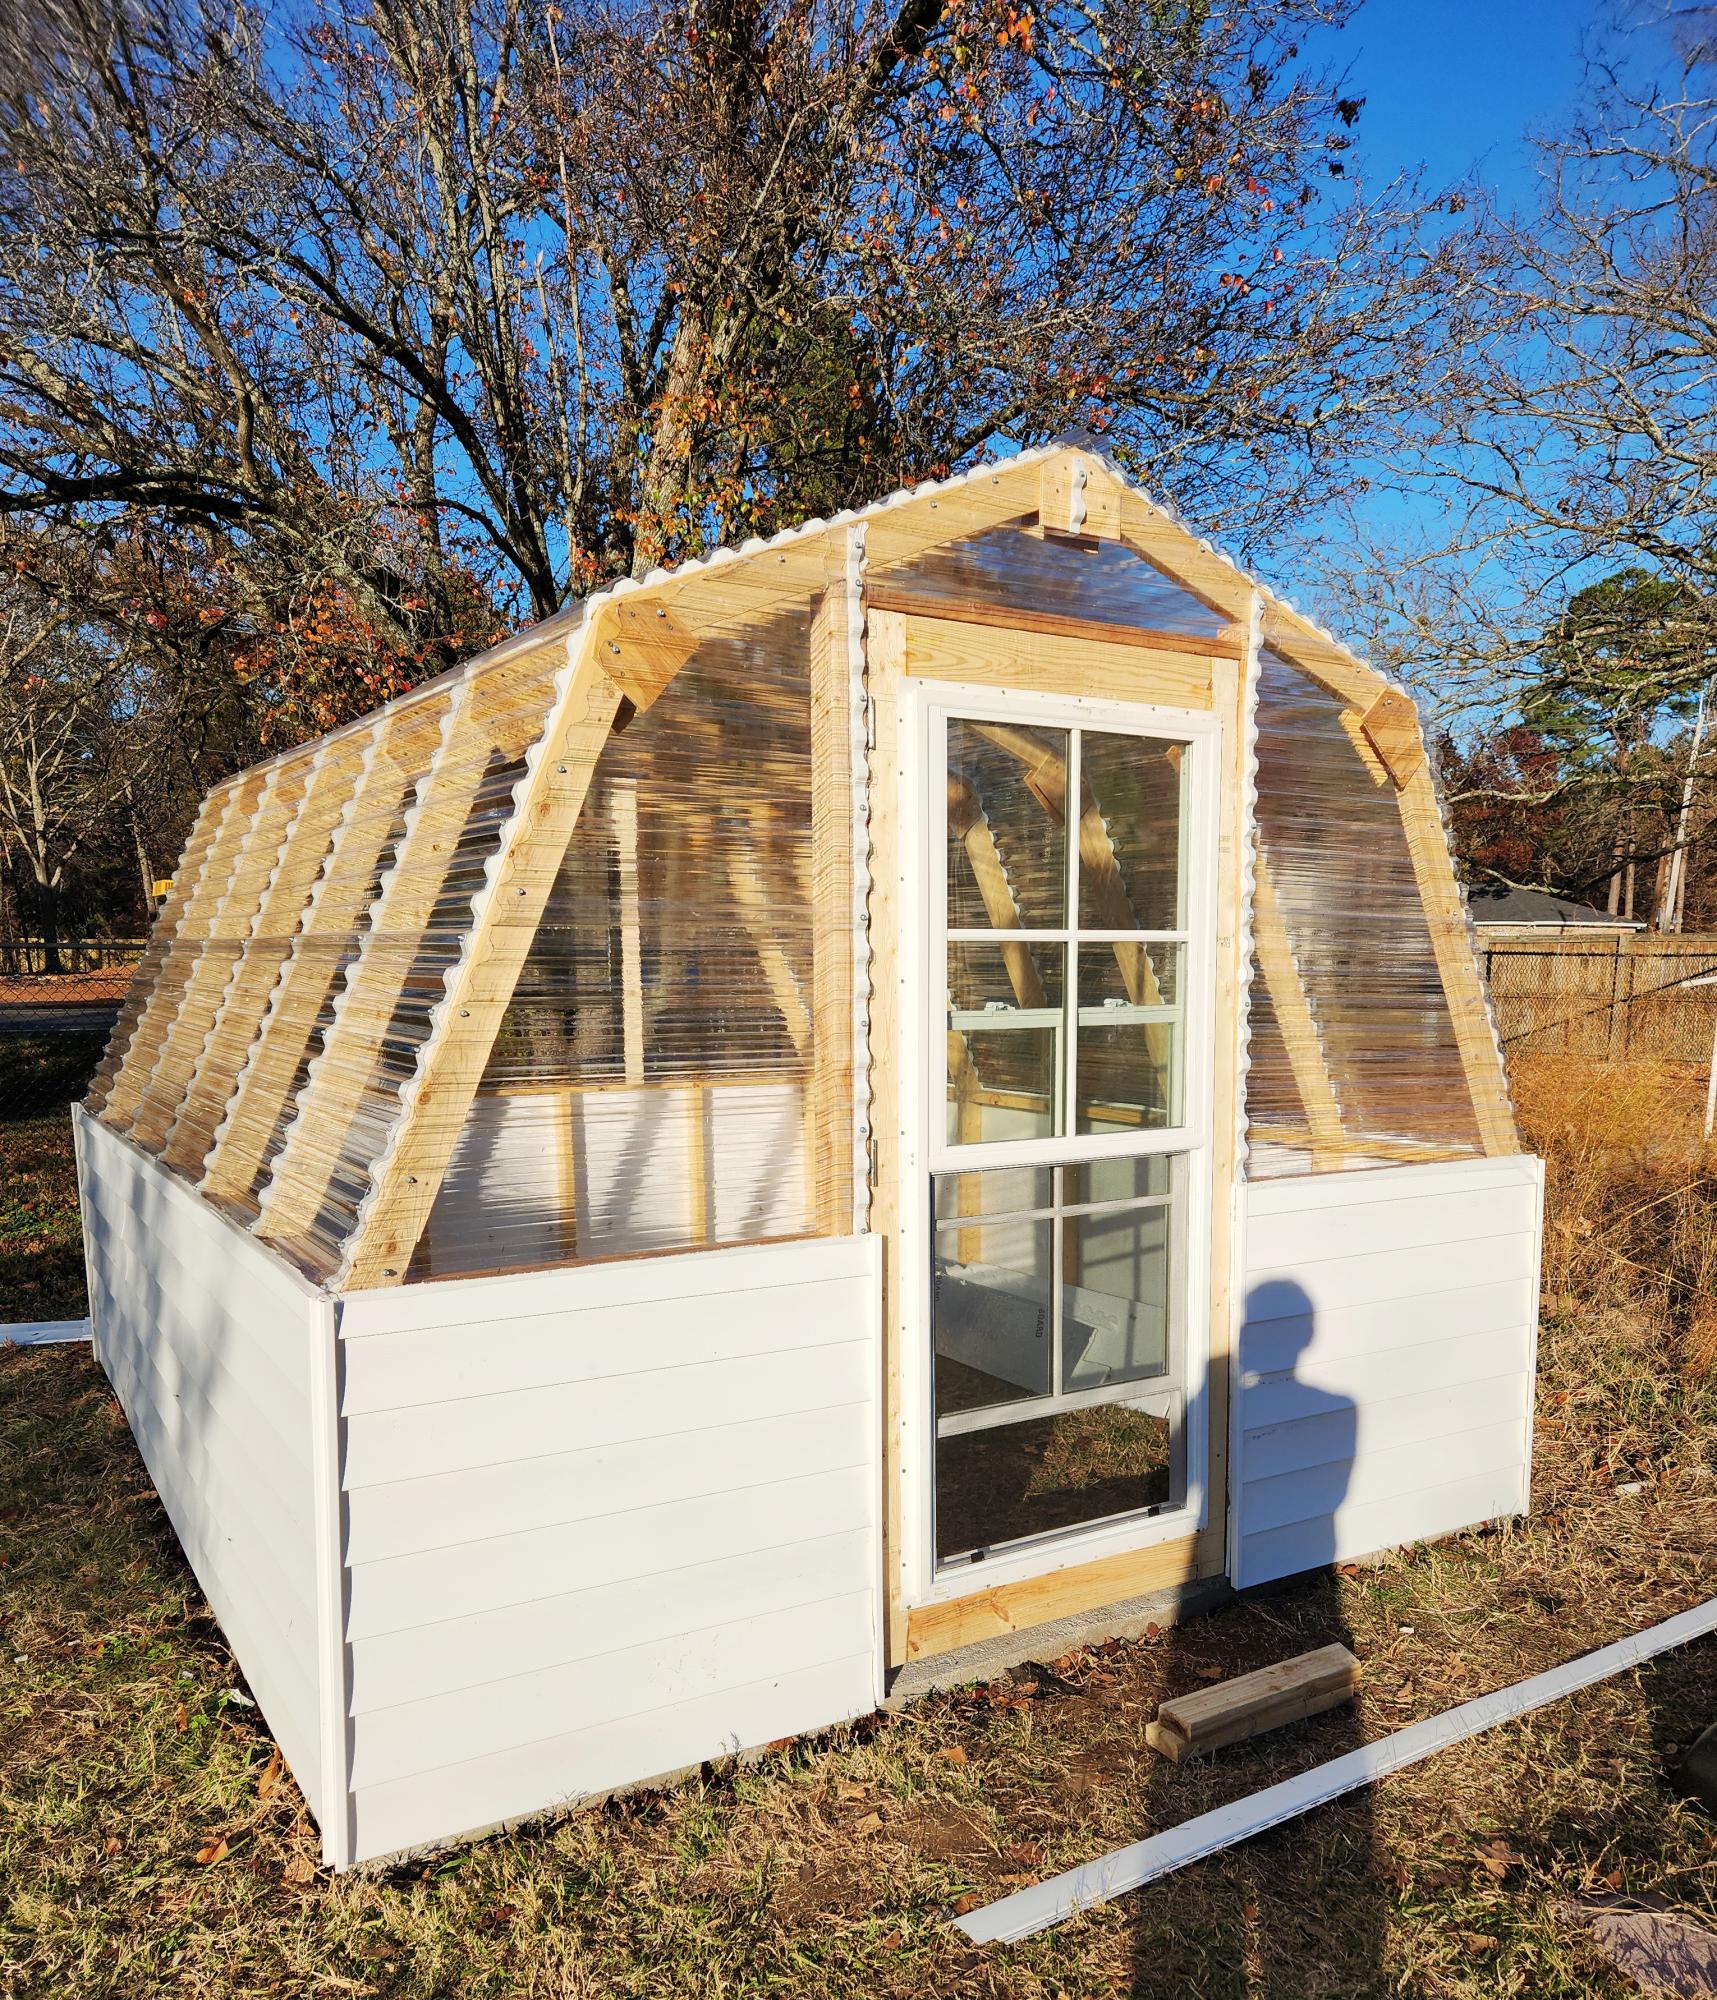
Our greenhouse. Long time coming but your plans were easy to follow. Can't wait to try some others.
Charles
Built from Plan(s)
Our greenhouse. Long time coming but your plans were easy to follow. Can't wait to try some others.
Charles
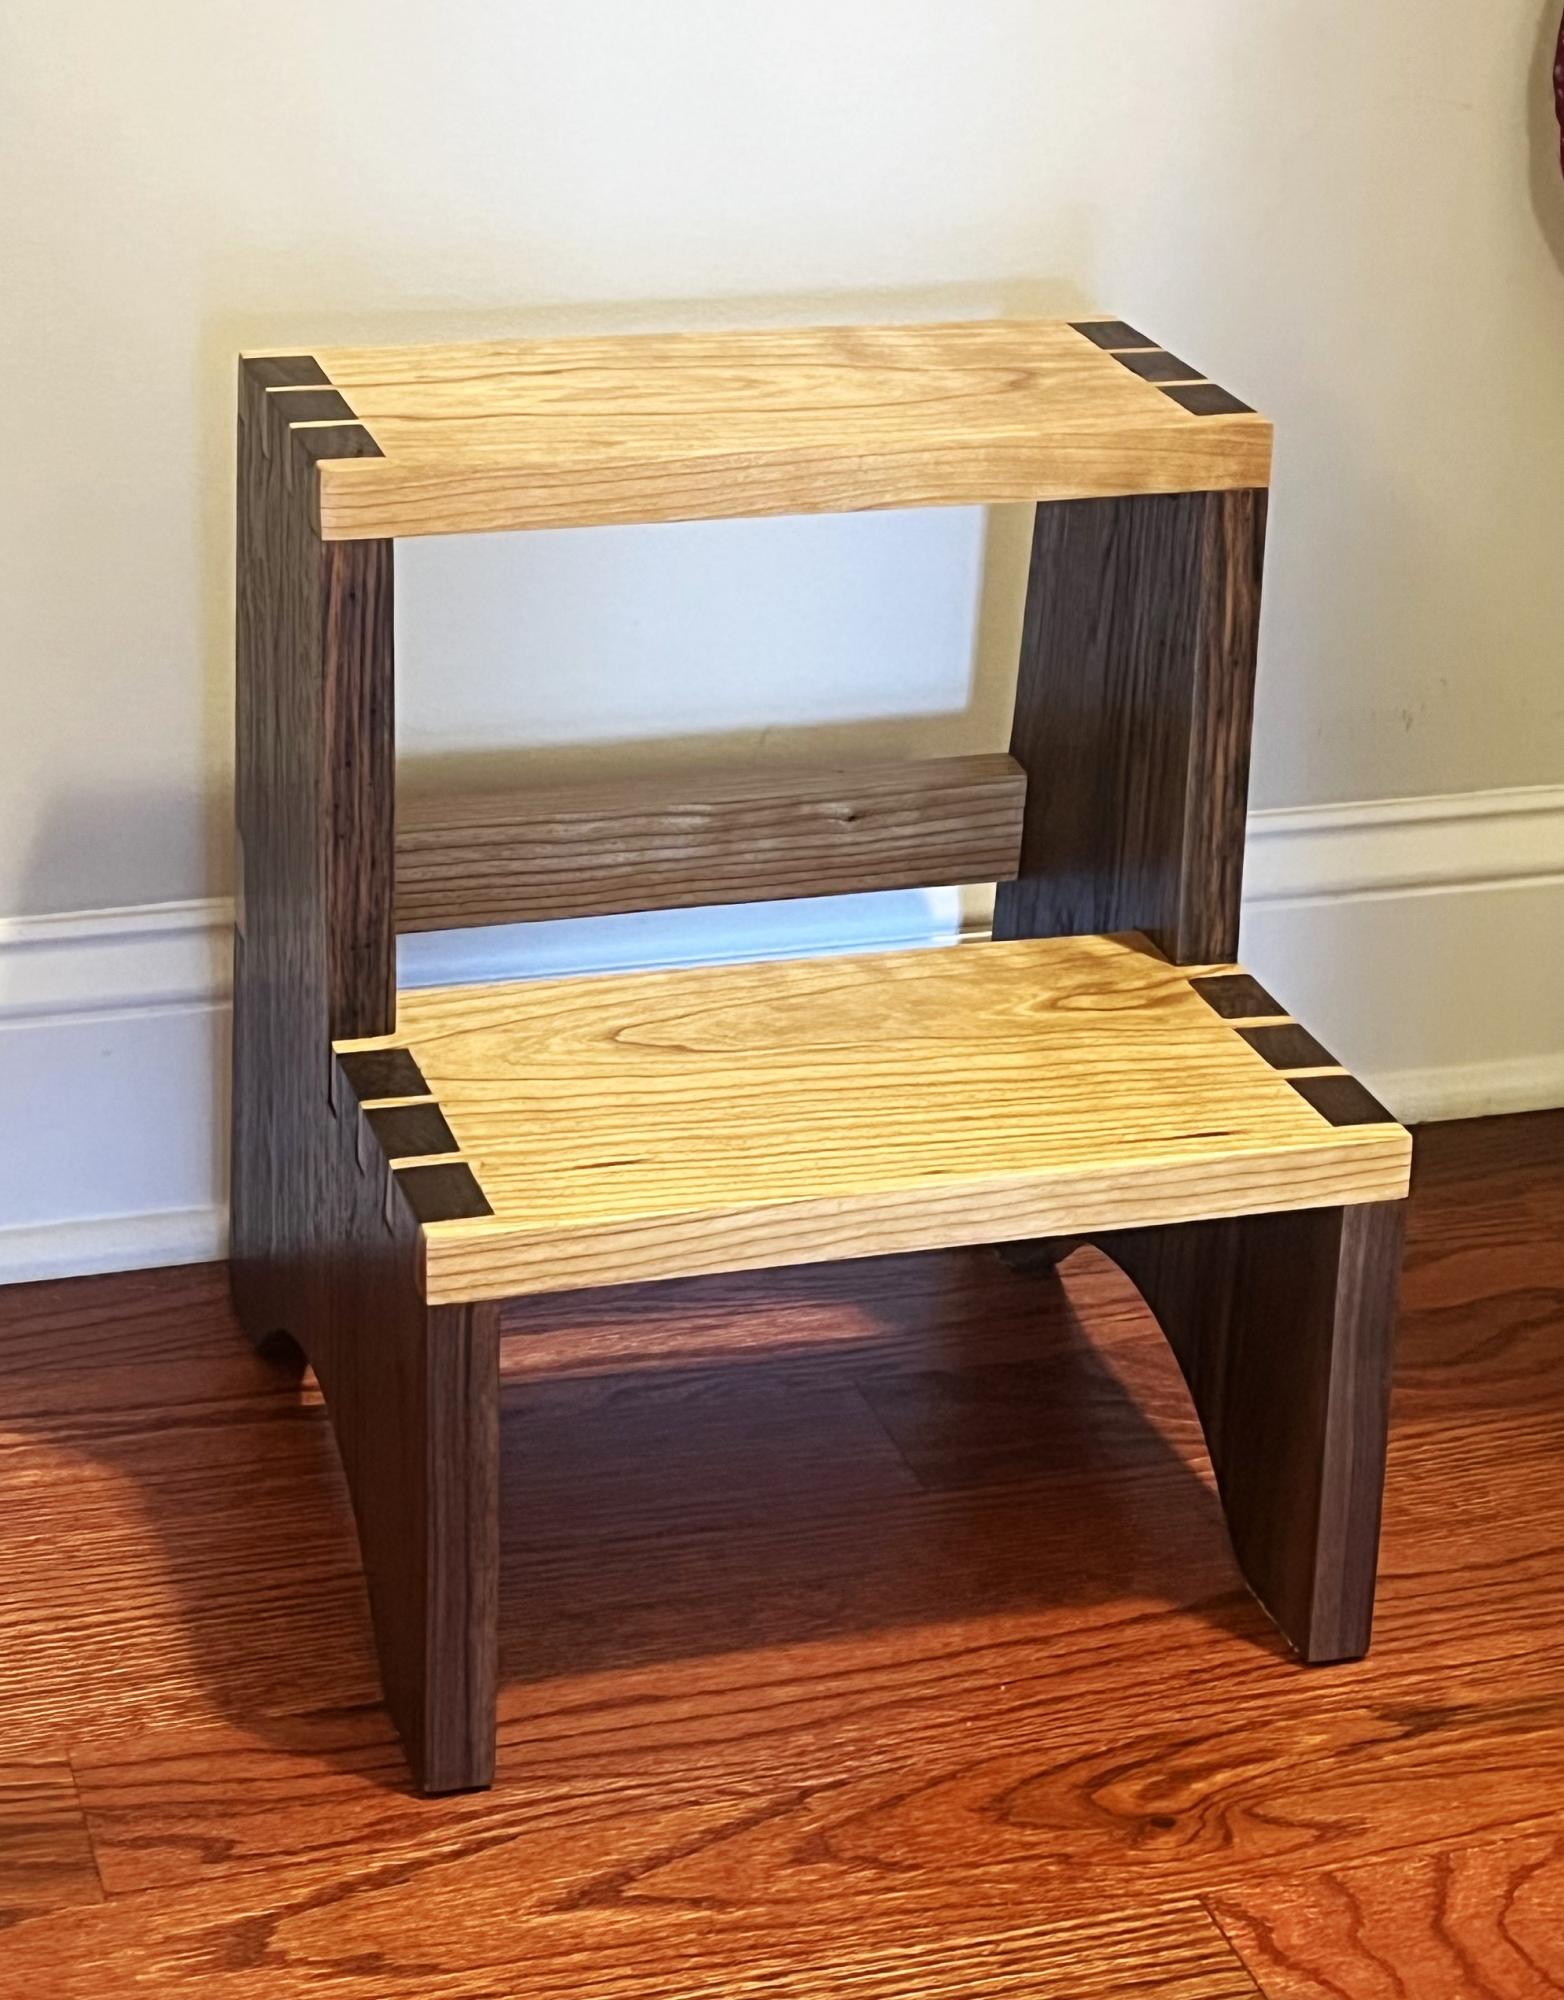
I’m going to make a step stool for the son of good friends in Florida. The design I liked had dovetail joints, which I’ve never cut before. So I made this stool for my wife as a prototype. Walnut sides with Cherry for the steps. 12.5” front to back, 14” tall, and just about a foot side to side.
Mark Johnson
THANK YOU ANA FOR ALL THE GREAT PLANS!!
I am in southern california (mild weather) so i just used pine and coated them with urethane.
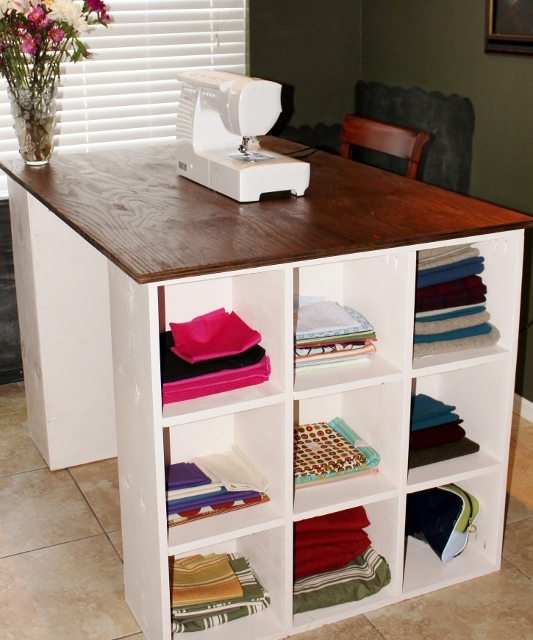
Our first woodworking project! A sewing desk that was featured on this site.
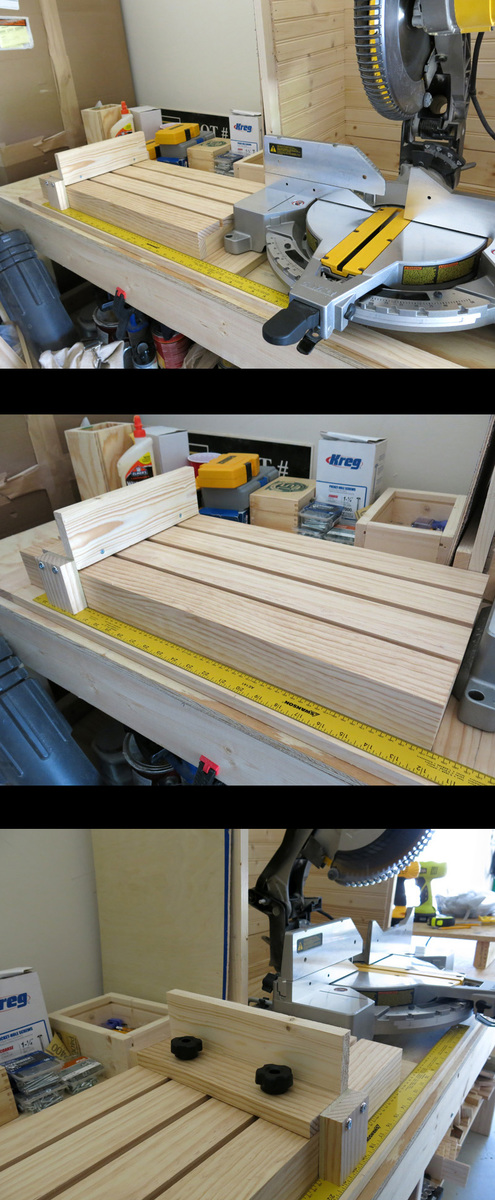
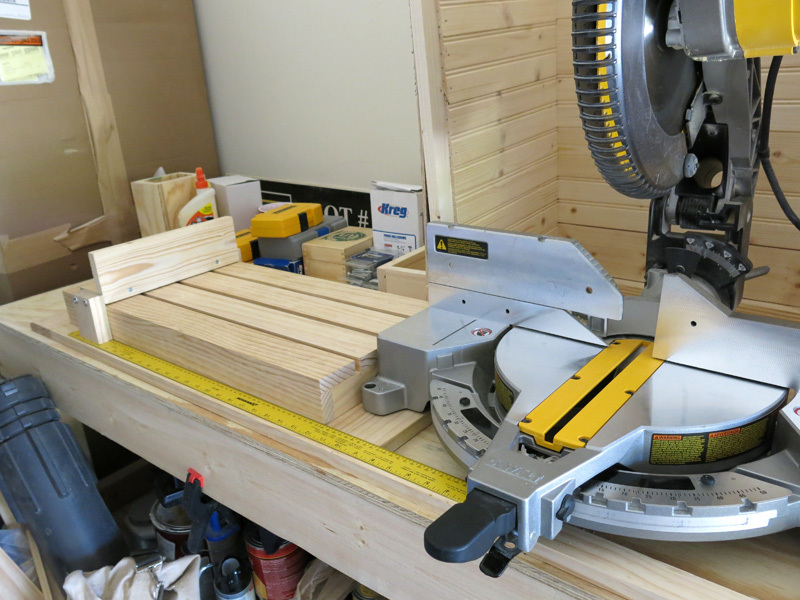
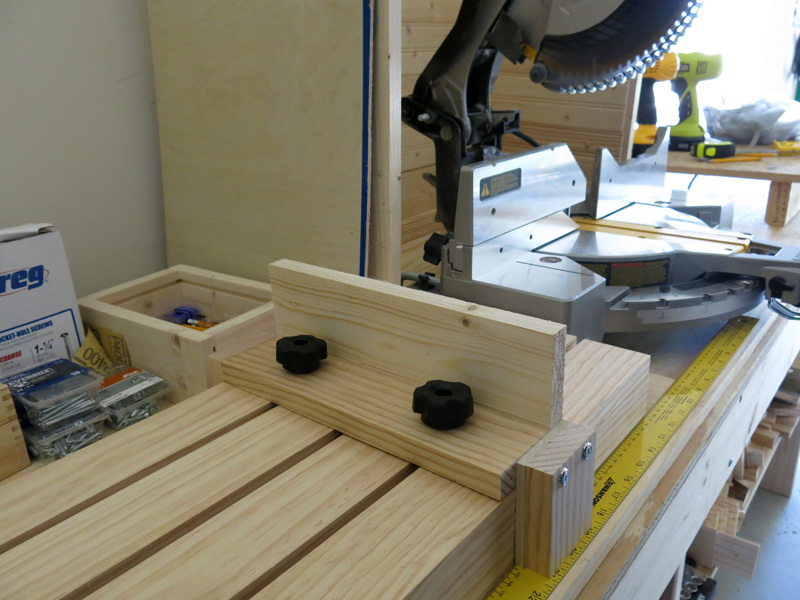
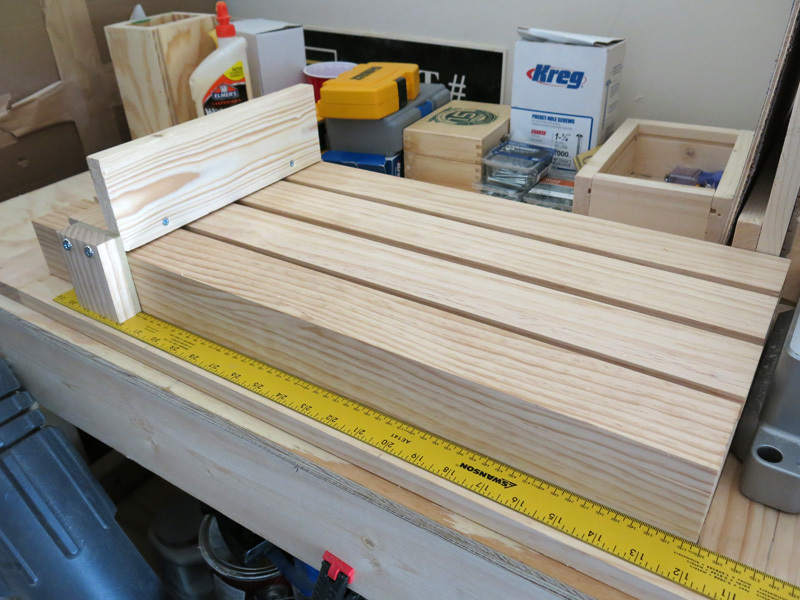
I wanted a jig/guide that would allow me to cut multiple pieces of wood exactly the same length using my Mitre saw. Designed this Jig and apart from the 4 screws you see everything is pocket holes. Now when I build from Ana's plans and my own designs I can guarantee all the pieces that need to be the same length will be!!

This was the first time I had ever worked with some of the tools and really done any serious building. We built a new deck onto the back of my home and I could not stand the cost of the furniture to make it complete. Thank you Anna I have become fearless with tools!! Our deck has become even more special!!
Thank you for the plans! Super easy. Built for my son and his girlfriend. They needed more storage in their kitchen.
Misti B
I had trouble with this project. I wasn't sure of the terminology, off square and such. It went well, I ended up not putting the truss part on due to not paying attention when cutting the wood.
I altered the original plans in the following ways:
I'm not that experienced with projects so here are a couple of things I learned:
Thanks for the great plan! Now I can start on all the other projects on our improvement list.


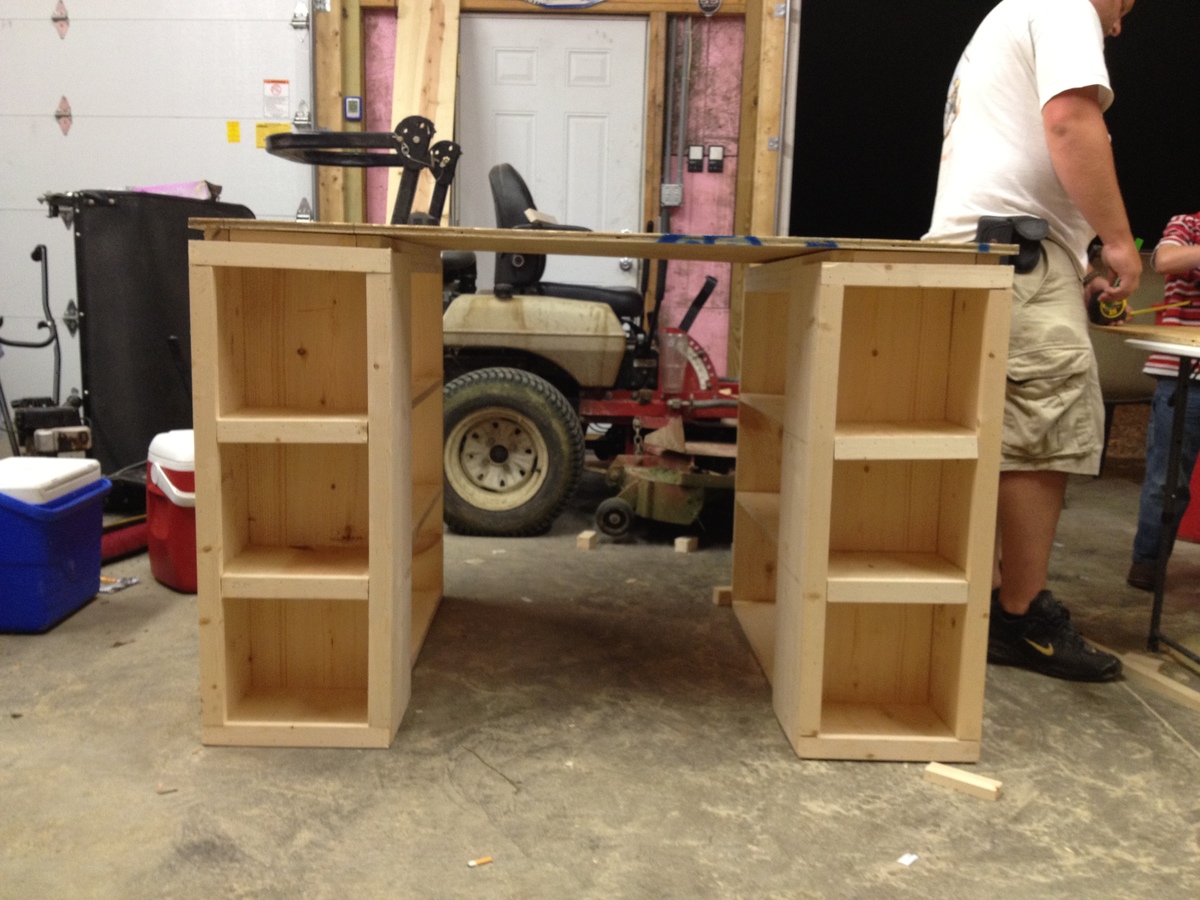
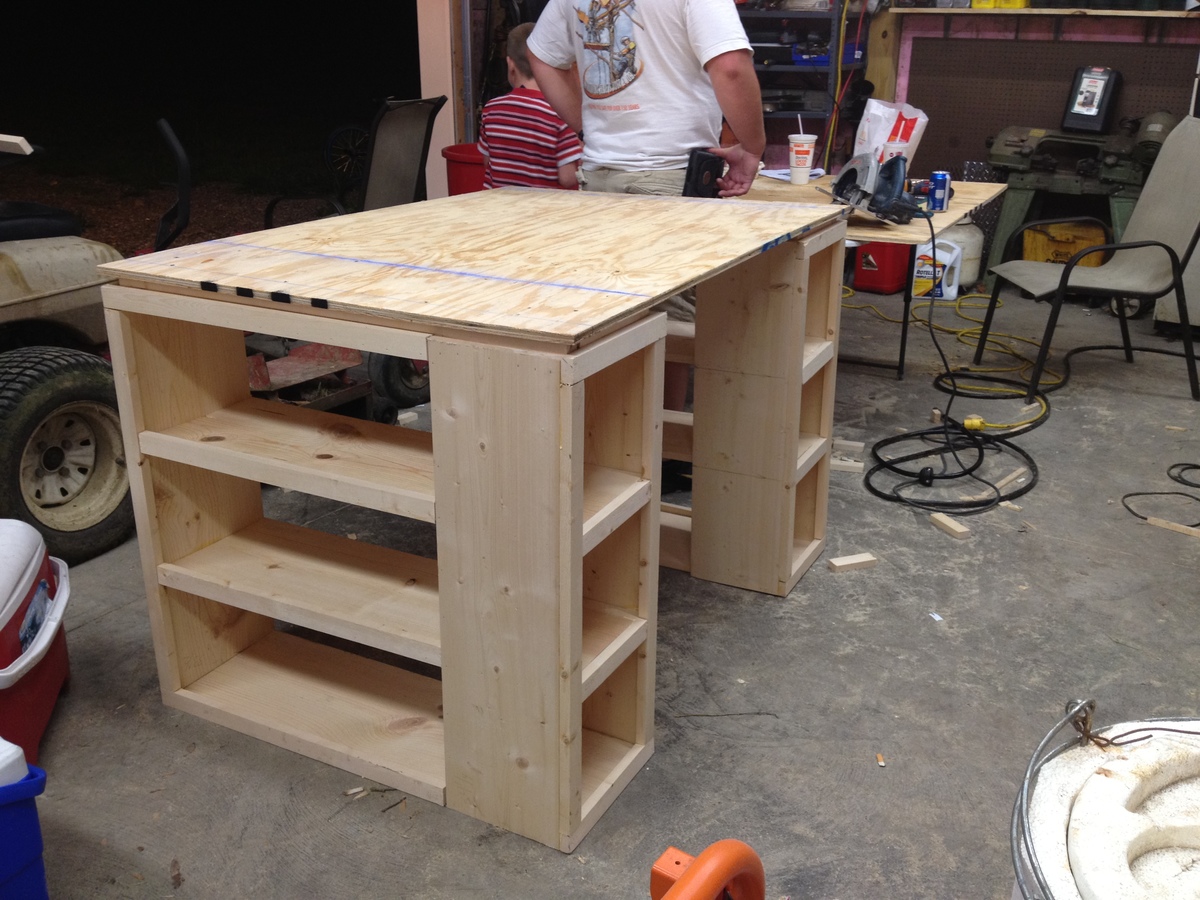
This is my very first Ana White build! I needed a table to go into my craft room and stumbled upon Ana White. What an AMAZING site! After browsing and finding many projects i would like to give a whirl i finally decided on this modern craft table. My husband and I have worked together on many different projects and decided we would try this one. The plans were very easy to follow although we did make a few mistakes along the way. I painted it white and finished with several coats of poly. All in all we love it and have a list of other builds to do next.
Make sure to check us out at SouthernChicLove.Blogspot.com!

This is not my first build, as I built some tables for my shop using various plans.
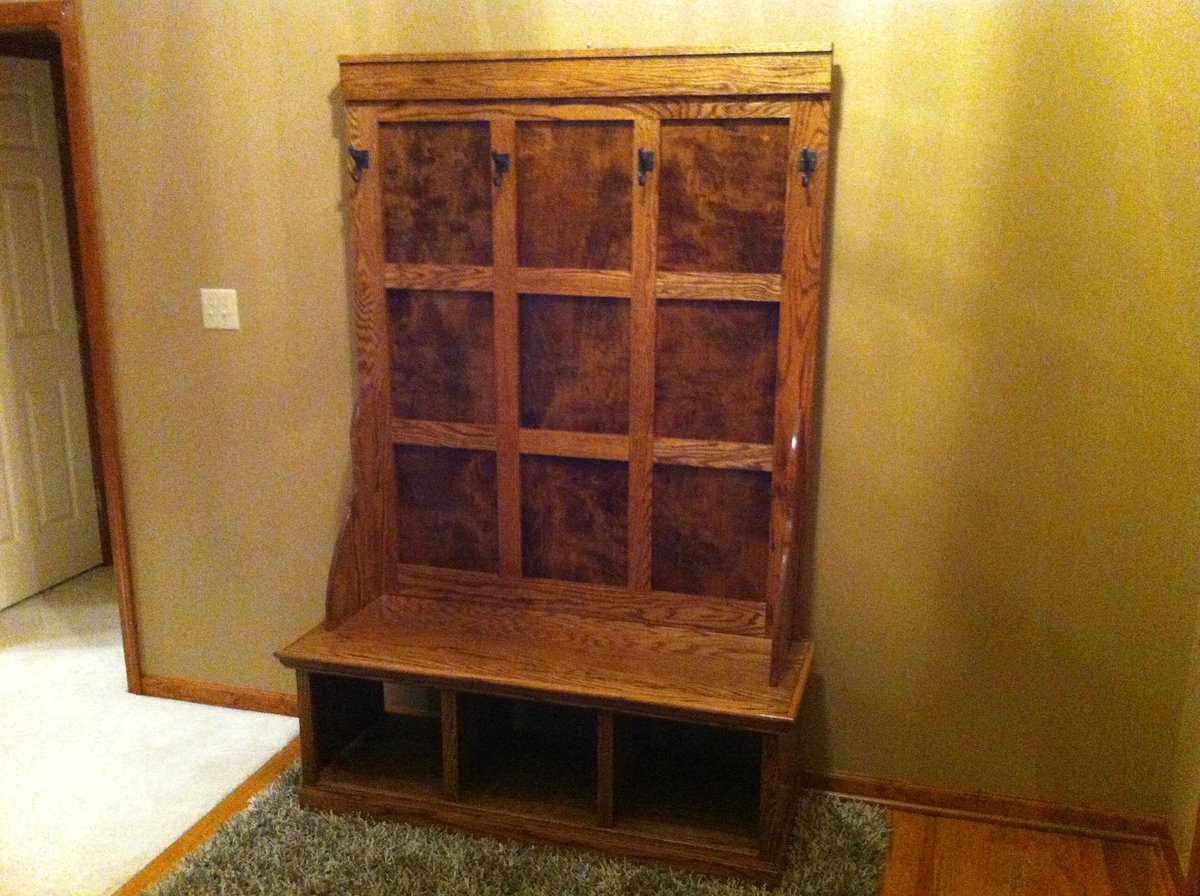
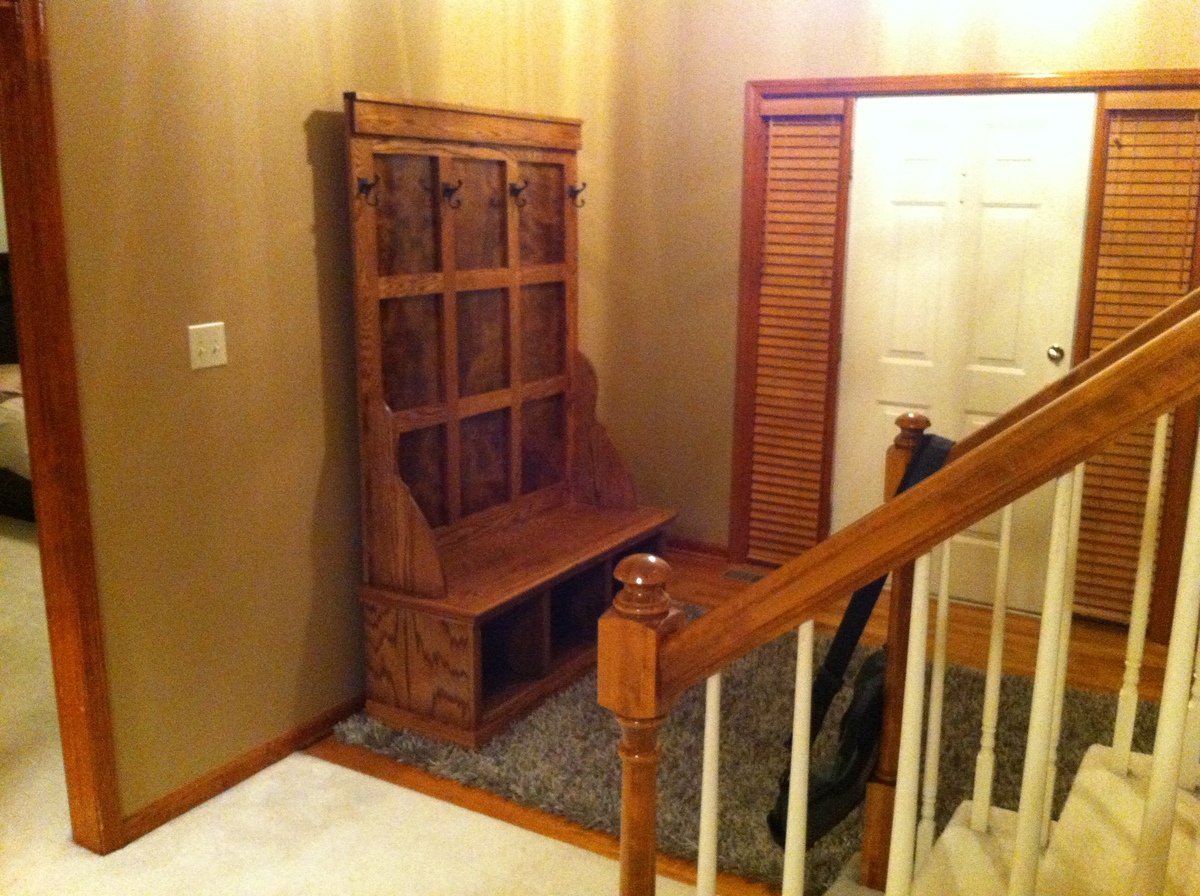
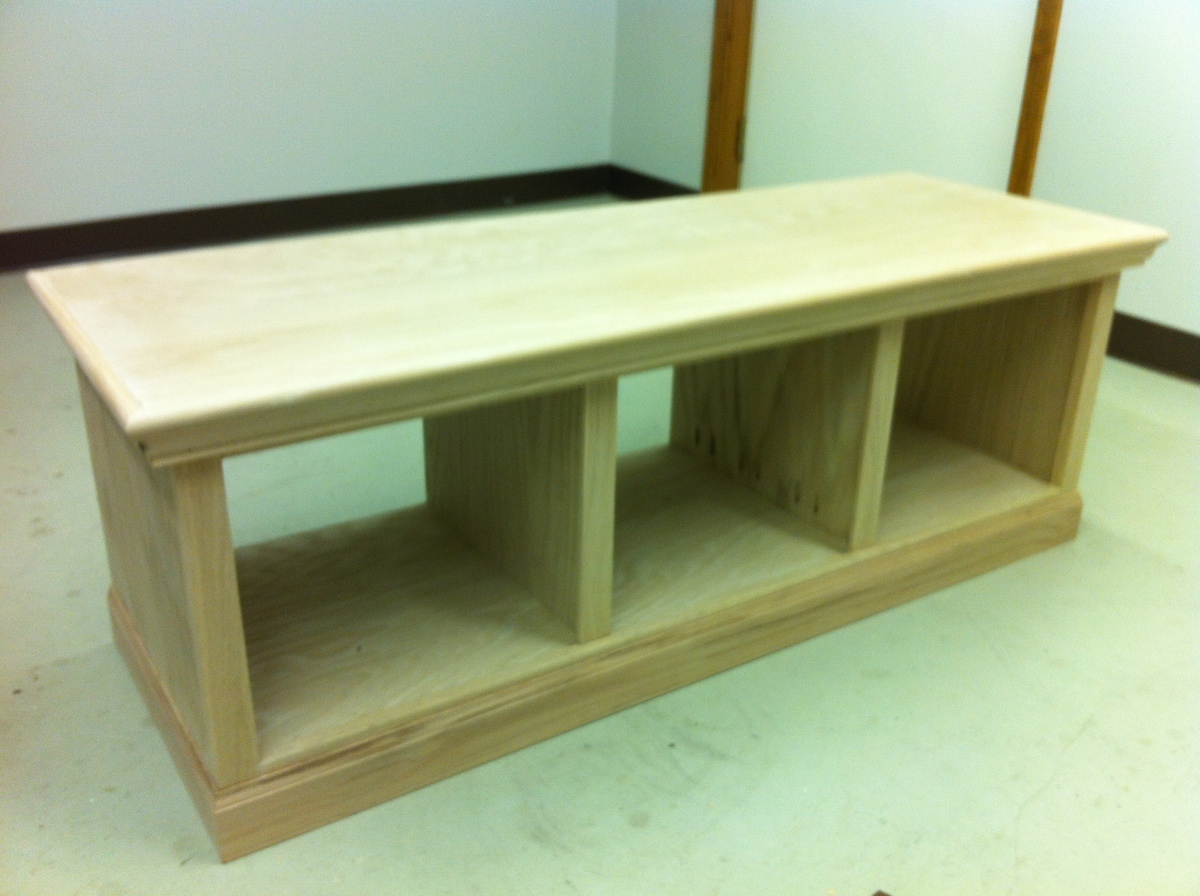
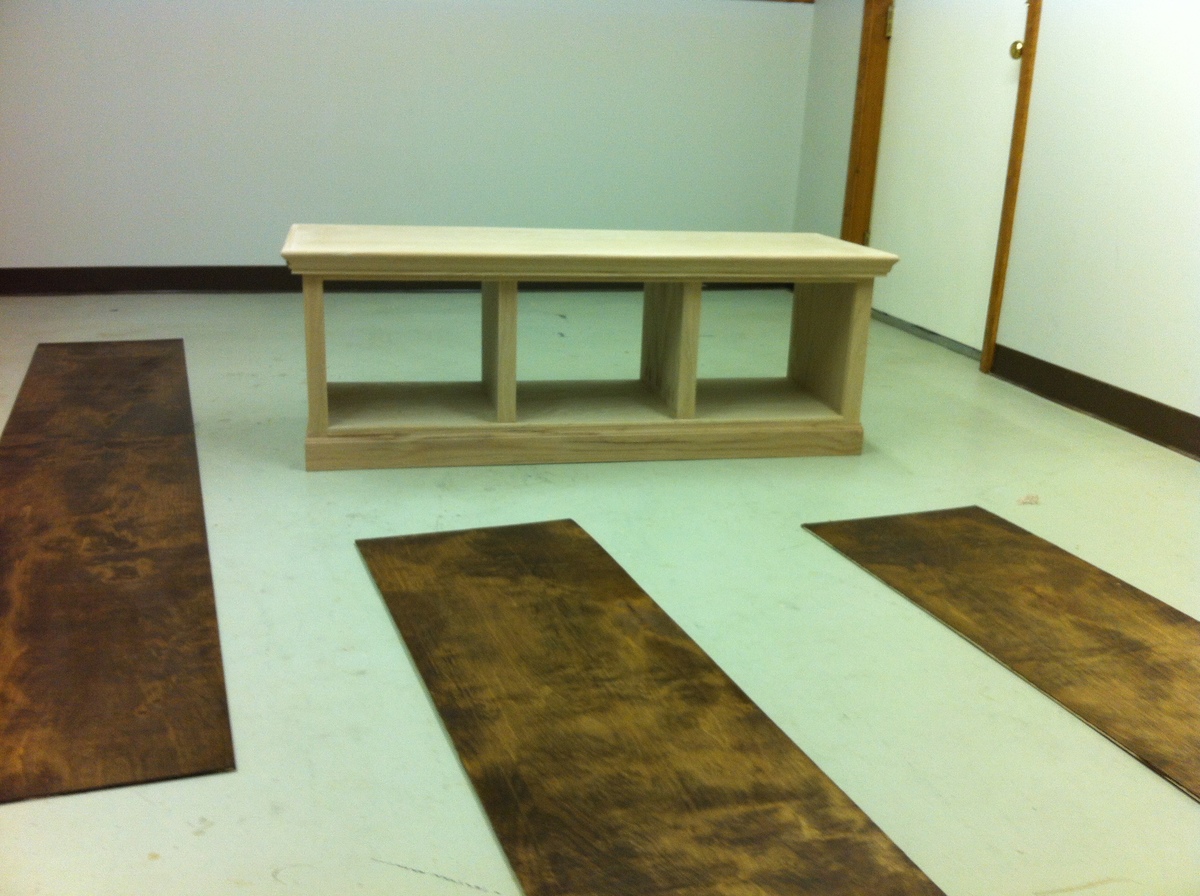
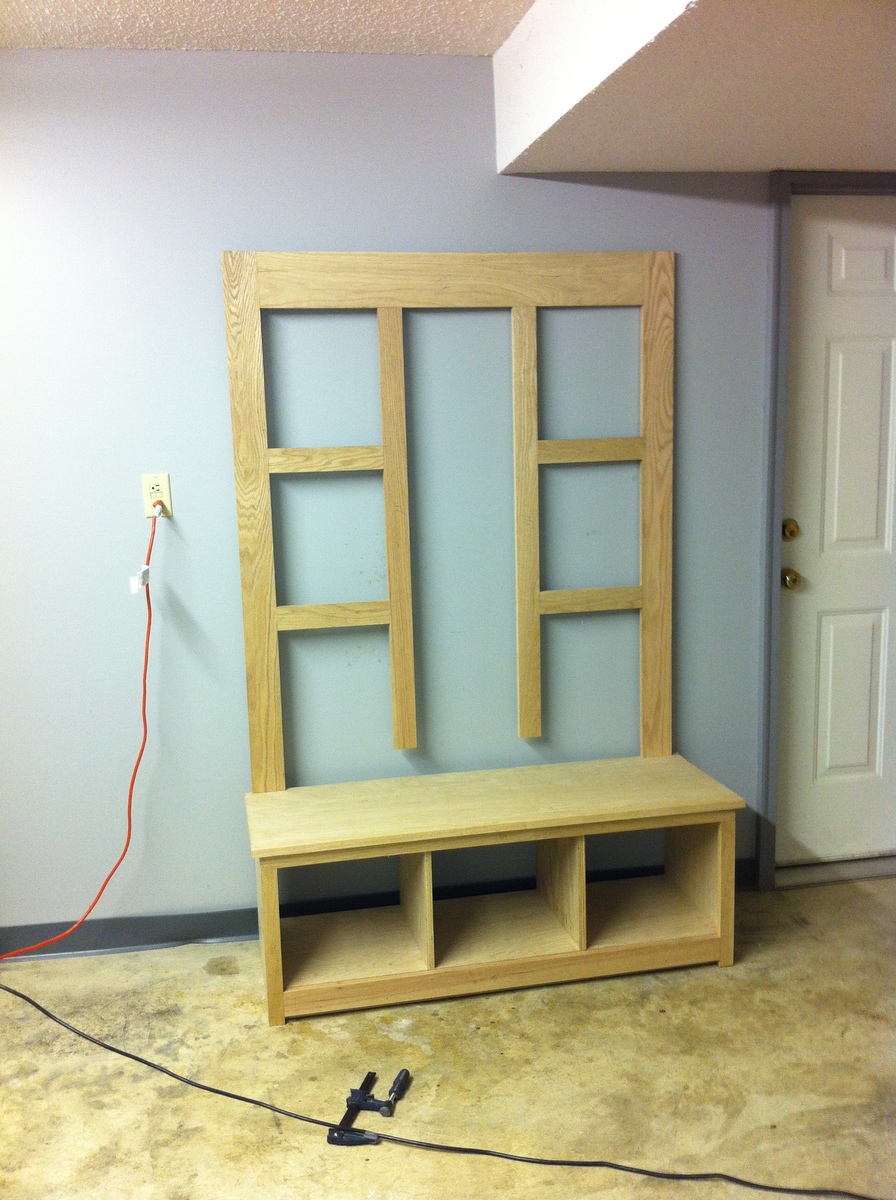
Anyway, here it is, the hall tree! I changed up the trim a bit. So much of me went into this, and a couple of times I pulled out the crowbar and started over on the moulding and on the cross supports on the top because I was a bit of a perfectionist... something I need to learn to control with this new found hobby.
Let me know what you think! Already the picture have about 50 likes on my facebook and people want me to build them one! I think I'll just send them the link... !!!

Sat, 04/06/2013 - 09:03
What did you use for the back plywood panel? Oak? I'm having difficulty finding oak plywood in anything except 3/4", and it looks like there's a contrast between wood types. Is that just a difference in stain or difference in wood?
Thanks!
Thu, 10/16/2014 - 08:35
I love your version. I really like the moulding that you put on the top piece of the bench. Since there is a lip on the top piece (overlaps the bottom section of the bench), how did you attached the moulding so that the top of it lays flat and flush with the top piece? I assume that you made some sort of hidden spacer between the lip and the moulding. Is that correct?
Also, how did you attach the back plywood to the decorative cross beams, finish nails?
Thanks for sharing!
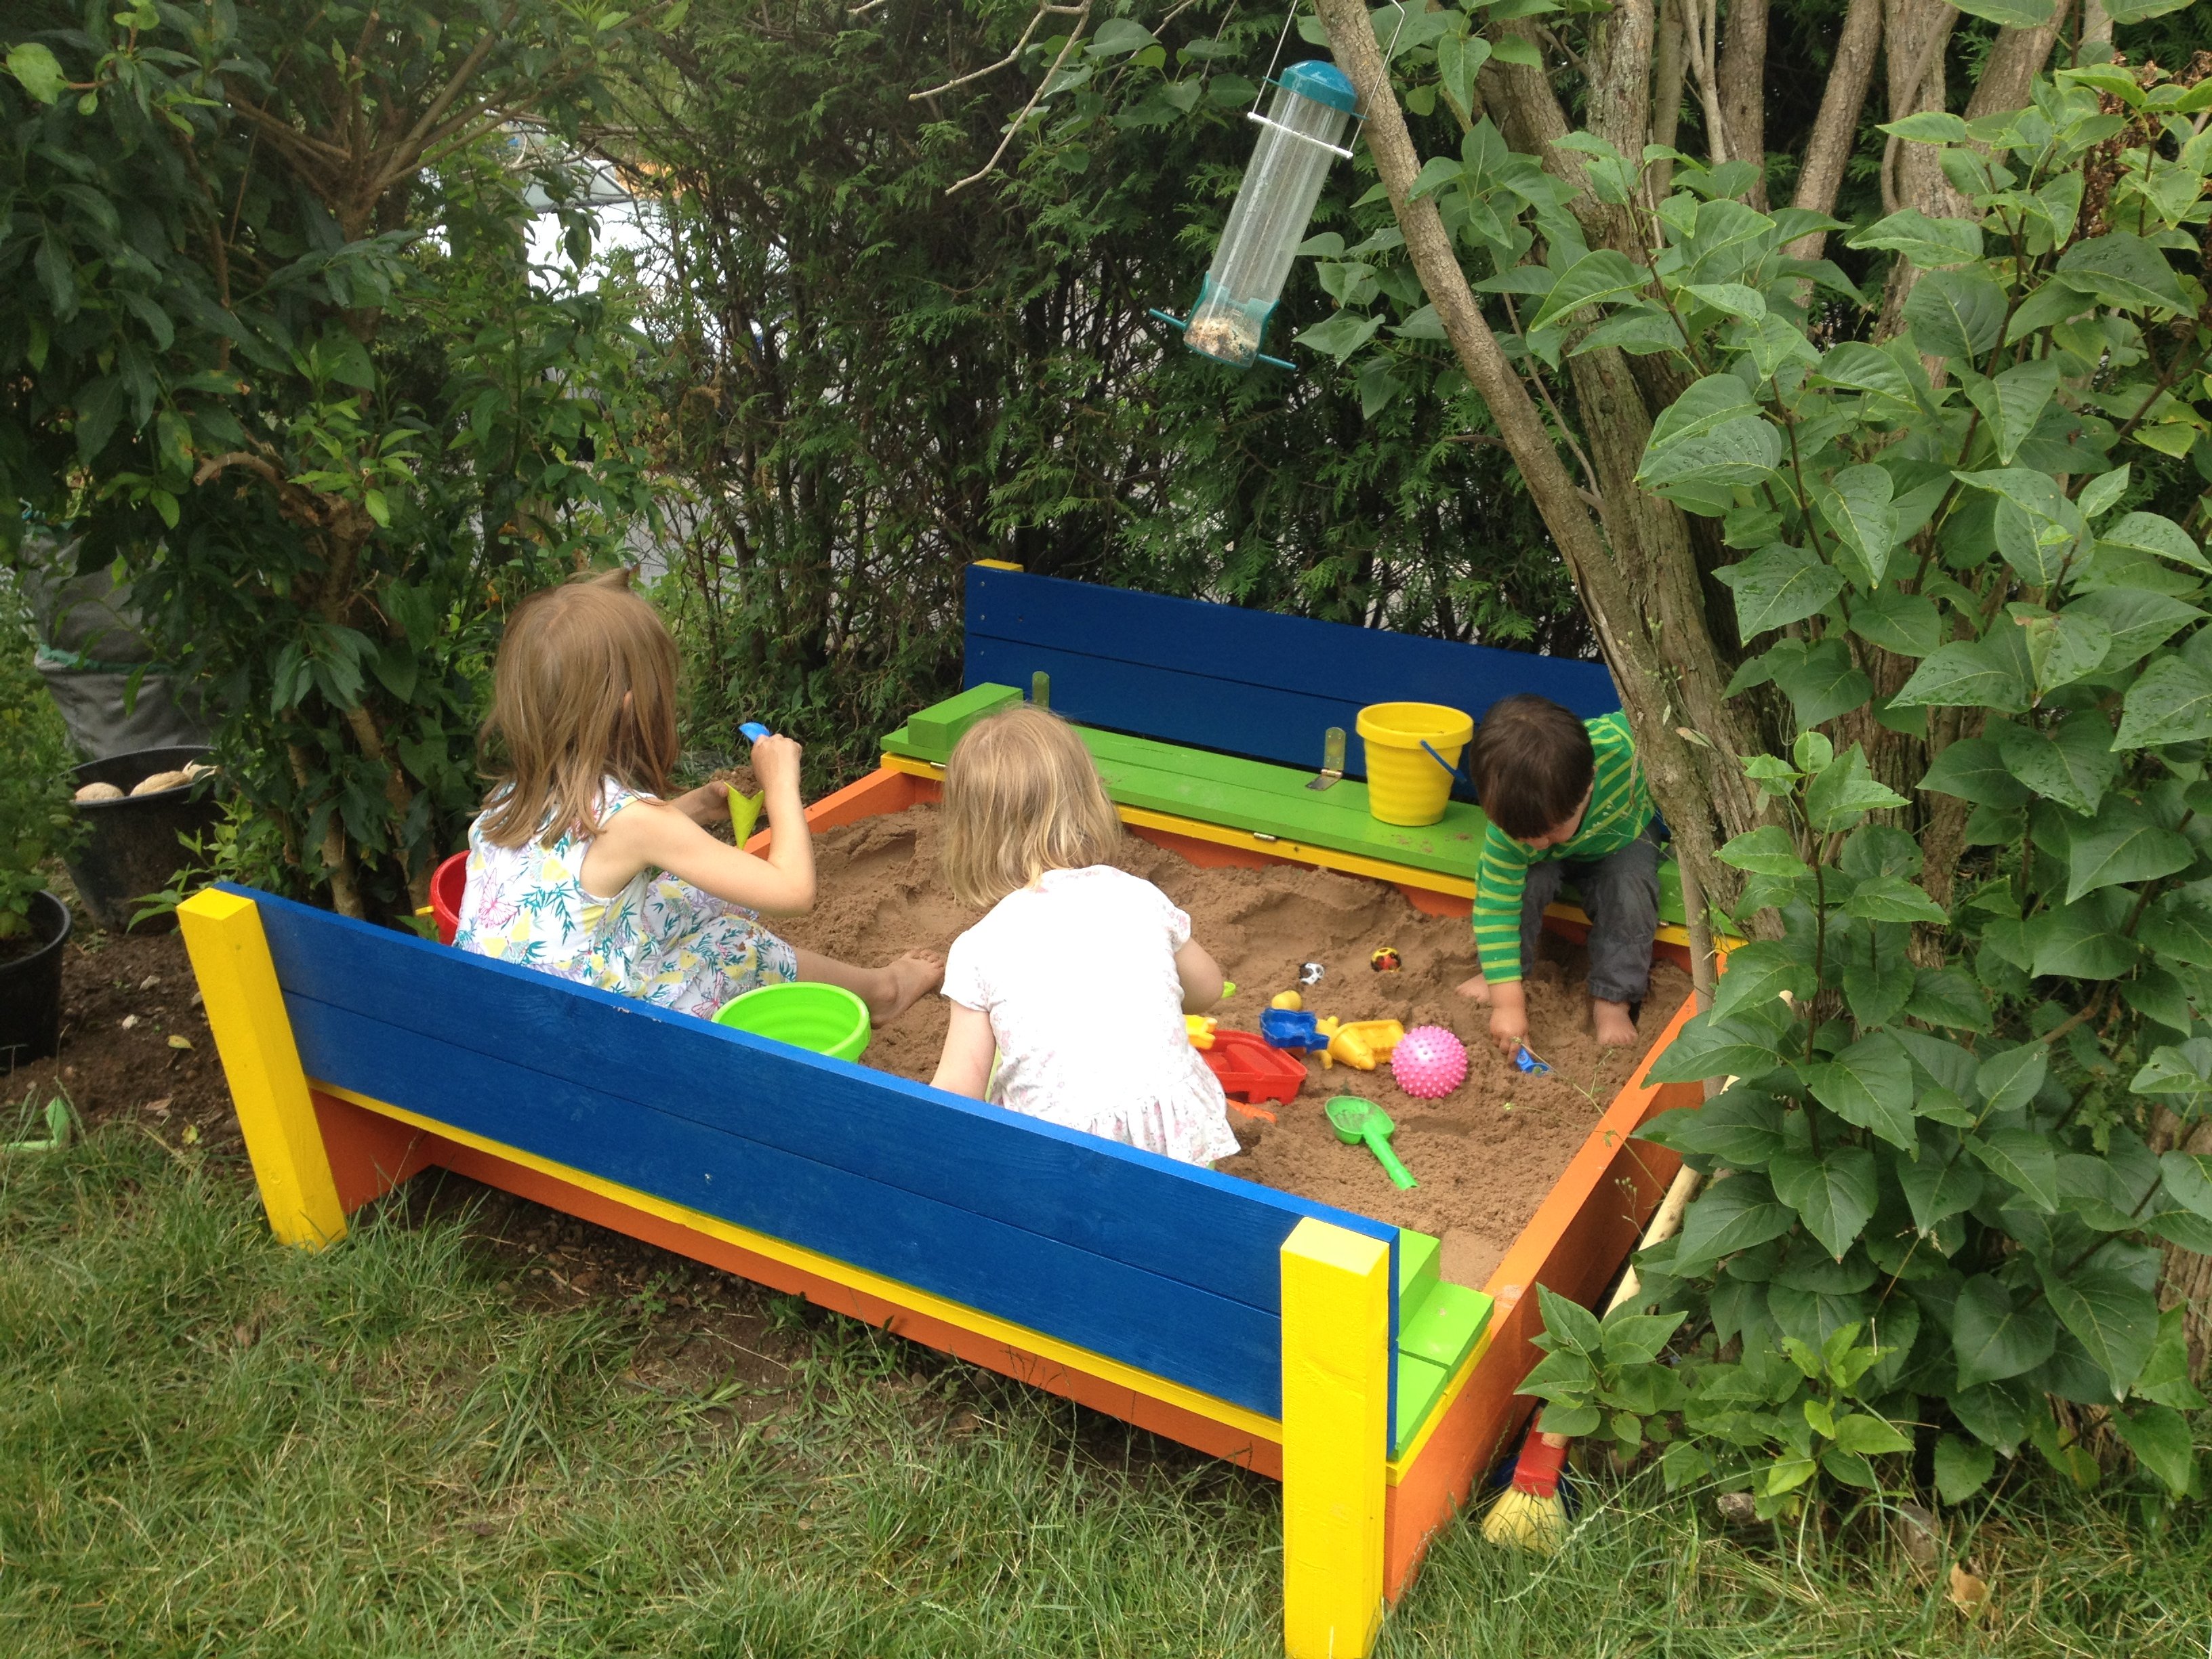
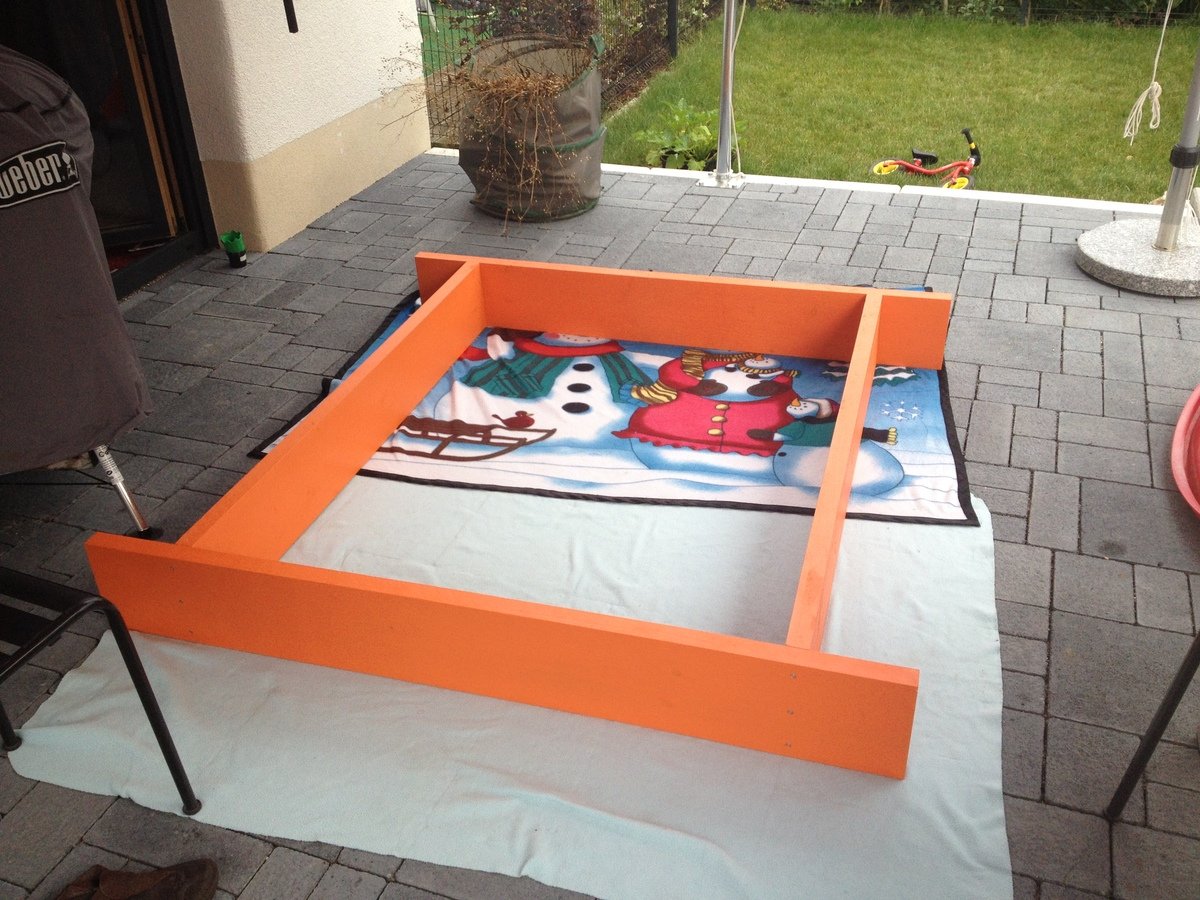
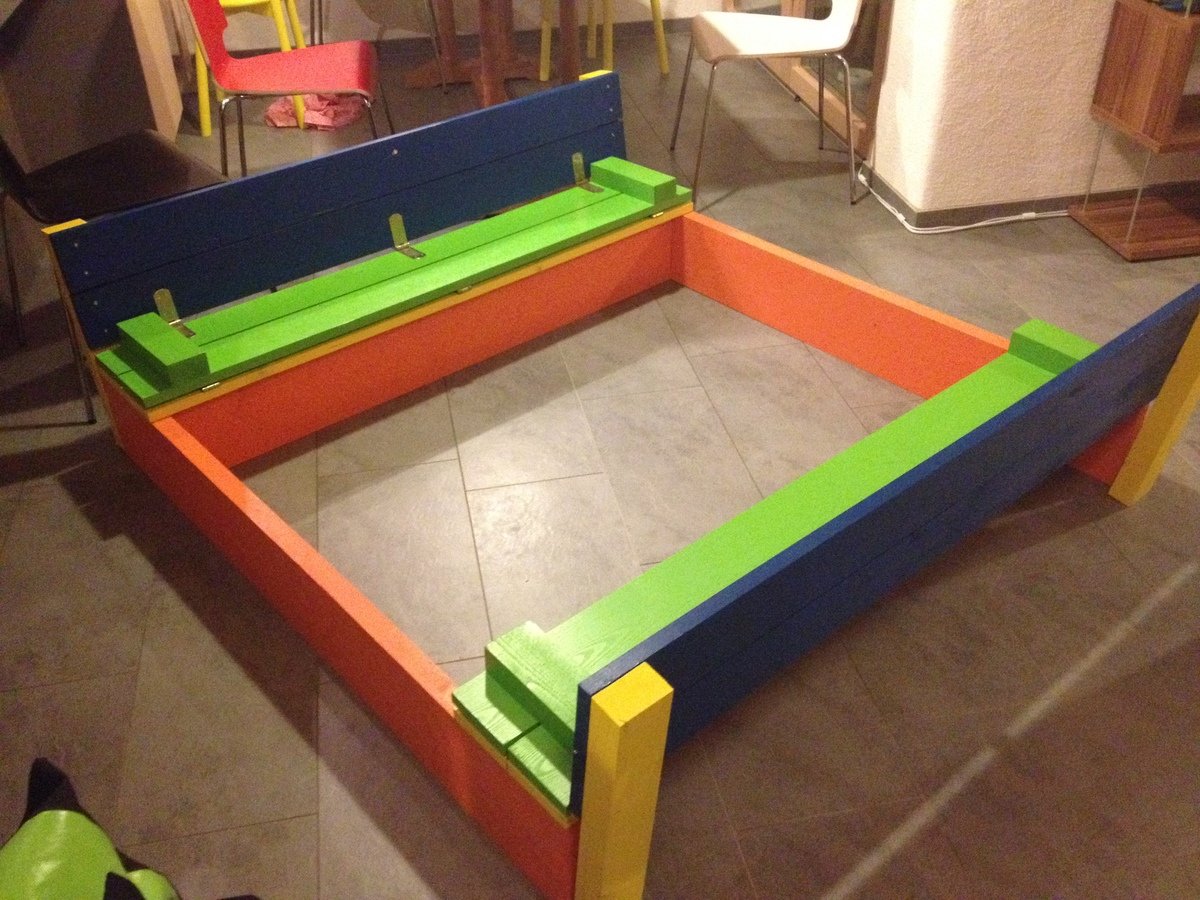
This was our first build from this website and we are so pleased! Having seen very involved plans on an Australian website for a similar sandpit, I was so pleased to come across this version, with its far simpler design!
We wanted a slightly bigger sandpit, so I needed to do some modifications, and while I was enlarging it, I also converted to metric sizes, and designed specifically for the timber I knew I could buy locally (very obscure and inconsistent seeming German sizes). So the end result is a 1.5x1.5m sandpit, that has so far had 6 kids playing happily in it at once!
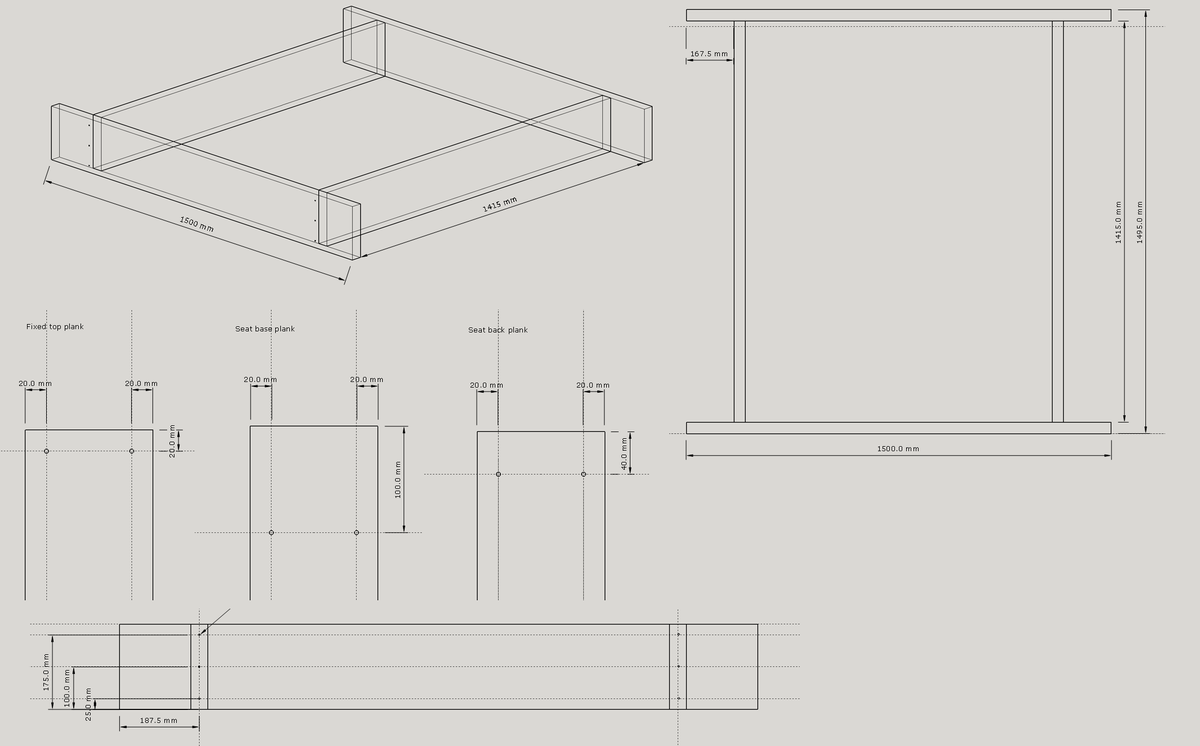
I've put in the drawings I used, and the cutting list for larger sizes in case anyone else is working in metric, or wants a bigger size!
Our other modification was to offset the shorter sections of the base to run along the front plank of the bench seat - there were two main benefits for this - we need a lot less sand, as there is none wasted under the seat, and the seat is supported and can't bow downwards!
The dimensions and layout we used are in the images.
Supplies
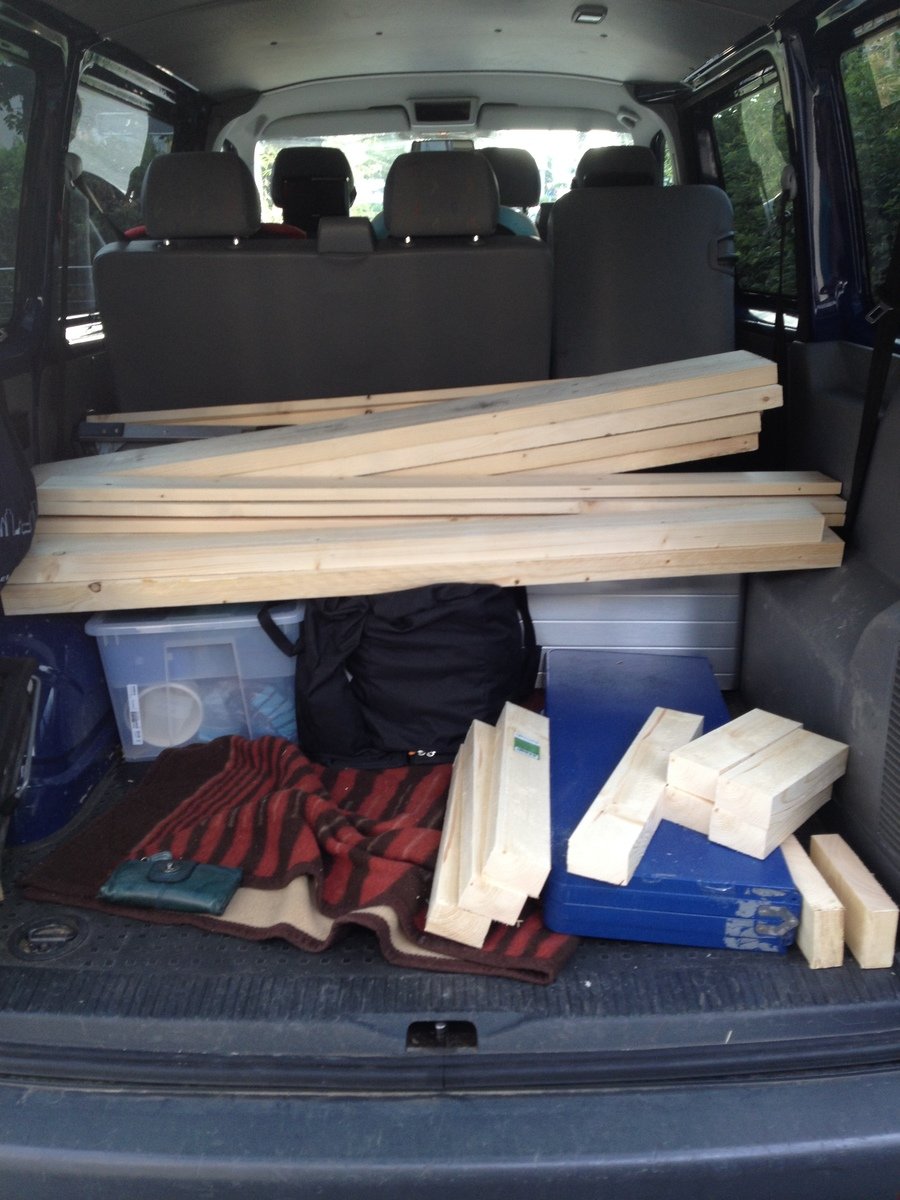
Timber
2 - 200 x 40 x 3000mm
6 - 120 x 24 x 3000mm
1 - 80 x 50 x 3000mm
Hinges
12 - 140mm long (the original design had 8, we went with three per edge to allow for the extra width)
Self tapping decking screws
18 - 5 x 80
48 - 5 x 50
96 - 3 x 20 (or enough for your hinges, depending on the design)
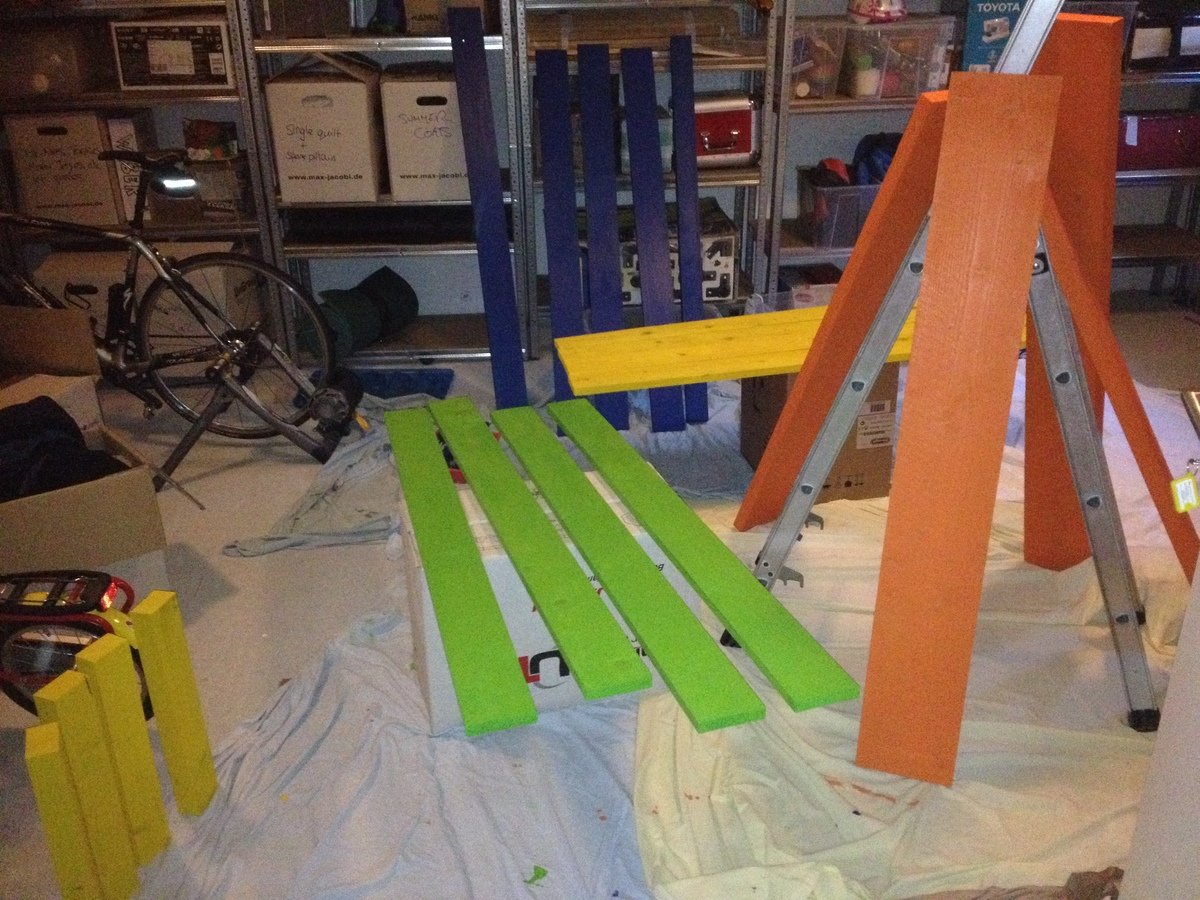
Paint
3 - 375ml PU Acrylic Paint, suitable for exterior use (top planks and seat supports)
1 - 750ml PU Acrylic Paint, suitable for exterior use (base)
Weed matting and staple gun
Sand
I calculated I would need 20 x 25kg bags - in the end we needed 11 - don't ask me where we went so wrong!
Cutting list
2 - 200 x 40 x 1500 (long sides of base)
2 - 200 x 40 x 1415 (short sides of base)
12 - 120 x 24 x 1495 (top slats - just under half a plank, to allow for waste)
4 - 80 x 50 x 245 (armrests / seat braces)
4 - 80 x 50 x 495 (back supports of seats)
I gladly paid 5 Euro for the wood to be cut in Hornbach - it should have been more than this, but the guy was generous!
12 hinges (the original design had 8, we went with three per edge to allow for the extra width)
On Sunday we had the idea, on Monday I drew up the plans, on Tuesday I went shopping! Once all our wood was home safely, we sanded it down - most edges weren't badly finished, but there were a few splinters that needed getting rid of!
The next two nights Mr W gallantly set to work with the paint brush. After two nights, the wood all had two good coats of paint and we were ready to start assembling on Friday.
I pre-drilled the base of the bench before the second coat of paint - three holes for each butt joint - with some careful measuring this made screwing the base together really easy!
The top planks were also pre drilled, but there unfortunately my tiredness made me make mistakes, and some had to be re-drilled! Spacing the planks out took a lot of time, but I am glad I made the effort. I used cereal box, and experimented with different numbers of layers - I knew I wanted a theoretical 5.4mm gap, but it took some time to get the right number of layers of carefully creased and concertinaed card!
Having got our spacing wedge sorted, we screwed the blue planks in place at either end of the base. We then assembled the green seat section, and the blue/yellow back rest. Following a tip from the comments section, we added the hinge to the seat/back combo first, as this ends up being on the underside. Once those two hinged sections were made, they were then laid in place on the base (card wedge spacers in place) and then the final hinges added. The final assembly took about 5 hours - but this was partly because we started outside, then had to move everything inside when a huge thunderstorm rolled in!
The next morning we got busy with the staple gun and tacked weed matting over the base, then it was hauled in to position and filled up! For us getting this done and dusted was important, otherwise it could have dragged on a lot, but we are terribly proud that it was done in less than a week from being fist conceived!
I hope the metric/enlarged plans are of use to someone else too. One other idea we had, which we didn't get round to building in, was a support bar to be fitted when you close the pit, so the kids can play on top as a stage when it is not being used for a sandpit!

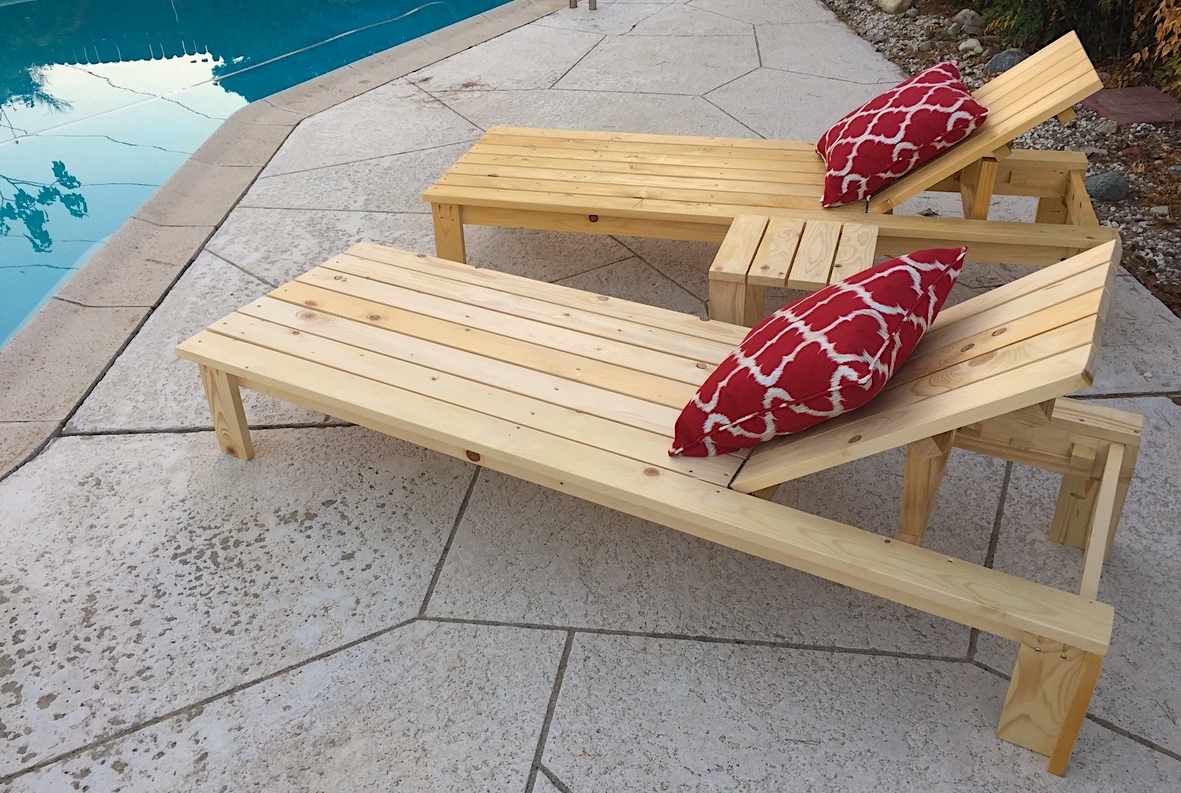
Still needs stain and cushions. Will post finished product once complete.

Made another video of Ana Whit's X table!
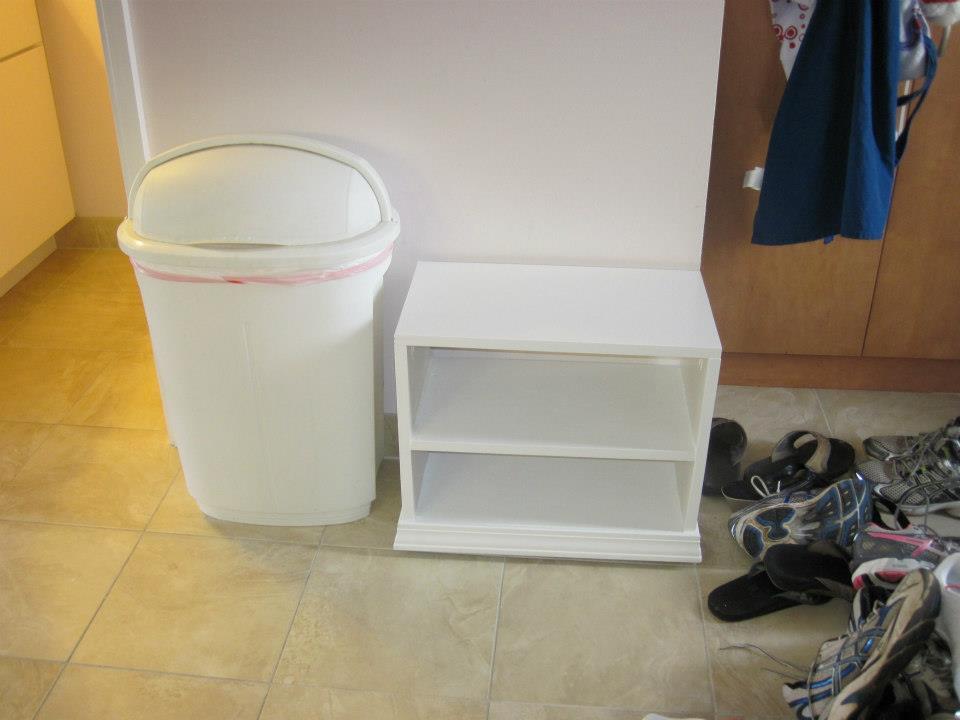
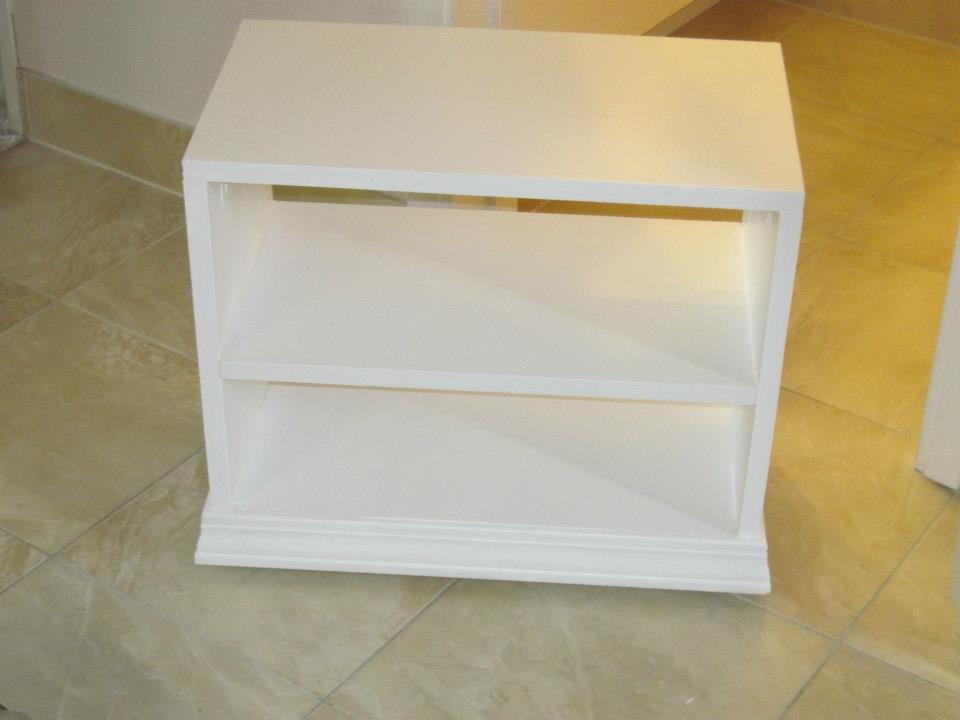
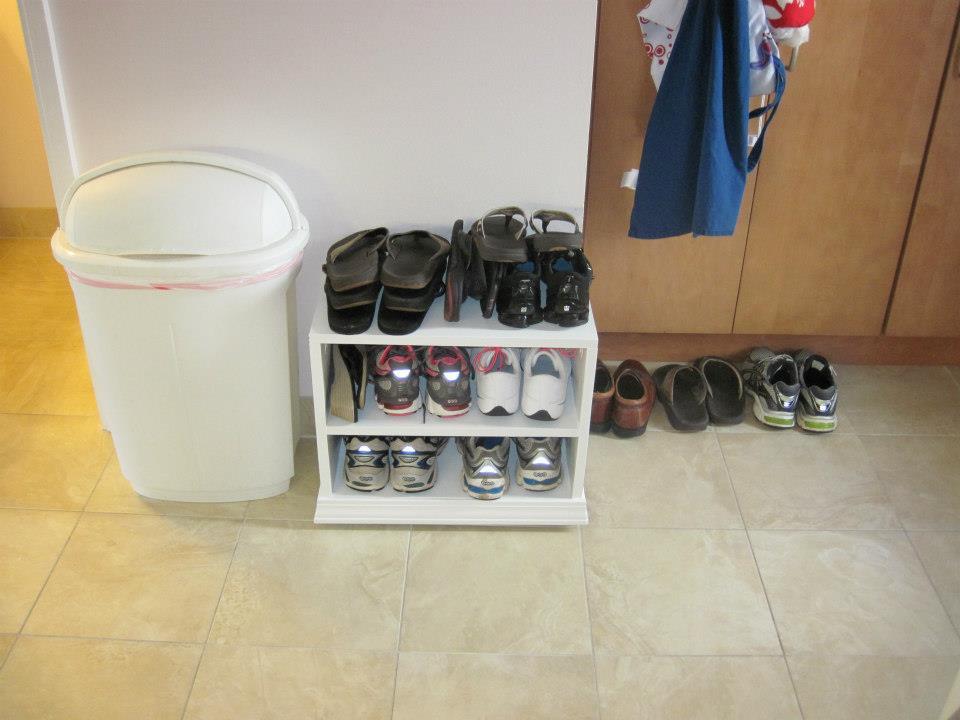
Between my husband and I, we routinely have 10 pair of footwear by the front door. In Hawaii, its tradition that you remove your shoes at the door. Unfortunately for us, our condo doesn't have much room by the door. As such, there would often be a pile of footwear as you entered the unit, which is the kitchen. I have tried various shoe organizers over the years, and none really fit the bill, or the space we had. So I built one myself.
Its a pretty basic box, with 1 fixed shelf. All joined with my Kreg jig (of course). I also attached some casters on the bottom to make it easier to move out of the way if needed. After assembling and painting, I picked up some moulding and added it to the bottom, which helped to hide the casters. Then I used some old liquid nail/caulk I had to fill in the holes.
Painted the arms in a metallic onyx paint, shelves are Briwax dark brown.
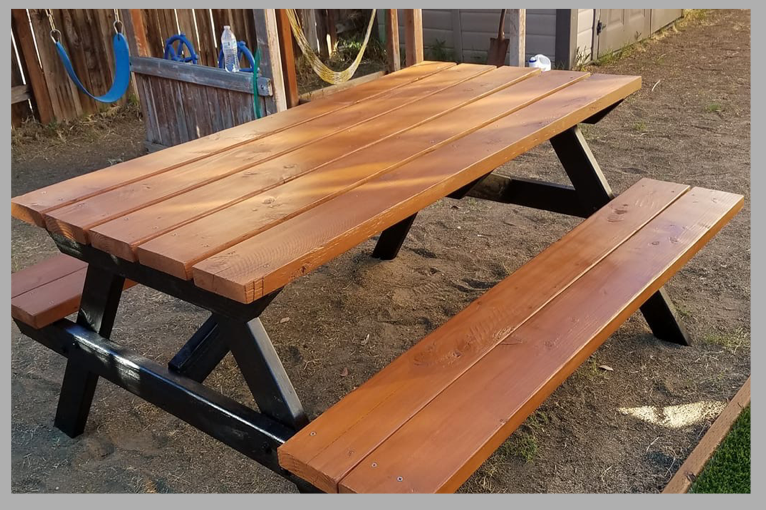
I built this picnic table while I was pregnant with my youngest. It was an addition to our outdoor kitchen. Came out pretty good, thanks to Ana's plan.
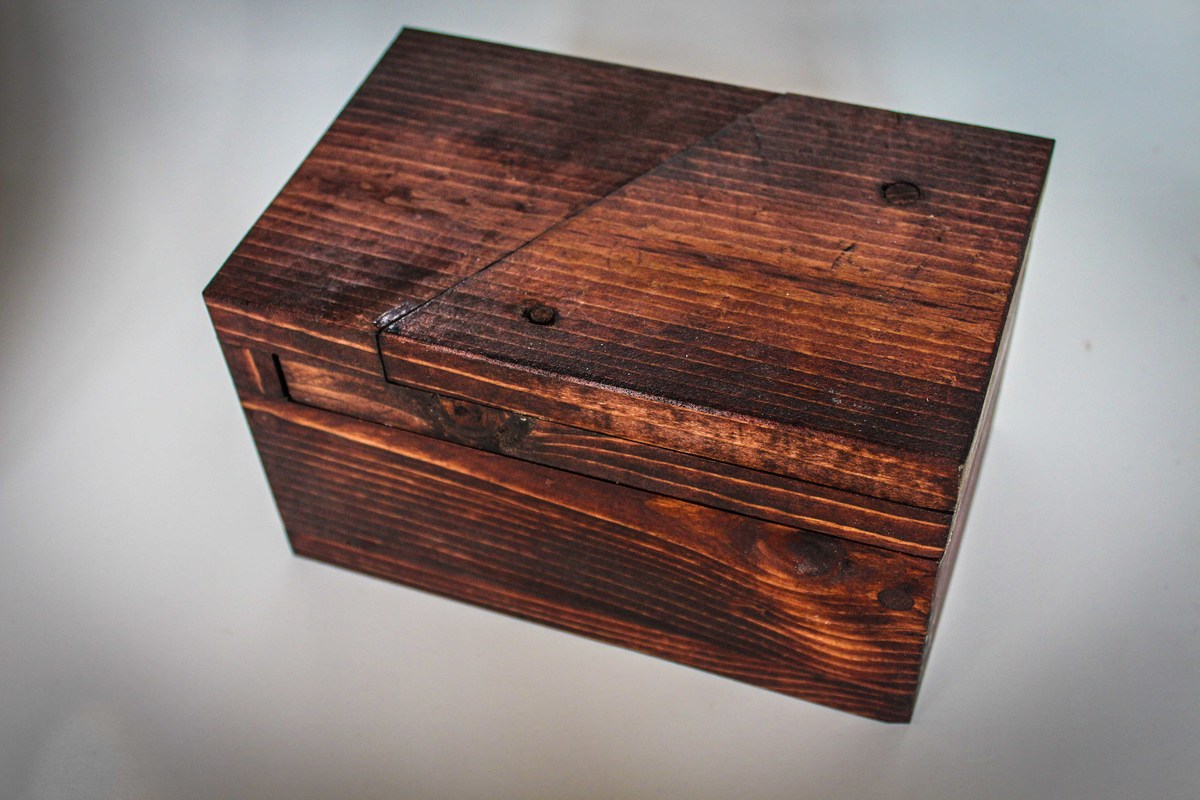
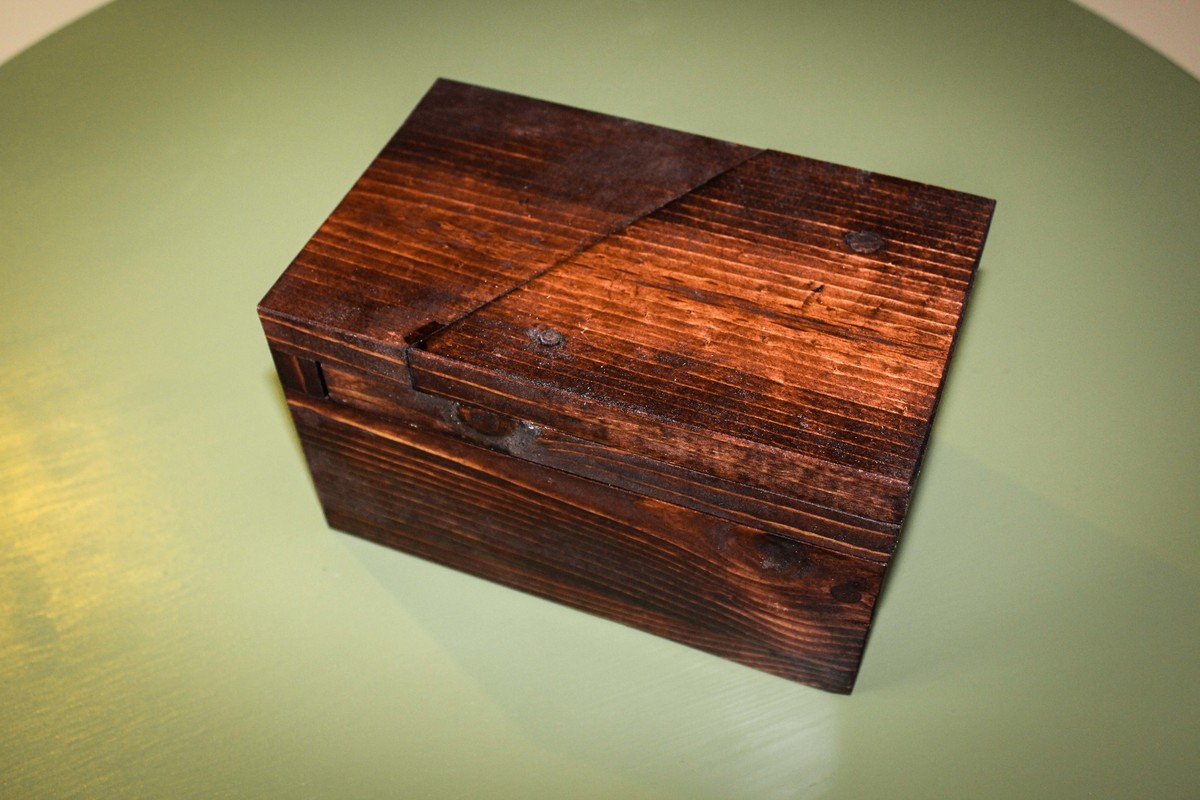
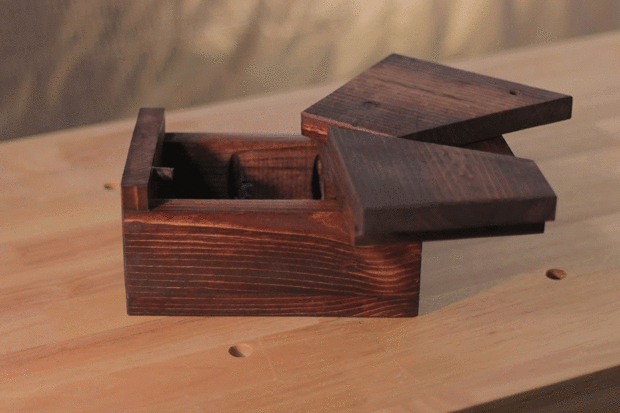
This is a simplified version of the Unabox from Make Magazine.
Build Instructions:
http://www.instructables.com/id/Puzzle-Box-Unabox/
Video:
http://youtu.be/VTaoUHsGau8
If you like this, please see my other puzzle box.
http://www.instructables.com/id/Puzzle-Box-4/

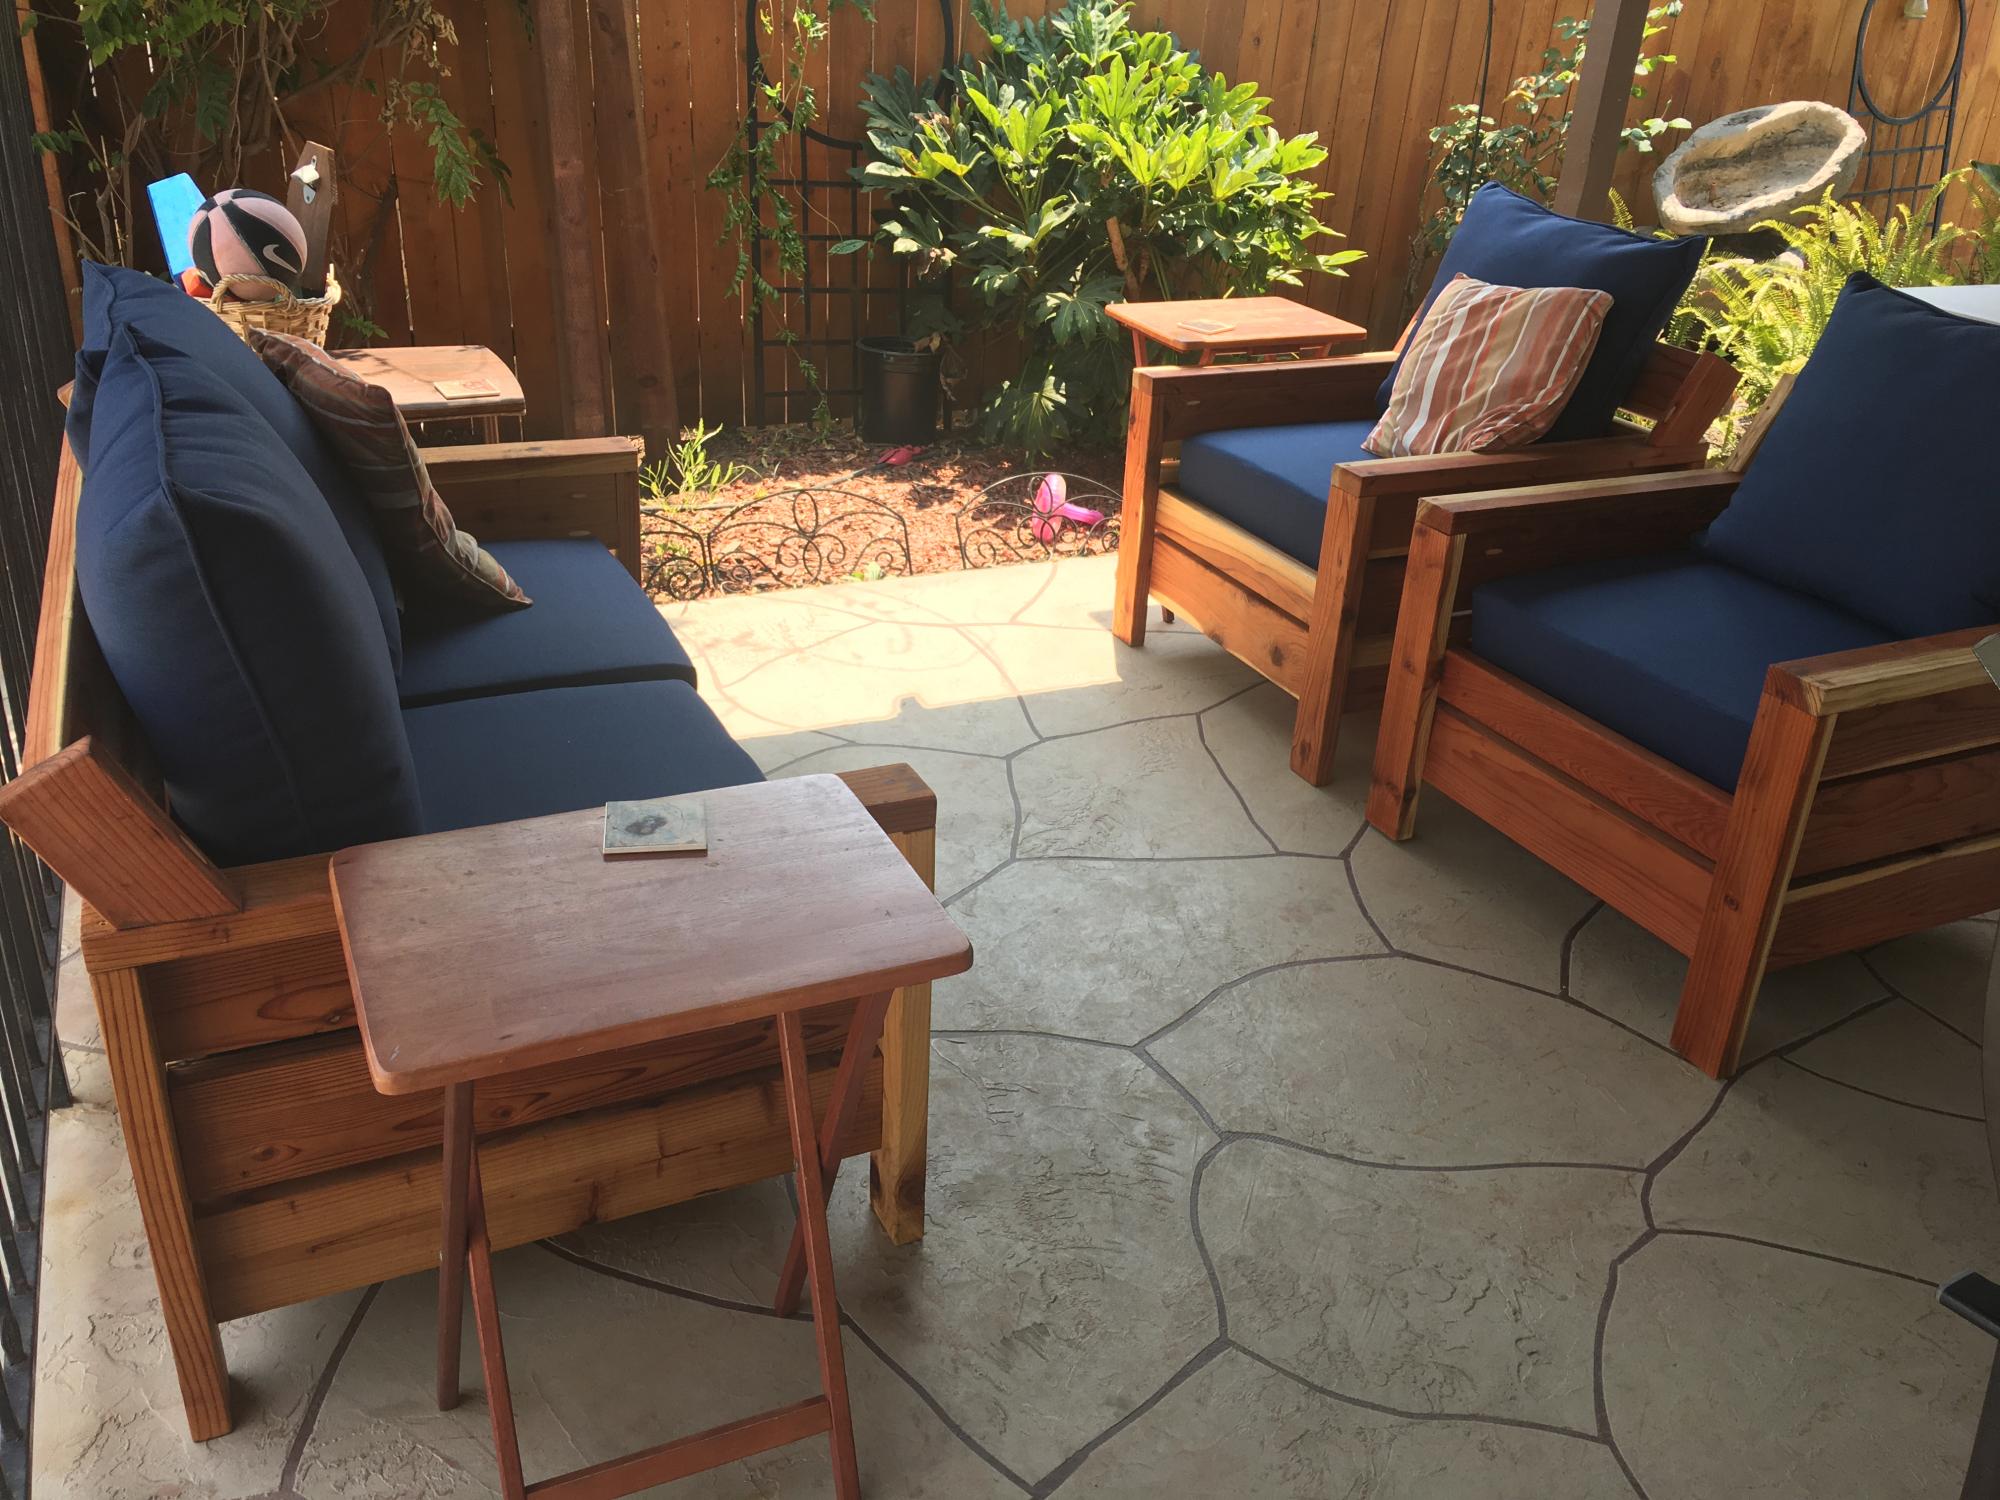
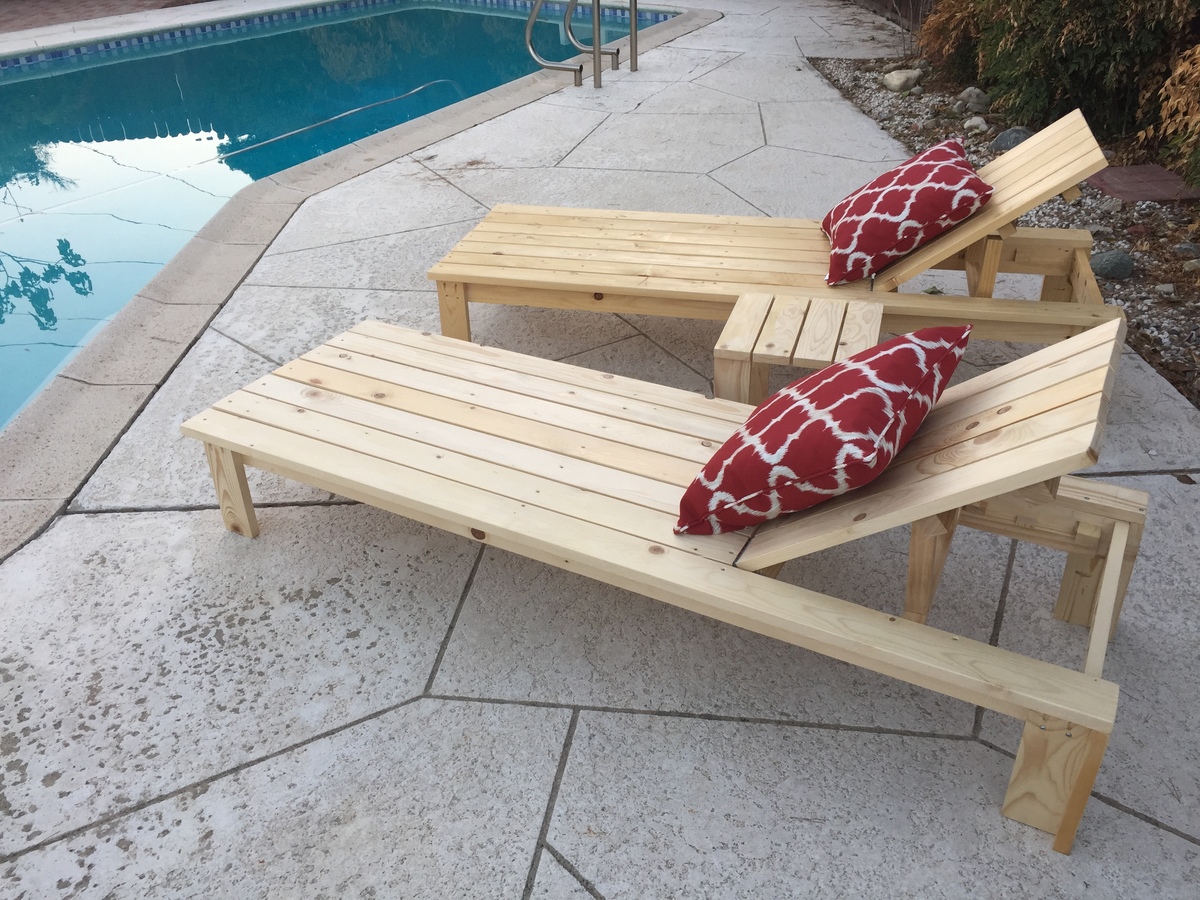
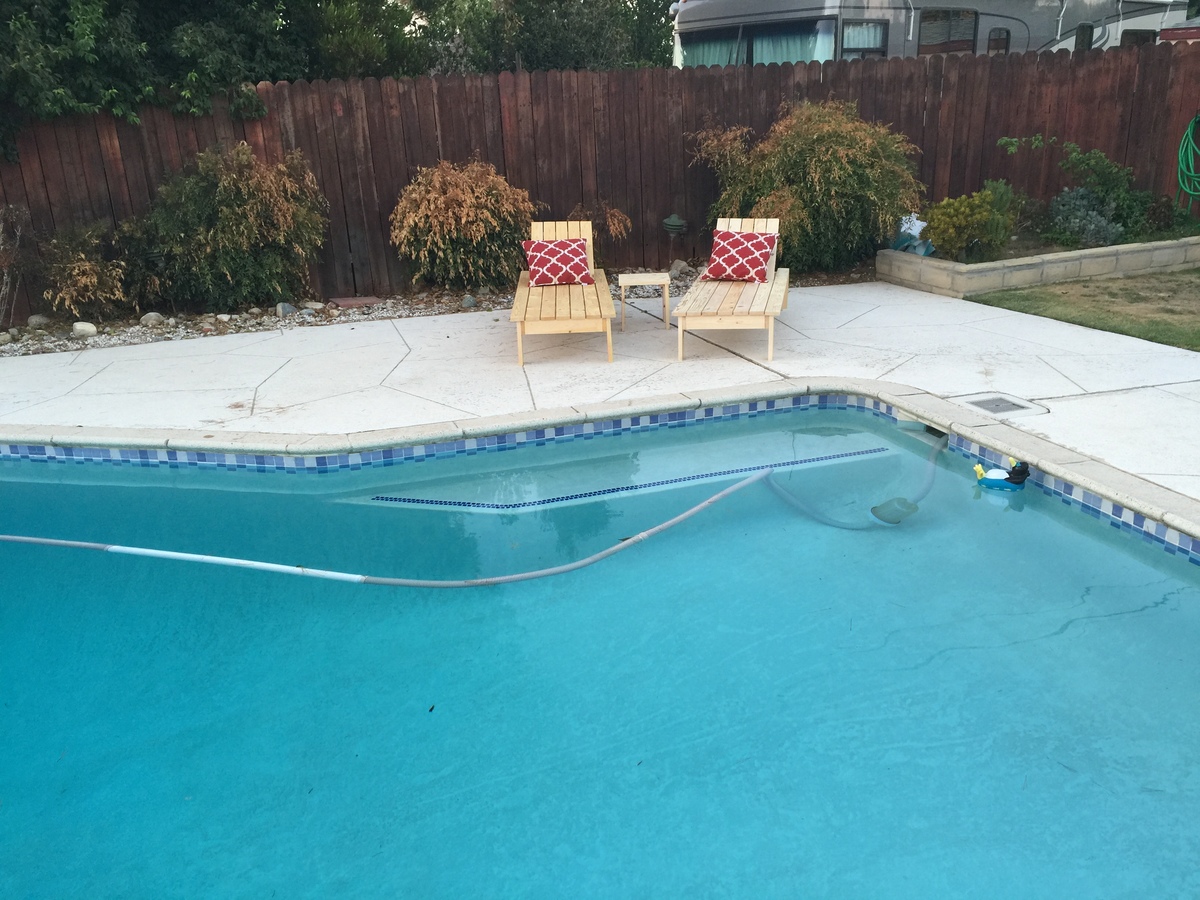
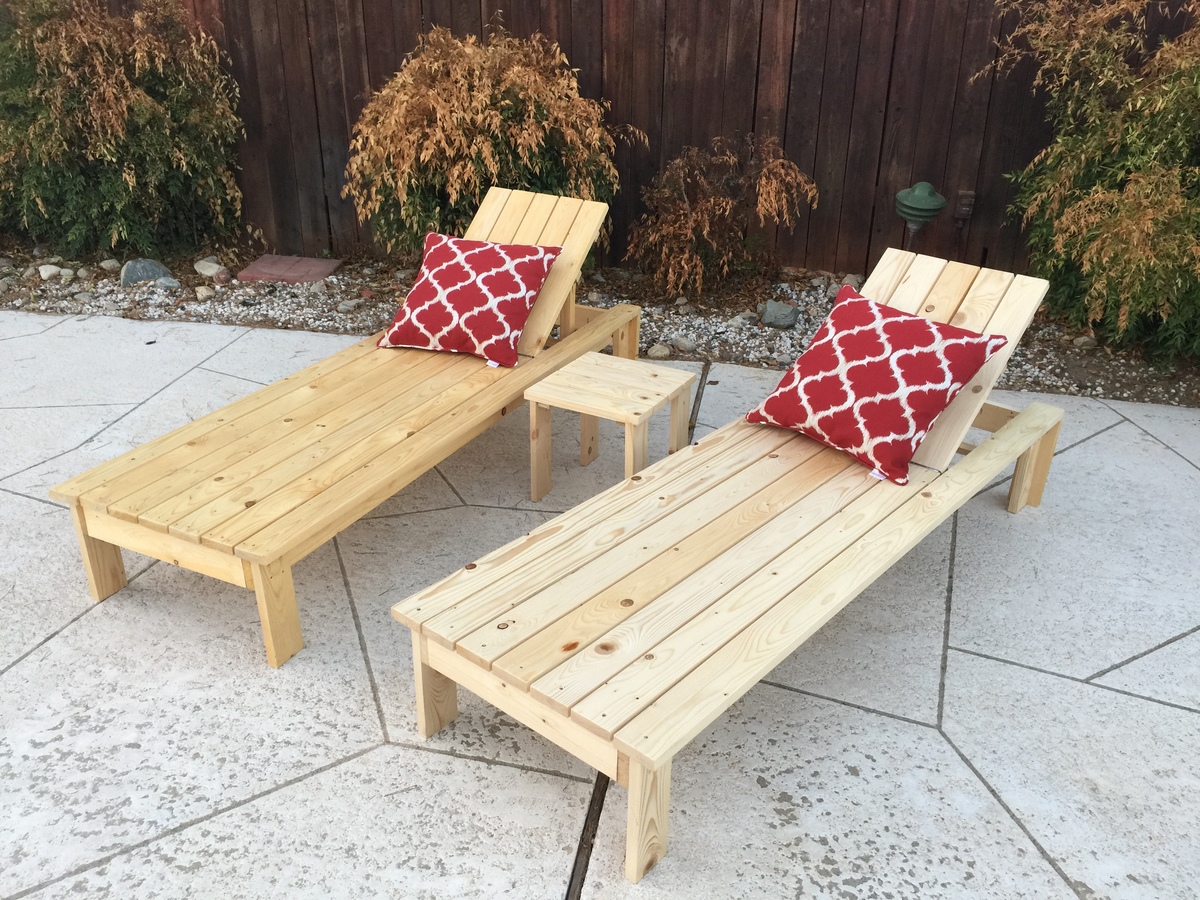
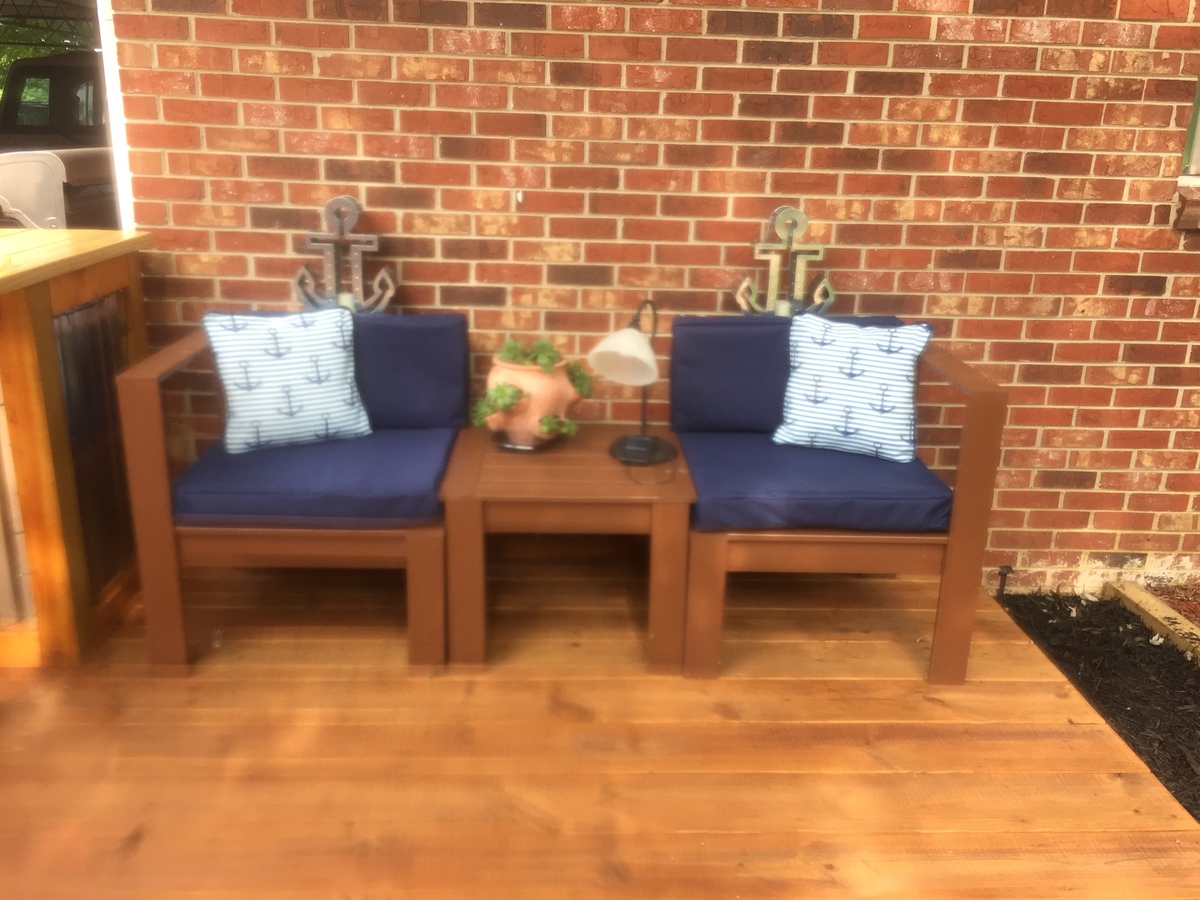
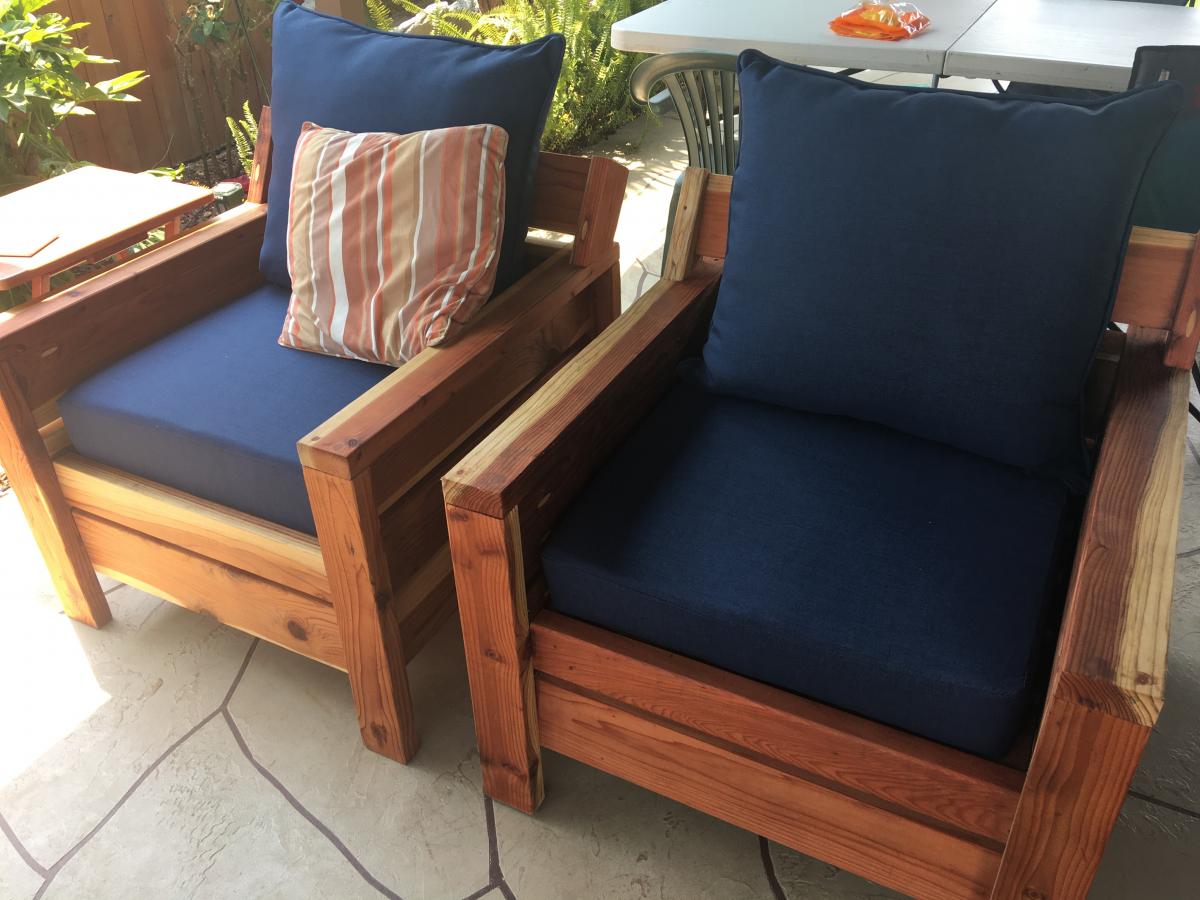
Saw some of the other brags which includes a raised backrest so I incorporated that into my build. There's a 30 degree angle on the backrest (two 2X4's and one 2X6)
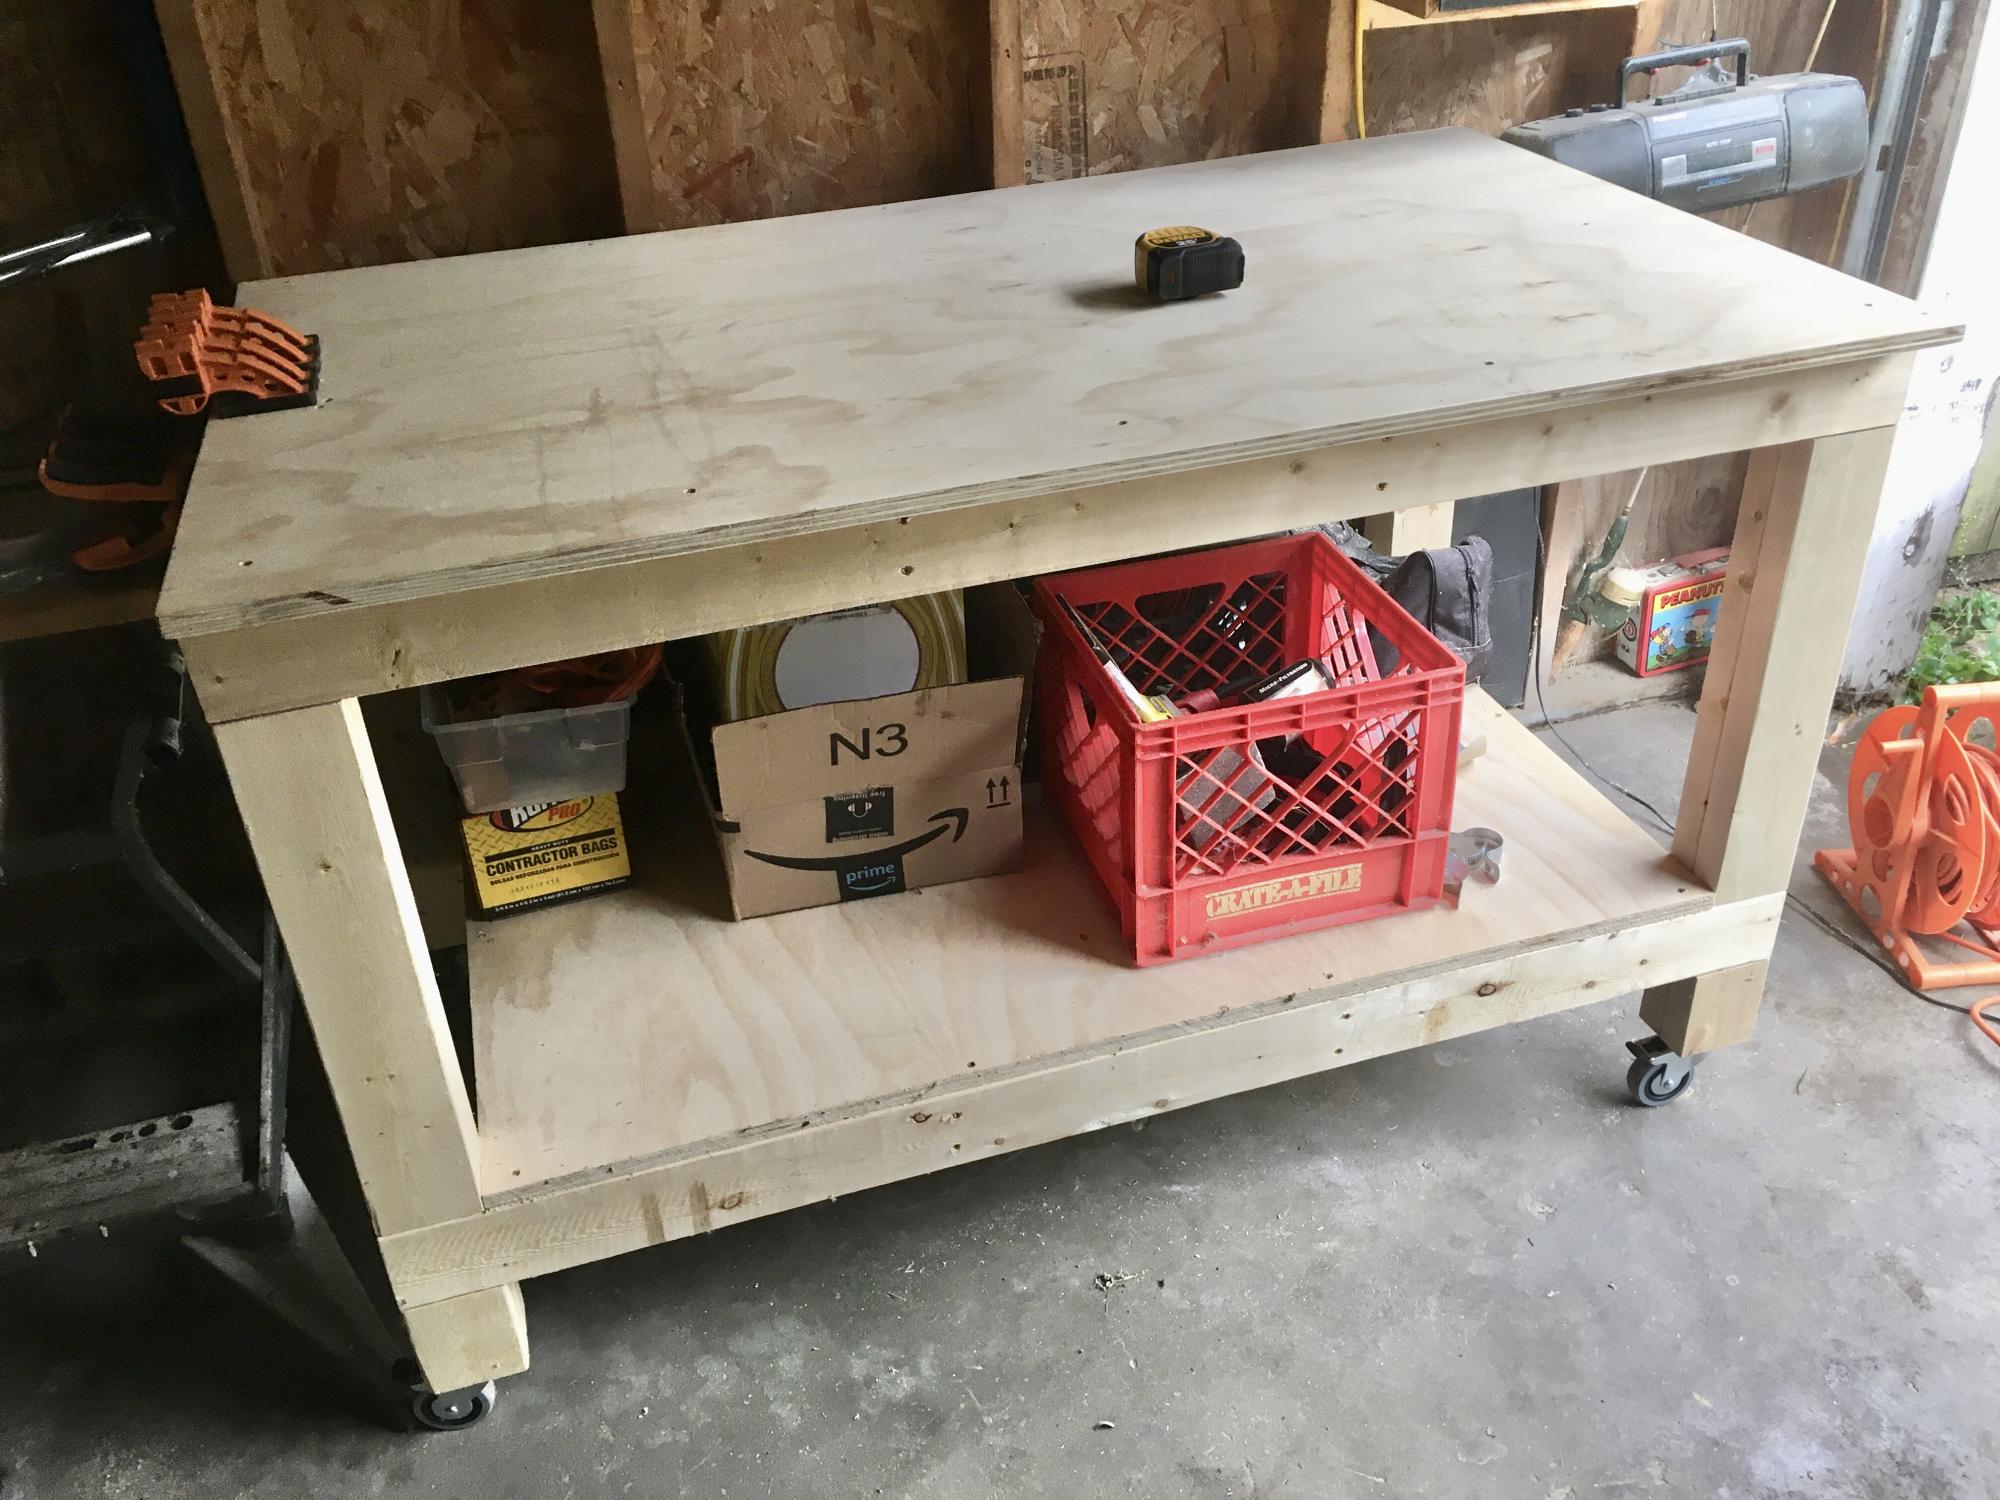
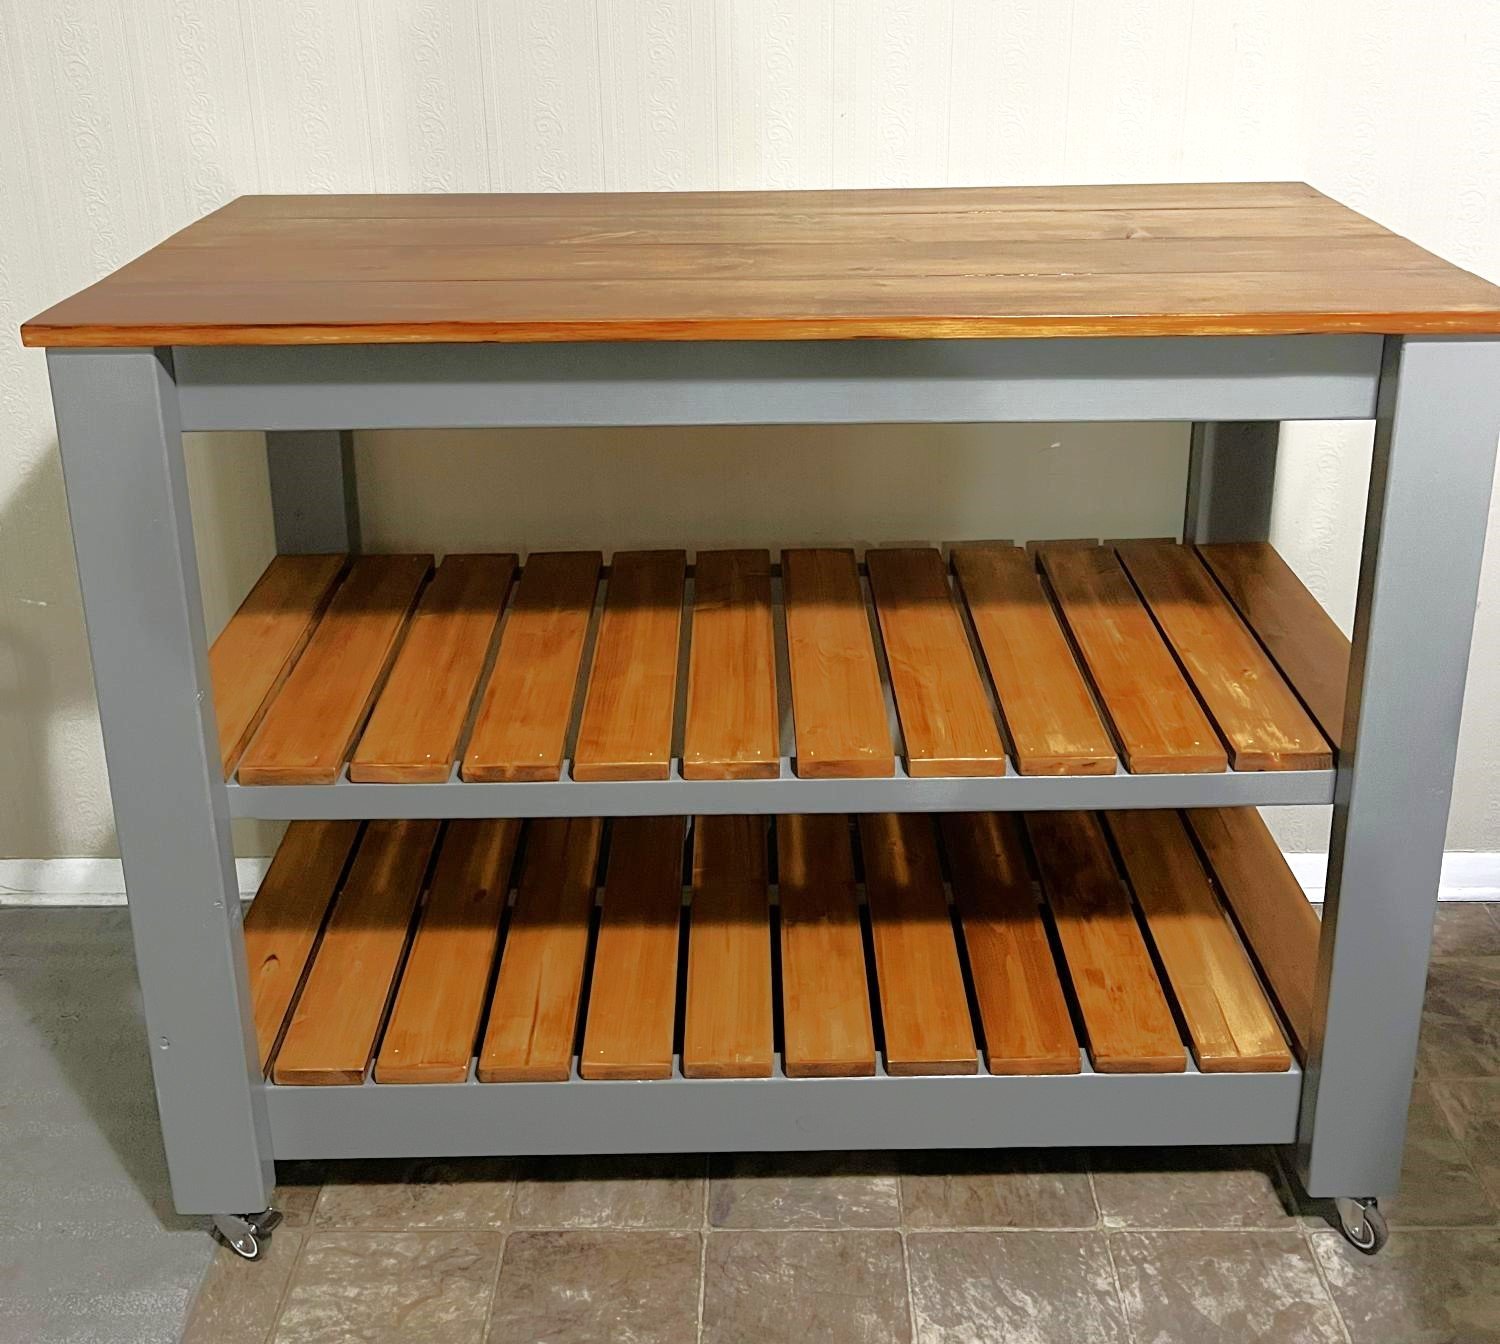
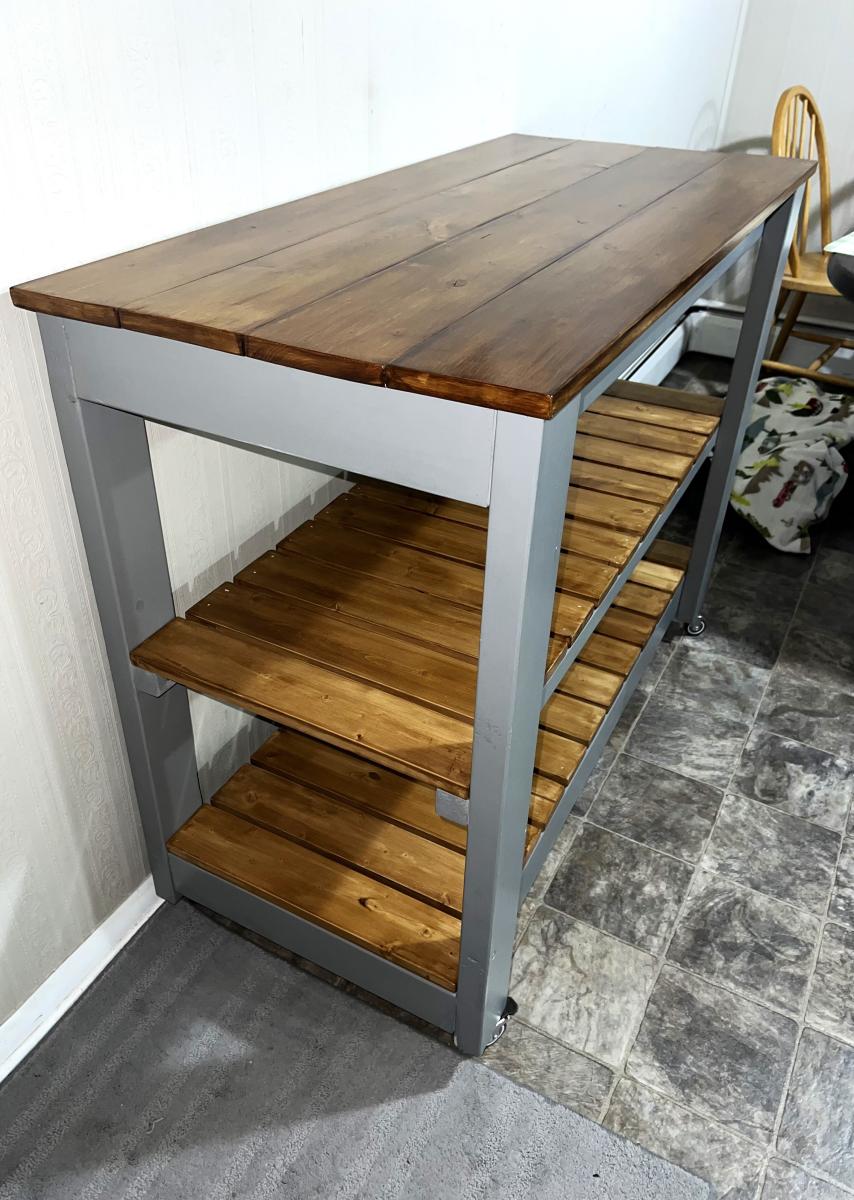
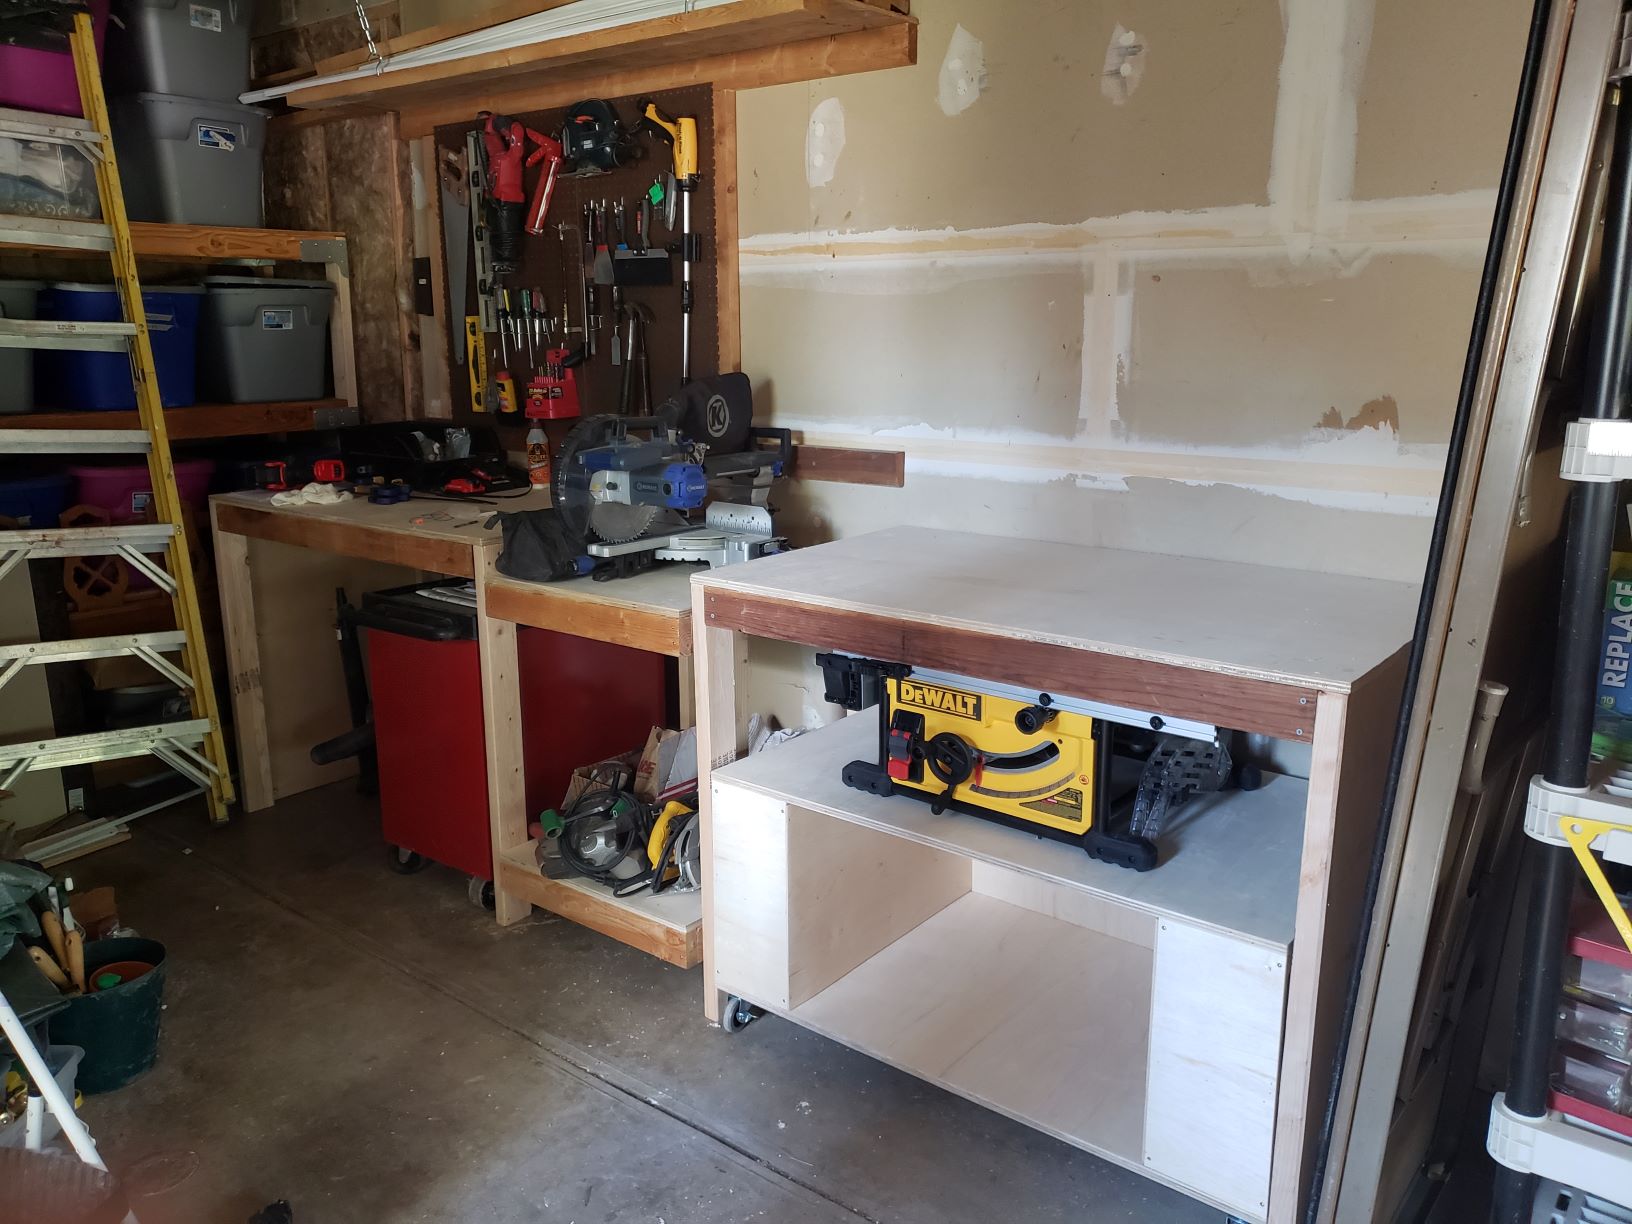
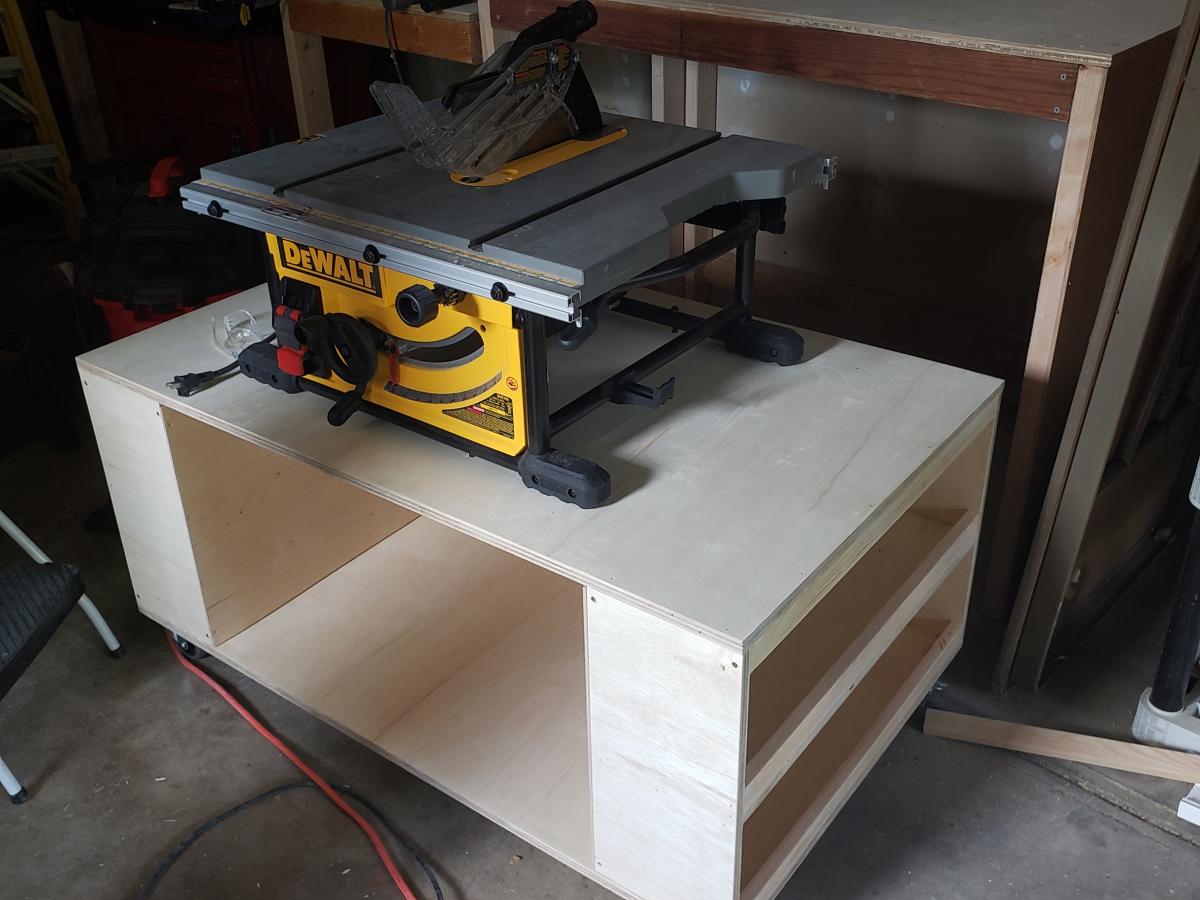
I needed a workbench and Ana's easy plans were perfect for what I needed. I have a small one-car garage that I do my projects out of. The garage also provides storage for bikes, kayaks, gardening tools, etc. I customized the dimensions a little, making the bench only 30" deep to better fit the space available, and to add wheels to be able to roll the bench out into the driveway if needed. The lower shelf provides some good storage for me as well.
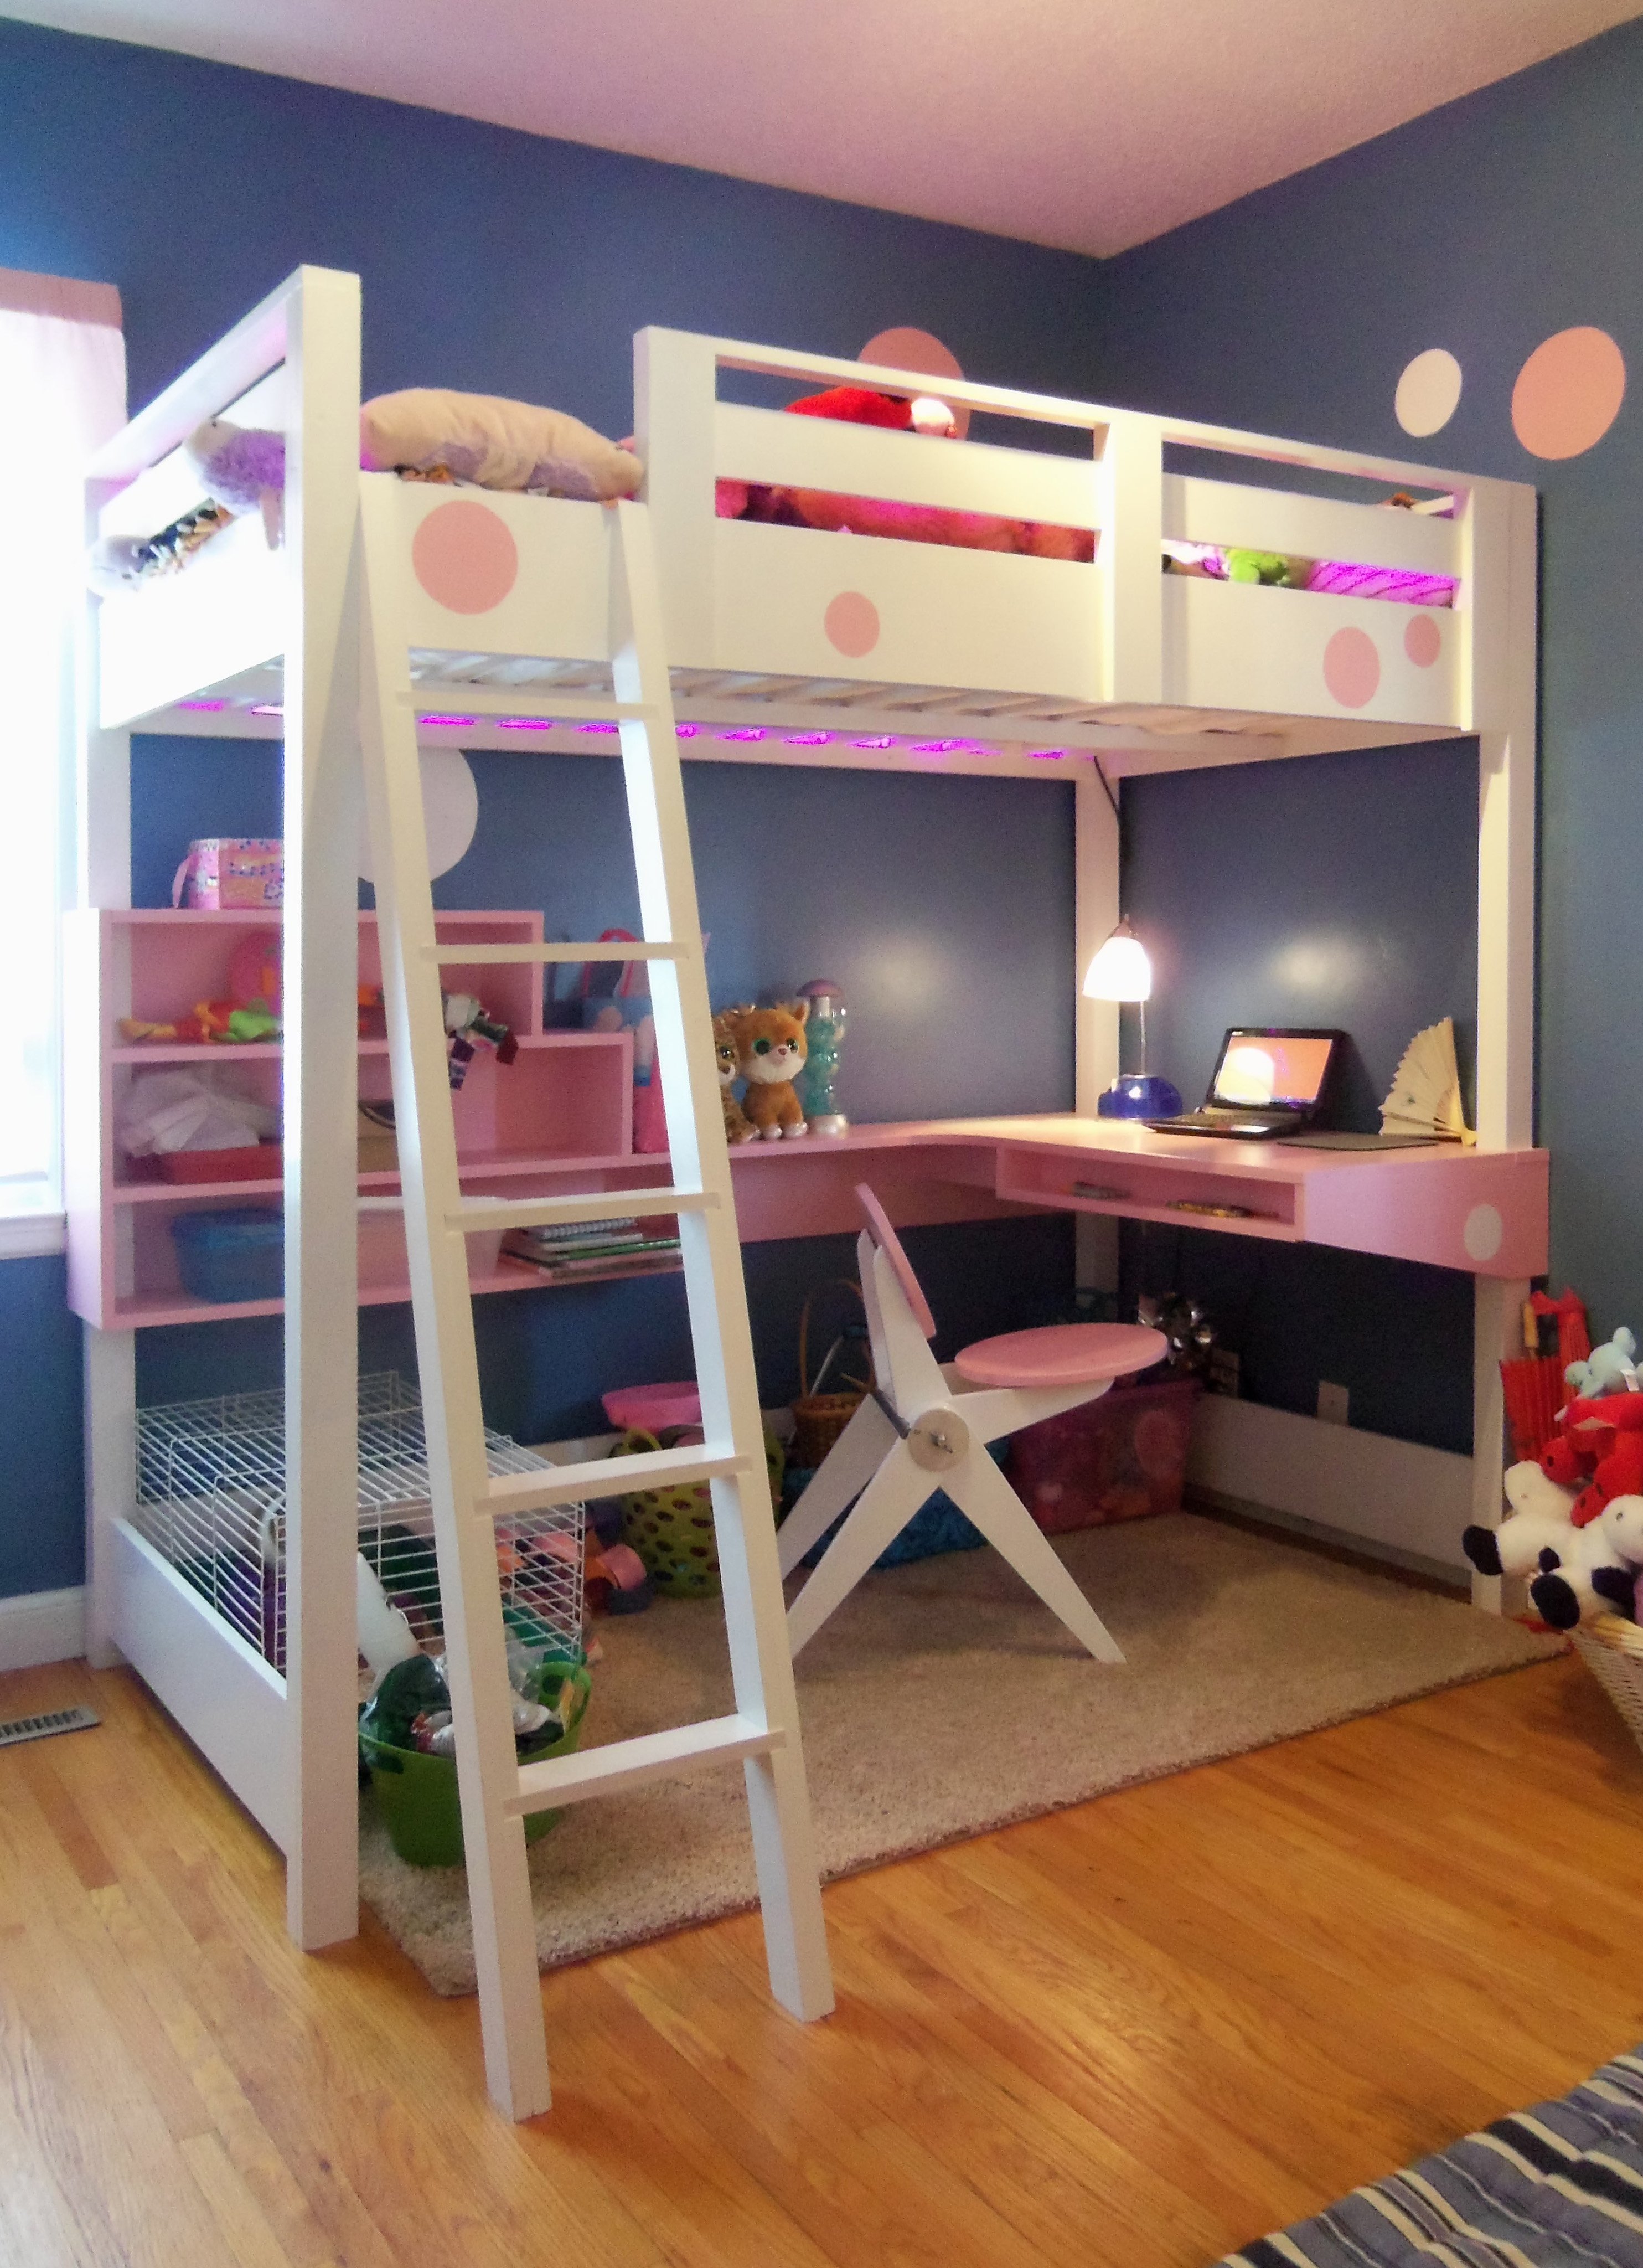
I just wanted to share the loft bed I built for my daughter based on the plans available here. I added a desk, painted an existing chair I had built to match and included pink LED lights around the inside of the bed. Thanks for everyone sharing their ideas, plans and pics..!
Fri, 08/14/2015 - 21:39
Awesome! Do you have plans up for the desk area? I would like to incorporate that similar style. Thank you.