Community Brag Posts

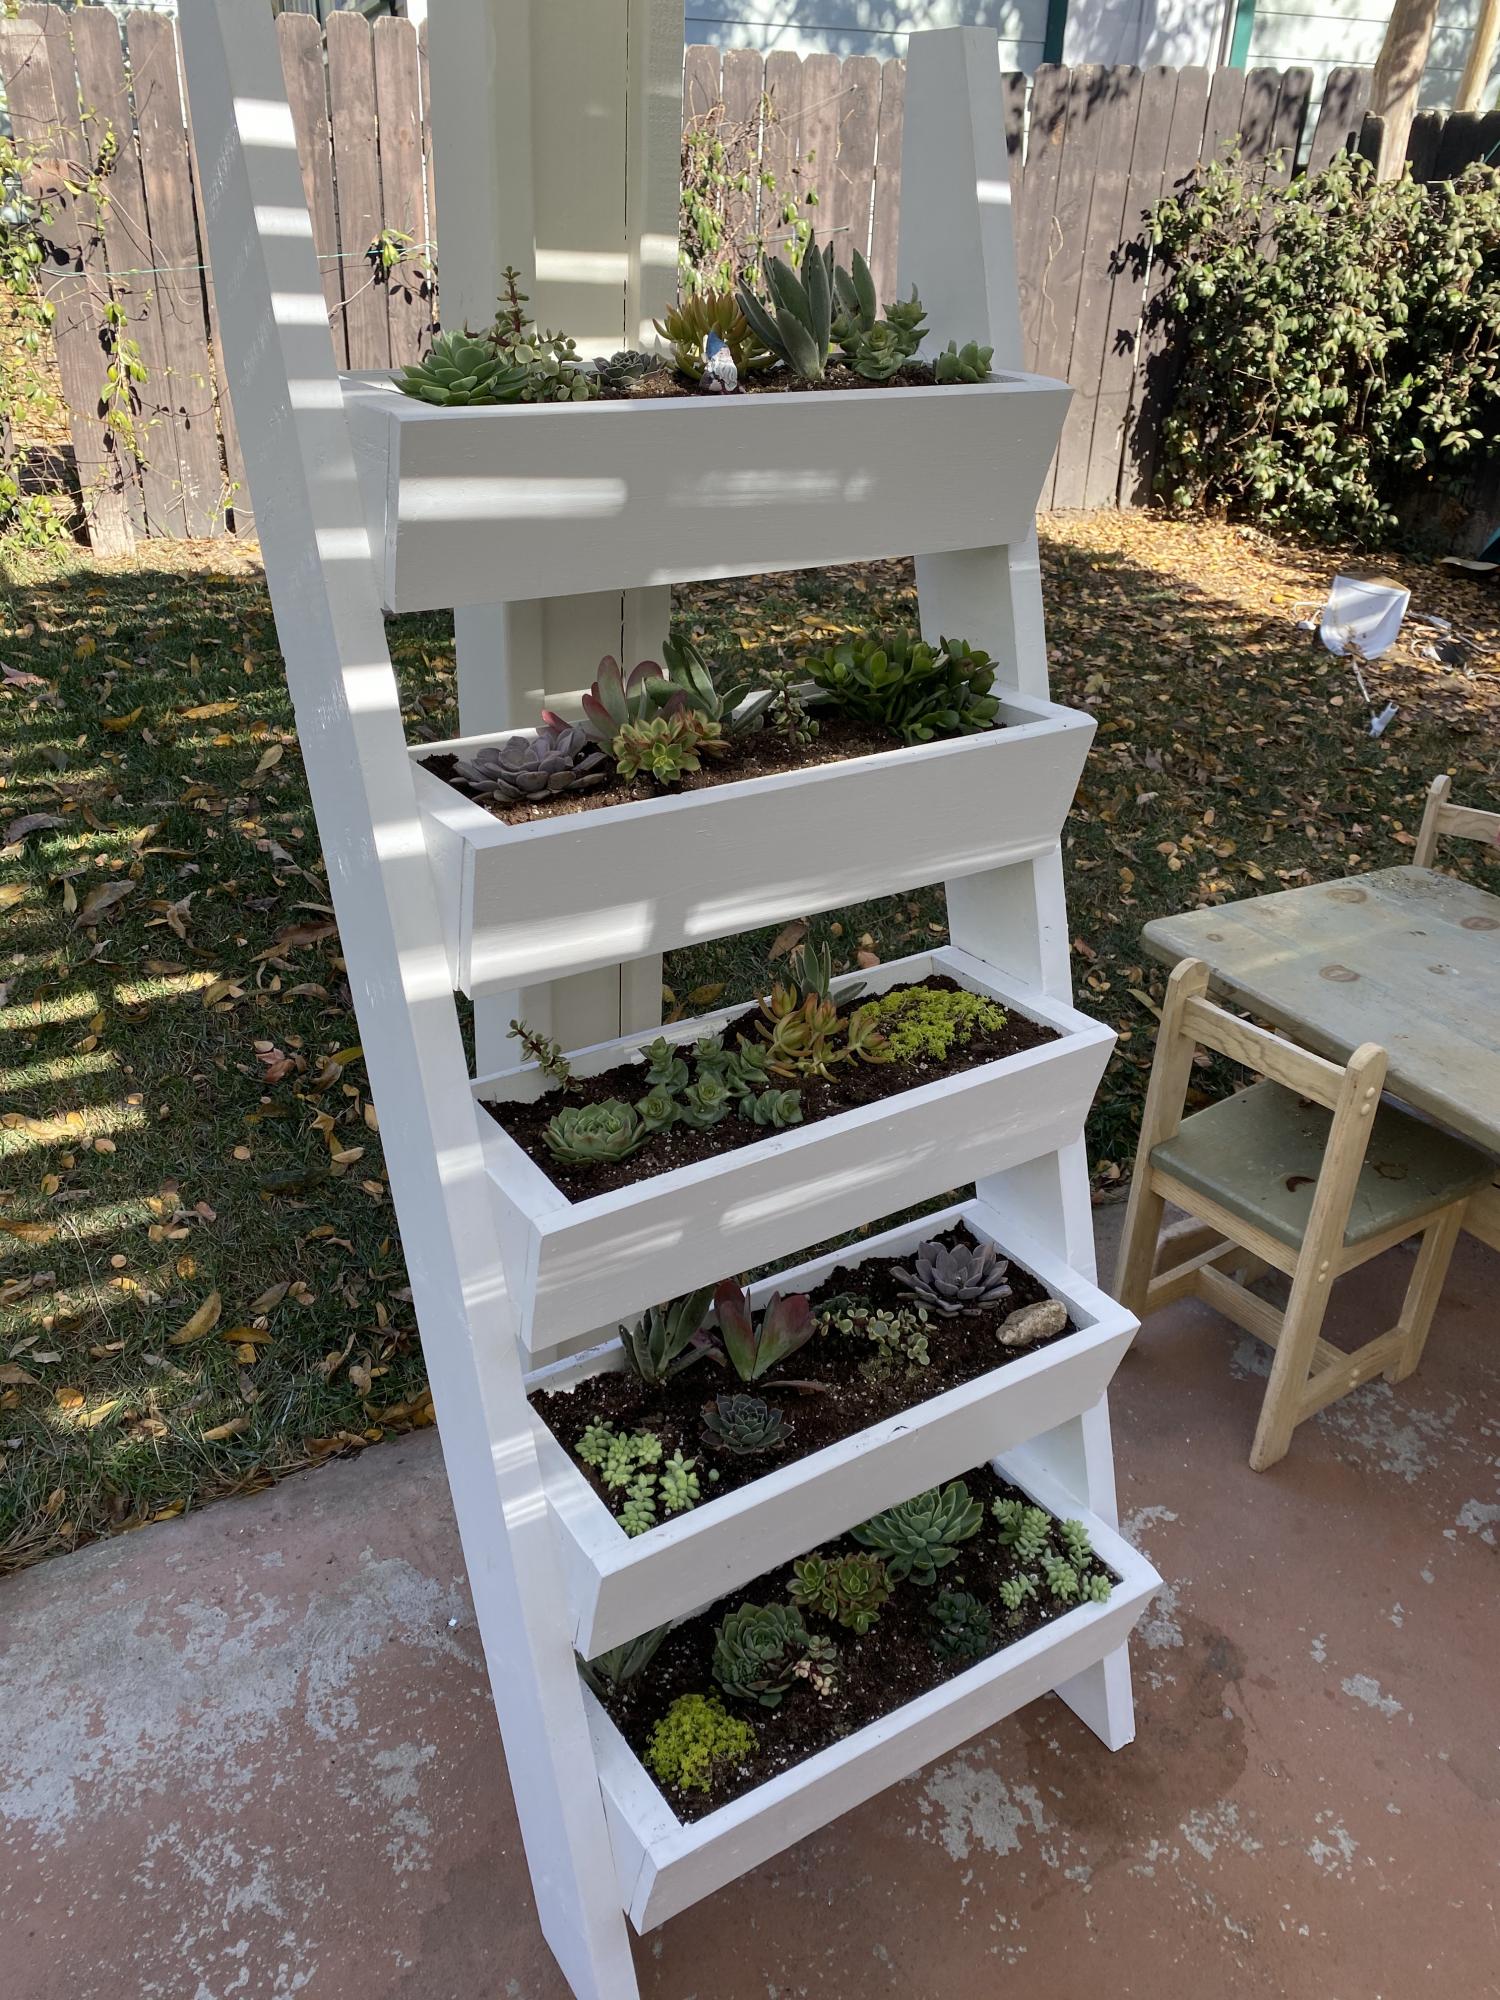
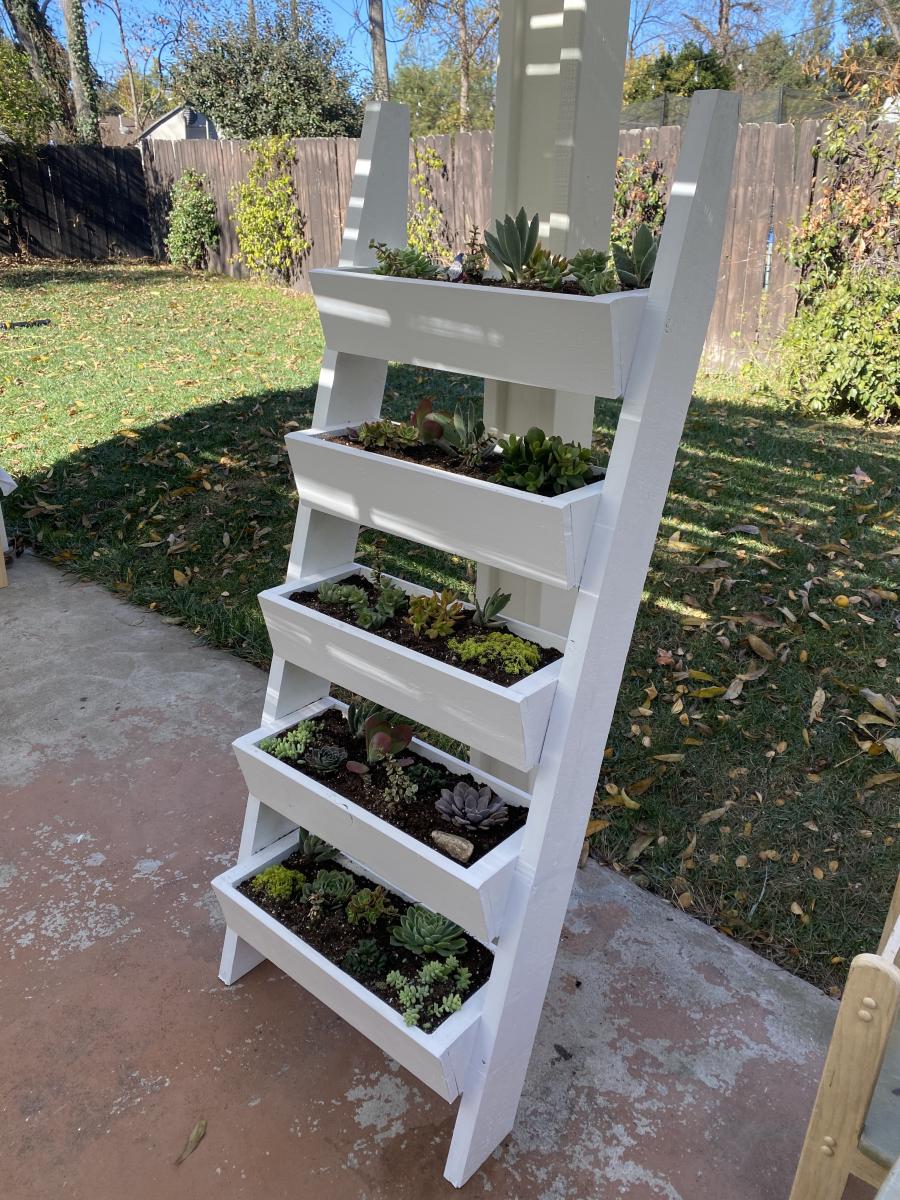
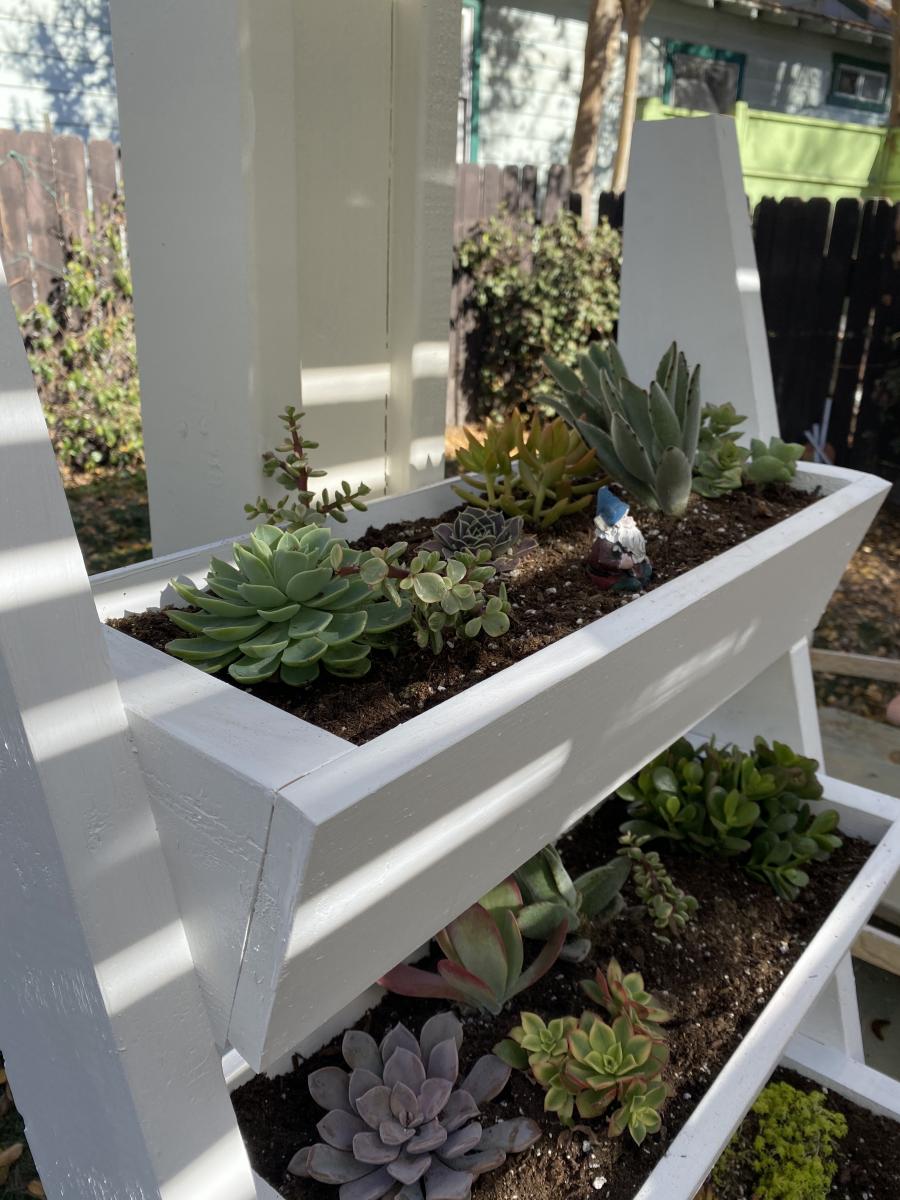
Leaning Bookshelf from The Handbuilt Home

Submitted by Shorty on Wed, 11/19/2014 - 18:24

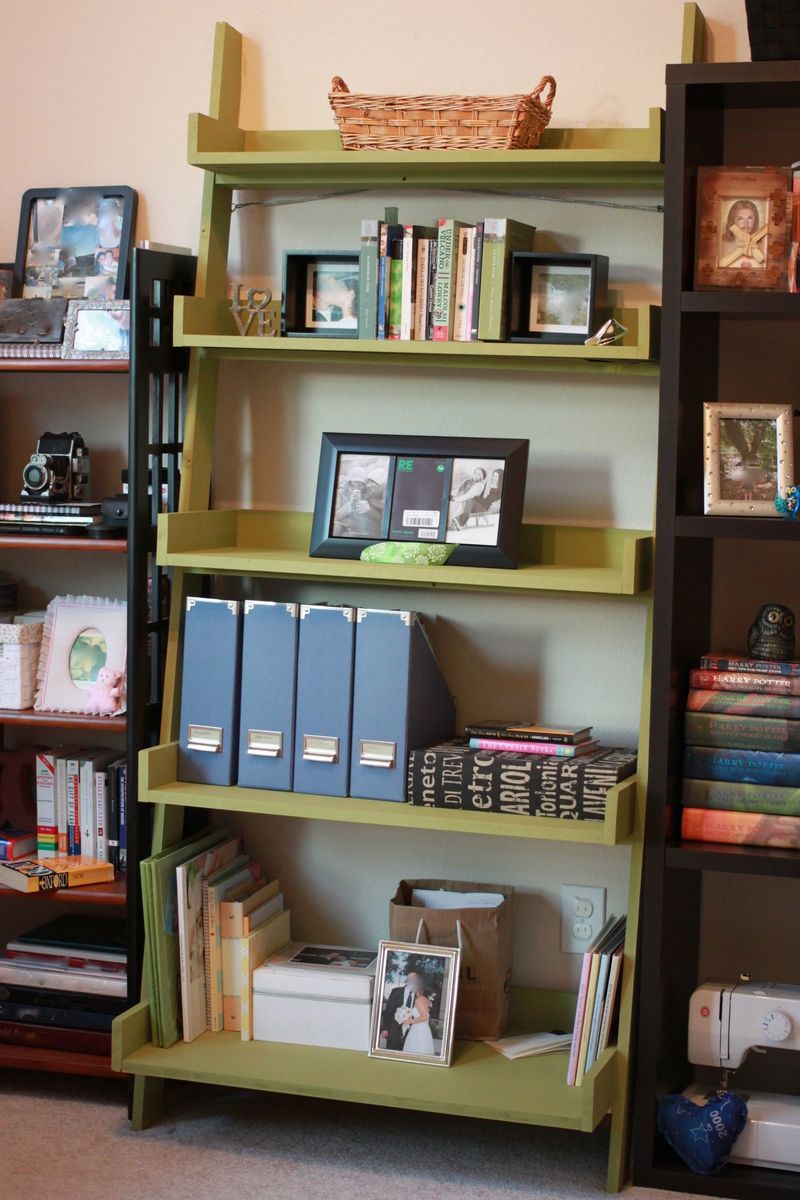
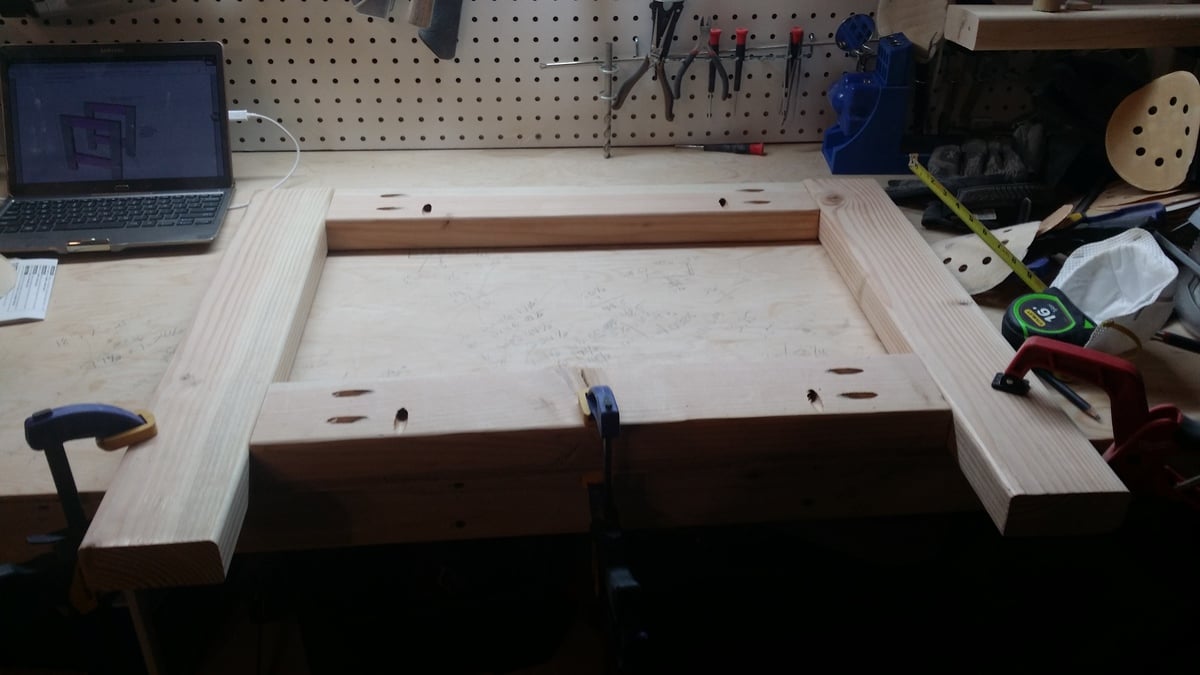
As my husband and I were slowly piecing this shelf together, I began to worry if it was going to end up rather unattractive. Turns out I had no need to worry and the completed project was better than I had imagined! It's extremely sturdy and a good size (I actually brought down the width a notch). I painted the shelves and supports separately which turned out to be an excellent idea.

Built from Plan(s)
Estimated Time Investment
Weekend Project (10-20 Hours)
Finish Used
Glidden Spanish Olive
Recommended Skill Level
Beginner

A nice place for the living room "stuff"

Submitted by Anonymous (not verified) on Fri, 02/24/2017 - 19:14

I followed the plans exactly except I made the legs 5 inches taller to allow more room on the bottom shelf. this was my first project with doors and drawers and my third big project after building a chicken coop and the Ana White triple pedestal table. I couldn't find 2x2s so I stripped 2x4s (the dimensions aren't exactly the same but close enough). Took me longer to build than it would most people because I'm not that experienced.

Built from Plan(s)
Estimated Cost
About $130 for everything.
Estimated Time Investment
Week Long Project (20 Hours or More)
Finish Used
Thalo green satin latex by Valspar. Then I watered down some black latex and wiped it on with a crumpled paper towel and wiped it off with another crumpled paper towel. I had some tintable glaze but I didn't like it as much as my watered-down paint method.
Recommended Skill Level
Intermediate

Comments

Stocking Rack

Submitted by dabsads on Wed, 12/09/2020 - 14:16

Thanks for the stocking stand plan! We have LOTS of people coming in for a Cozy COVID Christmas, and needed room for more stockings.

Made out of cedar. Substituted 4’ black pipe and drapery rings. And built it with hangar bolts and wing nuts so it can be easily broken down and stored between Christmases.

Built from Plan(s)
Estimated Cost
$40
Estimated Time Investment
Afternoon Project (3-6 Hours)
Finish Used
Unfinished for now. May just use some tung oil to highlight the cedar grain.
Recommended Skill Level
Beginner

Comments

Farmhouse Table

Submitted by shackrock on Sat, 01/26/2013 - 08:12

Based off of the Ana White design w/ pocket holes. This was really our first big project, so we made plenty of mistakes. Some lessons learned:

1. Pick non-warped wood to start with!
2. Clamps are pretty important to use when screwing into your kreg jig holes. It is REALLY hard to keep things flush without some strong clamps. Biggest lesson learned!
3. Always do your polyurethane coats in 60+ F temperatures. I did one coat when it was pretty cold, around 40 degrees. The liquid ended up beading and it was extremely hard to get out, eventually I just put many more coats on and called it a day.
4. Sand, sand, and sand some more!

This build is very rustic, but next time I think I could build a pretty perfect one. We're going to use this one, I like how rustic it is.

Estimated Cost
135
Estimated Time Investment
Weekend Project (10-20 Hours)
Finish Used
1 coat of water-based wood conditioner, Some dark MiniWax stain (2 coats), 3-4 coats of water-based polyeurethane.
Recommended Skill Level
Beginner

5 years in the making

first project ever, made a few alterations to both plans and came up with this.

Estimated Time Investment
Weekend Project (10-20 Hours)
Recommended Skill Level
Beginner

Comments

The Full Farmhouse with a 15.5" clearance for under-the-bed storage

Submitted by Anonymous (not verified) on Mon, 02/27/2017 - 08:42

For our small 1960's Master bedroom, I needed more storage for under-the-bed totes. When we were all done, I made a bedskirt with the needed drop-length to hide all of the totes.

Estimated Cost
$140
Estimated Time Investment
Weekend Project (10-20 Hours)
Finish Used
Sherwin Williams Ovation extra-white
Recommended Skill Level
Beginner

Christmas done!

Submitted by Anonymous (not verified) on Sun, 12/13/2020 - 11:22

I made some for me but didn’t use cedar for the 1x2 and 1x2.5. This time I ripped the pickets for those and love how these came out. I may be making me some more in the future.

Built from Plan(s)

Comments

Camp Loft Bed w/ Stairs

Submitted by marievilla on Sun, 01/27/2013 - 14:22

My husband built this bed for our son by combining 2 of the plans from here. The Loft bed and the Camp Loft Bed w/ stairs. We knew we wanted to build a loft bed for our son but liked the idea of the platform w/ stairs so it wouldn't block his window. We also wanted to incorporate a bookshelf for his growing collection of Legos to display as well as books, etc. The next project to add to this will be the desk for underneath. I'll add pictures when we build that. Instead of using 2 x 4's for the top rails of the bed, he improvised and created his own version of a panel for the top. I love how it turned out!

Estimated Cost
$200
Estimated Time Investment
Week Long Project (20 Hours or More)
Finish Used
Fully sanded the furniture down, then applied 1 coat of Minwax American Chestnut Polyurethane & Stain in One Gloss Finish. After allowing it to dry overnight, we applied a second thinner coat.
Recommended Skill Level
Intermediate

Comments

bxrsnkds

Mon, 06/10/2013 - 22:25

absolutely love this, just what I would like to have for my son! Thanks for the inspiration :-)

CandiD

Mon, 07/01/2013 - 05:14

Just love this, I'm hoping to do something similar in a full size for my 9yr old daughter. She feels a bit sketchy with a ladder so the stairs will be better and I love using my Kreg jig so not having to piece together the supports sounds good to me!

coffee table

Submitted by DanGraves on Wed, 11/26/2014 - 09:12

This was the first table we built.

Built from Plan(s)
Estimated Cost
$35.00 for wood and stain.
Estimated Time Investment
Weekend Project (10-20 Hours)
Finish Used
Minwax
Recommended Skill Level
Starter Project

Comments

Outdoor coffee table and side tables

Submitted by Eddie K on Wed, 03/01/2017 - 06:44

I build these basically with leftovers from our new fence.  The coffee table is 4x4 post legs with a 2x4 frame attached underneath.  For stability, I used a 12" wide scrap of 3/4" plywood on the top before attaching fence pickets.  Old tags were used on both sides and ends.  The (two) end tables were 2x4 legs with 1x4 side trim pieces, but without the plywood stabilizer, and a single cut down picket for the top.

Estimated Cost
A guess here, since it was all leftover lumber, but I'd say about $20-25 for the table and $6 for each table.
Estimated Time Investment
Afternoon Project (3-6 Hours)
Recommended Skill Level
Beginner

Bunk beds that transport when needed

This bunk bed project was absolutely perfect for a small cottage bedroom for our son. We selected this plan when noticing that this could essentially be built as 4 flat sections and easily transported.

We were able to construct the bunk beds prior to owning the cottage and were then able to move in and bolt together.

Estimated Time Investment
Day Project (6-9 Hours)
Finish Used
Interior latex paint.
Recommended Skill Level
Starter Project

Comments

Sirocco

Fri, 03/19/2021 - 01:12

The best way to shop on the internet and get one dealership to beat another’ price.main thing is only pay the cash no extra. I just only share the website which you find the best and also lowest price on a new car review toyota tundra

Hailey platform bed

Submitted by RuthE on Fri, 11/28/2014 - 17:30

I completed this project almost entirely by myself. I had a malfunction with the saw & needed assistance from my husband in the beginning, but borrowed a saw from a friend & completed the rest by myself. I made the platform bed one weekend & made the headboard another weekend. Fun project! And it turned out beautiful!! Thank you, Ana White for your awesome plans on your website!!! 

Estimated Cost
Unsure, I had most of the wood already.
Estimated Time Investment
Weekend Project (10-20 Hours)
Finish Used
I preconditioned my wood with Minwax pre-stain conditioner & followed with Minwax Stain in Jacobean on the bed. For the headboard my son wanted a chalkboard in his room so I painted the center planks before I added the casing & trim with chalkboard paint. After I added the rest of the wood, I carefully preconditioned my wood with Minwax pre-stain conditioner & followed with Minwax Stain in Jacobean on the rest of the wood. Super easy!!
Recommended Skill Level
Beginner

Comments

Vertical Planter w/ Succulents + White Opaque Stain

Submitted by Anonymous (not verified) on Tue, 12/22/2020 - 23:20

Made this over a few afternoons during the interesting year that is/was 2020! First DIY project and really enjoyed it! I used an opaque white stain and it's filled with succulents from our local nursery (Lincoln Nursery in Pasadena, CA). Painting took the longest as one coat of the stain still let some of the knots in the wood show through. Thanks so much for the plan and inspiration!

Estimated Time Investment
Day Project (6-9 Hours)
Finish Used
Opaque white Behr outdoor stain
Recommended Skill Level
Beginner

fancy x desk

Submitted by jamesryan9 on Fri, 02/01/2013 - 01:31

I chose to make this great looking desk out of Walnut wood. So, obviously its not the $55 dollar fancy X desk that Ana White has posted, but it does share the same design. We were looking for a heavy, sturdy, and large desk for our office and I simply added linseed oil to bring out the natural beauty of the Walnut wood. Thank you so much Ana for giving me the tools I needed to complete this project. Feel free to email me or message me if you have any questions, comments, or suggestions. [email protected]. Thanks

Built from Plan(s)
Estimated Cost
$400
Estimated Time Investment
Weekend Project (10-20 Hours)
Finish Used
I applied Linseed Oil and followed the directions on the back. I let it soak into the wood for 5-10 min and wiped off the excess with a cloth. I sanded some areas very fine and reapplied the linseed oil in certain places until I found the look I was searching for.
Recommended Skill Level
Intermediate

Tryde end table

29.5" square, 25" high

Estimated Cost
$60 (Alaska)
Estimated Time Investment
Day Project (6-9 Hours)
Recommended Skill Level
Intermediate

Comments

First DIY Console

Submitted by Anonymous (not verified) on Tue, 03/07/2017 - 15:59

Absolutely love this Console!  Going for a coastal theme and could not find exactly what I was looking for so decided to make it!  Love to use my hands and now I will be off to my next project!  Used Cedar board for the top, pine for the remainder.  Love the thick, rustic top.  This console is two inches less in depth than the original plans due to the shape of my living room.  Thank you for the plans and everyone's DIY projects!  They were all a big influence on the final design.

Built from Plan(s)
Estimated Cost
300.00 due to the thick cedar planks I used. approximately 250.00 before that.
Estimated Time Investment
Weekend Project (10-20 Hours)
Finish Used
White Wood Paint and American Walnut stain
Recommended Skill Level
Intermediate

Farmhouse Doll Bed and Doll Mattress

Submitted by Pa on Sat, 12/26/2020 - 22:58

Well ... we found this farmhouse bed pattern as two play kitchen set were being constructed. Irresistible design; we decided that we HAD to also make the doll bed! And the bed came together very quickly. Two changes: per other comments, removed one vertical slat from the headboard/footboard (wanted the narrower width), and put an extra brace in the middle of the bed (just in case it gets stepped on or sat on).

Also used the pattern for the 18” Doll Mattress Tutorial. Skipped the buttons for tufting and simply sewed in 8 little Xs with embroidery floss.

This bed is for a granddaughter with a birthday in a few days .... and I’ve already started cutting out a second set for a granddaughter with a birthday in a couple of months. Happy to say that all of the bedding/linens are handmade; the pillows include lace and ribbons from two family weddings. You just can’t help but smile when you look at one of these finished farmhouse beds!

Estimated Time Investment
Weekend Project (10-20 Hours)
Finish Used
Polyurethane
Recommended Skill Level
Beginner

Shoe Crates

I saw someone's brag where she used this plan for shoe storage. I thought it was a great idea. It sure lets me clean the floor better, just roll it out of the way, clean, roll back. It is so much better than the shoe rack that occupied the space before with such piles of shoes that it was arduous to clean the floor at all. Next month I will take care of the second shoe rack for my own shoes.

It was so simple, I loved making them. Grandpa and I had fun. The best part, you can make them quick because the don't have to be perfect. And Grandpa's nail gun made quick work of all the attached boards. All boards were also glued and sanded.

Ana your site gave me the confidence to solve my own furniture problems with custom solutions. Thanks, I can't wait for my next project.

Estimated Cost
$100 for 2.5 carts
Estimated Time Investment
Afternoon Project (3-6 Hours)
Finish Used
Polyurethane, 2 coats
Recommended Skill Level
Starter Project

Ryan's Washer/Dryer Pedestal

Submitted by zoolander on Fri, 12/05/2014 - 17:25

I loved this design.  I couldn't believe that they wanted to charge me almost $600 for the pedestals for the washer/dryer set that I bought on black friday, so I decided to give this project a go.  I basically used the same construction plans from Sausha's project, but I dressed mine up a bit.  First, I chose a bit larger trim for the tops and bottoms of the posts.  Then, I bought some 2" baseboards and did the top and bottom with baseboards.  On the bottom, I had to use my tablesaw to trim off about 1/2" because I used 1x1" boards on the bottom so that I could have more space for baskets.  Then, on the top, I inverted the baseboard and allowed it to overlap a bit so that if it were to vibrate, the washer/dryer could not fall off the edge.  I also added some fabric on the top (stuff that I use to cover the bunk boards on my boat trailer...kind of like a very thick and durable felt material) to cut down on vibration and also keep the units in place.  Finally, I added sides by using wedge trusses on the inside of my side posts and then I put a 1/8" piece of plywood over top and nailed/glued it to the trusses.

It turned out great.  Thanks for the plans Sausha!

Estimated Cost
$125
Estimated Time Investment
Weekend Project (10-20 Hours)
Finish Used
paint
Recommended Skill Level
Intermediate

Comments

Zlk200

Mon, 12/21/2015 - 17:38

Did you use sanded plywood? Did you use any veneers for the exposed 2x4's to get a smooth finish or did you paint right on it?

lastly, what is the name of the trim you put on the 4x4s? I've hard a hard time finding it. Thank you!

In reply to by Zlk200

zoolander

Wed, 06/29/2016 - 13:59

Sorry for the super delayed response.  I didn't realize this question was here.  I did not plane anything.  I did sand the surfaces a bit, but I didn't get too crazy.  I put 3 thick coats of paint on it which made it pretty smooth.  If you look very closely in person, you can still see a bit of wood grain, but it is only noticable if you really get down and look.  I did use a lot of wood putty to fill all of the gaps and crevaces and then I sanded those parts pretty well.  


With regard to the trim, the top literally just standard baseboard material turned upside down, and then the little trim on the tops and bottoms of the 4x4s is just another standard strip of moulding that I got from Lowes.  I think they call it "Chair Rail" moulding.  Its the stuff that you put down if you are doing some sort of paint separation or wainscoting.

http://www.lowes.com/pd/1-625-in-x-12-ft-Mdf-Chair-Rail/3403018

I used woodglue on all of the moulding and tacked it on with a nail gun.  Then I filled all of the nail holes with wood putty and also use the putty to fill gaps where the corners came together to make that look smooth.

I hope that helps...you are probably already done with your project by now, but I figured that I would answer anyway.  :)