Community Brag Posts

Kerplunk Game for Outdoors

Submitted by thediyplan on Thu, 03/18/2021 - 13:54

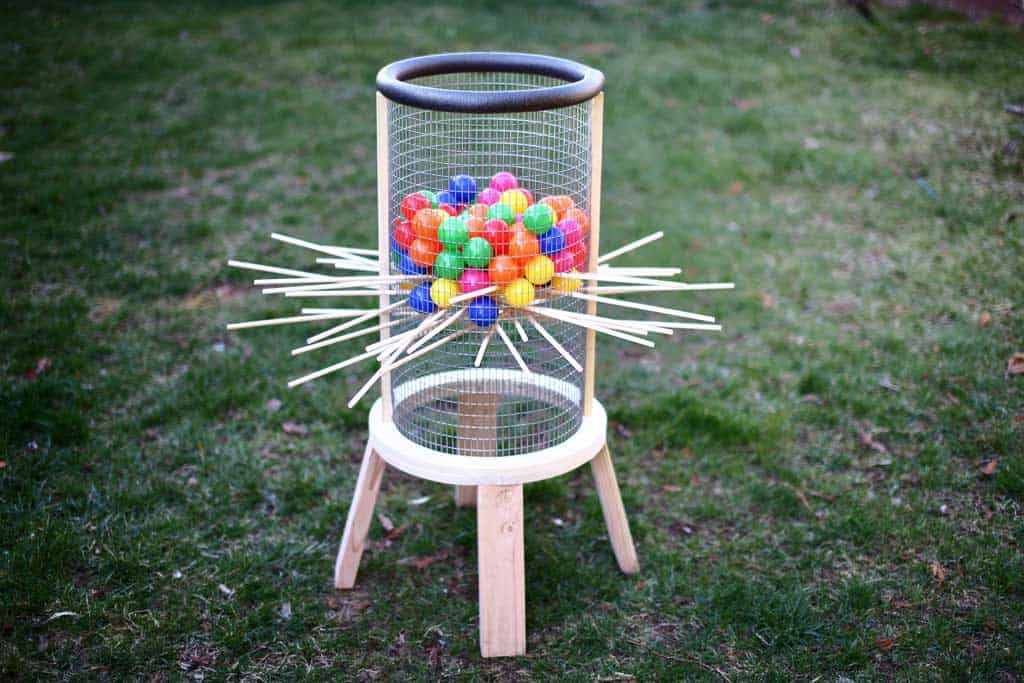
Here’s another fun game to play for all ages, especially for kids. It’s called a Kerplunk Game. The original Kerplunk game is small, made from plastic, and is mainly for indoor use. But to make it more interesting and to encourage kids to spend more time outdoors, I’ve built a Giant DIY Kerplunk Game with a wire mesh screen. This is a great backyard game for any occasion or a party.

See my website for additional pictures and how I've built it, TheDIYPlan.com

Estimated Cost
$70
Estimated Time Investment
Afternoon Project (3-6 Hours)
Recommended Skill Level
Intermediate

Comments

Easy Street Breakfast Bar

cross between a kitchen island and the x frame console table. LOL

Cross breeding furniture, gotta love it! :0)

Estimated Time Investment
Day Project (6-9 Hours)
Finish Used
Classic Gray minwax, and poly
Recommended Skill Level
Intermediate

Comments

Modified Fillman Dresser

Submitted by Lady Goats on Mon, 01/19/2015 - 12:58

Spent forever building this modified version because I couldn't figure out what kind of drawer faces I wanted. Finished with General Finishes gel stain and Minwax Paste Finishing wax. 

Estimated Cost
Used scraps, so all that I paid for was the knobs and finishing wax.
Estimated Time Investment
Week Long Project (20 Hours or More)
Finish Used
GF gel stain in Java and Minwax Finishing wax
Recommended Skill Level
Intermediate

Beautiful bed!

Submitted by Anonymous (not verified) on Mon, 08/19/2019 - 09:05

This bed is gorgeous and the plans are perfectly laid out for even a beginner to use.  We were making a full bedframe, so we used the exact measurements given in the cut list and it fit the mattress just right.  We made the accompanying headboard with a few changes.  We were using pine and wanted the headboard casing to match, so we just used 1x4's and routed the edge with an ogee bit we had on hand.  We also wanted the platform just a tad bit higher and made the legs 10 inches instead of 7.  We also ended up making the platform slats out of 1x4's instead of 1x3's as they were cheaper.


Pin For Later! 

Beautiful bed!

Estimated Cost
$80.00
Estimated Time Investment
Weekend Project (10-20 Hours)
Finish Used
One coat of Minwax Honey stain, finished with flat spray poly
Recommended Skill Level
Beginner

Comments

Outdoor Seating

Submitted by Anonymous (not verified) on Thu, 03/25/2021 - 17:11

I made this in a weekend to add seating to our back patio area -- I AM IN LOVE WITH IT!

The whole family hangs out here, it has given us a great place to spend outdoors during lockdown.

I picked up the cushions on craigslist, so the cost of the entire project was kept super low.

I will be staining and sealing it soon, I am so happy with how it turned out! Thanks Ana :D

Estimated Cost
$300
Estimated Time Investment
Weekend Project (10-20 Hours)
Recommended Skill Level
Intermediate

Comments

Seasonal And Holiday

Storage Bed

Submitted by SamWiseMan on Thu, 03/14/2013 - 11:36

We needed a guest bed for our guest bedroom. So I built the storage areas under the bed out of plywood and boxed them up. The bed would probably look better with a headboard, but we decided to just do that curtain style headboard.

I had seen different beds similar to this, and I just had those in mind when I started. I didn't follow any specific plan except for what I had in my head.

It was painted with an oil-base white paint.

Estimated Time Investment
Weekend Project (10-20 Hours)
Recommended Skill Level
Beginner

Toddler Sized Picnic Table

Submitted by Nor7 on Wed, 01/21/2015 - 09:44

I love this plan. I made this for my toddler and he loves it! My daughter is too small to climb on but she's always trying. She loves it too.

Built from Plan(s)
Estimated Cost
15
Estimated Time Investment
An Hour or Two (0-2 Hours)
Finish Used
None yet. To be completed
Recommended Skill Level
Beginner

Trestle Table at counter height

Submitted by Anonymous (not verified) on Sat, 04/22/2017 - 13:51

I made a bench from head/foot boards left from a bed I made many years ago that was taking space in our shed. When I searched for trestle table diy, I knew this was just what I was looking for. Thank you for sharing your ideas!

Recommended Skill Level
Beginner

Greenhouse

Gabled Greenhouse completed with upcycled tin roofing. Extended the greenhouse to a 20' long structure.

Comments

Nursery Dresser

I made this dresser for my sister's nursery. The room is fairly small, so she wanted a changing table on top of the dresser to save space. We also added a third row of drawers.

Estimated Time Investment
Week Long Project (20 Hours or More)
Finish Used
Satin white paint
Recommended Skill Level
Intermediate

Comments

dbwalk

Sun, 11/23/2014 - 05:35

I like how you modified the plans to make it have two more drawers.  I'm looking forward to doing this very soon for my twin daughters.  I was just wondering how the dimensions on the right and left sides were changed?  Also, does this seems to carry the extra weight of the drawers OK?

RH Inspired Mason Activity Table

Submitted by jhavinga on Sat, 01/24/2015 - 13:28

Really liked Ana's 20 second tidy up table, and wanted to try to have something like this for my son. Then saw the activity table at RH and tried to replicate it down to the exact same finish. Made small changes here and there such as adding 4 individual drawers, different wood dimensions, etc. He loves it and uses it lots for his Thomas the Train Set. Thank you again Ana.

Estimated Cost
$100 for wood, screws, stain, clear coat.
Estimated Time Investment
Day Project (6-9 Hours)
Finish Used
First time using water based stains. I dont remember the names of the stain colours used but they were Minwax. The finish was a lot work actually but cant really be seen in the photo. I saw

1. I started by beating up the wood with nails, hammer, chains, broken wood, anything you can find!
2. I did a white wash over the bare wood. 1:1 water and white paint.
3. Sanded the paint off. where the wood was beat up the paint would stay white.
4. Did water based wood conditioner.
5. 1 coat of a gray stain (sorry I cant remember name) wiped off.
6. 1 coat of brown stain. (again sorry! wiped off.
7. finished with a water based matte clear coat.
Recommended Skill Level
Beginner

Comments

timberandsoul

Sat, 01/24/2015 - 22:47

I love the finish you do on this table. Looks great. I wish you could share the exact names of those stains :(

Big Kids Picnic Table

Submitted by gsnpbc on Mon, 04/24/2017 - 10:00

My son and I made this table this weekend in just a couple of hours with no problems. The directions were clear and easy to follow. Thank you for sharing them with us.

Built from Plan(s)
Estimated Cost
$40
Estimated Time Investment
An Hour or Two (0-2 Hours)
Recommended Skill Level
Beginner

Farmhouse Counter Stools

Hello Ana,

I wanted to let you know I really appreciate your website and the DIY plans. I am an avid woodworker, and I saw your farmhouse counter stool plans a couple of months ago in one of the emails y’all send out, and I thought I’d try out your plans. I made the frame of the chair out of pine and painted it with white milk paint. I made the seat out of Walnut. I honored your plans, but made the seat 1/2” bigger in length and width so as to overhang the frame 1/4” on all sides. I attached the seat with figure 8 fasteners, since I did not want to drill through the solid walnut and plug the screw holes. The plans were very straightforward, and I thought it was easy to build. You have such awesome ideas and plans - thanks for the inspiration!

I have attached a couple of pics.

Thanks again!

Ken Monson.

P.S. - I plan to try some of your other farmhouse plans in the next few months.

Built from Plan(s)
Estimated Cost
$0, I had all the wood and finish in my shop
Estimated Time Investment
Weekend Project (10-20 Hours)
Finish Used
White Milk paint for the stool frame and Danish Oil for the stool seat
Recommended Skill Level
Intermediate

Comments

Emersen nightstand - First Build

Submitted by Feolet on Thu, 01/29/2015 - 18:58

I used reclaimed fence wood instead of plywood.  Just put together three planks to make the side/top/bottom pieces.  I adjusted the size a bit since I had limited space for it to fit into.  This was my first ever furniture project and my first use of my new kreg jig.  

Built from Plan(s)
Estimated Cost
Less than $20 (not counting some tools I bought that I'll use from now on). The fence wood I used was free, so I just needed to buy the 1/4 plywood for the back and bottom of the drawer, the screws, and the handle. I had the green paint, and the polyurethane spray.
Estimated Time Investment
Weekend Project (10-20 Hours)
Finish Used
Polyurethane spray
Recommended Skill Level
Beginner

Comments

King Bed

Submitted by Anonymous (not verified) on Fri, 04/28/2017 - 05:02

Love, love, love our king bed I build based on an adaptation of Ana's design.  I did the slats a little different, and used 1"x 2"'s and cut them in order to make a slot for the slat.  i also used non-mortise bed rail fasteners (from Amazon) so the bed could be taken apart easily.  This was my first wood working project and now I am hooked!  I am also a quilter and made the quilt for it too!  I did it on a long weekend by myself.  I was probably a bit slower than most folks considering it was my first woodworking project, so I was constantly looking up how to do things on Youtube.

Estimated Cost
Assuming you have all the tools, my bed cost me only about $200.
Estimated Time Investment
Week Long Project (20 Hours or More)
Finish Used
I painted it with a "one coat"primer and paint. I was not happy with the finish. Definitely use a separate primer before you paint. I simply sanded down some of the edges to give it the rustic look.
Recommended Skill Level
Starter Project

Potting Bench

Submitted by Anonymous (not verified) on Sun, 04/11/2021 - 13:47

I slightly modified the project to suit my wife's request. One key note: Make sure the main frame pieces mirror each other. I missed that and had two identical pieces outlined in Step 1, versus where the inside aprons actually face each other to allow for the top and bottom rails to be secured to the frame.
Thompson's Clear stain protects the wood; one coat after cutting the pieces and a second one for good measure after assembly.

Estimated Cost
$50.00
Estimated Time Investment
Weekend Project (10-20 Hours)
Recommended Skill Level
Beginner

Comments

Entry table

Submitted by McCallD on Thu, 03/21/2013 - 15:11

Made this as an entry table did the drawers out instead of in like the plan. Love how it turned out!

Recommended Skill Level
Beginner

Comments

torched table

Submitted by samghickey on Mon, 02/02/2015 - 04:34

My wife and I saw a large table and chairs at a local antique store priced at $1000...

It was nice and probably worth what they were asking, but after a failed attempt to negotiate the price down to a more reasonable number, I decided to build a table.   I was in the thinking stage when it hit.  I've been wanting to tear down this random privacy fence in the back yard ever since we moved in a few years ago and so......   a table was born from an old fence..


You cant tell in the pictures but this table seats 12 comfortably. ( 4 on each side and 2 on each end).  it is 7' by 4'  

Estimated Cost
I visited the store to determine cost even though I made mine from an old fence. I believe you could make this table for well under $200 ( that's for a huge table)
Estimated Time Investment
Weekend Project (10-20 Hours)
Finish Used
blow torch and polyurethane

run torch over your assembled table about 2-3 inches above surface and keep it moving, try on a test board first you catch on quick. Do all your sanding before the torch no sanding after torch before poly.

after torching, put first coat of poly. light scuff before second/third coat.. thats it.
Recommended Skill Level
Beginner

Comments

samghickey

Mon, 02/02/2015 - 04:49

4x4 fence post legs notched to hold 2x4 frame topped with a 3/4 in plywood. ( necessary since many boards were cupped or bowed, needed to have something to glue to.)
fence boards werent long enough for length of table so they were staggered as pictured. I had to do alot of planing and run all the fence planks though a table saw to square them as much as I could. ( also not as necessary if you buy wood from your local hardware store.)
The frame has 3 cross braces, and corner braces all the way around. plywood screwed to bracing/frame
planks laid out on plywood and glued plus brad nailed to hold them while glue dried.
routered edges of table top and started sanding, LOts of sanding , belt sanding with 80 grit then orbital sander stepping up to eventual 400 grit. I then cut skirts for the top of the legs 3 and 1/2 in skirts to cover screw holes. and a 1 in skirt to cover the rough edge of the plywood, ( both plywood and table top have a 2 in and 3in overhang respectively. Once everything was sanded to suit. I torched it and hit it with poly..

ssellers

Tue, 02/03/2015 - 08:34

This table is absolutely beautiful!! I am thinking of doing something similar but on a slightly smaller scale. Would you be able to post your plans? I'd love to see the brace work on the bottom/sides of the piece.
Also, how difficult was it to work the blowtorch? Any tips on what I should do (or not do) when trying it out on my own?
Thanks for the post!

Michael K

Tue, 02/03/2015 - 15:21

Your project came out great! The wood grain is so prominent. My guess is that torching accentuates the wood grain so that it stands out more. Excellent stuff.

samghickey

Tue, 02/10/2015 - 21:10

just try torching on a test piece first, it was suprisingly easy to do.
Plans...... I didn't make any. ( booo ) I used a 2x4 frame and 45 degree corner braces with 3 cross members. since most of the wood was extremely weathered, there was a lot of planing and sanding to do. Even then I put down a piece of plywood as an underlay for the planks to glue to. I punched the planks down with brad nails to allow the glue to dry because the planks took some effort to keep them flat. I have since built a matching coffee table 4' by 4' with yellow pine from the lumber yard, Not nearly as much work to put together since all the boards were reasonable straight/flat.

Sawhorse "bench" coffee table

Submitted by Anonymous (not verified) on Mon, 05/01/2017 - 02:04

Great project with super clear instructions!  Love the look of the sawhorse legs and had just completed a live edge table top, so merged the two for this coffee table.  

Built from Plan(s)
Estimated Time Investment
Afternoon Project (3-6 Hours)
Finish Used
Satin lacquer over all, ebony stain on legs.
Recommended Skill Level
Intermediate

2 X 4 Adirondack Chair Season

2 X 4 Adirondack Chair Season

I'm so tired but i can't stop doing this chairs.
It's fun and gives me satisfaction when it's done
Here is just part of the orders that i got this week.

I'm taking a break, having coffee and resting a bit. Much more sets to do

Thanks Ana White for this beautiful chair plan

Estimated Cost
50/60 Canadian dollar
Estimated Time Investment
An Hour or Two (0-2 Hours)
Finish Used
Behr waterproof stain and sealer
Recommended Skill Level
Beginner

Comments