Community Brag Posts

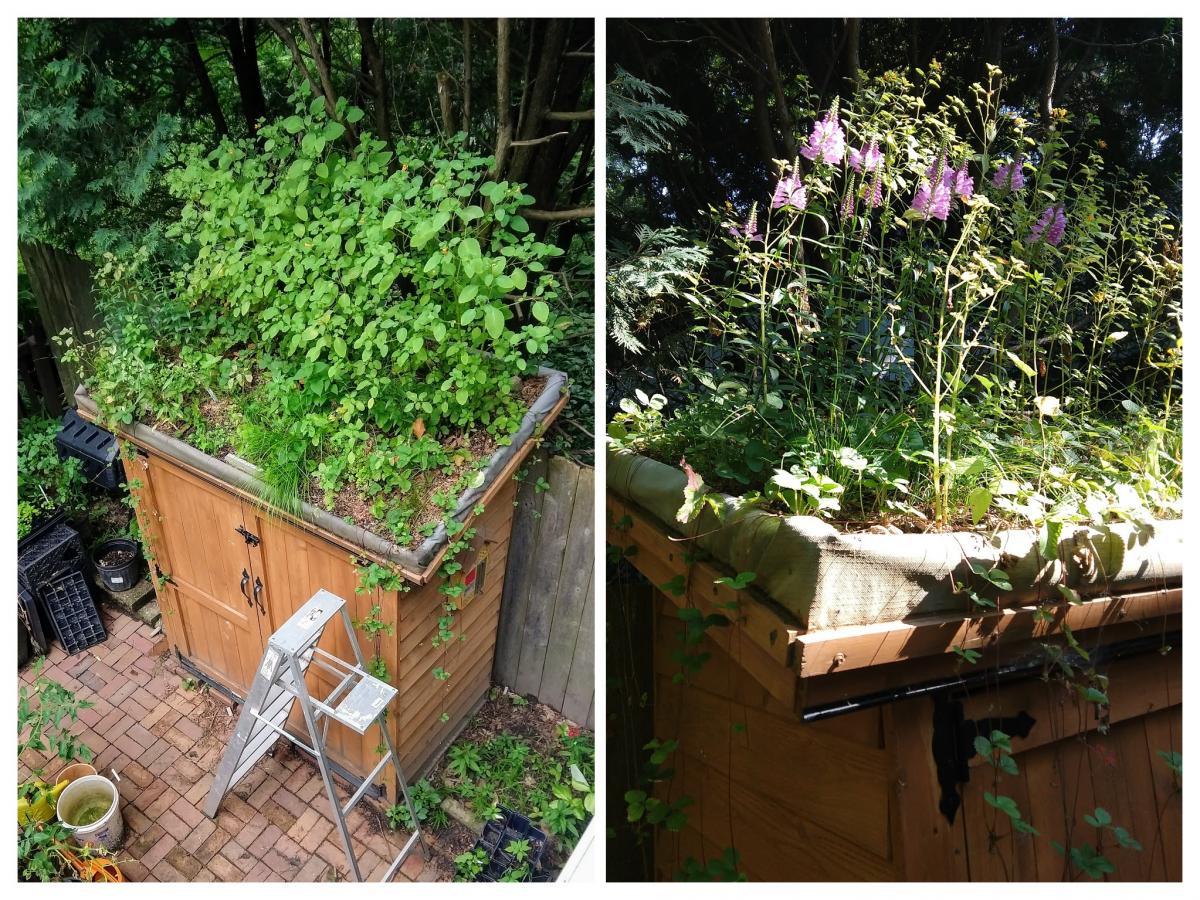
Small Cedar Shed with Living Roof

Submitted by Anonymous (not verified) on Mon, 09/09/2019 - 12:46

I built the shed during the summer of 2018, following Ana's plans but with the addition of a green roof. After almost a year the vegetation -- a variety of native plants from the upper Midwest -- has started to fill in pretty well. My carpentry skills are rudimentary so the project took a long time but was worth the effort.

Built from Plan(s)
Estimated Time Investment
Week Long Project (20 Hours or More)
Finish Used
Wolman™ F&P Cedar Finish and Preservative, if I remember correctly.
Recommended Skill Level
Intermediate

Comments

Mailbox

Submitted by loniwolfe on Tue, 01/10/2012 - 13:50

My grandmother has been in terrible need of a new mailbox. The one she had was original to the house, 1972, I believe. Needless to say it was falling apart.
My stepdad and I built this for her, and my sister painted on the name adn address.
All better now!

PS, I chose Grace's Mailbox plan because you have to choose a plan when posting a brag blog and we didn't use one, we just kind of winged it.

Built from Plan(s)
Estimated Cost
$20-$30
Estimated Time Investment
Afternoon Project (3-6 Hours)
Finish Used
Clear wood sealer, spray can
Recommended Skill Level
Beginner

Comments

Full size loft

Submitted by Anonymous (not verified) on Tue, 10/01/2019 - 18:46

Built a full size loft bed for my kids but wanted something safer than having them climb up and down a ladder so used the Camp Loft Bed plans to add the platform and stairs. It is much easier for the kids. Going to finish by covering the platform and stairs with carpet.

Estimated Cost
180
Estimated Time Investment
Day Project (6-9 Hours)

Comments

Bar buffet

Submitted by Anonymous (not verified) on Sun, 10/06/2019 - 12:32

We needed a unique bar for our home, and loved the sliding bar doors on this one! It fits our house, and we get so many compliments!

Built from Plan(s)
Estimated Cost
400
Estimated Time Investment
Day Project (6-9 Hours)
Finish Used
Sanded everything, applied Kona stain, finished with a poly top!
Recommended Skill Level
Starter Project

Comments

bypass closet doors

About 6 months ago the husband and I purchased a foreclosure for dirt cheap, hoping to rehab it into something livable. It turned out to be a total gut job. So much of the budget was blown on the big stuff--roof, electrical, water, plumbing, that we've really had no choice but to figure out how to do much of the work ourselves with occassional assistance from my son-in-law, a general contractor who lives 400 miles away.
Although he did most of the basic sheetrocking I decided that I was going to build my own closet. After all, how hard could it be. I got it framed out and sheetorcked. Between the low ceilings in the room and the fact that I mismeasured the door frame height, I wasn't able to put in standard doors. But that's okay, I think I like these better.
Thank you, ladies, for giving me the courage to tackle some of these jobs that need doing. I've learned a lot of new skills, done things I never thought I would ever do...and love the feeling that so much of myself is going into making this house my home.

Built from Plan(s)
Estimated Time Investment
Afternoon Project (3-6 Hours)
Finish Used
behr semigloss white paint.
Recommended Skill Level
Beginner

Comments

Debi_G (not verified)

Wed, 04/04/2012 - 15:38

I love these doors. This is now on my to-do list!

Converted A ashley twin size bed into Twin size Crib

Submitted by Mamabear2 on Thu, 01/23/2014 - 09:53

I purchased a twin girls captins bed for my daughter to grow into but she wasn't quite big enough for it yet so I had my husband convert it into a twin size crib!!!! Im in love with how it turned out. My husband Free hand a crown on a sheet of ply wood and cut it out. I used quilt batting and covered it with pink material and did the tips of crown in purple.

Estimated Cost
80.00
Estimated Time Investment
Day Project (6-9 Hours)
Recommended Skill Level
Starter Project

Roll Away Workbench with Miter Saw Stand

Submitted by advanlente on Sat, 03/28/2020 - 11:03

After collecting my tools, I needed a place to store them that would protect them. I had already had two jigsaws break because I was storing them in a rubbermaid tote. When I saw this plan I knew it was going to be perfect for my shop. My husband was supper happy because I would finally have a central spot for my workshop. My boys were happy to help when they could. 

Estimated Time Investment
Week Long Project (20 Hours or More)

Modern slatted bench

Submitted by Whimwhams on Mon, 06/27/2016 - 11:51

I made this for my sister the day before her house warming party. It was a pretty easy build. I used wood glue and 2" nails. Using a nail gun, this came together pretty quickly. I do wish that I had wide enough clamps to hold everything in place while it dried, because there were a few gaps due to some imperfect boards. I used 104" stud length boards, so I only need to purchase 7 instead of 9. this was enough to make the cuts for the top and both leg pieces from each board. the price was the same and we had limited space in our van for boards, so this was a better option for us. I used a sprayer hooked up to an air compressor to apply the stain and was able to get in between the slats fine with this method, brushing over it as I sprayed. Luckily I chose the same color as her deck not knowing, so it matches great. Now I need to make one for myself! :)

Estimated Cost
$40
Estimated Time Investment
Afternoon Project (3-6 Hours)
Recommended Skill Level
Starter Project

Providence Picnic Table by Falafel and the Bee

This is my second large wood project...and both from this blog! The plans were fabulously easy. This was the first time I used my miter saw, and it was a great way to break it in.


Estimated Cost
Under $120.00
Estimated Time Investment
Weekend Project (10-20 Hours)
Finish Used
Benjamin Moore Arborcoat Transparent Teak
Recommended Skill Level
Intermediate
Seasonal And Holiday

Blanket chest

Submitted by dbizzle on Sat, 04/19/2014 - 18:51

My wife wanted a new chest to store blankets in. I saw the plans for the Becca and thought it would be perfect for what we were after.

I used some regular plywood I had laying around and some select pine for the trim. I liked the look of the top in the plan but wanted some more texture to it, so I used a solid piece of plywood for the top and layer pine for the trim features. I tested my new chisels to recess the hinges to minimize gapping under the lid.

We painted it solid black to match the rest of the basement furniture. A few coats of poly finished it off for durability.

This took about 2 months for me to get around to finishing. That's probably about...12 hours of actual work, plus finishing.

Built from Plan(s)
Estimated Time Investment
Weekend Project (10-20 Hours)
Finish Used
Valspar spray primer, Rustoleum Painter's Touch Black (2 coats), Minwax Water-based Polycrillic (3 coats)
Recommended Skill Level
Intermediate

First build--shoe cabinet!!

Submitted by Anniecat on Fri, 05/16/2014 - 23:40

Had a horribly messy front entrance so really needed this shoe cabinet. It's dimensions suited my space better than an Ikea one, and accommodated more shoes. This being my first project, I am glad I started with this instead of a loft bed, since I made alot of mistakes (& corrections) along the way. Although some of the problems occurred because of pieces that ended up being convex. I chose to fill in the gap between the two boards on the front of each bin. It worked out really well.
Really love the Kreg Jig! So worth the investment.

Could not figure out how to properly use magnet catches. Did apply one to one side of the top drawer but it doesn't work too well--pulls the bin too far in. 

Built from Plan(s)
Estimated Cost
$80
Estimated Time Investment
Week Long Project (20 Hours or More)
Finish Used
Used latex primer (which I hated because it behaved like an alkyd & destroyed a couple of brushes) & high gloss paint for high durability.
Recommended Skill Level
Beginner

First time builder....

Submitted by Belle on Thu, 05/29/2014 - 05:35

After finding Ana's plans on how to make these outdoor chairs we decided to give it ago one long weekend. The plans are easy to follow and the end result is the most comfortable chairs, we've spent hours relaxing in them. It took 4 hours to make two chairs and the rest of the weekend painting them. The only thing that I would have done differently is to paint the wood prior to assembling the chairs. My partner then decided to use the left over wood to make a matching table (not shown)

Built from Plan(s)
Estimated Time Investment
Afternoon Project (3-6 Hours)
Finish Used
We primed the chair and then used Cuprinal Silver Birch
Recommended Skill Level
Starter Project

Comments

Debbie440

Fri, 05/30/2014 - 15:41

I made this chair too. I was looking at others to get ideas about what kind of cushions to buy. I really like yours.

In reply to by Debbie440

Belle

Thu, 06/05/2014 - 09:01

I hand made the cushions, had to dust off the sewing machine. The foam and the fabric were more expensive to buy than all the wood. We're going to make the two seater sofa next and I'm going to buy pre-made, it's not the same but we live in an isolated area with limited shopping..

Teen loft bed

Submitted by Anonymous (not verified) on Mon, 06/22/2020 - 20:34

Combined two plans found on this wonderful site with our own revisions to provide a larger desk work area (20" deep). I also added a small shelf to allow for setting a book, water, whatever on it without getting out of the bed. As my first "indoor" project there were several lessons learned - one is to buy the higher grade lumber for the primary components including legs and beams. I did not do this and I had to spend more time than I should've finding good square, straight wood. Another lesson was that staining and polyurethane coating are a skill that requires a lot of practice and time. I and my daughter are thrilled with the final result but choosing to stain/poly it likely doubled the overall build time. Still no regrets, though. My 12 yo daughter just loves her new bed and thanks to this site for the spectacular ideas.

Estimated Cost
$600?
Estimated Time Investment
Week Long Project (20 Hours or More)
Finish Used
I used Minwax Cherrywood gel stain (2 coats) and Minwax Fast Drying Polyurethane (3 coats). For the gel stain, apply with cotton rag and do NOT let it sit on the wood for more than 10 minutes before wiping it off. Before applying first coat, vacuum the wood especially the knots, wipe all with white cloth, wipe with cloth dampened with mineral spirits and let dry, then wipe with tack cloth, then apply stain. AFTER the first coat and between all subsequent stain coats, let fully dry and wipe with tack cloth before applying poly. For the first poly coat, wipe with white cloth, then wipe with tack cloth, and apply poly using a china brush (specific for finishing). Submerge your brush in mineral spirits and press down to eliminate bubbles, then wipe it along newspaper until mineral spirits are nearly gone from the brush. Cut the first coat of poly 25% with mineral spirits and brush on in even strokes. AFTER the first coat, sand lightly with 220 or 320 sand paper, vacuum all dust, wipe with white cloth, then with cloth dampened with mineral spirits and let wood dry, then wipe with tack cloth, then apply second coat with full strength poly using the same process of first eliminating the bubbles from the brush. Repeat that process for all subsequent coats. Then let dry for several days before assembling the bed.
Recommended Skill Level
Intermediate

Outdoor Sectional and Pallet Coffee Table

Submitted by Anonymous (not verified) on Sun, 11/20/2016 - 17:56

Hi Ana! 

My husband used your plans to build the 2x4 outdoor cedar sectional :) He did it in 1 day and it couldn't have been easier! He even tried first time working with pallets to make a small table and it came out perfectly too! Can't wait to enjoy family time on our new back porch.

Thanks Again & Love From Austin ❤️

Kathleen 

Estimated Cost
$350
Estimated Time Investment
Day Project (6-9 Hours)
Finish Used
Stain
Recommended Skill Level
Beginner

Comments

meredithl

Thu, 10/24/2019 - 16:35

Hi, your furniture is beautiful.  May I ask:   Where did you find your cushions?  And what color/ brand stain did you use?  Lovely job.

Seasonal And Holiday
Back