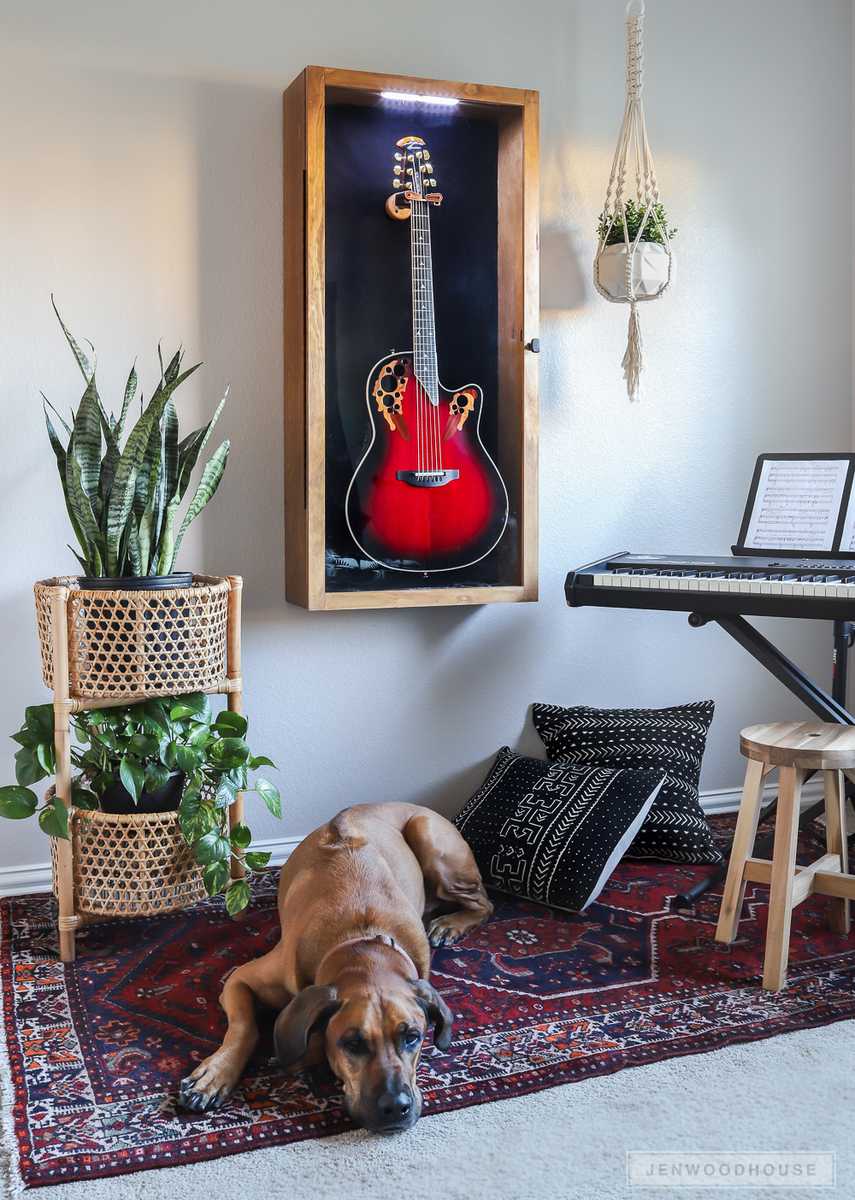
Community Brag Posts

Guitar Display Case

Hi fellow builders!

It's Jen from The House of Wood! Today I’m sharing this beautiful Guitar Display Case. I've been wanting a place to display my guitar, and this definitely fits the bill, with a glass (acrylic, actually) panel door, motion-sensored battery-powered LED lighting, and gorgeous rosewood guitar hanger. And I designed it so that you can build it out of half a sheet of plywood! Get the build plans for my Guitar Display Case at JenWoodhouse.com.

Estimated Cost
$25
Estimated Time Investment
Day Project (6-9 Hours)
Finish Used
Golden oak
Recommended Skill Level
Intermediate

Beginner Bench

Submitted by angiemicn on Sat, 07/02/2011 - 04:29

First Anna project, I needed a bench by the pool, so I did waterproof it, which is holding up well, and it's extremely nice even with my limited skills. Definately worth the time and sanding.
Things I learned, need to measure each cut out. I didn't, so my slats are not all the same length. Still works really good, but I should've measure, cut, measure, cut, because I didn't take into account the width of the blade. I wouldn't use so much wood filler. I really glopped it on there. The sanding and staining pre, good call.
I would've used 2 pieces of wood for each leg.
Well, next one. I've already learned so much from making it and had a great time making it. Can't wait to get started on the table to match!

Estimated Cost
65.00 (big chunk of that was the waterproof deck sealant/stain)
Estimated Time Investment
Weekend Project (10-20 Hours)
Finish Used
Behr Premium Weatherproofing/waterproofing Deck, Paint, Furniture Wood Finisher, Natural 500, 2 coats, 220 sand in between, use the minimal amt of wood filler, because it really shows through....This is nontoxic, and since I have 5 Golden Retrievers, 2 puppies that chew, I couldn't use treated wood
Recommended Skill Level
Starter Project

Comments

Kimmie (not verified)

Mon, 02/20/2012 - 11:11

Love this beginners bench! Saw this on pinterest...will be repinning for future reference! Amazing stuff on your blog!

Kimmie (not verified)

Mon, 02/20/2012 - 11:12

Love this beginners bench! Saw this on pinterest...will be repinning for future reference! Amazing stuff on your blog!

Moose Head

Submitted by Newfey on Wed, 08/07/2013 - 17:37

This is a wall ornament I made for my daughter for their get away home on the golf course at Canadian Lakes, MI. "No animals were hurt in the mounting of this moose head" The only thing to suffer was a few pieces of scrap wood that I had laying around.

Estimated Time Investment
Weekend Project (10-20 Hours)
Finish Used
Minwax stain and spar varnish. Just something that I had lawing around
Recommended Skill Level
Intermediate

Comments

Newfey

Fri, 08/09/2013 - 08:24

My daughter say a small one on a shelf in a little restaurant in Stanwood, MI and told me that she would like one, only larger. That was as large Asia could make it wit the scrap wood that I had laying around.

Newfey

Fri, 08/09/2013 - 08:29

My daughter say a small one on a shelf in a little restaurant in Stanwood, MI and told me that she would like one, only larger. That was as large as I could make it with the scrap wood that I had laying around.

Kitchen Island Trestle Table

This was something my wife needed for the kitchen. I told her to find one that she liked and I would build it. This took about 6 hrs because I was building from a picture and no measurements. I dropped the shelf a little lower so my wife could store her mixer and stuff on it. Needless to say I think it came out pretty nice. We are still going to paint it and put one more coat of stain on the top.

Estimated Cost
$140.00
Estimated Time Investment
Day Project (6-9 Hours)
Finish Used
Oak Stain on top
Recommended Skill Level
Intermediate

Comments

Indoor Basketball hoop

Submitted by Shells1104 on Wed, 05/16/2018 - 19:37

Joined 1 x 3 boards together with pocket holes and wood glue. The hoop is reused from an old " over the door" hoop. Decided to just drill straight through the boards into studs. Really easy and my son loves it!

Estimated Cost
$50
Estimated Time Investment
Afternoon Project (3-6 Hours)
Finish Used
weathered gray, early American, ibswich pine.
Recommended Skill Level
Starter Project

Comments

Replacing Our Outdoor Furniture

Submitted by Anonymous (not verified) on Mon, 04/25/2022 - 15:42

When our outdoor furniture started falling apart, we decided it was too expensive to replace until we found your plans for the “Modern Outdoor Chair from 2x4s and 2x6s.”
The design was almost exactly right.
The only change we made was to make the arms taller so the cushions from our original set would work. Instead of 2x6s for the sides we changed one of the boards to 2x8 and adjusted the arm height by a couple of inches. We made the chair first.
We then used the plans for the Loveseat and completed our set.
After painting the first chair after assembly, we decided it was easier to cut the wood and paint the parts prior to assembly and touch it up after.
The design adjustment matched perfectly. We also created a coffee table using the same type of assembly.
We know these loveseat and chairs will last!!!
Thanks so much
Kim and Scott Griffin

Comments

Haley Storage Bed

My husband and I were able to put this together over the course of two weekend days. Then it took me an eternity to paint/finish it. But we love it now and so does our little girl!

Estimated Cost
$150
Estimated Time Investment
Weekend Project (10-20 Hours)
Recommended Skill Level
Starter Project

Comments

[email protected] (not verified)

Wed, 09/14/2011 - 14:39

Your bed looks amazing!! Did you make the footboard taller?
I want to make this for my niece :)

Chernandez

Wed, 12/28/2016 - 15:12

This was an easy two day project that turned out great. My daughter loves it. I made the foot board taller to keep the mattress from sliding off. Thank you for the plans.

Wood Caddy for the Bathroom

Using Ana's great Reclaimed Soda Crate Caddy plan I built the perfect wood caddy for my bathroom by just adding rope handles and stenciling "BATH" to the front.

Built from Plan(s)
Estimated Cost
$10
Estimated Time Investment
Afternoon Project (3-6 Hours)
Finish Used
Mixwax special walnut.
Recommended Skill Level
Starter Project

Corner cabinet

My mom had been wanting a corner cabinet in her dining room forever but every one we found was mad expensive. So I built her one as a gift. She loves it! I used left over paint from her dining room walls so the colors match exactly.

Built from Plan(s)
Estimated Cost
$100. Paint was free as it was left over.
Estimated Time Investment
Day Project (6-9 Hours)
Finish Used
Interior wall paint
Recommended Skill Level
Intermediate

Adirondack stools or end tables

Super strong stools and/or end tables! I LOVE them. Wanted a rustic vibe, stained with Varathane Briarsmoke with Varathane matte poly. The build took no time at all... The only reason this is a day project in my opinion was the true time it takes for drying between finishing coats. They were both built in one evening. Can't wait to build the Adirondack chairs from Ana's book to go with them!  

Built from Plan(s)
Estimated Time Investment
Day Project (6-9 Hours)
Finish Used
1coat of Varathane Briarsmoke + 3 coats of Varathane Matte Poly
Recommended Skill Level
Beginner

Quick, Cheap and Fun to Do Shelf

Submitted by Joanna A on Fri, 07/08/2011 - 11:37

Very quick to do. I made a few modifications to the plans as you can see. I also stained the pieces before gluing and screwing together. My boys LOVE this one...

Built from Plan(s)
Estimated Time Investment
Afternoon Project (3-6 Hours)
Finish Used
stain from other projects
Recommended Skill Level
Beginner

Table and chair

Submitted by carongirls on Sun, 08/11/2013 - 13:56

I made the $4 dollar chair and Ana Table. For the chairs I used 2x2's for the legs to help sturdy it up and because of that my seat slats are closer together. It's a very sturdy chair. I can sit on it and it doesn't budge.
The table was easy to do.

Estimated Cost
Chair $4.50 Table $17.00
Estimated Time Investment
Weekend Project (10-20 Hours)
Finish Used
Left over paint
Recommended Skill Level
Beginner

Comments

Farmhouse bed

Submitted by jphbgsu on Sun, 09/06/2015 - 19:48

The project went relatively well. Had to readjust in order to fit our king. I used 2x4s and 2x4 joist hangers to support the mattres. 

Built from Plan(s)
Estimated Cost
300.00
Estimated Time Investment
Week Long Project (20 Hours or More)
Finish Used
Rustoleum ebony stain and satin polyurethane.
Recommended Skill Level
Beginner

Tommy bookcase

Submitted by Kleinzeit on Thu, 07/19/2018 - 12:57

I started off following the plan, then decided I didn't want to put a full back on it. Then I decided it was a good time to learn how to use my new router, and the next thing you know, it had turned into this! I didn't know what I was doing, so I just made it up as I went along.

Estimated Time Investment
Week Long Project (20 Hours or More)
Finish Used
American Walnut aniline dye, Dark Walnut stain, Medium Walnut Danish oil
Recommended Skill Level
Intermediate

Comments

Rear foyer bench!

Submitted by Anonymous (not verified) on Mon, 05/09/2022 - 13:19

Used the warming hut bench plan to build this rear foyer bench! I used Behr Stain & Poly in Mission oak (2 coats) and love the way it ties in with the rest of our house. Plus I love saying "Thanks, I made it!" when people see it and ask where I found something that fit so perfectly. :)

Comments

Factory Cart Coffee Table

I used Ana's plans for her factory cart coffee table to create my new coffee table. It was super easy and cheap! I used 1x10's for the sides to make it a bit taller. I found my casters at Northern Tool for $12 a piece. That was the main cost of the table. I used Gorilla Glue and 2" nails to hold everything together. I had it done in a couple hours and I love it! You can see more details at http://www.shanty-2-chic.com/2011/06/crate-coffee-table-reveal.html !

Built from Plan(s)
Estimated Cost
$85
Estimated Time Investment
Afternoon Project (3-6 Hours)
Finish Used
Minwax Dark Walnut stain and 1 coat of Polycrylic Semi-Gloss
Recommended Skill Level
Beginner

Clubhouse Fun!

Submitted by nleonard85 on Tue, 08/13/2013 - 12:36

This project is fun and relatively quick for the end result. All together, it took just over 20 hours. For the most part I followed the instructions and wood cuts according to the plan. I ended up having to tweak some things and I'm not sure if the error was in the plans provided online or my own error. Probably mine!

I thought I would add that, for the sign, I simply picked a font on the computer and printed out big letters (a size that would fit nicely on the sign) and then used those letters to trace out the border. Then I painted the letters by staying inside the lines! Easy Peasy. I used a small rustic rope and drilled holes in the sign to slip the rope through. I then tied knots so as to hold the sign in place. Works great and definitely completes the set. I thought about skipping the windows, but I'm so glad I did not. They really stand out and look amazing. My son loves to open them and just stare out (who knows what his imagination is making him see).

This bed is great because it allows for another area below. My son likes to turn on a lamp, sit in his chair and read. Thank you SO MUCH for this plan!!!

Built from Plan(s)
Estimated Time Investment
Week Long Project (20 Hours or More)
Finish Used
Minwax Early American. Applied with rag.
Recommended Skill Level
Intermediate

Comments

BrettPaPa

Thu, 08/15/2013 - 09:43

This is spot on! Great job! Your finish is just super! What stain and color did you use?

nleonard85

Thu, 08/15/2013 - 13:35

Thank you! I used a water-based Minwax stain from Sherwin Williams. The color is called "Early American" and the product number is 230. I applied it with a rag since it is easier and I think it actually looks the best.

Smaller Version

Submitted by Pomarola25 on Fri, 09/11/2015 - 03:01

Took me a bit longer since I had to make a new cutting list as my table was smaller.  Plus, the wife wanted a really dark rich stain on it so several coats went into the stain.

Built from Plan(s)
Estimated Time Investment
Day Project (6-9 Hours)
Recommended Skill Level
Intermediate

Harp Design Turned Leg Farmhouse Table

Submitted by danicarby on Sat, 08/04/2018 - 12:12

A friend of mine loves the tables by Harp Design Co. but she wanted changes made to it such as the apron being inset, removable legs, oak wood, specific finish, etc.

She hired me to make her one and it's been an exciting build!  I built it from a pile of raw wood, turned the legs, etc.

My favorite thing to do is to inpsire others to reach beyond what they're comfortable doing - that's why I post about my projects through my website so other people will feel like they can do it too!  https://theprojectlady.com/how-to-build-a-harp-design-table/


I'd rate the level of build as intermediate, but really anyone can make it easier or harder.  The most challenging part is the legs - do something more simple, hire someone to make you some, order them online, etc.  The posts I created for this table are in-depth but don't let that intimidate you!


Happy Building Friends!

Estimated Cost
$450 for oak wood, $100 for finish, $30 for hardware
Estimated Time Investment
Week Long Project (20 Hours or More)
Finish Used
General Finishes High Performance Clear Coat with Transfast Dye (tinted color)
Recommended Skill Level
Intermediate