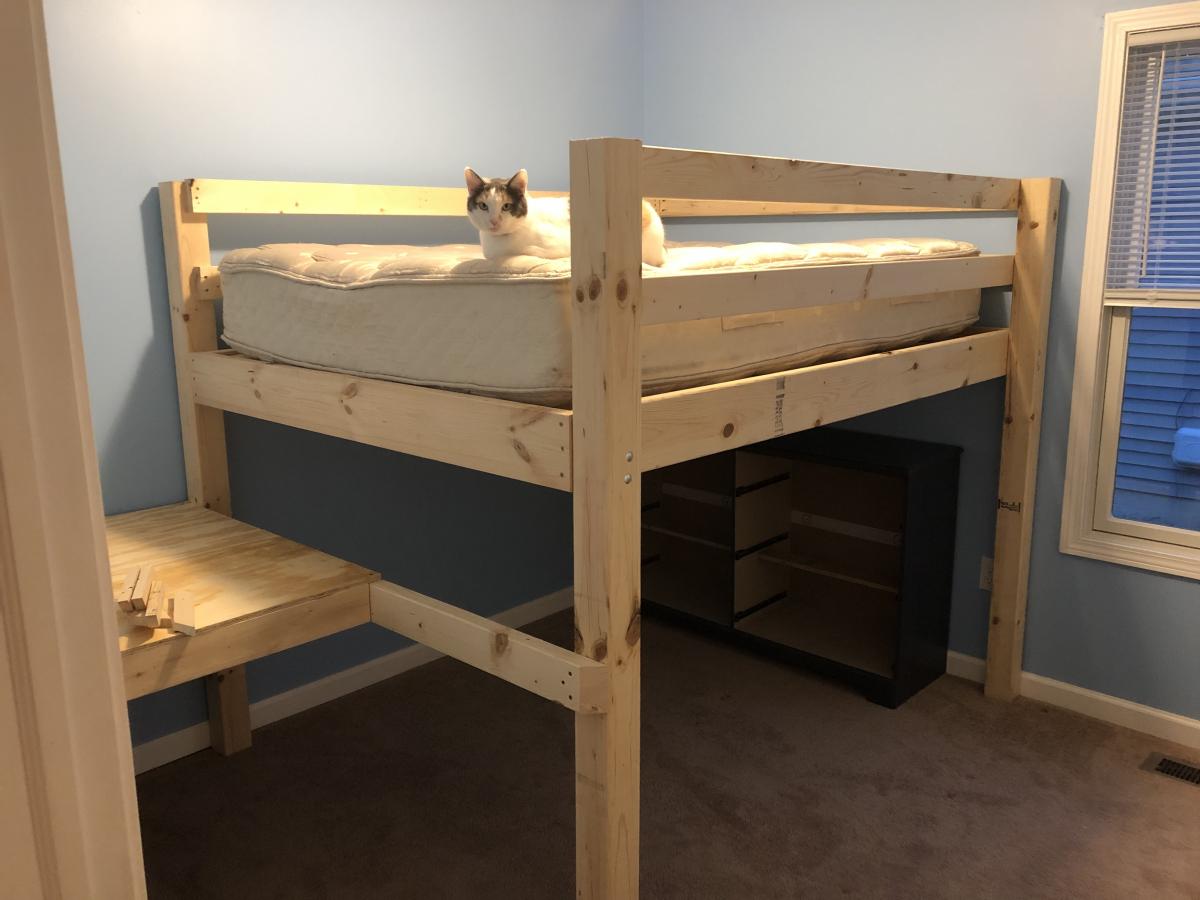
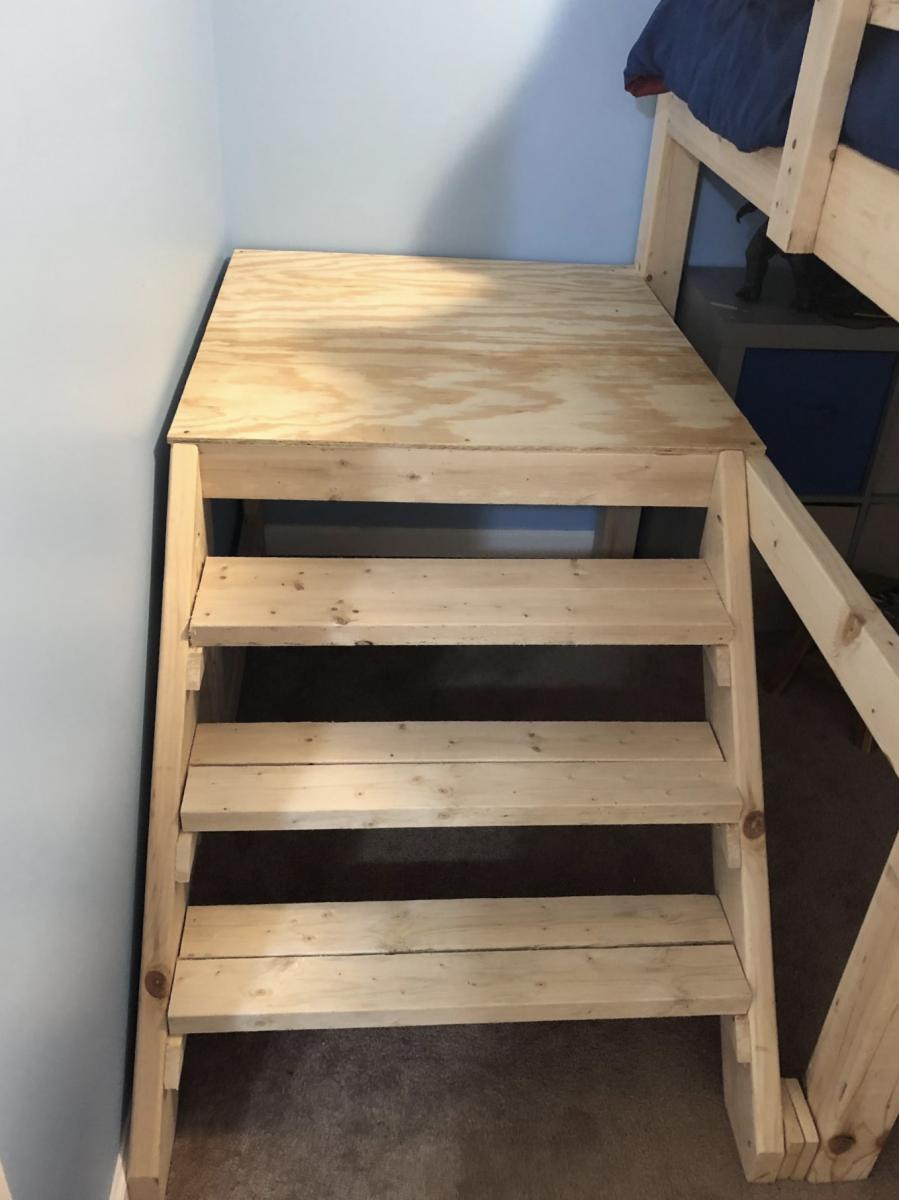
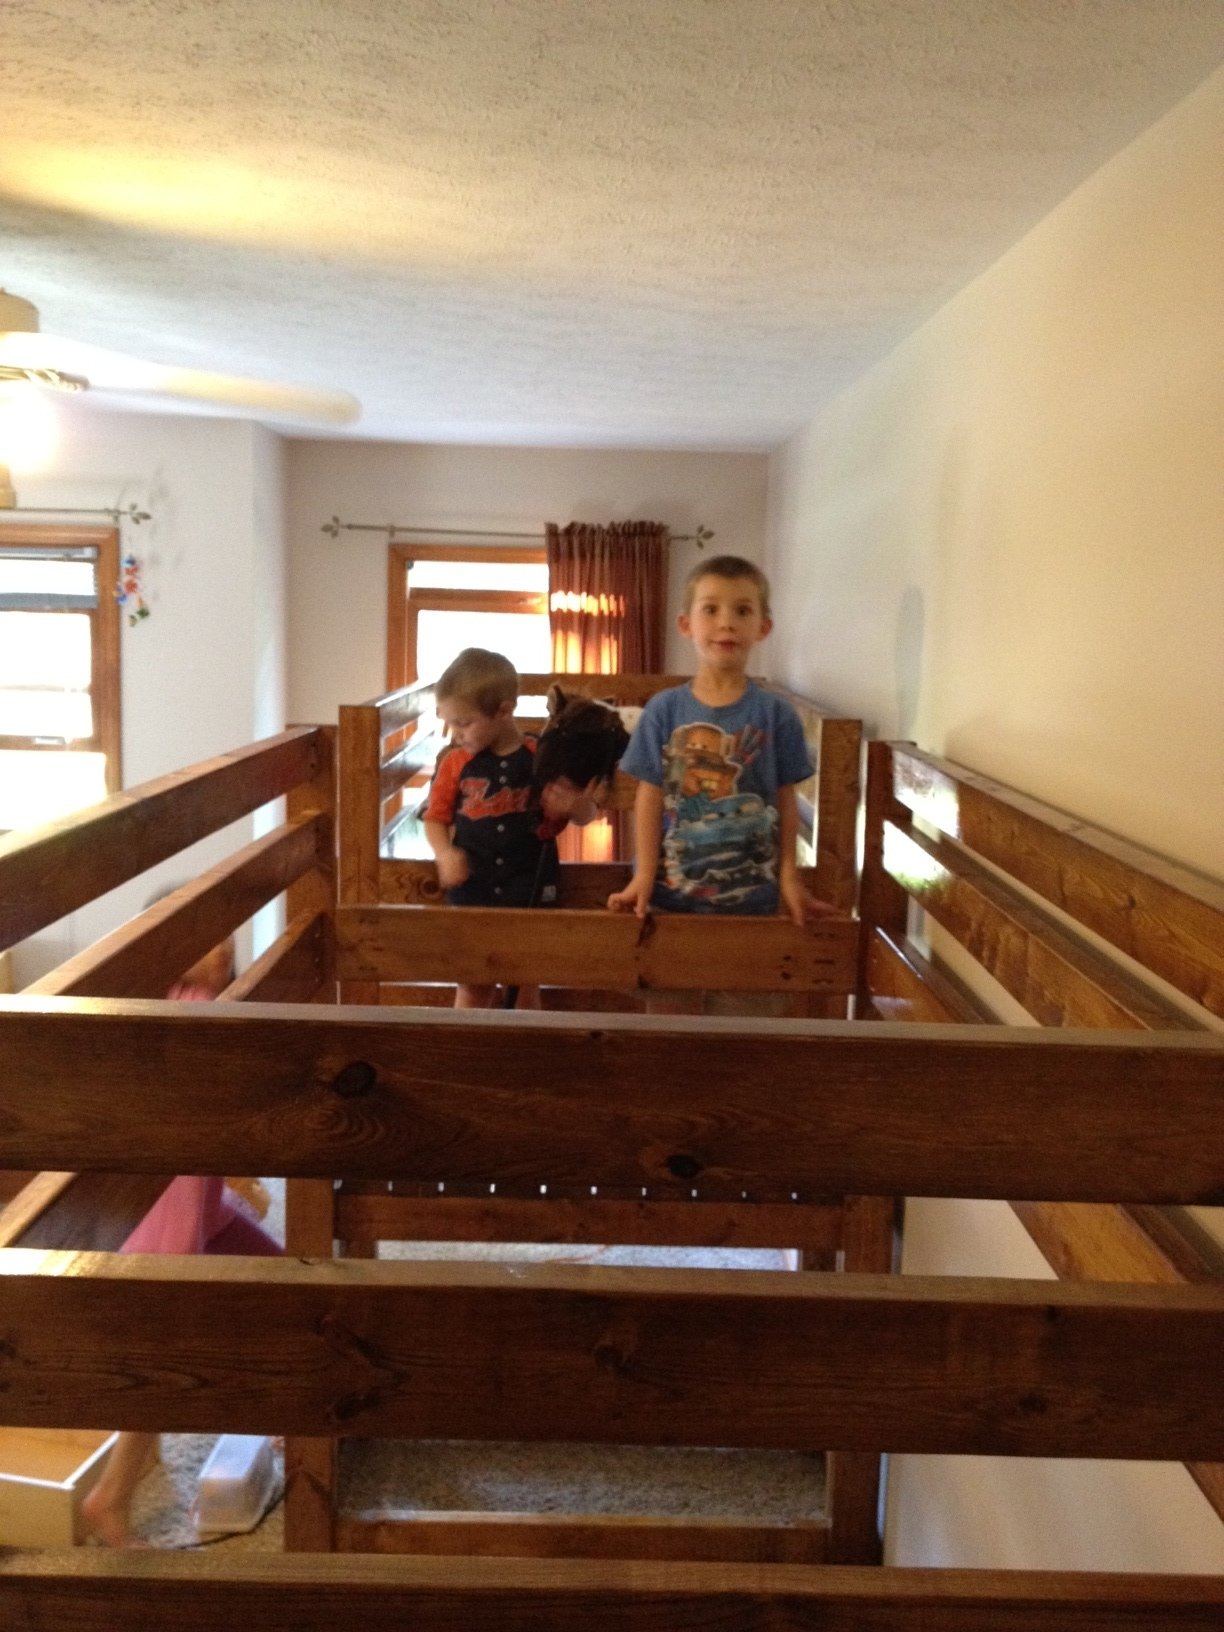
Community Brag Posts

Full size loft

Submitted by Anonymous (not verified) on Tue, 10/01/2019 - 18:46

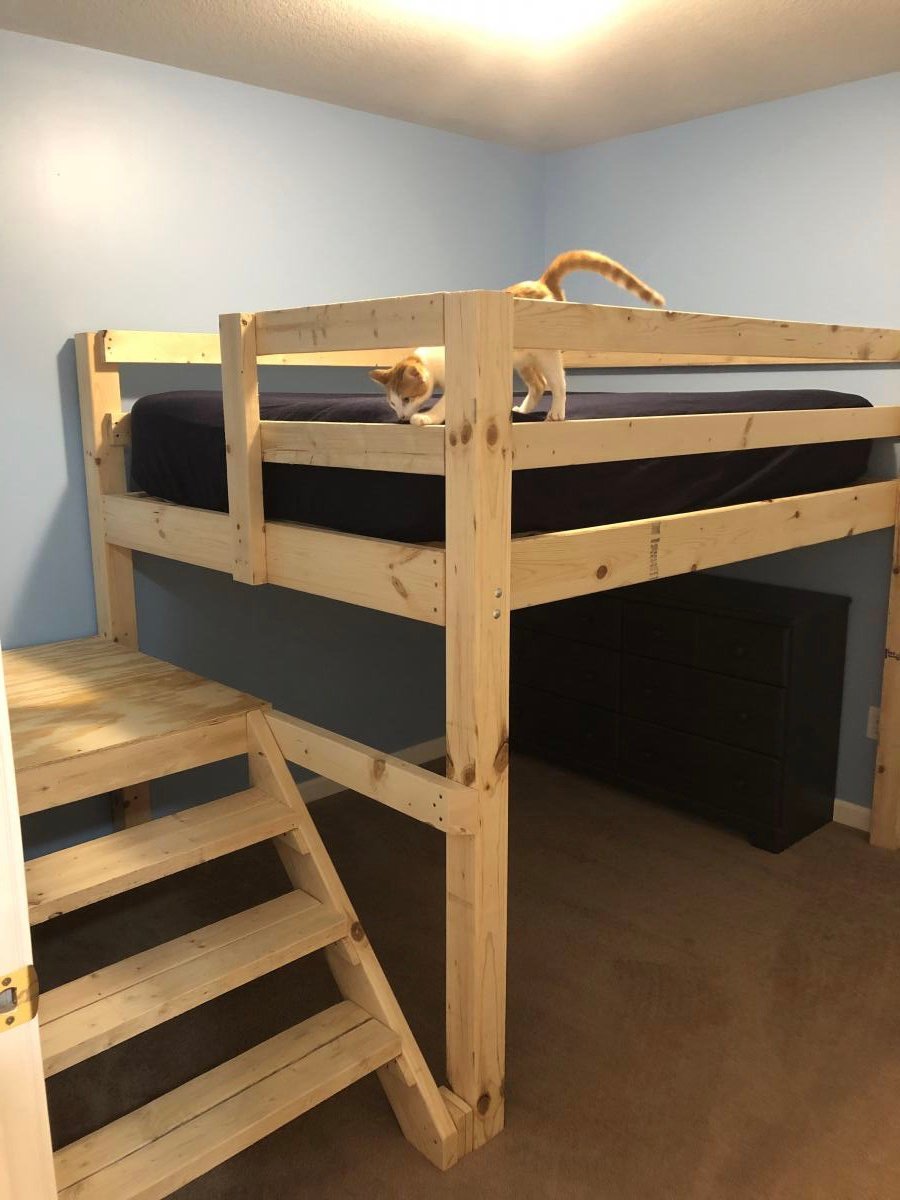
Built a full size loft bed for my kids but wanted something safer than having them climb up and down a ladder so used the Camp Loft Bed plans to add the platform and stairs. It is much easier for the kids. Going to finish by covering the platform and stairs with carpet.

Estimated Cost
180
Estimated Time Investment
Day Project (6-9 Hours)

Comments

Bar buffet

Submitted by Anonymous (not verified) on Sun, 10/06/2019 - 12:32

We needed a unique bar for our home, and loved the sliding bar doors on this one! It fits our house, and we get so many compliments!

Built from Plan(s)
Estimated Cost
400
Estimated Time Investment
Day Project (6-9 Hours)
Finish Used
Sanded everything, applied Kona stain, finished with a poly top!
Recommended Skill Level
Starter Project

Comments

Ana White Inspired Farmhouse Table - "The Gathering Place"

Submitted by Anonymous (not verified) on Sun, 10/27/2019 - 11:54

This my first-ever custom, DIY farmhouse dining table that I built for my amazing in-laws! They just moved into a beautiful new home with a large, open dining area, and they've been looking for a large table that our growing family can gather around. This table seats up to 12 people at one time, and it 2.5' tall, 3.4' wide, and 10' long (with the extensions out.)

I've repurposed many tables and/or wood projects before, but this is my first table made completely from scratch. It took me approximately 2 weeks to fully complete, and cost less than $300, (including "investment tools" such as large wood clamps, electric sander, etc.)

Estimated Cost
300
Estimated Time Investment
Week Long Project (20 Hours or More)
Finish Used
I used an Espresso-color stain for the coloring of the table, and a water-based satin ____ sealer to protect the wood while giving it as natural a feel as possible. (I chose water-base so that the sealer would be clear and not affect the Espresso color.)
Recommended Skill Level
Intermediate
Seasonal And Holiday

Fire-pit Life

Submitted by Anonymous (not verified) on Mon, 10/28/2019 - 18:38

Fortunate enough to live on a beautiful river, my wife and I decided we were done bringing the folding chairs out for each weekly bon fire. Our three girls love s’mores and we wanted a great atmosphere with a place to easily grab wood and snacks in the dark while we enjoyed the outdoors. The combination of plans took us about a week to finish. The kids were away for the weekend and we rented an auger to drill the post holes. This proved to be the most difficult part of the project. It took nearly the whole weekend to dig out the unexpected granite and all the patience that we had in reserves. Once the posts were set, it was only a slightly uphill battle.
My wife made the bench in the time it took to return the auger and come home. The fire pit benches were also a pleasure to assemble and the most functional part of the project. I suspect the whole thing would have been faster if the large posts were easier to cut through. That treated lumber can eat saw blades! When setting the top posts it was also a two ladder and two person job. They were quite heavy and a little nerve wracking to set if you don’t love heights and a heavy load. We would do this project again in a heartbeat as it is a feature in our yard and makes for many enjoyable family and friend gatherings. The fire pit bench top is also great for hosting the entire bbq meal assortments to select from.

Estimated Cost
$1000
Estimated Time Investment
Week Long Project (20 Hours or More)
Finish Used
None, treated lumber, 3 years later and still looks brand new!
Recommended Skill Level
Intermediate
Seasonal And Holiday

Family stocking stand

Submitted by kjoslyn78 on Tue, 12/24/2019 - 14:33

We have a vent-less gas wall heater, but had no mantel for hanging stockings. Thanks to the new plan, we have the perfect solution! We already had the 2X4s left over from the simple panel bed project, so we only purchased hooks and stains for this. 

We shortened the width to accommodate 4 stockings instead of 5 (we cut the 2 cross pieces 9 inches shorter). We also decided to add a large 2X6 cap to mimic a mantel, which really seems to tie it all together much better. We love this and have ideas now on how to make slight changes so it will more easily slide "over"/around the wall heater

(yes, we are not keeping it that close while stockings are hung, so as to not risk catching fire)

Built from Plan(s)
Estimated Cost
Under $20 (if you need to purchase wood/stain, we did this for under $10)
Estimated Time Investment
Afternoon Project (3-6 Hours)
Finish Used
Rust-oleum: Kona
Recommended Skill Level
Starter Project

Outdoor Day Bed with Canopy

Submitted by hawaiitara on Mon, 04/09/2012 - 15:22

We needed a daybed for our lanai and when I saw these plans I knew it was perfect. We built the bed in a day and then painted later when we had time. It is just the place for taking a nap and because it is on a covered lanai, weatherproofing was not an issue.

We followed the instructions and it was very easy to complete! Thanks Ana!!

Built from Plan(s)
Estimated Cost
$150
Estimated Time Investment
Day Project (6-9 Hours)
Finish Used
I used heirloom white to paint it, followed by sparsely painting over it with turquoise so it would look beachy. I attached sea stars to the top corners. I used valspar paint in innocent turquoise I think.
Recommended Skill Level
Beginner

Custom Horse Handle Teeter Totter

Submitted by Anonymous (not verified) on Wed, 09/13/2023 - 09:28

This is the Seesaw I made for our Granddaughters, plans were easy to follow and the girls love it.

sawhorseworkshop

Built from Plan(s)

Comments

2 Person Adirondack

Submitted by Tony H on Sat, 11/18/2023 - 11:36

 A customer asked me to make them two singles and a double. Unfortunately, not as comfortable as the single chair.  There’s nowhere to put one of your arms.  If I do another double, I’ll add an arm rest in the center.  The middle is supported by a double 30 degree leg. 

Seasonal And Holiday

Dresser to Buffet

Submitted by tazO on Fri, 06/01/2012 - 06:07

I have been looking for a dresser to transform into a buffet. I posted on a facebook yard sale group and a wonderful woman offered me one she had been keeping in her garage for free.
Step one stripping a lot of old paint and sanding, sanding, and sanding some more. I found a stencil i like on etsy. Stenciled that design onto the top of my "buffet" with white paint and then when it was dry lightly sanded it. I then stained the entire top the color i wanted. 3 coats of varnish finish that off.
The next step was the bottom. The hardest part about that was getting all the old paint out of all the ins and outs of this piece. Once that was done, with the help of the husband, we removed all the rails and braces holding the bottom 2 sets of drawers. It was put together with interlocking pieces so taking it apart left some hold in the side and middle brace. My husband cut pieces to fit in there and were put in place with wood glue. Once dried they were sanded completely smooth. We used a 1/4" piece of luan for the back and 3/4 piece of pine for the bottom of the now open area. A little trim, 2 coats of white enamel and some new hardware for the drawers and tada a new buffet..lol.
Just got it in yesterday so I'm still decorating, but i love the way it turned out!

Estimated Cost
$40
Estimated Time Investment
Weekend Project (10-20 Hours)
Recommended Skill Level
Beginner

Comments

spiceylg

Fri, 06/01/2012 - 06:29

That came out really nice. Love the stencil touch, too! I am looking for a dresser to turn into a media console. Never thought about posting on FB. Great idea!

Garden Tool Storage Rack

Submitted by kwildman on Tue, 04/28/2020 - 20:45

This isn't an Ana White plan but I've learned so much from this site that I designed and built this garden tool rack. Its pine 2x4 construction. I love it!

It is 84" tall x 72" long x 26 wide (opening) and 48"wide for garden tool hangers.

Estimated Cost
100
Estimated Time Investment
Afternoon Project (3-6 Hours)
Finish Used
No finish
Recommended Skill Level
Beginner

Comments

Kids Storage Bench

Submitted by ValBryant on Thu, 08/16/2012 - 09:10

After building a few things from plans I decided to come up with something on my own, and from scraps I made this bench for my son.

Built from Plan(s)
Estimated Cost
Scraps
Estimated Time Investment
An Hour or Two (0-2 Hours)
Finish Used
Dark Walnut
Recommended Skill Level
Starter Project

Barn Style Greenhouse

Followed your excellent plans, thank you.
Adapted to make smaller...approximately 10ft X 8ft.
It gave me a very enjoyable project to complete during 'lock-down ' and with Greenhouse.

Built from Plan(s)
Estimated Cost
£800
Estimated Time Investment
Week Long Project (20 Hours or More)
Finish Used
Treated all wood with preservative.
Steel panels (old roofing) were obtain from a kind neighbour for free and all external metal/wood was given several coats of 'Red Oxide' gloss Barn/agricultural paint.
Adaptions made by myself were :-

I put self adhesive 'Flashing' on the bottom wood of the vertical sides...to attempt to protect the wood in contact with the floor from getting over wet......time will tell if it works.

I made additional gussets to support the top piece of wood (attached to each end).

I had trouble with keeping the corrugated roof running parrallel....but the reason for this was that it was not manufactured with straight@right angle ends (when I held a level/straight edge along end - there was a quarter of an inch gap in the centre).
Recommended Skill Level
Intermediate

Double Wide Camp Loft Bed!

Have two boys who where in need of more floorspace to play. Saw the great plans for the Camp Loft and decided to make a double wide. One platform and two beds.

All in all went together as designed. Eliminated the stairs for a ladder. Works great if you have a long wall.

Estimated Cost
$85 for all the wood; 50 for stain and poly
Estimated Time Investment
Weekend Project (10-20 Hours)
Finish Used
Minwax
Recommended Skill Level
Beginner

Comments

Modified Corner Media Stand

I used the Tall Corner Media Stand plans as inspiration for this, but I didn't actually need it top be very tall, so I took off one of the shelves, and decided not to add the extra section for the cable box and what not.

I also liked the simplicity to it without all the trim, so I decided to leave the sides and top slats off and just stain it and add a 1x3 at the bottom for aesthetic purposes.

Built from Plan(s)
Estimated Cost
$85 (for lumber and stain. Already had screws/glue,etc.)
Estimated Time Investment
Afternoon Project (3-6 Hours)
Finish Used
MinwaX'S full collection: Pre-stain wood conditioner, English Chestnut stain, and clear coat
Recommended Skill Level
Intermediate

Comments

DavidM1962

Sat, 04/16/2016 - 23:01

Any possibility you could have an option for metric measurements on your projects. I assume that there would be many more metric speaking nationalities besides me that would find this helpful. Your country, and a smattering of others, are among the only countries that still use the old Imperial system.

Outdoor sectional

I changed the plans a bit and added backs to the chairs. I've never used a saw or a drill before, but I am thrilled with how easy this was to do. I love the end result!
I found cushions to go with the furniture at Target.

Estimated Time Investment
Week Long Project (20 Hours or More)
Recommended Skill Level
Beginner

Big Sandbox with Lid

Submitted by flinchball on Mon, 09/21/2020 - 13:18

Made the sandbox 6x6. Recessed it so it sits flush with the timber’s around our fire pit area. I added extra armrests in the middle that double as supports when the lid is closed in case anyone wants to walk on it. Filled the sandbox full enough that the armrests sit on the sand when closed. It’s very sturdy now for walking on and the kids have tons of room to play. Thanks for a great plan to work from.

Built from Plan(s)
Estimated Cost
$100
Estimated Time Investment
Day Project (6-9 Hours)
Finish Used
Boiled linseed oil.
Recommended Skill Level
Beginner

Comments

Back