Community Brag Posts
Simple Potting Bench
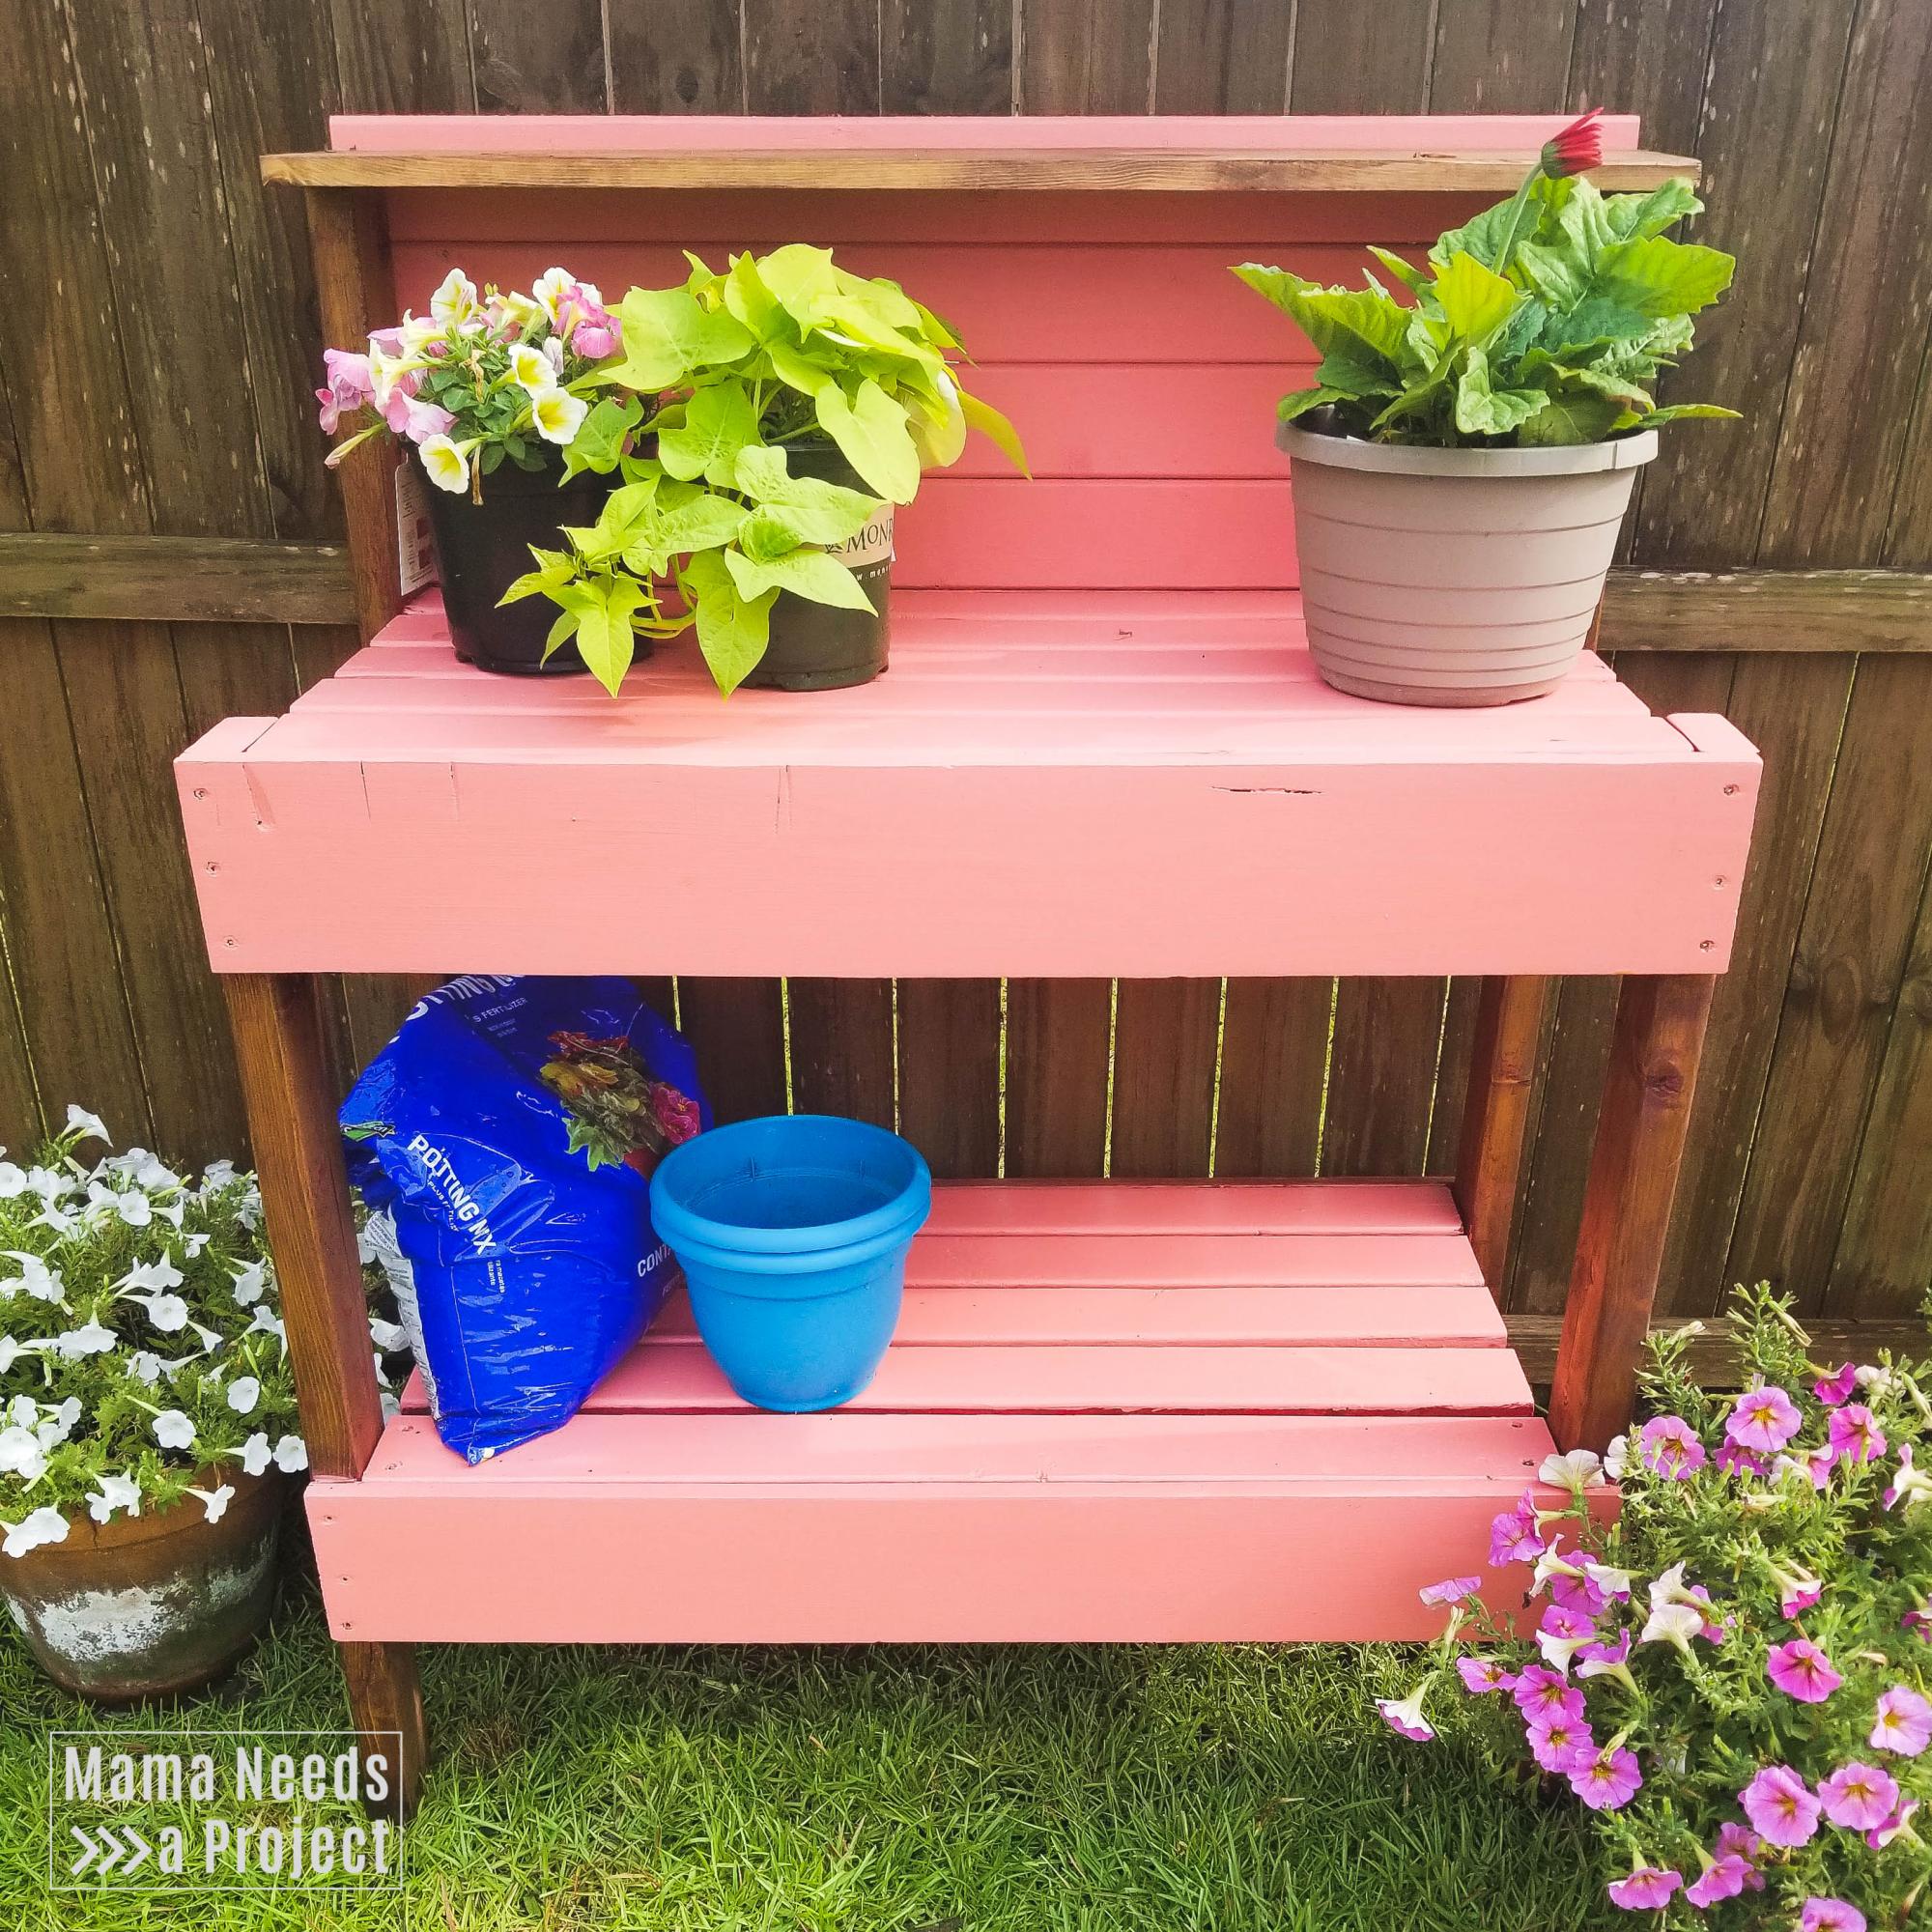
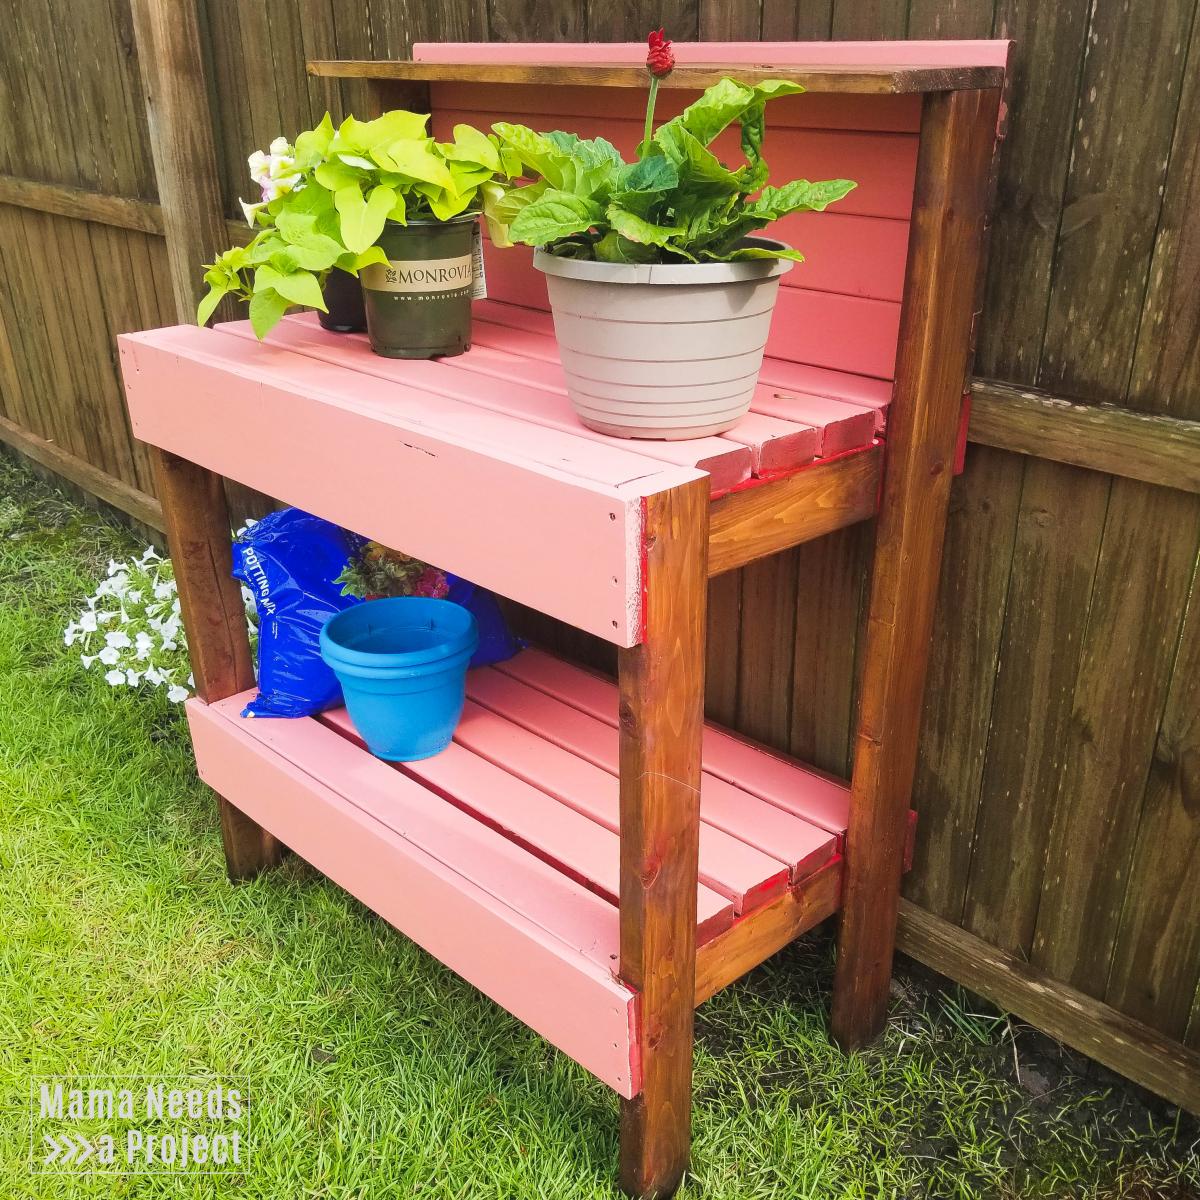
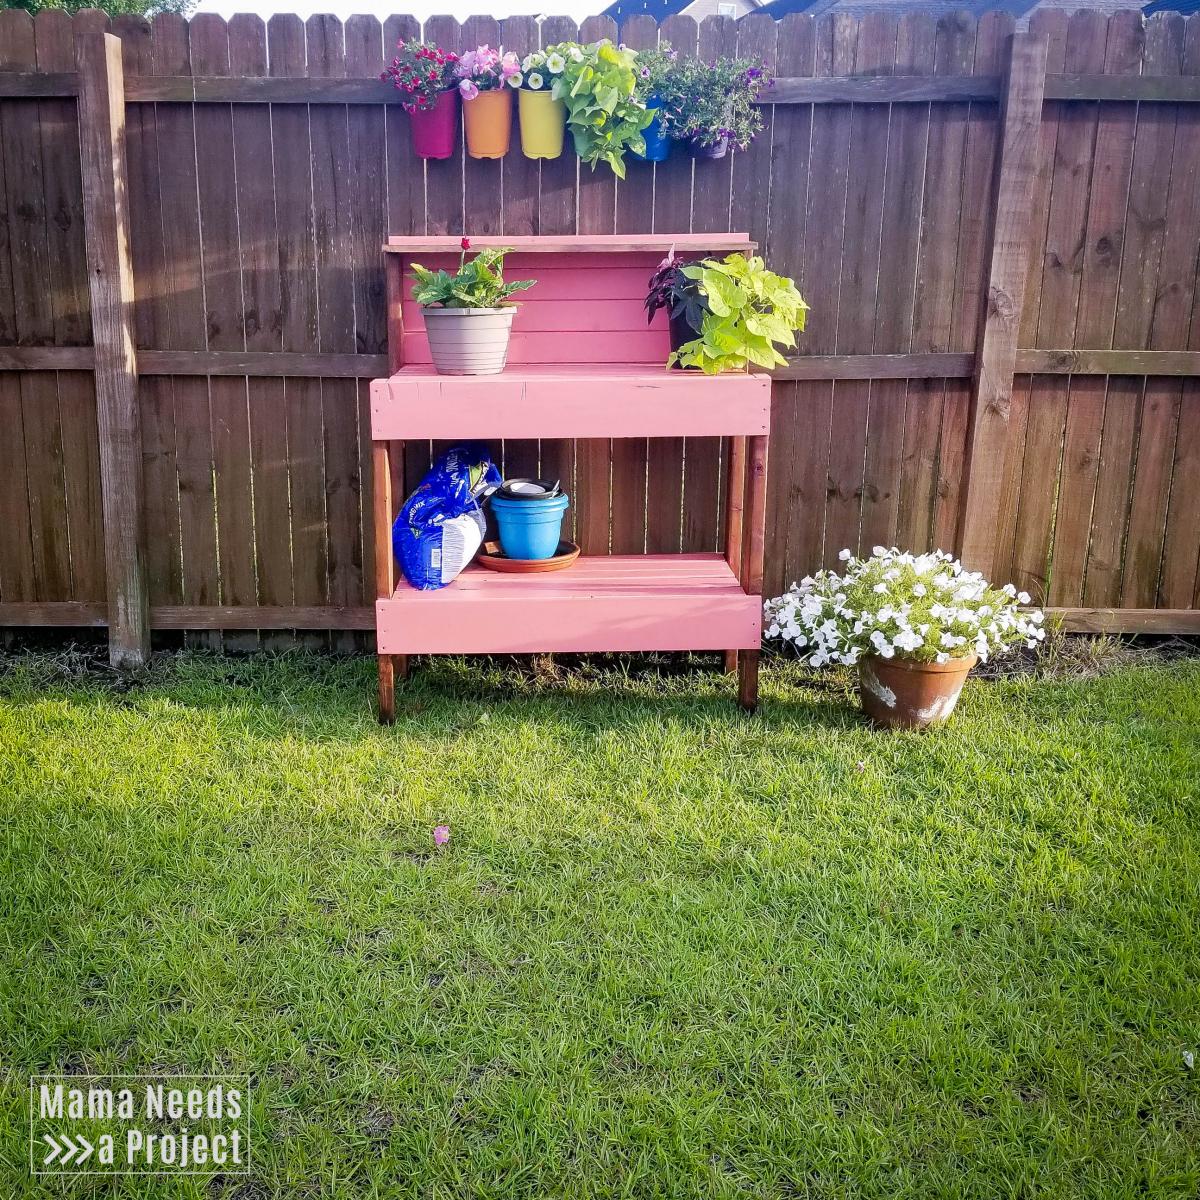
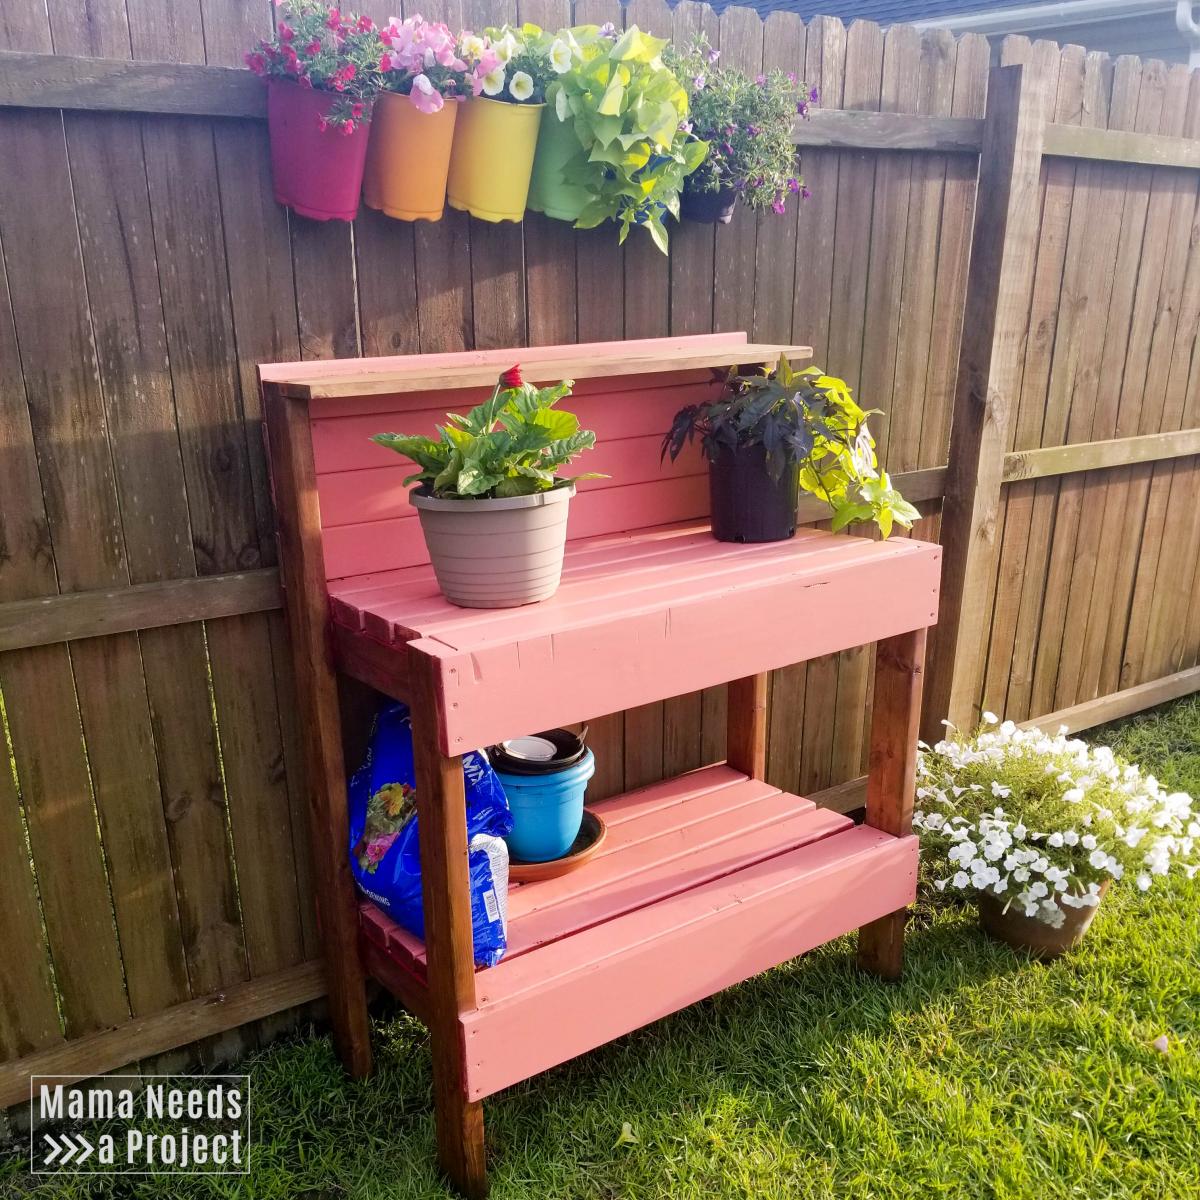
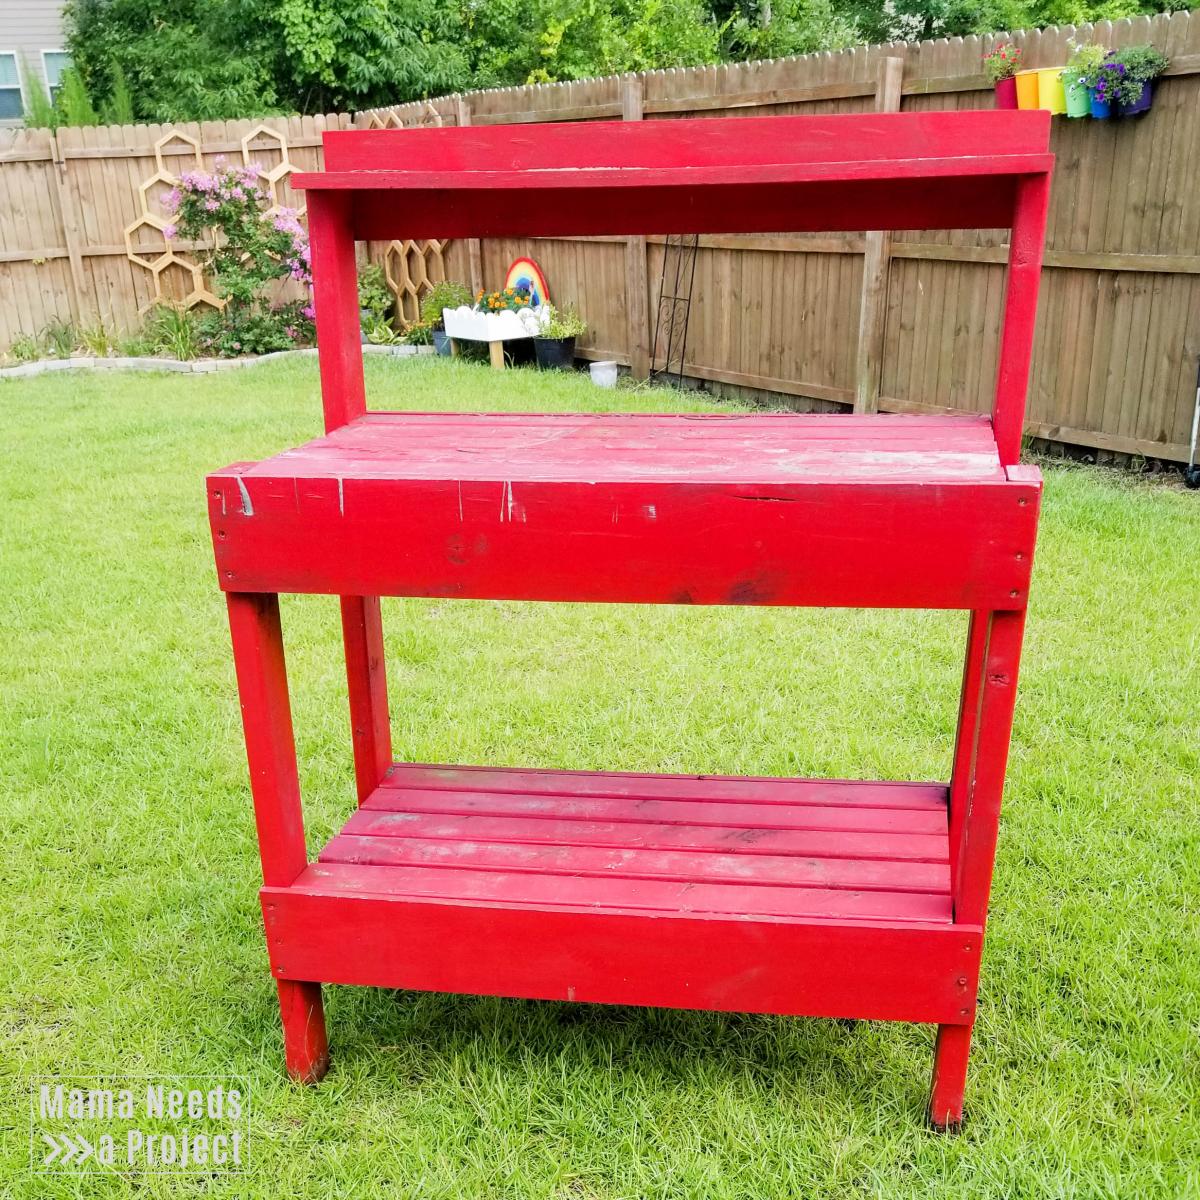
I originally built this potting bench in 2014. It was the very first project I built completely on my own! After 5 years of being outside it needed a little makeover. I sanded and refinished it, and made a couple modifications.
The last picture is the before :)
You can read about the whole building process here: https://mamaneedsaproject.com/2x4-potting-bench-makeover/
Built from Plan(s)
Estimated Time Investment
Afternoon Project (3-6 Hours)
Recommended Skill Level
Beginner
Comments
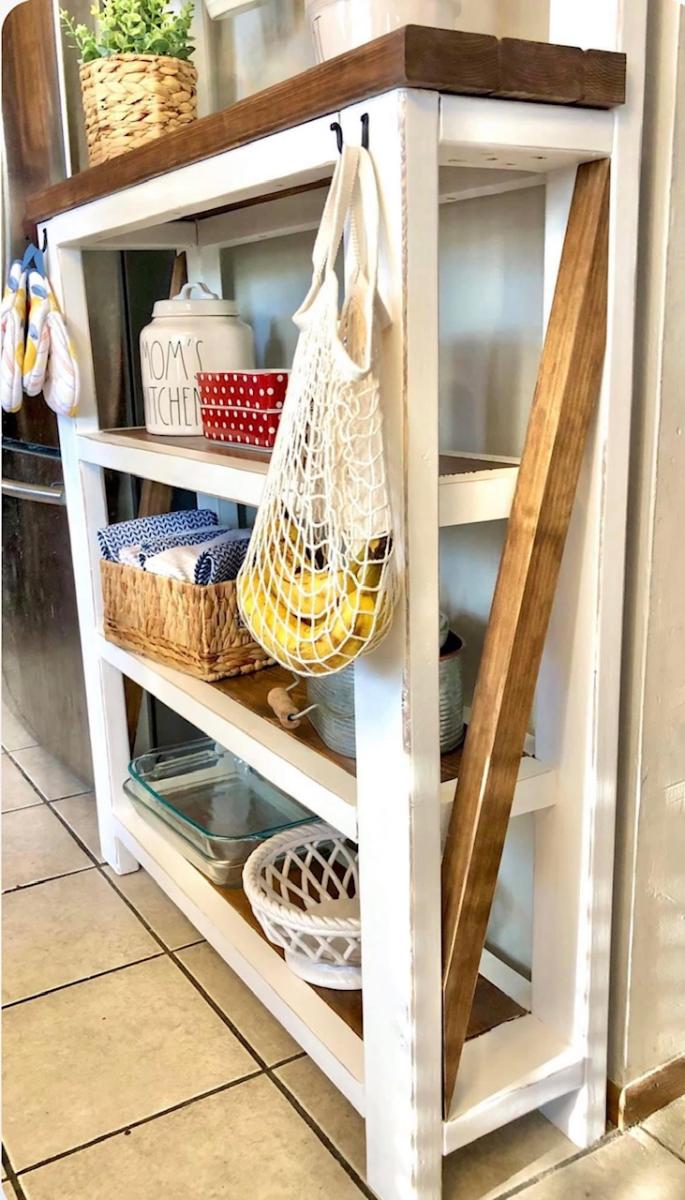
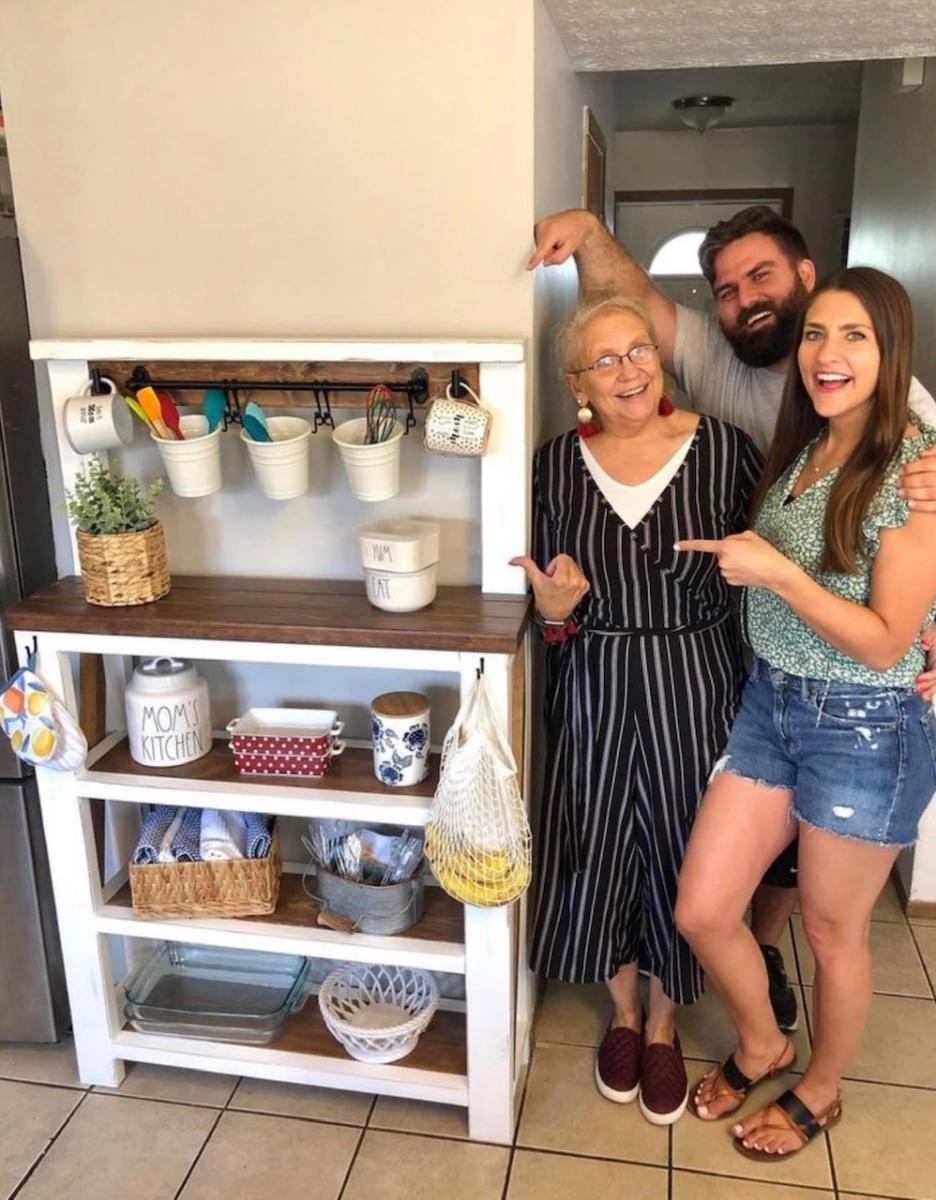
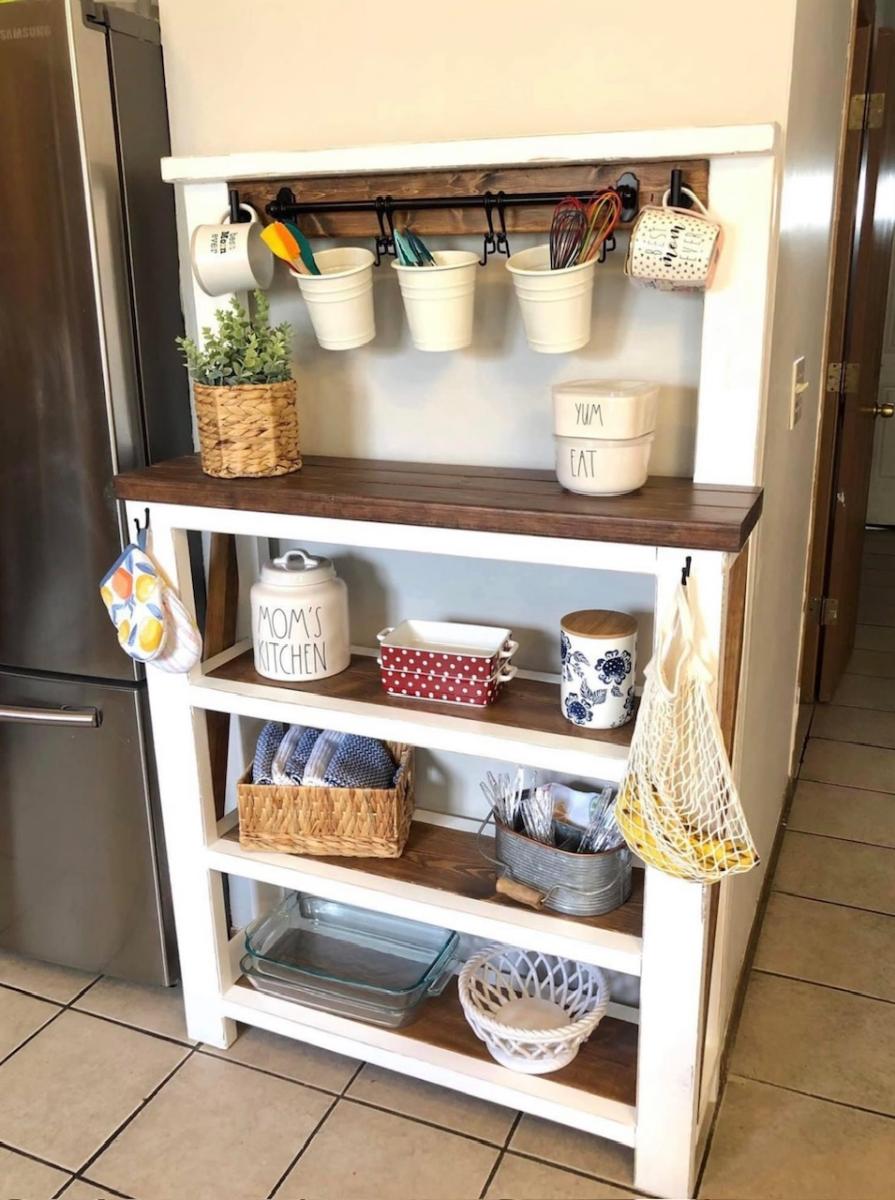
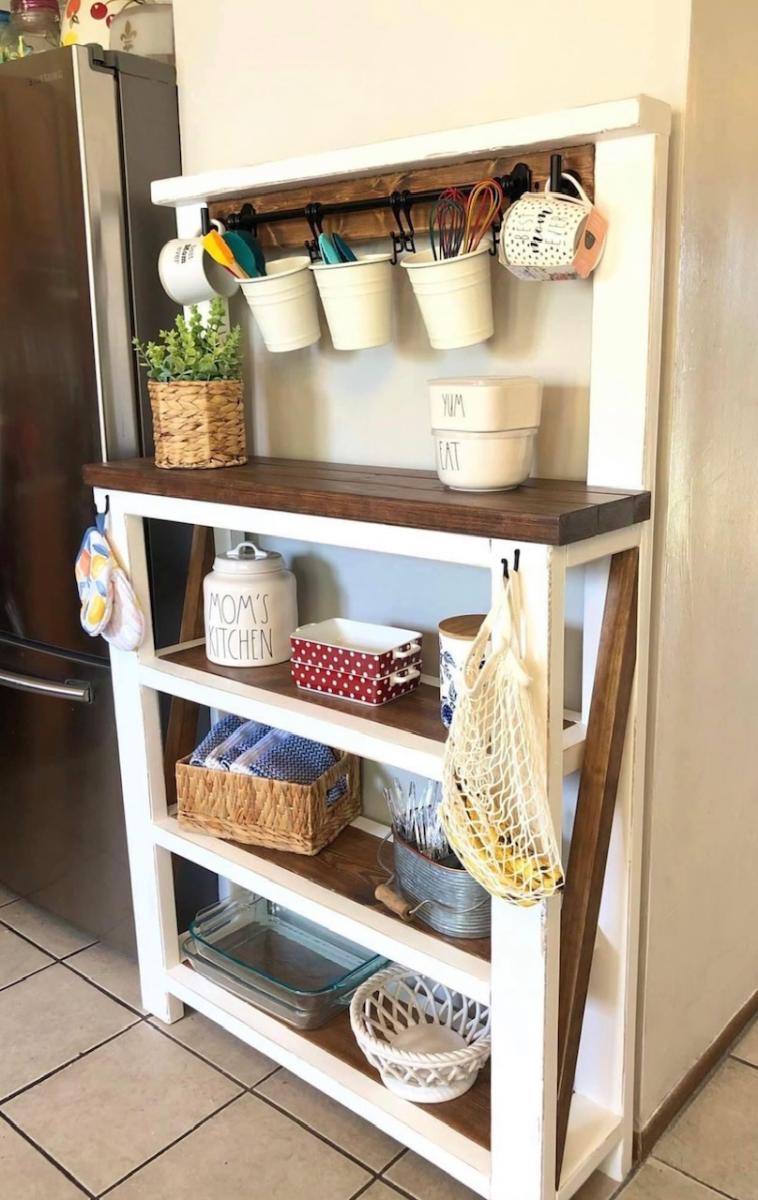
Kitchen Storage Shelf
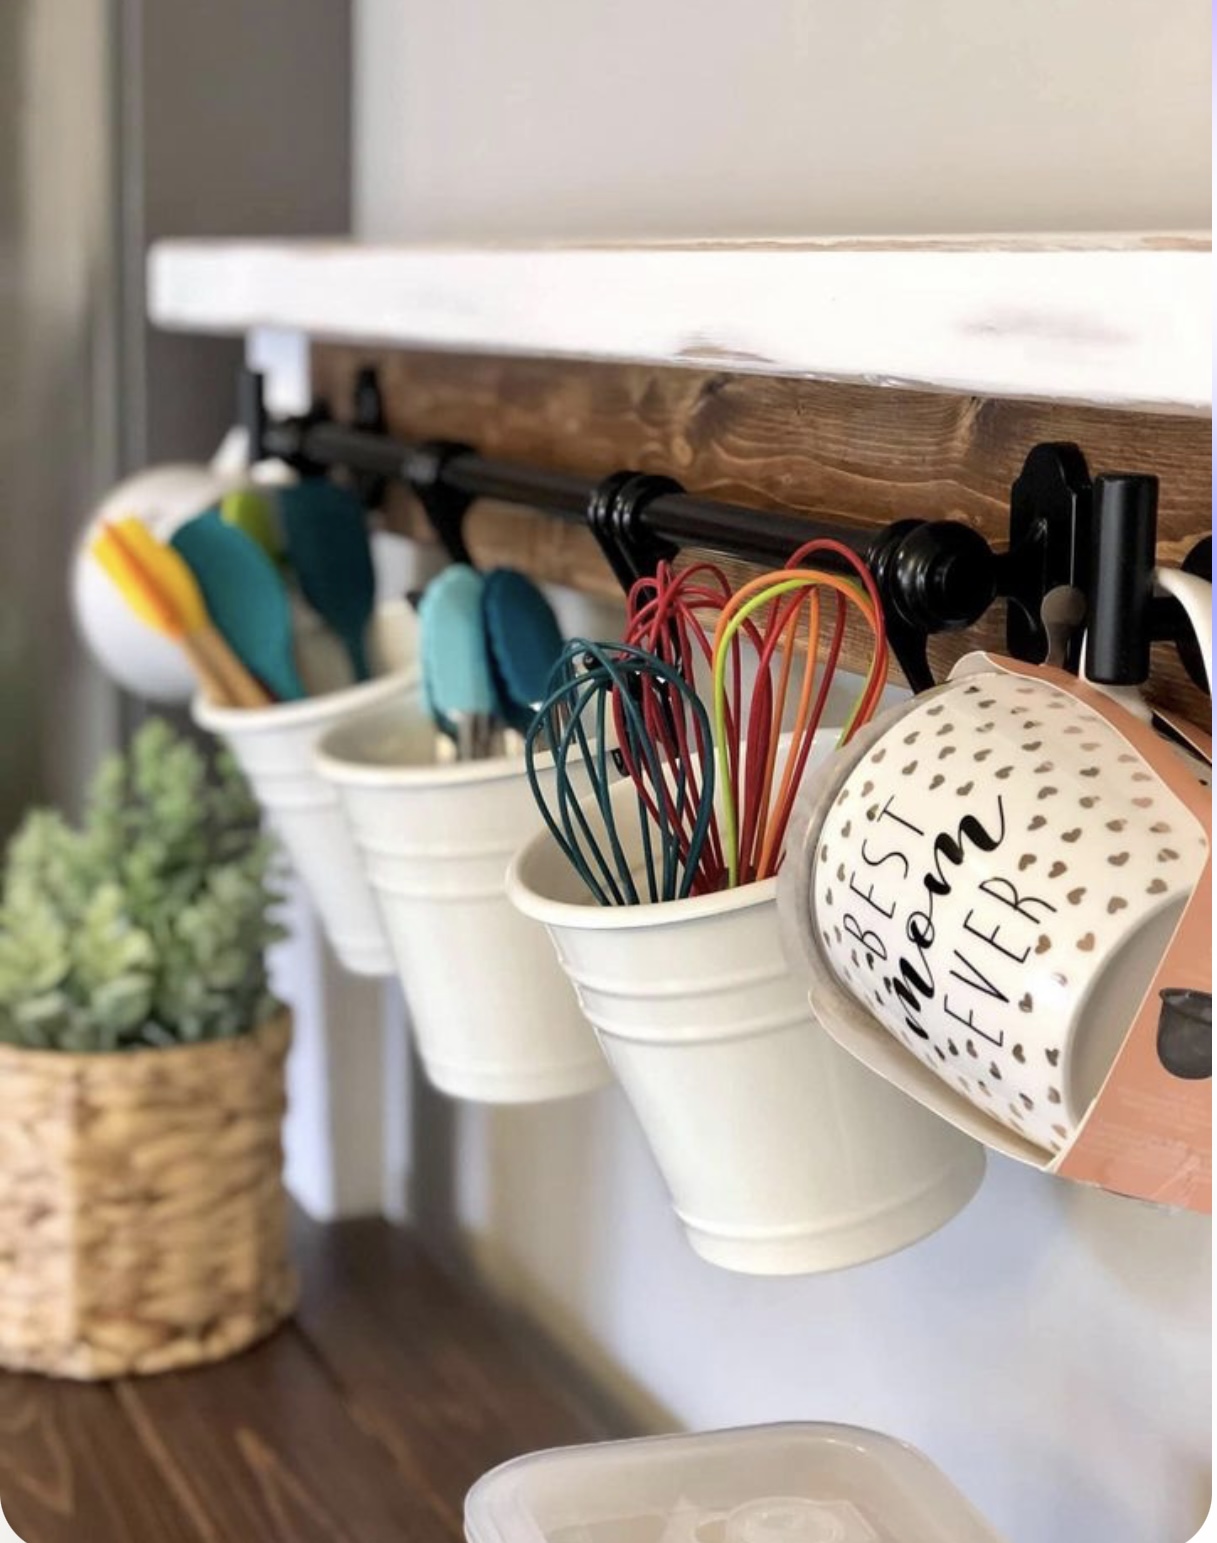
Thanks to you we were able to build my mom a shelf for her kitchen with a combination of two of your plans! My mom loved the top of the “Farmhouse Potting Bench” but also wanted shelves like the “Rustic X Console Table”. We combined the two and adjusted measurements to fit our wall space. We didn’t do a complete X on the side because we wanted it with one slant, but loved how it turned out over all!
Kayla
Built from Plan(s)
6 seater L shaped sofa,

Made this about 7 years ago from Ana's plans. Very easy to follow. I actually extended it to be a 4 and 2 seater set. Still a perfect today. Love it
Wicklow
Ireland.
Built from Plan(s)
Comments
Sat, 06/10/2023 - 06:39
Fabulous outdoor seating!
It looks so great, shared on our Facebook page today! Thanks for sharing.
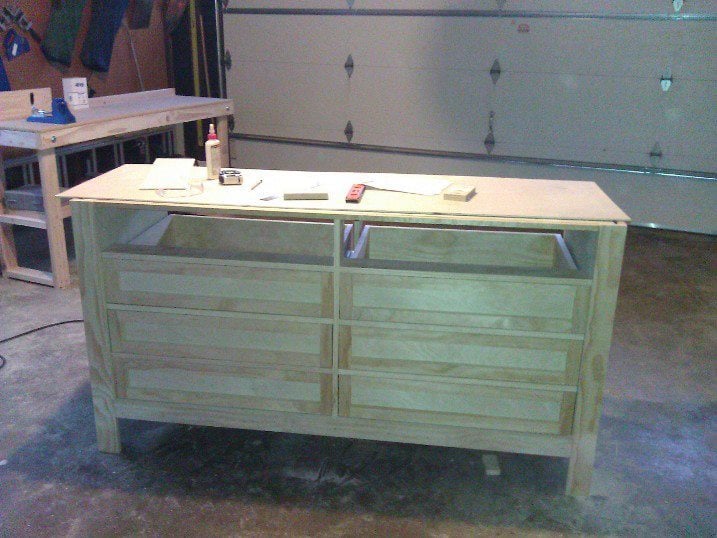
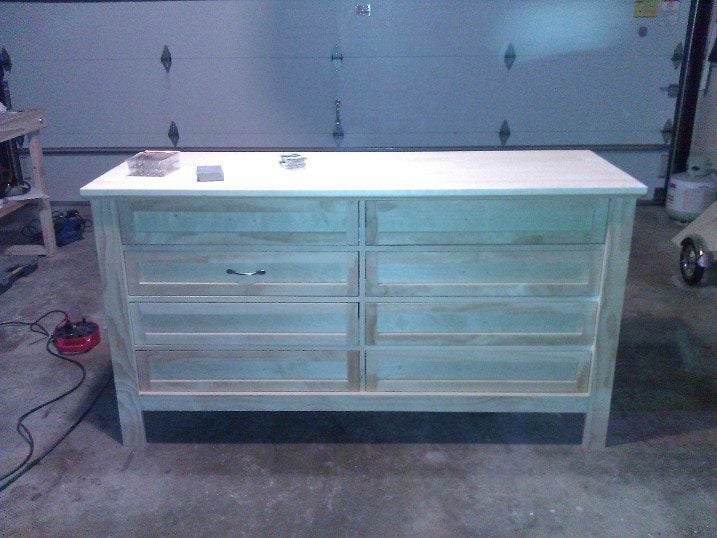
Hudson Dresser
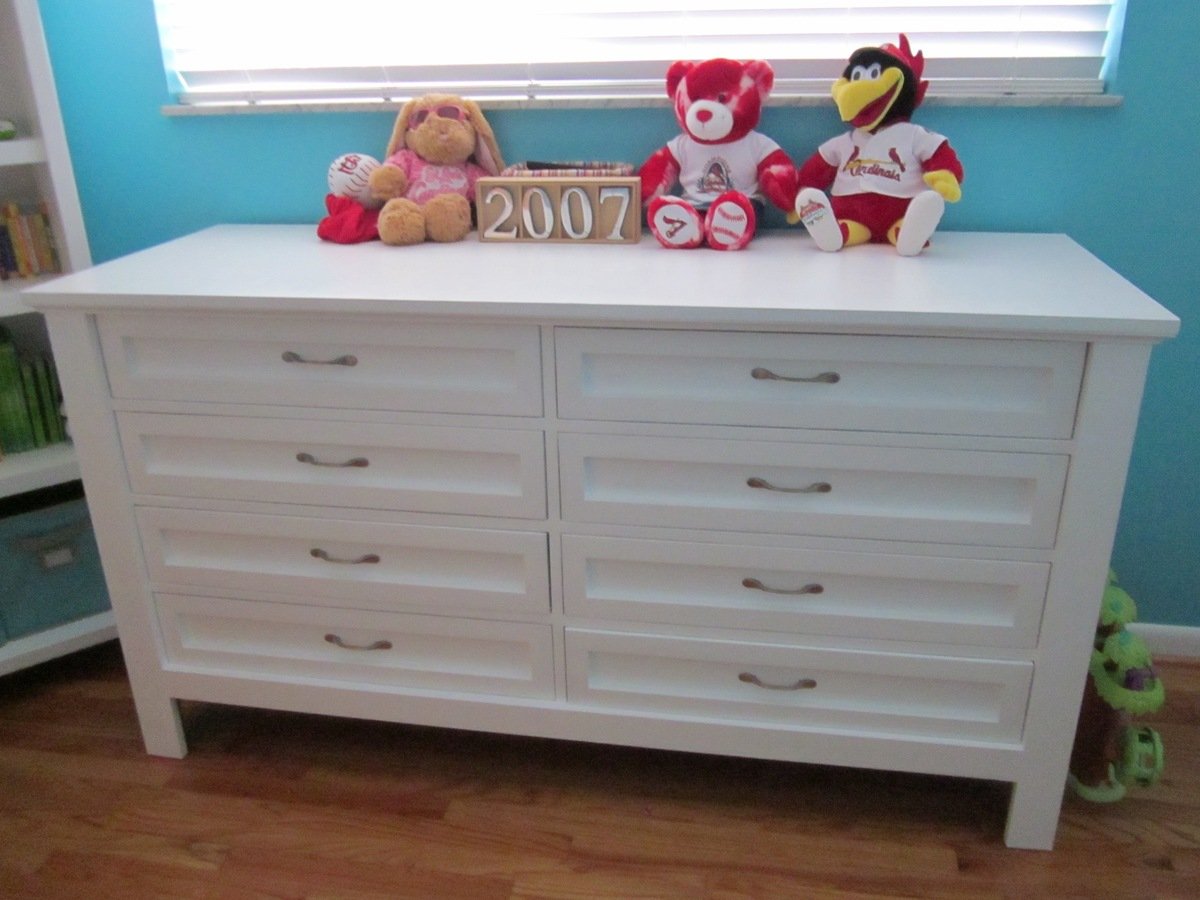
Took us about three weeks mostly working on weekends. We could only work when our child was sleeping. A worth while project if you have the time, space and tools needed. It weighs a ton when done. Our higher cost is due to using a higher wood quality and $125 for the eight ball bearing drawer slides. All the plywood is birch, the top is an Aspen panel and the rest is select pine.
Built from Plan(s)
Estimated Cost
$500
Estimated Time Investment
Week Long Project (20 Hours or More)
Finish Used
Latex Paint
Recommended Skill Level
Advanced
Comments

Thu, 10/25/2012 - 11:44
I'm about to start building
I'm about to start building this and I was wondering how you installed the drawer slides.
Thanks!
Bench Planter

This build was also a lot of fun! I made an extra brace to hold the wait of two sitting on the bench. Thanks again Ana for your plans!
David Marks
Built from Plan(s)
Hotel Room Bed and Wall Project
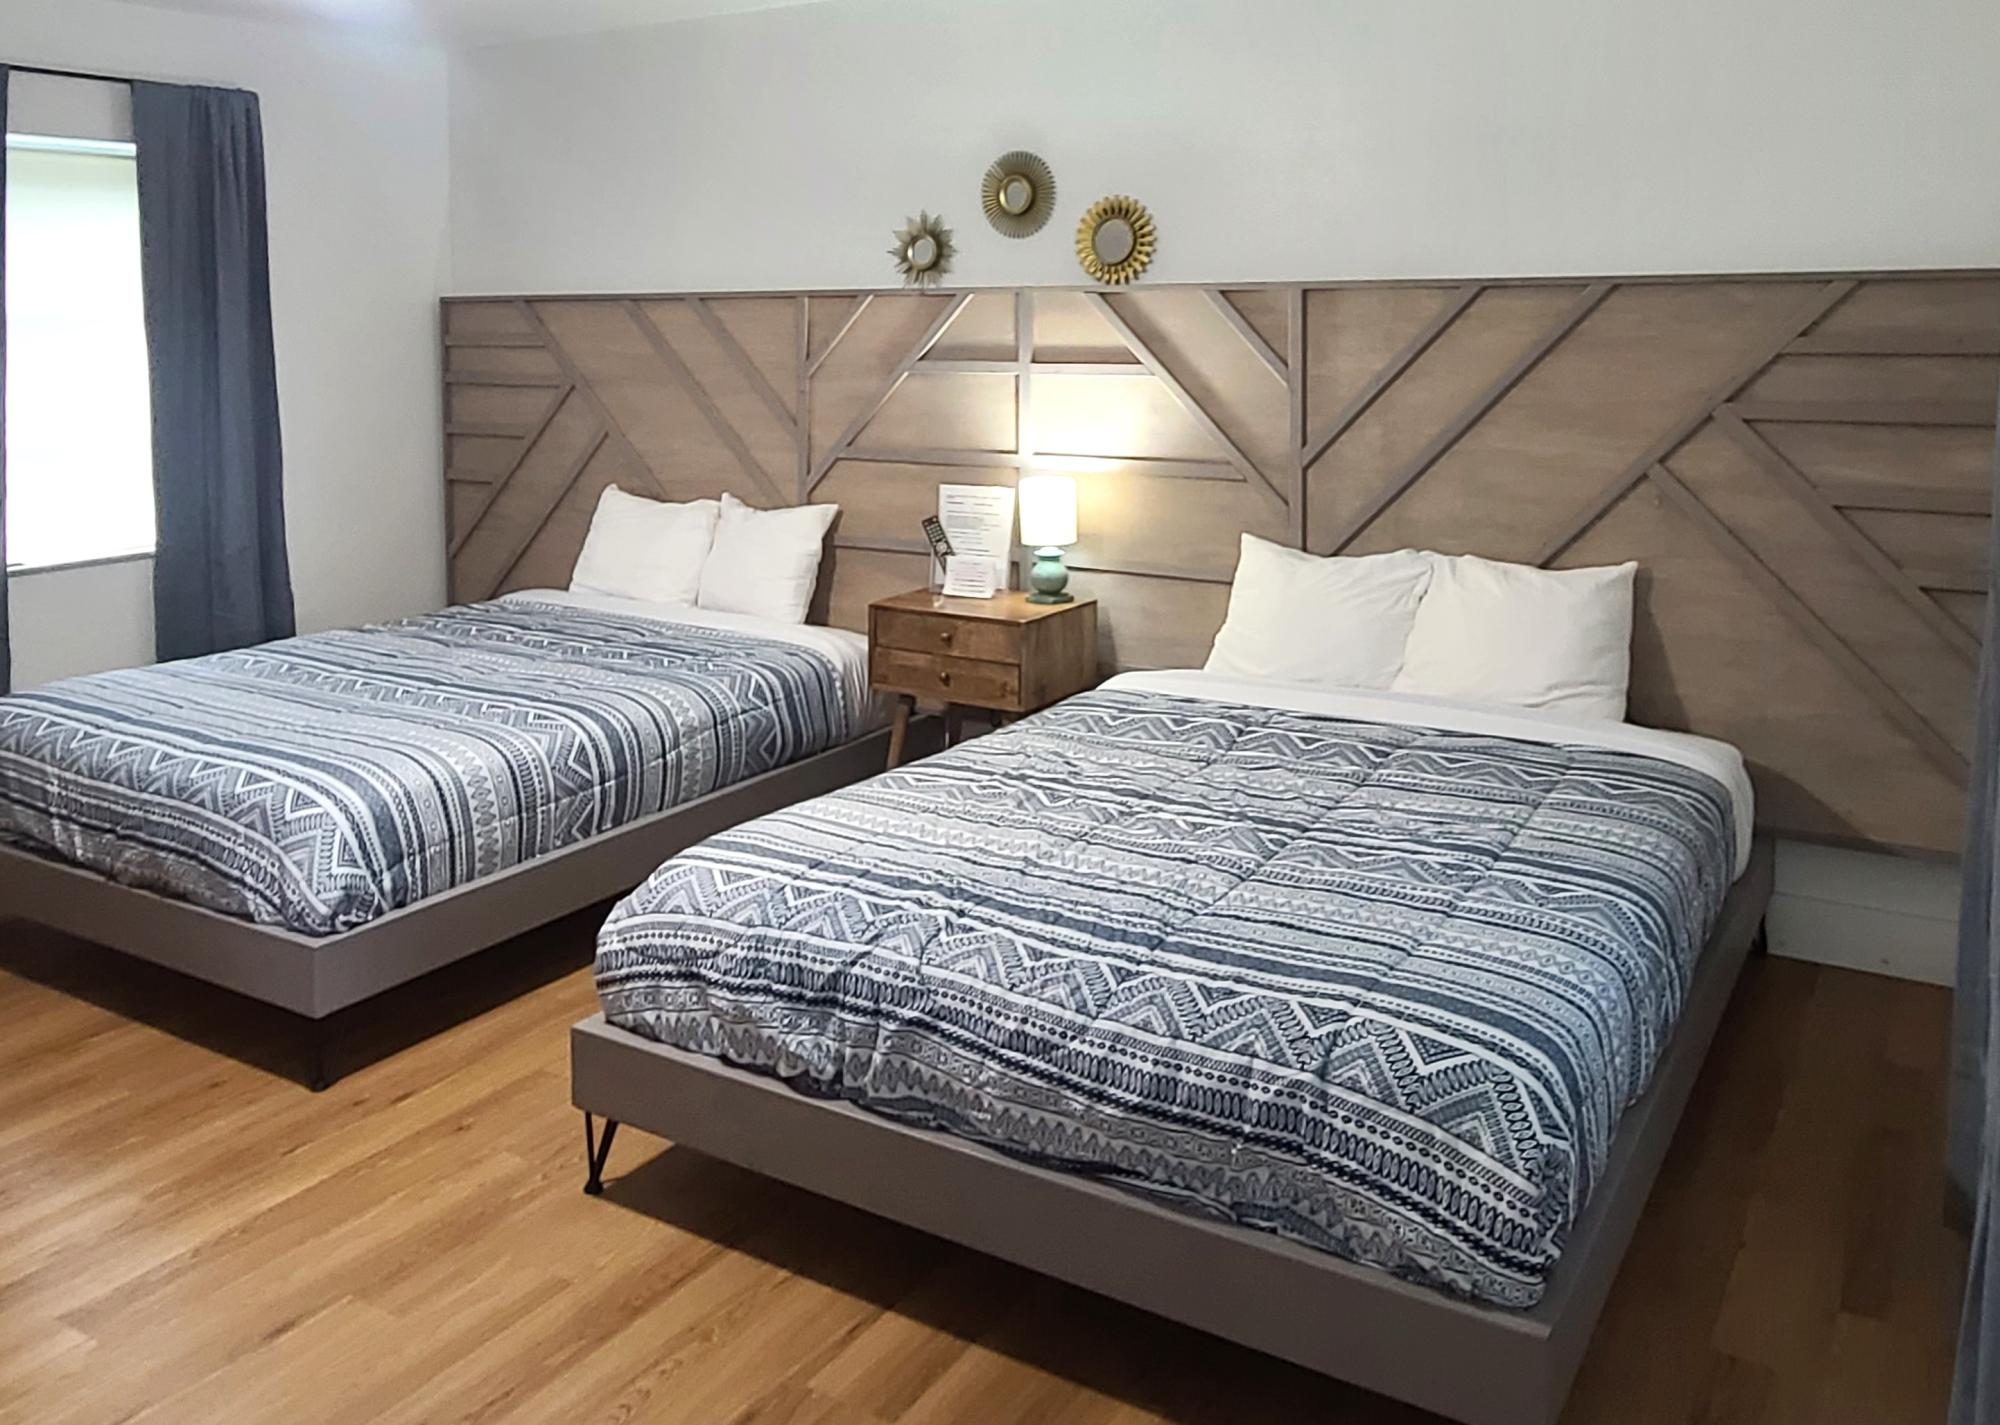
Built these bedframes and headboards for a local motel
Built from Plan(s)
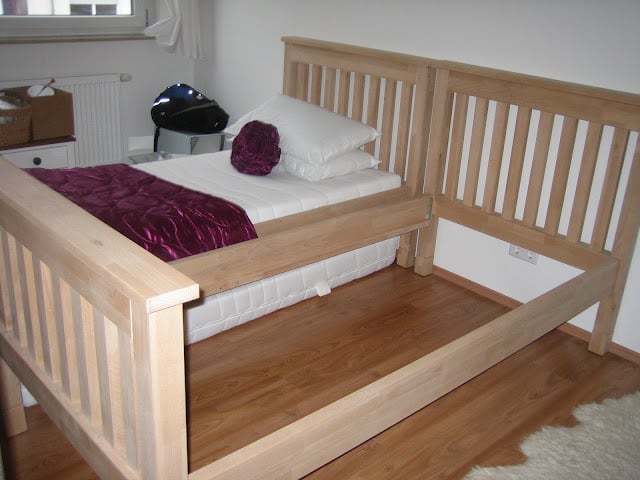
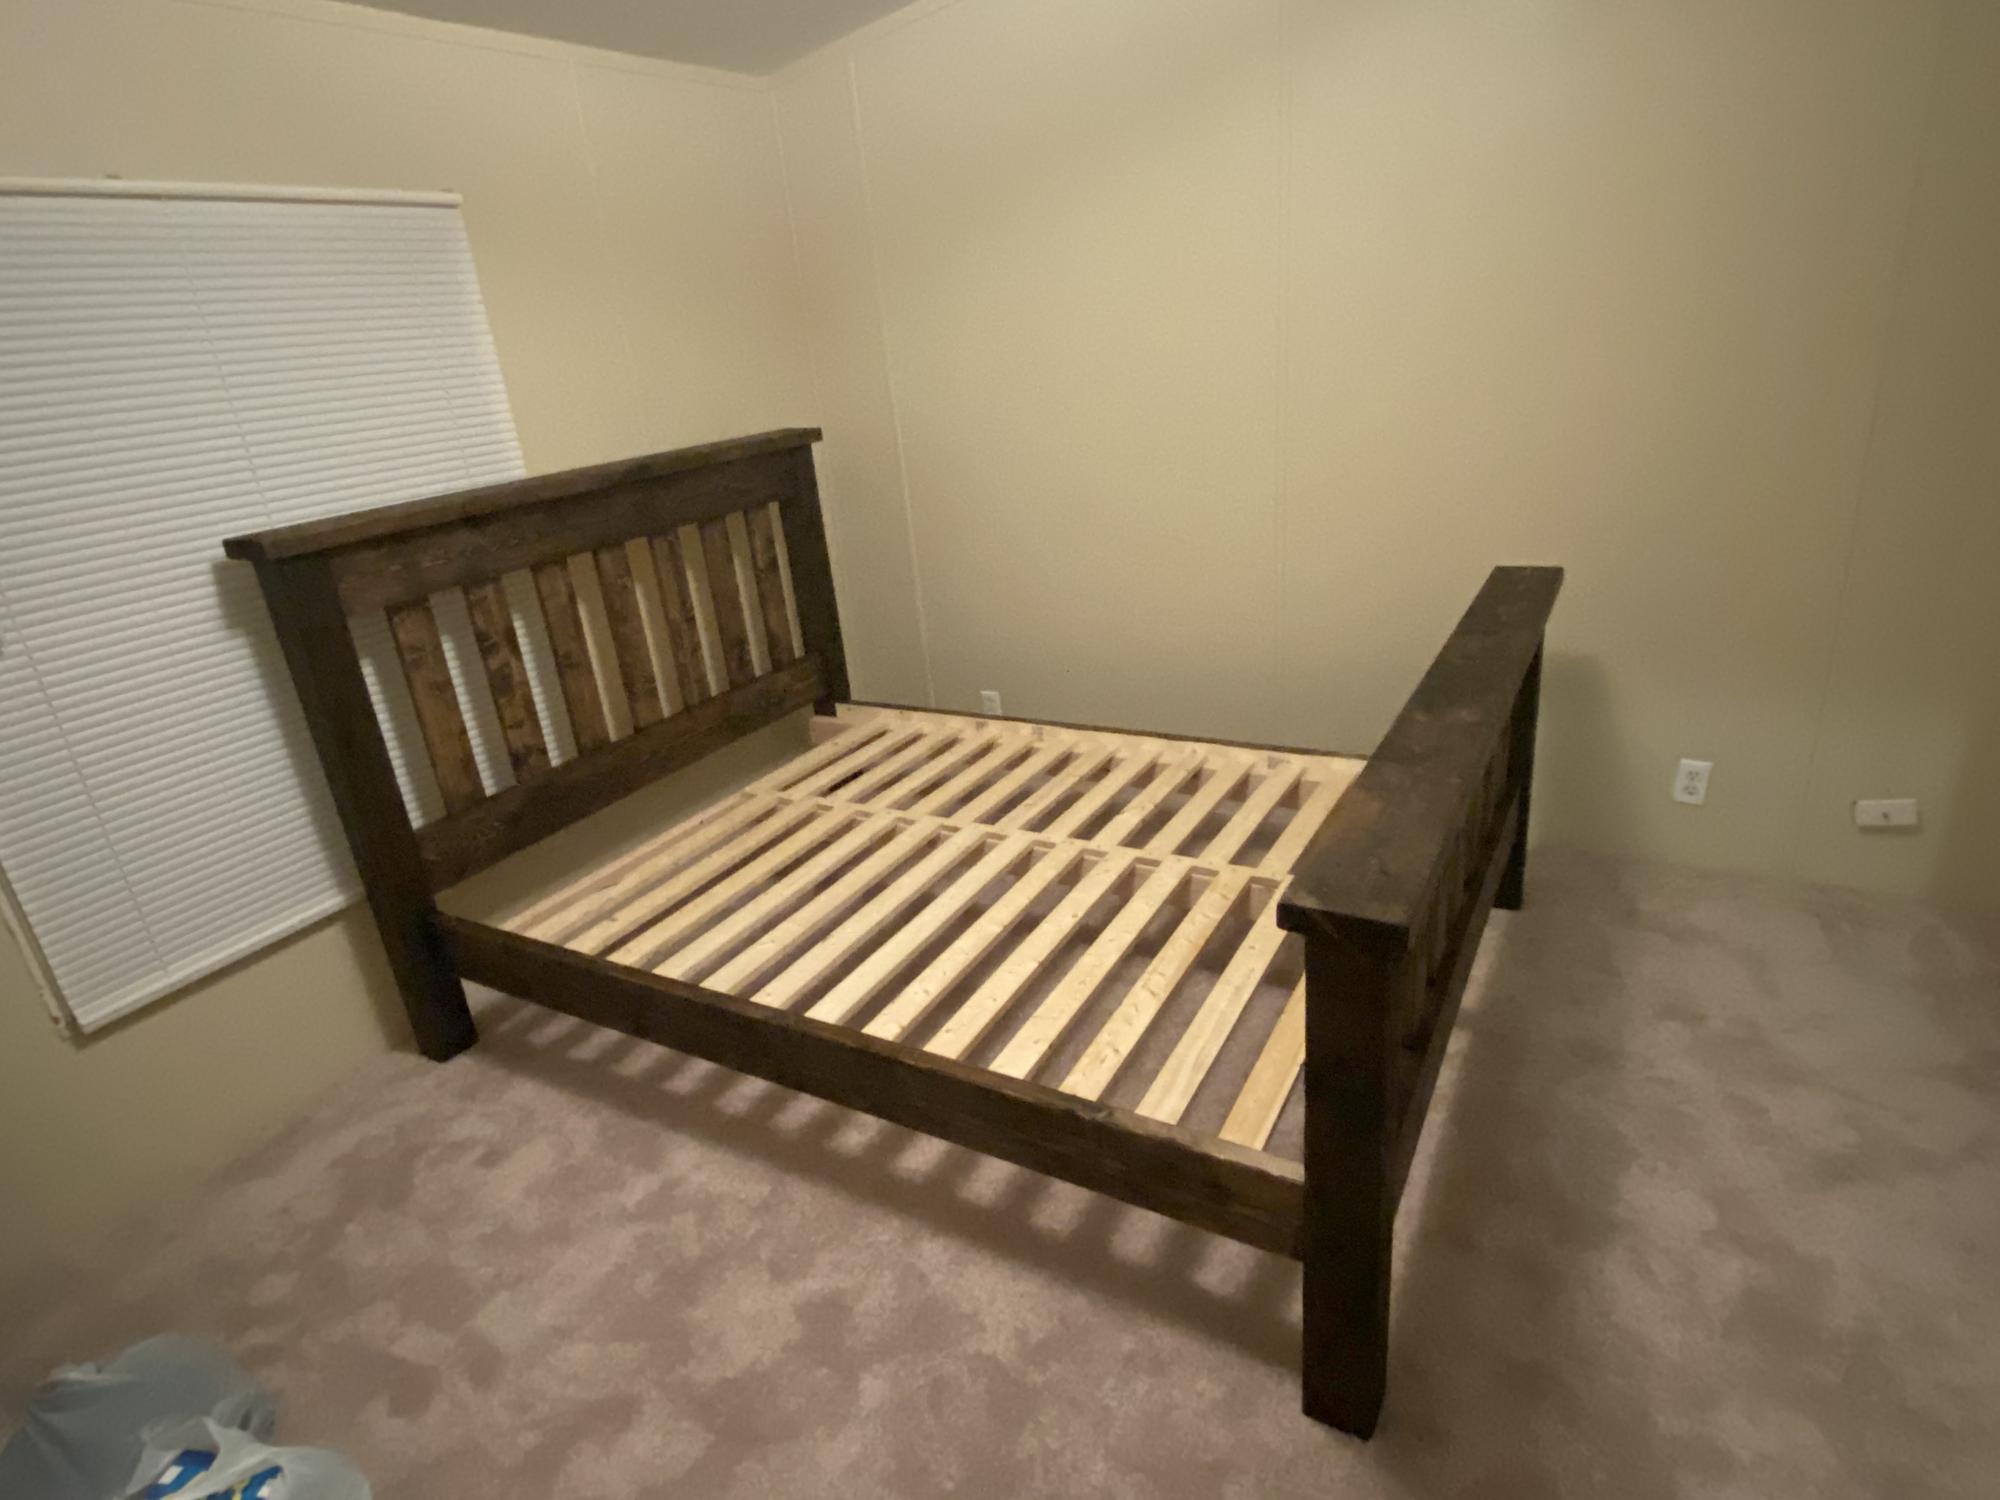
Simple Beds
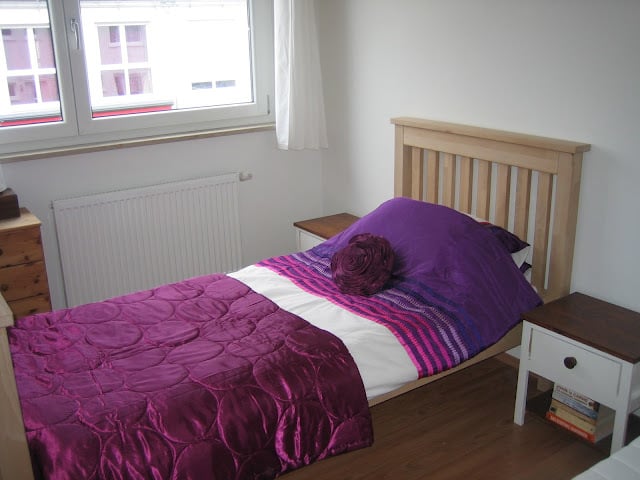
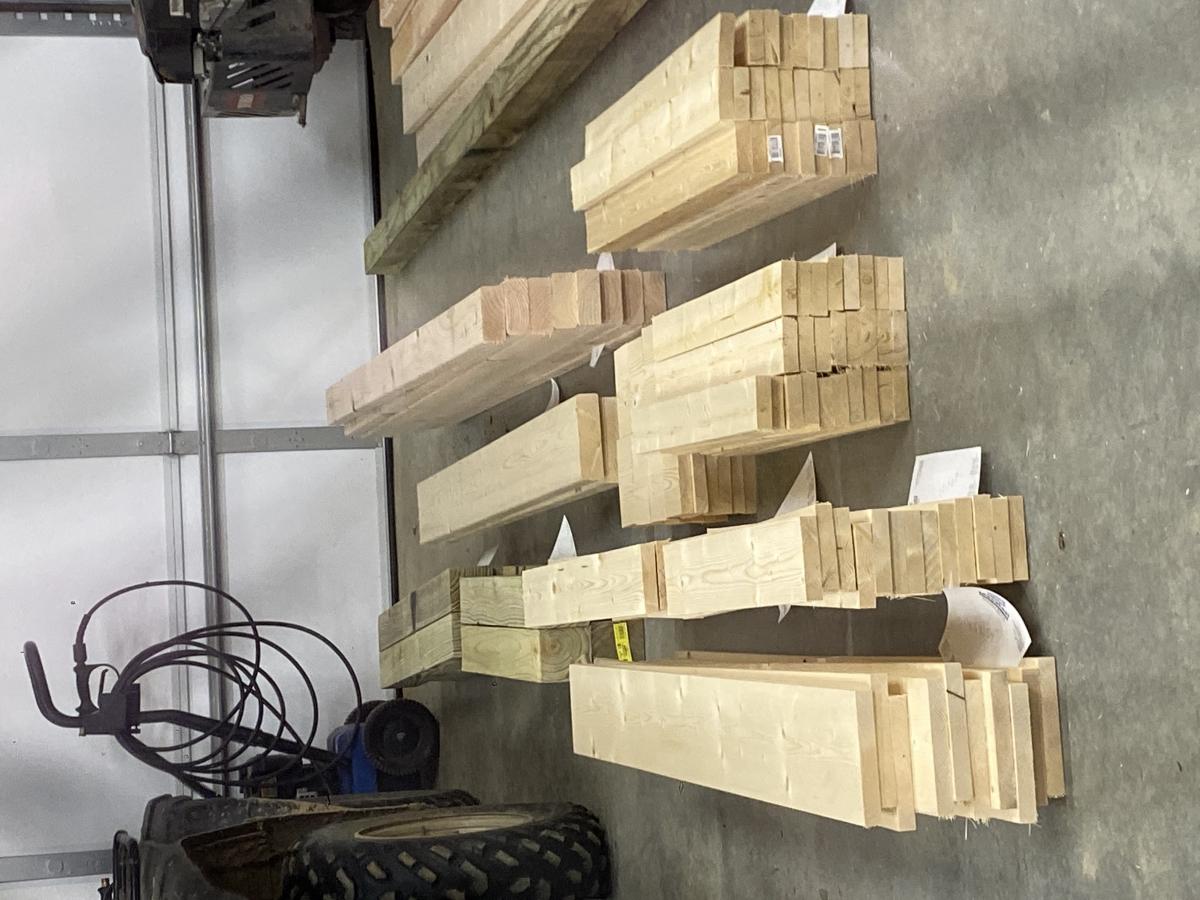
I used the basic design for this bed but altered it quite a lot to make the joins stronger, the edges smoother and the whole thing generally easier to take apart and put back together.
I used beech wood and completed the project at a woodworking club, so it's quite hard to estimate the time taken, as I only did it one evening a week and spent most of the time bringing the wood out, putting it away and clearing up each time I was there!
I am still undecided whether to give it an oil finish or to paint it white with chestnut wood stain on the headboard and footboard tops.
Built from Plan(s)
Finish Used
Possibly oil or maybe white and chestnut wood stain - haven't decided yet!
Recommended Skill Level
Intermediate
Room Divider Wall with Built-in Storage
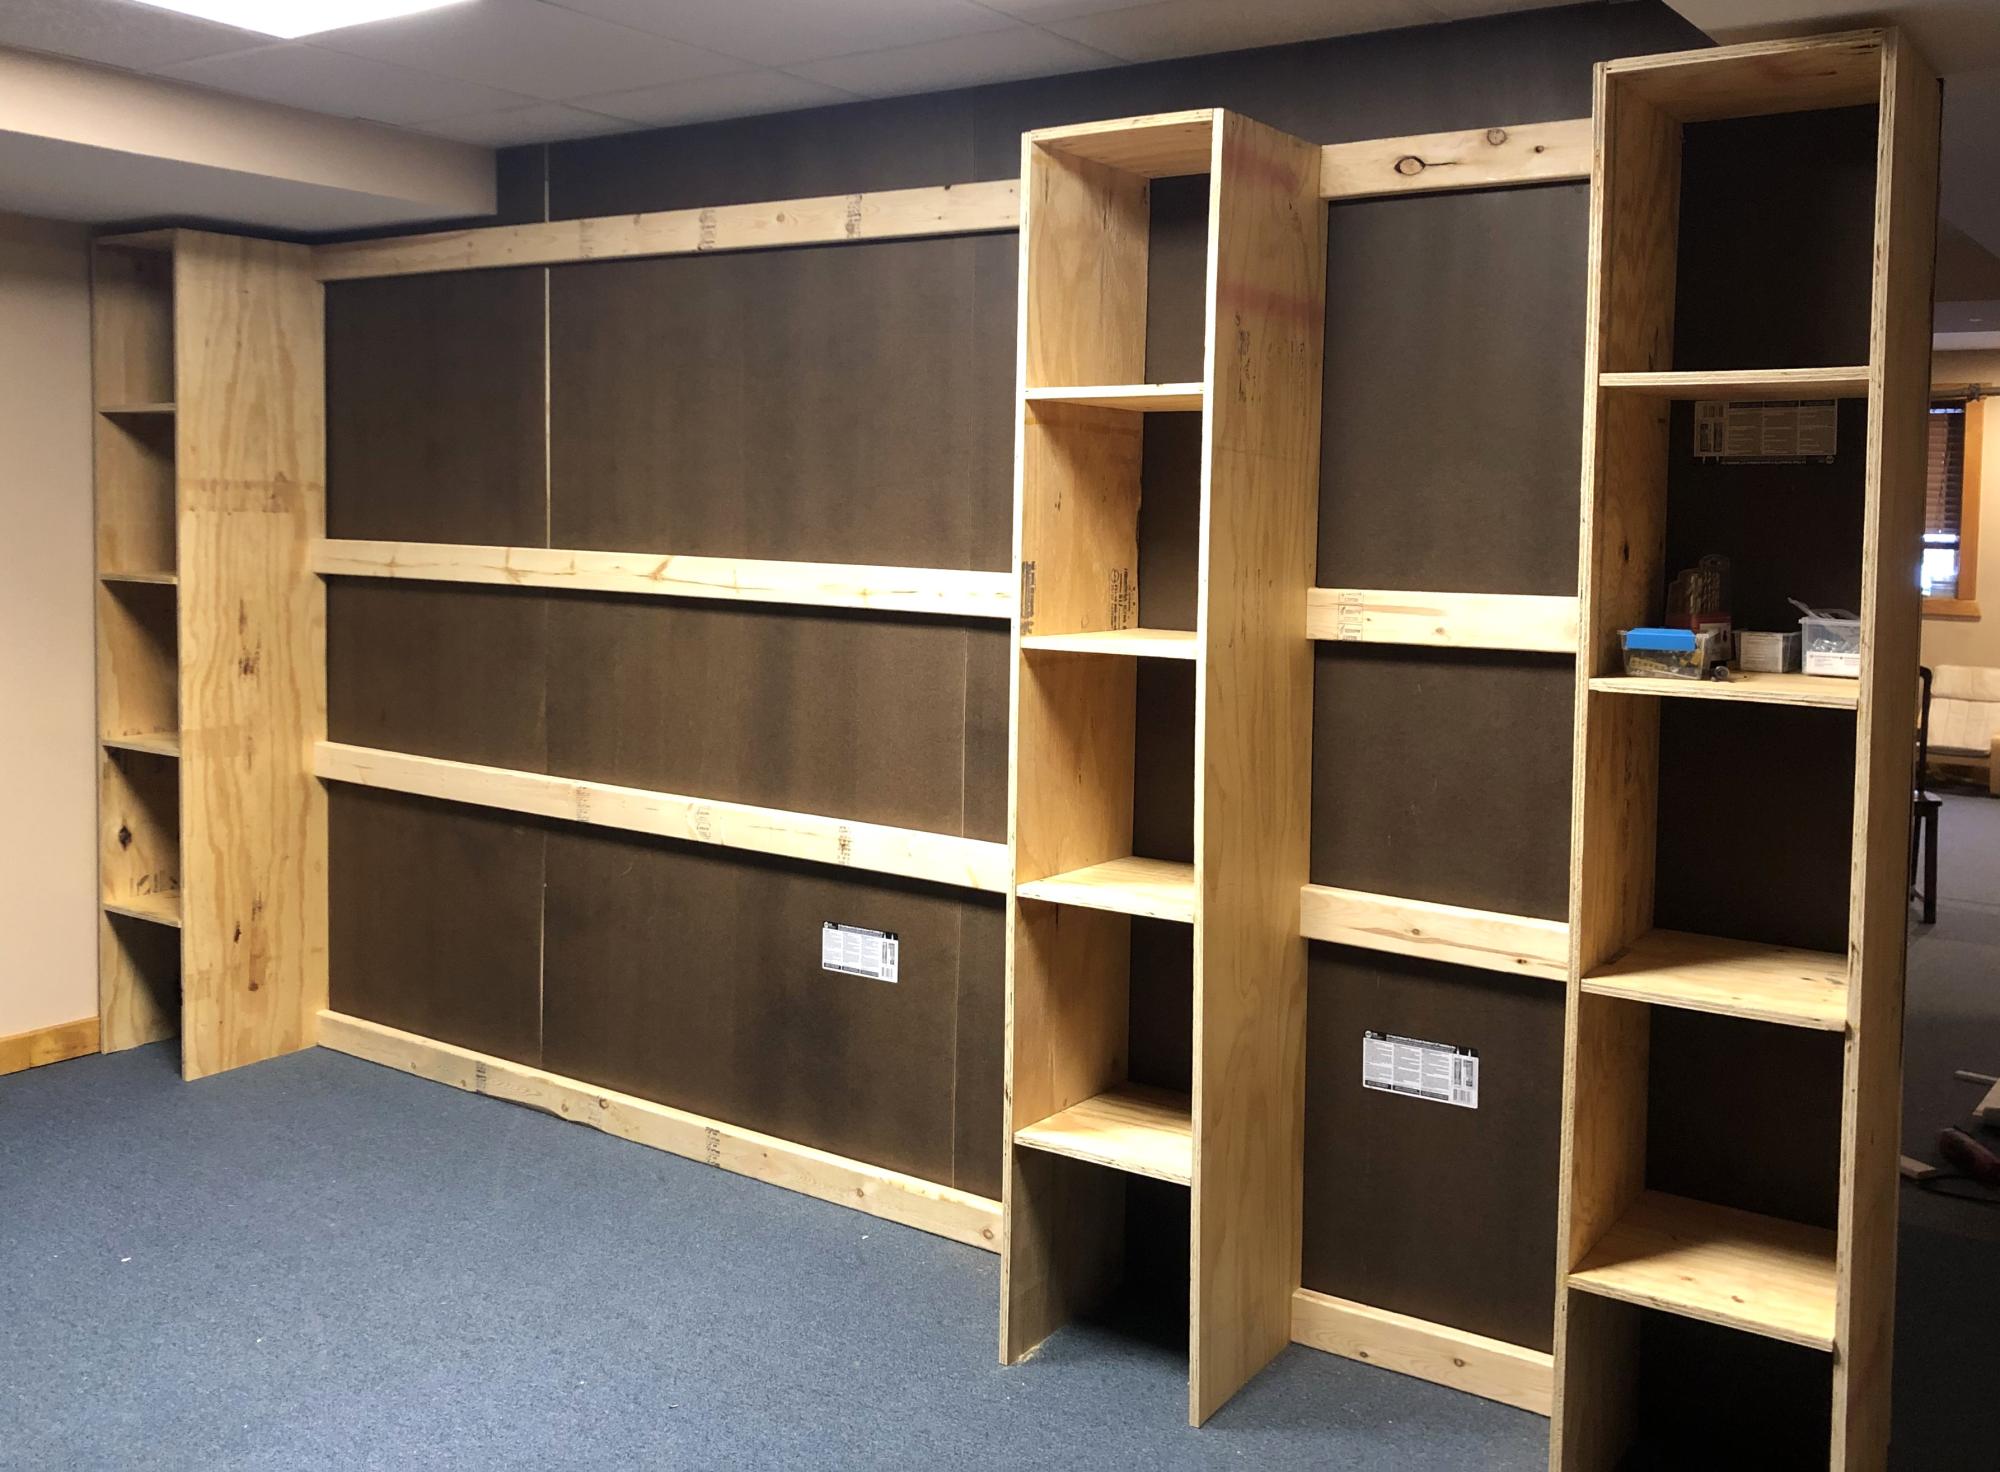
Modified the wall divider closet plan into a wall to serve as an extra bedroom in my basement. The inner wall was subsequently painted.
Grace LeBlanc
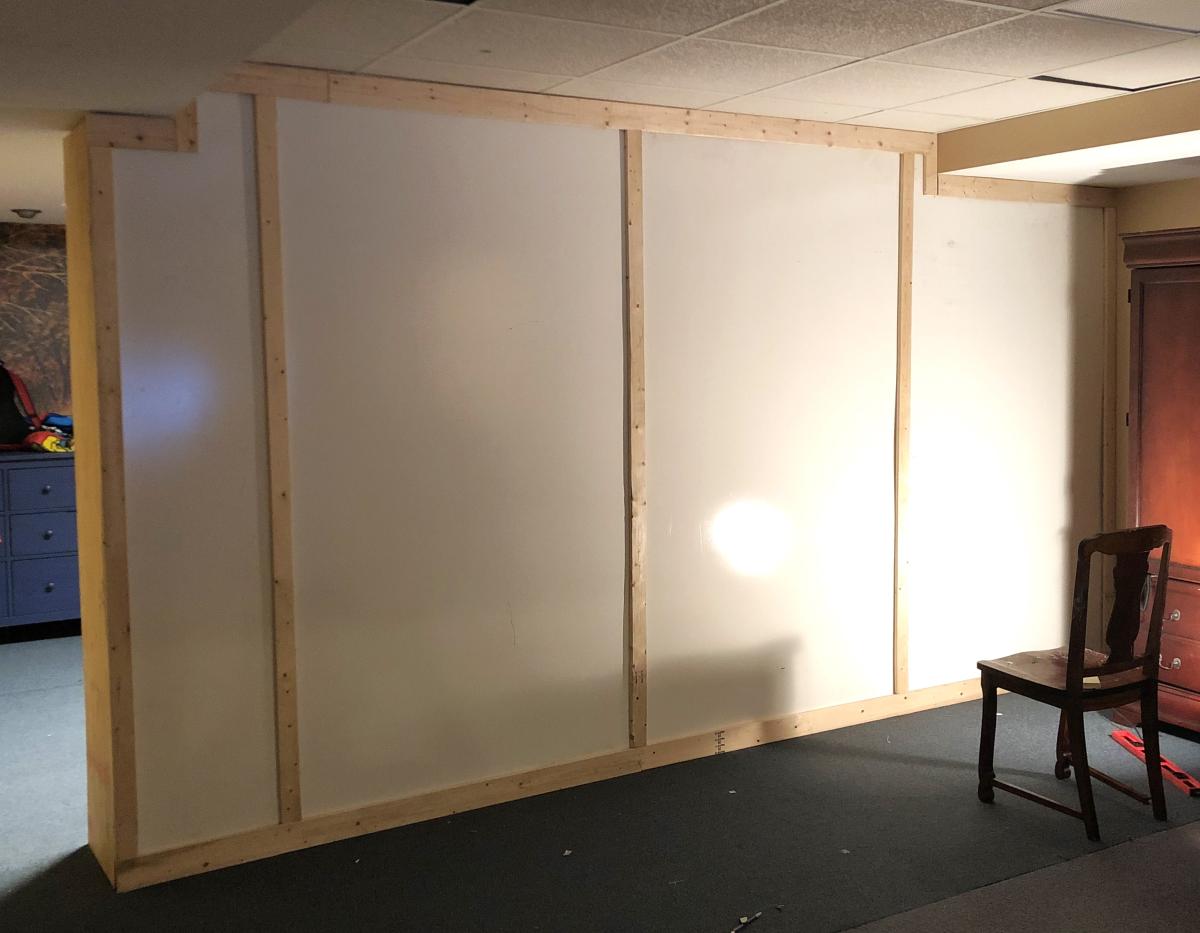
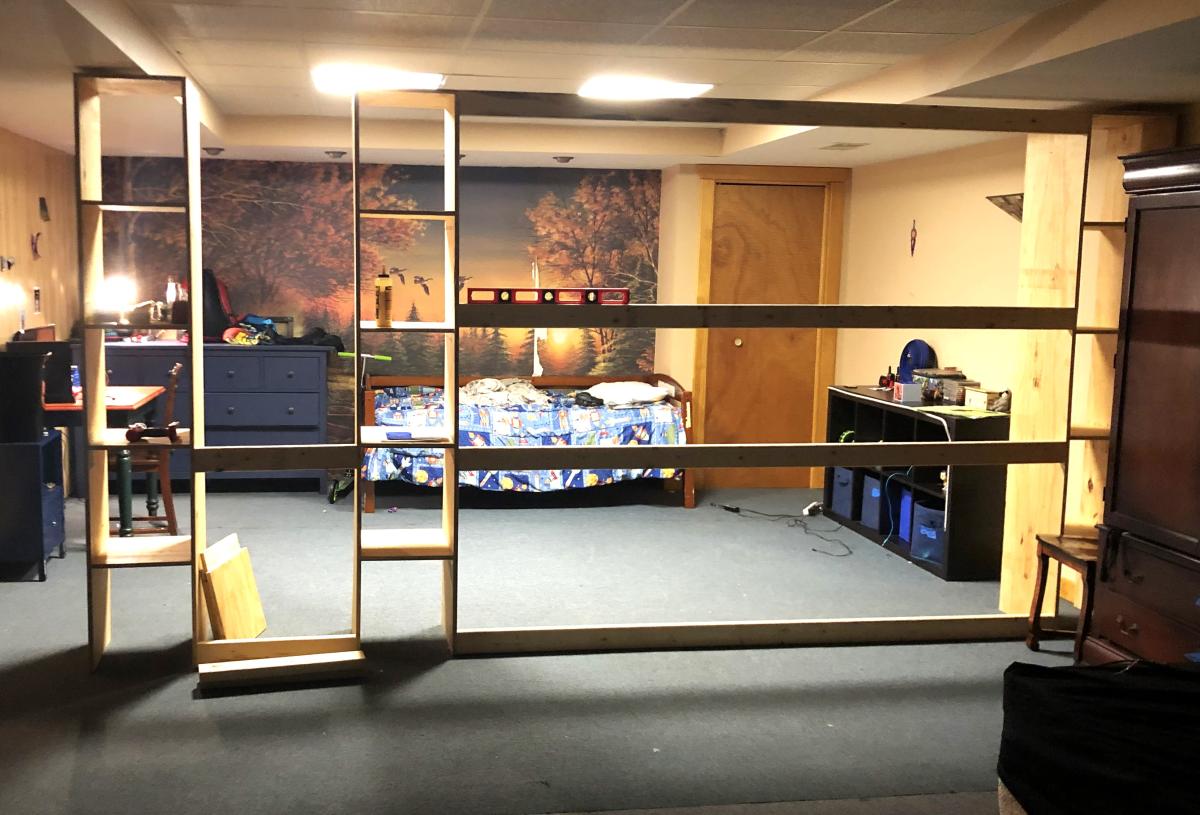
Built from Plan(s)
Comments
Bunk beds
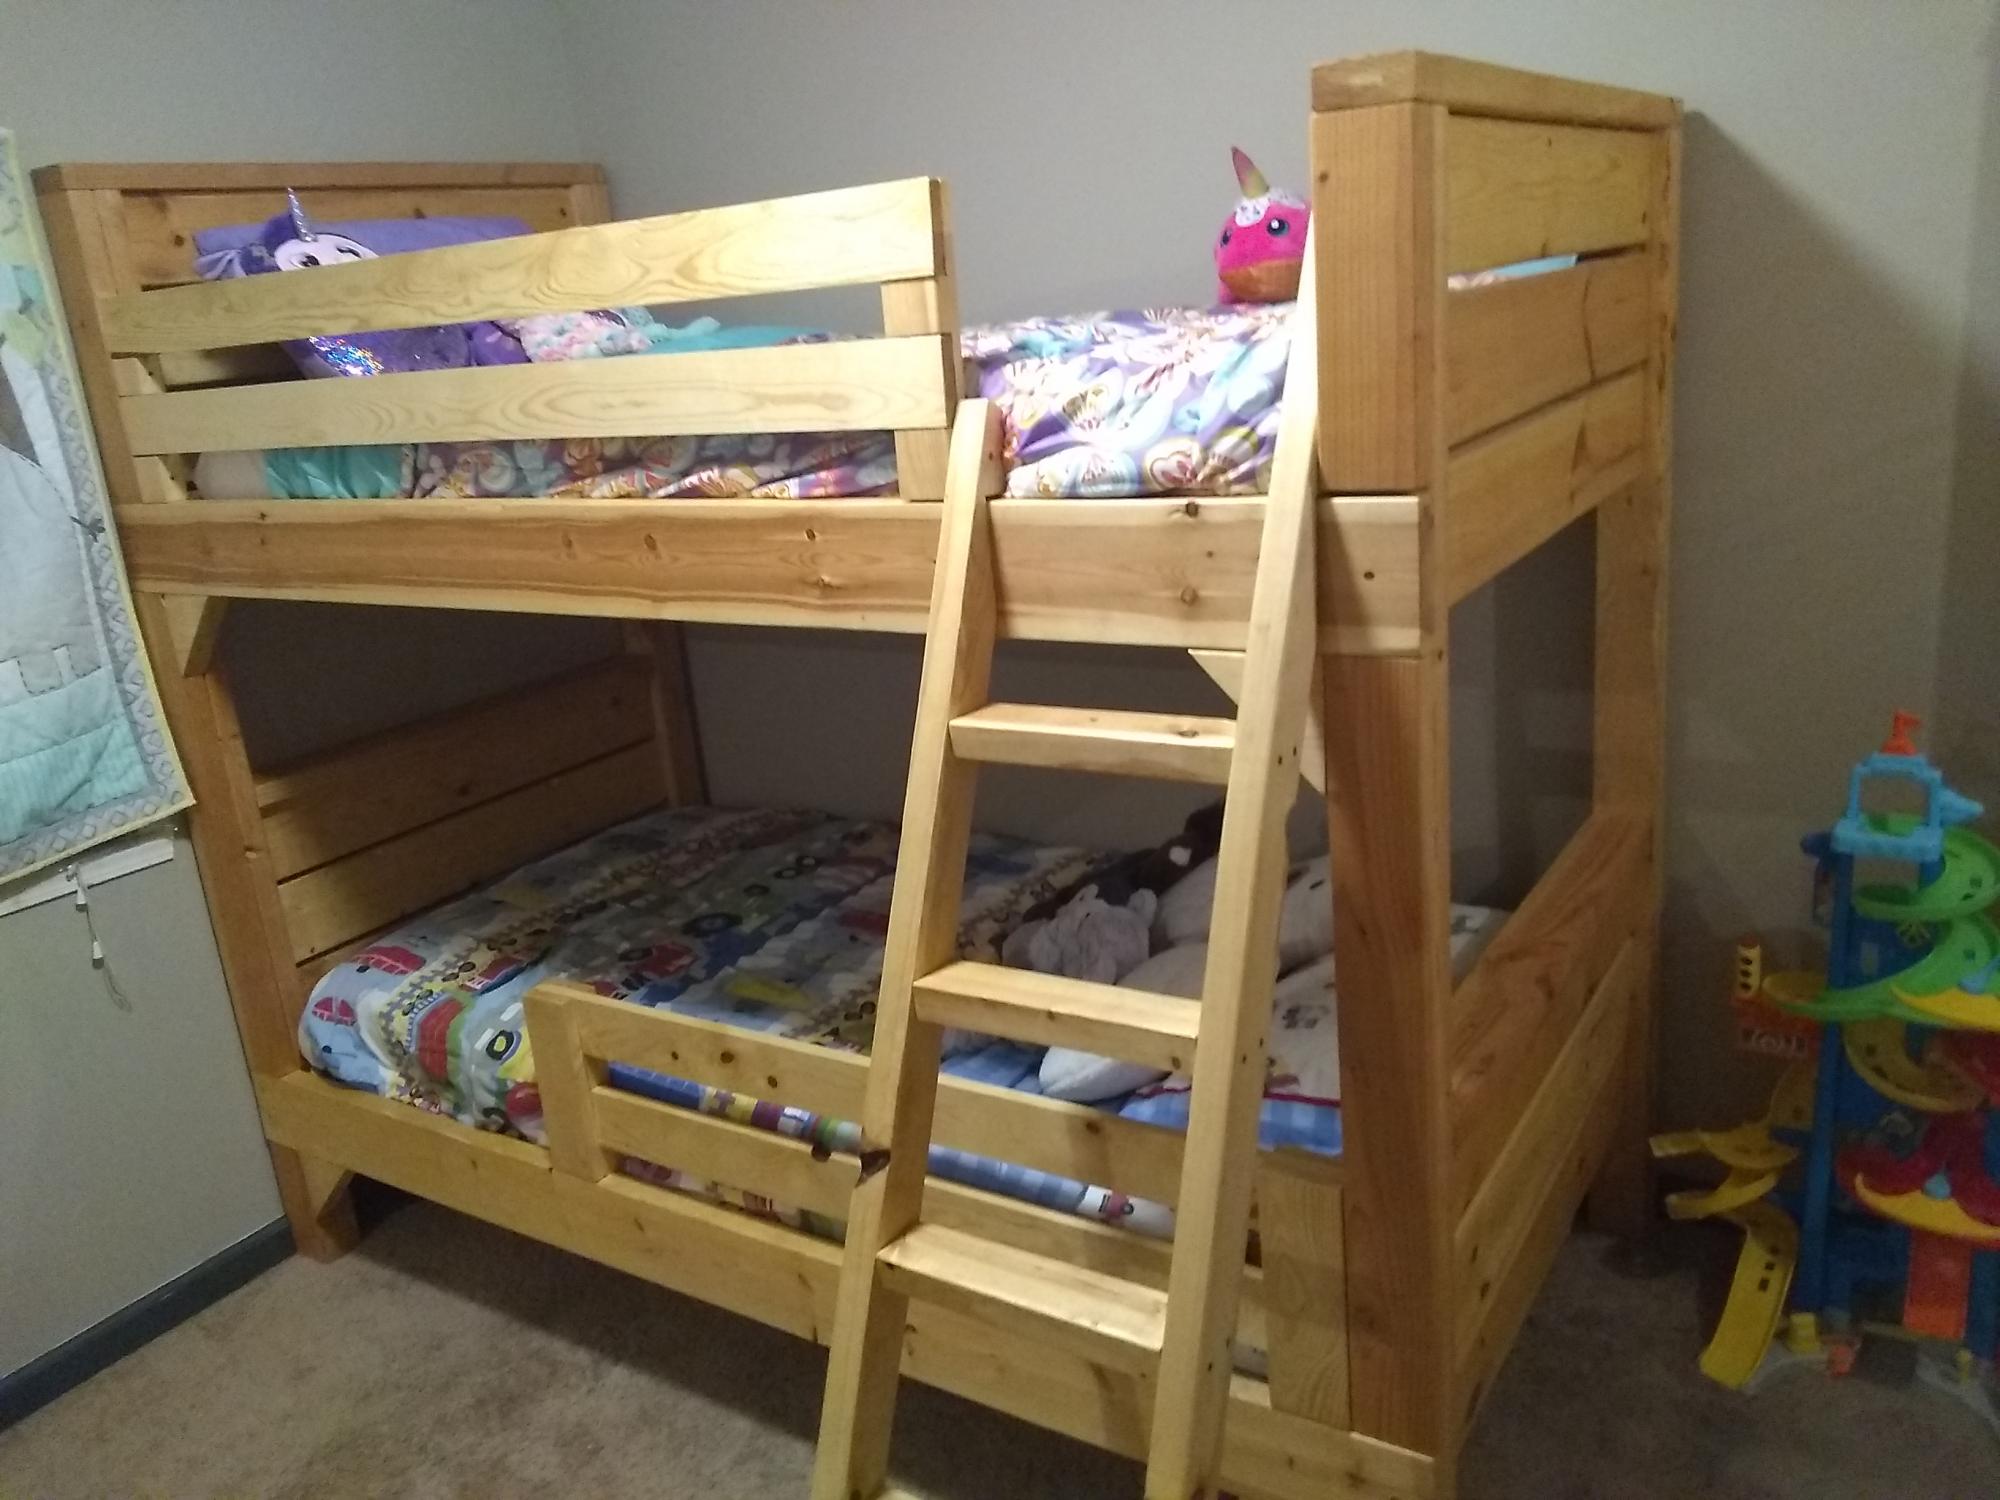
I built this bunk bed from the plans here on Anna white, I love this site. I think it came out really good. It took a little longer than expected because I sanded every piece down, every corner, every side, every end, because it's for my kids.
I devised the ladder myself for my situation and modified the rails I found as well.
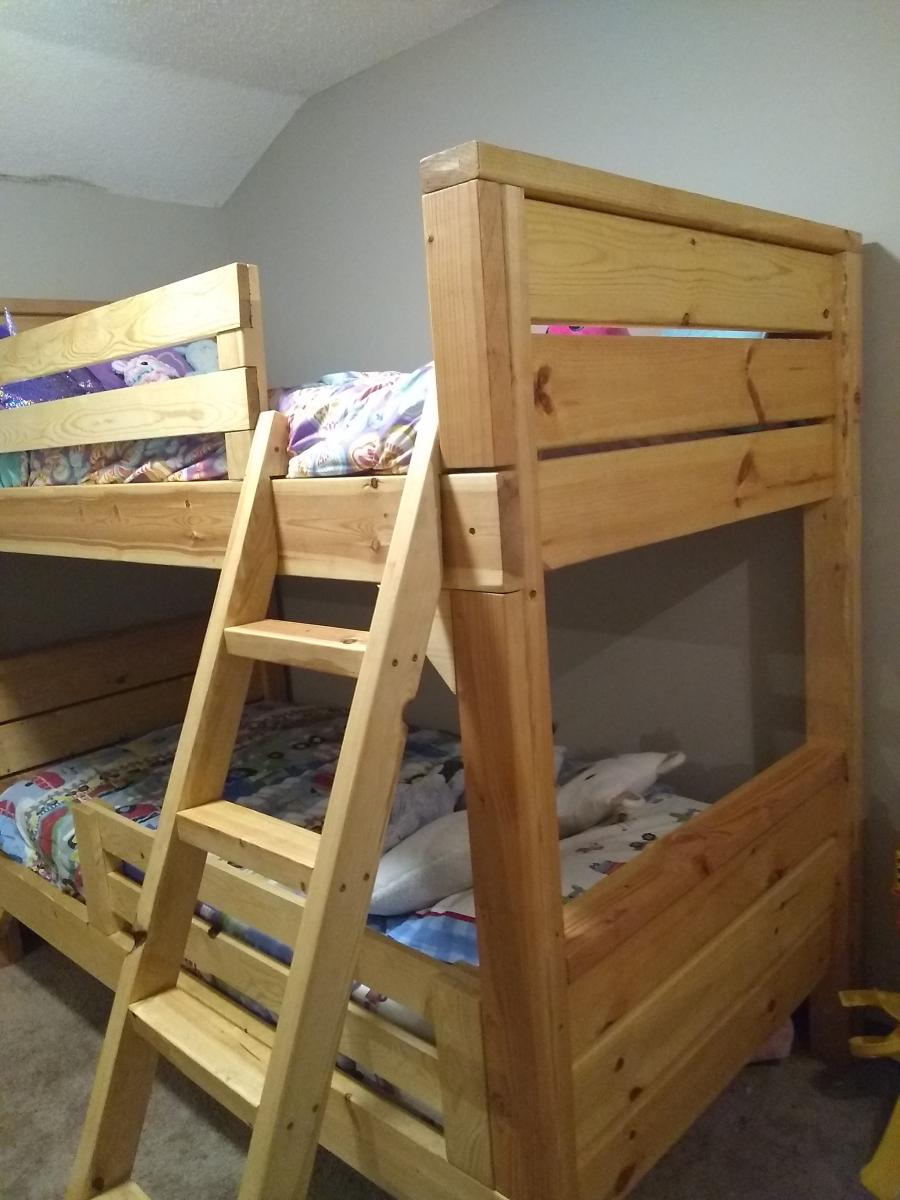
Built from Plan(s)
Estimated Cost
150.00
Estimated Time Investment
Week Long Project (20 Hours or More)
Finish Used
Clear matte polyurethane
Recommended Skill Level
Beginner
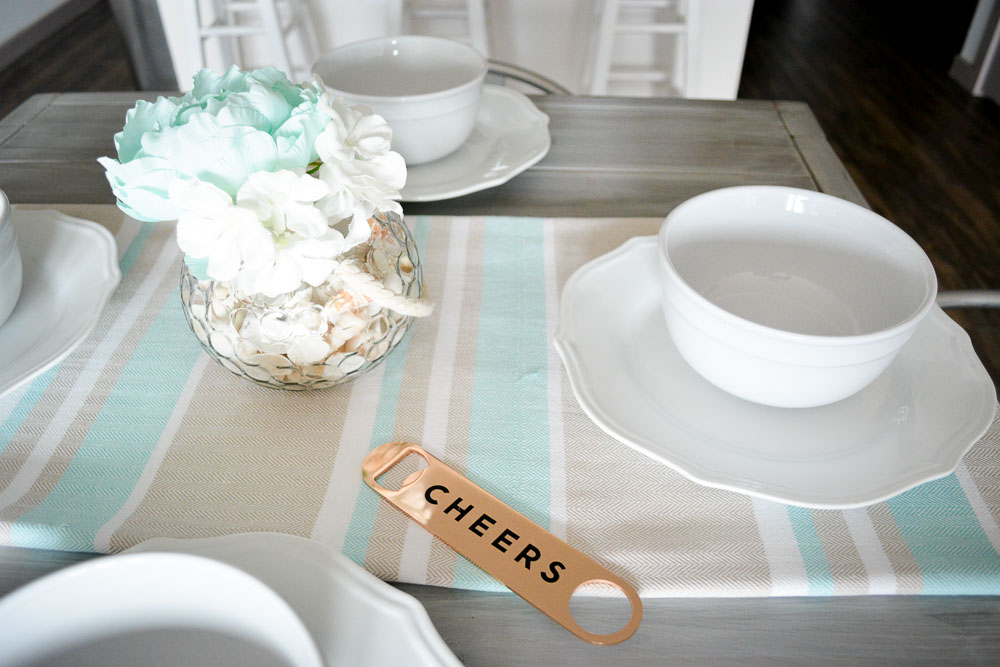
DIY Farmhouse Table For Under $40!
This is my sqaure farmhouse style dining table. It is so easy to make! An important tip is to get good pieces of wood. You don't want any bowing or else it won't be perfectly level. To see more photos and tips, go to SweetTeal.com/diy-farmhouse-table.
Built from Plan(s)
Estimated Cost
$40
Estimated Time Investment
Afternoon Project (3-6 Hours)
Finish Used
For the color combination, go to SweetTeal.com. For whatever color you do though, remember to put a finish on top. It will help protect your table and seal the wood. I used DecoArt's Soft Touch Varnish.
Recommended Skill Level
Beginner
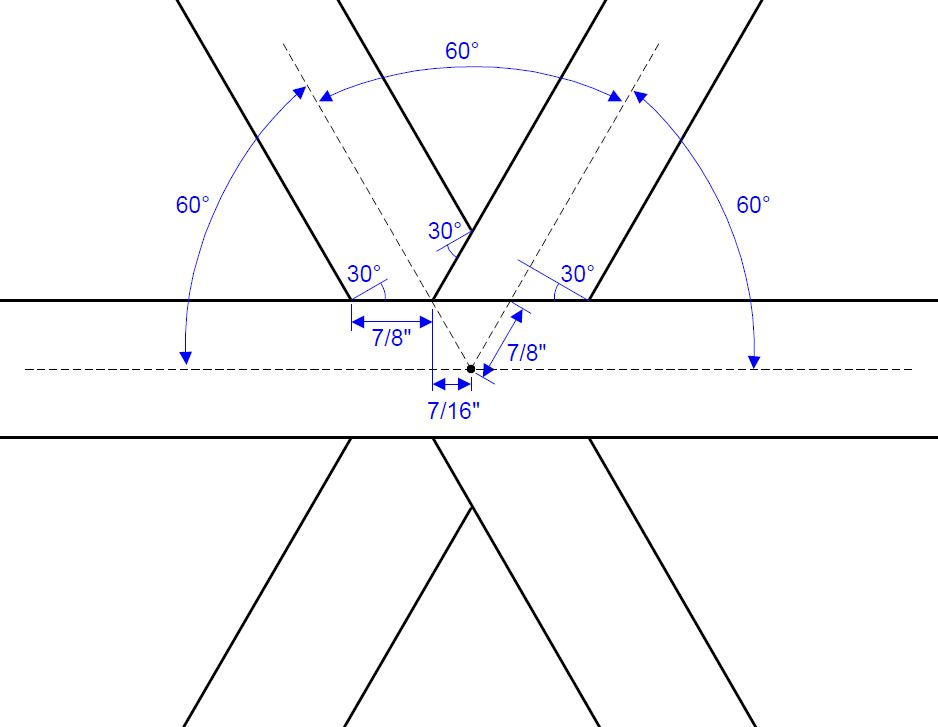
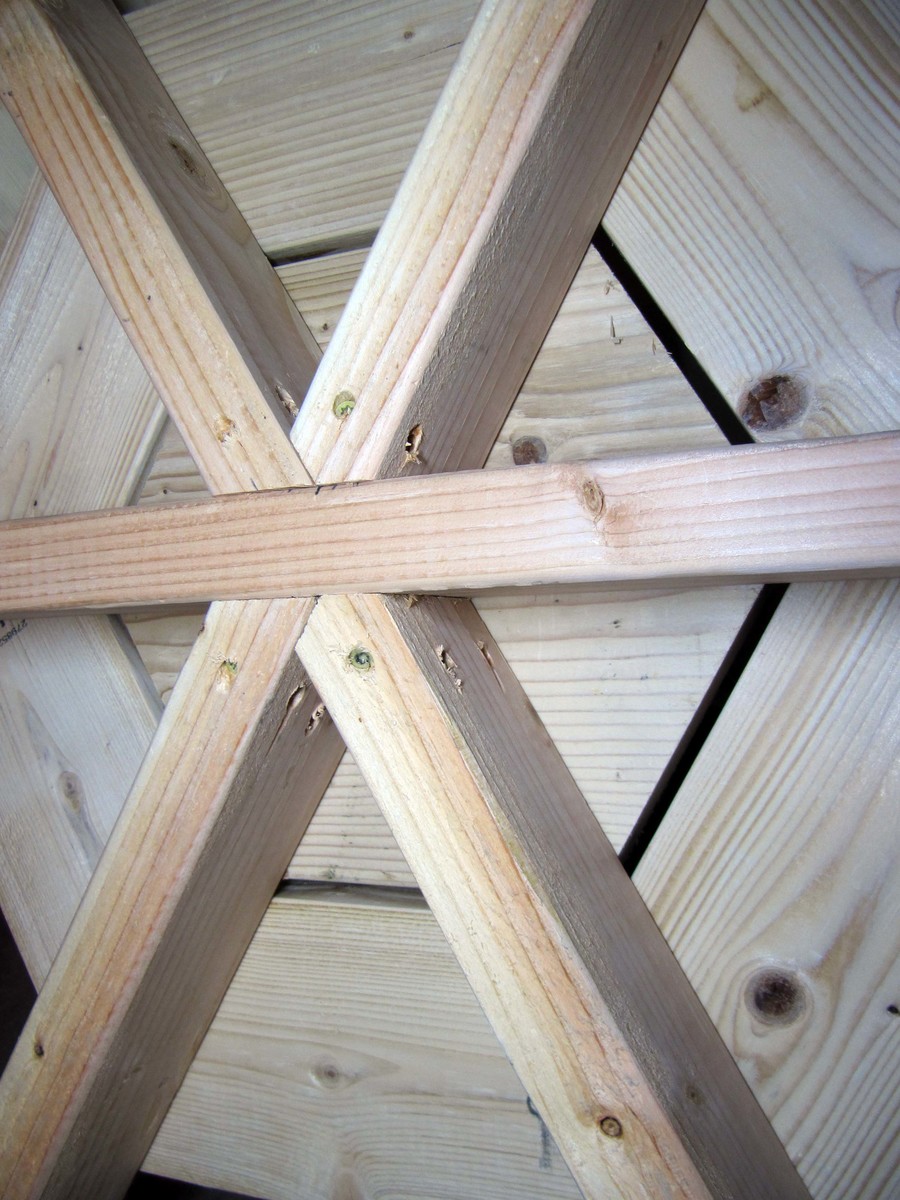
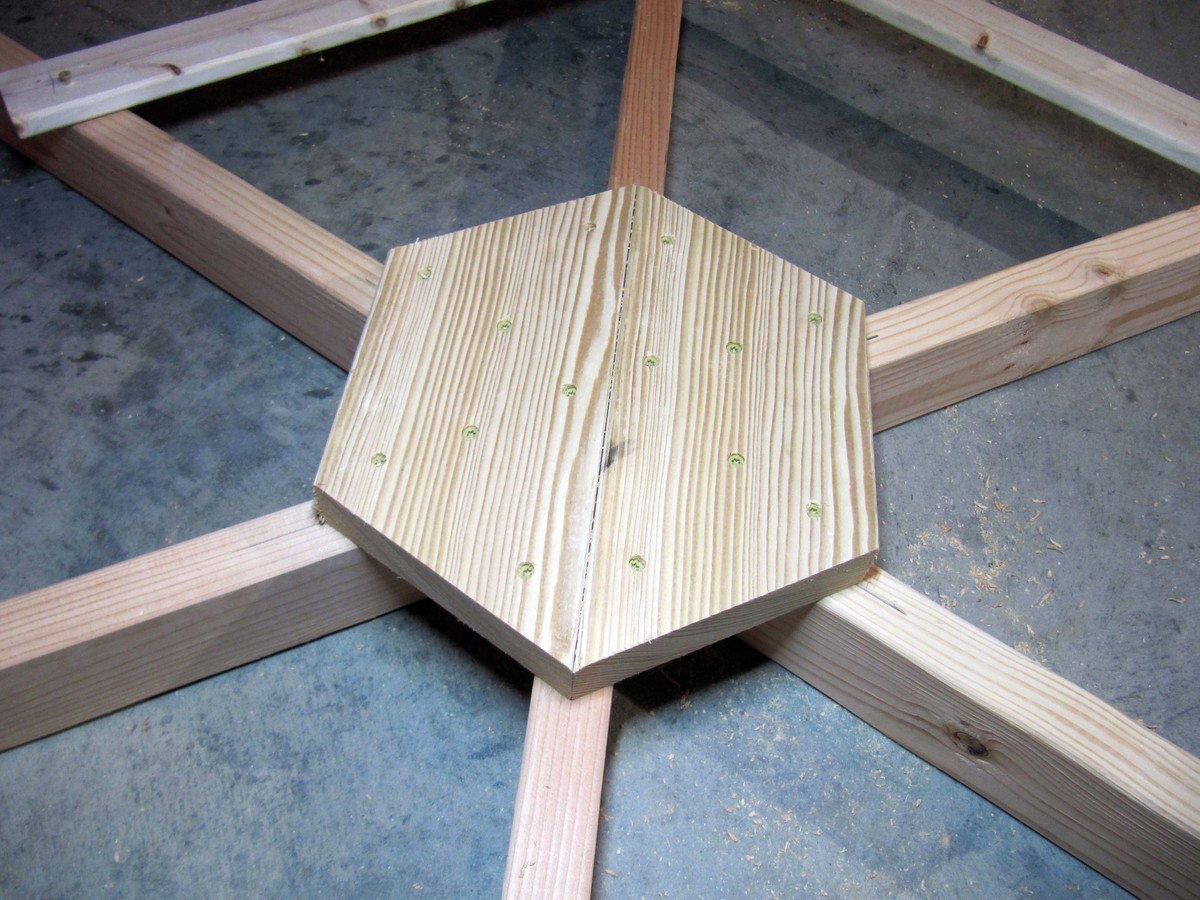
Hexagon Picnic Table
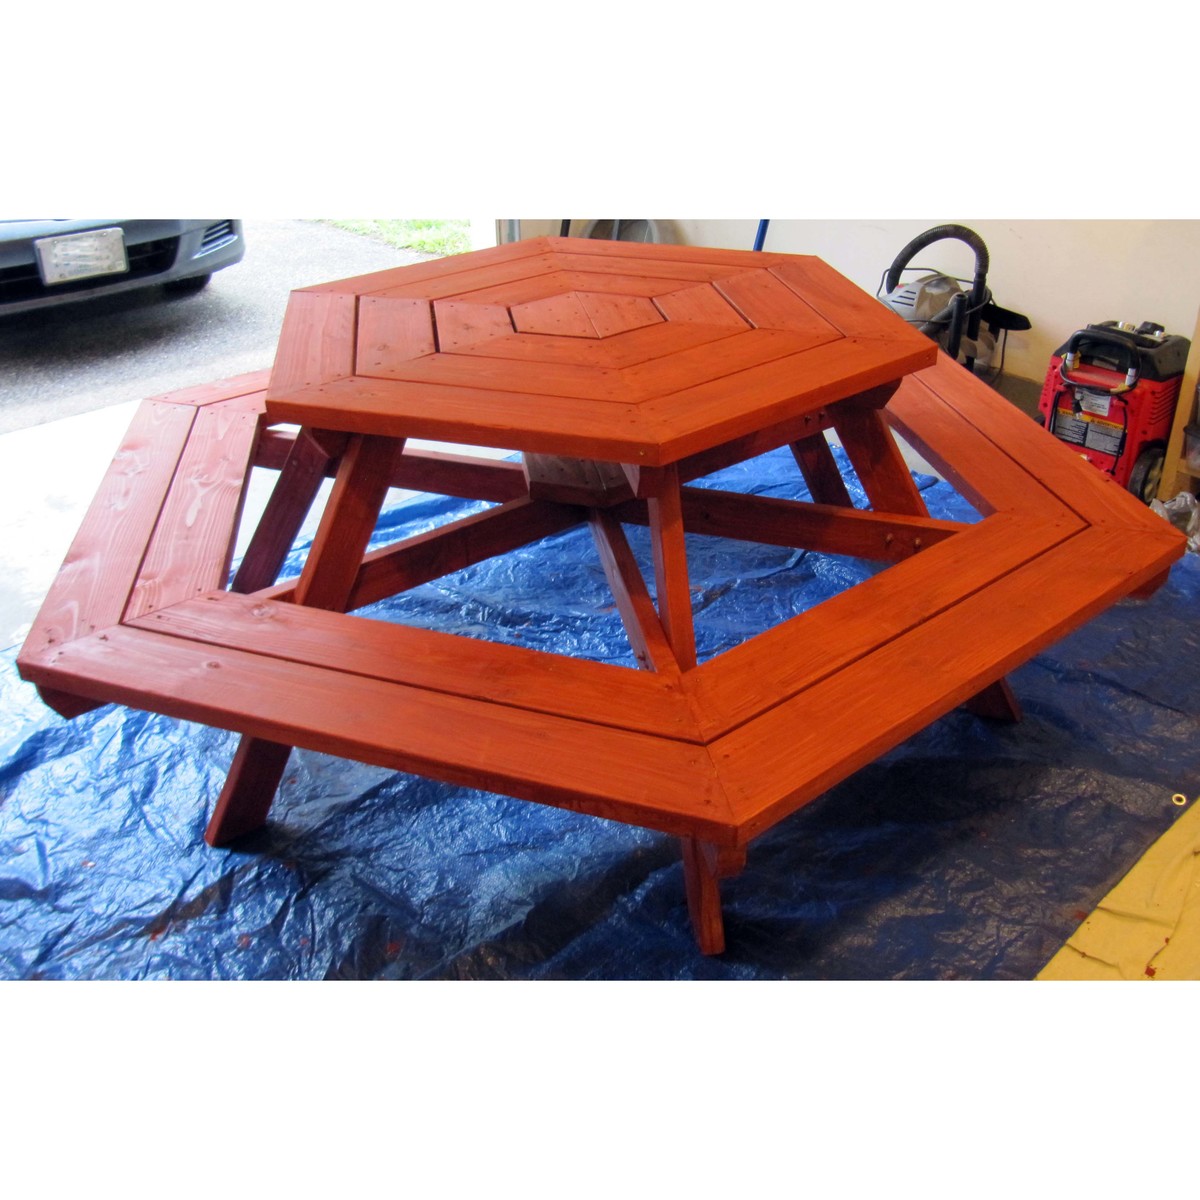
Thanks for the plans. My little brother from Big Brothers Big Sisters and I made this table and had lots of fun doing so. We made a few modifications which might be useful to others:
1. We modified the center joints (at the lower and table level) so that one 2x4 could continue across the entire diameter of the table for greater strength (see pictures for details).
2. As recommended we extended the seats out 4". This made it very comfortable to get in and out.
3. We started the center with 2 pieces of 2x6 rather than 6 with the thought being that this would help strengthen the center of the table. (see pictures for details).
4. We added a stiffener at the center 6-way joint on the lower level to help really strengthen that center joint. This was made out of 2 pieces of 2x6 as shown in the pictures.
Thanks,
John
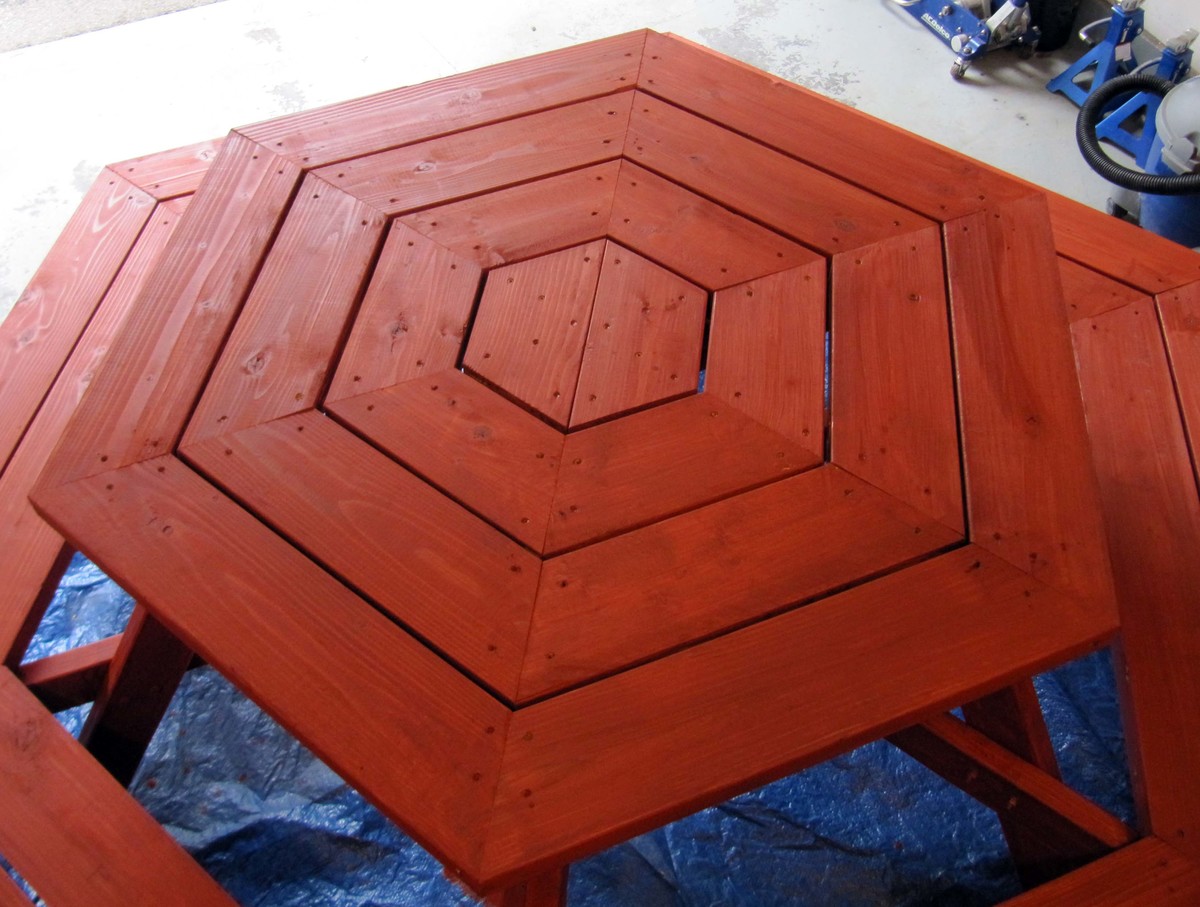
Built from Plan(s)
Estimated Cost
$80
Estimated Time Investment
Weekend Project (10-20 Hours)
Finish Used
Semi-transparent Redwood Stain
Recommended Skill Level
Intermediate
Farmhouse Craft Station
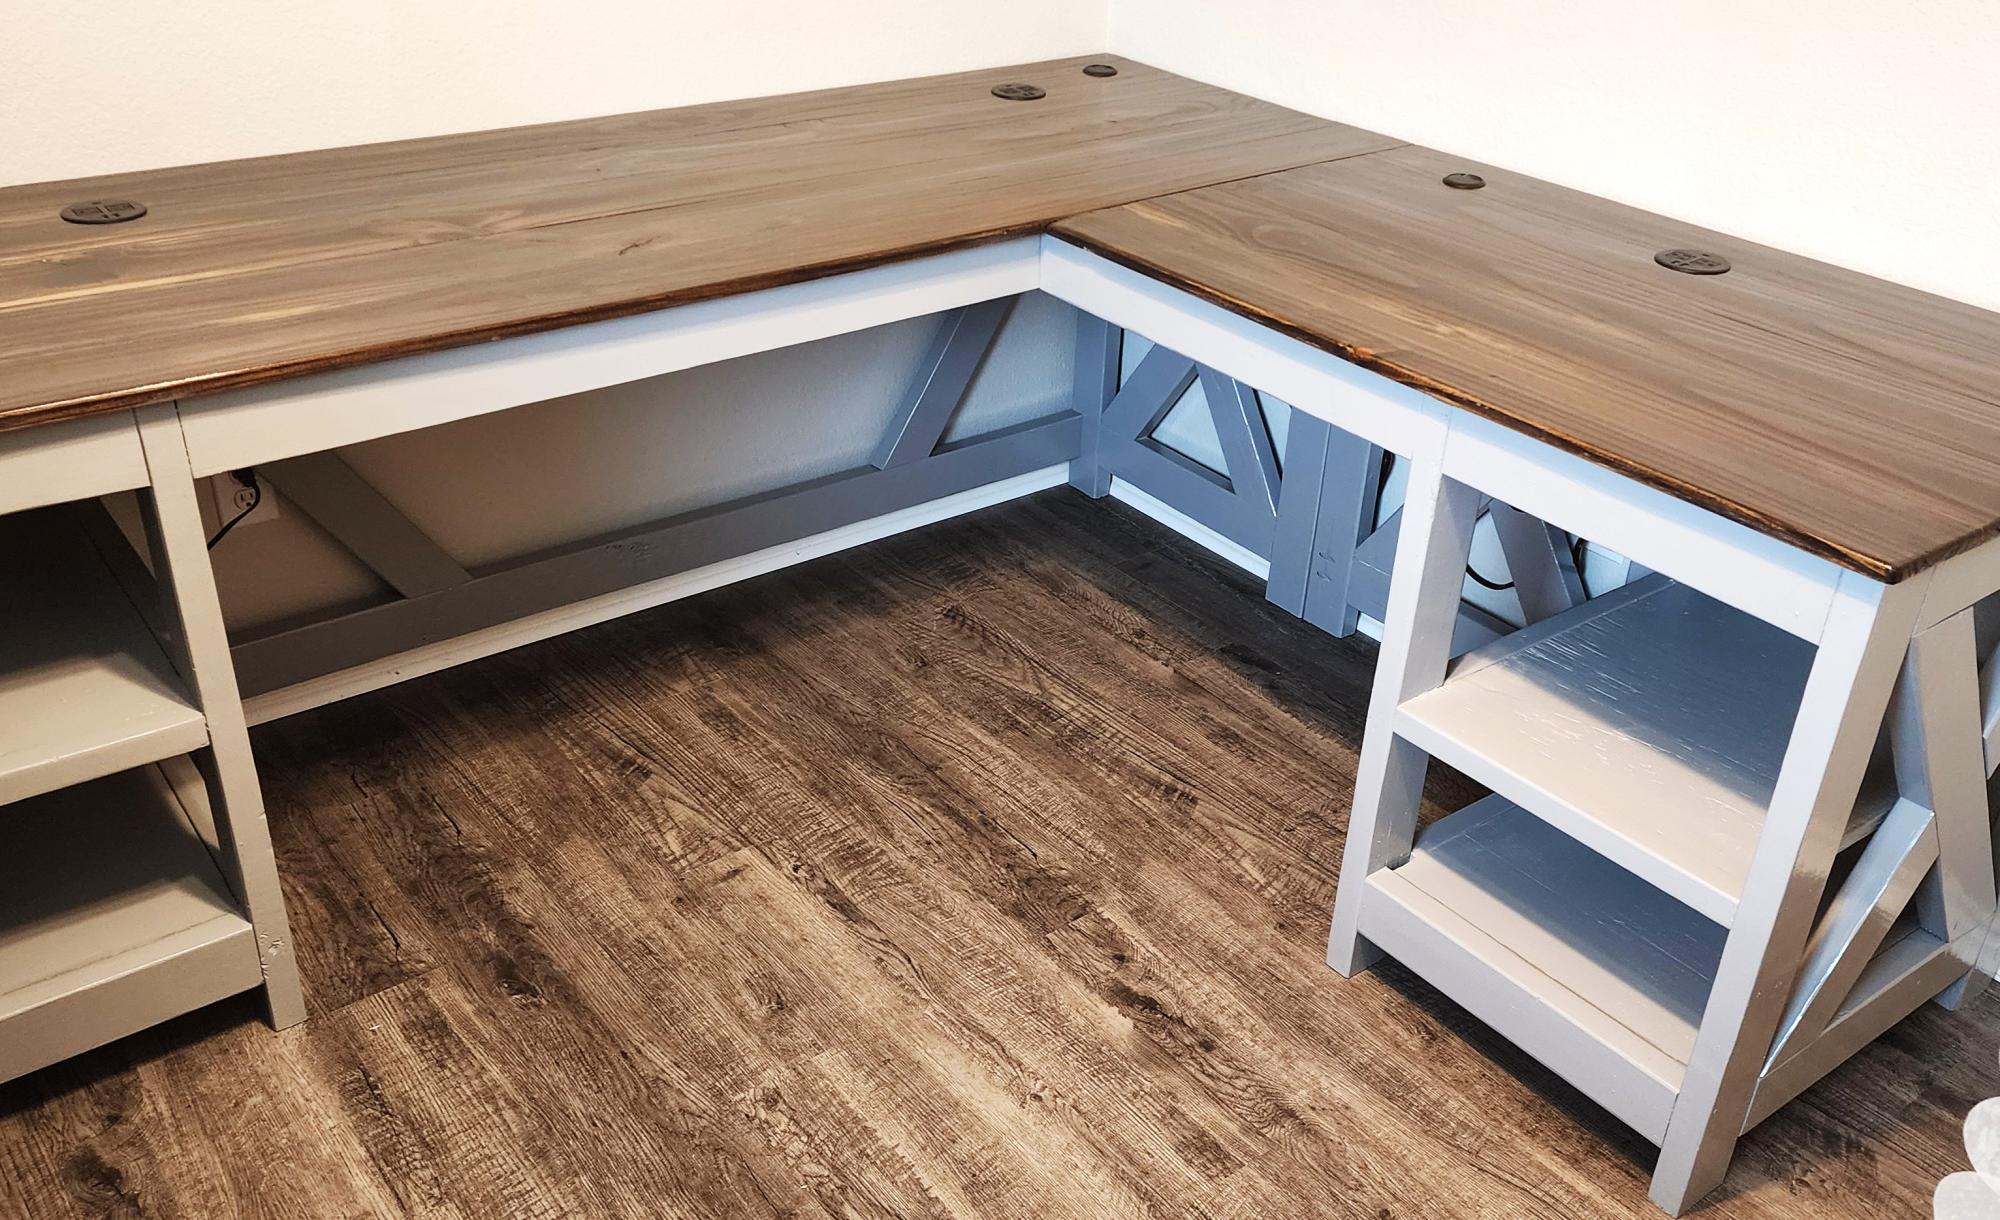
Desk for my wifes craft room.
Joshua Moore
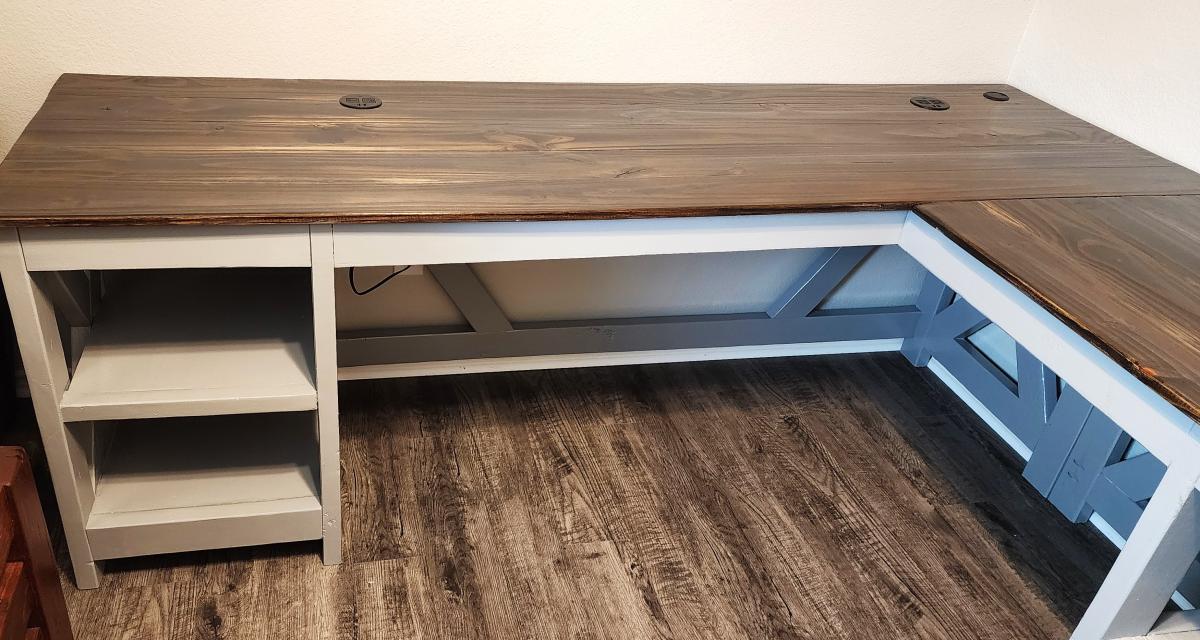
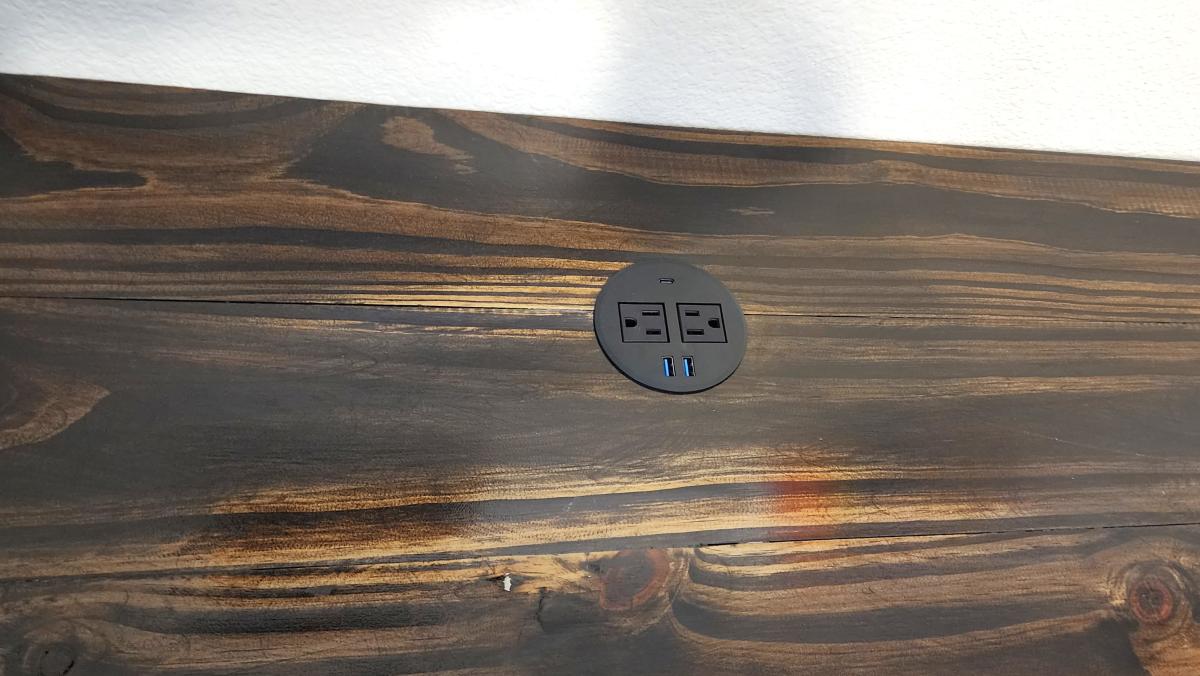
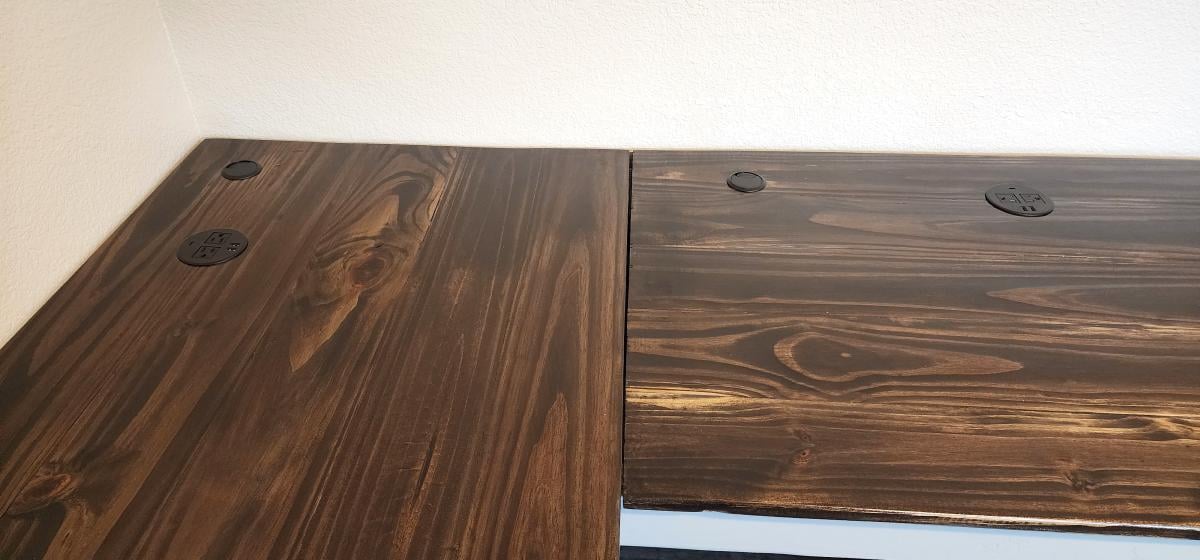
Built from Plan(s)
Garden Bench!!

I built this for my wife for an anniversary present. She had wanted a garden bench for some time but the ones that she wanted were between $500-$700 which is ridiculous for this type of bench. So, I did a search on here for garden benches but there weren't really any plans for them and the few brag plans were not really the type of bench I was looking for. I printed off a few pictures of benches that I liked and got to work. The front and back legs a 2x6 and a 1x6 glued together and then cut to be straight. I wanted something thicker then just a plain old 2x6. If I had to do this again though, I would have just glued 3 1X6's together. The reason being, is that 1x6's usually do not have a rounded edge and a 2X6 does. So needless to say when you glue them together you have a nice little gap on either side. Without a table saw to take this off, its pretty difficult to get a straight cut. But I ended up getting it right after sweating for a few hours in the garage. The bench stands 36 inches high, 48inches wide and about 18 inches deep. The seat height is right at 18in also.
In the unfinished pictures I actually had the depth being 24 inches. After sitting on it though it was just way to deep. So I pulled it apart, made the adjustments and its now much more comfortable to sit in.
If anyone has any questions or wants more details feel free to drop me a line!
Thanks!


Estimated Cost
85
Estimated Time Investment
Weekend Project (10-20 Hours)
Finish Used
Oil based acrylic paint
Recommended Skill Level
Beginner
Comments
Fri, 06/19/2015 - 13:32
Yes I think thats what they
Yes I think thats what they came out to be. yes the cross pieces are 2x4 and the slats are 1x4's

In reply to back legs by smz1919
Fri, 06/19/2015 - 13:34
I glued a 2x6 and a 1x6
I glued a 2x6 and a 1x6 together to get the thickness. Now that i have a table saw and a jointer this entire process would have been much easier but after getting it to look like one solid piece i just outlined the slant i wanted and cut it using a jig saw.
Fri, 06/19/2015 - 20:17
Back slats
So the back slats are just glued in place right? I wonder if it would be easier to use a biscuit joiner or not
Sun, 10/23/2016 - 17:46
Garden Bencch
on the back legs how high up did you go before you started cutting the angle? and was it around 15 degrees fromt he edge?
Wed, 05/26/2021 - 08:32
Hi Nathan Love the look of…
Hi Nathan
Love the look of the bench. Would you have a list of material requirements. I intend to make a bench like this and would like to know the measurements of the top back spar (the shaped one).
Here in the Uk our timber yards do not always supply the same cuts as the US so I need to have some idea of the pieces I need
Many thanks
My first woodworking project
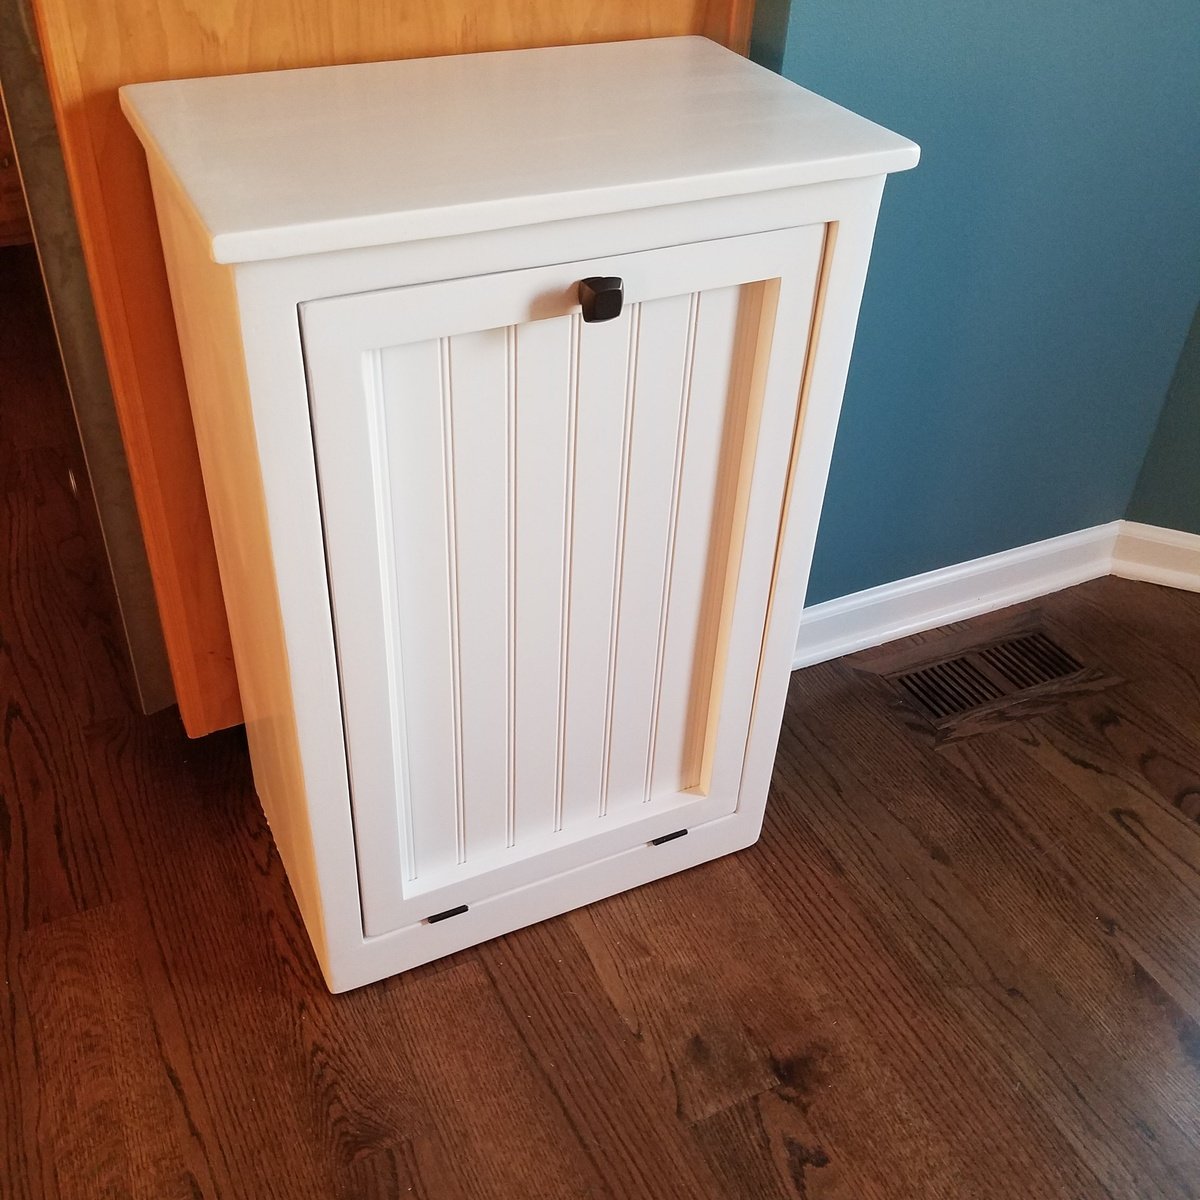
Our Australian Shepard will no longer be digging the trash out all over the floor! I did change the plans up a bit because I wanted a hangover off the sides as well as the front. And we used bead board instead of the solid panel. Thanks for the great plans Ana!
Built from Plan(s)
Estimated Time Investment
Weekend Project (10-20 Hours)
Finish Used
2 coats of extreme and primer and 2 coats of White paint. I lightly sanded in between each coat. I applied the primer and first coat of pai t qith a roller and the final coat was applied with a paint brush.
Recommended Skill Level
Beginner
Comments

Wed, 09/21/2016 - 14:57
Amazing First Project
This turned out beautiful!!! I love the beadboard and the added overhang. Can't wait to see your next project!
Grand Kids beds.
Thanks for great Farmhouse bed plans. Easy to follow material list, cut list and instructions.
Built from Plan(s)
Estimated Time Investment
Afternoon Project (3-6 Hours)
Finish Used
MinWax Dark Walnut
Recommended Skill Level
Beginner
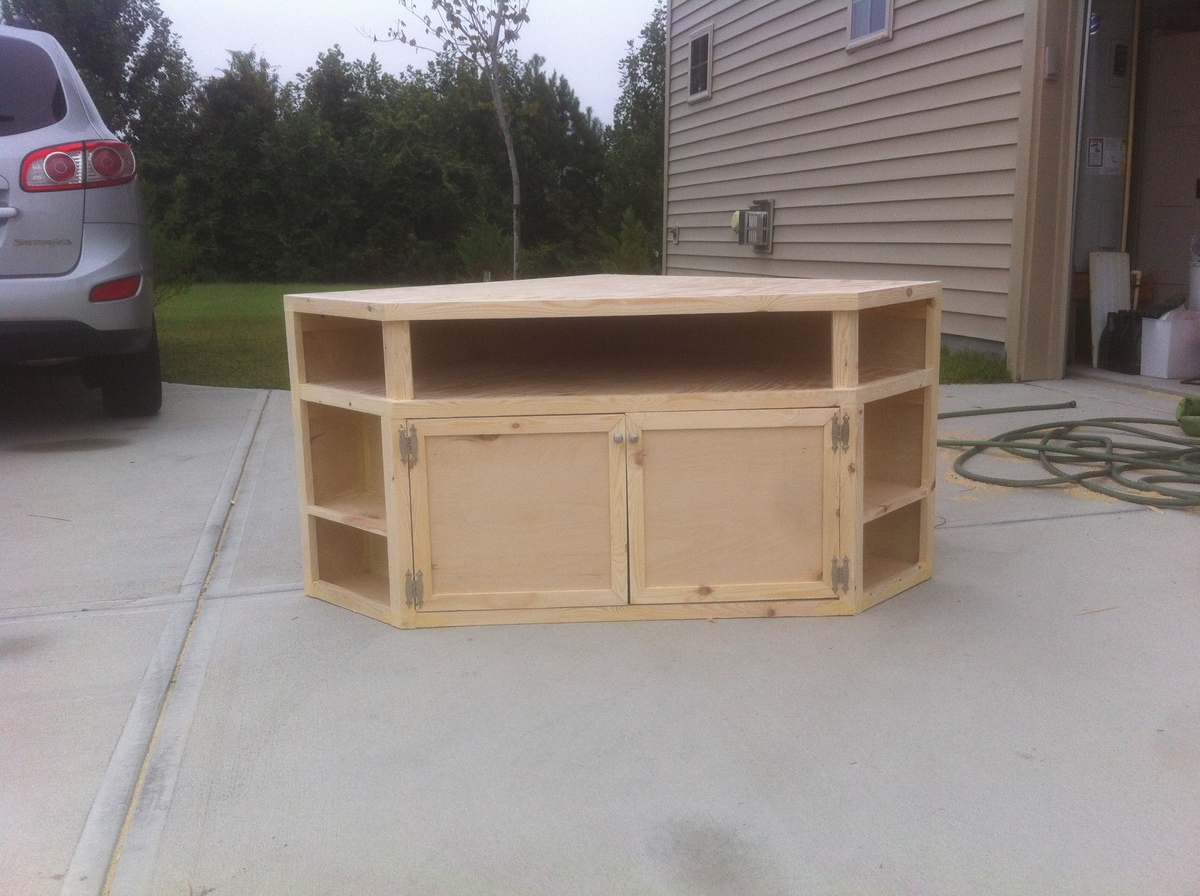
Floating Corner Entertainment Stand
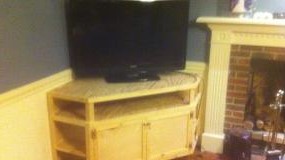
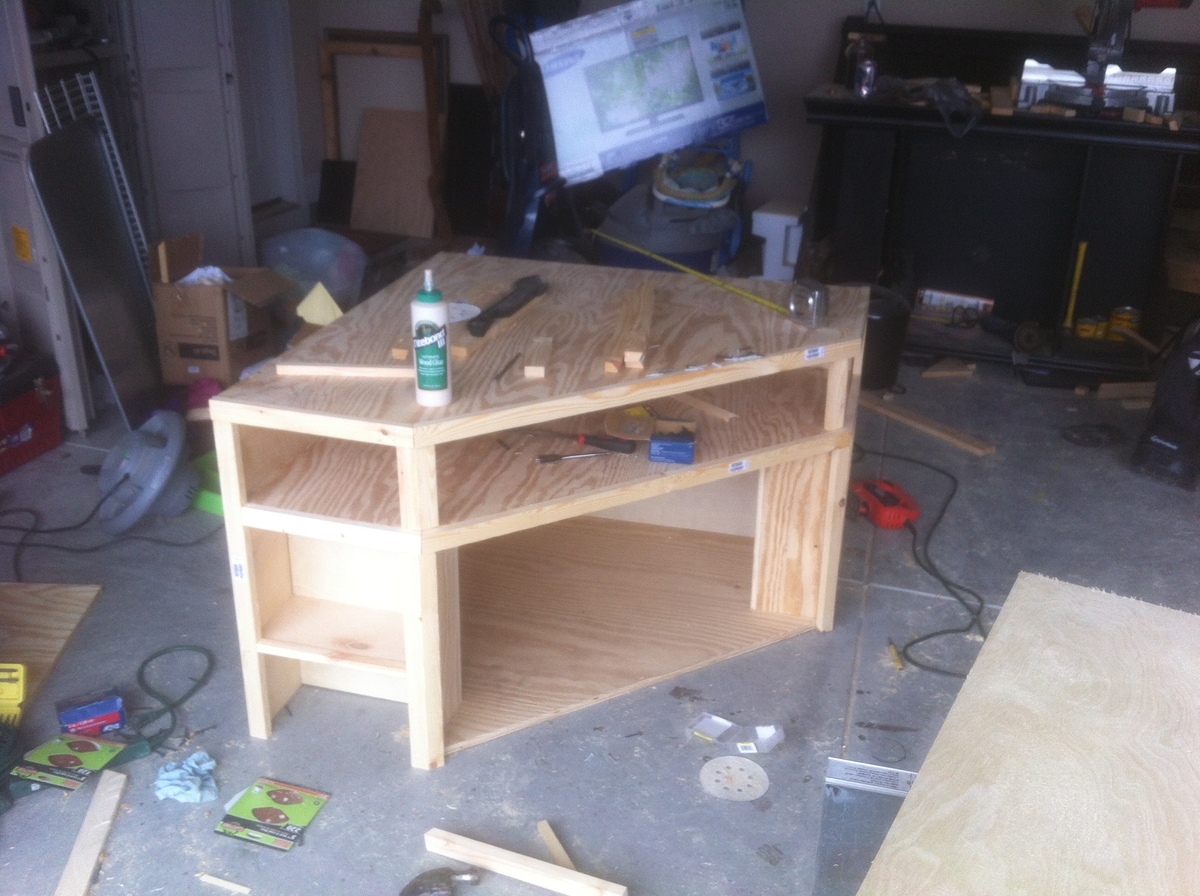
This is a corner entertainment stand. I didn't have a plan to follow so I made it up as I went. The dimensions are 40" L xW and 27" tall. It has a base hidden underneath it help support the weight and is also screwed into wall studs to prevent tipping. The angle for the front cross section is 22.5 degrees. I made this for a friend. She is going to paint it unfortunately. Materials cost only around $120. 3 sheets 3/4" plywood, some 1x2s and a couple hinges and cabinet knobs.
Estimated Cost
$130
Estimated Time Investment
Weekend Project (10-20 Hours)
Recommended Skill Level
Intermediate
Comments
Sun, 01/06/2013 - 04:49
This is REALLY a nice looking
This is REALLY a nice looking corner unit. In our living room, the ONLY place for the tv is in the corner. I have a prebuilt unit now that cost me quite a bit, and we hate it. Its all modern with glass shelves. This corner cabinet is EXACTLY what I want to build. I have a 1 year old so having doors to hide the electronics is a must.
I would VERY much like to build this. Are there any more detailed pictures or a plan I could download? Ive been searching for the last few days an just cant seem to find anything that catches my eye like this one.
Looks great!!
Sun, 01/06/2013 - 06:18
Thanks Justin
The shelves are made out of premium plywood. For the top, bottom, and the middle shelf, I measured and cut out on pieces of plywood. Then used plywood for the "walls" of the unit. I trimmed it with 1x2s. The doors are also plywood. I just rabbit jointed nice wood for the frame of the doors. Underneath the the TV stand is a 2x4 set back a little bit to give it that floating looking. It is anchored to the wall on the inside of the unit with screws going into the studs of the wall. I hope this makes since.
First Project

Well, I started with one chair and finished with a full set. Not bad for a first timer. Definitely room to improve. Little tip if you're going to make this amazing set... raise the backs as they are too low with thicker cushions. I built a casing to go on top after the fact. Pretty happy with how it all turned out. Thanks Ana for the plans... now onto the next project!


Comments

Fri, 04/28/2023 - 08:41
2X4 & 2X6 starting set
Very nice workmanship. I'm curious as to how comfortable they are with the straight 90* backs? Let me know please at [email protected]. Again nice workmanship.
Fri, 04/28/2023 - 08:41
2X4 & 2X6 starting set
Very nice workmanship. I'm curious as to how comfortable they are with the straight 90* backs? Let me know please at [email protected]. Again nice workmanship.
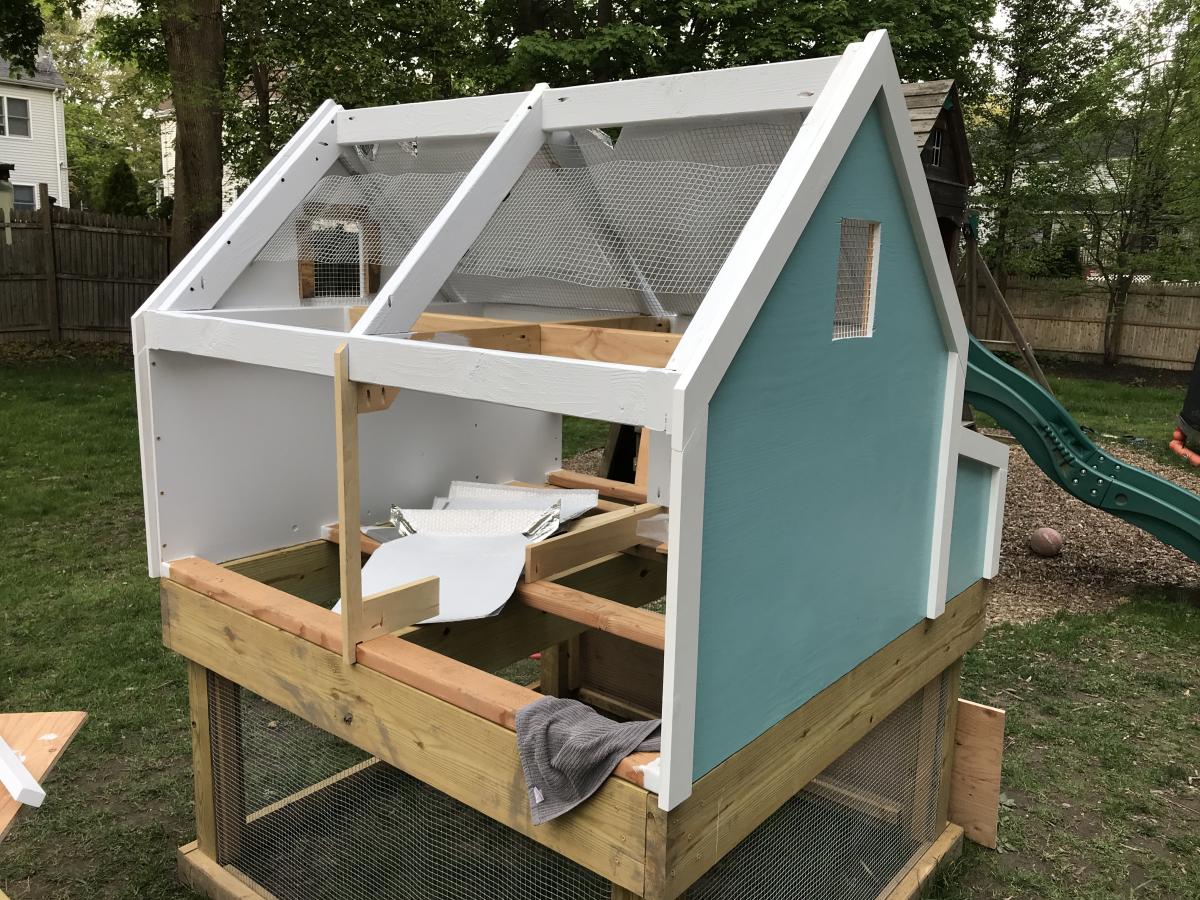
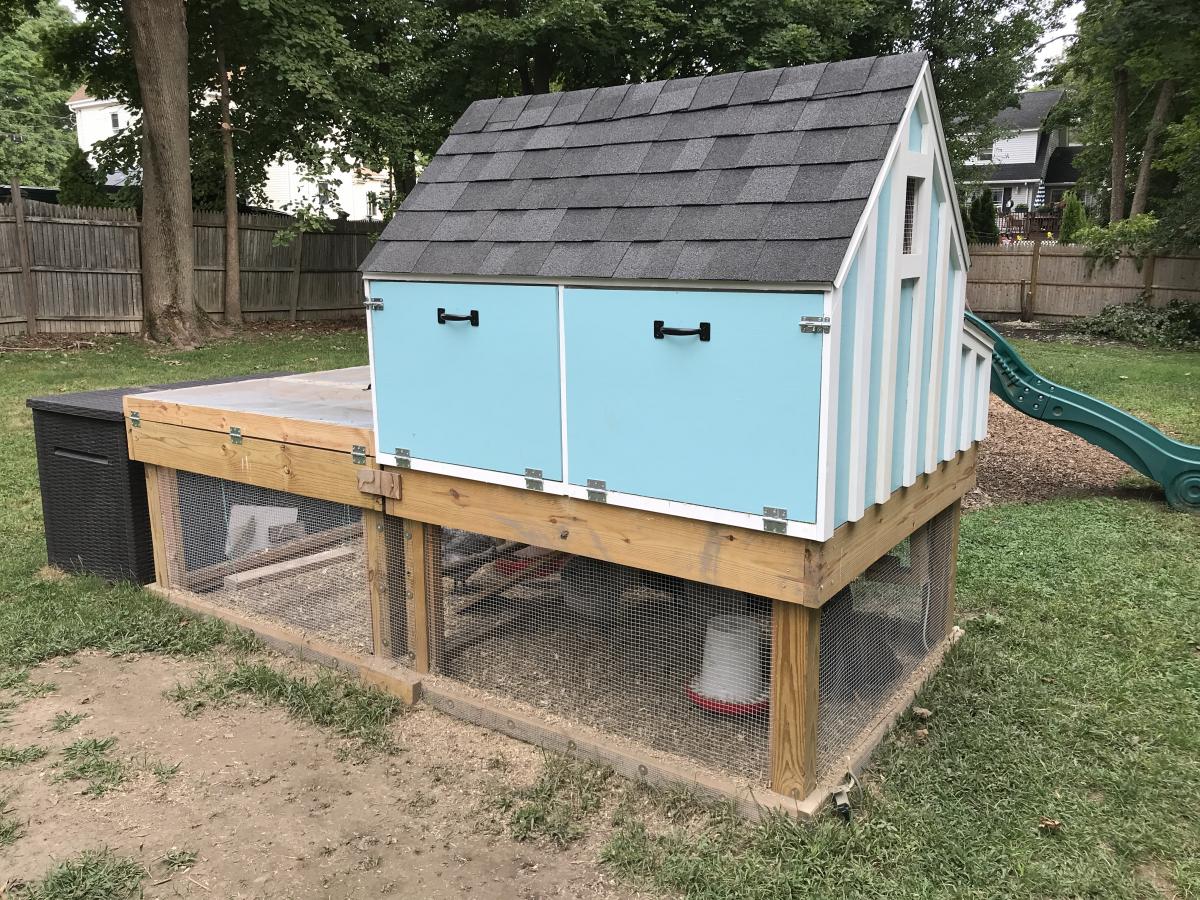
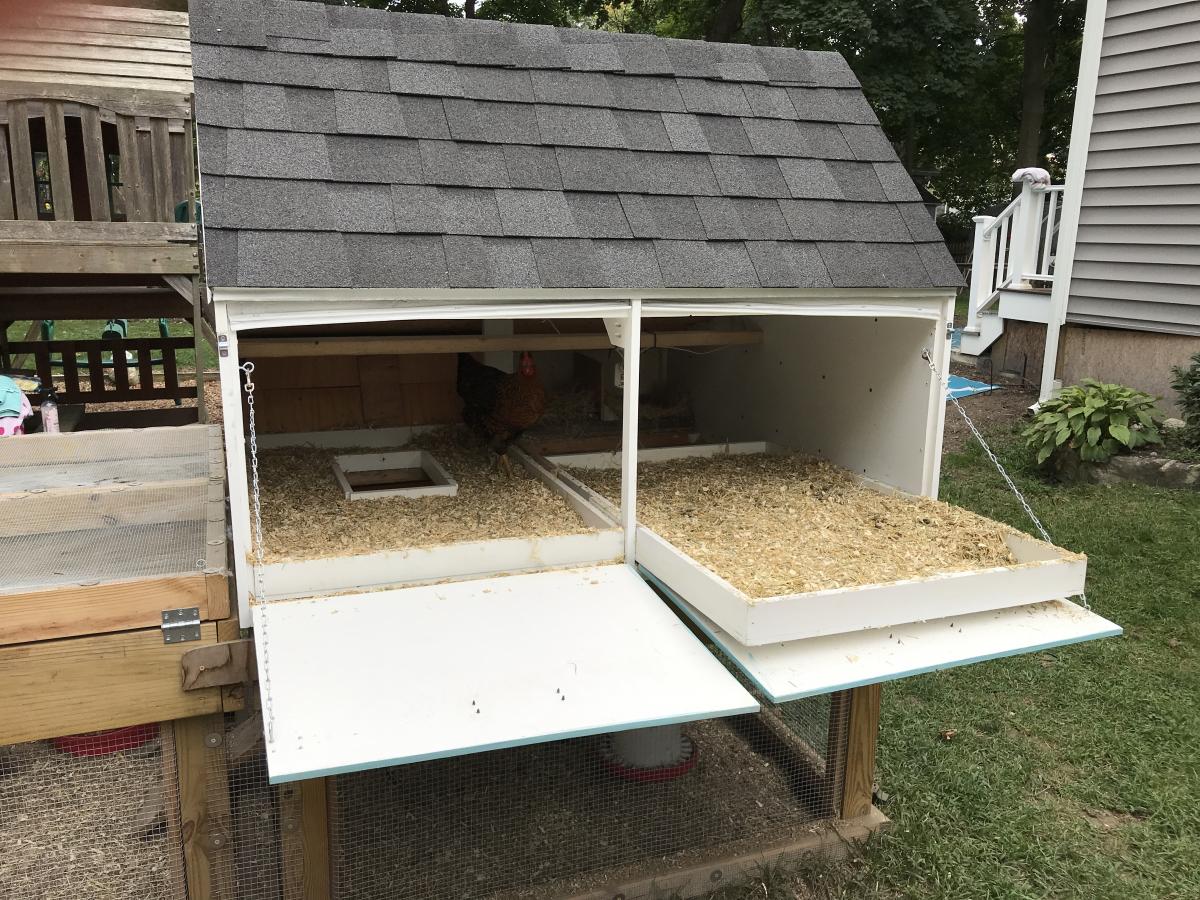
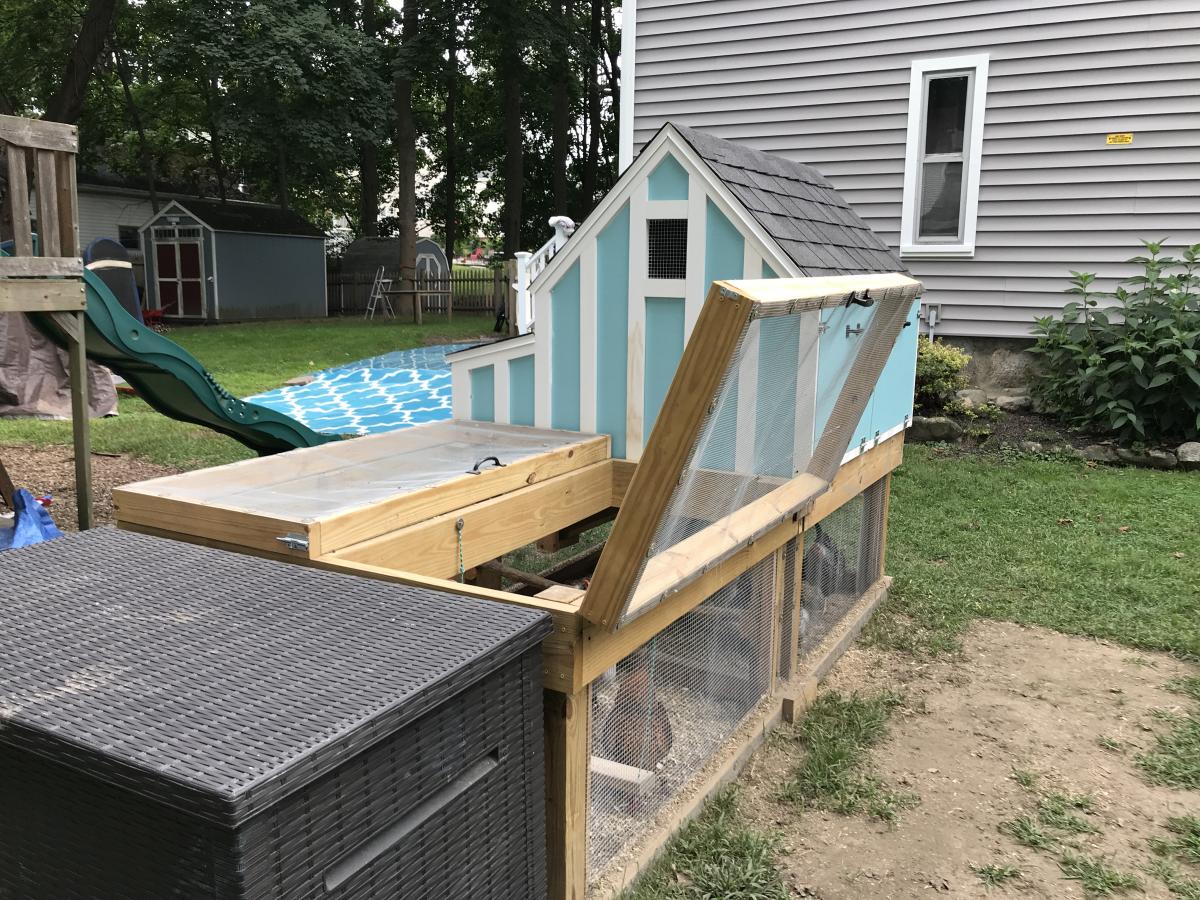
Double-wide Chicken Coop
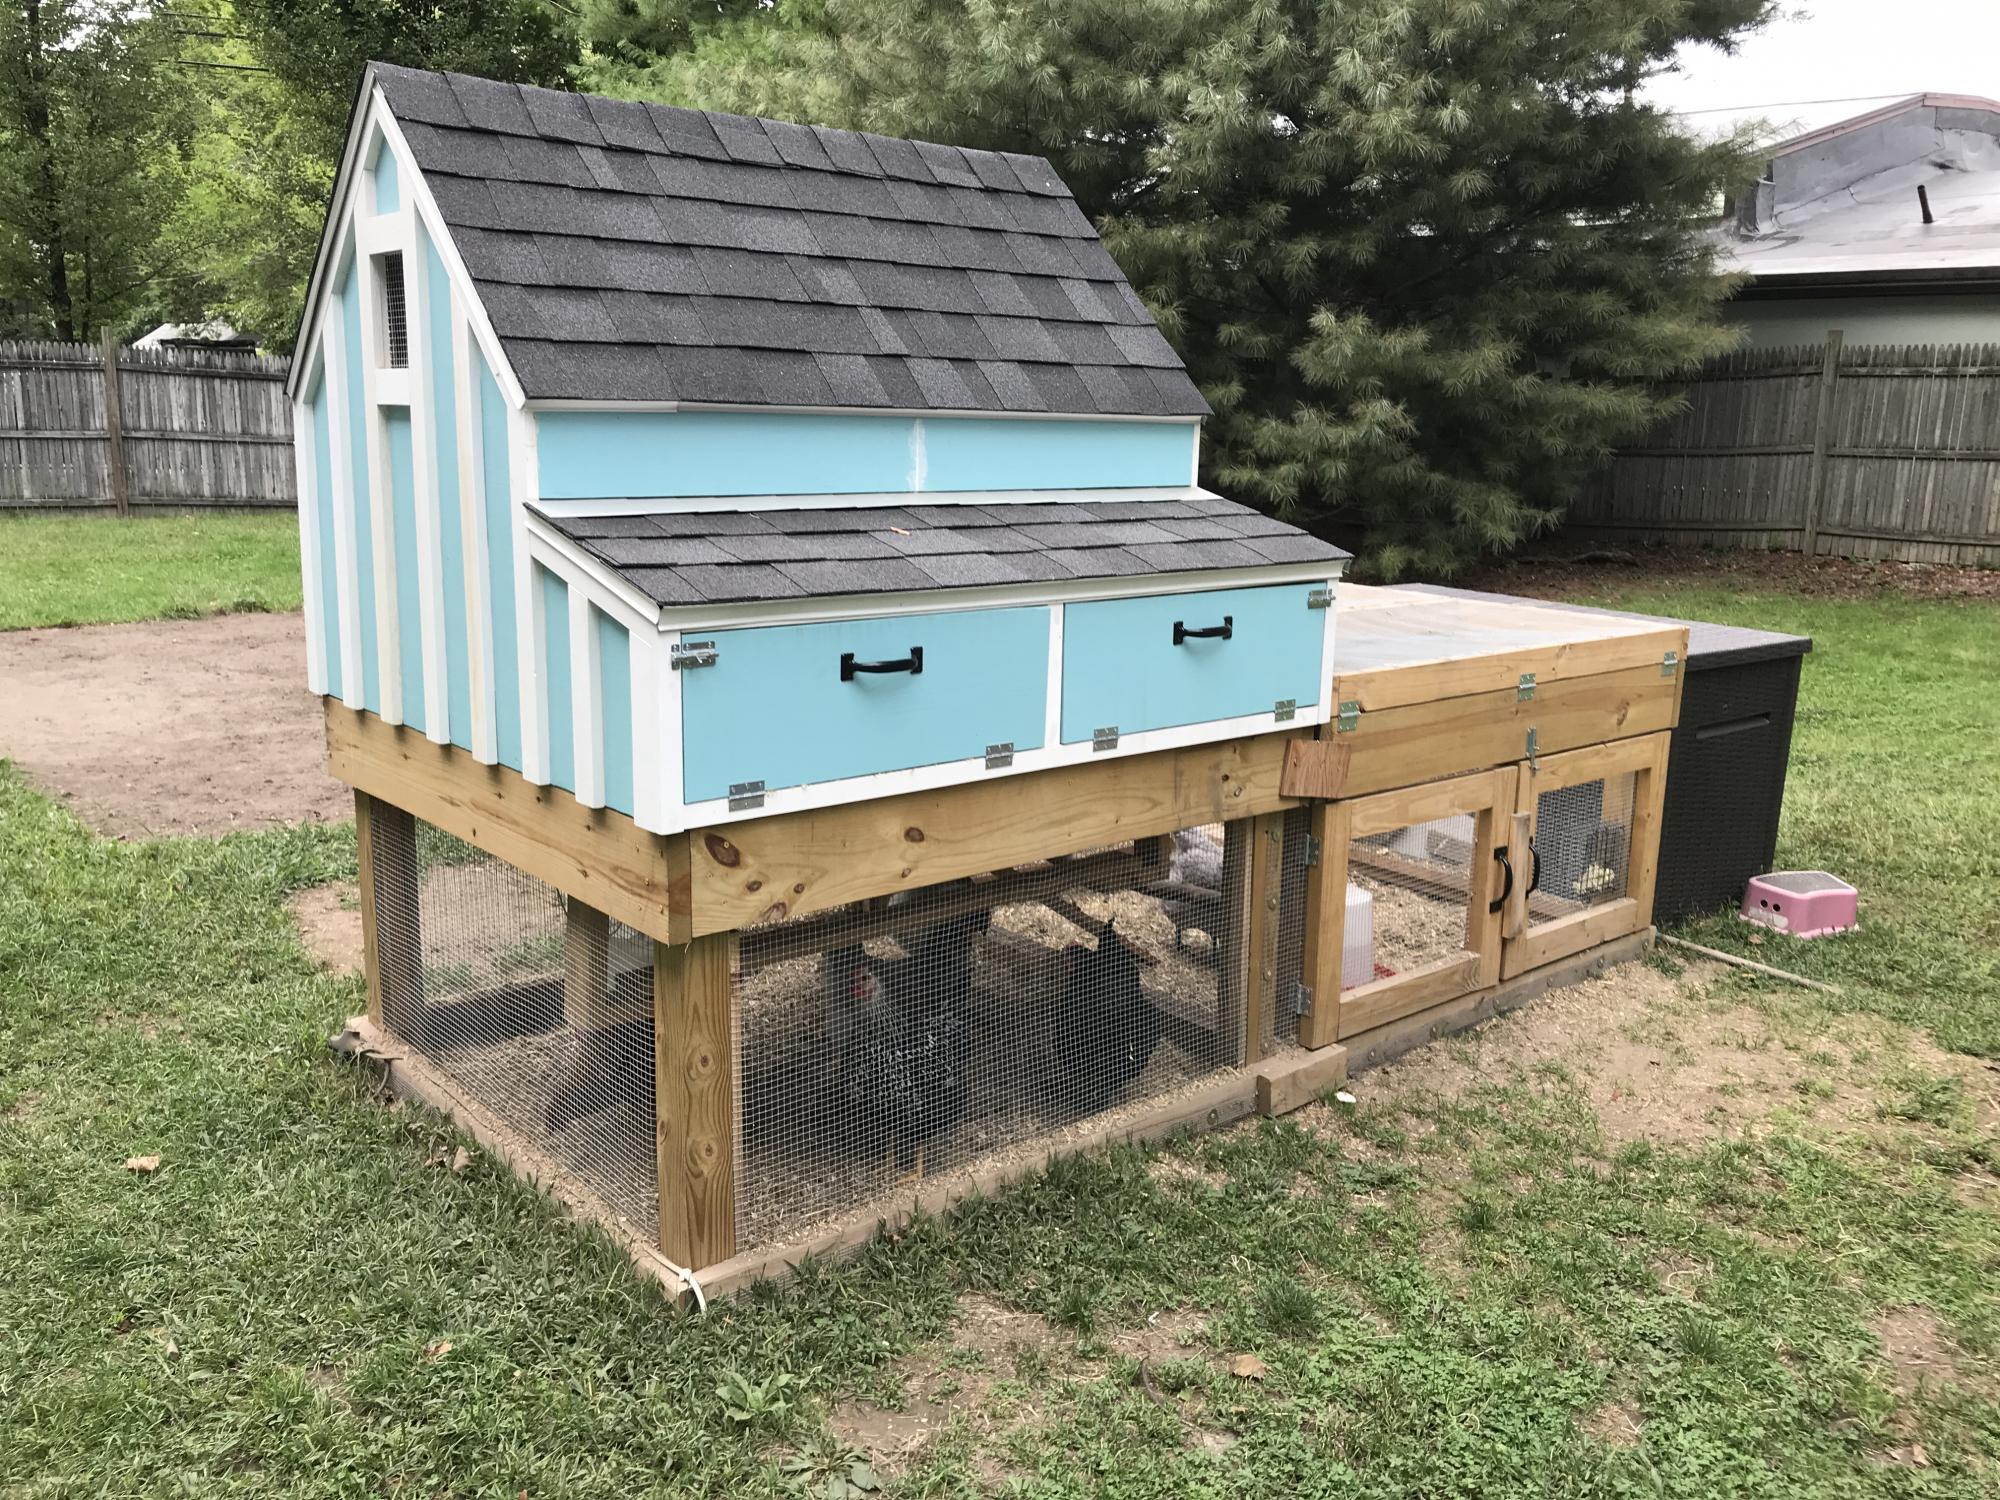
This was a fun build, though it took me quite a while because I decided to paint the interior. I ended up making it twice as wide to accommodate our six chickens. It took some planning but in the end I had essentially two coops side by side with no dividing wall between them. I also doubled the size of the run.
I cheaped out on the plywood and went with 1/2" - there was a big difference in cost as plywood was hard to find at the start of the pandemic. Using 1/2" turned out to be a big mistake. The 1/2" plywood warped quite a bit after I had painted it making it difficult to use the doors. I may have to replace the doors eventually with 3/4".
Overall I'm very happy with the end result. It's been easy to clean and maintain and the girls seems quite happy in it. This is one of the best looking coops I've come across. Thank you for these fantastic plans!

Built from Plan(s)
Estimated Cost
$1200
Estimated Time Investment
Week Long Project (20 Hours or More)
Finish Used
Exterior Benjamin Moore Aura/Regal leftover paint from previous projects.
Recommended Skill Level
Intermediate
Comments
Sun, 09/13/2020 - 11:25
Great Mods!
Love the double wide modification plus the extra work on finishing it, is the cherry on top! Thanks for sharing!
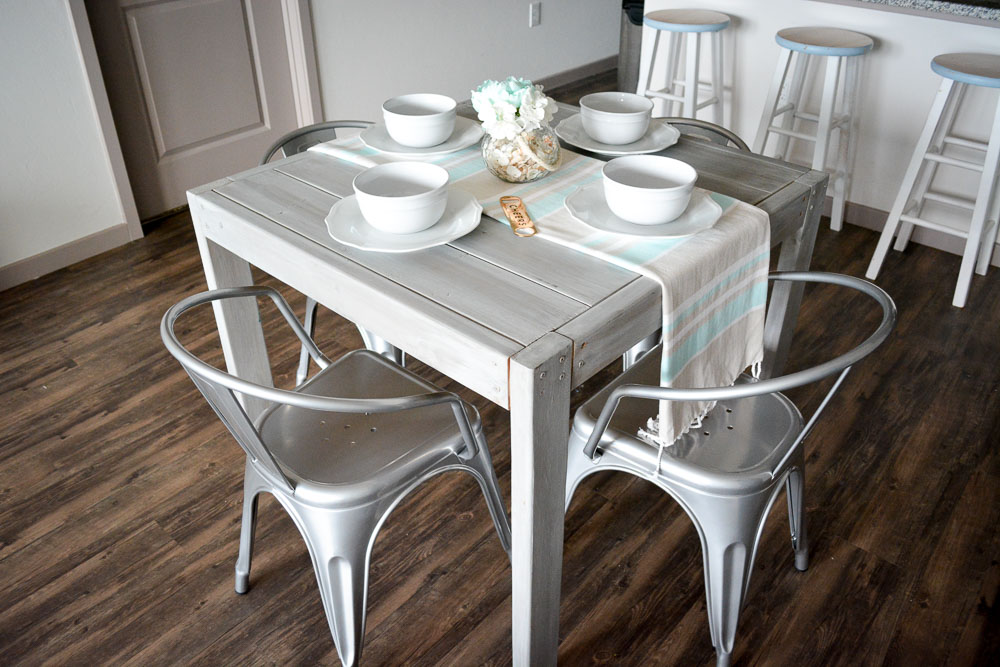
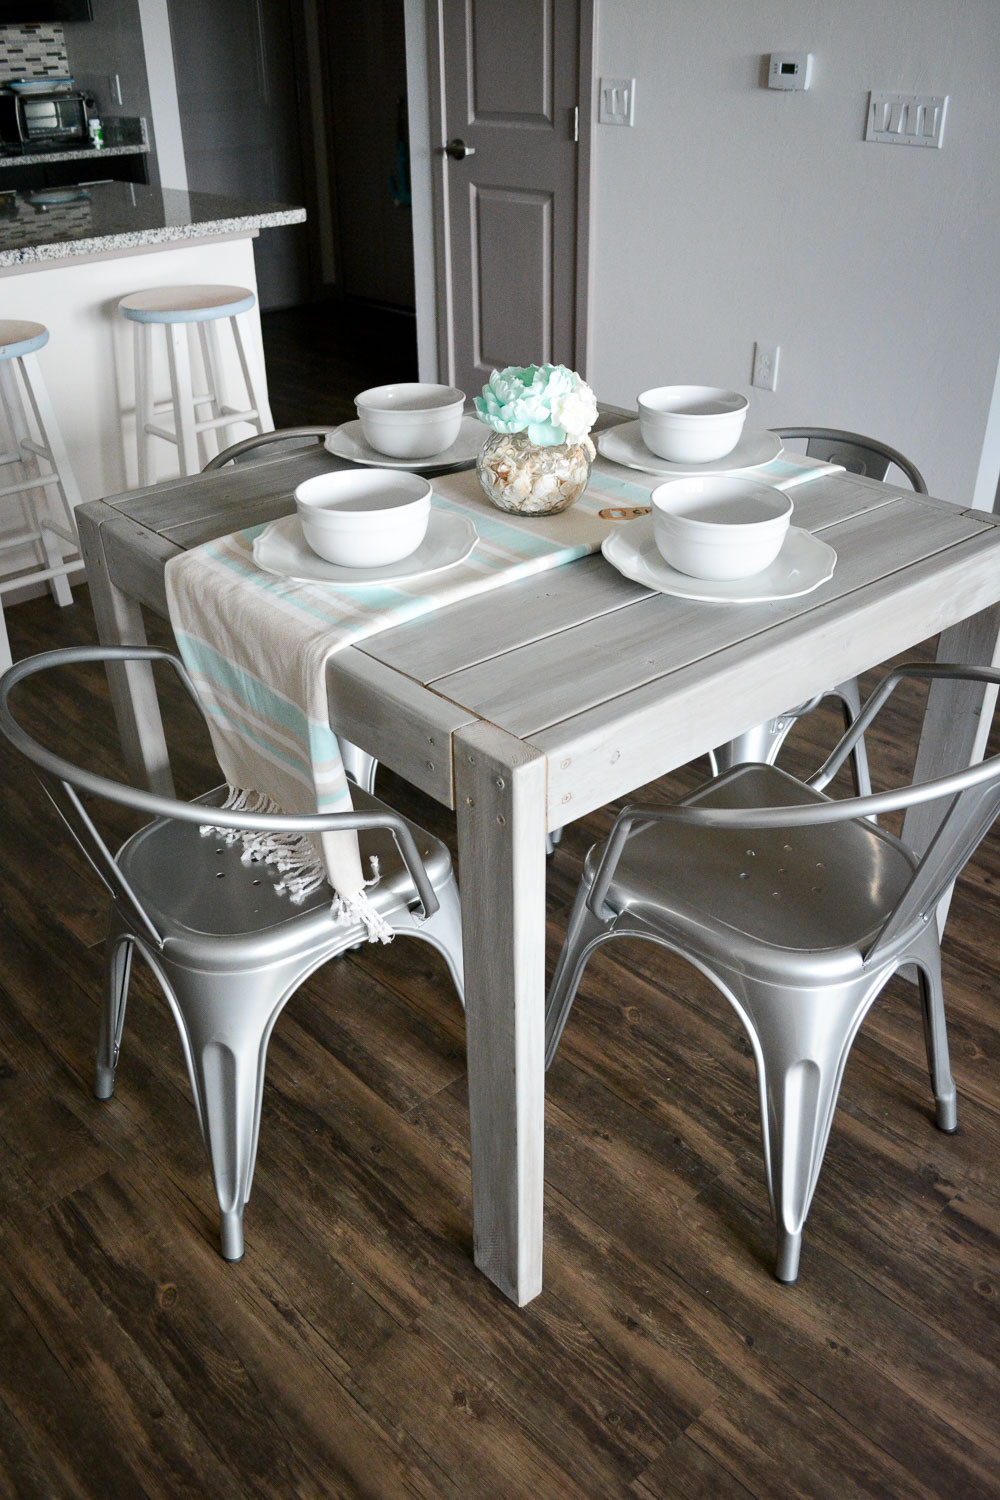
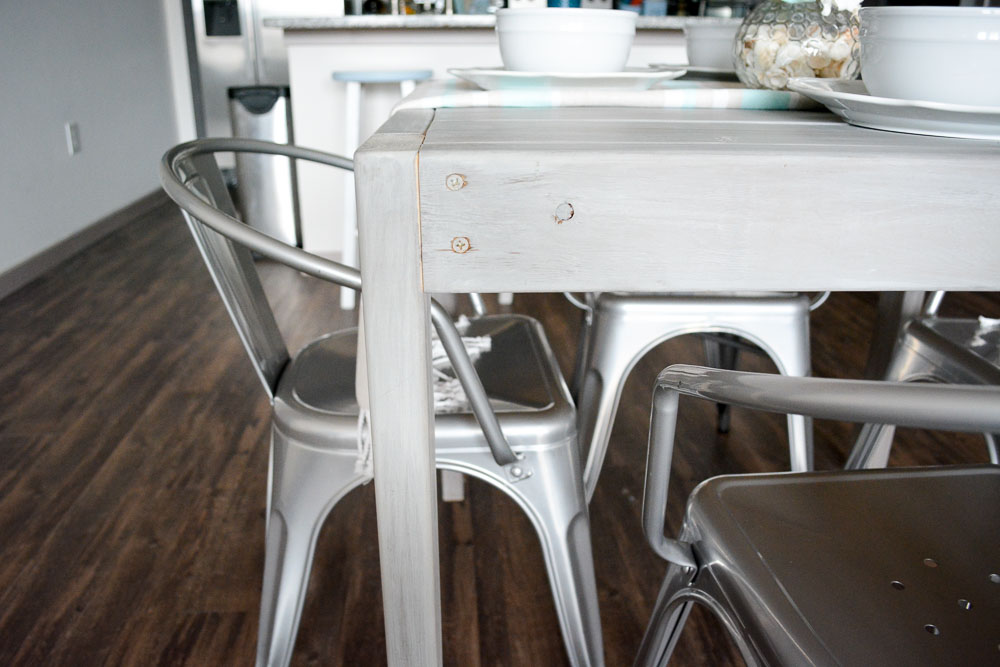
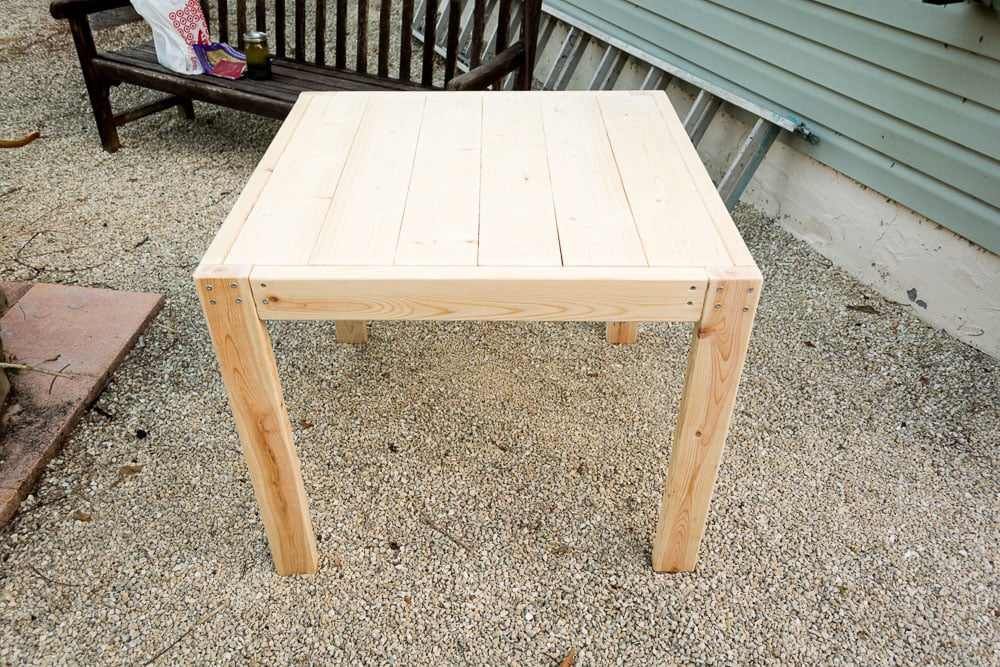
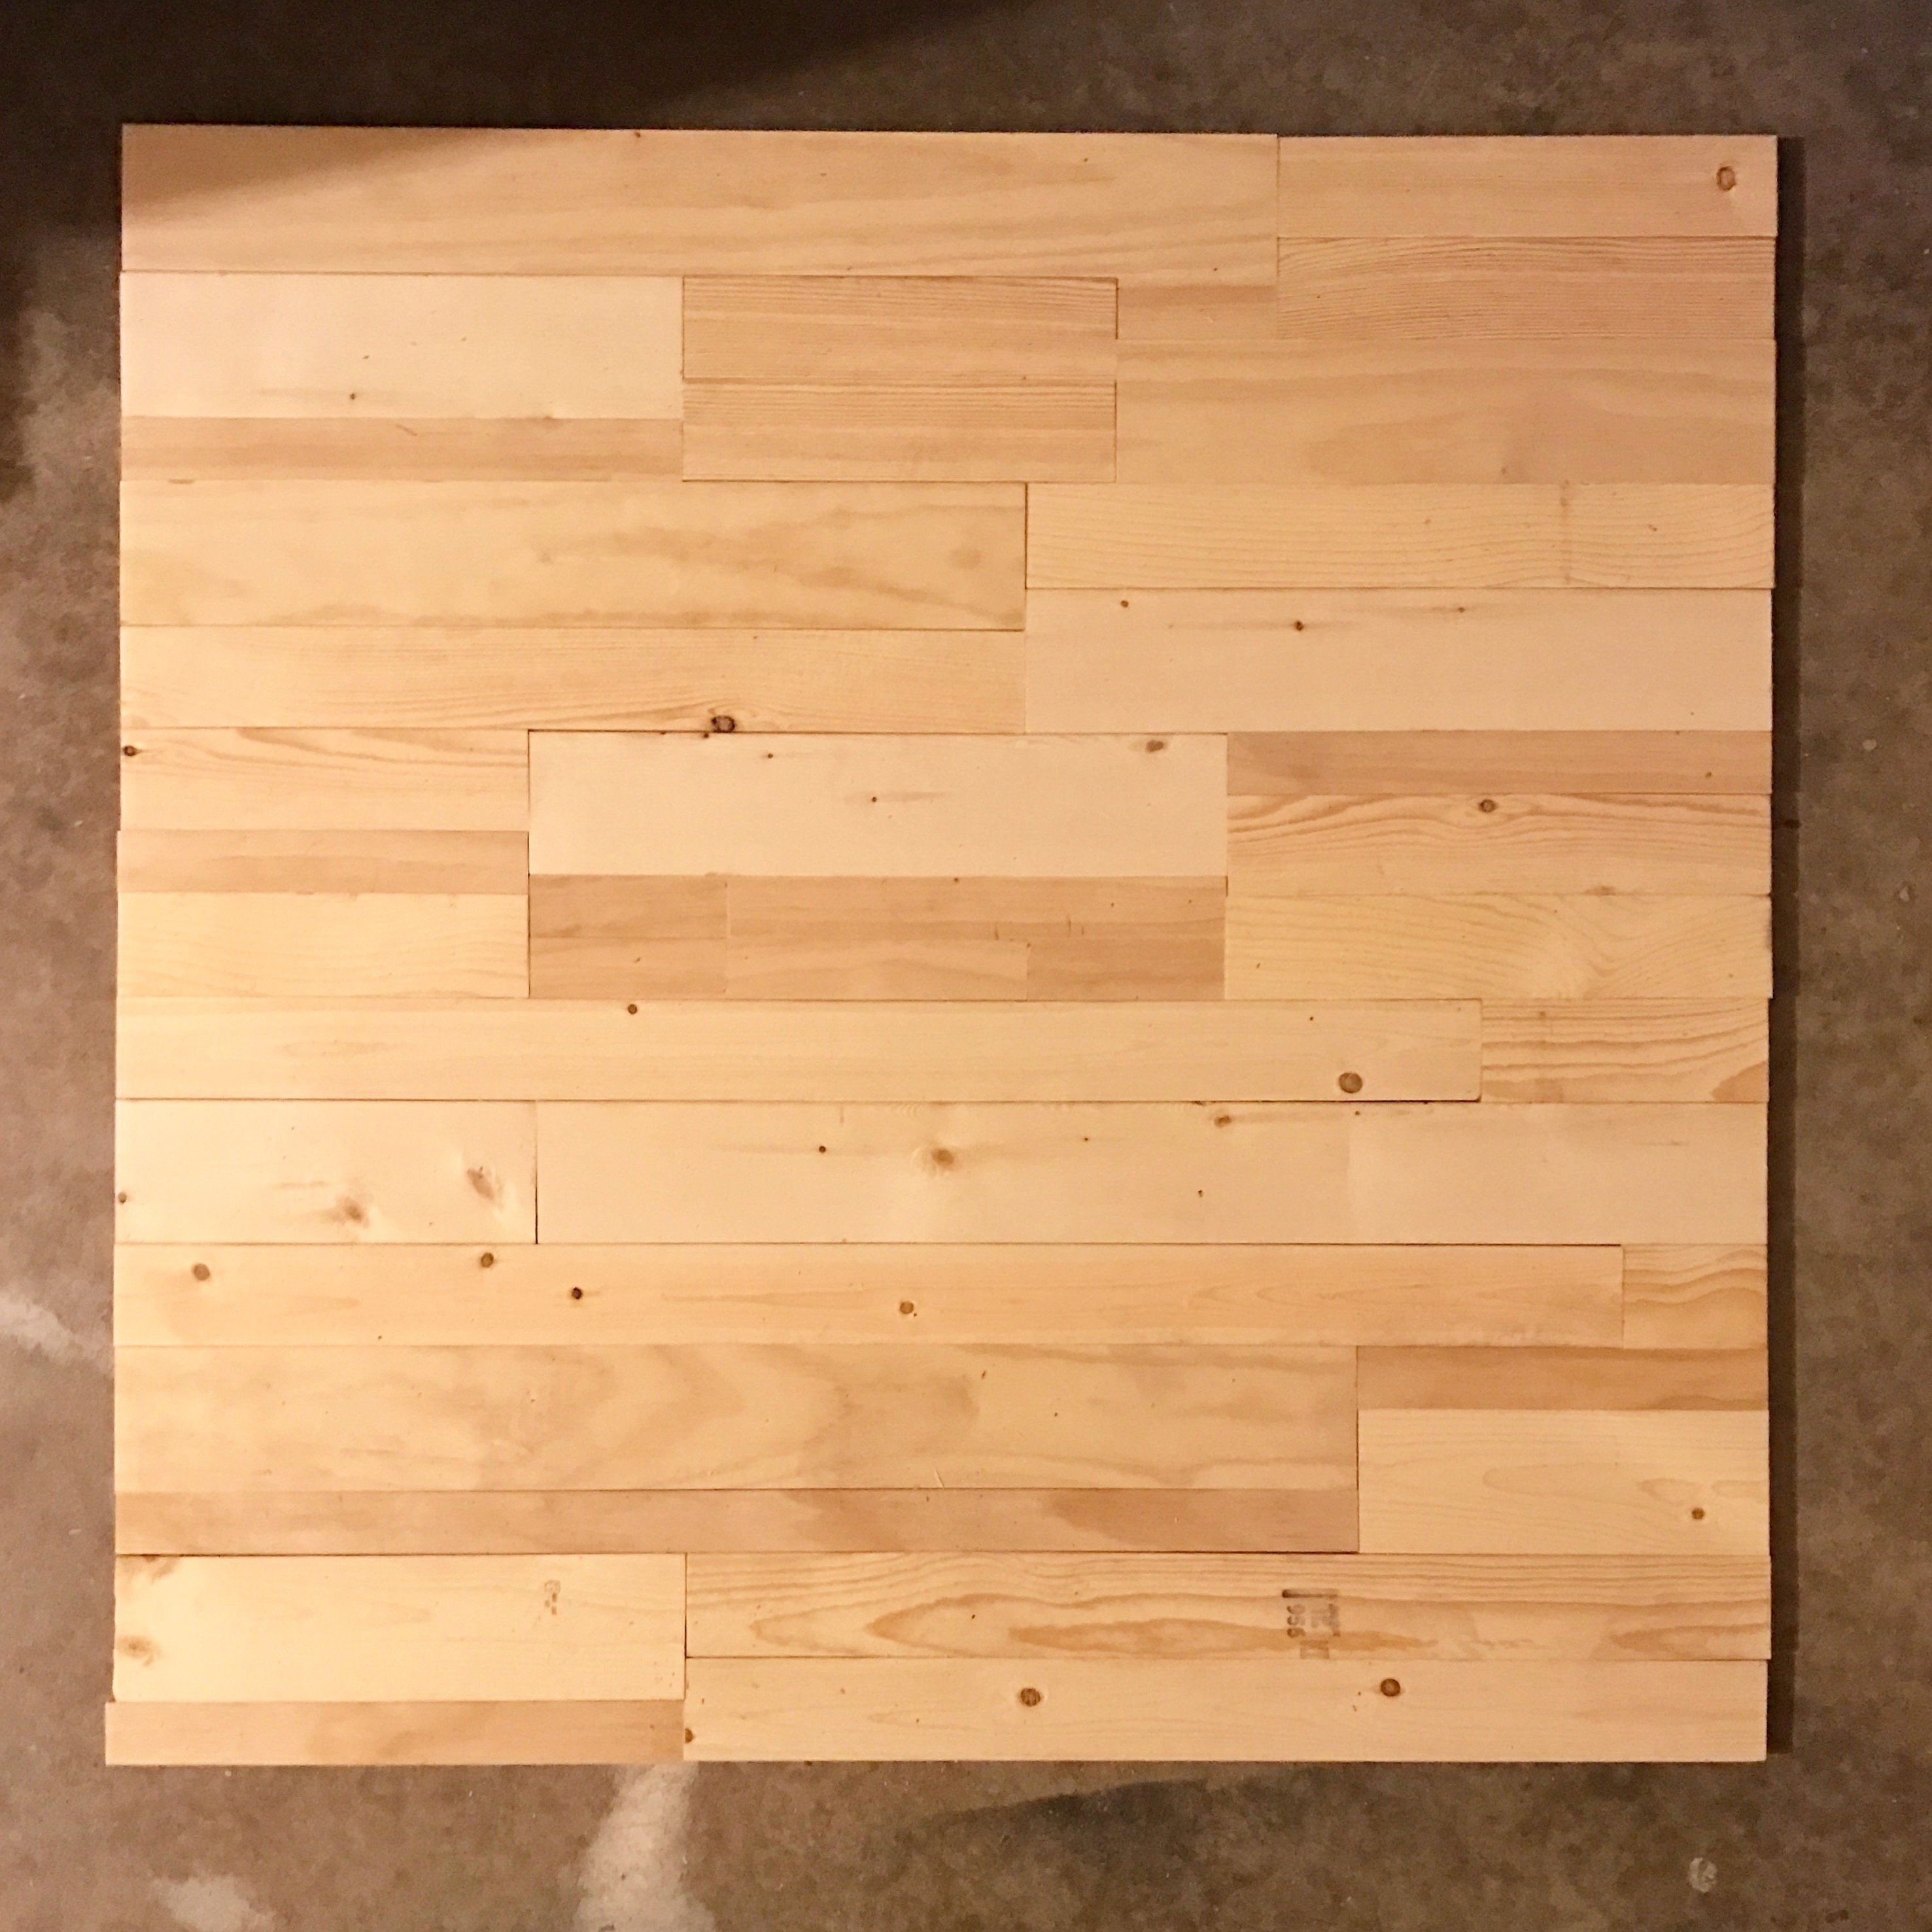
Square Farmhouse Table
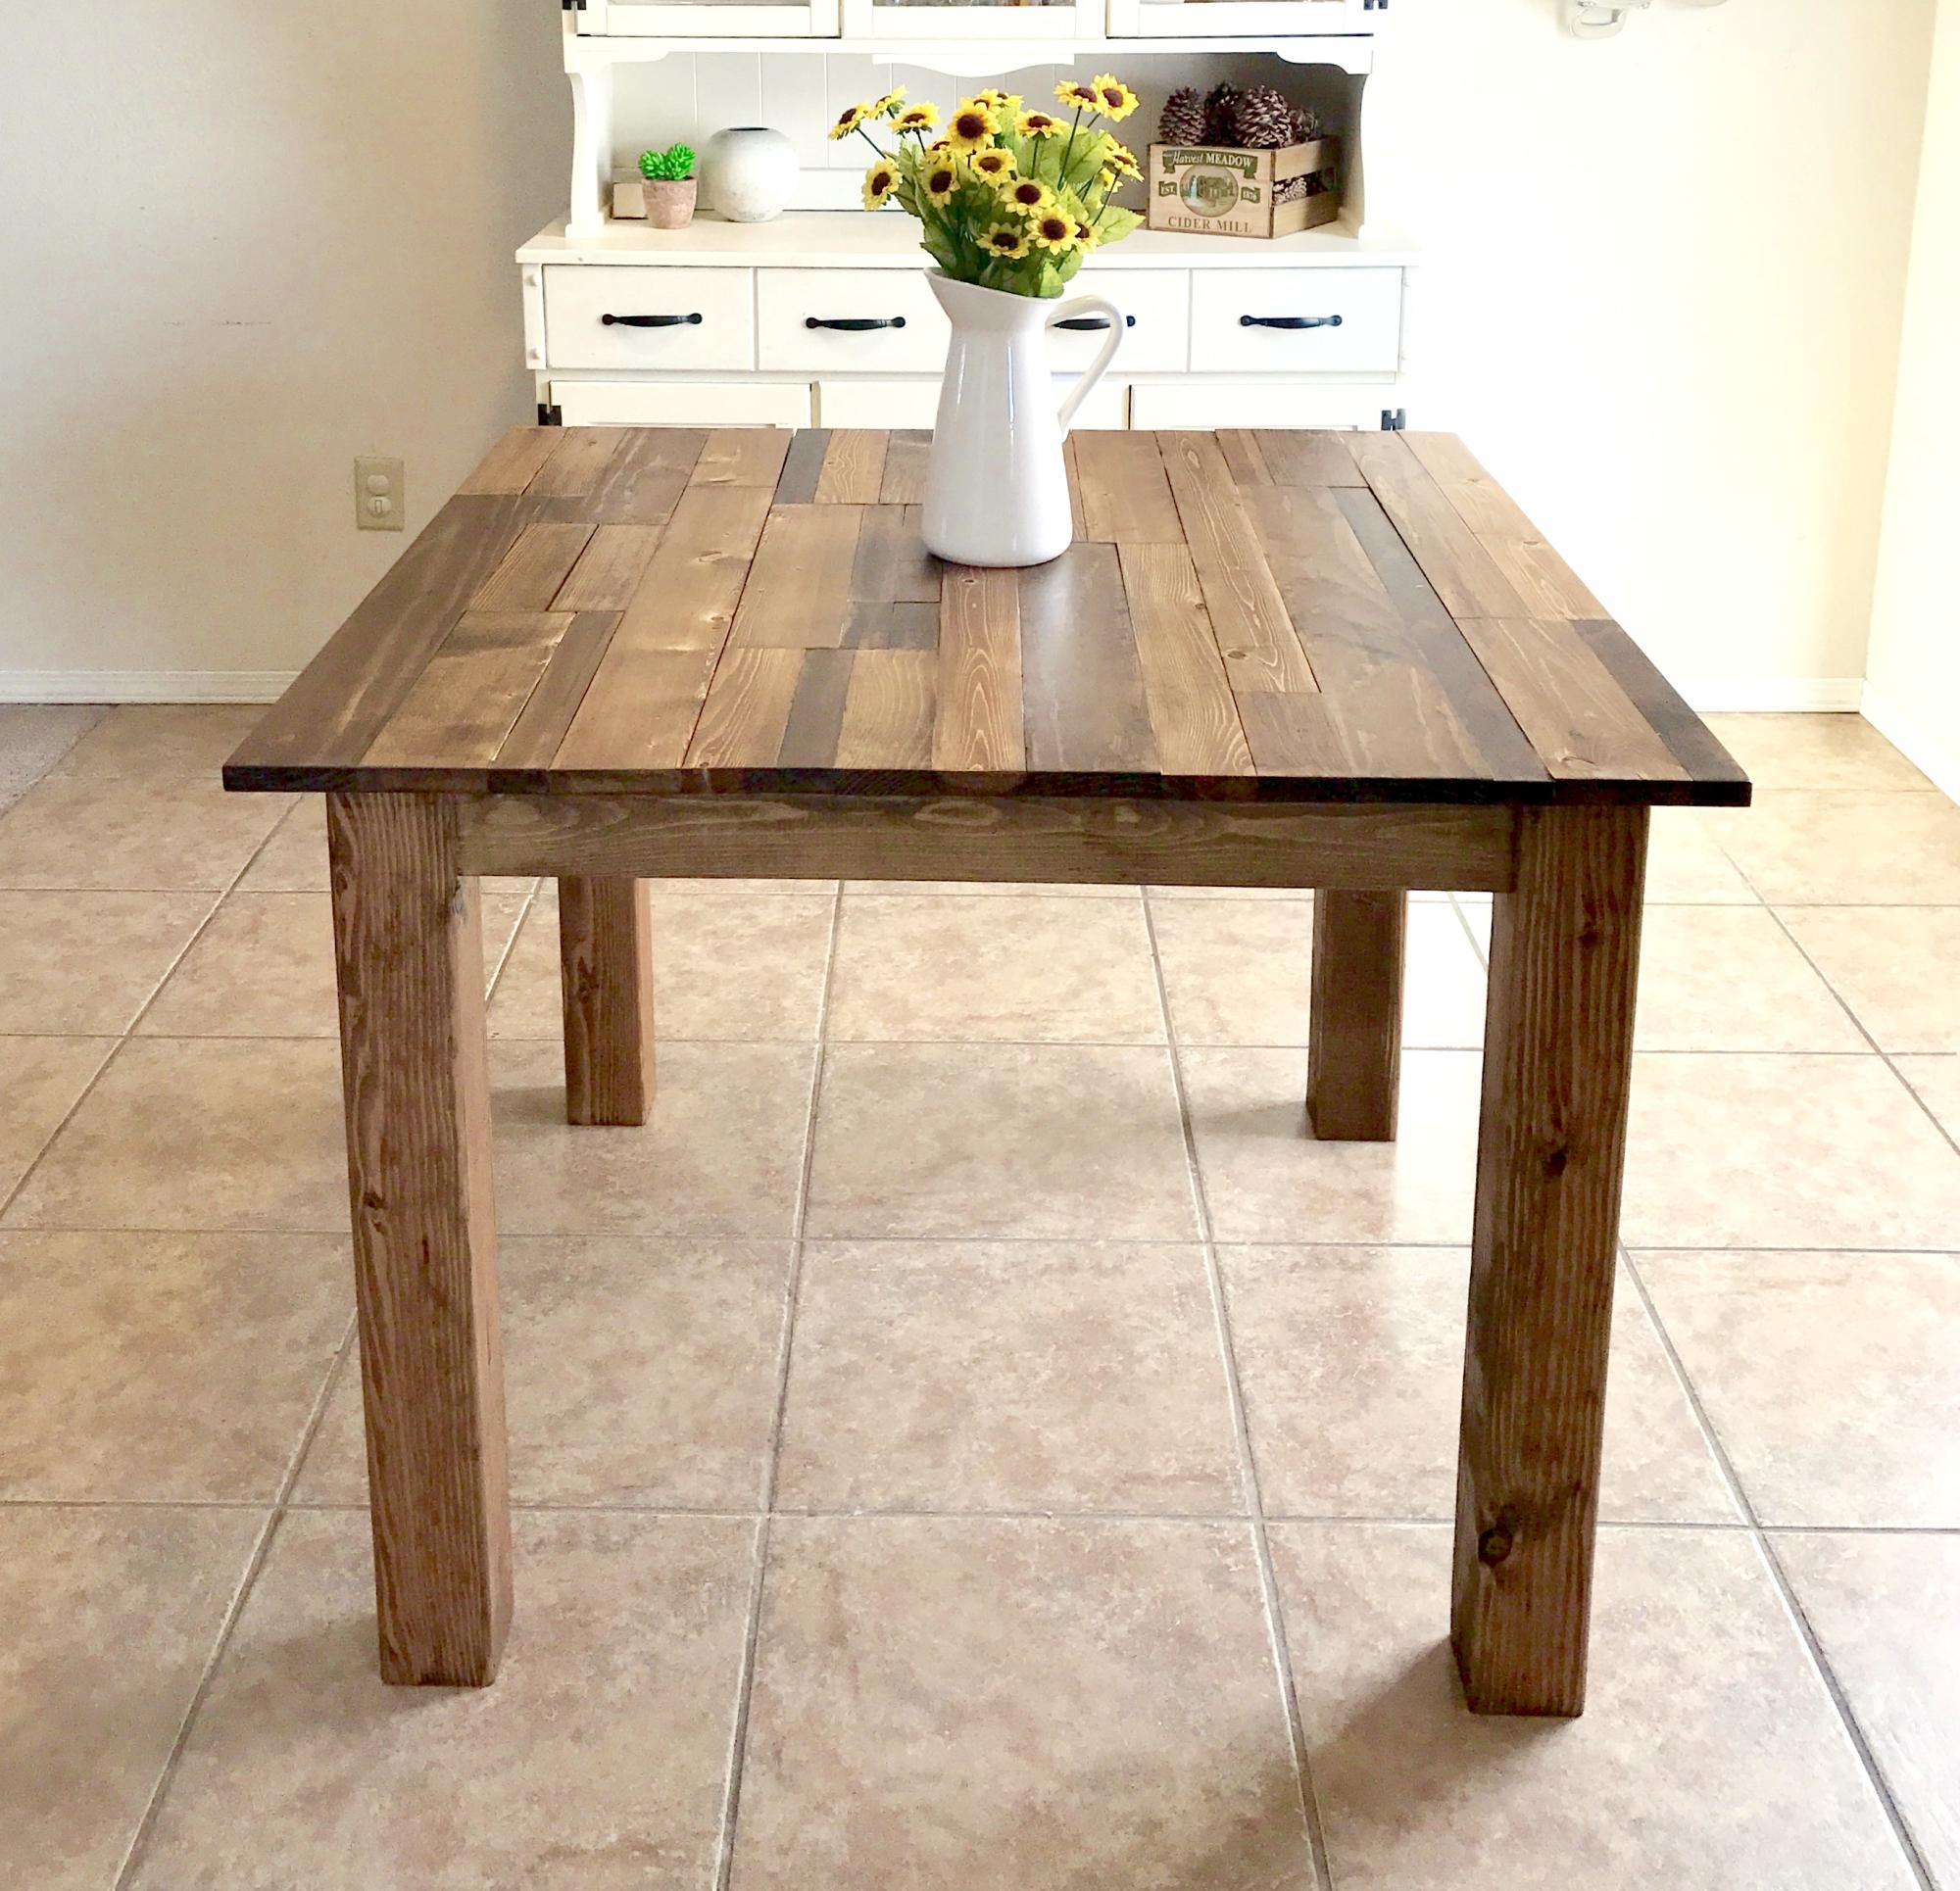
I built this table for a friend who wanted a rustic, plank-top kitchen table. She wanted a square table with 4x4 legs. Since I don't have clamps, I used pocket holes and wood glue for the table top. Also, I only have a 7&1/4" miter saw, which means the 4x4s were too thick to cut. So I made one cut in the legs, then flipped them and made another. It worked! :) I sanded down the sides of the table top with 80 grit. They needed to be evened up since some of the planks were a little longer than others. I back braced underneathe the top with (3) 1x3s. Then, I sanded all over with 120, vacuumed, then wiped it down with a damp towel. Fun build!!
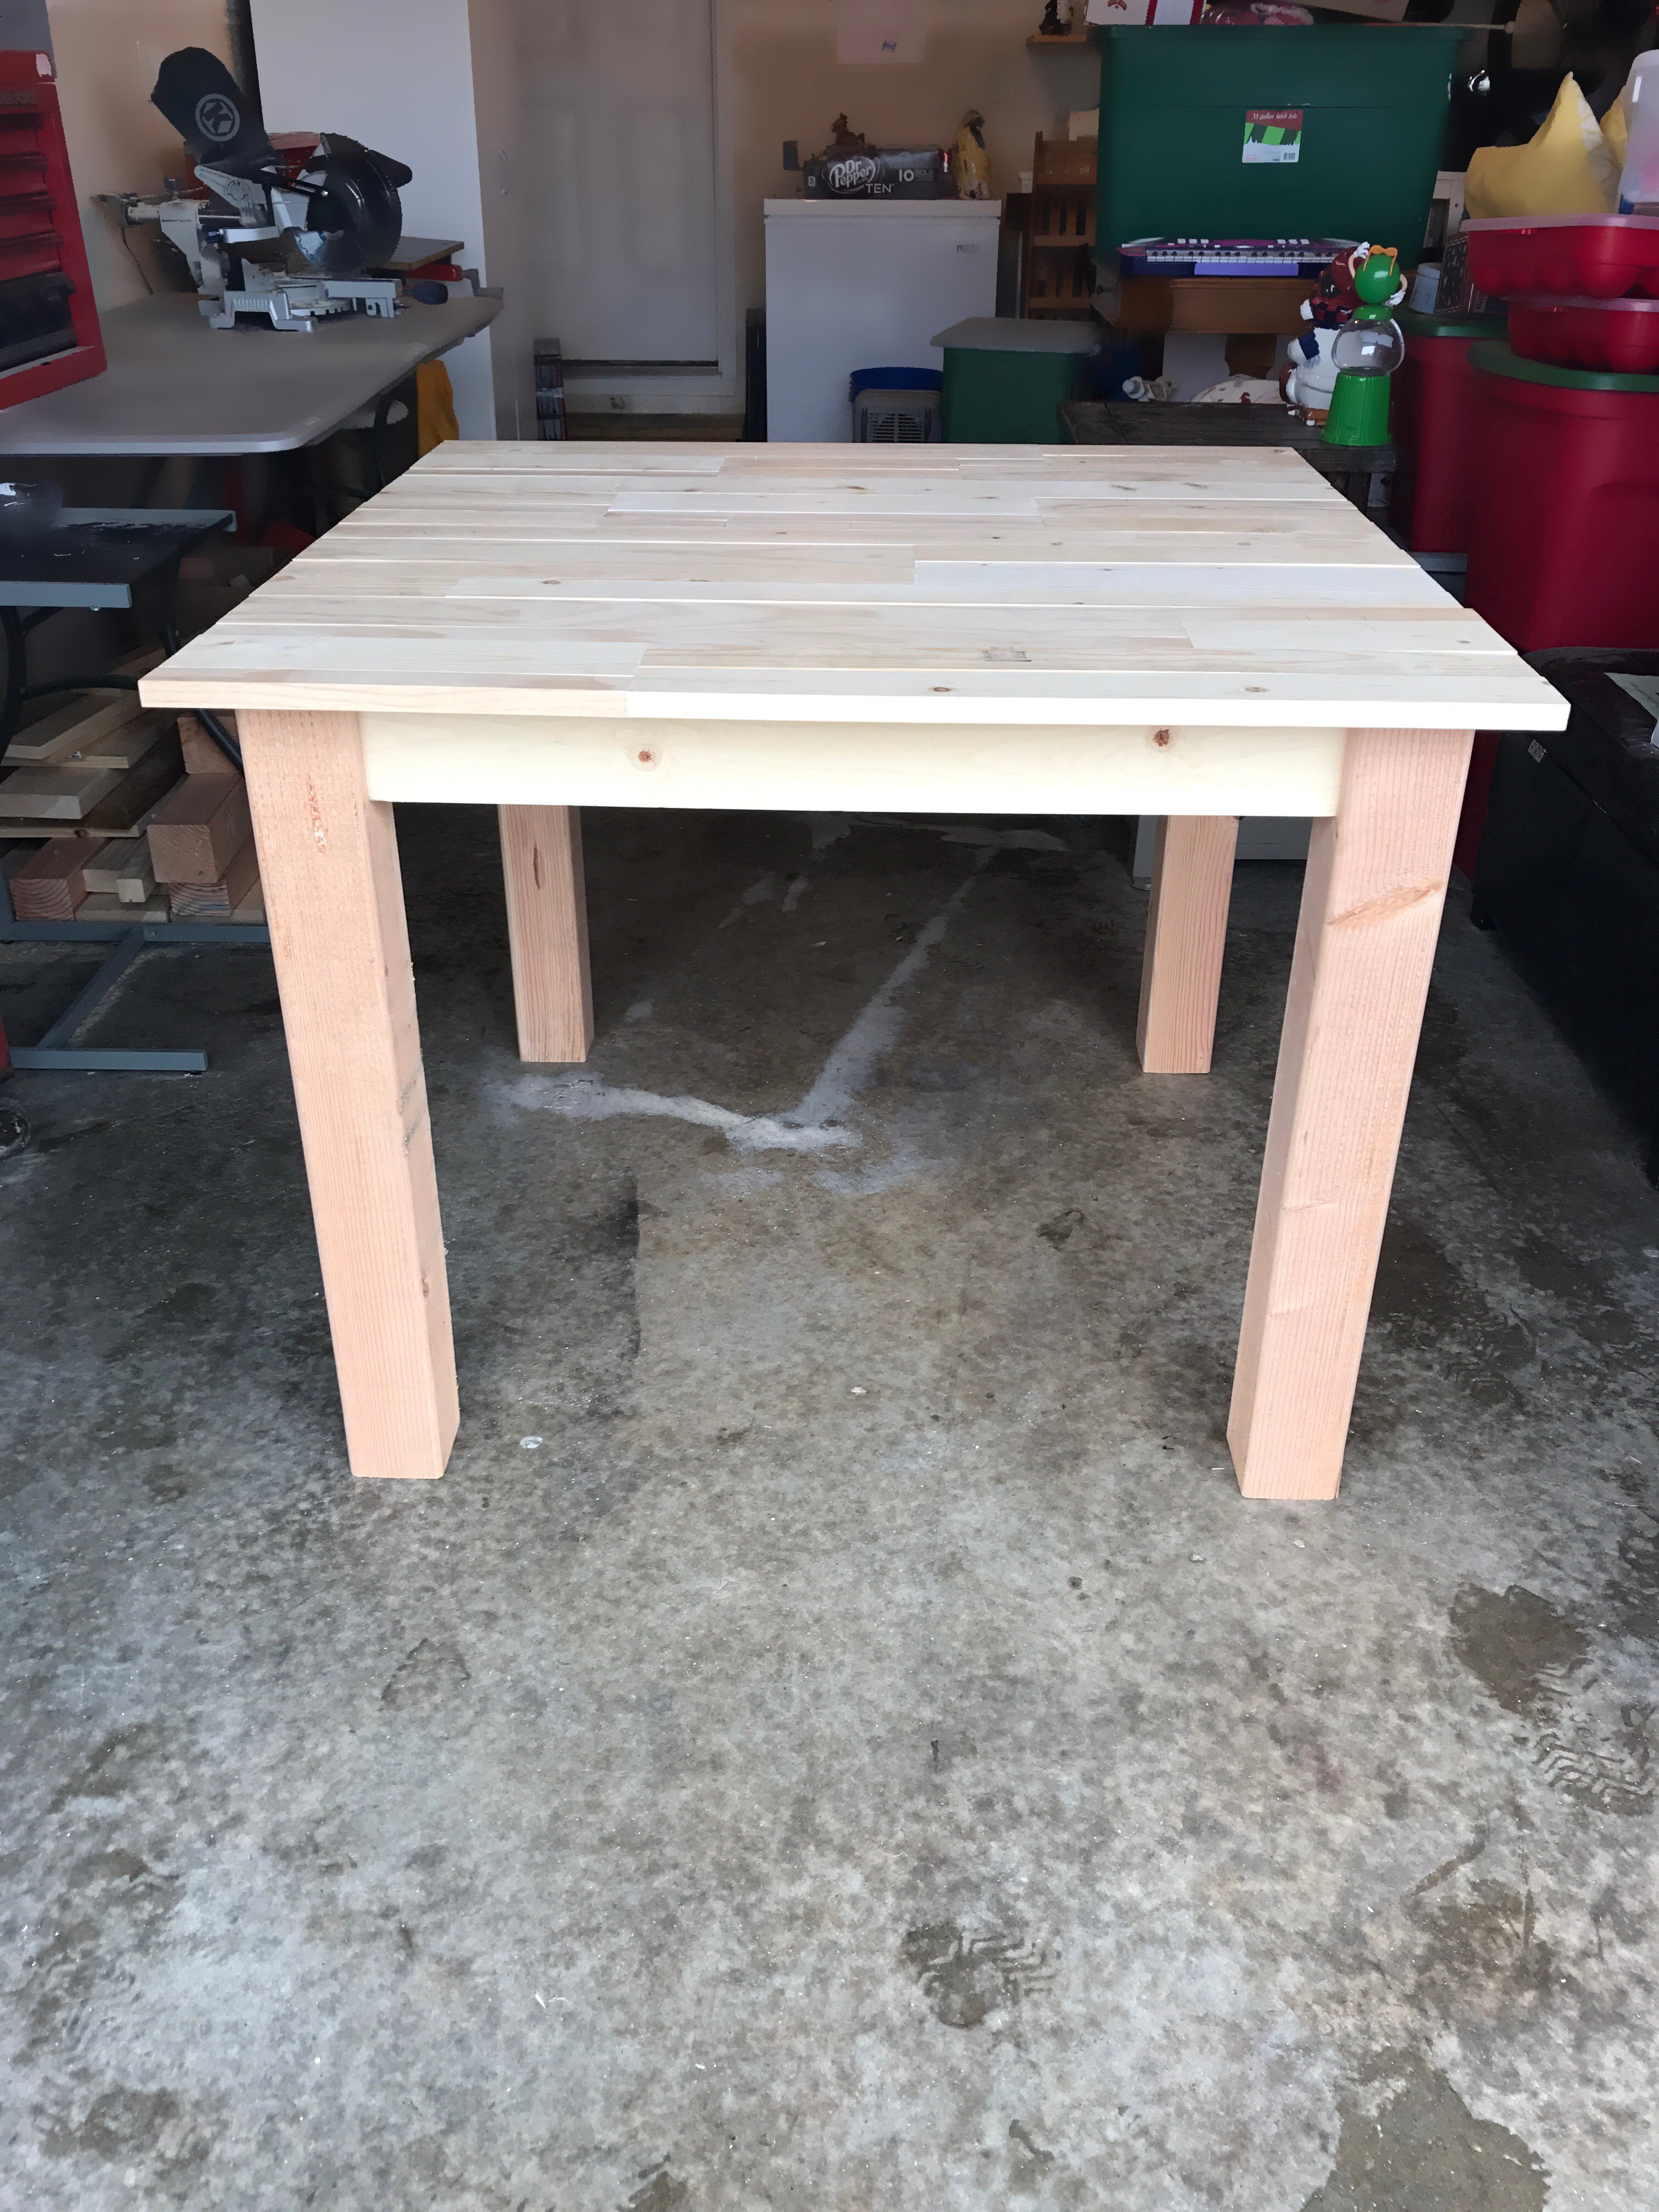
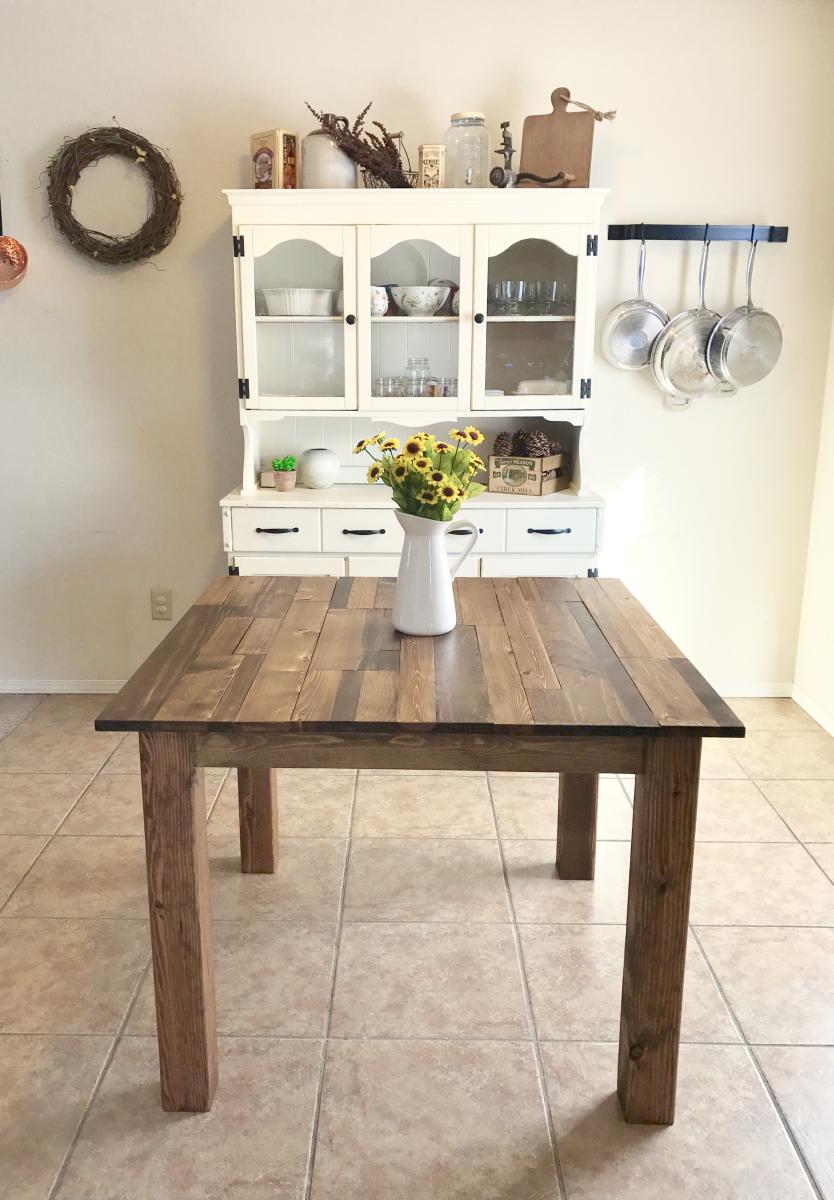
Built from Plan(s)
Estimated Cost
~$100 for lumber, screws, wood glue, sandpaper, and finishing products.
Estimated Time Investment
Week Long Project (20 Hours or More)
Finish Used
For the finish I used Minwax wood conditioner, then a coat of Minwax stain in Provincial. I went back and put a second coat of stain on a few of the premium pine pieces, because they soaked up the first coat really well, and I wanted some darker pieces on top. I let those soak for about 15 minutes. Afterwards I did 2 coats of Polycrylic all over, then a third coat for the top only. I dry sanded between coats with 600 grit sandpaper.
Recommended Skill Level
Intermediate
Shoe Dresser
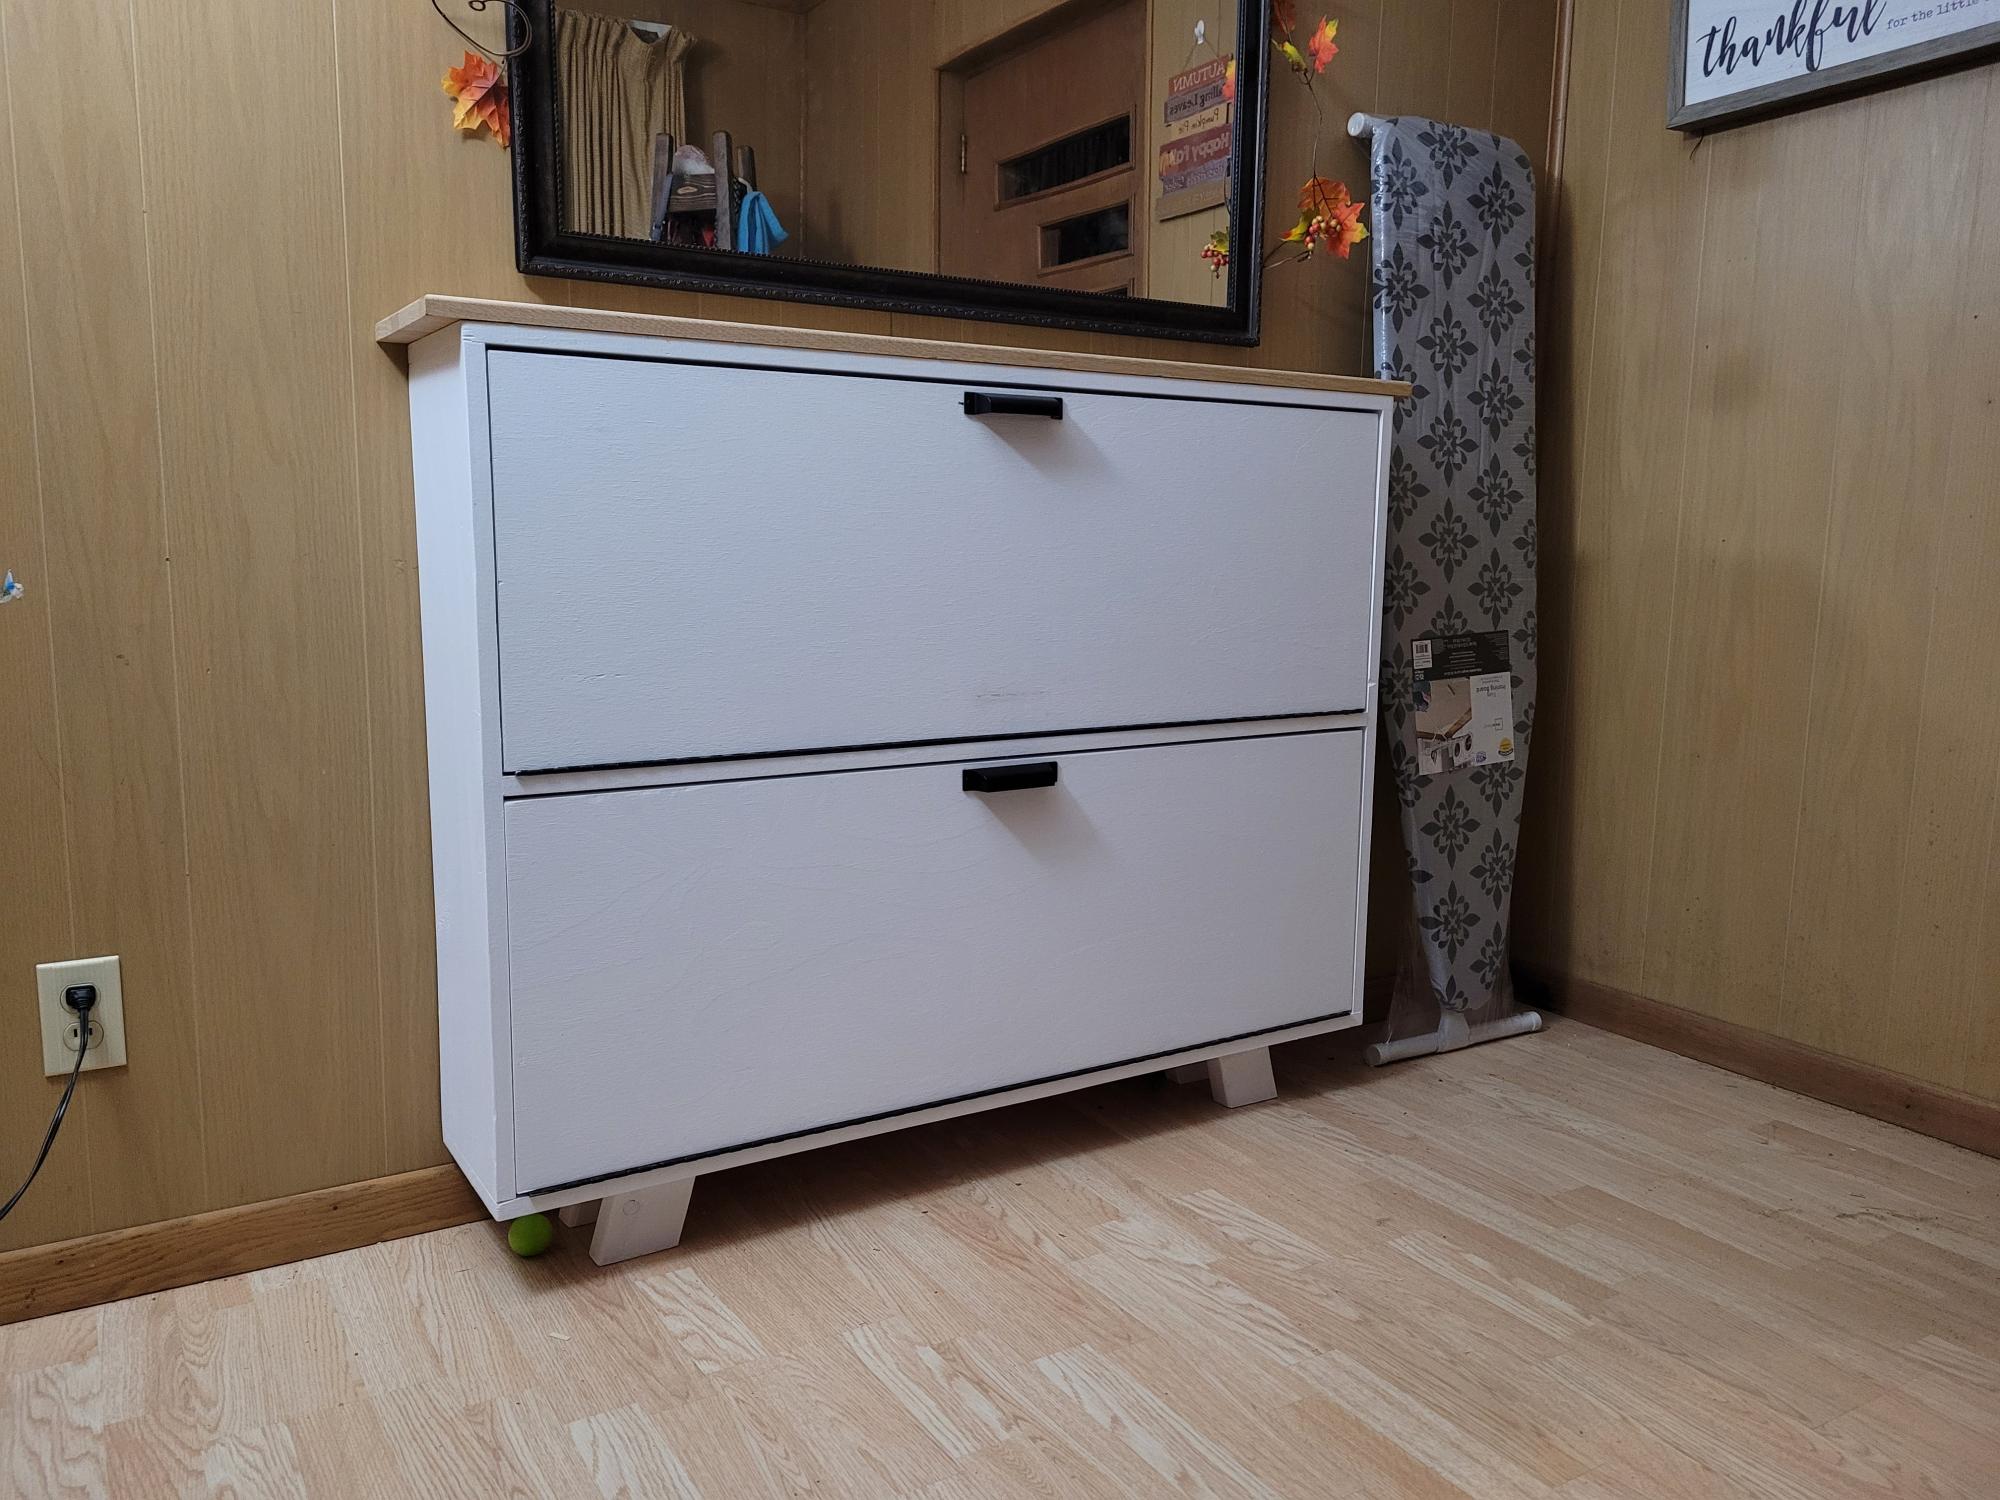
I've been wanting to make this for so long! I still have a couple blemishes to touch up but I'm super pleased with how this turned out. Easy construction and tons of customization options! THANK YOU ANA!!!
Built from Plan(s)
Estimated Cost
$150.00
Estimated Time Investment
Weekend Project (10-20 Hours)
Finish Used
Minwax Polycrylic. Semi-gloss.
Recommended Skill Level
Intermediate
Comments
Chuck1979
Mon, 07/08/2019 - 10:46
We didn't use a plan for…
We didn't use a plan for this but, if someone wants to build it, check out the linked YouTube video.
Ana White
Tue, 07/09/2019 - 11:11
Amazing! Thanks so much for…
Amazing! Thanks so much for adding a brag post and linking to your video!
gunnare57
Fri, 07/31/2020 - 09:43
Hello! Was looking to see if…
Hello! Was looking to see if this is something you would be interested in building for us? We are in love with this project but don't have the tools or means to do it ourself..
Can talk about pricing / size etc.
Thanks!