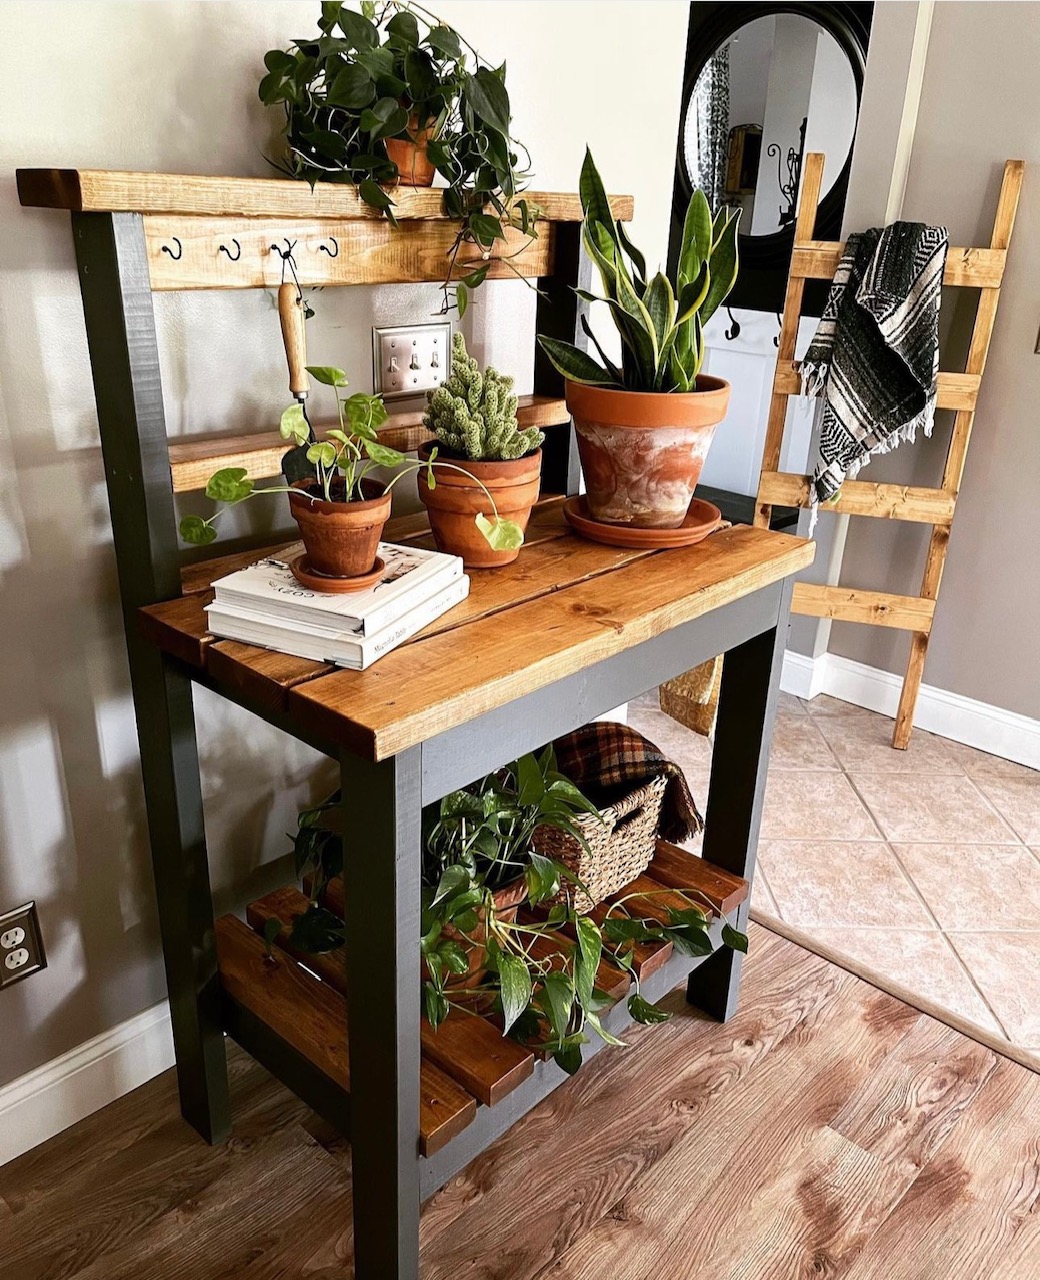
Community Brag Posts
Modern wood dresser
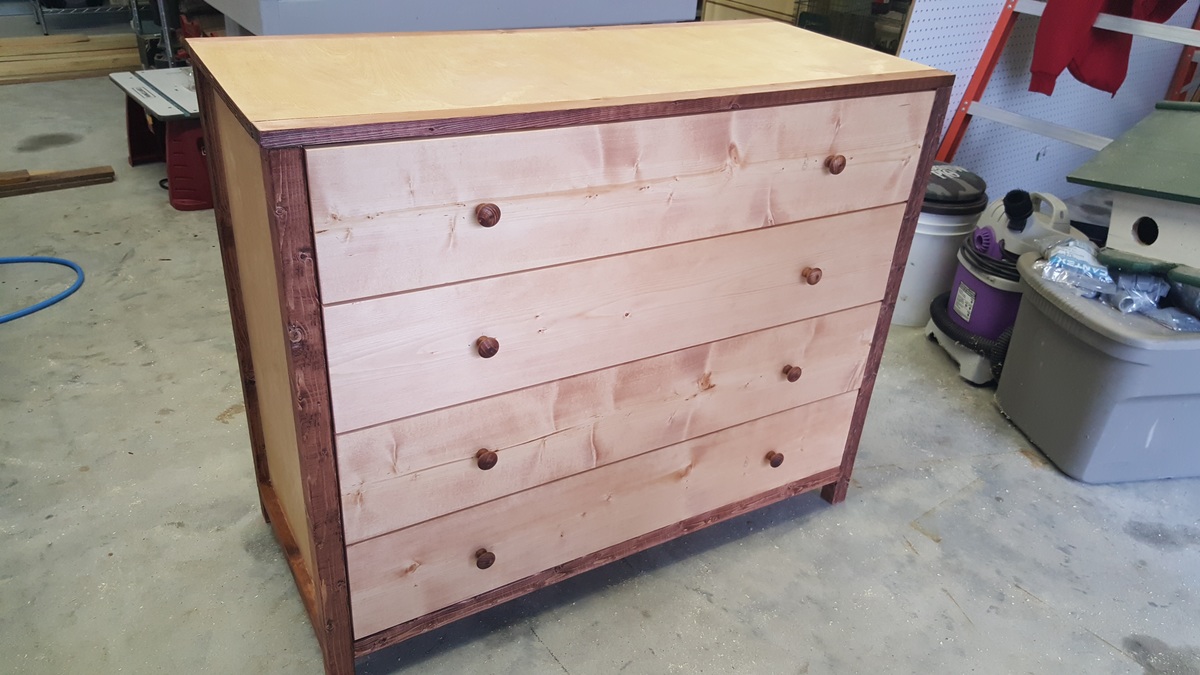
We didn't paint it, but I think it turned out well. We followed the plan almost exactly and it came out great!
Built from Plan(s)
Estimated Cost
150
Estimated Time Investment
Weekend Project (10-20 Hours)
Recommended Skill Level
Beginner
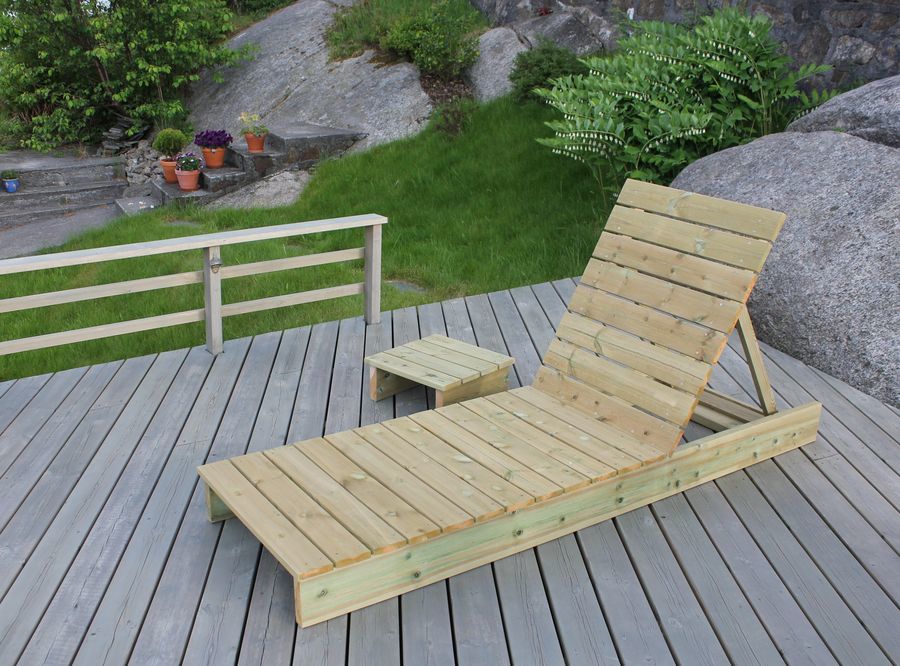
Garden lounger and side table
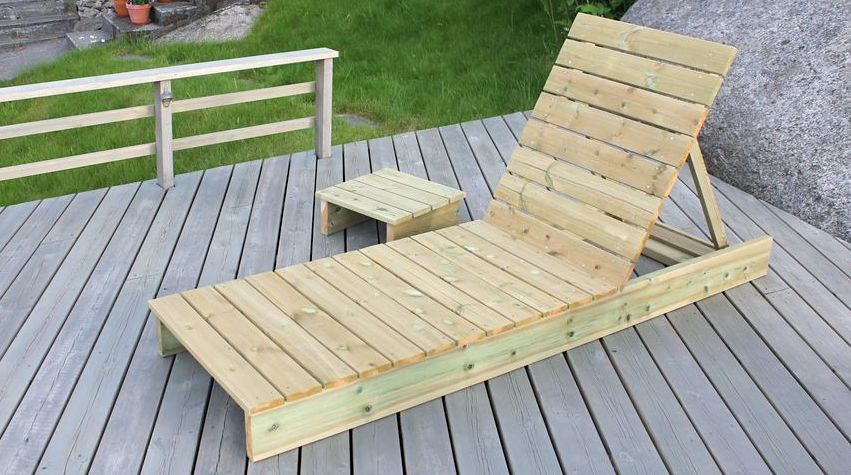
Solid garden lounger and side table to match our garden chairs and table.
Built from Plan(s)
Estimated Time Investment
Afternoon Project (3-6 Hours)
Finish Used
Saturating wood oil.
Recommended Skill Level
Beginner
Modified Industrial Style Coffee Table w/ Bottom Shelf
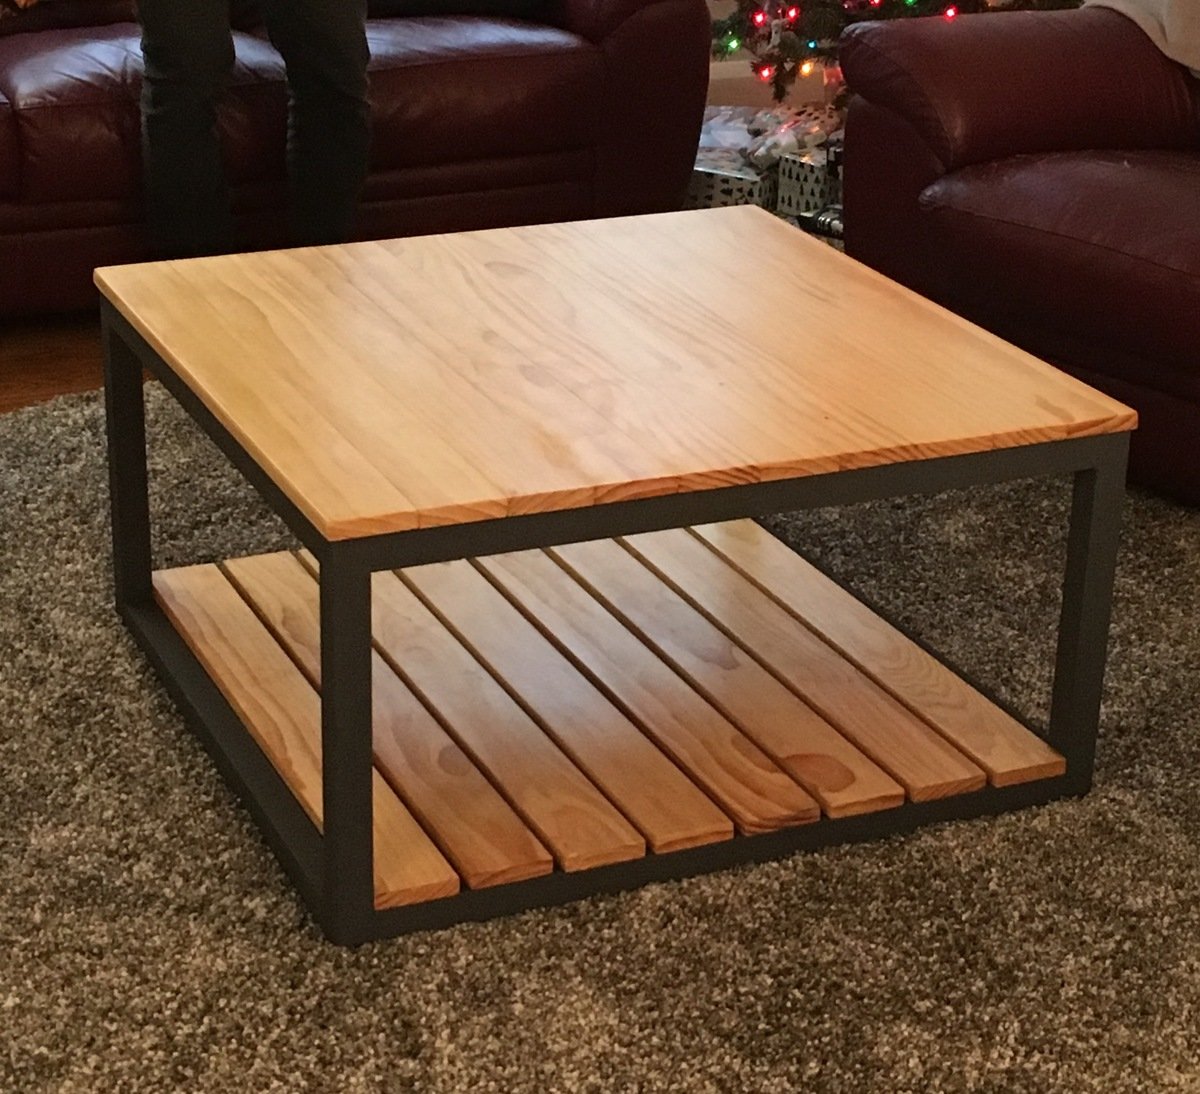
Our first project!
We used the "Industrial Style Coffee Table as seen on DIY Network" plans and simply added a bottom shelf. This required an extra 2x2 bracer (same cut as top bracer) and 8 more 1x4s, cut slightly smaller than the top 1x4s in order to have them sit flush with the bottom 2x2s. The table is all pine.
We spaced the bottom shelf boards roughly a half inch apart (give or take - it's "rustic"!) and screwed in from the bottom just like the top boards.
On the top shelf, we used 3 coats of Minwax Natural stain, and followed up with 3 coats of Minwax Satin Poly. We sanded these after attaching to the frame in order to achieve a level surface. We started with 80 grit, then 120, then 150. We then used 220 in between coats of poly. The result is a smooth, but not store-bought smooth surface, which we think works well.
We didn't spend as much time on the bottom shelf since they'll be mostly storing items, giving them just a quick 150 sand prior to 2 coats of stain and 2 coats of poly. Finally, we nailed in some plastic feet to keep it about a half inch off the floor.
All in all, being our first project, and going beyond what the original plans called for, it took us a few weeks to complete, working on it mostly on weekends and here and there in the evenings after work. We love the finished project and it works really well in our living room!
-Dan and Beth
Built from Plan(s)
Estimated Time Investment
Week Long Project (20 Hours or More)
Finish Used
Natural Stain (Minwax)
Satin Poly (Minwax)
Satin Poly (Minwax)
Recommended Skill Level
Beginner
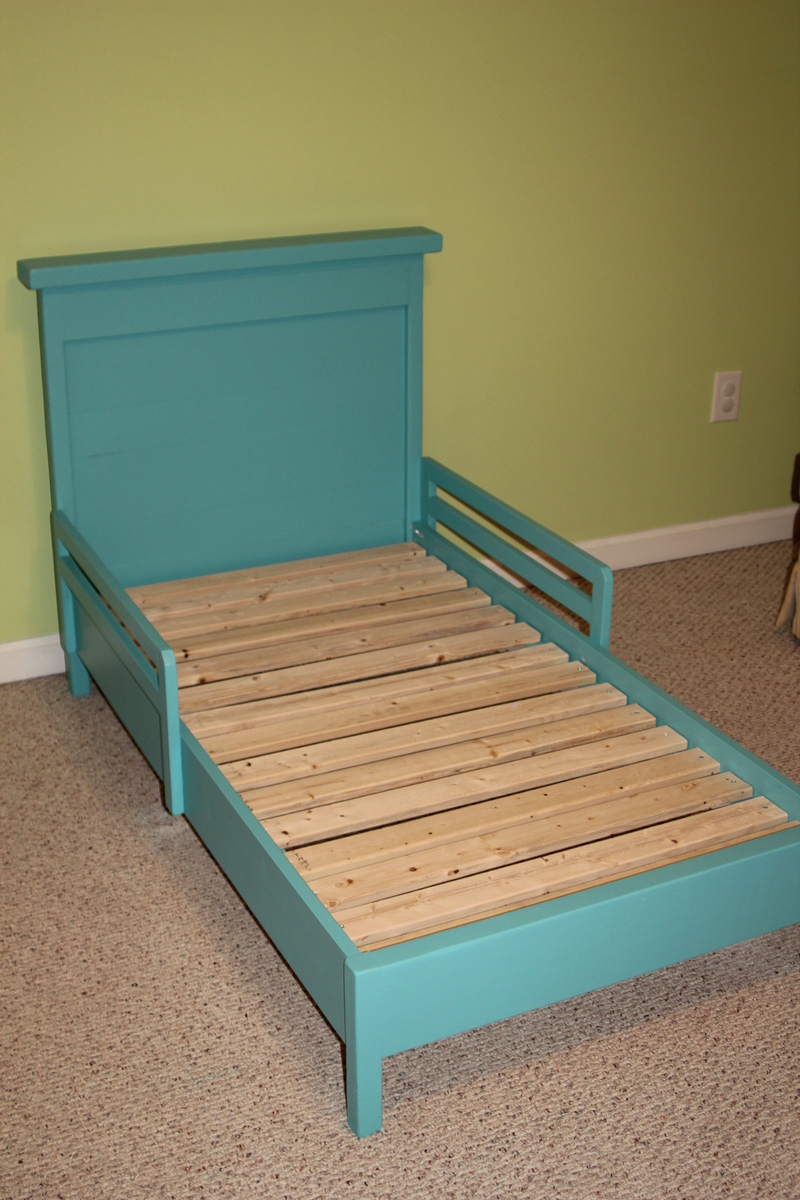
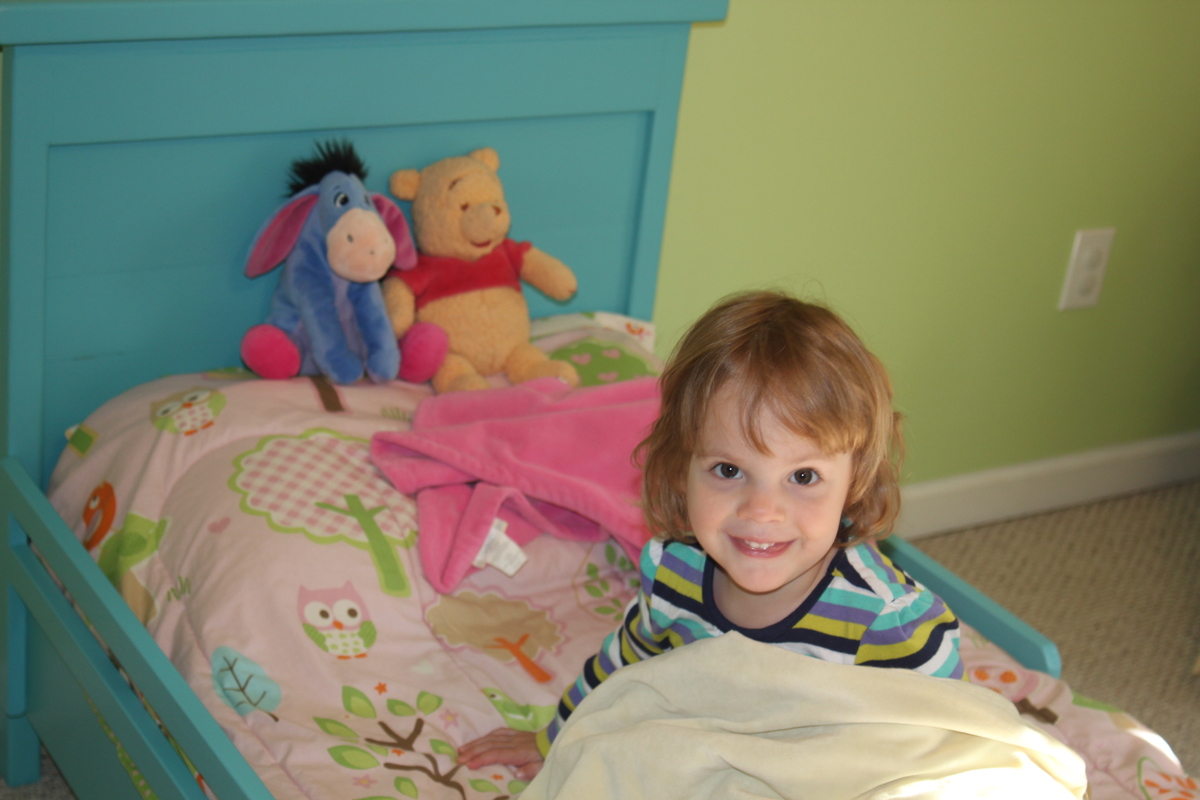
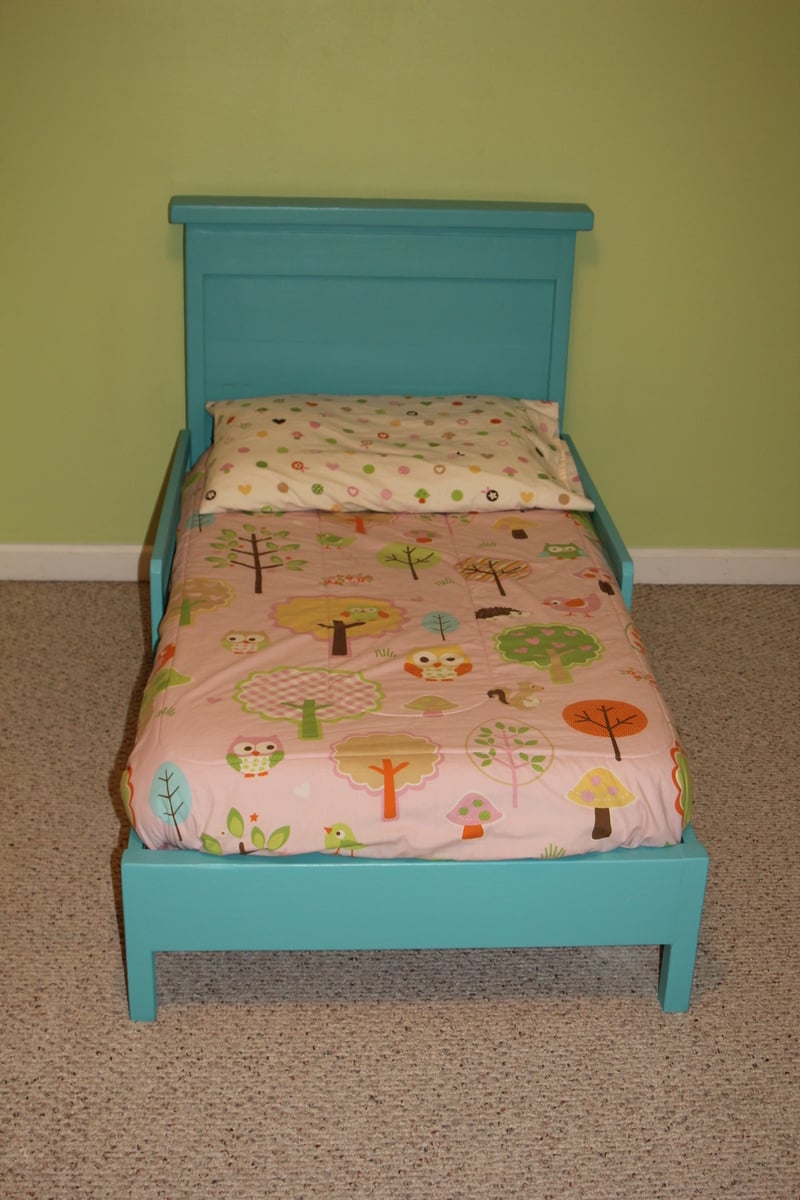
Traditional Toddler Bed with Rustic Headboard
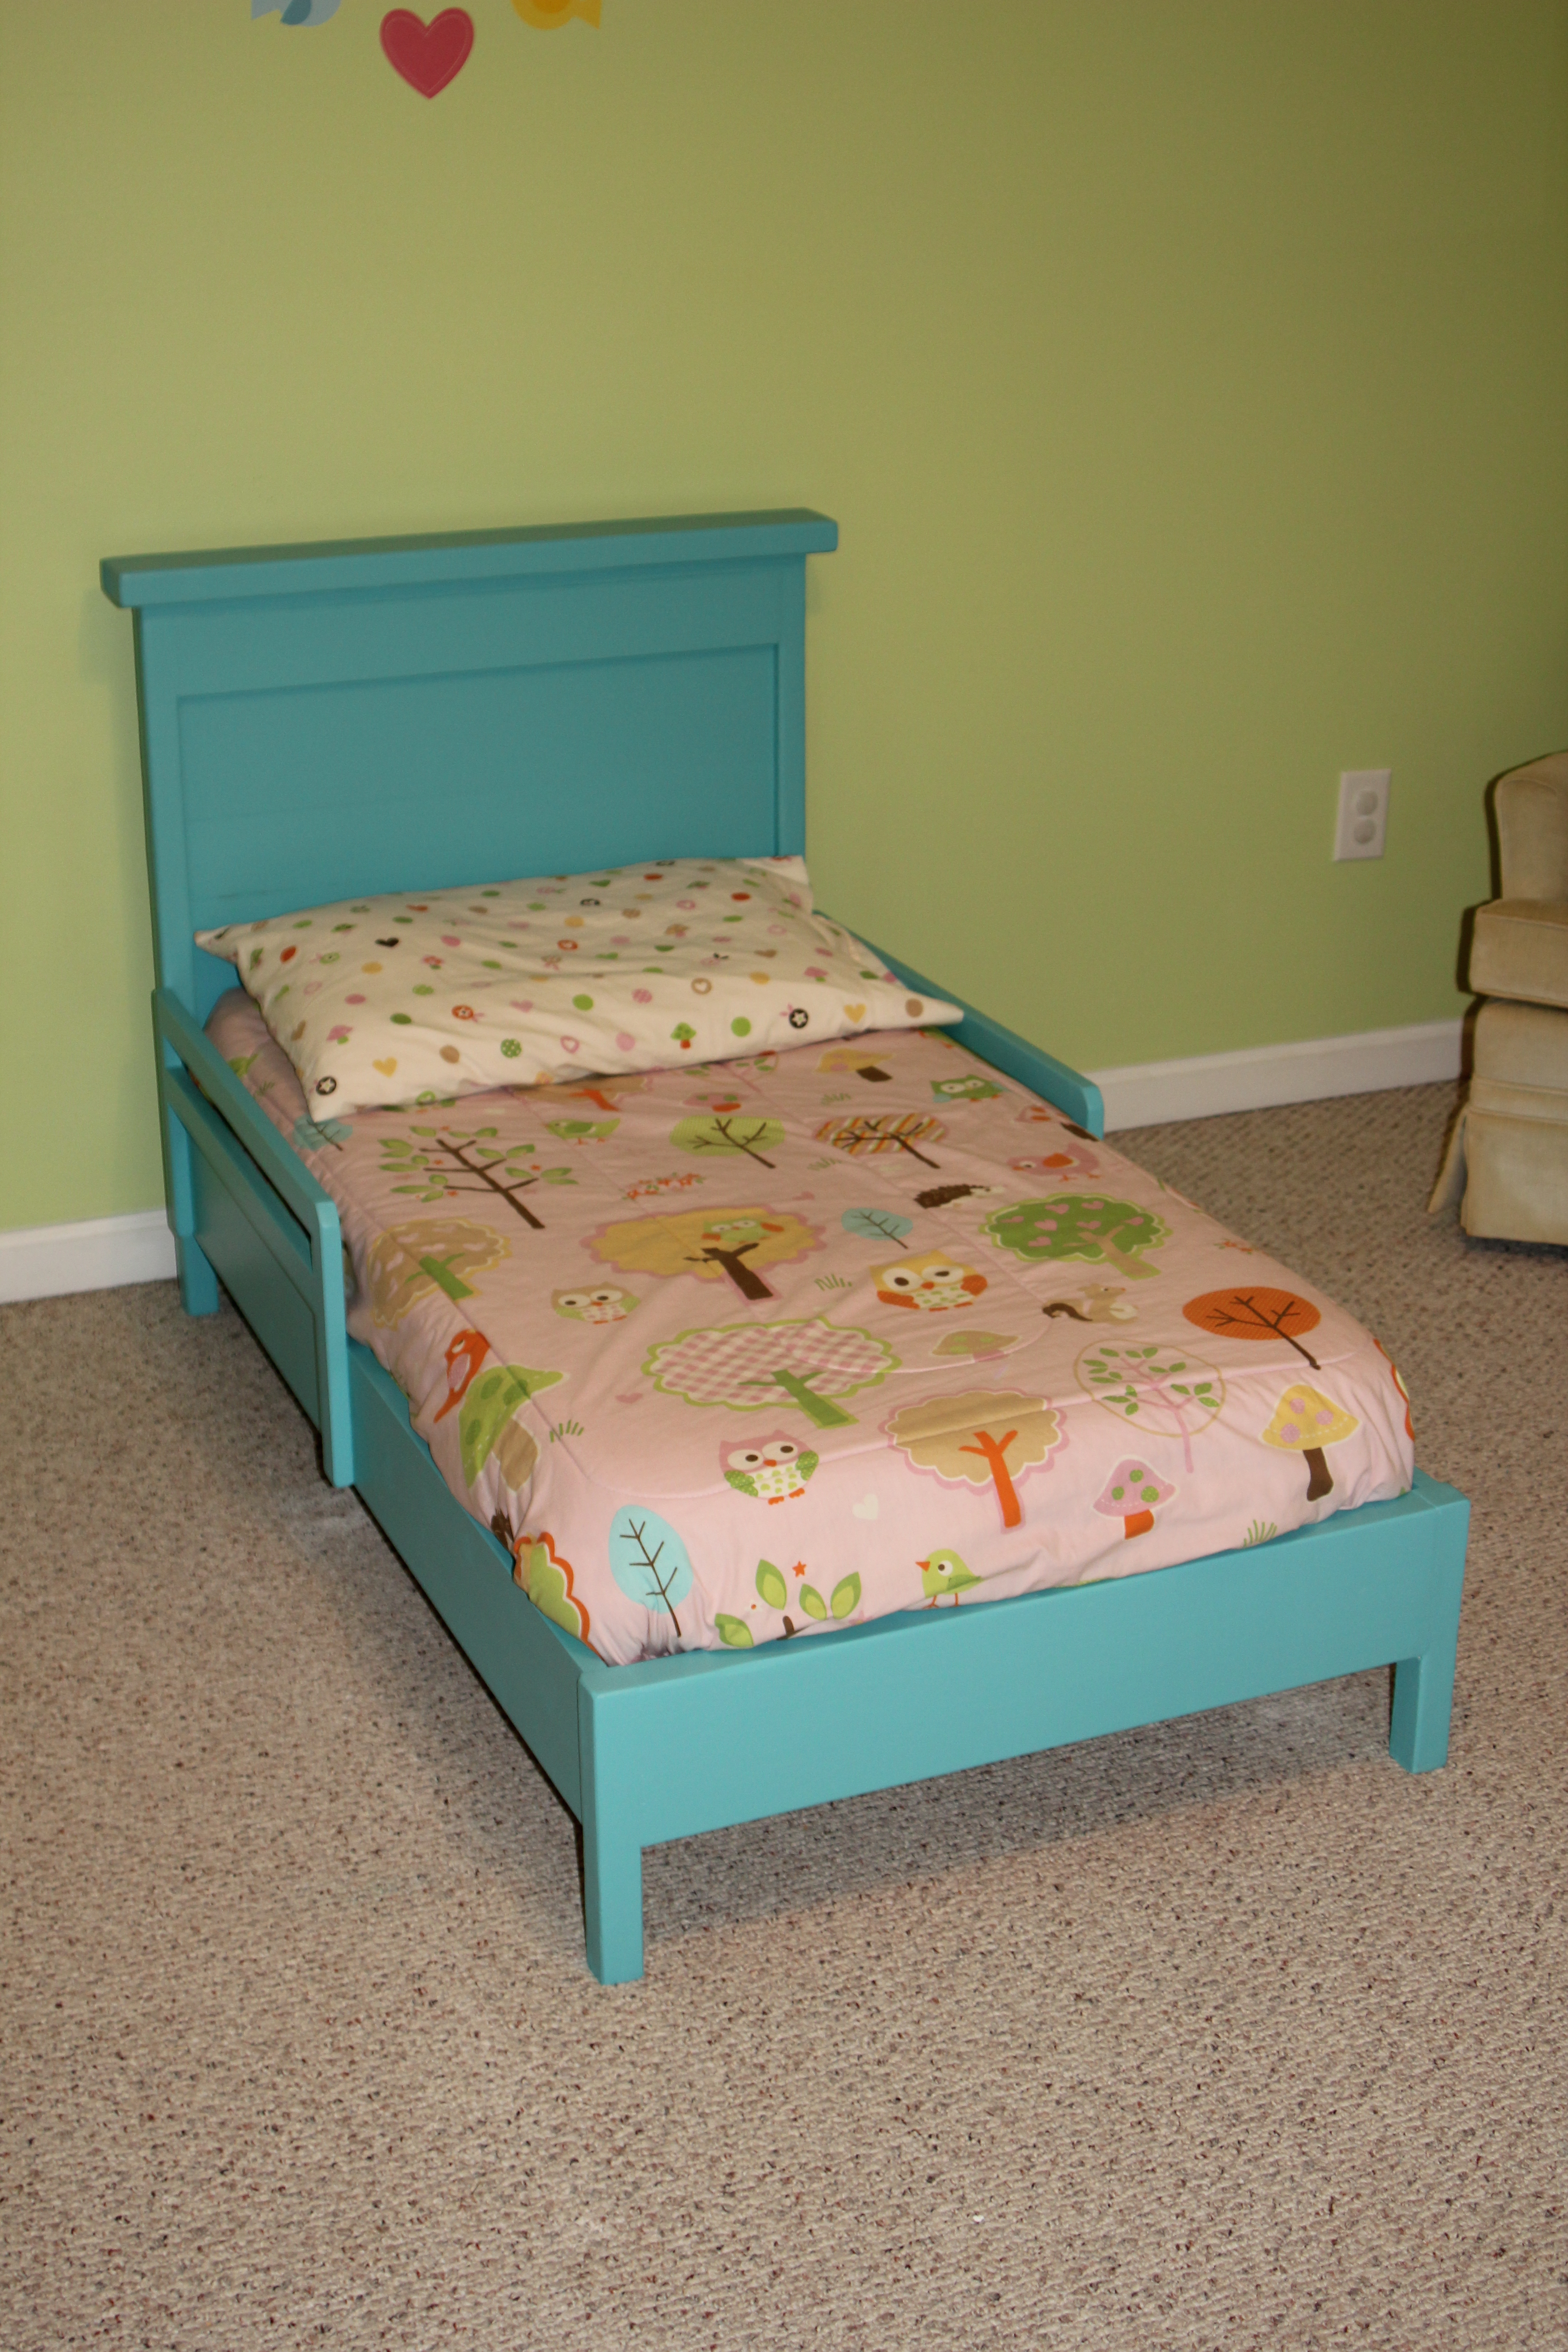
After my daughter started escaping from her crib I knew it was time to build her a new bed. I didn't think she was quite ready for a full size yet so I thought a toddler size would work for at least the next year.
I started with the Traditional Toddler Bed plans and scaled down the size of the Rustic Headboard and incorporated that. The biggest thing I learned in the process was to measure your mattress first! I don't think I realized the size variation in crib mattresses and ended up having to recut my slats and rails to accommodate my larger mattress. Also, our mattress is 5 inches deep, which means that the safety rails only extend about an inch over the top of the bed. This seems to be fine for my daughter and she hasn't fallen out - yet - but I think if you have a very restless sleeper or just want to play it safe, you might want to add an extra inch or two to the height of the guardrails.
I also used a 2 x 6 for the foot rail as this allowed the legs to be inset further and gave it a more solid look on the bottom.

Built from Plan(s)
Estimated Cost
$60
Estimated Time Investment
Day Project (6-9 Hours)
Finish Used
Valspar Primer and 2 coats of Olympic Premium in Caruso
Recommended Skill Level
Beginner
Comments

Outdoor planter steps or benches
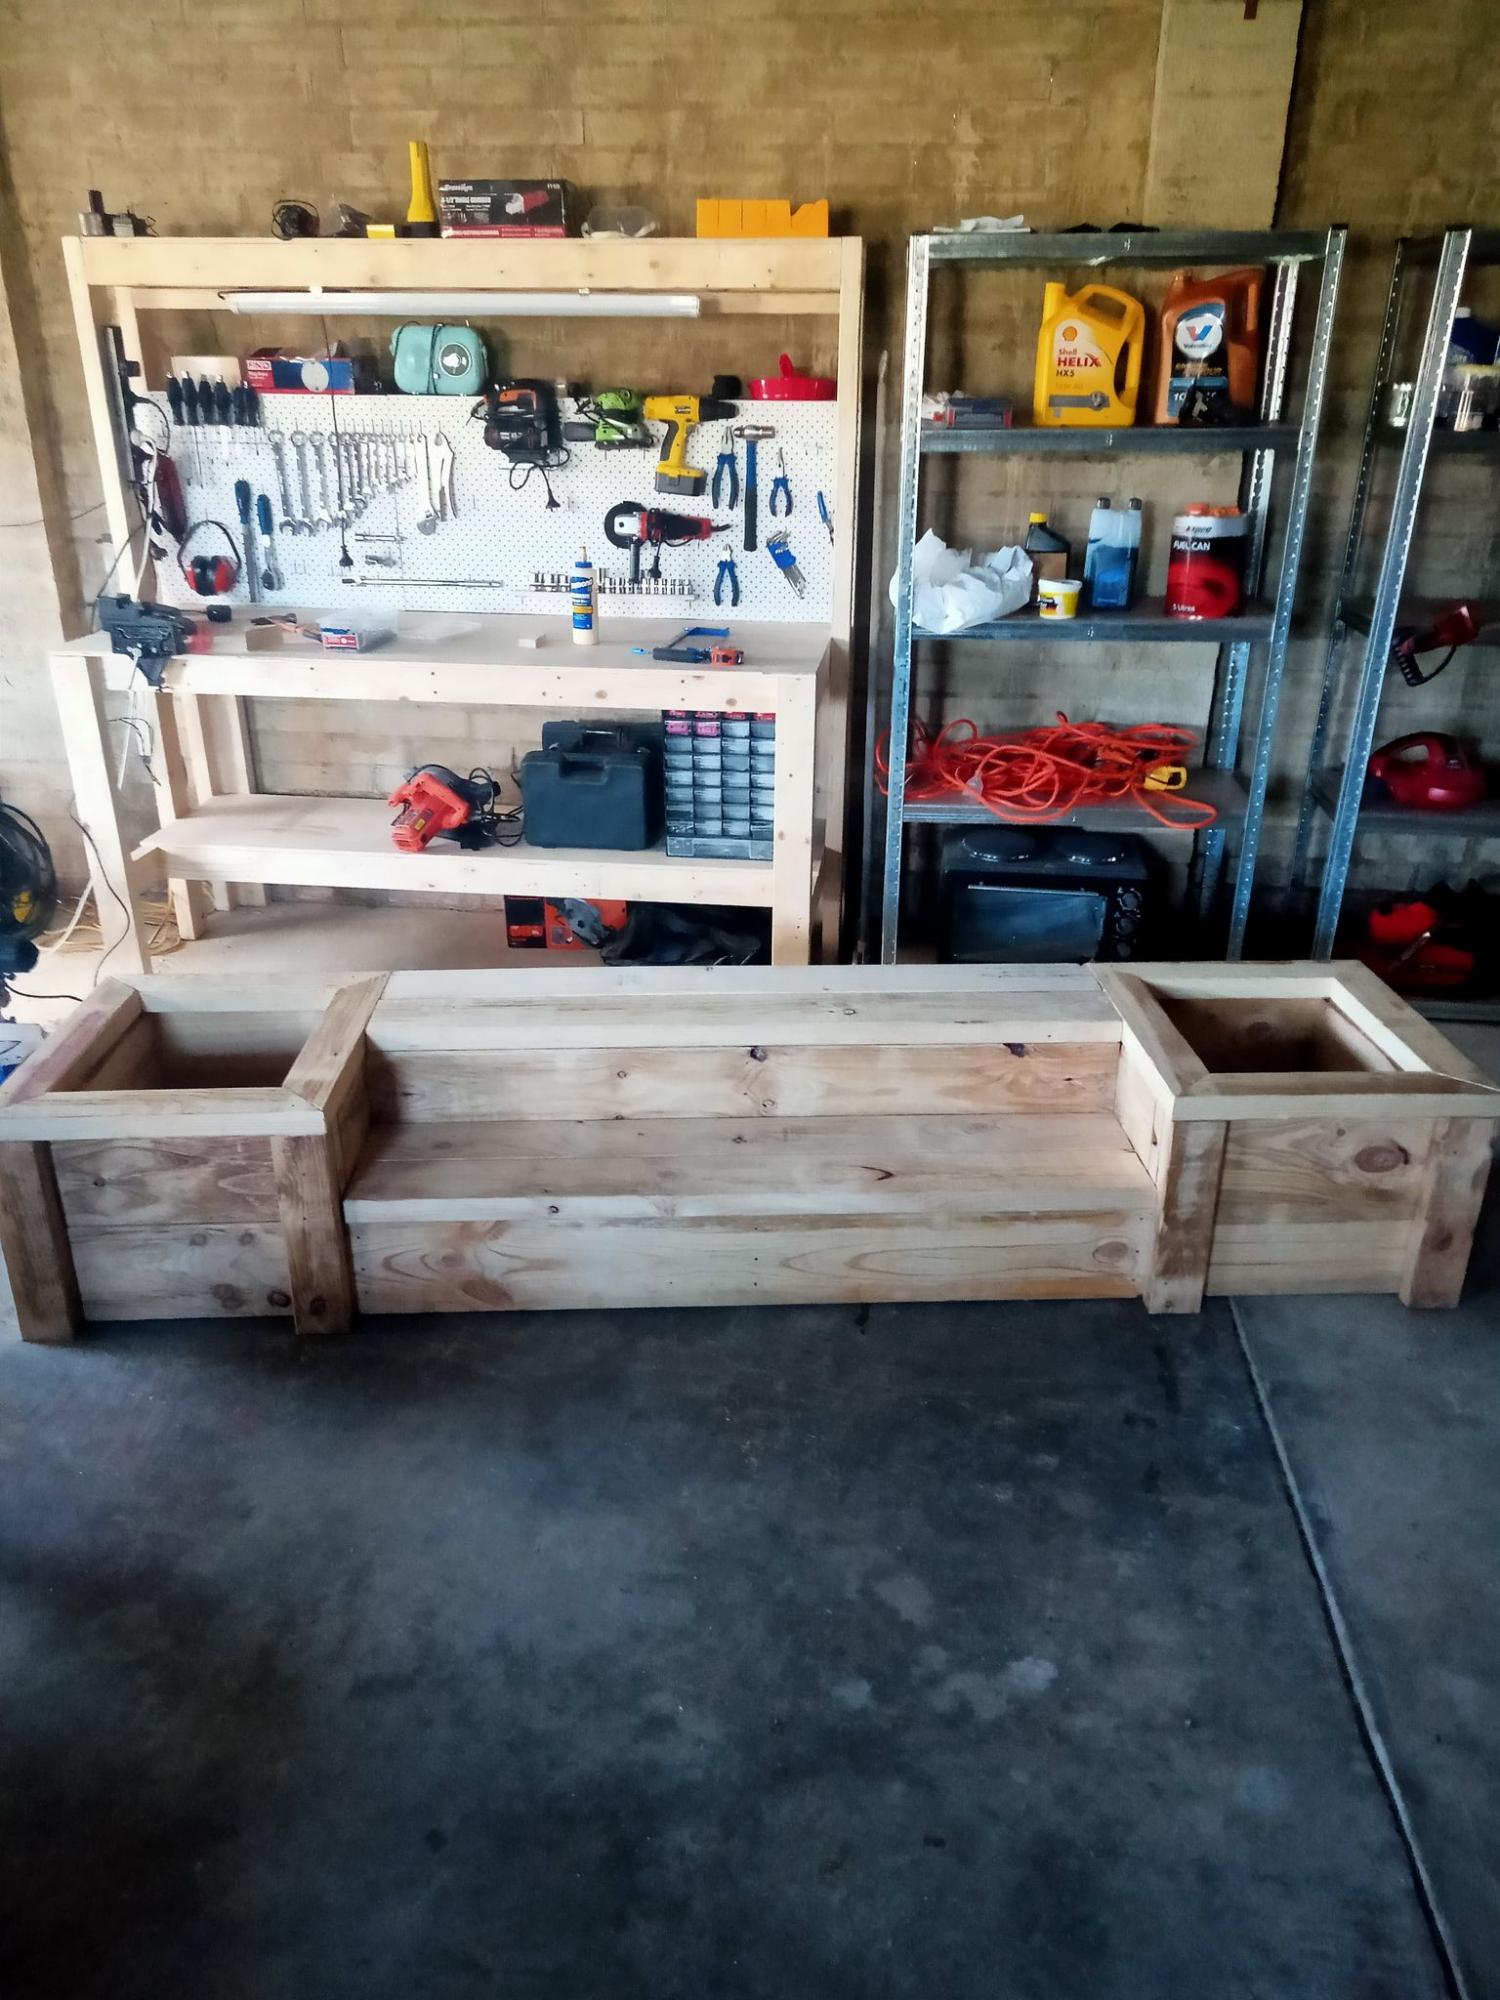
A very enjoyable project. I'm relatively new to diy woodworking projects but these plans make it so much easier.
Thanks.
Built from Plan(s)
Estimated Cost
$250
Estimated Time Investment
Weekend Project (10-20 Hours)
Recommended Skill Level
Intermediate
Comments
Modified Chicken coop

We live in a termite infested area and as such were nervous about putting wood in contact with the ground. We modified these plans to sit on top of a welded bar frame that is moveable and stands a meter high. The measurements are custom to our welded frame but the shape was based on these plans as was the construction process followed. We dont have a worry about predators so have used a design that doen not have a closed floor - our girls can simply fly or walk up the ladder to the roost and are able to leave the coop when ready in the morning without us opening doors. We are also in a warm environment thus an enclosed coop is not needed.
So far they are happy and are happily laying in the two egg boxes (We left the remaining space closed internally so that we can use it for storage) and as there is no bottom to the coop they poop straight into the run and onto the sand floor.
They are not free ranging yet as we are nervous of our dogs chasing them but once we are happy to let them free range we will use the gate built into the welded run.
Thank you Ana and lady goats for this design - I spent hours (and hours) researching and reading and looking at coop designs before deciding that this cute number was the one we wanted.
From me and my happy hens, thanks again!
Built from Plan(s)
Estimated Cost
$250
Estimated Time Investment
Weekend Project (10-20 Hours)
Finish Used
Exterior was painted with a water based exterior paint over wood primer
Inside was varnished
Inside was varnished
Recommended Skill Level
Beginner
Corner Cupboard
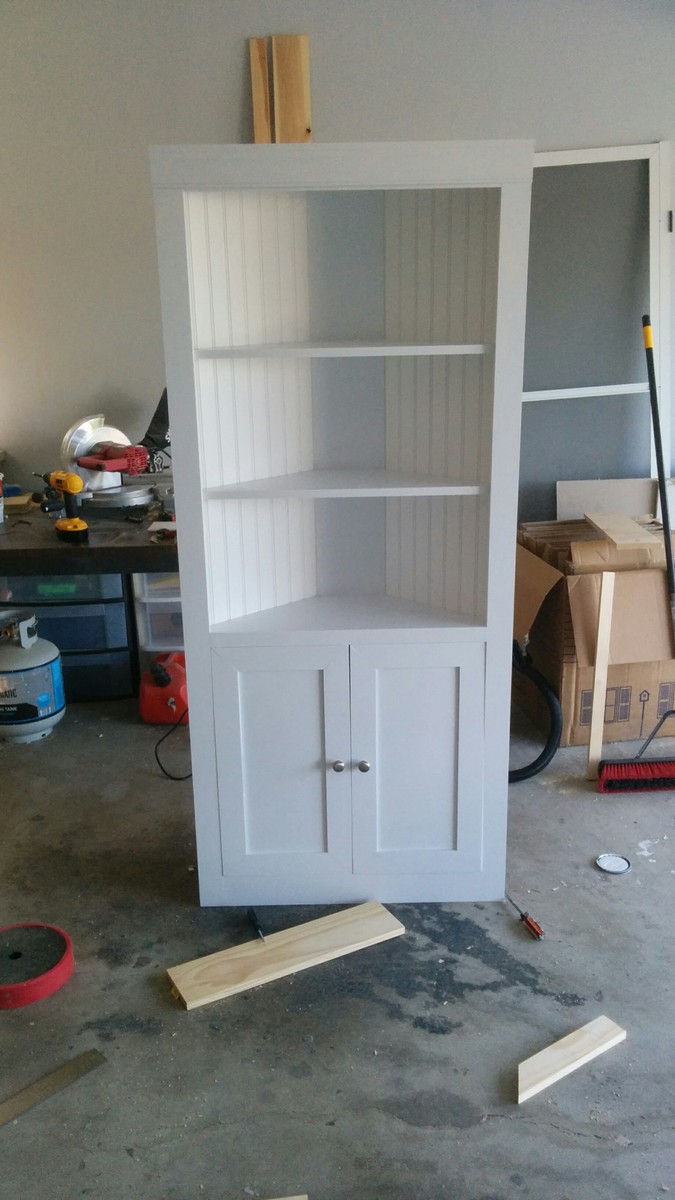
Estimated Cost
100$ before paint/hardware
Finish Used
White Paint
Recommended Skill Level
Intermediate
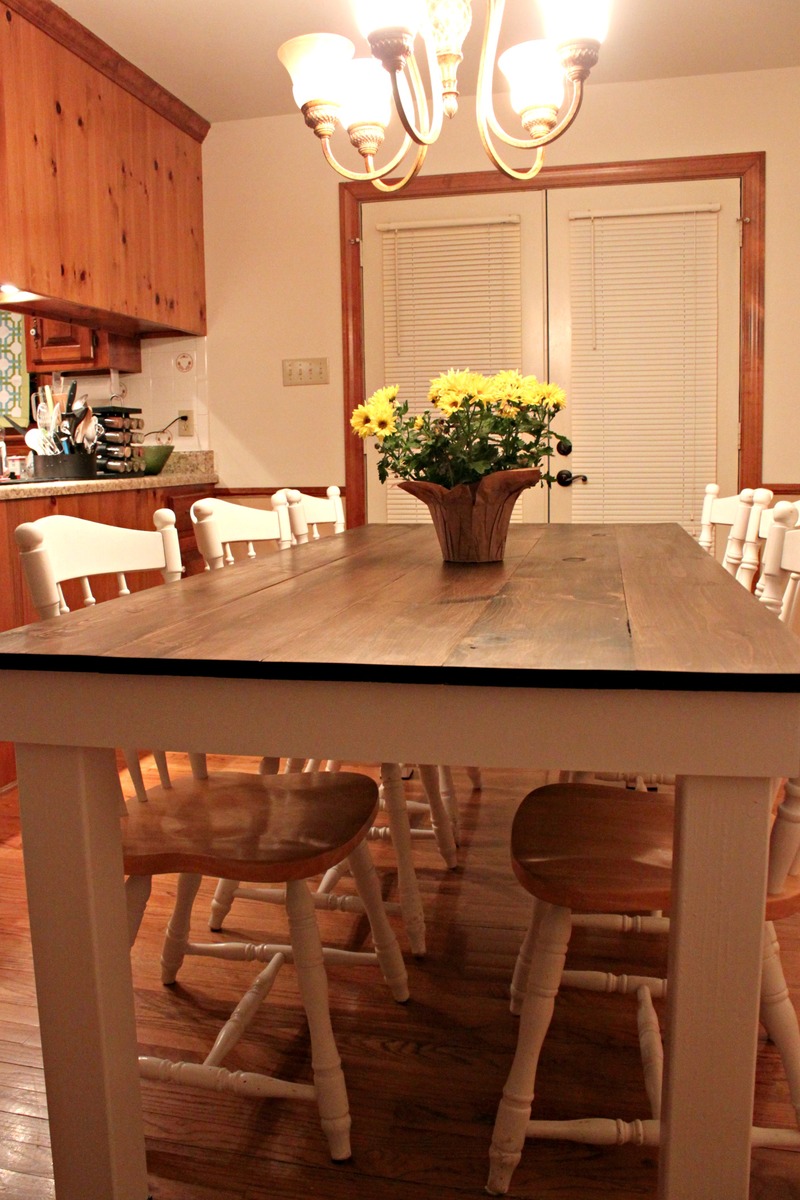
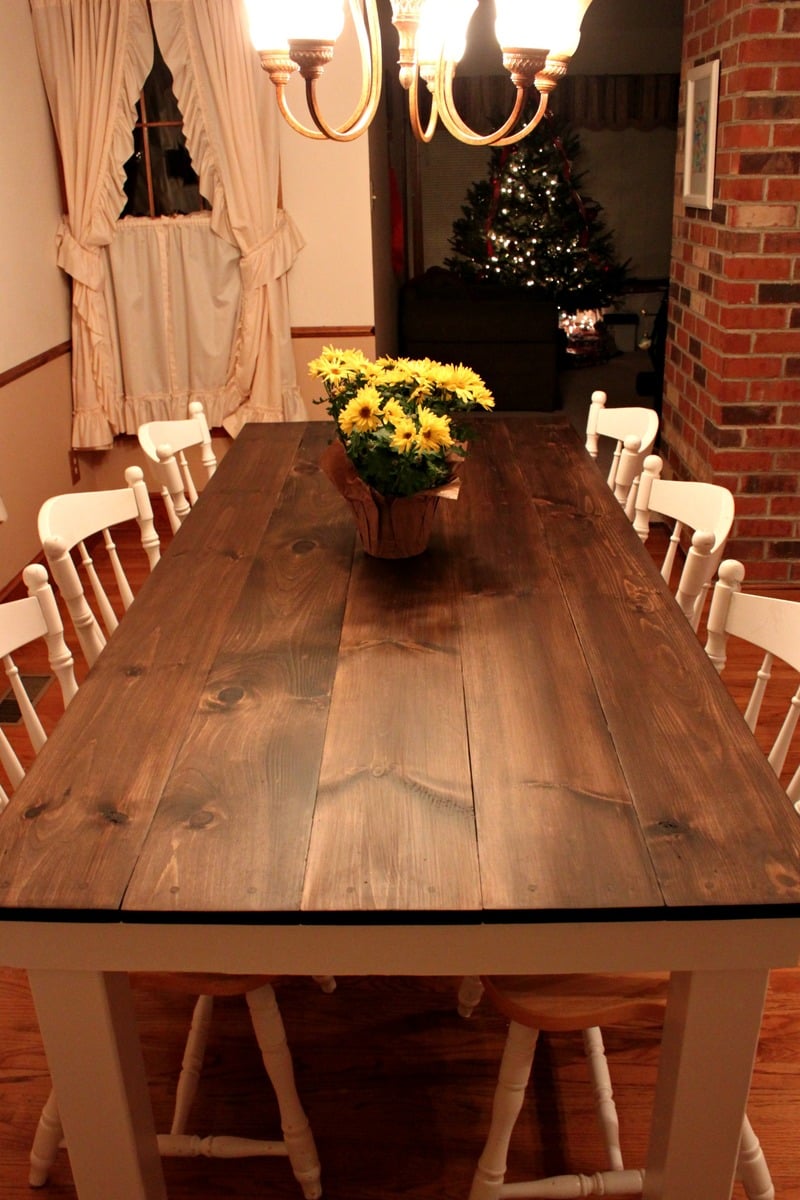
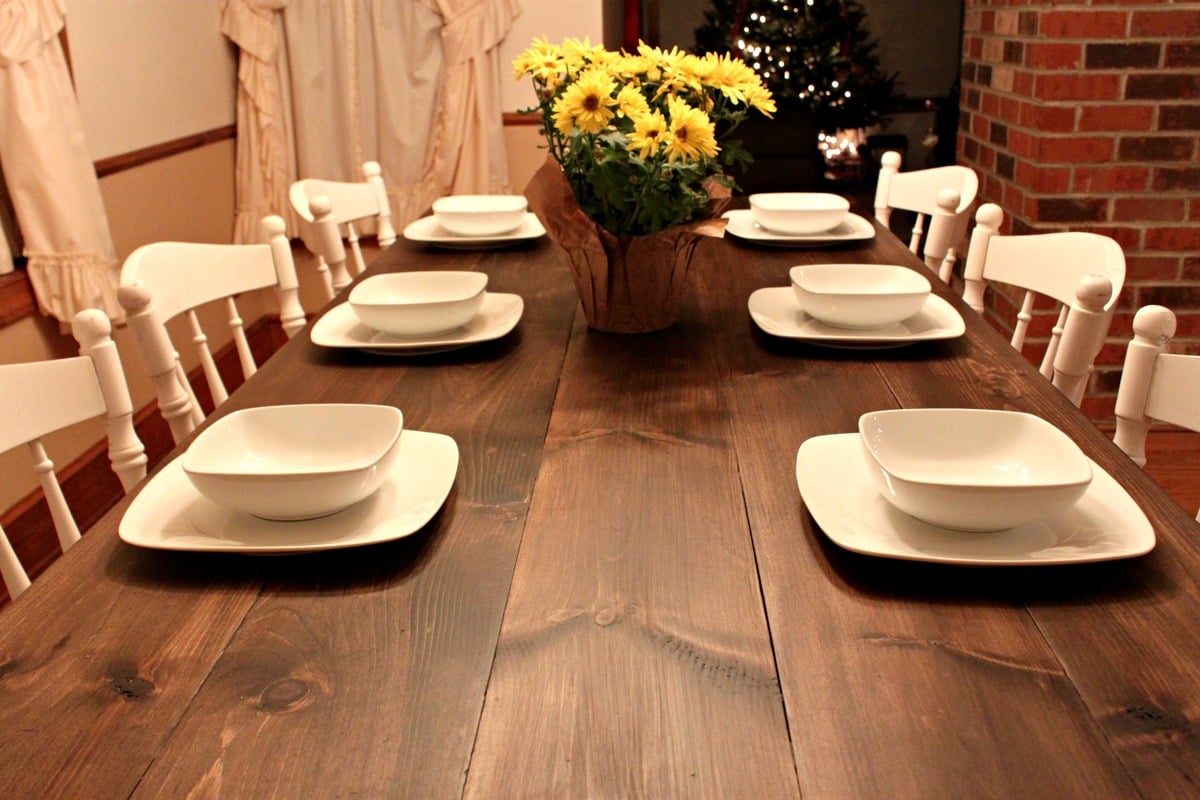
Farmhouse Table
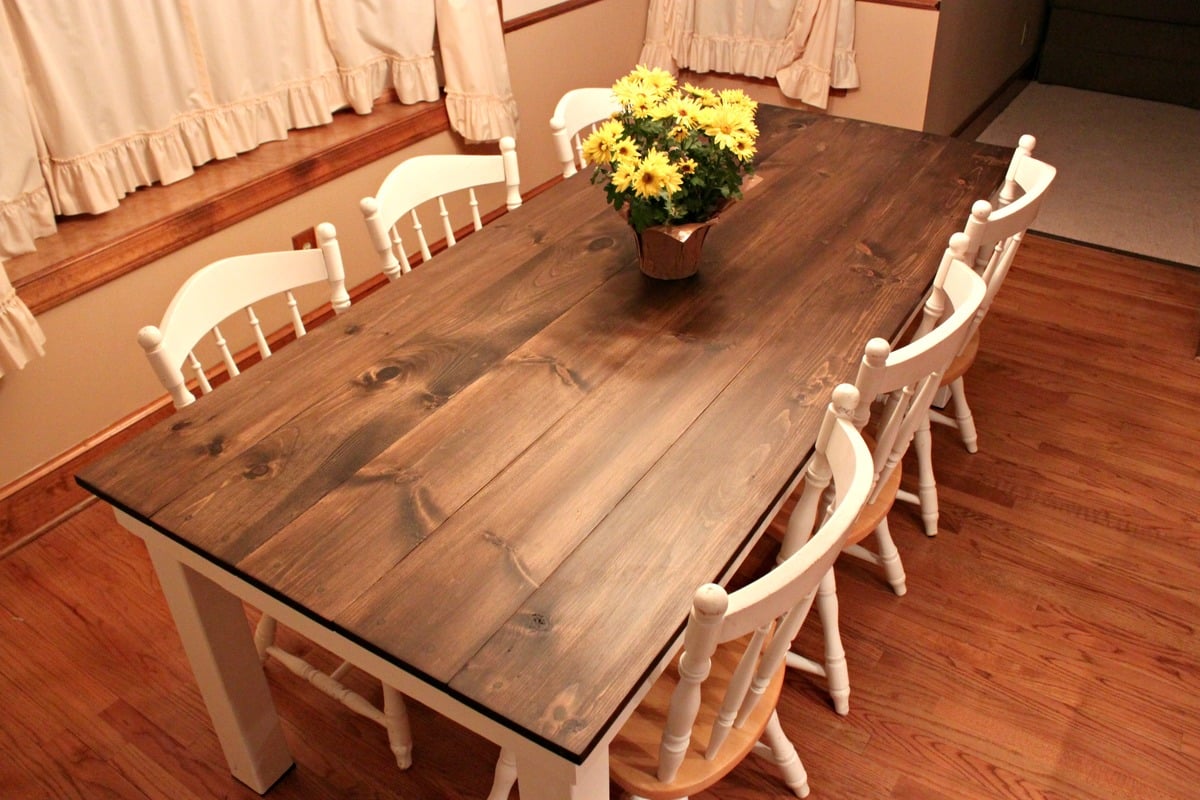
My husband and I love entertaining, but our small kitchen table was just not cutting it for both our space and our hosting abilities. We decided that instead of searching for the perfect table and spending a ton of money, we would just build our own table. We found that Ana's Rustic Table plans best matched what we were looking for, but my husband being the detailed person that he is didn’t just want to take her measurements and run with them. So we taped off the floor around our old table to decide how large we wanted our own table to be.
 We basically followed Ana White’s plans to a T.
  Until it got to the legs. Ana White used 2×4′s for her legs, but we decided we liked the look of chunkier 4×4 legs instead.
  We also did things in a different order, like attaching the legs to the apron before attaching the table top. This did make everything way easier when it came to painting, no tape needed.
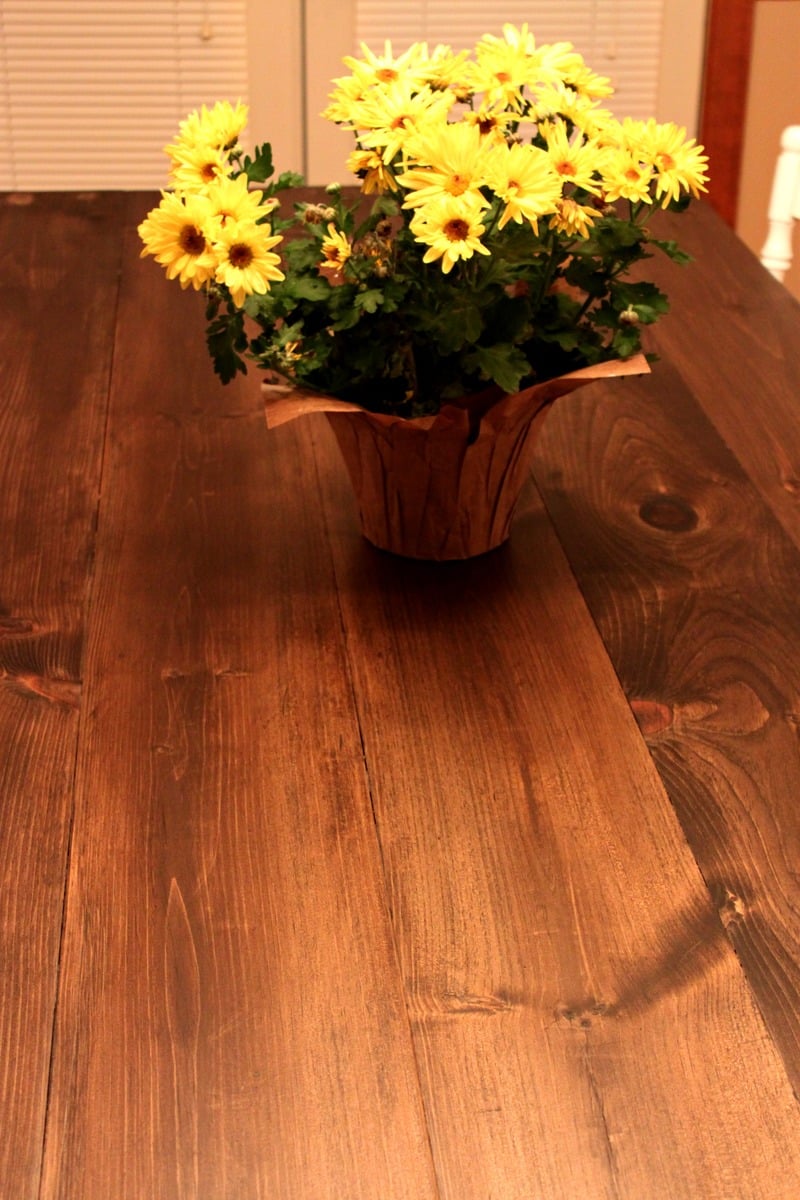
  We also stained the bottoms and sides of the tabletop boards before attaching them to the apron. After the top was attached I stained the top side and applied about 3-4 coats of Matte polyurethane. I like the matte finish because it doesn’t add any sheen and makes things look even more rustic; however, we’ll have to add a regular coat of poly as well because the matte is too soft for something that will see such rough use over the years.
  And now for what you’re all wondering about, how much did this project cost us?
- Wood – $86
- Stain (Dark Walnut) – $7.77
- Paint (Olympic Snow Storm) – $11.97
- Polyurethane (Rustoleum Matte finish) – $11.93
- If that is all we needed to buy then our total would have been: $117.67.
Built from Plan(s)
Estimated Cost
$300
Estimated Time Investment
Weekend Project (10-20 Hours)
Finish Used
Dark Walnut
Recommended Skill Level
Beginner
Comments
Mon, 12/31/2012 - 09:43
Stain Question
Your table is gorgeous! You did an amazing job.
I am getting ready to attempt my first two projects, bookshelves and a buffet table. I had a couple of questions about how you got such a consistent stain.
1) The Stain - What kind of stain did you use? How many coats did it take? Did you use a conditioner first?
2) Wood filler - How did you get the wood filler to match the stained areas so well? What kind did you use?
Thanks for the advice! I was thinking I would have to paint the buffet but after seeing your table I think I may actually attempt the stain.
Extra Long Bed
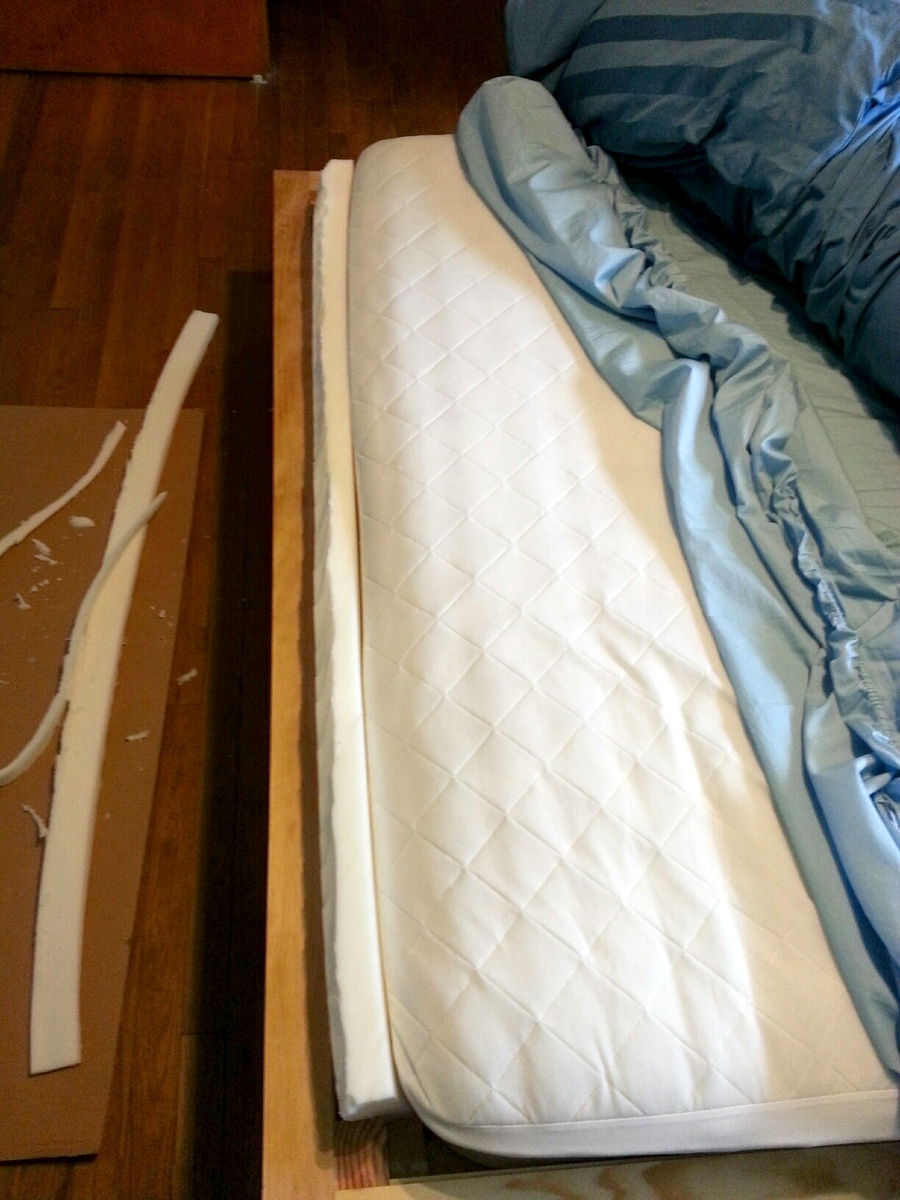
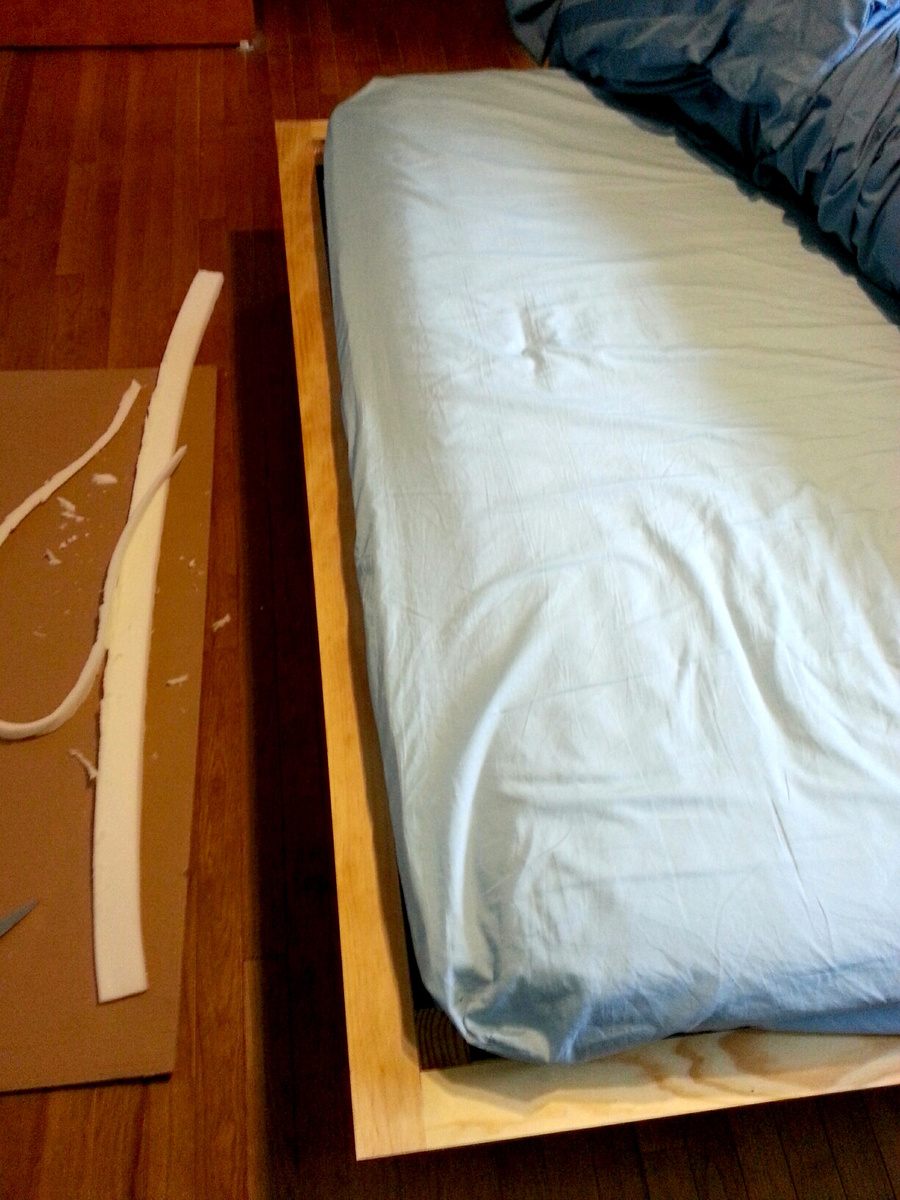
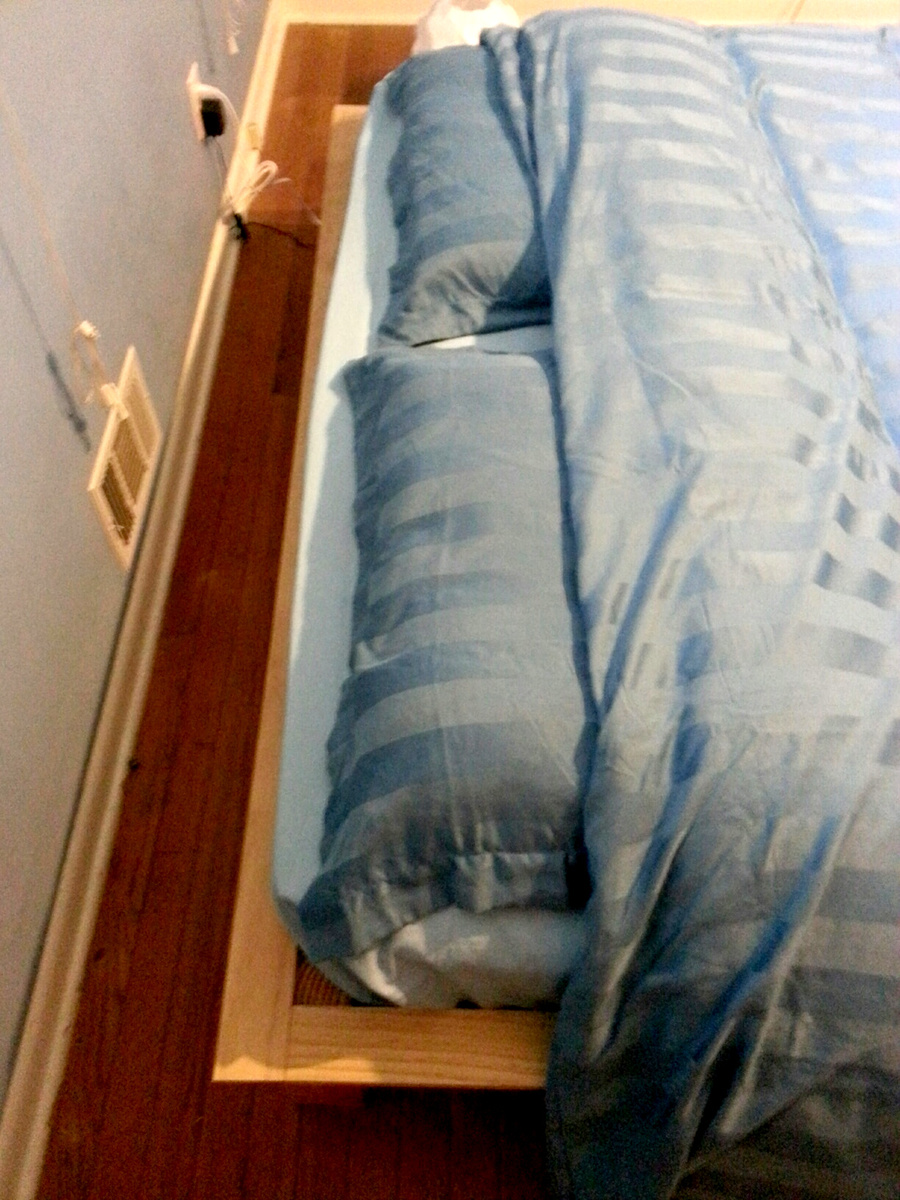
My hubby is 6'5'' tall. Since most matresses are 80 inches long, he mostly ends up with his feet hanging out of the bed (since you don't lay your head down at the very beginning of the mattress, right?). So I tried to solve this problem by making the bed 4'' longer than the plans suggested. I added 2'' of foam on each end of the bed, so now its 84'' long and my hubby fits perfectly!
Thanks for the great plans, I had a blast building my own bed!
Built from Plan(s)
Estimated Time Investment
Weekend Project (10-20 Hours)
Recommended Skill Level
Beginner
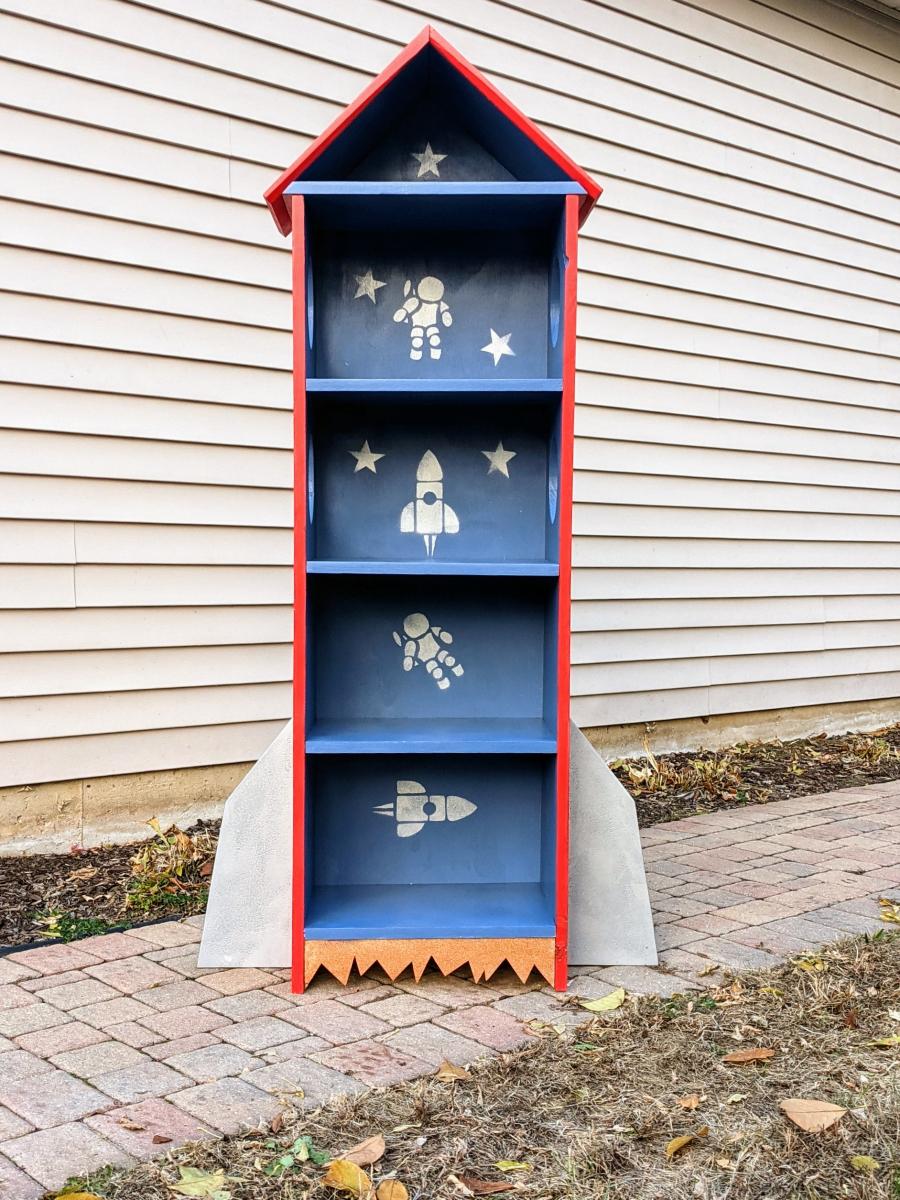
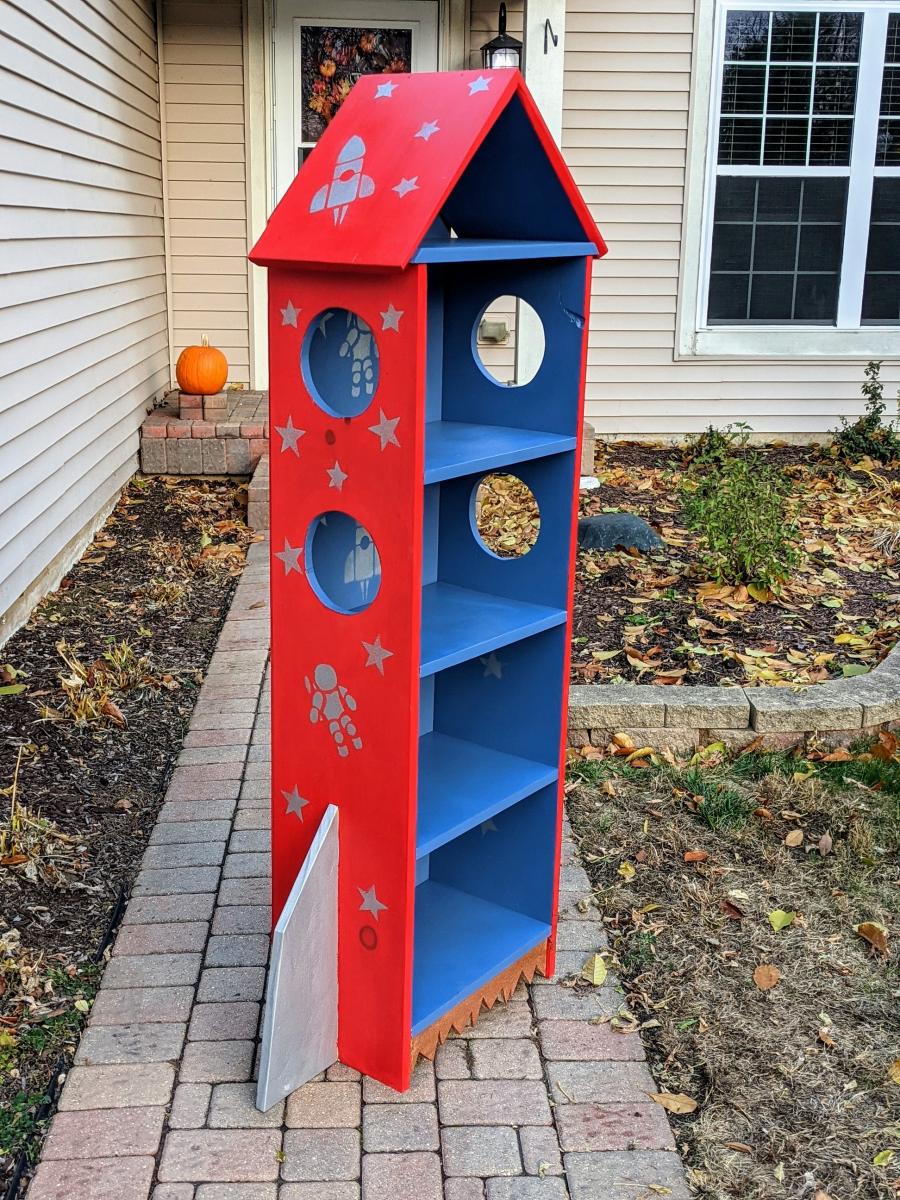
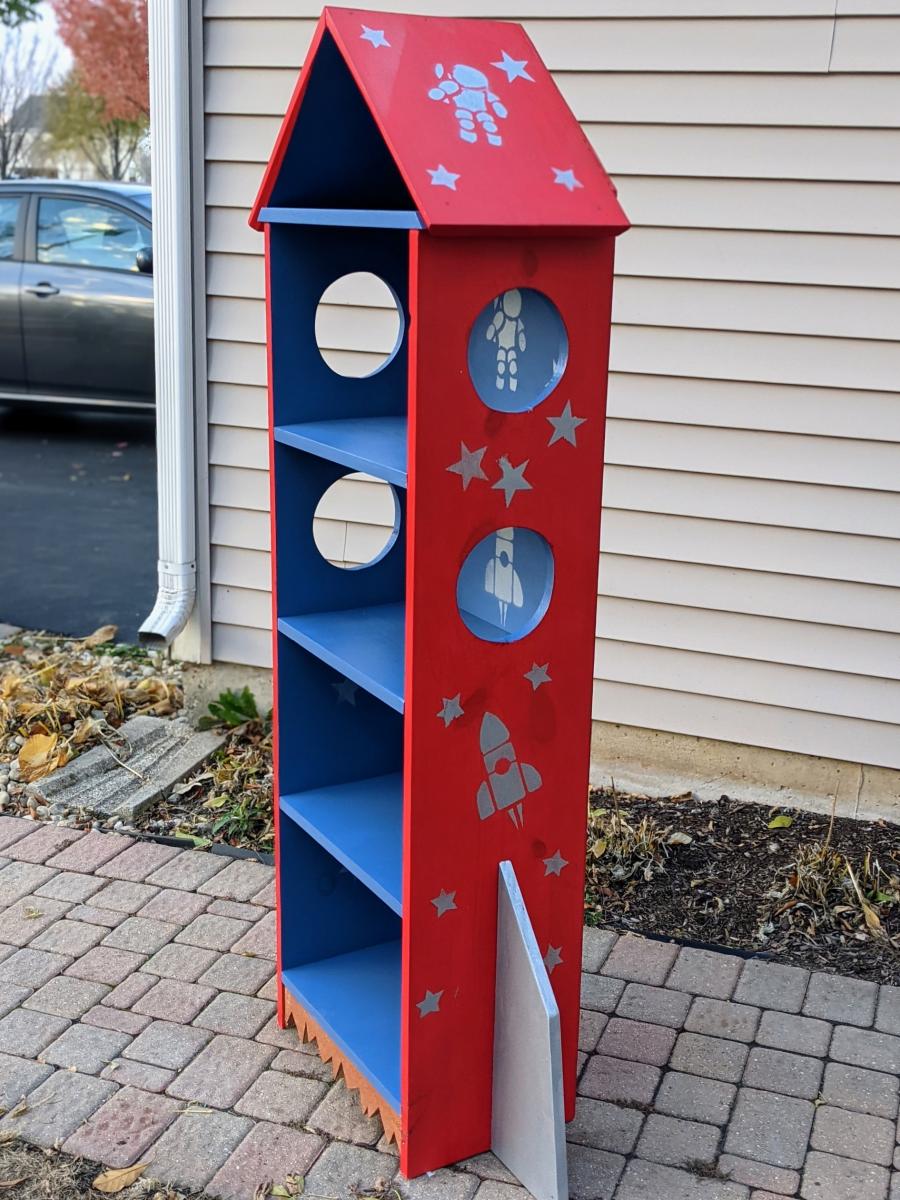
Rocketship Bookcase
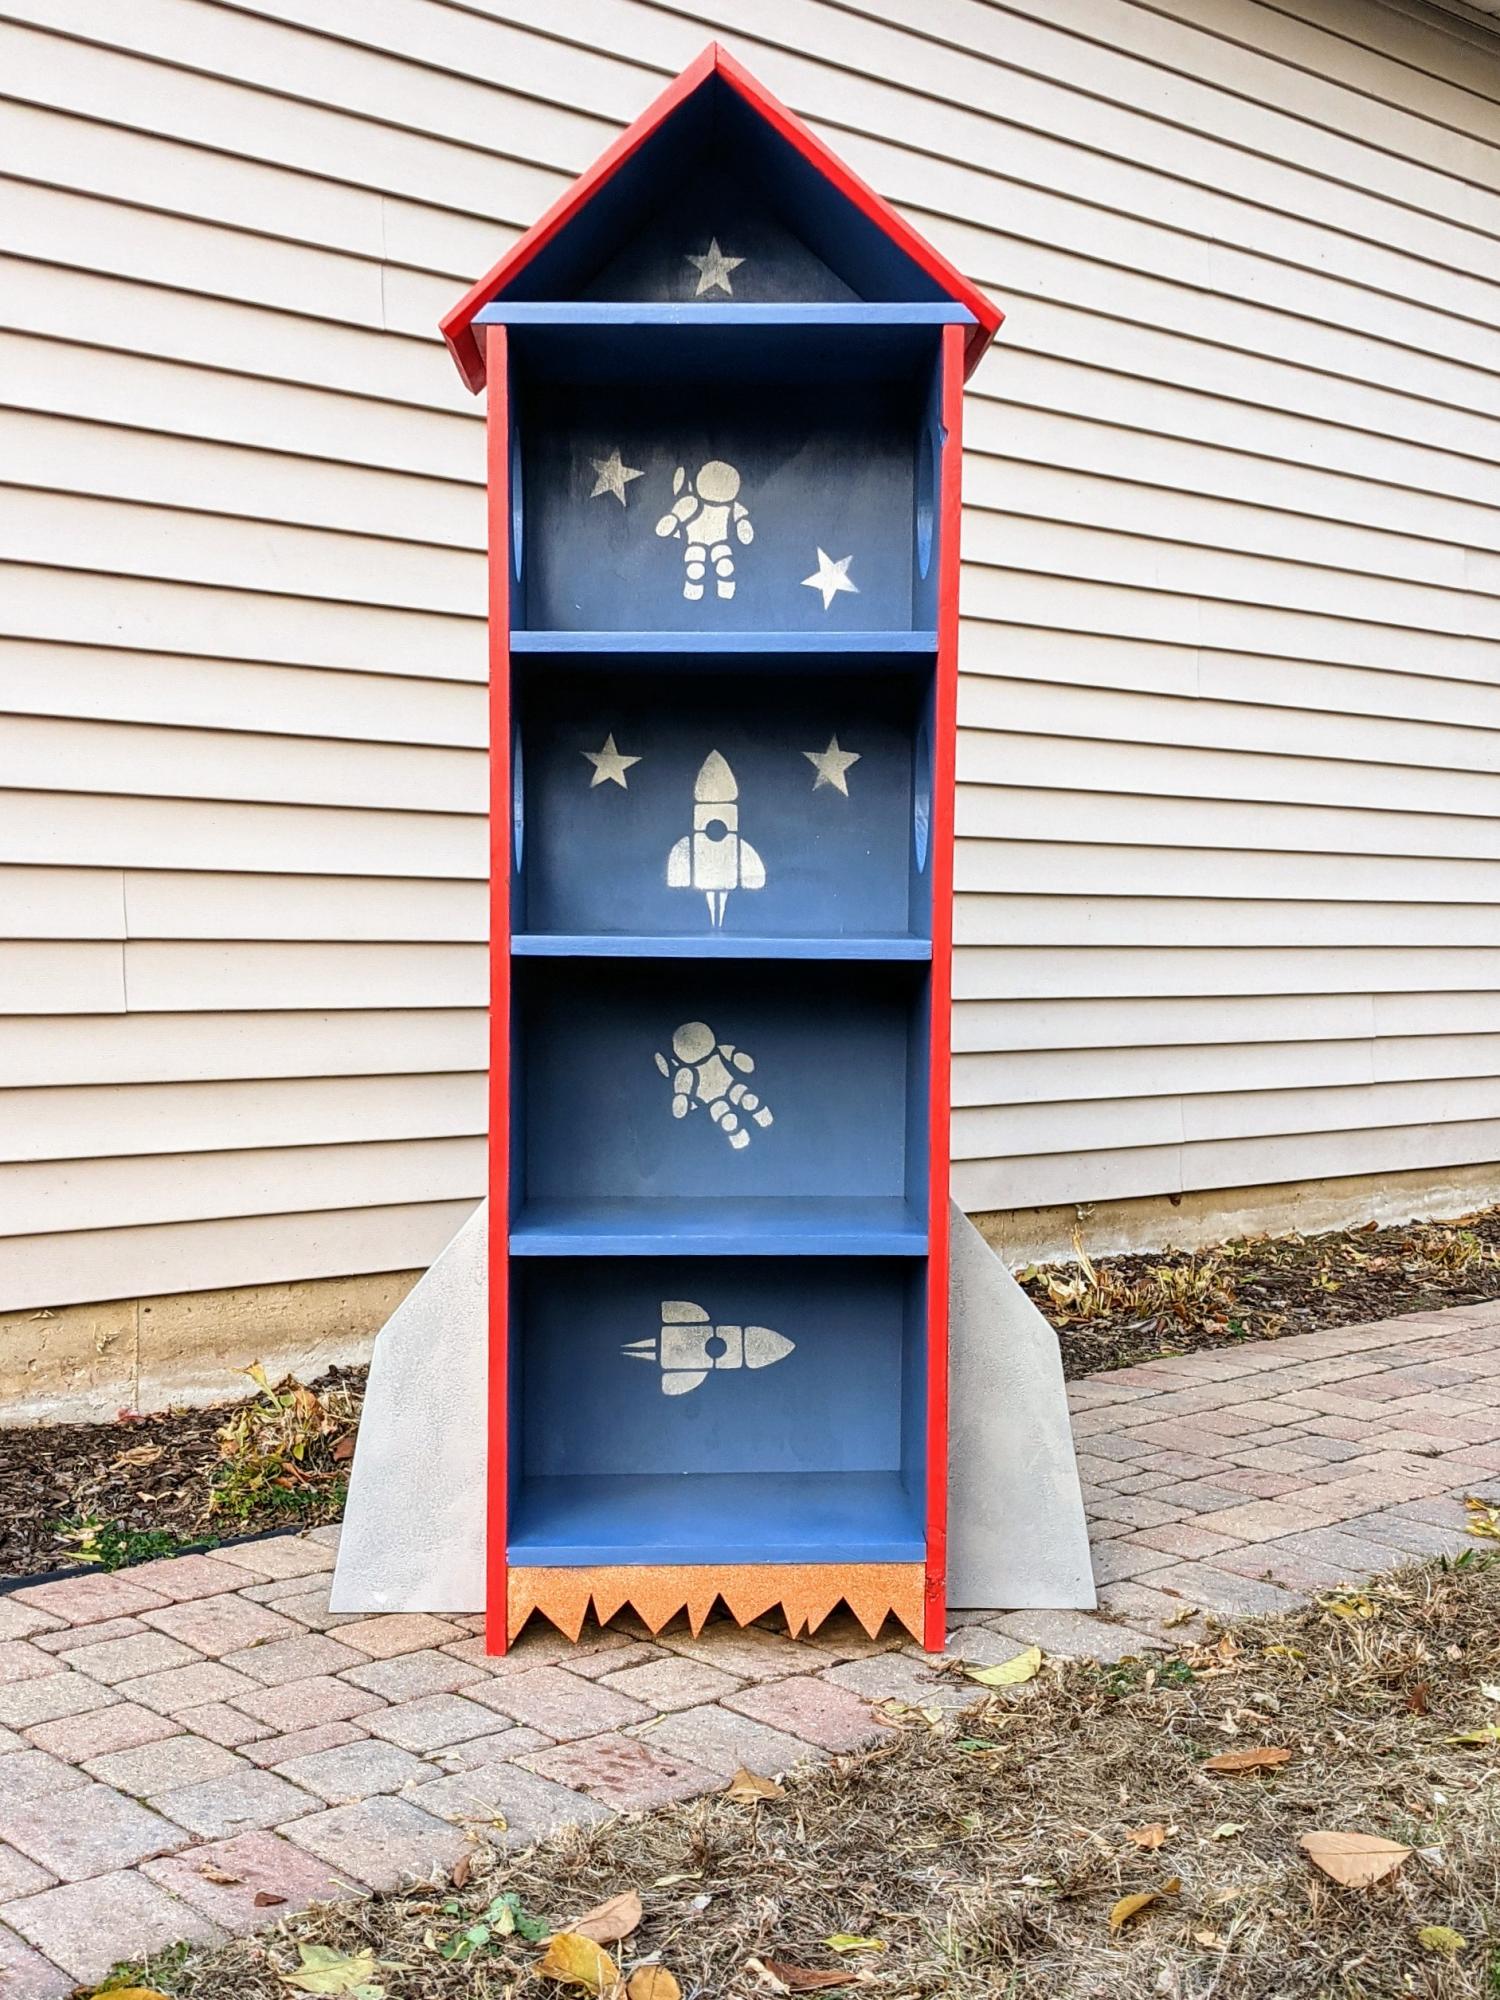
Pretty much followed the steps as outlined in the rocket bookcase plans. Googled astronaut and spaceship stencils and free hand drew those on construction paper. This bookcase is heading to my 3 year old son's room and he's pretty excited to fill it with toys and books.
Built from Plan(s)
Estimated Cost
$70
Estimated Time Investment
Day Project (6-9 Hours)
Finish Used
Semi gloss blue and red paint. A sparkling orange spray paint for the fire, metallic gray for the fins and stencils. Covered it with spray poly for a protective coat.
Recommended Skill Level
Intermediate
Comments
6 cube bookshelf
This was my first project that I've built and I feel really great about how it turned out!

Built from Plan(s)
Estimated Time Investment
Day Project (6-9 Hours)
Finish Used
White paint
Recommended Skill Level
Beginner
Comments

Thu, 01/24/2013 - 14:25
Beautiful Bookshelf!
Great job! Your bookshelf looks solid and the color is crisp against the darker wall. Love the frames too!
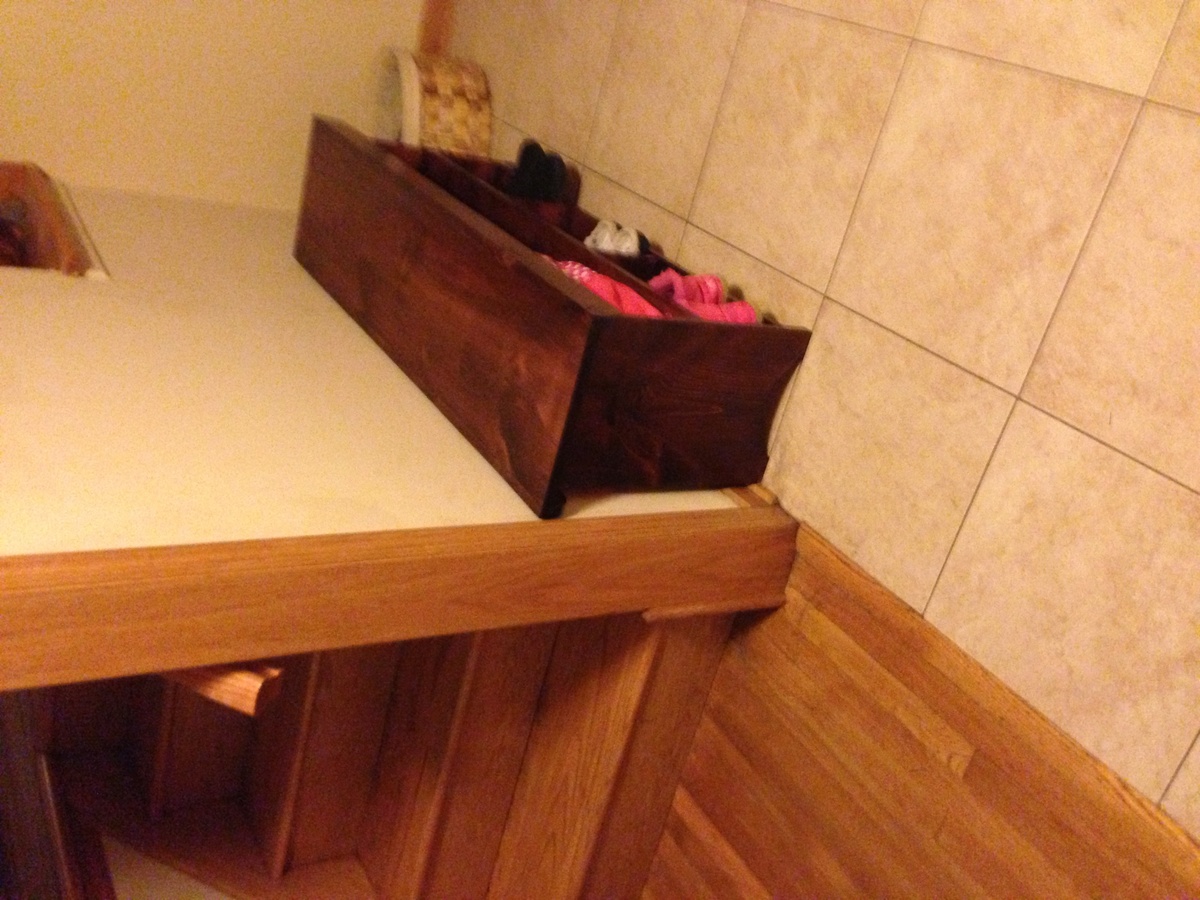
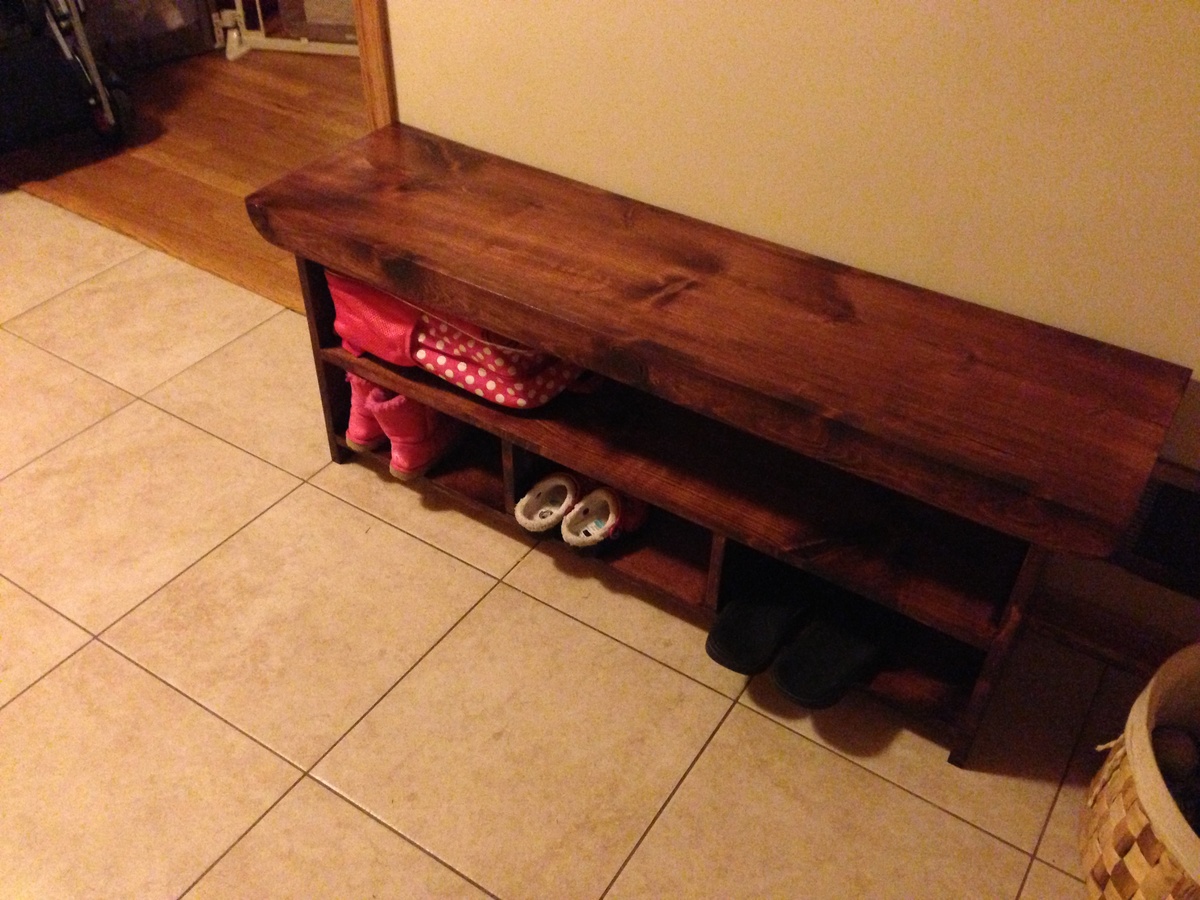
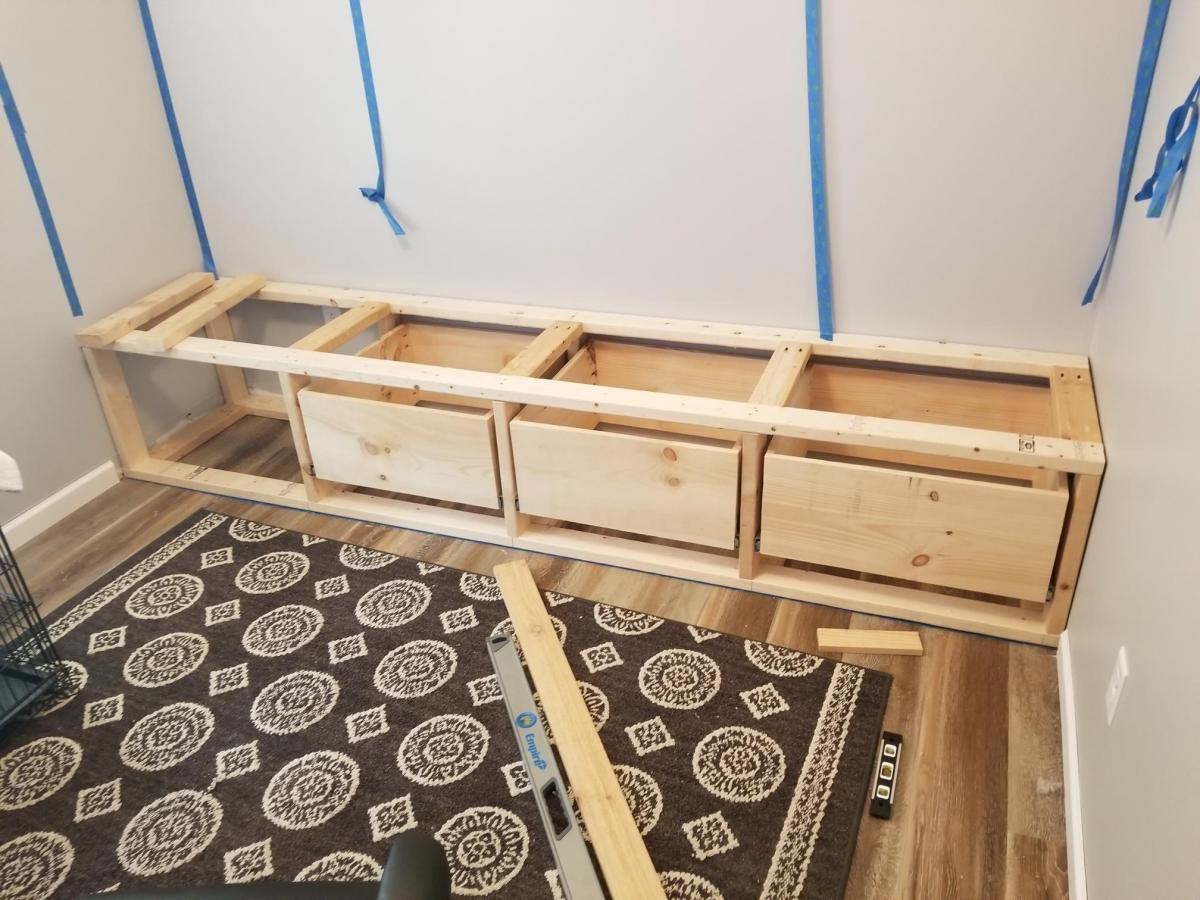
Kid's Country Bench - stretched
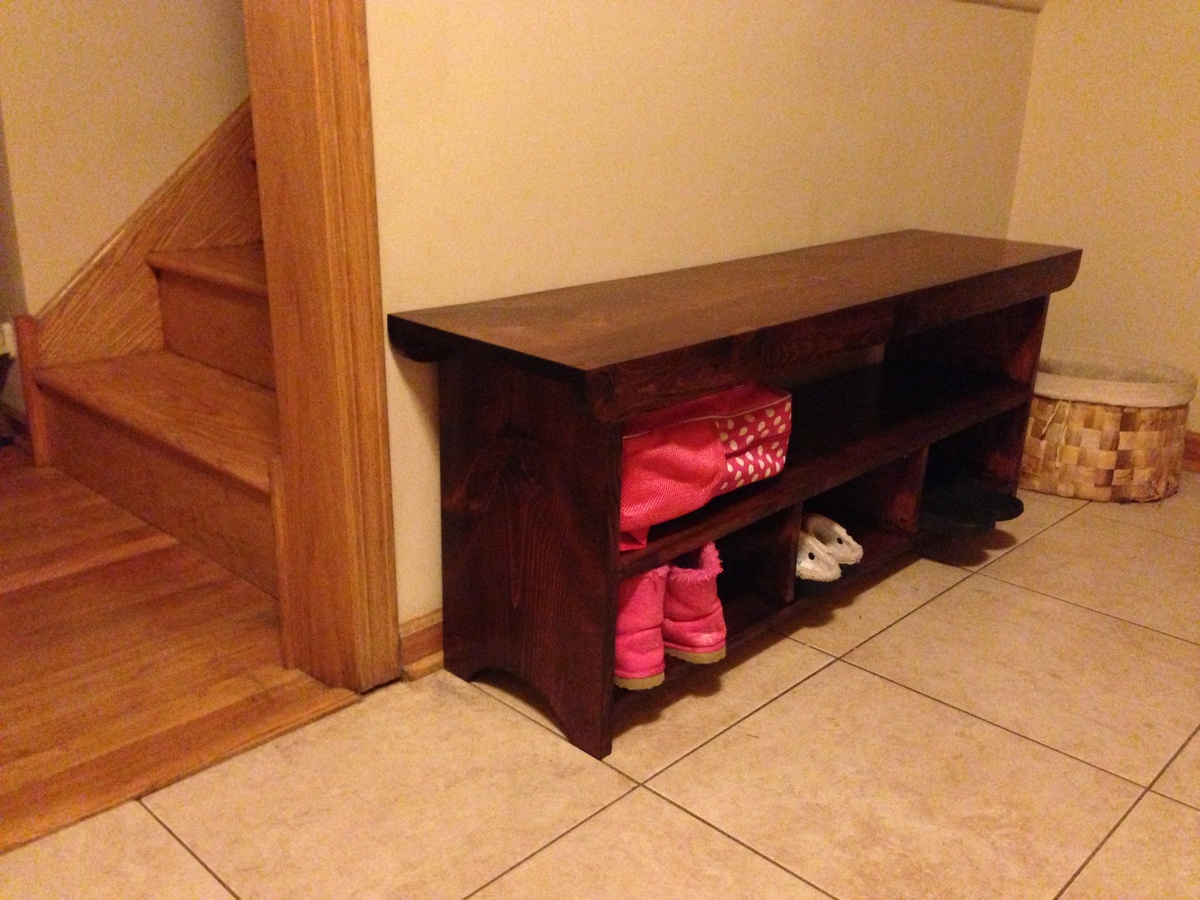
We needed a bench to hold shoes and bags on the foyer, and this plan fit the bill. I stretched the bench one foot so 3 kids could sit on it and to add one more cubby. I used pocket holes everywhere I could, so I had to modify the assembly order. We're excited to start using our new bench!

Built from Plan(s)
Estimated Time Investment
Weekend Project (10-20 Hours)
Finish Used
I started with minwax pretreatment and used minwax Red Mahogany stain. I finished with varathane tube water-based poly, since it didn't require sanding between coats.
Recommended Skill Level
Beginner
Combination of the Emme Twin Bed and Farmhouse Storage Bed
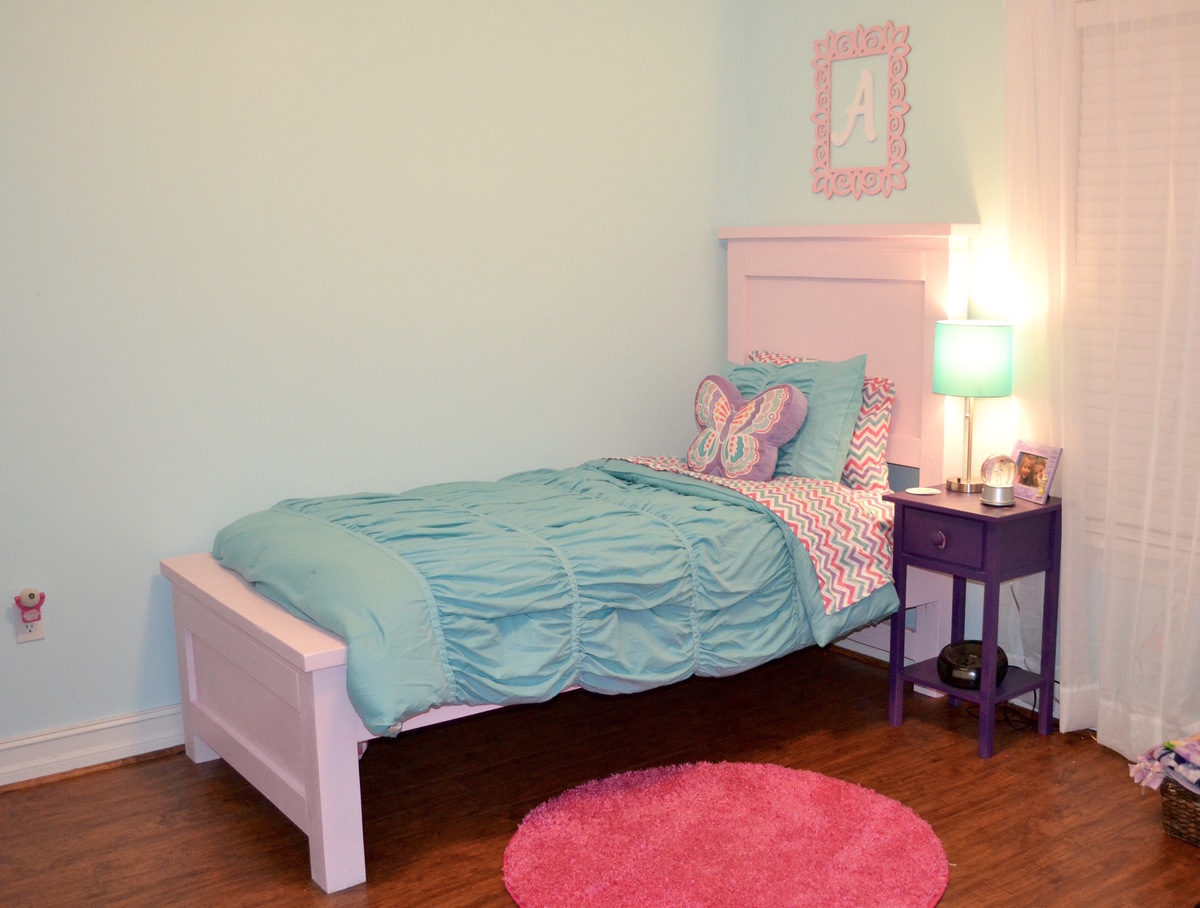
I used elements of both the Emme Twin Bed and Farmhouse Storage Bed to create this perfect bed for my daughter. Thank you so much for your fantastic plans Ana!
Built from Plan(s)
Estimated Time Investment
Weekend Project (10-20 Hours)
Finish Used
We used a soft pink paint/primer in an Eggshell finish. I applied two coats of paint and sanded between coats.
Recommended Skill Level
Beginner
Simple Modern Outdoor Sectional
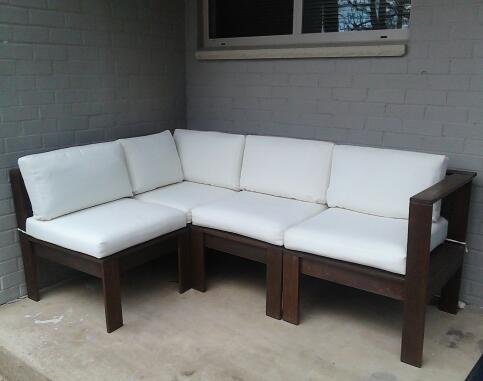
So glad these plans were posted so that I could build my own outdoor sectional. I built two armless and two corner/end pieces. I used cedar with American Walnut stain and clear/satin spar urethane. I purchased the cushions online. They only had 24x24"; so for the back cushions, I used a seam ripper to open the cushion, cut the foam and extra fabric, and re-sew.
Built from Plan(s)
Estimated Cost
500 including cushions
Estimated Time Investment
Week Long Project (20 Hours or More)
Finish Used
American Walnut water-based stain
Clear/Satin spar urethane
Clear/Satin spar urethane
Recommended Skill Level
Beginner
Comments

Farmhouse toy box

Made a few adjustments to the farmhouse toy box. Made it a little bigger and added Xs out of 1x2s around it to give it a little extra something! I'm using it as a storage coffee table and I couldn't be happier with it! So in love!
Built from Plan(s)
Estimated Time Investment
Day Project (6-9 Hours)
Finish Used
Minwax dark walnut stain, three coats of Varathane clear gloss polyurethane, and painted with Valspar white paint.
Recommended Skill Level
Beginner
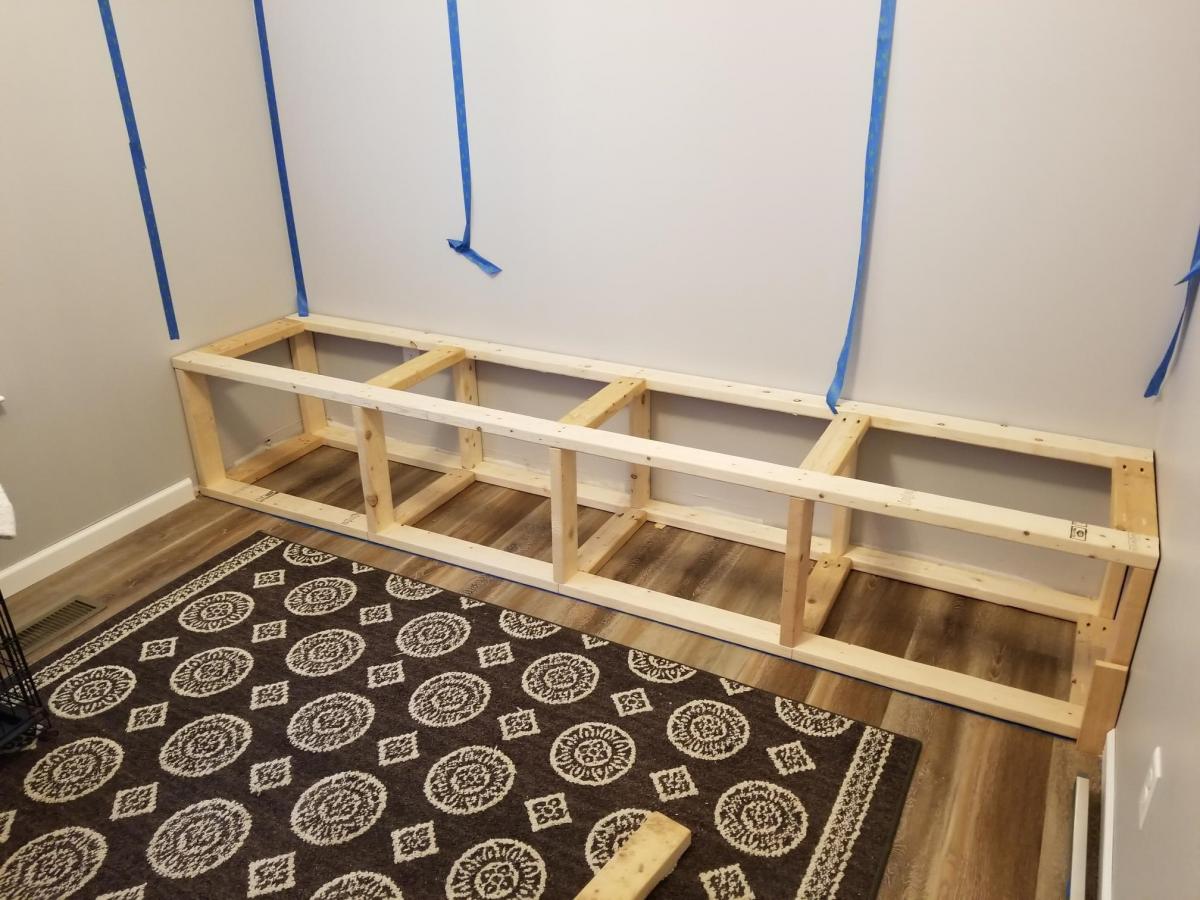
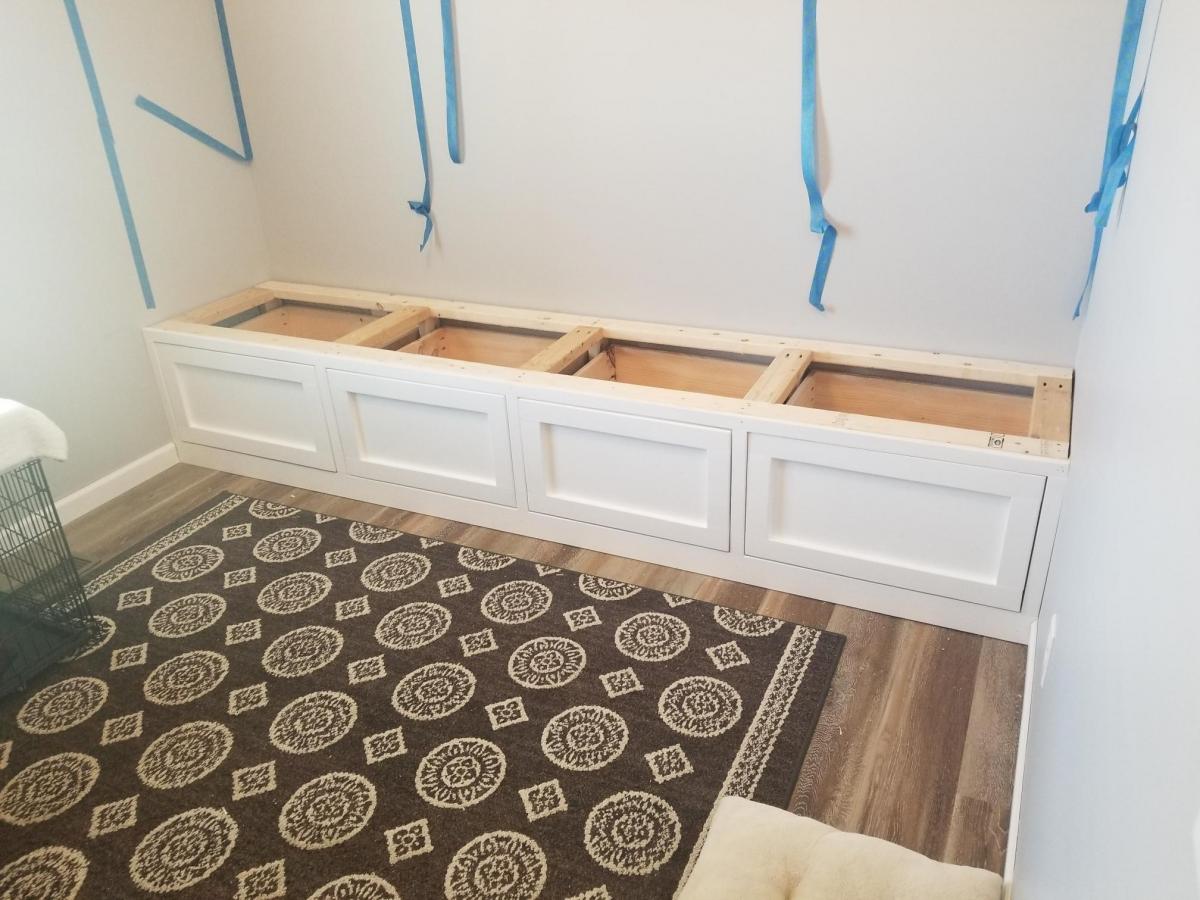
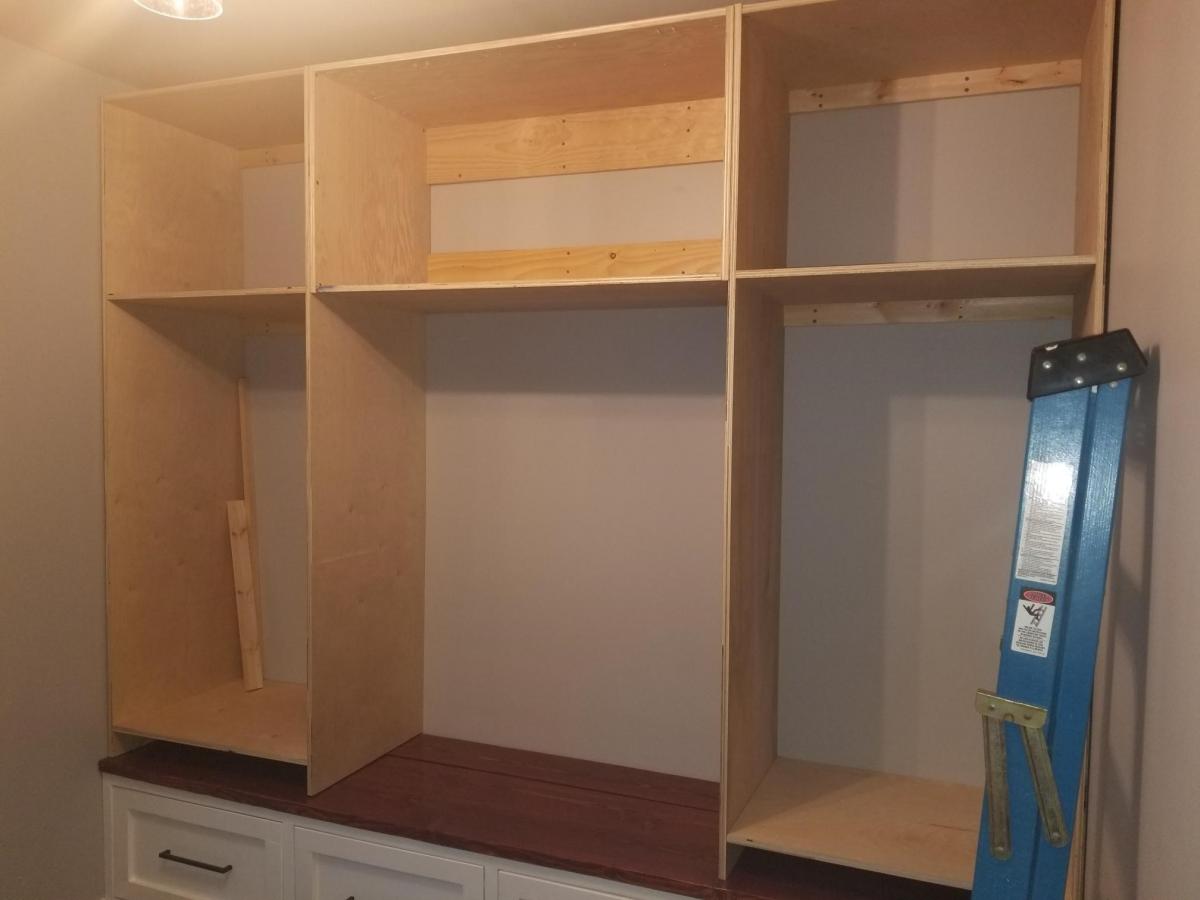
New Mudroom
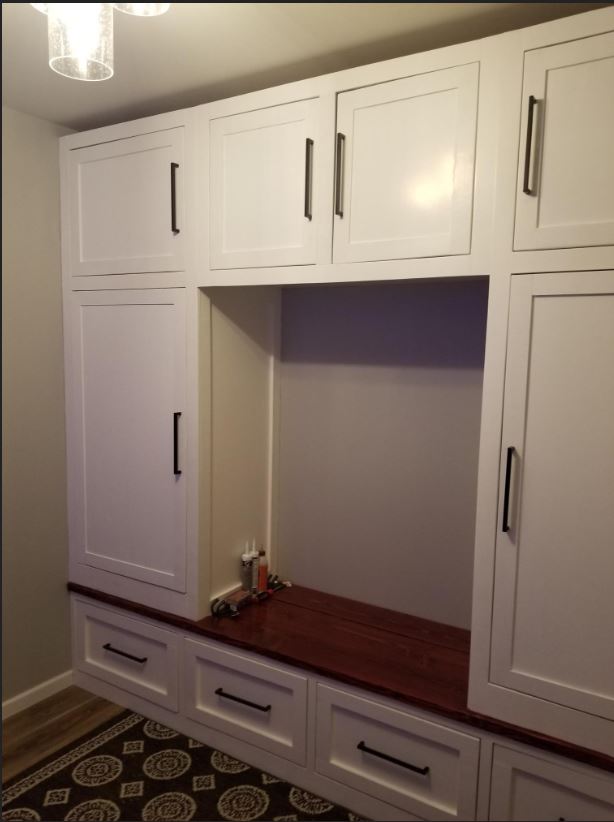
Built this new Mudroom / Office from some plans i found on your website and I absolutely love it! It has turned out better than I Expected and I learned soo many new things when planning and building this out!

Built from Plan(s)
Estimated Cost
$1000
Estimated Time Investment
Week Long Project (20 Hours or More)
Recommended Skill Level
Intermediate
Comments
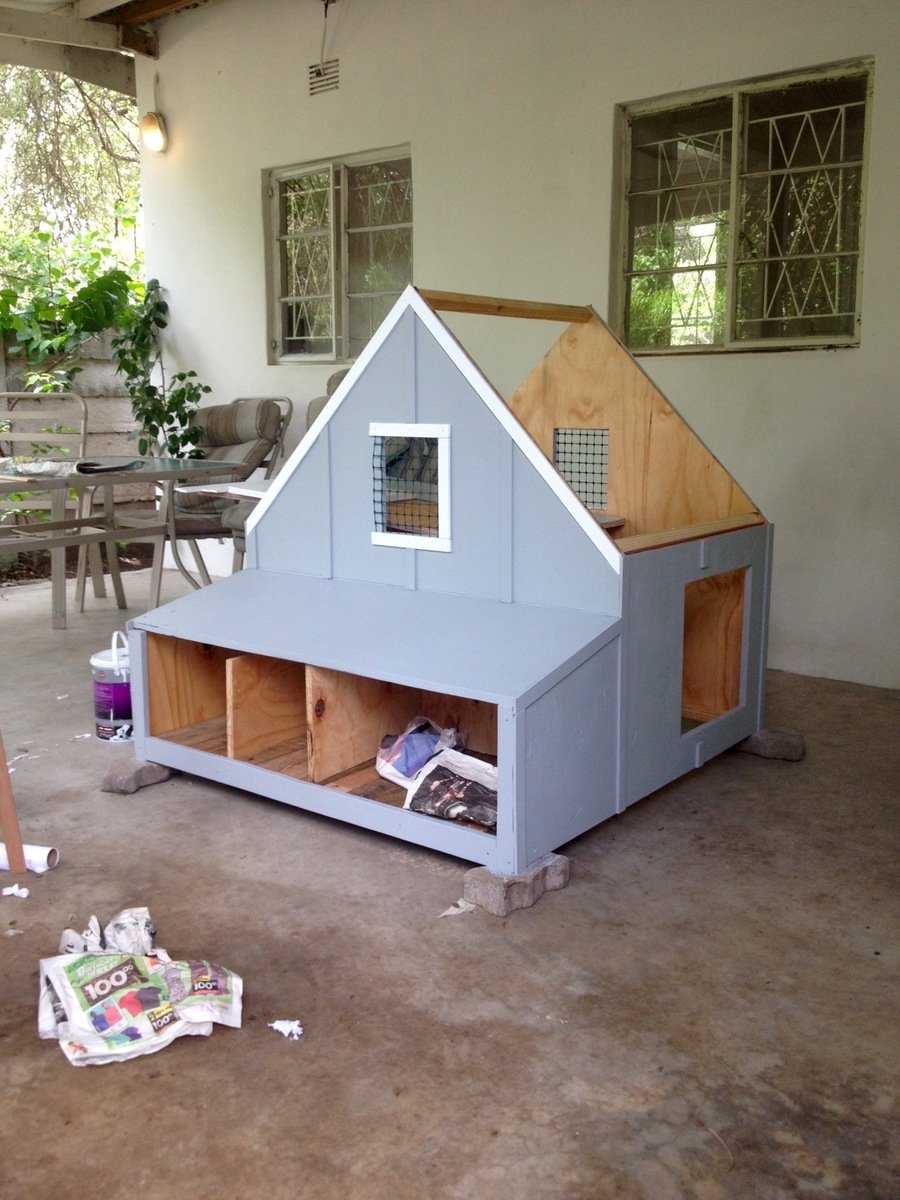
A-Frame Chicken Coop - Easy to Clean

Thanks for the free plans. I did have to make modifications for the doors. i hid the hinges to give it a clean look. i used cedar for the trim and Plywood Siding Panel T1-11 4 IN OC (Common: 19/32 in. x 4 ft. x 8 ft.; Actual: 0.563 in. x 48 in. x 96 in.) for the doors. i used a metal flashing for the roof so it will vent.


Built from Plan(s)
Estimated Cost
$250
Estimated Time Investment
Week Long Project (20 Hours or More)
Finish Used
BEHR Transparent waterproofing finish (Cedar Natural Tone) NO 501
Recommended Skill Level
Intermediate
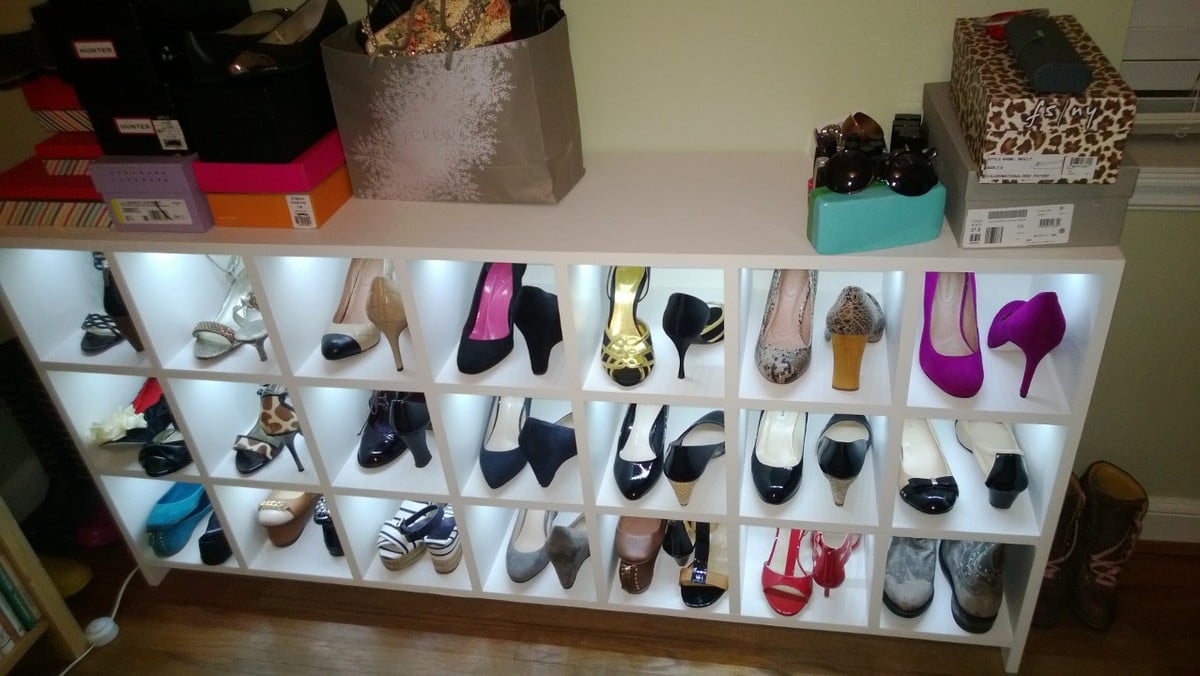
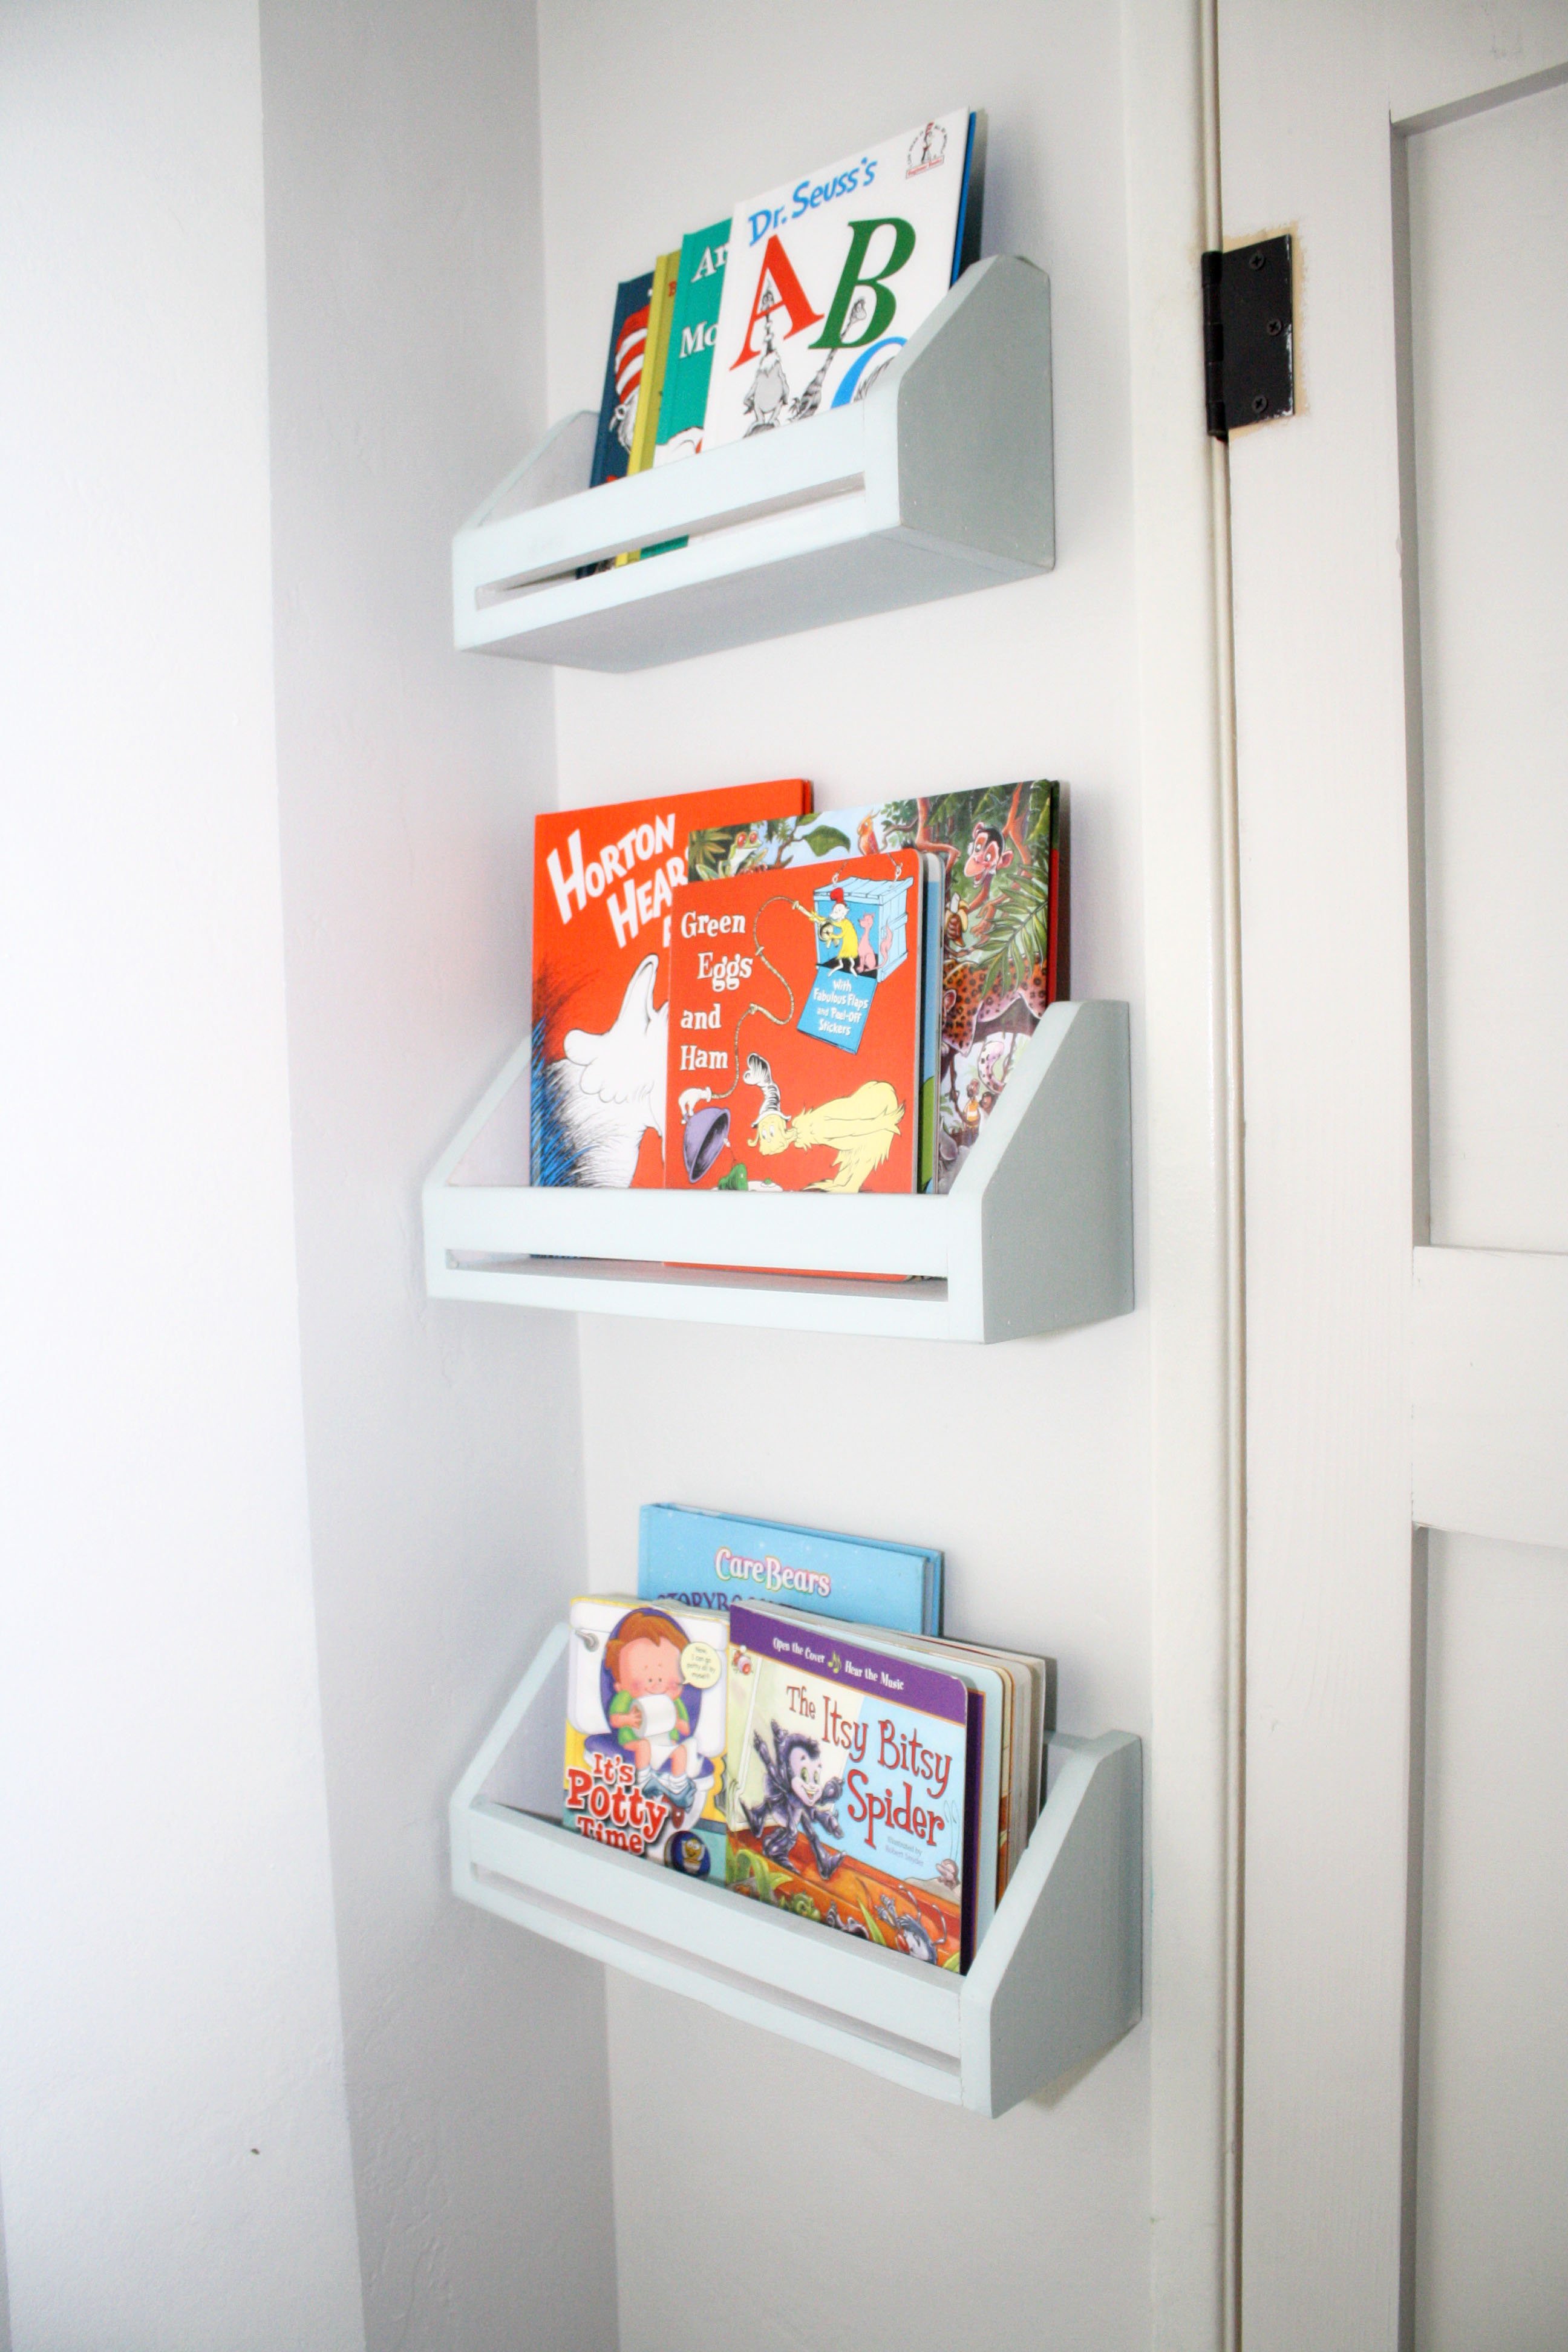
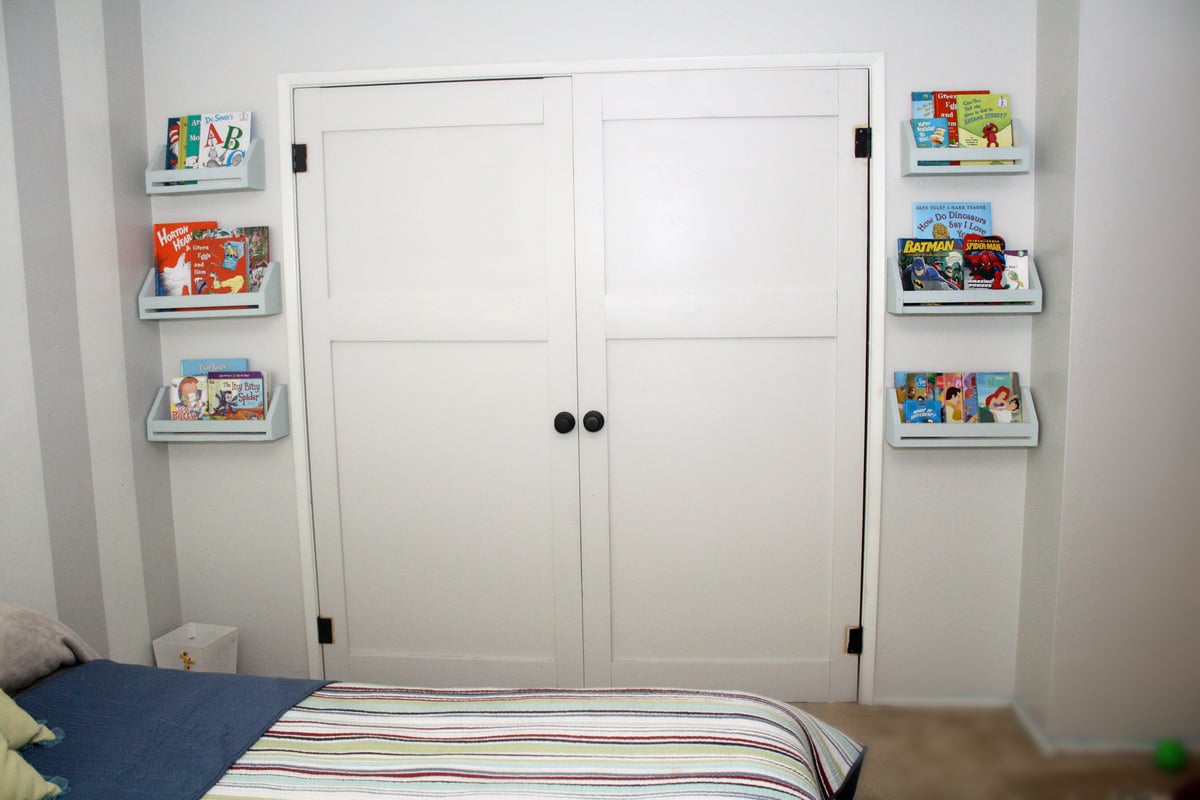
Adapated shoe cubby to on its side with LED lights.
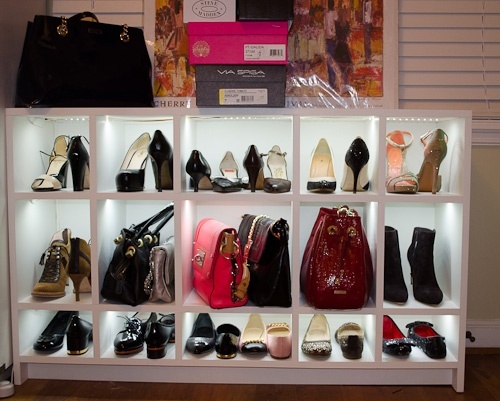
This is an adaption of the shoe shrine shelves. Since I didn't have a closet or other room than the bedroom to put these, I put them on their side. I modeled these off the shoe shrine shelves.
Each cubby is 11 3/4 deep x 8 x8 for the long version. The 2nd version I made was only 48 inches wide and did not divide well so I simply left the center cubby wider. I also made the 48" version to have different height shelves for purses in the middle and flats on the bottom.
I basically flipped the shoe shrine's on their sides and added LED lights. This also inspired a tall version for a cubby we had upstairs.
I used a panel saw to cut the plywood and then assembled with a Kreg pocket hole jig for horizontal pieces and biscuits for the top and the dividers. I did not want to fill the holes or I would have used Kreg instead of the biscuits.
I used 3/4" paint grade plywood and a 1/4inch back panel.
LED lights came from LED wholesalers on amazon. This step requires electrical knowledge! Not much more than a wiring a light but do not attempt if you are not qualifed to do so. LED strings required a fine tip soldering iron, wire and heat shrink.
Built from Plan(s)
Estimated Time Investment
Week Long Project (20 Hours or More)
Finish Used
Latex Behr Swiss Coffee sprayed on.
Recommended Skill Level
Intermediate
Comments

Fri, 03/22/2013 - 08:18
Great job! Your closet now
Great job! Your closet now looks like a fancy shoe boutique!
Fri, 03/22/2013 - 11:50
Thanks!
The LED's came after we designed them. I was like there is no light where these are going and its hard to see inside the cubbies. This is true for the bottom cubies which are only 5 inches tall. So for 30 bucks a cabinet it was a quick and easy addition that really made them pop. Only downside is it can make the room look like you are in Nordstom's :) so she doesn't leave the lights on regularly.
Thu, 09/18/2014 - 01:42
Nicely done!
Very nicely done. Do you mind telling me more about which particular LED product you used and the process to wire them in? Did you mill out any part of the cabinet to set the lights? How are they activated? Thanks in advance. You can also email me at [email protected]. Much appreciated!
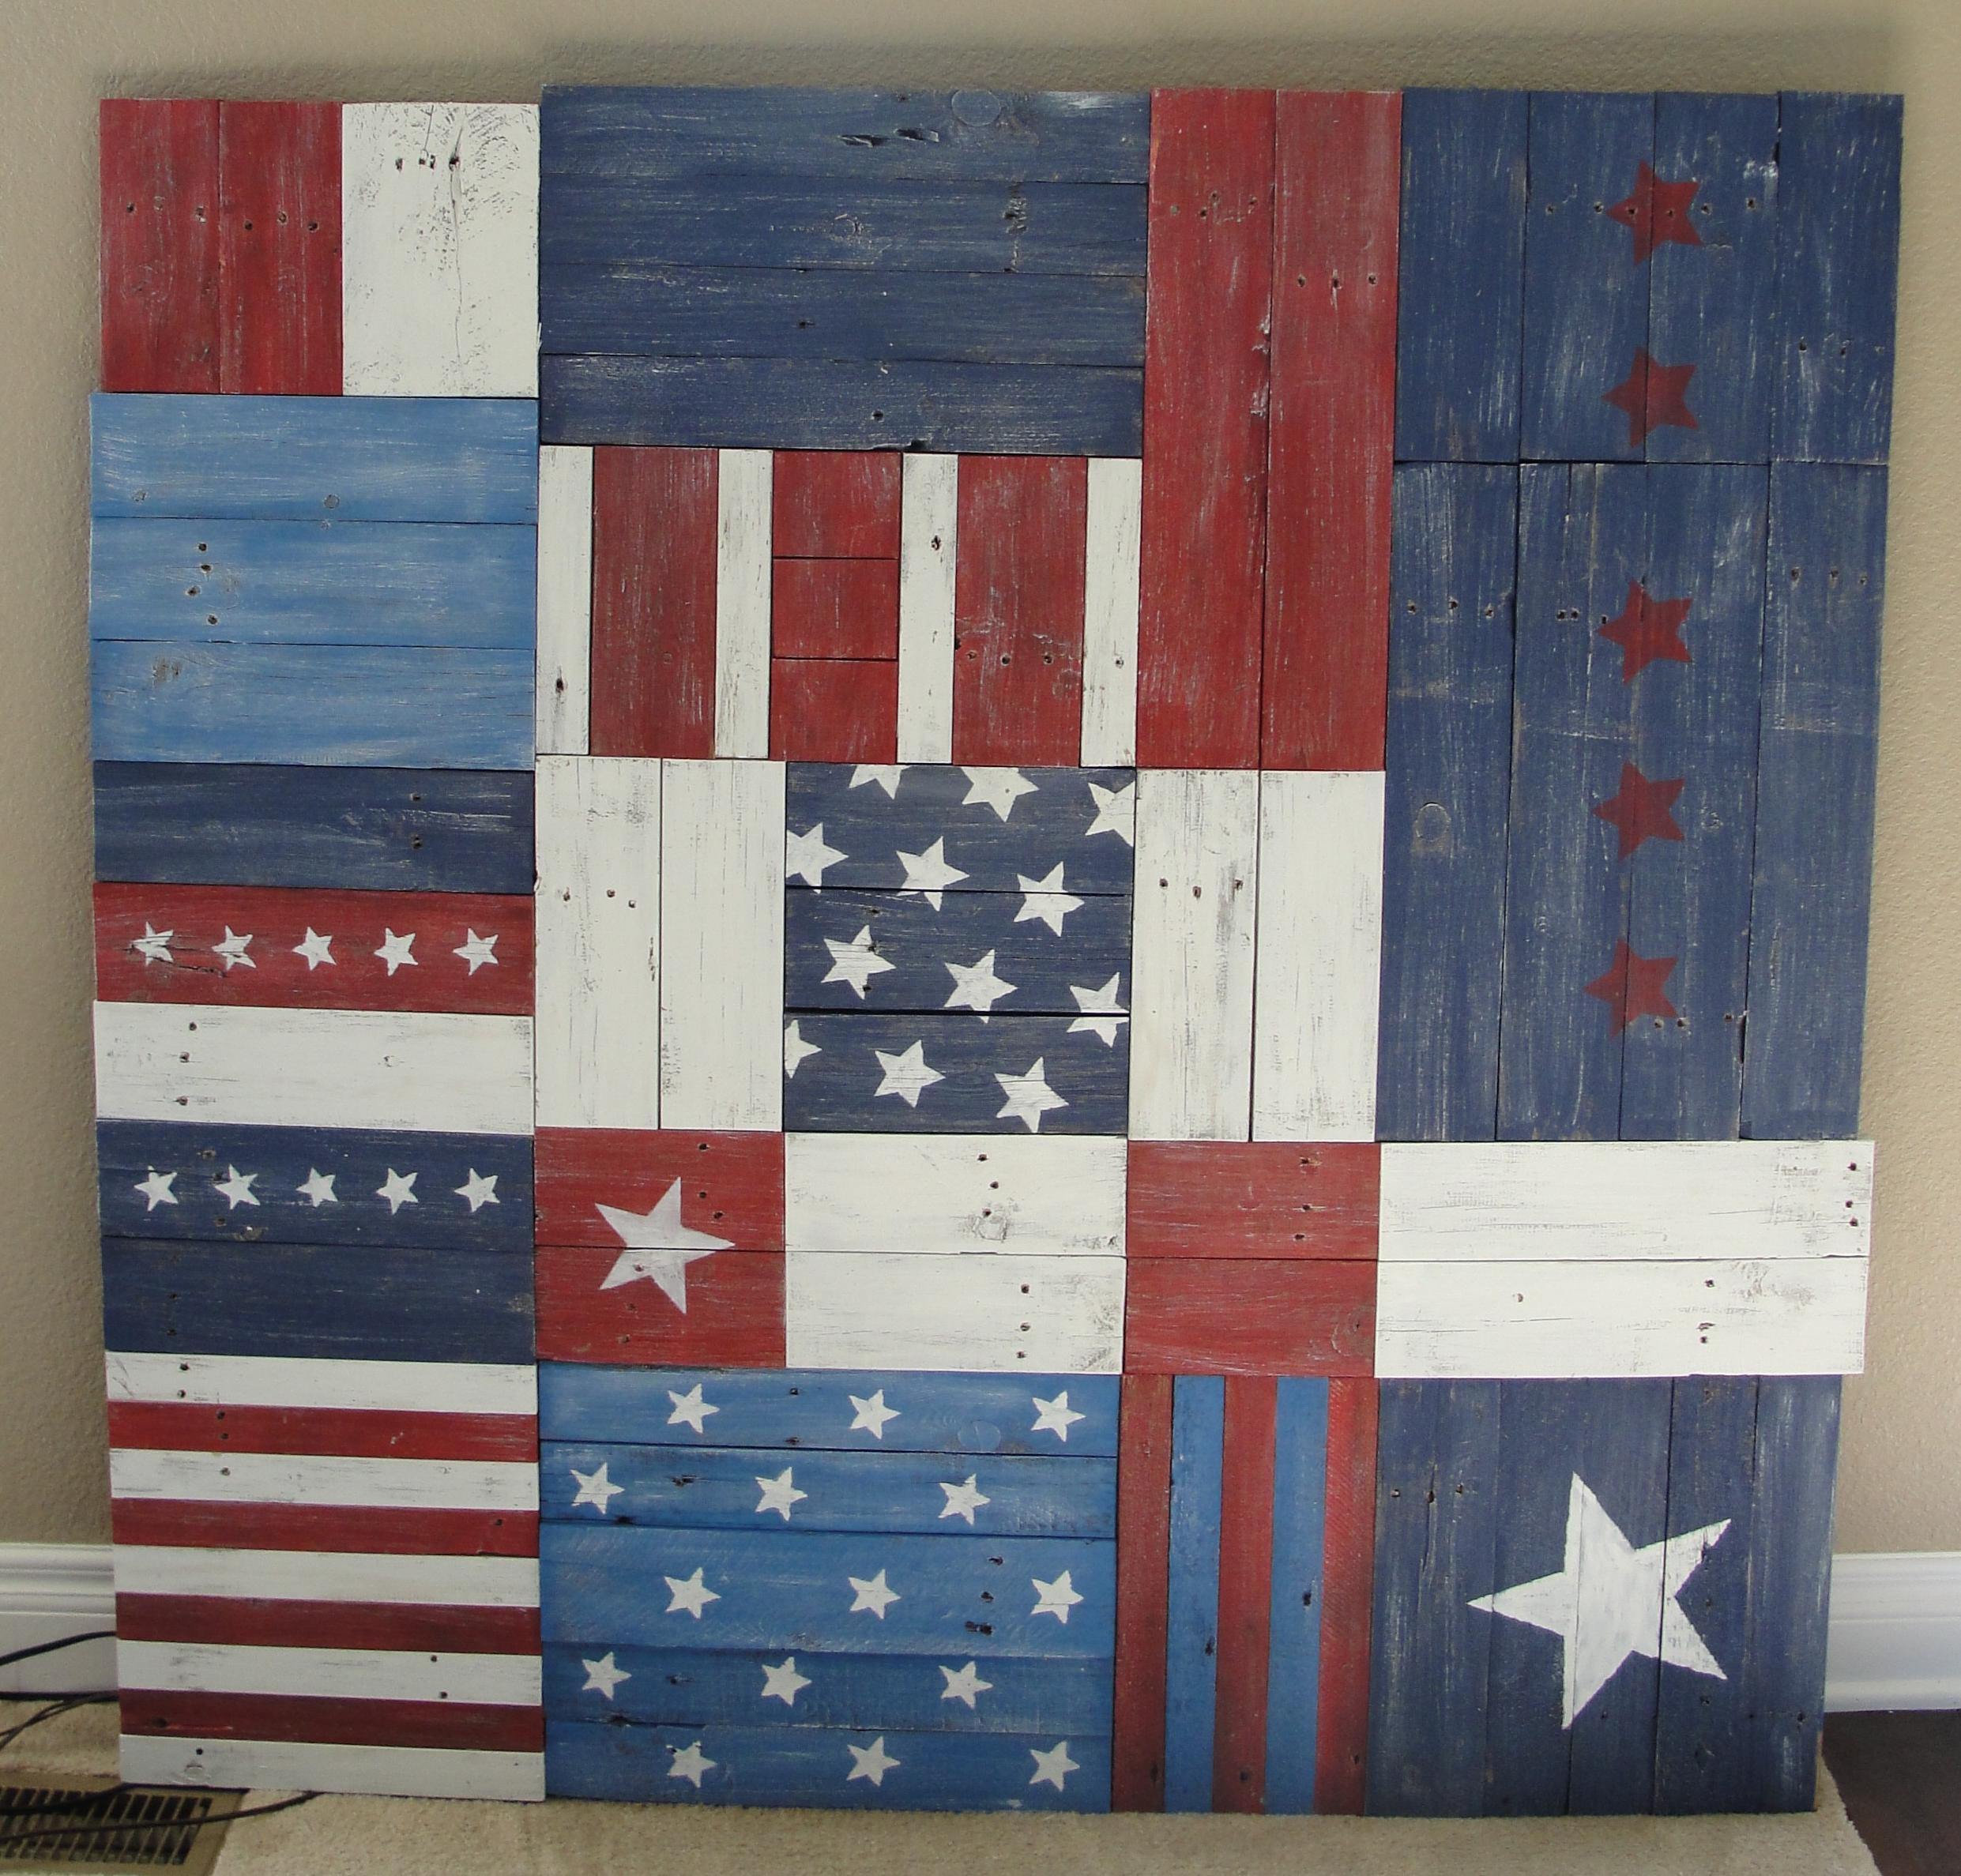
Book shelves
I have had these for a while but never finished with the painting, the most dreadful part...but found some chalk paint that I love, and will always use chalk paint to finish all my projects now.
Built from Plan(s)
Estimated Cost
free- scrap material
Estimated Time Investment
Afternoon Project (3-6 Hours)
Finish Used
I used Annie Sloan Duck Egg and made my own white chalk paint with a recipe found online that worked great with Paris Plaster, water and flar behr paint, I only got a tester for $3, plaster $6. Annie Sloan $65.
Recommended Skill Level
Starter Project
Comments
Wed, 03/27/2013 - 23:38
Cute and functional
Love these. Also love that you mixed up your own chalk paint. :) Shelving in my daughter's room is definitely a toss up between photo ledges and these now.

Thu, 03/28/2013 - 15:54
Thank you, can't wait to
Thank you, can't wait to start on their new bed. ;0)
4x4 Truss Beam Table and bench
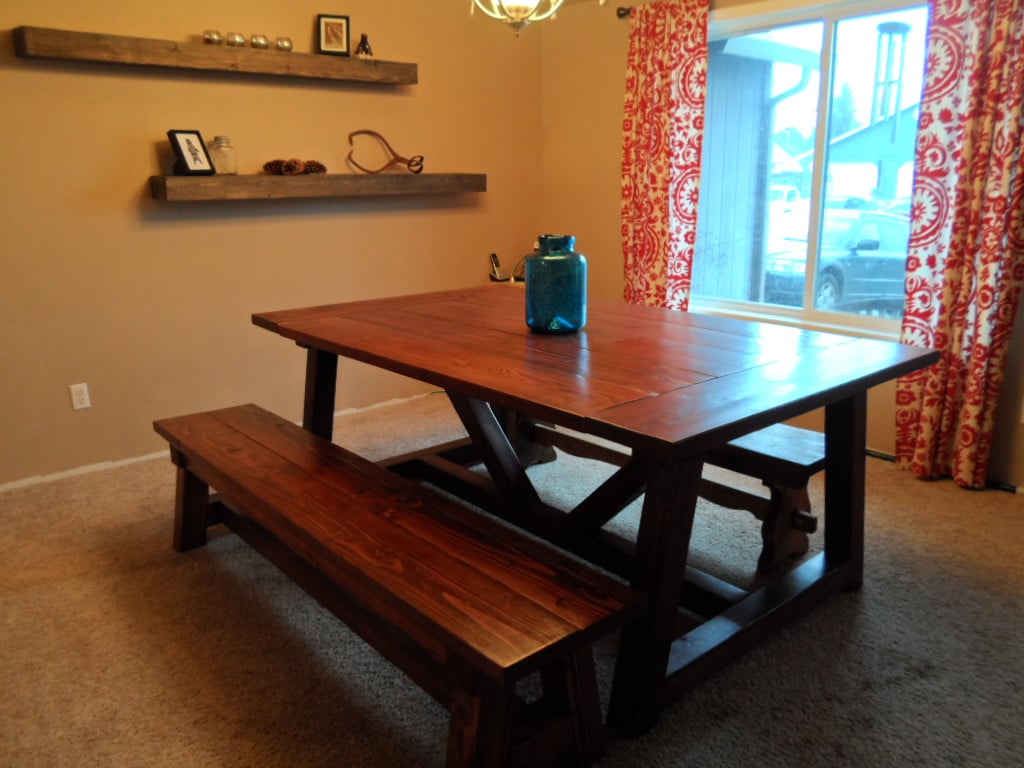
Love this plan and the table and bench turned out exactly as I hoped. I did it by myself except for a little heavy lifting from my sweetheart. I researched the finish online and I am so happy with the results.
Built from Plan(s)
Estimated Cost
With finishing products and screws this was approximately $200
Estimated Time Investment
Week Long Project (20 Hours or More)
Finish Used
Minwax Pre stain conditioner, Minwax English Chestnut *( 2 coats), Varethane Poly *( 3 coats) then #0000 steel wool to smooth the bumps then Minwax Paste wax hand rubbed until the finish was perfect.
Recommended Skill Level
Intermediate
Comments
Tue, 02/10/2015 - 08:19
Looks great!
We have been shopping for tables and cannot find anything we like for a good price. I keep going back to building one myself. Your table top looks great .. nice and flat. Did you follow the plans to a T, did you use a kreg jig?
Tue, 02/10/2015 - 22:13
I did change the dimensions
I did change the dimensions of the top a little. I wanted a wider surface. I did use a kreg jig, it made it a breeze to build. I spent a lot of time on the finish, sanding, using steel wool, and several coats of polyurethane. Thank you for the compliment !