Headboard and nightstands
I made this headboard a year ago and it was my first Ana White project. I finally got around to making the nightstands last weekend and I just adore them. My guest room is finally complete!
I shrunk the size and dumbed down the plans to fit my skill level.
Mon, 10/10/2016 - 09:08
I love what you did! It looks so great! I prefer this style, which is more simplistic than the other. Great work!!
Mon, 10/10/2016 - 10:28
Love how this turned out - the simpler drawers is just as (if not more) beautiful!
Tue, 10/11/2016 - 14:56
Thanks! I wish I would of set up an account before I posted so I could get notifications. I honestly didn't think anyone would notice it :)
Tue, 10/11/2016 - 14:58
I am so excited that people noticed this :) Is there any way of putting this under my account? I didnt make an account until today and I would like to get notifications. I have my project on my facebook page and can prove that I made it with other pictures. Thanks!
Mon, 01/20/2020 - 07:44
I would love to see this in a farm-house (rather than rustic) aesthetic along with drawers under the seats for extra storage. Maybe on casters with a fold up extension on the other side? So many ideas running through my head with this!
Take a deep breath in... then out. Relax as the warm water soothes your muscles. Then look at this freaking amazing end table I made! And this was only my third project ever! Great plans and easy to make.
***Only necessary change to plans was for the decorative Xs. The 2x2s must for the decorative Xs on the small version of the end table must be AT LEAST 25" not 22" as the plans call for. The 22" 2x2 did not reach diagonally (especially when making miter cuts).
I used pre-conditioner on the pine/douglas fir wood before applying the stain.
Two Piece Portable Outdoor Wood Chair
Built from plans from diyPETE.com.
One day project (another day for poly)
Extra Wide Console- we will use in our beach cottage. A little rustic paint job and tongue n groove back board. The paint job was a tedious process. First coat was Semi transparent gray stain, next was a thin coat of Kilz primer, then a light sanding and finally a baby blue stain.
Dana T
Modified the original plan to meet our needs of a laundry sorter. Had problems with the hinges so ditched them. I used dowels with a combination of a chamfer cut on the bottom of the door. Dado-ed the trim on the doors and slide the bead board panels in. The face frame is all held together with pocket hole screws, which I highly recommend because it eliminates nail holes and keeps the face frame square. This was my first wood working project, took me a little long to get it done. Thanks for looking.
Modified January 28
So here are some more pictures of my project. I don't really have any good pictures of the dowels. But what I can tell you is, I drilled holes through the sides of the face frame and the trim pieces and then measured where the holes would be in relation to the "drawer". I then drilled holes in the drawers at those measurements, I was careful to not go to deep. I think I went in half an inch. After that I started at one end and placed the dowels in, then put each drawer in. It wasn't easy but with a little patience it worked. The key is to wax the dowels so they will last longer as well. I also am including pictures of the top and bottom trim. On the top the original plans called for an overhang piece and I didn't like the way that looked. I ran the top board an inch long on each side and then wrapped it in quarter round trim. I did this because I plan on adding the Mimi Hutch Top. The bottom was built per the plan, but I ran into a problem with my bottom trim not being level and you could tell. So I raised the whole unit on 1 1/2 legs then placed it on a level surface and again wrapped it in a decorative trim. The key on both trims was a nice miter joint. Last picture I added was of my stoppers. I took scrap from the 1x2 trim and cut them to an inch and a half or two (can't really remember), then using the Kreg Jig drill bit drilled recessed holes. I then opened the doors until the side 45s were level then mounted the blocks on each side. I feel that it is better than a chain or string catch. Again thanks for looking and I hope I answered all of your questions.
Tue, 01/22/2013 - 11:29
Dowels! What a great idea! Would you mind sharing how you did it? Could you possibly add some pictures showing the dowels? You did a great job. It looks beautiful.
In reply to Dowels! What a great idea! by moosmani
Tue, 01/22/2013 - 20:11
Yes I will send you the info you requested, I'll try to get it out to you tomorrow or Thursday.
Wed, 02/15/2017 - 11:05
Can you send the plans to me?!?! I need this for my new home! [email protected]
Thu, 01/24/2013 - 09:27
I love what you have made! Could you post pictures of the top and the bottom trim? I'm very impressed that this is your first project!
Sat, 11/16/2013 - 18:23
I am a little confused. I love the three bin laundry sorter, but everyone is mentioning plans. I am not finding plans for it on the site. Also, what goes in to hold the clothes? There may be obvious answers, but I am not seeing them. I'd appreciate any help you could give.
Tue, 12/02/2014 - 02:58
I've been thinking of working up one very similar to this, also with 3 bins, but I didn't want to use chain either. Those stoppers will be ideal - do you put them on both sides or is one enough? Thanks for the share!
Sat, 01/24/2015 - 11:29
Hi-
Im not sure if you still have the plans to this awesome project, but if you do, would you be able to share them with me? Ive been looking to make something like this forever, but just couldnt find any help!
thanks,
karah
[email protected]
Wed, 02/25/2015 - 12:35
If you still have these plans, could you please send them to me? [email protected]
THANK YOU!
Wed, 02/25/2015 - 16:45
I am searching for the plans for the gray corner entertainment center. Does anyone still have them that could email it to me….
Tue, 01/19/2016 - 17:43
Hi there! If you still have the plans for this I would love to have them! Thanks a lot
Tue, 04/12/2016 - 18:51
I would love to have the plans for the laundry bin if they are still available, Thank you!
Wed, 02/15/2017 - 07:16
Can i also have the plans! This is perfect for what we want to do in our laundry room
Wed, 02/15/2017 - 11:24
Can you please send me the plans! [email protected]
Mon, 07/10/2017 - 04:19
I absolutely LOVE your laundry sorter!!!! You did a fabulous job and the TRIM, WOW amazing!!!! I've searched Ana's website and cant find the plans' could you please email me the plans to [email protected]. I started building my own furinture back in October 2016 and the reward is amazing... Keep up the good work.
Happy Building,
Lisa
Tue, 01/16/2018 - 19:55
Love this! Can you email the plans to [email protected] please?
Thank you
Tue, 01/16/2018 - 22:18
I'm too new at woodworking to be able to tackle this right now, but would love to download the plans for future. My most successful project so far is a pretty standard bookshelf. I got a free plan, with lots of guidelines and explanations, at https://tinyurl.com/ydeup8lo -- it came with a 440 page guide, "The Art of Woodworking" that has tips and techniques, and am plowing through that right now.
Wed, 02/28/2018 - 12:53
This is amazing. I am very new to woodworking. Could you send me the plans please? I would be most appreciatative
Wed, 03/11/2020 - 23:27
I would love to have the plans for the three bin laundry sorter to build for my laundry room. Are the plans available? Awesome work!
Thu, 07/16/2020 - 14:14
Looks amazing!! I want to build one just like that, can you please email me the plans, thanks!! [email protected]
Tue, 01/12/2021 - 06:26
This looks like something I can build. Would you please e-mail me the plans? The address is [email protected]
About This Project
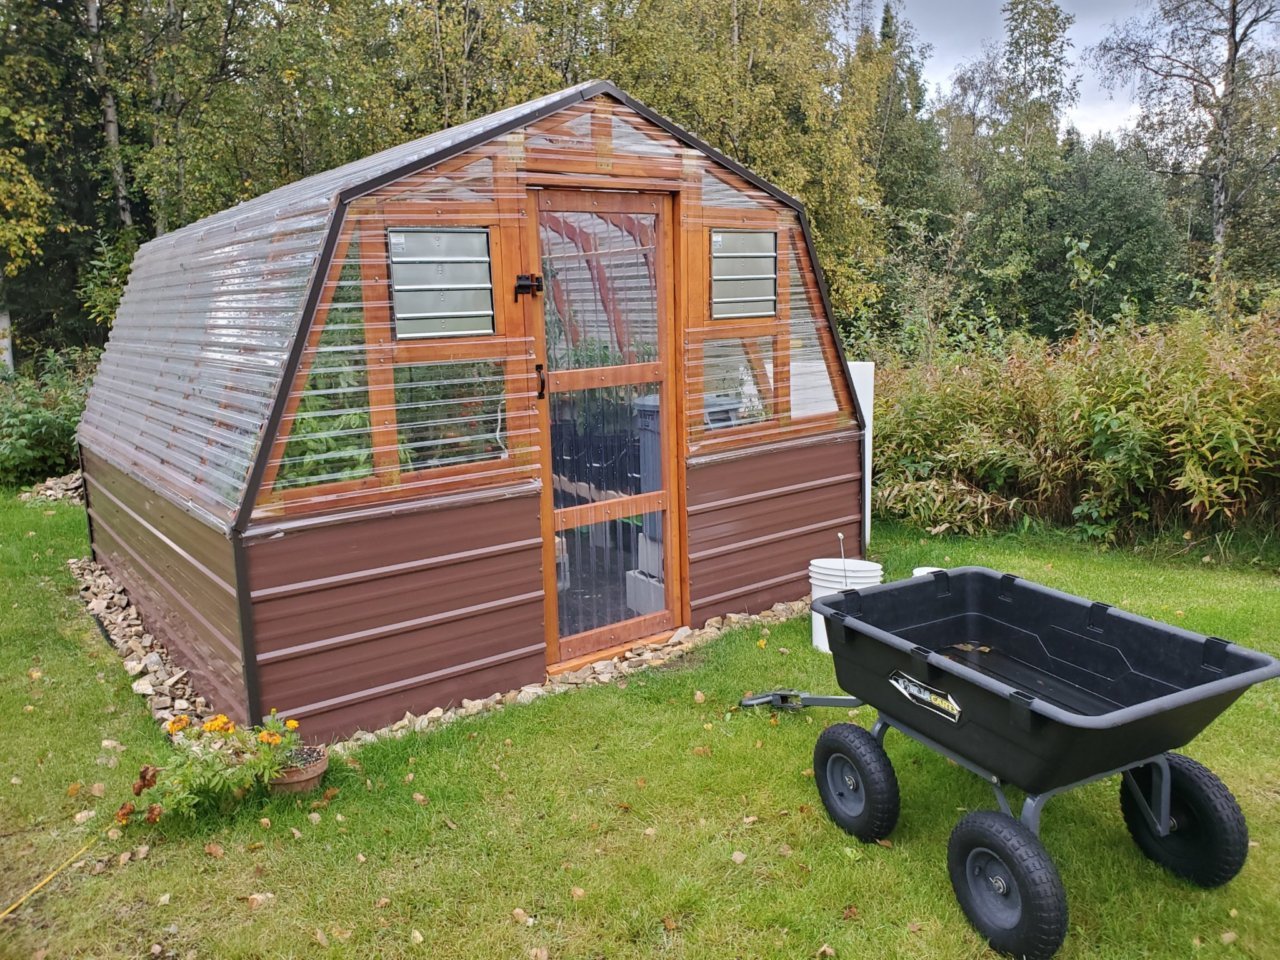
It was truly great for us to find a greenhouse design from a fellow Interior Alaskan blogger. We kept coming back to this design, enough times to where we decided to actually build it.
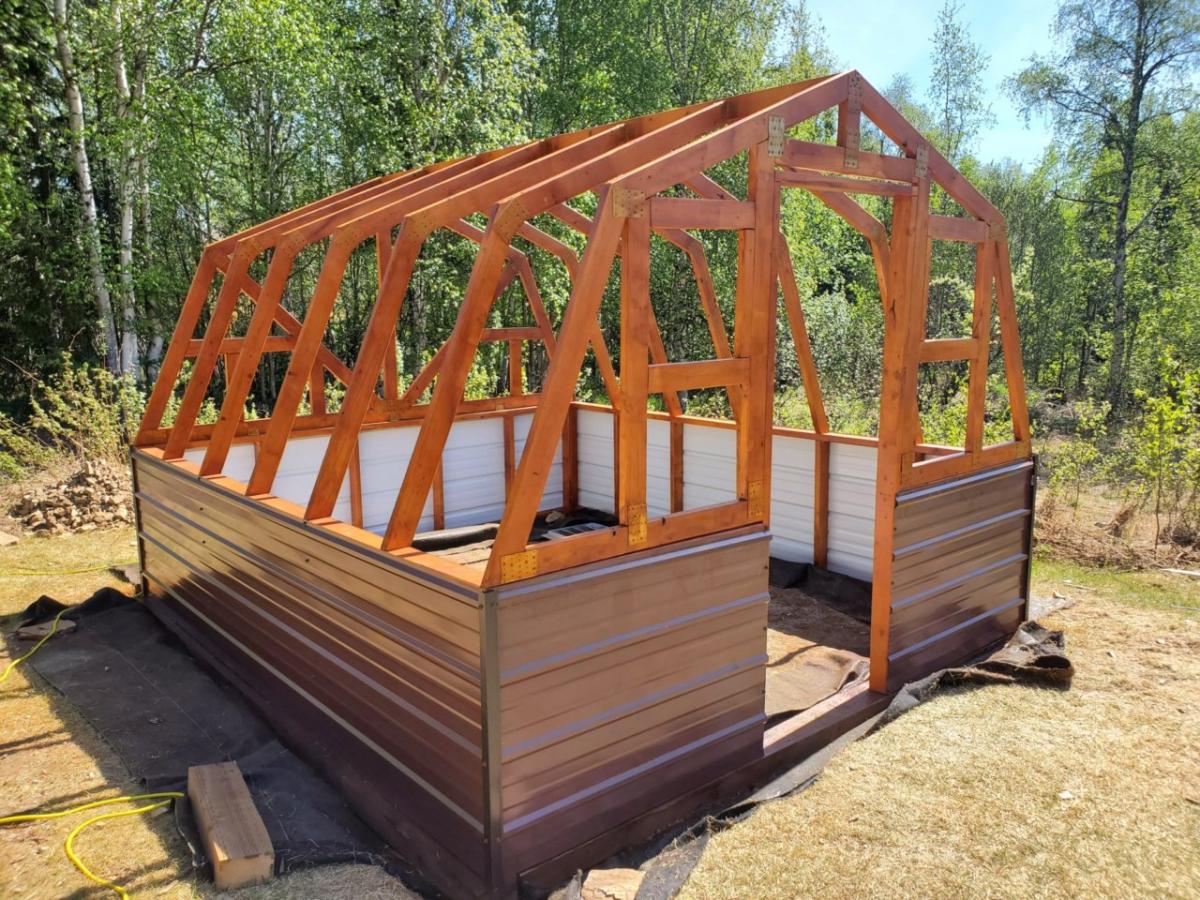
We would be the first to admit that tackling a gambrel style building was slightly intimidating and not what we had in mind for our very first self-built building! But, we faithfully followed the cut lists and directions. It turned out beautifully! If you're in the same boat, have confidence that you can build this too!
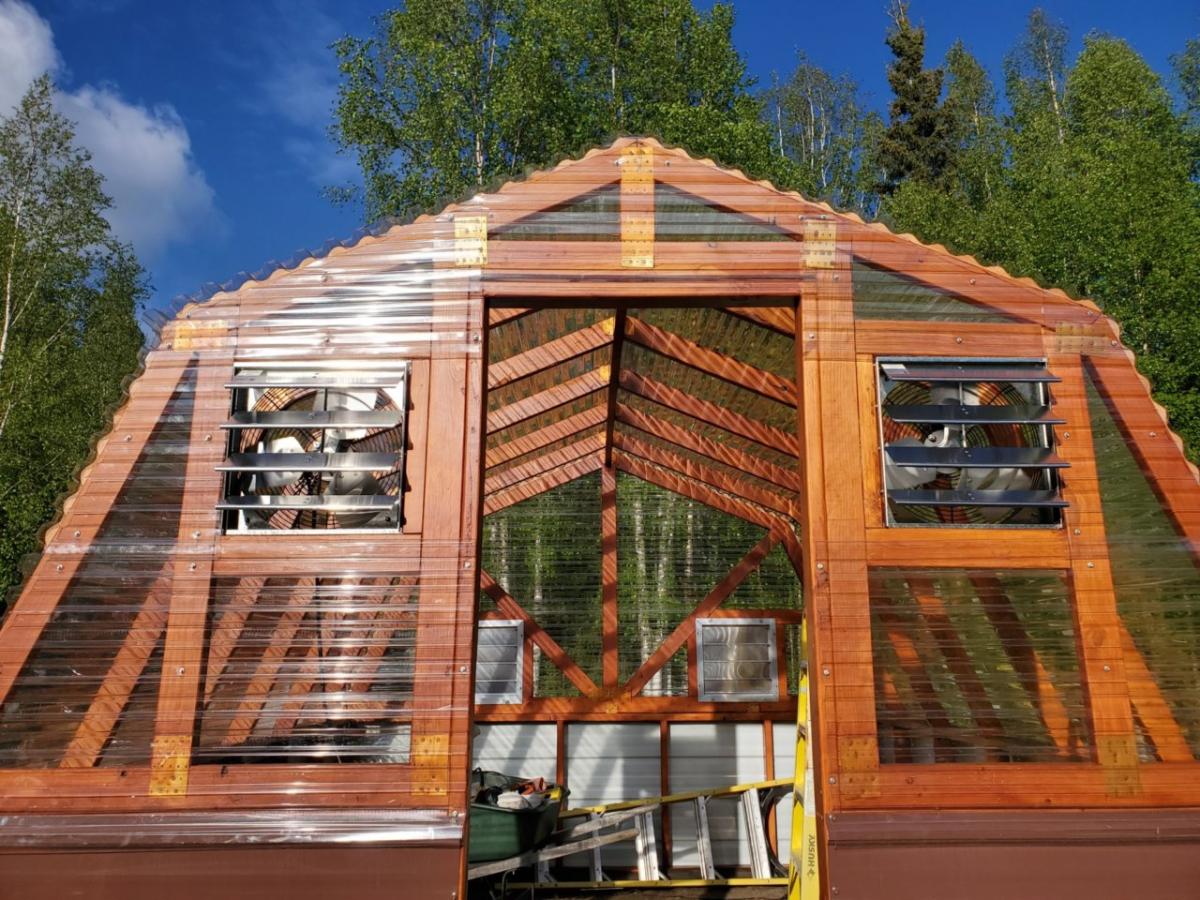
We love the options available for making it your own. We decided to stain the greenhouse lumber of ours to match our cedar sided home. We also built a semi frost-resistant foundation, since we're a little north of Ana at 65 degrees and sometimes experience frost heaving. We also added full climate controls to ours, adding both fans and louvers that keep our greenhouse at perfect temperatures.
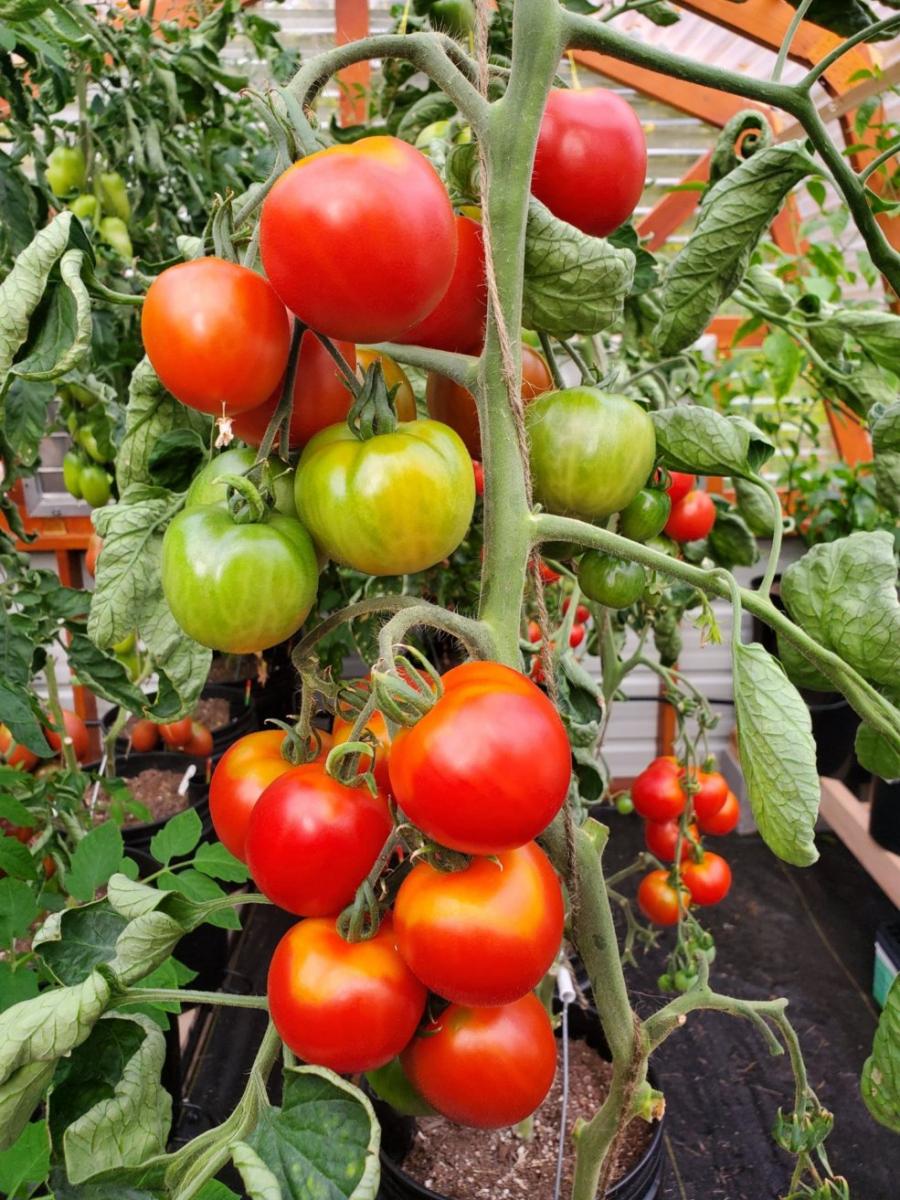
The performance has been great! Building this greenhouse has been the single greatest thing we have done in our years of subarctic gardening. We might even consider building a second greenhouse down the road. No matter how big your greenhouse is, it's never quite enough!
Thanks for the great plans, Ana! We appreciate your work!
We made two of the Picnic Table to Bench units in the month of March. The second one is in the bottom part of the picture hidden by the wood rack. I took the picture from our upstairs porch. My husband is still amazed that we accomplished this. He is not a DIY'er. We built a new house in 2016 and had a bunch of leftover wood sitting on our (unfinished) basement floor. We managed to build our benches mostly from that wood. We did have to buy 3 more pieces to finish the second back/tabletop. Then we got the balance of the wood moved out to our storage barn. The color is deck stain from our porches. I chose 20 hours as our time frame because the used wood required a lot of sanding and prep work. Our time frame was probably about 3 weeks but we are 68 and 73 years old and were really in no hurry. The plans were very simple to follow. We made them 6 feet long.
We mainly followed the plan but made some adjustments because we wanted the “ugly” side to be able to house brooms and mops and we cut the width down just a tad. We absolutely love how it turned out!! And we definitely needed this in our space!
I used the basic design principles from Ana's site but decided to use 3.5x6.5 round fence posts (purchased at my local Tractor Supply Company) for a different look plus they are a little cheaper than 4x4 posts. I also used pressure treated 2x4s for some added strength and perhaps longer durability. I used Ana's cedar fence pickets idea for my roof (these pickets are used as walls on one of the other shed plans on this site). I didn't need a very robust roof as my firewood shed sits underneath the deck which provides a lot of protection from the rain. I attached the structure using 3 inch deck screws and the roof with 1.5 inch deck screws (nails would have been more than adequate for the roof but I had the screws on hand).
I did run into some problems due to my design changes. Most of my issues involved attempting to square up the round posts which are much closer in shape to a jagged stick than dimension lumber such as a 4x4 post. If I had to do it over again I would not have used the round posts. Constant tweaks and adjustments to the posts significantly delayed my build time and frustrated me at times. I was just barely able to wedge my woodshed in between the 2 deck posts which actually came in handy as I was able to secure the shed to the deck posts with 3 inch screws...making the shed very solid! The final issue I discovered after loading up my wood shed. The 2x4s at the bottom of the structure began to sag. I fixed this by using my floor jack to raise them up and placed 8 inch tall 4x4s underneath (2 in the front and 2 in the back).
Overall I'm happy with the way it turned out and I really love all the plans on this site...GREAT ideas!!
Threw this together over a 4 day weekend. Love how light these chairs are.
Substituted edge glued project panel for the table top and seats instead of joining several planks.
Used a combination dark walnut, jacobean, and early American stain on the finish.
They were simple to make and the plan was easy to follow. The only modification I made was adding the 1x3 topper in place of the longer legs sticking out of the top.
Fri, 07/19/2013 - 06:36
Adding these to my to-do list for spring (yes, I plan ahead). I'm thinking of elevating and elongating them to fit around a bay window.
Thank you so much for the two videos we watched of you and your husband explaining and demonstrating how to build garage shelves. We used your plans as a guide. We chose to add shaker style doors to create cabinet shelves. We absolutely love them. We are not handy as you can see we had a living room lamp for a work light and a lifetime table as a work bench. Thank you!
The Paulsons
My wife and I are expecting our first child so I wanted to make a toybox for his toys. I liked the plan that i found on this website since the front piece had the cutout to reduce fingers getting pinched. I also added some spring assisted hinges to make help the lid stay up and also close a little softer than just regular hinges.
This was a build from a picture and made to fit into a space we have in the laundry room. Used the Kreg jig for much of it.
Tue, 06/05/2018 - 14:52
Awesome laundry sorter! Can't wait to see the paint/stain!
Thanks so much for sharing a brag post - much appreciated!
Ana
Hi friends!
Jen Woodhouse from The House of Wood here.
After sharing my new dining room, I got a lot of requests for plans for my dining table, so I’m thrilled to finally deliver. The box joints on the legs add just the right amount of detail to this dining table, don’t you think?
Be sure to tag me @jenwoodhouse if you share photos of your build on social media. I'd love to see it!
You can get all the details for this build on my website jenwoodhouse.com
Essential Low Bunk Bed by Brian James
I adapted the plan to make a stand for our printer and shredder. Except for one board, I was able to use scraps so my total out of pocket was $9! I did plane the 2x material to 1 1/4”, and also used 2x material for the base to add a little strength to hold the shredder. Thank you Ana White, for generously sharing your plans!
I used Ana's Farmhouse Potting Bench plans and modified it to be more compact and left out the x detail. I built it for under $40 in material.
Modifications for Shopping and Cut List - Construction and placement is same as Ana's original plan, so make sure you look that over.
3 - 2x6x8
3 - 2x4x8
1 - 2x2x8
FOR 2 Legs
4 2x6 @15.5"
2 2x4 @34.5"
2 2x4 @54"
(cut the 34.5 and 54 out of 1 board and repeat)
2x2 Cross Supports
3 2x2@28"
2x4 Cross Supports
2 2x4@28"
Center Tabletop Support
1 [email protected]"
Bottom Slats
4 [email protected]"
Tabletop Boards
3 2x6@36"
Top Cap Board
1 2x4@37" leaving 1/2" overhangs