Fancy x farmhouse table
![](/sites/default/files/fancy%20x.jpg)
Barnwood fancy x farmhouse table.
Followed the plan exactly. Added an extra 6 foot board across the back for better pillow support. Got the 24" cushions from the big box store. With one extra 8 foot board + left overs, I have enough to make a modified, small 34"x17" coffee table from the 2x4 plans linked below, which is perfect for the space I need. Will add a photo for that when I'm done.
My first time building anything. Came out great. Thanks for the great instructions!
Annie K
The bed was a wedding present to my wife. I got rough cut, kiln dried hickory at a local sawmill, planed, and joined it to get the finished lumber. The lumber was sanded with three grtis with a random orbital sander and wet sanded once. The posts are laminated hickory slats that I inleted for the rail hook hardware. The head and footboard slates are tongue and groove, fitted into troughs on the top and bottom. The tops of the posts were milled out to allow the tongue and groove cap to fit flush. Three coats of Golden Oak, and then two coated of polyurethane. Looks great, but really heavy.
We kept the windows square. Our Jigsaw is broken, so we also skipped the heart cutouts. We have a boy and a girl, so we chose a beach house theme. I'm a total beginner builder, and my husband helped me at night after the kids were in bed. It took us about 6 weeks. We used shakes to build the roof. They are pretty affordable from Home Depot. 1x6 boards were considerably more expensive, so we substituted 1x4s.
Thu, 07/17/2014 - 12:51
LOVE the beach theme! We have a little boy now, and I have thought about altering our sweet pea version so it's a little more neutral for a little boy. You did a great job, and I love the cedar shakes. They look great!
These Chairs where fun and easy to build. I used 1x8 for the back. I used counter sunk 1 1/4 in screws and pocket holes and kreig screws. I thought A hinge would not be safe so I screws the tray down with a 2in overhang. Can not wait until Christmas.
So loving this nesting office station❤️! We will have a sofa sleeper in the office as well. So we needed a desk that could be moved to the wall when the sofa sleeper is being used by guest. I saw a post from Ana for her Nesting Grill Station and I came up with the idea to make this nesting office station. The cabinet includes a file folder drawer (which is from Ana's mail boss plans), a regular drawer, cabinet doors with shelves. One of the shelves is a pull out shelf for the printer. I think it came together great! Design for nesting desk inspired by these plans: https://www.ana-white.com/woodworking-projects/nesting-grill-station https://www.ana-white.com/woodworking-projects/mail-boss
Wed, 07/15/2020 - 04:40
I love this! Very creative and practical design and oh so pretty. Nice job!
Mon, 08/31/2020 - 09:47
This looks so good. Great work. Do you mind sharing how you concealed the wheels? Do you have wheels on both pieces?
Sat, 10/03/2020 - 08:35
Hi, Thank you! Actually I didn't add wheels to the design since this will be in an office with thick carpeting. I added adjustable metal foot pads to the bottom of the desk.
I have followed Anna for several years and really liked the Adirondack chairs so I finally got around to making mine, the plans are the same but I made some modification so I could use as much of the recycled mahogany I had. The wood came to me from South America in the form a crates, I kept as much of the original patina as I could as well as the chainsaw kerf marks. The seat was the only part where I used a different wood and that is kiln dried beetle kill pine.
Wow, this was an amazingly fun project! My first Ana White project that I made for my baby girl's first birthday. Way young, I know but it's been lots of fun for this amateur woodworker watch his daughter make lots of creations in this little kitchen. Still to be added is the curtain under the sink. Some things to note--scrapbook paper for the backsplash that I gluegunned on and then modge-podged the surface to create one childproof layer; magnetic metal inserts that I sprayed with chalkboard paint (dual feature!); the sink is made from a thrift store bowl and the faucets on the countertop are really lugnuts gluegunned into nuts and bolts underneath, but loose enough to still turn; and our burners are silver and black painted pieces of plywood (probably the hardest part of the creative process was figuring that out); and lastly our stove knobs are made of toy truck wheels. We also added a fun battery operated light in the oven that I fashioned out of a battery powered LED light, PVC pipe, a light switch from Radio Shack and some wire. That took a ton of time.
What I learned the most in this project was the need to keep being creative and not let reality limit me. With creativity there is always a way! Have fun and enjoy yourself with this one. Our little one regularly gives us "cake" and "soup" that she makes in her little kitchen. Thanks, Ana, for a great forum!
My son made the table and the love seats for his Senior project in high school . What a labor of love. Love they way it turned out. He opted not to do the flag but to stain it all over. It took 5 coats of stain to get the finish we got.
I followed Ana's basic table plans but modified it to have legs in the middle (6 legs instead of 4). I used ballisters/ banisters found out our local Habitat for Humanity Restore for the legs which helped cut down the cost.
Maybe I spend too much time on pinterest... but there's so many great and amazing things to find there!
This Pottery Barn Knock-off Ruler Growth Chart designed by MJ from 517 Creations was definitely one of them.
http://517creations.blogspot.ca/2011/04/ruler-growth-chart-pottery-barn…
Supplies
one 6 foot 1x8
a fine tipped sharpie
stain
clear protective coat
My husband and I built this table for our new home in our garage. It was our first "big" building project, and we LOVE it! We used a weathered grey stain, and three coats of spar urethane on the top. We've been using it for over six months, and it has held up beautifully, despite my three small kids shenanigans, many meals and spills, and crafts galore. The plans were so helpful, and gave us the confidence to tackle this project. Thanks!!
Came out fantastic! I made this one for my son and have now been recruited by my daughter to make another!
We took Ana's original coop plans and diva'd it up a bit to suit our needs and our climate. We added a pop door and decided to split the roof panels into four, three of which open up. We put the hinges on the top of the roof panels so we could easily prop them open. We also added a brace across the bottom of our ladder for support. Since we added a door I believe our ladder is a bit more steep than in the original plans.
Because we put our hinges on top we added lattice strips inside on the top of the door panels that go just under the 2x4 of the roof peak to keep the rain out. We also used a roof cap for the same reason. We went back and added silicone to the strategic places to prevent water leaking into the nesting box while also being careful not to affect the necessary ventilation.
We used OSB for our roof panels instead of T111 because it's what we had on hand and also because we were going to be painting it.
Finally I added handles to each of the hinged panels to make opening easy. And cute!
Wed, 02/27/2013 - 11:11
Love your coop! It's so cute! I need to find a weather vane. We ended up adding a roof cap of sorts - just aluminum flashing really. It does still leak in the nest box, though, which just encourages me to change out the bedding for fresh straw, which is a good thing I guess!
In reply to Love your coop! It's so cute! by anniejw17
Wed, 02/27/2013 - 13:24
Yes mine leaked, too. We added the roof cap and some silicone but that still didn't stop it. So I finally went in and added some screen molding behind the panels in the nesting box. It still isn't quite "leak proof" but it is better. I will share if I figure out how to make it leak proof! Thank You!
Mon, 01/13/2014 - 09:45
These were great plans, thanks for sharing!
I'm new to having chickens so since it's cold now is Massachusetts I'm holding off on getting a couple of hens. The 2 main questions I have are where did you end up mounting the roost? And where did you end up putting the nesting box? I only put a floor on half so was thinking the roost board could be suspended above the ground on the open side. That leaves the 1/2 floor to hold the nest box?? Please any comments on the roost, nest box, watering and feeding systems are welcome.
thx..Bill
In reply to A-Frame Chicken coop Questions by billd333
Mon, 01/13/2014 - 10:03
Hi Bill,
I am actually in the process of writing another blog post about this coop. I have gotten so many questions about the modifications we did and have lived with it long enough to know what I would have done differently. You doing the 1/2 is great and is one of the things I would do differently if we had it to do over again.
I will post an update here as soon as that post is live. In the meantime, feel free to contact me directly at Jamie @ Southern Revivals.com
Thanks!
Jamie
We felt very lucky to have built in shelves in all of the closets when we moved in. We painted them a glossy (easy to clean) color and have tried to make use of them. With little kids its never been very organized, and I racked my brain for a method to fix that. None of my ideas sounded good...tiny little labels from a label maker stuck on the bottom shelf? No....
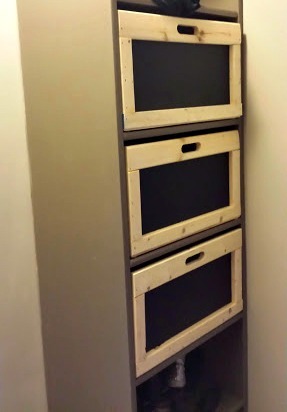
So Casey (inspired by the plans of Ana White's) decided to make these crates. I've been seeing the ones they sell at craft stores all over the place, used for all kinds of things. To maximize the space in the closets he made them custom sizes for each one. Each closet has different widths of shelves and some even in each closet are different heights.
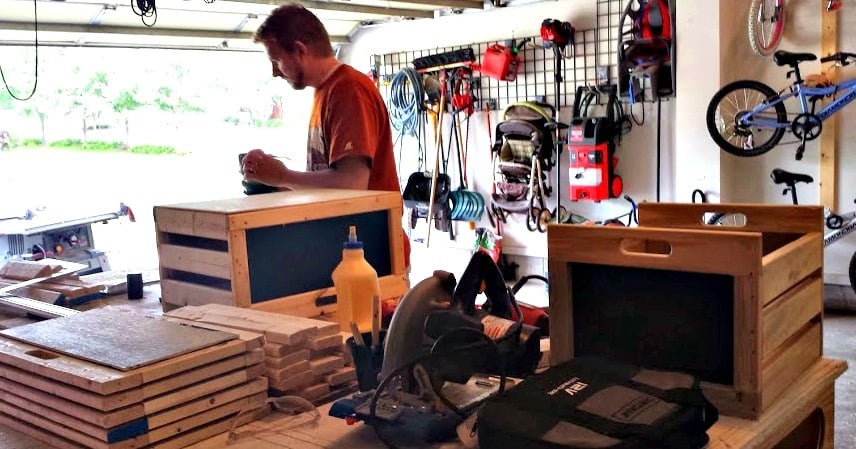
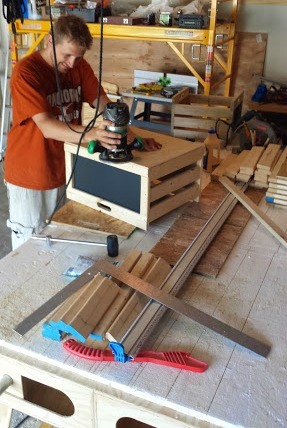
So a bulk of this project was gathering those measurements and planning what and how much wood to buy. Casey takes his time, and the project he's done the planning on for awhile began to take shape today.
We chose chalkboard painted fronts and backs for labeling. I really like the opportunity to change the labels over time as the types of things the kids want kept in their crates changes over the years. It'll take time to figure out what combinations (socks and undies or jammies and quilts?) go best together and take up the right amount of room. So we'll keep a chalk eraser handy :).
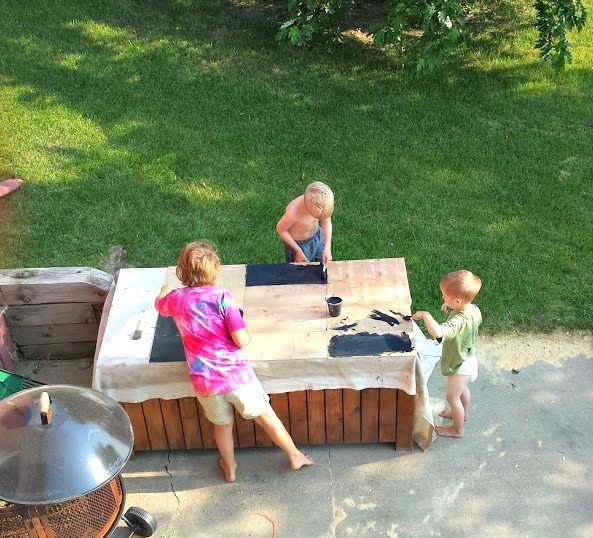
I woke up this morning to the sounds of the kids talking outside. He'd set them up to help by painting the chalkboard ends. I'll admit a few of them have a few more paint drippings than others, but the look of delight at being involved was so worth it. And honestly seeing them all together now I think it was a great idea for him to let the kids get those started.
Having a family project is one of my favorite feelings in the world. Second favorite? The organization in one of my daughter's room (since hers are all done now) that's gonna make putting away laundry way easier for her and I.
I built this square table and 4 chairs. It was a really fun build!! It measures 41Lx41Wx30H.
Thu, 10/14/2021 - 14:49
Awesome job! It looks great as a set, very nice. :) I love the chairs, did you find the plans for these or did you just figure it out yourself? I want to make this table and the chairs you made would be perfect..if I can find the plans. I'd appreciate any help for the chairs. Have a great day.
The design plan from the https://www.ana-white.com/woodworking-projects/2x4-modern-adirondack-ch… worked out really well and with tiny modifications to the dimensions i was able to build this in a couple of days. All the wood used was discards on a construction site plus a neighbor discarding a dismantled old fence. Added my footstool which was fairly straight-froward as well. My wife made a few cushions at home for it and its super comfy Really happy with the way the whole thing worked out. Thanks Ana
My first Ana White project, so fun to build. Now standing at my summer place in Sweden, ready for a whole summer of picnicking.
Marie Stana
Farmhouse table. Tabletop is reclaimed from a church built in 1890 (bought at Manyunk Timer in Philadelphia). So glad we went that route (the knots, grain, etc match on the outer two pieces which you can see in the pic... it's really great, but it is expensive).
Top has only minwax polyurethane, there's no stain whatsoever. Frame is stained with Minwax "polyshades" (Mission Oak shade).
Chairs you see are the "Winslow" chairs from coaster. Highly recommend them. The match was luck.
Omitted the breadboard ends only because my tabletop pieces are 13 in (!) across: that would have been too wide for ends I thought.
Many thanks to this fantastic site for the plans. I am new at this and the table is KILLER; there's no possible way I could have expected it to turn out so well.
I completed this project using pine plywood for the body and doors and a pine board for the top. Modifications included omitting the drawers and adding doors instead. Side doors open up to adjustable shelves, which I used the Kreg Shelf Pin Jig to create the holes. The hardest part was fitting the doors. I would suggest waiting until the unit is build, then cut to size leaving space for your paint or polyurethane finish. The hinges are from Lowes and the knobs are from Hobby Lobby. I did add veneer edging to the front as well as the sides of the doors- this was a bit messy and I spent a lot of time sanding off the adhesive that seeped out the sides. I used an old iron I picked up at Goodwill so I wouldn't ruin my clothing iron.