Community Brag Posts


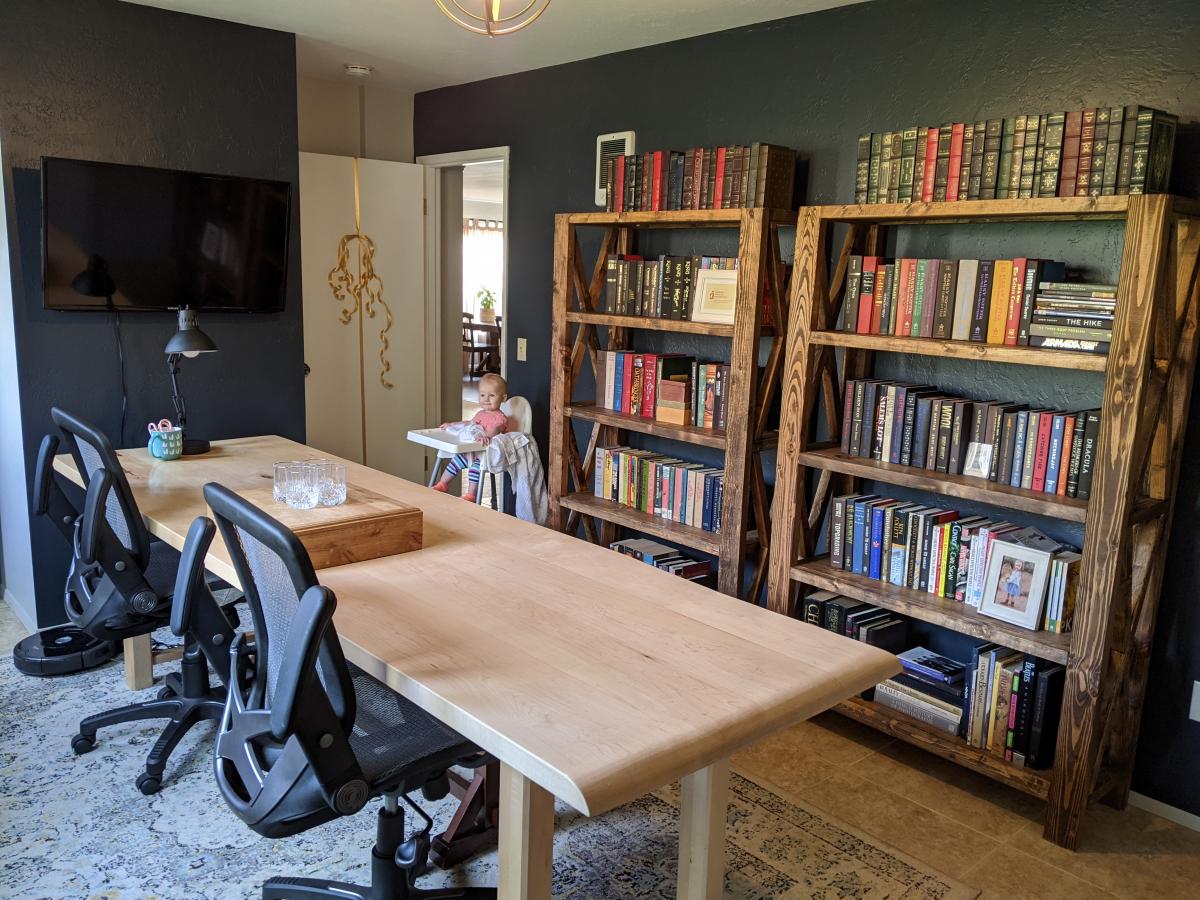
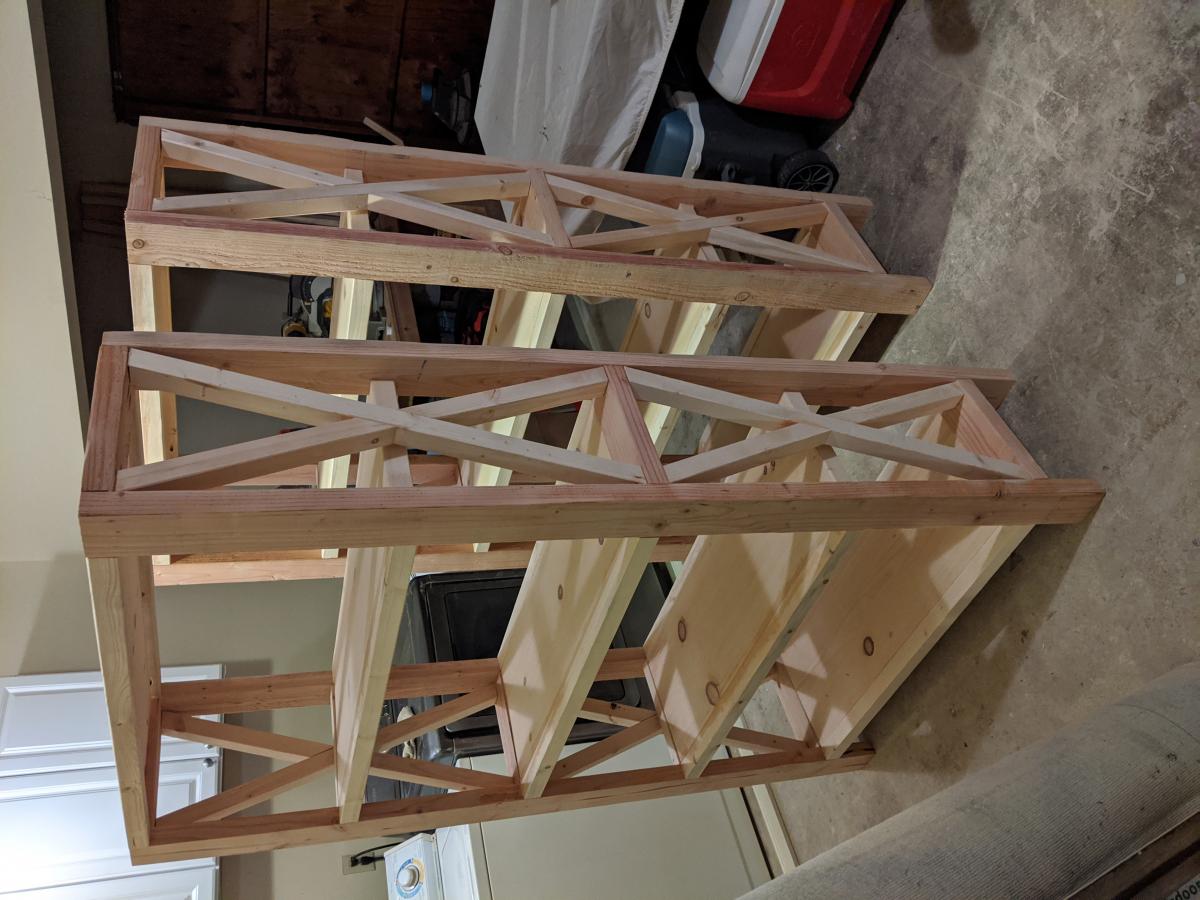
Tall Rustic X Bookshelves
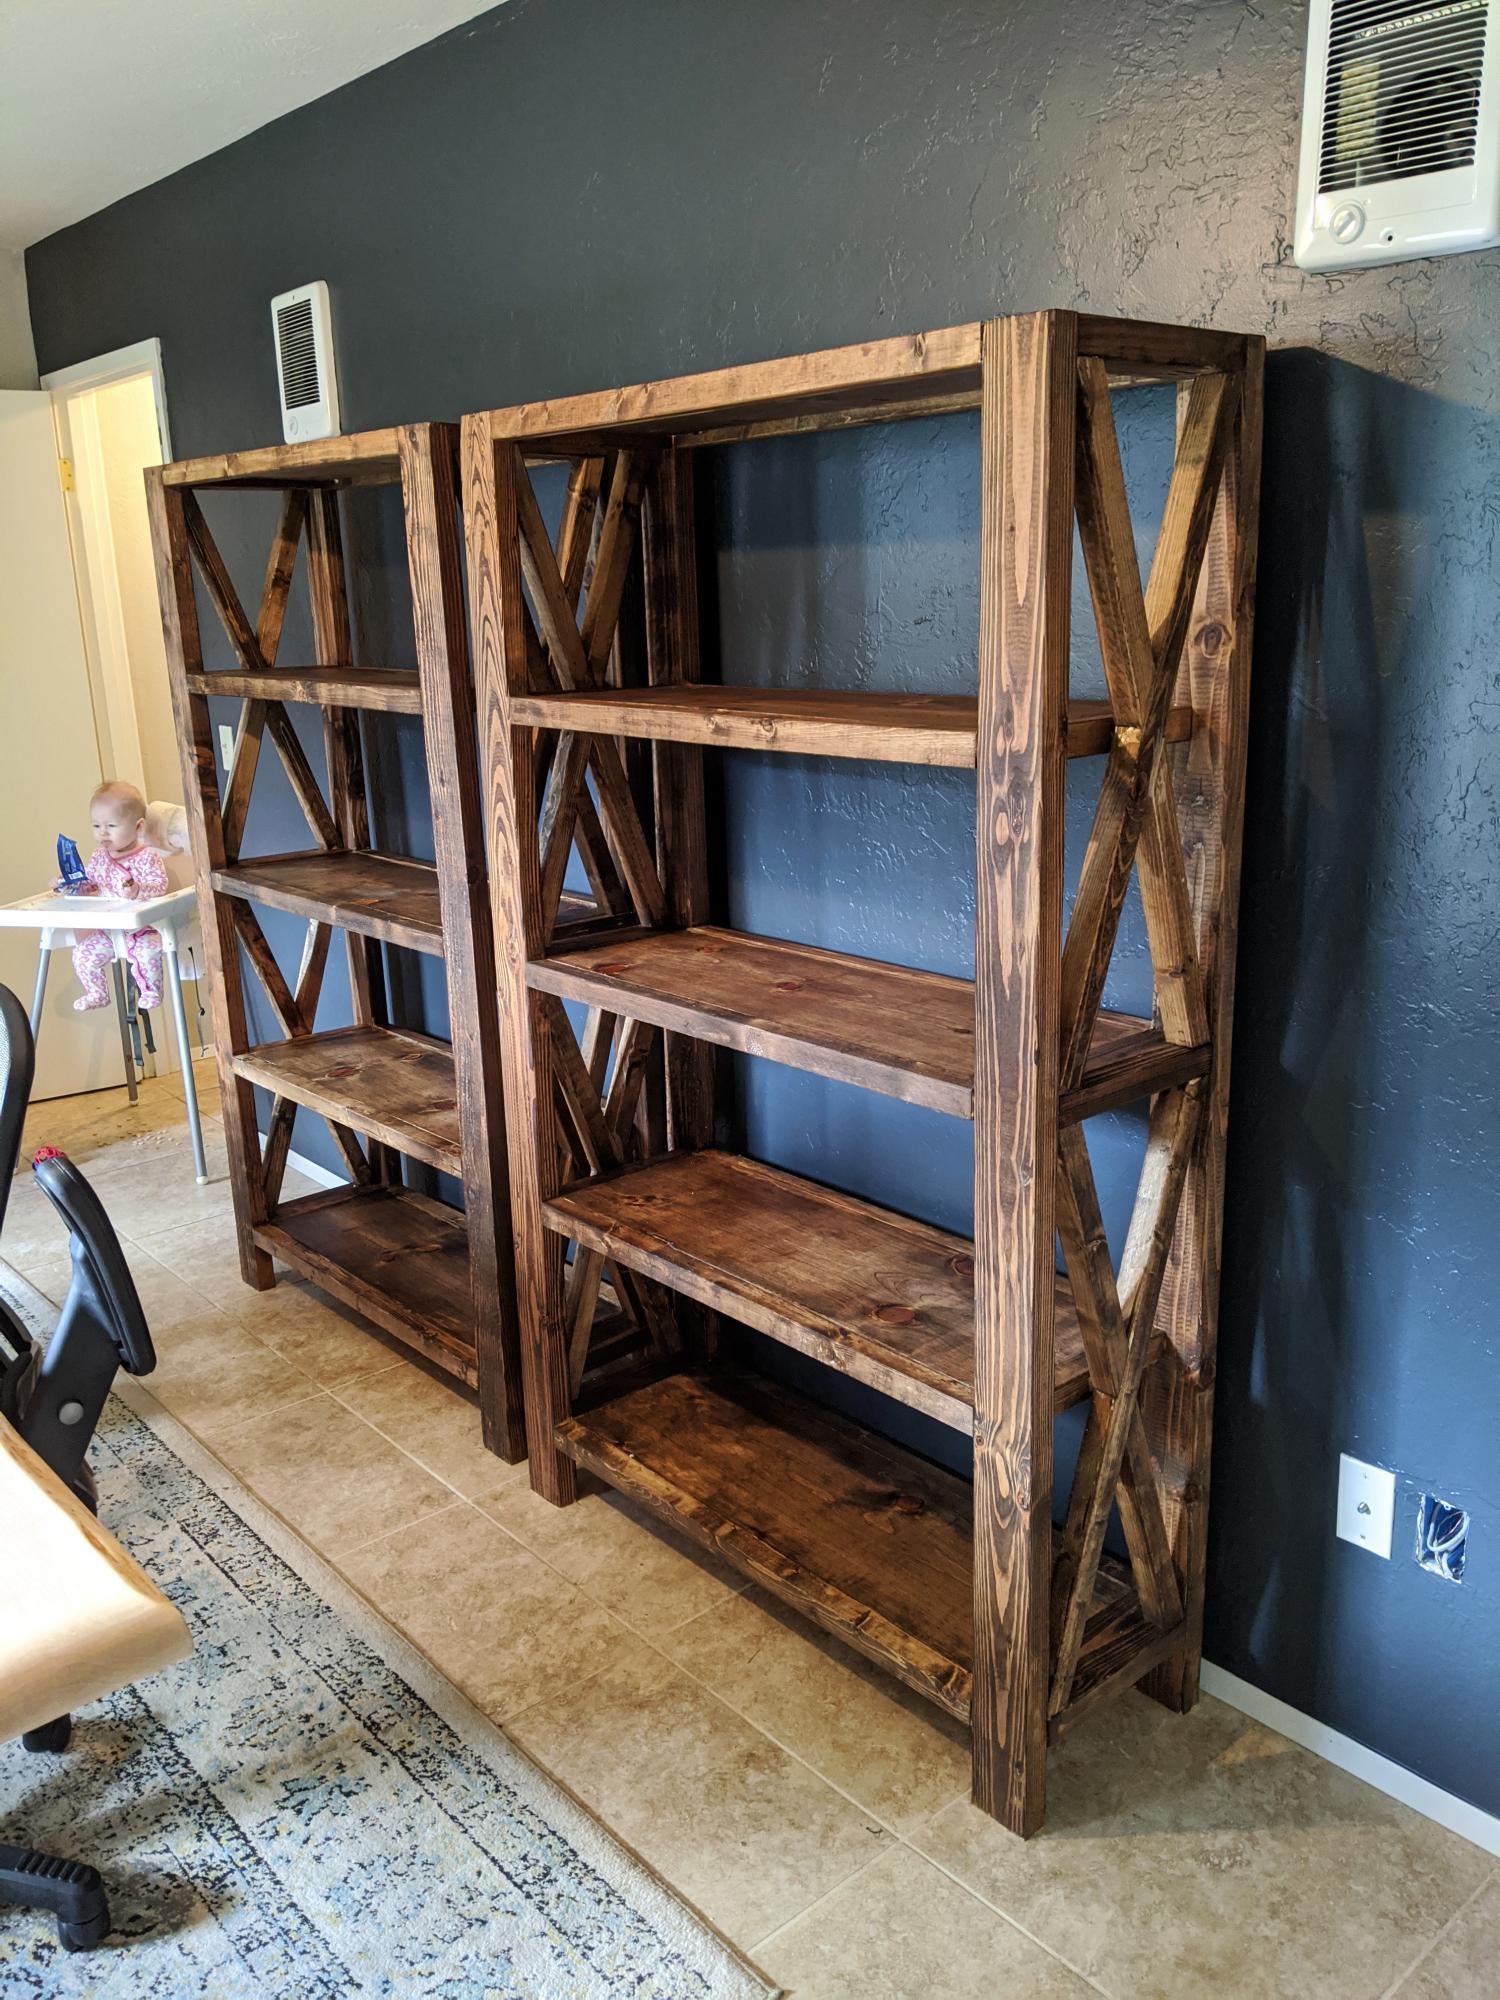
I followed the Rustic X Tall Bookshelf plan to make a set of bookshelves for my husband for Christmas! It was my second ever woodworking project. The plan was really easy to follow and so fun to make! I ended up using an additional shelf piece on the very top for a more modern spin on it. I also bought a pocket hole jig to use on this project. I'm happy with how it turned out!
Built from Plan(s)
Estimated Cost
$75 per shelf
Estimated Time Investment
Weekend Project (10-20 Hours)
Finish Used
MinWax English Chesnut Wood Finish and Paste Wax
Recommended Skill Level
Intermediate
Folding workbench
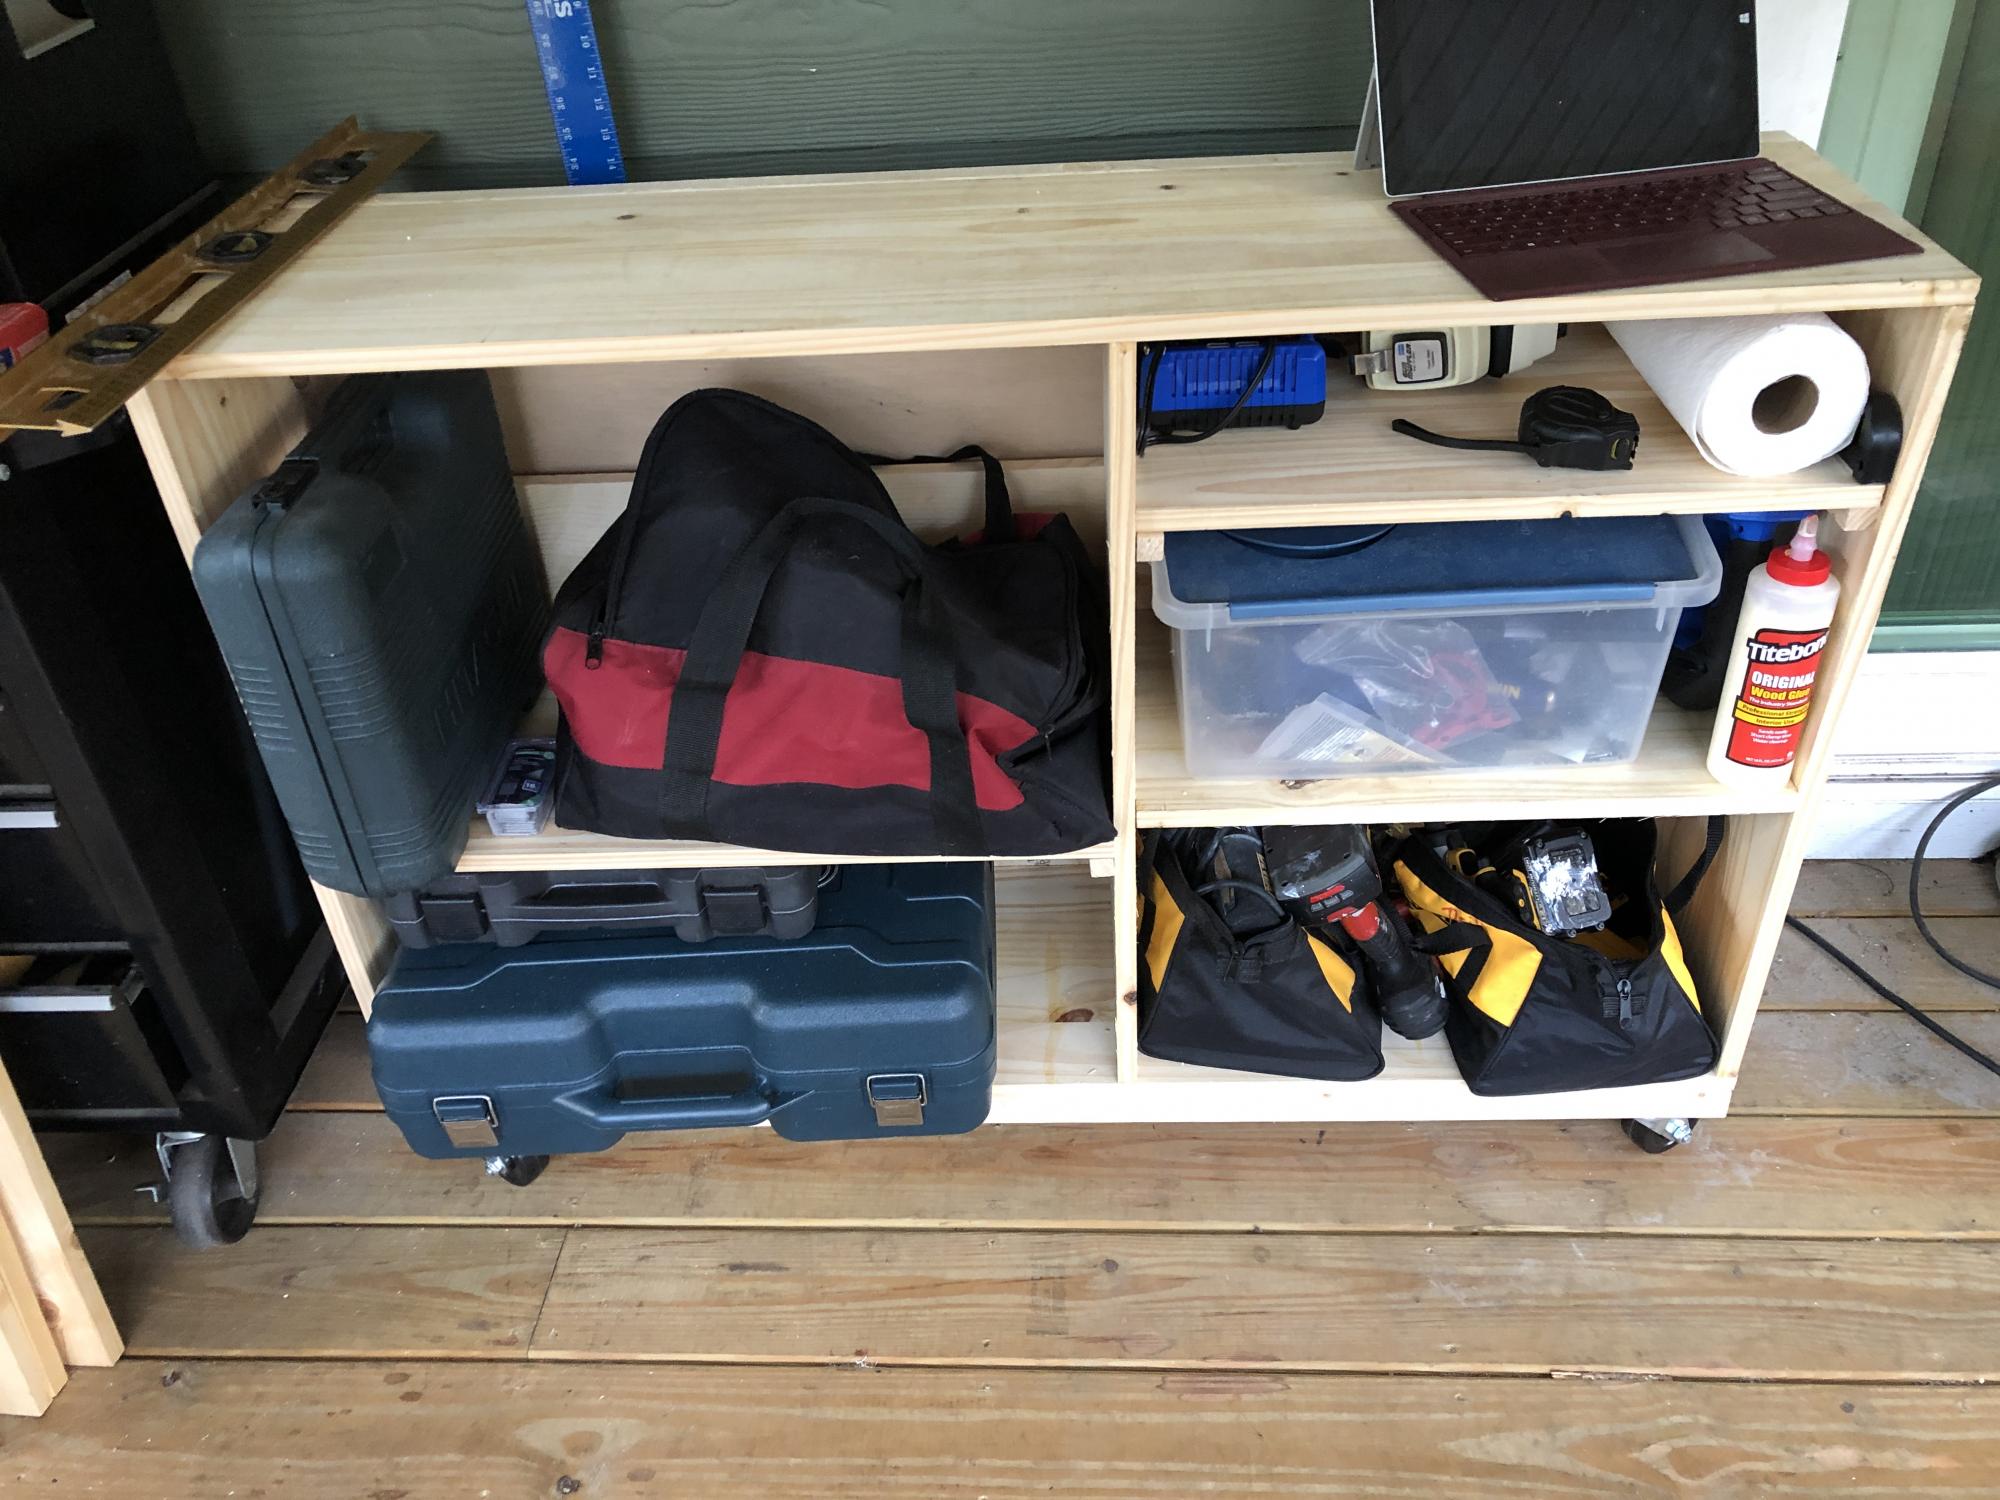
We do not have a garage yet, so this size works great to push out of the way when not being used and pull out for a workbench and also to extend the table top for the saw. The plans were easy to follow and easy to modify. I added a base made of 2x4’s to make it sturdier since it will be moved across a deck vs a level floor. I also added some boards behind the shelf to keep things from falling out the back and adjusted the height to match the table saw top. Next up will be a router table stand to replace the camping footlocker.
Built from Plan(s)
Estimated Cost
$100
Estimated Time Investment
Afternoon Project (3-6 Hours)
Recommended Skill Level
Starter Project
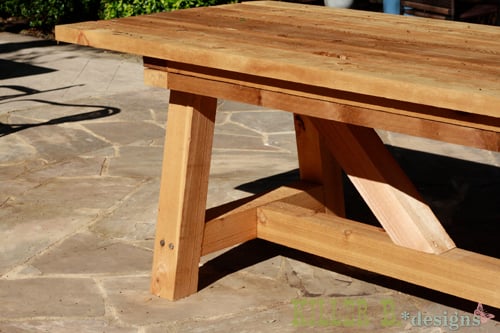
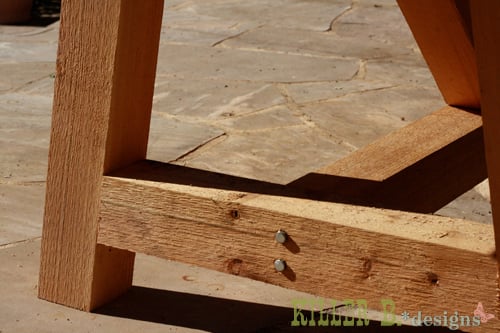
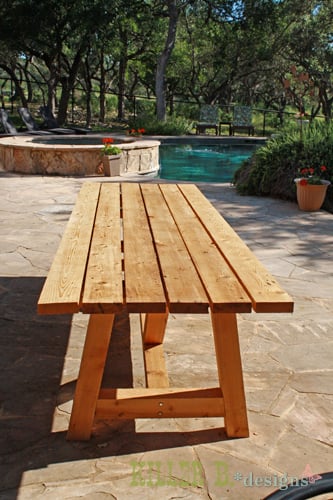
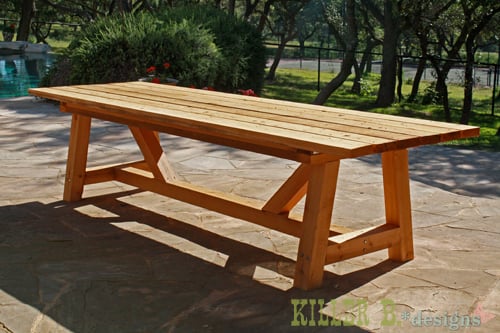
10 foot long Provence Table with 4x4's
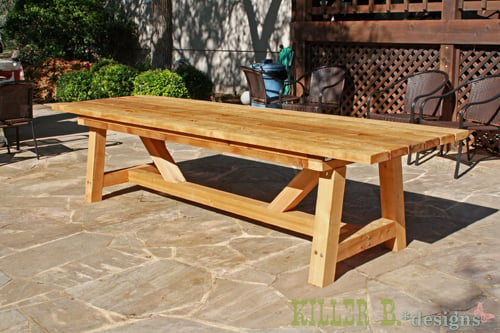
My mom was looking for a new outdoor table, and asked me to come up with something. I found the link for these plans (http://www.thedesignconfidential.com/2011/04/free-diy-furniture-plans-t…) to knock off Restoration Hardware's $4000 Provence Beam outdoor table. Overall I liked the plan, with the chunkier look of the 4x4's. But there were a lot of errors in the diagrams, and the finished height is 34" which is ridiculously tall for a table. So we took it apart and cut the legs back down to change the finished height to 30". We chose rough-cut cedar for it's look and outdoor properties, not wanting to use treated lumber for a dining table. We couldn't find 2x10's like the plan, so we substituted seven 2x6's just like Ana's plan, but left a 1/2" gap in between so water can drain and not pool on top and rot the wood. Also, since we were working with 4x4's for the legs, we chose heavy duty lag bolts instead of screws to join them together. I love the finished look they give. Overall it's a sturdy, yet lightweight table that my mom loves and has already used for entertaining!
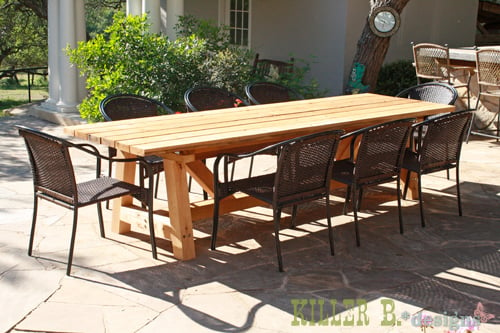
Built from Plan(s)
Estimated Cost
$230
Estimated Time Investment
Day Project (6-9 Hours)
Finish Used
outdoor sealer
Recommended Skill Level
Advanced
Comments

Wed, 04/25/2012 - 10:02
Thank you!
Thanks Brook! It was so much fun to build. I put my dad and husband to work while I was the "project manager" ;)
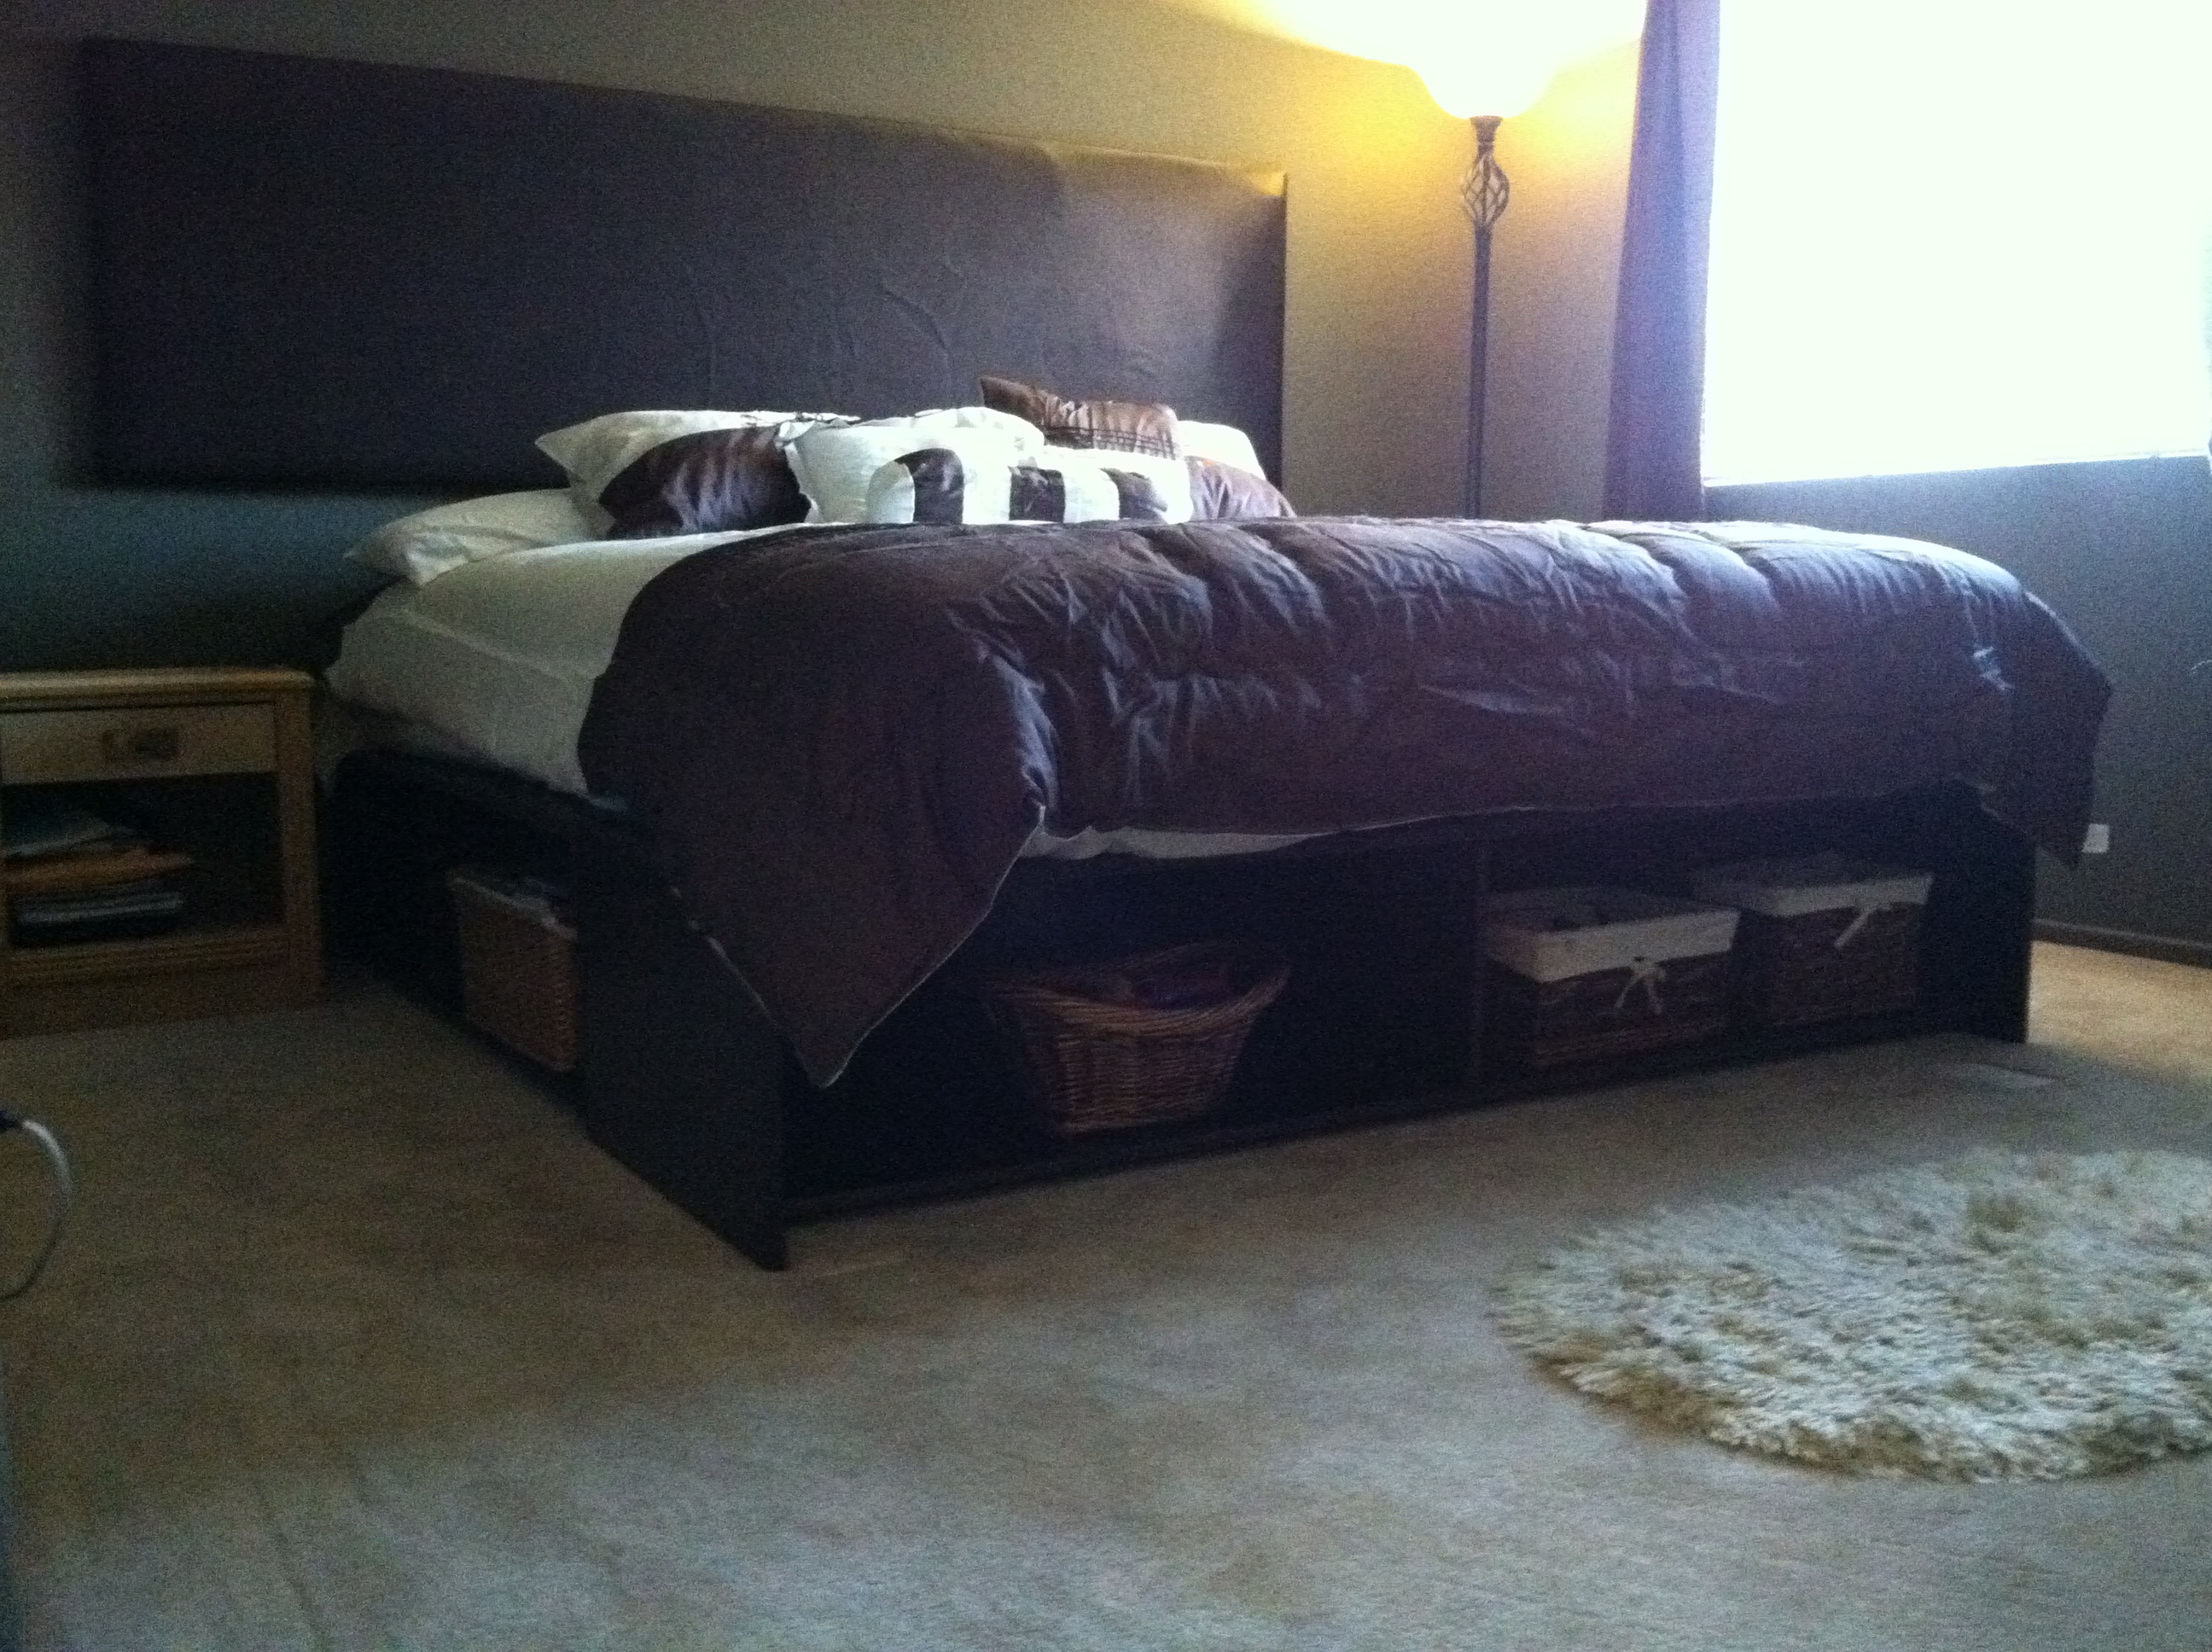
Storage Daybed
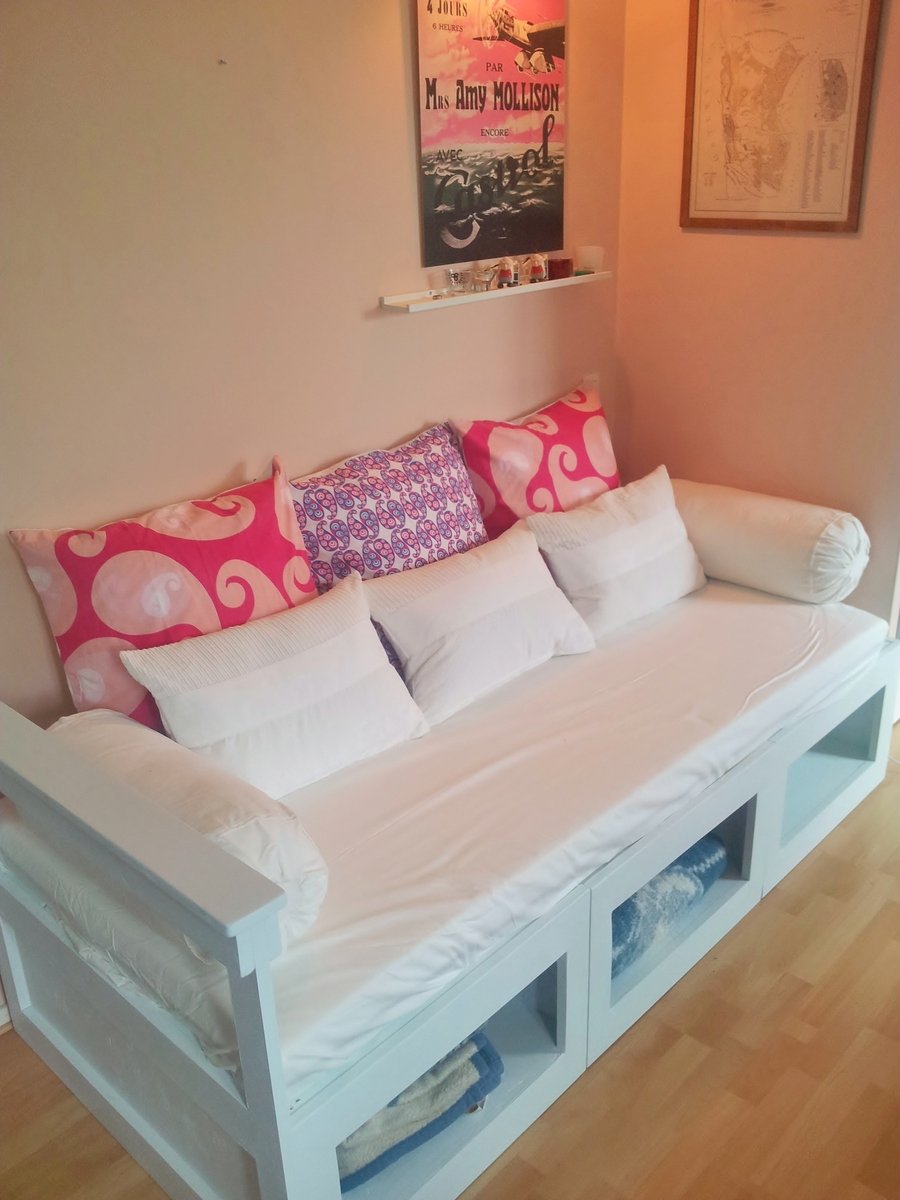
This is the 3 box storage daybed, as you can see I added an armrest on one end as it sits in a corner.
Tips for building this project: Buy a decent circular saw, I used a cheap one and really regretted it. Square your timber, I ended up squaring my timber using a sander, which wasn't as easy as it sounds. Check you measurements, the bottom of one of my boxes was a little short because I didn't double check the measurements and I ended up having to fix it with an extra piece of timber. 2 or 3 saw horses are a real help and lots of clamps.
I used the cutout outline from the link below but had to convert it all to metric since I live in Sweden, also a standard single mattress here isn't as wide but longer then the one used in the linked project. I didn't take this into account and ended up having to buy an extra piece of plywood.
http://ana-white.com/2009/12/plan-stratton-daybed-as-request-by-you.html
I got the single mattress and the pillows from IKEA.
This was a lot of fun and I look forward to spending many hours relaxing on my new daybed.
Built from Plan(s)
Estimated Time Investment
Week Long Project (20 Hours or More)
Finish Used
white paint
Recommended Skill Level
Beginner
Comments
Thu, 08/09/2012 - 10:48
I Feel Your Pain
Nice job on the daybed, I like that you got through all your "dilemmas".
Your saw's bevel function (hopefully it has it) might be nicer than mine but you can try to adjust it.
I have a $50 dollar skil saw and my only complaint is how difficult it is to set the base plate 90 degrees to the blade. I even take care to set the circular saw between two 2x4 when not in use so that setting it on the ground doesn't change the angle of the foot plate to blade. I can cut 90 degrees with a speed square as a guide, but I can't adjust the saw right.
I will be starting assembly of my first furniture project with the wood I cut two days ago. I will see how the pieces go together.
Best of luck on your next project!

Sat, 08/11/2012 - 06:27
Thanks, I'm pretty pleased
Thanks, I'm pretty pleased with it. Yes that was one of my problems as well, trying to get the base plate set at 90, I found that if I leaned on it too much it flexed a bit which isn't good. Also by the end I had a pretty blunt blade or I was getting pinching or something thing because the plywood had some shocking edges with splintering. What I would really like is a proper saw table, but for now that's just a dream. Good luck on your project.
Wed, 08/21/2013 - 10:50
Armrest
Hi there! I was hoping that someone on here had added the armrest! Would you be willing to post a pic of the end of the bed so that I can see how you configured it? Im goint to be starting this project soon for my daughter, and need to strategize some armrest ideas for hers.
Thanks so much!!
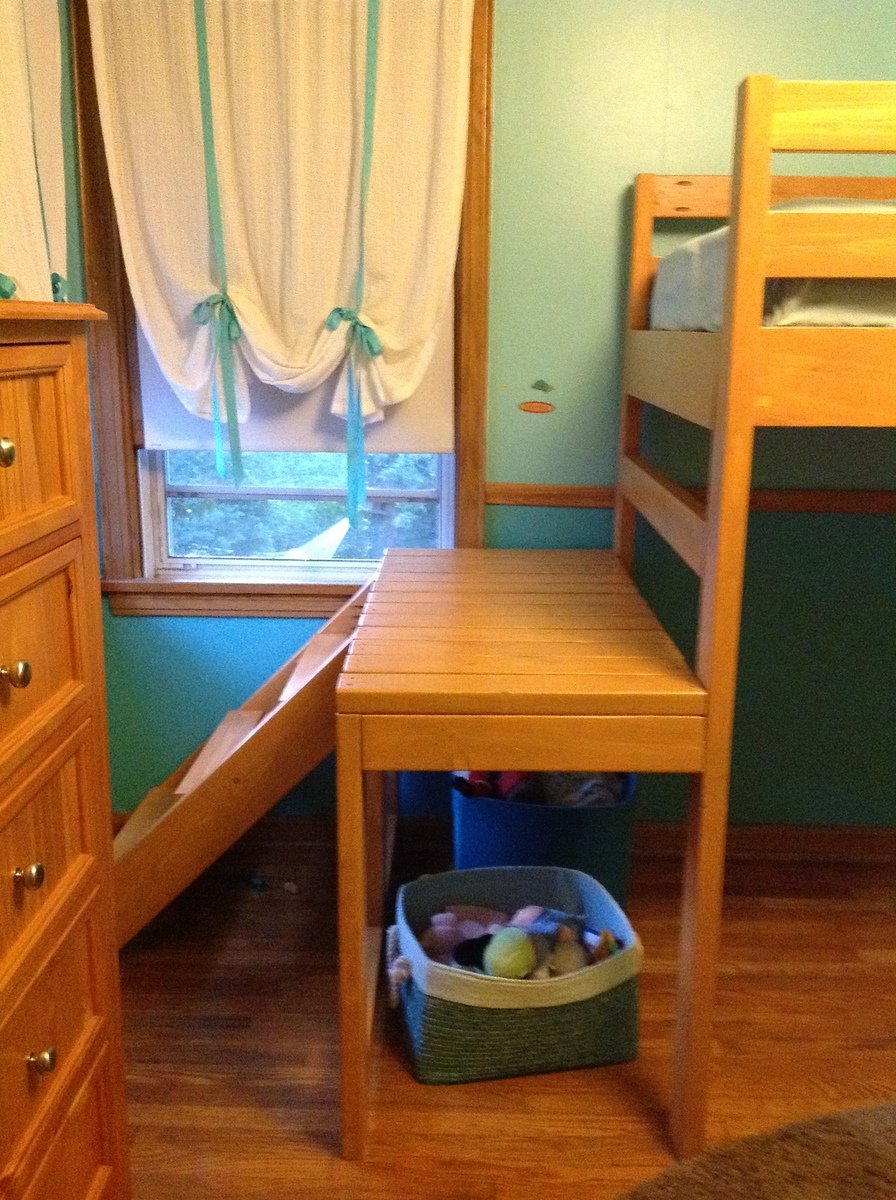
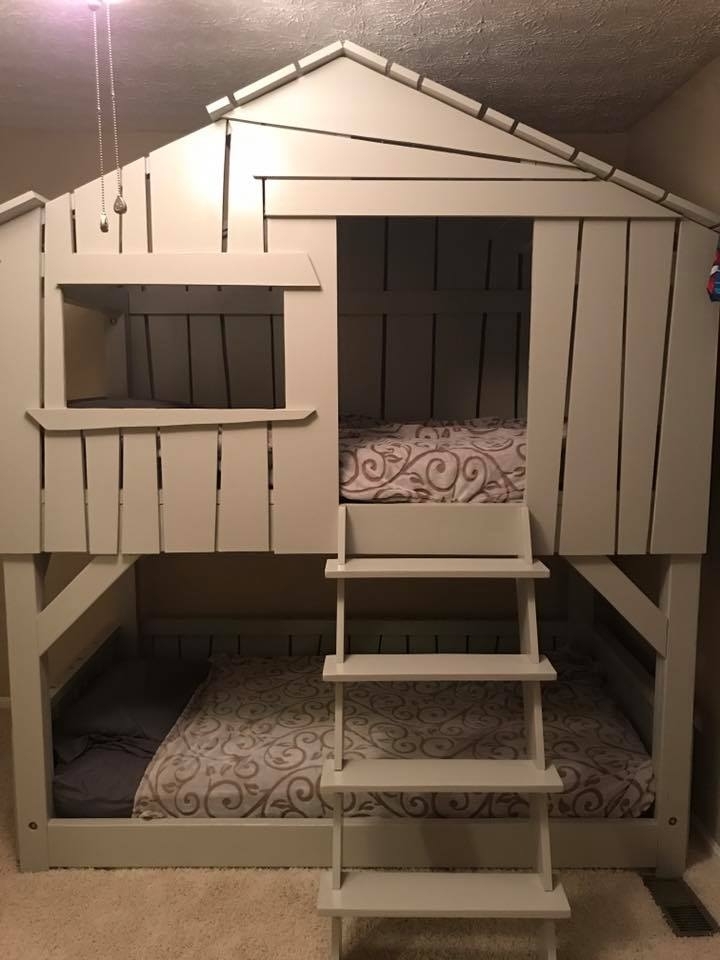
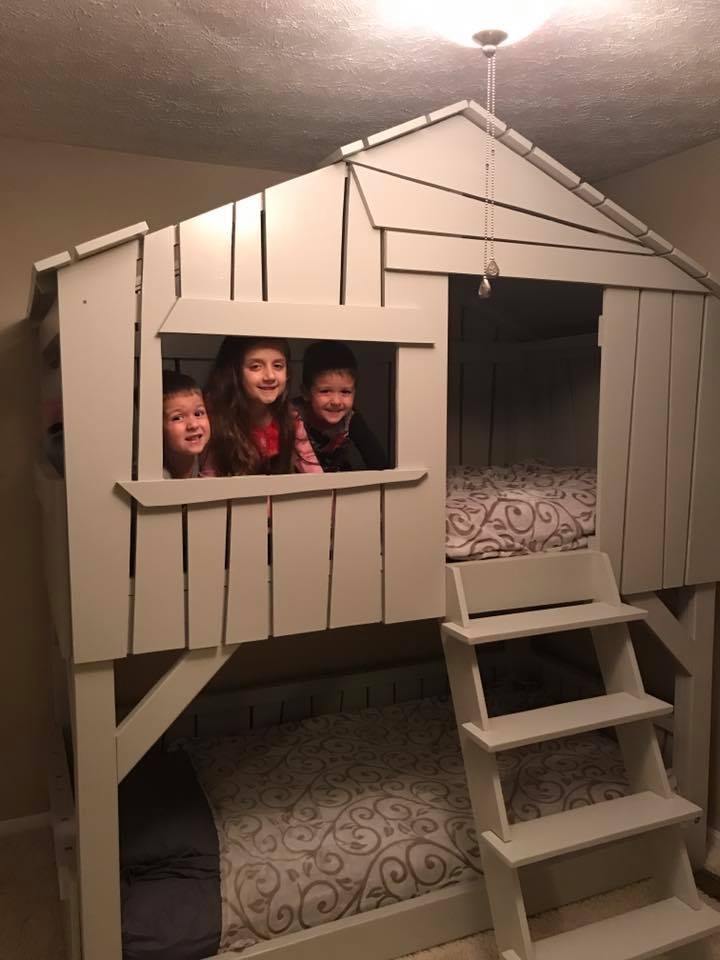
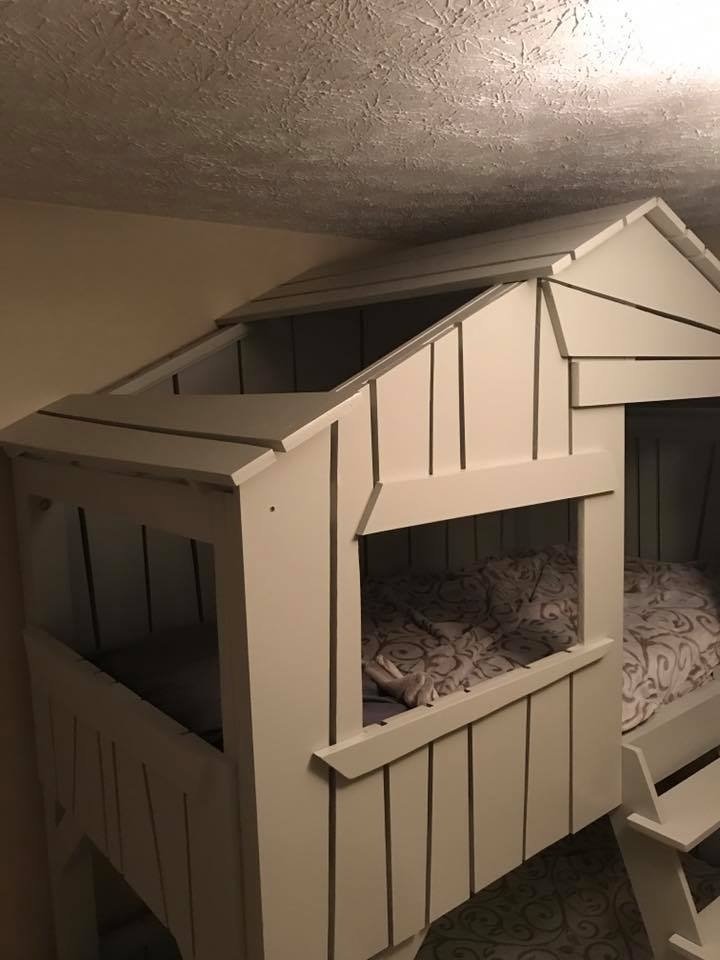
Camp loft with side stair
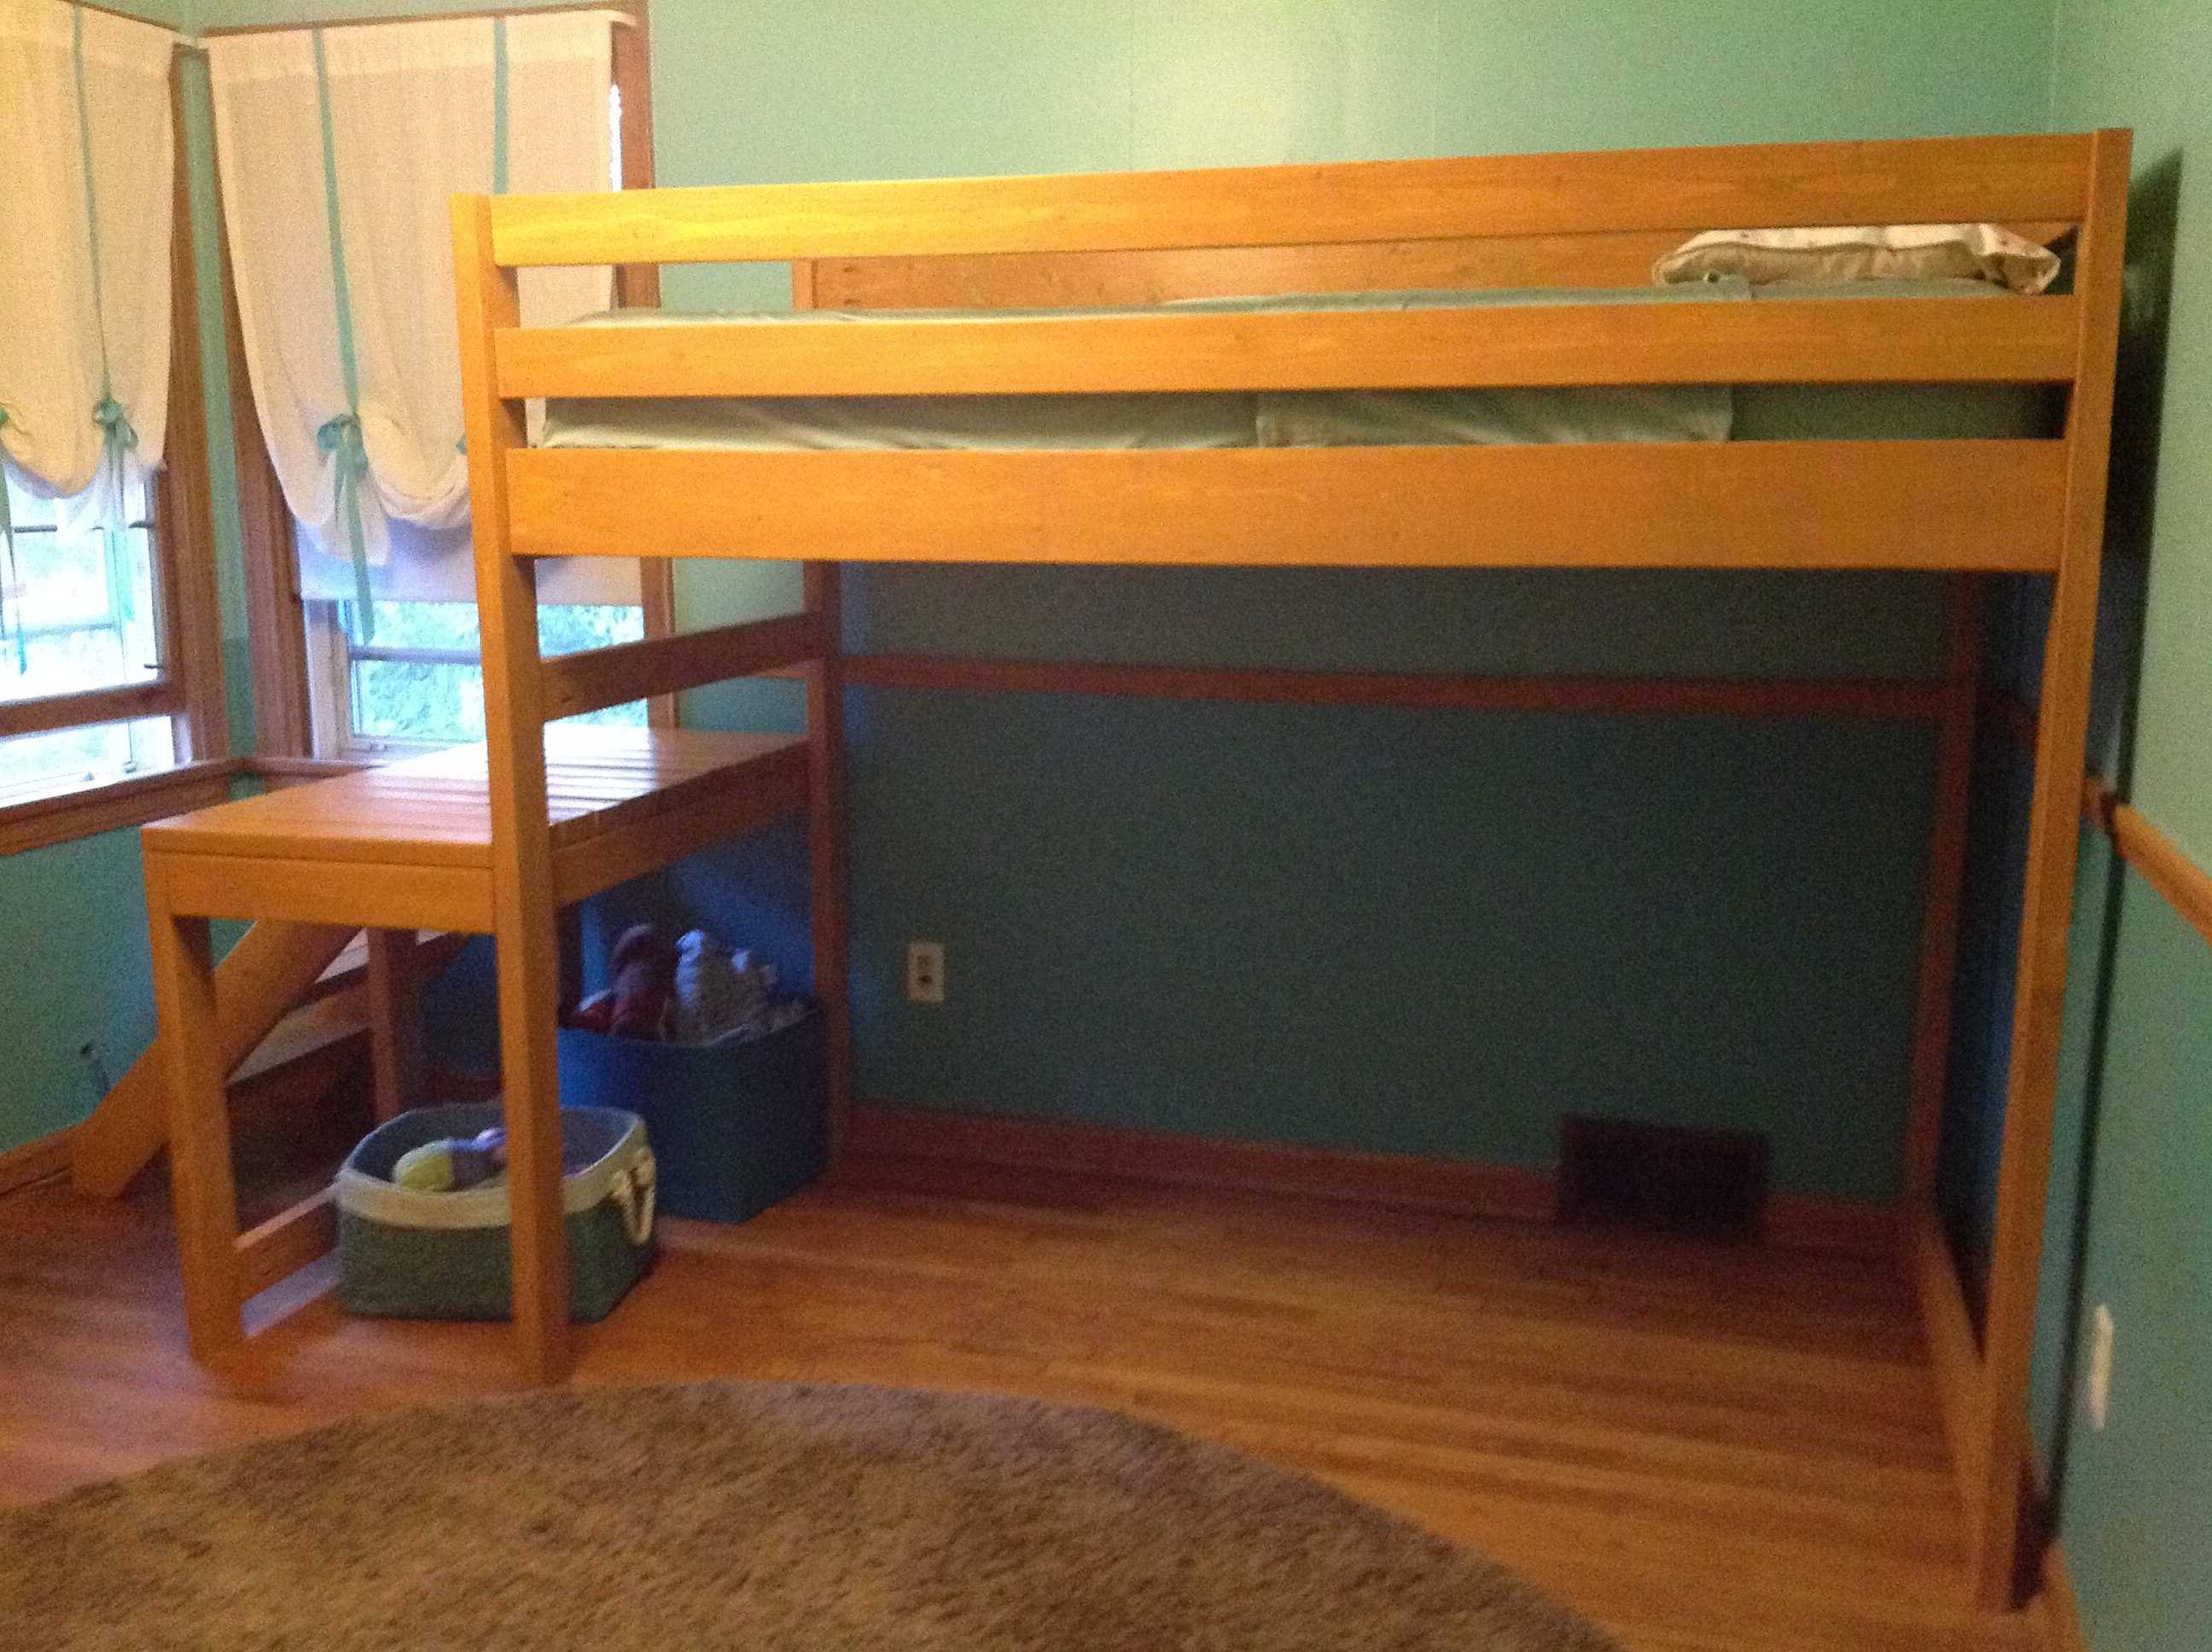
I finally decided I was going to make the fort bed for my daughter and was about to print off the materials list to take to the lumber yard and the junior height camp loft was front and center on the webpage. Though significantly more bed, it looked perfect my little girl. We really wanted her bed high enough to avoid the only heating vent in the room and didn't want to lose the floor space for play, this seemed to be an ideal fit. When I finally put the bed together I realized that keeping the staircase as in the original plans resulted in a bowling alley sort of space left over. It was awkward and really shrunk the room as the 'alley' wasn't usable for much of anything. I played around a little bit and my husband and I decided that we would put it on the side. It fit perfectly to the wall and was much more space efficient for the room. I am a little nervous about the new openness of the deck portion, but both kids have found it a fun place to read and pretend fish. It was my first project of this size and I did everything until the final assembly by myself and I am so glad to have done it. It took more time than I imagined, but again I am a true novice.
I really wanted it stained so that it would camouflage the wear a little better, but I had a great deal of trouble finding a low VOC stain in my town. I used the lowest I could find and a low VOC water based poly. It matches her dressers and trim nearly perfectly. Her older brother likes the bed so much that nearly everyday he tries to convince her that she wants to switch beds with him.
Built from Plan(s)
Estimated Cost
$100-$120
Estimated Time Investment
Week Long Project (20 Hours or More)
Finish Used
Zar UltraMax low VOC stain in Golden Oak
Recommended Skill Level
Beginner
Comments
Tue, 08/28/2012 - 11:28
I love your bed so much! And
I love your bed so much! And I love the idea of having the stairs on the side like that. :)
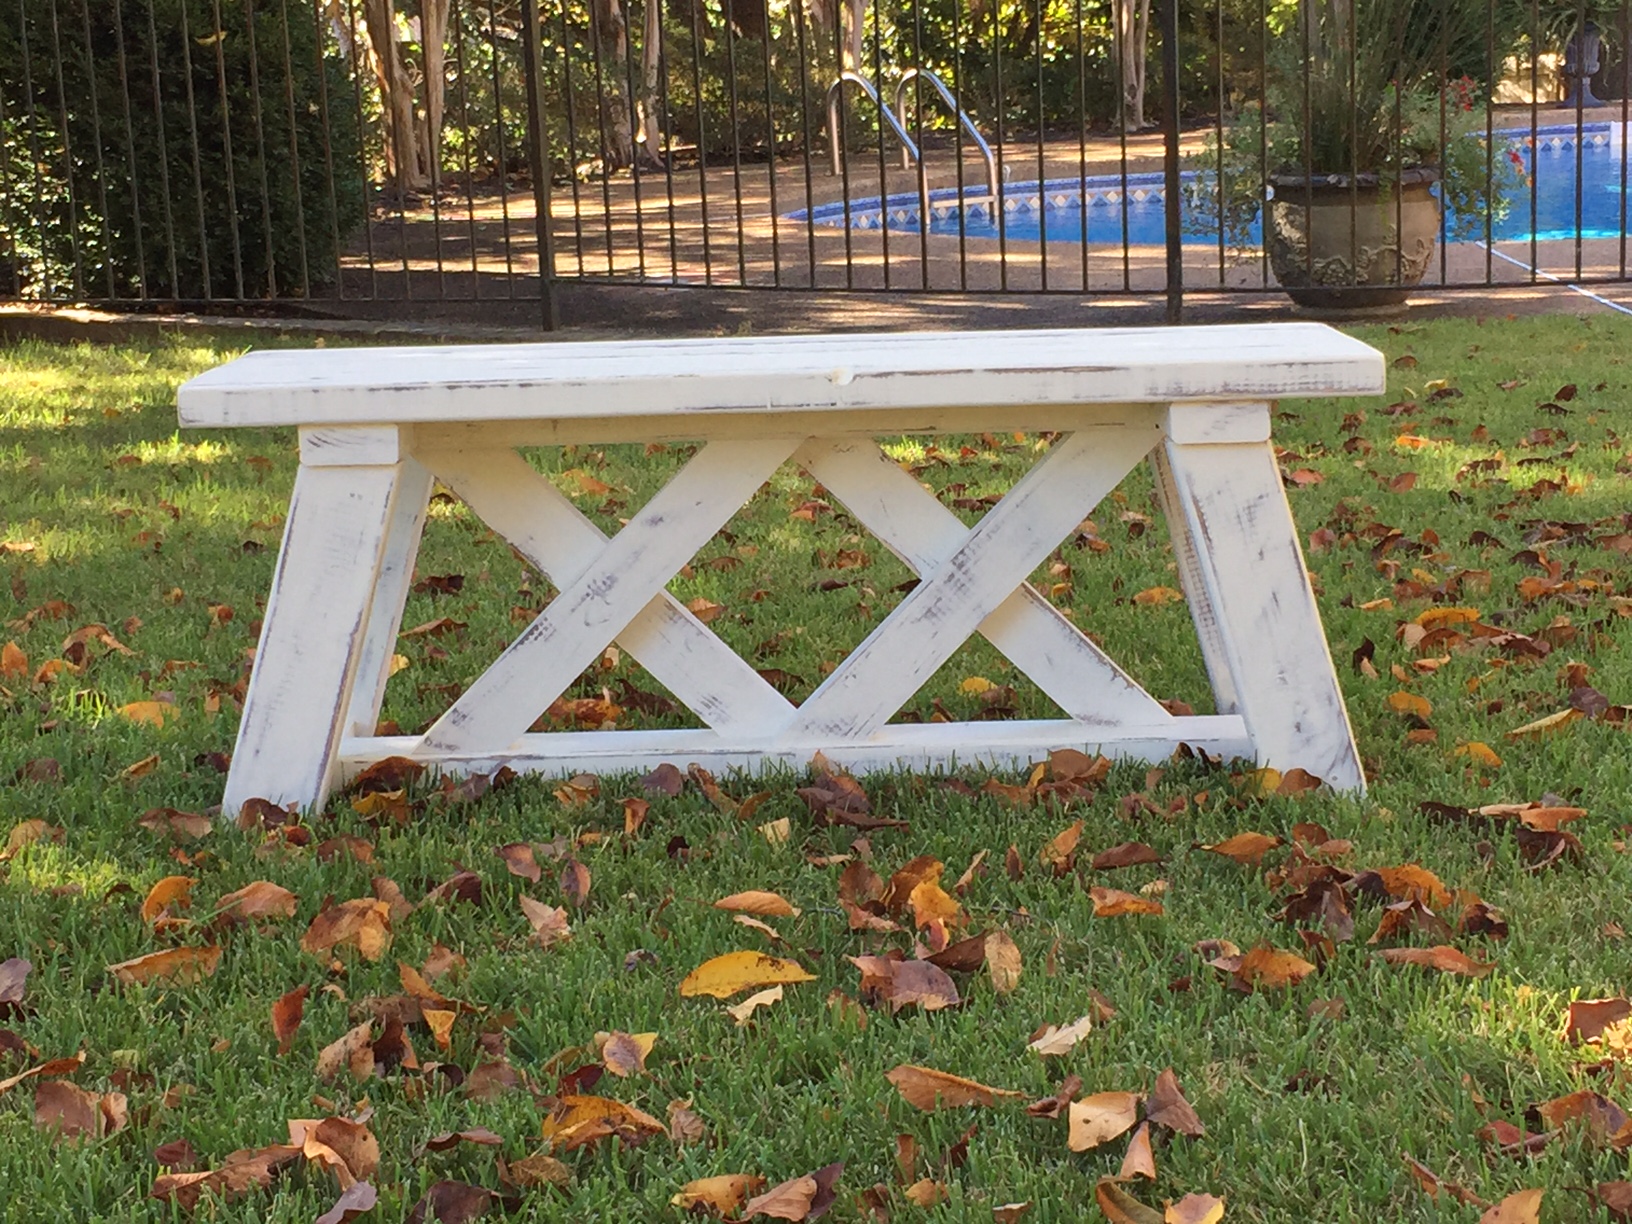
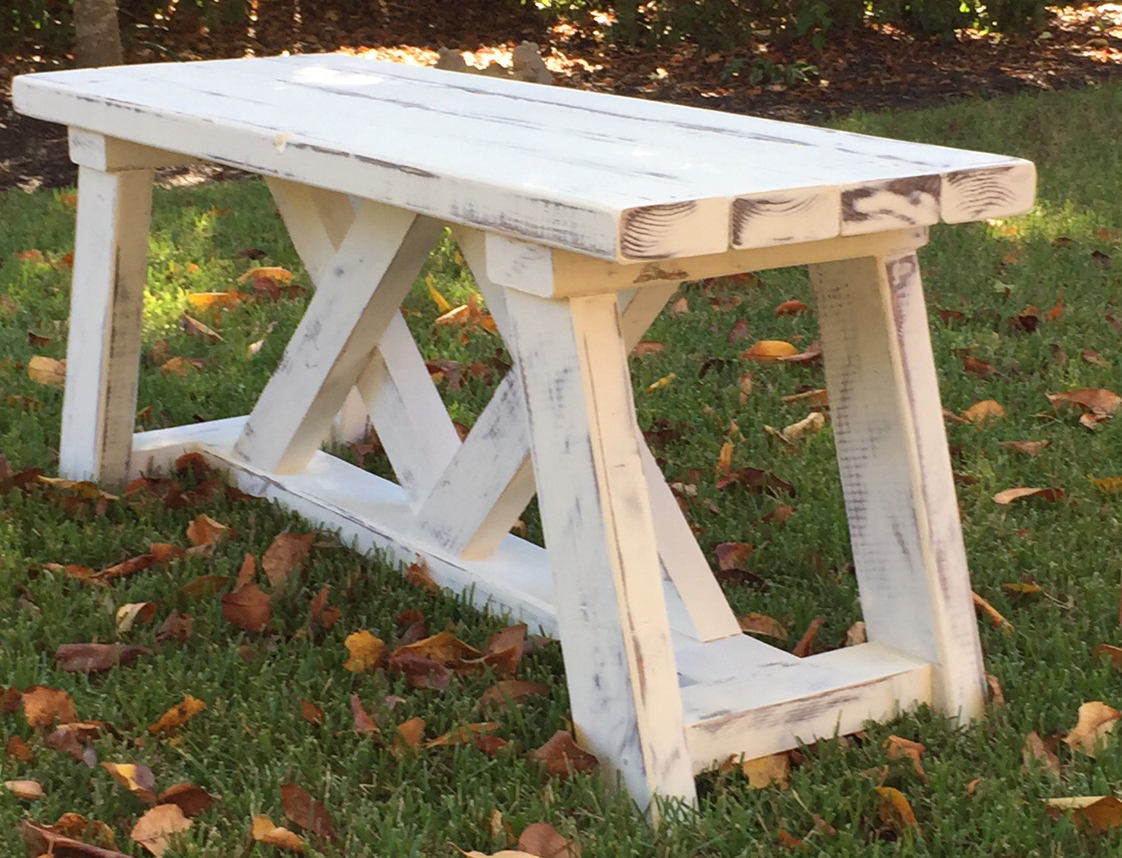
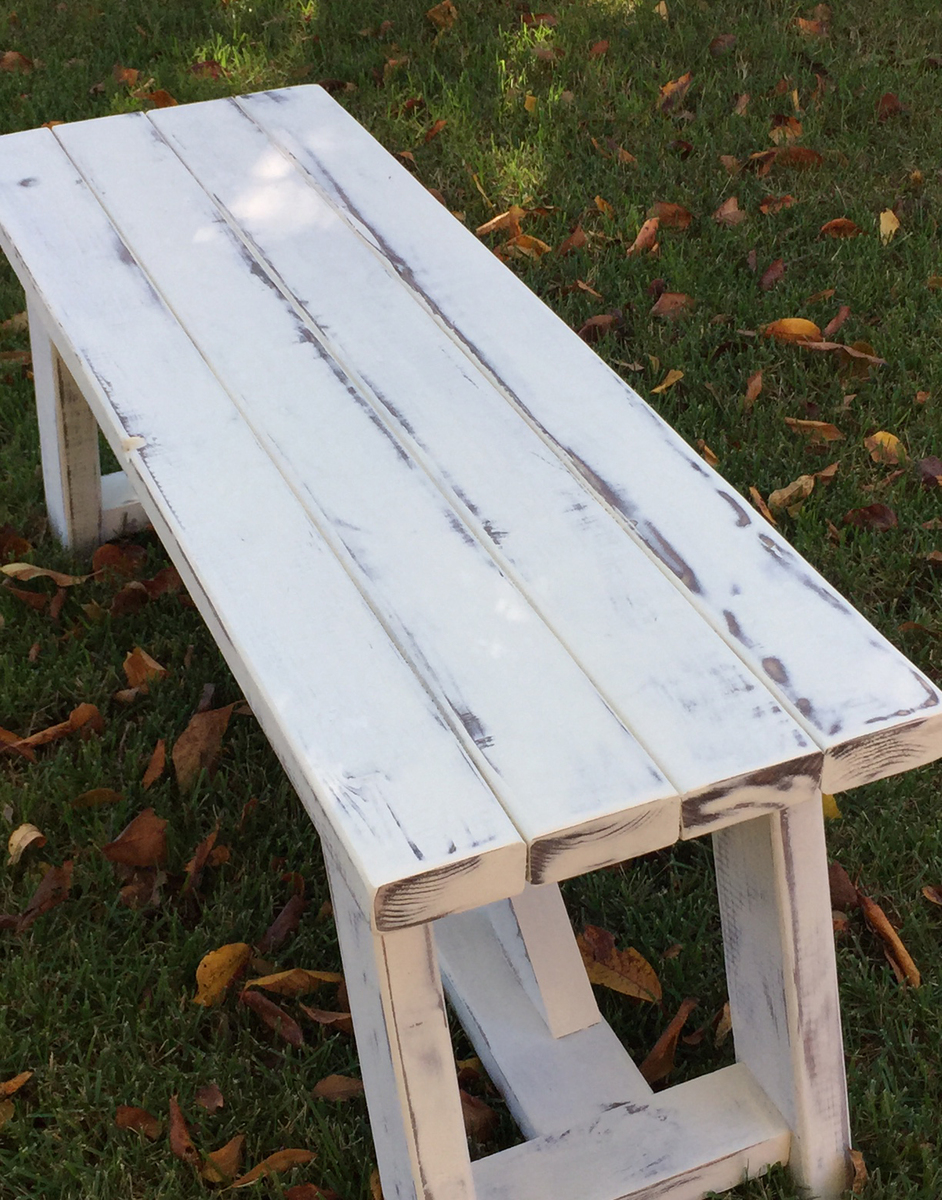
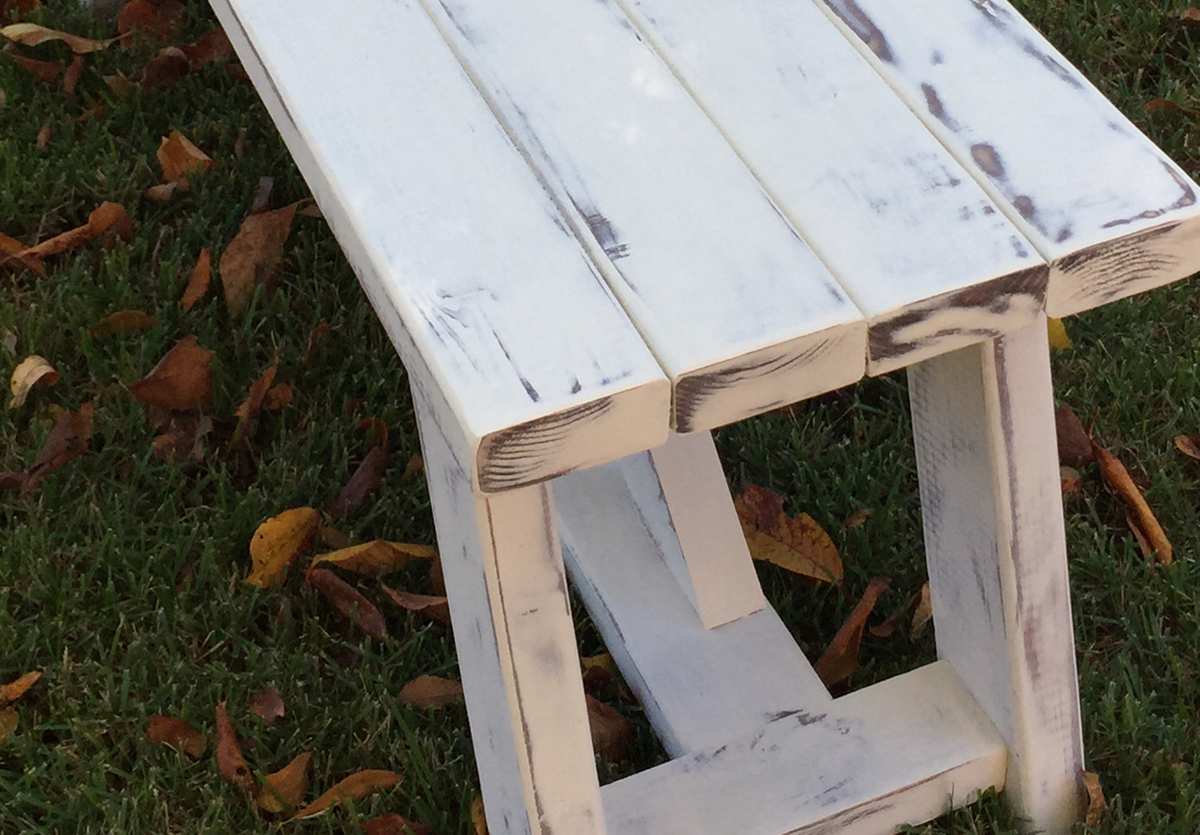
Double X Bench
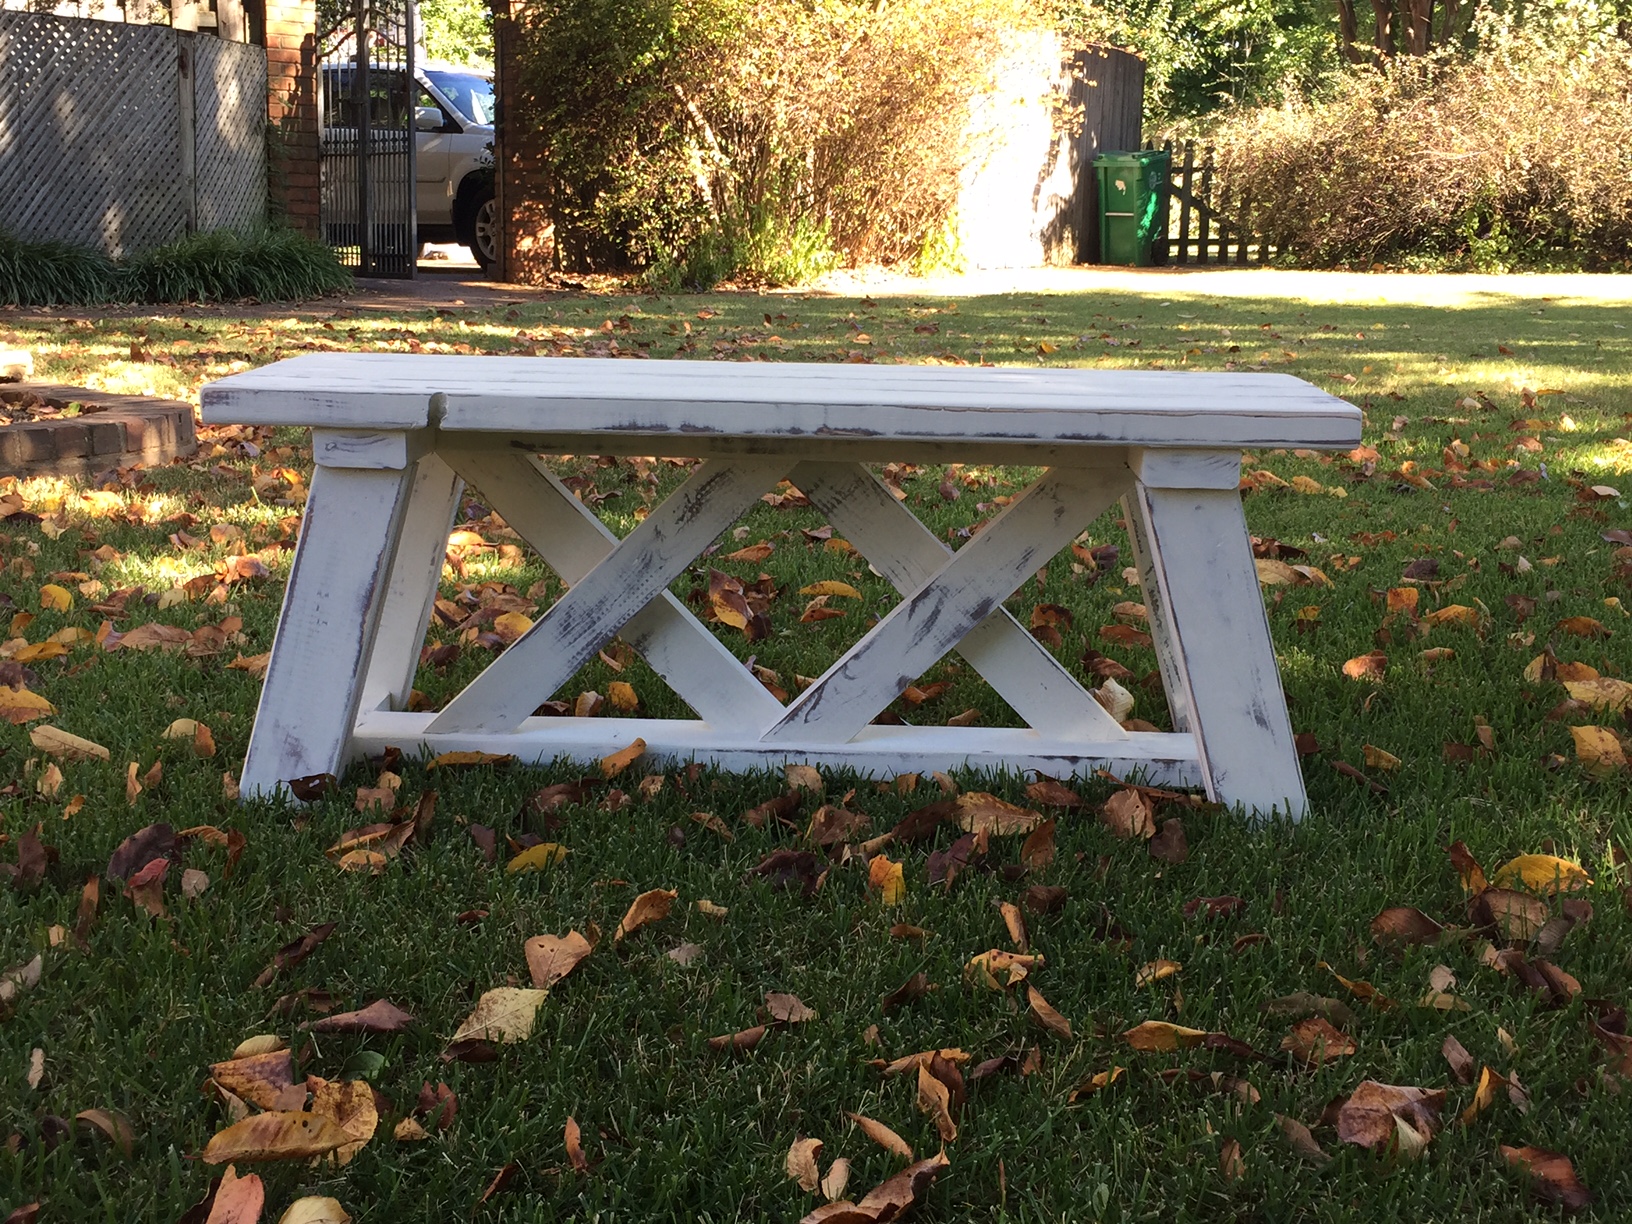
This was the second double x bench that I made. It was very simple to make. It took me around 3 hours to build it and another 2 hours to sand, stain and paint it (this does not include the 1 hour between coats that I allowed them to dry). I used Annie Sloan Old White Chalk Paint and General Finishes Java Gel stain. Annie Sloan Chalk paint does NOT need a topcoat if it is being used outside.
Built from Plan(s)
Estimated Cost
$15 - i already had the stain, paint and screws.
Estimated Time Investment
Afternoon Project (3-6 Hours)
Finish Used
Annie Sloan Old White Chalk Paint
General Finishes Java Gel
General Finishes Java Gel
Recommended Skill Level
Beginner
Comments
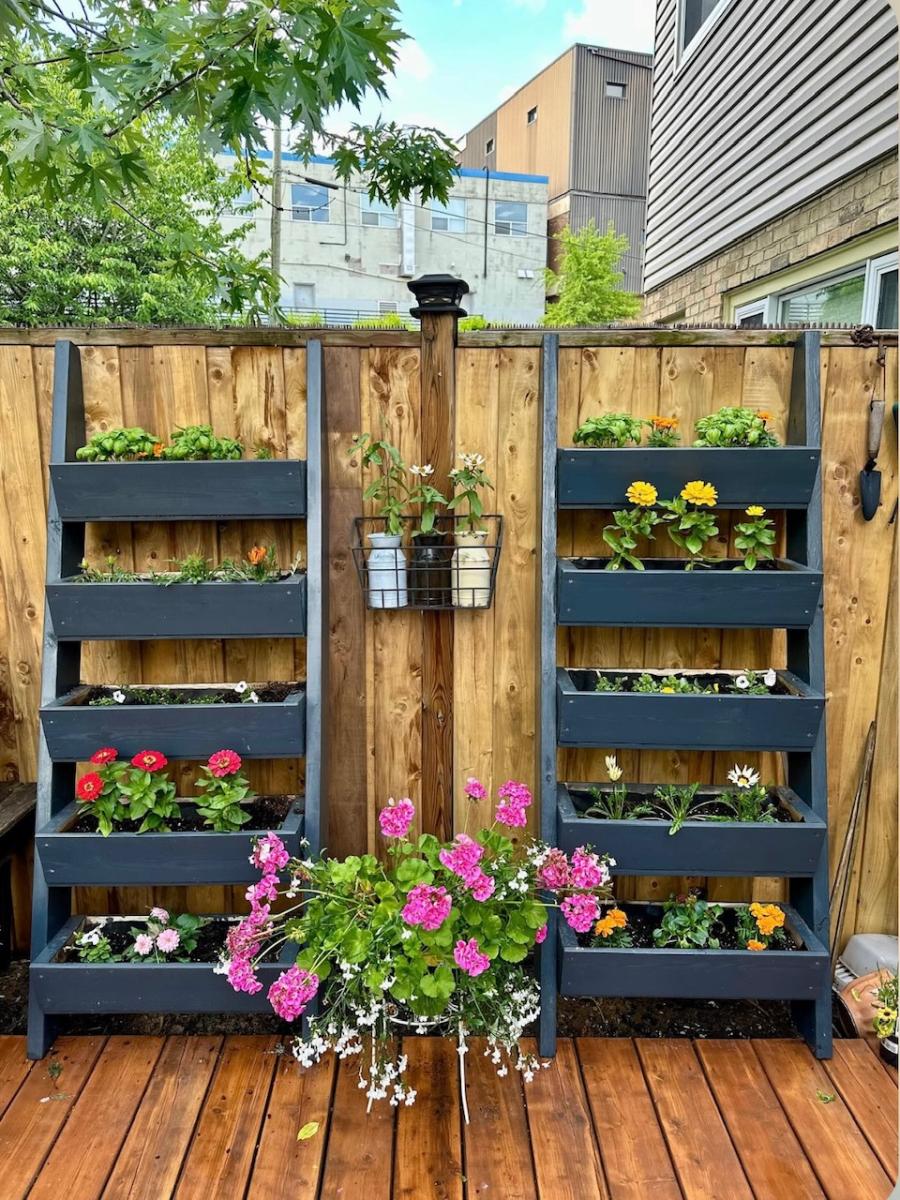
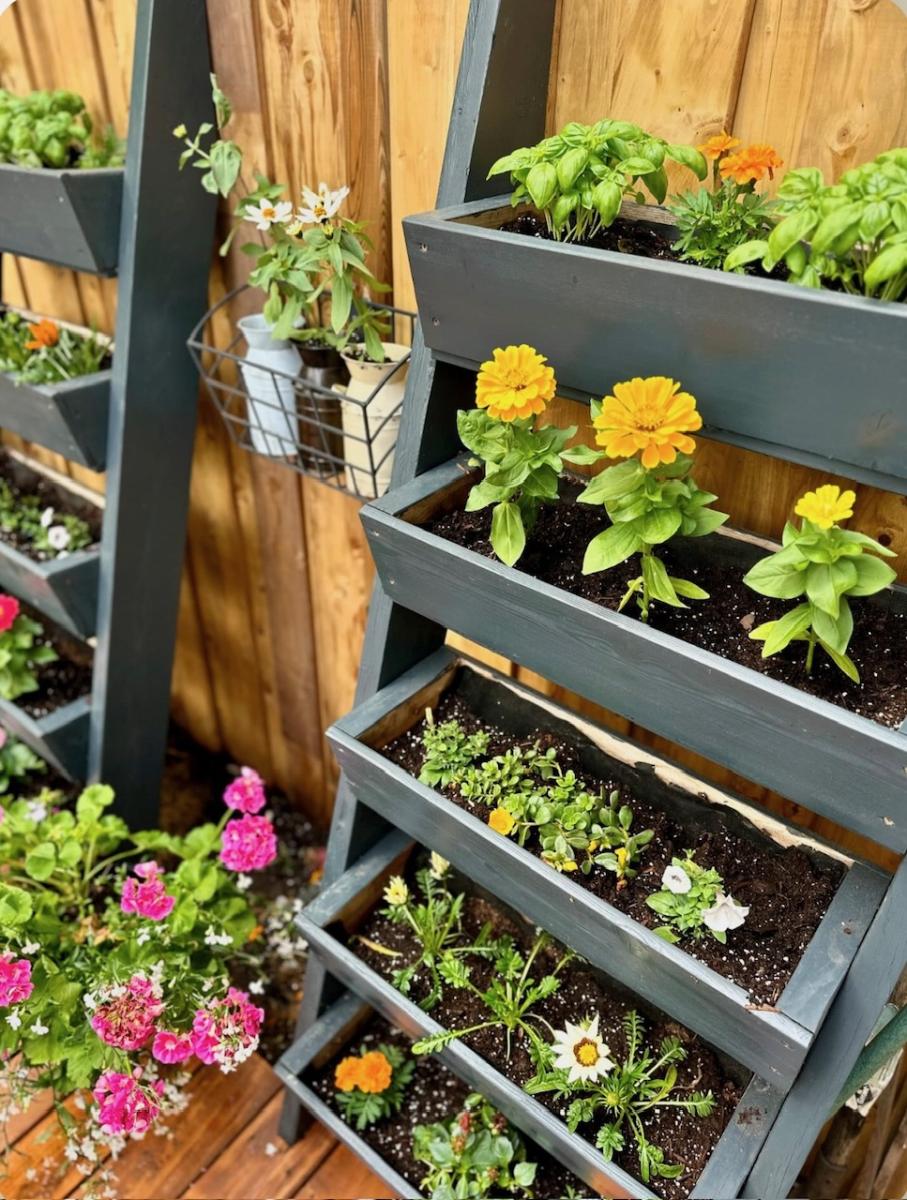
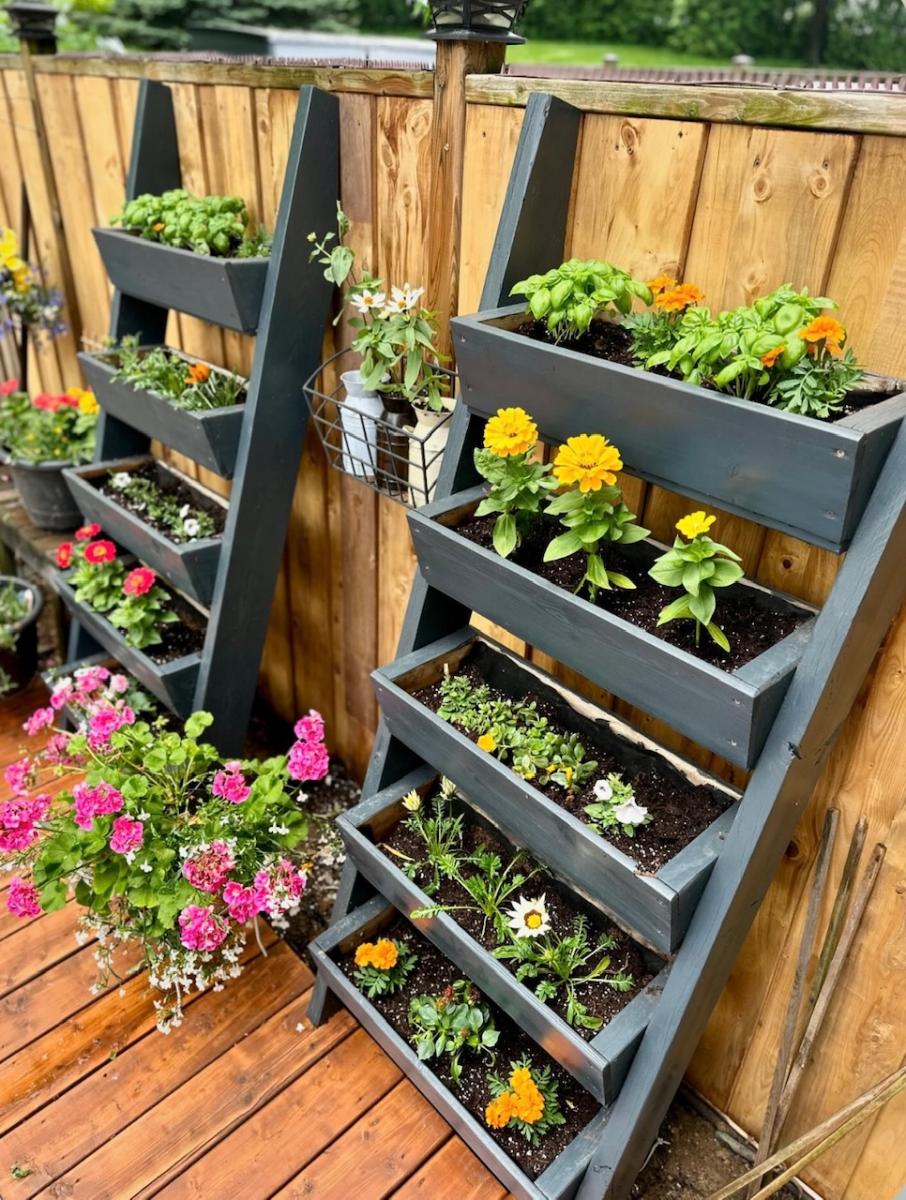
DIY Ladder Planters

Awesome Ladder Planters with Refresh! See finishing details @kristinliarestoration
Built from Plan(s)
Picnic Table for 2 People
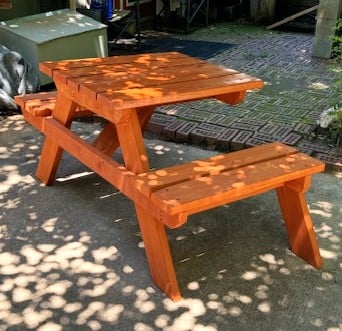
2 person picnic table from work in progress to end product. Thank you Anna for the inspiration and the plans. With my dyslexia I had a few challenges, but in the end it finished up nicely. Perfect for me and my daughter.
Jack aka Teci Teacher
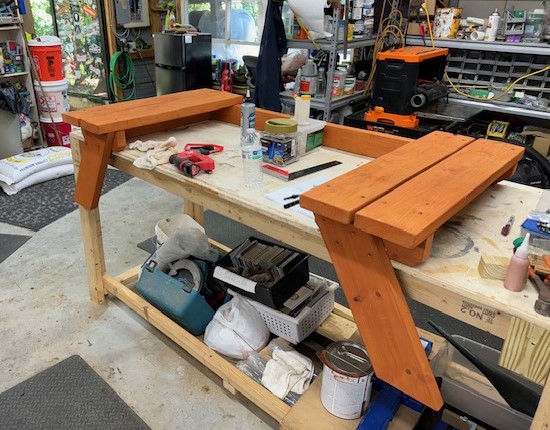
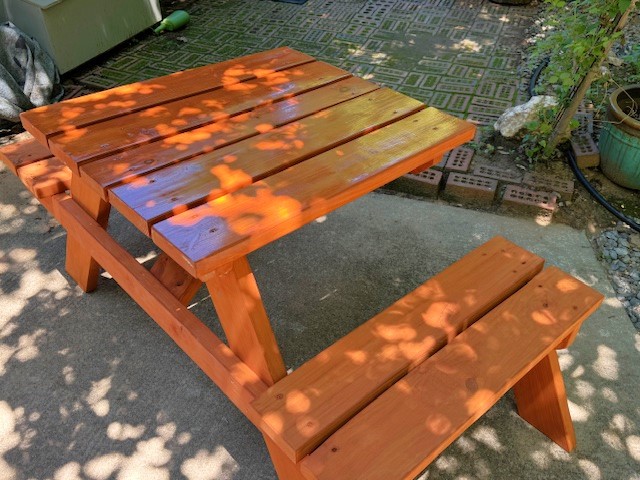
Built from Plan(s)
Hard Maple Waterfall Coffee Table
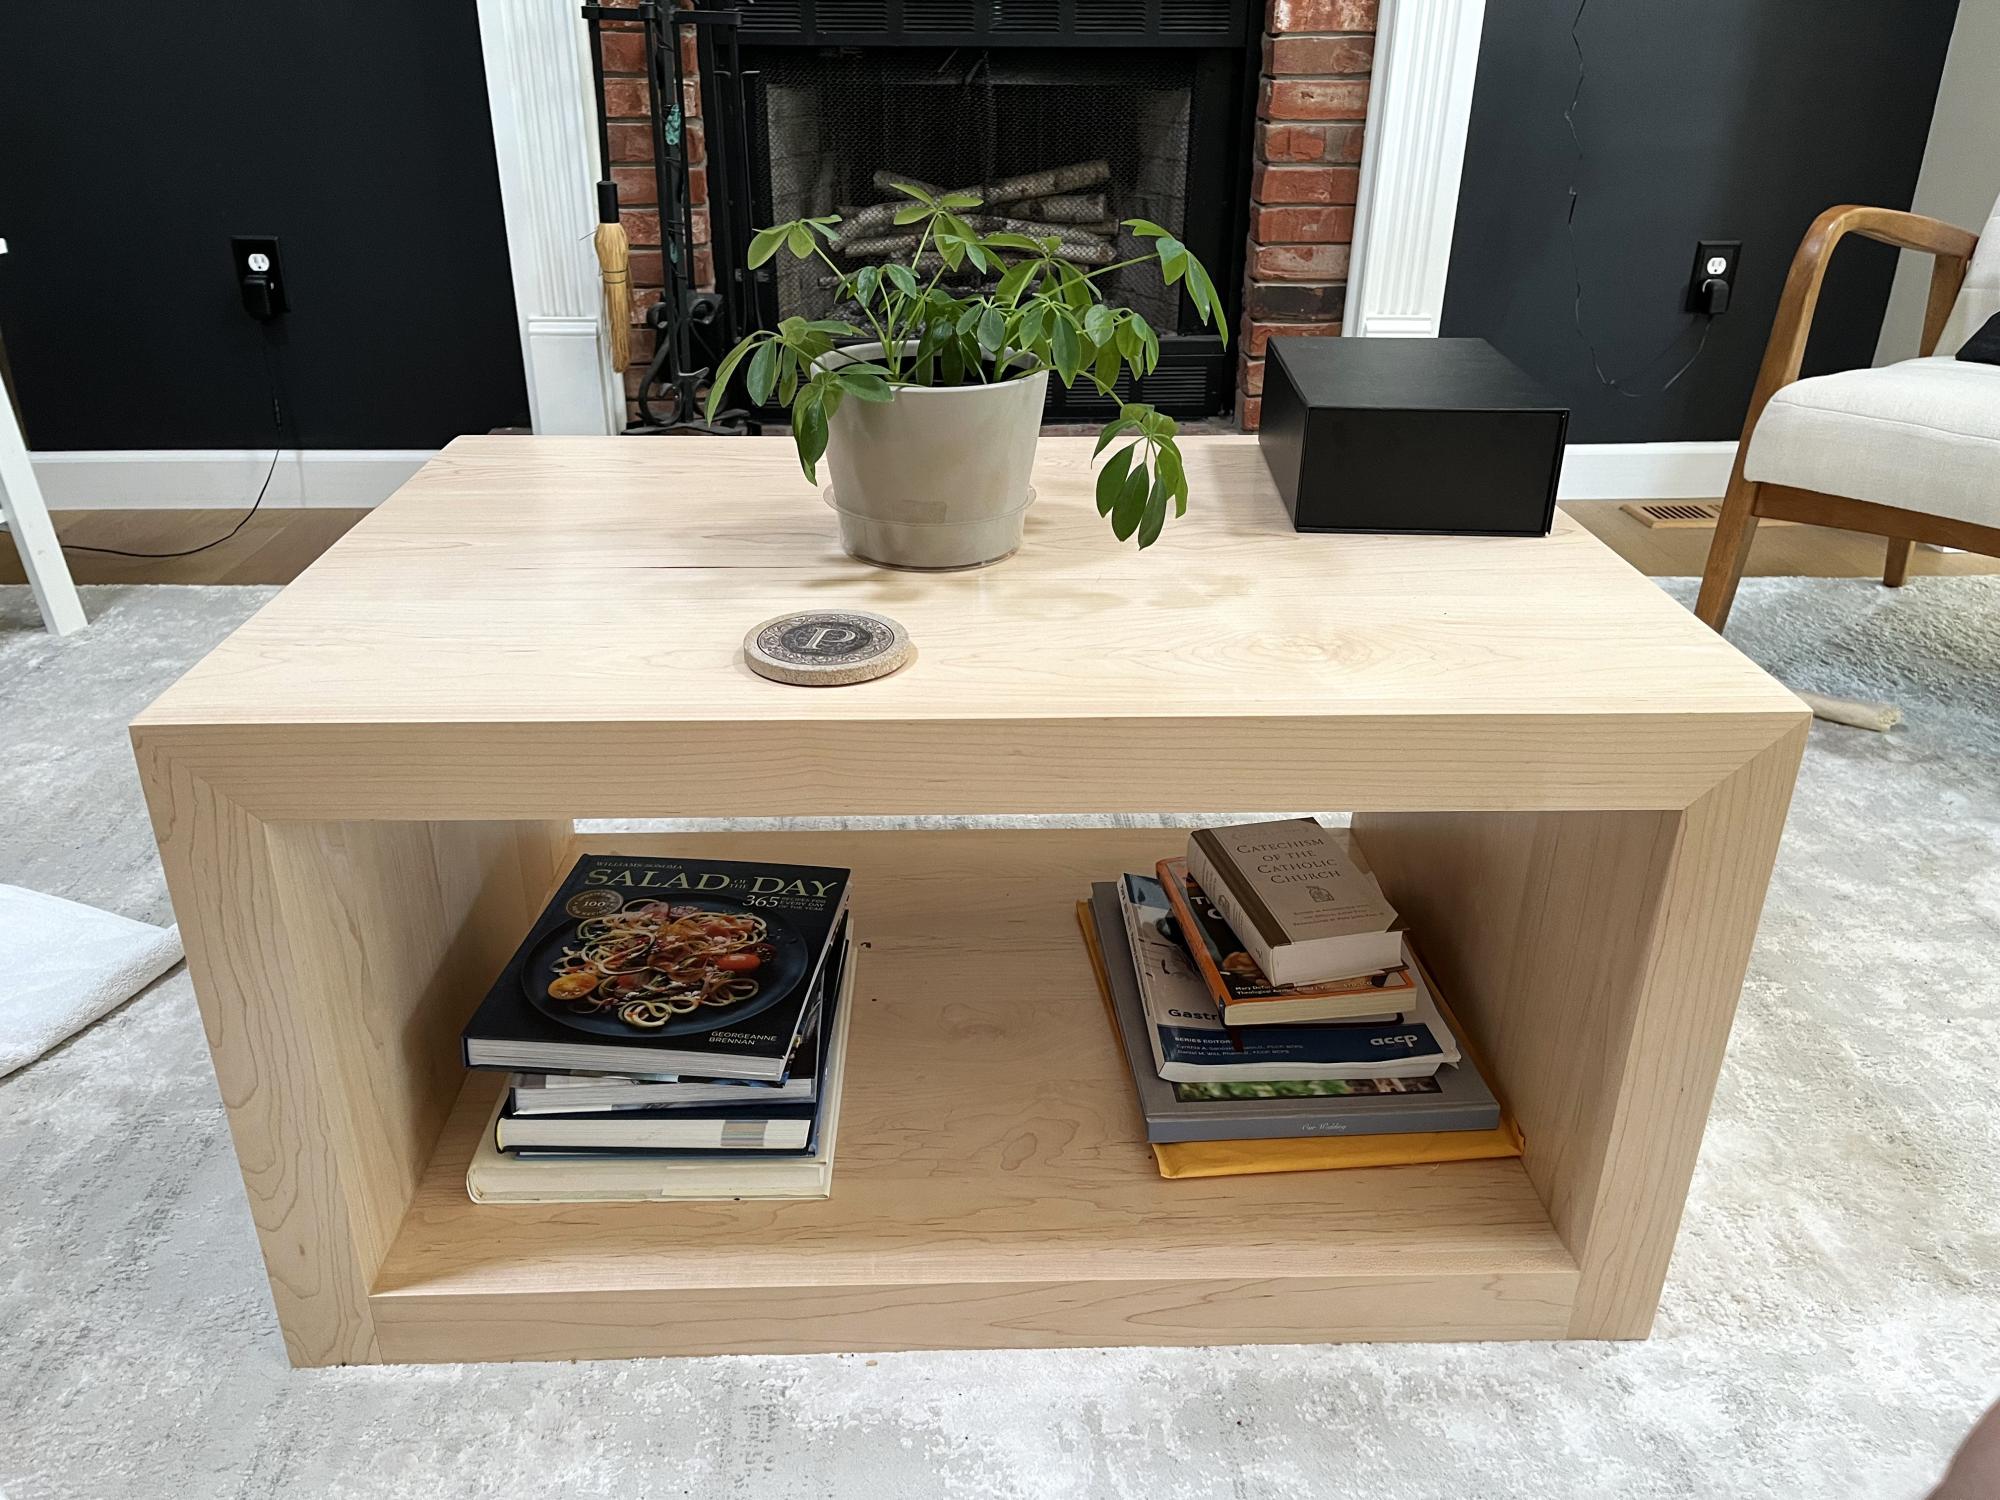
Hard maple waterfall coffee table.
Scott
Built from Plan(s)
Treehouse bed with slide
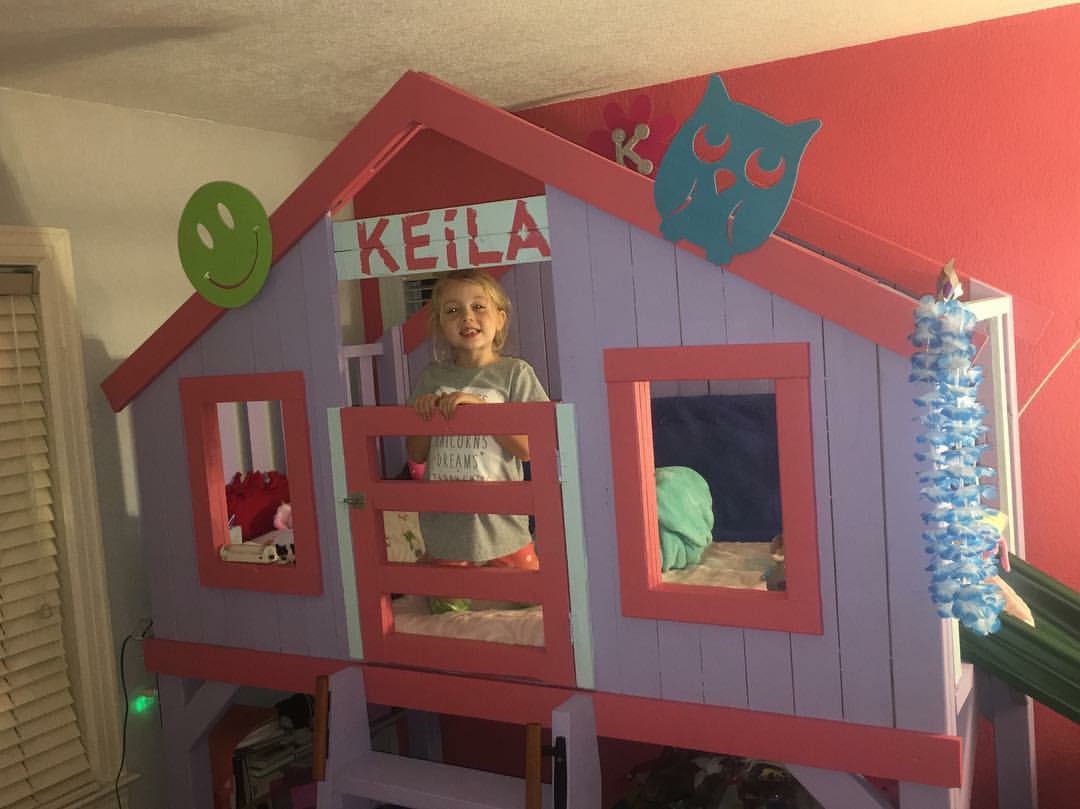
I built this for my daughter Keila. She loves it and her friends do too! Took me one day. I painted the entire bed in deck paint. It completely eliminated all
Splinters!!! I added the slide, a USB plug, cup holder, and fan.
Built from Plan(s)
Estimated Cost
350.00
Estimated Time Investment
Weekend Project (10-20 Hours)
Finish Used
Deck paint to cover all splinters. Slide was 75.00 extra found at a discount overstock supply house. I had to cut off two feet for it to fit in a 11x11 room
Recommended Skill Level
Intermediate
Adirondack Minnie Mouse
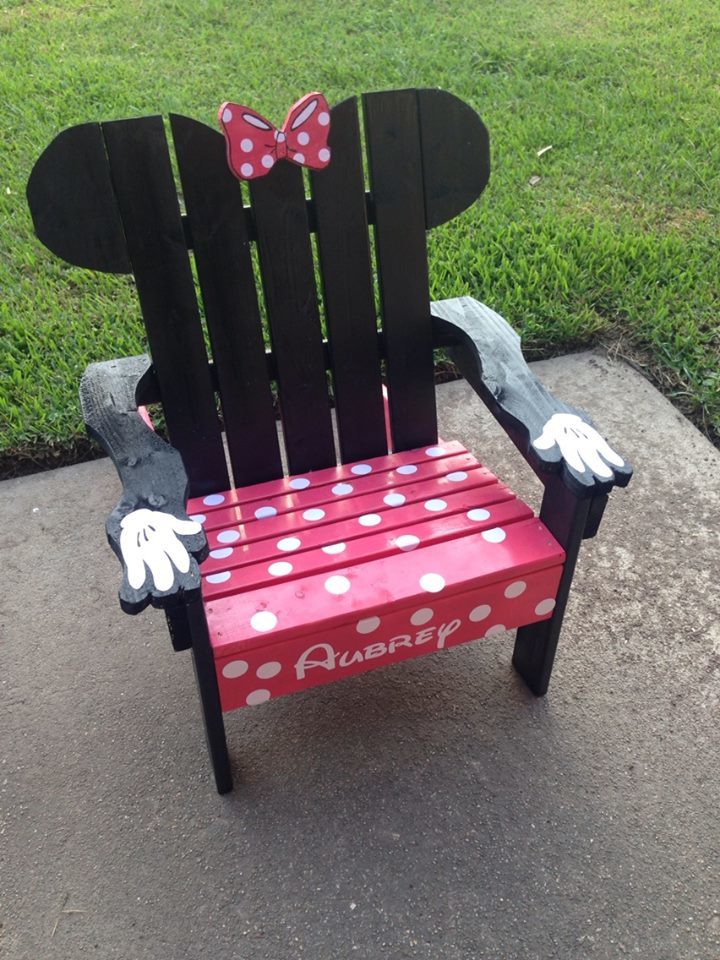
My daughter is into everything Minnie Mouse right now so I figured, why not!
Built from Plan(s)
Estimated Cost
$15
Estimated Time Investment
Afternoon Project (3-6 Hours)
Finish Used
I used stickers for the white details, but my daughter promptly peeled them all off. I suggest paint.
Recommended Skill Level
Beginner
Comments

Tue, 04/28/2015 - 12:04
Is there any way to get the
Is there any way to get the plans for the minnie mouse chair? Would love to make this. I can open the plans for the basic adirondack chair, but not the minnie mouse one.
Thanks!

Sun, 07/24/2016 - 18:30
I am not able to download the minnie mouse chair plans
I am not able to download the minnie mouse chair
plans, can someone please assist?
Stocking Stand
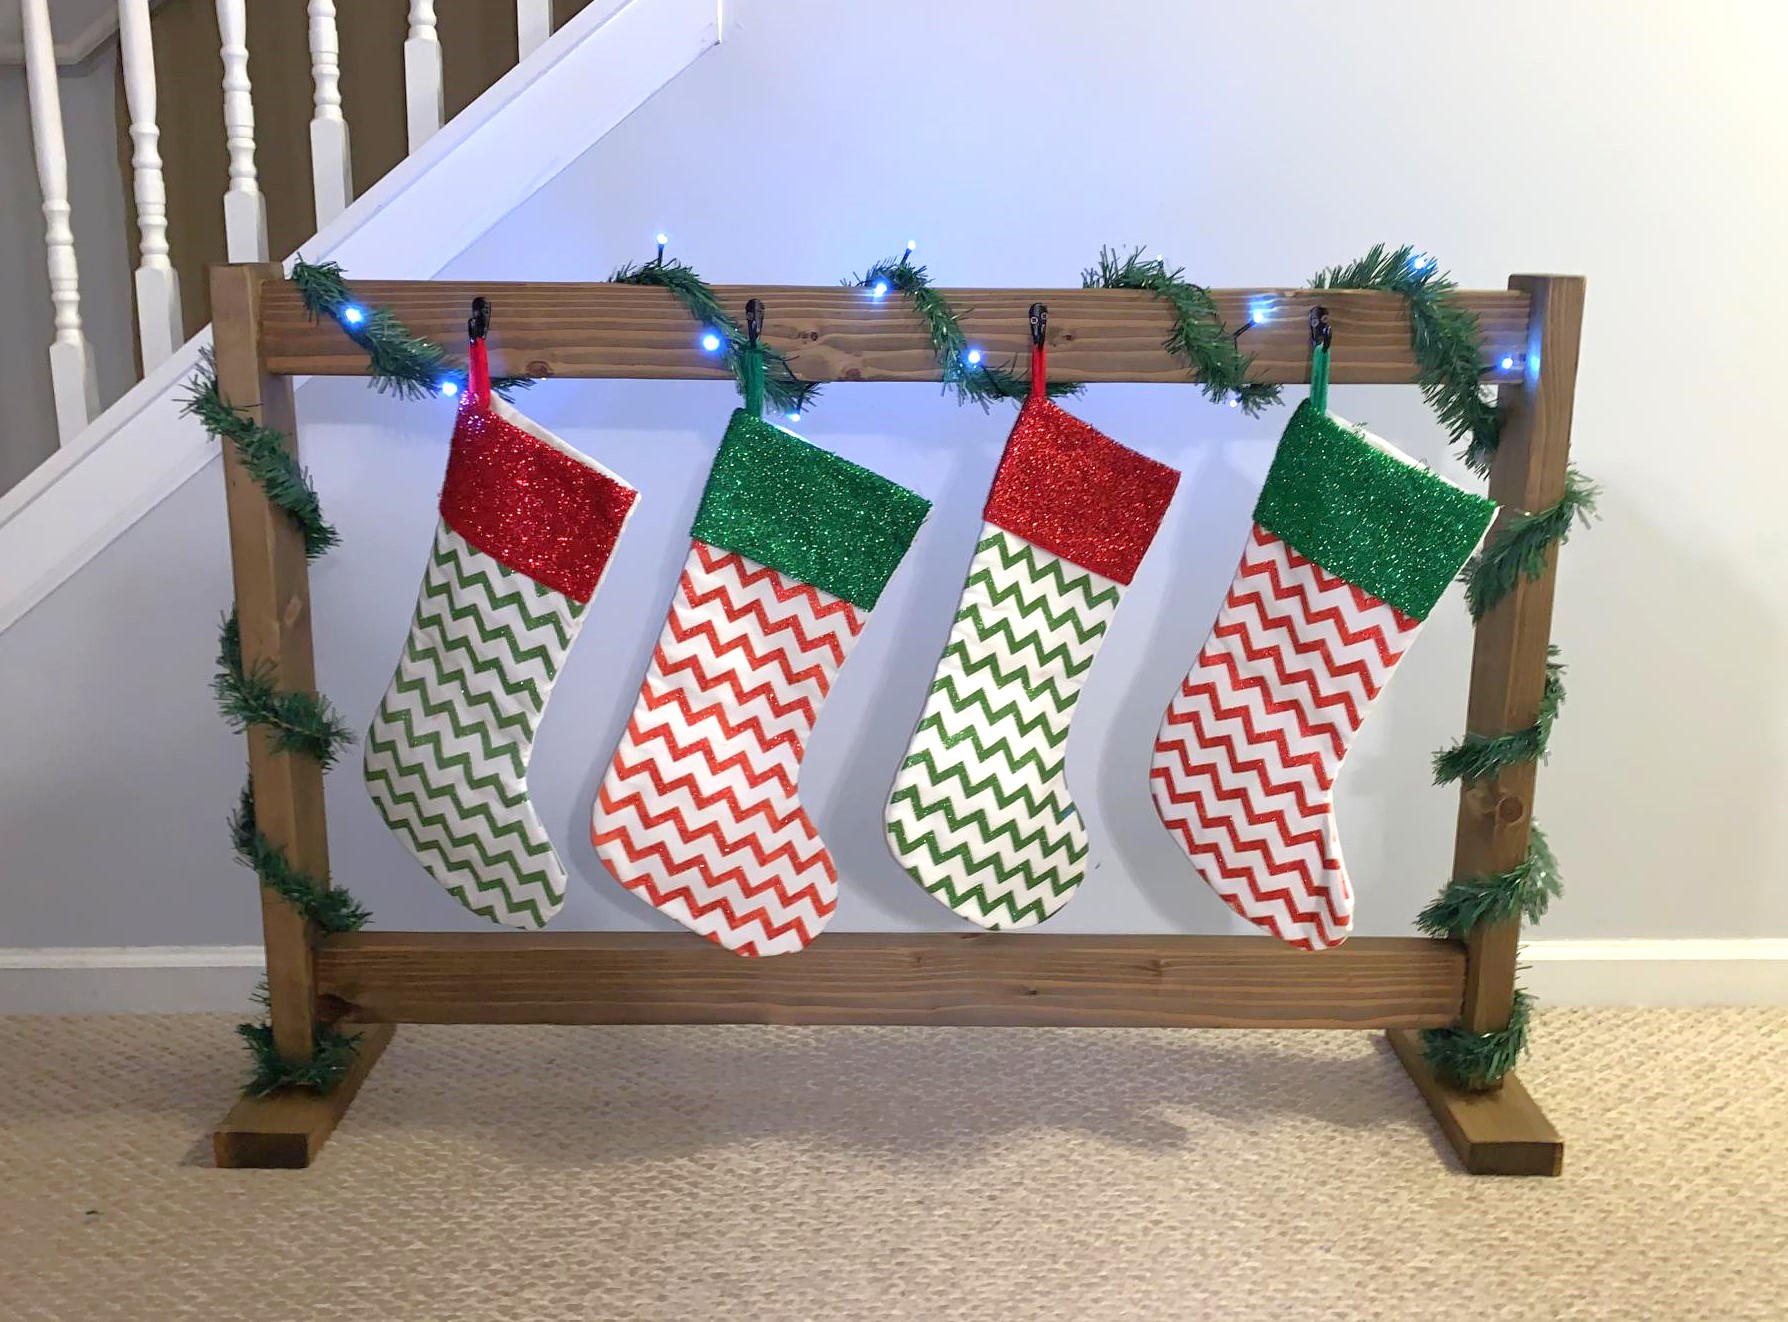
So fun! Directions were easy! Can also be used as Backpack hanger if you put a little bit longer feet on them. I bought the metal hooks from Walmart.
Built from Plan(s)
Estimated Cost
$18
Estimated Time Investment
Afternoon Project (3-6 Hours)
Finish Used
Jacobean Minwax stain
Recommended Skill Level
Starter Project
Comments
Seasonal And Holiday
Bathroom Storage Tower
I loved the look of the Craft room Storage tower but modified to suit my wife's bathroom theme/decor. The inside back (MDF beadboard) is painted a milk coffee color to lighten it up. The door inserts are plexiglass, which was more expensive than glass but with 2 boys 6 and 2 it is well spent, and the MDF beadboard. Covered the plexiglass with self-adhesive film for glass on both sides to hide the towels inside. This project took me about 12 hours to complete but over a 3 month period, mostly spent on finishing the project with my boys underfoot or at 12-2am. YIKES!!! If i keep this up she will want to buy instead of letting me build.
Price List:
wood: $100
Stain/Paint: left over from house reno. would have been $15 stain $20 Varnish 30$ quart of paint
Handle: $7
Hinges: $4 basic style
I wanted to use Eurostyle hinges but opted to buy the Kreg system instead of Forstner drill bits.
Will be building another just different dimensions for laundry room makeover.
Built from Plan(s)
Estimated Cost
100$ CDN for lumber everything is more expensive in Canada
Estimated Time Investment
Weekend Project (10-20 Hours)
Finish Used
Saman's waterbased stain Chocolate Varnish applied
Recommended Skill Level
Starter Project
Comments
Sat, 01/26/2013 - 12:18
Thanks! It was my first
Thanks! It was my first furniture building project! I did a huge reno that i did on my house but that is construction and 1/8th in isnt as big of an issue as in furniture.

Mon, 01/28/2013 - 20:45
I've been wanting to build
I've been wanting to build something similar for my bathroom! Yours turned out great. It inspires me to get to work!
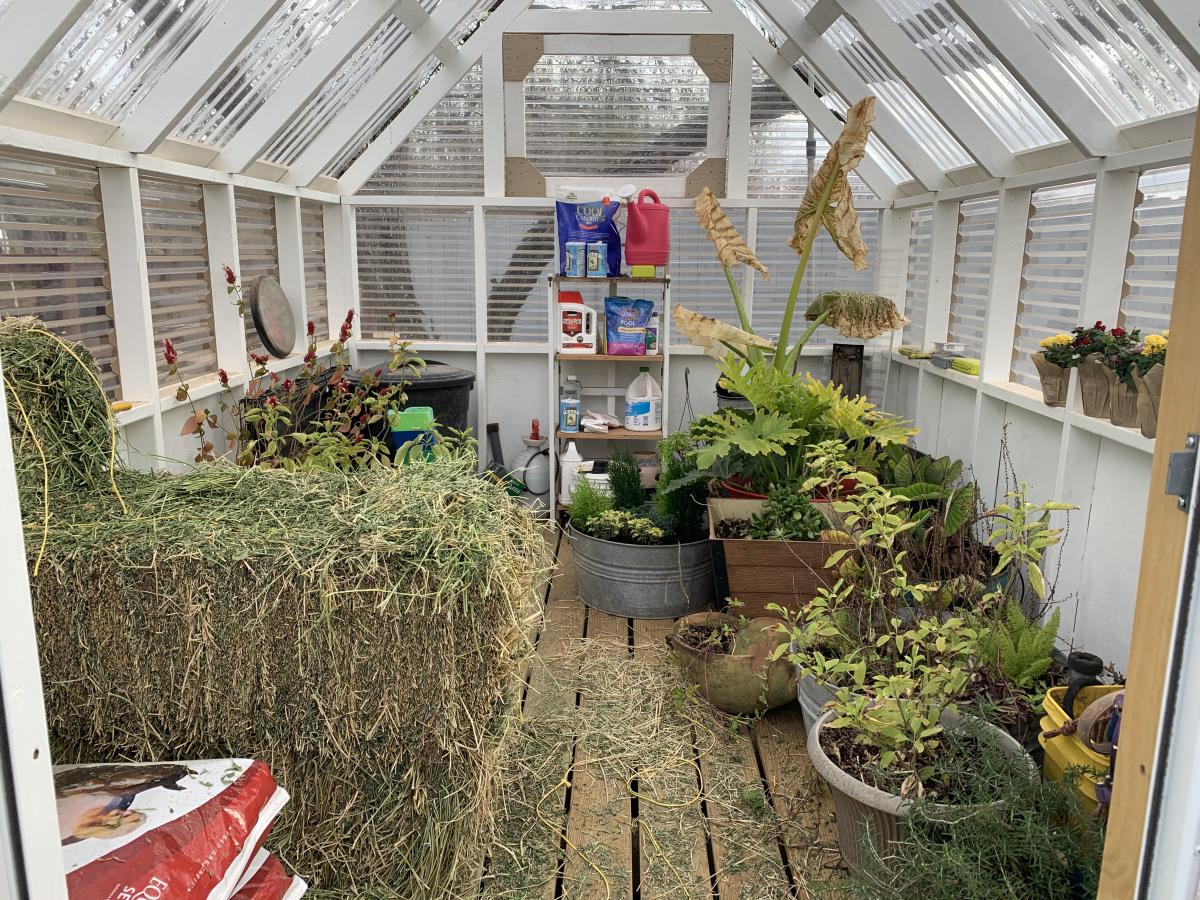
SMALL GABLE ROOF GREENHOUSE
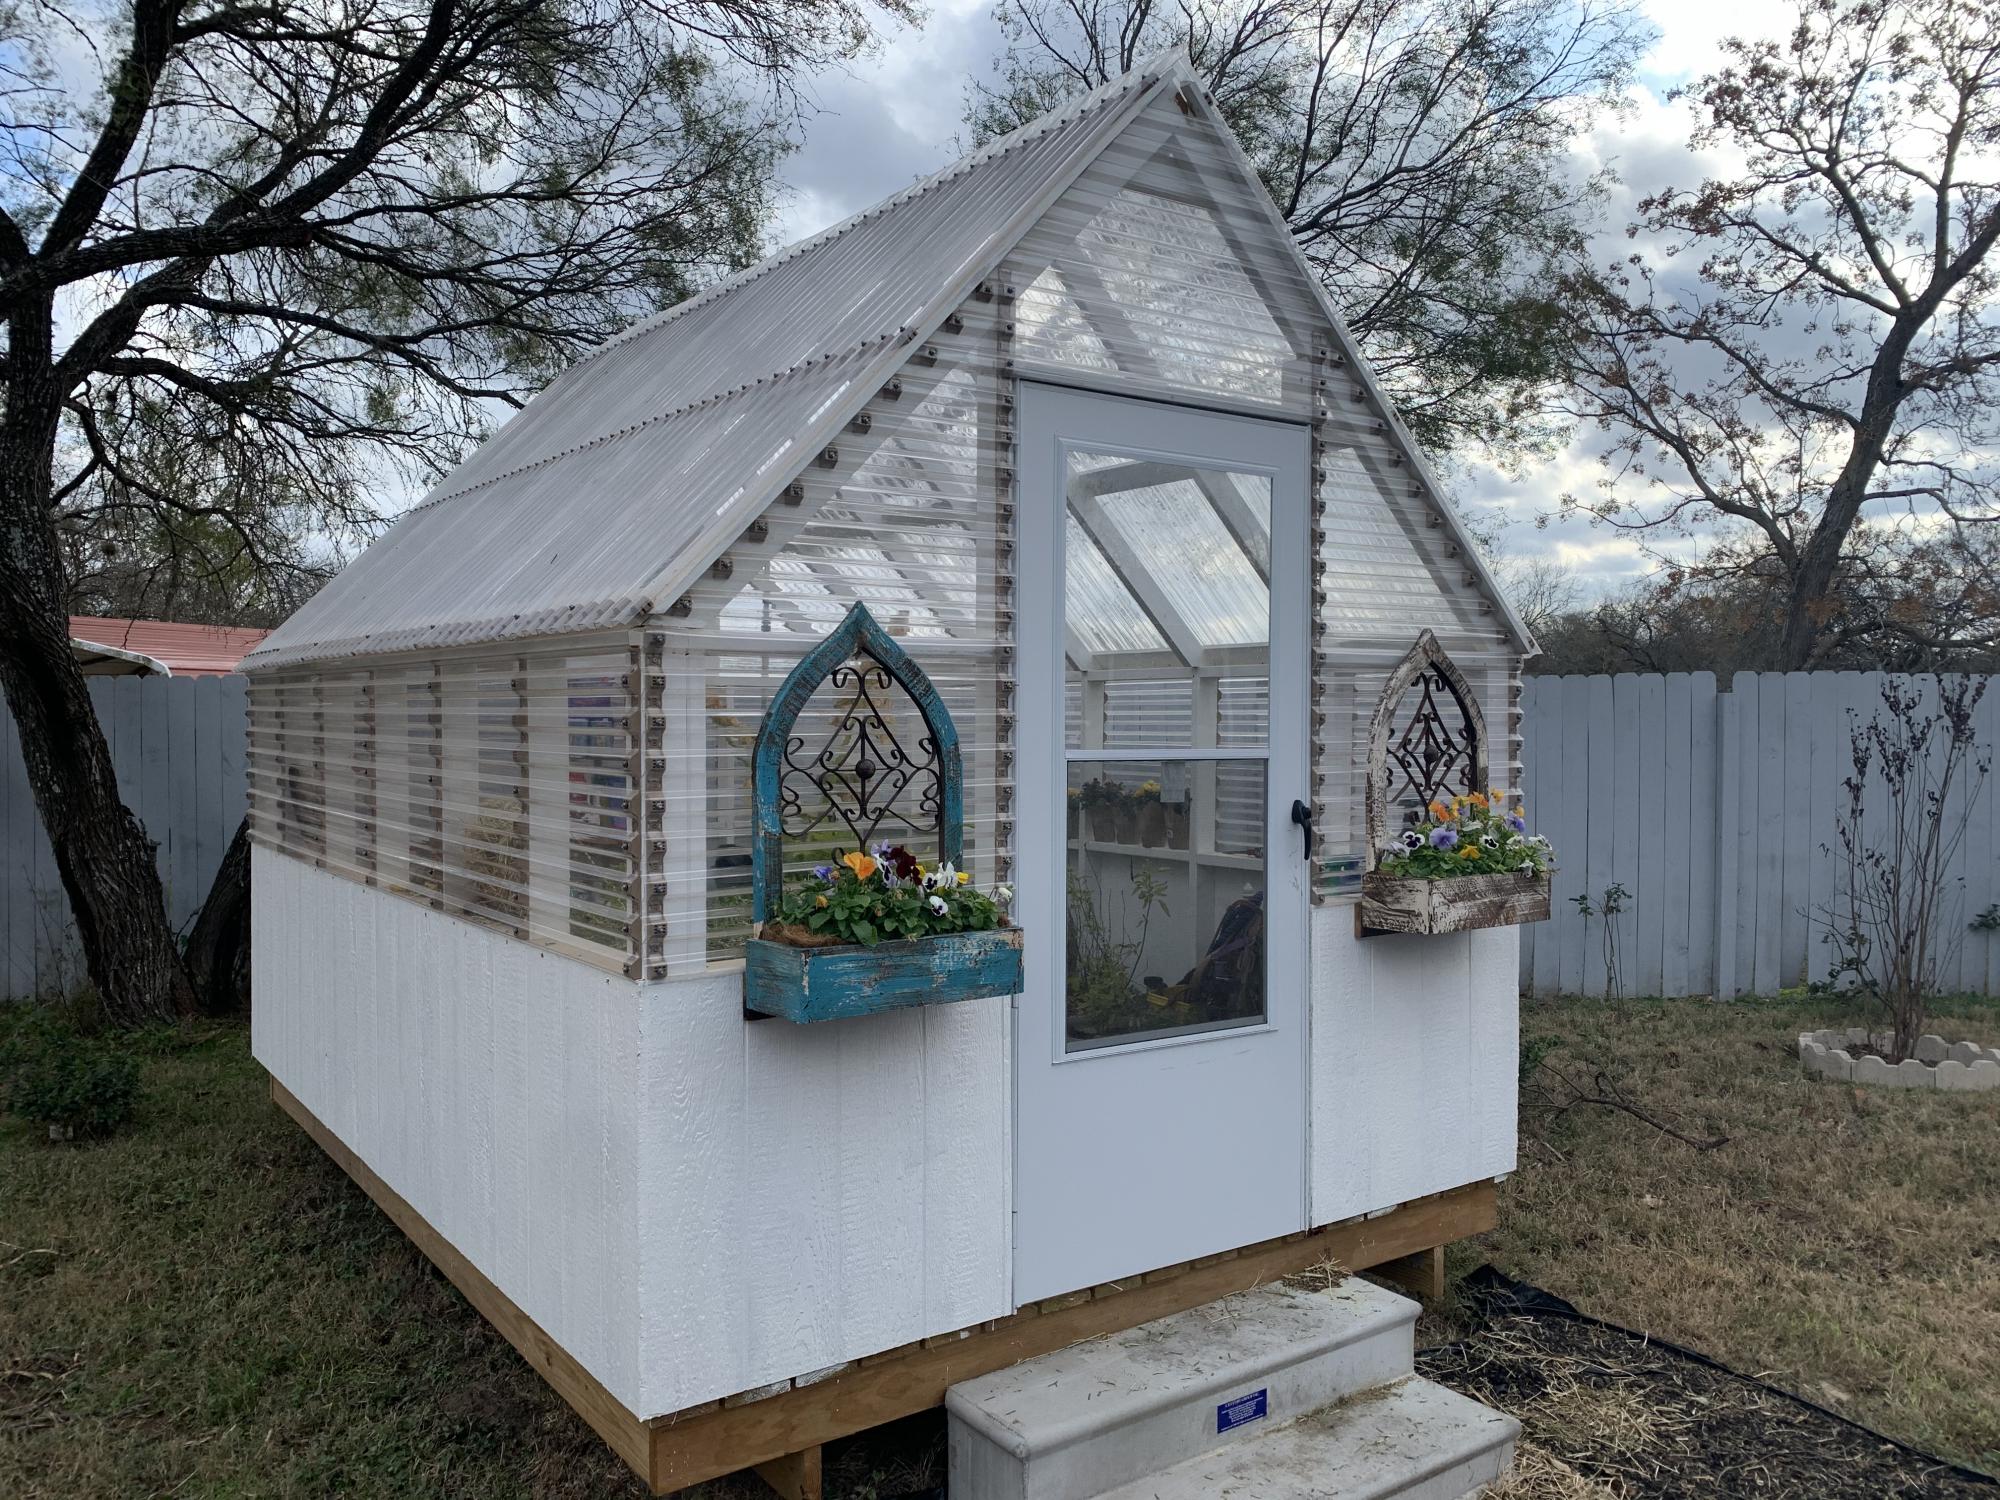
I was planning on building a greenhouse some time next year but I just happen to see this by chance and fell in love with it. I've always built from my own designs but when I saw this I decided to purchase the plans. I couldn't be more happy with it. Right now its doubling as a feed room. I wanted a solid foundation so I build a floating deck to mount the walls on. The deck added quite a bit to the total price.
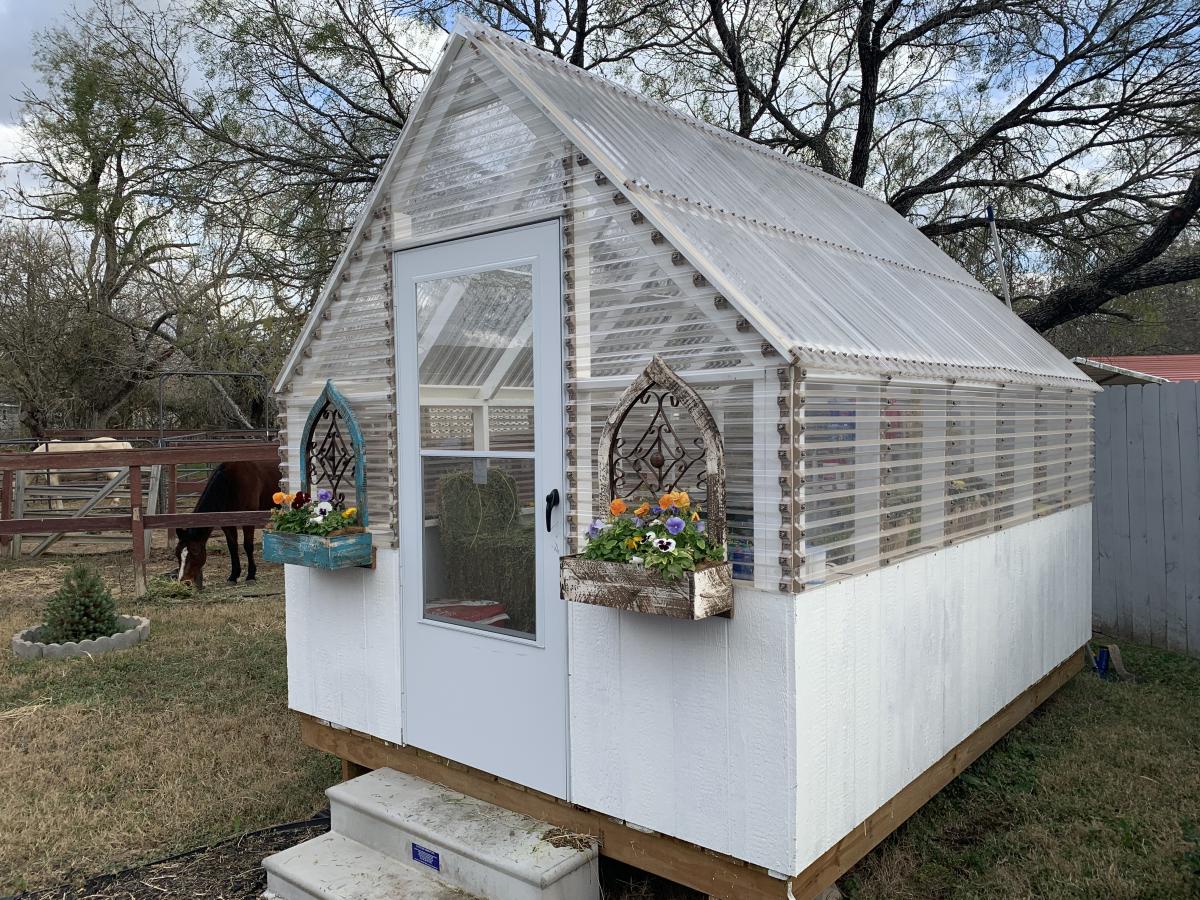
Built from Plan(s)
Estimated Cost
$1384.94
Estimated Time Investment
Week Long Project (20 Hours or More)
Finish Used
Paint
Recommended Skill Level
Advanced
Comments
Wed, 12/23/2020 - 09:52
Just beautiful!
Love that you're able to double it as a feed room, great job on this build!
Lawnmower Shed

Modified the design to allow me to roll lawnmower directly in the end. Fun project.
Built from Plan(s)
Recommended Skill Level
Intermediate
Comments
Modified Clubhouse Bunkbed
I used the plan from the Clubhouse bunk bed and modified to look similar to a Mathy-by-Boles Treehouse Bunkbed.
Built from Plan(s)
Estimated Cost
$450
Estimated Time Investment
Week Long Project (20 Hours or More)
Finish Used
Primer and kid friendly paint. oh yeah...sanding. Lots and lots of sanding!
Recommended Skill Level
Intermediate

Triple Printer Console
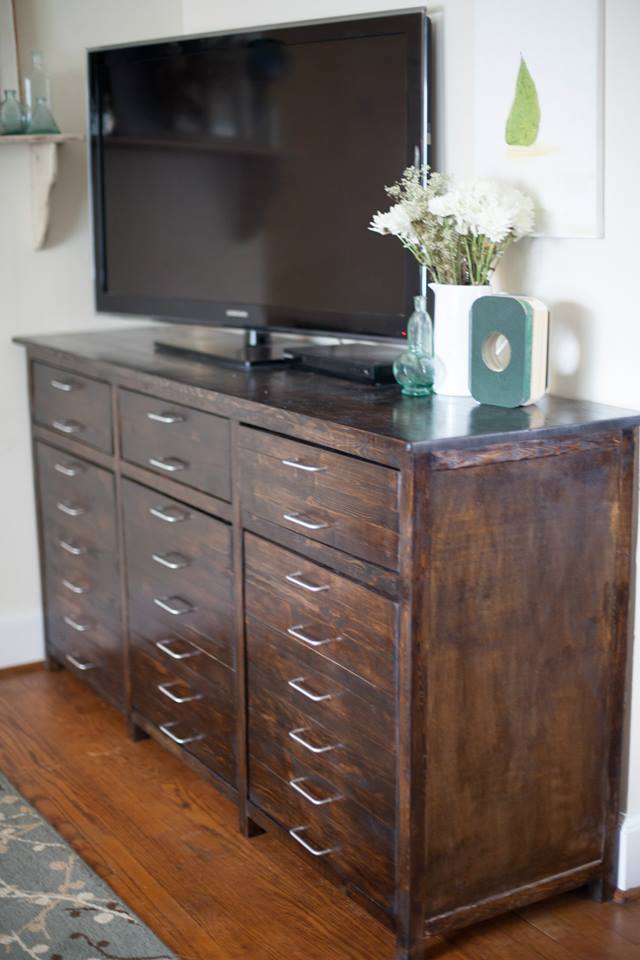
We made this and a dresser just like it. We wanted matching furniture.
Estimated Cost
$350
Estimated Time Investment
Week Long Project (20 Hours or More)
Finish Used
Danish Oil
Recommended Skill Level
Intermediate
Comments

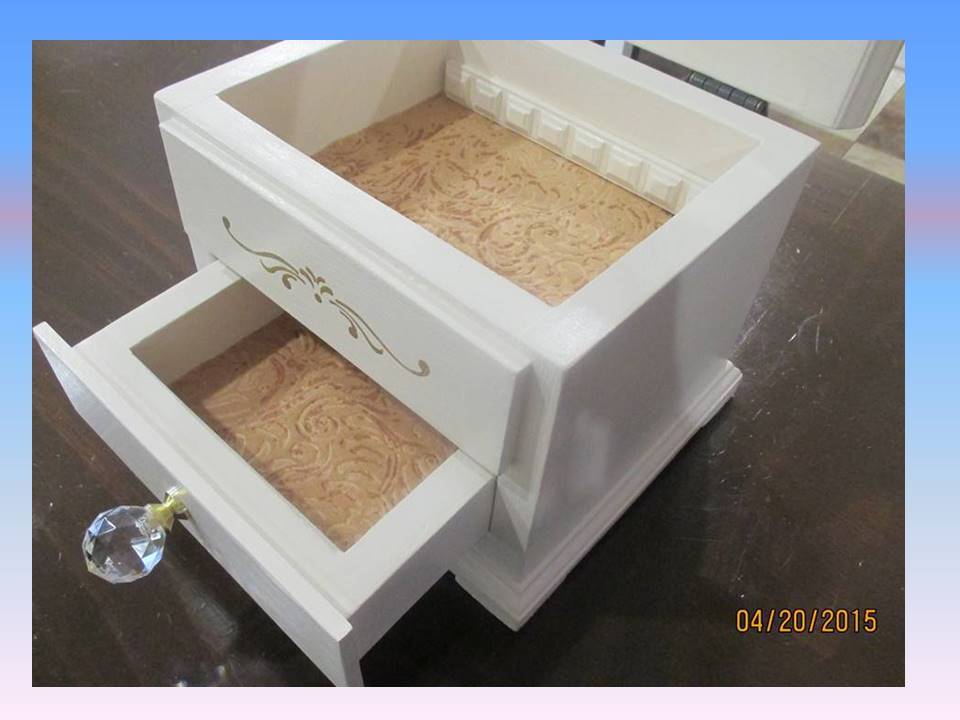
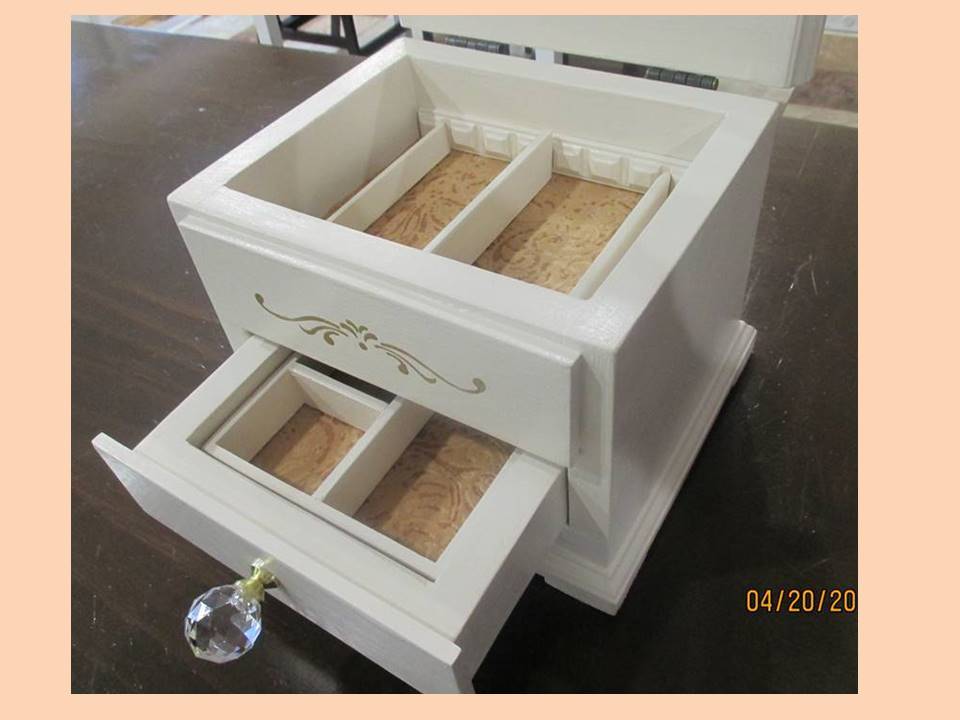
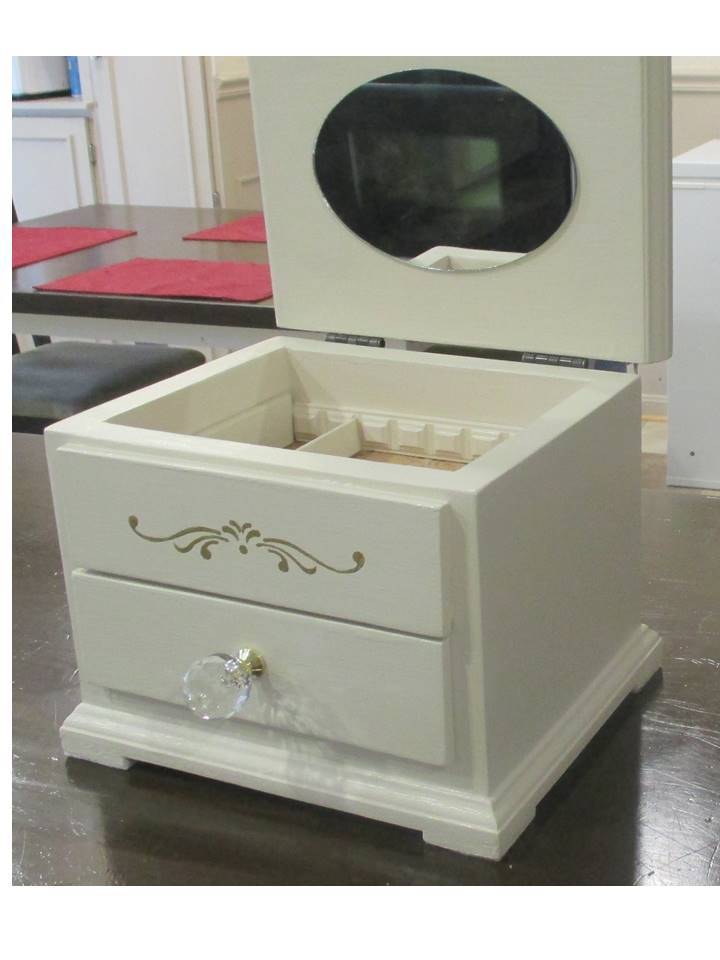
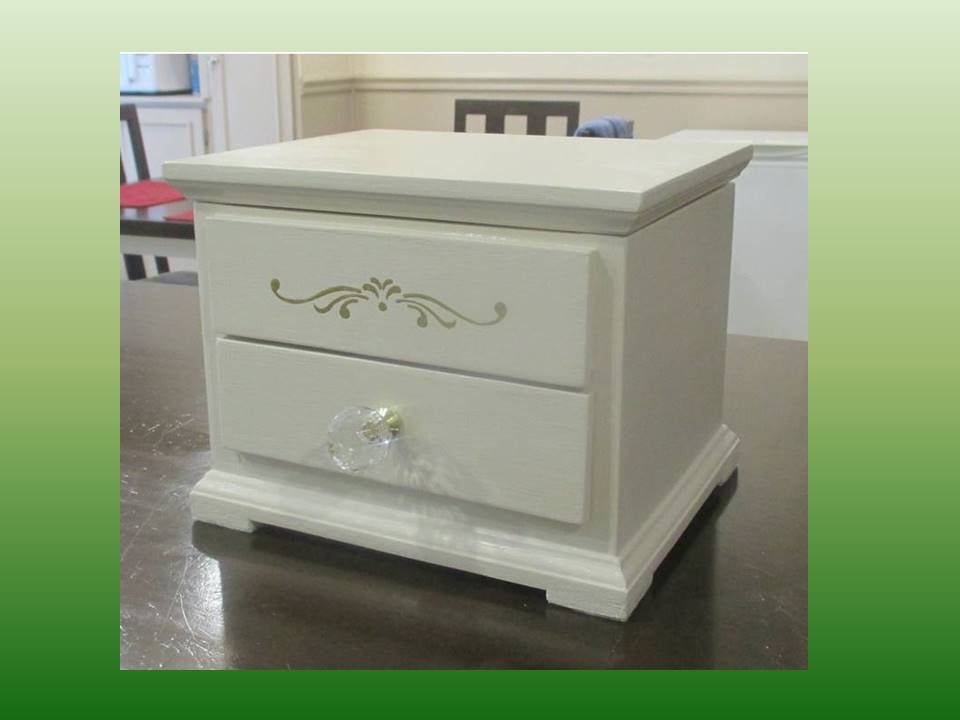
Jewelry Box Retirement Gift

This jewelry box is a gift for a friend at work who is retiring. It is a variation of the Easy Jewelry Box, with the following modifications:
Hinged lift-up top with mirror
Overlay drawer fronts from ¼” craft wood (Gold stencil on top false drawer front, and drawer boxes are 1/8” shorter than the shelf from front to back, to ensure the fronts sit flat against the box front and drawer back doesn't touch the box back at all)
The bottom is 2 pieces thick, to allow space for the drawer overhang and attaching the bottom moulding.
Solid wood back (instead of plywood)
Top and bottom edged with mini stop moulding to make the overhangs, and added feet made from lattice
Removable drawer divider tray and 2 heights of removable dividers for the top, made from dentil, lattice and screen bead mouldings
I really took my time on this build to get everything just right with the build and the finish. Probably spent about 6 hours spread out over the last few weekends.
Built from Plan(s)
Estimated Cost
Cost: 1x8 and 1x2 Lumber and finishes were already on hand (left over from other projects) and I spent about $25 for the mirror, hardware, felt, mouldings, and craft board.
Estimated Time Investment
Day Project (6-9 Hours)
Finish Used
3 coats Clark & Kensington semi-gloss paint + primer in Crushed Peanut, sanded between coats. Stencil: 1 coat Americana Gloss enamel metallic in glorious gold. Soft wax on the shelf and drawer bottom.
Recommended Skill Level
Beginner
Comments

Wed, 04/22/2015 - 18:29
Thank you!
Hi Linda, thank you for the nice comment! This was a fun build, and I'm very glad to say the gift was a big hit! :)
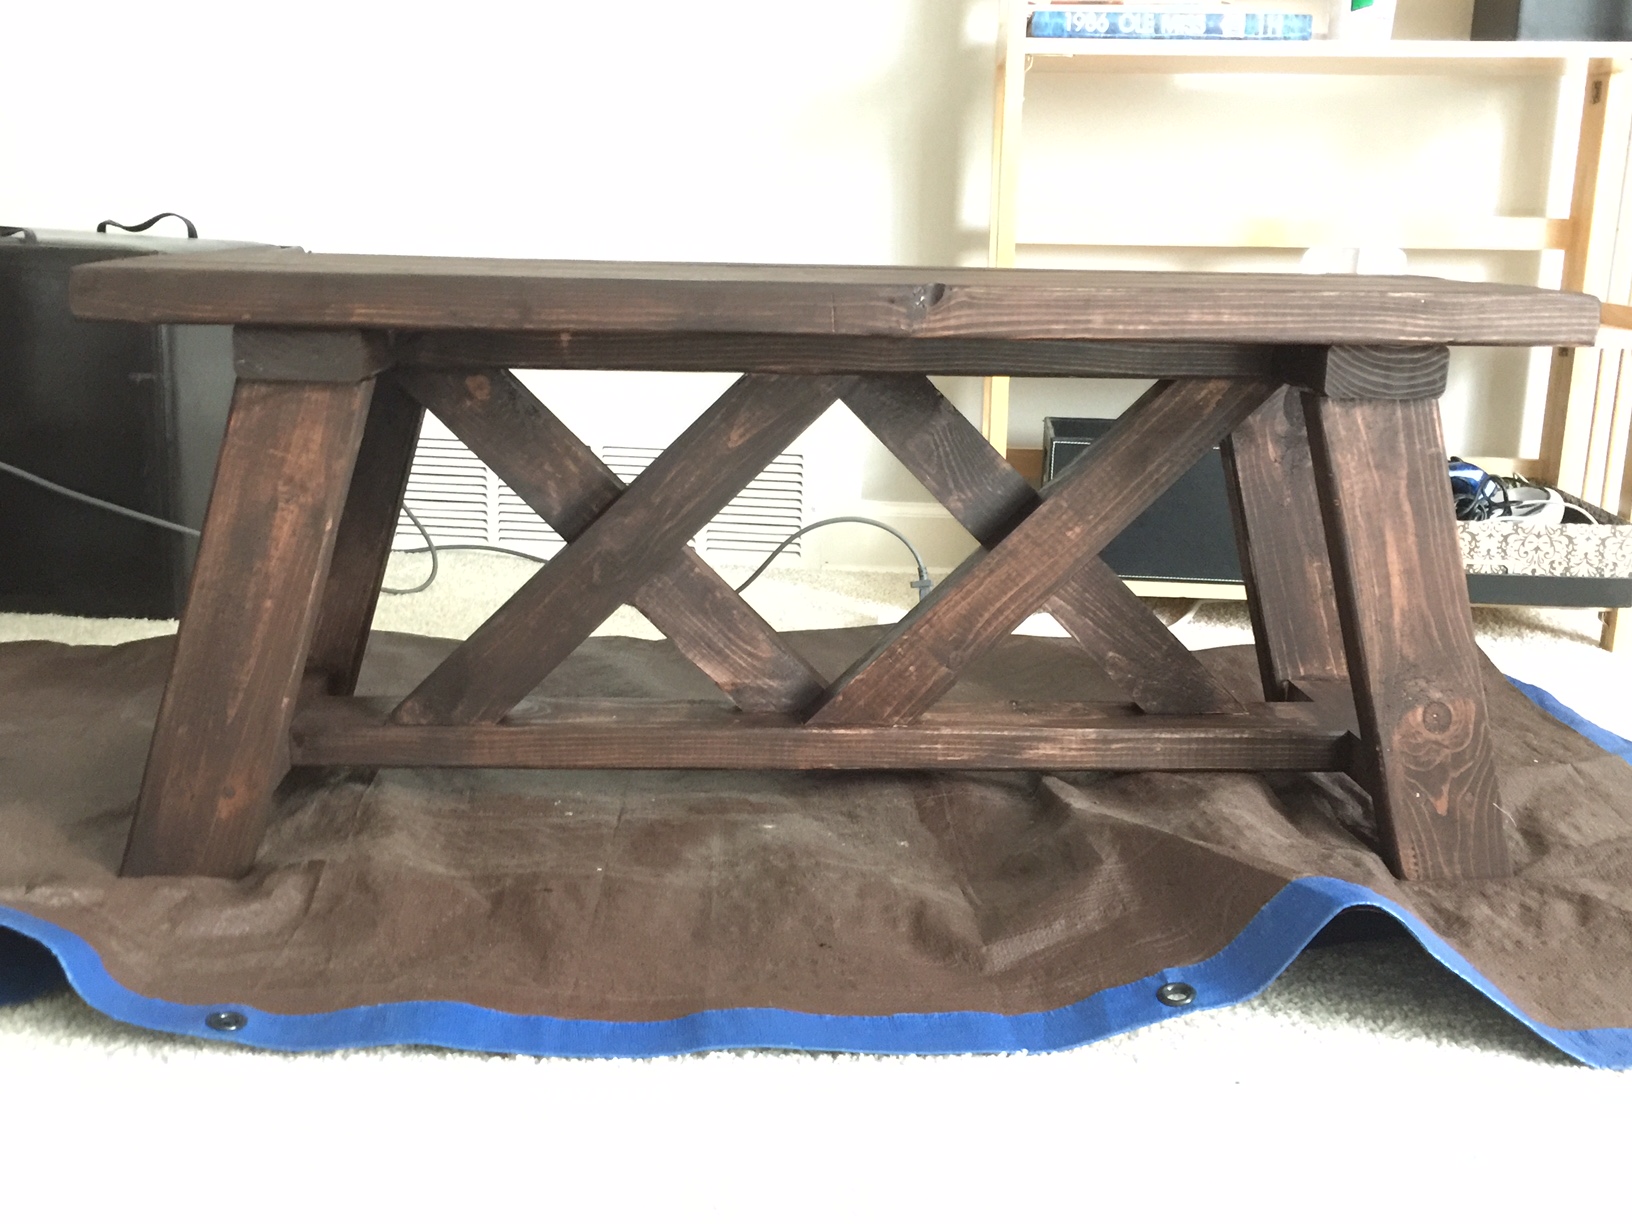
Rustic X Farmhouse Table
We were able to finish this table after work one afternoon and stain it the next day. (we have a 16 month old also, so you can do it! :) ) I wanted a similar style I had found at World Market that retailed for $700 we were able to complete this entire table for $100 including all hardware and stain. LOVE it so much and get SO many compliments on it. Thanks so much!
Shelby
The Dandy Lion
Estimated Time Investment
Day Project (6-9 Hours)
Finish Used
A satin poly with espresso stain in one
Recommended Skill Level
Intermediate