Community Brag Posts

Screen door with built in dog door

Our old screen door wasn't cutting it anymore, so I built a new one, and to kill two birds with one stone, I included a built-in dog door. Now I just need to find the motivation to close off the old dog door.

I have the plans to build this screen door with a built-in dog door posted via the blog link below for anyone interested.

Estimated Cost
80
Estimated Time Investment
Afternoon Project (3-6 Hours)
Finish Used
white exterior paint
Recommended Skill Level
Intermediate

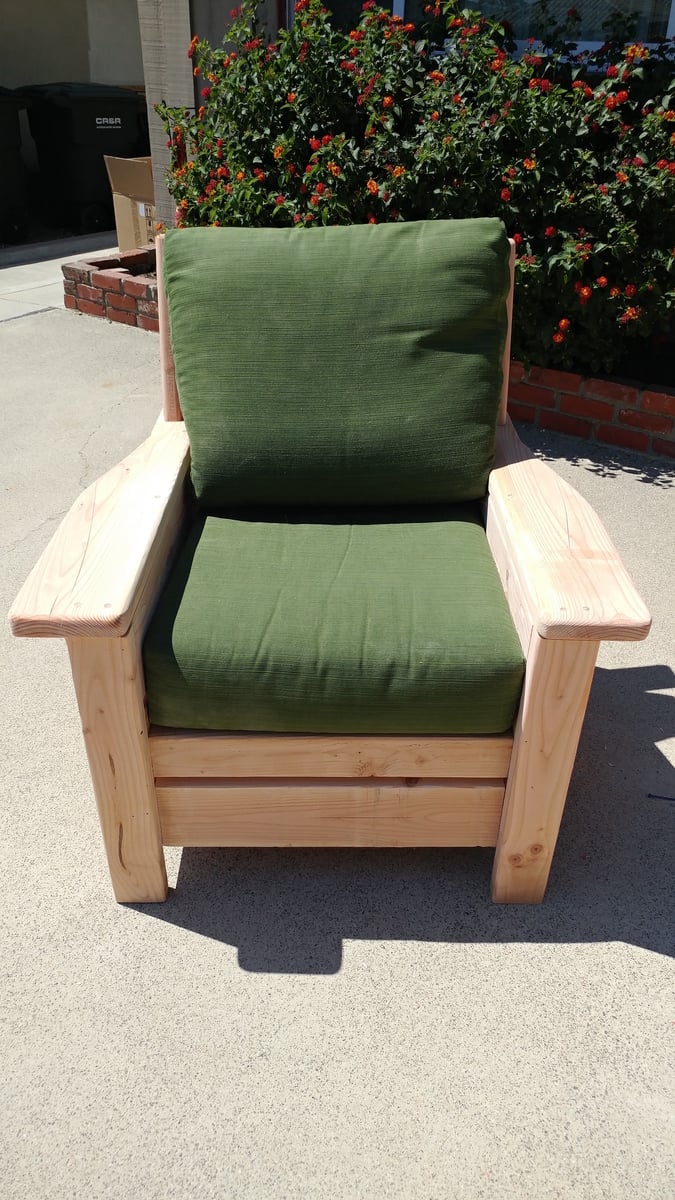
Modern Outdoor Chair with a twist

Submitted by Anonymous (not verified) on Wed, 07/05/2017 - 16:05

Taken from the Modern Outdoor chair project and added a back. Then decided that I love the andorak style chair arms and thus the Andrmodern chair was born.. 

Estimated Cost
$35.00
Estimated Time Investment
Afternoon Project (3-6 Hours)
Finish Used
Will use the Behr two in one
Recommended Skill Level
Beginner

Comments

jkess44

Tue, 06/09/2020 - 13:36

Wow! I really like this look, Im sure its very comfortable. Do you have plans to share? I am very much a beginner and need guidance, lol.

Outdoor Sofa and Sectional

Submitted by Anonymous (not verified) on Fri, 07/14/2017 - 00:22

I haven't really done anything like this, came out quite well. I modified the back for what I think is better comfort, added side supports to hold throw pillows in place and added 2 extra 2x4's to seating surfaces. The sofa I built in an afternoon with an extra pair of hands to line things up and hold them in place. The sectional took a little longer to complete as my helper was off building his own couch (after he saw how simple it was to do). I also didn't use a pocket jig (couldn't find one in rural hardware store) but a countersink drill bit for all screw holes. 

Estimated Cost
in Canadian, for the sofa and sectional about 220 with stain.
Estimated Time Investment
Weekend Project (10-20 Hours)
Finish Used
latex semi transparent stain
Recommended Skill Level
Beginner

Comments

Large Old English Style Farmhouse Dining Table

My wife and I were wanting a large outdoor farmhouse table that looked stylish, and like it could have been bought at Pottery Barn or another high-end furniture store. We found this plan that Ana white had made "Small Old English Style Farmhouse Dining Table". We often host groups from our church and will have 15-20 people on our patio or around our pool area, so we needed a bigger table... I just made some modifications to make it longer (7ft) in length to better fit our space and allow for more people to sit.

To make this plan longer, I simply adjusted the cut-list on the long 1x2s, 1x4s, and 1x6; and added a crossbar to prevent the longer tabletop from sagging. I also added the diagonal corner struts to make the table a little sturdier.

Adjusted Shopping List:
4 - 1x2 @ 8ft
5 - 1x4 @ 8 ft
6 - 1x6 @ 8ft
Waterproof 1 1/4" Kreg screws (for outdoor use)
Minwax Weathered Oak
Minwax Vintage Grey

Adjusted Cut-List
• 2 - 1x2 @ 26.5"
• 2 - 1x2 @ 76.5"
• 2 - 1x2 @ ~33.25"
• 2 - 1x4 @ 26.5"
• 2 - 1x4 @ 76.5"
• 4 - 1x4 @ 7.25" w/ 45º miter (diagonal corner supports)
• 1 - 1x4 @ ~28" (Crossbar - I forget the exact measurement)
• 6 - 1x6 @ 82"

For seating we just bought some inexpensive farmhouse weather resistant chairs from Walmart:
https://www.walmart.com/ip/Yaheetech-Metal-Dinning-Chairs-Stackable-Cof…

Estimated Cost
$170
Estimated Time Investment
Day Project (6-9 Hours)
Finish Used
Minwax Early American (base), Minwax Weathered Grey (2nd coat)
(See more on outdoor use of stains: https://ana-white.com/blog/2019/05/outdoor-wood-furniture-finishing-secrets)
Recommended Skill Level
Beginner

Comments

Outdoor Sofa - Front Porch

Submitted by mclaudeg3 on Fri, 11/06/2020 - 16:47

This project was quite easy and did not require many tools. The plan allowed me to adjust the measurements easily so it could fit in that space. I used regular 2x4’s and treated the wood with Mountain Ash colour in a semi-transparent stain from Sherwin Williams, I just love the colour! I build 2 - 2 seaters exactly the same. The one side has no arm, as I wanted it to look like a lounge chair. I love to sit in the corner and stretch my legs 😊. I bought the cushion covers from IKEA, and got good quality foam.

Estimated Cost
Wood ~$300
Estimated Time Investment
Weekend Project (10-20 Hours)
Finish Used
2 coats of semi-transparent Mountain Ash stain from Sherwin Williams.
Recommended Skill Level
Beginner

Comments

Seasonal And Holiday

Bench with soft-close drawers for Front Entry

Submitted by drickstan on Tue, 08/11/2020 - 10:43

We needed a bench to fill the space in our front entry and provide some storage for seasonal gear. We couldn't find anything to buy that would work for us, so when my wife found these plans, I had to try it! Couldn't be happier with the results. We widened the bench by a foot to 84" to fill the space. Basically, it just made each drawer 4" wider. Everything else was built to plan. The most expensive thing was the soft-close 24" drawer slides (~$100). As soon as you go above that 24" depth, they get pricier! It was also tricky to get the drawers to catch properly on the soft-close mechanisms, but I made sure to take the time to get it right before closing it all in. Now I just open and close the drawers for the pure satisfaction of it! I used premium pine plywood for the top and I find it still doesn't give that smooth finish I like, even after sanding. I think I'll create a new top out of joined knotty pine planks later and just attach it to the top.

Built from Plan(s)
Estimated Cost
$300 CAD
Estimated Time Investment
Week Long Project (20 Hours or More)
Finish Used
Primer and pearl finish paint.
Recommended Skill Level
Intermediate

Modern Farmhouse Bed Frame

Submitted by SofiaTaz on Thu, 01/06/2022 - 23:15

I love how this bed frame turned out! Everywhere that has stain is cedar and the rest is all scrap spruce. Thanks for another great plan Ana!

Built from Plan(s)

Comments

Outdoor Garbage Can Shed

Submitted by Anonymous (not verified) on Fri, 12/08/2023 - 08:45

Chose the small firewood shed project as a "template" if you will .. built this to house our garbage cans and eventually put a gate on it to "help deter" the Florida black bears (we do multiple things to keep them at bay) but this will also just be a nicer looking way to keep the cans outside.

I modified the floor since the firewood shed had a floor that was suitable for, well, firewood but not so much for rolling garbage cans. Had to leave the one slat off the back for the depth of the can which I didn't completely account for in the beginning. Overall, still need to paint it and water seal it but happy with how it turned out.

Built from Plan(s)

Cedar Planter for Pole Beans

Submitted by swhitead on Mon, 07/20/2020 - 10:41

Increased width of box to 46" by using 8 fence boards instead of 3. put base at 12" down, lined box with landscaping fabric to hold dirt. Created trellis with 1x2 boards with 10" long corner braces, spaced screws 6" apart around edges and weaved cotton thread to create the trellis. Used 12" scraps of 2x2 to create a "slot" inside the center of the planter to support the trellis. Added container mix and green pole beans started in egg cartons earlier in the spring.

Built from Plan(s)
Estimated Cost
$35
Estimated Time Investment
Day Project (6-9 Hours)
Finish Used
None
Recommended Skill Level
Intermediate
Seasonal And Holiday

Nail Gun Cabinet

This week was a collaboration between me and Brad at FixthisBuildthat.com. I made a slight variation of his hanging tool cabinet to store my nail guns. More details at my website: http://www.lanebroswoodshop.com/2015/03/nail-gun-cabinet.html

YouTube video: https://www.youtube.com/watch?v=BUHnkjojlWc

Estimated Cost
$100
Estimated Time Investment
Weekend Project (10-20 Hours)
Finish Used
Wipe on Poly
Recommended Skill Level
Intermediate

Garage Shelving - Some minor mods to Ana's great basic plan

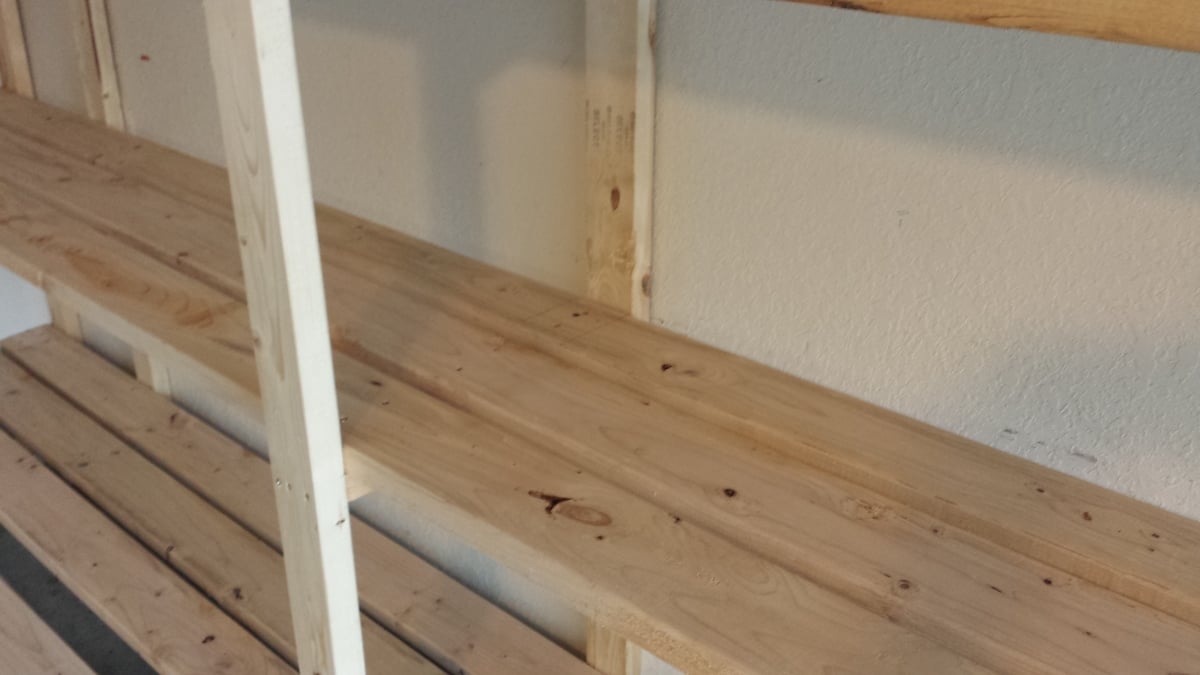
My father-in-law and I knocked this project out in about 5 hours including the trip to the lumber yard. You've got a great basic design here! A few modifications we made:

1. I thought the depth of the shelves in the original plan was a little too shallow so I used 3 2"X6"s instead of the 4 2"x4"s. That made the shelves 1 1/2" deeper. Although 2"x6"s are obviously more expensive, the overall cost for the project didn't change much because we only had to use 3 boards per shelf instead of 4. This also reduced the amount of screwing and made it easier to position the shelf boards without taking measurements since we only had one middle board to deal with (instead of 2 with the 2"x4"s). We just eyeballed the spacing of the middle shelf board as we worked.

2. Since our garage has a 10' ceiling, I decided to go 8' tall with the unit. This allowed us to add a 5th shelf.

3. Some oversized tubs can be 18-20" high or more so I varied the height of each shelf -- 24" at the bottom, then 20", 18" and 16". There's approx. 24" available between the top shelf and the ceiling.

4. Due to the position of the garage door track, I had to notch out a couple feet at one side. The end support piece is only 6' high.

5. Since many storage tubs can be 16-18" wide, I made sure that there was at least 54" between 3 of the vertical support structures. This will allow us to store 3 tubs side-by-side and maximize storage. You might notice that I have two vertical supports that appear to be very close together near the back wall. I did this so I would have something on that side to attach more shelving to on that short wall where the garage door opener is. 

The only cuts we had to make for this entire project were for the 18 1/2" 'braces' or support pieces on the vertical ladder structures. The shelves are either 14' or 12' (top shelf only) and the vertical 2"x4"s are either 8' or 6'. Most lumber yards will carry these lengths in either 2"x4"s or 2"x6"s. 

We didn't use any wood glue, and I admit this may come back to haunt me. However, to get a good fit and eliminate gaps, I used clamps I already owned to squeeze the boards together before adding the screws. Everything feels very solid and sturdy to me. 

Because of the extra height compared with the original plan, I was worried about it possibly tipping over (we have a 10-year-old who likes to climb frown) so I made sure that 3 of the supports are lined up with the wall studs. After leveling the entire unit, I plan to anchor it to the wall using 3 1/2" screws.

So for about $187 in lumber and maybe $20 in construction screws, I've got 76 feet of STURDY shelving that should accommodate hundreds of pounds! Not a bad investment at all...


Estimated Cost
$187 lumber + $20 construction screws
Estimated Time Investment
Afternoon Project (3-6 Hours)
Finish Used
None right now, but my wife wants to sand it and apply marine varnish to give it a shiny, yet still unfinished, look.
Recommended Skill Level
Beginner

Comments

Garage Shelves + Work Bench

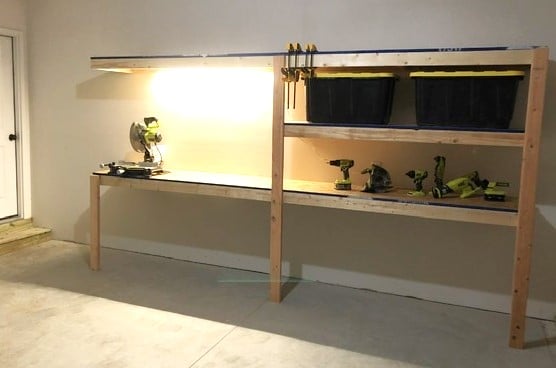
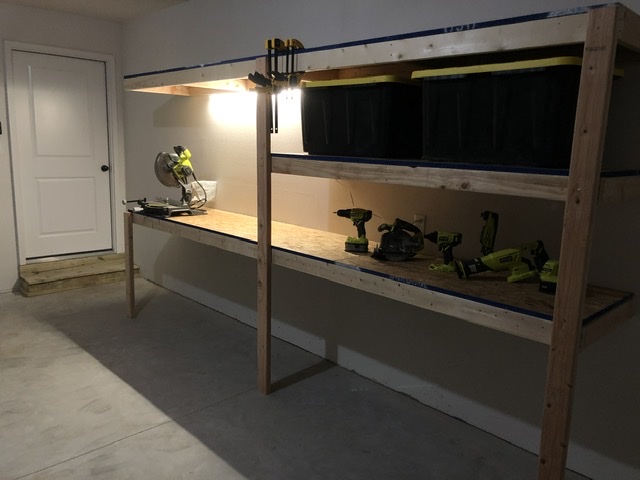
I used Ana’s plans for the garage shelves, but modified them to include a work bench. A lot of you tubers have done this, built a combination work bench and shelving, but I built nearly everything according to Ana’s plans. 12 feet long, 24 inches deep. I got some LED lights (two 1600 lumen strip lights) from menards that really brighten up my entire garage and make the work bench more useful. The one thing I really wanted was to not have a supporting pillar on the work bench to keep it open, and I loved how it turned out. I went for 3/4 plywood, mostly to have a stronger work surface, and I’m glad I did. I have since added a supporting 2x6 off of the study to support the top shelf above the bench and its strong enough to do pull-ups off of, and I have reinforced the support leg under the bench with a cross bar. Thanks for the great plans!!

Estimated Cost
~$200 (lumber prices have gone up recently due to supply issues with covid)
Estimated Time Investment
Weekend Project (10-20 Hours)
Recommended Skill Level
Starter Project

Comments

Pantry Wall

Submitted by amiles573 on Tue, 03/28/2017 - 13:41

I modified the origianl plans by making the cabinet taller.  I also built 2 cabinets and trimmed them both together to make it appear as if it is 1 giant cabient.  It measure over 7 feet tall and just over 6 feet wide.  I did add an additional 1x2 brace in the center of the cabinet to help support.  I also cut an additional 1x4 to use a brace when anchoring it to the wall.  I also chose to add an additional 2 trim pieces to each door because they are much taller than the original plan doors.  

Built from Plan(s)
Estimated Cost
$400
Estimated Time Investment
Weekend Project (10-20 Hours)
Finish Used
Varathane Stain, Weathered Grey
15 7/8" center to center cabinet pulls
Fully Inset, Frameless Hinges
Recommended Skill Level
Beginner

Comments

Murphy bed

Submitted by bpcooper14 on Wed, 05/08/2019 - 06:09

So I've always wanted to build a Murphy bed.  And by always I mean since I first came across plans here that made it look so simple.  It ended up taking me a while to do because my job has me working 6 days a week so I was only able to work on it for short chunks of time.

I ended up utilizing a few different plans and mashed them together to build a full size murphy bed.  The shelves are the support legs when the bed is down.  The "hinge" mechanism are heavy duty 360 degree seat swivels.

All-in-all it turned out WAY better than I expected with only some minor issues throughout the construction process.  

Next up is a twin xl Murphy bed with a murphy desk attachment that will serve as a craft  table when up.

Estimated Cost
3 - 4x8 sheets of 3/4" plywood ($25 each)
3 - 1x2x8 to wrap the frame ($2-3 each)
1 pack Door Hinge pins to serve as the pins to hold the bed upright ($3-5)
1 pint stain
1 pint shellac
2 - Heavy Duty 360 degree seat swivels ($20)
Screws/nails/etc.

All told, this project probably cost around $200
Estimated Time Investment
Week Long Project (20 Hours or More)
Recommended Skill Level
Intermediate

Comments

Wife's Kindergarten Classroom

Been a while since I had time to actually build anything worth posting about! My wife wanted some items for her Kindergarten classroom this year, so built several items, most inspired by the Farmhouse family.

Estimated Time Investment
Day Project (6-9 Hours)
Recommended Skill Level
Beginner

Comments

sido17

Thu, 07/18/2019 - 15:27

I would love the dimensions or plans for this. Would love to make it for my classroom.

dlee69

Tue, 07/30/2019 - 12:07

Hello

Can I please get the plans to the u shape table?

Thanks

Linguine

Mon, 08/19/2019 - 12:09

I am guessing the corner posts are 2 x 4s, the top is 2 x 10s.  It looks like the width is 6’ (looking at the floor carpet tiles being 24” square). So 2 - 2 x 10s side by side for the main part of the desk top and 2 - 2 x10s perpendicular on each side of the chair.  I guess the height is subject to choice and the length of each side would also be subject to choice or to the length of the 2 x 10s to be economical.


an educated guess would be 4 - 8’  2x10s for the top and 6 - 6’ 2 x 4s for the legs?  


Anyone else have any input here?  Open to suggestions.....

Chicken Run with Turkey House

Submitted by vendo on Wed, 10/13/2021 - 10:03

My daughter helped me build this enclosure. We used Ana's chicken run plan, but just made it taller so we could walk in easily. We added an overhang to store food and pellets under, for the supports we used Ana's easy shelves angle support plan, and finally we used the playhouse base plan for the base of turkeys house. All plans used are linked below. We ran the chicken wire out under the structure and still need to bring in some large rocks or pavers, but so far no issues with predators. Turkey was getting too big to fit in the smaller coop, so we decided to have fun with his house and used cedar fence pickets and some treated 2x4's, built a box and jig sawed the shape of a turkey. As you can see in the first photo the ladder for turkey wasn't big enough, all the other chickens were in his house, lol. So I beefed up the ladder and he happily can put himself up at night now:) Overall a super successful project, I wasn't sure what to do with the top and just at that point, the neighbor walked over and offered the metal, talk about a huge win and the perfect solution! We attached the run to the previous smaller structure and now they have so much more room and are laying like crazy:) Finally, I think this would make a great dog kennel as well...

Simple 2x4 Bench

Submitted by jennibee on Sun, 09/14/2014 - 17:03

I made this in an afternoon. Loved this project. It is made with 2x4's using a Kregs Jig and mitre saw (plus additional tools like a drill and square).  This was my frist time using the Kregs Jig and I am sold!!

The free plans were taken from another website. They are very detailed and there is even a video (I recommend it as he gives a great tip for making sure the back stays equal/level to each other before putting the back on). Even though you can build this by yourself, I did have help for the heavier sides once they were assembled.  I plan to build the additional side table soon and finish them both with sanding and staining when the weather seems less iffy for rain.

If you are looking for a good beginner project that doesn't take forever or have complicated steps, this is your project.

Built from Plan(s)
Estimated Cost
Around $50
Estimated Time Investment
Afternoon Project (3-6 Hours)
Recommended Skill Level
Beginner

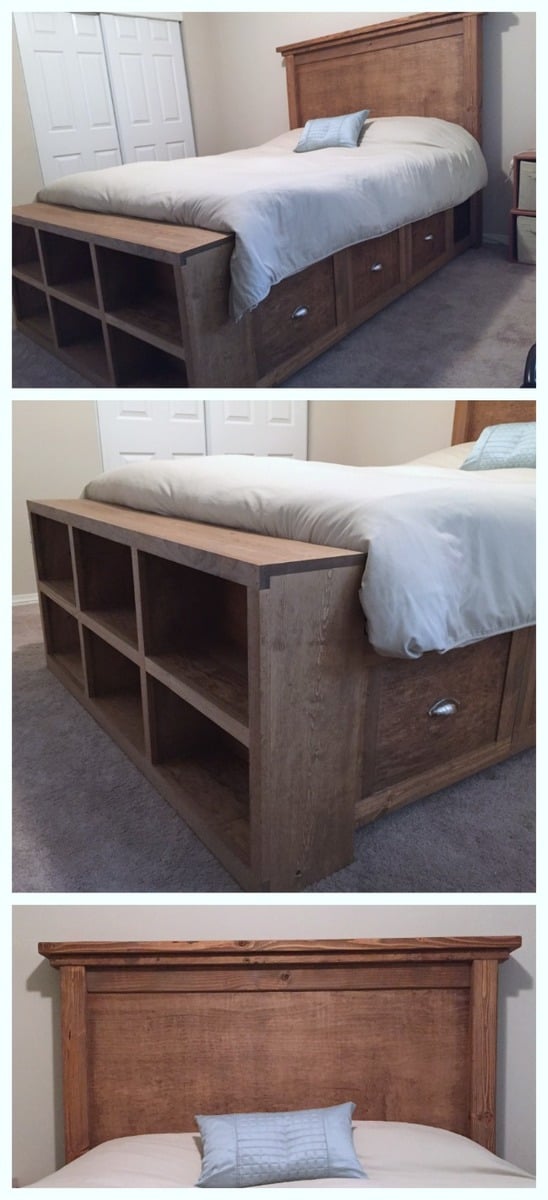
Farmhouse Bed with Storage and Bookshelf footboard

Submitted by rbgreene04 on Sat, 05/21/2016 - 15:50

I altered the plans just a bit so that I could make use of the drawer closest to the headboard, while using bedside tables as well (not the ugly ones in the pictures, but some that only exist in my mind as of now). With the plan as is, I didn't think that first drawer would be able to open if you have a nightstand. So I left about a 17" gap that can be used as an open shelf for storage, and still had room for 3 drawers. I also wanted to include a bookshelf as the footboard to make it multifunctional. We have a ton of books and no place to store them (fear not, a large bookshelf/media center is coming soon!) I also altered the top of the headboard just a bit to give it more texture and visual appeal (hopefully, but beauty is in the eye of the beholder so I've been told). Lastly, I did not put the 1/4" plywood backing on the drawer carcasses. They were pretty sturdy as is, and only got more sturdy as they were attached to the headboard and footboard; I'm not worried about racking at all. Leaving the back off also allows me to pull the drawers out and access some hidden storage in between the two drawer carcasses. 

I wanted a simple finish, so I rubbed it with dark walnut Danish oil. Super simple finish and I think it'll hold up as the bed is not like a desk that needs poly or something. 

Estimated Cost
Cost? Great question! I build things, but don't keep track of receipts. Whoops! It's a major flaw of mine, and I'm working on it. I'd estimate just shy of $300.
Estimated Time Investment
Week Long Project (20 Hours or More)
Finish Used
I sanded to 120 and then lathered on Dark walnut Danish oil. I let it soak into the wood, and boy was the wood thirsty. Then reapplied after about 30 minutes and wiped off the excess, which there wasn't much excess--did I mention the wood was thirsty?
Recommended Skill Level
Intermediate

Comments

ciara5545

Sun, 08/28/2016 - 19:50

This bed turned out amazing.  I love the modifications and agree the first drawer will be more usable.