Community Brag Posts


Farmhouse L Desk
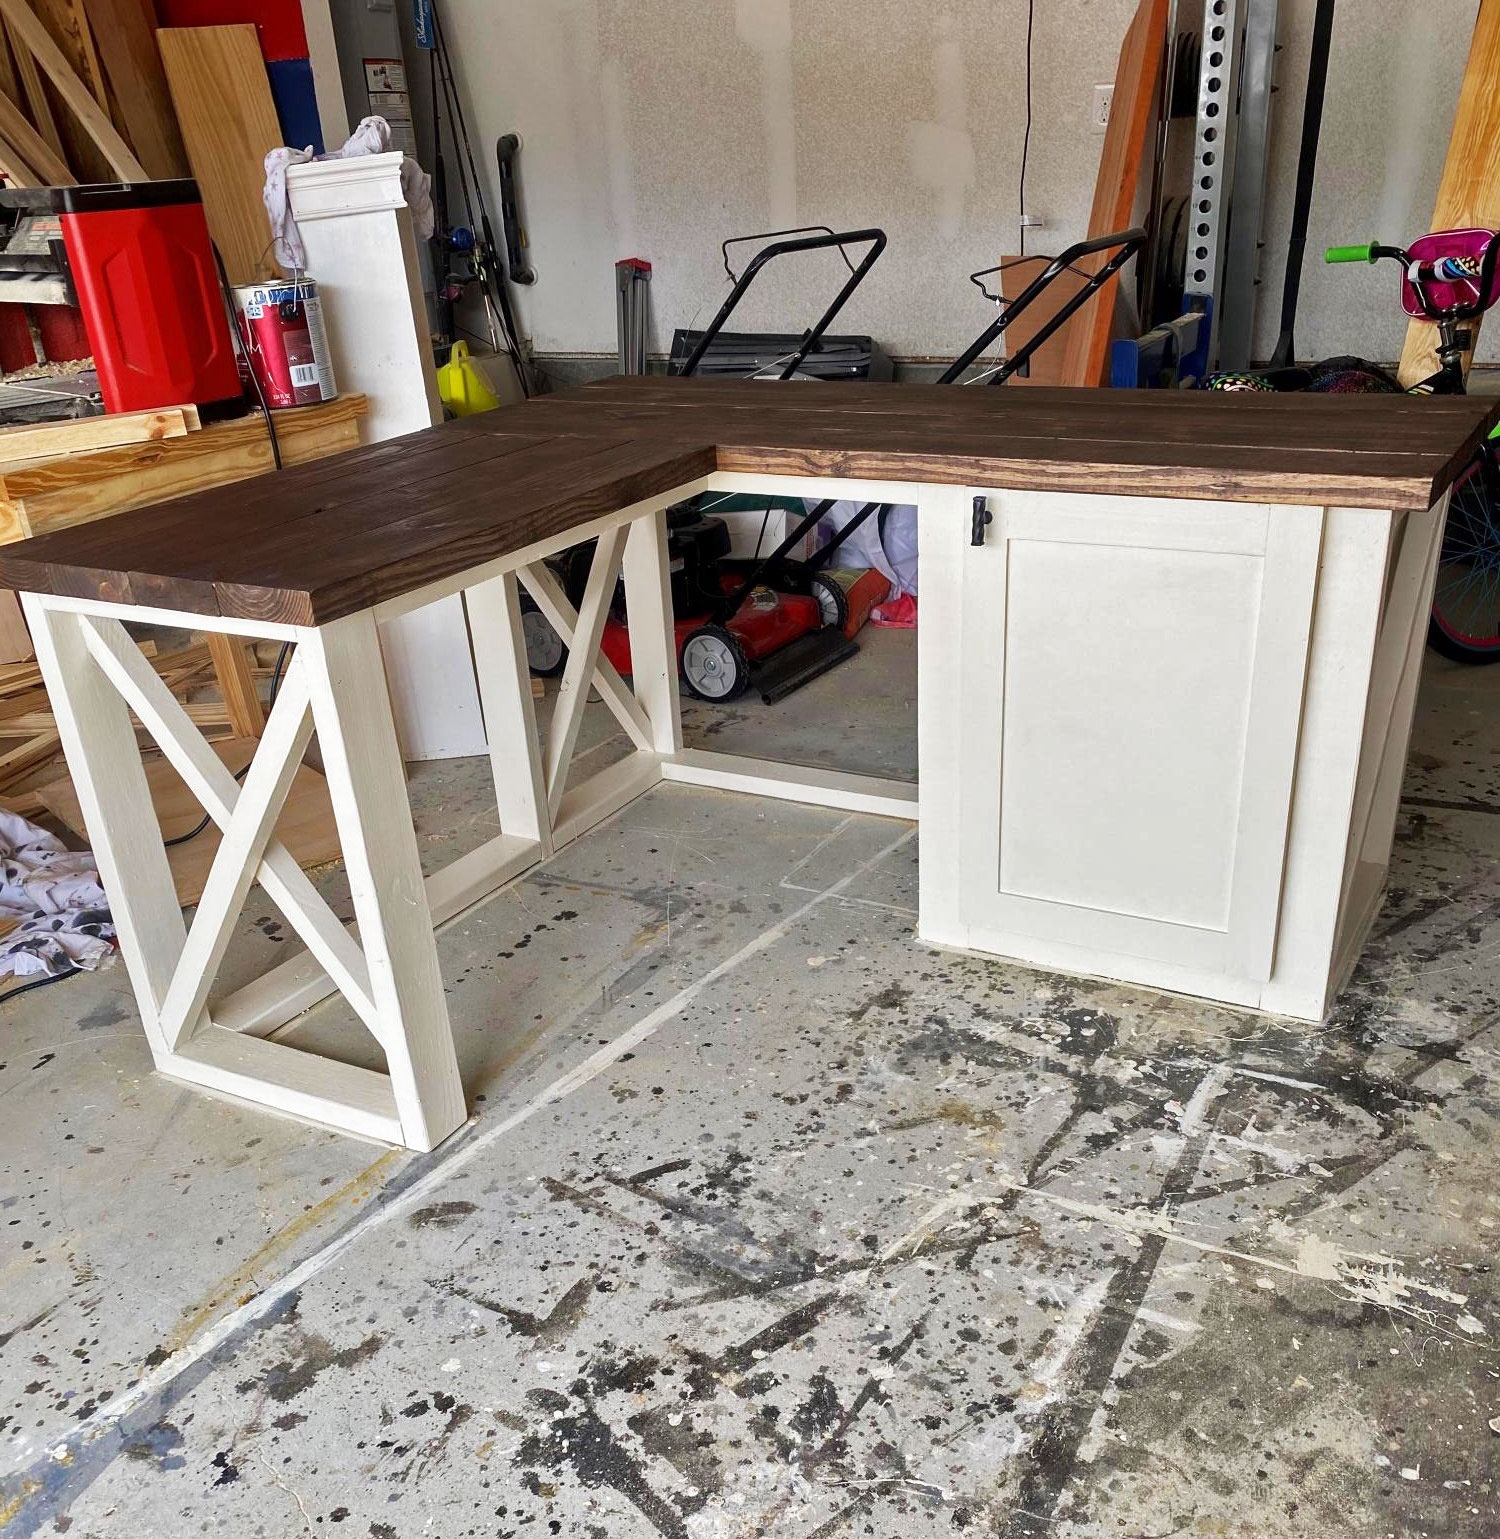
Put a twist on the farmhouse desk plans
Built from Plan(s)
Comments
Wed, 12/09/2020 - 11:03
Love your twist!
This is beautiful, love the finish! I would love to see it in it's space!:)
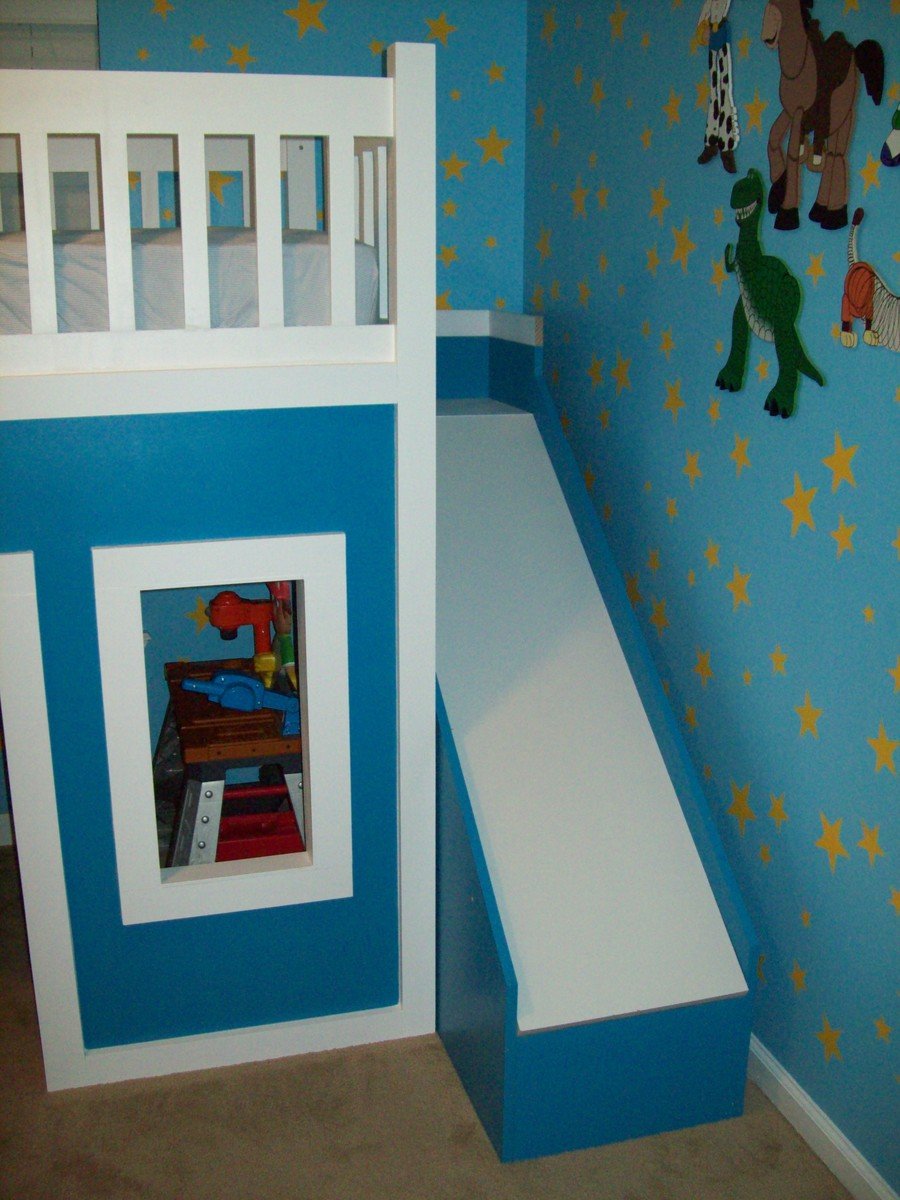
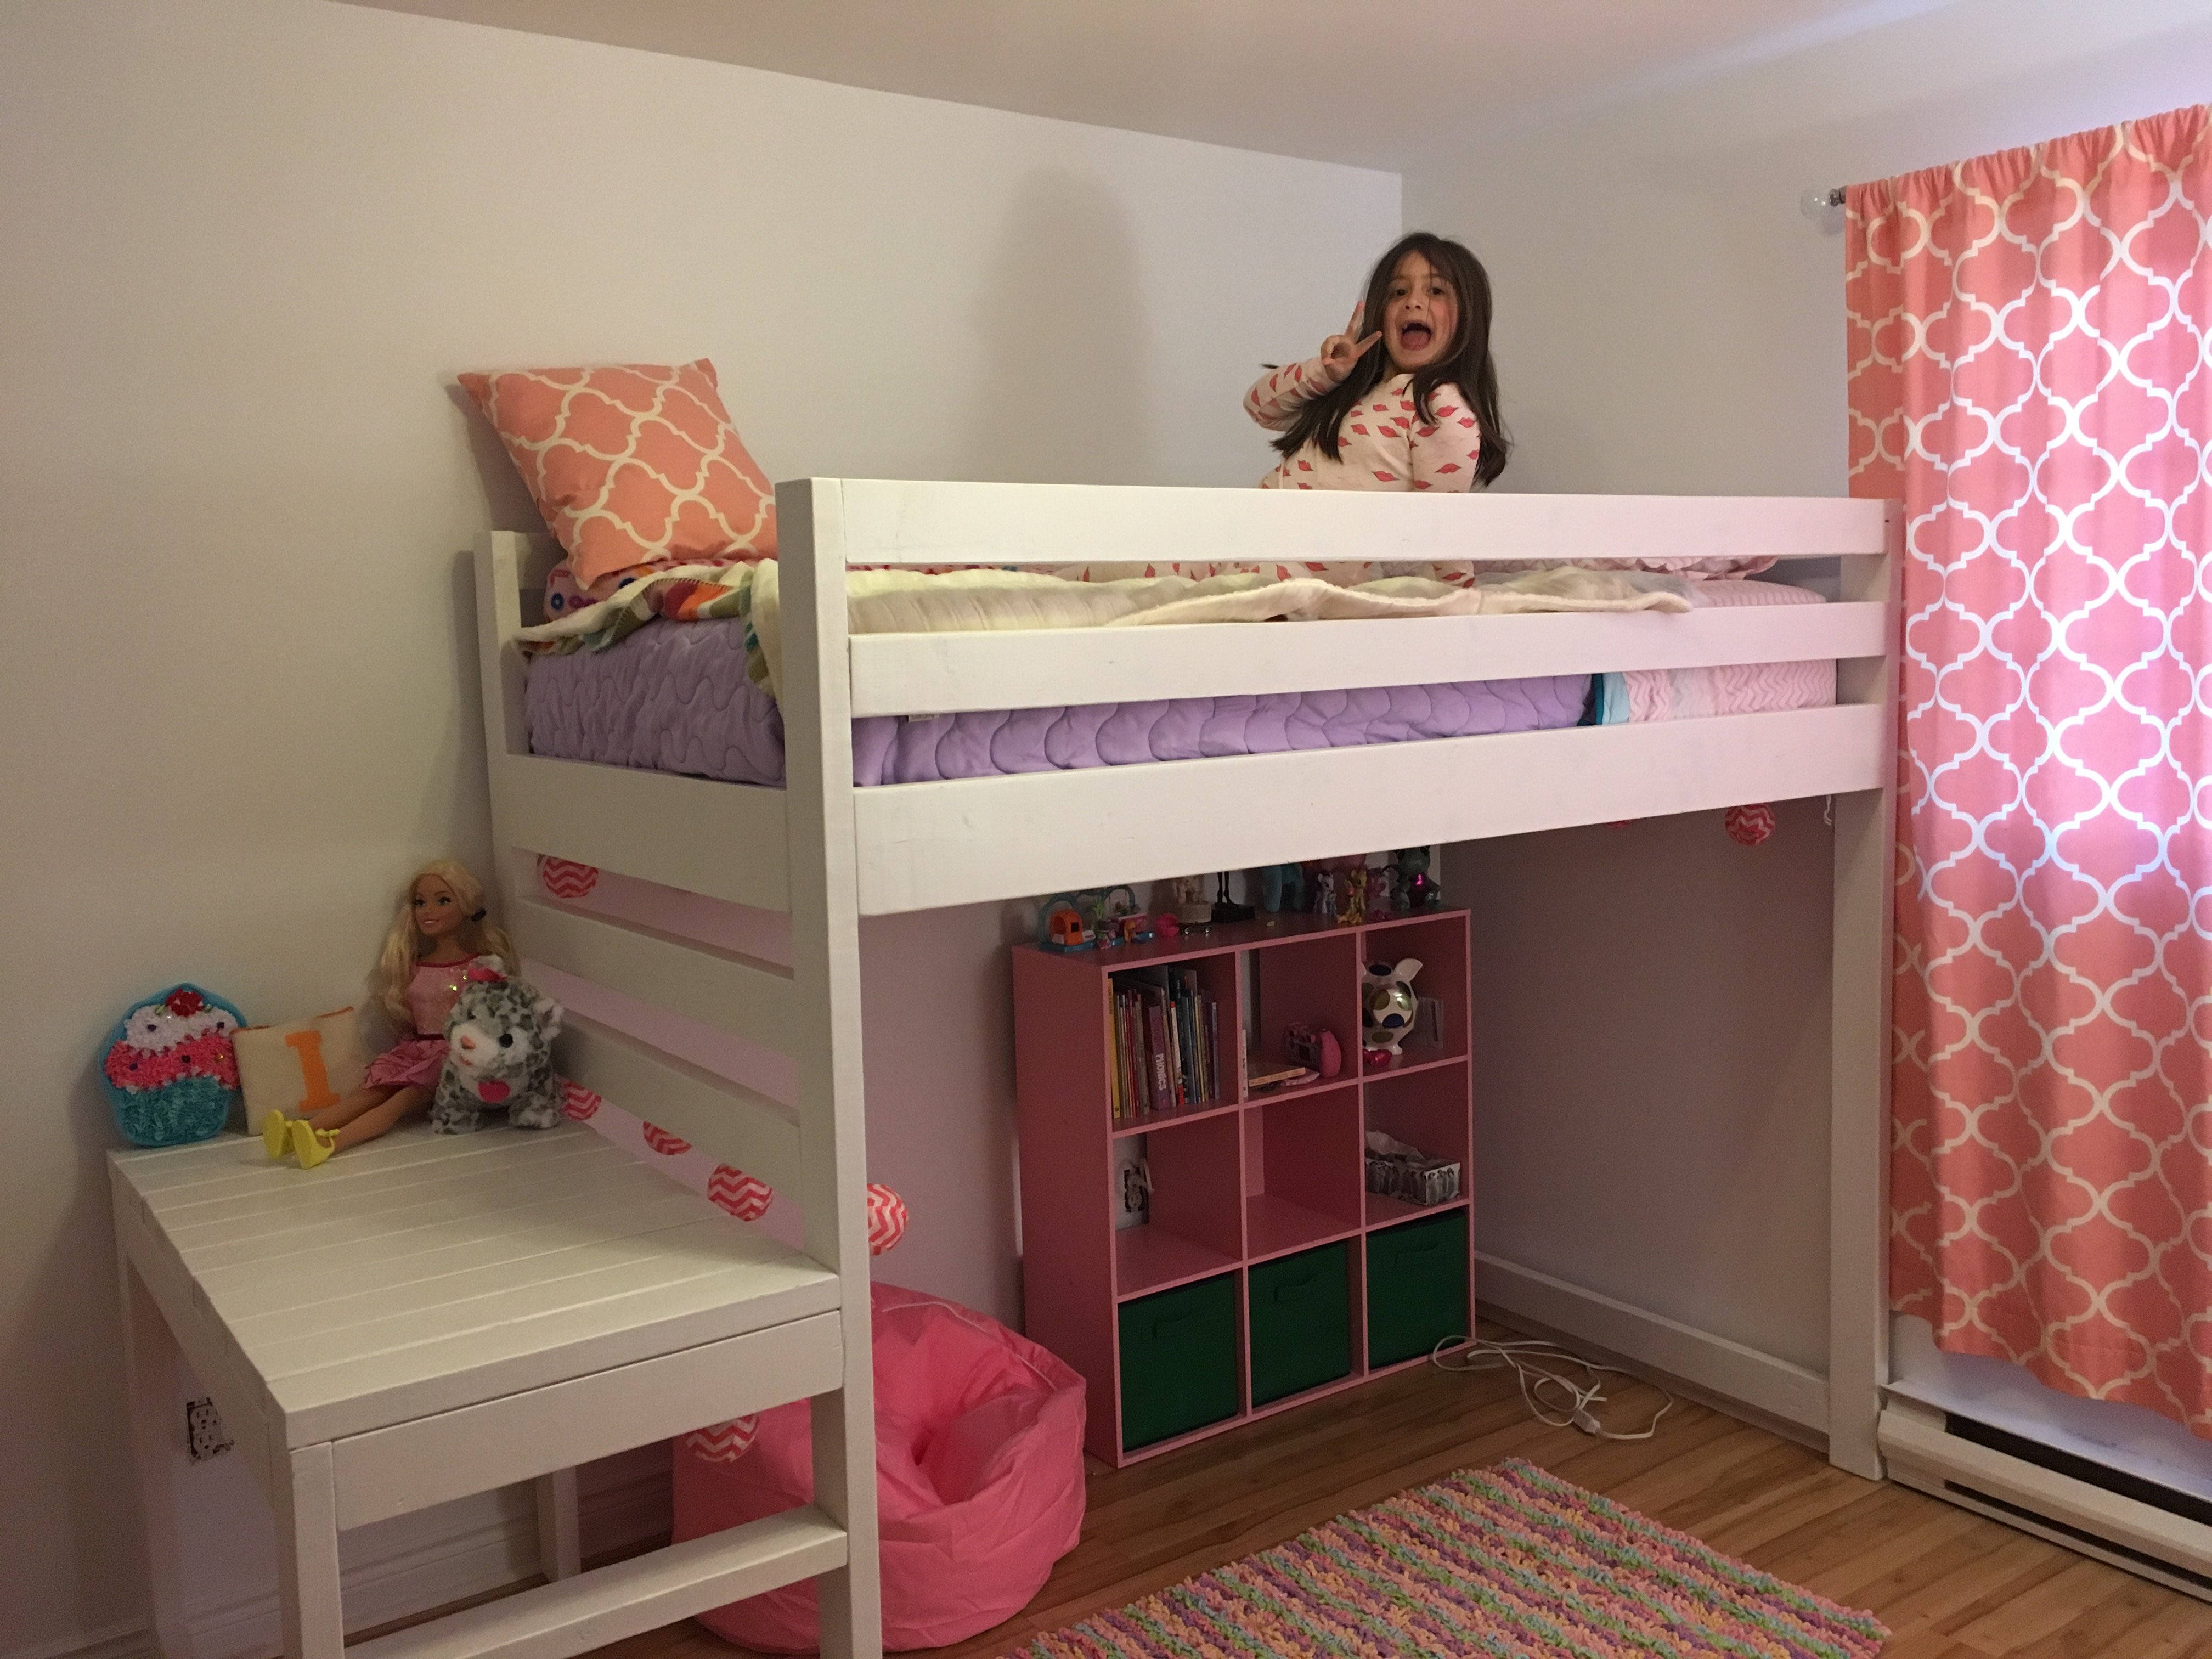
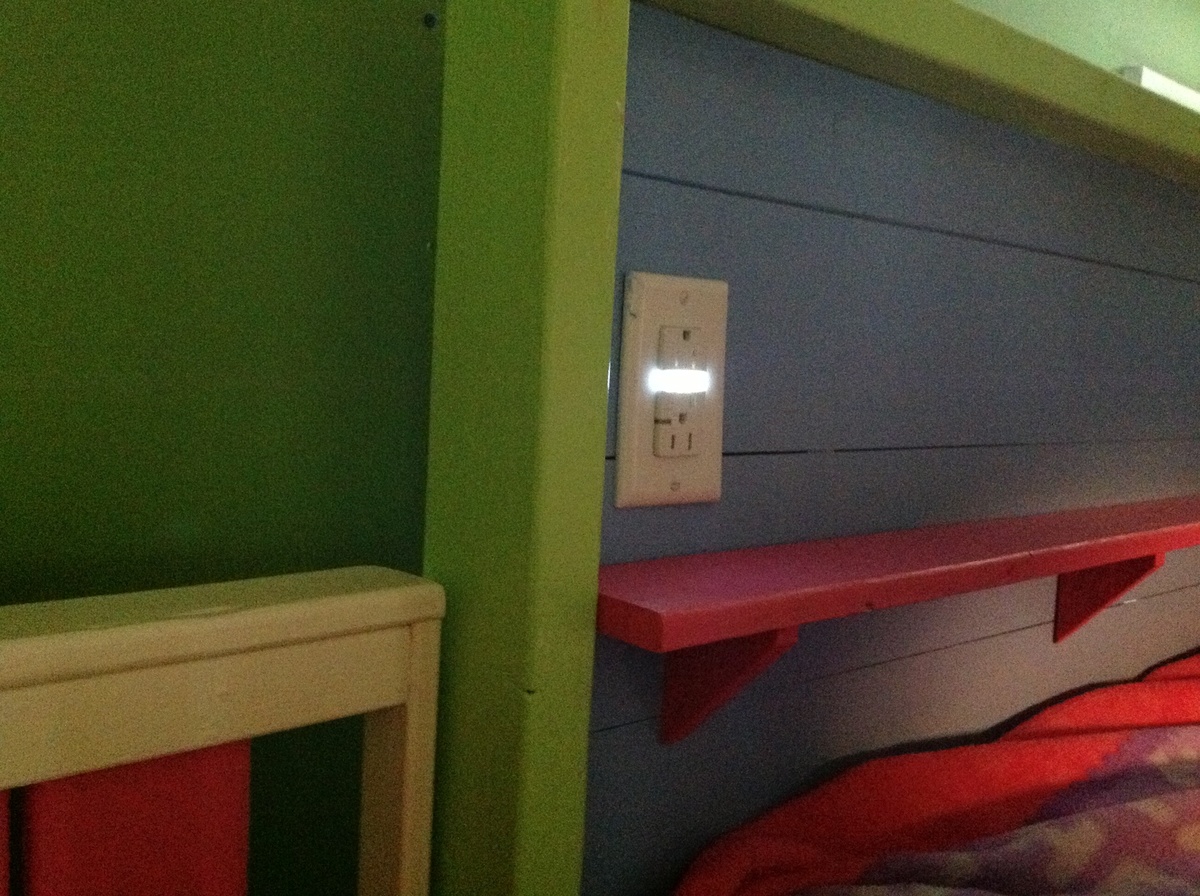
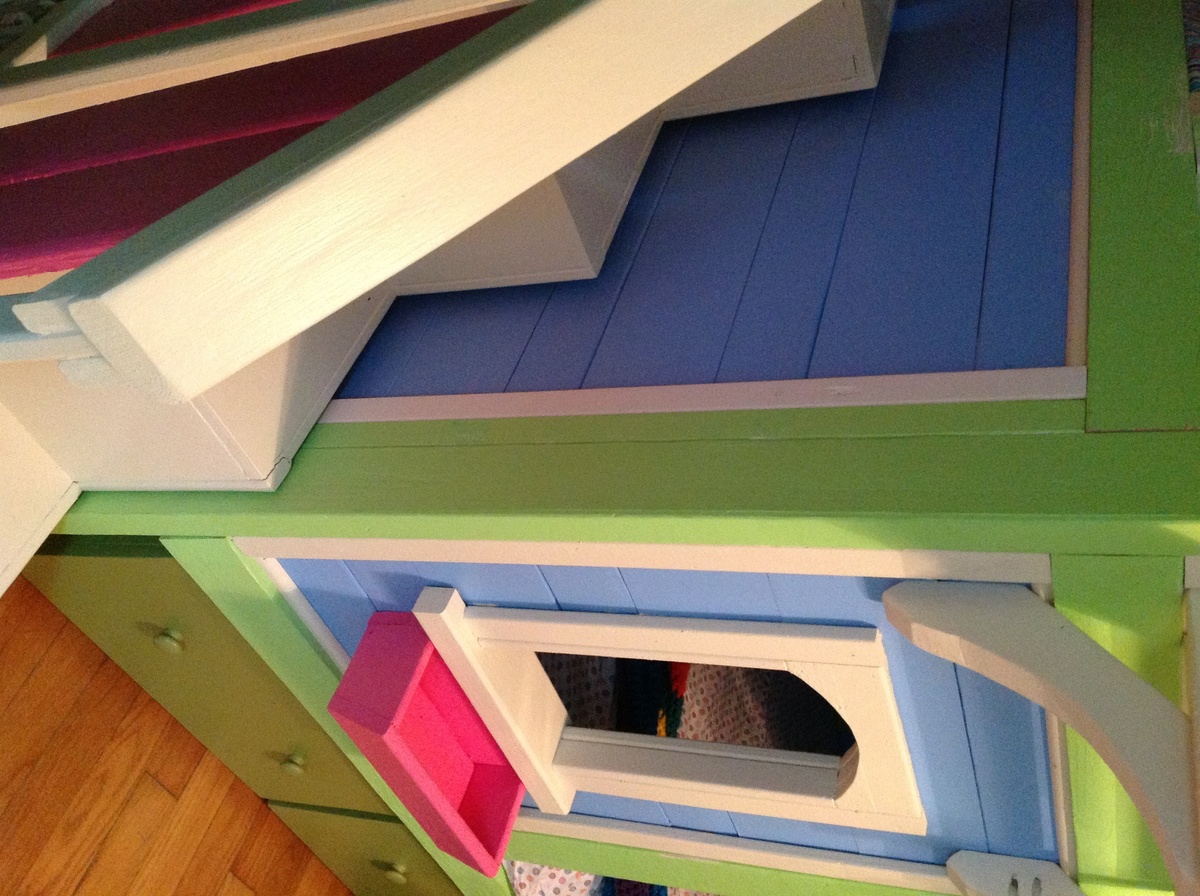
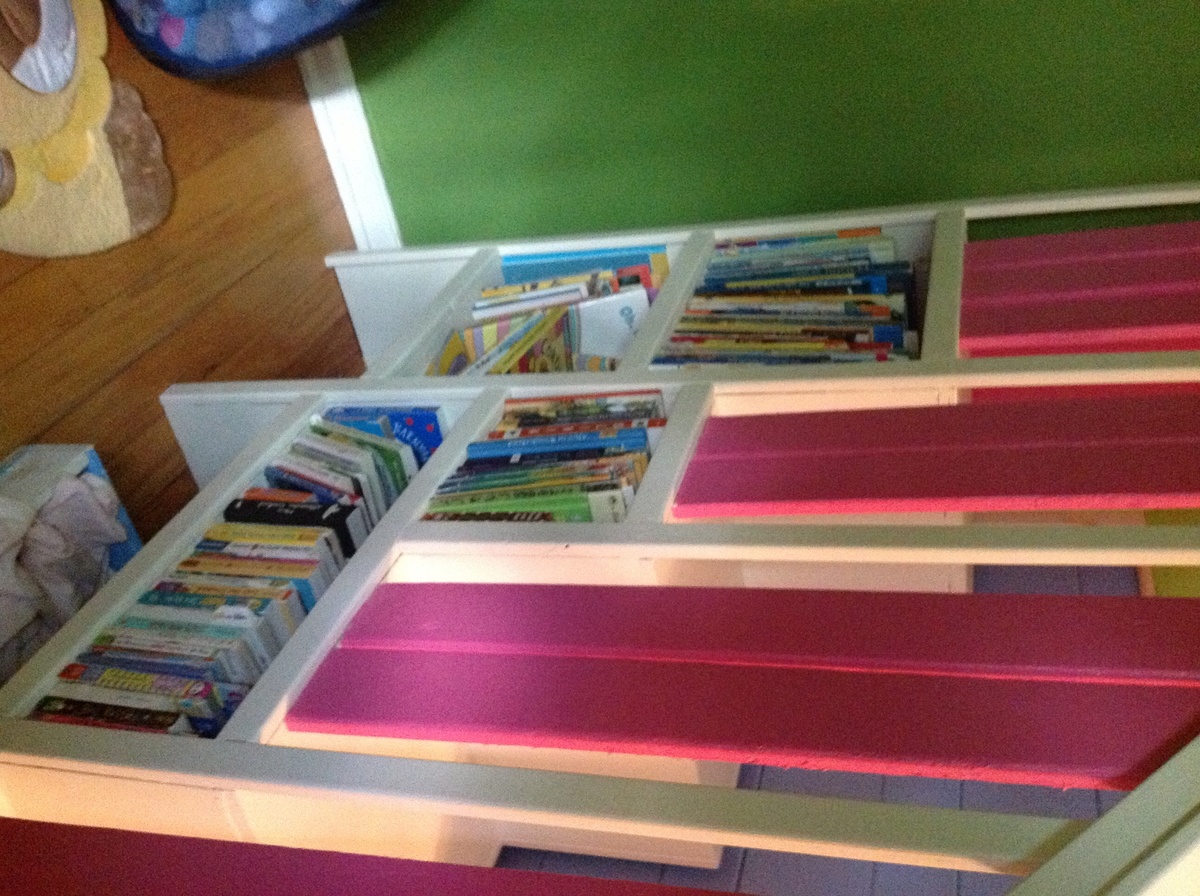
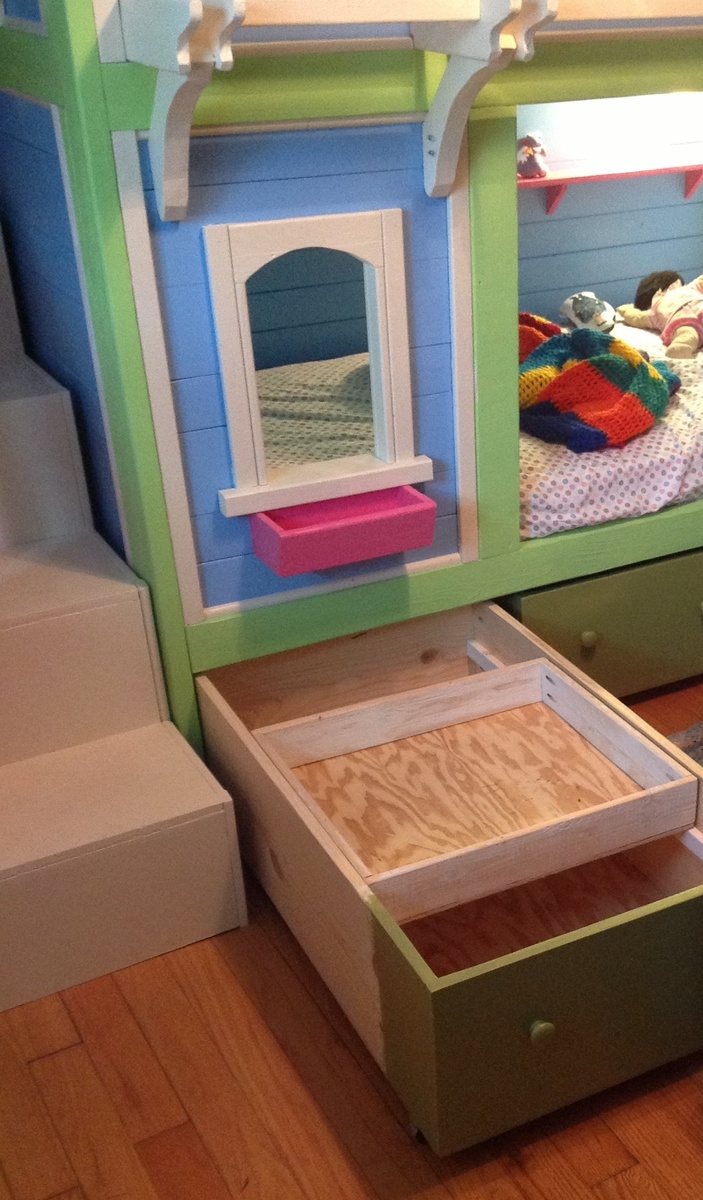
Playhouse Loft Bed With Stairs And Slide

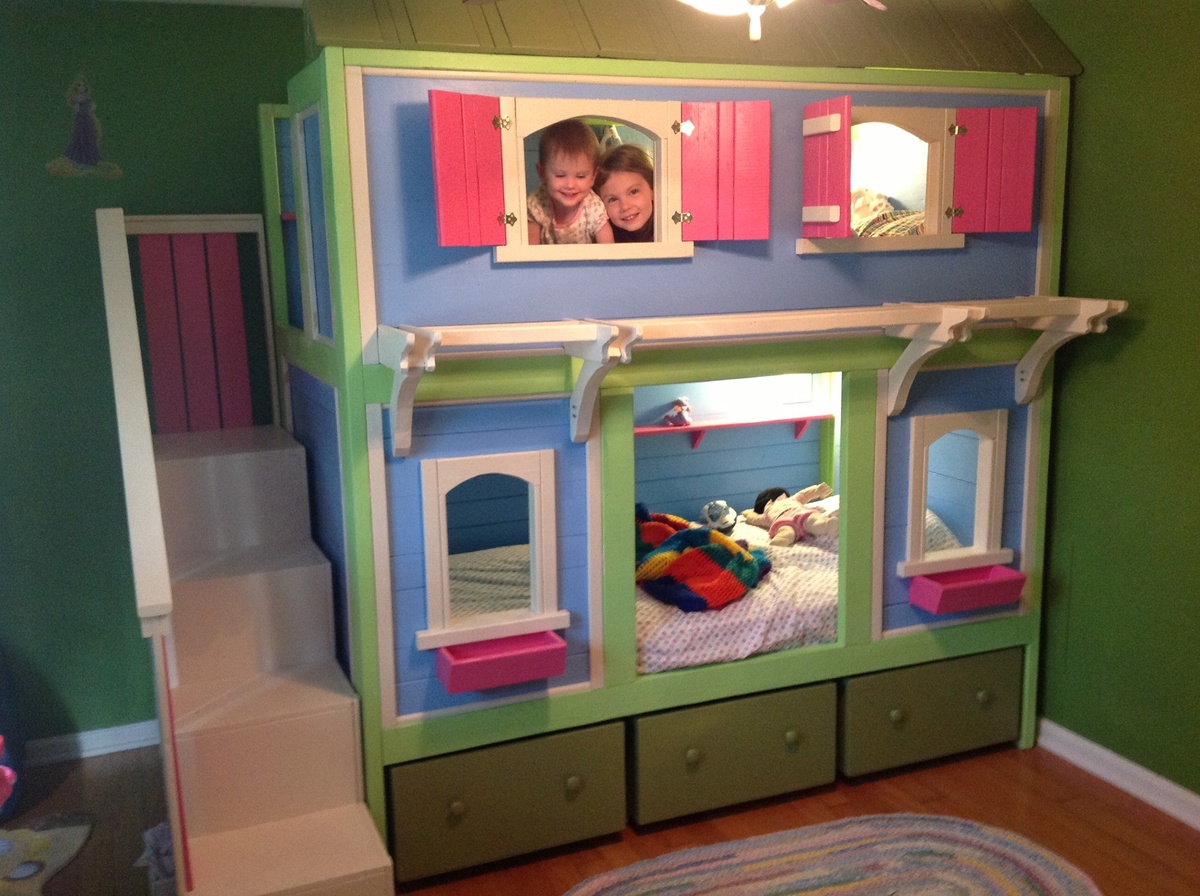
My son was about to turn 3 and I really wanted to redesign his bedroom as a birthday surprise. We went with a Toy Story themed room, he just loves Toy Story.
I started off by painting the walls blue with yellow stars like Andy's room in the movie. I added some custom painted art work and then it was off to find a cool playhouse bed. My husband and I were shopping around and we could never really find what we were looking for in the store. So we decided to build one ourselves using plans from this website.
I used the playhouse loft bed and the playhouse loft bed stair plans, for the bed and the stairs. I used the castle loft bed plan as inspiration for the slide. The project took us about 5 weeks from start to finish. We both have full time jobs and we did most of the work on the weekends. I looked at each plan very carefully and made notes. I had to modify the stair plans slightly to fit the space where we wanted to put the bed. The stairs look narrow, but they work just fine. My husband and I can both use them to get up in the bed. The stairs feature hinged stair tread with built in storage. We built them like that at first, but then later decided to make them stationary stair treads, with plywood. I didn't like the way the hinges looked and the top stair was so deep that I was worried my son would fall in there and get stuck. The storage idea was neat, but his safety was more important to me. The bed turned out really nice and VERY sturdy. Both my husband and I are able to get up there with my son (not at the same time).
Another modification that I made was instead of slats to hold on the mattress, I used a piece of plywood. I wanted the roof in the playhouse to look finished, and I didn't want to see his bedding hanging down from the slats. I painted the top of the plywood white, where the mattress goes to blend in with the slats, and the other side was painted blue to match the walls inside the playhouse.
I did modify the playhouse front facade to have 2 windows and one door. I like the symmetrical look. The total project cost about $400. I used birch plywood and select pine boards, and about 6 quarts of paint. I noticed AFTER we had finished the bed using the birch plywood, that Home Depot had cabinet grade plywood on a random end cap, that was just as nice for $12 less a sheet. If I could do it all over again, I would definitely use that!. I wanted the paint to have a nice smooth finish, without having to do a lot of sanding or patching.
We had Home Depot cut the plywood to the dimensions we needed. I had my husband cut the rest of the wood dimensions listed in the plans, and then I painted all of them before we put the pieces together. I used a small roller and self priming paint. The paint finish looks great. After assembling the bed I can not imagine what I would have gone through trying to paint it after the fact.
The slide was a bit tricky, I looked at the plan for the castle loft bed and attempted to use those dimensions, and for the most part they worked. But when we went to assemble the slide, we did end up recutting some of the wood to different dimensions. I used a piece of the melamine coated closet shelf material for the slide.
It is already finished in white and its nice and slick, like a slide should be! I hate MDF, but for this it seemed the best fit. We cut the top edge at an angle to meet up with the slide platform. PLEASE BE CAREFUL with this material. After it was angle cut the edge was razor sharp and I sliced my fingers up. Once it was installed it butted up perfectly to the slide platform, and the edge was hidden and not a danger. But use caution during the install.
Clamps are your friend! We used Kreg clamps for everything. They kept the wood in place while we were screwing the parts together. The coolest thing that my husband came up with was clamping two identical pieces for plywood together, and drawing the template for the slide support walls. Then he used his circular saw to cut them out. We ended up with two mirror image pieces. They looked awesome. I left them clamped together when I sanded the edges as well.
We really didn't have any building experience other, than building tables and chairs for children, We got the deluxe Kreg jig kit and a miter saw on Craigslist for $50 each and they were both practically brand new. This was the first time we had ever used a Kreg jig and we are both addicted. That thing is the bomb.
We locked my son out of his room for a week while we assembled everything. We had the big reveal at his birthday party and all of the guests were excited to see it after seeing my facebook teaser posts of our progress. There were 8 kids up there at one time and the bed did not budge. They all enjoyed the slide. I did the planning and paint and my husband did an awesome job making all of the cuts and sanding everything. We are both very proud of the final product. My son love his new big boy bed.
DISCLAIMER: This bed is not recommended for a child under 6 years old. My son is mature for his age and we monitor him carefully.


Built from Plan(s)
Estimated Cost
$400
Estimated Time Investment
Week Long Project (20 Hours or More)
Finish Used
self priming paint
Recommended Skill Level
Beginner
Comments
Mon, 01/21/2013 - 12:41
This bed is awesome. My
This bed is awesome. My boyfriend and I want one just like this for are son. Did you happen to write out all your dimensions? I would love to make this bed for my son.
Mon, 10/20/2014 - 03:10
Finished Dimensions
I also would like to know the finished dimensions of your project. What is the hight, length, and depth?
Modified this to fit my bunny!
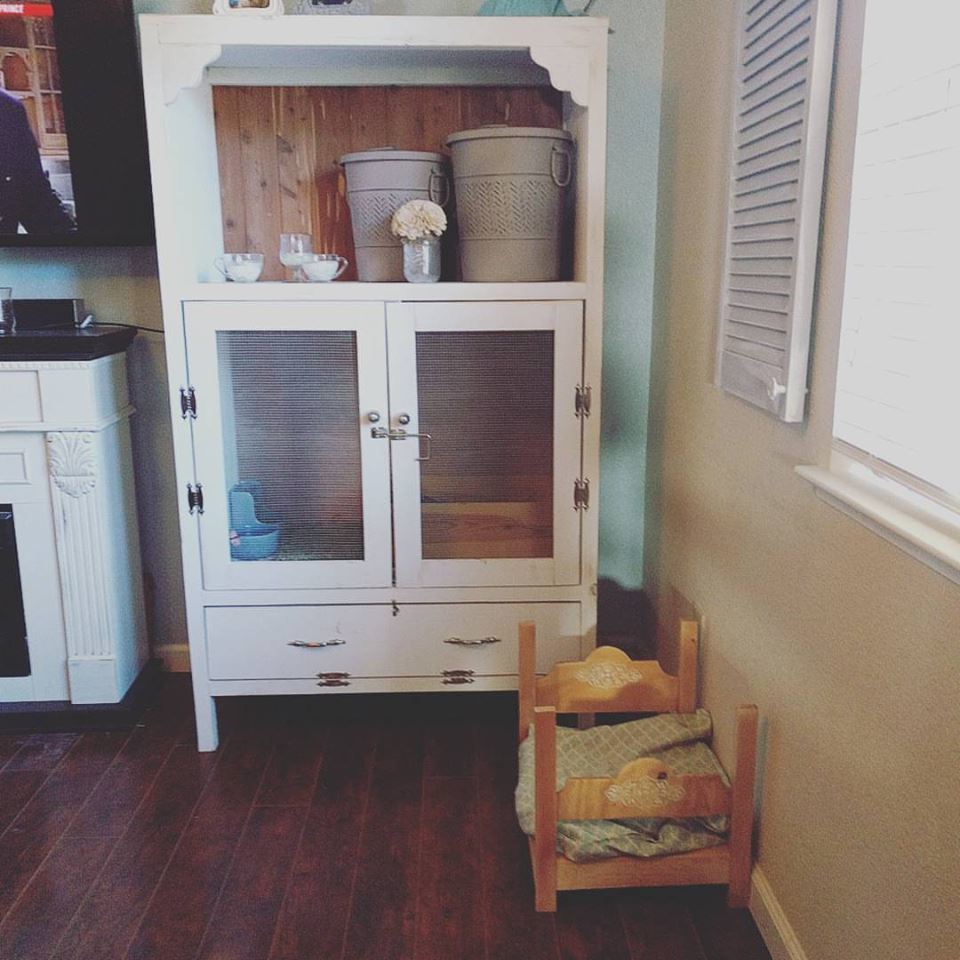
I used Ana's plans, but switched things around a little as I went. I wanted something fancy for my bunny to hang in when I'm not home. The biggest modification I made for a bunny was the bottom. I wasn't happy with the stability of the chicken wire even though my bunny is just a few pounds. I used a more solid plastic called plaskolite ( you can find it in the lighting section of Lowes) We are planning on adding levels for the bunny as well as a cloroplast tray to fit the bottom since bunny poo can get stinky. We took about 2 weeks to complete this project and it was definitely a learning experience! We also tried to cut costs by getting some of the wook and backing from Habitat for Humanity!
We also made the little bed with the leftover wood from this project :-)
Built from Plan(s)
Estimated Time Investment
Week Long Project (20 Hours or More)
Finish Used
We used a chalk paint and painted everything BEFORE we added the doors and hardware. Then we distressed it a bit with some sandpaper.
Recommended Skill Level
Intermediate
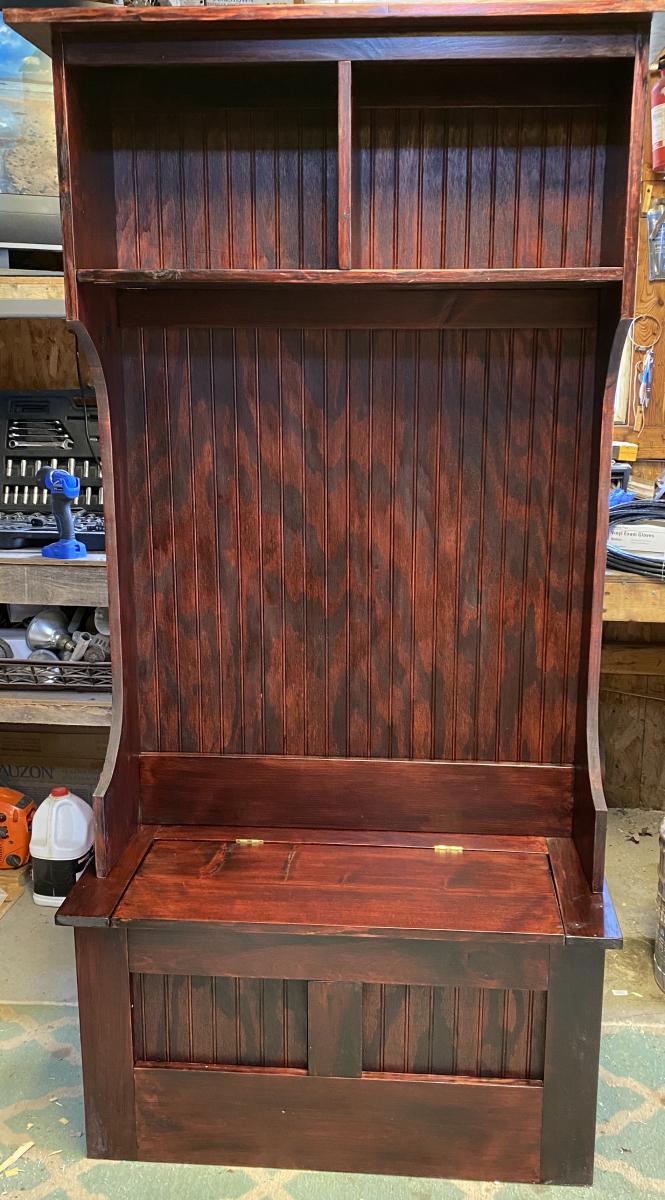
Hall tree
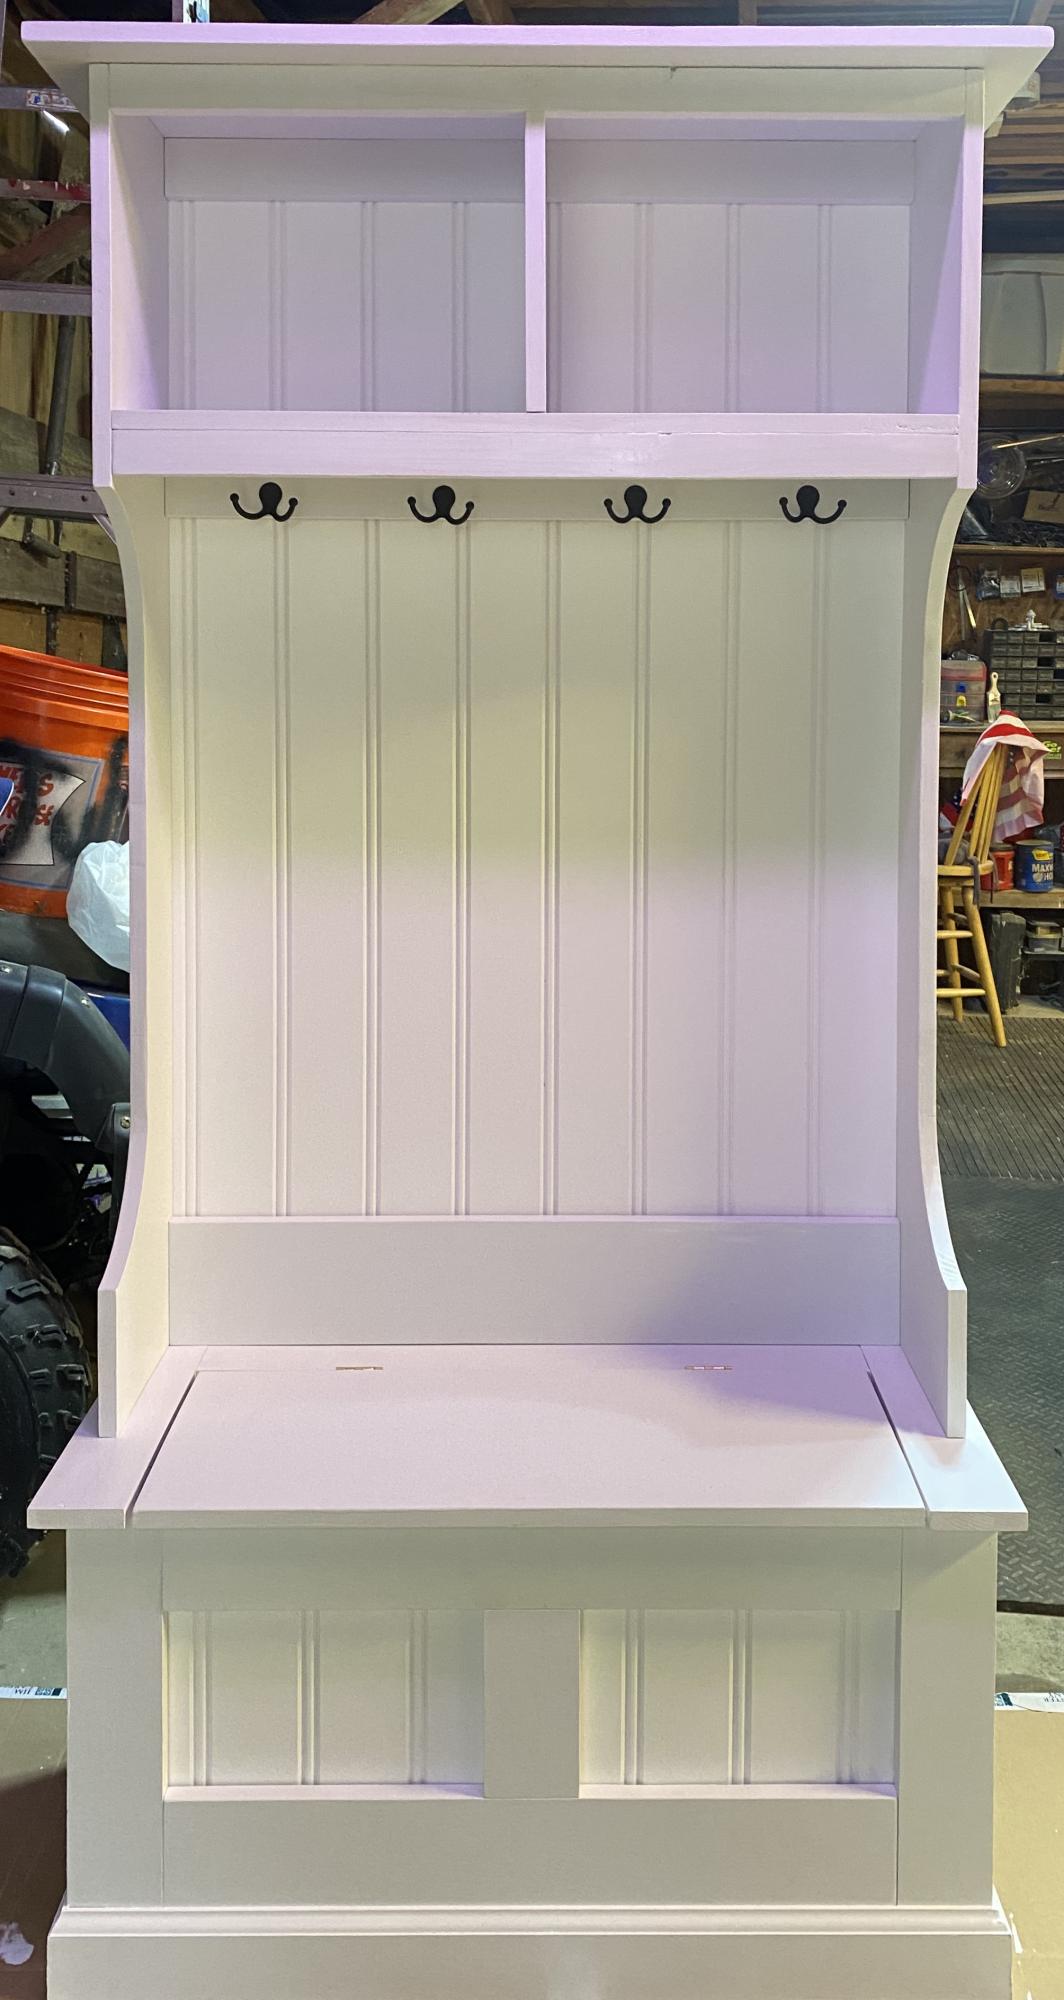
This is the third hall tree I made from this site. Love how easy the plans are to follow!
Built from Plan(s)
Estimated Cost
$200
Estimated Time Investment
Weekend Project (10-20 Hours)
Finish Used
Paint and stain
Comments
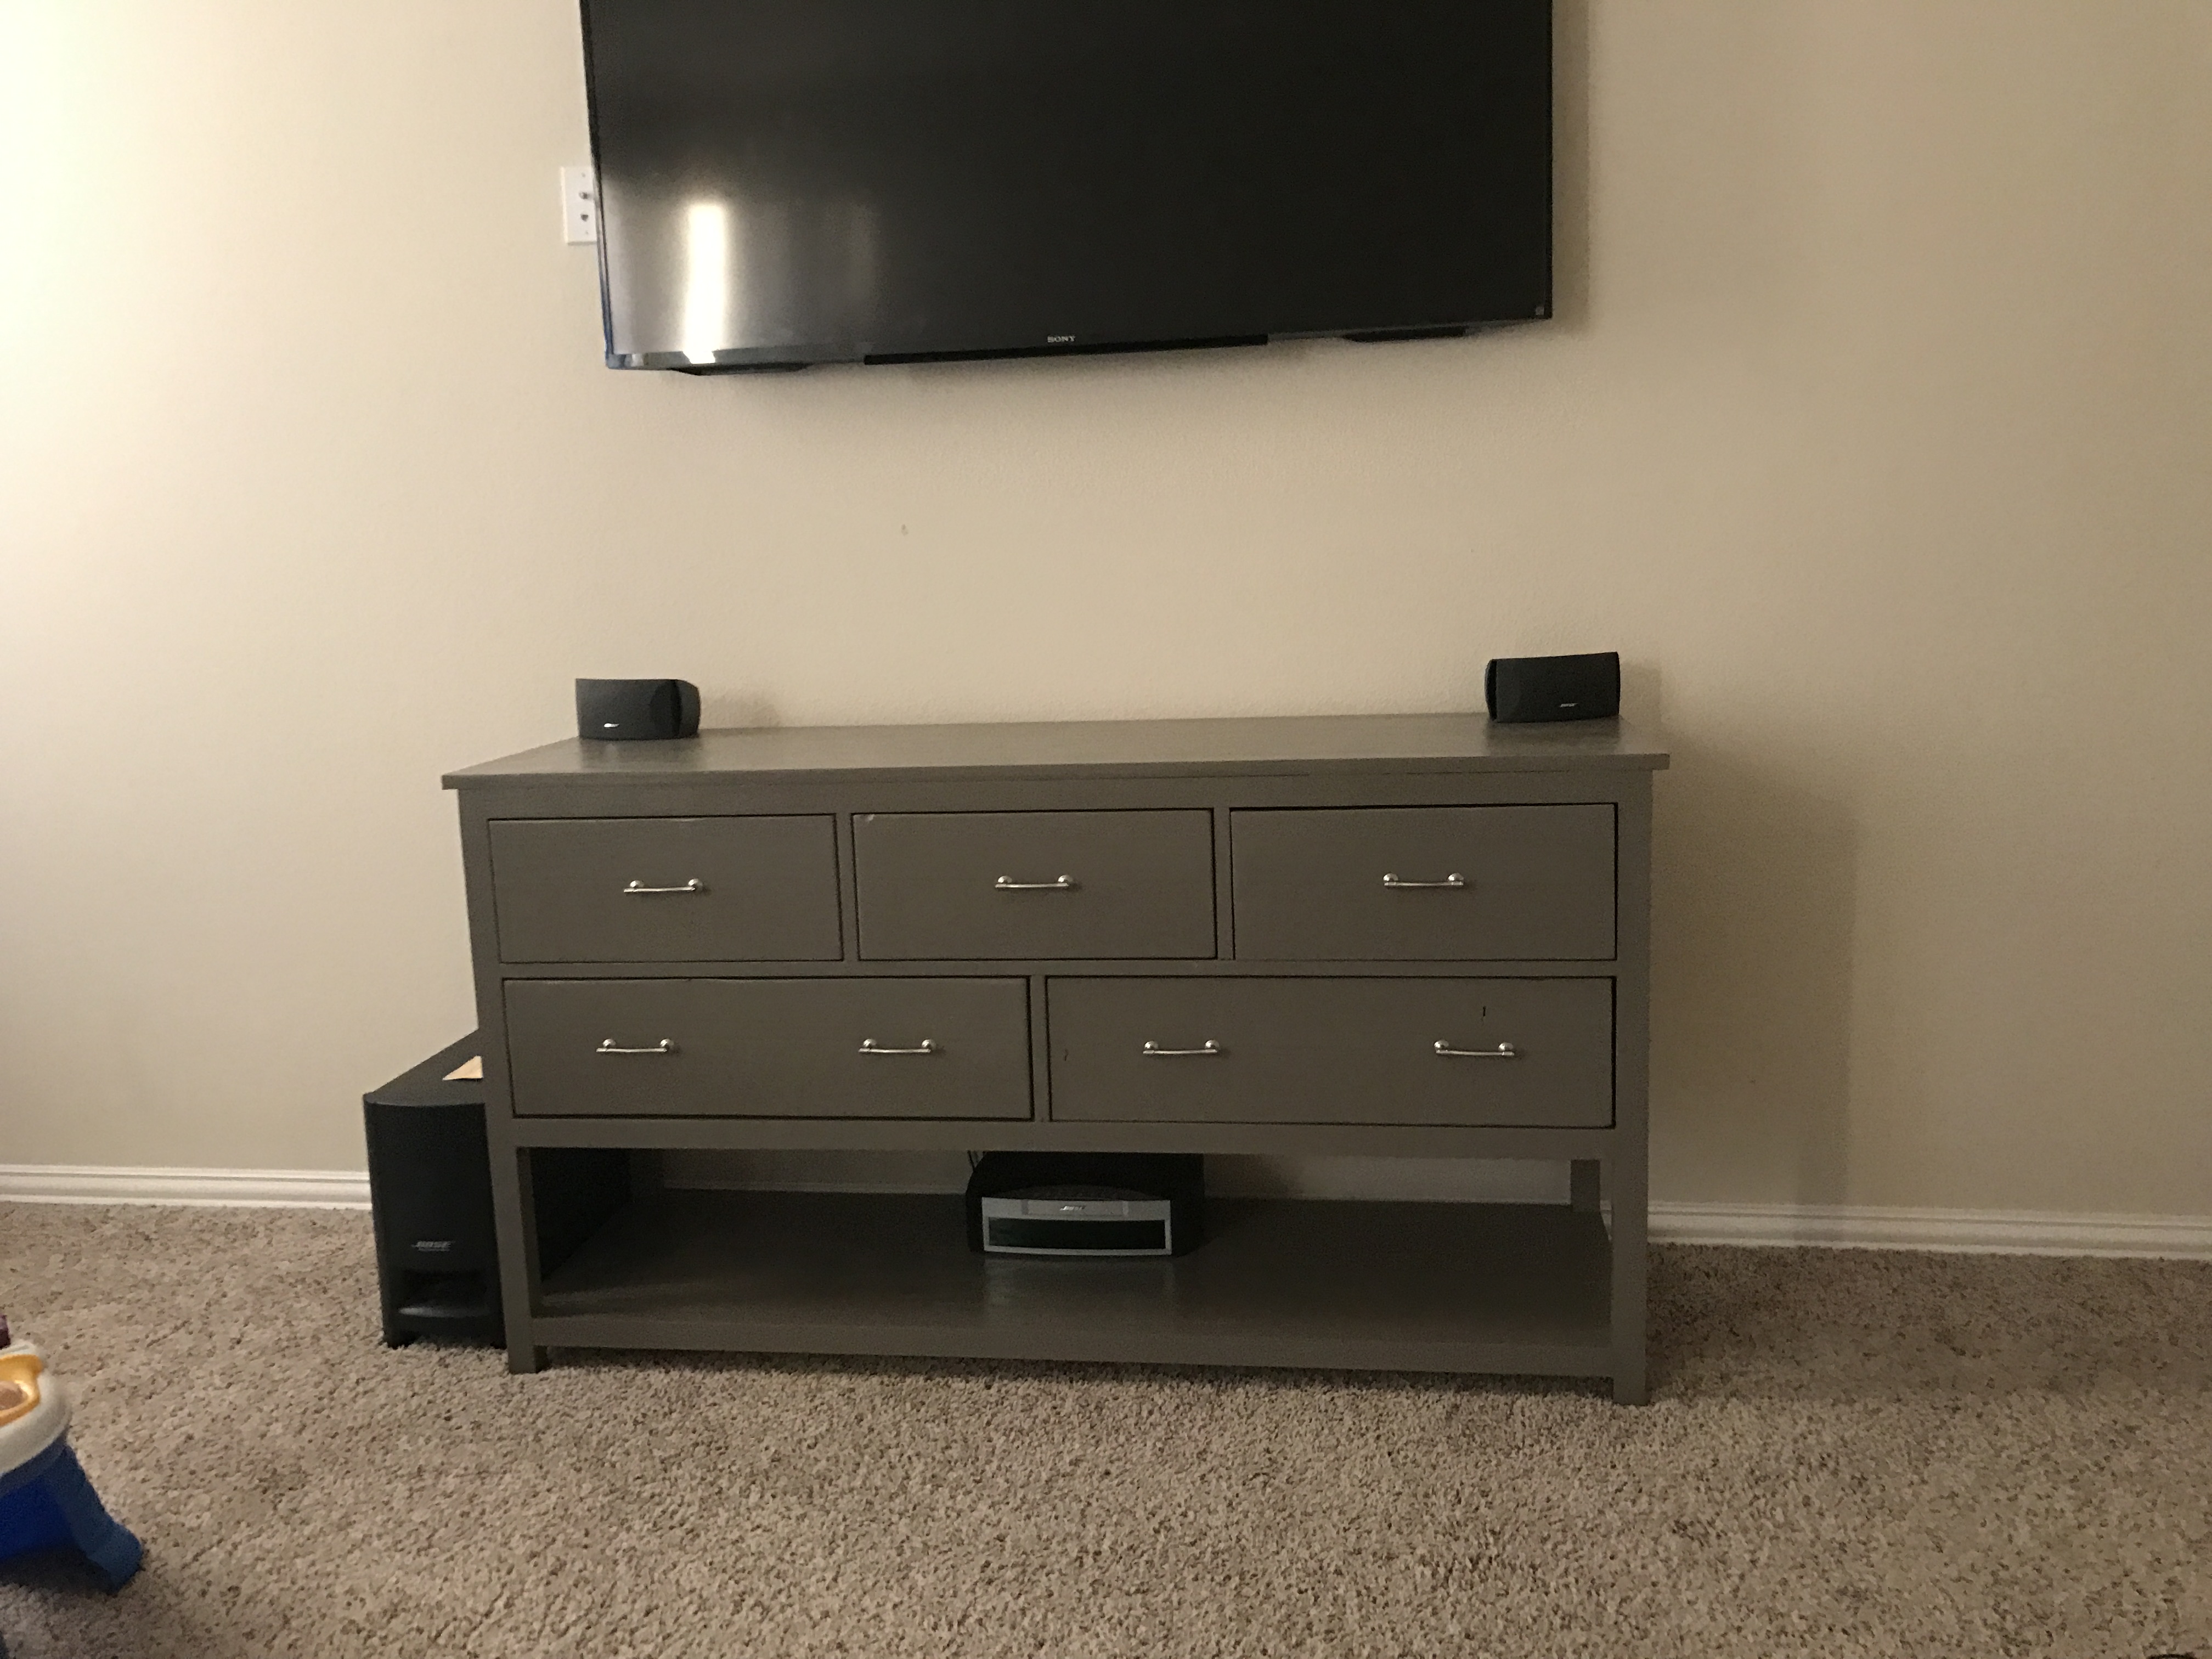
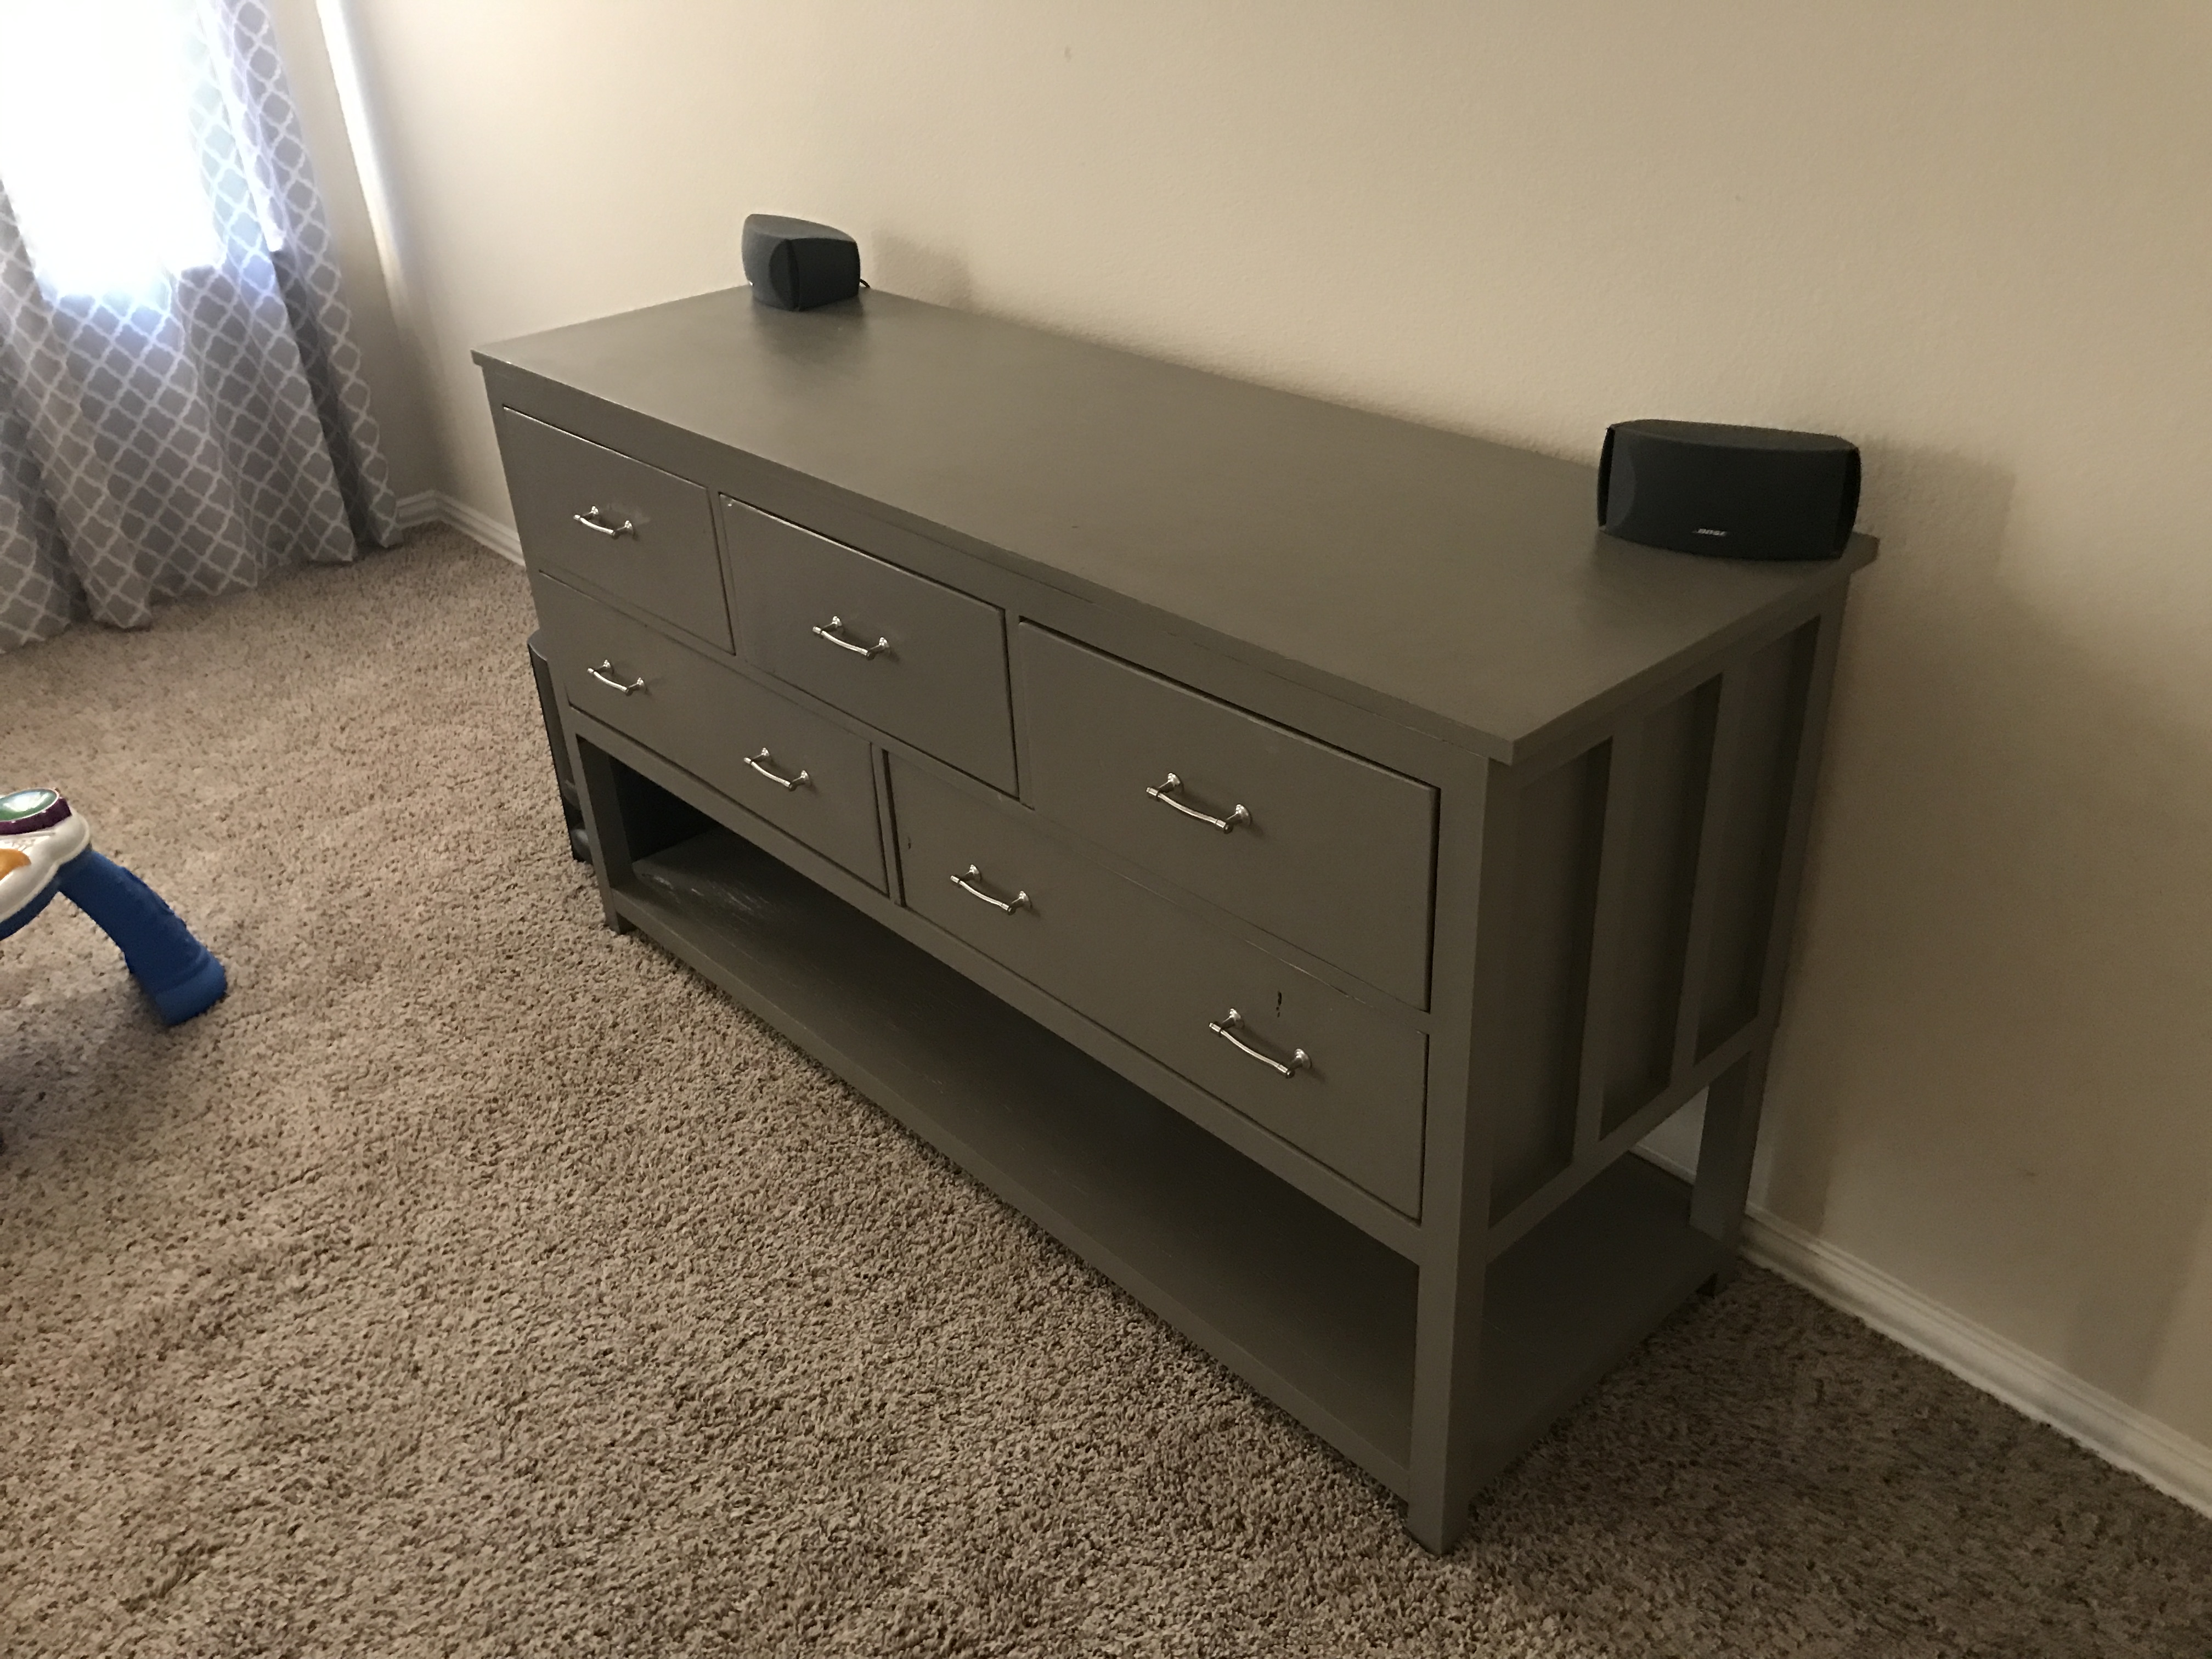
Rhyan Collection Coffee Table and End Tables
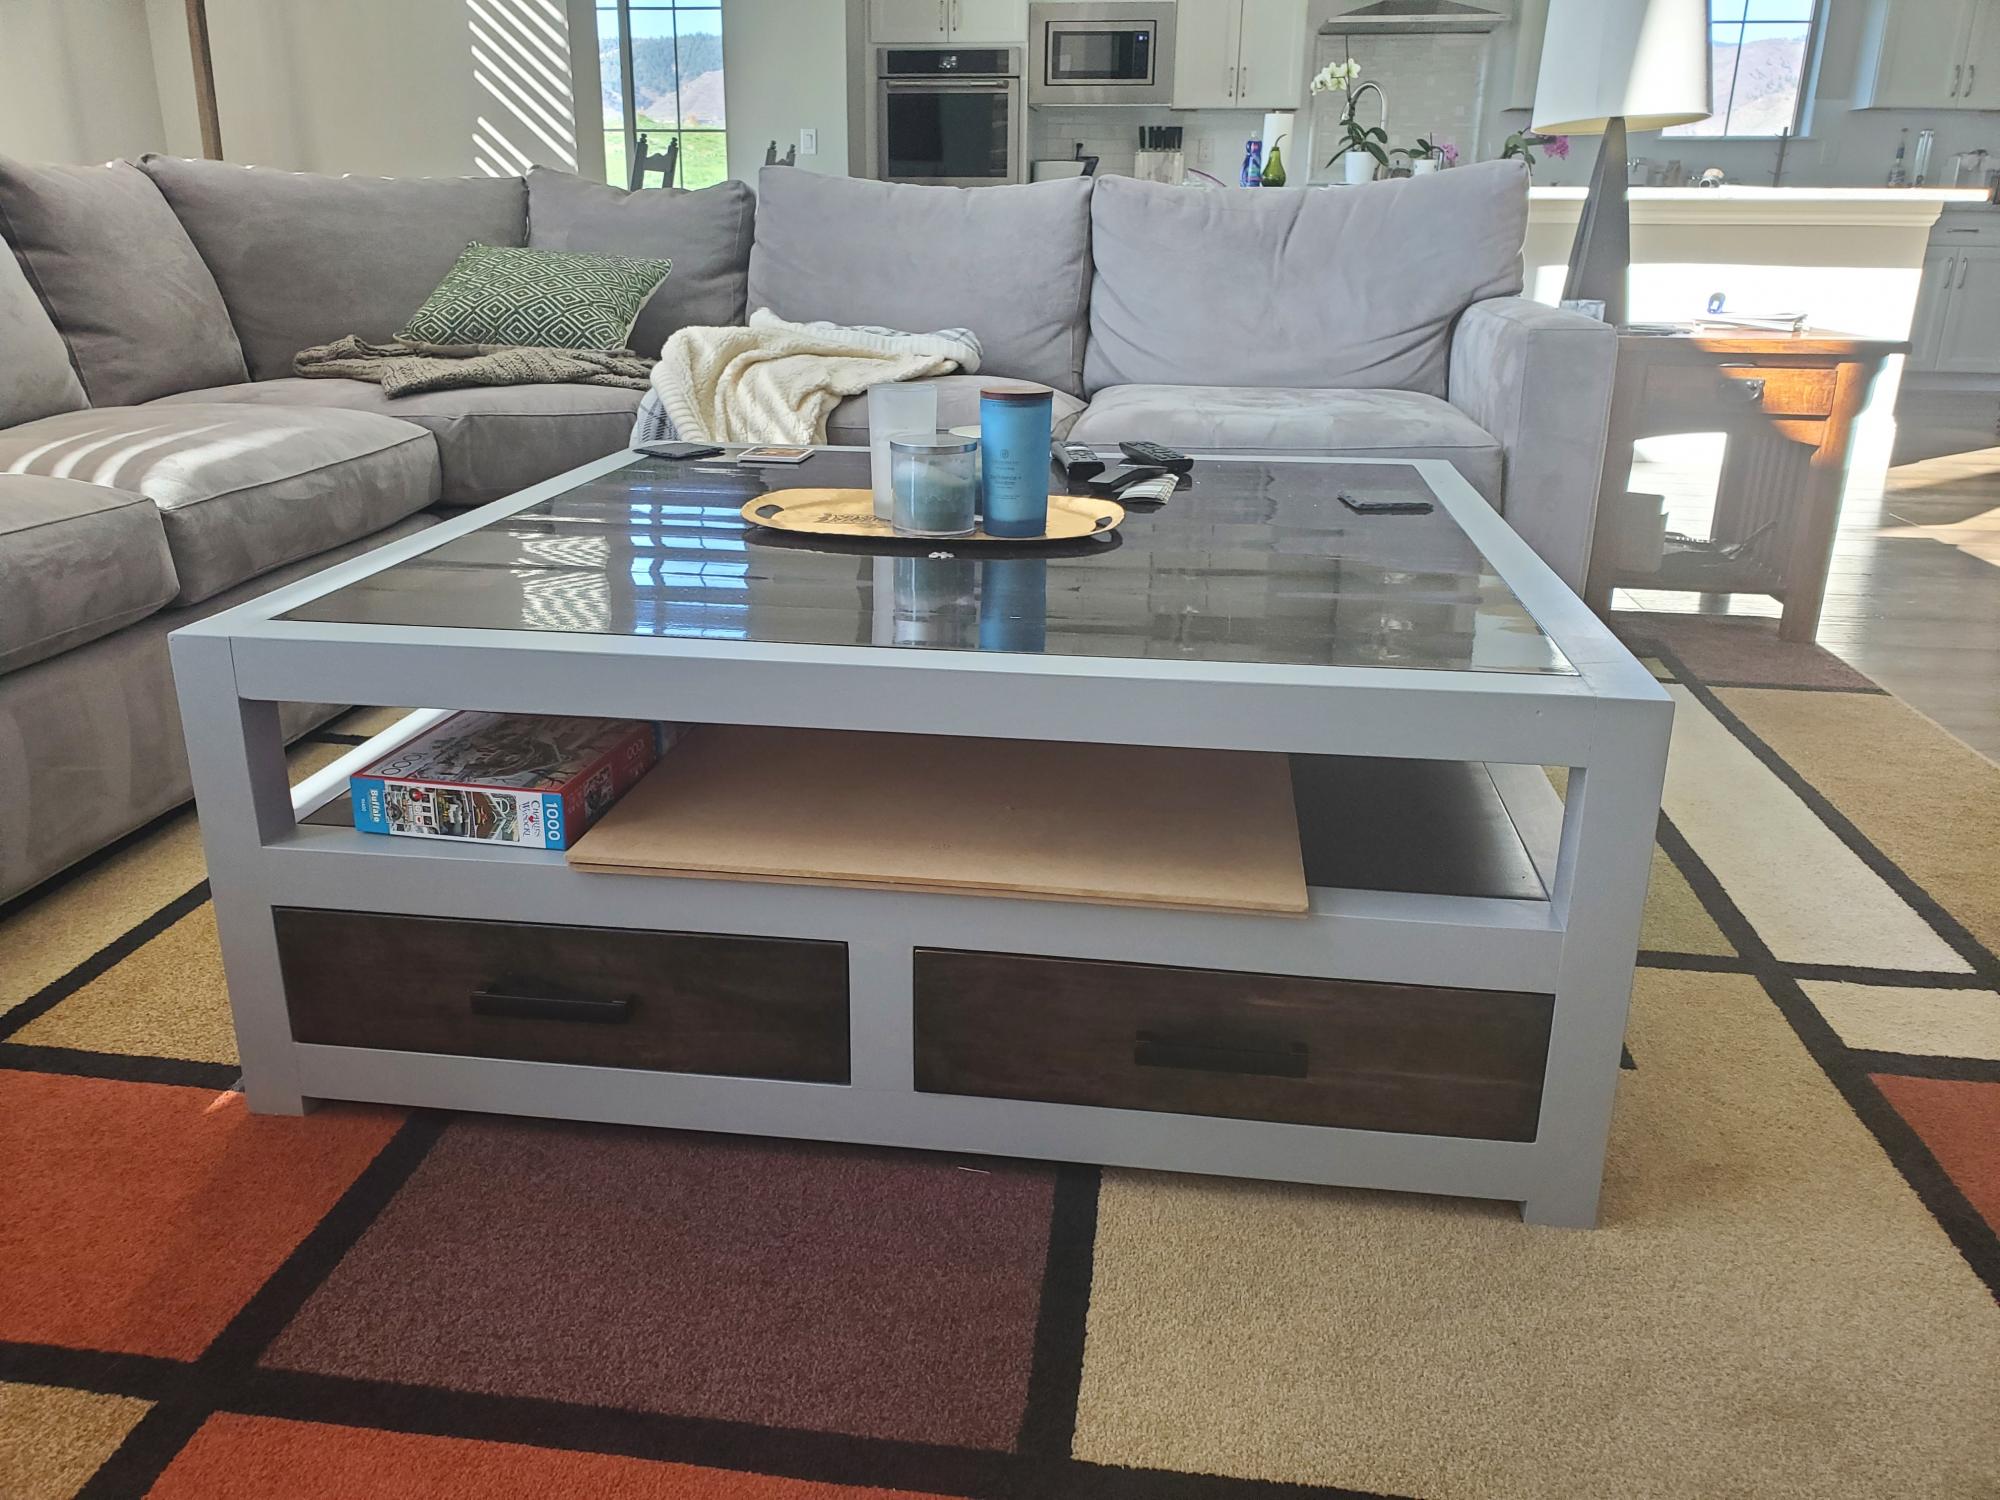
Modified the Rhyan Coffee Table plan for a square, 4-foot by 4-foot coffee table. Used poplar 1 x 3s glued together and then planed down to 2.25-inch square for the structural members. The stained wood portions are glue-ups make from Hemlock 1x 6s from Lowe's.

Estimated Time Investment
Week Long Project (20 Hours or More)
Finish Used
The paint is a color match from Sherwin Williams of a chalk paint from Valspar call Kid Gloves. The stain is leftover from the builder of our house and is the same stain used on our stair railings. Drawer pulls are off the shelf from Home Depot.
Recommended Skill Level
Intermediate
Comments
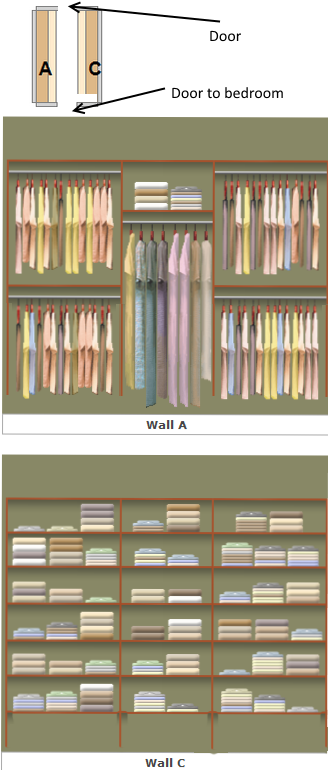
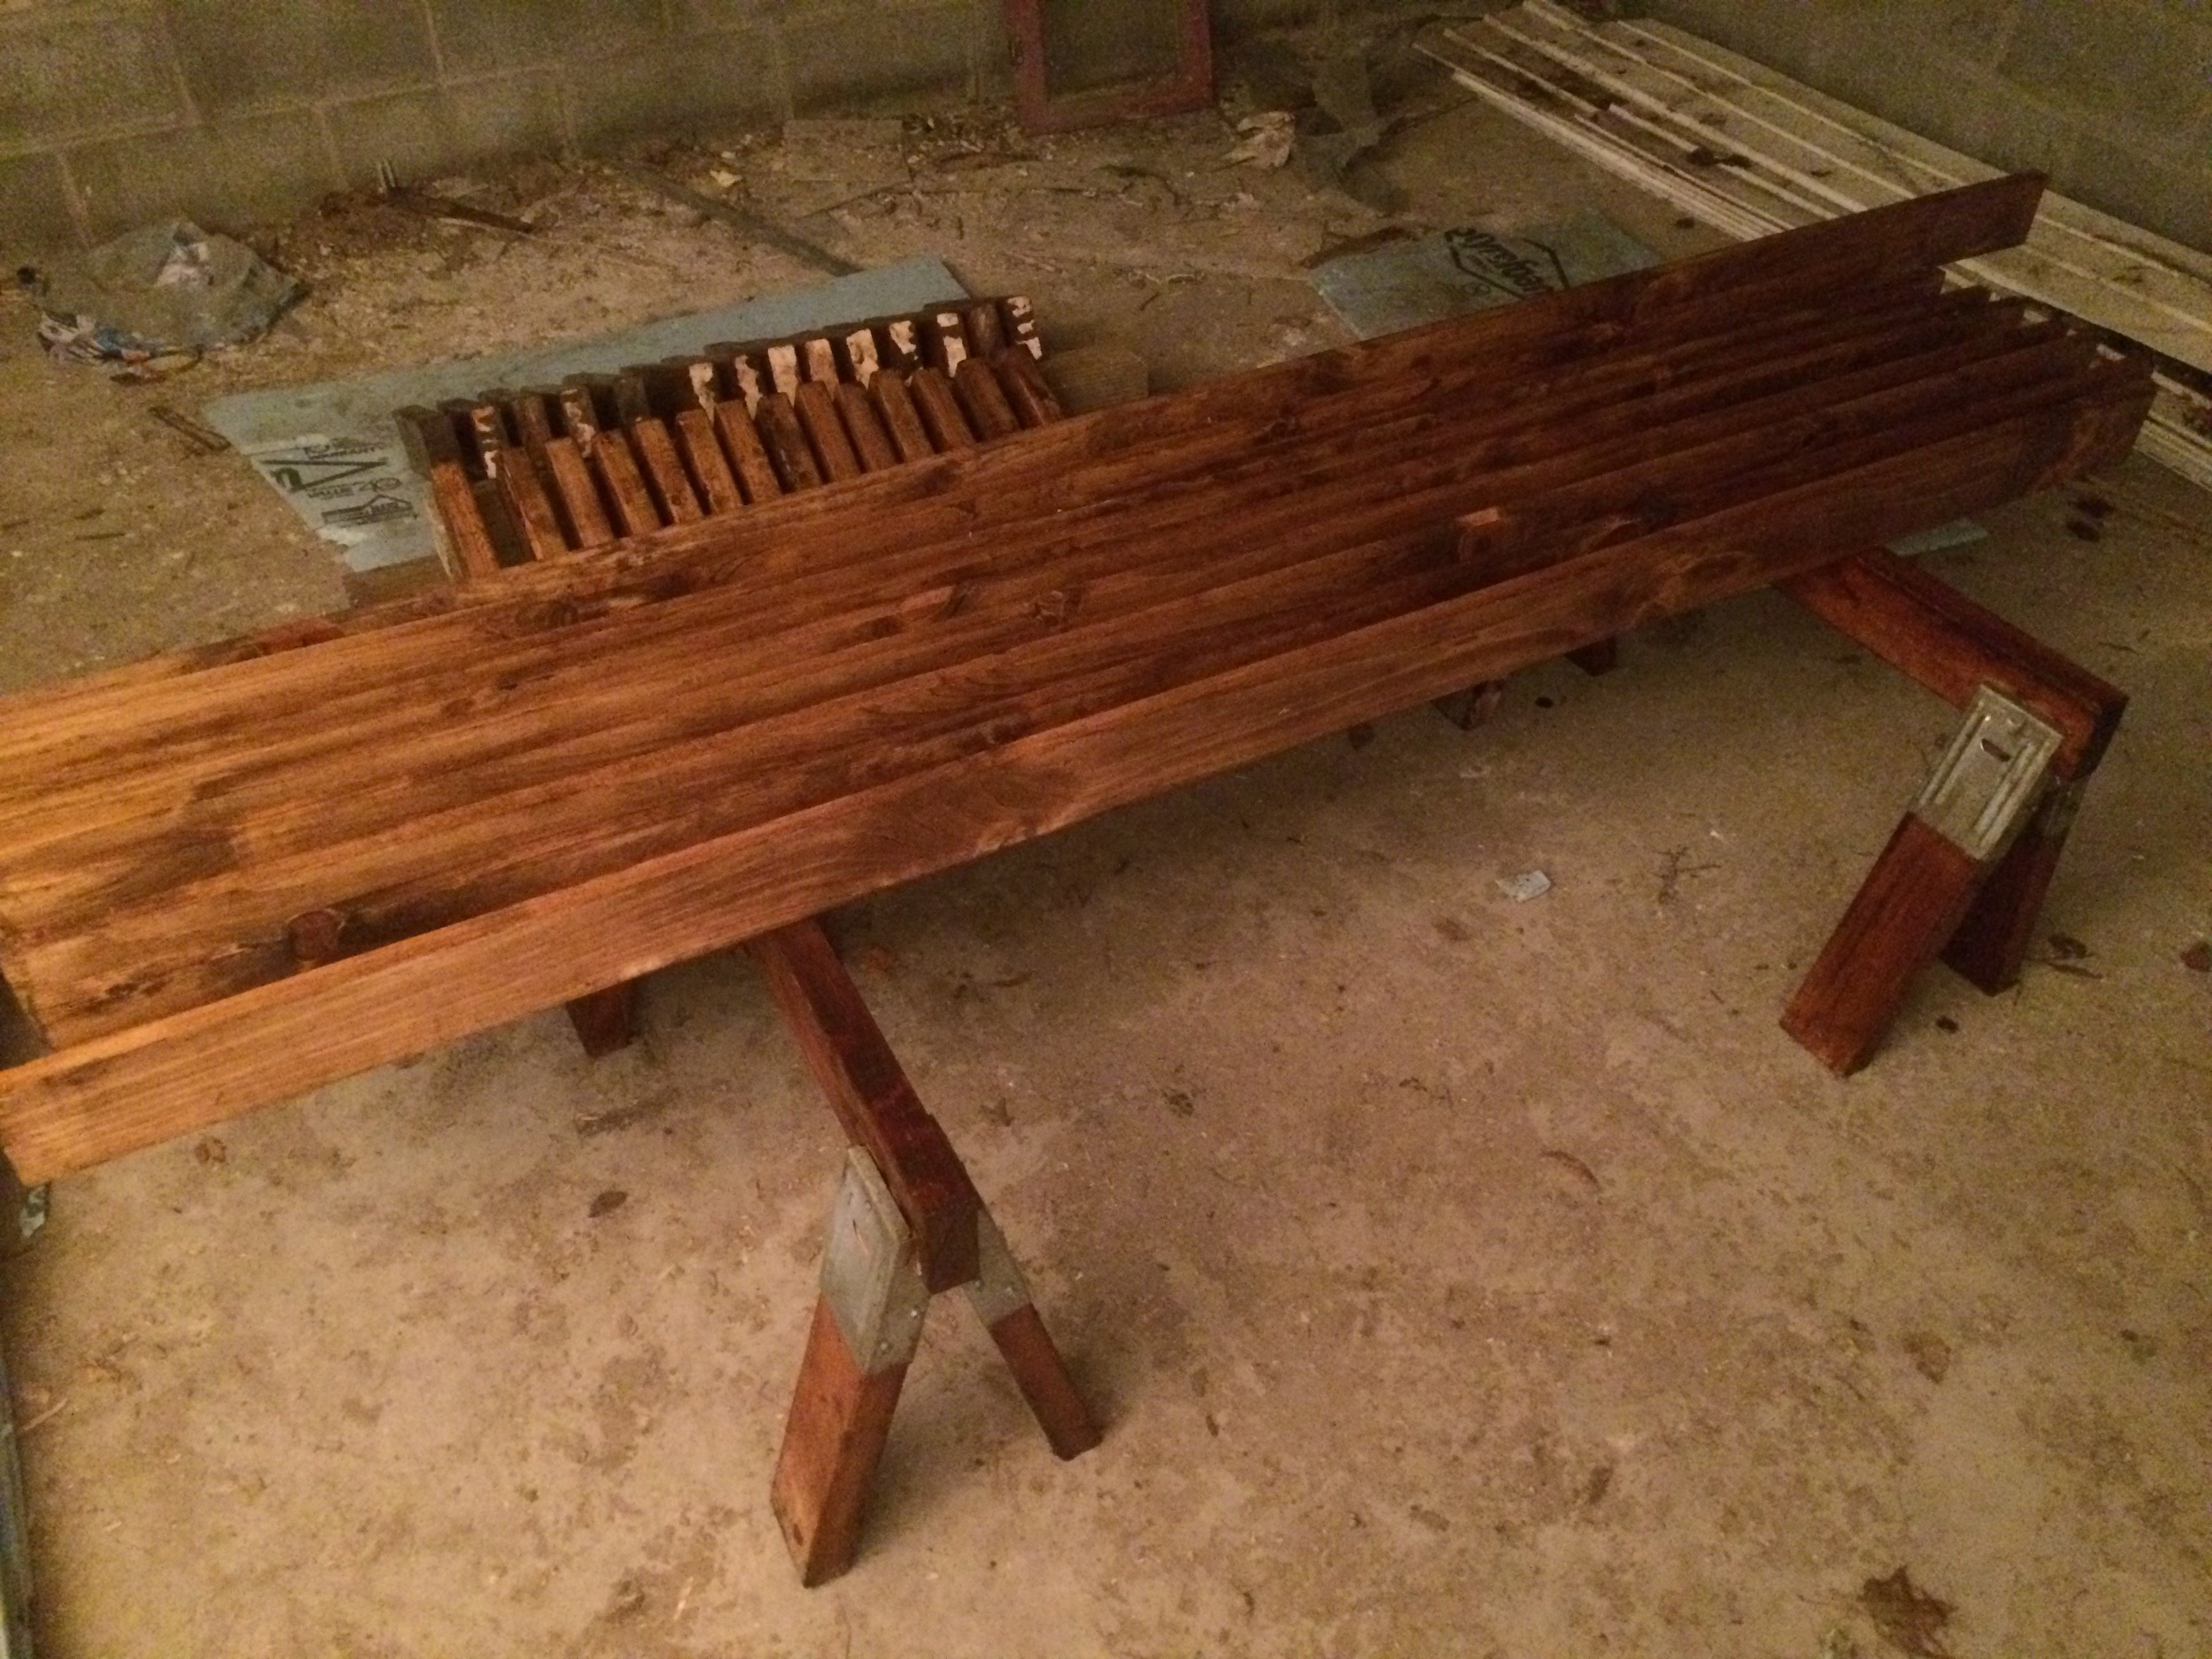
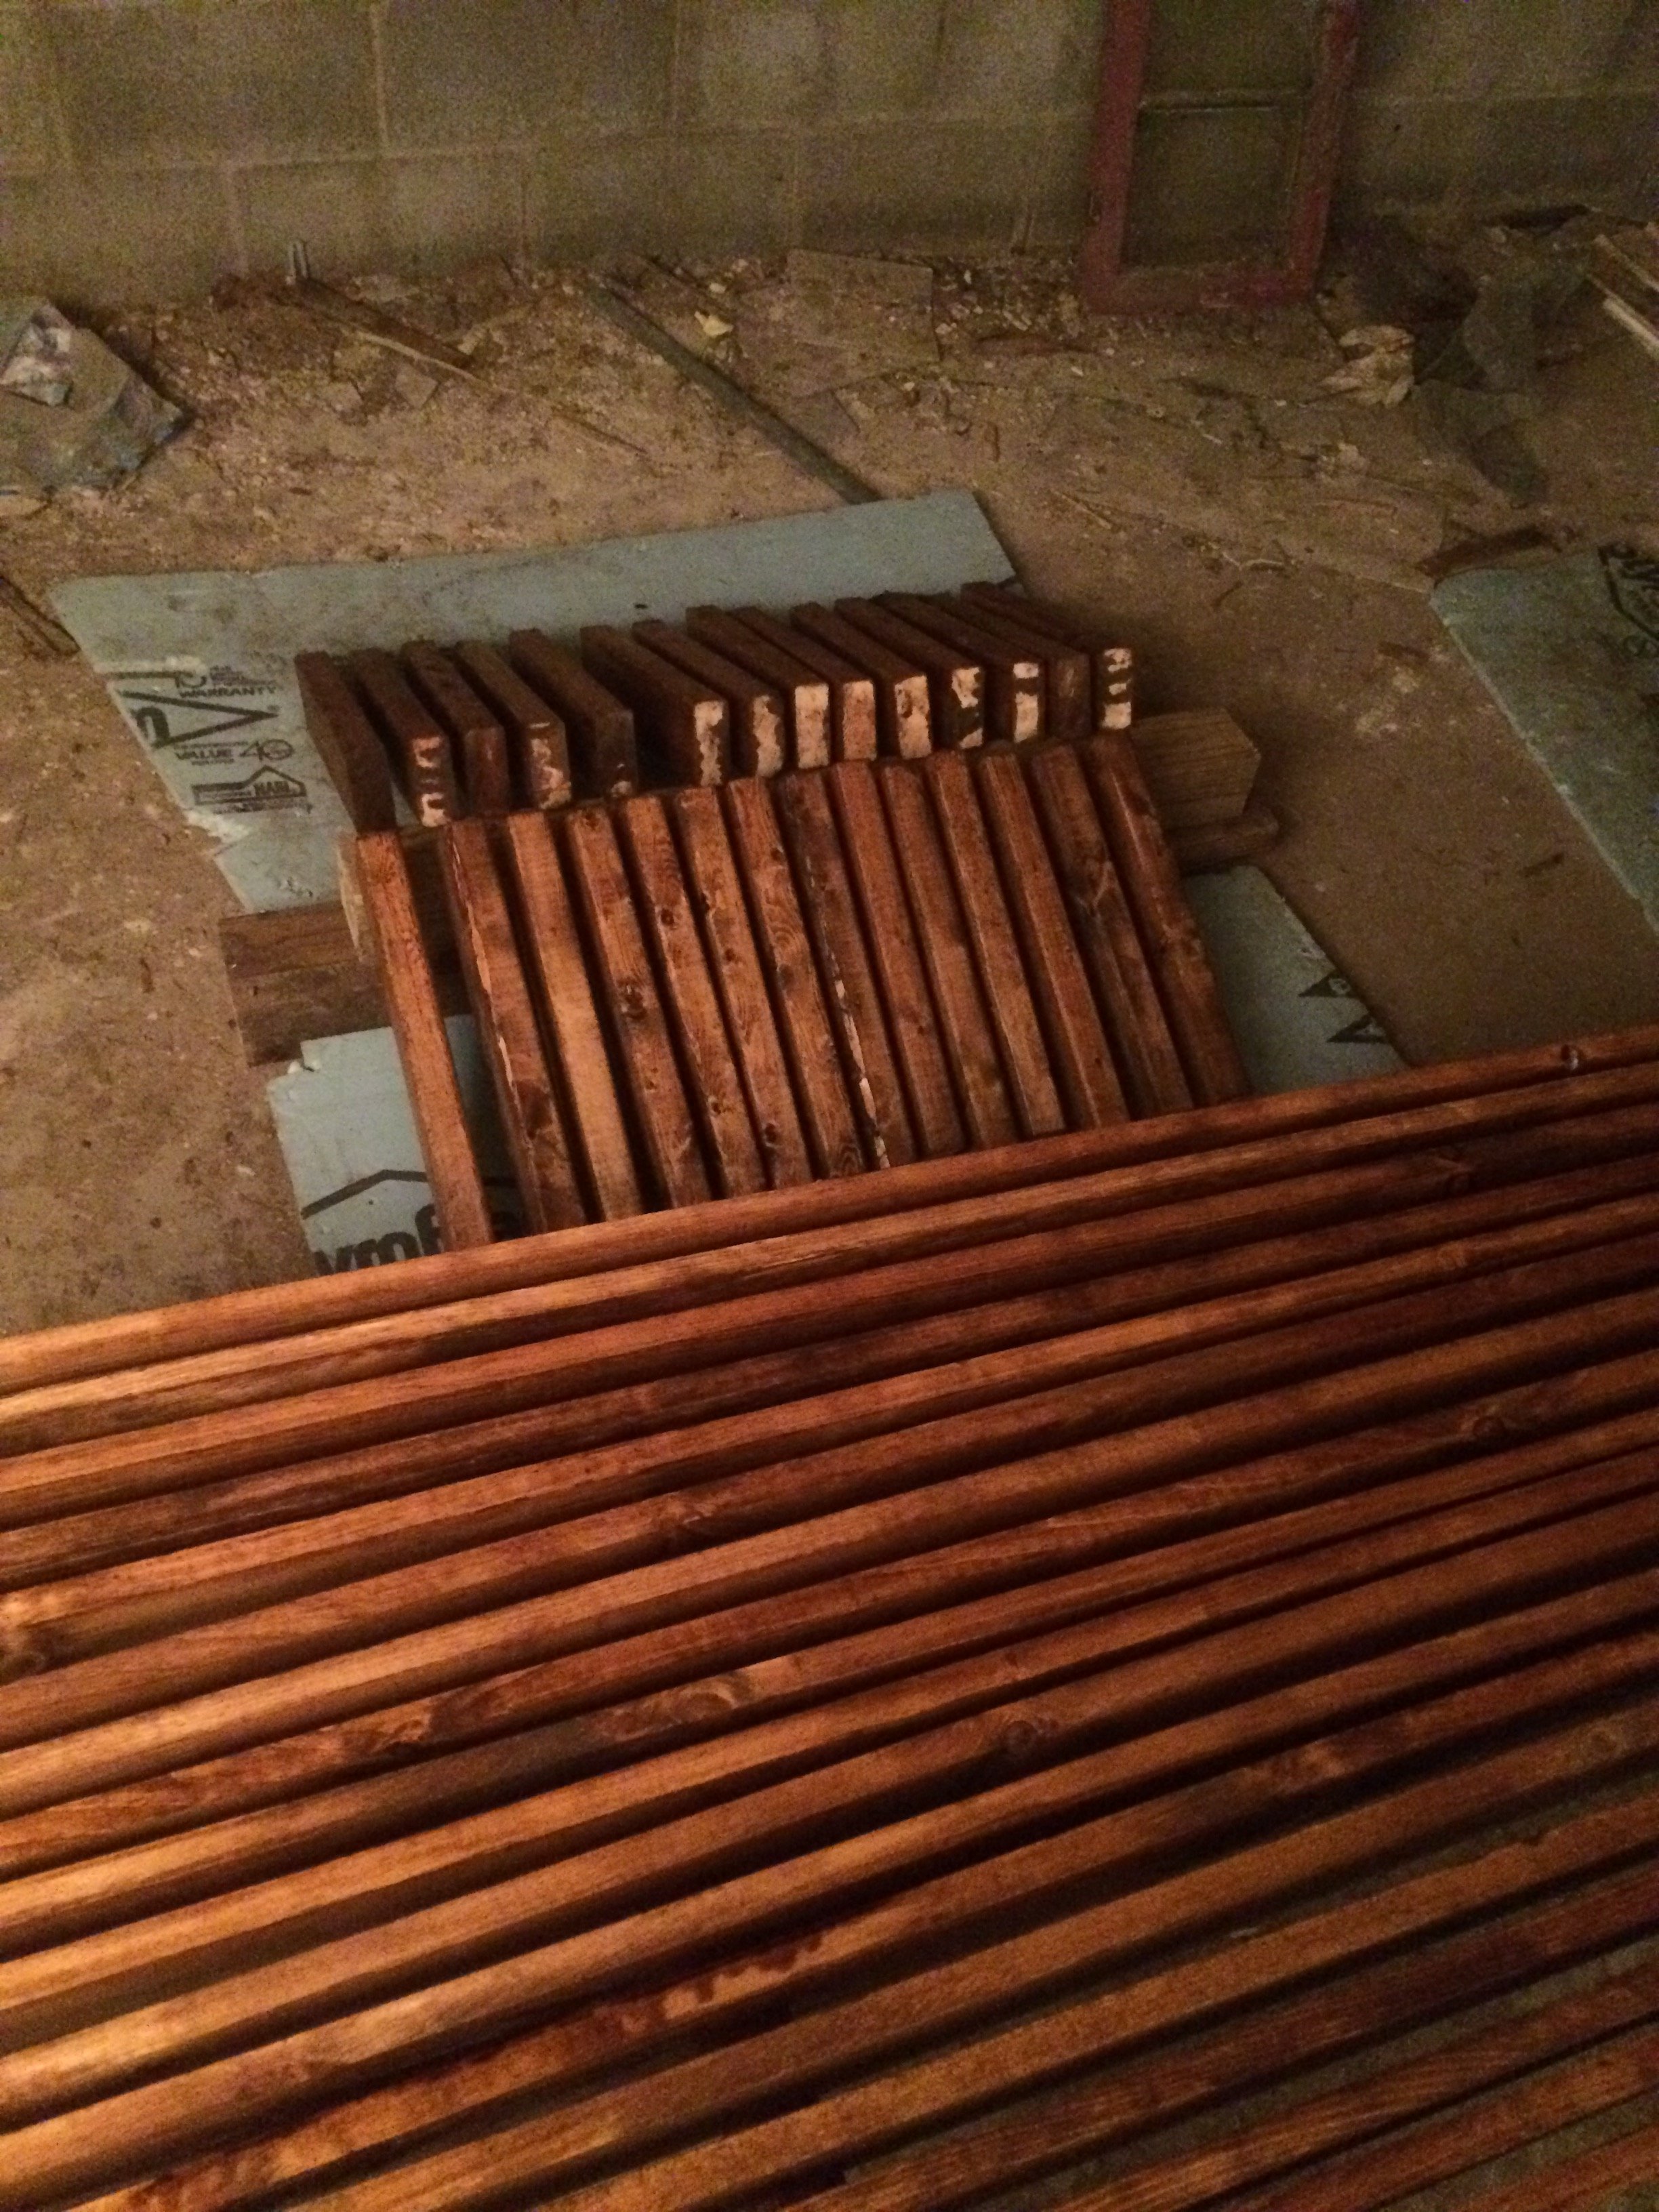
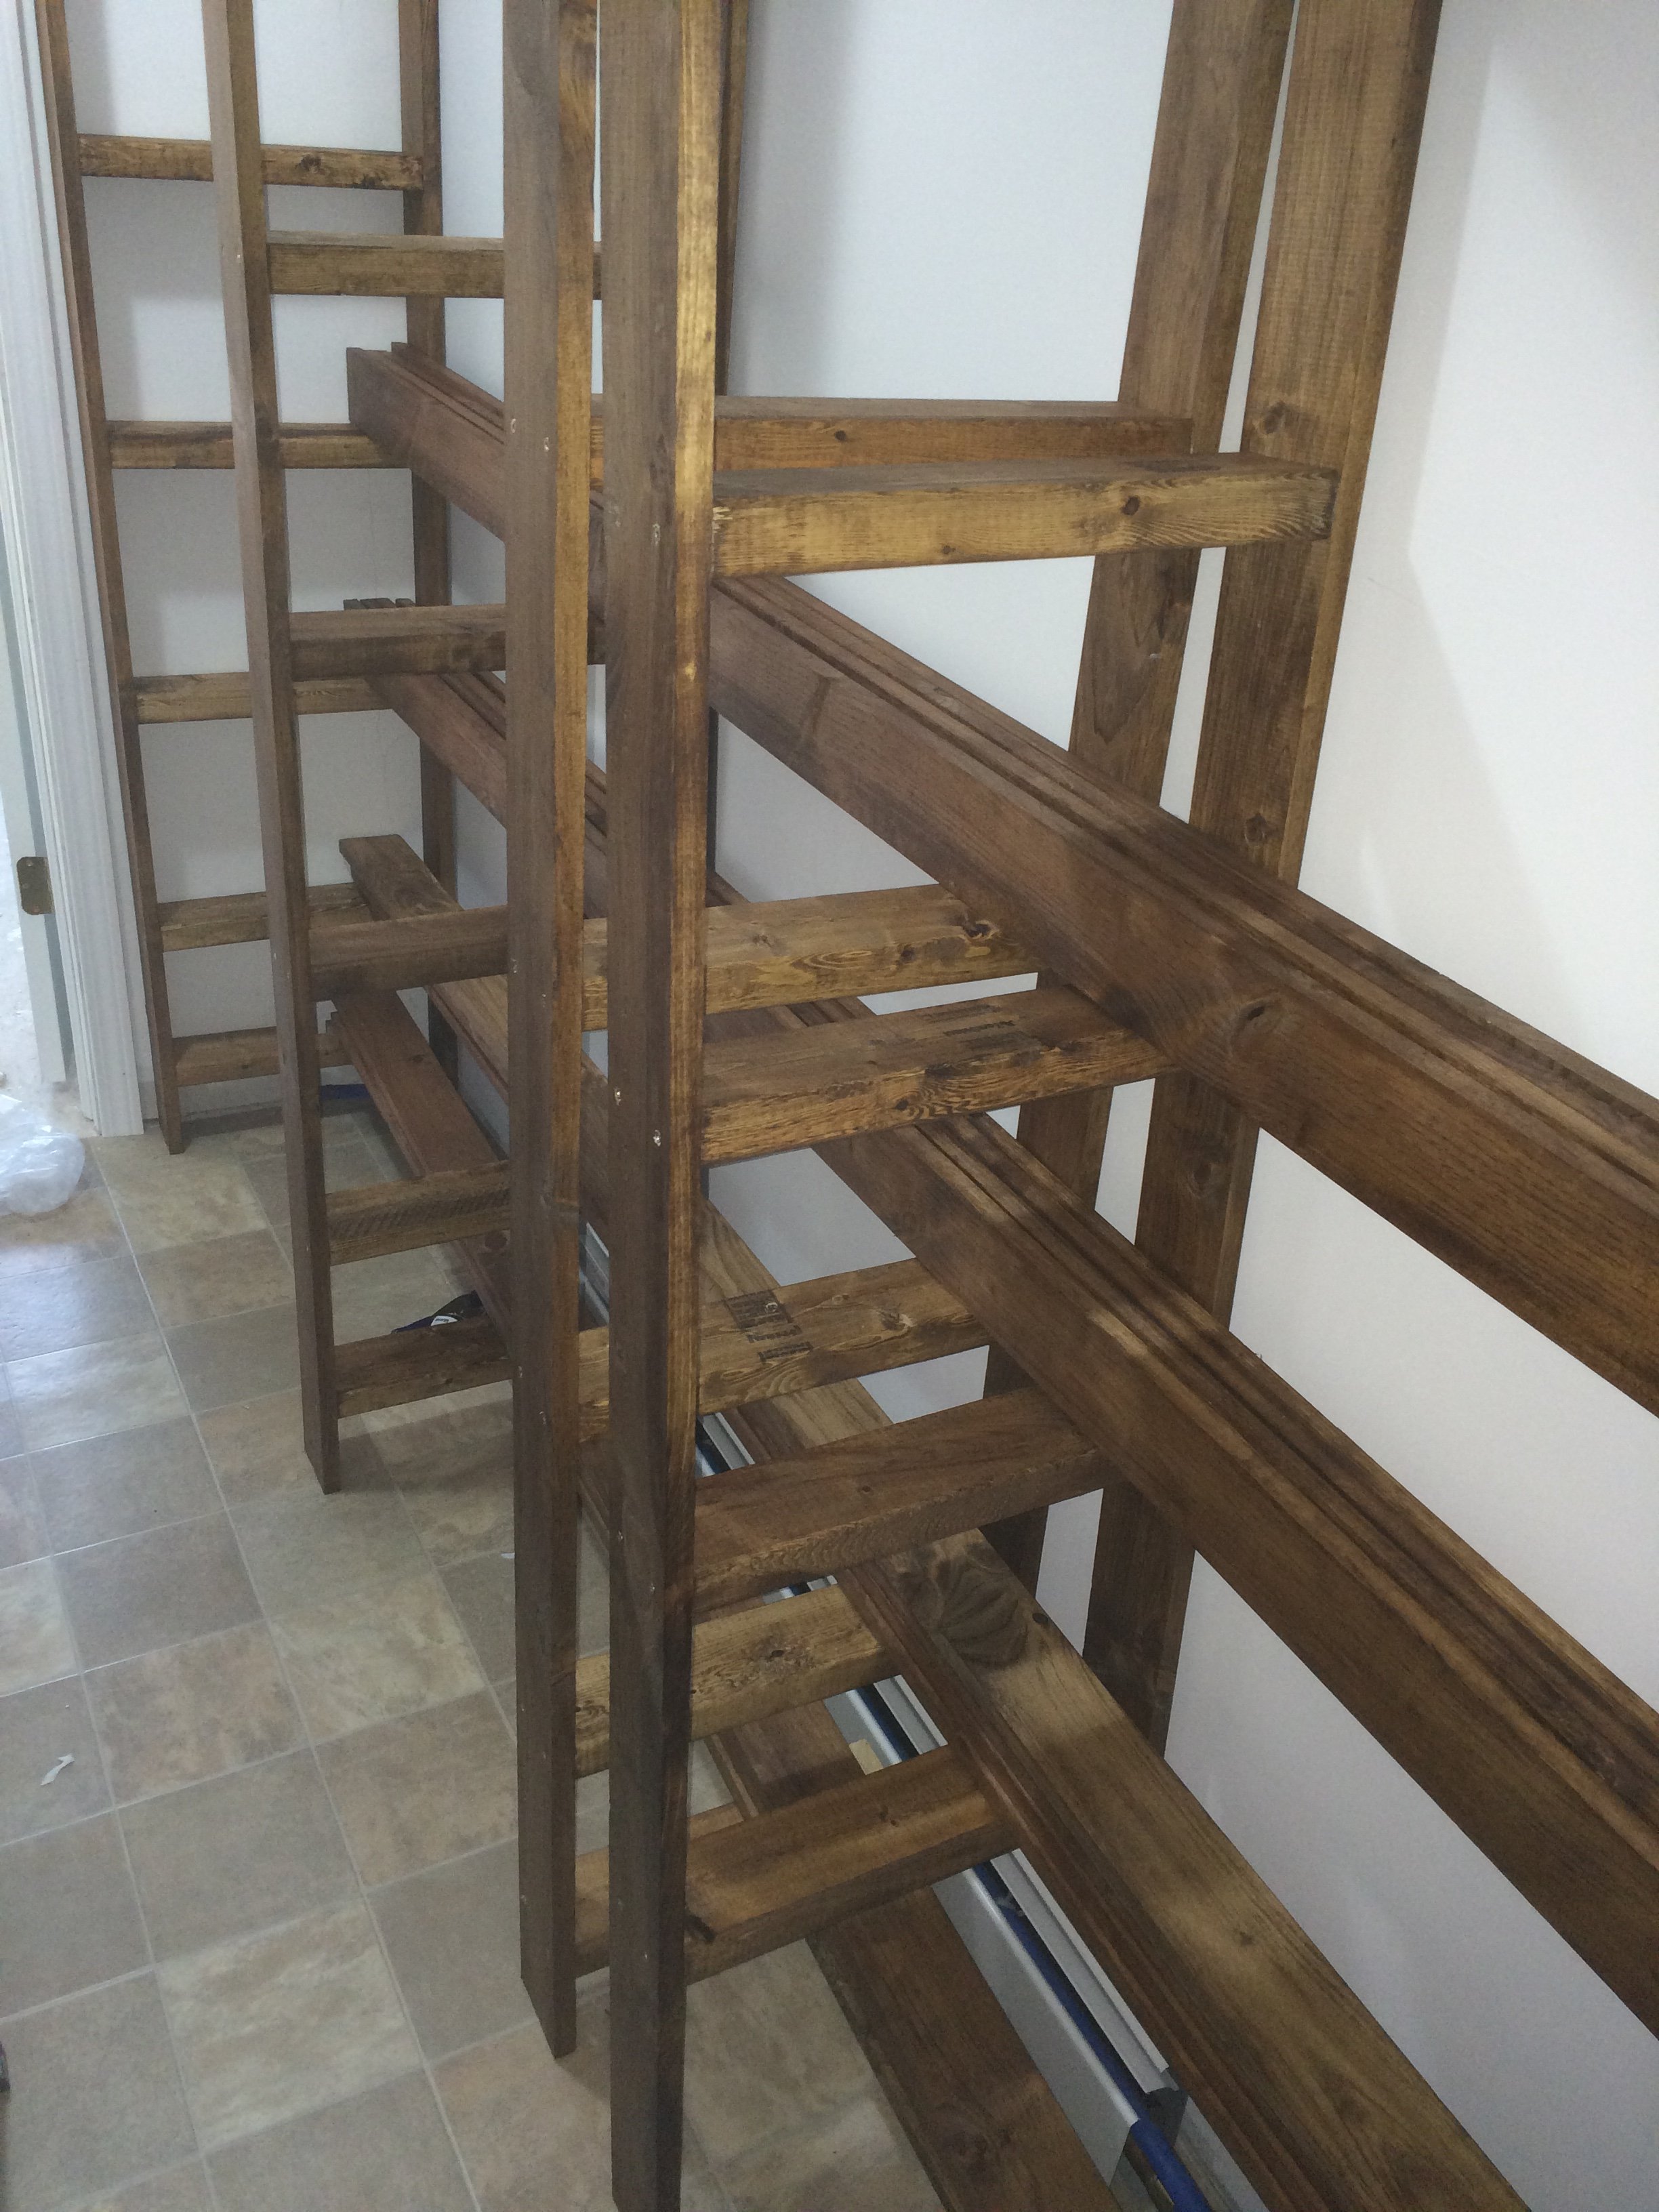
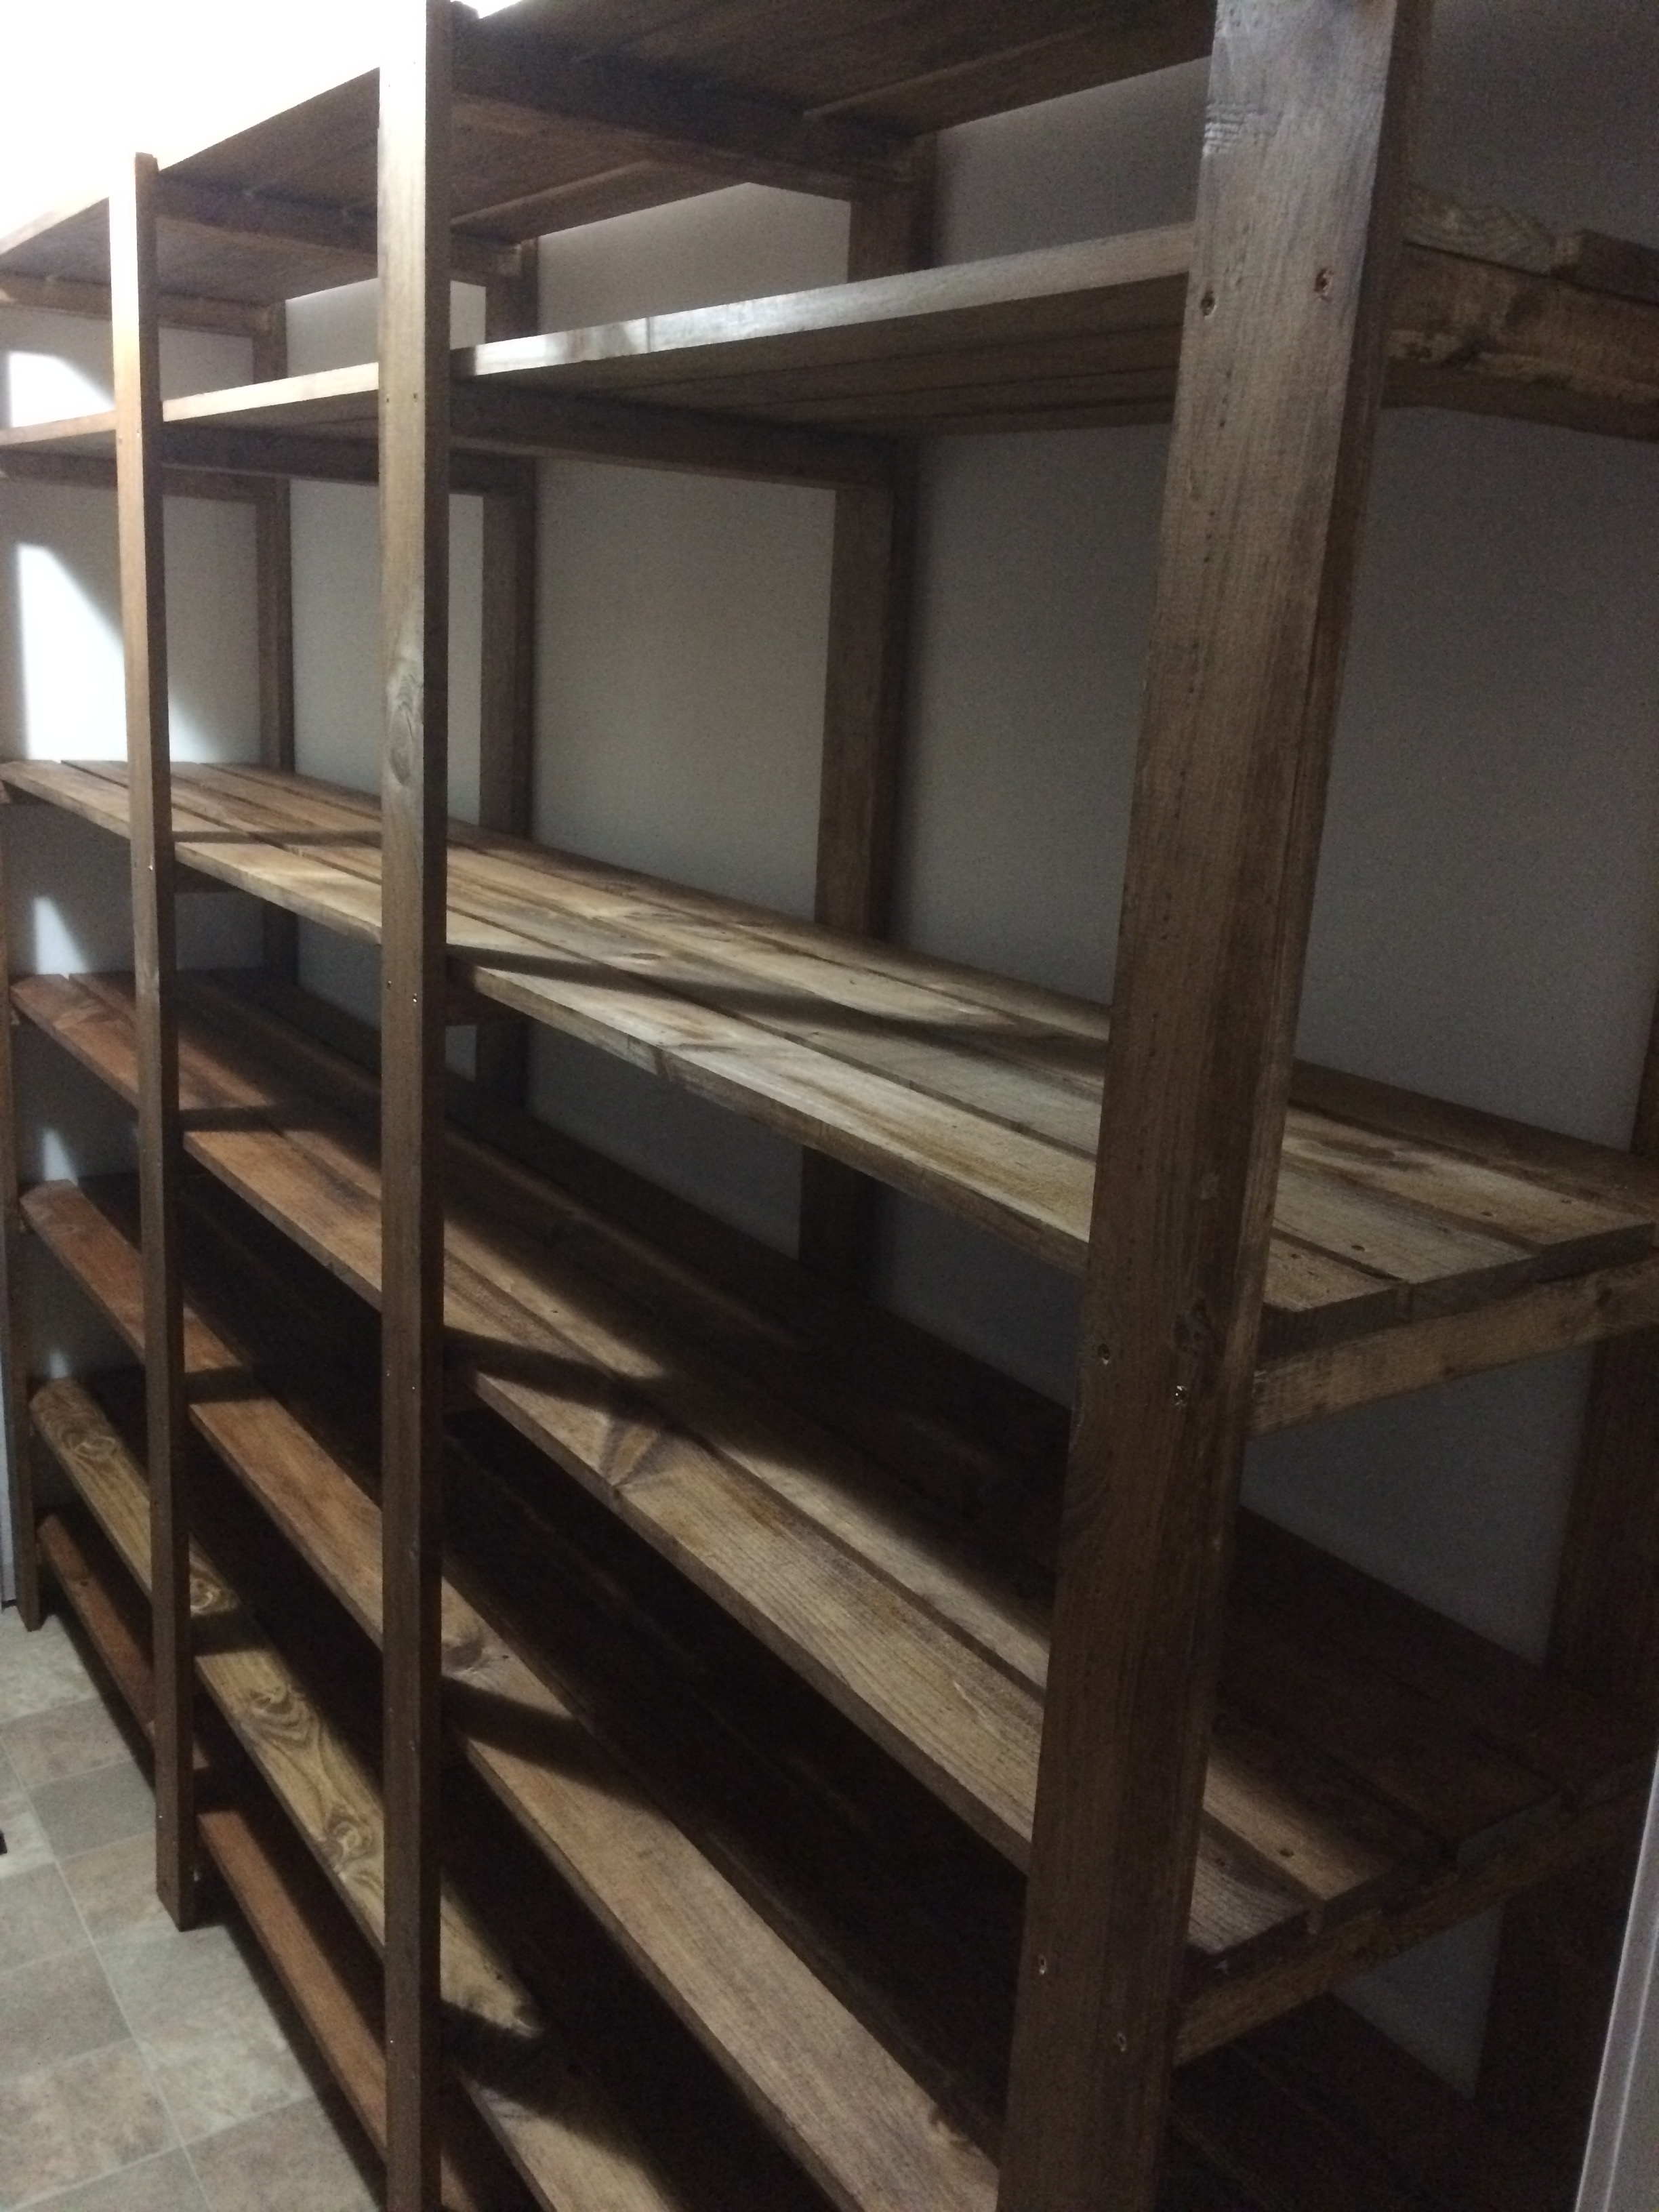
Custom Industrial Style Closet
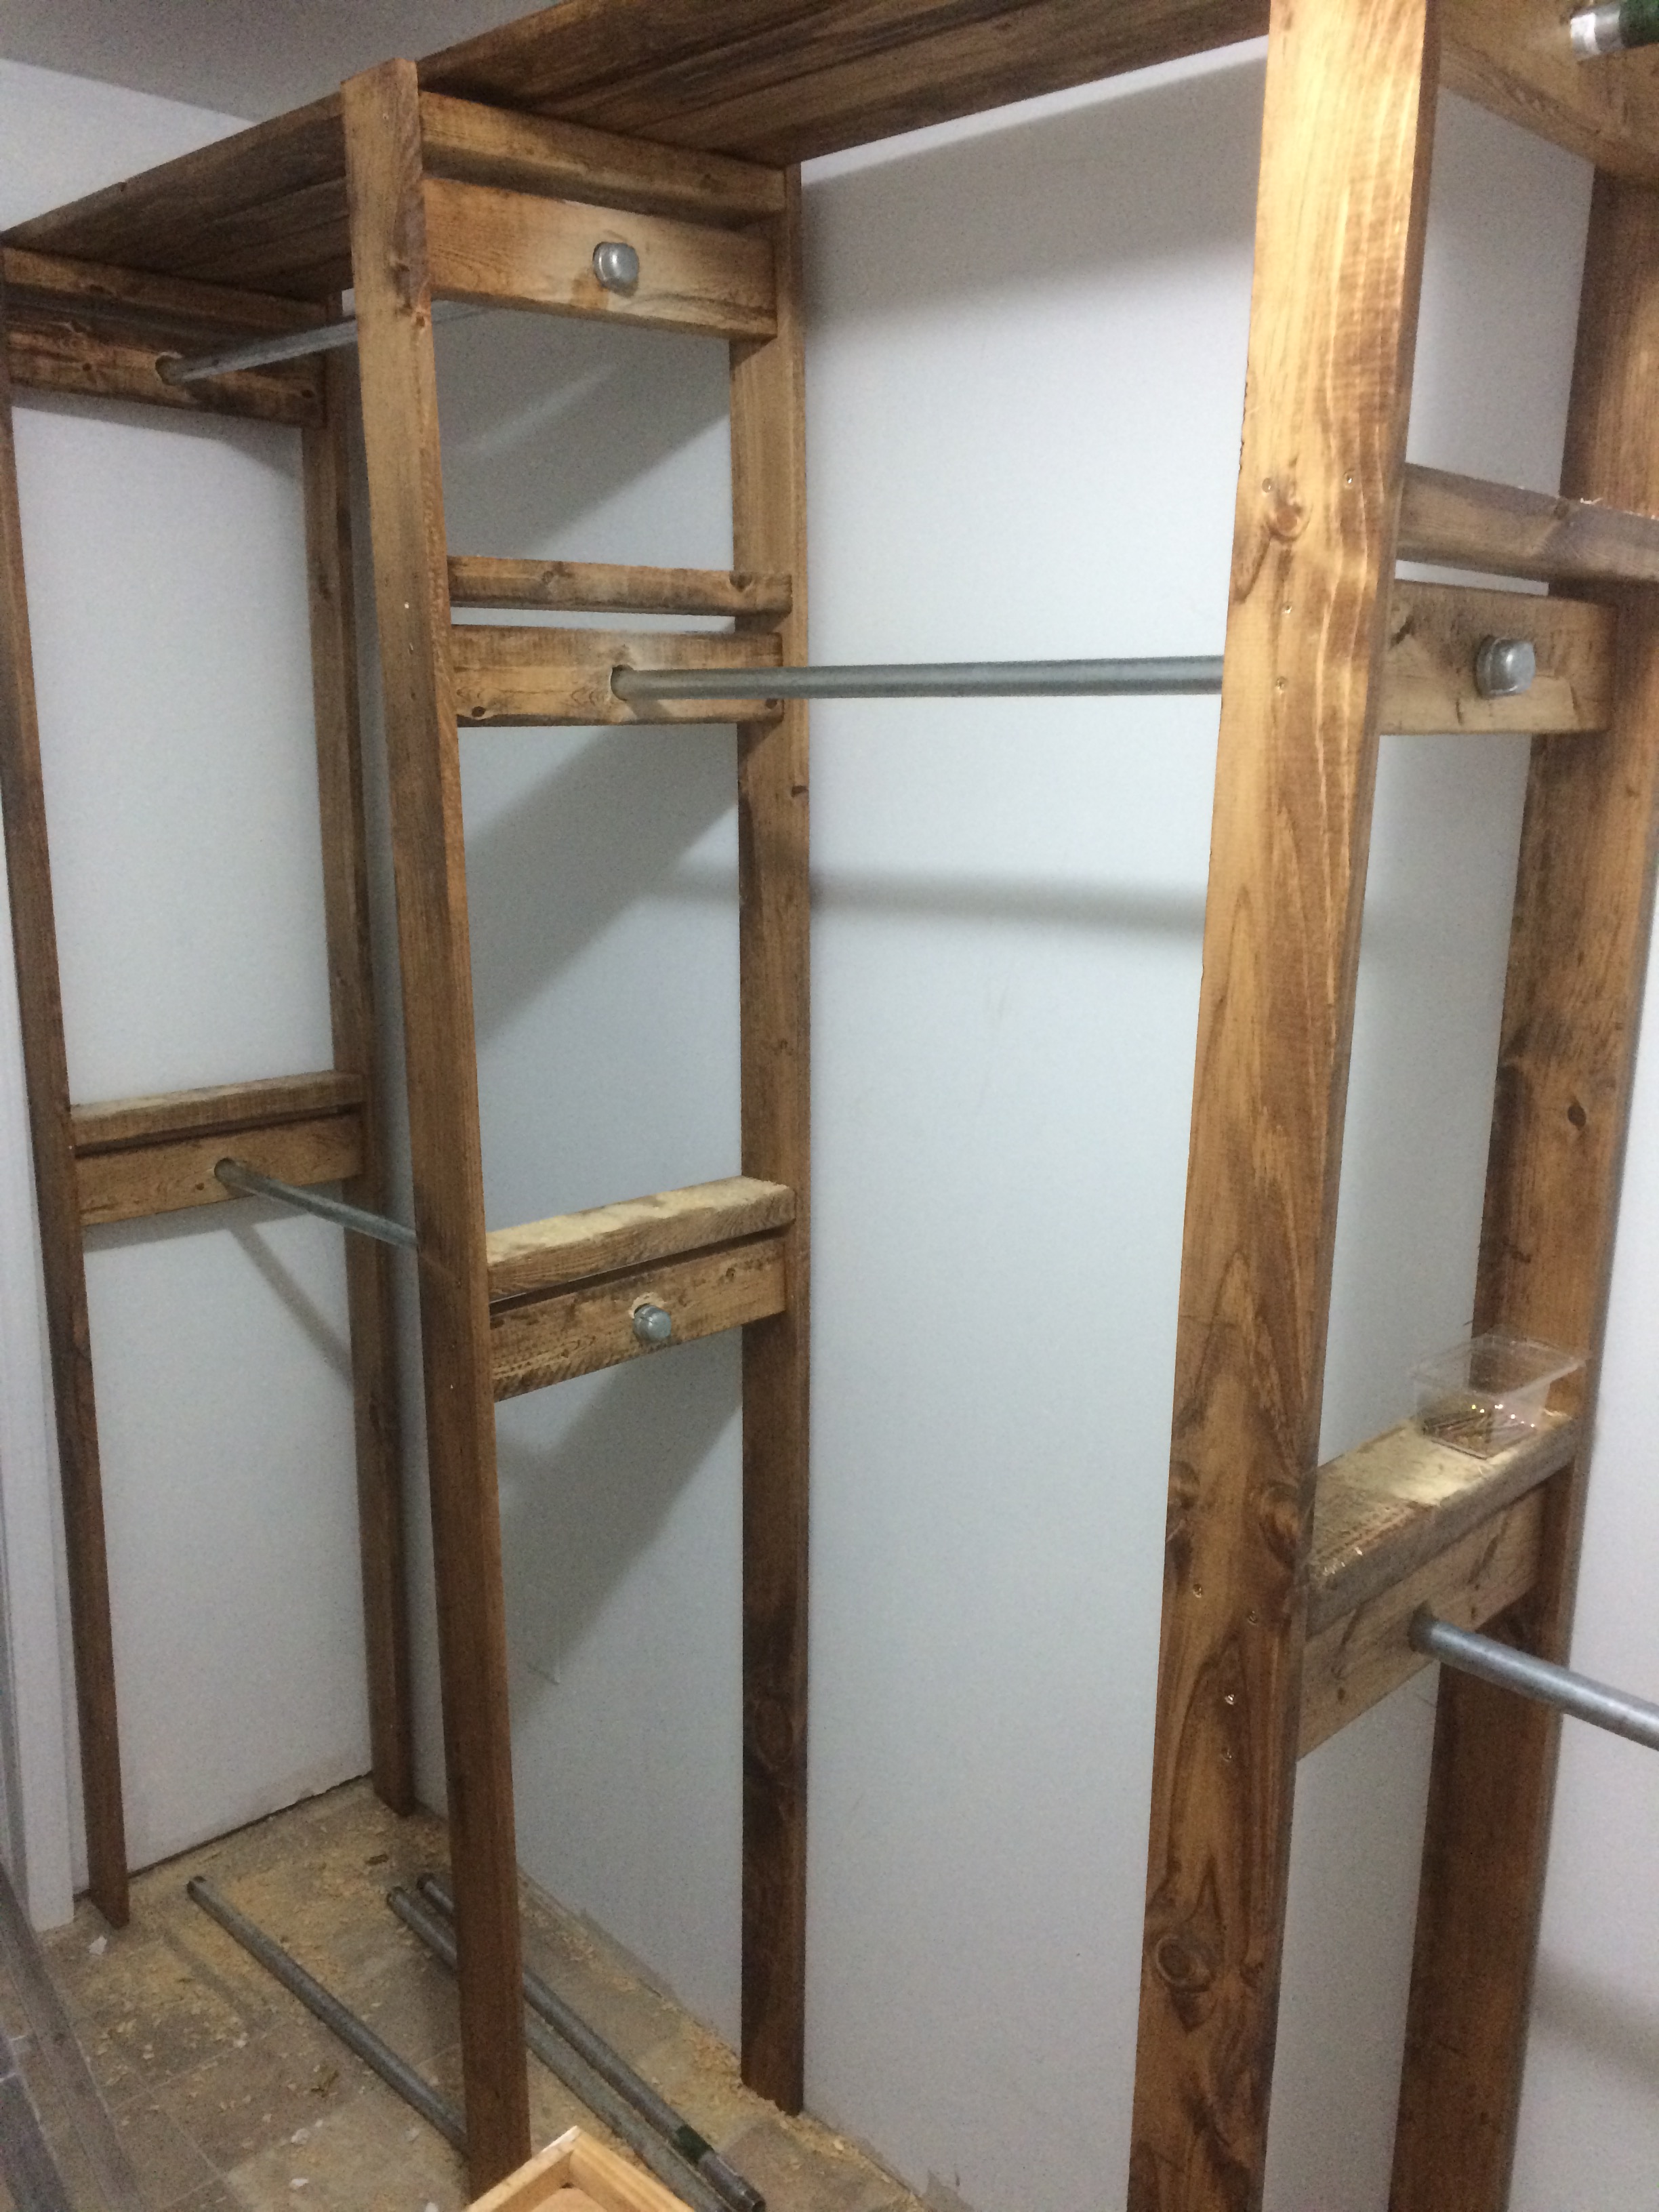
We remodeled our house and now had a new 9x6 master closet to fill. During construction I saw this design on ana-white.com and liked the style, but wanted to customize the layout. I found an online closet designer and played around until I found something my wife and I liked. We ended up with a 9 foot long his/hers double hanging on the ends and a long hanging section in the middle. And on the other side 8 feet of shelving (leaving about a foot for other storage).
I bought the pipe as a 10 foot pipe to be cut and threaded (for free by the store). I did have to change the design a little because the store cannot thread pipe less than 14 inches. So I ended up replacing the short pipes and T's with 2x4s. That made it a little cheaper and I still like the end result.
We stained all the wood using Minwax "Early American". This probably accounts for most of the build time.
Then I put together the supports and brought them into the closet to add all the pipes and slats. I started with the wall for hanging. And later did the shelving.
Here's another forum with more pictures of this project:
http://woodworking.formeremortals.net/me-mo-community/#/discussion/866/…
Built from Plan(s)
Estimated Cost
<$400 for whole closet.
Estimated Time Investment
Weekend Project (10-20 Hours)
Finish Used
Minwax "Early American"
Recommended Skill Level
Beginner
Comments
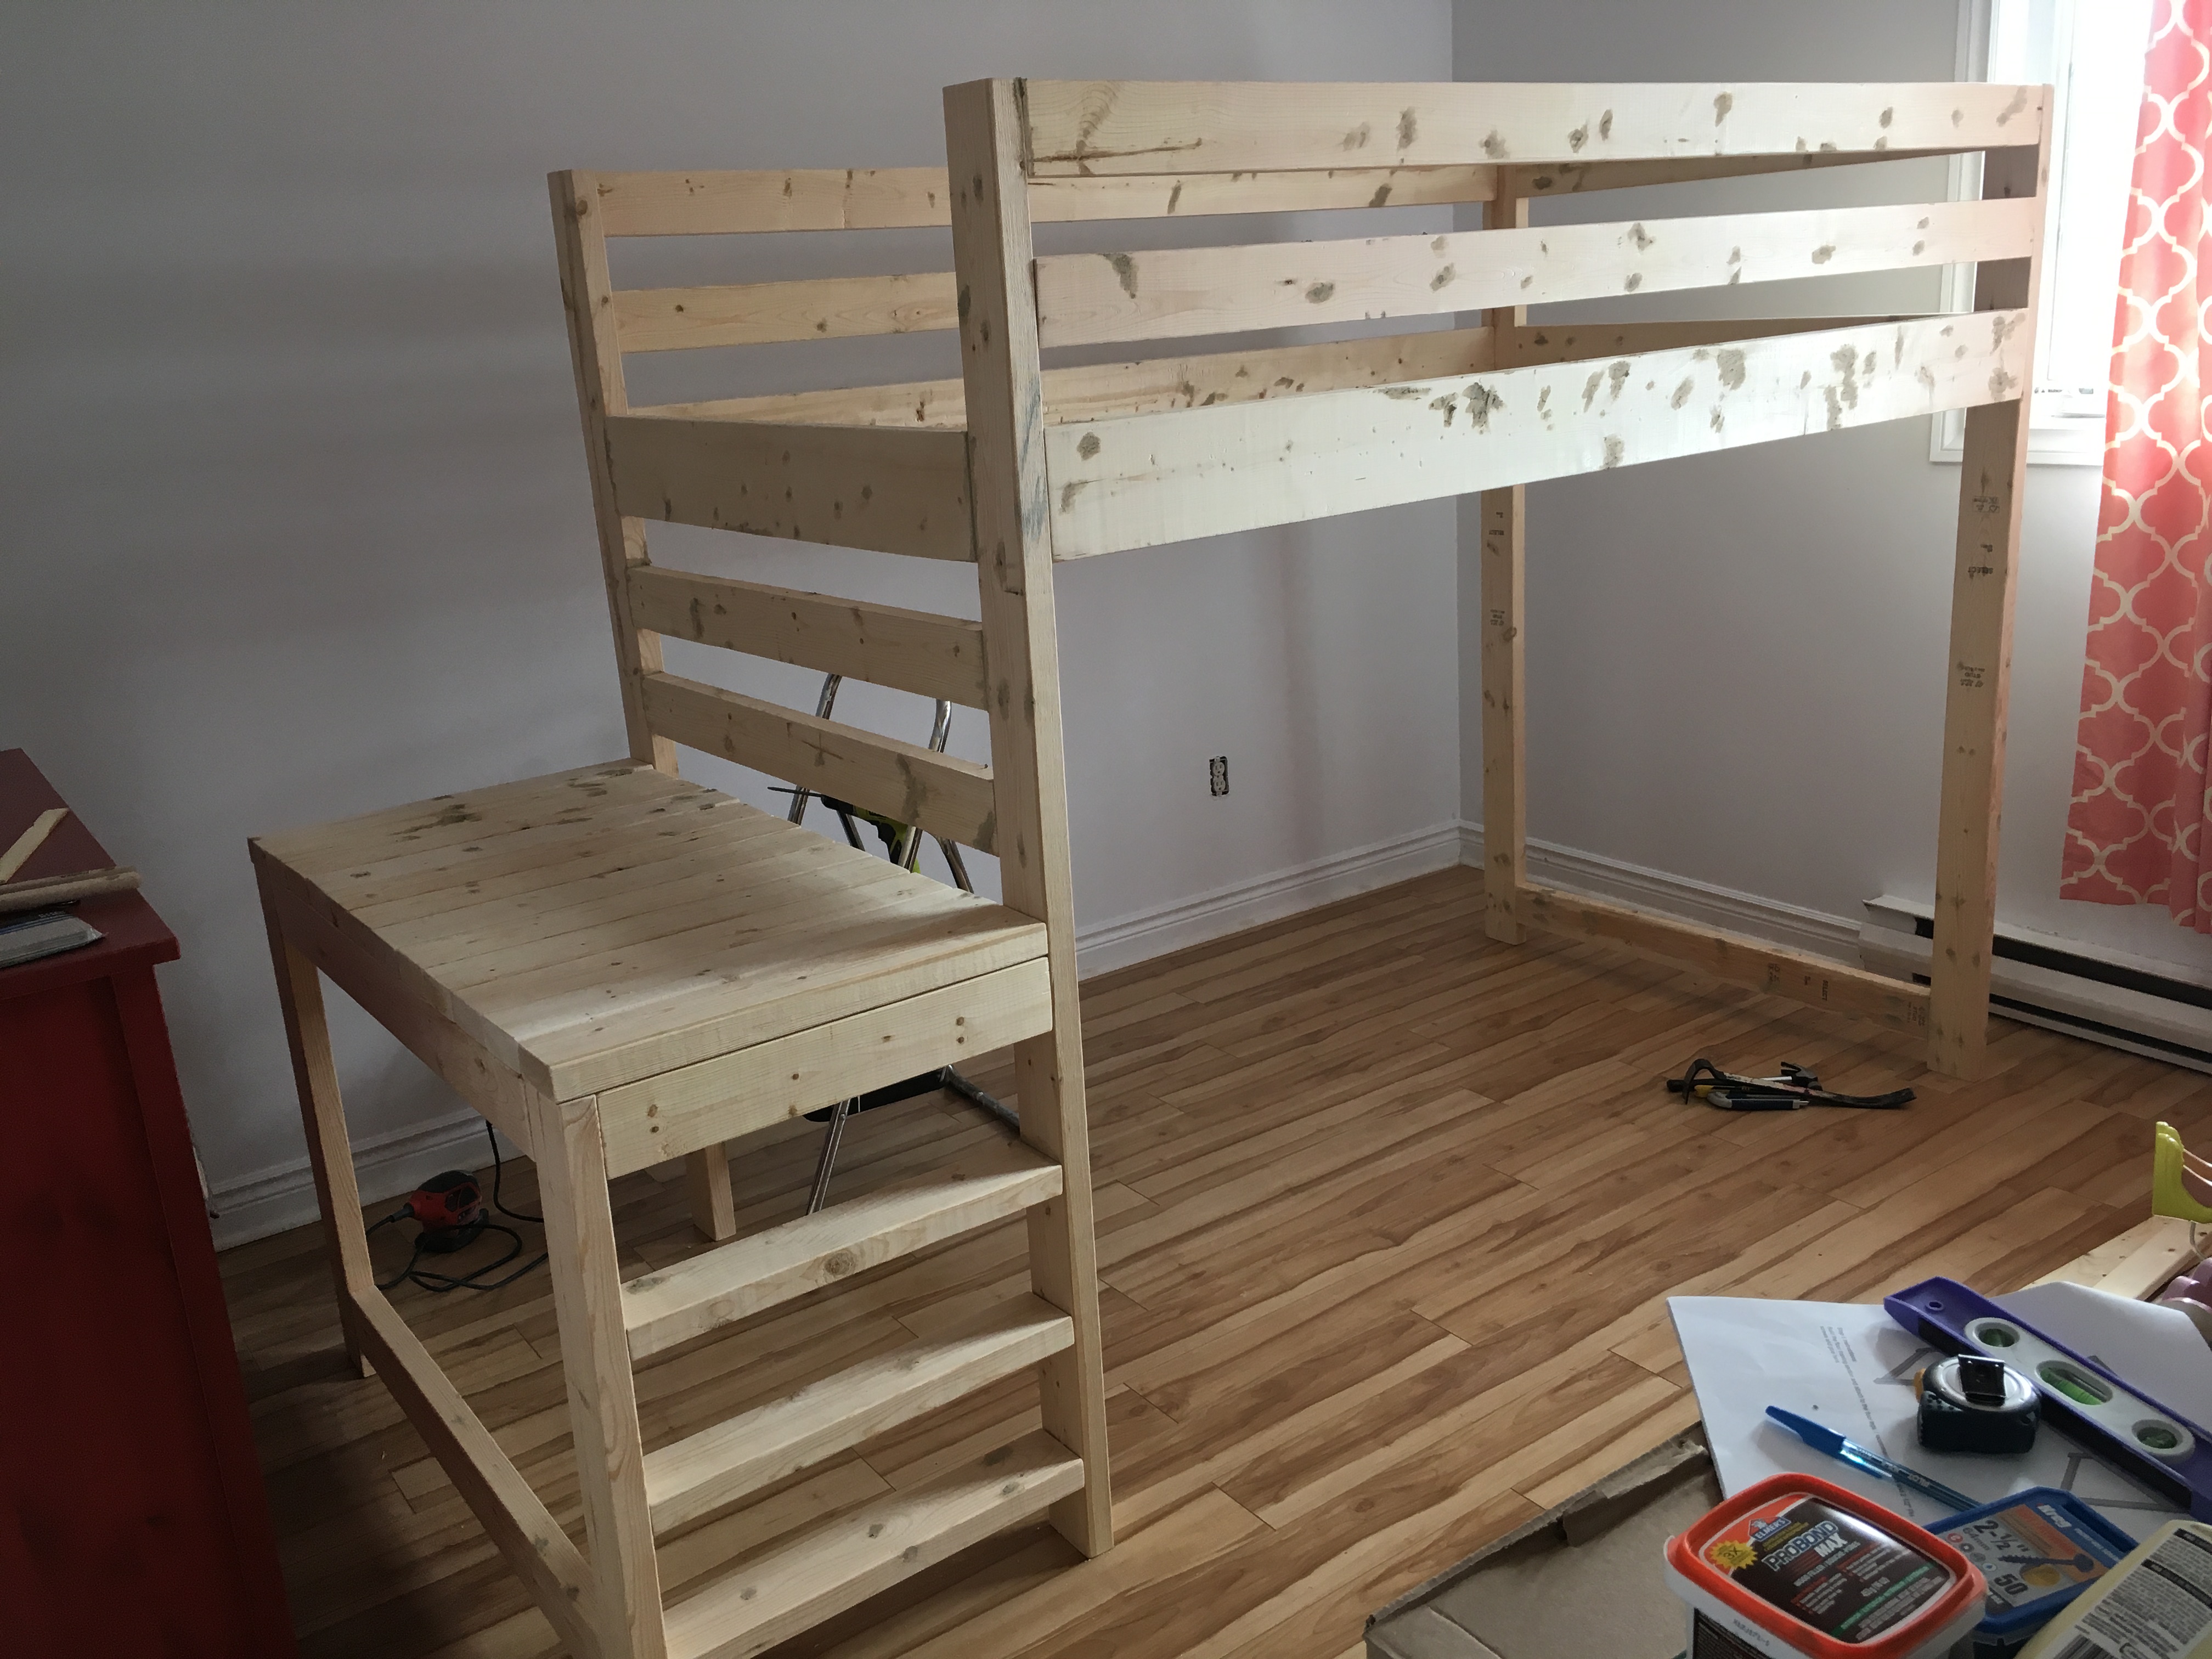
Ana's Loft bed w/o the stairs
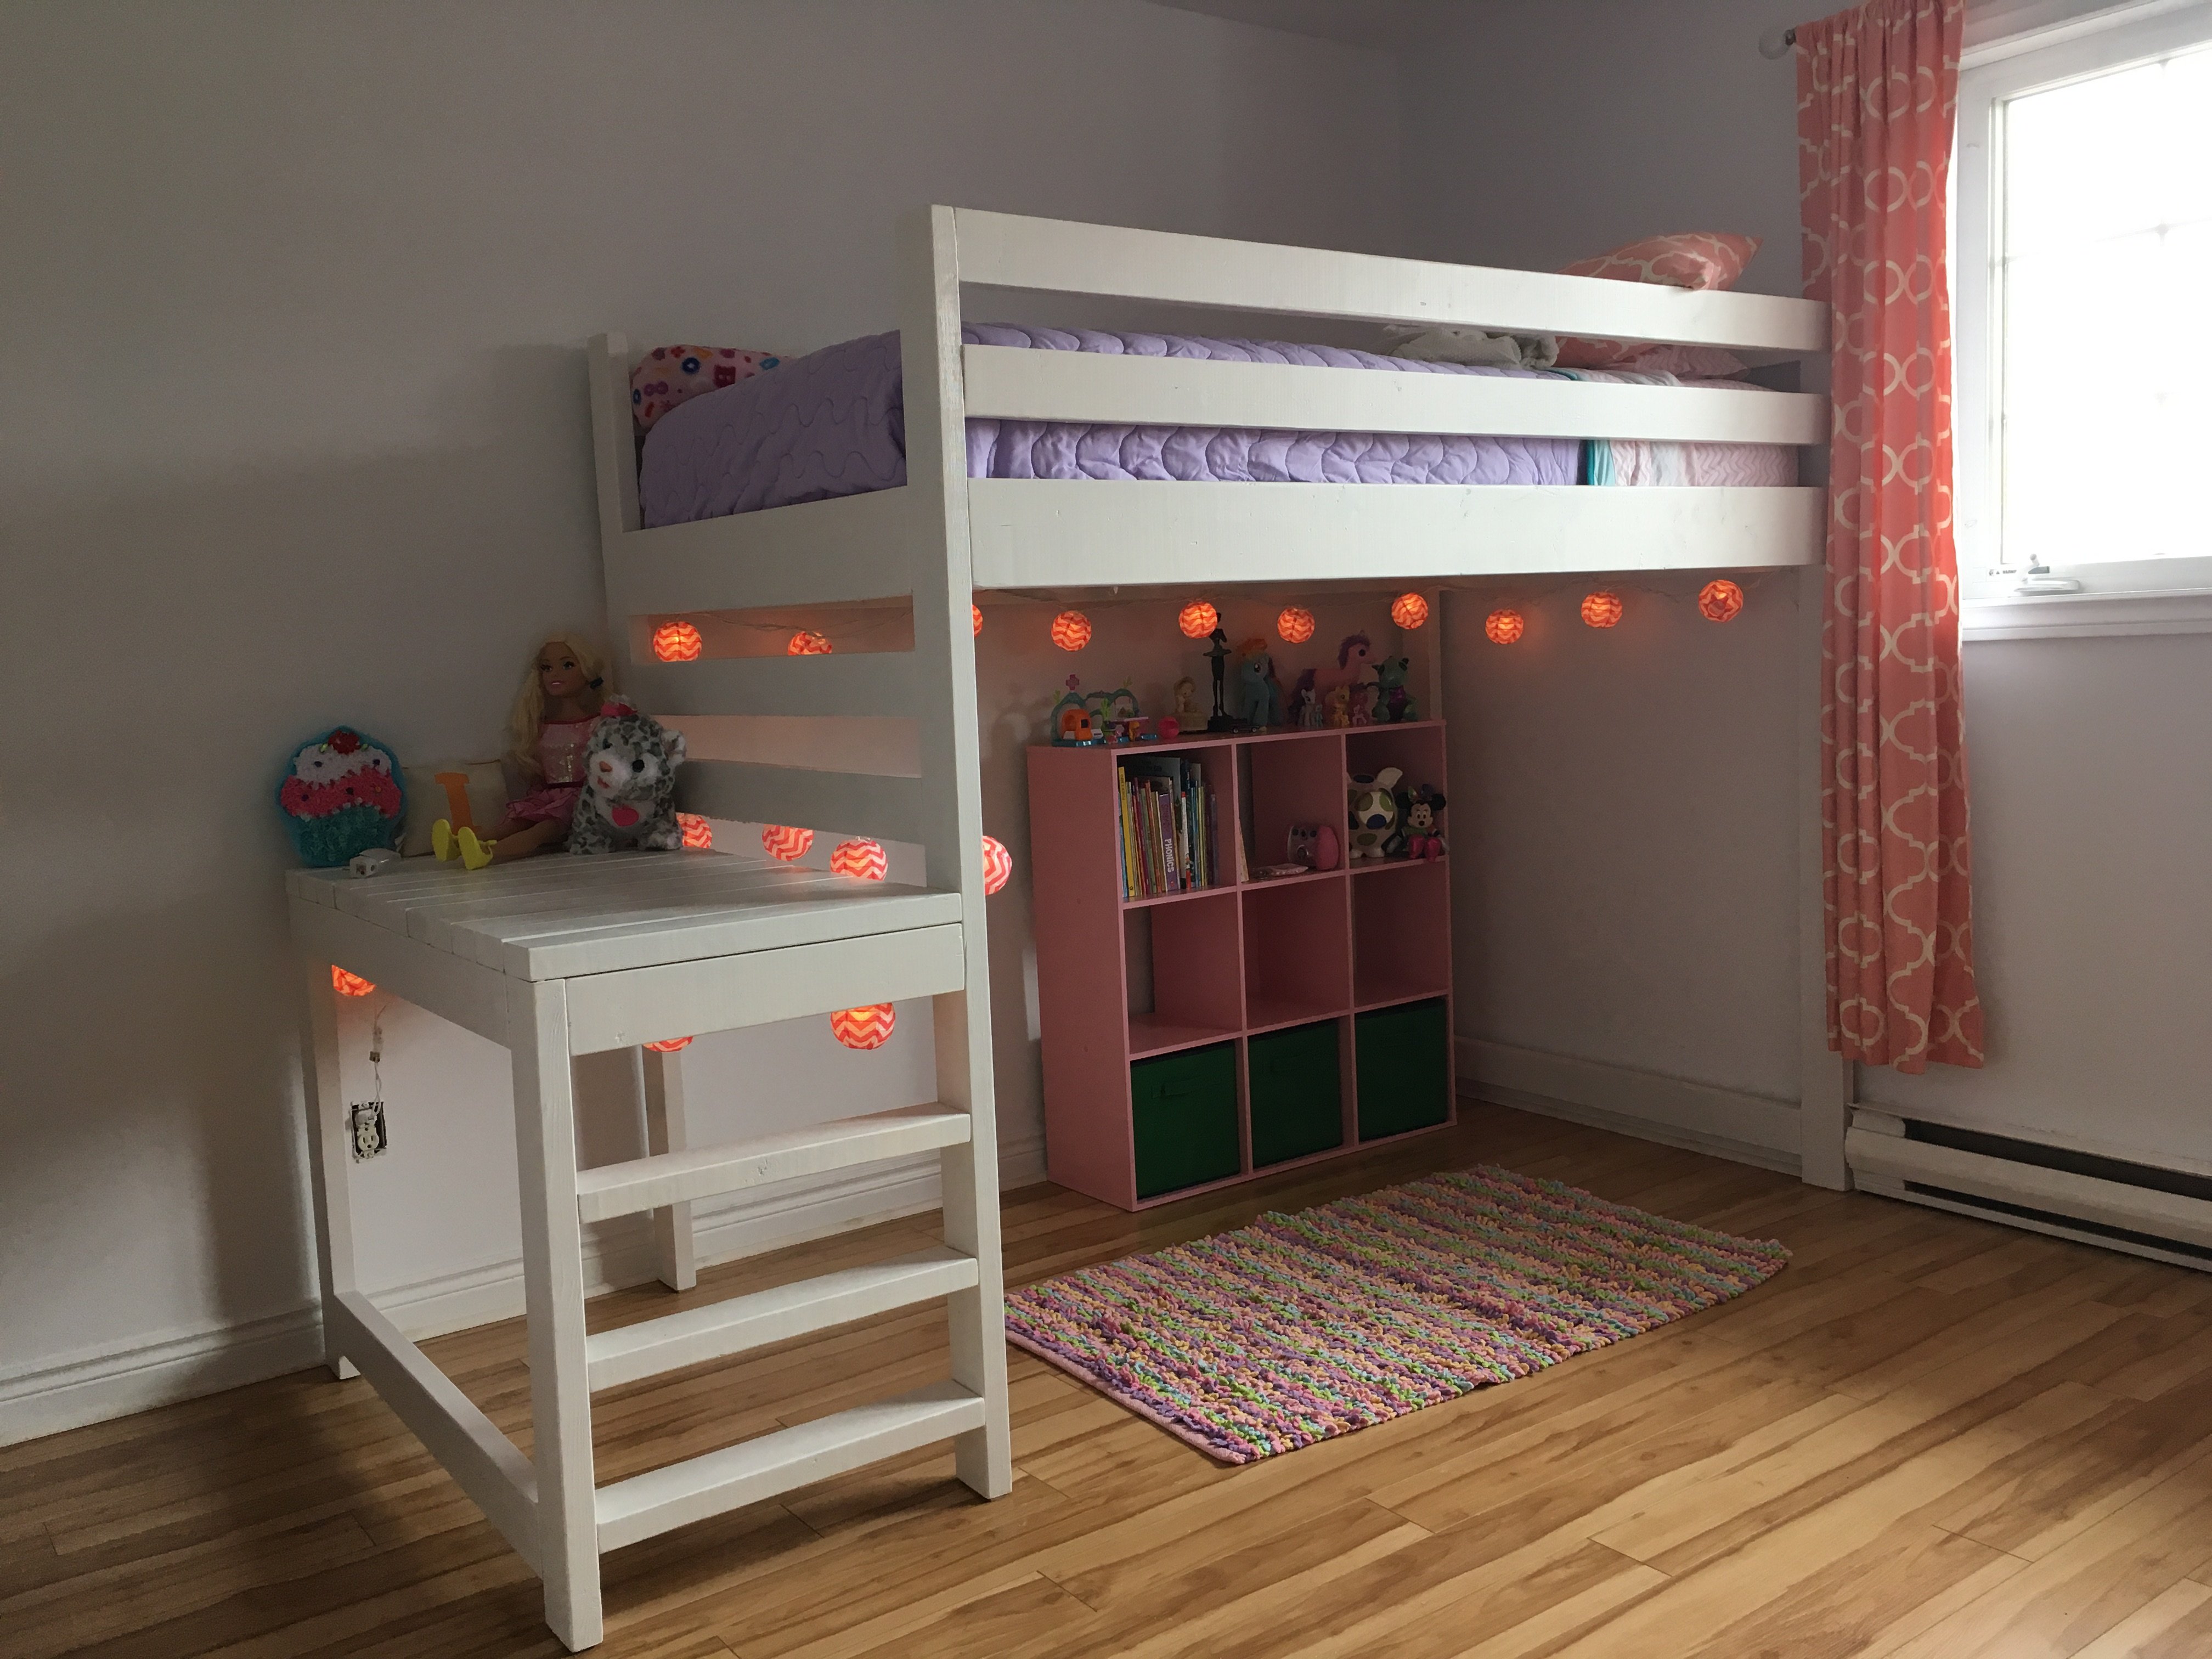
I fell in love with the loft bed but thought the stairs stuck out too far for my daughter's room so I revampd the plan just a bit to add three 'stairs' in the platform rather than the standard stairs in the plan.
I got started on the project on a Friday night, got my cuts made, my pocket holes drilled and pieces sanded for an early start Saturday morning, everything went together like a dream - though it would have gone MUCH faster if I had had a second set of hands; I had to balance all of the long peices on other peices to try and get them attached and it took much longer than it had too!
It was all together, the holes filled and first coat of primer on by Saturday afternoon - I used Zinsser primer so the knot's did not bleed through. Sunday morning I was painting and it was in place and decorated by Sunday night!
Great, easy to follow plans (as always) Ana - thank you, I have one VERY happy daughter!
Built from Plan(s)
Estimated Cost
Approx $150
Estimated Time Investment
Weekend Project (10-20 Hours)
Finish Used
paint
Recommended Skill Level
Beginner
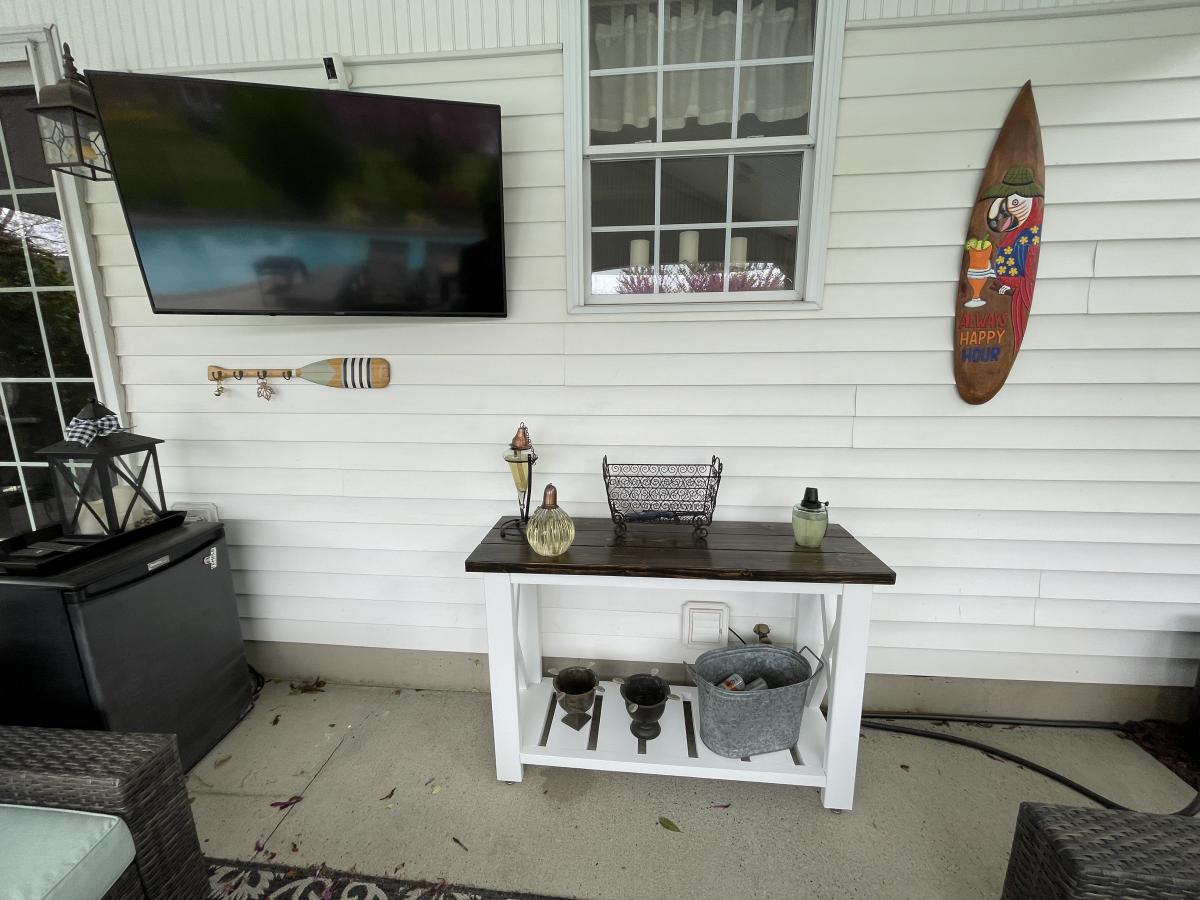
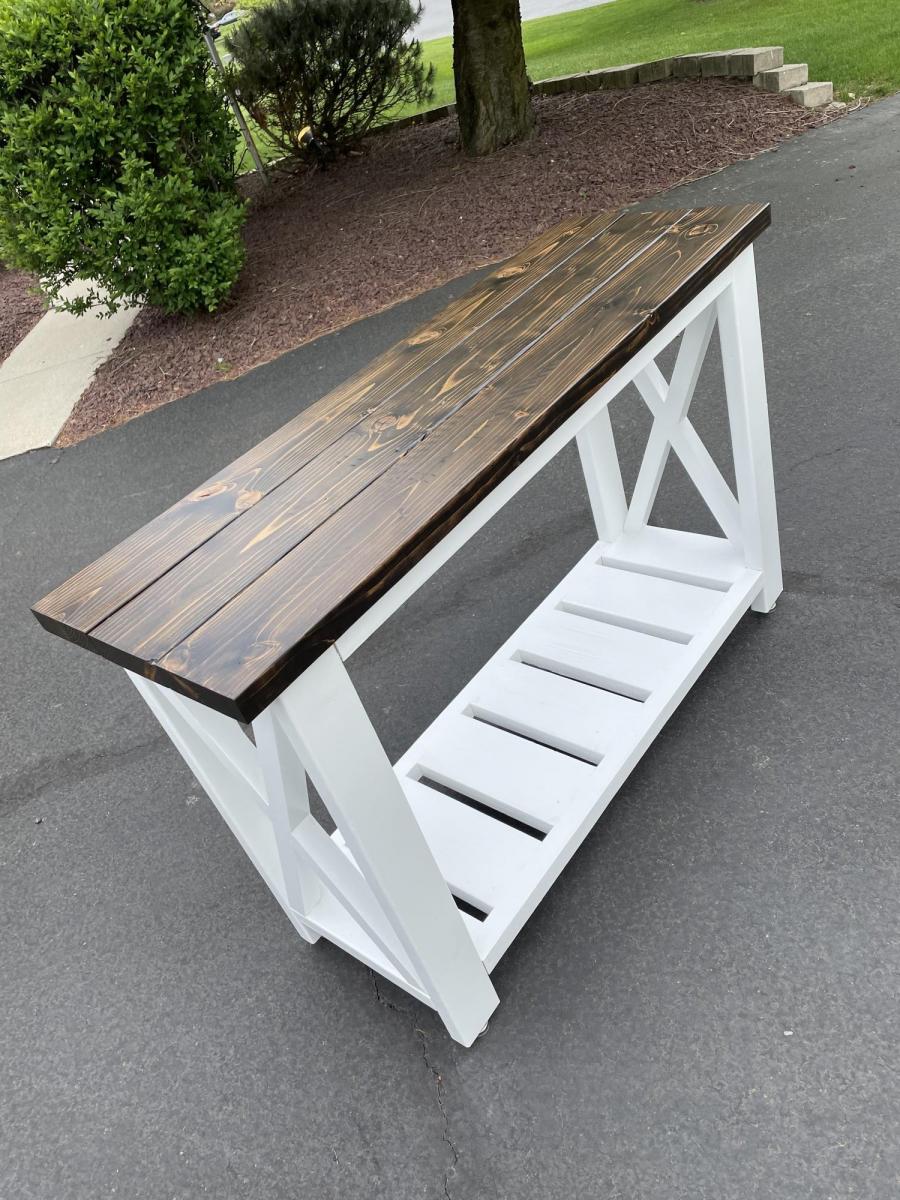
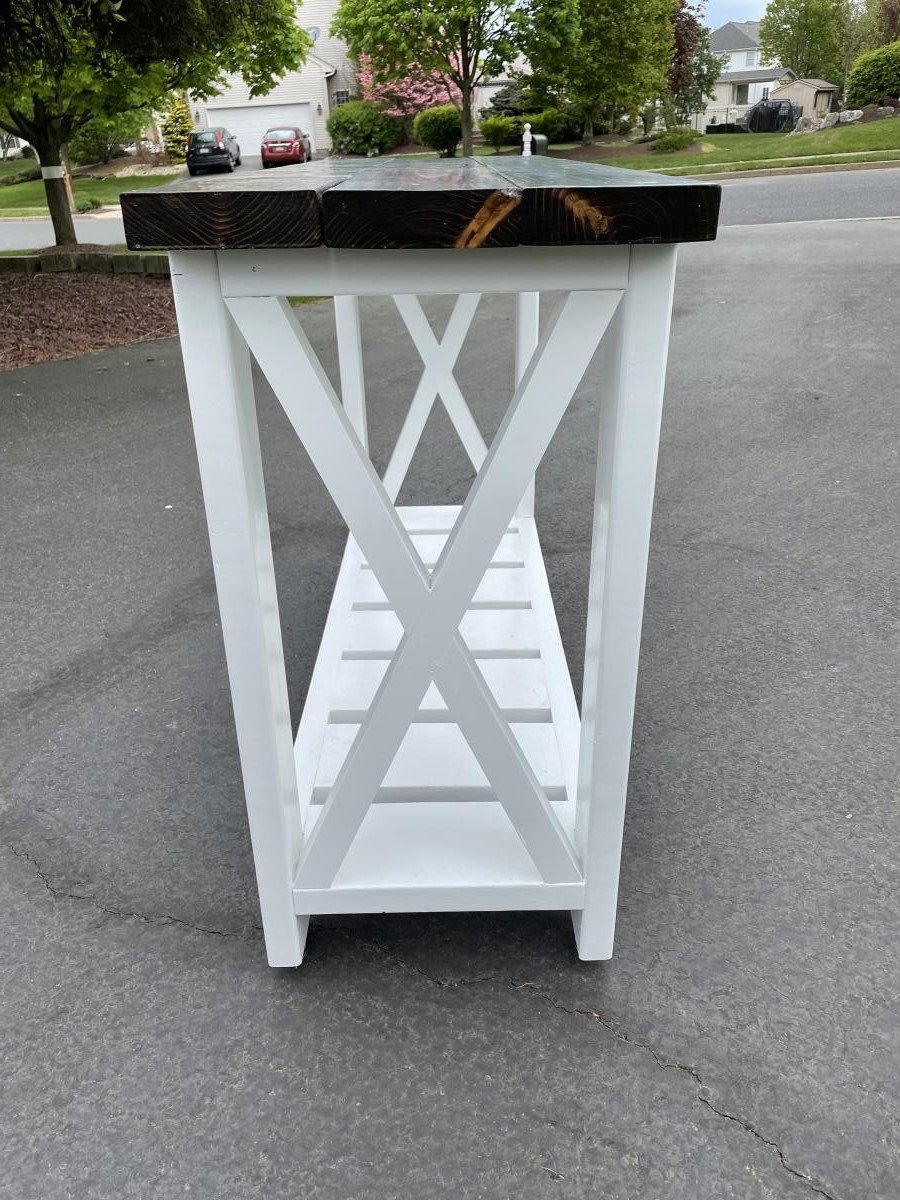
Farmhouse Table 1
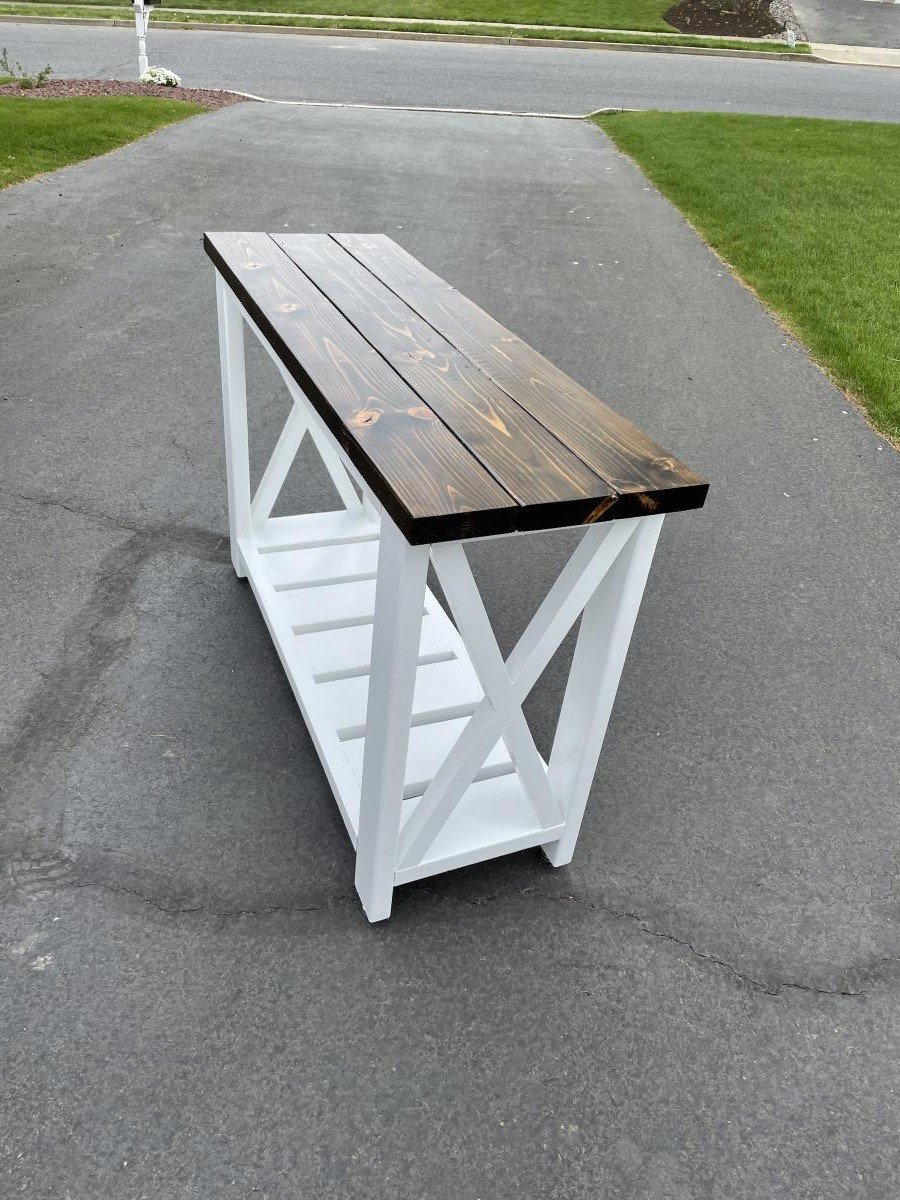
Used the plans here to make the table. Modified the dimensions slightly to fit my space by re-drawing the plans in AutoCAD 3D. Added stainless steel adjustable feet to the legs for leveling. Wanted to keep the wood up off the ground since this table sits on my back patio. Amazon link for feet: https://www.amazon.com/gp/product/B08VRPCDNL/ref=ppx_yo_dt_b_asin_title…
Built from Plan(s)
Estimated Cost
$220.00
Estimated Time Investment
Weekend Project (10-20 Hours)
Finish Used
Minwax Espresso Stain on top
Minwax Satin Polyurethane on top
Sherwin Williams Exterior Latex Paint - White on base
Minwax Satin Polyurethane on top
Sherwin Williams Exterior Latex Paint - White on base
Recommended Skill Level
Beginner
Comments
Custom Dog Bath
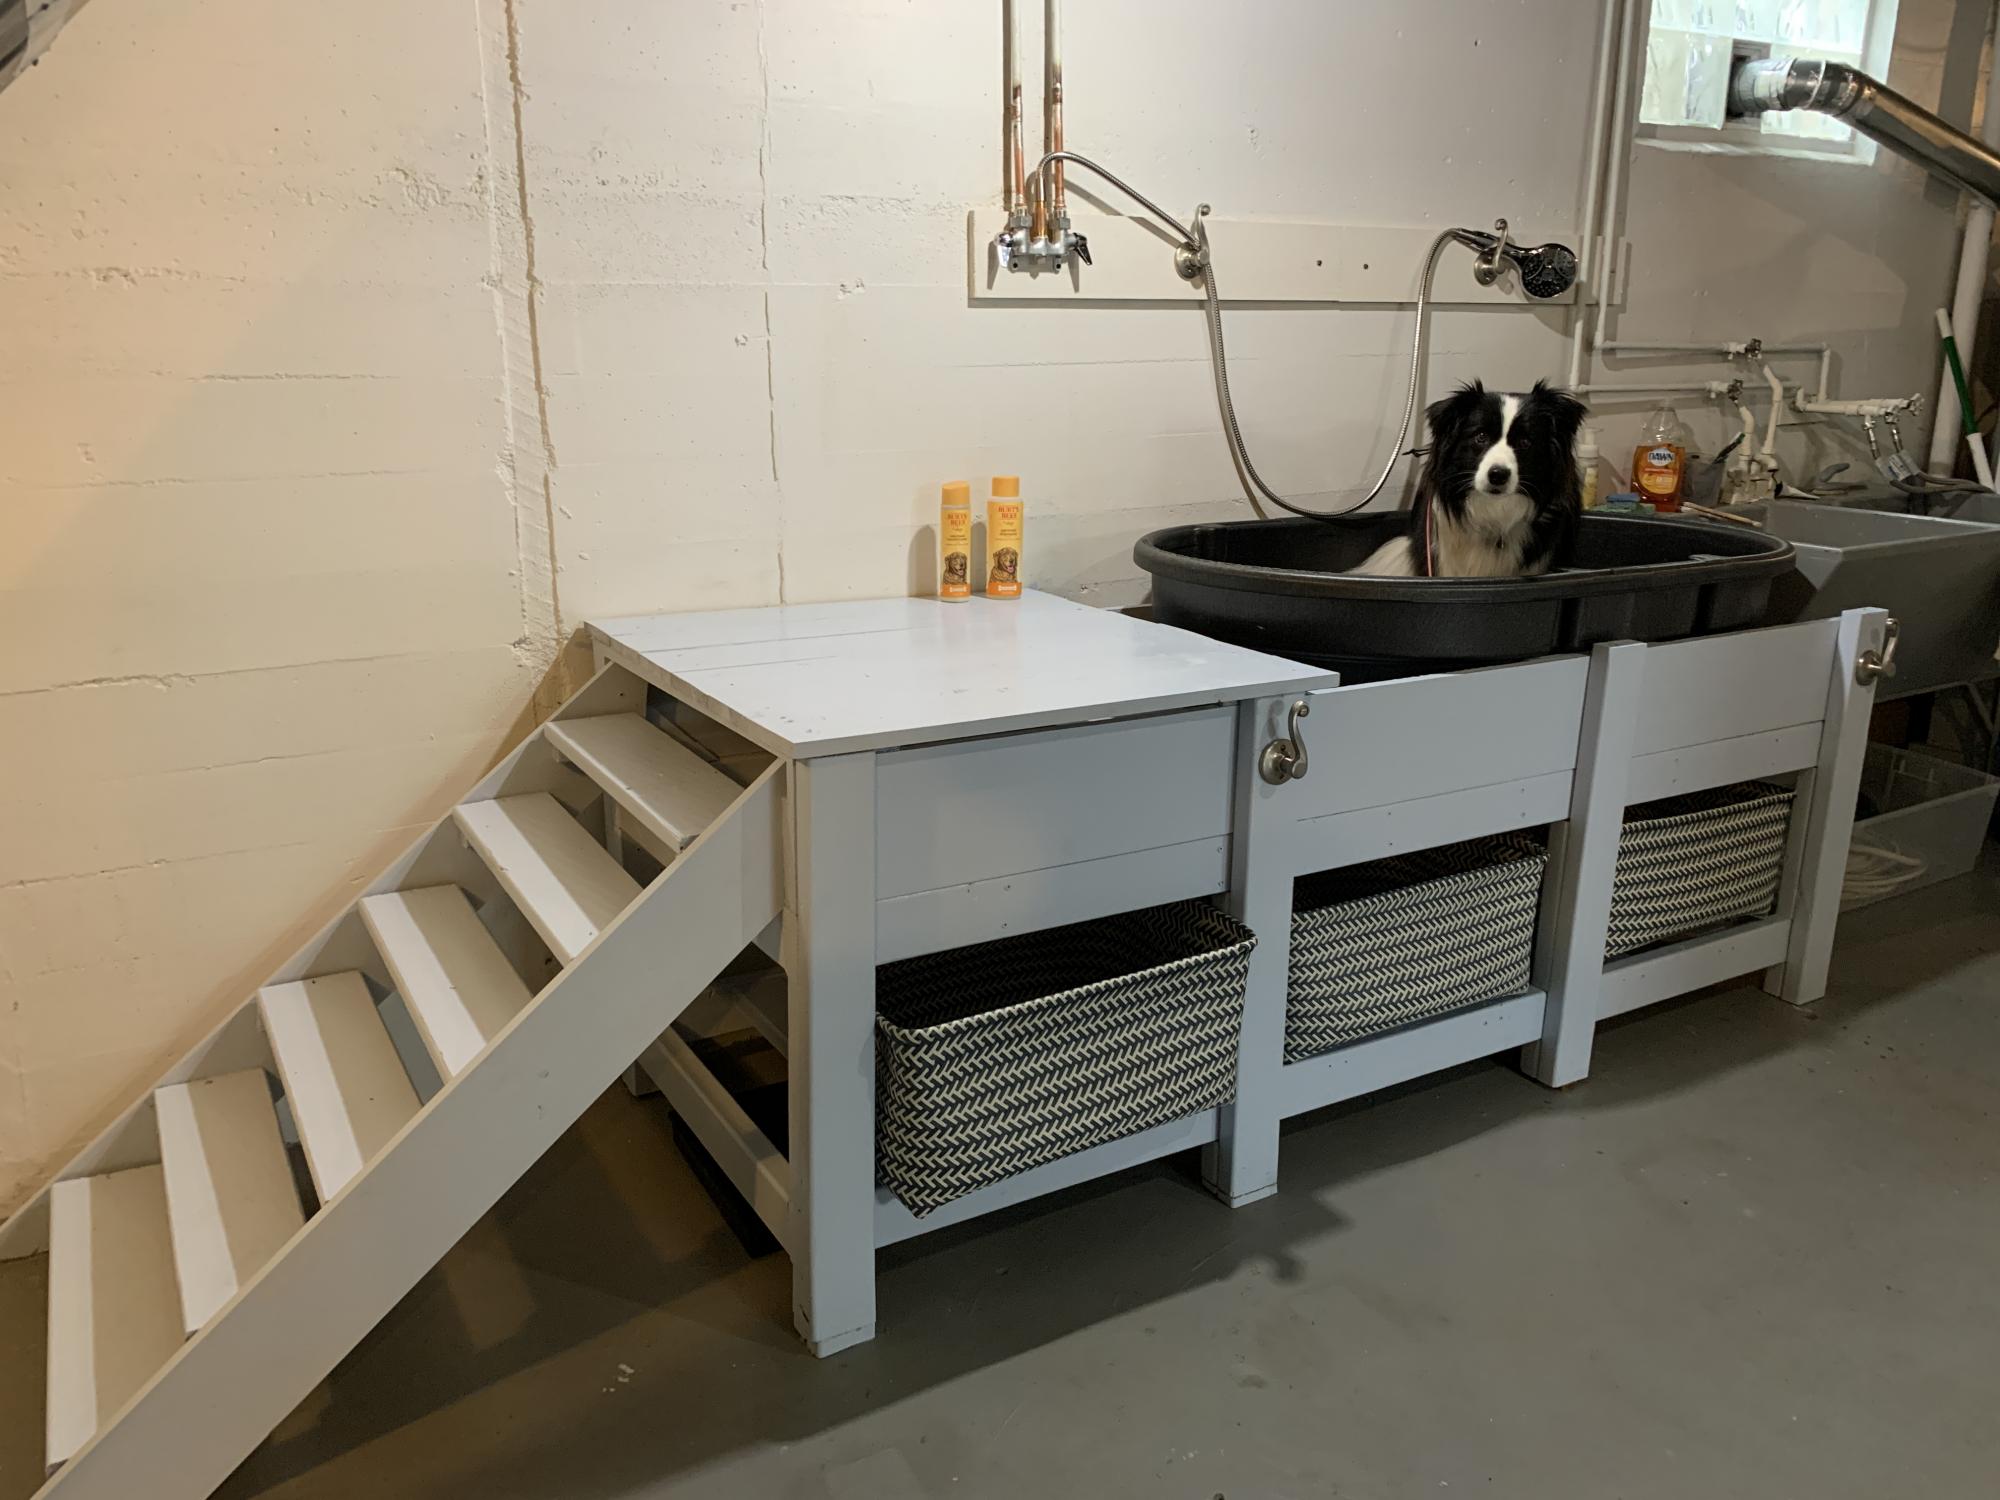
Tego needed a raised dog bath. No, I needed a raised dog bath. Specifically, my knees needed a raised dog bath for Tego. So, after looking at Pinterest and Ana's plans, I decided what I really wanted to do was customize something to fit my needs (and knees) and build it myself. Overly ambitious for a first-time woodworking project, but hey, raise the bar.
I started by reading and rereading Ana's beginner's woodworking guide (very informative). I also learned so many other things along the way. There's a reason, besides looks, you need flat boards (they need to screw together tightly). Unfinished basement floors are so not level (especially near the walls). Screw lengths matter (need shorter ones for thinner boards). The big-box store doesn't make precise cuts (but they can make a lot). Planning for the finishes will save you time (know your basket sizes). Just to name a few.
It's going in an unfinished basement, so I wasn't going to tile and add glass doors. I wanted to keep it relatively simple, basic.
The stairs were the hardest to measure and build (math matters) - and I might re-do. I made the steps smaller, dog-sized, but she finds them awkward. I'd stick with typical riser heights, but it depends on the size of your dog.
Plumbing to link the tub drain to the utility sink drain was the most expensive. Probably I could have done it myself, but I decided not to learn both plumbing and woodworking for one project.
Overall, I'm pleased with the result - and Tego is learning to love it.
Built from Plan(s)
Estimated Cost
$250 in supplies (plus plumbing)
Estimated Time Investment
Week Long Project (20 Hours or More)
Finish Used
Exterior paint in semi gloss
Recommended Skill Level
Beginner
Comments
Thu, 07/22/2021 - 12:38
You've created such an amazing dog wash!
Love it, you and Tego are AMAZING! Thank you for sharing your custom build:)
Wheelbarrow
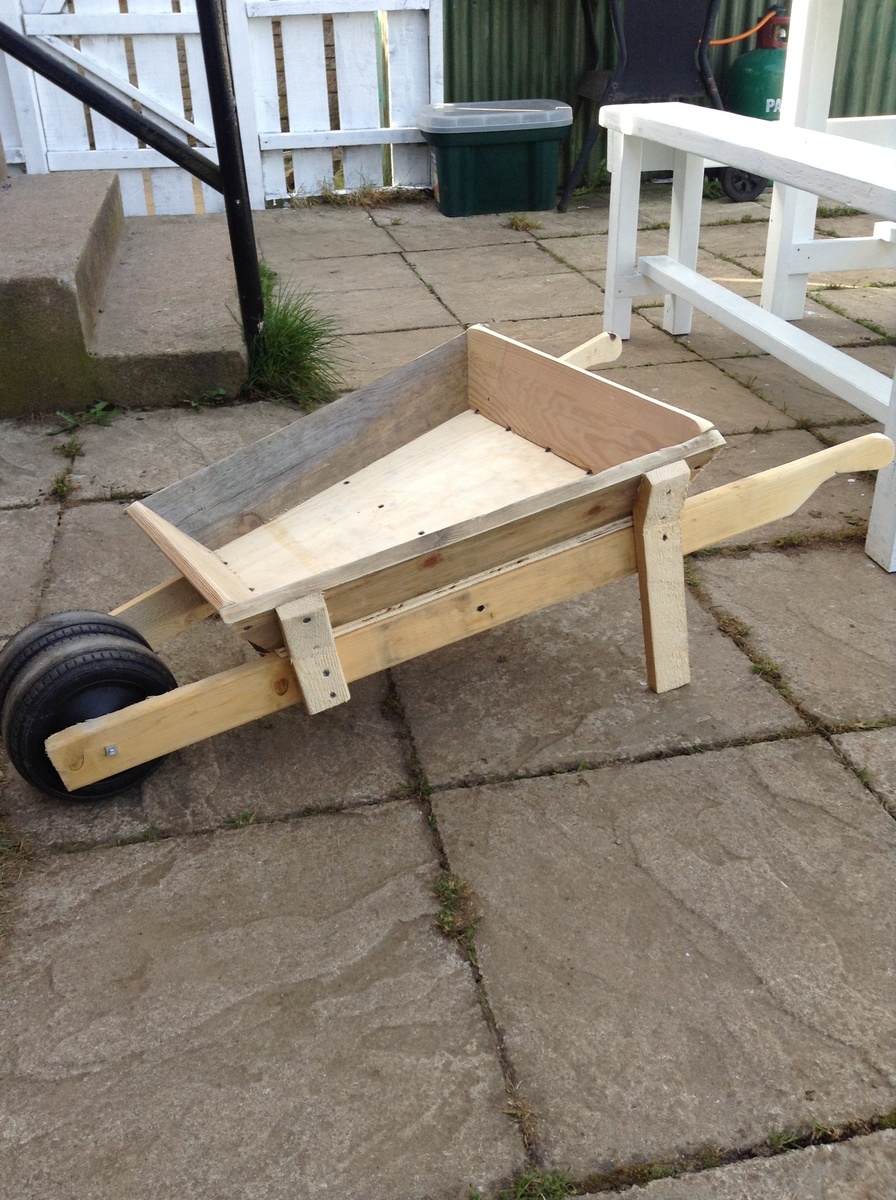
My neighbour Bryan challenged me to make it. It was indeed a challenge as there is no strait bit to a wheelbarrow and I had no plans so I kind of made it up as I went along. From far the hardest thing I made so far.
Estimated Time Investment
Day Project (6-9 Hours)
Recommended Skill Level
Advanced
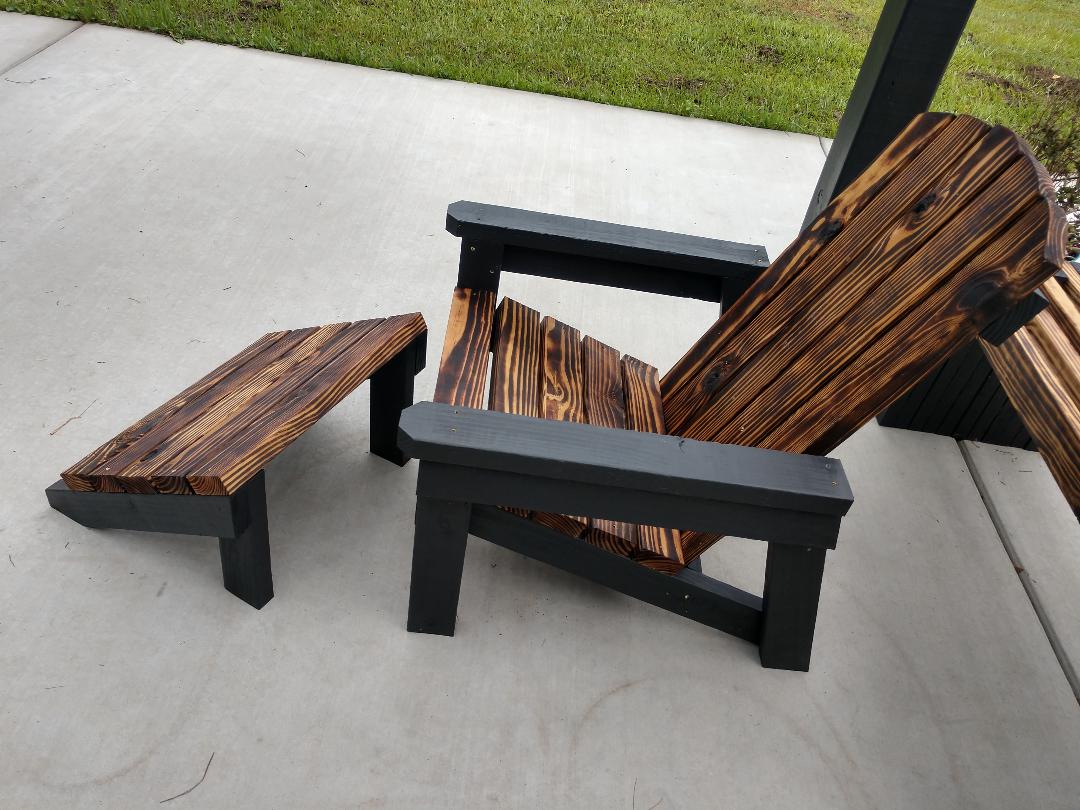
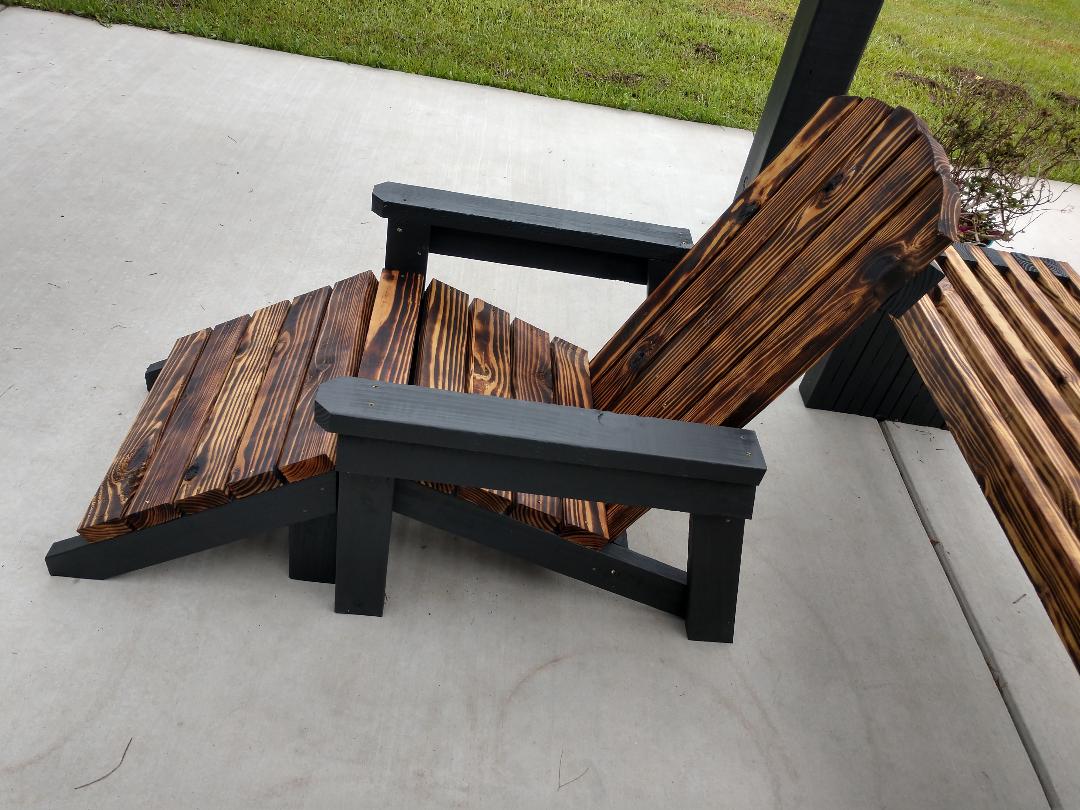
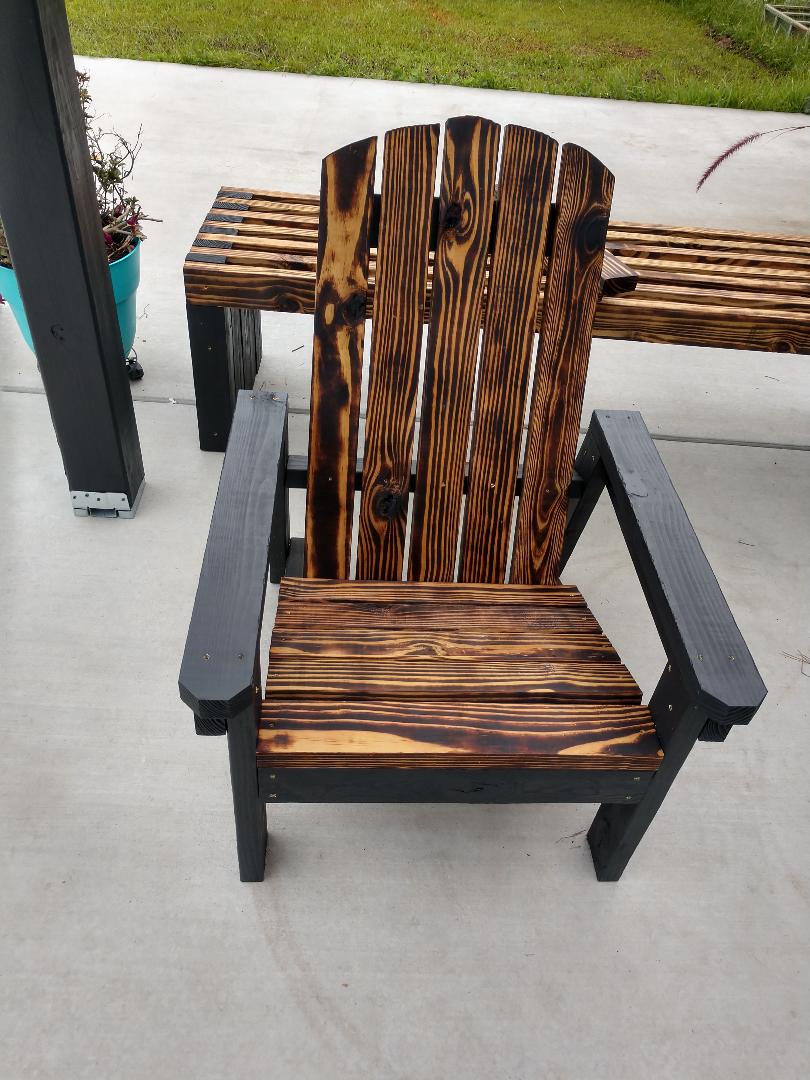
2x4 Adirondack Chair
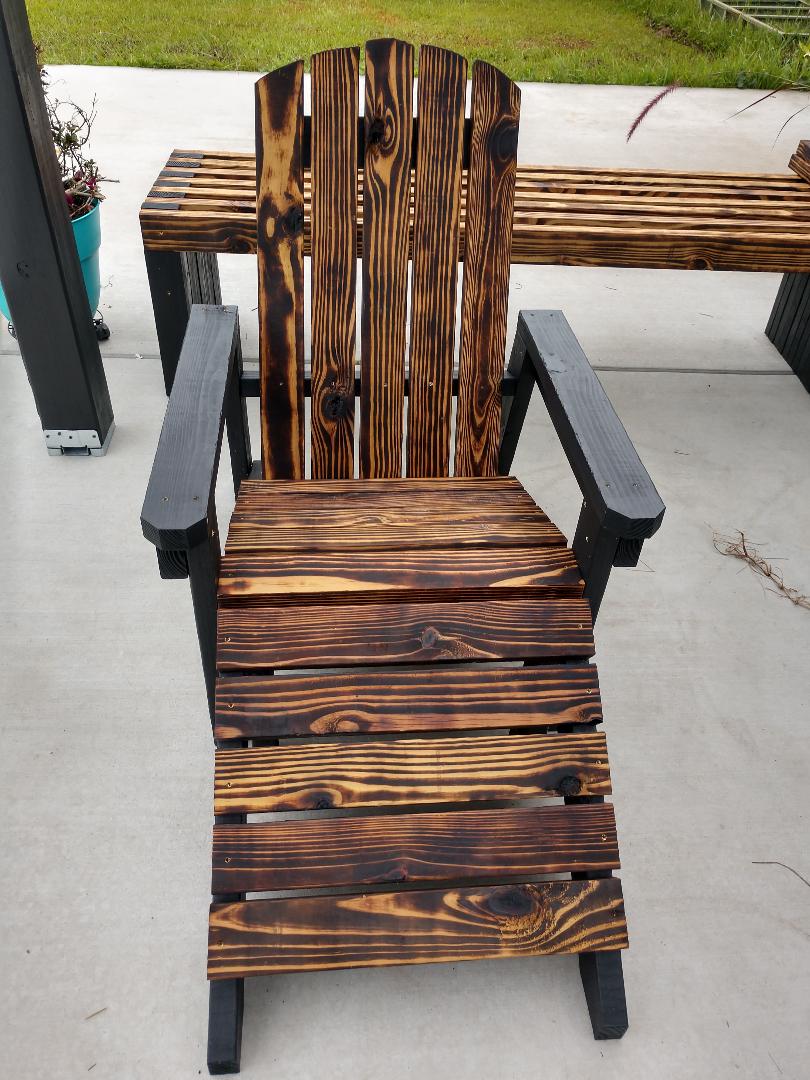
Very easy instructions. I love the way they turned out. I used all 2x4's that I had left over from another project. I burned the top pieces and painted all other pieces. Love your easy instructions. My first time making furniture.
Thanks
Yvette

Built from Plan(s)
Recommended Skill Level
Beginner
Awesome Bed
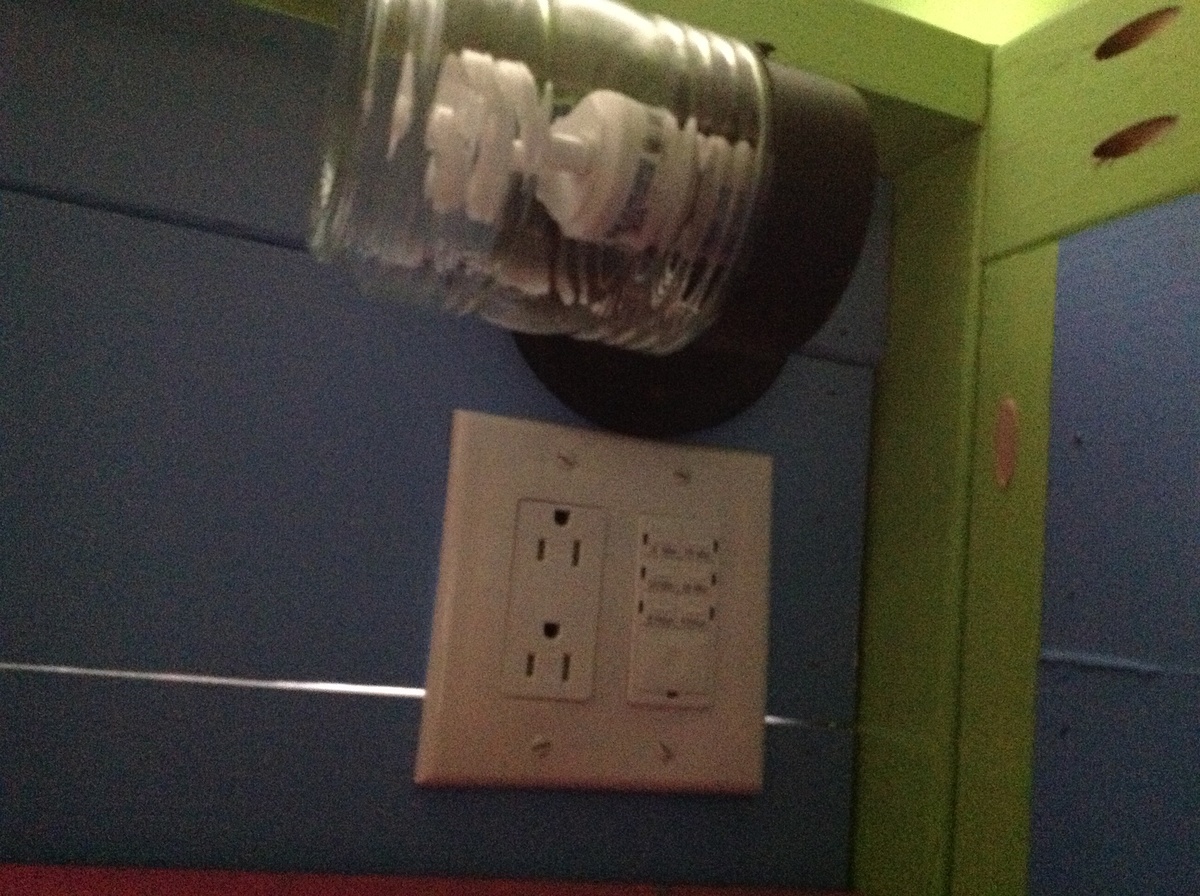
Thank you Ana and Jenny for this project. After many searches for the perfect bunk bed for our 4 and 2 year old daughters I was ready to spend more than $1500 in a store on something that was not nearly as cool as this. The plans were easy to follow and it took my dad and me about a week to make the bed. My girls love it and have spent the last two days in their room.
We made a few modifications to the design that I highlighted in the pictures. We wired the back of the bed with electricity to include some outlets, a light that is on a timer switch, and an outlet with a built in night light. We also added 2x2s to support the sides to make them stronger when the bed is apart. We move a lot (4 times in the last 5 years) and the design was great for taking apart and putting back together. The light on the timer is great for telling my oldest she can read books for 5 minutes and then go to sleep when the light goes out.
Thank you so much for these great plans!
Built from Plan(s)
Estimated Cost
$850
Estimated Time Investment
Week Long Project (20 Hours or More)
Finish Used
Behr paint. They have an app for ipad for choosing colors that is great.
Fiesta pink PPH-63
Antique White 1023
Tart apple 420B-4
Scotland isle 410D-5
Costa Rica blue 550B-4
Satin finish
Fiesta pink PPH-63
Antique White 1023
Tart apple 420B-4
Scotland isle 410D-5
Costa Rica blue 550B-4
Satin finish
Recommended Skill Level
Intermediate
Comments


Tue, 05/07/2013 - 23:39
...and you've got me beat! I
...and you've got me beat! I still haven't finished the sliding boxes that fit inside the storage boxes. I had better get on that.
Wed, 03/26/2014 - 13:57
Making the bed?
I love all of these fantasy bunk/loft beds but as I look at them i wonder how hard it is to take the sheets off, put on new ones & tuck in blankets etc. I love these beds but I have physical limitations because of chronic health problems & I am afraid that if I had a bed like this for my kids that I would have to hurt myself to strip or make the bed... Can someone who has one tell me how hard it is - or isn't???? Thank you... A newbie to Ana-white.com but it's now my new #1 favorite website!!
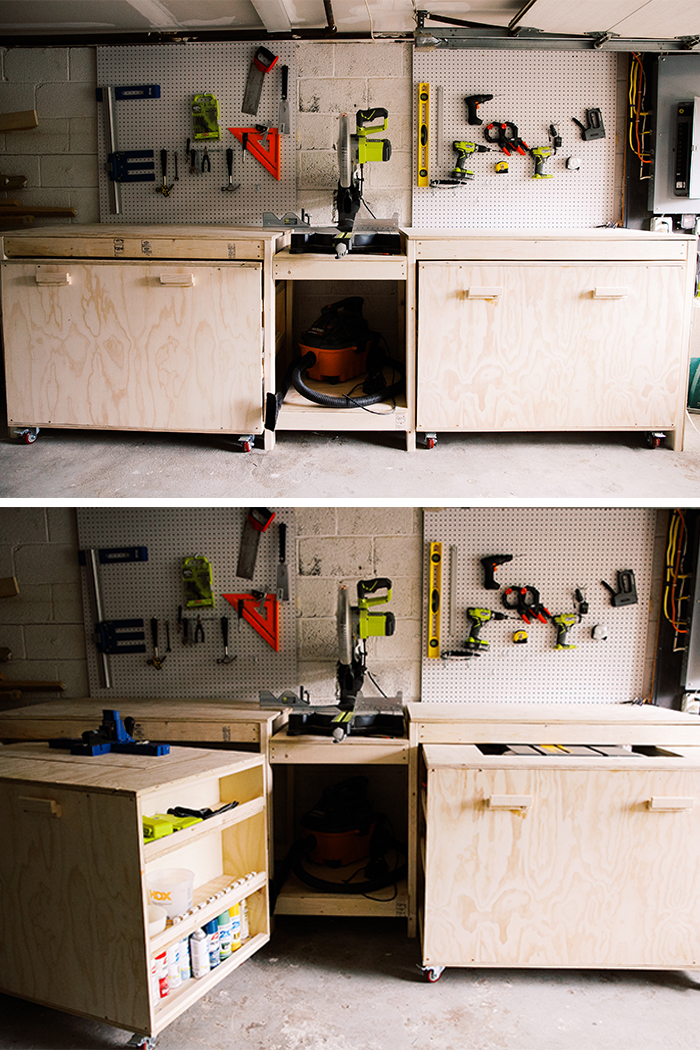
Ultimate tool bench with rolling carts
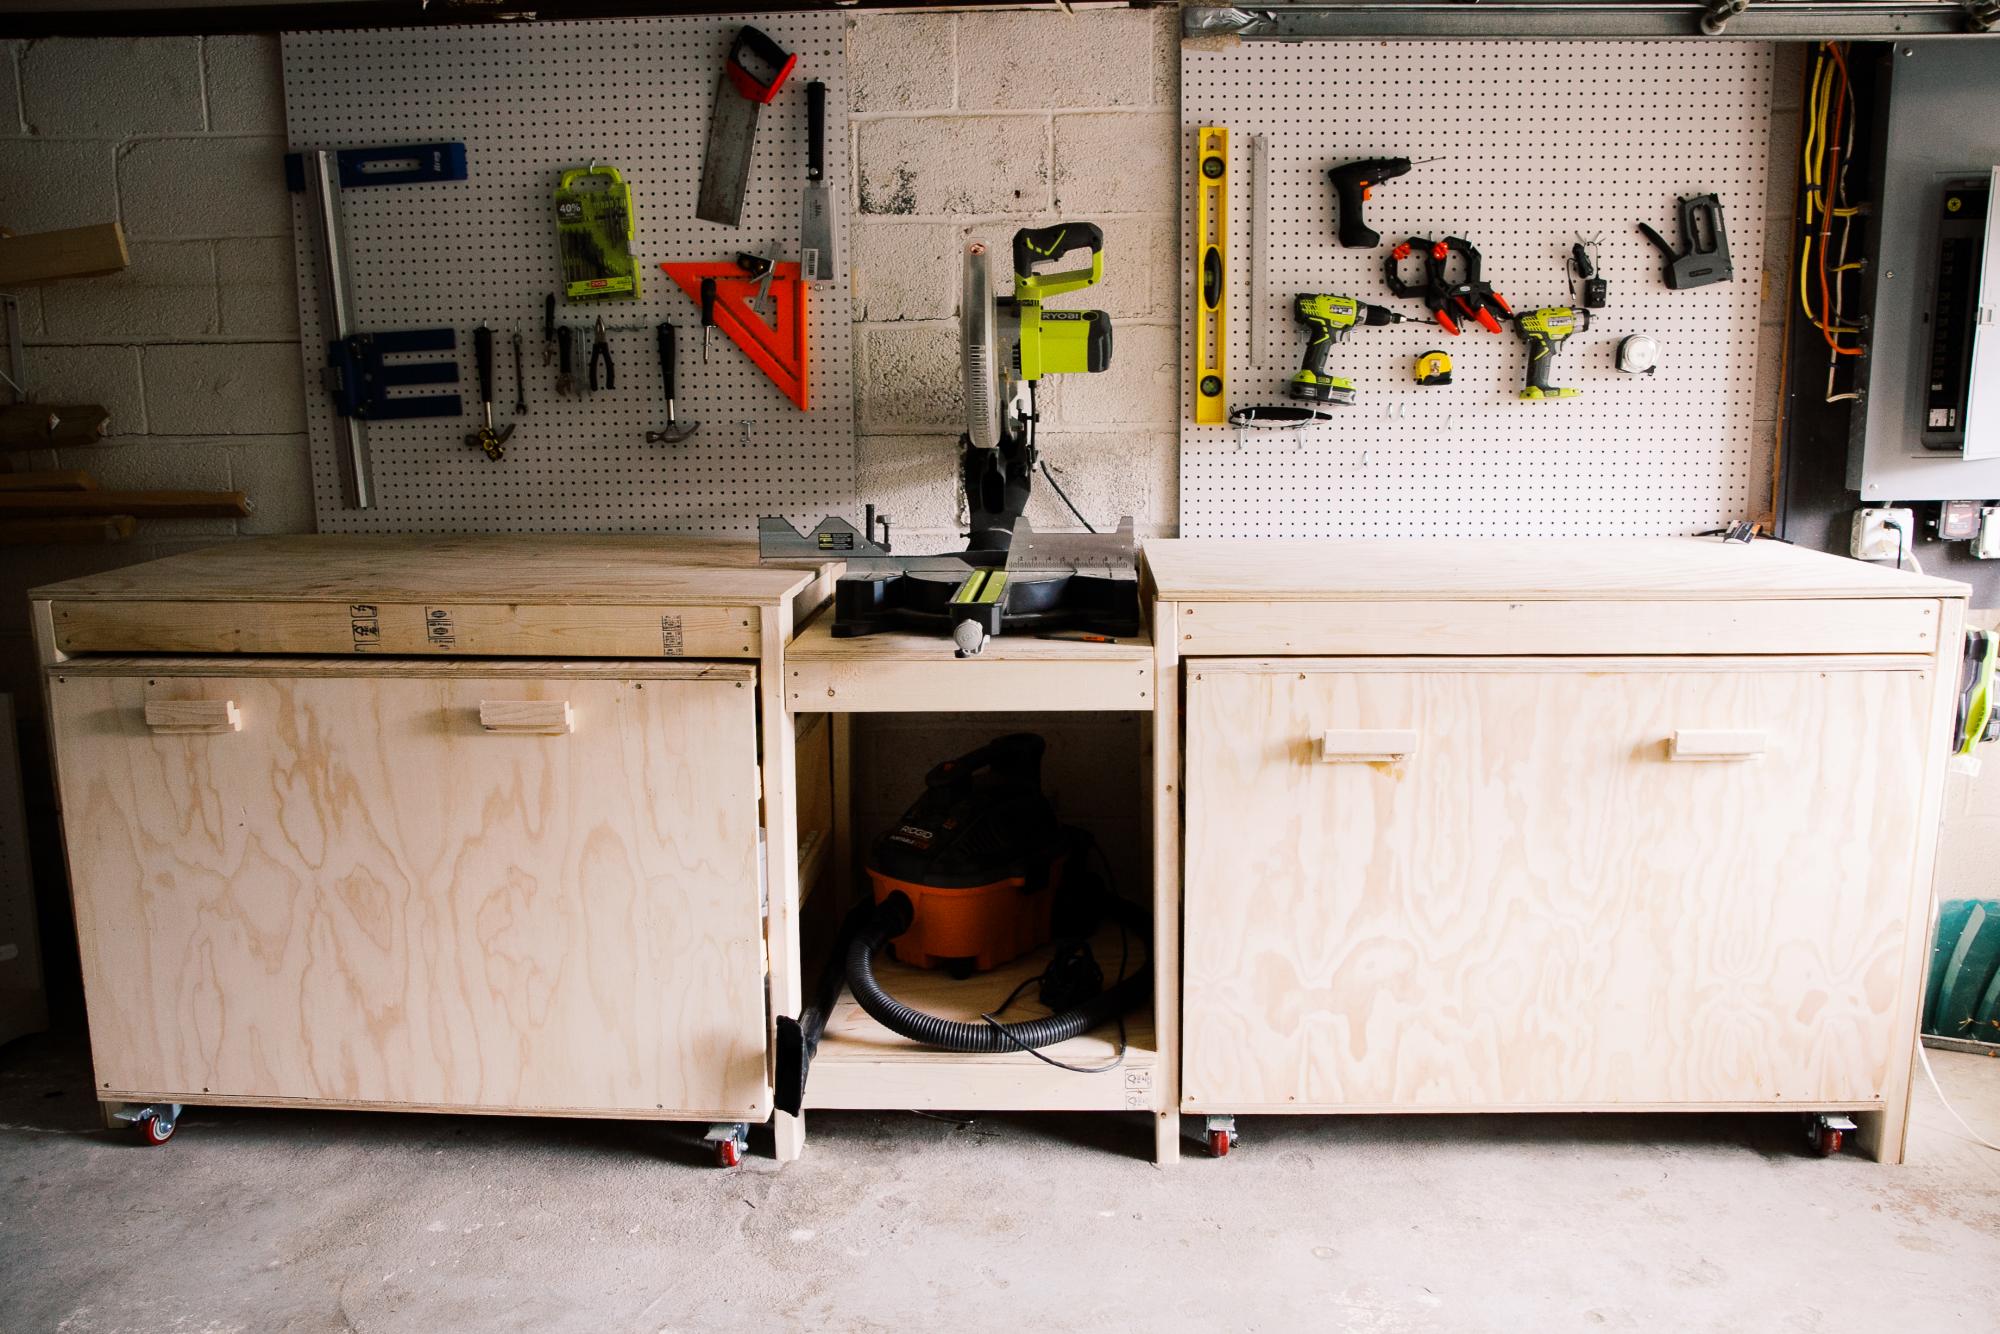
This plan is so perfect and I love the fact that it has a space for most of the tools, for a miter saw, table saw, and could be customized to your needs and tools that you have!
Built from Plan(s)
Comments
Thu, 08/26/2021 - 20:44
Looks fantastic!
Thanks for sharing, I can see a lot of awesome builds happening there!
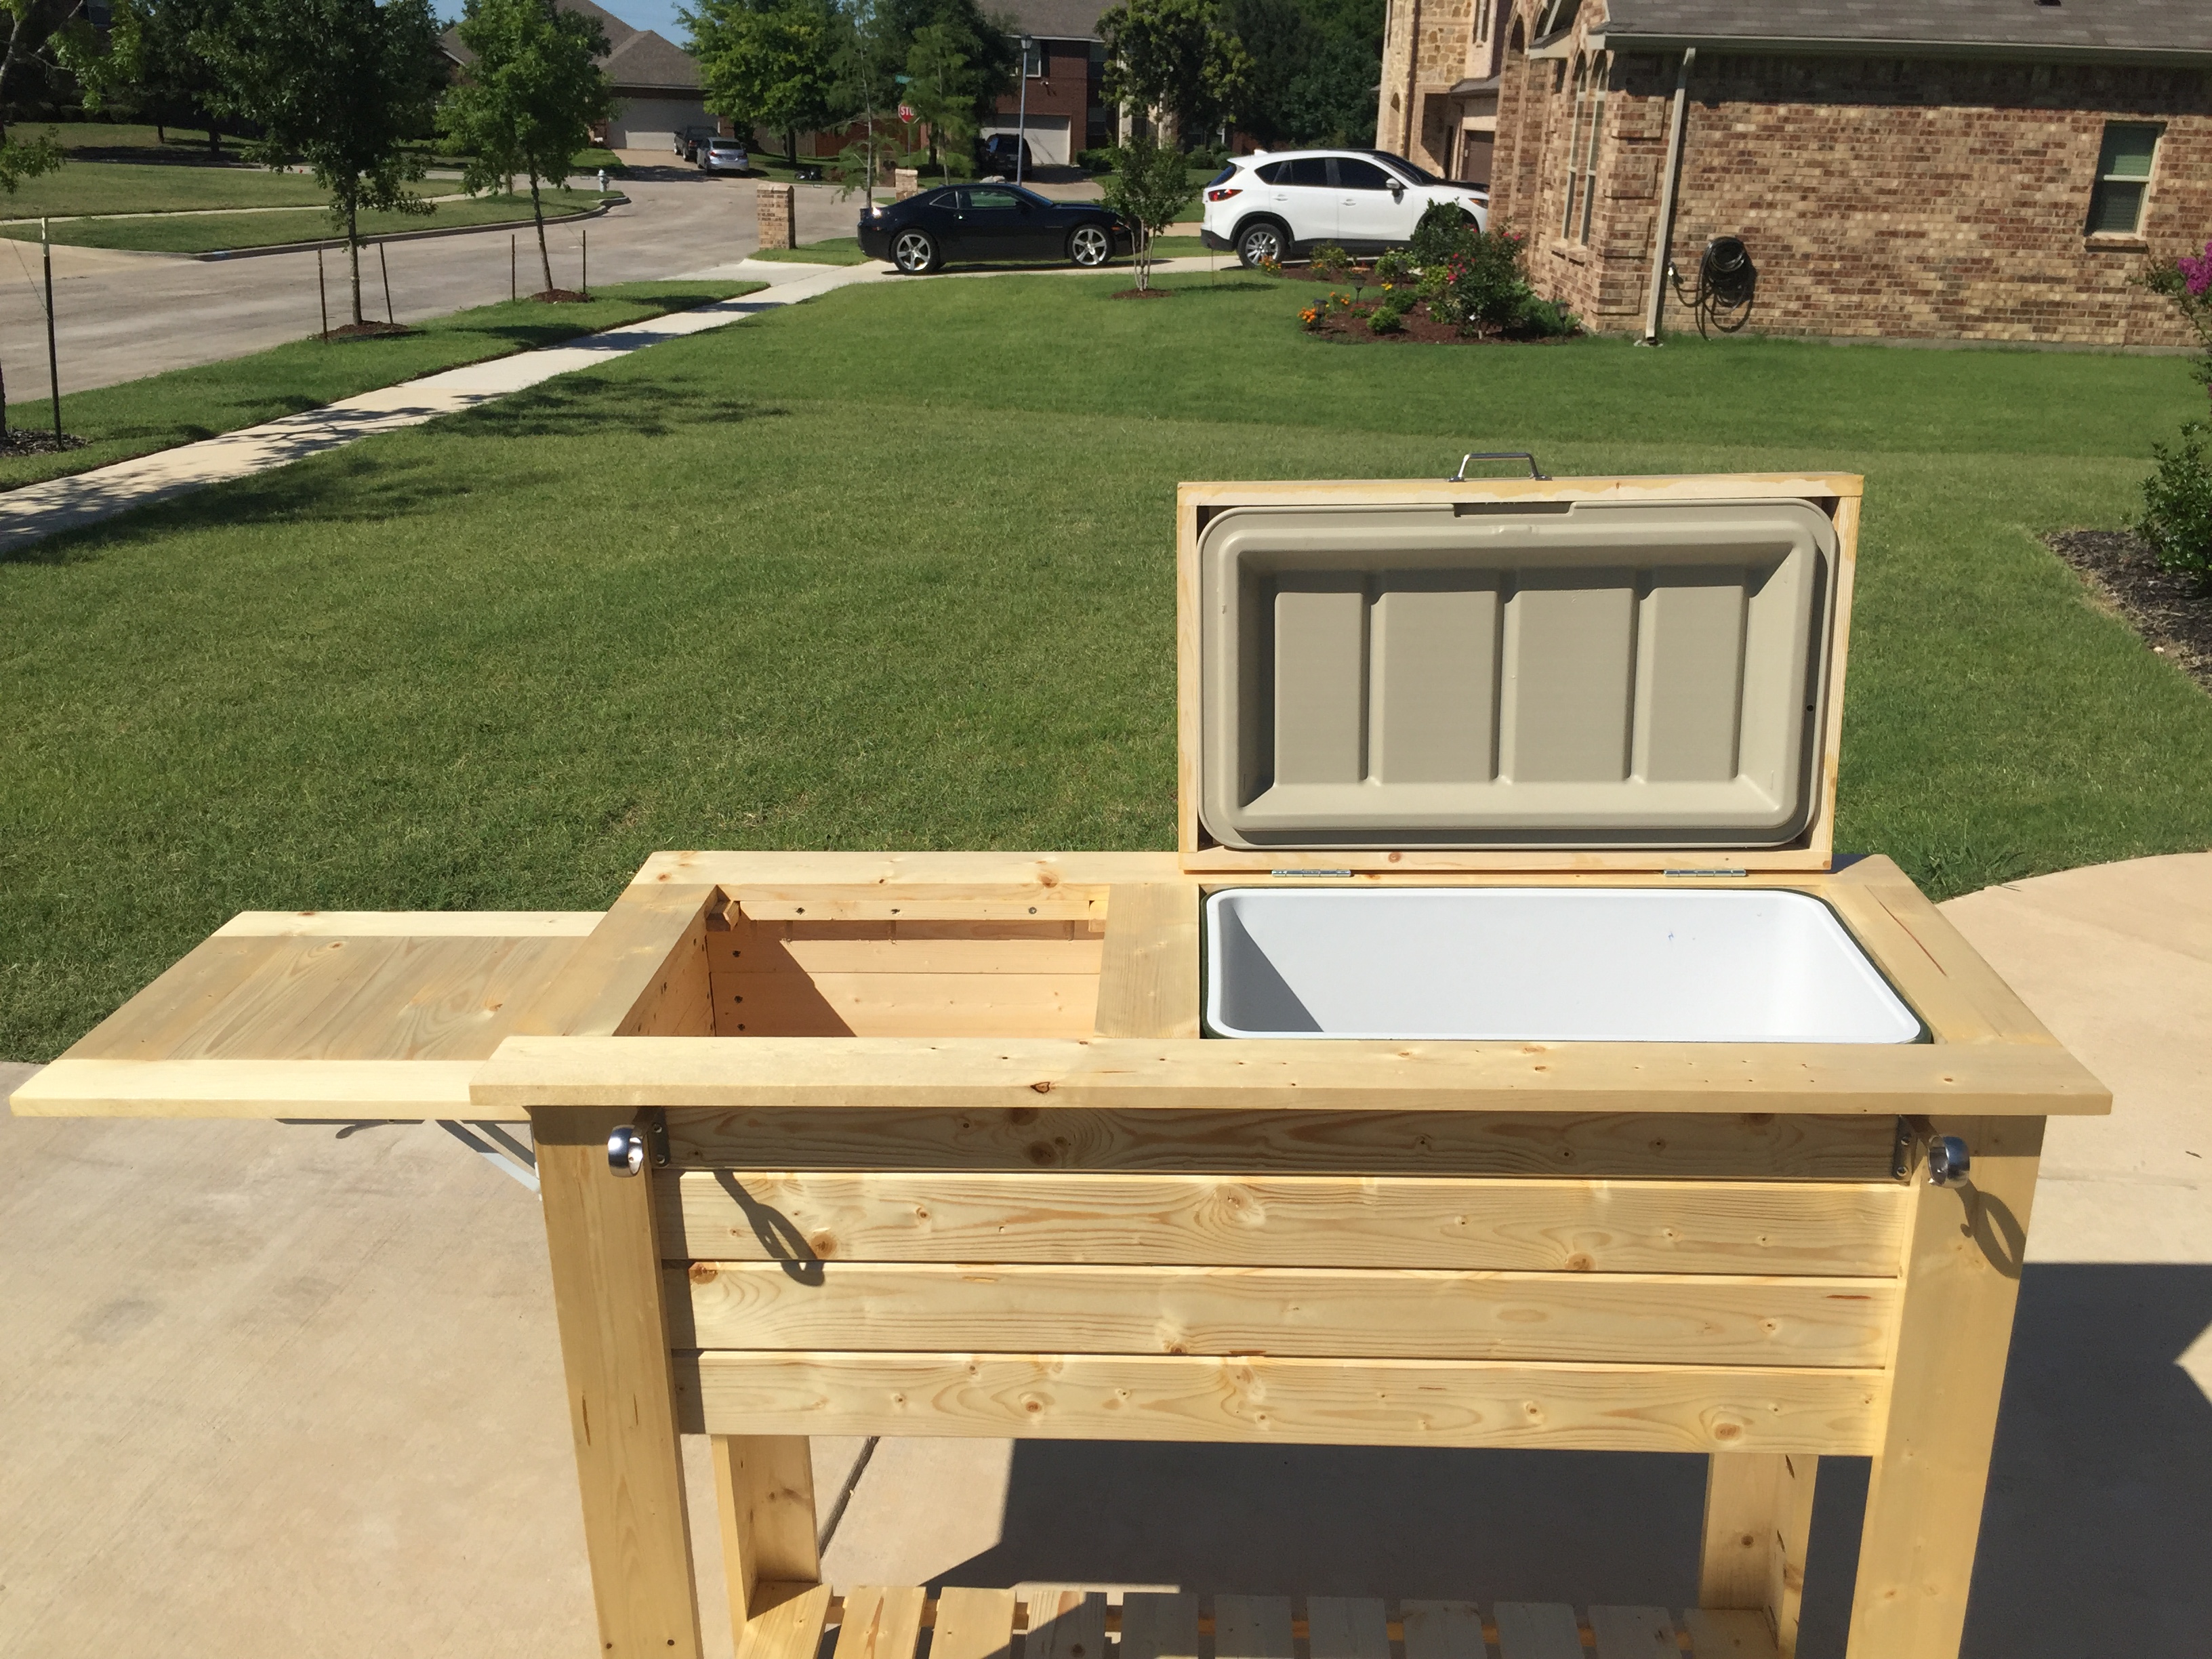
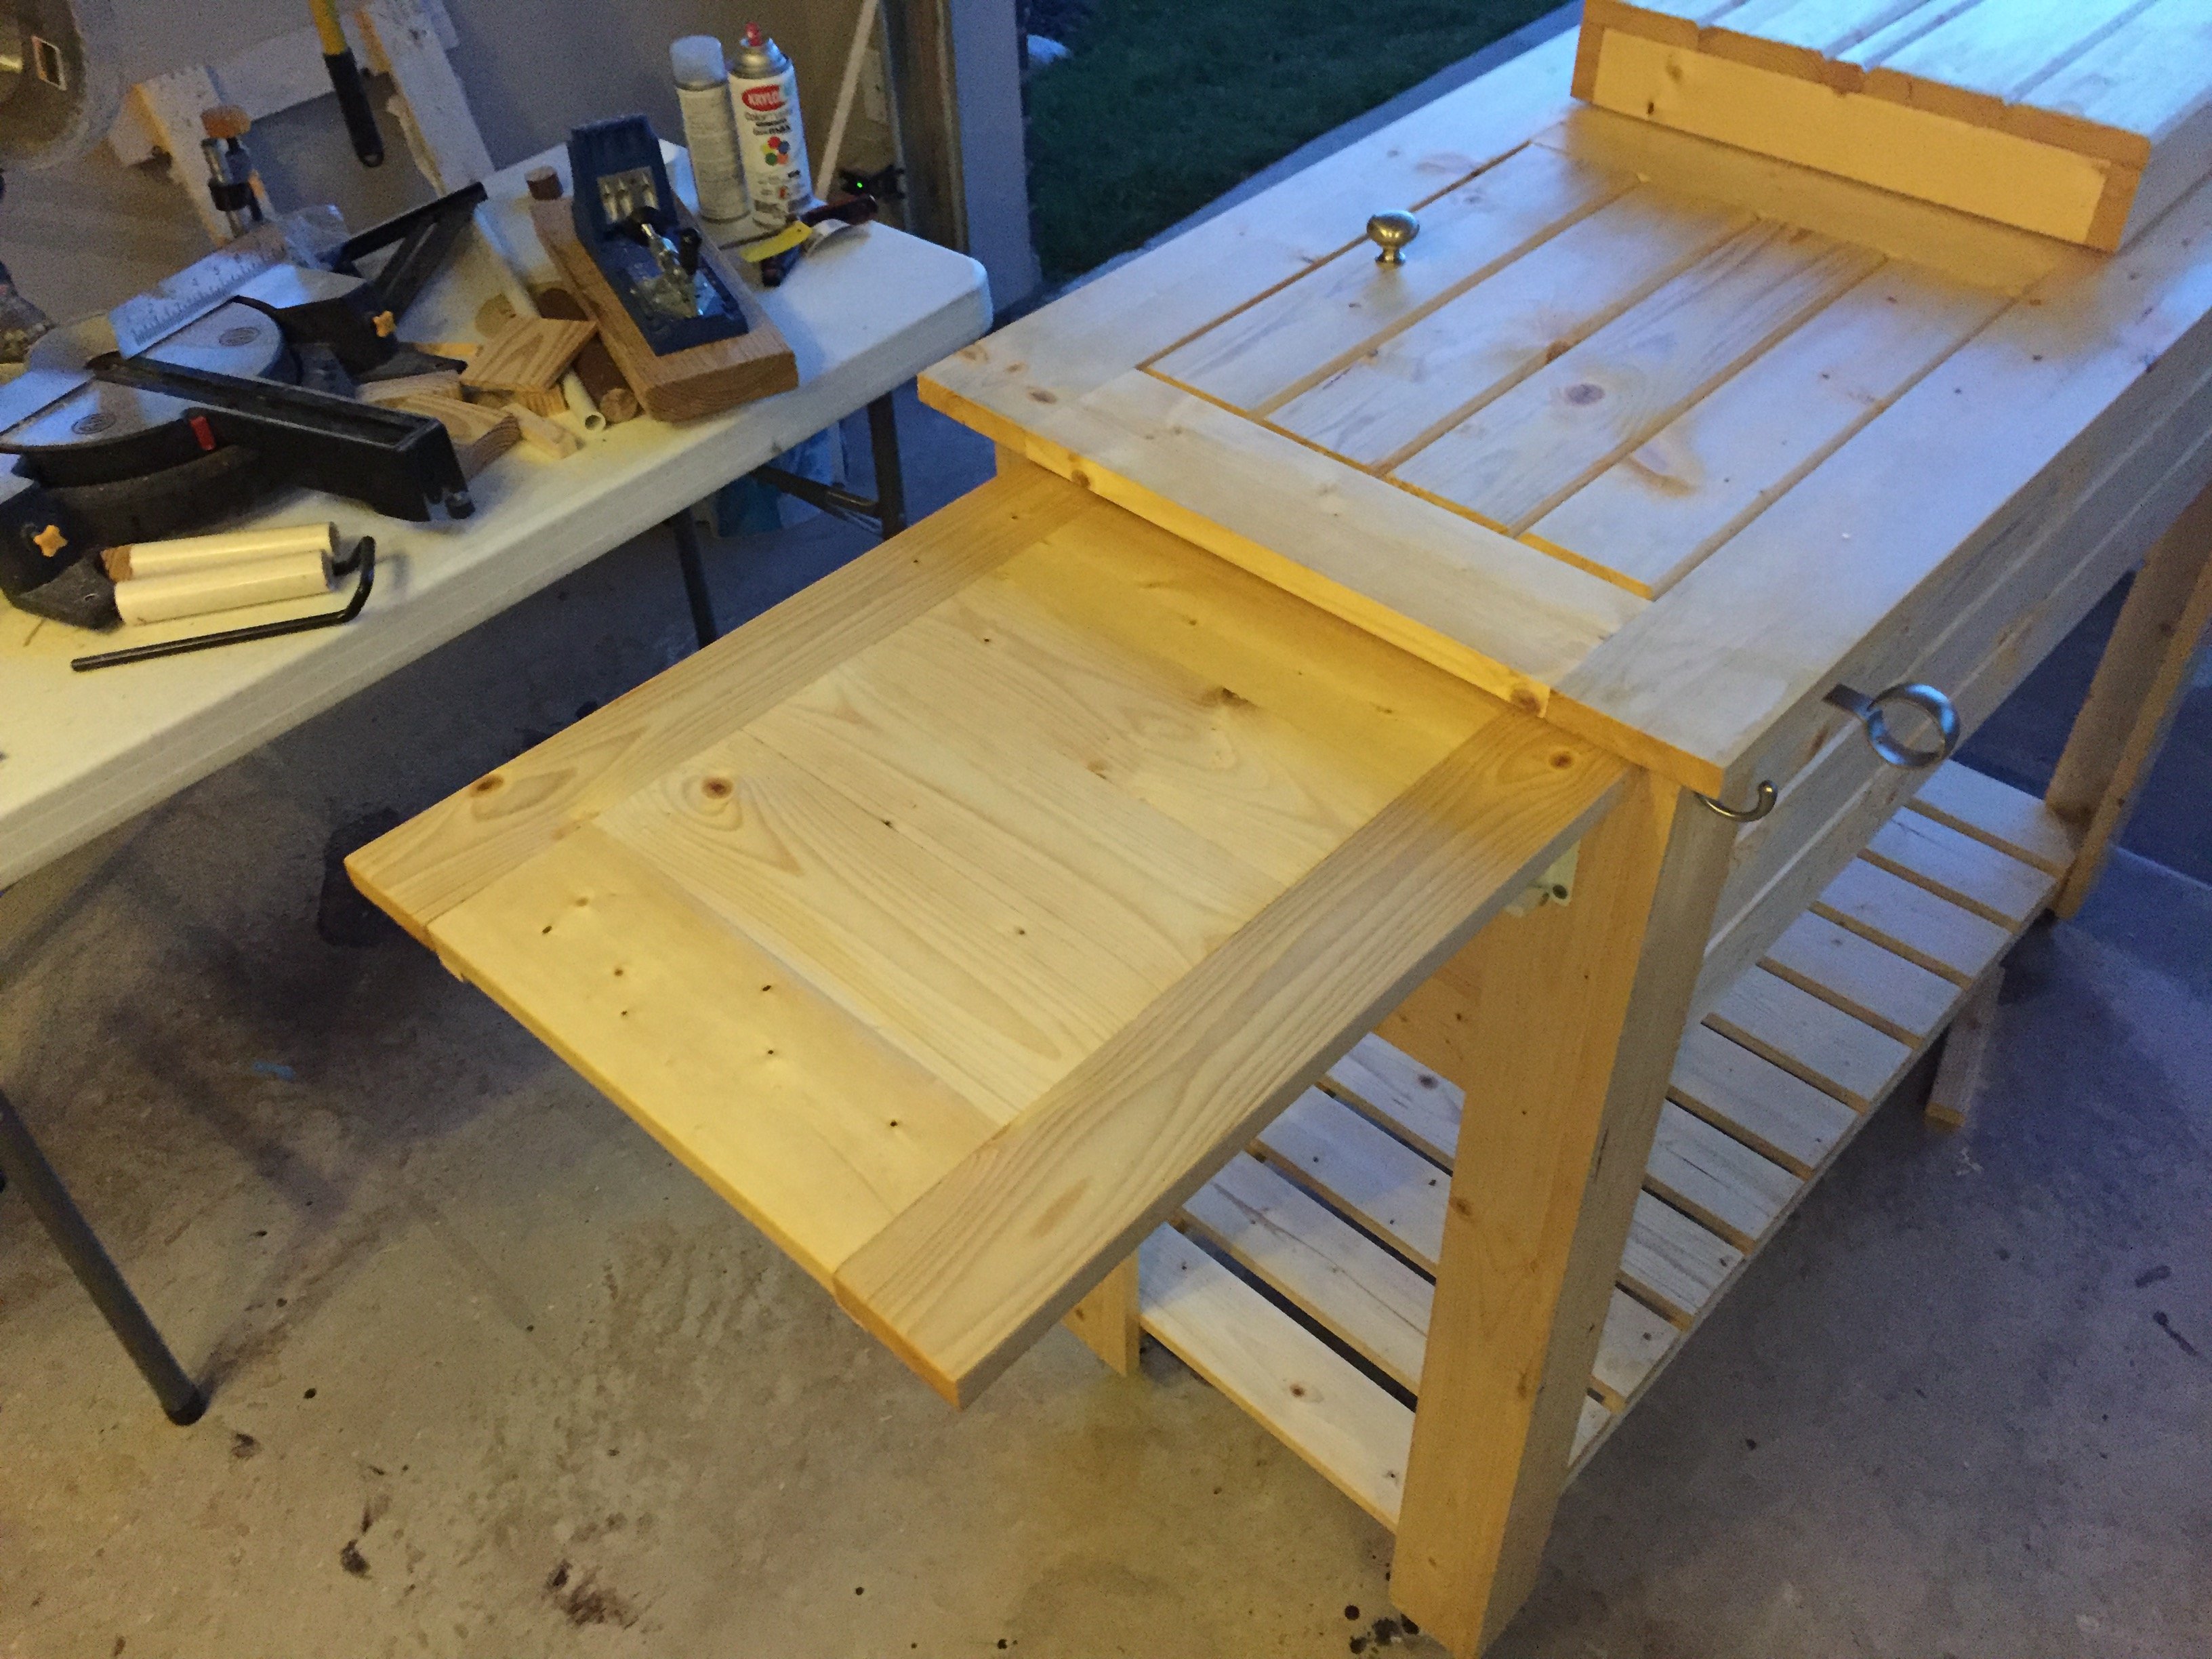
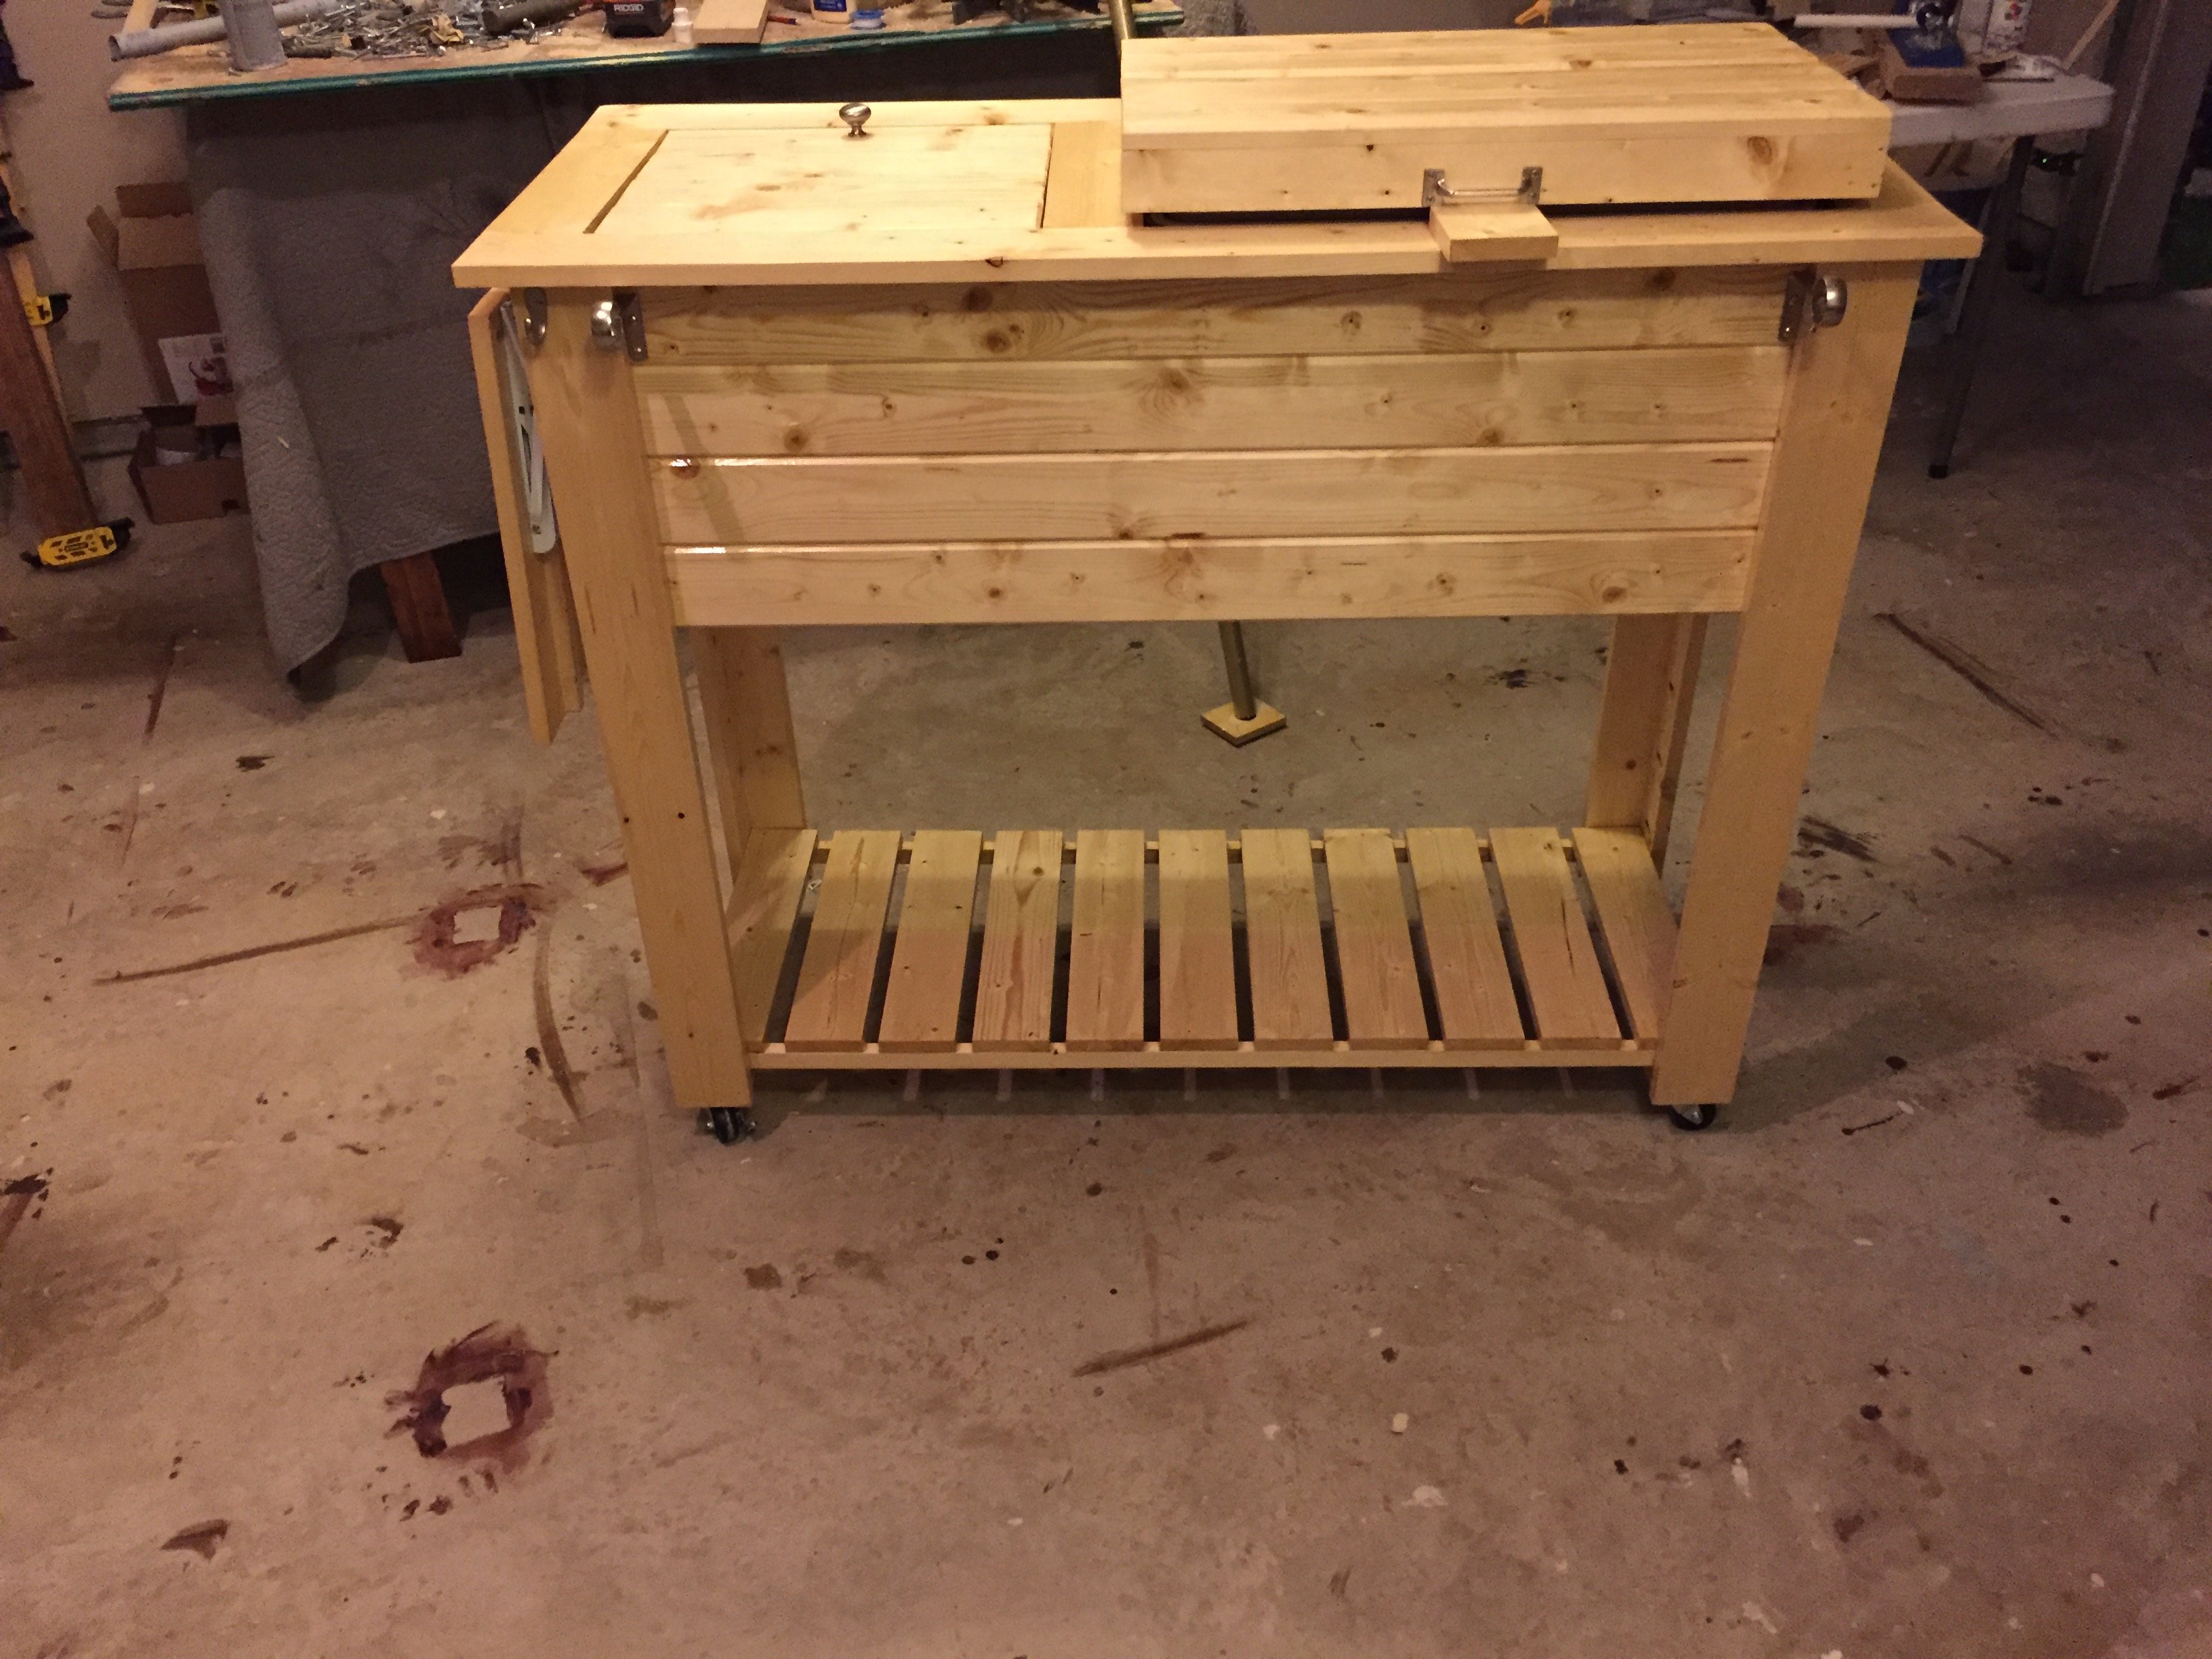
Patio cooler/Grill cart!
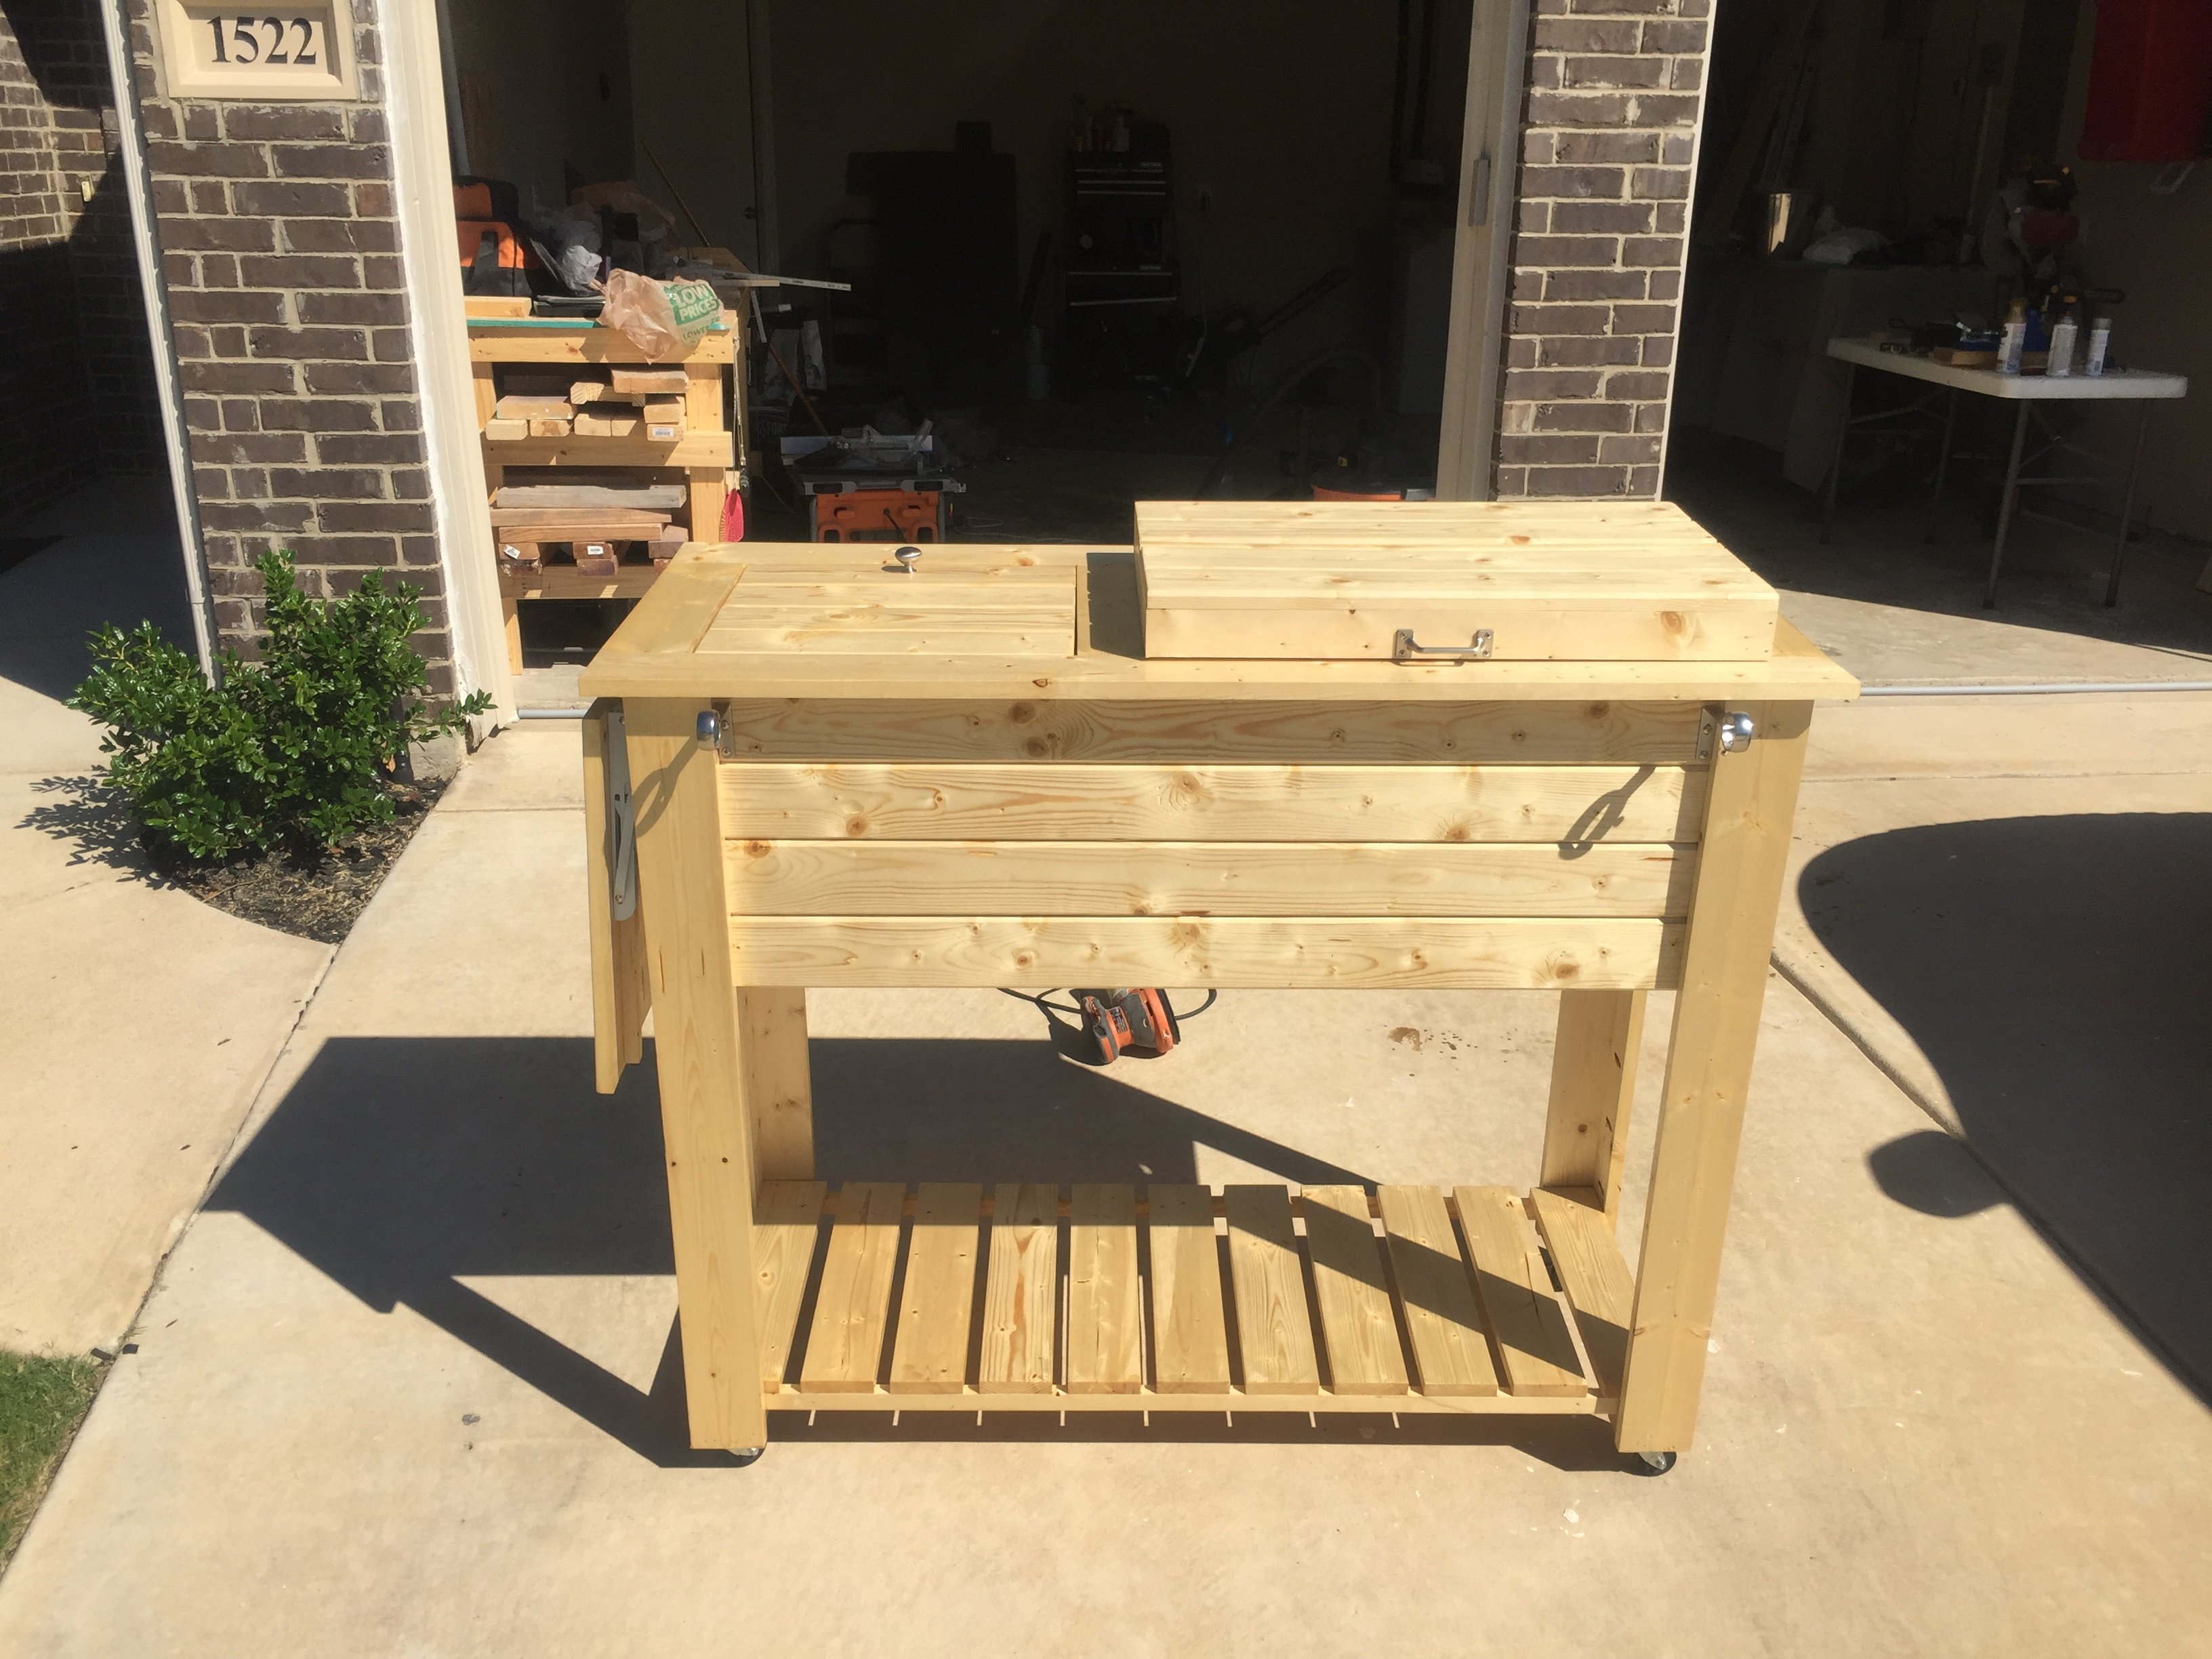
Great project! I'm new to wood working and have been looking for simple but challenging builds. Needless to say this fit the bill... This grill cart was a great starter build and ultimately became a Father's Day gift! My Pops loved it!
I did add a couple of custom pieces: a foldable table top extension and towel bar... things Dad will undoubtedly need as he's an outdoorsman who loves to BBQ!
Thanks for the idea/design plans!

Estimated Cost
$150
Estimated Time Investment
Weekend Project (10-20 Hours)
Finish Used
Semi-gloss spar urethane (3 coats)
Recommended Skill Level
Beginner
Comments
Patio Table w/Built in Beer/Wine Cooler

After seeing the patio table with beer/wine cooler, I wanted to build this for my brother and wife who recently bought a house. I asked them if they were interested and of course they said yes. I modified the original plans by adding a 2x4 on each side of the cooler to make the table wider. I also made the legs out of 4x4 vs the 2x4s that were originally called for. I used redwood and then stained it and used a varnish for the final coating. I probably wouldn't use the varnish again for an outdoor table, because it looks like it should be an indoor table vs outdoor. Overall, I'm pleased with the results and the best part about it, I get to enjoy it every time I go over for a BBQ.


Estimated Cost
$225-250
Estimated Time Investment
Week Long Project (20 Hours or More)
Finish Used
Olympic Redwood Naturaltone Toner Exterior Stain
Cabot Spar Varnish Semi-Gloss
Cabot Spar Varnish Semi-Gloss
Recommended Skill Level
Beginner
Comments
Wed, 07/03/2013 - 13:04
Measurements
Awesome table, do you happen to have the measurements you used. I'd like to make the same table but I need the lumber yard to make the cuts.
Farmhouse bed
Just love your site so many great ideas
Built from Plan(s)
Estimated Cost
$300
Estimated Time Investment
Week Long Project (20 Hours or More)
Finish Used
None
Recommended Skill Level
Intermediate
Comments
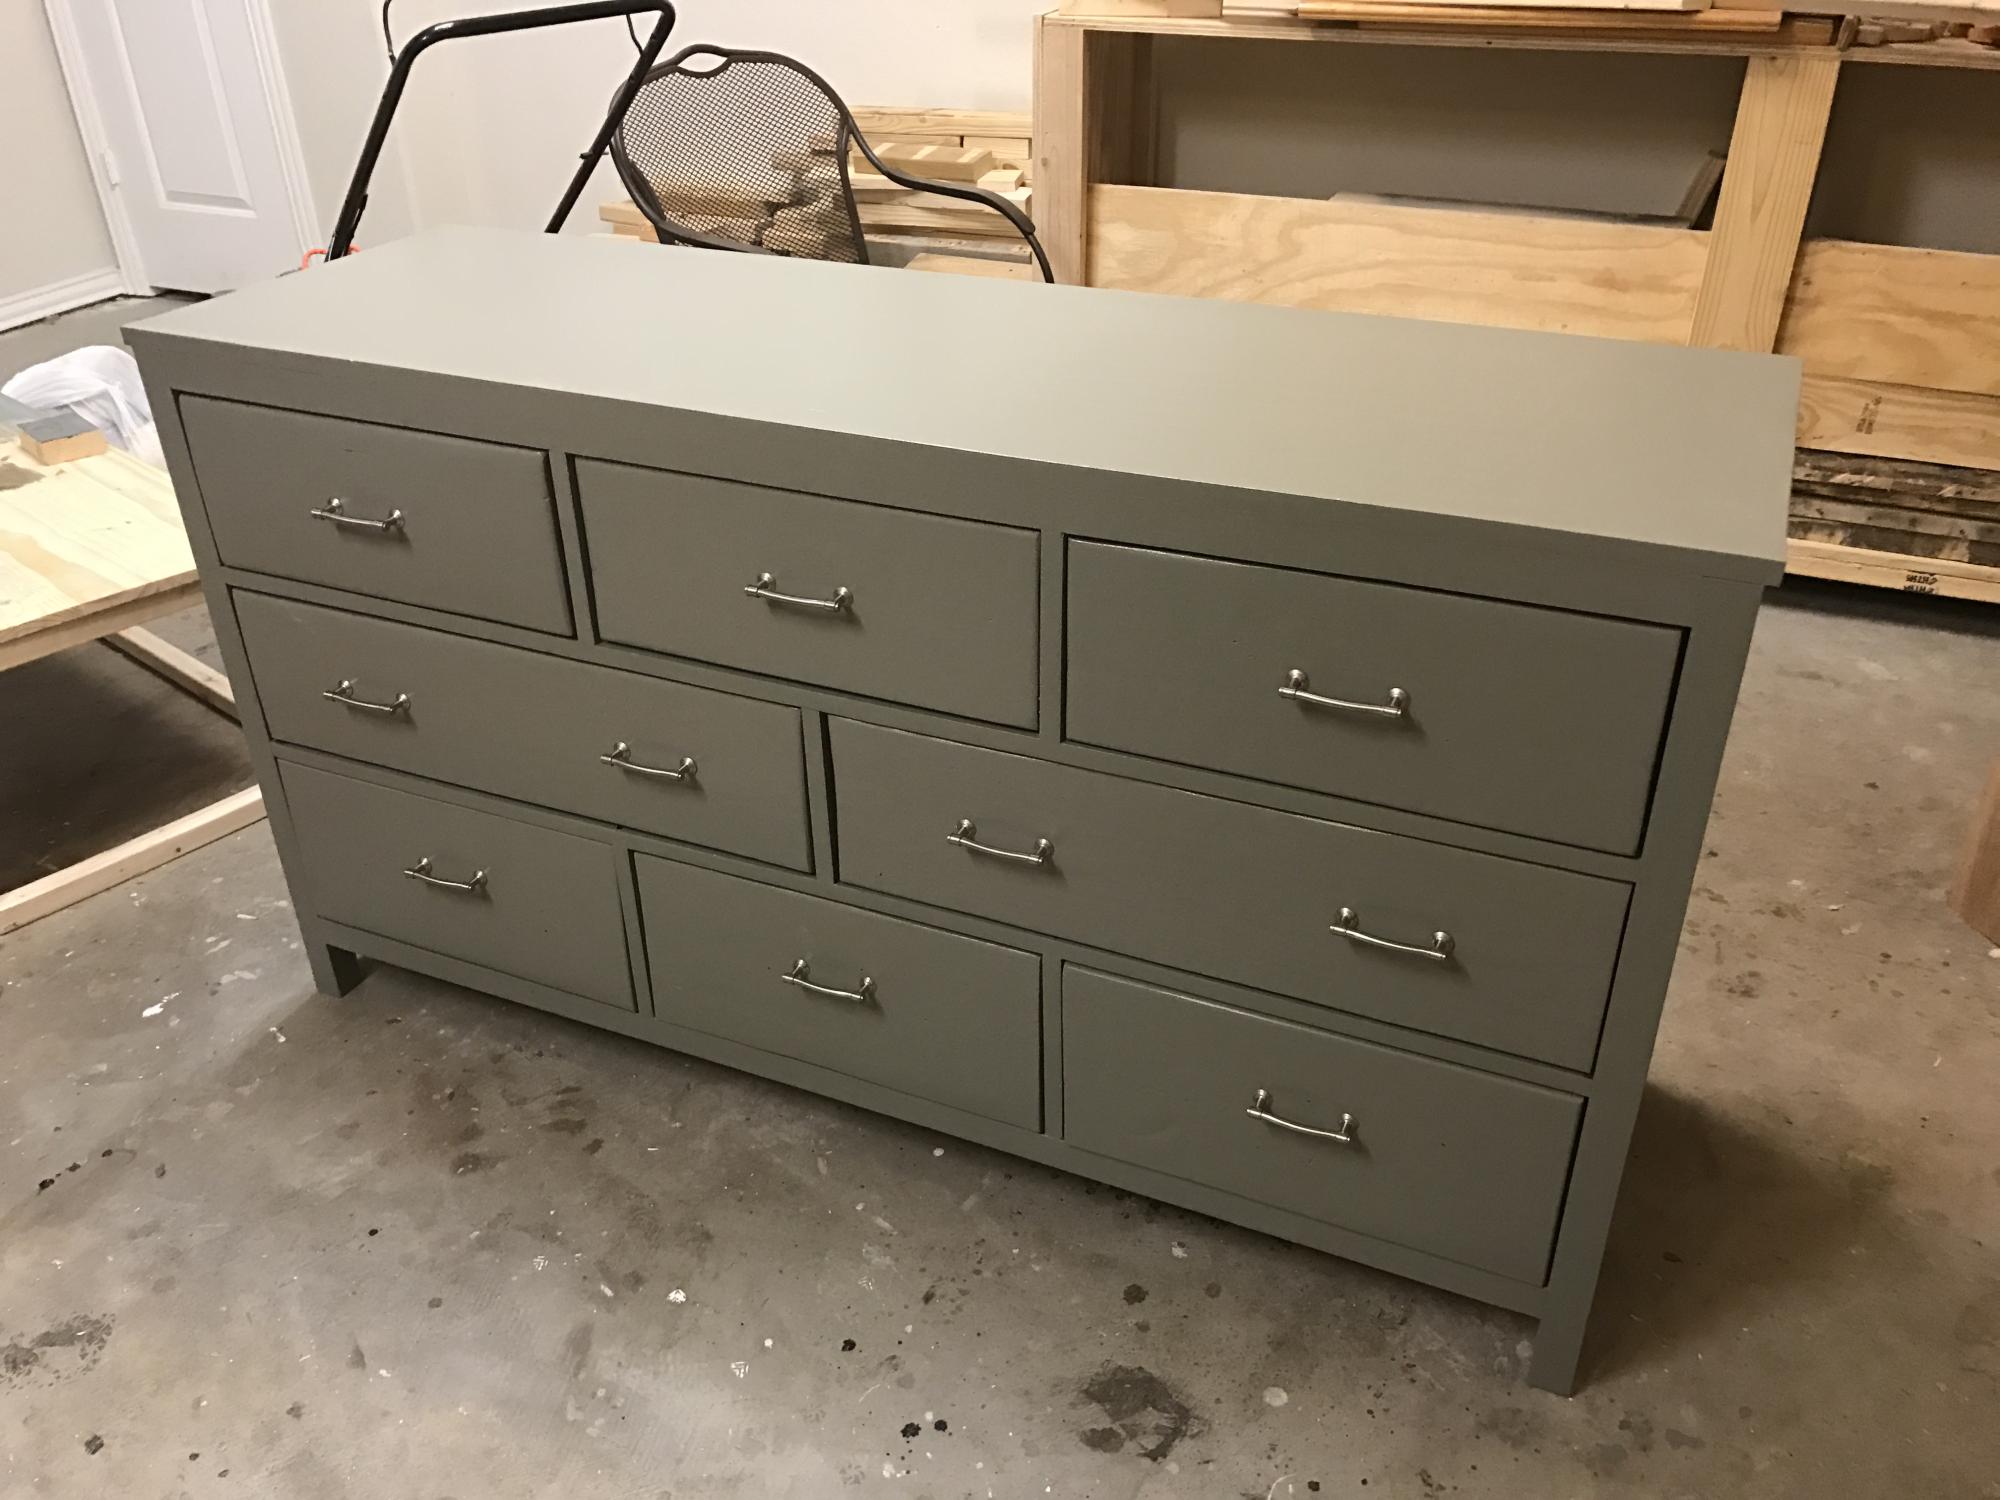
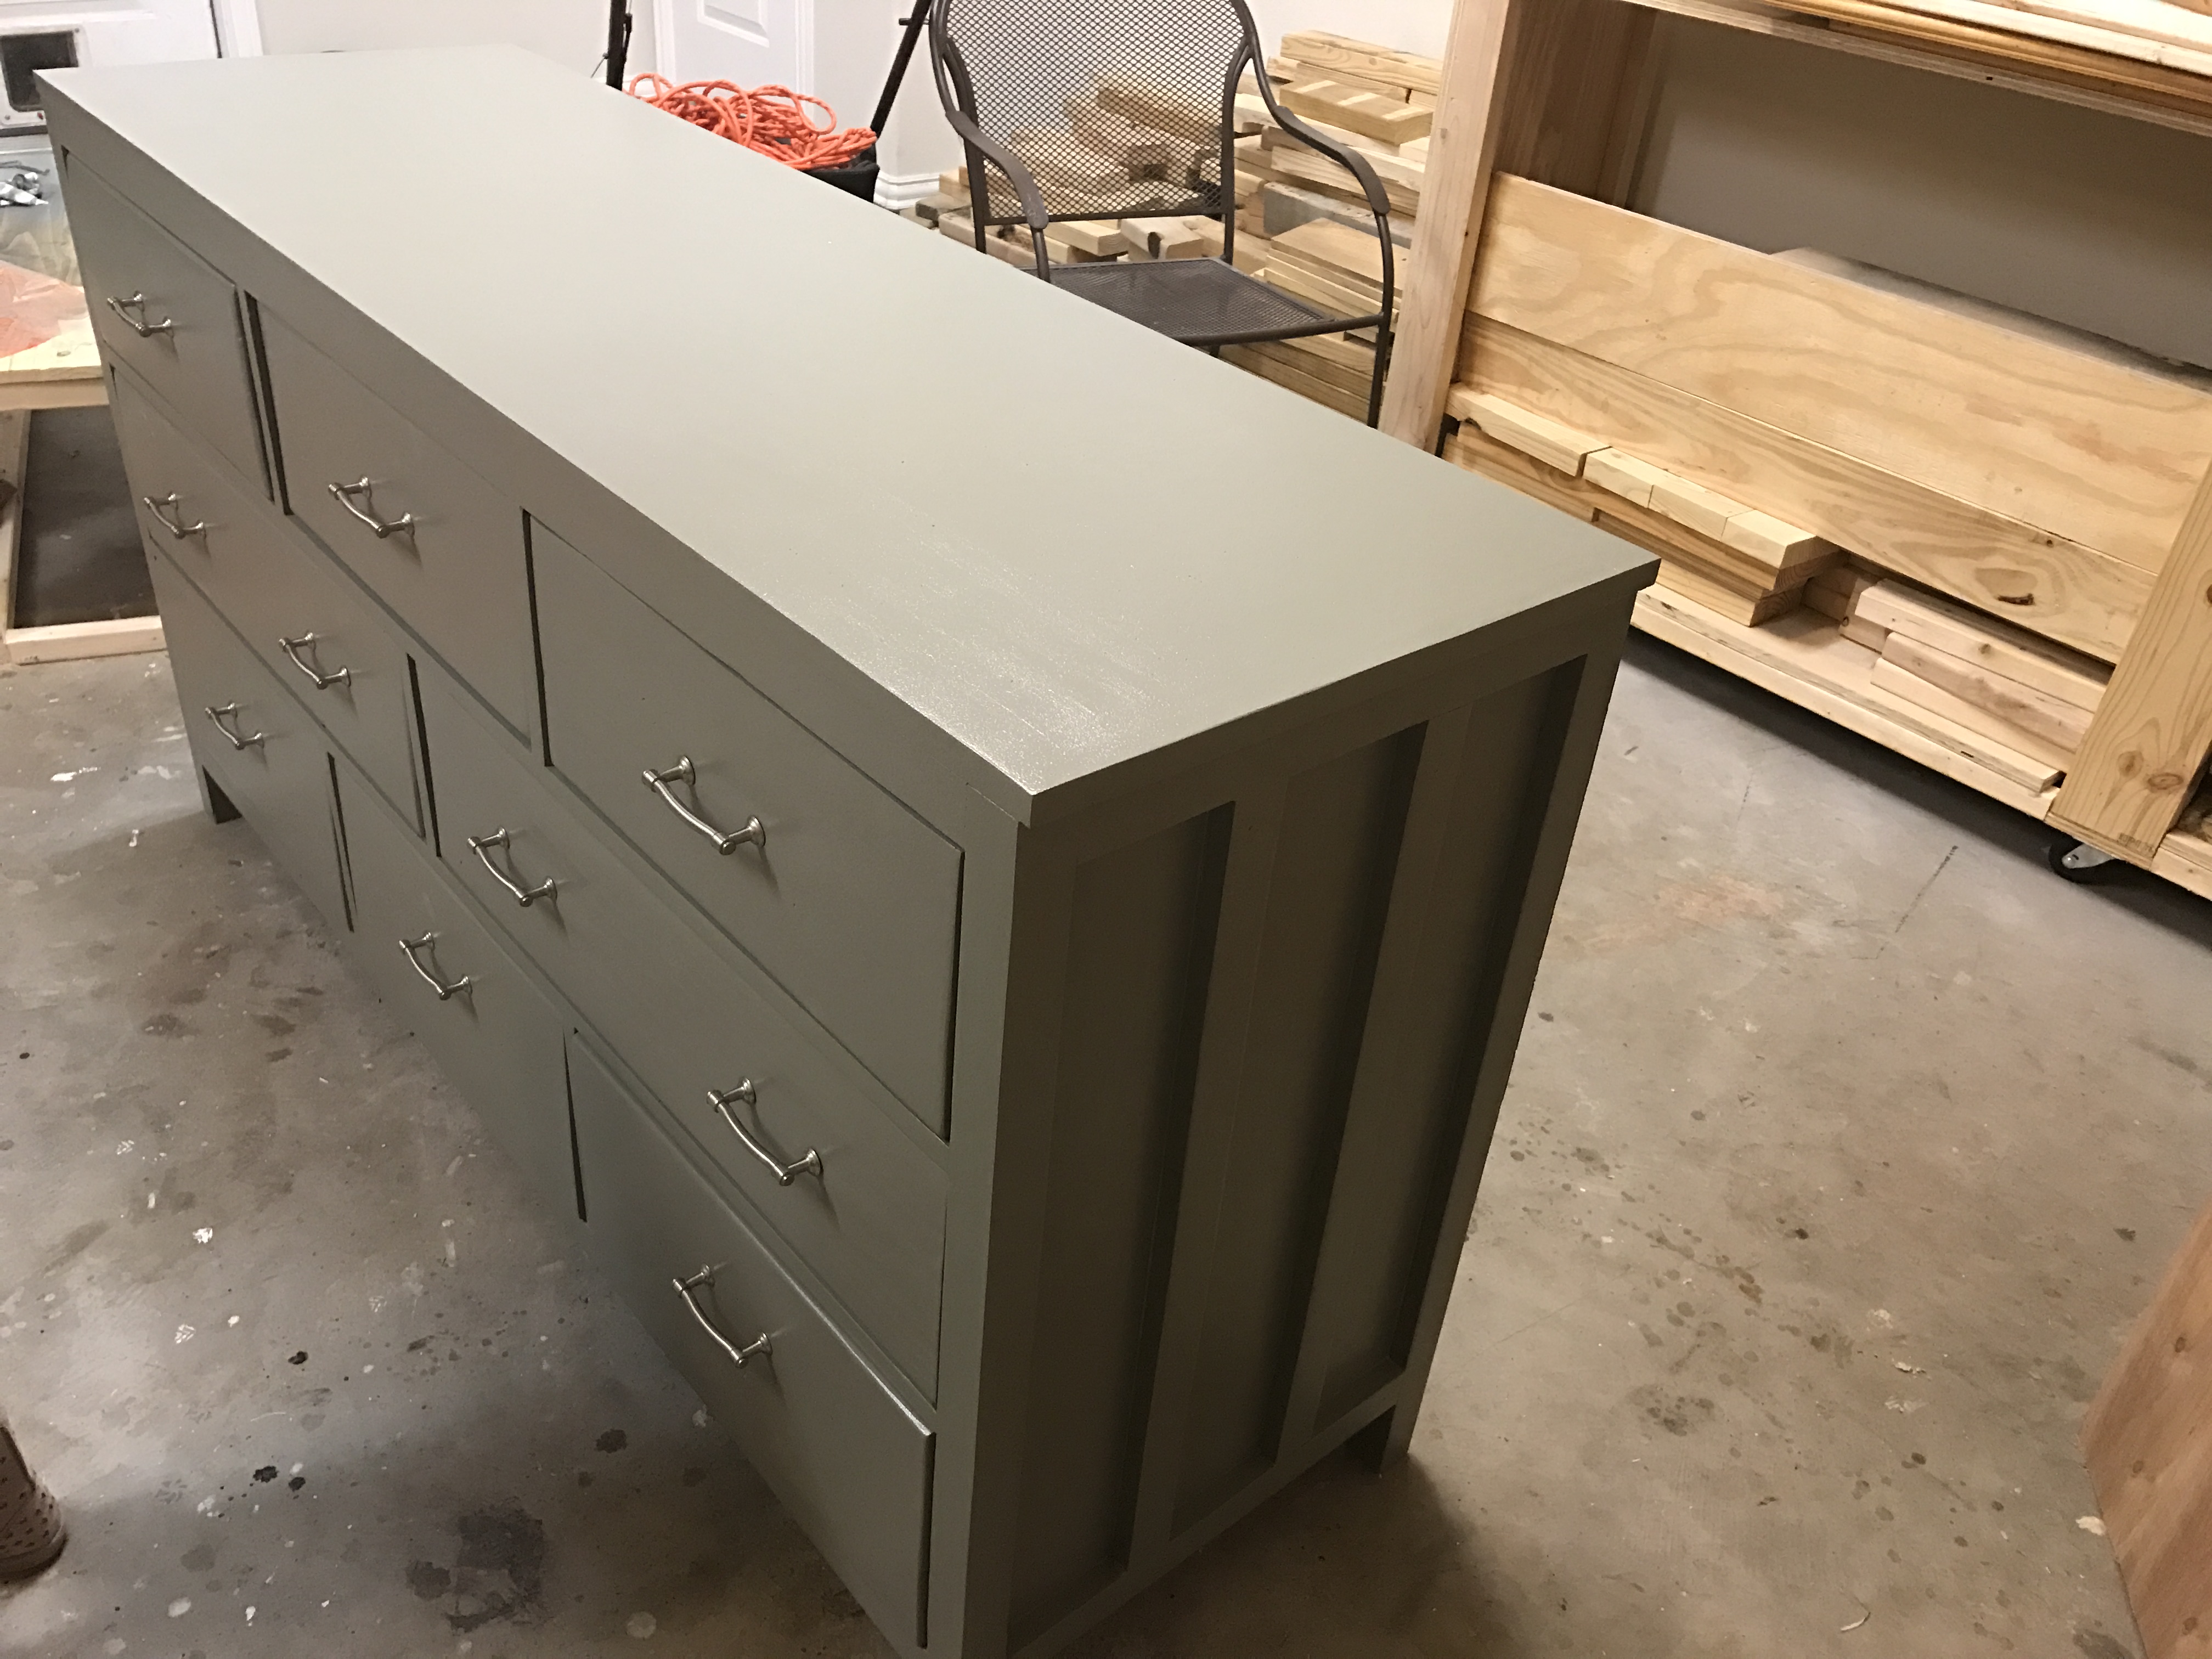
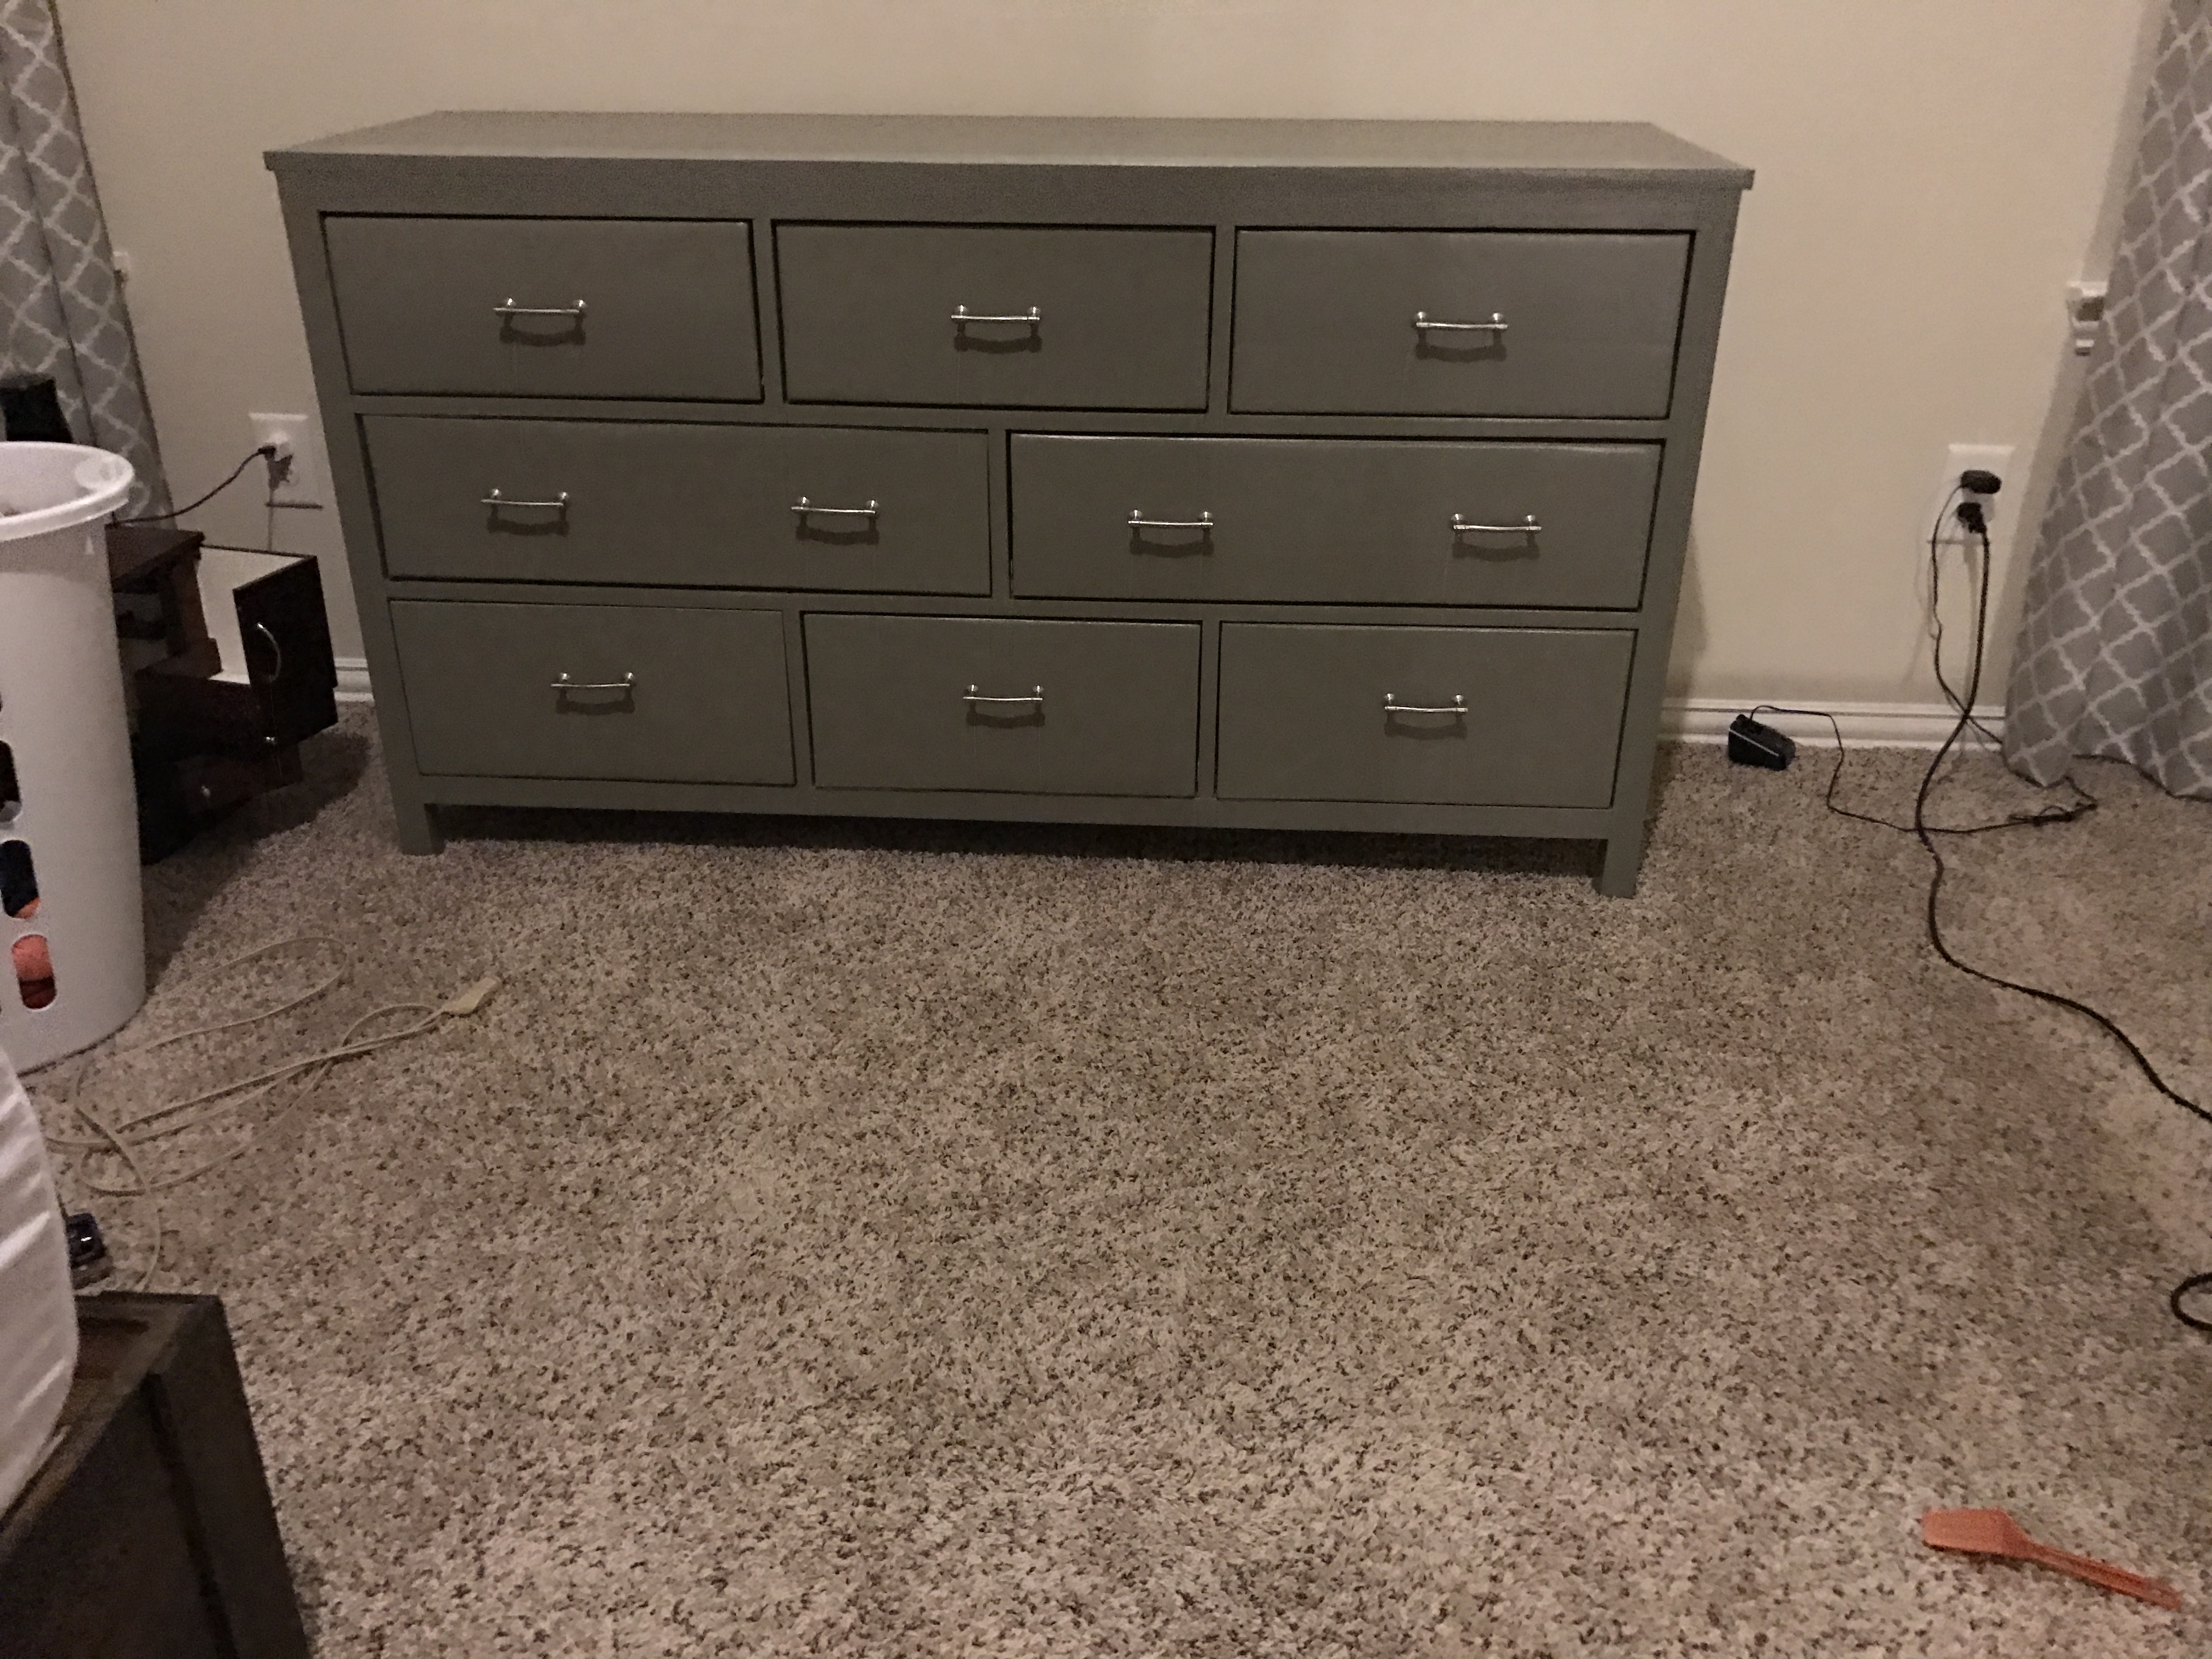
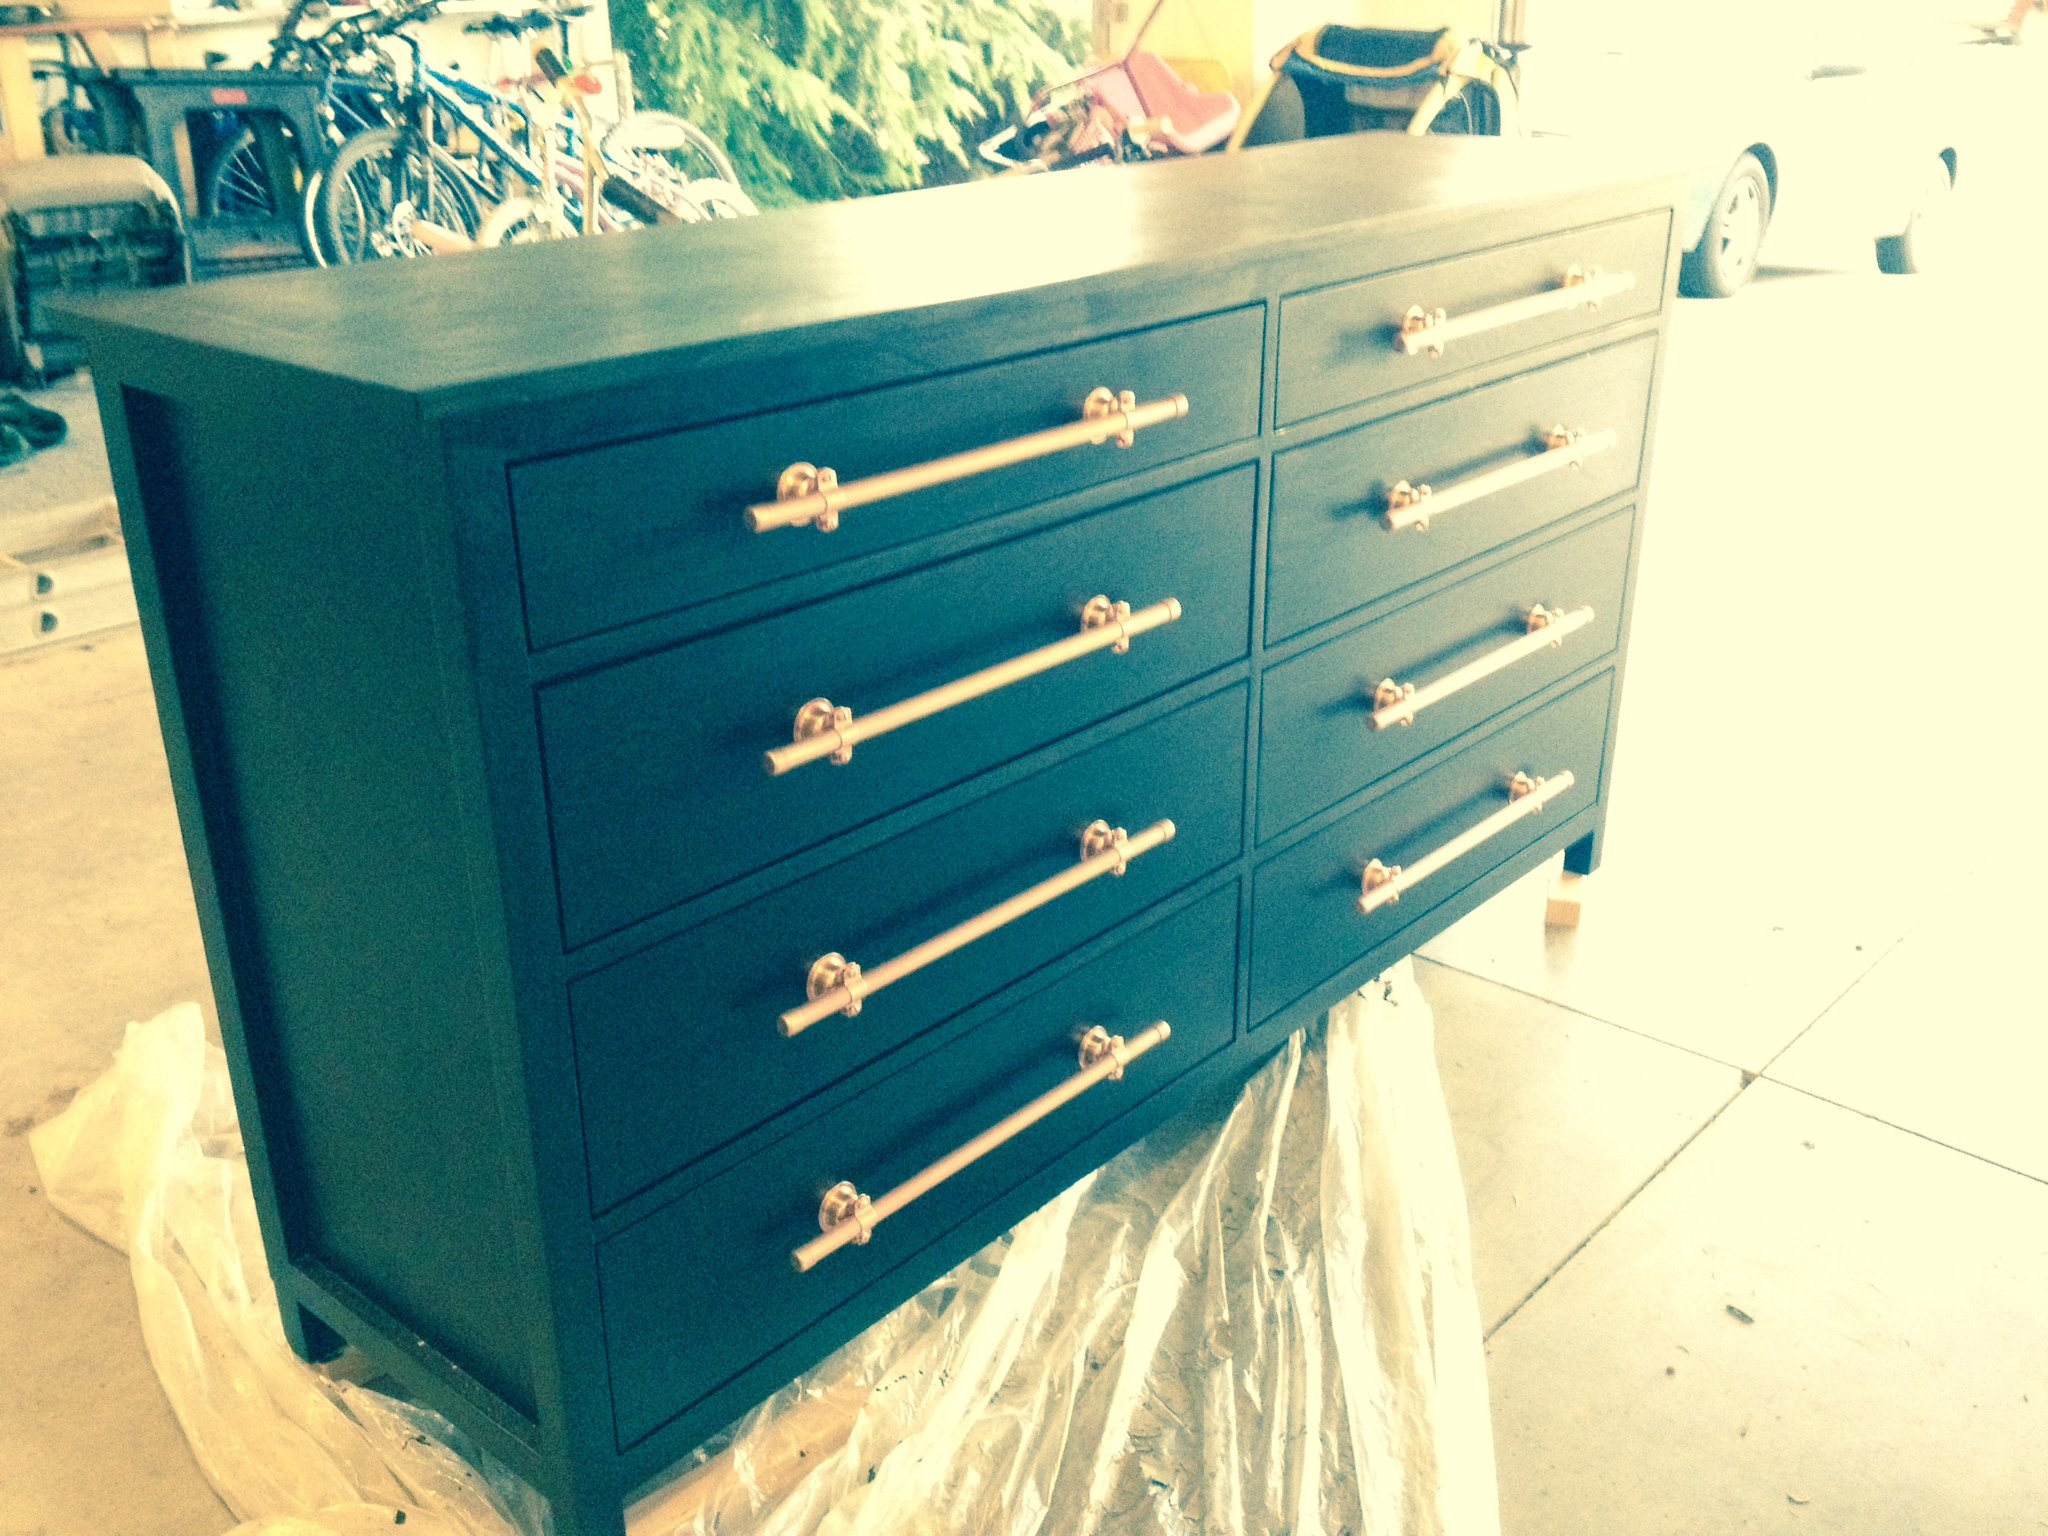
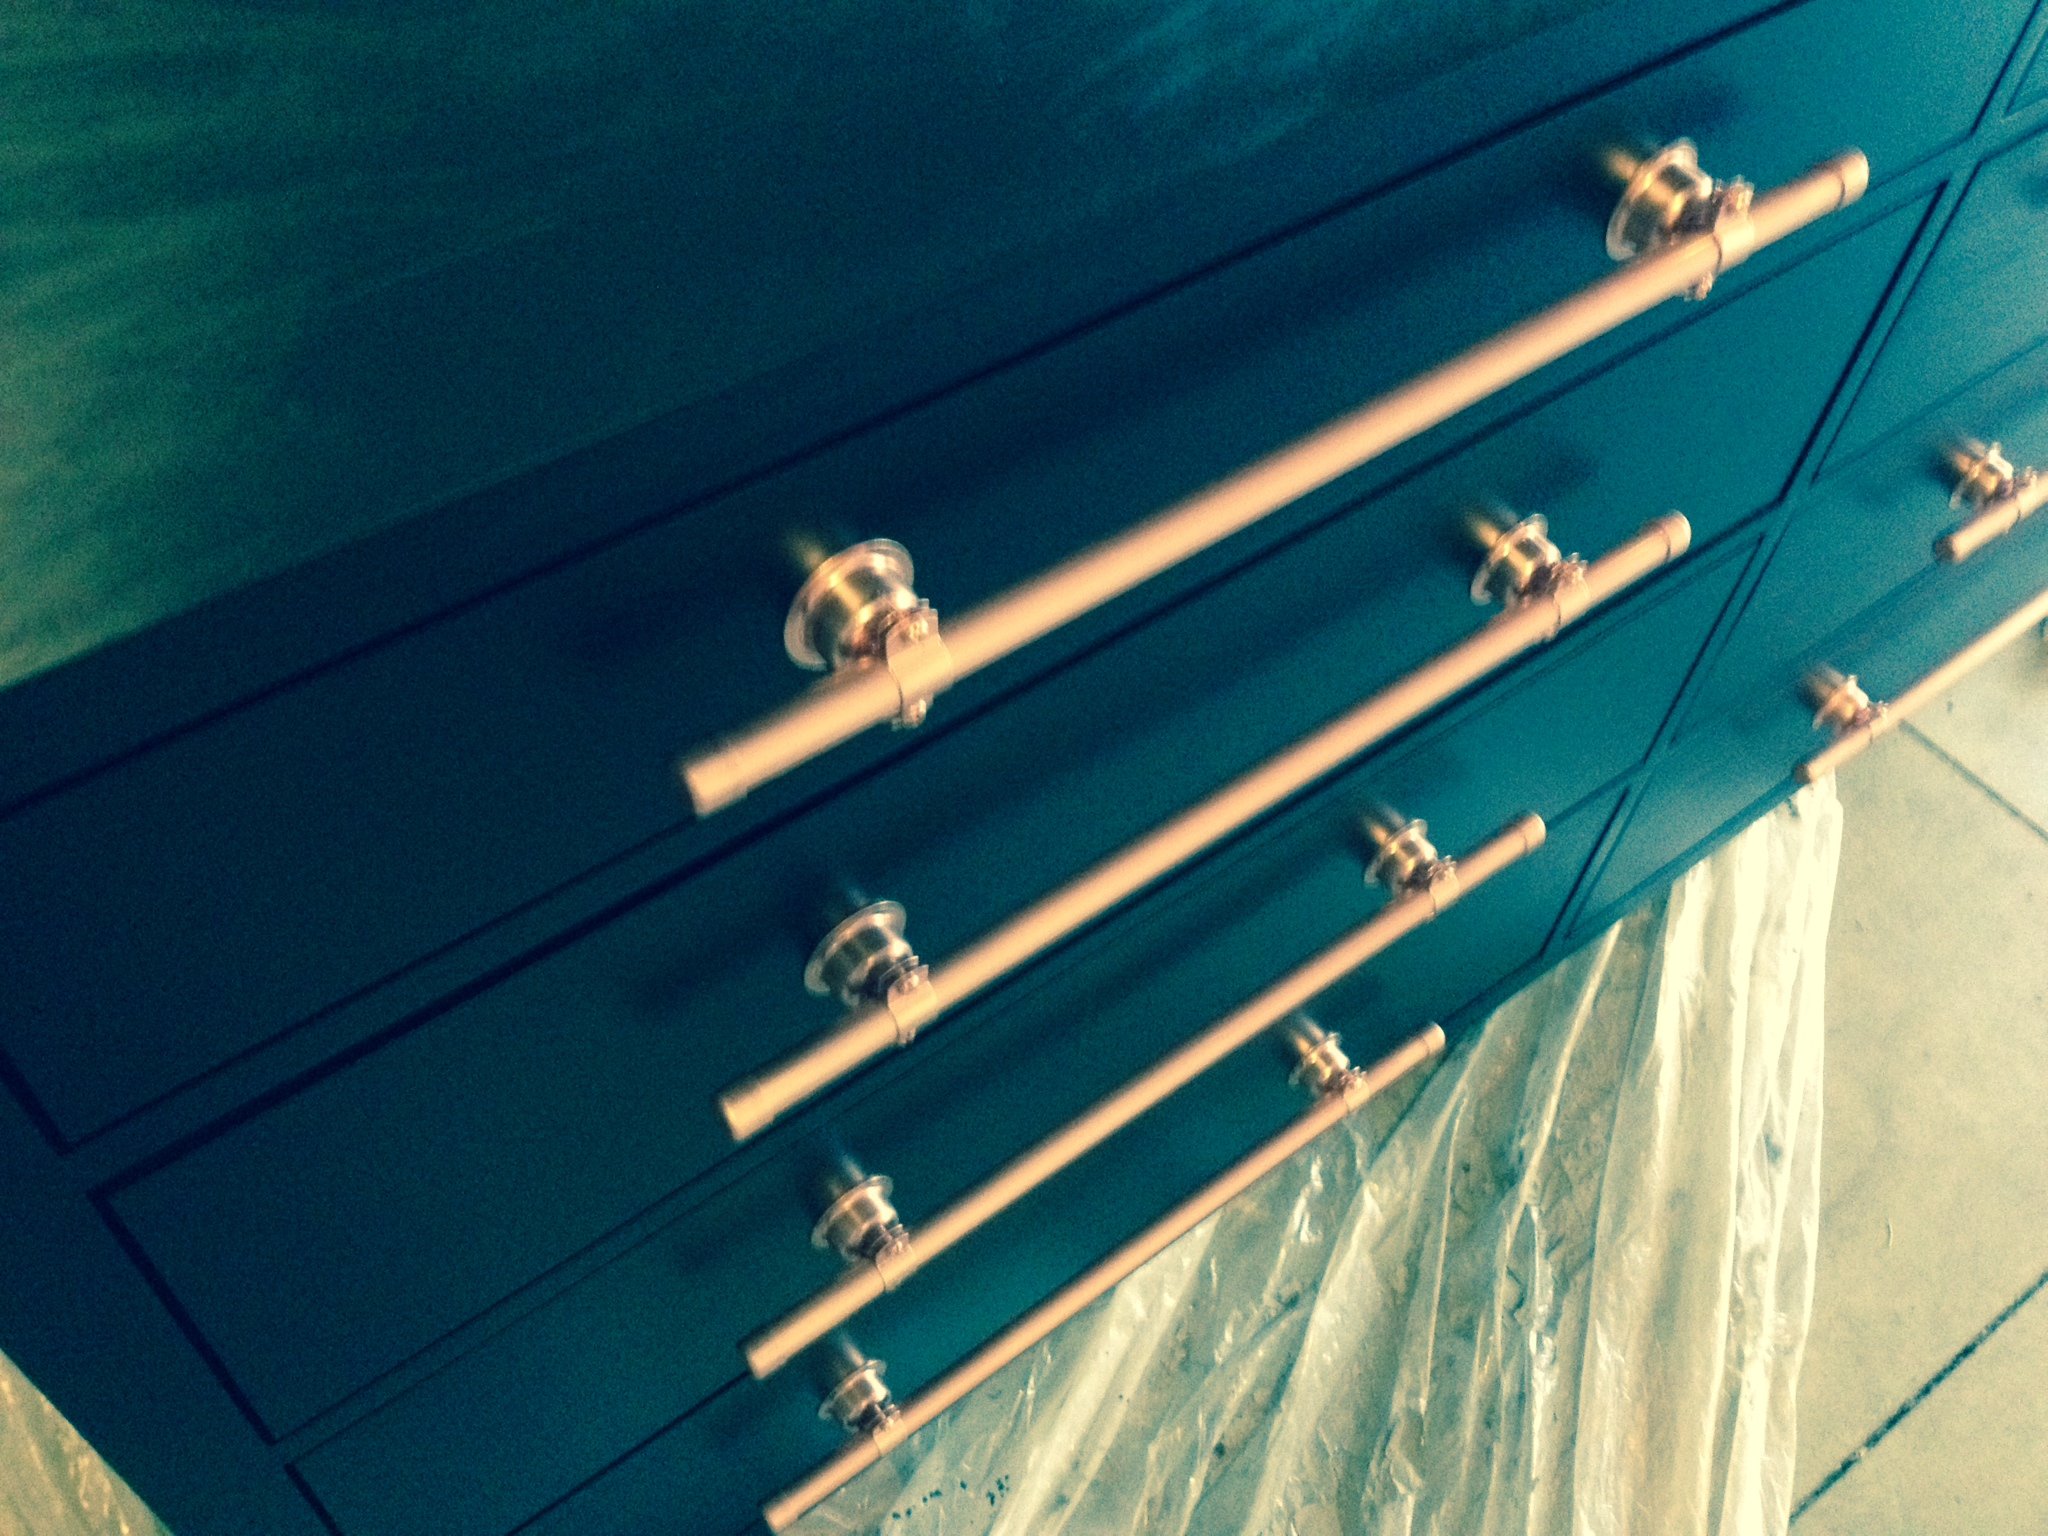
Shaker Style Dresser with Copper Hardware
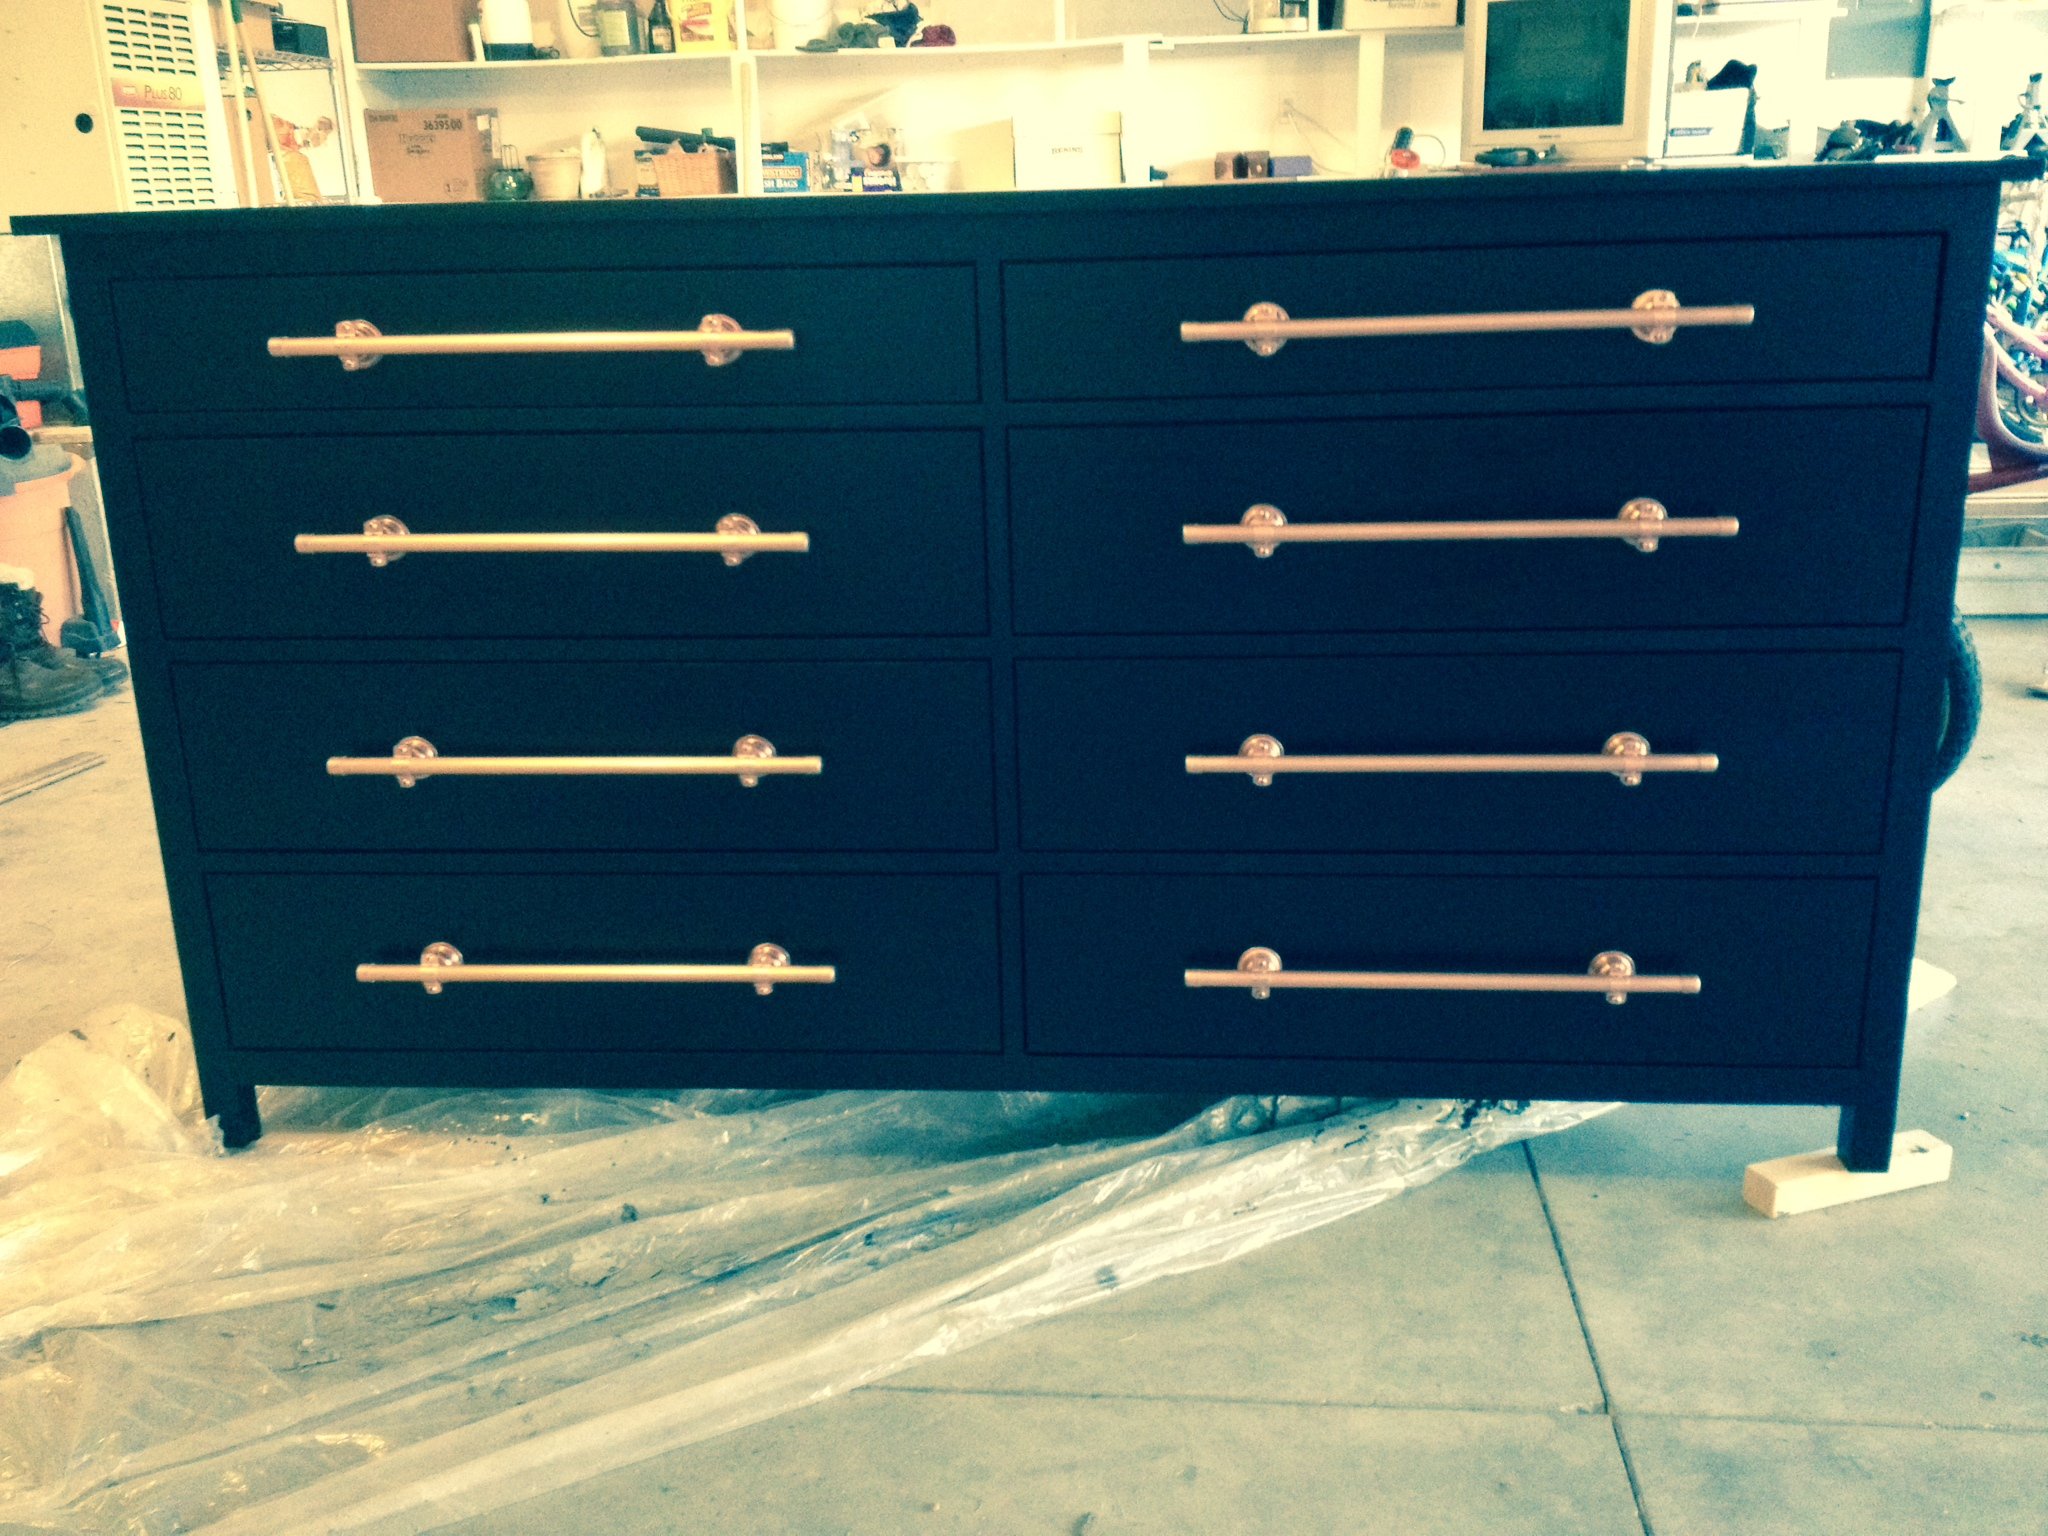
Definitely a more advanced project, but the end result was pretty nice. I used copper bars and fasteners to create a unique hardware look on this dresser.
A few words of advice for those looking to use these plans:
1. Verify that your plywood is truly 3/4". I used Home Depot's so-called "3/4" plywood, which is actually 5/8" or 11/16" plywood (I forget which). Without a true 3/4", the sides of your dresser will be slightly off. I discovered the problem too late, which meant I had to shim the drawer slides. Trust me, you don't want to go through that exercise!
2. You can recreate the copper look with simple supplies from Lowe's or Home Depot. You just need a length of copper pipe and copper plated steel bell hangers. After I cut the copper pipe to the right lengths, I washed each section using barkeeper's friend to get that shiny copper finish. Then I sprayed each piece with clear paint so it wouldn't tarnish. Still shiny even now!
3. Do NOT nail in the front boards of the drawers from the back! The directions call for 1" nails and when I nailed it in, I blew a chunk of wood right off the front of the drawer. I filled it with wood putty, but still, not a good plan. Just countersink a few 1" wood screws and your results will be much better.
Built from Plan(s)
Estimated Cost
$400-$500
Estimated Time Investment
Week Long Project (20 Hours or More)
Finish Used
I used Minwax Polyshades, Espresso, Satin. This is a two in one product that has both stain and finish. I wouldn't recommend using this. I had to use two coats and had a lot of dust nibs show up both times. If I could do it over again, I would stain the wood to the color I wanted, then apply a clear satin finish.
Recommended Skill Level
Intermediate
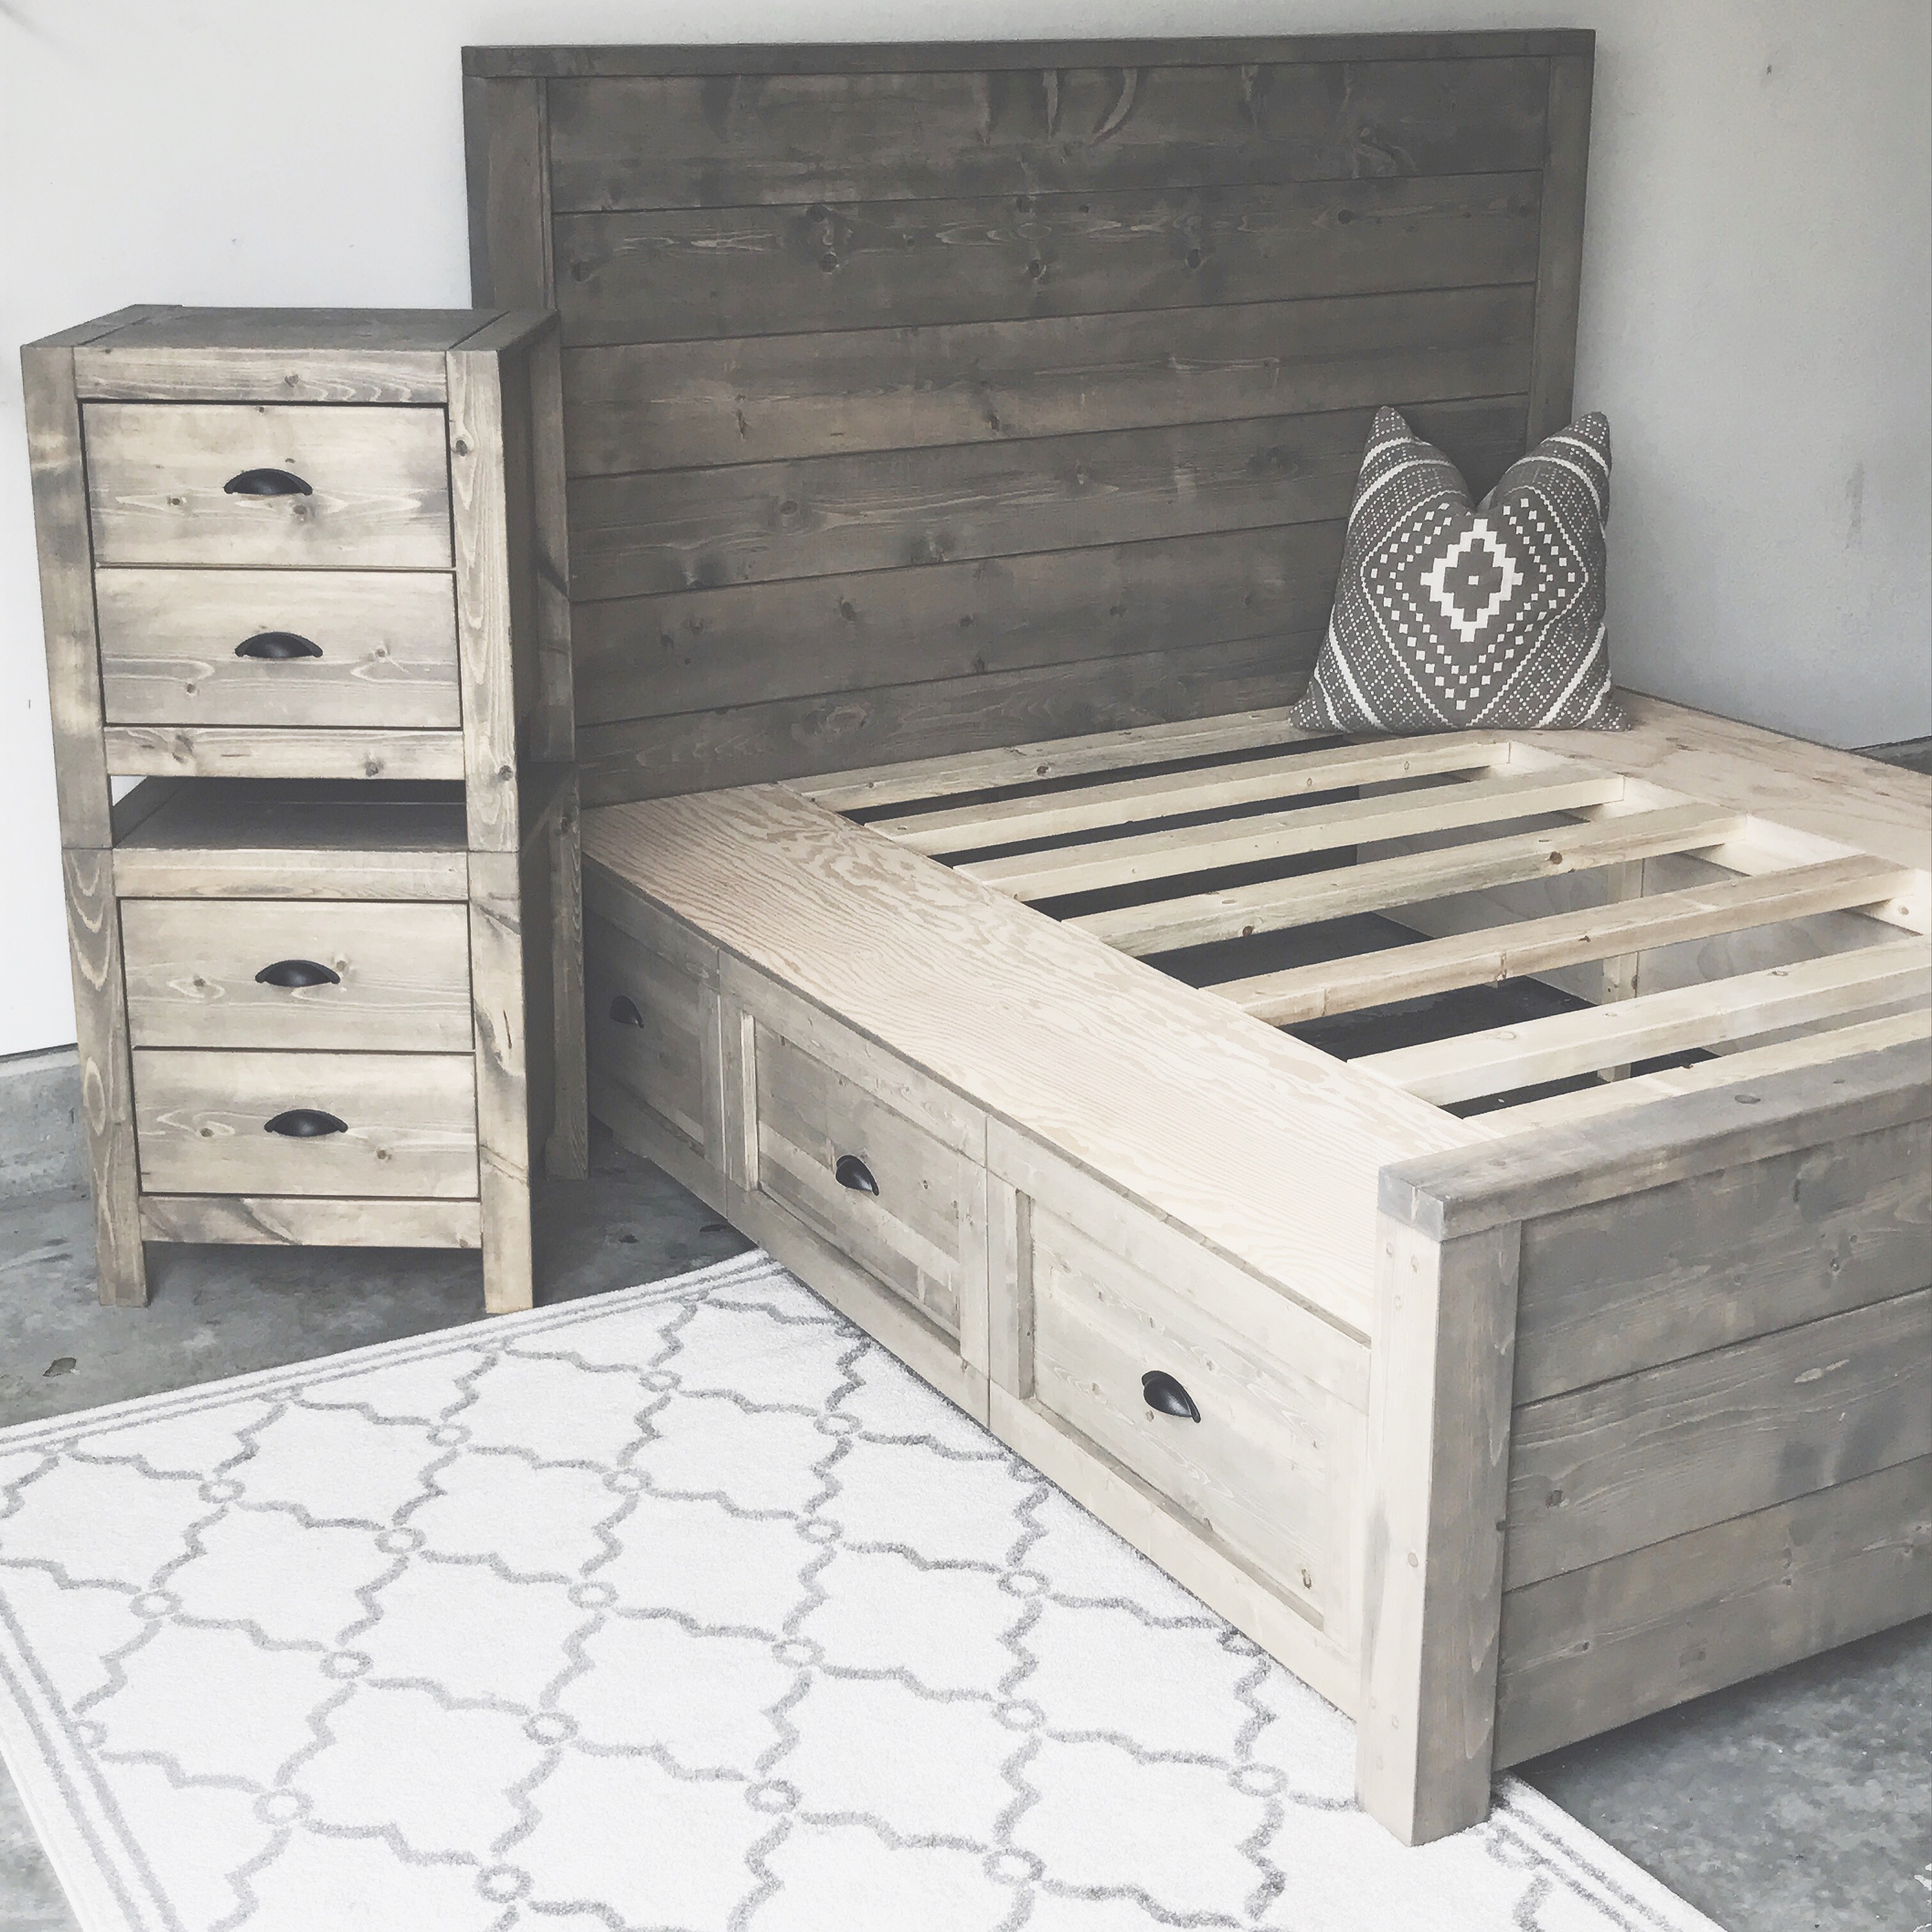
Storage Bed
We used the plans for a six drawer storage bed to build this with a custom headboard and footboard. We used plywood to build these boxes but have since switched to using MDF. We use a pine laminate for the drawer faces.
Built from Plan(s)
Estimated Time Investment
Weekend Project (10-20 Hours)
Finish Used
Custom mix
Recommended Skill Level
Intermediate
Comments
Sat, 09/26/2020 - 05:51
Size boards?
I absolutely love this style. I am trying to figure out your modifications.
What size pine planks are those for the foot and head board? 6”?
Thanks!

In reply to Size boards? by leftysgirl
Wed, 10/05/2022 - 10:08
I would guess 1x6 too
I would guess 1x6 too
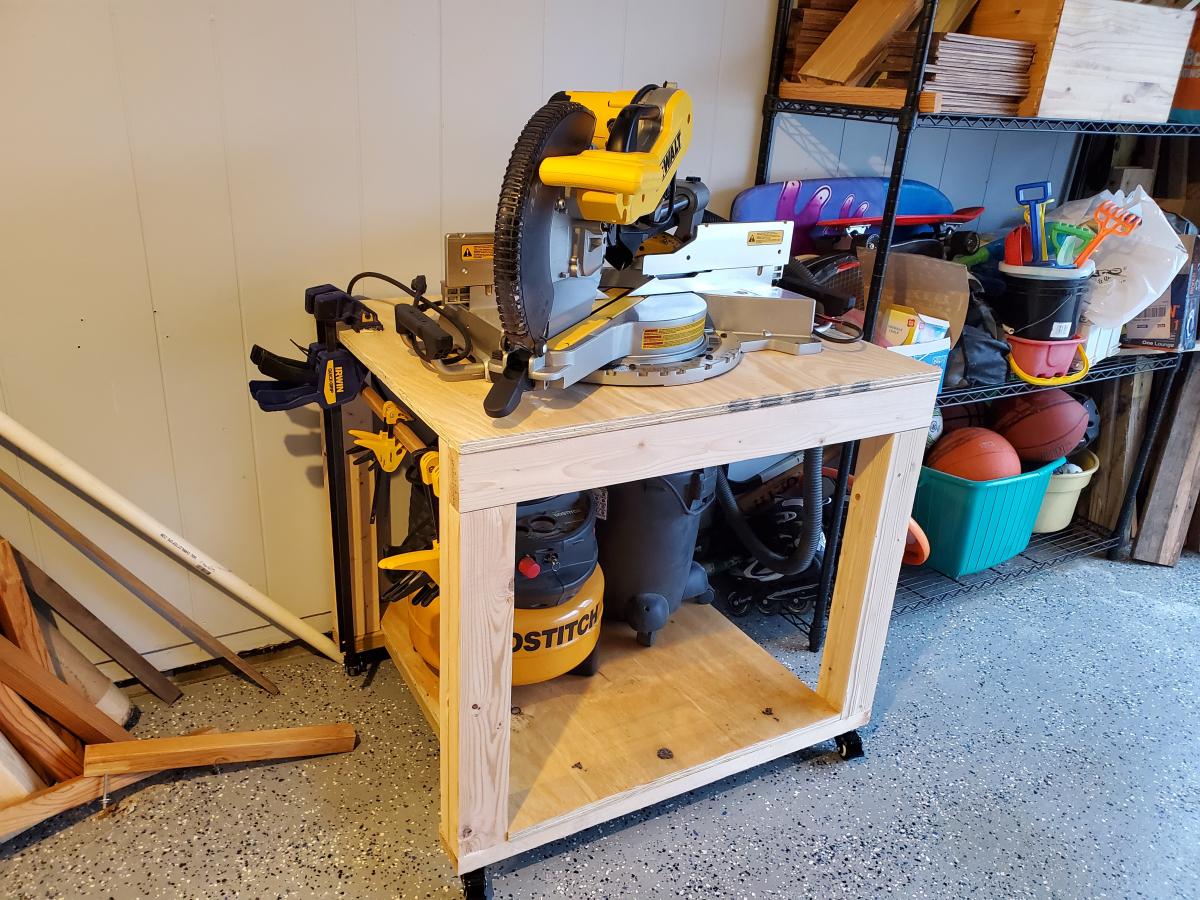
Easy DIY Garage Workbench with modifications

My fabulous husband bought me an awesome new miter saw for Christmas, and it is way too heavy to lug around! So my first project with the new saw was a workbench to mount it on! I added wheels so it can roll anywhere. I'm also very short and wanted to store a very tall shop vac on the lower shelf so I made modifications to accommodate that. I also made it 30" x 36" to make it just the right size for my saw. I will be using this piece as the center of other work tables I will build in the future!
Built from Plan(s)