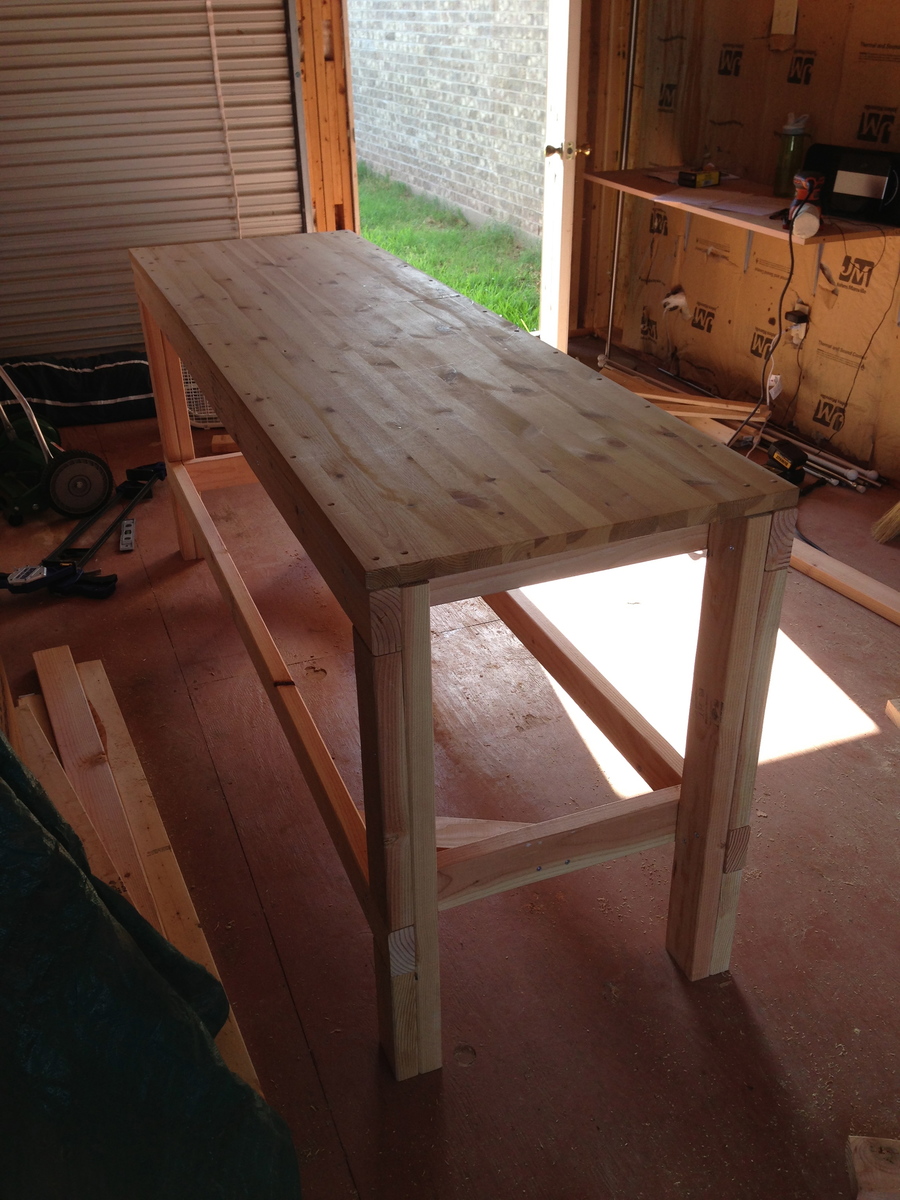
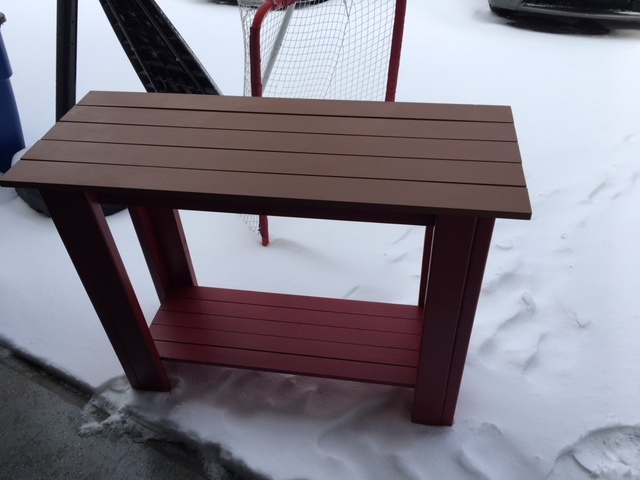
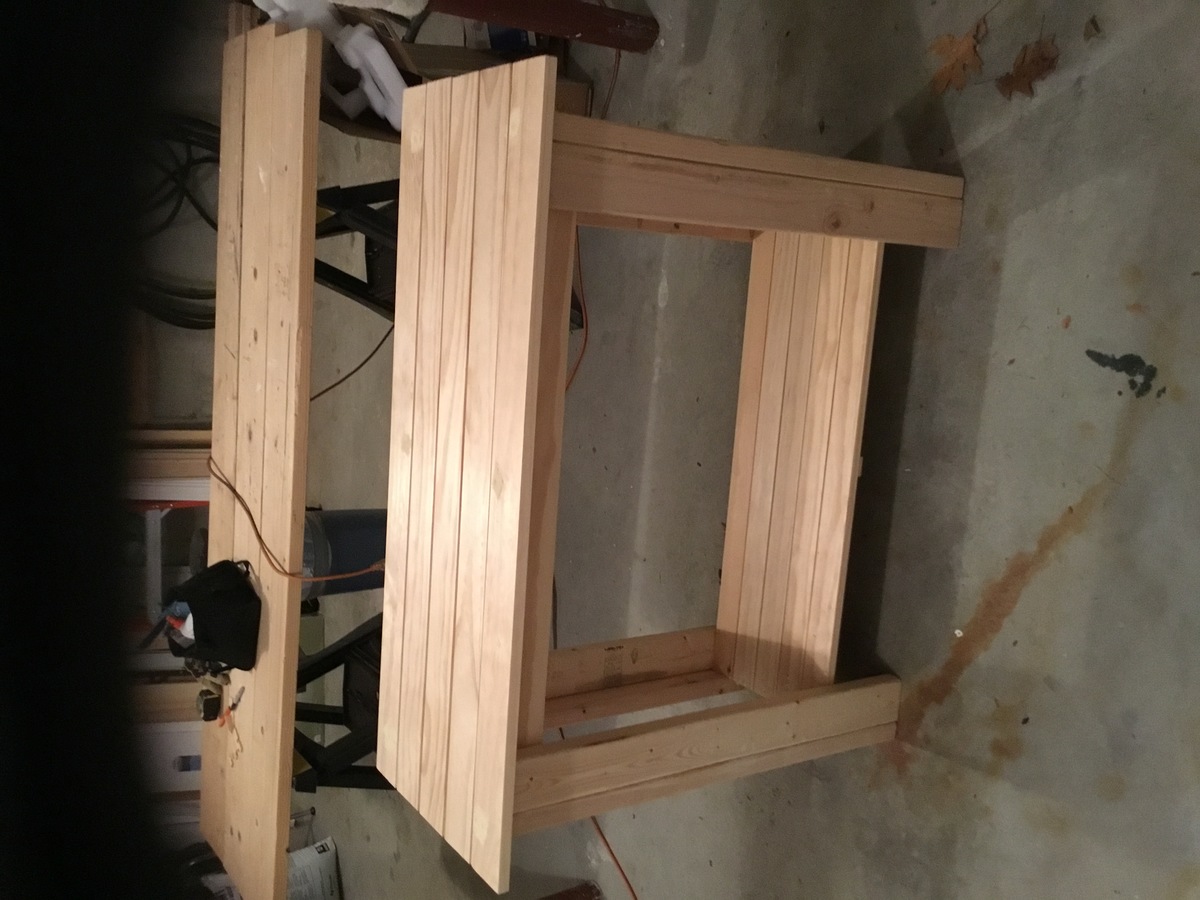
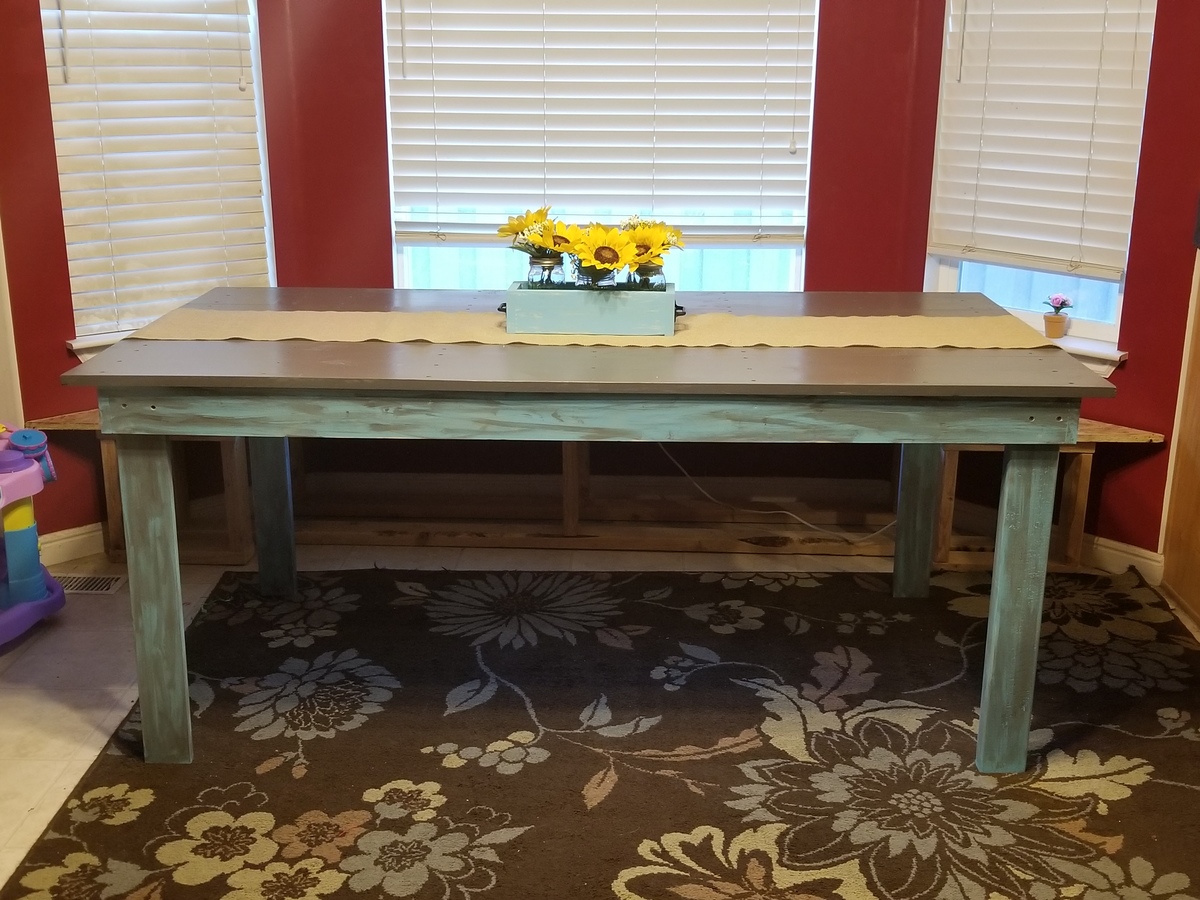
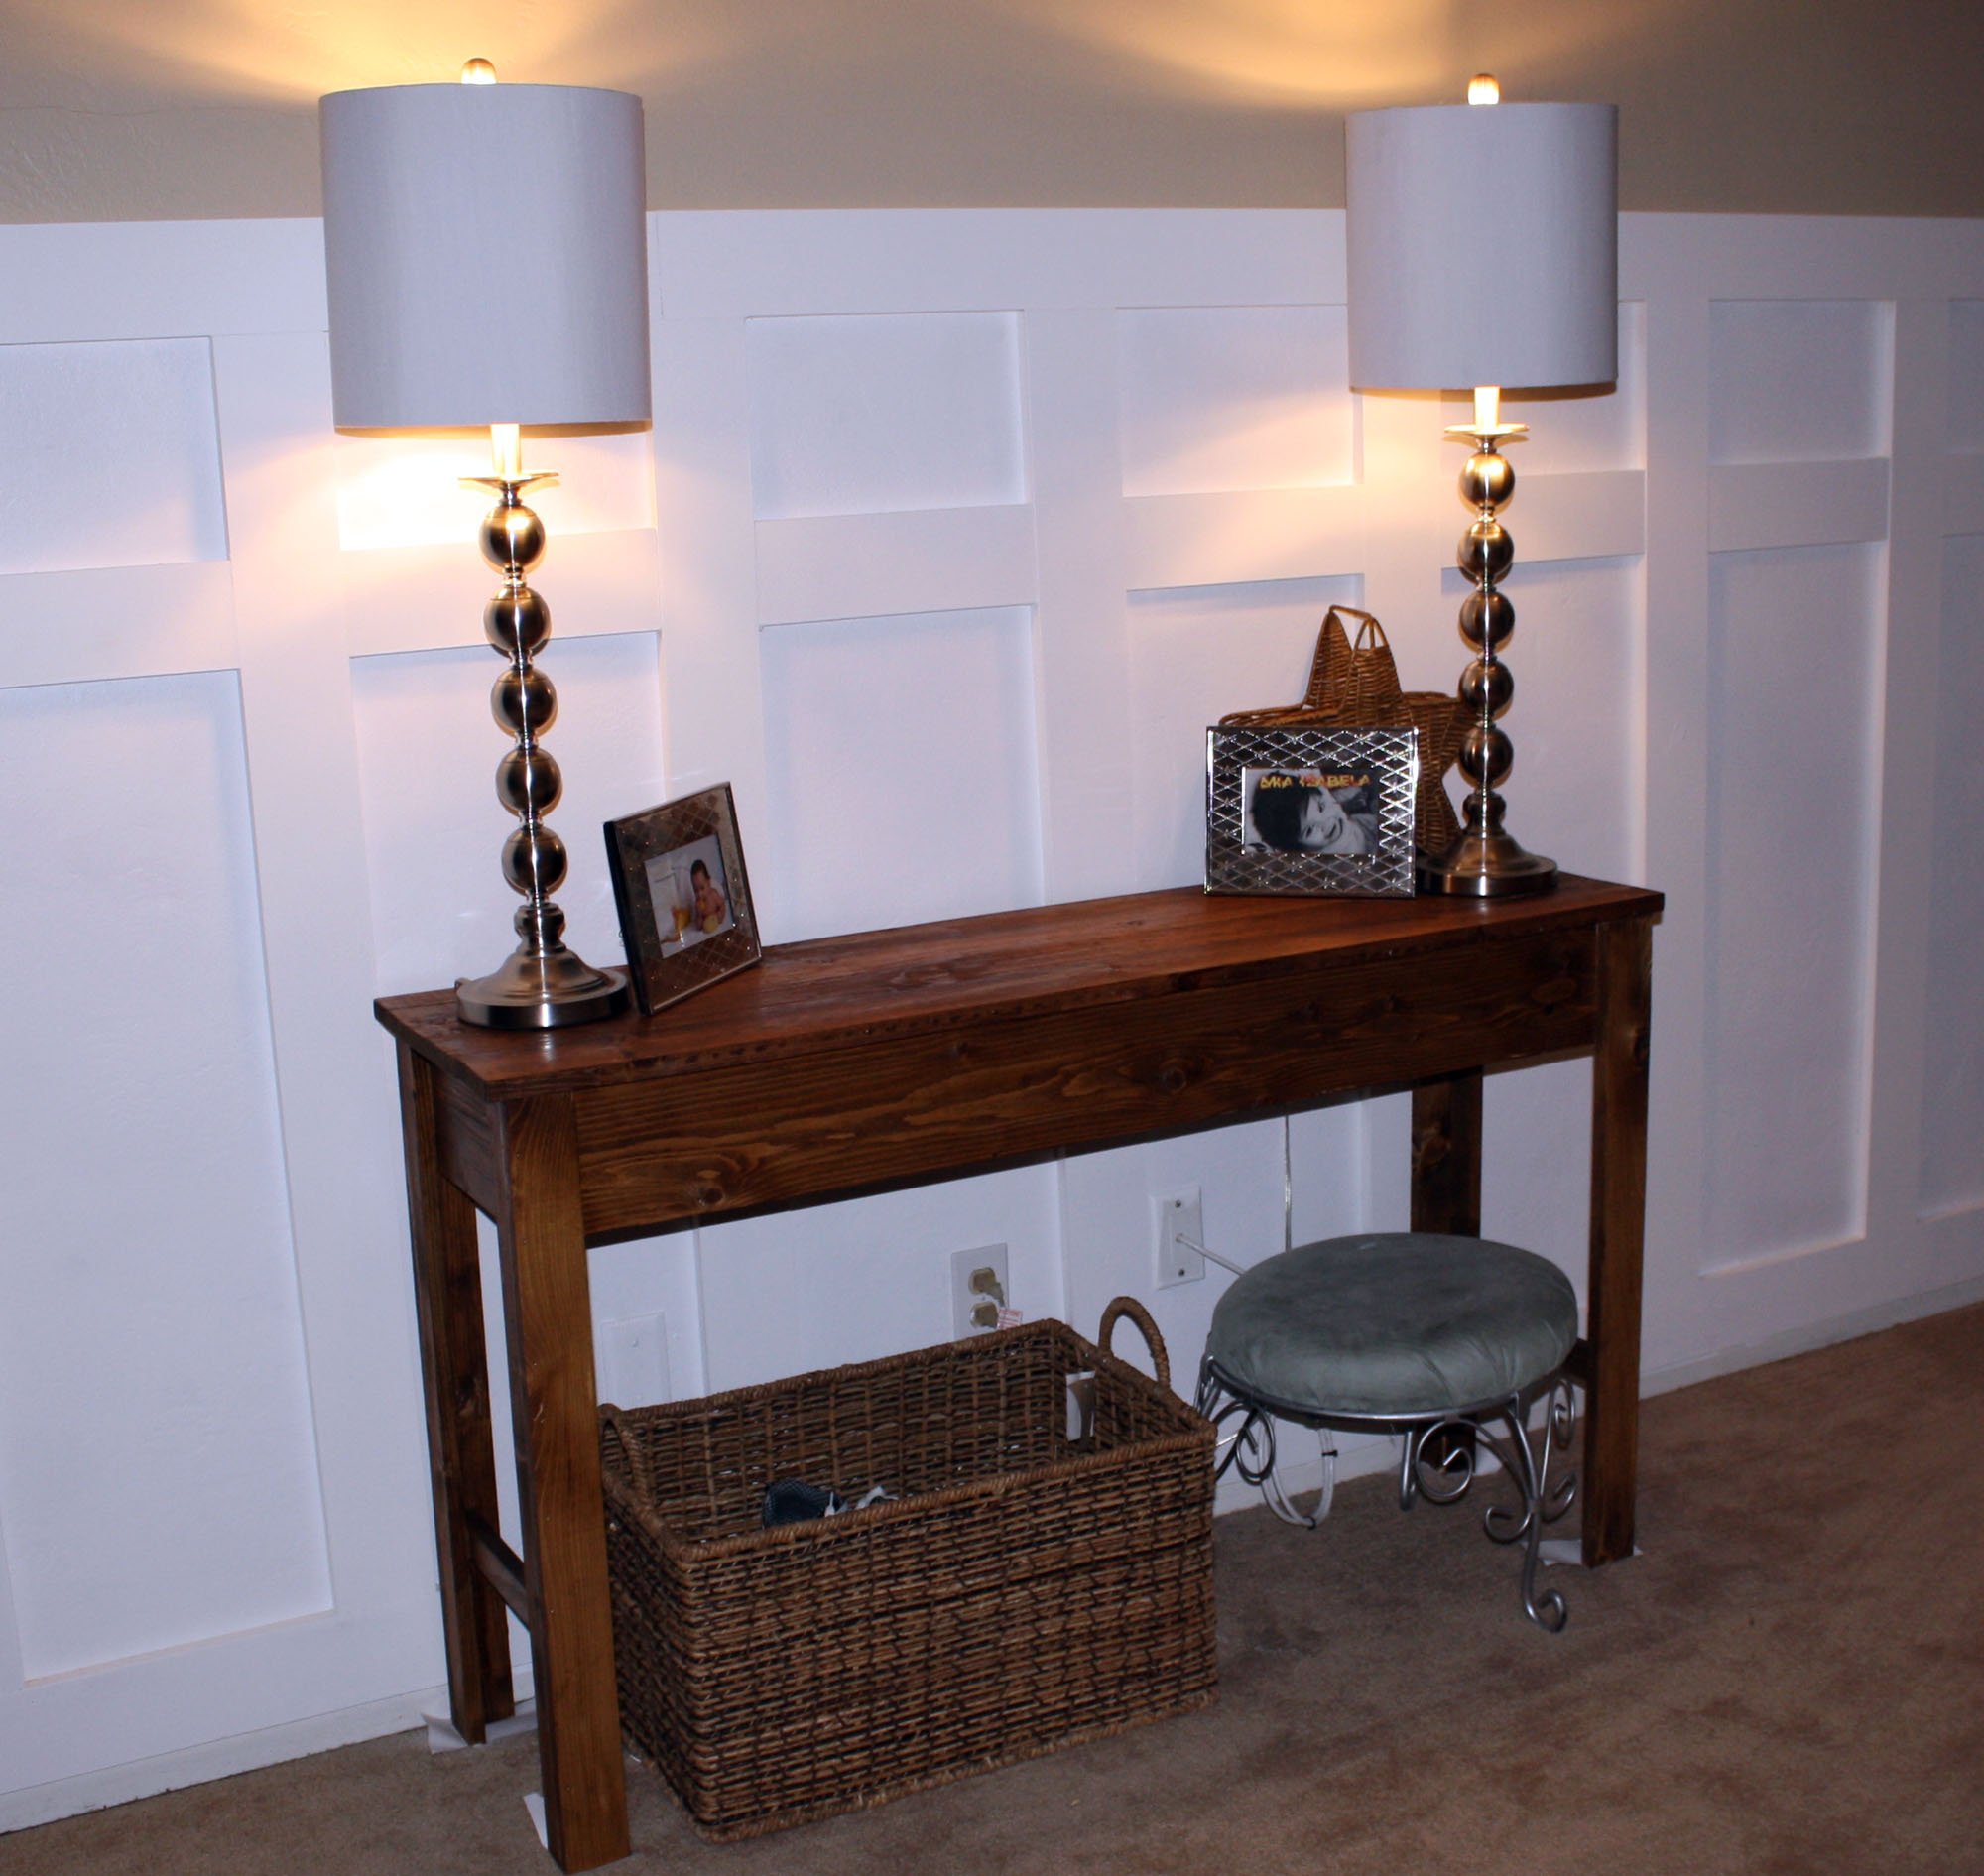
Community Brag Posts

$2 Farmhouse Table

Submitted by Handy Andy on Tue, 04/19/2011 - 14:29

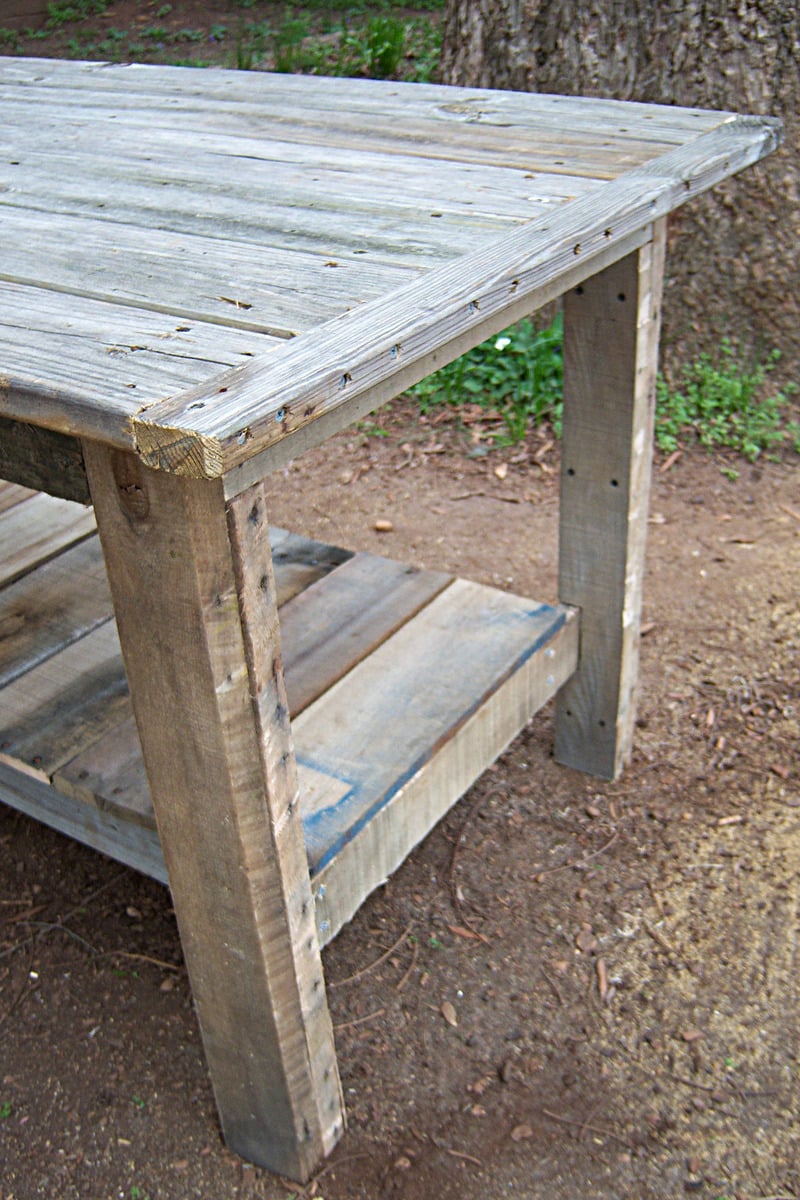
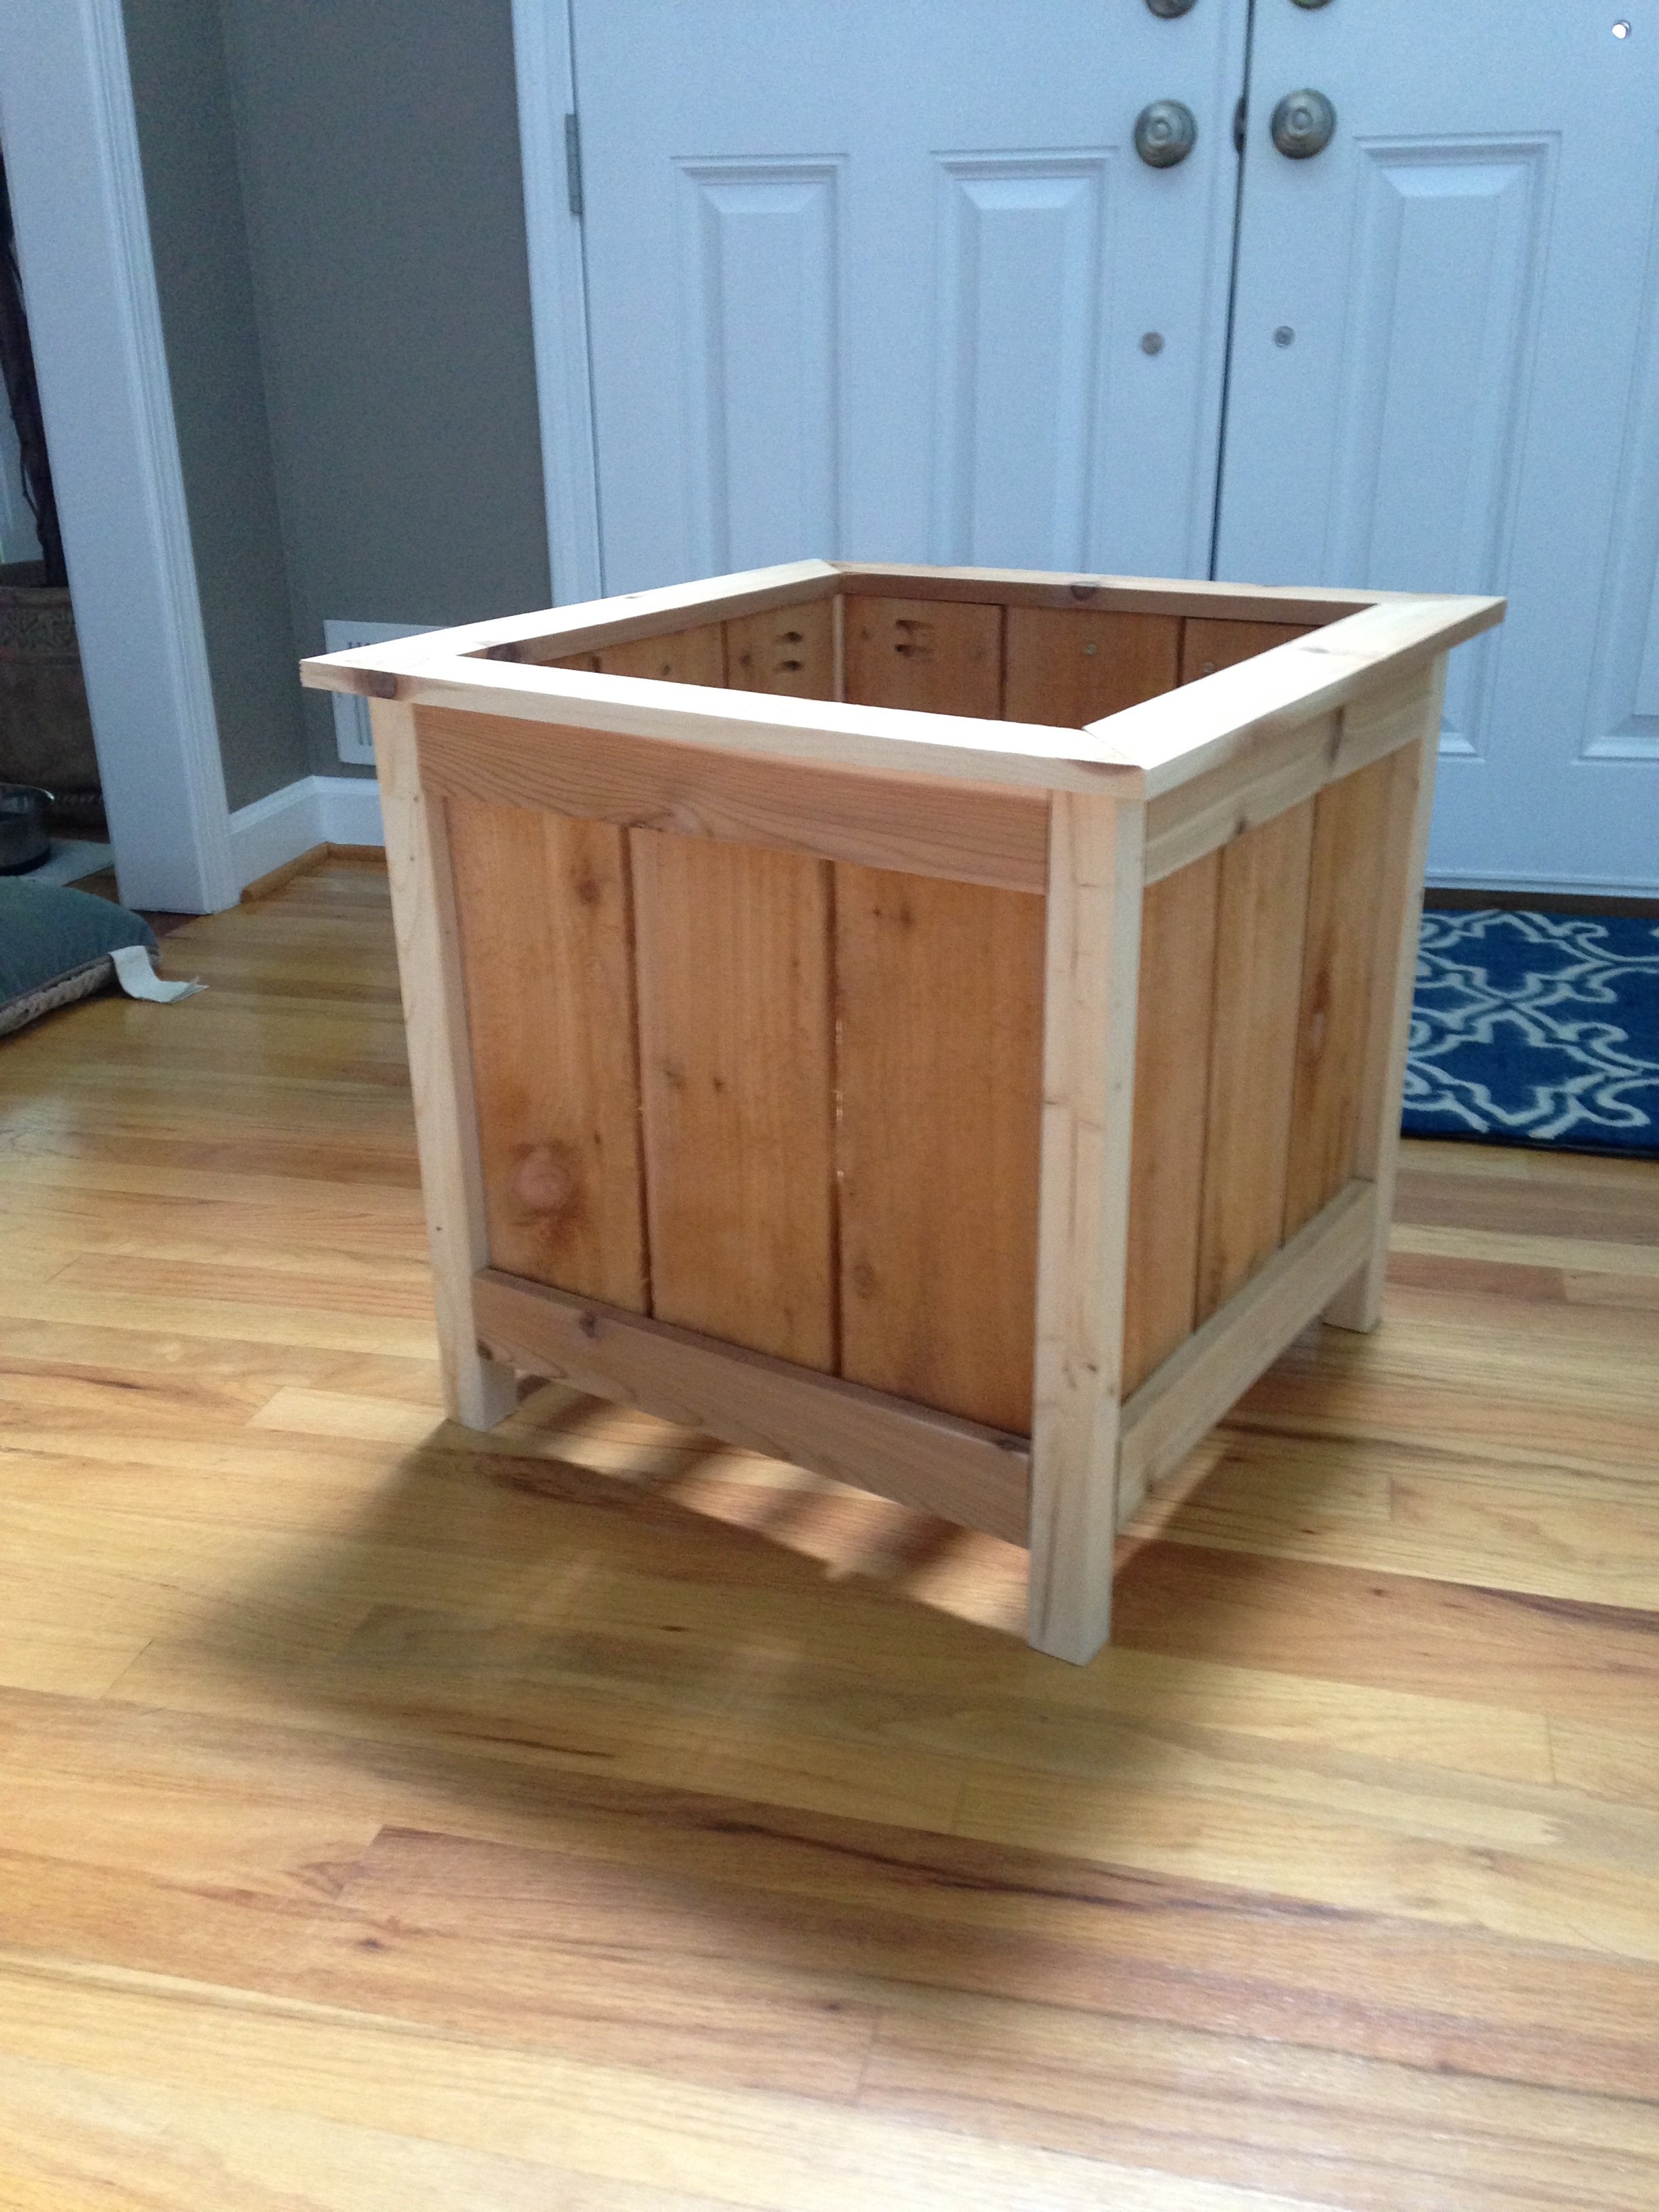
I am starting to work on more and more projects and I'm limited with space. I needed a worktable that could double as a backyard dining table (should the occasion arise). We have been planning to build the farmhouse table for a while now, so this was a great opportunity to build a prototype. I did some repair work for a friends deck and she gave me the leftover decking material. This became my table top. I purchased 4 2x4's at our local Habitat for Humanity ReStore for 50 cents each (this was the only money spent on this project). While I was at the ReStore I also picked up 4 pallets (they are free). After cutting them apart, the 2x4s from the pallets became the table legs and the 1x4's & 1x5's from the pallets became the shelf underneath. The shelf has been great for holding extra tools while I'm working on projects. My daughter likes to stack her toys on it too! This was a super quick and easy build. My wife even suggested we just refinish it and bring this one inside!

As always, I have to give thanks to Ana for such great plans!

Estimated Cost
$2
Estimated Time Investment
Afternoon Project (3-6 Hours)
Finish Used
We haven't yet decided on the finish, we might just use a clear coat and call it done!
Recommended Skill Level
Beginner

My first "build"

Submitted by dkarinen on Sat, 06/22/2013 - 21:05

This was my first Ana White project. It was really super easy! I love the way it turned out! I can play around and change photos depending on my mood or the holiday. We had them all together pretty quick. I sanded and primed them and my husband used the spray gun to paint them. I quickly learned there is a technique to that and I didn't want to screw them up! Great beginner project, now I'm hooked on this site!

Built from Plan(s)
Estimated Cost
$70
Estimated Time Investment
Afternoon Project (3-6 Hours)
Finish Used
BEHR Rejuvinate
Recommended Skill Level
Starter Project

Farmhouse nightstand

Submitted by mgibson on Tue, 06/02/2015 - 13:30

This project was very fun, and it was my first nightstand. The directions are so easy to follow. Thanks Ana : )

Built from Plan(s)
Estimated Time Investment
Weekend Project (10-20 Hours)
Recommended Skill Level
Beginner

Comments

Faux Fireplace Mantle

Submitted by KristineF on Thu, 12/28/2017 - 08:15

Thank you for providing the plans to this mantle. I had a lot of fun building it with my father while I was training for the NYC Marathon. We finished it the day before the race and was a great way to display both of my accomplishments! It was also a lot of fun to decorate for the holidays. Next I have to build a nice shelf to display all of my finisher medals! 

Estimated Time Investment
Weekend Project (10-20 Hours)
Finish Used
Distant Gray paint with satin finish.
Recommended Skill Level
Beginner

Comments

Seasonal And Holiday

Loft bed

Submitted by Anonymous (not verified) on Sun, 12/26/2021 - 13:03

I used your loft bed plan and made some adjustments to better suit our needs. My daughter absolutely loves her bed and we love having all the extra room under her bed. Thank you and I will be using many more of your plans.

Justin

Comments

Tall Cupboard based on Single Locker Plan

Submitted by mac226 on Fri, 04/22/2011 - 14:22

We have a funny alcove in our kitchen that is narrow but very high.  I didn't want the space to go to waste, but because of the odd shape I couldn't find anything that would work.  I modified the Single Locker Cabinet plans to design a tall cabinet and reclaimed a door from an old wardrobe we found on the street.  


I tried cutting the wood myself with a circular saw, but the cuts weren't straight enough.   So I took the wood to a lumber yard and had it professionally cut.  I had to get a little help from a handyman to get the cupboard square, attach the door and get it anchored to the wall.  (It's so tall it could easily topple without being secured!)

We primed the plywood with two coats and then used and Eco-Friendly eggshell in white to finish it.  To keep the door securely closed we used a long double sided magnet strip.  Now that funny alcove is being put to use.

Built from Plan(s)
Estimated Cost
50
Estimated Time Investment
Weekend Project (10-20 Hours)
Finish Used
Two coats primer with white eggshell for interior. Primed door and used Antique Cream cupboard paint.
Recommended Skill Level
Beginner

Workbench

My husband and I just bought a home that has a fantastic shed/barn in the backyard. I've been wanting a workshop ever since college and this is finally my time to make that dream come true. Enter ana-white.com!! My sister had recommended this site after her husband created an unbelievable loft bed for their 6 year-old. Looking through all the plans I became ecstatic and couldn't wait to get my first project under way. I've printed out MANY plans and can't wait to work on them all, however I realized very quickly that I did not have a space to actually "work" on in the shed. When I came across this workbench plan I knew it was the right one for me.

Some changes were made, since I already had a perfectly good table top that I purchased from IKEA years ago. The top came out to be 23 1/2 x 78 3/4" so I had to make many adjustments in the cuts. I also left the bottom shelf free of plywood since I couldn't fit a piece that large in my Toyota Corolla. All in all, I couldn't be happier with the table. It's sturdy, reliable and provides a TON of workspace for me. My back is already thanking me!!

Built from Plan(s)
Estimated Time Investment
Afternoon Project (3-6 Hours)
Finish Used
No finish
Recommended Skill Level
Intermediate

Comments

bullitt453

Tue, 06/25/2013 - 05:58

Good job on the workbench. Since you can't fit the piece of ply in your car, I would recommend cutting a 2x4 support to go between the leg supports. Then cut 1x4s to place perpendicular to the supports to create the shelf. Believe me, that shelf will come in VERY handy, so I would definitely recommend adding it. Its nice to be working on a project and simply reach down for the next tool/supply instead of walking away from your work area to get it.

Simple Stackable Compost Bin from Pallets Collars

Submitted by mtairymd on Sat, 06/06/2015 - 13:48

Build Instructions:
http://www.instructables.com/id/Simple-Stackable-Compost-Bin-from-Palle…

How it works:
https://www.youtube.com/watch?v=Tgtd88kKIn0

With one single unit as opposed to two or three bins, the space needed for composting is minimized. Each tier stacks on top of the other, latching together to make the bin. This setup makes it easy to turn and rotate the compost, since moving the collars is simple. Just remove the top collar and place in a new location adjacent to the original bin location. Turn the compost into the new location and stack the collars until finished. This is a great alternative to having multiple compost bins next to each other.

Estimated Cost
Free
Estimated Time Investment
An Hour or Two (0-2 Hours)
Finish Used
Cabernet colored stain from Varathane and a polyurethane from Minwax.
Recommended Skill Level
Beginner

Table for barbecue

Submitted by Pjc6 on Sat, 12/30/2017 - 11:38

Modified plans to make it a little larger. Top is brown and bottom is ‘wild currant’ (red)

Estimated Cost
$80
Estimated Time Investment
Day Project (6-9 Hours)
Finish Used
Top was Olympic paint / sealant. Bottom was SW enamel acrylic
Recommended Skill Level
Intermediate

Bunk bed

Submitted by Anonymous (not verified) on Sun, 12/26/2021 - 14:45

Great build, easy to follow, very affordable. Thanks so much.

Comments

Little Bit Picnic Table

Submitted by Kevin on Tue, 04/26/2011 - 15:08

This is a great weekend project I would add supports to the table to make it a bit studier. I found out that any flat surface will be inviting for adults to want to sit on during a BBQ

Estimated Cost
$40
Estimated Time Investment
Afternoon Project (3-6 Hours)
Finish Used
semi transparent wood stain Behr tinted to Chocolate
Recommended Skill Level
Beginner

Charging Station supersized

Submitted by eande03 on Tue, 06/25/2013 - 21:09

We wanted a side piece for our kitchen so we followed the revised plans to make it a little taller. My wife is really happy with how it turned out. Easy, fun project that was finished quick.

Estimated Cost
$40-45
Estimated Time Investment
An Hour or Two (0-2 Hours)
Finish Used
Minwax weathered oak base coat topped with Minwax Polyshades Mission Oak Gloss. Used chip brushes, and Minwax pre-stain wood conditioner too. The gray from the weathered oak pops through just enough for our tastes.
Recommended Skill Level
Intermediate

Table and Chair for my Daughter "Hannah"

Submitted by toddh5902 on Wed, 06/10/2015 - 07:18

Such great and easy to follow plans. Even for a beginner like me. I did both projects in stages at my own pace and time. It probably could have been finished in a weekend, if I worked steady and straight through. Also if you are good and know exactly what you are doing, definitely in a weekend(haha). I just took my time and worked in baby steps, working through both plans. I am very pleased with the outcome. I did change a few things but that was my preference. I attempted to contour the chair seat, not bad but definitely not great. I used a handheld grinder with about 60 grit sandpaper to make the mold. If you are good and have a very very steady hand this can work. I have a router but not a jig for that type of pattern. All in all though I was very pleased with the outcome and so was my little Hannah. Thanks for this great website and keep up the great ideas.

Estimated Time Investment
Weekend Project (10-20 Hours)
Finish Used
No finish used yet at this time.
Recommended Skill Level
Beginner

Rustic table

Submitted by jdawn1988 on Mon, 01/01/2018 - 16:05

We built our table from the rustic table plans and I am in love. I am a beginner and I was so scared but it turned out amazing!! Thank you for giving me the courage and confidence to start building my own furniture! 

Built from Plan(s)
Estimated Time Investment
Weekend Project (10-20 Hours)
Finish Used
Minwax stain in slate
Minwax polycrylic
Recommended Skill Level
Beginner

Queen Storage Bed with Drawers!

This was our third major building project (I've built some frames and small shelves in my free time but our other two big projects were the bunk beds and the tryde coffee table).

This was our first time cutting plywood boards and it was a huge chore at first, until we got the hang of it and built a good circular saw guide that cut our cutting time by more than half.

We couldn't find the type of drawer slides we needed so we decided to forget them and built our own wood slides. They basically are just L-shaped brackets made of 1x3 (on the bottom) and 1x2 (on the top), adjusted to the right spot to hold the drawers in place. A little candle wax (a trick learned from my husband's grandfather) is all you need to make them slide nicely. All in all, we built drawer slides out of wood for the about $20 total. Huge savings and honestly I think I like it better that way.

Things I learned during this project:
Plywood is a lot heavier than I ever imagined.
Cutting plywood is not fun.
I will never complain again about cutting boards with the miter saw!
Stainable wood putty is a joke. You can clearly see every spot I puttied. From now on we buy the colored stuff that already matches the stain!
Building drawers isn't scary--I thought it would be. I actually built all the drawers by myself in one morning, when hubby wasn't even around to help.
90-degree gripper things are a must have. And the more you have, the better.
Elmer's wood glue is really stronger than nails. We glued something and didn't like it and were unable to break it off so we had to nail it as it was!

This project took us nearly a month, but to be fair, I was out of town for two weeks of that time and this is definitely a project for four hands, not two.

Overall, it was a great experience and I'm so excited for the extra storage--our house is small but we don't want to move so we are trying to make use of every inch of space, without the house LOOKING like we are making use of every inch of space.

Next up: new bedside tables to match the bed.

Built from Plan(s)
Estimated Cost
$400-$500
Estimated Time Investment
Week Long Project (20 Hours or More)
Finish Used
Varathane American Walnut: two coats. Applied with paint brush, allowed to soak and then excess wiped with old socks (loved the old sock trick, thanks, Ana).

One coat of minwax semi-gloss poly.
Recommended Skill Level
Intermediate

Treehouse Bunk Bed

Submitted by Maymer on Thu, 06/27/2013 - 12:18

My kids are very into the "Magic Treehouse" books so my version of the Sweet Pea Bunk Beds is called The Treehouse Bunk Beds!
I made a few modifications, mostly for ease of access and airflow. I added windows for each bunk on the non-stair side of the bed because my kids room tends to be really hot so I thought they would appreciate more cross ventilation.
I made the side panel on the upper bunk removable (so that I would have access to put the fitted sheet on that end) by using pocket hole screws to hold the boards together, which make it one solid panel then I put 1x2s behind where the panel would go so it wouldn't fall in and used 4 slide bolts to hold it in place so it wont fall out. Also I made the two front panels on the lower bunk hinged doors so I could just lean in to change the sheets. The method for these was basically identical to what I described above but I attached them with non-mortised hinges.
I'd love to get the storage boxes made on of these days. Maybe after they start kindergarten!

Estimated Time Investment
Week Long Project (20 Hours or More)
Finish Used
I used primer and two coats of low-voc interior paint on the light brown and dark brown areas. The green trim and stairs I decided to experiment and I really liked the results. I just put one very thin (practically dry-brushed) coat of paint and it came out really interesting. You can still the grain of the wood so it almost looks like colored stain. For the stairs, I was worried about durability so I put 3 coats of clear satin polyurethane on top and it seems like it will hold up just fine,
Recommended Skill Level
Intermediate

Comments

Natural Finish Cedar Planter

Submitted by benpryor82 on Mon, 06/15/2015 - 07:15

Great results from this plan. The additional mitered top is easy as long as you can get a good 45 degrees on your saw. If you decide to do the top piece, glue the 4 mitered pieces together and clamp for a couple of hours in order to make sure the angles set correctly. Once the glue is dry, then attach to the top of your planter with glue and nails. I built 2 planters, including the mitered top edges, in about 5 hours.

Built from Plan(s)
Estimated Cost
Less than $50 for two planters.
Estimated Time Investment
Afternoon Project (3-6 Hours)
Finish Used
Unfinished, but will likely seal with Thompson's
Recommended Skill Level
Beginner

Letter A shelf

Submitted by Knathu121 on Fri, 01/05/2018 - 20:14

I made this Letter A shelf for my daughters nursery with scrap wood I had.

Built from Plan(s)
Estimated Cost
Under $10 due to the fact that I only need to buy screws.
Estimated Time Investment
An Hour or Two (0-2 Hours)
Finish Used
Spray painted white and then lightly spray painted pink.
Recommended Skill Level
Beginner

Farmhouse Bed- Queen Sized - Self milled wood.

Submitted by Anonymous (not verified) on Sun, 12/26/2021 - 19:46

All of the wood used in the project was milled in our yard, from trees on our land. The 4x4 uprights are poplar, and the rest is spruce, all originating within 500m of our house. The wood was sticker stacked for 2 years prior to planing down to the required size( last picture shows a not yet planed 1X6.)

Was a great project we have had many compliments on as it is the bed in our guest bedroom and has been used plenty during the Christmas season.

My only change up was using 1x6 for the side rails instead of 1x10 due to availability. Turned out amazing!

Built from Plan(s)

Comments

Entry table

Submitted by Marisol on Wed, 05/04/2011 - 20:14

2nd project, but learning quickly! :)

I first started with the wall treatment, love board and batten walls, they add such a crisp look and tons of character, but then the entry way was a little bare. So I needed a table for our keys and some lighting...so this table was perfect, narrow and Pottery Barn looking...

It took about 1 hour to build, including cuts and everything....the staining was the task...my God was I impatient!
I started with the wood conditioner, which only gives you a 2 hour window to add the stain, but do need to wait 15 minutes to start...then I did 2 coats of dark walnut stain and after 8 hours of drying time came in the top coat...which takes 4 hours to dry and then a 2nd coat needed to be added (which I skipped) but I love the color, love the turn out.

So light, I carried it ALL by myself. :)

Built from Plan(s)
Estimated Cost
$15.00
Estimated Time Investment
An Hour or Two (0-2 Hours)
Finish Used
Minwax wood conditioner & Minwax Dark Walnut
Recommended Skill Level
Starter Project