Community Brag Posts
Plant stand
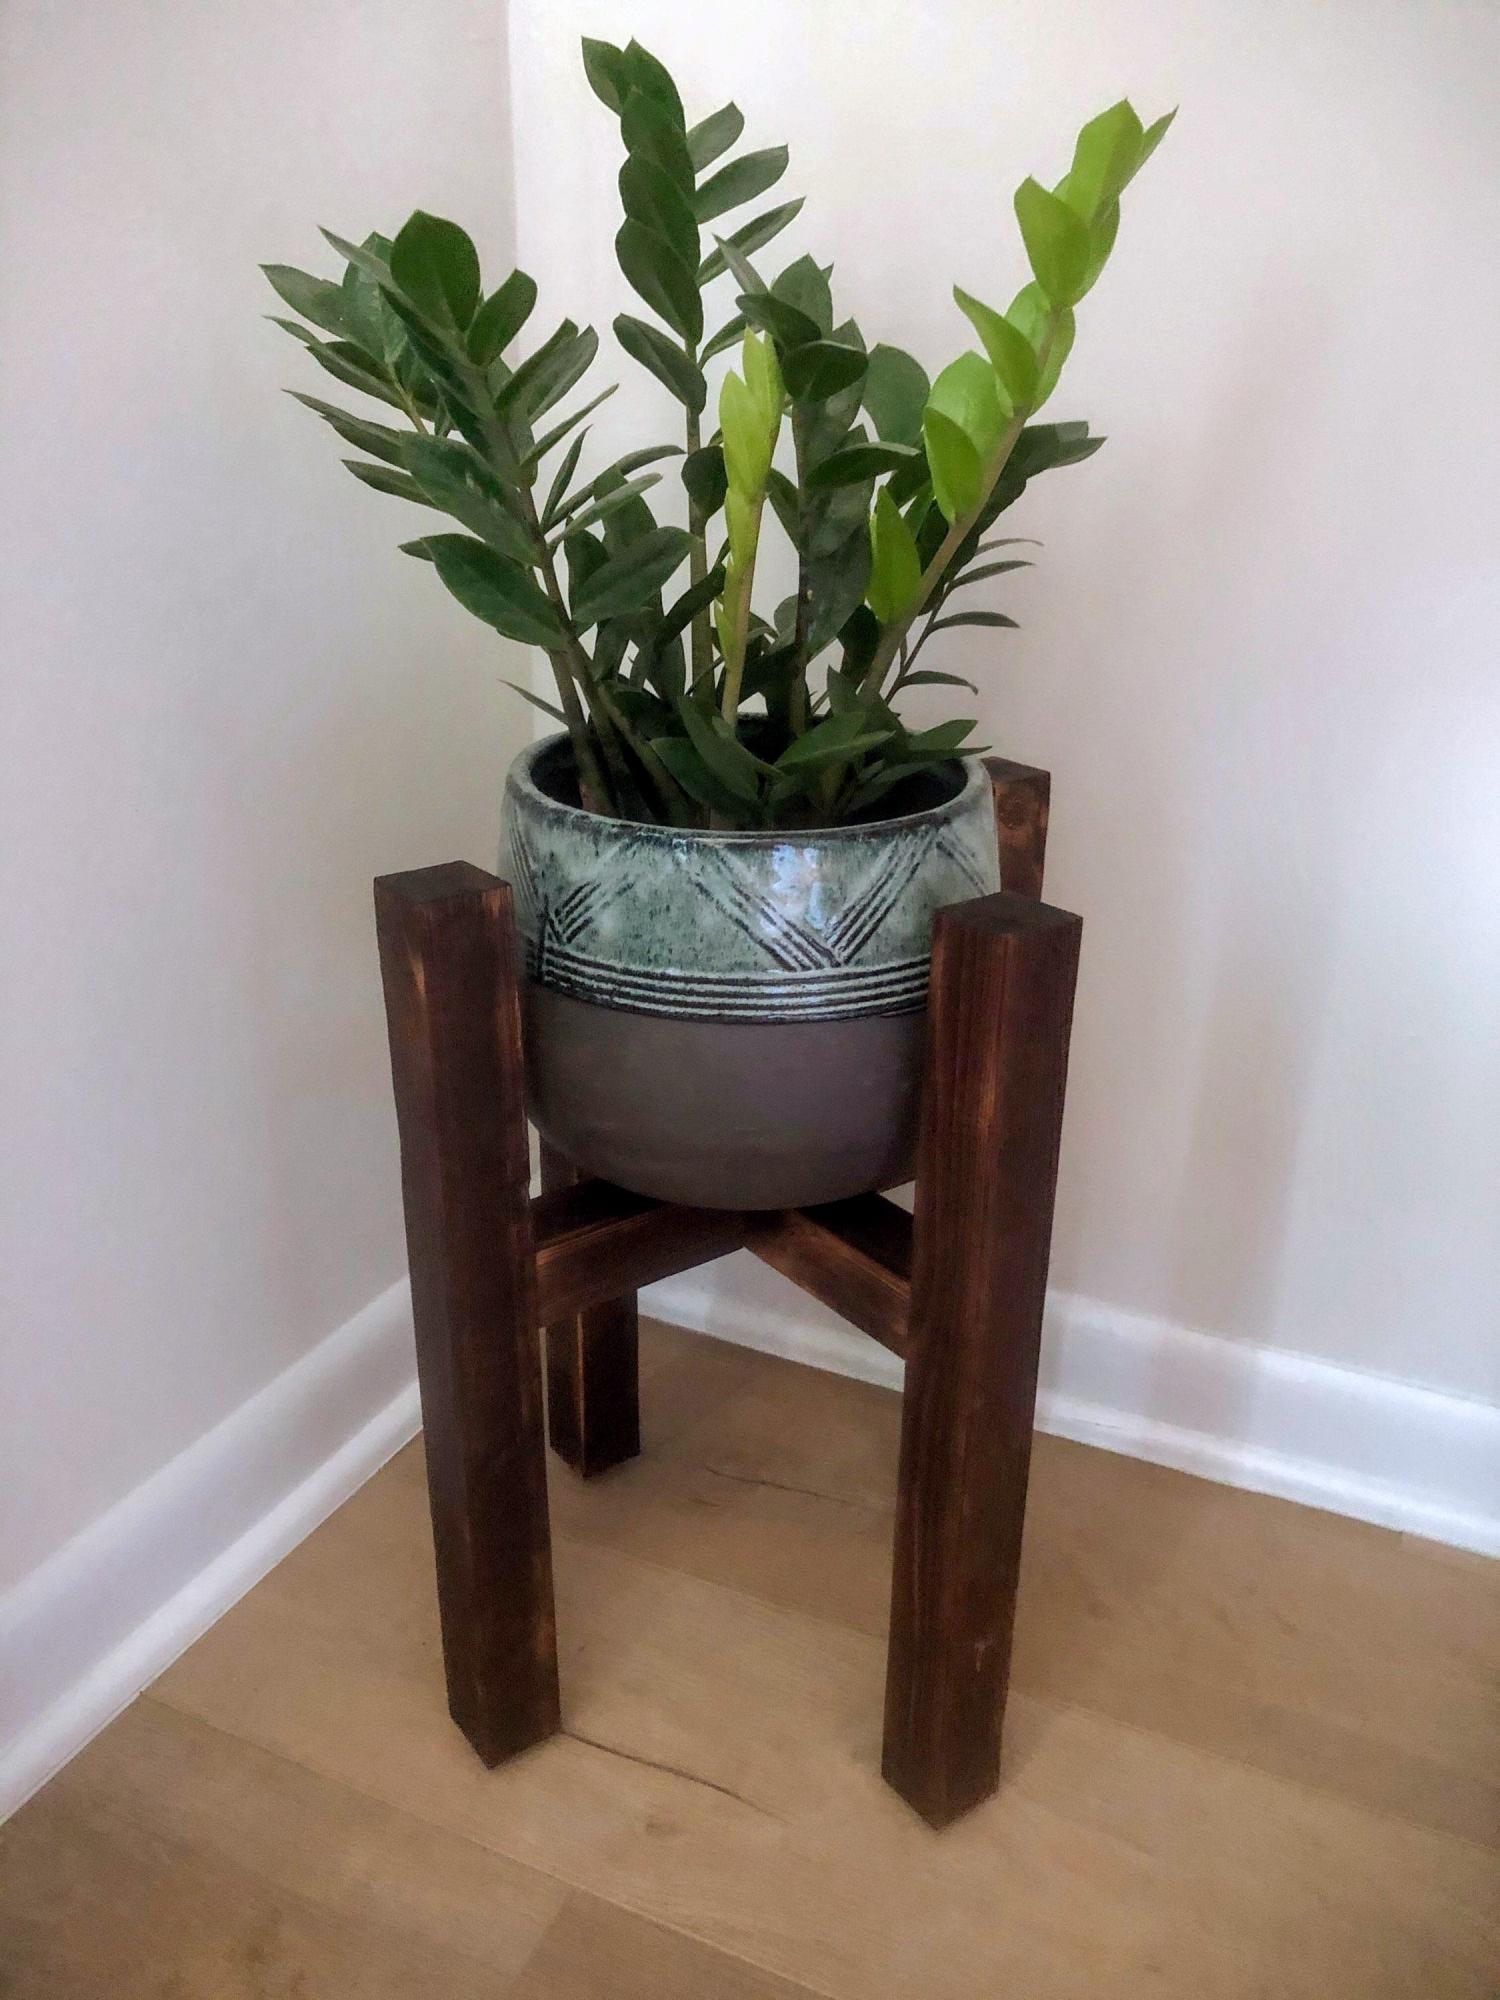
I made 3 of these for a friend. 2 @ 16", 1 @ 20".
Built from Plan(s)
Estimated Cost
$40.00 for 3
Estimated Time Investment
Afternoon Project (3-6 Hours)
Finish Used
Shui sugi ban. Just burned and brushed off.
Recommended Skill Level
Beginner
Toy Cabinet
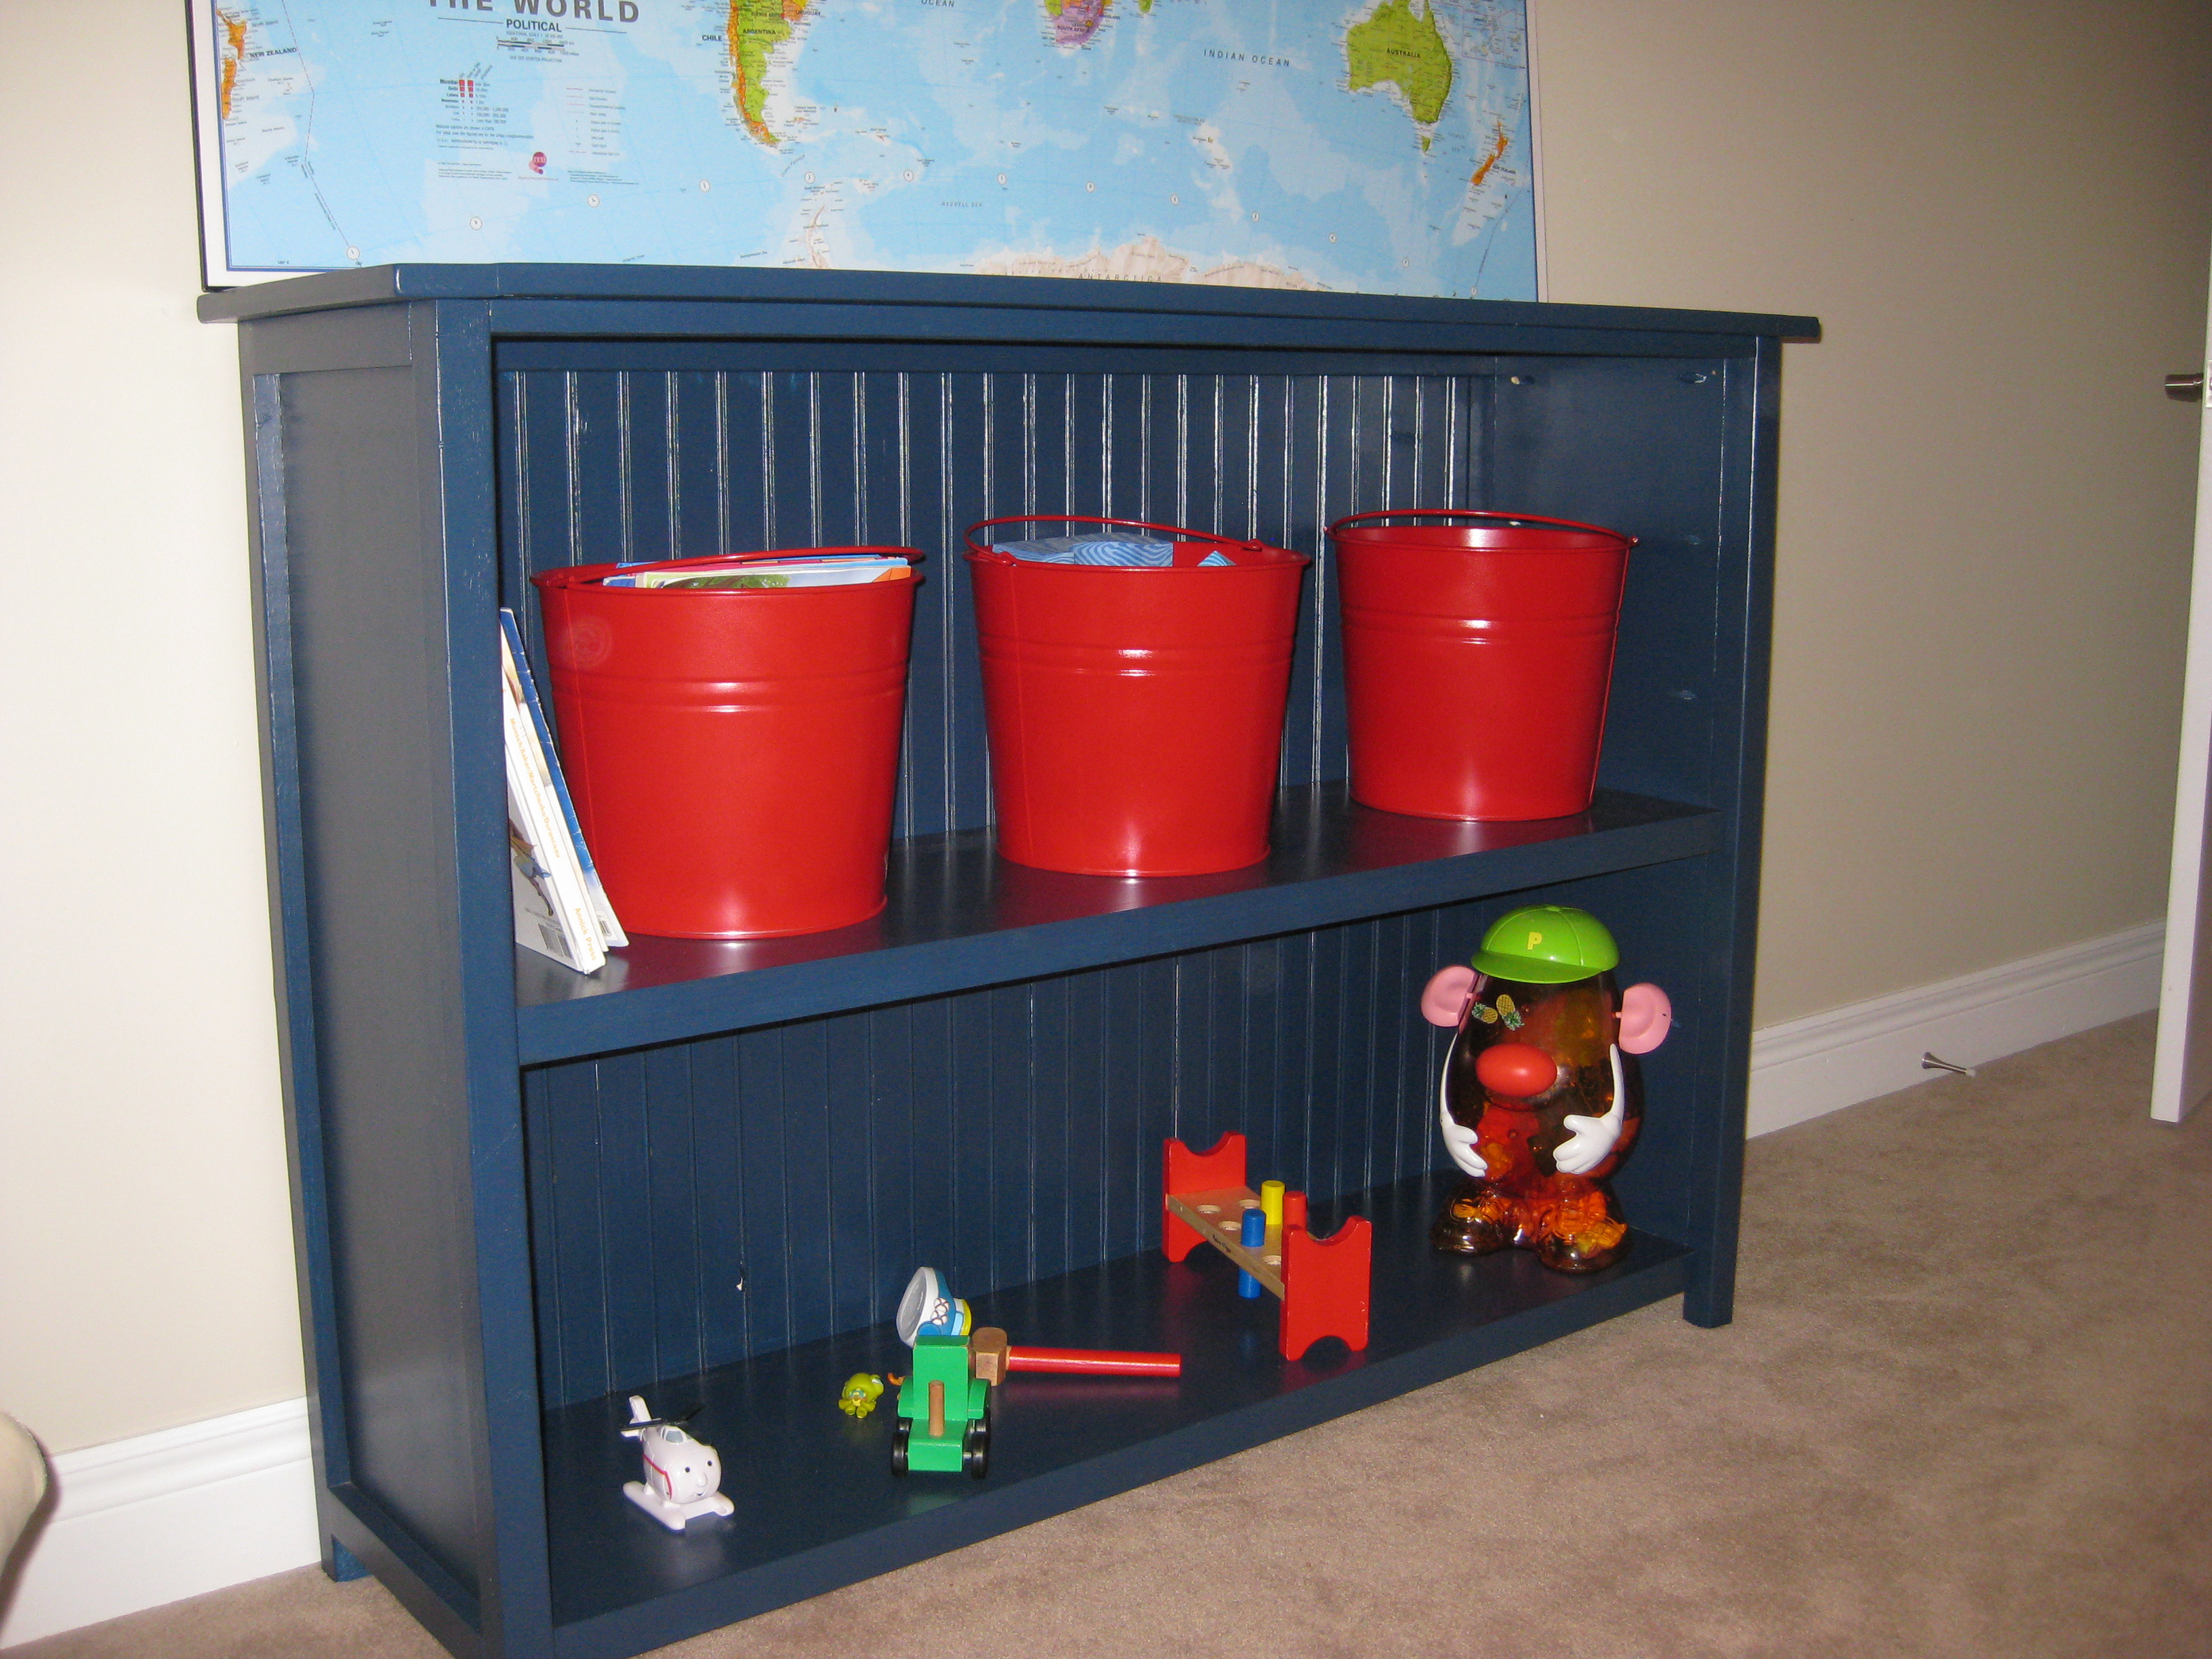
Originally the plan was to build bookcases for the family room using Channing Bookcase plan but after the wood was cut, priority switched to 2 year old Nathan's bedroom so I just flipped the height to the length and only added one shelf. Instead of a solid backing we decided on wainscotting for added interest.
Estimated Cost
$50
Estimated Time Investment
Afternoon Project (3-6 Hours)
Finish Used
Benjamin Moore paint
Minwax ploycoat
Minwax ploycoat
Recommended Skill Level
Beginner
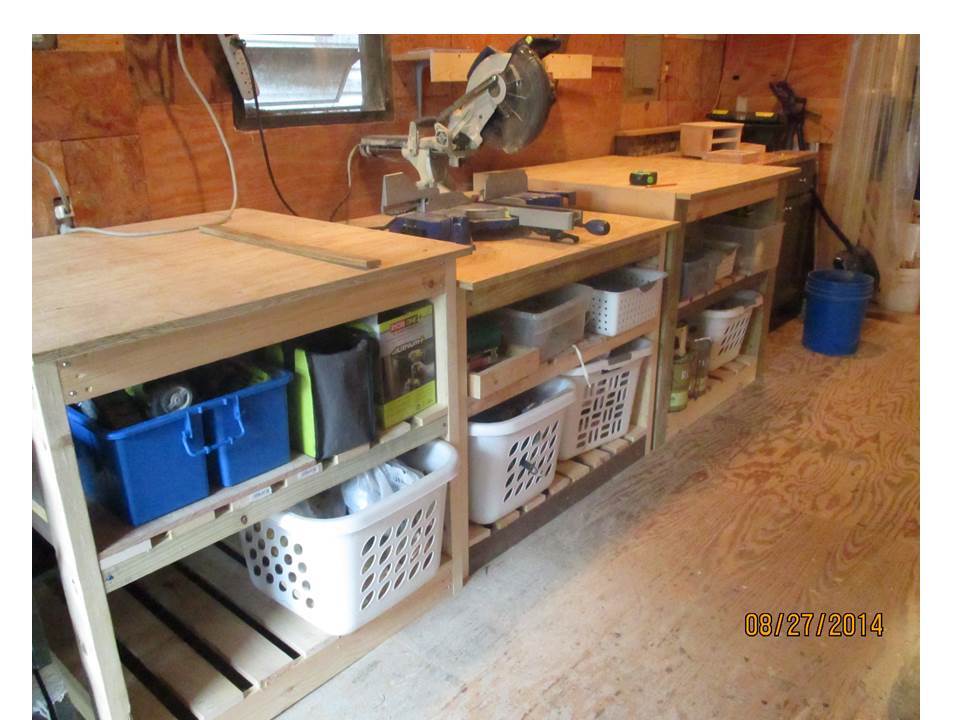
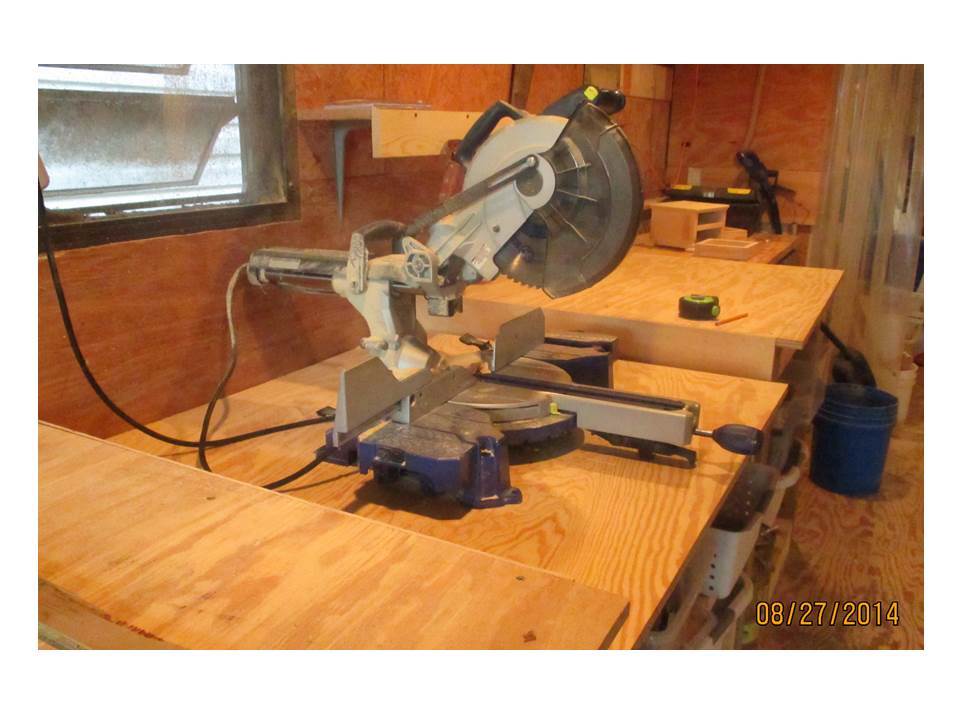
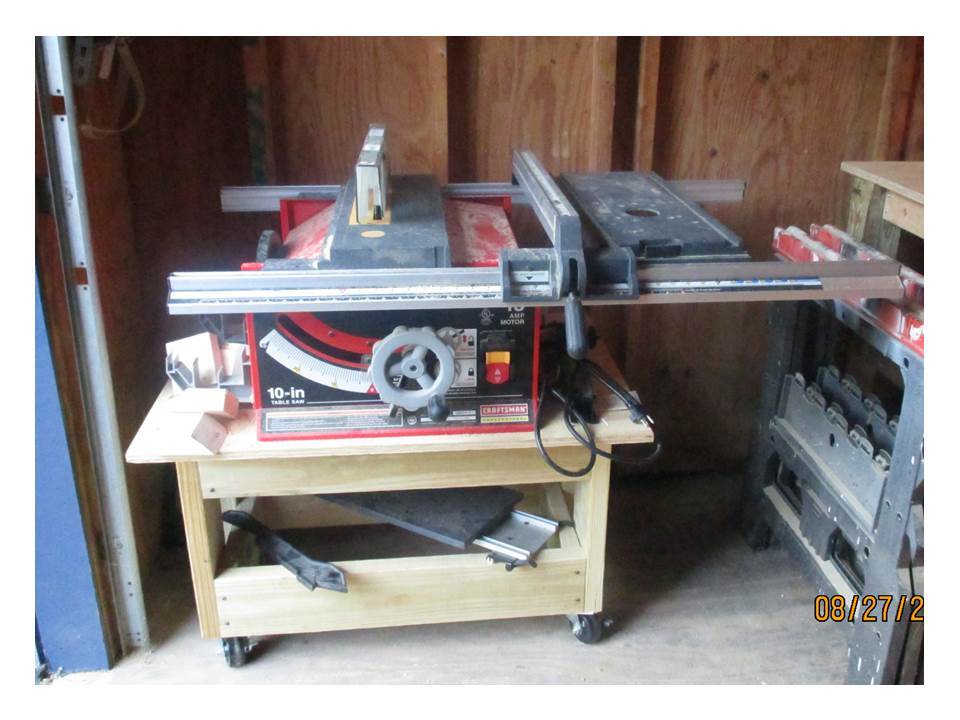
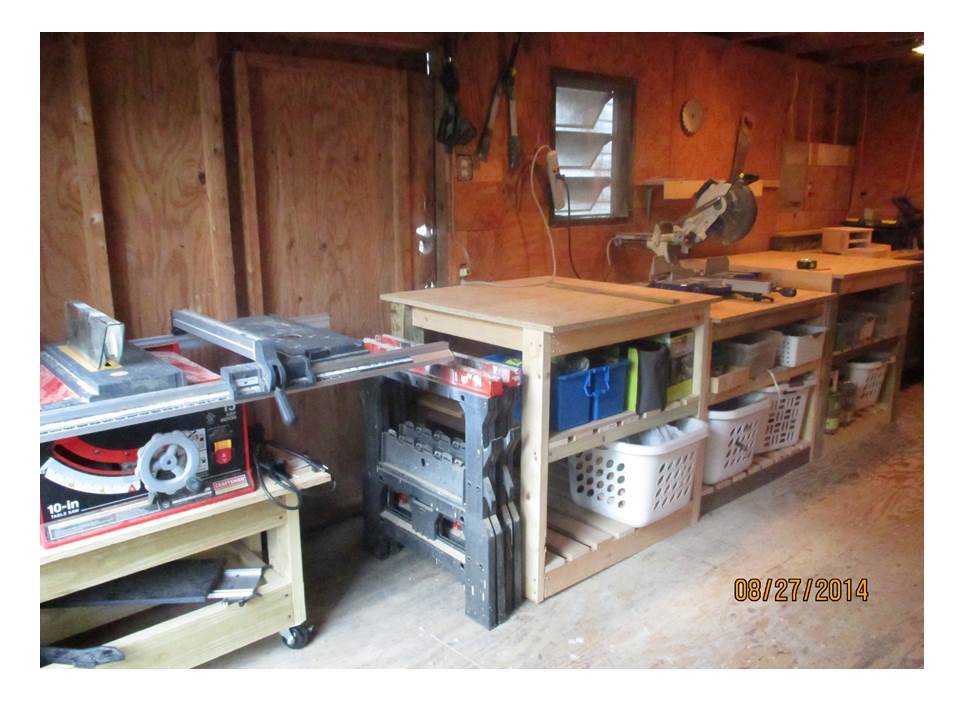
Work Bench Wall!

Built a whole wall of work benches for my garage! Instead of one giant bench this is made as 3 separate benches, plus a rolling bench for the table saw. They are a combination of elements from 3 plans - - the Sturdy Work Bench, the Workbench to Get the Job Done, and the Simple Rolling Bar Cart.
The heights allow for the long pieces cut with the miter saw to rest on the side tables, and when using the table saw (it’s on wheels) the tables can catch the pieces as they push off from the back of the table saw. The bench top surfaces are at 36 ½” tall, which is the height of the “deck” of the table saw, and the miter saw table is 3 ½” shorter. The side table widths are sized to fit the wood on hand (one at 36” and one at 40”), and the center lower one is 40” wide to allow plenty of elbow room for cutting miters on the sliding miter saw. The table tops are 36” deep, which allows plenty of working room and space for the sliding miter saw. The table tops overhang 2” on the front and back.
The leg assemblies are made from scrap and left over wood from multiple projects we’ve done over the last couple of years, which includes regular and treated lumber (1x, 2x, and 4x4 pieces, and even some reclaimed 5/4 decking boards ripped down). The legs are a mixture of 2x4’s and 4x4 posts. The only lumber that wasn’t already on hand was some more 1x4’s for the shelf slats and the plywood for the tops. Since this is a work bench, the finish will remain au naturale. It does need some additional sanding on the sharp/pointy edges on the table tops though.
The blue caddy at the end of the left shelf holds my newest power tools – Ryobi One Plus 18V Airstrike nailer and compact drill/driver, with extra batteries. Woot!! Those came in really handy on this build!
For now the shelves have open bins and baskets, but the plan is to get closed (clear) bins with lids for all the things on the shelves, to protect everything from the sawdust.
The shelves are slatted so they wouldn’t gather such big piles of sawdust since the tables are open. I can just vacuum or use the blower at the bottom to remove the sawdust that falls through.
The table saw bench was an afternoon project, and the 3 benches took several hours spread out over 3 weekends. I'm delighted with how these turned out, and can't wait to use them for more projects!
Built from Plan(s)
Estimated Cost
$175 for 1x4s, sanded plywood and screws (the rest was already on hand)
Estimated Time Investment
Week Long Project (20 Hours or More)
Finish Used
Leaving this unfinished
Recommended Skill Level
Beginner
Comments
Thu, 08/28/2014 - 11:35
I love when people share their workshops
If you go to lumberjocks.com or any woodworker website, you can find shop tours by the hundreds. Of course, most of these shops are used by really dedicated amateur or professional woodworkers. It's been great to see inside the shops of "average jolene" woodworkers like me.
I have a garage that can maybe accommodate a shovel or a rake (but not both) so this workshop layout wouldn't work for me. BUT it's a great use of some of the designs on Ana's website and would be excellent for a double car garage or a "garage and a half" layout.

Thu, 08/28/2014 - 13:26
Thanks HD!
Thanks HD! Our garage quickly morphed right into a workshop shortly after we moved into our house. It's a single car width. Since we don't park vehicles in there, we use the whole front of it as a workshop. It started out with old tables and repurposed furniture pieces from the house as our workstations. My DIY dream would be to have the folks from that show "Garage Mahal" come over and do an awesome climate controlled space with a mega dust collection system, *sigh* :)
Thu, 12/27/2018 - 14:52
Well Done!
This great! I'm going to try to replicate 3 of those pieces. Thanks for the inspiration - awesome!
Pine and Aromatic Cedar Blanket Chest

Raised panel pine blanket chest lined with 5/8" aromatic cedar.


Estimated Cost
$200
Estimated Time Investment
Week Long Project (20 Hours or More)
Finish Used
Tinted Shellac and butcher's wax
Recommended Skill Level
Advanced
Comments
Fri, 06/14/2019 - 10:03
this looks great, is there…
this looks great, is there anyway you can share plans to build this??
again, great job
Michael
Wed, 11/13/2019 - 07:15
I have searched and searched…
I have searched and searched and cannot locate the plans either. I am making 3, for my daughters for Christmas and this one is amazing. please share plans.
thank you!!
Farmhouse King Bed

Built the farmhouse bed for standard king bed. Painted bed frame and stained the top boards.
Built from Plan(s)
Estimated Cost
250
Estimated Time Investment
Weekend Project (10-20 Hours)
Finish Used
Dark walnut stain
Night view paint
Night view paint
Recommended Skill Level
Intermediate
Cedar picket shed for mower
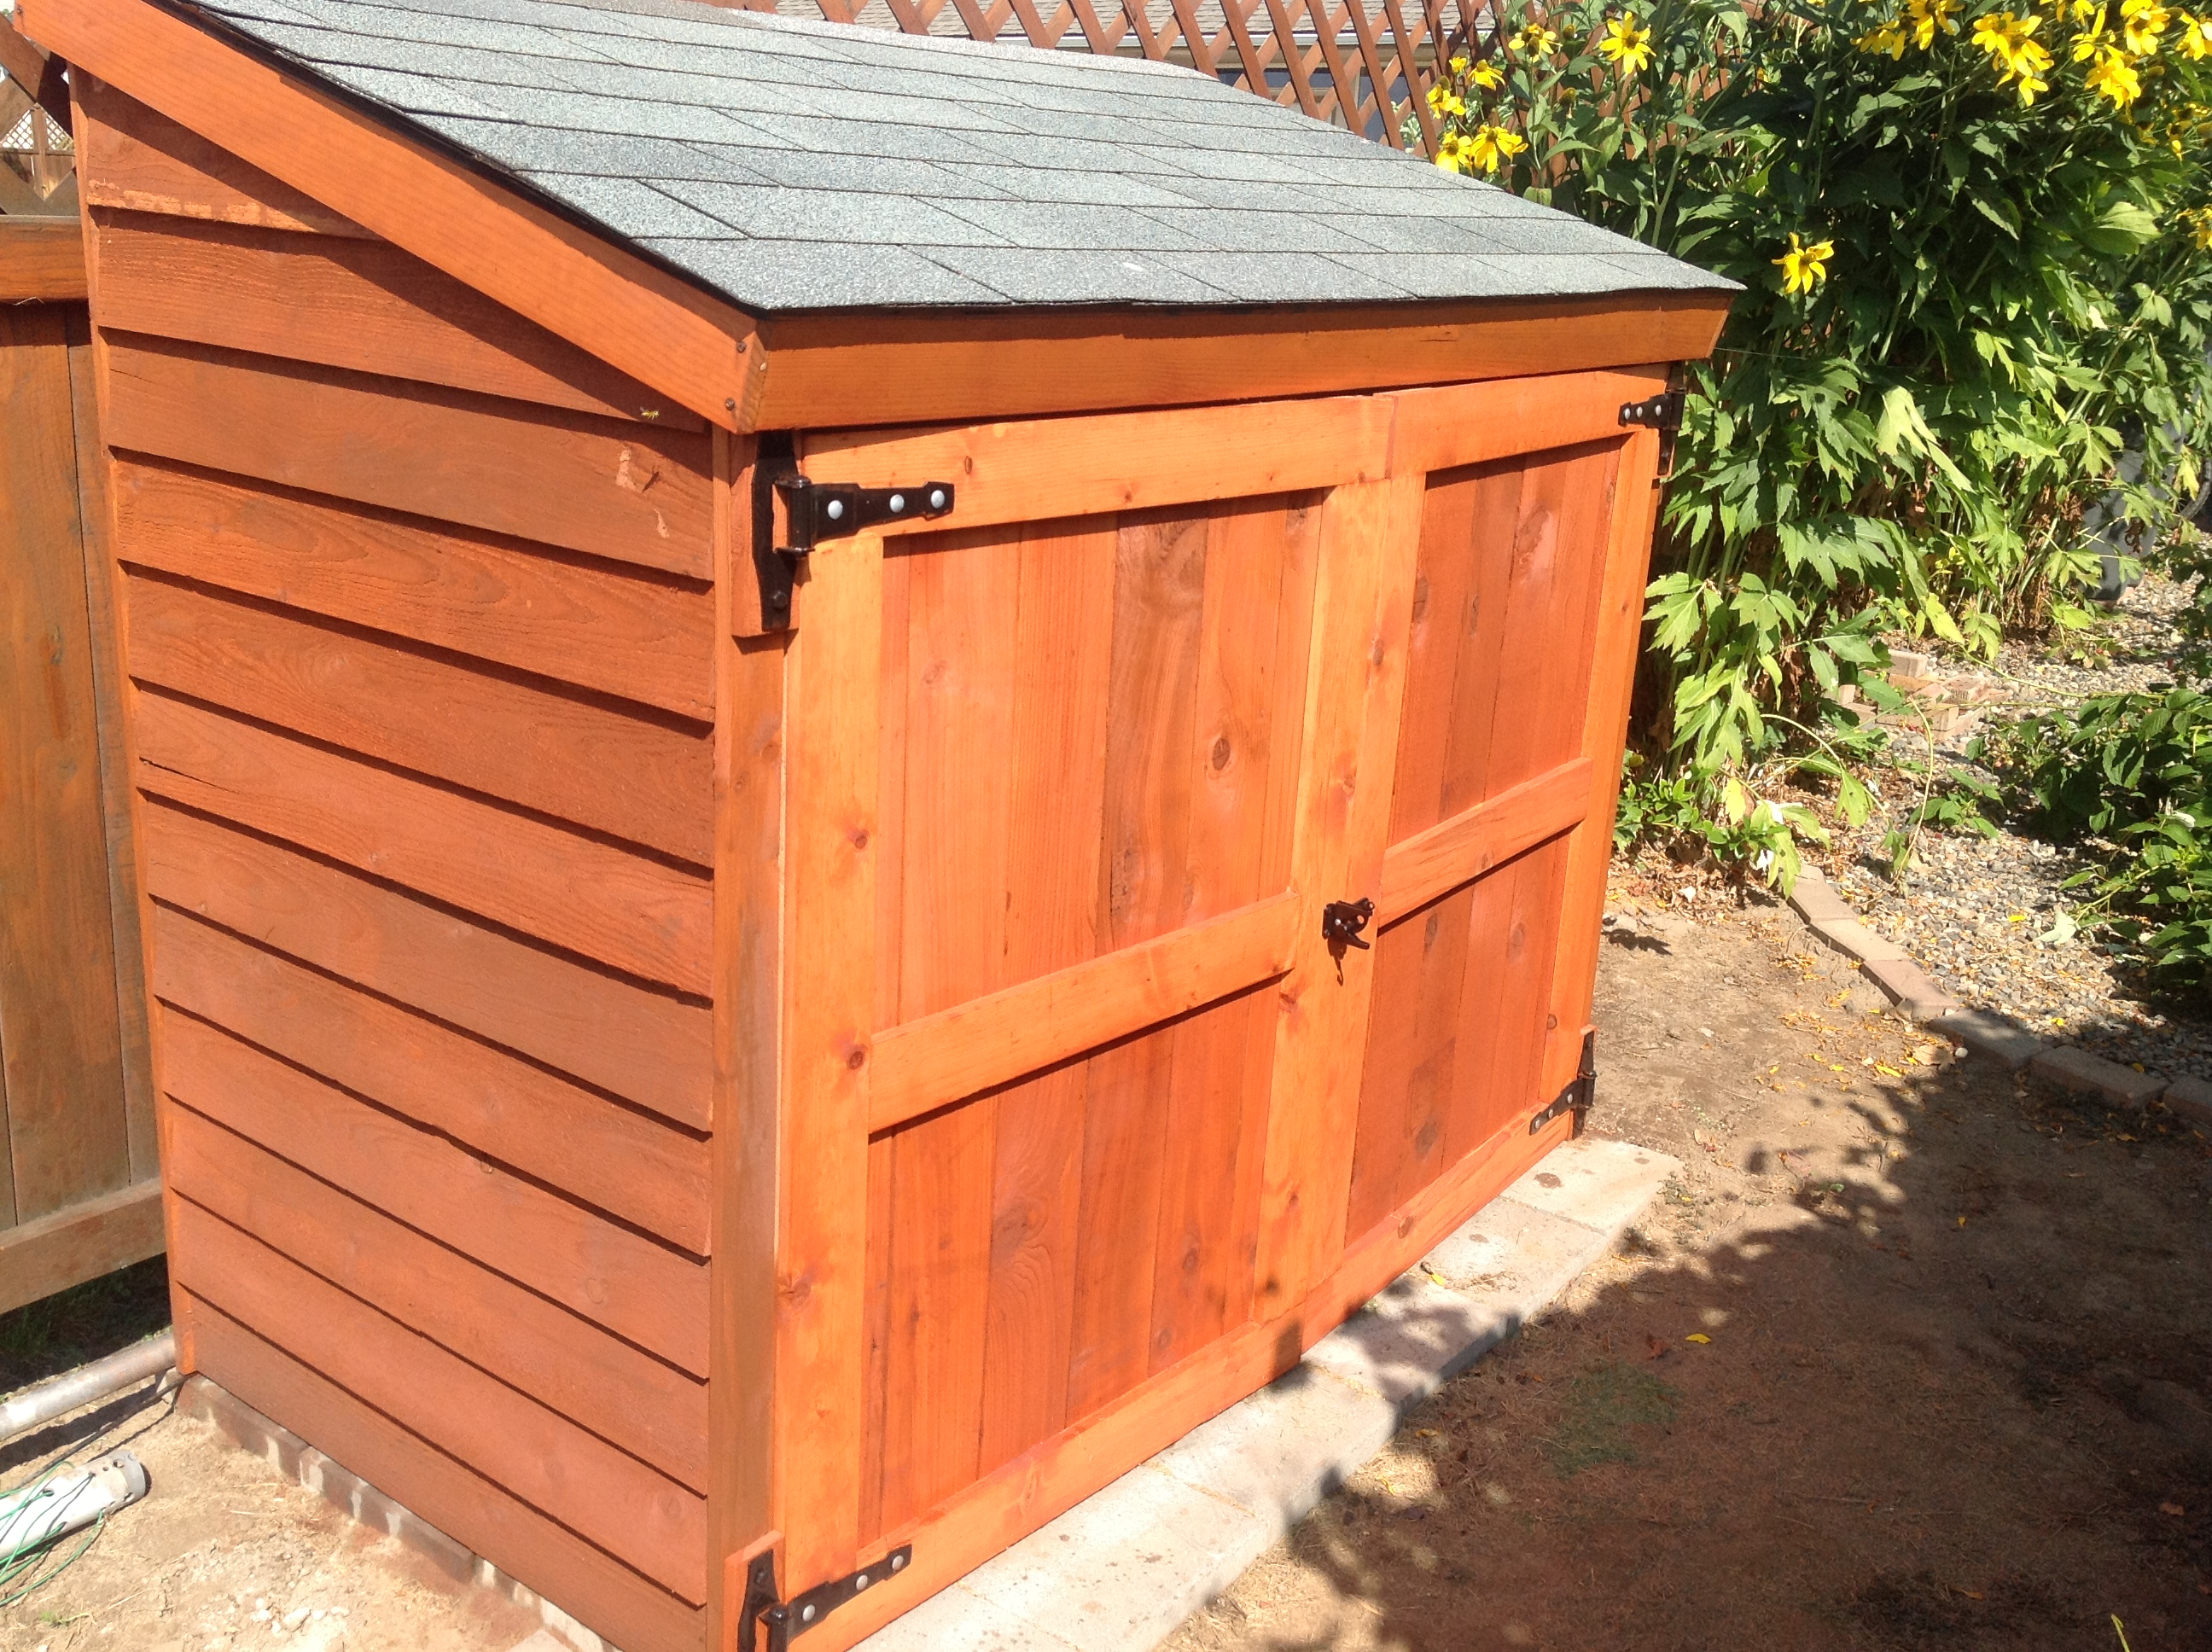
I loved the plan for the cedar picket shed. It was tall enough to block my neighbor's view, so I shaved 20 inches off the height. It is the perfect size for a mower. We made a floor out of 12 inch blocks. The ground we have here packs very well, so I think it'll be good for a long time. We also have a lot of wind, but this thing isn't going anywhere!! It is solid. I also like the fact that it takes a stain right along with the fence and there is no painting involved! The hinges you recommended were great.
Estimated Cost
about $300
Recommended Skill Level
Beginner
She's only been asking for 3 years (Doll House)
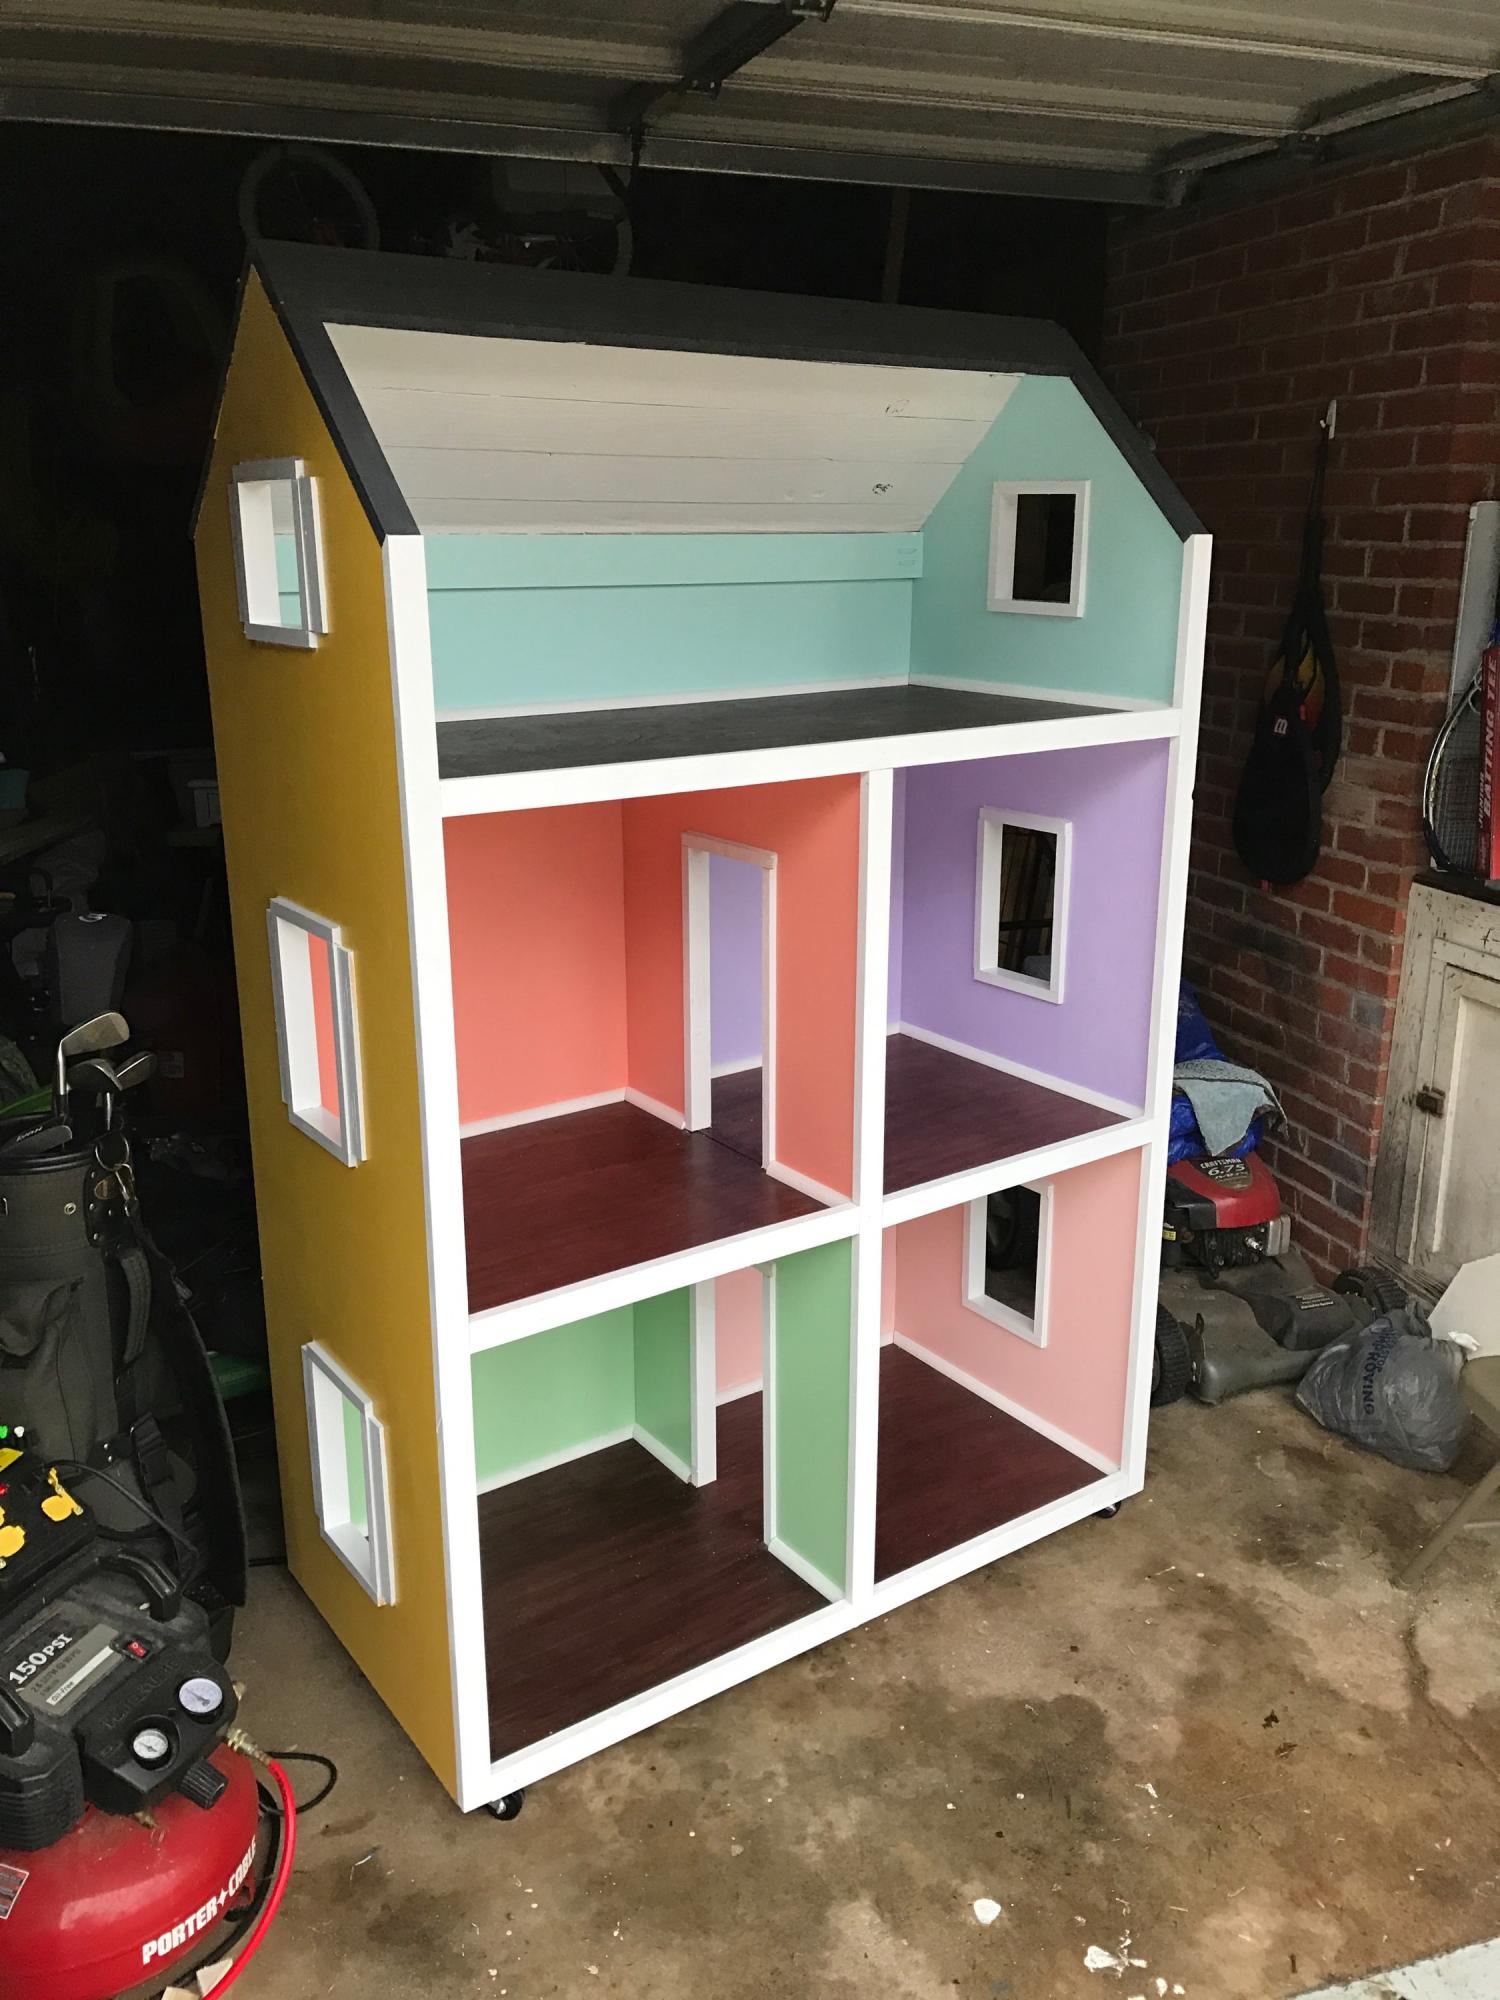
My Daughter has only been asking for a Doll House for like 3 years. This Christmas her uncle is giving her her very first American Girl Doll, so I figured it was about time to get on that doll house. I couldn't be more thrilled with the results. Such a great plan and easy to follow. Thank you so much.
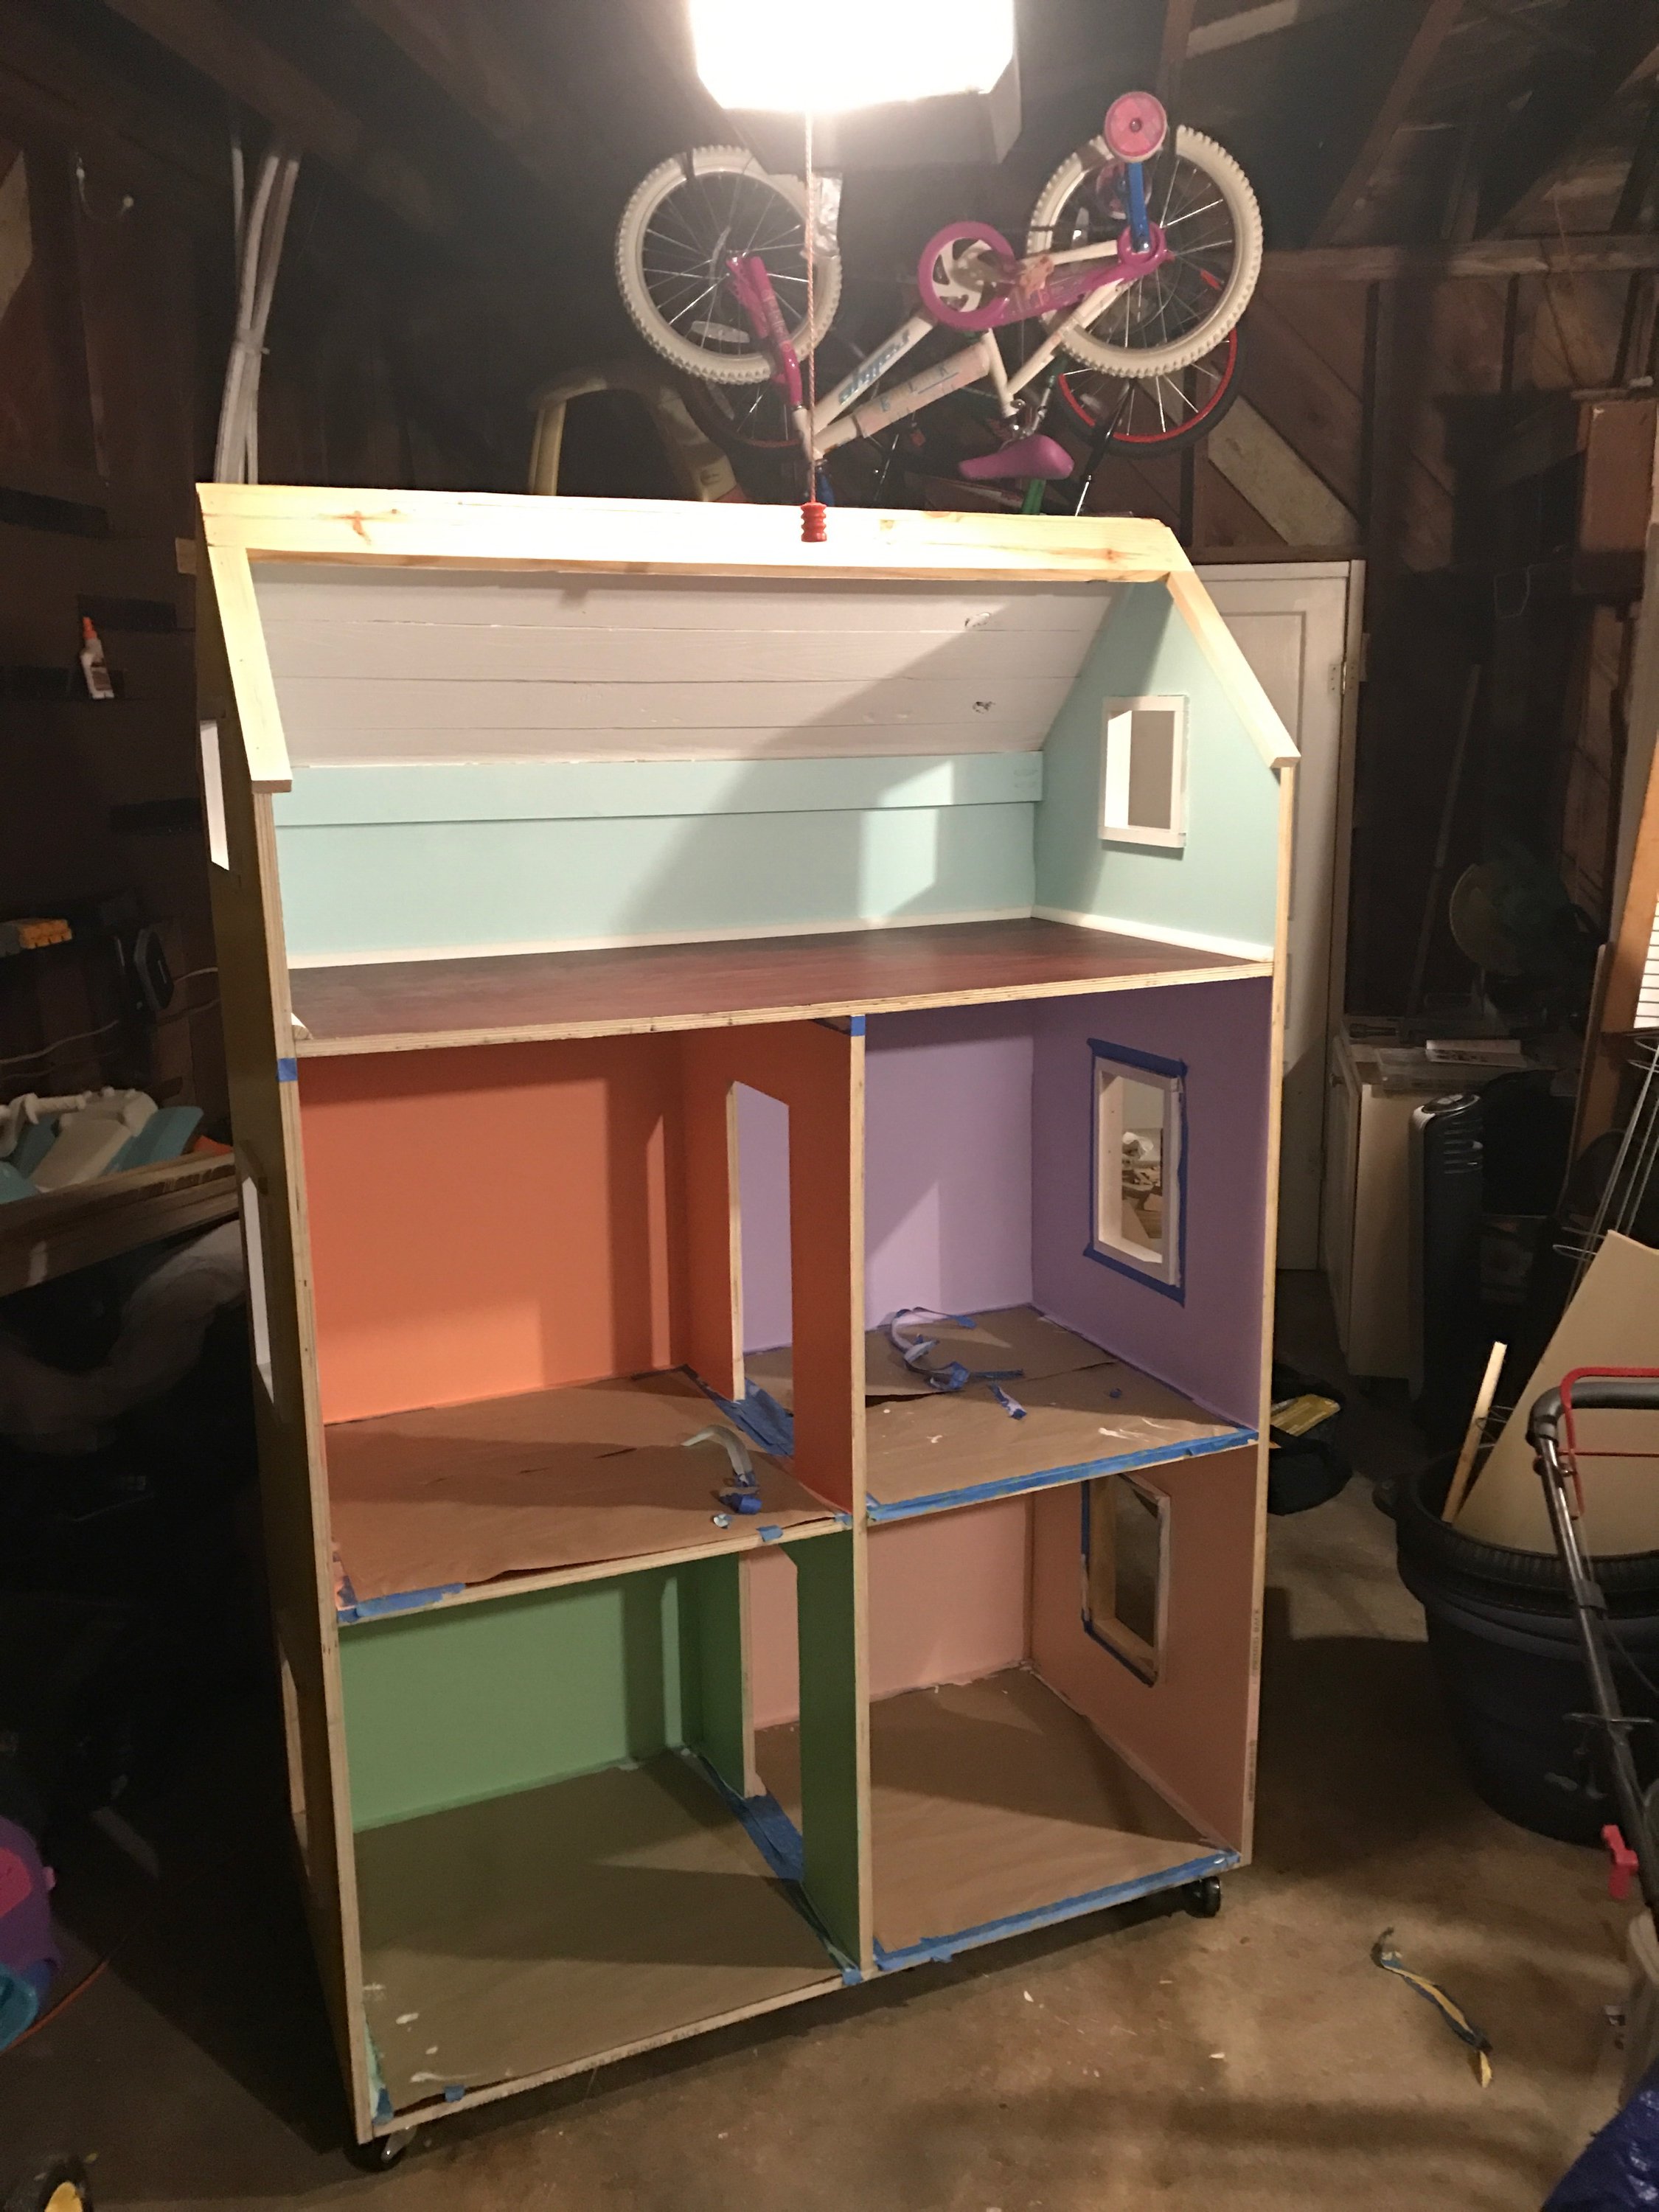
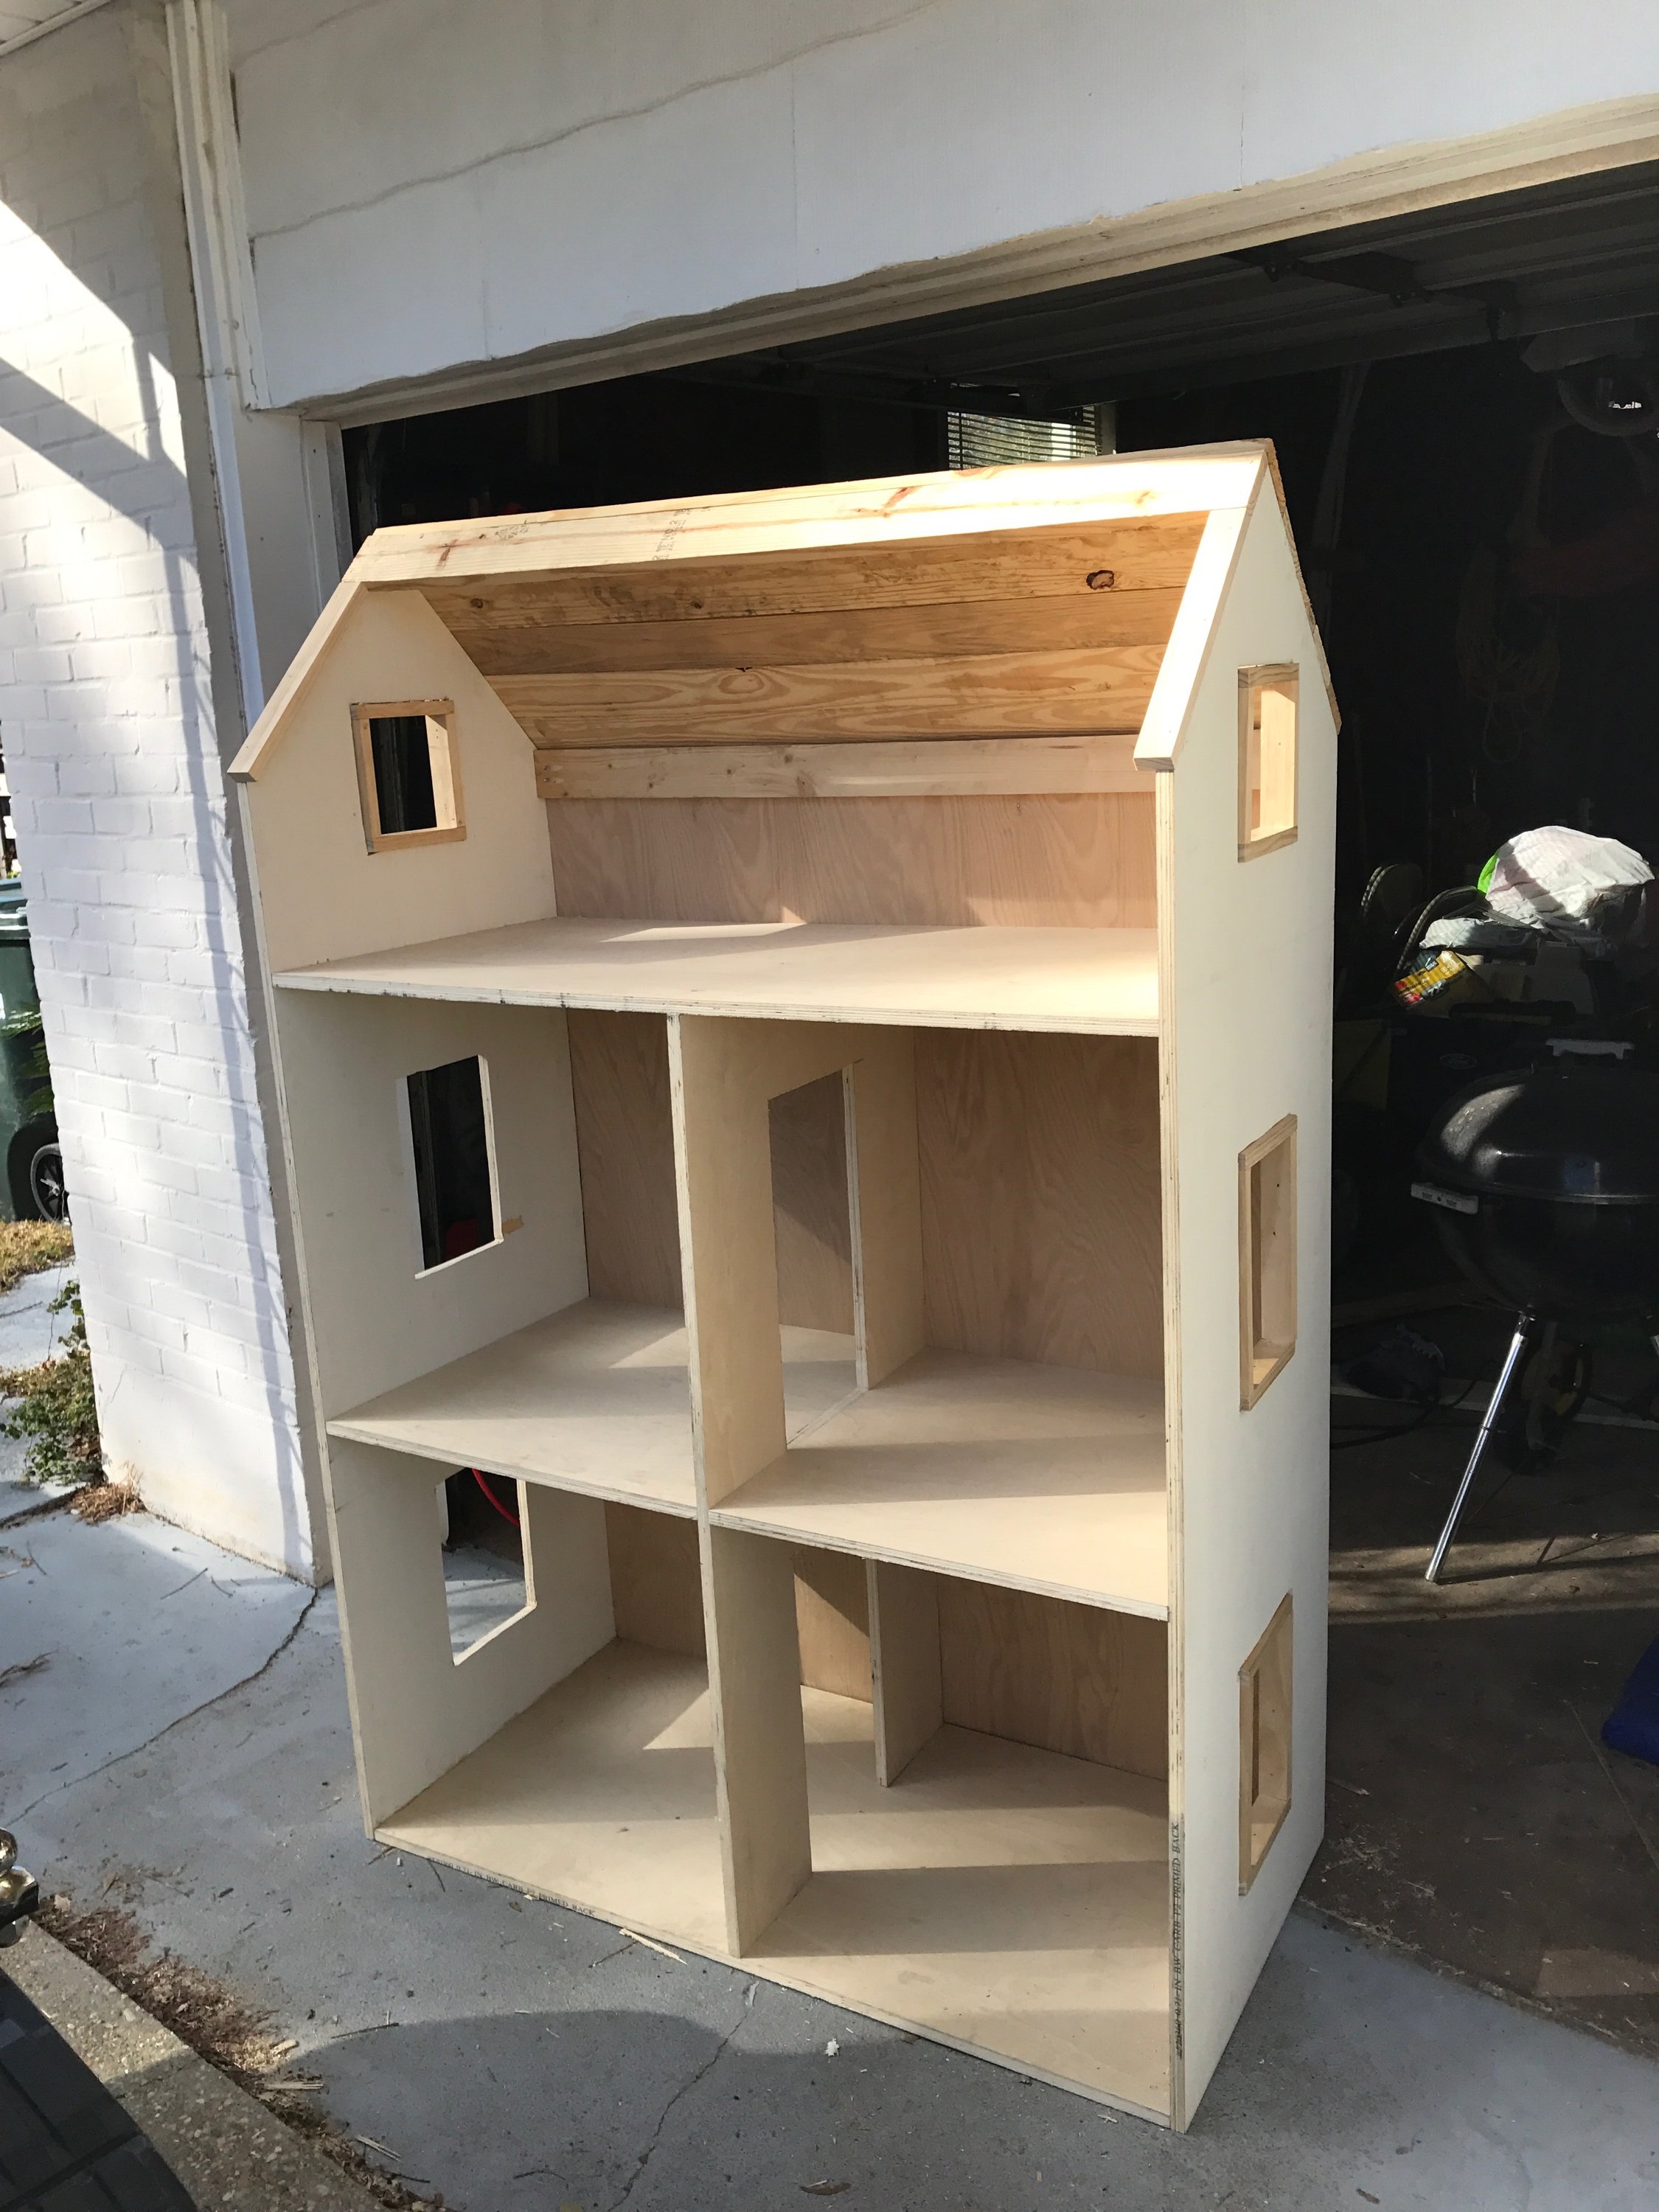
Built from Plan(s)
Estimated Cost
$250-$300
Estimated Time Investment
Weekend Project (10-20 Hours)
Finish Used
Used a Cherry Stain on the floors.
Recommended Skill Level
Intermediate
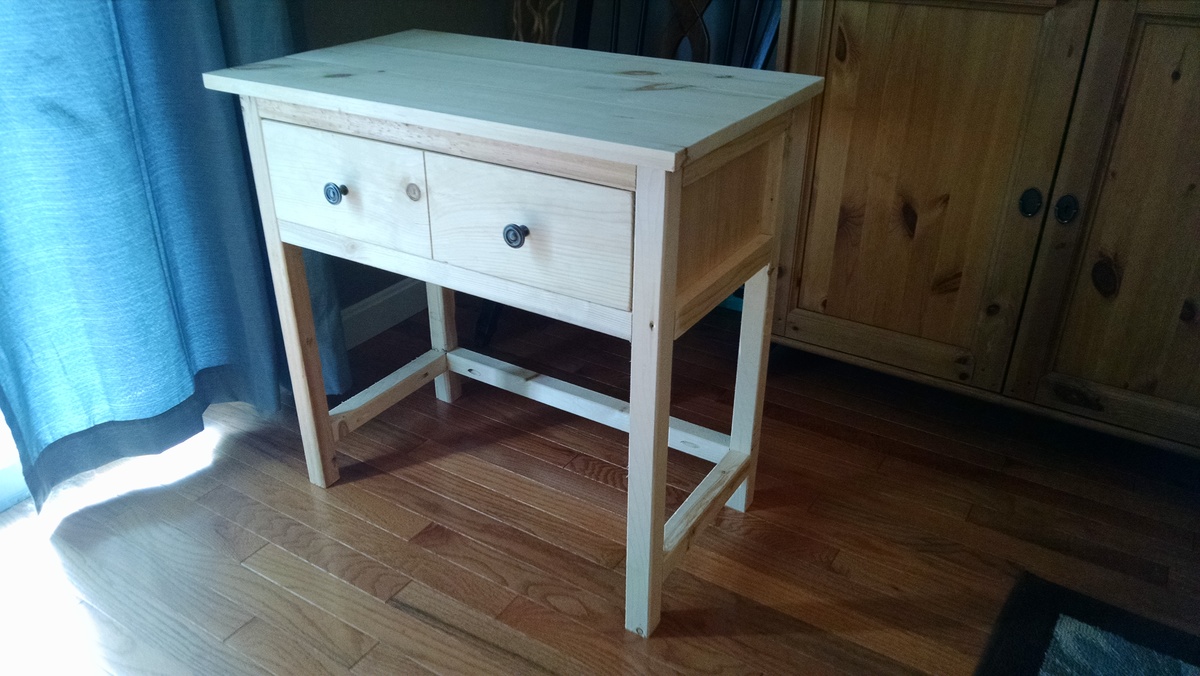
Modified brookston desk

We Built this desk for our son who’s having to do online learning for this school year. We modified the plans by using a project panel for the desk top and we used Kreg jig holes to assemble everything.
Built from Plan(s)
Estimated Cost
100$
Estimated Time Investment
An Hour or Two (0-2 Hours)
Finish Used
espresso.
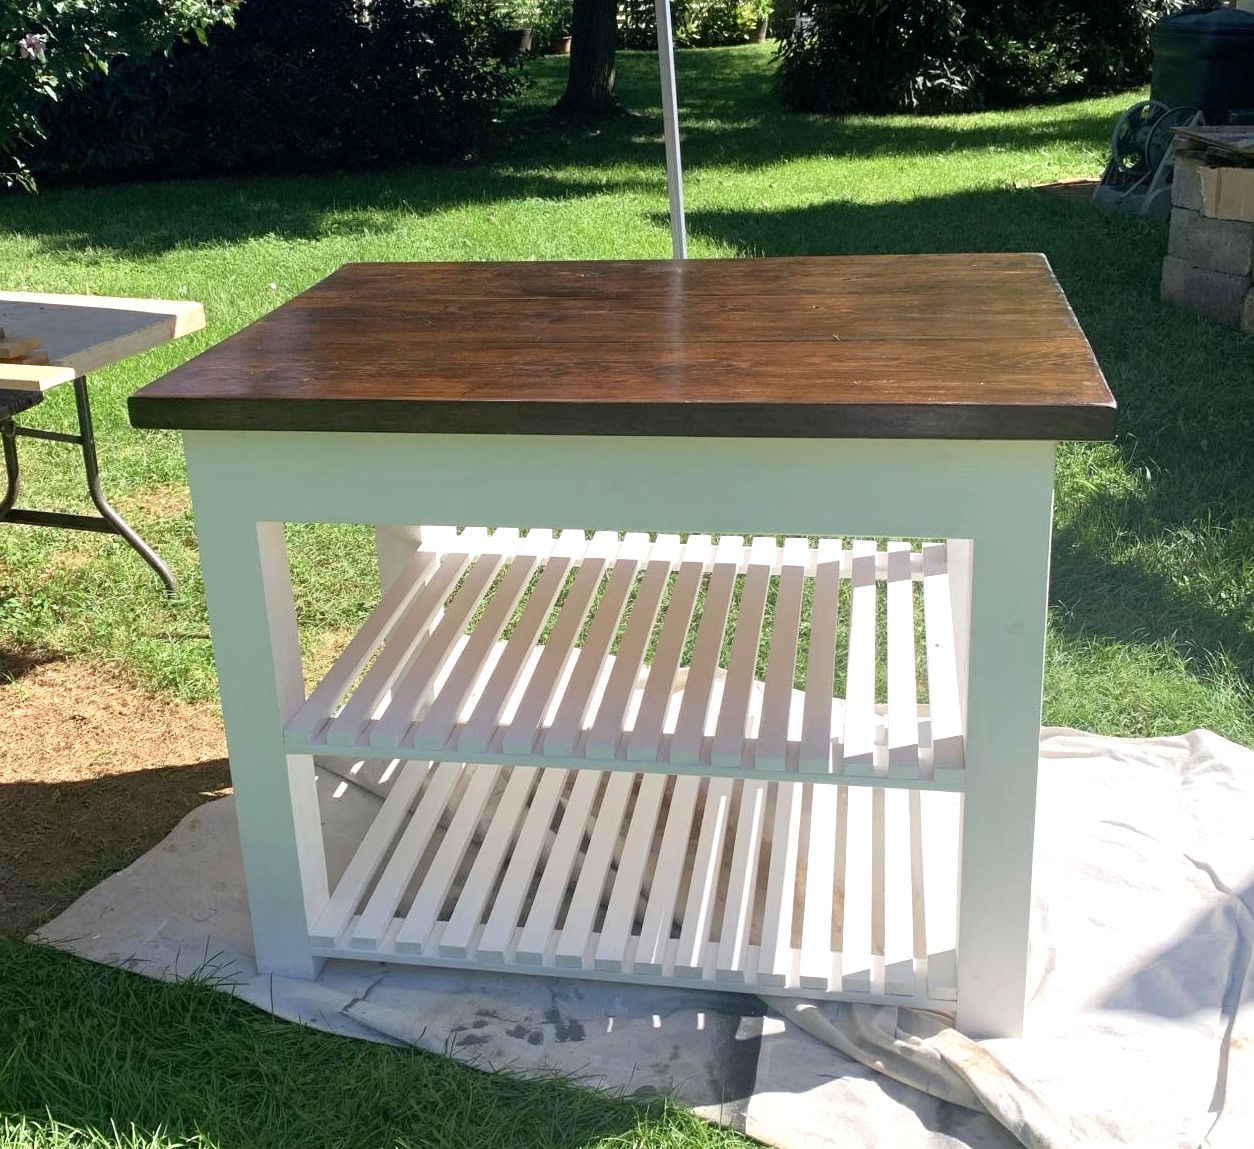
Kitty Tree Condo
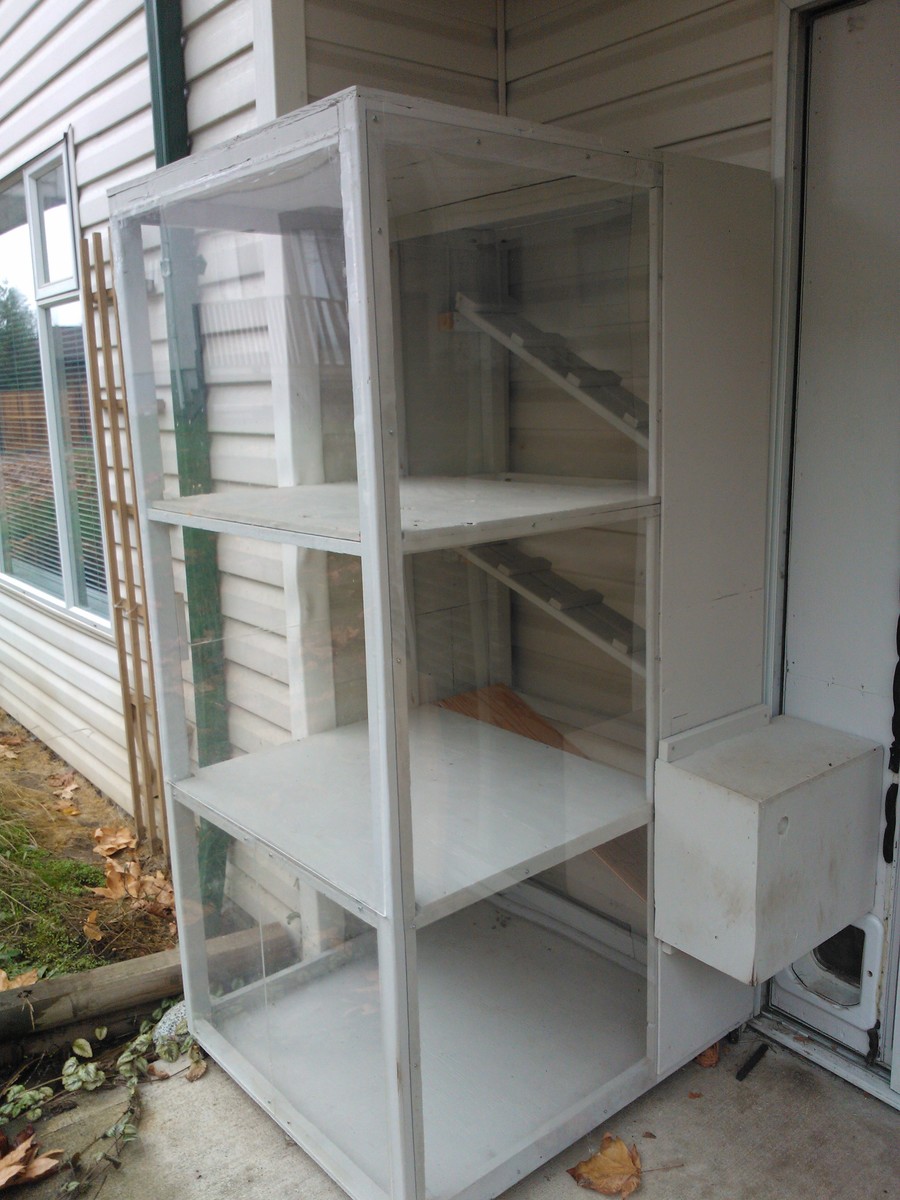
I adapted the simple Kitty Tree plan to make an outdoor sunroom for my cats. They are locked inside when I'm away, so this was a way for them to get some fresh air. They can access it via a tunnel, visible on the side as a grey box that butts up against the panel for the cat flap.
It's 36"X30" and 68" high.
The walls are made of plexiglas and I made the interior ramps by cutting up a set of wooden shelves.Plexiglas is expensive, but I salvaged some that was slightly scratched and going to the landfill. Otherwise, it would have cost me well over $100.
The frame was built using a Kreg jig, which is now my new favourite tool. I also added some casters so it can be rolled away from the wall for cleaning.
I found the Kitty Tree plan to be easy and versatile.
Estimated Cost
$25 for lumber and plywood, $15 for exterior paint, $150 for plexiglas
Estimated Time Investment
Weekend Project (10-20 Hours)
Finish Used
Exterior latex. a mis-tint I got for cheap.
Recommended Skill Level
Intermediate
Comments
Wed, 11/14/2012 - 07:39
Very innovative. How did you
Very innovative. How did you ventilate it for them to breathe?
Mon, 11/19/2012 - 06:42
The plexiglas is not quite
The plexiglas is not quite large enough to cover the space between the posts so there is a 1/8" inch gap around many of the edges.
Also the back is open. When it's away from the wall, I can lean in to clean it. So, it's not at all airtight.
Mon, 11/19/2012 - 06:45
One could use a wire mesh
One could use a wire mesh instead of plexiglas to save money. It would look okay, especially if painted, but I splurged on the plexiglas because it does look nicer than wire. I wanted to prevent complaints from our immediate neighbours if they thought a wire cage was an eyesore.
Mon, 11/19/2012 - 07:04
Fun!
Your cats are going to love this. Once the birds (thinking about swallows) figure out they can swoop by quickly without harm, the birds are going to love it too. You could even put a bird feeder nearby to make it more interesting for the cats to look at.

Fri, 11/23/2012 - 20:41
I Love the idea of the bird
I Love the idea of the bird feeder! It would be like watching Tom and Jerry cartoons! Lol
Entryway Locker

I built this for my brother's entryway. He has 3 kids and lots of shoes, jackets, etc were cluttered in the hallway. I had a few days to kill while my husband and father were working on a building a barn wall. So his girlfriend picked out the design and I got to building. She used a stain called red barn to match most of the decor at their home. I added an extra shelf at the bottom to help contain more shoes. She also added baskets and their initial to each locker. Turned out very cute and the kids love knowing where to put their stuff when they walk in the door.


Built from Plan(s)
Estimated Time Investment
Weekend Project (10-20 Hours)
Recommended Skill Level
Beginner
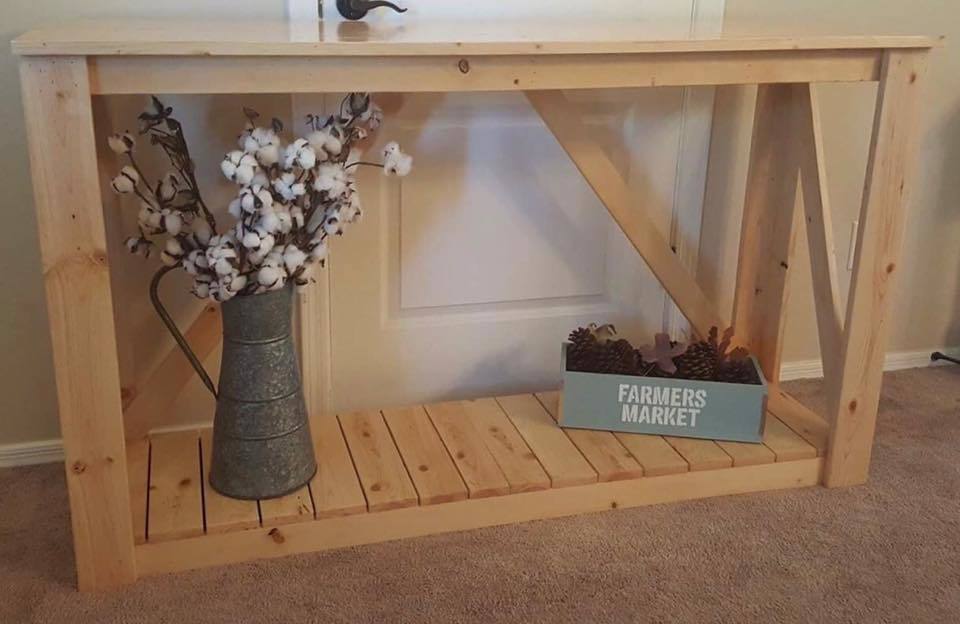
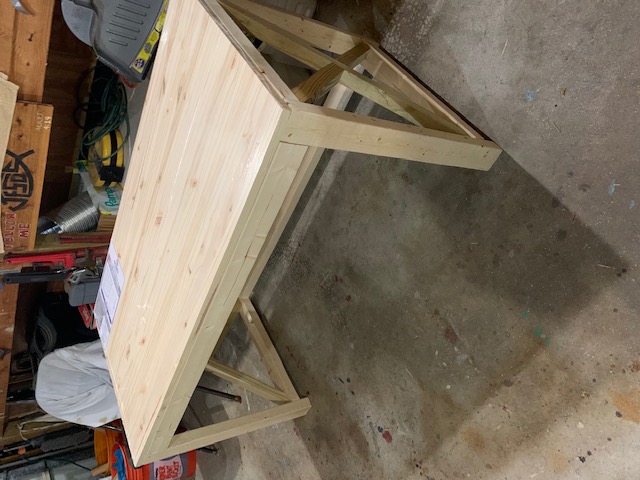
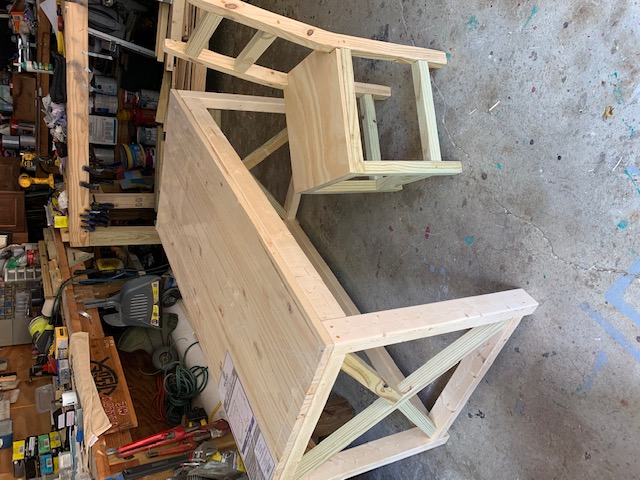
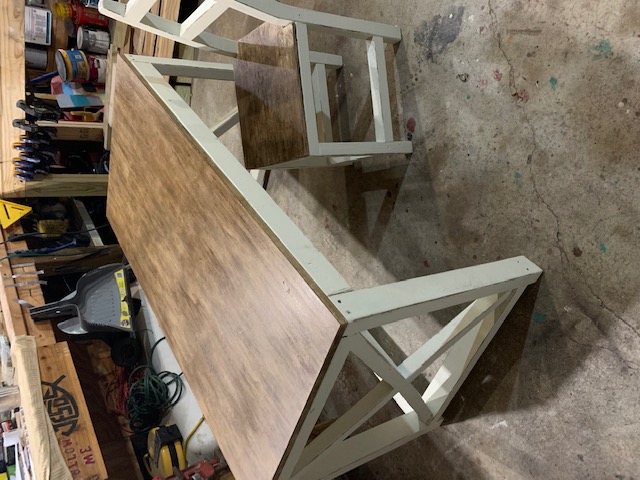
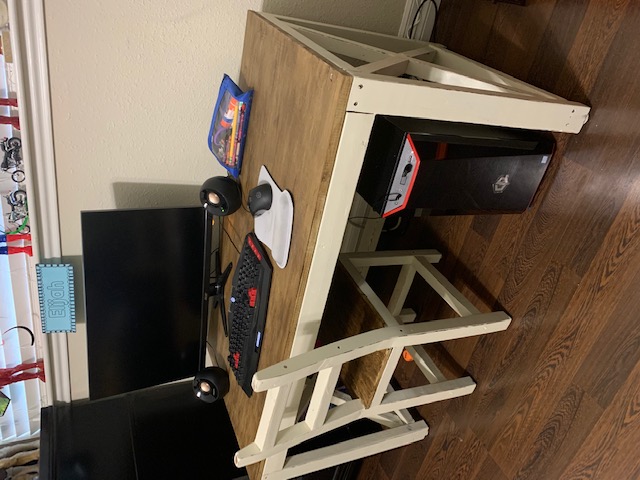
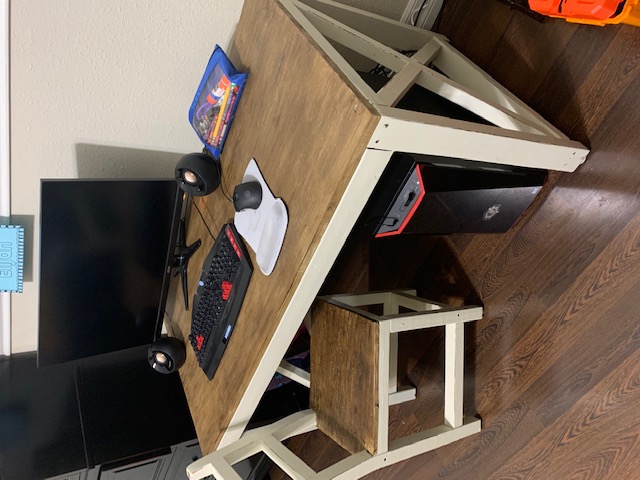
Kids Home School Desk and Chair
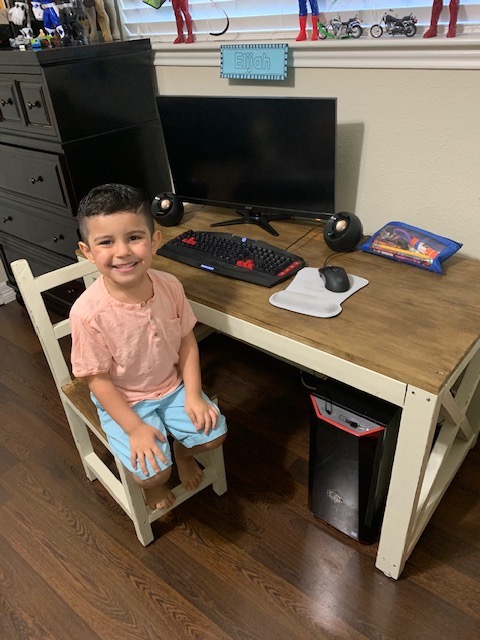
With the school year approaching and covid restrictions in place I decided to build my grandson a kindergarten home school desk. The desk dimensions are 2' X 4' X 25" high. I incorporated the Ana White famous X design on the frame. The wood is pine 2" X 3" frame and 2" X 2" for the X's.
The chair:
The back legs 30" high that I ripped from a 2" X 6" to 2 1/2 inches wide and angled the back rest at 6 degrees.
front legs are 15" high and the seat is at 15 1/2 high. The seat is 12" X 14 1/2 made from 5/8 plywood. "My grandson is 41 " tall so this allows for some growth.
I attached some glide felt adjustable to the legs and table for smooth easy movement.
Estimated Cost
$30
Estimated Time Investment
Weekend Project (10-20 Hours)
Finish Used
Chalk paint and dark wax for top and clear wax for painted frame with distressed frame.
Recommended Skill Level
Beginner


Modern Park Bench
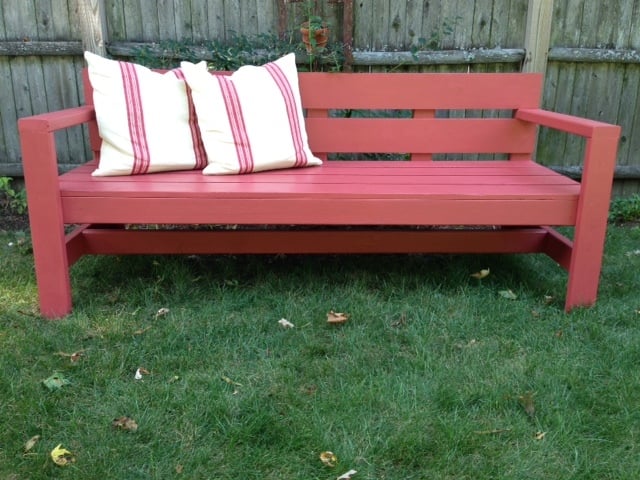
This is my third build and it took about 1/2 a day and cost $50 for lumber and $15 for hardware (decking screws). I previously built Ana's Farmhouse Table and doll farmhouse bed and cupcake stand.
I used the small kreg jig for part of the underseat frame, but it is not necssary. I wasn't using kreg screws so I found it easier to just attach through the end of the 2x4s. I recommend checking for squareness often for this project, especially as the arms and stretcher are attached.
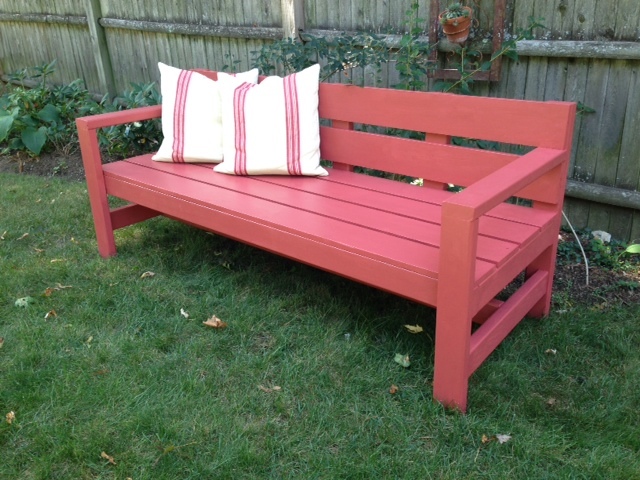
Estimated Cost
$65 plus finishing paint
Estimated Time Investment
Afternoon Project (3-6 Hours)
Finish Used
Acrylic exterior primer and Ben Moore latex semi gloss in Spanish Red
Recommended Skill Level
Beginner
Pie Chest
This project was built for my mother as christmas gift. Very easy to do, I based it off of Patrick's jelly cupboard plans and ana whites pie Chest idea. I modified mine to allow for a drawer/door at the bottom.
http://www.ana-white.com/2015/10/DIY_furniture/pie-safe
http://www.ana-white.com/2011/12/plans/patrick039s-jelly-cupbard
Built from Plan(s)
Estimated Cost
$125
Estimated Time Investment
Weekend Project (10-20 Hours)
Finish Used
WATCO Danish oil
Dark Walnut
Dark Walnut
Recommended Skill Level
Beginner
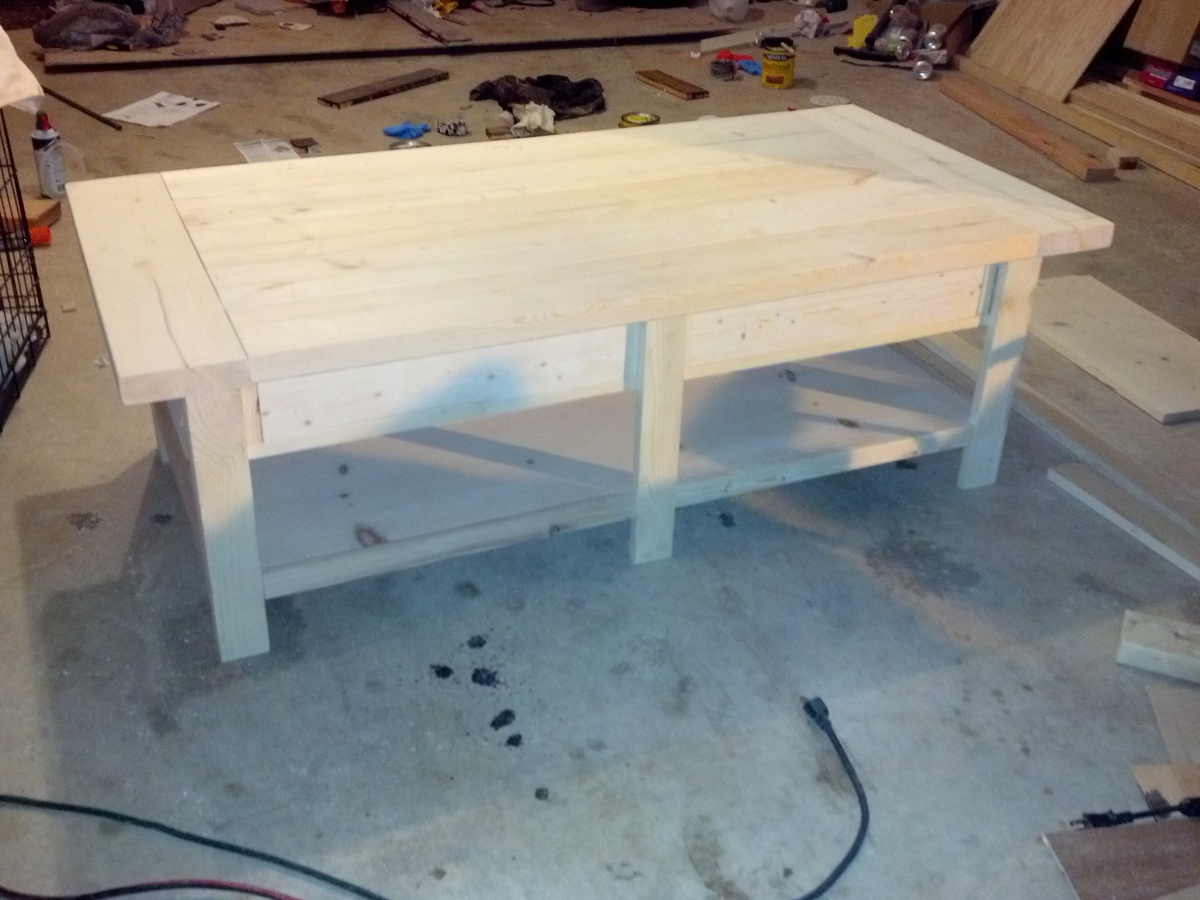
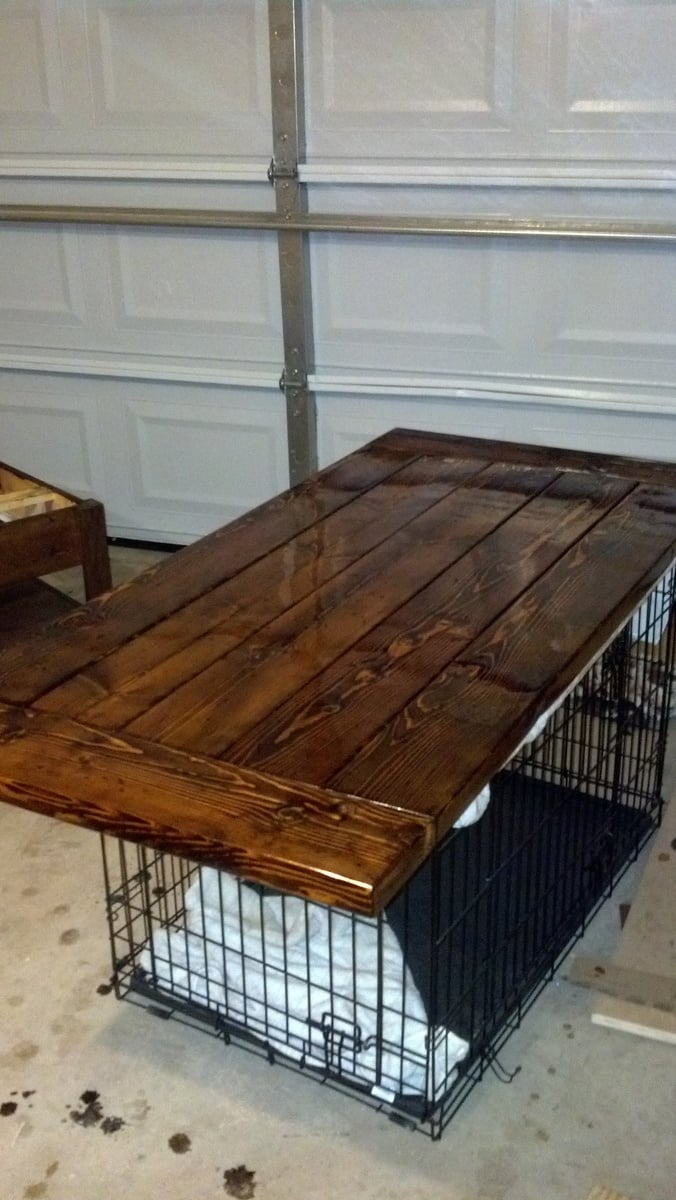
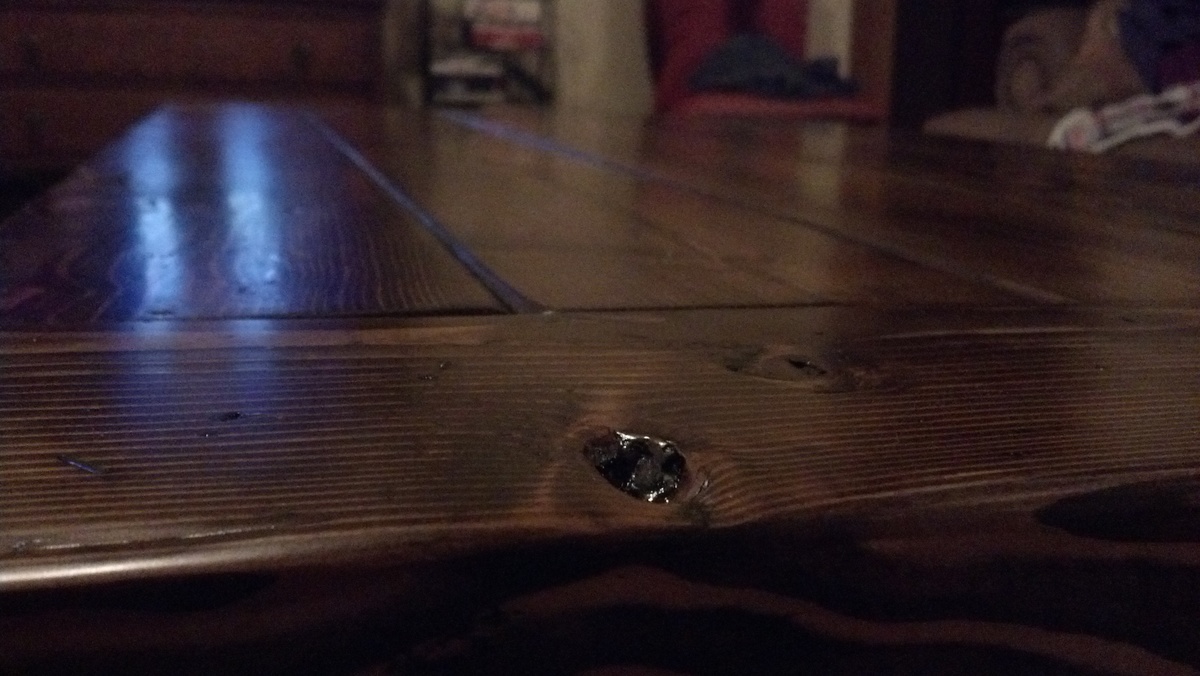
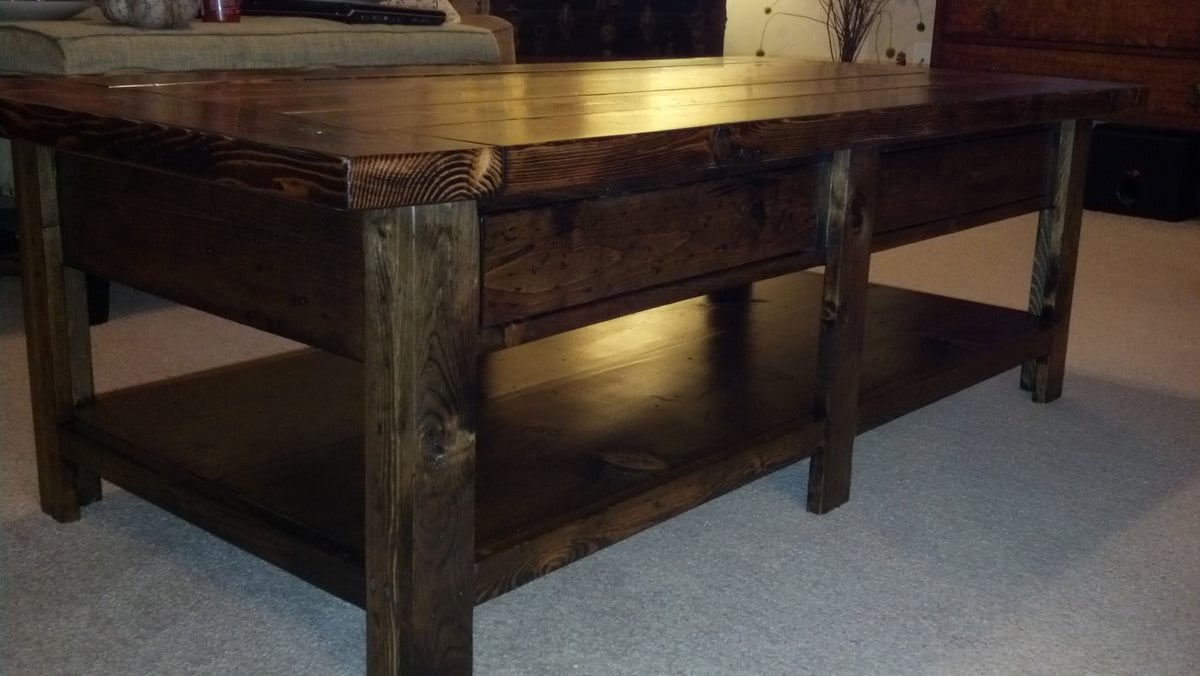
Benchwright Coffee Table

Benchwright Coffee Table. Minwax Dark Walnut & Satin Polyurethane

Built from Plan(s)
Estimated Cost
140
Estimated Time Investment
Week Long Project (20 Hours or More)
Finish Used
Distressed with hammers, nails, screws, etc. Used Minwax Pre-stain conditioner followed by two coats of Minwax Dark Walnut Stain and 3 coats of Minwax Satin Polyurethane.
Recommended Skill Level
Intermediate
First Piece
I broke down and got the pocket hole jig... easily cut this project's time in half
Needed a few different types of screws than listed in the plan
Built from Plan(s)
Estimated Time Investment
Afternoon Project (3-6 Hours)
Finish Used
Non eyet
Recommended Skill Level
Beginner
Comments
Mon, 09/08/2014 - 08:32
Looks beautiful!
oh my -- I HAVE to make one too! How are you going to finish?
Farmhouse Table and Benches

After shopping for a dining room table with my wife in mid November, I came to the realization that I could make a table like the ones being sold at the store for a fraction of the price. I spent some time surfing the web looking for farmhouse table designs when I stumbled upon Ana's website. The Farmhouse table (pocket hole updated version) really jumped out at me as something that I could accomplish as a person who had never worked with wood before. So starting the Friday after Thanksgiving I began building the table in secret, as I planned to surprise my wife with it for christmas.
Feeling ambious, I decided to add two of the farmhouse benches to my workload thinking it would make my surprise all the better. After a lot of long nights, I was able to complete the benches and table as well as stain and add a couple coats of polyurethane just in the nick of time. My wife was very surprised and couldn't be happier with out the table turned out. I can't wait to try more Ana White projects!
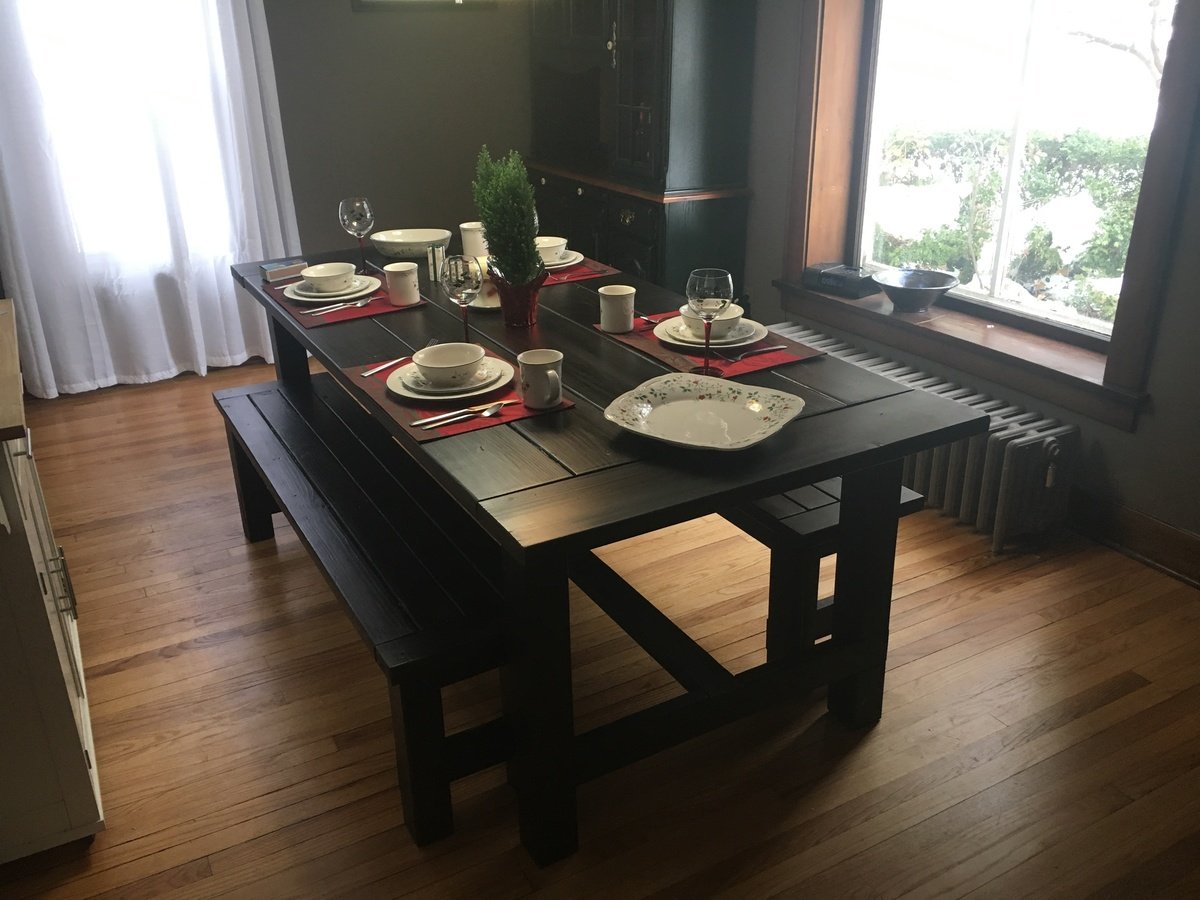
Built from Plan(s)
Estimated Time Investment
Week Long Project (20 Hours or More)
Finish Used
Varathane Kona Stain. (because of fir's poor stain absorption properties, I treated the stain as a paint. I put on a layer of stain and never wiped it off. It took about two days for the stain to dry this way)
Minwax Clear Satin polyurethane. ( 3 coats on the base and benches, 4 coats on the table top. sanded with 220 grit between coats)
Minwax Clear Satin polyurethane. ( 3 coats on the base and benches, 4 coats on the table top. sanded with 220 grit between coats)
Recommended Skill Level
Beginner