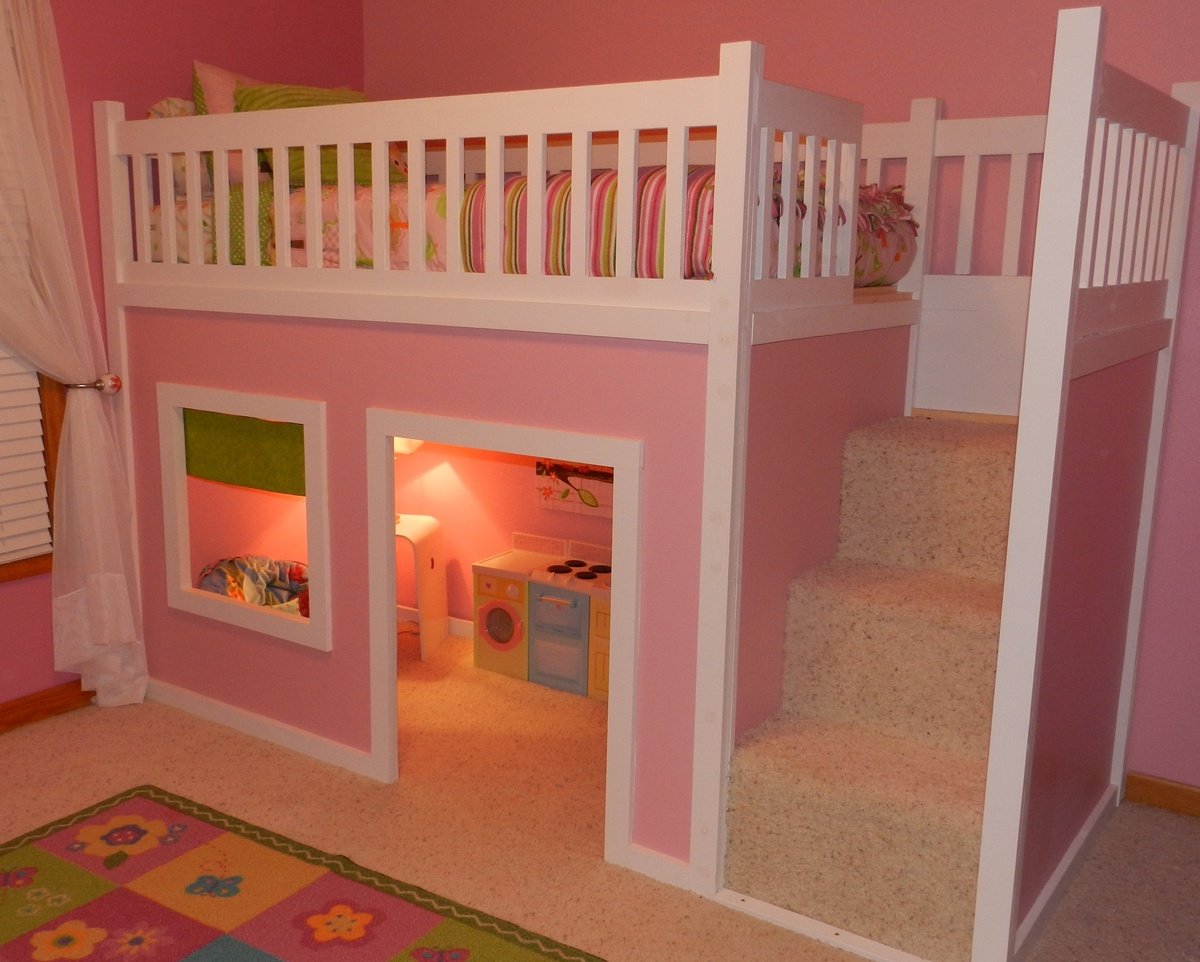
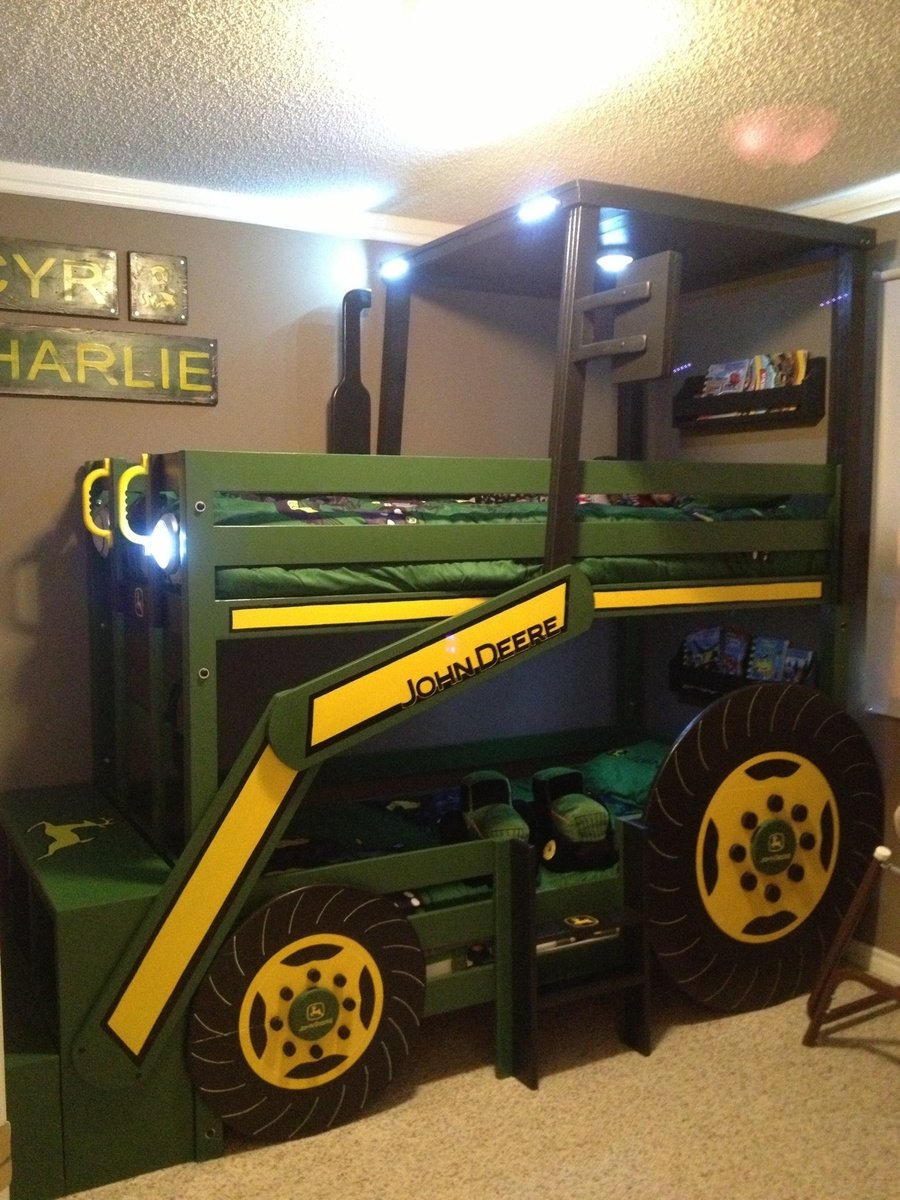
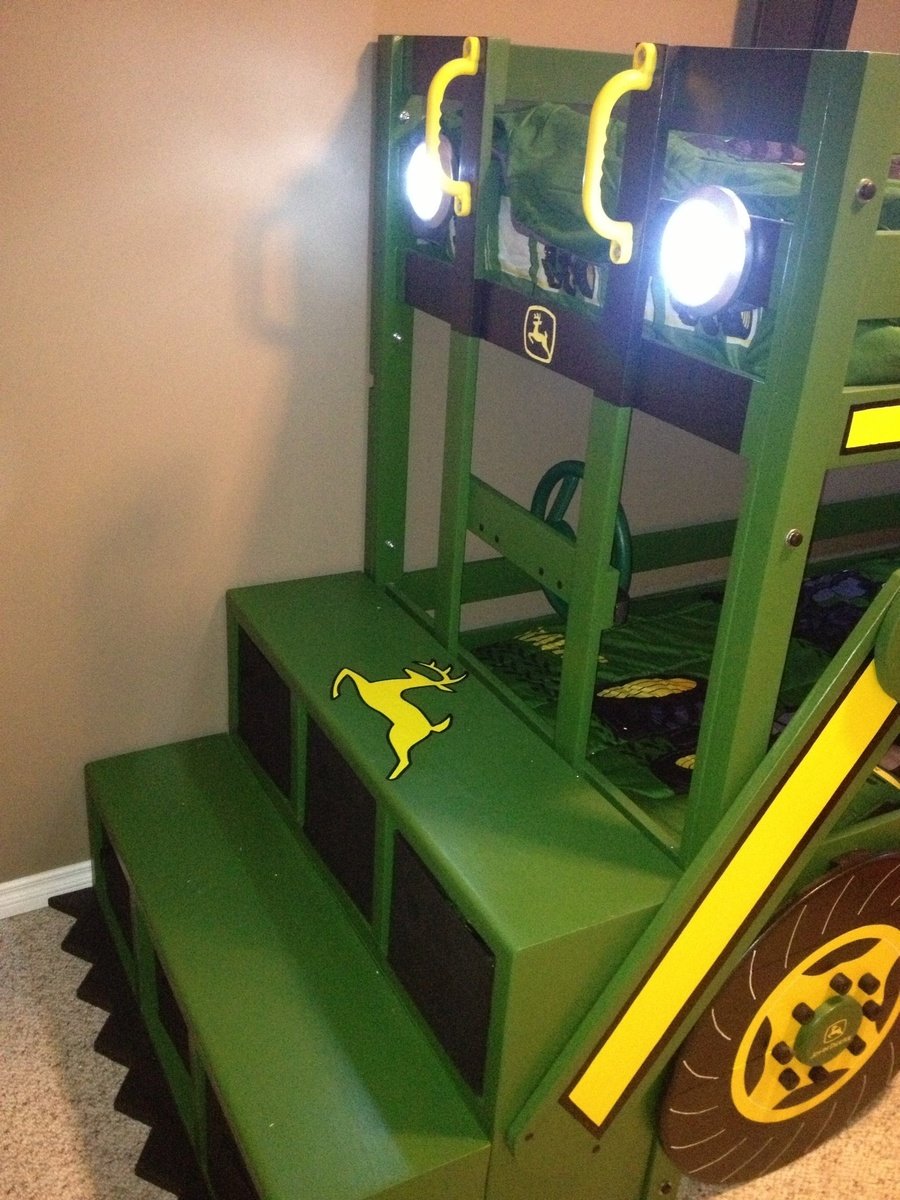
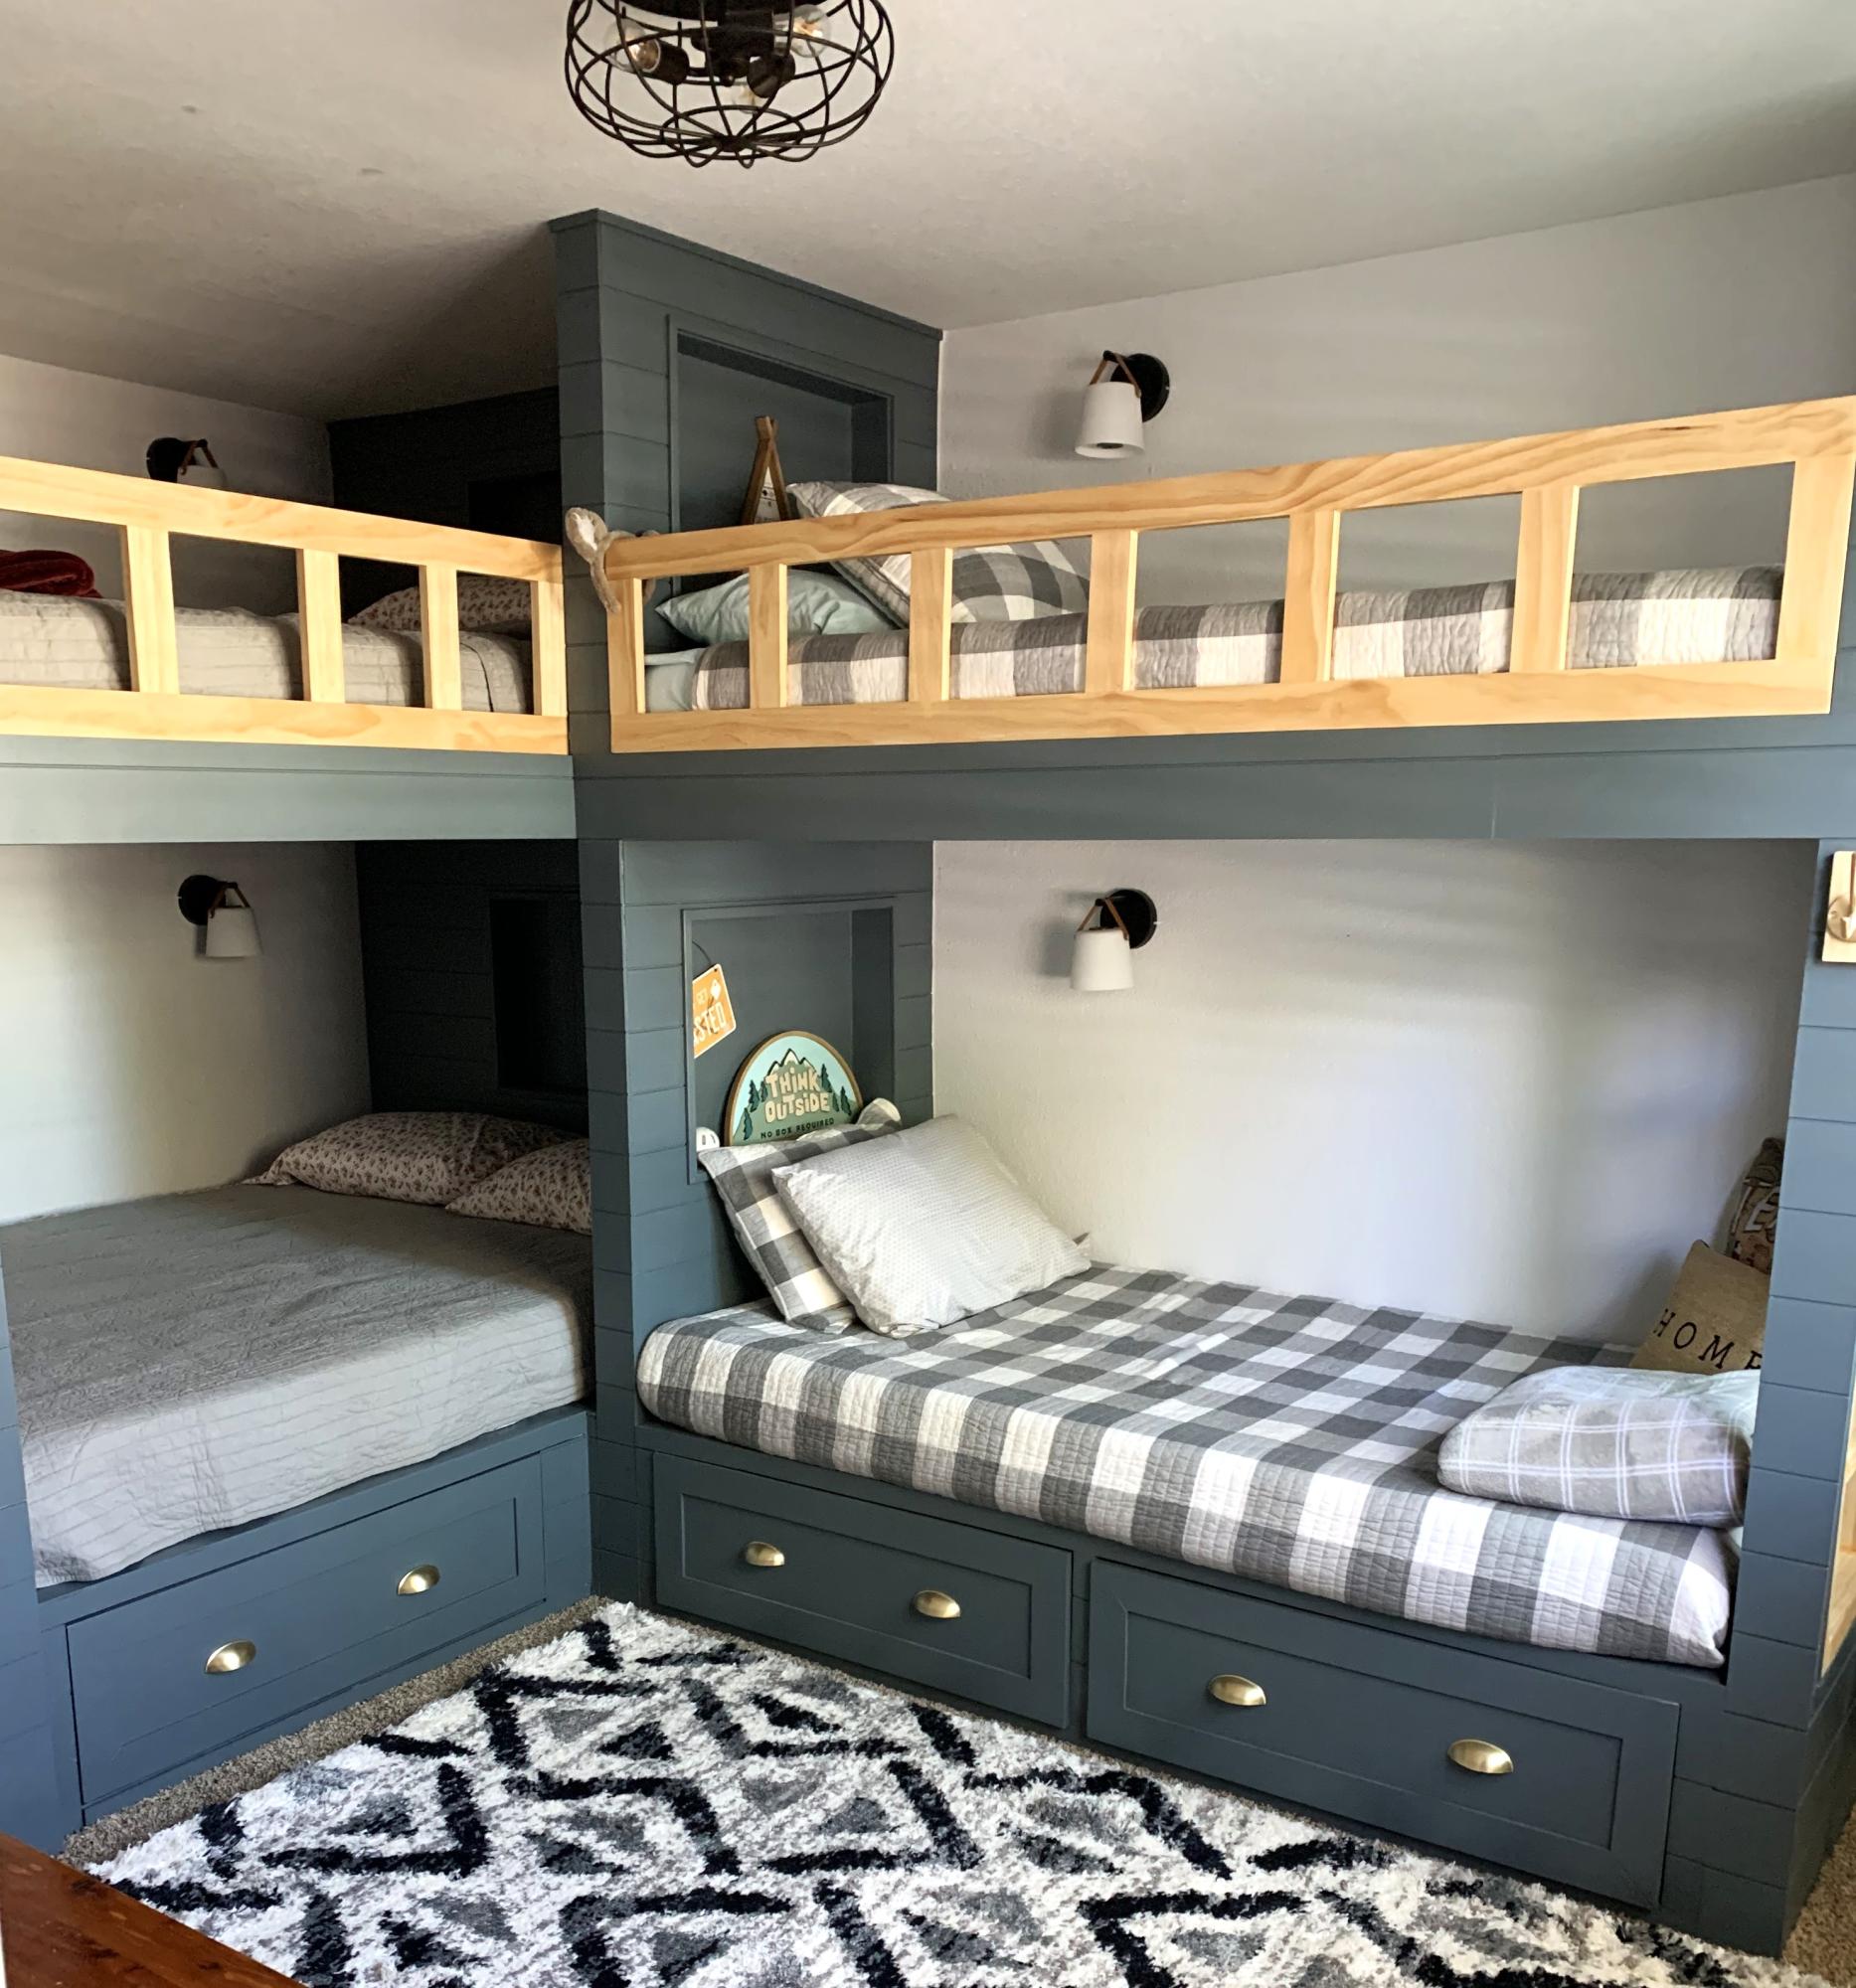
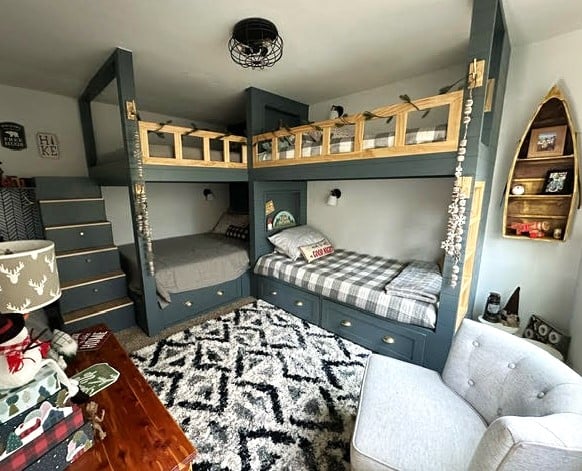
With another baby boy arriving in August, my one and three year olds are moving to a "big boy" room. My oldest decided he wanted a bunk bed and as they both are obsessed with tractors, when I saw the "John Deere Tractor Bunk Bed" plan, I was sold.
We would be needing a twin sized bunk bed though not a toddler. I used the classic bunk bed plans and simply modified them to suit our needs. I moved the ladder to the front, added a rail on the bottom bunk and added a small ladder to the side for my one year old to climb into the bottom bunk.
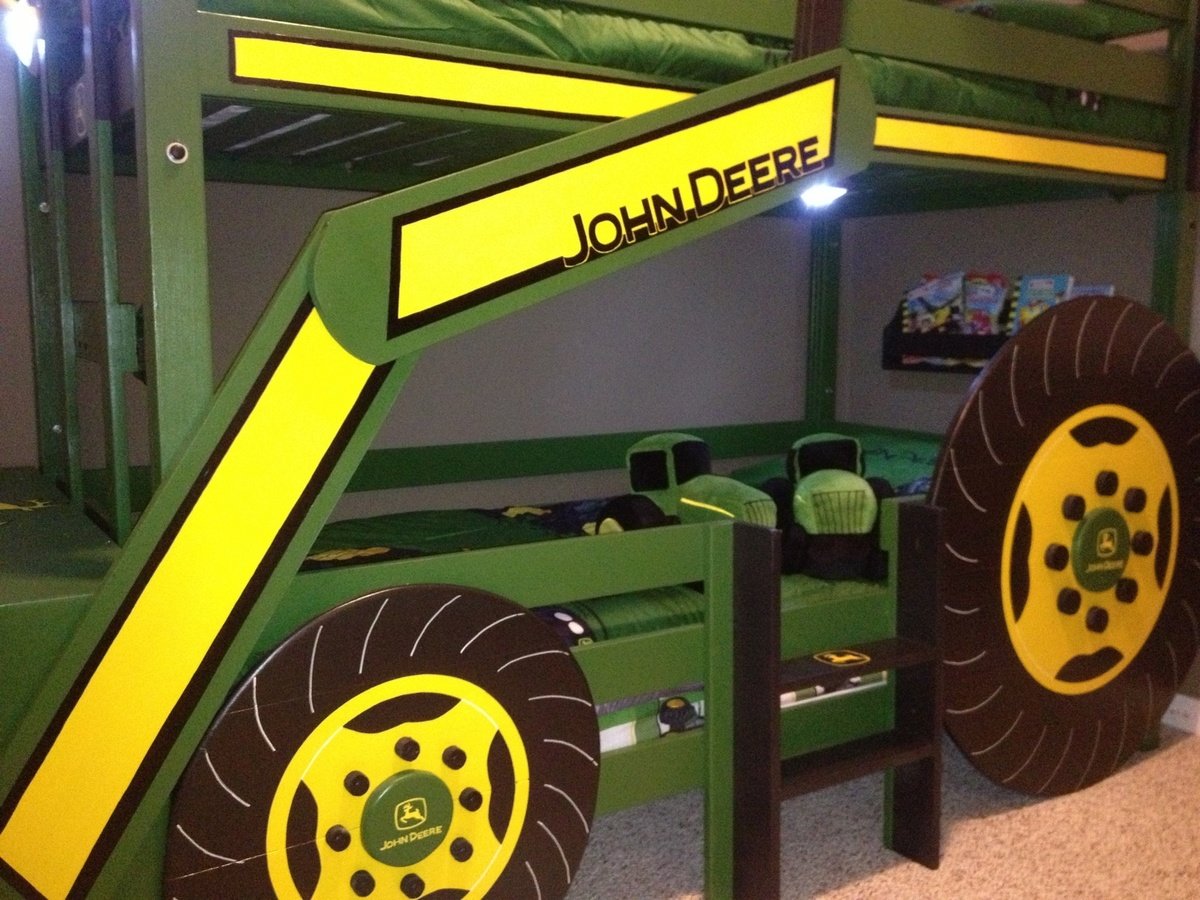
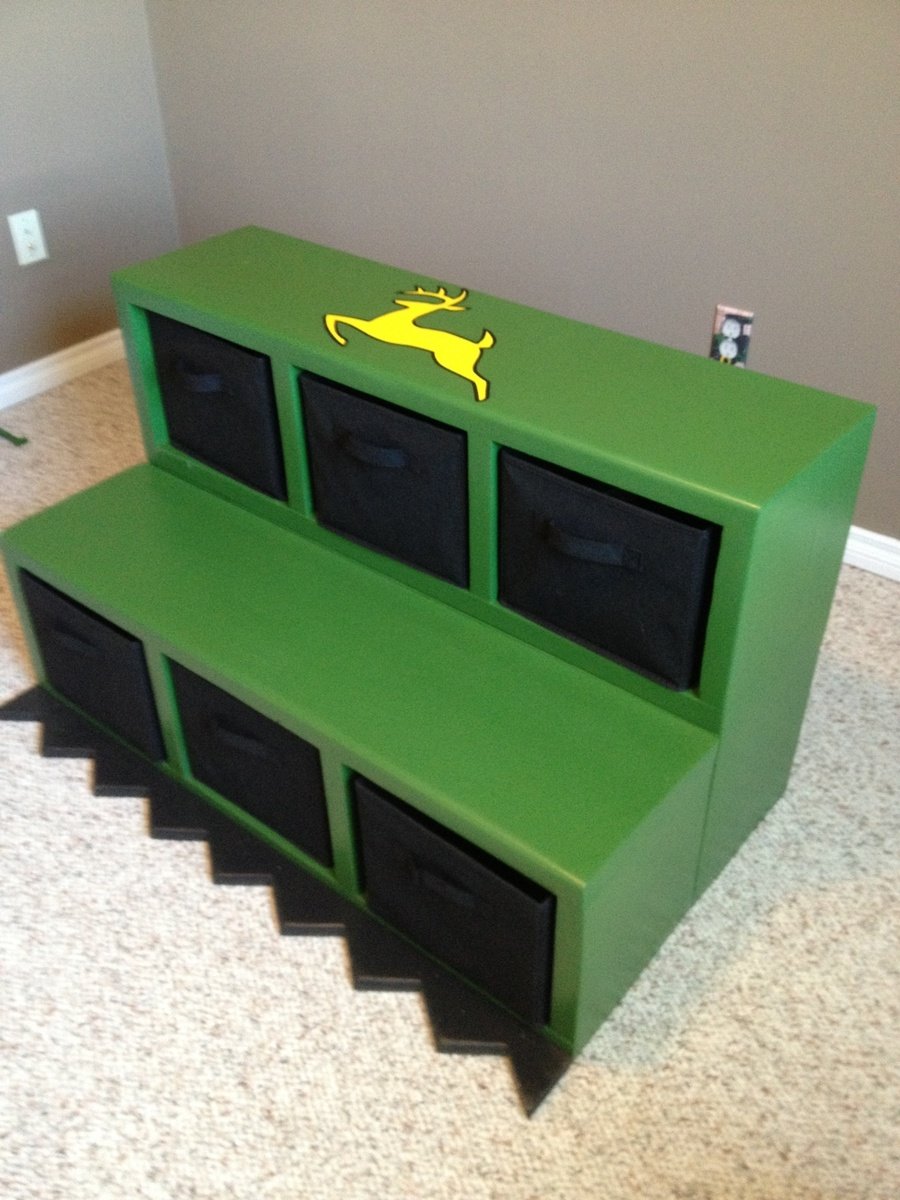
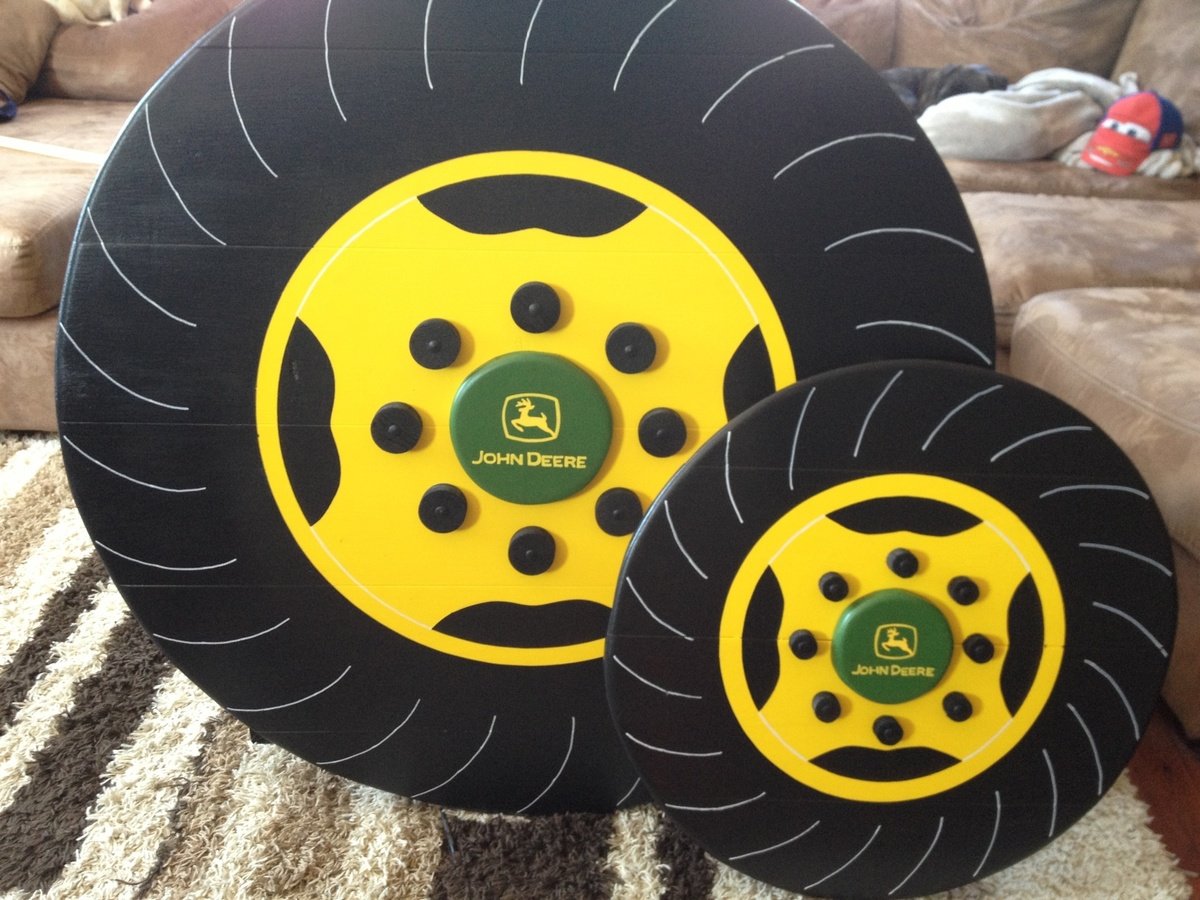
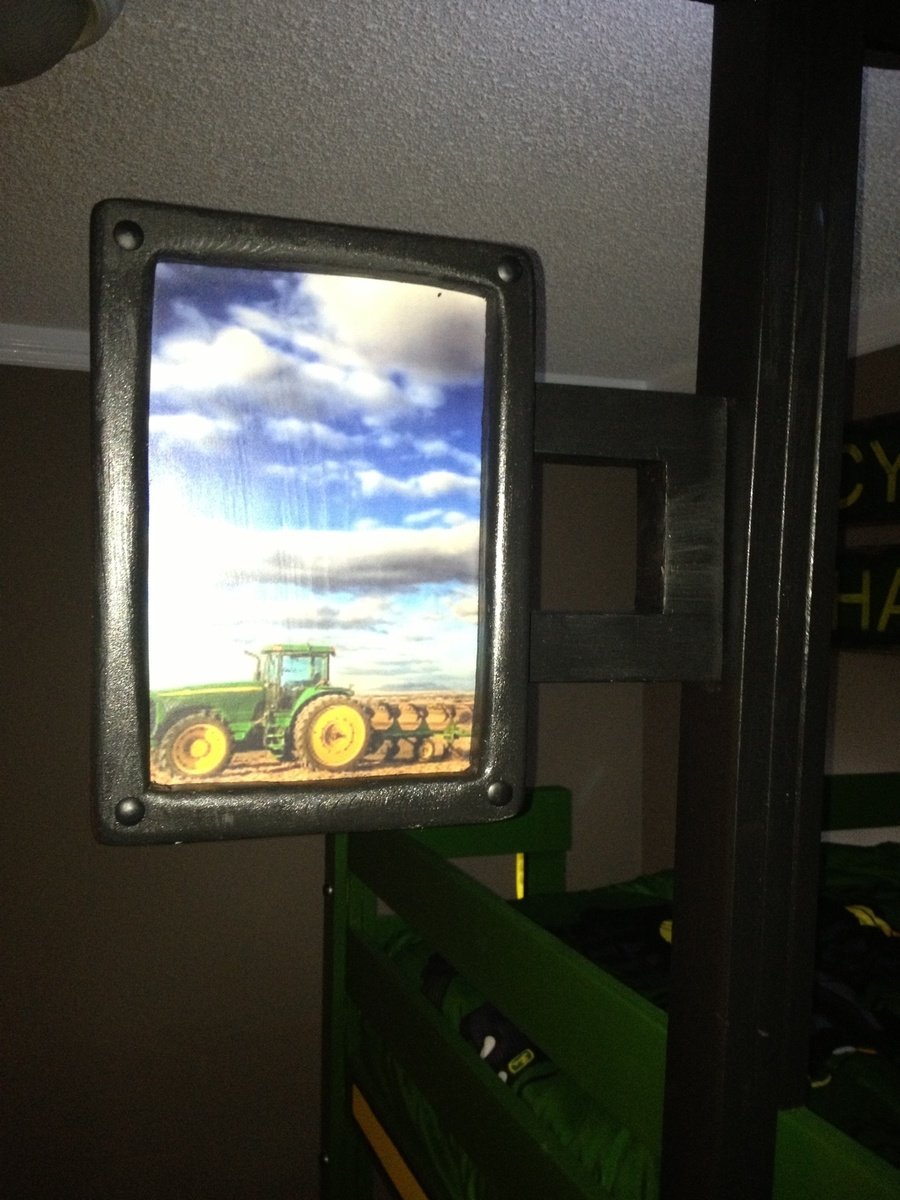
Once the the frame of the bed was complete, I added the tractor accessories. A couple of storage cubby shelves with fabric baskets for toy tractors which act as stairs up to the ladder and make the tractor bucket at the front. Also, the wheels which are made from joined 1x6s as I find plywood hard to sand and paint to the quality of finish I like. A cab & roof from 1x4s framed together. A side mirror that I decoupaged a picture of another tractor on. I used push lights for the headlights as well as a reading light above each bed (they're on timers so they'll turn themselves off). A steering wheel (play equipment access from toys r us). Also, I built and mounted by the head of both beds a "flat wall book holder" so they would have somewhere to store a few books.
My boys and I are fairly new to building so I spent a lot of time planning and measuring to ensure it would all come together in the end. It paid off because it all went smoothly (even with "help" from my boys). It's not perfect but they're very happy with the result. We also built a John Deere themed "Just my size closet" and even finished with over a month to spare before the new baby arrives! :)
Just want to say a quick thank you to Ana both for the amazing plans and also the inspiration to take on these projects. The time spent with my boys building as well as the resulting treasures are priceless and I would have never realized what we were capable of had I not stumbled upon your website and been so inspired by you and everything you've accomplished. Thank you!


Comments
Phillip (not verified)
Wed, 01/04/2012 - 14:17
Plans?
How can I get a copy of the plans?
Nicole rafferty (not verified)
Sat, 01/12/2013 - 19:47
Loft bed with stairs...plans
Omg....I love this I need to know how to do out....so I can make my husband build it..
Guest (not verified)
Thu, 01/05/2012 - 06:34
are the plans free, and if so
are the plans free, and if so can I get a copy?
Anonymous Coward (not verified)
Thu, 01/05/2012 - 07:16
Philip and Guest - The plans
Philip and Guest -
The plans are free, and click on the links in the post
From Plan: (plans are linked here)
Shameka (not verified)
Tue, 11/13/2012 - 18:29
Plans
Hey,
How do I get a copy of the plans for this bed? I would love to do this for my daughter for a birthday gift. I have gone to the section where it says plans but there is no link to click on. Thanks in advance.
Guest (not verified)
Sun, 01/15/2012 - 17:58
Playhouse Loft Bed Stairs Plans
RE: http://ana-white.com/2012/01/playhouse-loft-bed-stairs
Would you please send me the plans for the Playhouse Loft Bed with Stairs?
Thank you.
Guest (not verified)
Tue, 01/17/2012 - 09:20
Playhouse Loft Bed Plans
I would like to know how to get a copy of the plans for this bed. This is exactly what I want to do in my little girls room but I have not beed able to find plans. Thanks!
In reply to Playhouse Loft Bed Plans by Guest (not verified)
Karajoy
Fri, 01/27/2012 - 21:44
links
If you look in the section above, you'll see "From Plan:" There are two links (they're black and don't look like links. You'll need to hover over them). One for the basic bed and one for the stairs.
kelly.abbott (not verified)
Tue, 01/17/2012 - 18:38
Loft Bed..
I do not see the plans for the playhouse loft bed. Where is it located? Can you email it to me or post the link?
dminton82 (not verified)
Thu, 01/19/2012 - 21:42
LInk to the plans
http://ana-white.com/2010/09/playhouse-loft-bed?page=1
Guest (not verified)
Sun, 01/22/2012 - 11:57
Age
Hi, I was wondering what age group this is best suited for? I can't tell from the size of the pictures, and my daughter is only 2.
In reply to Age by Guest (not verified)
Karajoy
Fri, 01/27/2012 - 21:38
Age appropriate
I would say your 2 year old daughter is a little young for a bed this high. I think general guidelines would suggest waiting until age 6 for lofted and bunked beds, but I think that's being very cautious. Our daughter is just about to turn 4 and she does fine in it.
Cindy from Indiana (not verified)
Wed, 01/25/2012 - 11:29
Looks fantastic!
You did a great job! That looks fantastic!
I'm going to be making this bed within the next month or two for my daughter. She's 4 (will be 5 in April). I know the overall design isn't *that* high off the floor, but my daugter has a tendency to roll out of bed...often. LOL
Do you find the guardrail/slats are high enough to prevent roll offs, or should I add some height to them when I build?
Yours turned out awesome! I can see why your daughter (and sons) love the bed!
Cindy
In reply to Looks fantastic! by Cindy from Indiana (not verified)
Karajoy
Fri, 01/27/2012 - 21:34
Guard rails
Hi Cindy.
Thanks for your kind words.
We had the same concerns about our daughter rolling or falling out. She is almost 4, but still had rails on her previous bed. We put the slats that the mattress sits on in the very lowest possible position and actually traded twin mattresses with her brother who had a thinner mattress. Her's had a pillow-top and even the extra 2 inches made quite a difference.
There are nearly 9 inches between the top of her mattress and the top of the rails which is plenty to prevent accidental roll-outs, but it certainly wouldn't hurt to add extra if it would make you more comfortable.
Now if we could just keep her from standing up there, I'd feel a whole lot better. lol
Good luck with yours.
Kara
Cindy from Indiana (not verified)
Sat, 01/28/2012 - 07:27
Thank you!
Hey Kara,
Thank you so much for replying! That does make me feel more comfortable that there will be around 9" between the mattress top and the rail top. Not sure yet if I'll add a bit more or not, but it's good to hear how it worked out for you guys. Now I'll be hoping to keep my little dare devil from trying to 'fly' off the top of it and we'll be good to go. LOL
Thanks, again! That was really helpful.
Cindy
Guest (not verified)
Thu, 01/26/2012 - 12:59
Hi! LOVE THIS!!! Am planing
Hi! LOVE THIS!!! Am planing on making for my daughter. Any chance there are plans for this in a Full Size bed?
In reply to Hi! LOVE THIS!!! Am planing by Guest (not verified)
Karajoy
Fri, 01/27/2012 - 21:48
Full Size
I've seen some posts on Ana's Brag Boards of these lofts with full sized mattresses on top. Ana's original plan is a twin bed, but others have modified it to suit their needs. You may just want to search and see if anyone has included their plans for a full. Sorry I can't be more help. Good luck!
Guest (not verified)
Mon, 01/30/2012 - 08:09
Awesome!
I will be making this for my boys. For the guard rail, I will be making it go all the way to the ceiling, since they like to jump off of things. They will get a kick out of it because it will be a "wild animal cage", lol.
In reply to Awesome! by Guest (not verified)
Karajoy
Sat, 02/04/2012 - 16:14
Caged.
Love it! It takes the safety issue out of the equation totally. Great idea. I know they'll LOVE it, too.
JessiW (not verified)
Tue, 01/31/2012 - 18:32
Very Nice...
That is very nice if you dont mind me asking how long did you make that one... I am wanting to make one for my daughter but I dont have 103 inches that called for in the one plan...
In reply to Very Nice... by JessiW (not verified)
Karajoy
Sat, 02/04/2012 - 16:10
Length of bed
We made our bed to the exact specifications that Ana gave (103"), however, if you need to save space, you could leave the stairs off and opt for the ladder.
Kelly Kelley (not verified)
Tue, 02/07/2012 - 15:42
Bed Plans
I tried to get the plans for this bed and I cant seem to locate. Could you help please? Thank you!! What a beautiful bed!!
In reply to Bed Plans by Kelly Kelley (not verified)
Karajoy
Wed, 02/15/2012 - 18:34
Plans
Hi Kelly,
There are links to the 2 plans in the "ABOUT THIS PROJECT" section above. Just hover your cursor over the "From Plans:" and the links will change color. They appear black and therefore, don't look like they're linked to anything. They're both there. Good luck!!
Guest (not verified)
Fri, 02/10/2012 - 14:23
Bed plans
I cannot find the plans to this bed. Could you email them to me ? Abby
Guest (not verified)
Sat, 02/11/2012 - 09:30
I need the plans for this can
I need the plans for this can someone please send me them :) [email protected]
Karajoy
Wed, 02/15/2012 - 18:40
Where to find the plans...
There are links to the 2 plans in the "ABOUT THIS PROJECT" section above. Just hover your cursor over the "From Plans:" and the links will change color. They appear black and therefore, don't look like they're linked to anything.
Or...I've added them here.
http://ana-white.com/2010/09/playhouse-loft-bed
http://ana-white.com/2010/09/easy-playhouse-loft-bed-with-storage-stairs
Guest (not verified)
Fri, 02/24/2012 - 17:03
WOW!
We were looking for plans to build a loft bed to save space in our 3.5 year old daughters room. My husband found this and we are sold on this idea. She is going to flip when she sees her new bed! Love it!
Amanda D. (not verified)
Mon, 03/05/2012 - 20:01
Decor
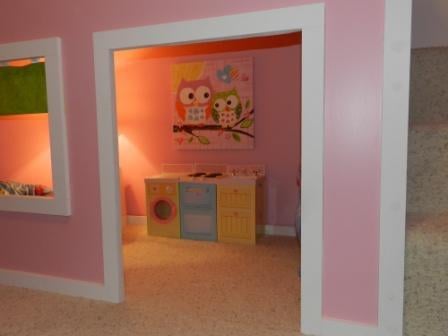
Hi there, I was wondering if you could tell me where you got the fabulous little washer and dryer combo that I see in the photo. I know the sweet owl painting is from target, but I love the little play space you seem to have created! :)
In reply to Decor by Amanda D. (not verified)
Karajoy
Mon, 03/19/2012 - 19:42
Decor
The little set inside is from Playskool's Rose Petal Cottage collection. It's a little miniature set and worked perfectly in this space.
Kirstie (not verified)
Sat, 03/17/2012 - 22:52
Cute Decorations!
I LOVE this so much! I love the color scheme as well, we decided to copy the scheme in my daughter's room. I was wondering where you got the curtain from? Did you buy it or make it yourself? It's almost exactly the color of the green paint we bought so I would love to know. Also, I love the washer and dryer too, also curious about that. Thanks!
In reply to Cute Decorations! by Kirstie (not verified)
Karajoy
Mon, 03/19/2012 - 19:40
Decorations
Hi Kristie.
I made the little curtain and the little washer/stove/sink set are from the Playskool Rose Petal Cottage collection. Good luck building your playhouse. It's a little girl's dream!!
Guest (not verified)
Wed, 03/21/2012 - 20:27
Changing sheet?
Hi Kara,
I'm really interested in building two of these for my girls... they caught my attention because they've been asking for a bunk bed and I don't want to do a bunk bed because I hate the idea of struggling to change the bedsheets. Just wondering if it's a hassle with a bed this height.
Yours looks amazing, btw!
Thanks,
Sarah
gabey2329 (not verified)
Tue, 04/10/2012 - 11:18
playhouse with loft bed
oh my god i love this it would be awesome for my daughter also. were you able to stay in your budget???? do you think is a safe style for a 3 year old? she would go absolutely nuts!
Guest (not verified)
Fri, 04/13/2012 - 20:17
so beautiful! if i wanted to
so beautiful! if i wanted to do this with a full mattress how would i tweak the measurements? i want to do this with a full with the stairs... just so she can be in the bed for a longer period and also the space underneath to be a bit bigger... also if i wanted to make the stairs have a drawer? i really would appreciate alll the feedback if possible because im so far from handy... :-/ and 1 more thing how did u get a light down there?
Veahava
Fri, 05/11/2012 - 18:27
I was wondering if once put
I was wondering if once put together is it easy to take apart? My dad builds houses for a living and was going to make it for my daughter at his house then bring it to mine to set it up
Sharlean (not verified)
Sun, 06/10/2012 - 14:40
My husband and I just
My husband and I just finished making this bed with stairs for our 3 year old and he loves it.
Rebeccaguest (not verified)
Tue, 06/12/2012 - 06:41
up to??
what age would you reccommend this for?? my son is 3 n a half and i woant to attempt to make this bed, but dont want to spend time and money if i will have to buy him a new bed in a couple of years. i would like it to last a good while. also, like veahava, i was wondering if this was easy to dismantle once put together as i am planning a move in the future, thankyou
winter_baby26
Thu, 06/28/2012 - 07:43
Wow!
This looks amazing! I'm sure your daughter was thrilled. I can't believe it only cost $350 to build - I have no doubt you would pay significantly more than that if you bought something similar at a store.
Claire_UK (not verified)
Tue, 10/02/2012 - 02:14
This is absolutely divine -
This is absolutely divine - you are so talented! I have just found this website and can't imagine I'd ever be able to make something so beautiful. Putting up a shelf is beyond me. Your daughter must be so proud of her little nighttime palace!
Christine N (not verified)
Sun, 10/21/2012 - 20:01
Playhouse Loft Bed with Stairs
I am trying to get the plans for this bed with the stairs but when I click on the link it doesn't give me the plans. Help, my granddaughter would love love love this. Thank you so much.
Nikki_DivaMomm… (not verified)
Thu, 12/06/2012 - 20:30
Bed size
I LOVE this bed ! It's exactly what my husband & I are looking for !! With your measurements, is this suited for a toddler mattress or a twin??
Tara Payon (not verified)
Mon, 12/17/2012 - 20:42
Bed Size
Love love love this bed, what size mattress does it use?
vana (not verified)
Wed, 01/16/2013 - 06:05
hi! Someoneo to tell me how
hi!
Someoneo to tell me how many hours spent on it?
vana (not verified)
Wed, 01/16/2013 - 06:07
hi someone to tell me how
hi someone to tell me how many hours spent on it?
ochoa
Mon, 02/04/2013 - 20:53
PLEASE, PLEASE, PLEASE,
PLEASE, PLEASE, PLEASE, SOMEONE TELL ME HOW TO GET THE PLANS, I REALLY WANT THIS BED FOR MY LITTLE GIRL!!!!
In reply to PLEASE, PLEASE, PLEASE, by ochoa
mikepattenson
Mon, 05/25/2015 - 22:12
You can download more plans
You can download more plans from these resources:
jammhdad
Thu, 02/14/2013 - 12:36
Playhouse loft bed with stairs
This is awesome, how do I get a copy of the plans for this bed? I would love to do this for my grand daughter as a birthday gift
jammhdad
Thu, 02/14/2013 - 12:48
Playhouse loft bed with stairs
found the link, here is it for those wo are also looking I can't wait to start this project THANKS
http://ana-white.com/2010/09/easy-playhouse-loft-bed-with-storage-stairs
cevans81
Wed, 09/11/2013 - 05:11
Absolutely Love this Bed!
We made this bed for our daughter and now my son and daughter play with her kitchen and table underneath in the playhouse. Your instructions were so easy to follow and everything matched up perfectly. We did do the ladder due to space but the bed is beautiful. We get so may compliments when people come over and I always tell them about your website. You truly have awesome ideas! I can not wait for the next project and I am sure it will be off your site :-)
kullmann
Mon, 10/07/2013 - 17:26
playhouse with loft bed and stairs
I love your playhouse with loft bed! How tall is the underneath part? Would you be able to fit a desk underneath? Also, could the plans be adjusted to accommodate a double bed?
THANK YOU!!