Portable Workbench

I have a small workshop so this workbench allows me to bring the work outside. It was my first project and I think it came out great.

I have a small workshop so this workbench allows me to bring the work outside. It was my first project and I think it came out great.
Nothing fancy but my daughter loves it for the house.
Jeff May
Having already built a rustic bench to go with my Farmhouse Table, I knew it would be the perfect guest "book" bench for my wedding. For only $15 (I had the lumber for the top on hand), and the help of all my bridesmaids during my bachelorette weekend, we built this bench in just about an hour. Everybody had a hand in it, which makes it even more meaningful. It sits at the foot of the Farmhouse Bed my husband and I built from reclaimed barnwood from my father. I love that we have something so hand-made and sentimental to commemorate our wedding celebration. It makes me smile every time I look at it!
We built this A-frame chicken coop using the plans from Ana White. We modified them a bit to include a front door, a solid front wall, and 8-foot untreated cedar fence boards (cut in half) for the loft floor instead of plywood. We also used hardware cloth instead of chicken wire since racoons are a problem where we live, and they have been known to reach through chicken wire to grab at hens. Instead of being able to open both sides of the top of the coop, we only put doors on one side just to make the building process a little simpler. The hardest part of building the whole coop was cutting the 60* angles on the 2"x4" trusses. Our cuts are not exactly perfect, so the nodes (meeting points of the 60* angle cuts) are a little rough, but we plan on covering this with a roof cap eventually. More photos and details are on my blog: http://littlefarmbigcity.wordpress.com/2013/06/29/red-white-and-blue-co… -kate
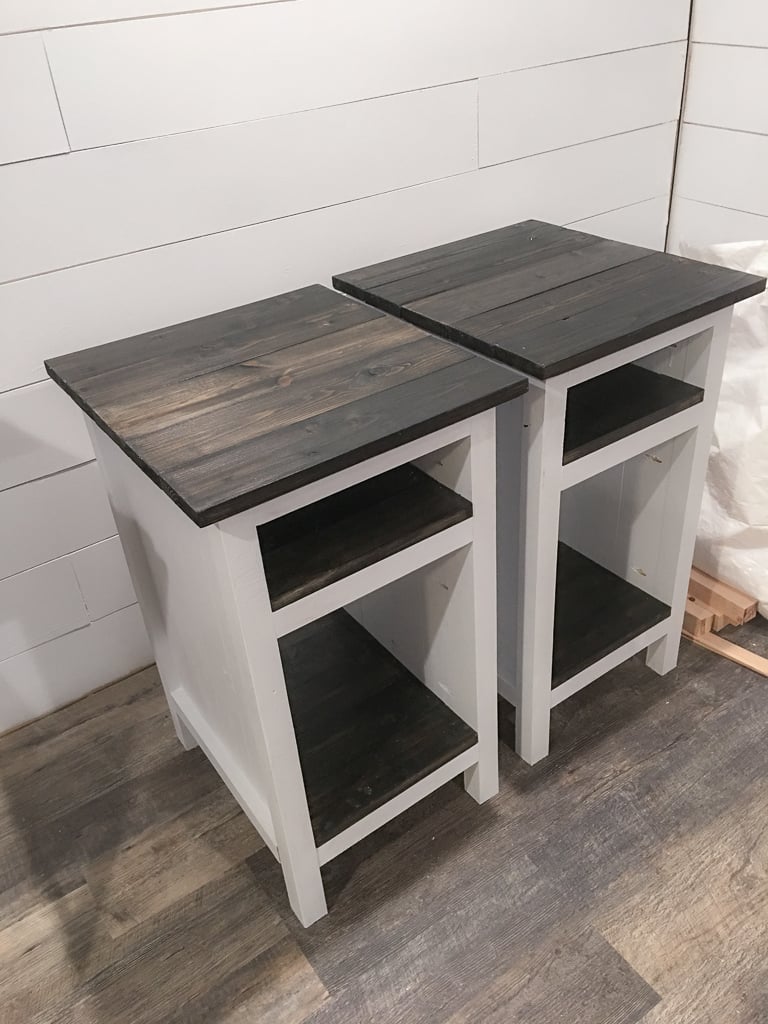
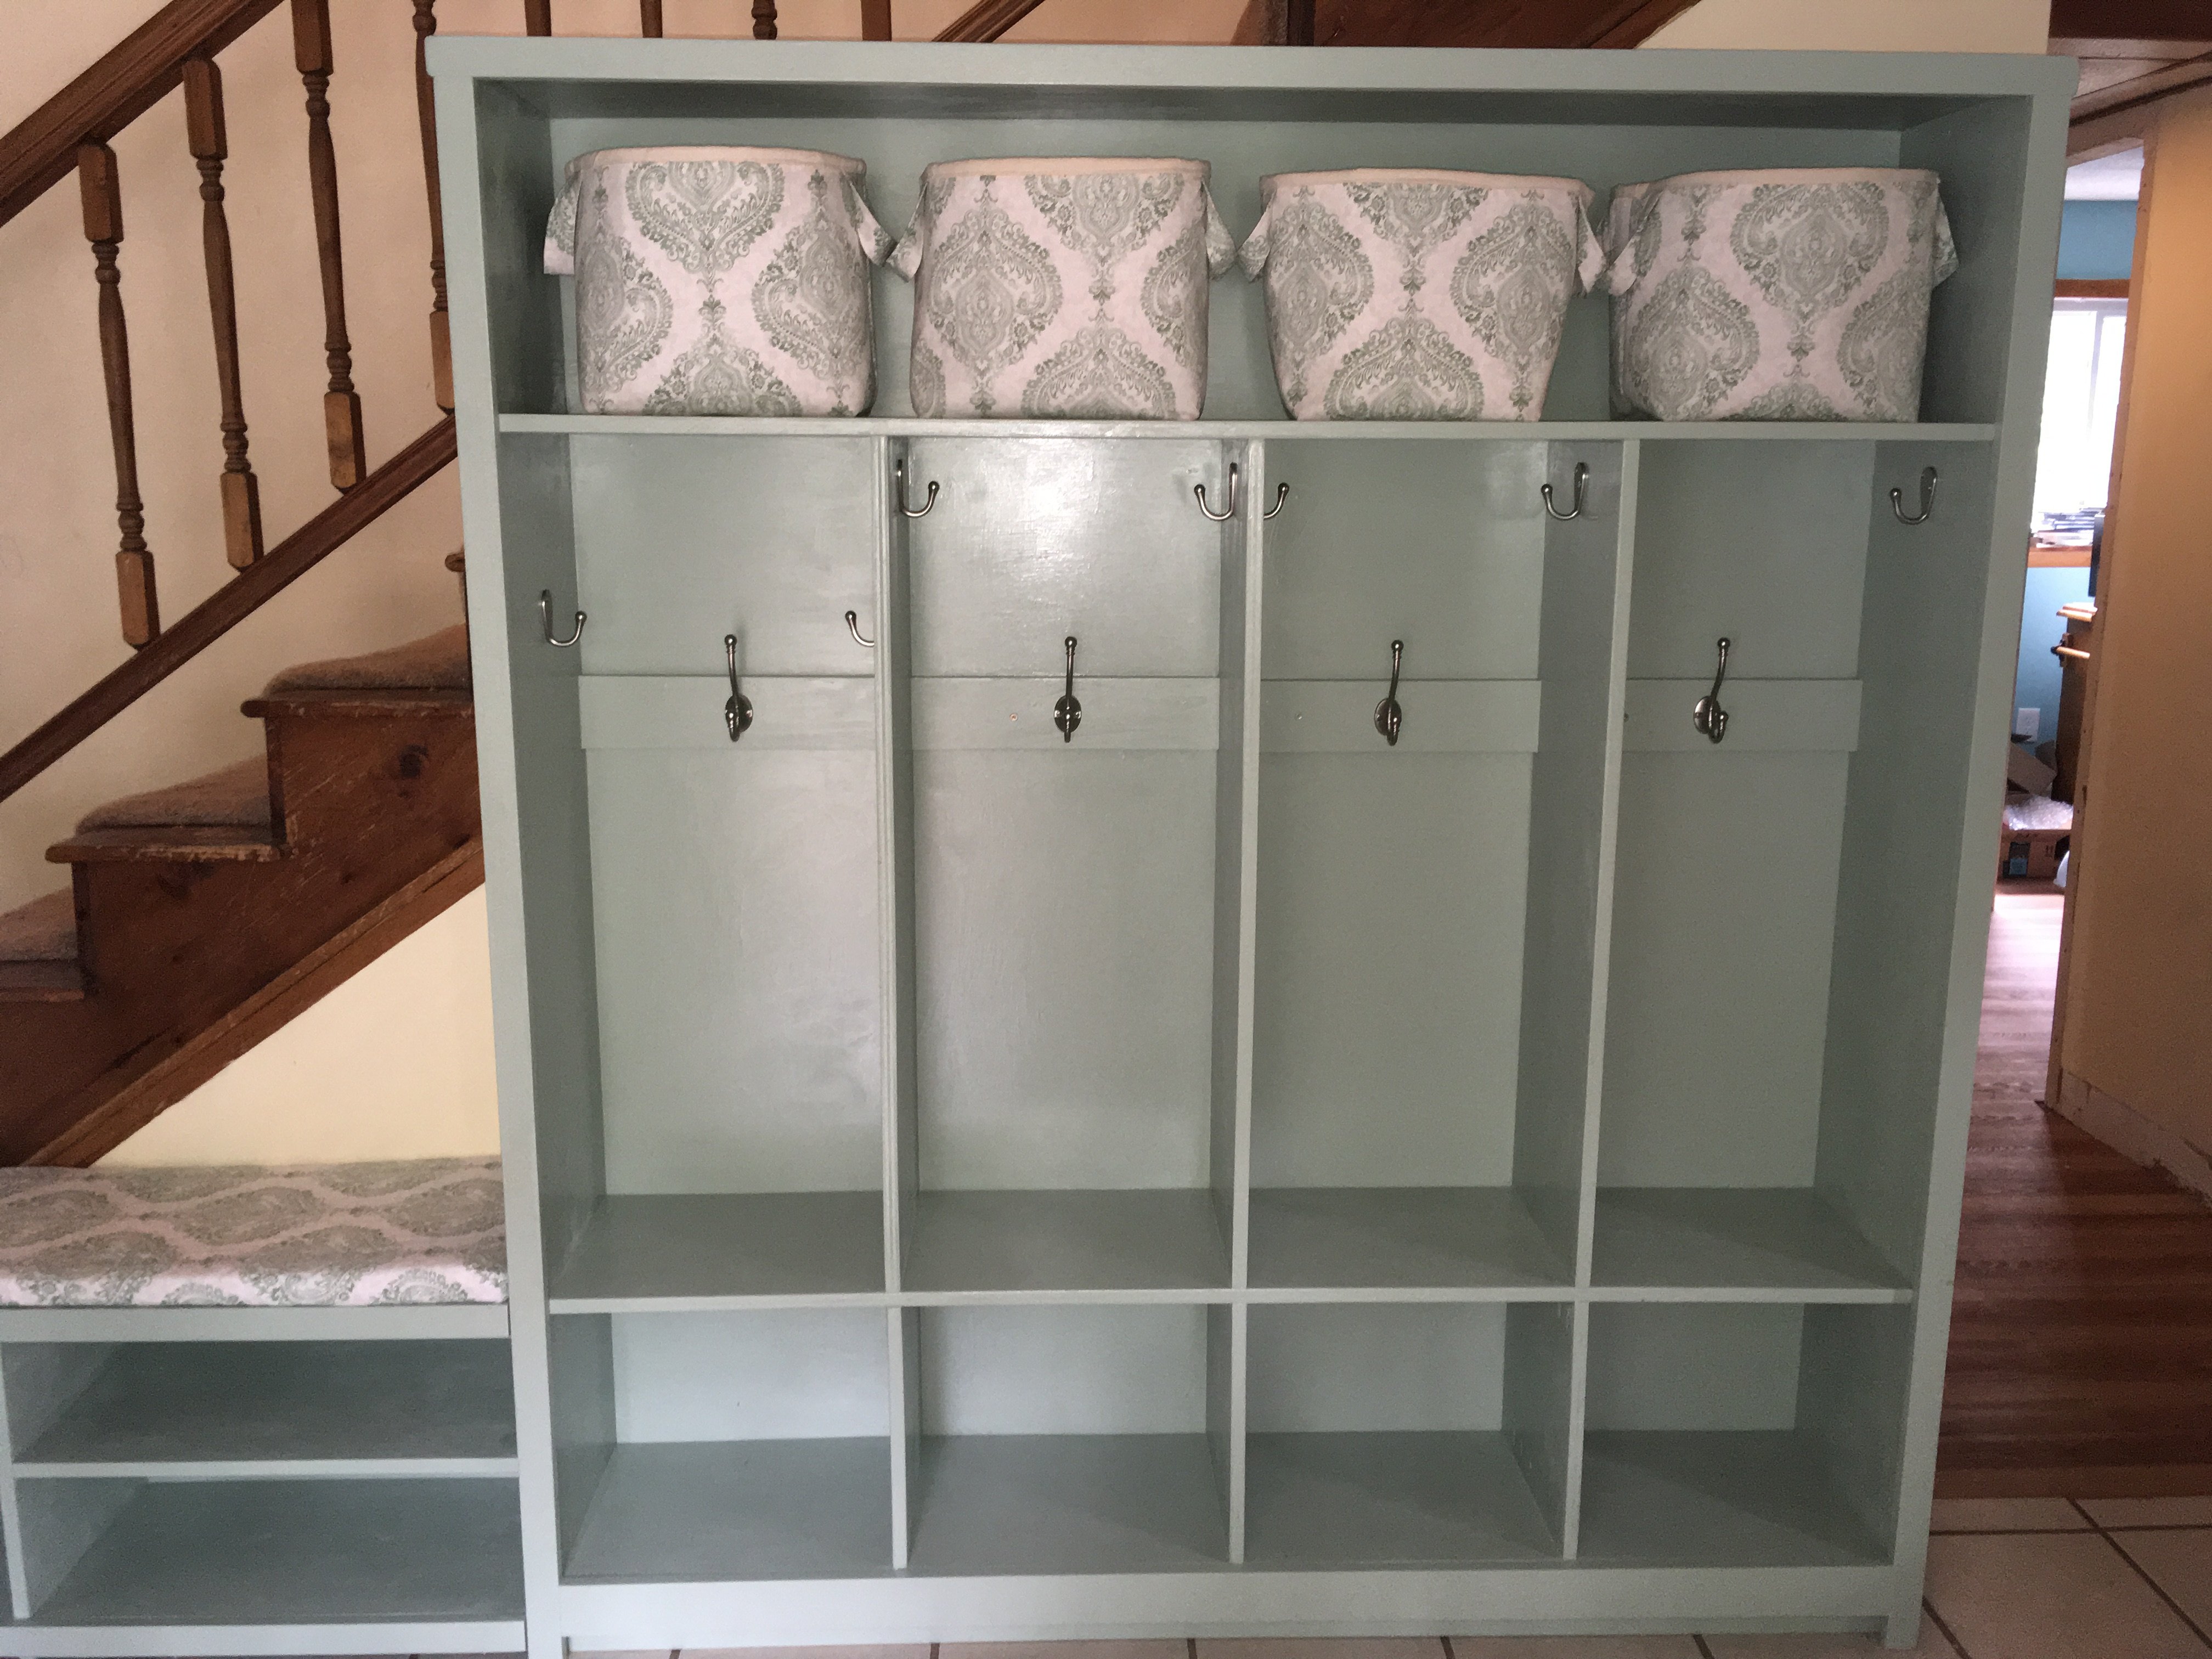
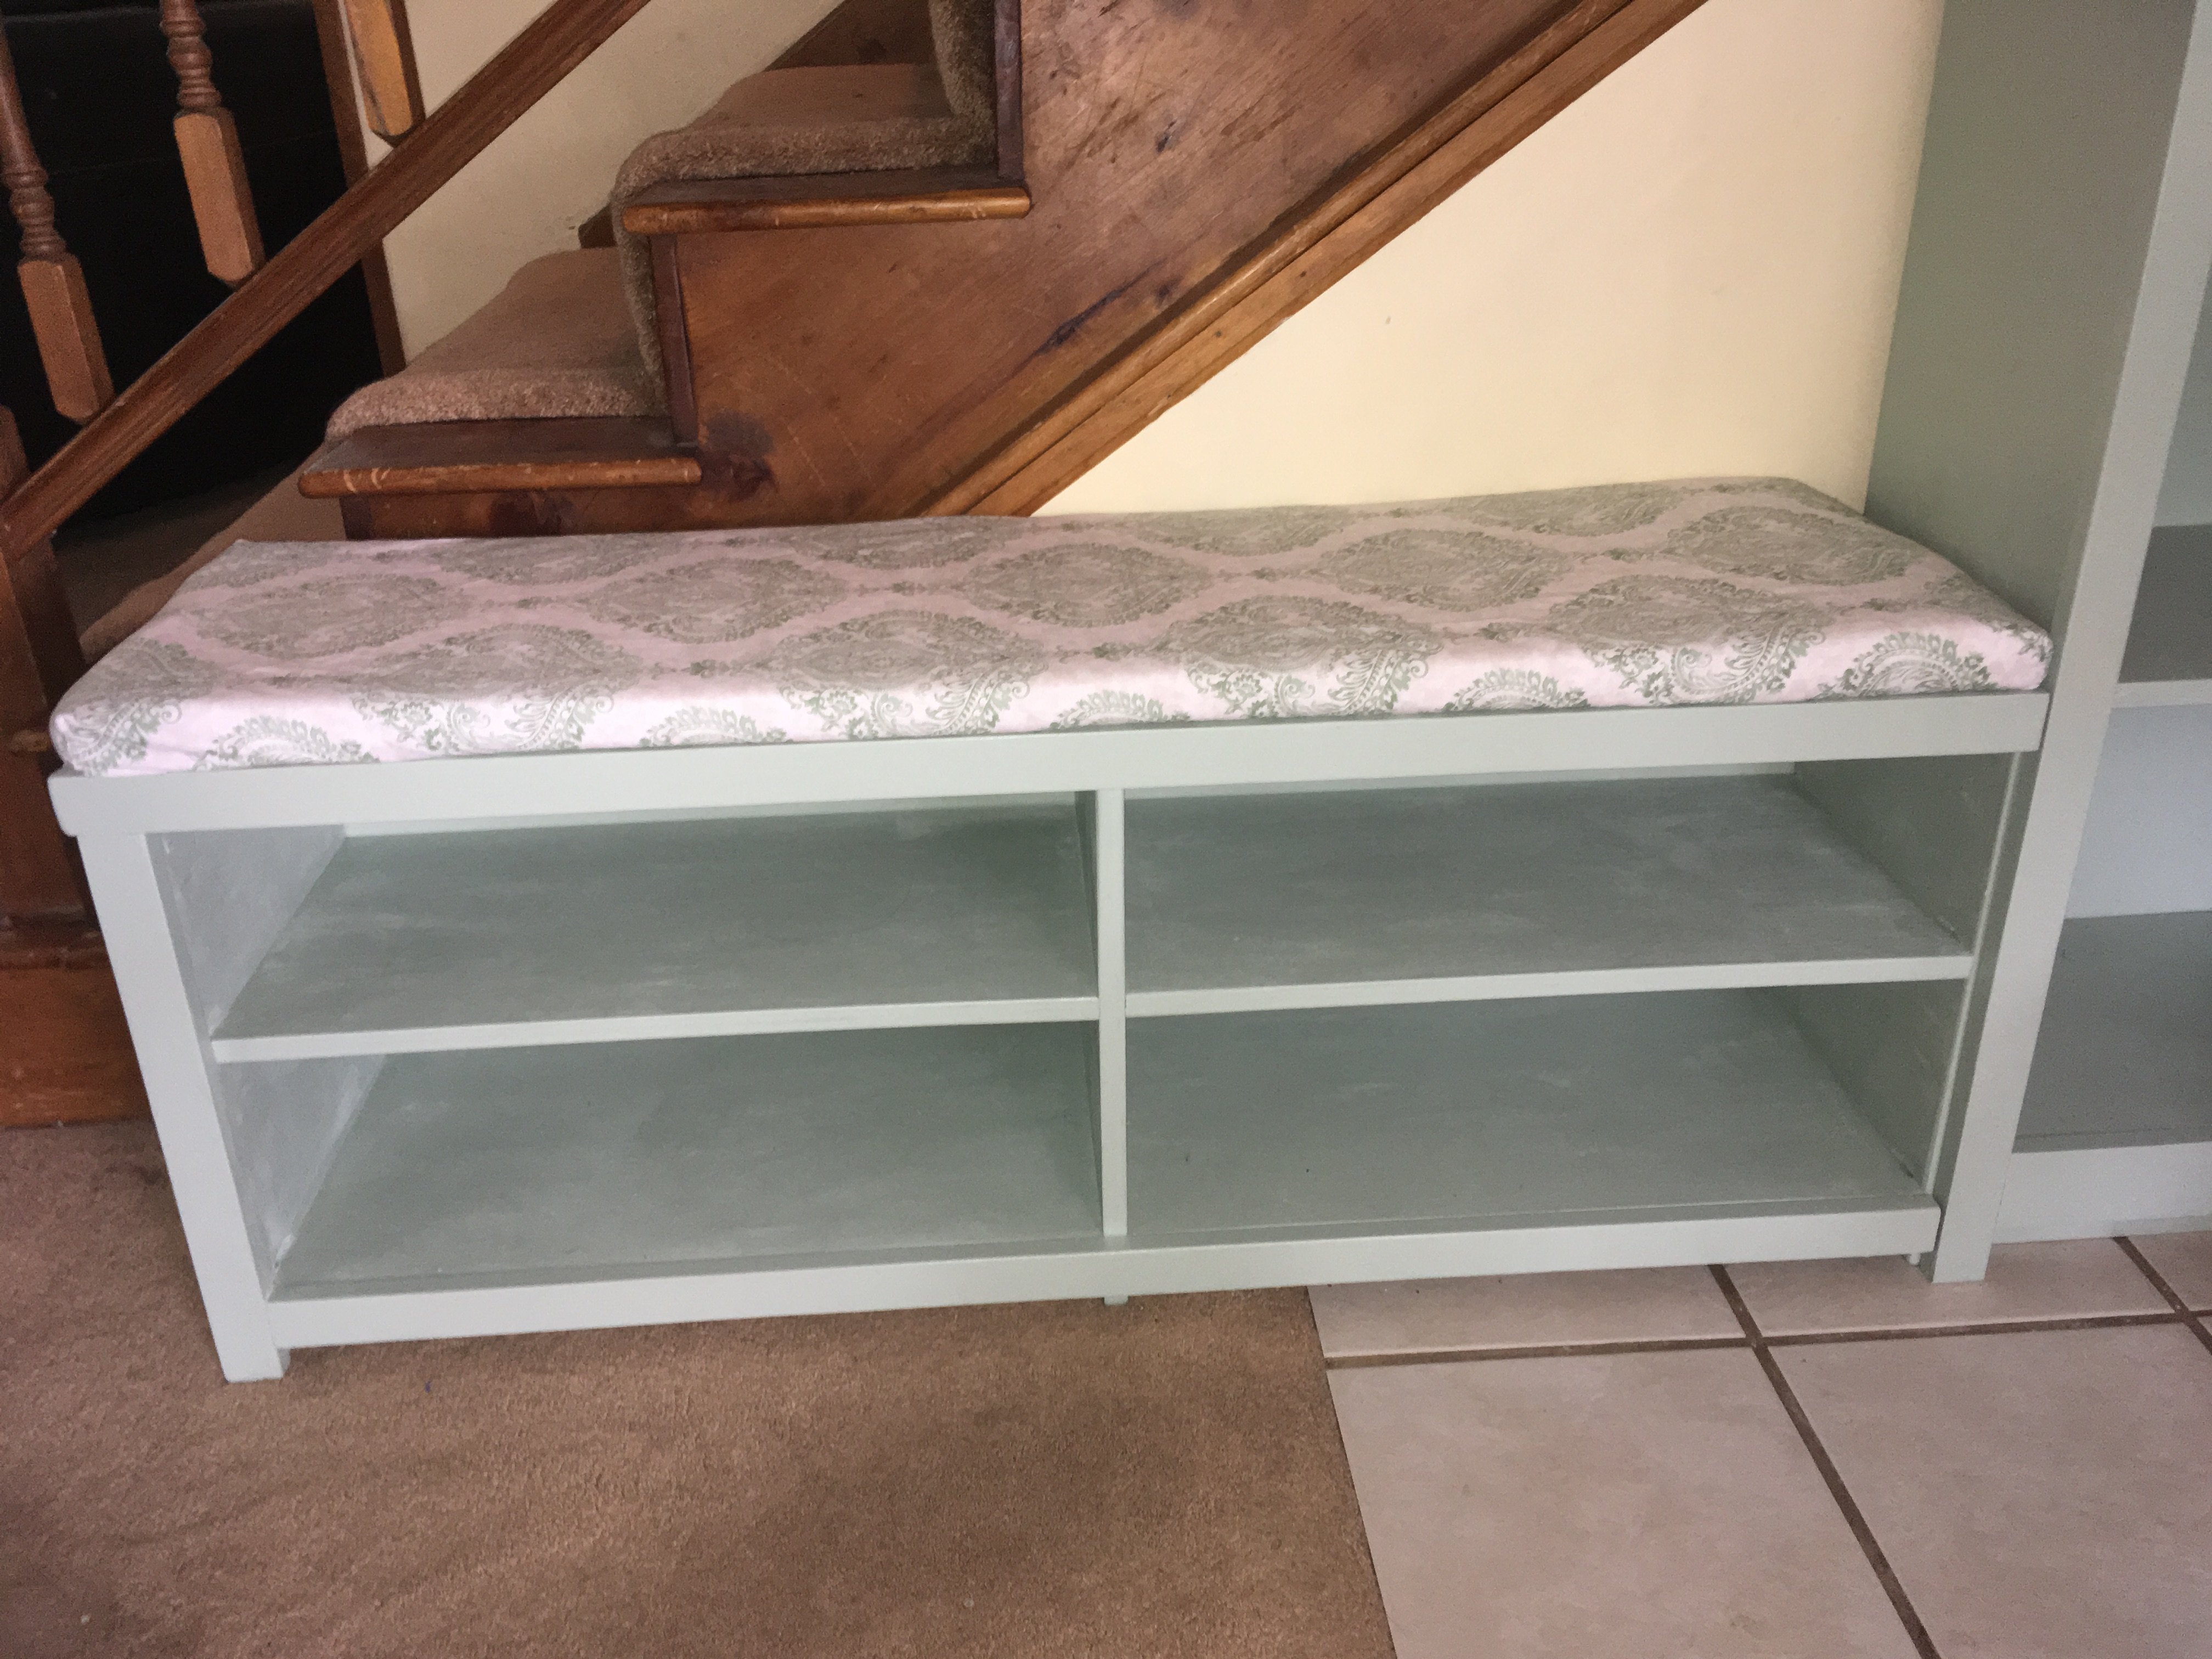
These are made from the three drawer plans but modified the size to meet our needs and used planks for shelves instead of drawers. Painted white and black gel stain.
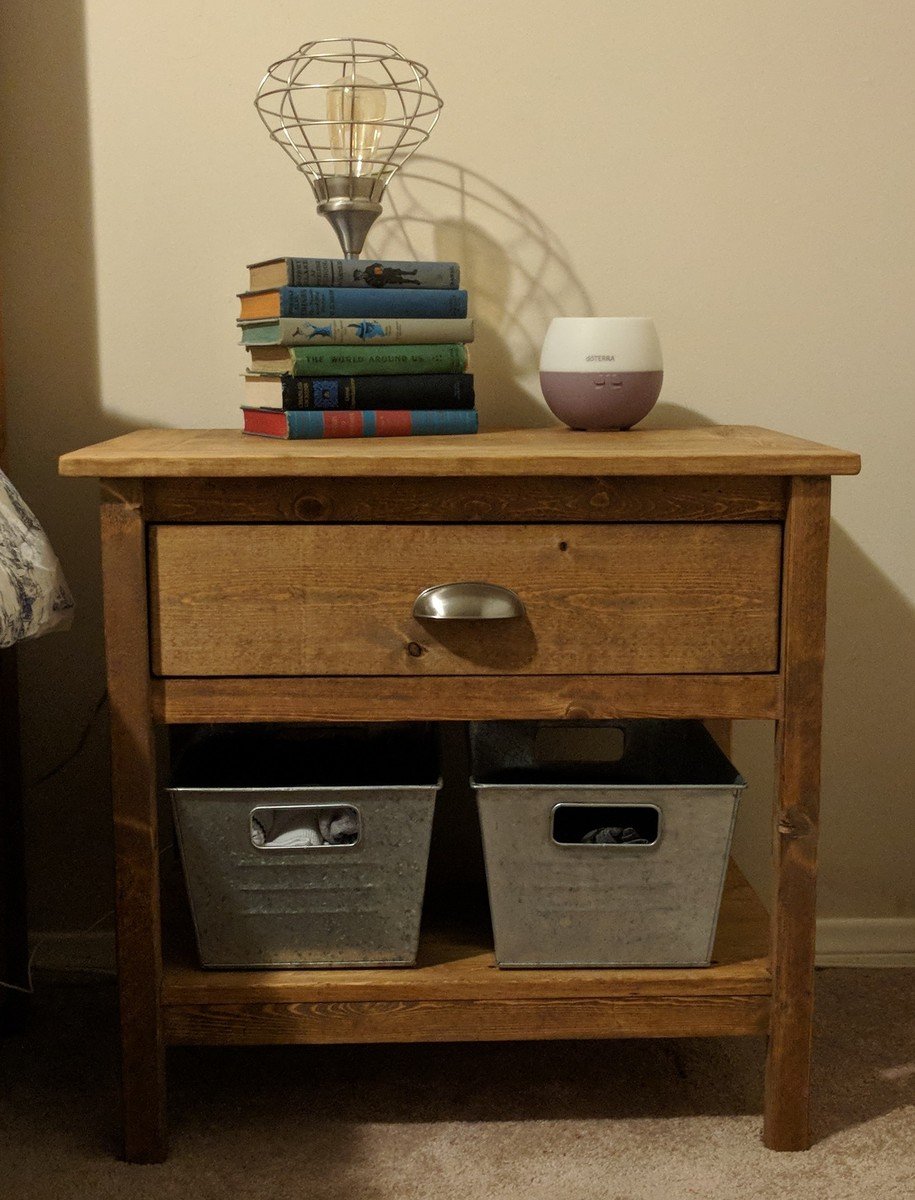
UPDATE FROM ANA - We have received MANY requests for this plan and have created a plan inspired by this post here.
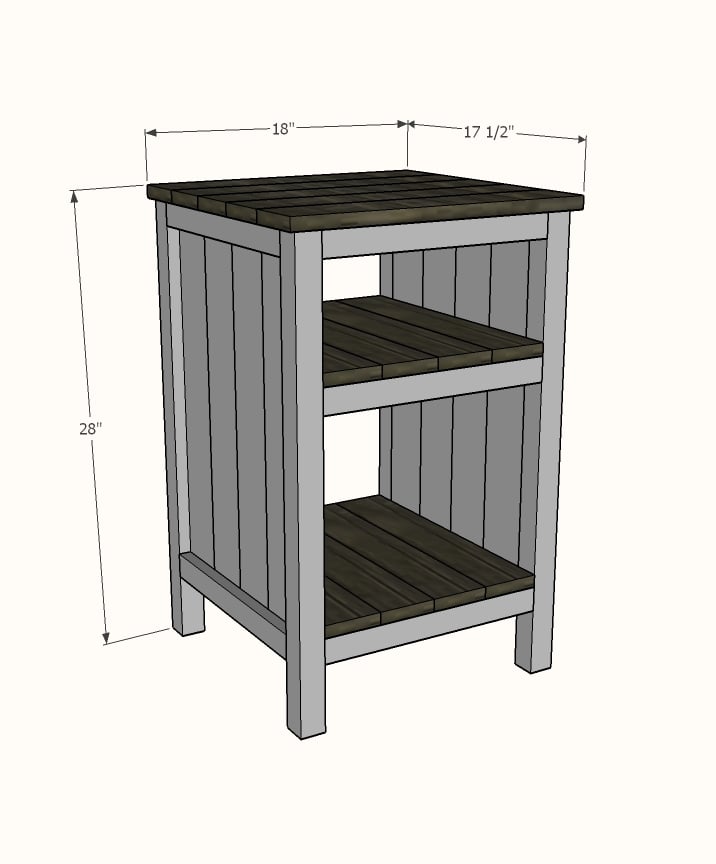
Shopping List (for ONE bedside table) + Tools
Cut List (for ONE bedside table)
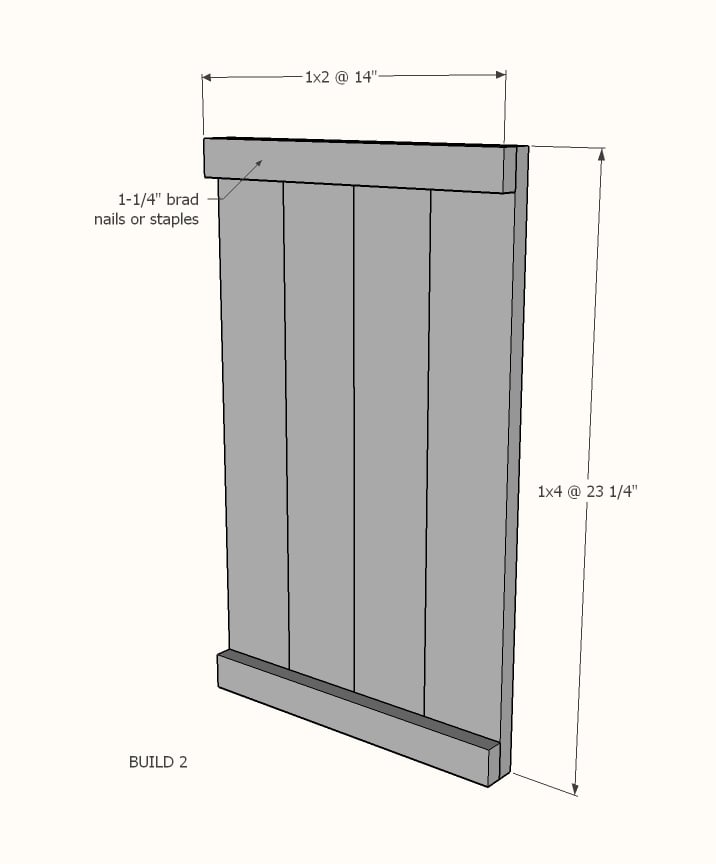
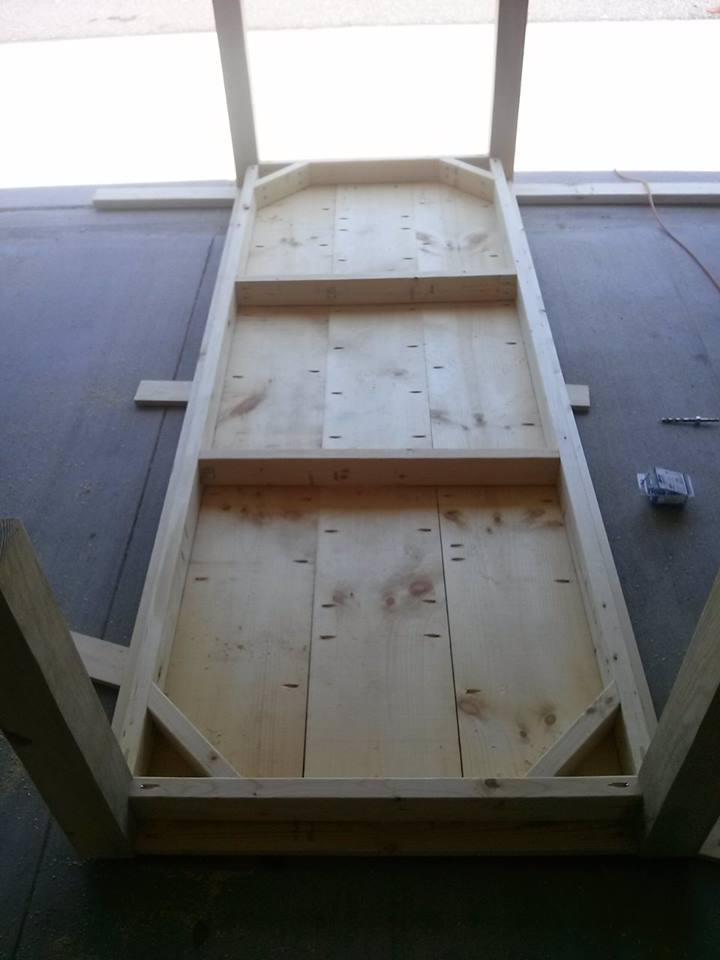
Cut 1x4s and 1x2s with miter saw. Layout side panel 1x4s as shown above. Measure and cut 1x2 to length. Nail the 1x2 to the 1x4s, two nails per overlap with glue. Make sure your side panels are square. Build two.
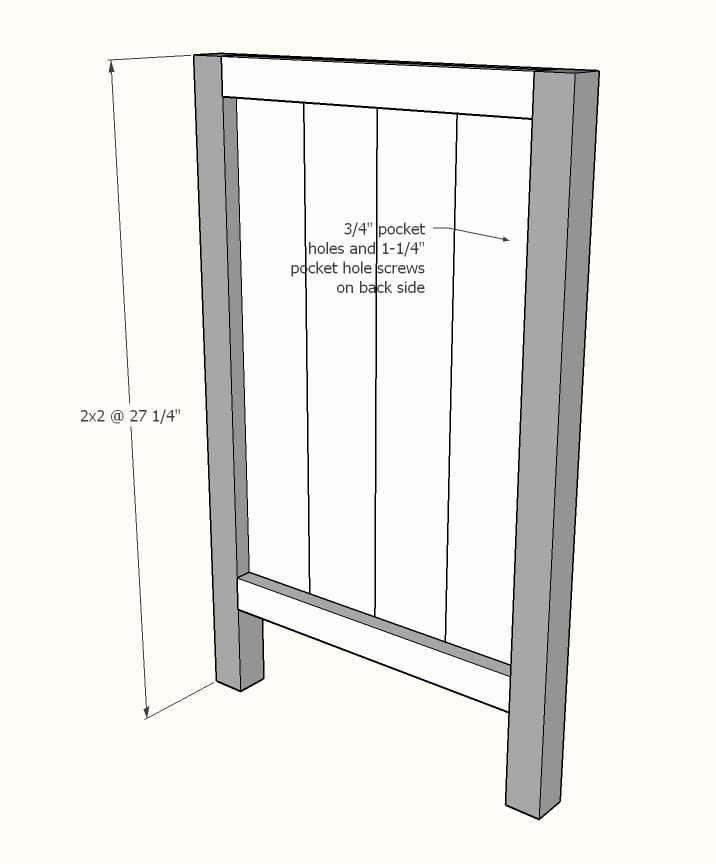
Drill 3/4" pocket holes on inside edge of 1x4 ends as shown above. Cut 2x2s with compound miter saw. Attach to the 2x2 legs with 1-1/4" pocket hole screws.
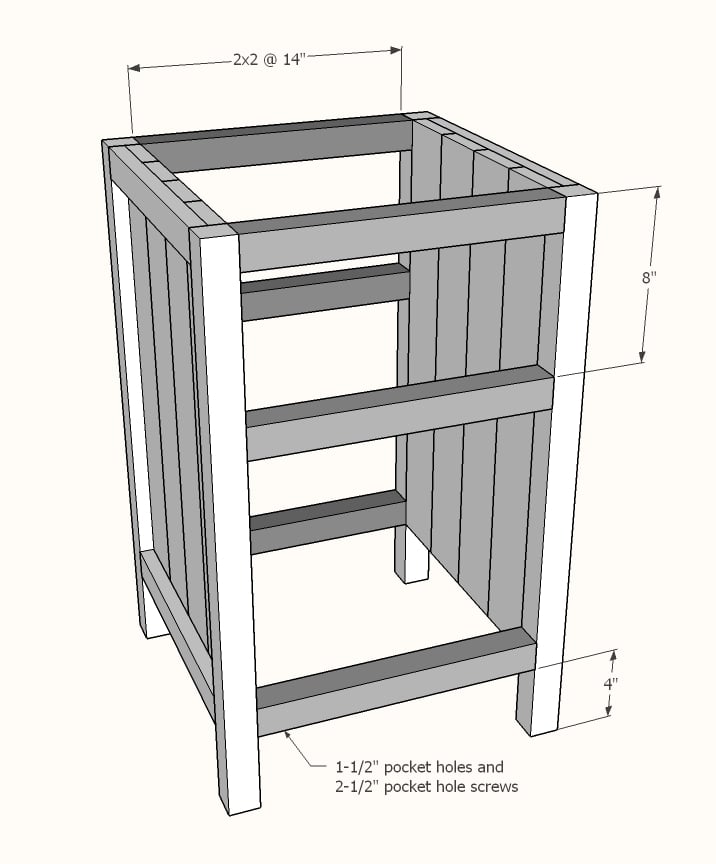
Set Kreg Jig to 1-1/2" setting. Drill 1-1/2" pocket holes on end of each 2x2, one per end. Attach to 2x2s with wood glue as shown above.
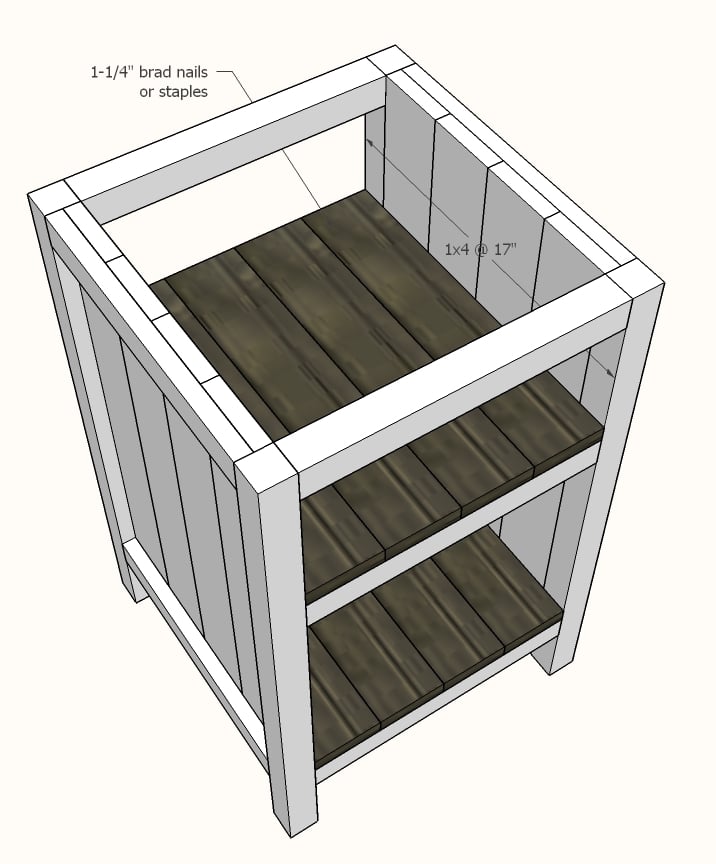
Cut 1x4 shelf boards with compound miter saw. Nail and glue to the inside of the project as shown above.
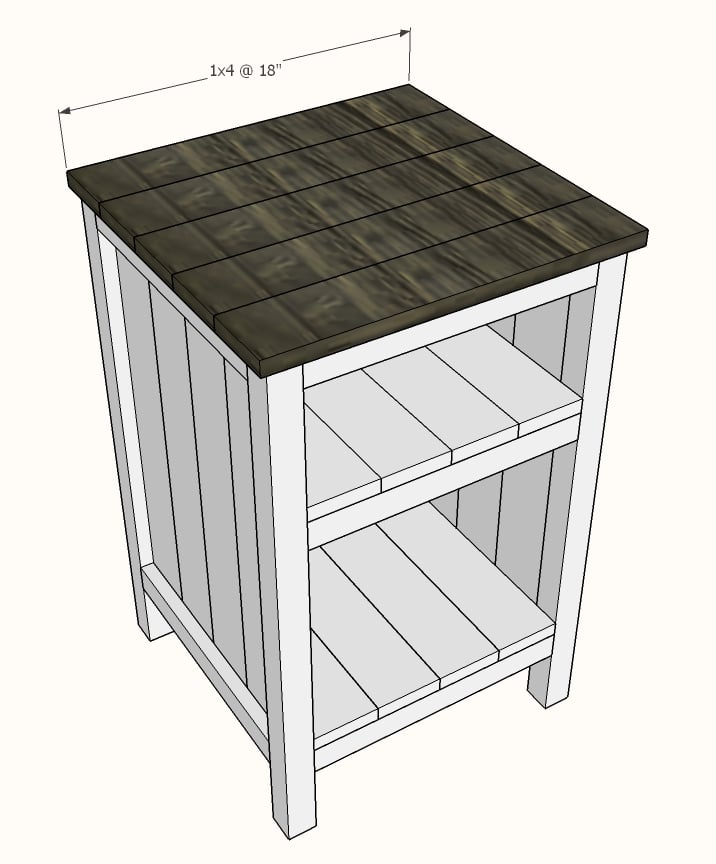
Cut 1x4 top boards with compound miter saw. Nail and glue to top with 1-1/4" nails and wood glue.
If you wish to add a back, measure and cut from 1/4" plywood and attach with 3/4" brad nails.
Mon, 02/12/2018 - 16:24
Is there plans for this one? Its gorgeous and I'd love to build it!
In reply to Is there plans for this one? by laurahamer07
Thu, 06/07/2018 - 15:37
Hello, this nightstand was built using these plans http://www.ana-white.com/2011/06/reclaimed-wood-look-bedside-table instead of adding drawers the builder added shelves. The shelves can be 3/4" plywood or 1x boards.
In reply to bedside end tables by karenlouder
Thu, 06/07/2018 - 15:40
Hello, this nightstand was built using this plan, but instead of drawers, simply measure and cut shelves to fit from 3/4" plywood. http://www.ana-white.com/2011/06/reclaimed-wood-look-bedside-table
Wed, 07/24/2019 - 09:24
It's taken us a couple of weekends, but we finished our bedside table. We made two, but one still needs painting.
Thank you for the plans. We had a great deal of fun and learning experience making these.
Want to see it? https://www.facebook.com/photo.php?fbid=2830583376957272&set=pcb.283058…
I used a mix of 2x4's and 1x4's for this project. It is only 4 feet long so I thought 2x4's would make it too bulky. It goes together very quickly and it looks great!
Was planning to build the table from smooth cedar... But at the lumberyard I happened across this beautiful batch of 5/4 poplar and adjusted on the fly. The tabletop is actually a crazy assortment of widths... 6, 8, 4, 12, 4, 8, 6 (respectively). Kregged, sanding like the dickens, two coats of light stain (cause I love all the ribbons/grain in this top) and fought with the poly for a few days to get it smooth. Decided to paint the base cause the broad grain of the pine base wouldn't match the top. My wife picked the little accent color for the stretchers on the base and that added some nice contrast. I didn't intend to build a bench at the start, but I had enough wood and the remaining 5/4x12 poplar top was too pretty not to use!
snagged the 4 chairs on Craigslist too. Really rounded out the set.
This is my first try at building furniture. I've built larger things in the past like decks and a fort for my nephews, but never furniture. Even though I used the plans to build the main box, I did change up the bottom and added some new stuff. I added wheels to the bottom my wife could easily move it around her classroom. I didn't want to put a square base on it because I thought it might hit her ankles when she was standing close to it. So I sort-of notched it out to give an opening for her feet and I used some scraps to create a short shelf at the bottom. I also added more trim that the plans call for. I cut strips of the pine plywood for the base molding and topped it with quarter round. I used corner trim for the front corners, the self inside and the bottom notched shelf. I also used screen trim for the back of it. I think it came out nice and I've very pleased with it. I used 2 coats of Minwax PolyShades American Chestnut on it.
Sat, 11/30/2024 - 17:03
Can you send me the plans and step by step of podium please.
[email protected]
Fri, 01/31/2025 - 13:55
You did a good job on this podium.
I am a AG teacher and my school is wanting us to build a couple of Podiums in are wood shop. Could I get a copy of our plans that you used and it you have a material list. Thank you
My school email is [email protected]
Wed, 02/19/2025 - 10:30
Hi, my name is Chris and I'm the building trades teacher at LCACTC, a career center for high school students and I was wondering if I could get the plans for the podium. My intro class has two to podiums to build for the National Guard.
Getting ready for retirement, so I thought I needed a rocking chair.
No plans, just built what looked and felt right.
Thu, 03/18/2021 - 01:27
Lovely chair. Nice proportions. Would like to copy it. Have you got any plans, sketches, or dimensions to share?
Fri, 02/10/2023 - 13:10
Love this rocking chair! Do you have any dimensions or plans. I would live to take this project on. Thank you.
Okay, here's the finished product. I love it! Made from a cedar fence picket so it's lightweight and it holds 2 dozen eggs. - Kyria Baker
I love Ana's plan for lockers! This project is so rewarding and was very straight forward to build. I added a fourth locker and a shoe bench to accomodate my children. I also added a toekick behind the face frame so things won't get lost underneath. Instead of using 1 x 12's, I ripped plywood into 4 equal strips. They came out to be slightly less than 12 inches each as you have to account for the saw blade. Each locker has three hooks, a place for shoes, and a bin for winter gear. I made the fabric bins and bench cushion following online tutorials. I set the hooks according to the height of my children, so even my youngest can hang up her things. This project took me about a week and a half to complete, including the sewing portion. It is very sturdy and the 1x4's along the back allowed me to attach the unit to several wall studs. I placed the 1x4's(with hooks) low enough that the heavy backpacks will also have the shelf for support. The shoe bench measures 48" in length at the longest point. It is the same depth as the locker unit and fits perfectly behind the locker face frame. Thank you so much for your wonderful plan!
The bench was easy to build with great instructions. I had Home Depot make my cuts for this first project and then I went and bought a miter saw and other power tools for future ones. So much fun.
Mon, 03/14/2016 - 08:35
Great work. DId you do anything different to the swing itself? How did you build the frame. I'm looking to do this exact thing for my patio. I don't have anywhere to hang the swing.
Thanks for sharing any info.
Sat, 06/13/2020 - 16:54
Made the chair and then built the glider frame for it just eyeballing the picture. I can't figure out how to upload a photo of my design, but can try to describe it.
I made mine with a 4x4 on the base of each leg, but a 2x4 would work as well, it was just what I had on hand. The base board on each leg I made 48". From there I put two 48" vertical boards. The vertical boards were centered and from the front edge of the first board to the back edge of the second board. Two 16" boards were then used at the top and bottom of the vertical boards to hold them in place. Cap it off with a 30" board on top of the verticals. This is where you'll attach your eye bolts. I put both eye bolts 3 1/2" back from the front (a scrap of 2x4 works well as a guide). To join the two legs, I used two 52" boards on top of the base 4X4 of the verticals (one in front of the legs and one behind).
I had made the farmhouse bed from Ana a while ago and finally got around to building a pair of these bedside tables to match. I love how much bigger the top is than my previous nightstand's top. The bins on the bottom shelf are relatively cheap from Walmart, and I like the galvanized look with the wood.
My wife wanted to get rid of a railing above our steps and wanted some additional storage. I had this plan saved but though about doing something smaller. Once I realized that wasn't going to work, I decided to go with this plan. It worked great.
First build of my woodworking journey
Thu, 09/17/2020 - 10:50
Workbench is a great place to start, I can't wait to see all the projects that are built on it!
Made this bed from Ana's plans. Modified it with rail so I can add my box spring. Cost was approximately $160 for lumber, screws and stain. Absolutely loved the plans and easy to follow or modify if needed.
Tue, 02/23/2021 - 20:12
This is gorgeous! Is there anyway you could post your modifications? Very nice work!!!
Love taking used deck wood (free) and repurposing it. The modern Adirondack chair is perfect around my fire pit. - Wyn
Well my first big wood project since wood tech in HS is complete been up since 5am working on this chair
Seat slats were from a pallet and the frame was all scrap wood 2x4’s in the dumpster up the street
I’ll be selling it on marketplace once I finish sanding and staining. - Court Duncan Facebook Community
We needed a Dining table to fit our growing family and our friends. Combined ideas from the iTable, Farmhouse and Big Ur table plans. Used 8ft boards so with the breadboards it measures roughly 8ft 7in long. Rustoleum Kona stain. Only took the weekend to build. Thanks Ana!