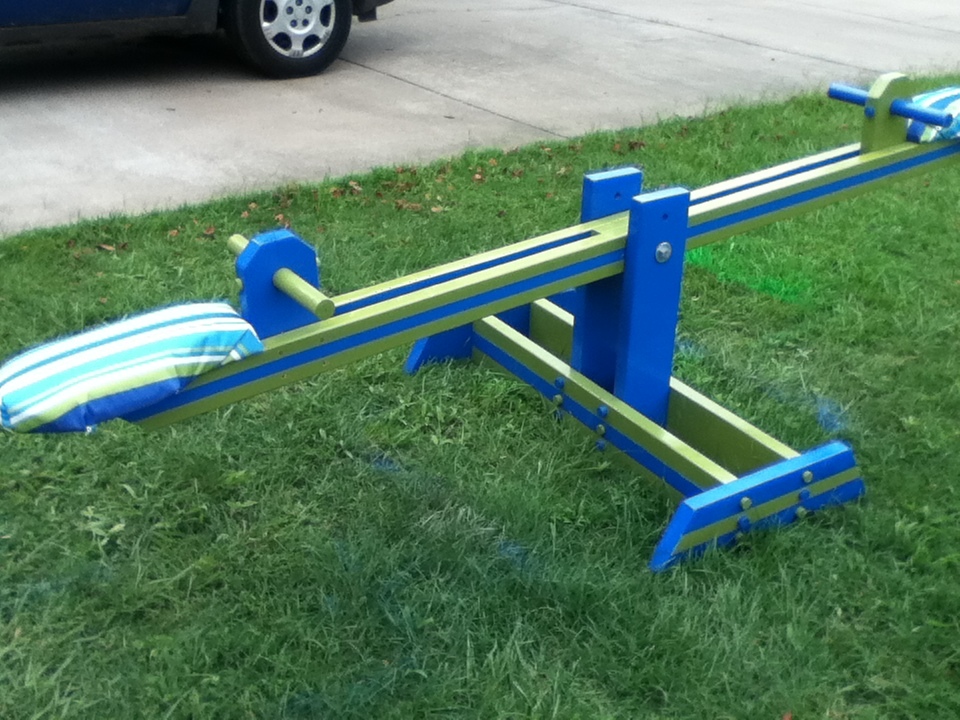
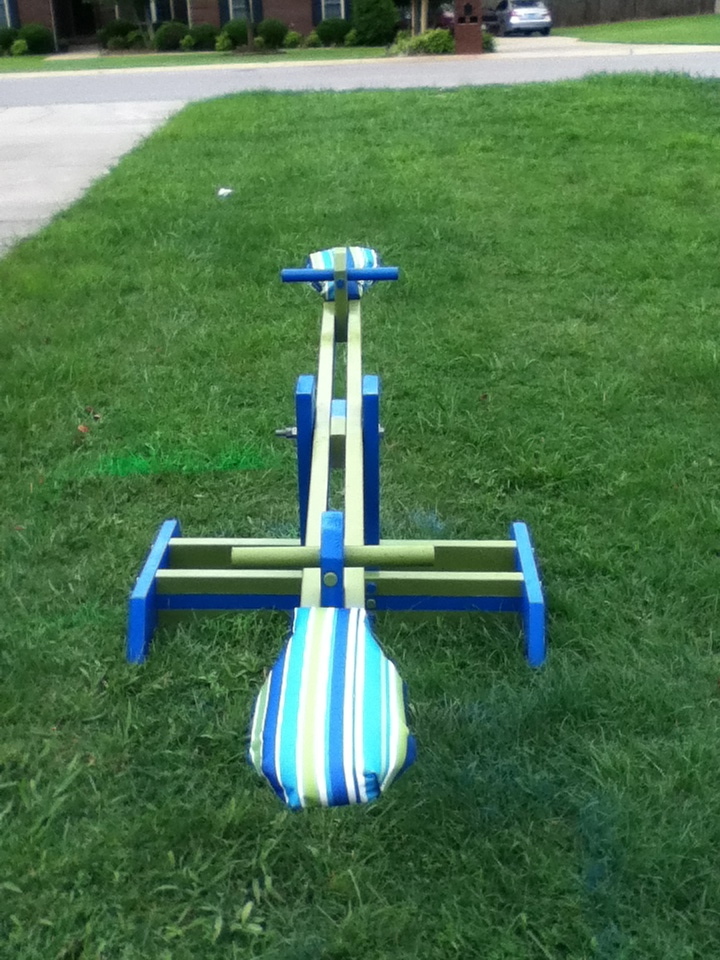
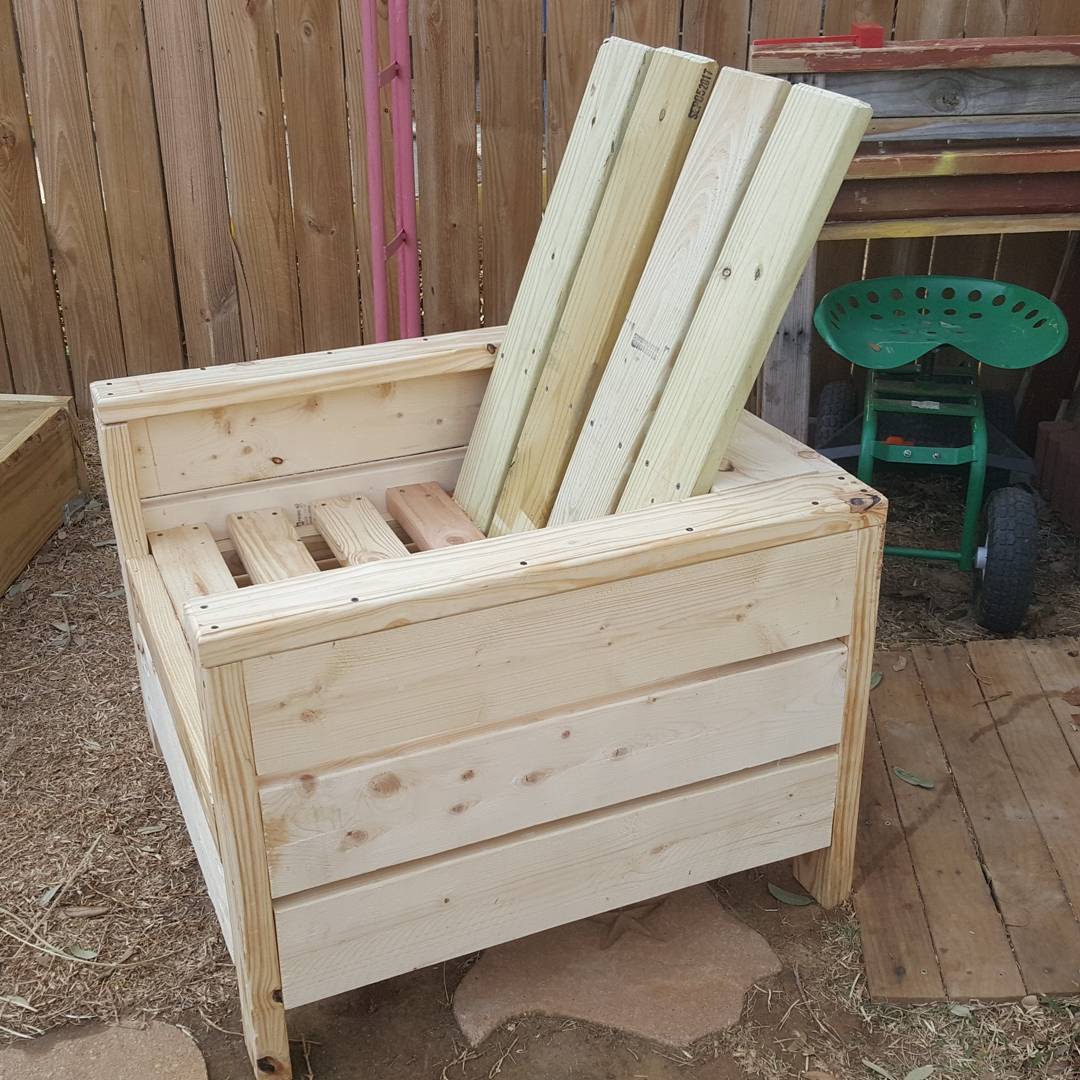
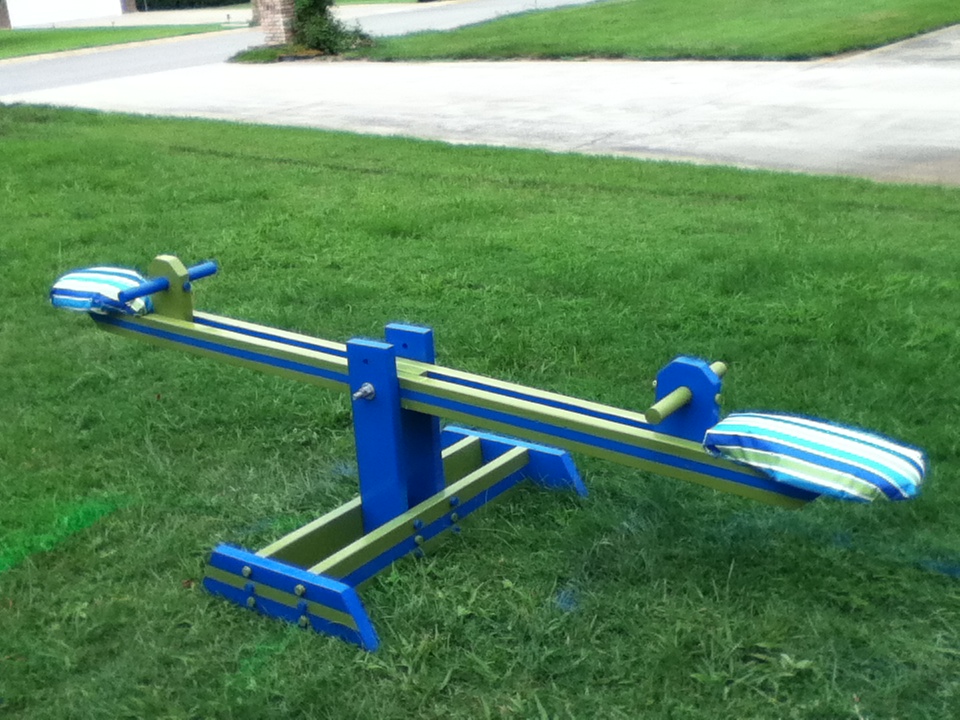
Community Brag Posts

Bedside tables

Submitted by Anonymous (not verified) on Mon, 02/04/2019 - 06:21

The plans are pefect. Very easy to follow and the measurements make the drawer install a breeze. Very enjoyable project.

Estimated Cost
$100 for a pair, including the pocket hole jig and excluding the plywood.
Estimated Time Investment
Weekend Project (10-20 Hours)
Finish Used
Behr Marquee Matte
Recommended Skill Level
Beginner

Pet Kennel

Submitted by ecsorah on Sat, 09/17/2011 - 13:13

My dog is very scared of thunderstorms and was always trying to find the a place that she could hide, which was usually under my desk. I decided to build her the pet kennel so that she could have her own hiding spot.

This was my first project and I definitely learned a lot in the process. I learned how to use my kreg jig and that I much prefer using a hand saw over a power saw. I also learned about accent bases. This project probably took longer than it should have but it was my first! The husband and I are very pleased with it (and he can't believe that I enjoyed the hand saw so much!)

Sorry for the poor picture qualities, we have not finished unpacking yet...

Built from Plan(s)
Estimated Cost
Around $60 ( I had a few things)
Estimated Time Investment
Weekend Project (10-20 Hours)
Finish Used
Outside - Oops paint - Glidden Accent base red delicious;
Inside - Oops paint - Sherwin Williams - light beige color don't remember name;
Oil Rubbed bronze Rustoleum spray paint on the hardware
Recommended Skill Level
Starter Project

Comments

loniwolfe

Mon, 09/19/2011 - 16:57

Great job! And I love how you painted it, it really pops! I've been wanting to build this for our dog, and let it double as a bedside table. Any suggestions or things to watch out for in the process?

Guest (not verified)

Tue, 09/20/2011 - 11:27

Thank you for the compliments!

What I learned in making this was when suing the kreg jig, not too much pressure or it will split the wood. I also learned about the importance of predrilling. Make sure you check for square and remember (because i didn't) that the plans don't include a bottom! I had previously made my dog a bed that I had stuffed with two old standard sized pillows and it fit perfectly in the bottom!

AmusingMJ's Fancy X-Leg Farmhouse Table

Submitted by amusingmj on Mon, 09/30/2013 - 05:58

We built a dining room table for some of my best friends. It was our first table build and a year later it is still beautiful! If you want to see a few 'in progress' pictures check out my blogpost on it at www.amusingmj.com/dining-room-table

Built from Plan(s)
Estimated Time Investment
Weekend Project (10-20 Hours)
Finish Used
Minwax Dark Walnut
Recommended Skill Level
Intermediate

Comments

Jewelry Box 2

Submitted by yhaas on Thu, 12/17/2015 - 20:58

I built this as a Christmas gift for my office partner/best friend.

Built from Plan(s)
Estimated Cost
$50 (bit of a guess, more if I add finishes which I already had, less if using scrap wood)
Estimated Time Investment
Weekend Project (10-20 Hours)
Finish Used
I used wood conditioner, then stained with Goudey stain in Rosewood. Next was a shellac washcoat, followed by glaze in Van Dyke brown, another washcoat, and finished with 2 coats of Tried and True varnish oil, then another 2 of Tried and True original wood finish. Knobs and felt were from Lee Valley.
Recommended Skill Level
Beginner

Comments

TV console

Submitted by Anonymous (not verified) on Sat, 02/09/2019 - 14:25

Had to build something to go with our brand new OLED TV. Combined Ana's 'Grandy Sliding Door Console' with a modified version of these modern barn door plans found at https://howdoesshe.com/build-a-fixer-upper-style-modern-barn-door/ from @angelarosehome to make the finished product shown here. My wife loves it (the pup doesn't mind it either)! 

Estimated Time Investment
Week Long Project (20 Hours or More)
Recommended Skill Level
Intermediate

Finally!

Submitted by mhob209 on Fri, 09/23/2011 - 15:29

After looking at this for way too long, I finally bit the bullet and built this table. It really wasn't difficult and it's so awesome having a side table on wheels! The stenciling made it a little extra work, but I love the added details.

Estimated Time Investment
Afternoon Project (3-6 Hours)
Recommended Skill Level
Starter Project

Comments

dress up station

Ive made a couple of these dress up stations now, for presents for my daughters friends. I plan to make her one next!
Plenty of room for storing all their fancy dress items :)

Built from Plan(s)
Estimated Time Investment
Weekend Project (10-20 Hours)
Finish Used
wallpaper and paint, rubber lace lining for the shelves, wooden ball feet, decals, mirror, name, hooks
Recommended Skill Level
Intermediate

Dollhouse

Submitted by samueldodd on Mon, 12/21/2015 - 06:04

The house is 48" high and 36" wide and 28" deep. It has 3 floors with a total of 10 rooms. Floors were made to look like hardwood floors and stained. Was fun to build and my granddaughter cried when she saw it. Due to the size of it, I installed wheels on it also. I made it from a picture on Ana White of Kidkraft Chic Dollhouse 2011-12-06 Paint all your pieces before you assemble. It makes it a lot easier than trying to paint afterwards.

Estimated Cost
$100,00
Estimated Time Investment
Week Long Project (20 Hours or More)
Finish Used
Roof was painted with oil based Red( because that is what I had on hand. The frame and walls and ceiling were painted white. The floor was made to look like a hardwood or plank floor and was stained with minwax Special Walnut
Recommended Skill Level
Intermediate

My first bed

Submitted by DAFrancis on Sat, 02/16/2019 - 10:20

I rasied it up abit and put the head board slats on the front of the headbard frame. Great design 

Built from Plan(s)
Estimated Time Investment
Weekend Project (10-20 Hours)
Recommended Skill Level
Beginner

Modern Craft Table :)

I loved this project the minute I saw it. I was using a cheap'o little computer desk that had metal legs and a prefab top for my craft table, I knew how much better my craft room would look with this as well as how much more functional it would be!
The desk went together rather quickly after all the wood was cut, Assembly time was maybe 1-2 hours.
I love it! Now how to finish it....

Built from Plan(s)
Estimated Cost
120.00
Estimated Time Investment
Day Project (6-9 Hours)
Finish Used
None yet :)
Recommended Skill Level
Beginner

Comments

hoffer5353

Tue, 10/04/2011 - 12:07

That looks great!
That was the first project that I really wanted to do. I haven't had a chance to do it yet but it is on my "to do" list for sure!
Can't wait to see how you choose to finish it!

Spanish Cedar X Base Farmhouse Table with Zinc Top

After craving a zinc-topped X base farmhouse table for our new house's large outdoor space for a while, but not wanting to spend upwards of $1k on one, I asked my husband (T) to build me one as my Christmas present last year. It took us a couple of months to get it done (very spread out over weekends) but I love the result.

I found the plans here for an X base table exactly like the one I had been lusting after, and googling around found several sets of instructions on how to fabricate metal countertops. We ordered the zinc from rotometals.com, and visited our local Woodworkers Source to find a suitable wood. I didn't want to use cheap lumber for a number of reasons.
1. I want the table to be around a very long time, and didn't want to have to stain it over and over
2. I was looking for a high end result that would only look better with wear and tear, which I knew couldn't be achieved with stained cheap framing wood
3. I had heard bad things about how wood wear outside in AZ, and though this is on a covered porch, we didn't want to spend hours making something only for it to fall apart.

We chose a Spanish Cedar, which the helpful guy at WWS suggested as one of a couple of good options. They squared the wood for us and cut it to the exact widths we needed, so T only had to cut to the lengths needed.

Once we were done with the frame, We used a sheet of MDF on a frame of pine to thicken the edges of the top, and wrapped the zinc around this.

We aren't DIY novices but this is the first piece of 'furniture' we have ever built.

We haven't sealed the zinc yet - I want it to patina more before I consider that. I have given the table one coat of oil (no colour) and it's performing wonderfully several months in.

Thanks Ana!

Estimated Time Investment
Week Long Project (20 Hours or More)
Finish Used
Oil
Recommended Skill Level
Beginner

Comments

spiceylg

Fri, 10/04/2013 - 05:06

Love the mod to this with the zinc top. Beautifully done!

katie0910

Tue, 10/15/2013 - 20:58

I love your table! I live in AZ as well and I would love to build an outdoor table, so thanks for the suggestion of Spanish cedar. I will keep that in mind when we finally are ready to build one.

Farmhouse King Bed

Submitted by Lantz198 on Thu, 12/24/2015 - 12:15

My bed frame dimensions were 76 wide by 80 length. So that is the inside demension after assembly. My headboard posts were cut to 54" and footboard posts were cut to 24". Headboard panels are 31.5" (14- 6" boards) and footboard panels are 15.5" (14- 6" boards). My posts were made from combining two 2x4s together. I plan on mounting the metal bed frame to the inside of the bed rails. I enjoyed this project greatly.

Estimated Cost
$166.25 unfinished. $185.00 painted.
Estimated Time Investment
Day Project (6-9 Hours)
Finish Used
Glidden Interior White with Satin finish
Two coats.
Recommended Skill Level
Beginner

Farmhouse table

Submitted by Anonymous (not verified) on Fri, 02/22/2019 - 11:10

Absolutely in love with this table. It turned out even better than we thought since this was my first diy project. We didn’t want to spend thousands of dollars buying a table similar to one we could make ourselves so we decided to give it a go. Our biggest issue with building it was the wood warping. We could only work on it every other weekend so the wood starting moving and it wasn’t on a flat surface. Definitely tie it down to a flat surface if you can’t build it all in a few days. We reinforced the breadboards with pocket holes on the inside and out because the first time we only did the inside, it snapped off. We used a lot of glue the second time around. Will definitely be making more tables in the future.

Estimated Cost
130$ Wood and materials
Estimated Time Investment
Week Long Project (20 Hours or More)
Finish Used
2 coats Varathane Jacobean, 2 coats water based satin polyurethane
Recommended Skill Level
Intermediate

Farmhouse bed

Submitted by Anonymous (not verified) on Sun, 01/15/2023 - 18:51

Needed a bed. After looking in town for premade beds, I wasn’t satisfied with the workmanship or price. I thought I could build one much nicer than what I was seeing. With these plans, I was able to make it happen. It turned out way better than expected. After a couple of strikes with paint, I watched a couple of YouTube videos on painting furniture black and that’s all it took to get exactly what I was looking for. Thanks so much for the plans. I also made the mini farmhouse bedside tables. I’ll put pics of it under the tables category

Comments

Silverware Showcase

Submitted by hoffer5353 on Tue, 10/04/2011 - 09:02

I had finally had it with the generic drawer organizer that we had. I decided that I would spend a few dollars and make it custom made! I took me aboout an hour and $5. It is amazing how little effort can make your kitchen look like it was a custom created space! I love it!

Estimated Time Investment
An Hour or Two (0-2 Hours)
Recommended Skill Level
Beginner

Comments

oldpaintdesign

Tue, 10/04/2011 - 14:00

That looks great! I definitely envy your organization! I love that the wood on your insert matches the outside of your drawers. Makes it look like it's been there the whole time!

Dream dollhouse for Lila

Submitted by ambro on Sun, 12/27/2015 - 17:42

I built this for my daughter's Christmas present this year. It was a fun project that you can do in a weekend if you hustle. The size a girth of this dollhouse is surprising.  Do yourself a favor and take measurements of doorways and hallways to make sure it will fit. It is nearly the size of a Lazyboy chair when finished. The best part of this project is the unlimited number of ways it can be customized.  Scrapbookpaper for walls , painted walls, carpet for floors, tile flooring,  stained flooring and so on. My daughter loves it and yours will too.

Estimated Cost
$100
Estimated Time Investment
Weekend Project (10-20 Hours)
Finish Used
Stain was a light oak from minwax. I bought rough Lumber and sanded it down to 220. I recommend anyone to spend extra money and get better quality or even oak 2x2's. It would have made this dollhouse pop. I bought paper from a craft store. They carried the paper that looks like wood paneling and bricks. I simply added a mantle made from a 1x1 by glueing and nailing it into place. I placed a piece of carpet from a bath mat on the bottom floor with heavy glue. The roof is a piece of luan paneling that I cut out and painted. I made the stairs a little different in that I angled the ends of some 1x2's and added 4 steps to each one. I predrilled holes and put in a finish nail and added glue to make them nice and tight. My daughter loves it. You have no idea how big this dollhouse is and how heavy it is until you get started. If you have small doorways you should consider assembly in the room it will be in.
Recommended Skill Level
Beginner

Christmas gift for parents

This bench wowed my parents when they saw me pull up on Christmas Day when I came to visit. Also, this was my first time using the kreg pocket jig. They love sitting outside with their cats and this couldn’t have been easier than I thought. I’m 5’2” and this is a big bench and look forward to building one for myself.

Comments

The Console Table

Please tell me I’m not alone…!! I must admit that I have found myself (on more than one occasion) just staring at a room for what seems like an eternity…trying to figure out why the space isn’t functional or just feels a bit “off”. It was during one of these “I dare you to blink before I do” staring sessions that I decided to build a table for my guest room.

Lucky for me, I can always count on Ana’s plans to rescue me from decorating madness! Well at least when it comes to the furniture part. (For everything else…I probably need lots of therapy!)

But seriously…anyone else get caught up in the time-warp-room-stare?! I can’t be the only one… :-)

My console table's complete story: http://gleeinspired.blogspot.com/2011/03/console-table.html

Estimated Cost
$25
Estimated Time Investment
Afternoon Project (3-6 Hours)
Finish Used
One coat of Minwax Jacobean stain.
Recommended Skill Level
Beginner

Comments

Guest (not verified)

Sat, 10/15/2011 - 21:49

How did you go about finding the wood that you purchased? I'm a newbee and all i have are Lowes & HD around me, also since I'm just starting out I don't have a saw- any suggestions?

claydowling

Sun, 10/16/2011 - 02:22

Lowes and Home Depot both sell wood. However, it's worth finding a local lumber yard to get a better quality of material. Trying to build a table with material from a big-box store will be an exercise in frustration, because it will warp on you, and your nice flat table will develop some interesting twists that will probably keep all four feet from touching the ground at once. I've been there plenty of times, and it's very frustrating to tear something apart to replace wood that warped after everything was assembled.

If you go to a lumber yard and ask for #2 pine, you should get something pretty stable.

You'll also definitely need to pick up some tools. Anyplace that sells lumber has a saw that they can cut material to length with, but none of them will make cuts accurate enough for building furniture. The only cuts you want made for you are those necessary to get material into your vehicle.

There are hand tools of acceptable quality sold at Lowes and Home Depot (well, mostly acceptable quality: nobody sells a decent chisel). They're cheaper and a lot less intimidating than the power tools, and with a little practice it's easier to do accurate work. The downside is that you'll have to hunt a little more for resources to learn how to use them.

brookieanne (not verified)

Thu, 10/20/2011 - 15:03

I love the table - it looks great!
And the time-warp-room-stare??? Yep. That's why I'm on Ana's site! We just moved into a new house about 2 months ago and I need some furniture to help pull some rooms together!

Sandbox with built-in seats

I modified this a tad from the original plans to suit my needs. I will eventually be adding a platform with attached slide and swing set.

Plans were easy to follow. My store didn't have 1x8's so I stacked 1x4's and used my Kreg jig to join them together and then I added extra bracing.

I had seen this on Pinterest a couple years ago and thought it was the coolest thing! Io excited I was able to build it myself!

Built from Plan(s)
Estimated Cost
About $40
Estimated Time Investment
Day Project (6-9 Hours)
Finish Used
None yet. I will stain and seal everything when I get the entire play set finished.
Recommended Skill Level
Beginner