Community Brag Posts

Thumb Chair

Super easy chair for the little people in your life.

Built from Plan(s)
Estimated Cost
$6 + scraps
Estimated Time Investment
Afternoon Project (3-6 Hours)
Finish Used
sanded and painted with valspar paint sample - two samples painted two coats on two chairs and one table
Recommended Skill Level
Beginner

Cottage Bench with Storage Cubbies for Girls' Room

Submitted by Debbie440 on Fri, 12/13/2013 - 05:49

I followed the plan exactly. The only thing different is that I added decorative trim.

I am a beginner and this was fairly easy. The only part I had trouble with is when I went to attach the back panel to the bench. It didn't quite line up. However, once I started screwing it down, it got better.

Estimated Cost
$35 for lumber and $5 for Sherwin Williams test paint
Estimated Time Investment
Day Project (6-9 Hours)
Finish Used
The color of paint I used is a sort of Antique White that I had color matched. I used Sherwin Williams test paint.
Recommended Skill Level
Beginner

Comments

Farmhouse King Bed

Submitted by Anonymous (not verified) on Fri, 10/04/2019 - 10:34

I used the Farmhouse Bed in the King size as an inspiration for this bed. I added a few things and tweaked the plan to make it my own. The cost of this bed was quite high due to the type of wood that I used, but can be made much cheaper with a softer, cheaper kind of wood and still look just as beautiful!

Estimated Cost
$600
Estimated Time Investment
Weekend Project (10-20 Hours)
Finish Used
I used a soft brown finish and lacquered it. It looks dark due to using walnut which is of course a brown wood.
Recommended Skill Level
Intermediate

Comments

Rocket book case

Submitted by SF Guy on Sun, 02/05/2012 - 19:44

Easy beginner project.

Built from Plan(s)
Estimated Time Investment
Afternoon Project (3-6 Hours)
Finish Used
I like the comment about using the free samples of paint. I read it a little late.
Recommended Skill Level
Beginner

Comments

Cupcake Stands

I was looking for a useful, cool, easy project I could make for my coworkers this holiday season. I stumbled on the DIY Cupcake Stand and thought it would make a perfect Christmas gift!

I made ten of them, so to keep the project affordable I opted to use an edge forming bit on my router instead of using molding.

To complete the gift, I'm planning to include jar of homemade cupcake mix and some cupcake liners :)

Thank you for the idea/plan!

Built from Plan(s)
Estimated Cost
About $50 to make 10 stands
Estimated Time Investment
Weekend Project (10-20 Hours)
Finish Used
The stands were finished with Behr semi-gloss paint in "Candlelight Ivory".
Recommended Skill Level
Beginner

Comments

Shanty Sideboard

Submitted by cefogus on Sat, 02/27/2016 - 12:37

I changed up a few things. Instead of plywood I used 1X6 lumber and joined it with pocket holes to make the sides, top/bottom, and shelf. I made the shelf one piece and added the dividers for supports. For the doors I cut down 1x4s to 1/4 inch thickness and glued them together. Then cut down 1x3 to 1/2 inch for the trim. I just didn't like the plywood look. But I like the plank look. The doors were a bear. I should have used bigger hinges. They were a learning experience for next time.

Built from Plan(s)
Estimated Cost
$300 in lumber plus stain.
Estimated Time Investment
Weekend Project (10-20 Hours)
Finish Used
MInwax Golden Oak and Clear Satin Poly.
Recommended Skill Level
Intermediate

Modern farm bed

Submitted by Anonymous (not verified) on Sun, 10/06/2019 - 11:59

Modern farmhouse bed frame highlighted with epoxy highlights along the side rails. This is a super sturdy bed. Which is simple to build the hardest part was being patient with the epoxy.

Built from Plan(s)
Estimated Cost
$250
Estimated Time Investment
Week Long Project (20 Hours or More)
Finish Used
General finishes arm r seal satin clear with red and black pigment . I layered the black first and then stain it red and touched up with red or black depending on what was lighter. And then used a satin finish polyurethane to protect the staining wood. The epoxy poor are used Black mirror coat by systems three. I then had to clean it up by planing it and then I had sanded it to a 3000 grit.
Recommended Skill Level
Intermediate

Raised Planter with 1x legs

Submitted by Anonymous (not verified) on Mon, 06/26/2023 - 12:14

38lx37hx15w Rope decoration doubles as handles. Color is in Cabot oil stains (Sunlit Walnut & Sundrenched Oak.

- Built by James P

Comments

Corner Cupboard Storage

Submitted by hoffer5353 on Wed, 02/08/2012 - 15:00

After Christmas I was talking to my cousin, she told me how she now needed storage to hide her new gifts she had received. Of course I wasted no time and told her about Ana's site.

So as we enjoyed lunch she pulled out her handy "smart phone" and began searching for the perfect plan for her needs.

It didn't take long for her to find the plan that suited her needs and we began planning. I got all the materials together and did some presanding so we could get this baby complete in her short weekend visit.

This plan was easy to cut and stain, however assembly was a bit more difficult as the angles made it difficult to get your bits into tighten kreg screws.

We didn’t make the bottom shelf adjustable however made it high enough for the mixer she wished to hide within it.

Other than typical door hanging issues the project turned out beautiful! The bottom cupboard doors even provided enough room for her large mixer and griddle.

Before she took her project home to enjoy she was already planning her next project.

These plans are beautiful, functional and do-able.

Thank you again Ana for making another person’s life’s organized!

Built from Plan(s)
Estimated Time Investment
Weekend Project (10-20 Hours)
Finish Used
varathane-red oak 3 coats
minwax poly
Recommended Skill Level
Intermediate

Comments

Aunt Michele (not verified)

Thu, 02/09/2012 - 08:25

Awesome job girls! I knew you'd rock it. :)

My nephews toy box

My husband and I built a toy box for our nephew for Christmas. We were able to complete this project in a day and were very satisfied with how it turned out. We used rope for the handles. And for the lid we used a long hinge along with 2 shocks so the lid would not collapse on his little hands. Because the pine was so nice, neither of us wanted to cover it up. :)

Estimated Cost
$120.00
Estimated Time Investment
Day Project (6-9 Hours)
Finish Used
No finish
Recommended Skill Level
Beginner

Rustic X End Table

Submitted by Anonymous (not verified) on Mon, 02/29/2016 - 13:30

We took on the rustic x table project and used the oxidization process described in the links (black tea then vinegar/steel wool mix). It turned out great! A few things I learned... When using the black tea if the tea runs it makes a difference. I had my wood up against a wall and was painting vertically. It pooled at the bottom, seeping into the wood. Didn't think this was a big deal but when I went to oxidize it you could see where it seeped. I couldn't sand it out without really lightening the wood too much. So, its there as part of my imperfect project. It kind of adds to the rustic look :) I let the vinegar/wool steep for a long time so it was more brown than gray. I ended up liking it (read: i didn't want to redo the whole thing) so I went with it. I really do like it though. I had to sand a lot to get it to lighten up some. We wanted a coffee table too- but something round. So, my husband invented the coffee table you see in the picture. He used the same kind of wood as the rustic x table and we used the same process to finish it. The time estimate mentioned below is just the end table.

Built from Plan(s)
Estimated Time Investment
Weekend Project (10-20 Hours)
Finish Used
Black Tea base
Vinegar/steel wool to oxidize (steeped about 2 weeks)
Lots of sanding
satin poly coat
Recommended Skill Level
Intermediate

Comments

Loft bed with platform

Submitted by jbar1981 on Wed, 10/09/2019 - 13:03

I modified a few things to fit my needs. I did a small ladder instead of steps to save room. I added a 2x4 down the middle with brackets to add extra strength for mattress area. I used my kreg drill bit to make holes for the 2x2 to also help with strength. I am a big guy and the bed was solid so no issues with weight. I added 8 inches to the main post to add height underneath for a doll house, book shelf and some other things my wife wanted under there. Excellent plans and my daughter loves it. 

Estimated Cost
200.00
Estimated Time Investment
Weekend Project (10-20 Hours)
Finish Used
Nothing yet
Recommended Skill Level
Intermediate

floating shelves

Submitted by amcateer on Mon, 02/13/2012 - 16:37

First project we have done. We love how well the shelves turned out. We modified the original plans to 9 inches deep. We had one hang up with the original plans b/c the two inch screw at the end of the frame go in perpendicular to the wall and we didn't have a way screw the frame into the wall and hit a stud. We added a hidden bracket on the end directly to the outside piece. It was a fun project and opens up our small kitchen tremendously.

Built from Plan(s)
Estimated Time Investment
Day Project (6-9 Hours)
Finish Used
black -high gloss.
Recommended Skill Level
Starter Project

Comments

amcateer

Wed, 02/15/2012 - 15:50

yes and no. We have more space but not everything we had in the cabinet (water bottles etc) worked with open shelves and we had to move elsewhere. We are thinking about adding another shelf in the middle that goes from the door to the coffee maker. But I'm not sure if it will look to cluttered. Eventually I would like to make a tilt out trash can cabinet with a cubbie for the microwave on top.

Easy Scrap Wood Crayon or Pencil Block Holder

Submitted by DMax2010 on Mon, 12/23/2013 - 07:40

I wasn't planning on doing another project so close to Christmas but I saw this and couldn't resist. After the holidays, I will be making one for myself, because it is really comfortable to hold!

I did both versions, one with just the crayon holder and one with the lap pad. For the lap desk, I used 1/4" birch (purebond) plywood, just because its lighter.

Thank you ladies so much for all the fun projects! I have to catch up on my brag posts, I've been so busy building (and trying to finish my dissertation!)

Happy Holidays!

Estimated Cost
Less than $5
Estimated Time Investment
An Hour or Two (0-2 Hours)
Finish Used
Sanded, then used some cardstock paper to mod-podge on with some white paint.
Recommended Skill Level
Starter Project

Benchmark Media Console

Submitted by Toastman on Thu, 03/03/2016 - 20:12

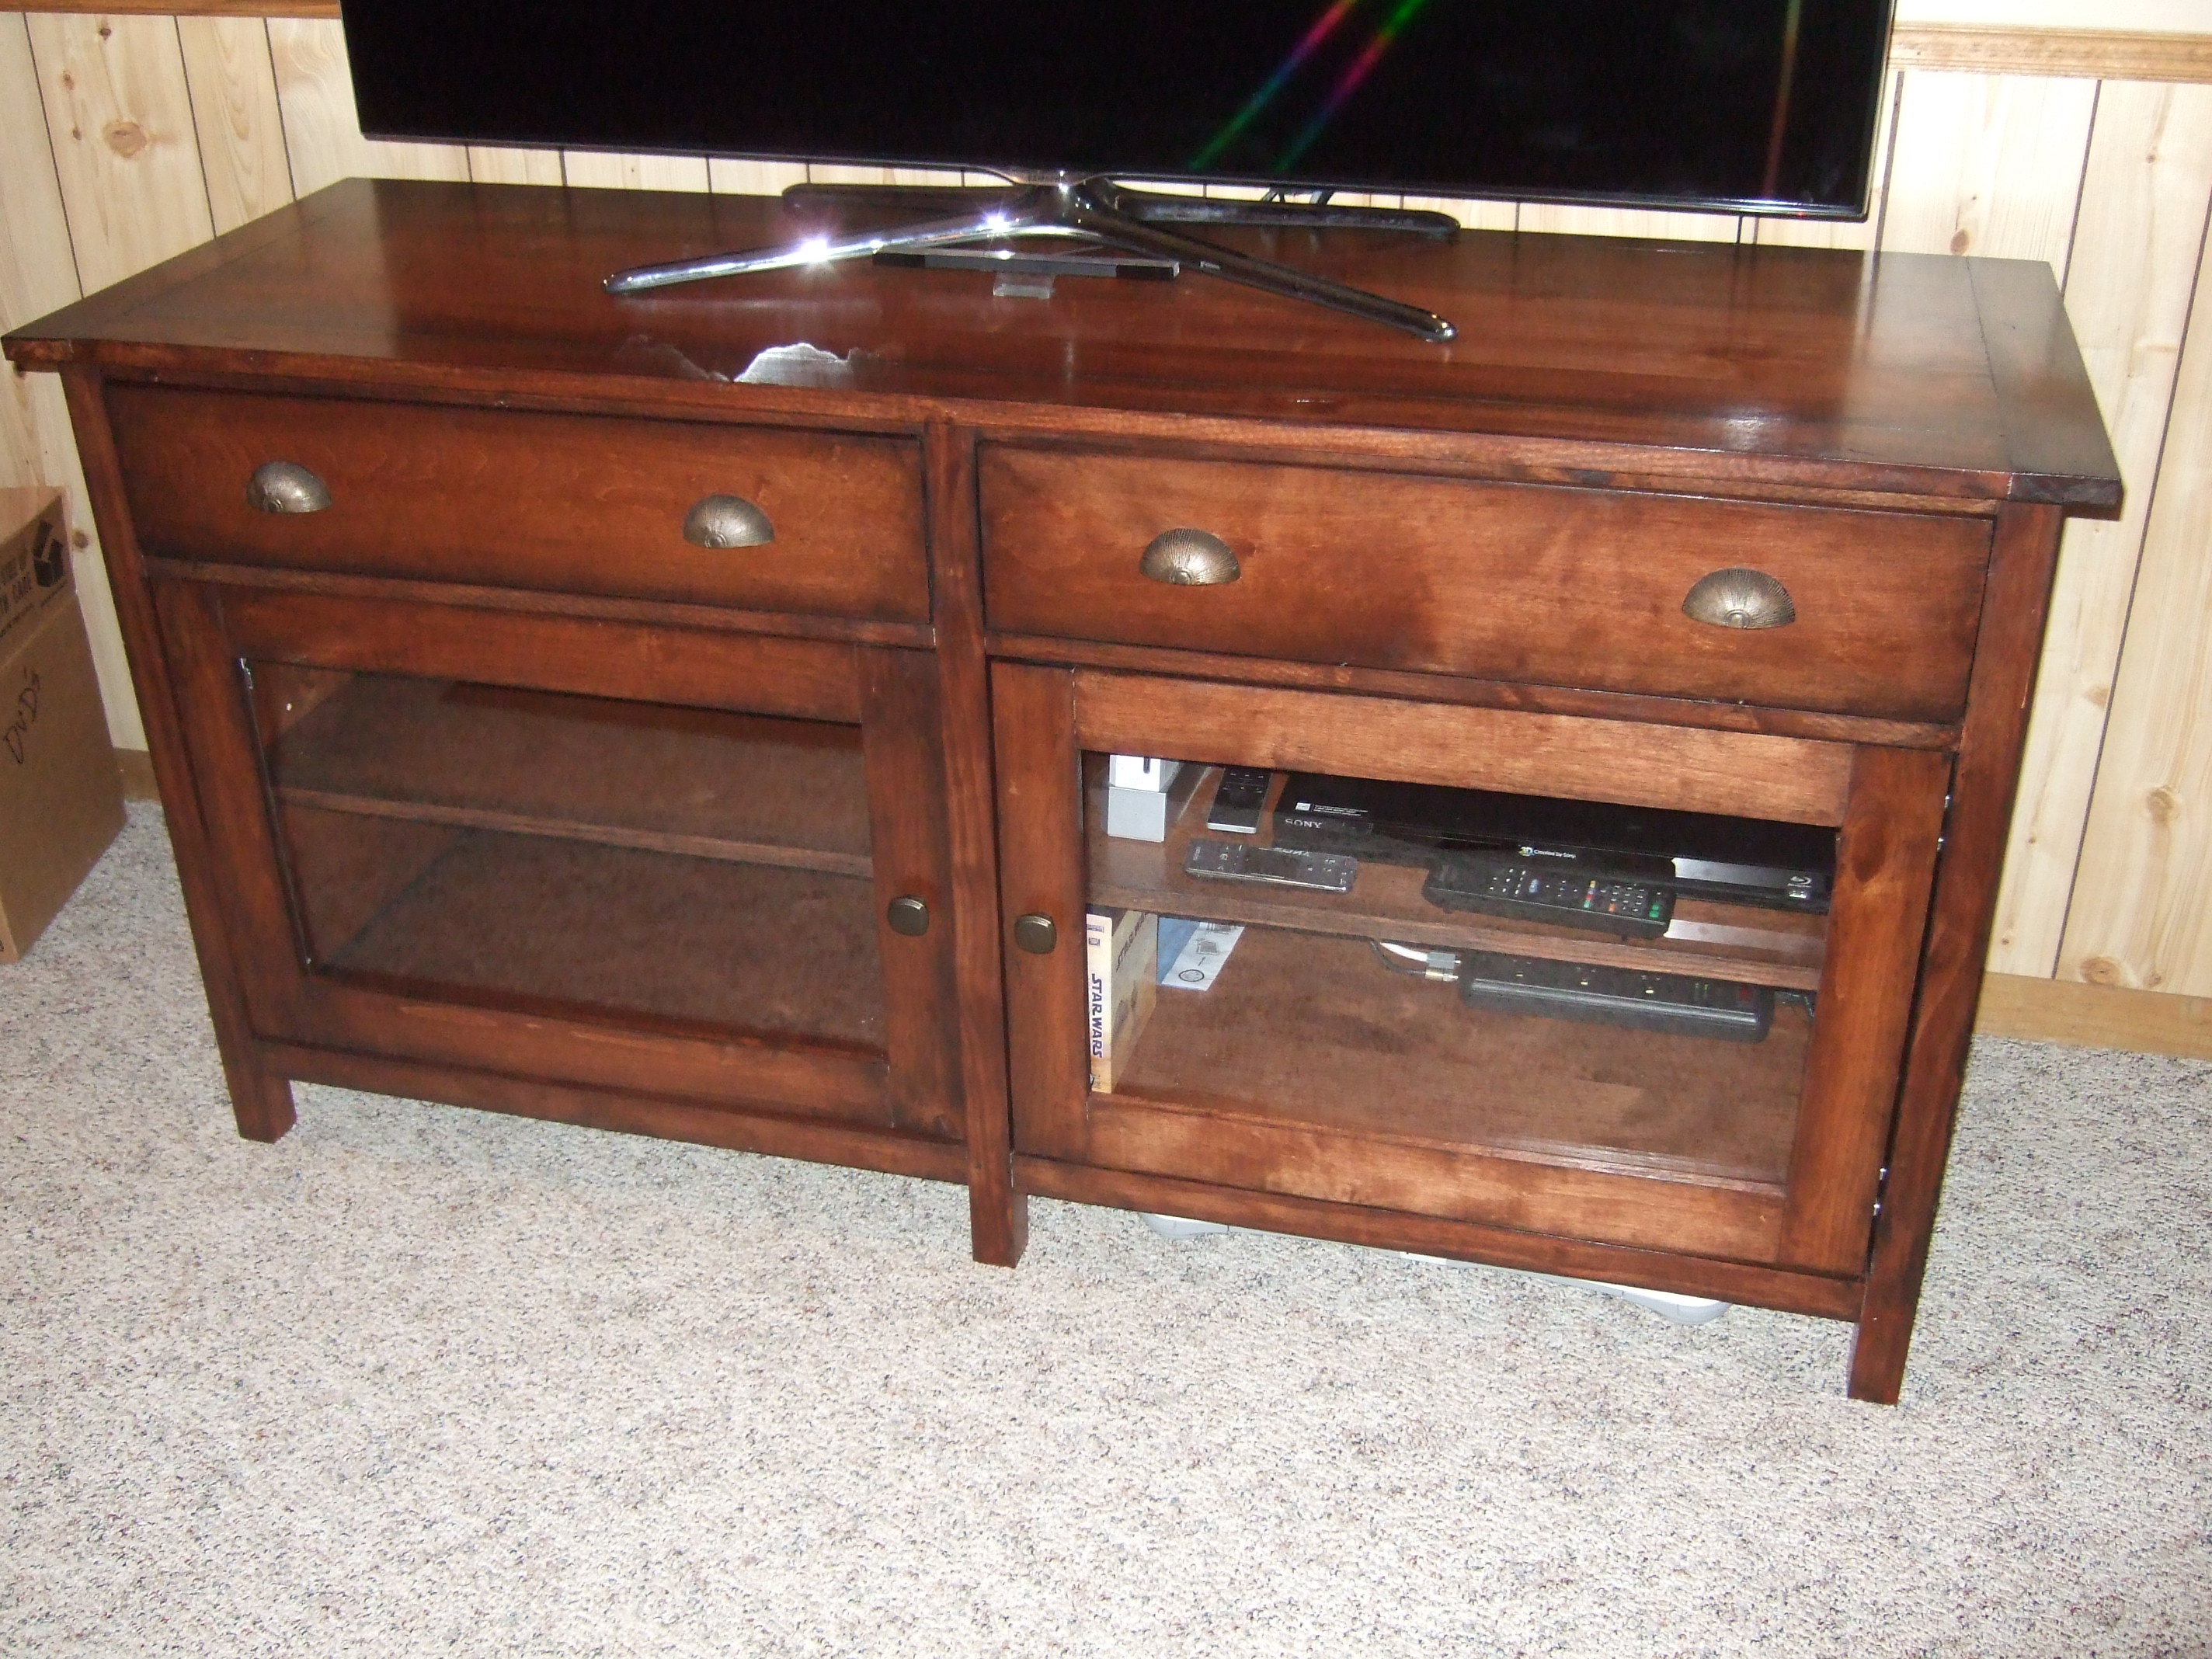
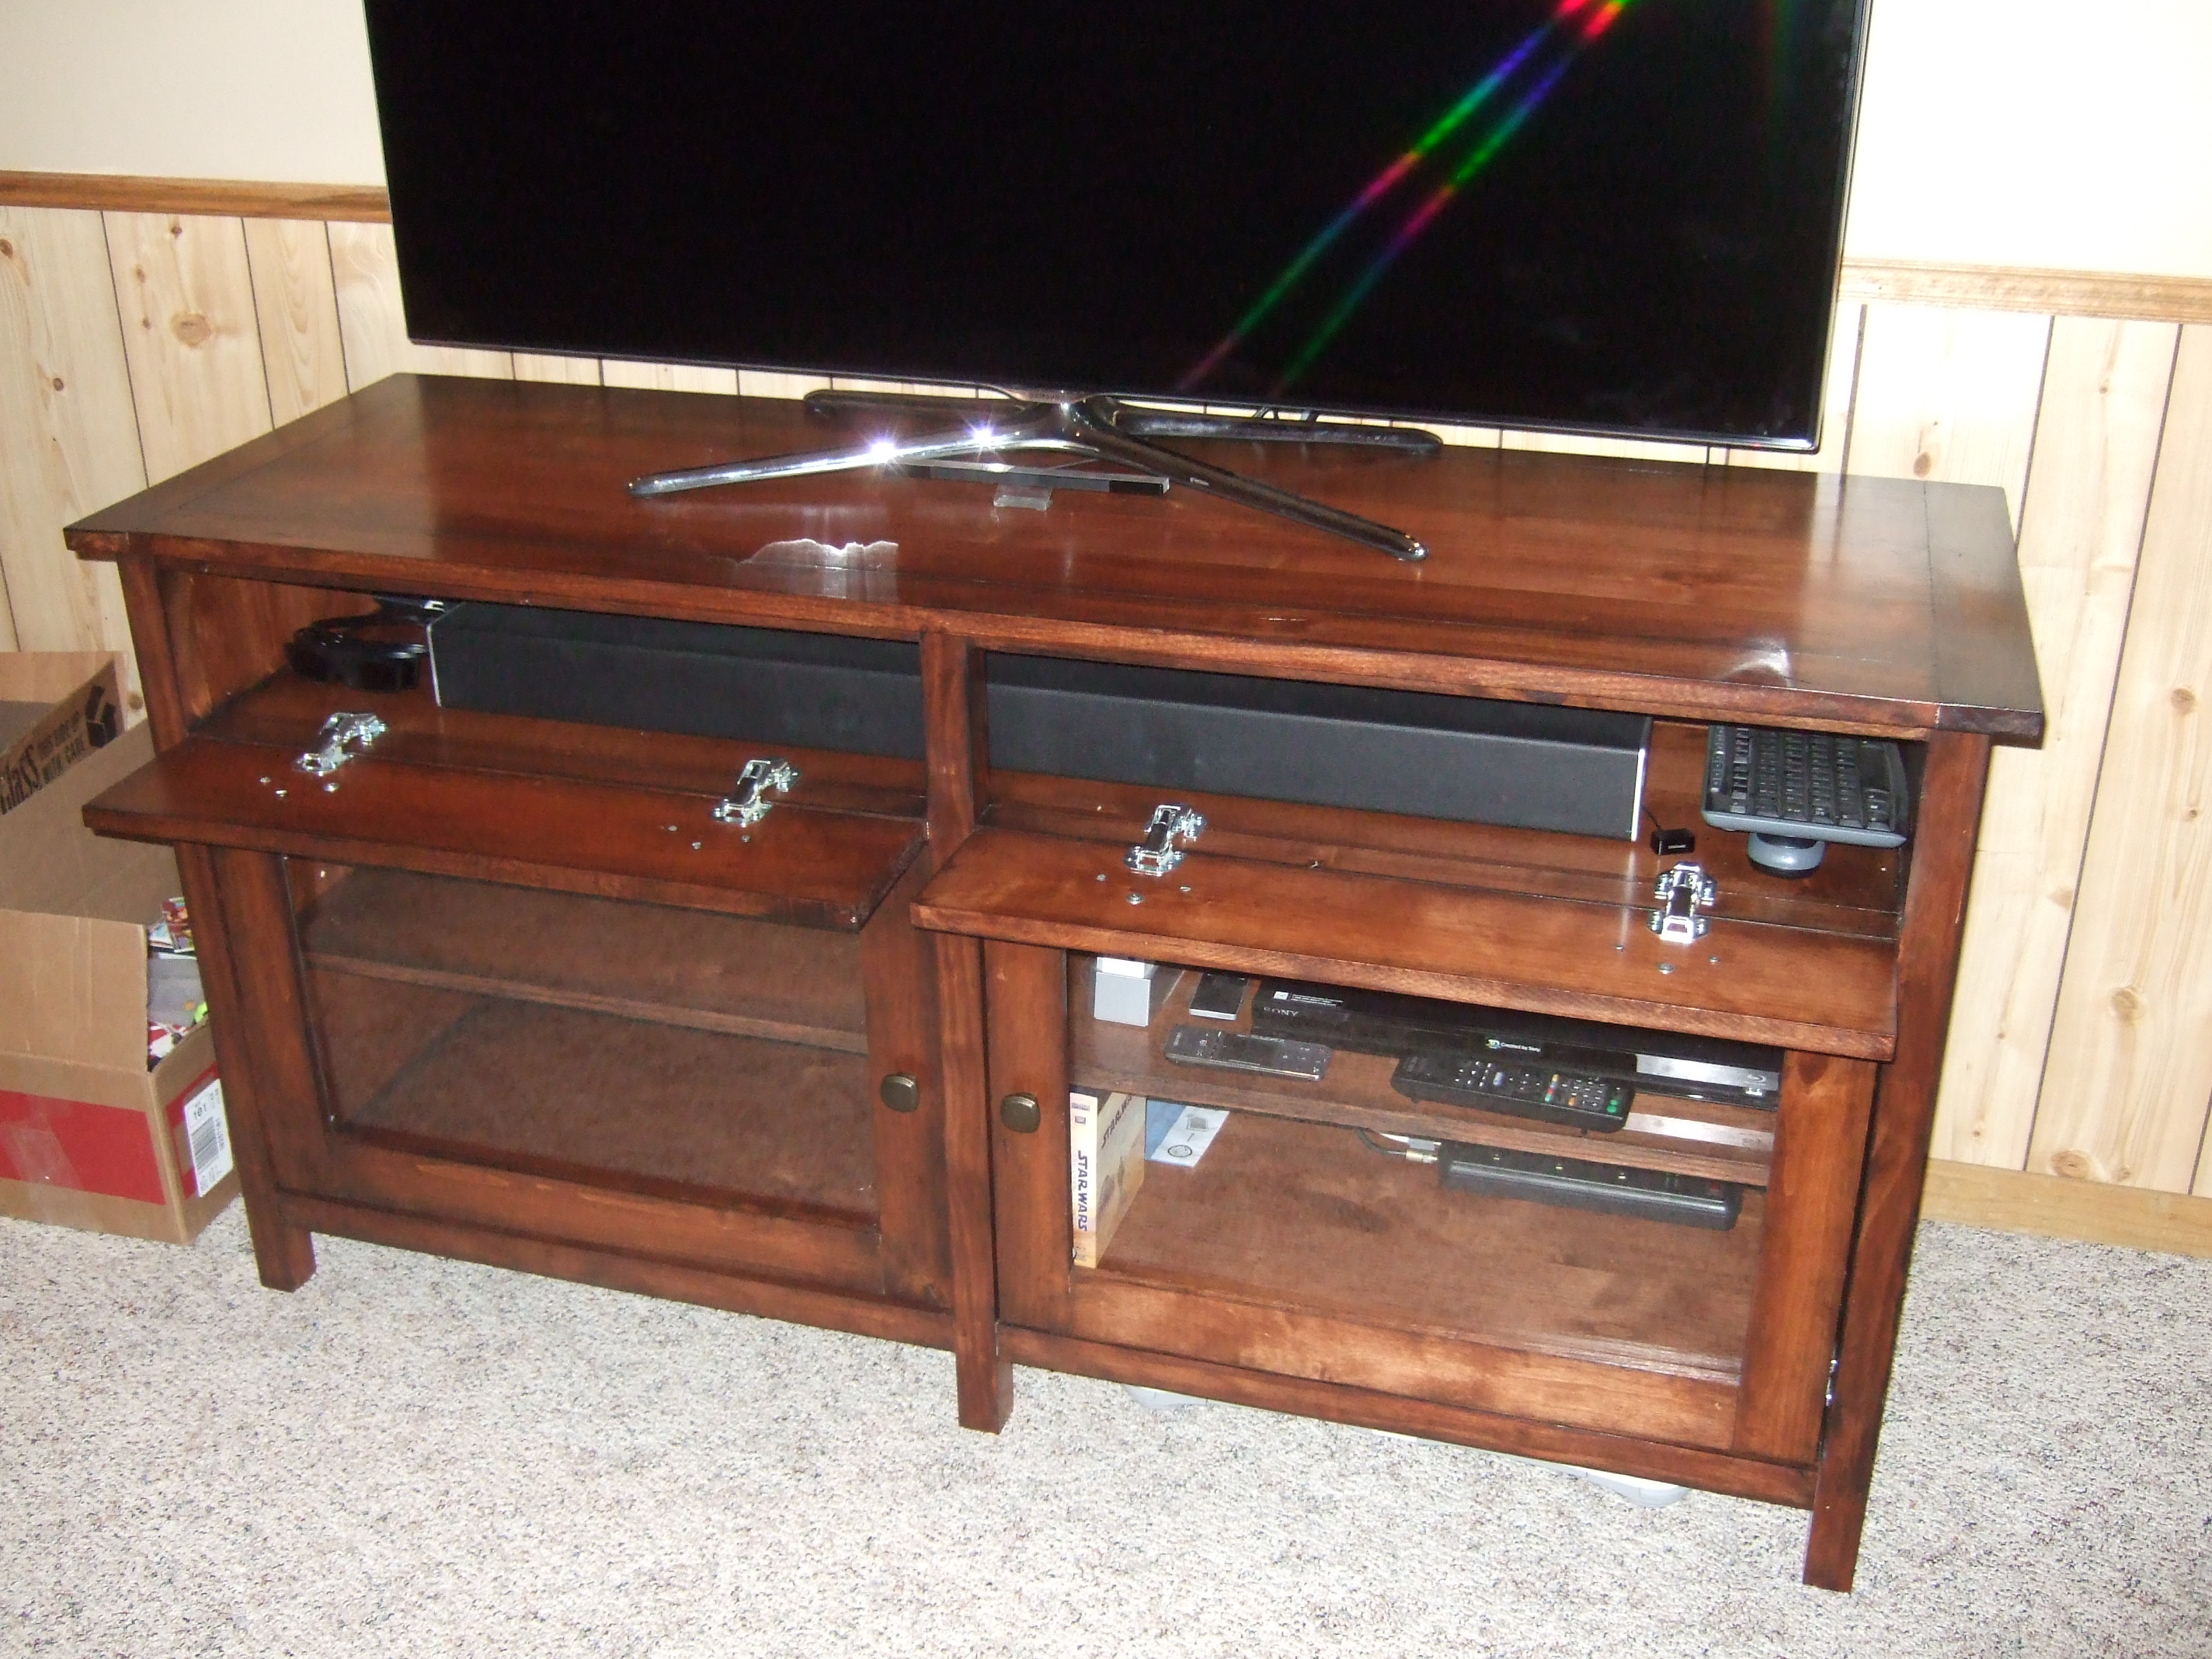
This was a great project to do. I have a family member that paid that full price for the real Pottery Barn piece. I then made this one and showed it to them. Ha!

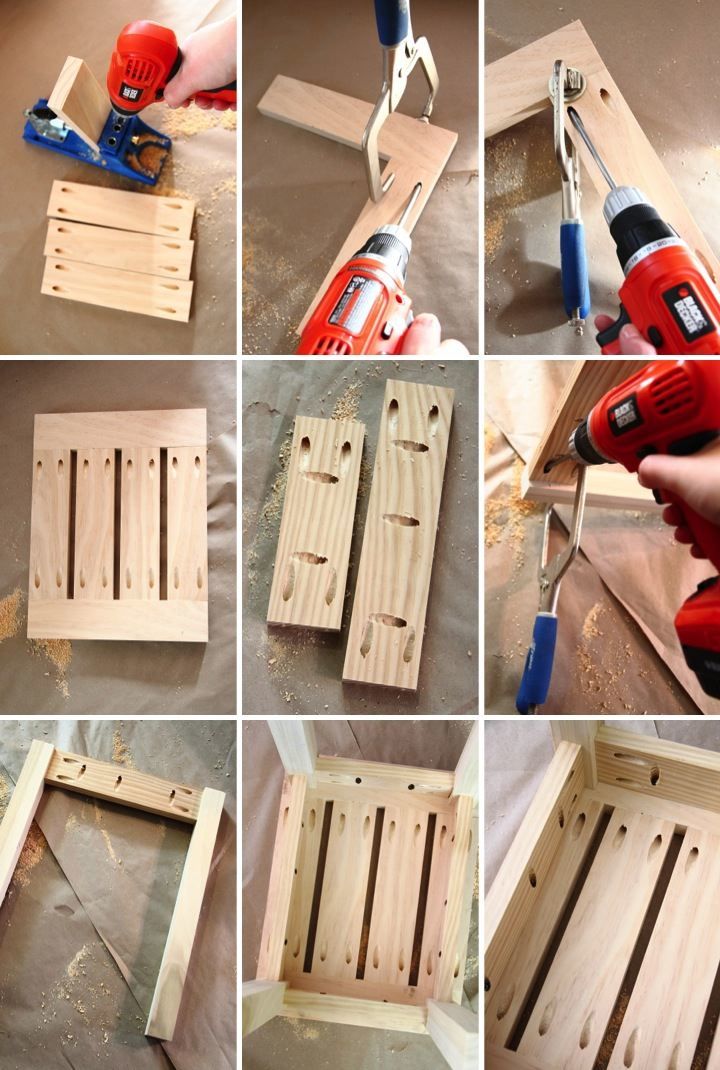
I used Alder ply but because of the expense I only bought 1 sheet which will run $90-$105 from Menards or Home Depot. Other lumber yards ran up to $140. I got all the pieces out of 1 sheet except for the 2 adjustable shelves which I used birch ply. And you can't even tell. I was going to make my own jig but just bought the Kreg pocket mini jig. Invaluable! and about $20. I found the overall cost from the plans to be under reality. Acrylic, hardware, and hinges will run you $70-$80 easy. But I guess if you use cheap pine or something than maybe you can be close to the estimate. 

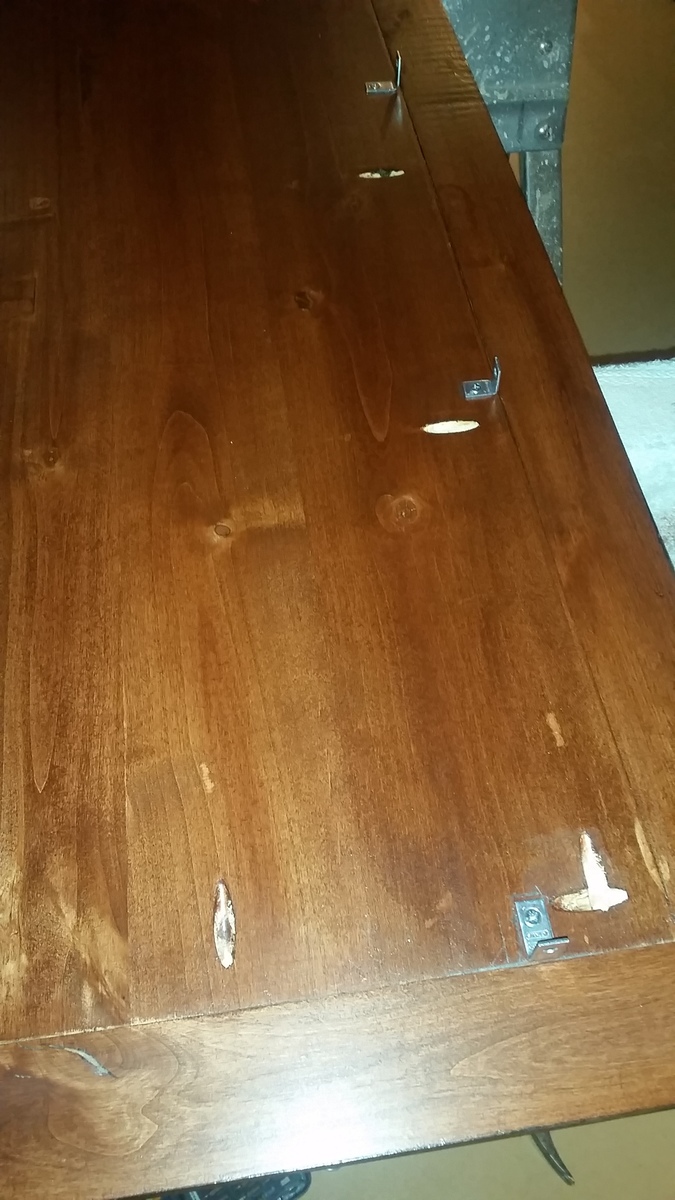
As queried by others, I too found the plans to specify how to attach the top. I used tiny "L" brackets around the underside perimeter and attached them with my screw gun to the frame (pic attached). For the doors, I didn't like the idea of just screwing the acrylic glass to the inside of the door so I routed the inside and attached some plastic tabs I found in the screen door section of HD to hold them in place. (pic attached). You could also use small mirror clips installed upside down.

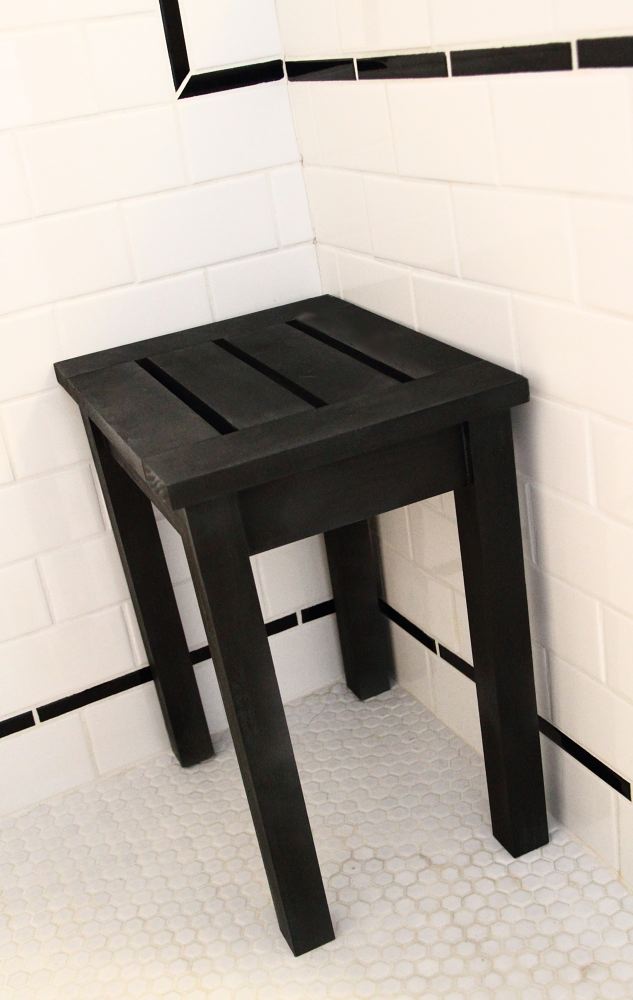
I wrestled with the color choice for a long time but finally found the Minwax Gel Stain Mahogany (which is different than regular stain mahogany) to be the right color. After staining and a coat of sealer, I glazed, let dry, then sealed some more. Finished it off with some supa-fine steel wool and paste wax.

I love this piece now because I only glued certain pieces so that I can take it apart and put it back together as I am moving soon. (out of country). The European hinges were a bit of a pain to mess with since they have some movement to them and only lateral adjustments, no vertical. But it came out great. (I think)

Thanks so much for these plans!smiley

Built from Plan(s)
Estimated Cost
$300
Estimated Time Investment
Weekend Project (10-20 Hours)
Finish Used
Minwax Mahogany Gel Stain, Polyurethane for finish
Recommended Skill Level
Intermediate

Lattice Fence Extension- with video!

Submitted by brittanyj on Fri, 10/11/2019 - 14:34

Lattice Fence Build Video
I built a lattice fence above a masonry wall dividing us from our neighbors after they cut down a bush that had formerly blocked the view. I time lapsed the whole thing, and thought you might find it of interest (or humor)

It took me 3 days instead of the 1 that I expected- am I the only one who greatly overestimates their speed at home projects? : )

Anyways, really happy with how it turned out. That’s the thing I love about woodworking. It always looks janky to begin and doesn’t show much promise, and then suddenly, it’s a work of art. Tis a thing of beauty.

There are a good amount of tips and tricks in the video of how to overcome difficulties in the build.

View on YouTube

Built from Plan(s)
Estimated Cost
$265
Estimated Time Investment
Weekend Project (10-20 Hours)
Finish Used
No finish- redwood is lovely on its own!
Recommended Skill Level
Intermediate

Simple Shower Stool

Submitted by lbrown on Sat, 02/18/2012 - 11:43

I love my 3' x 5' shower and with all that space I thought that having a little spot to sit down would be really nice. After looking around online and at some stores I couldn't find anything that I liked that was also reasonably priced so in the end I decided to make my own.

For details about how I built it check out my blog: http://www.homeandawaywithlisa.com/blog/2012/2/18/simple-diy-shower-sto…

Estimated Cost
Under $20
Estimated Time Investment
An Hour or Two (0-2 Hours)
Finish Used
I used a dark grey spray paint primer on the stool first before applying two light coats of black spray paint.
Recommended Skill Level
Starter Project

Comments

lbrown

Wed, 02/22/2012 - 17:17

Cedar would definitely be a great option. For the finish I used Rustoleum outdoor spray paint which is supposed to stand up to the elements. I figured that would help it stand up to the water in the shower.

Stable with upgrades!

Submitted by rjreiffer on Wed, 12/25/2013 - 19:23

This was an upgrade from the Ana's project on the stable. I made the shingles from cut thin strips of wood nailed to a 1/4" roof with a pin nailer.

Estimated Time Investment
Afternoon Project (3-6 Hours)
Finish Used
Everything in Ana's list plus varying sizes of 2" high by 1.5" wide (or less) to make the roof.
Recommended Skill Level
Beginner

custom cedar bench for deck

Submitted by canyadigit on Sun, 03/06/2016 - 15:14

Standard cedar deck, as you can see not complete, . However the benches are complete. Seen a picture in a book and custom cut and fit peices on my own

Estimated Time Investment
Day Project (6-9 Hours)
Recommended Skill Level
Intermediate
Back