Community Brag Posts

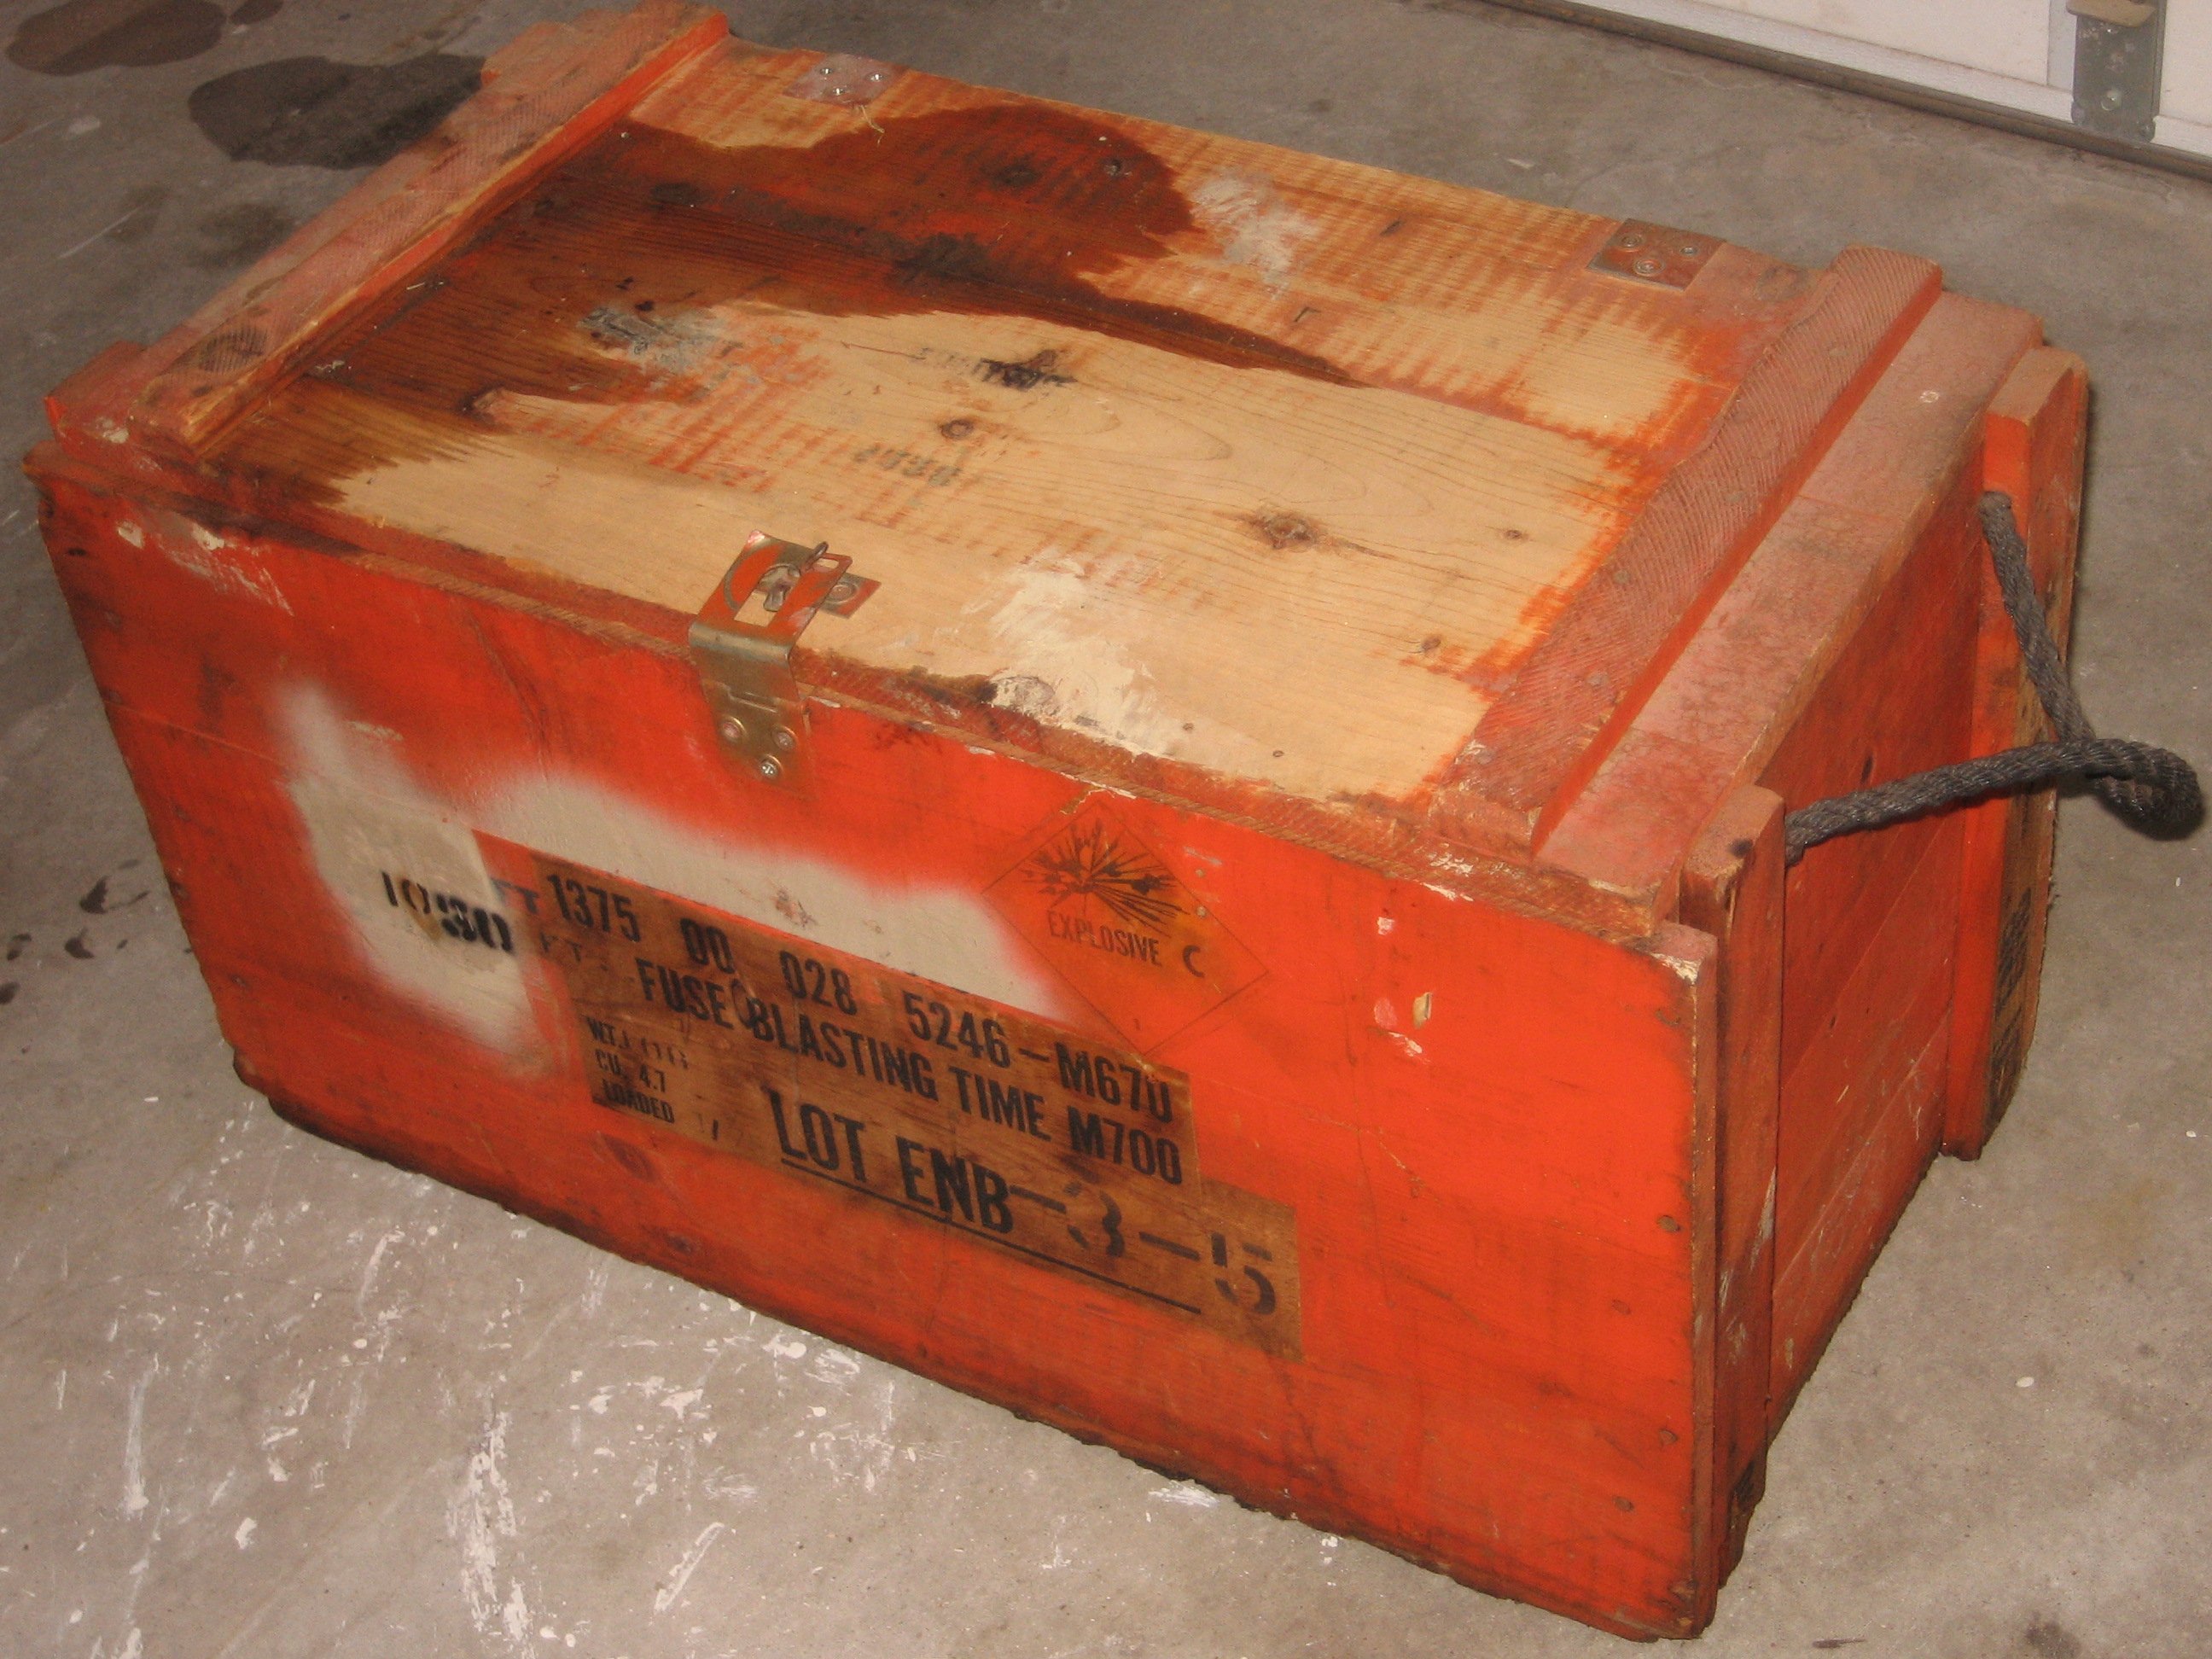
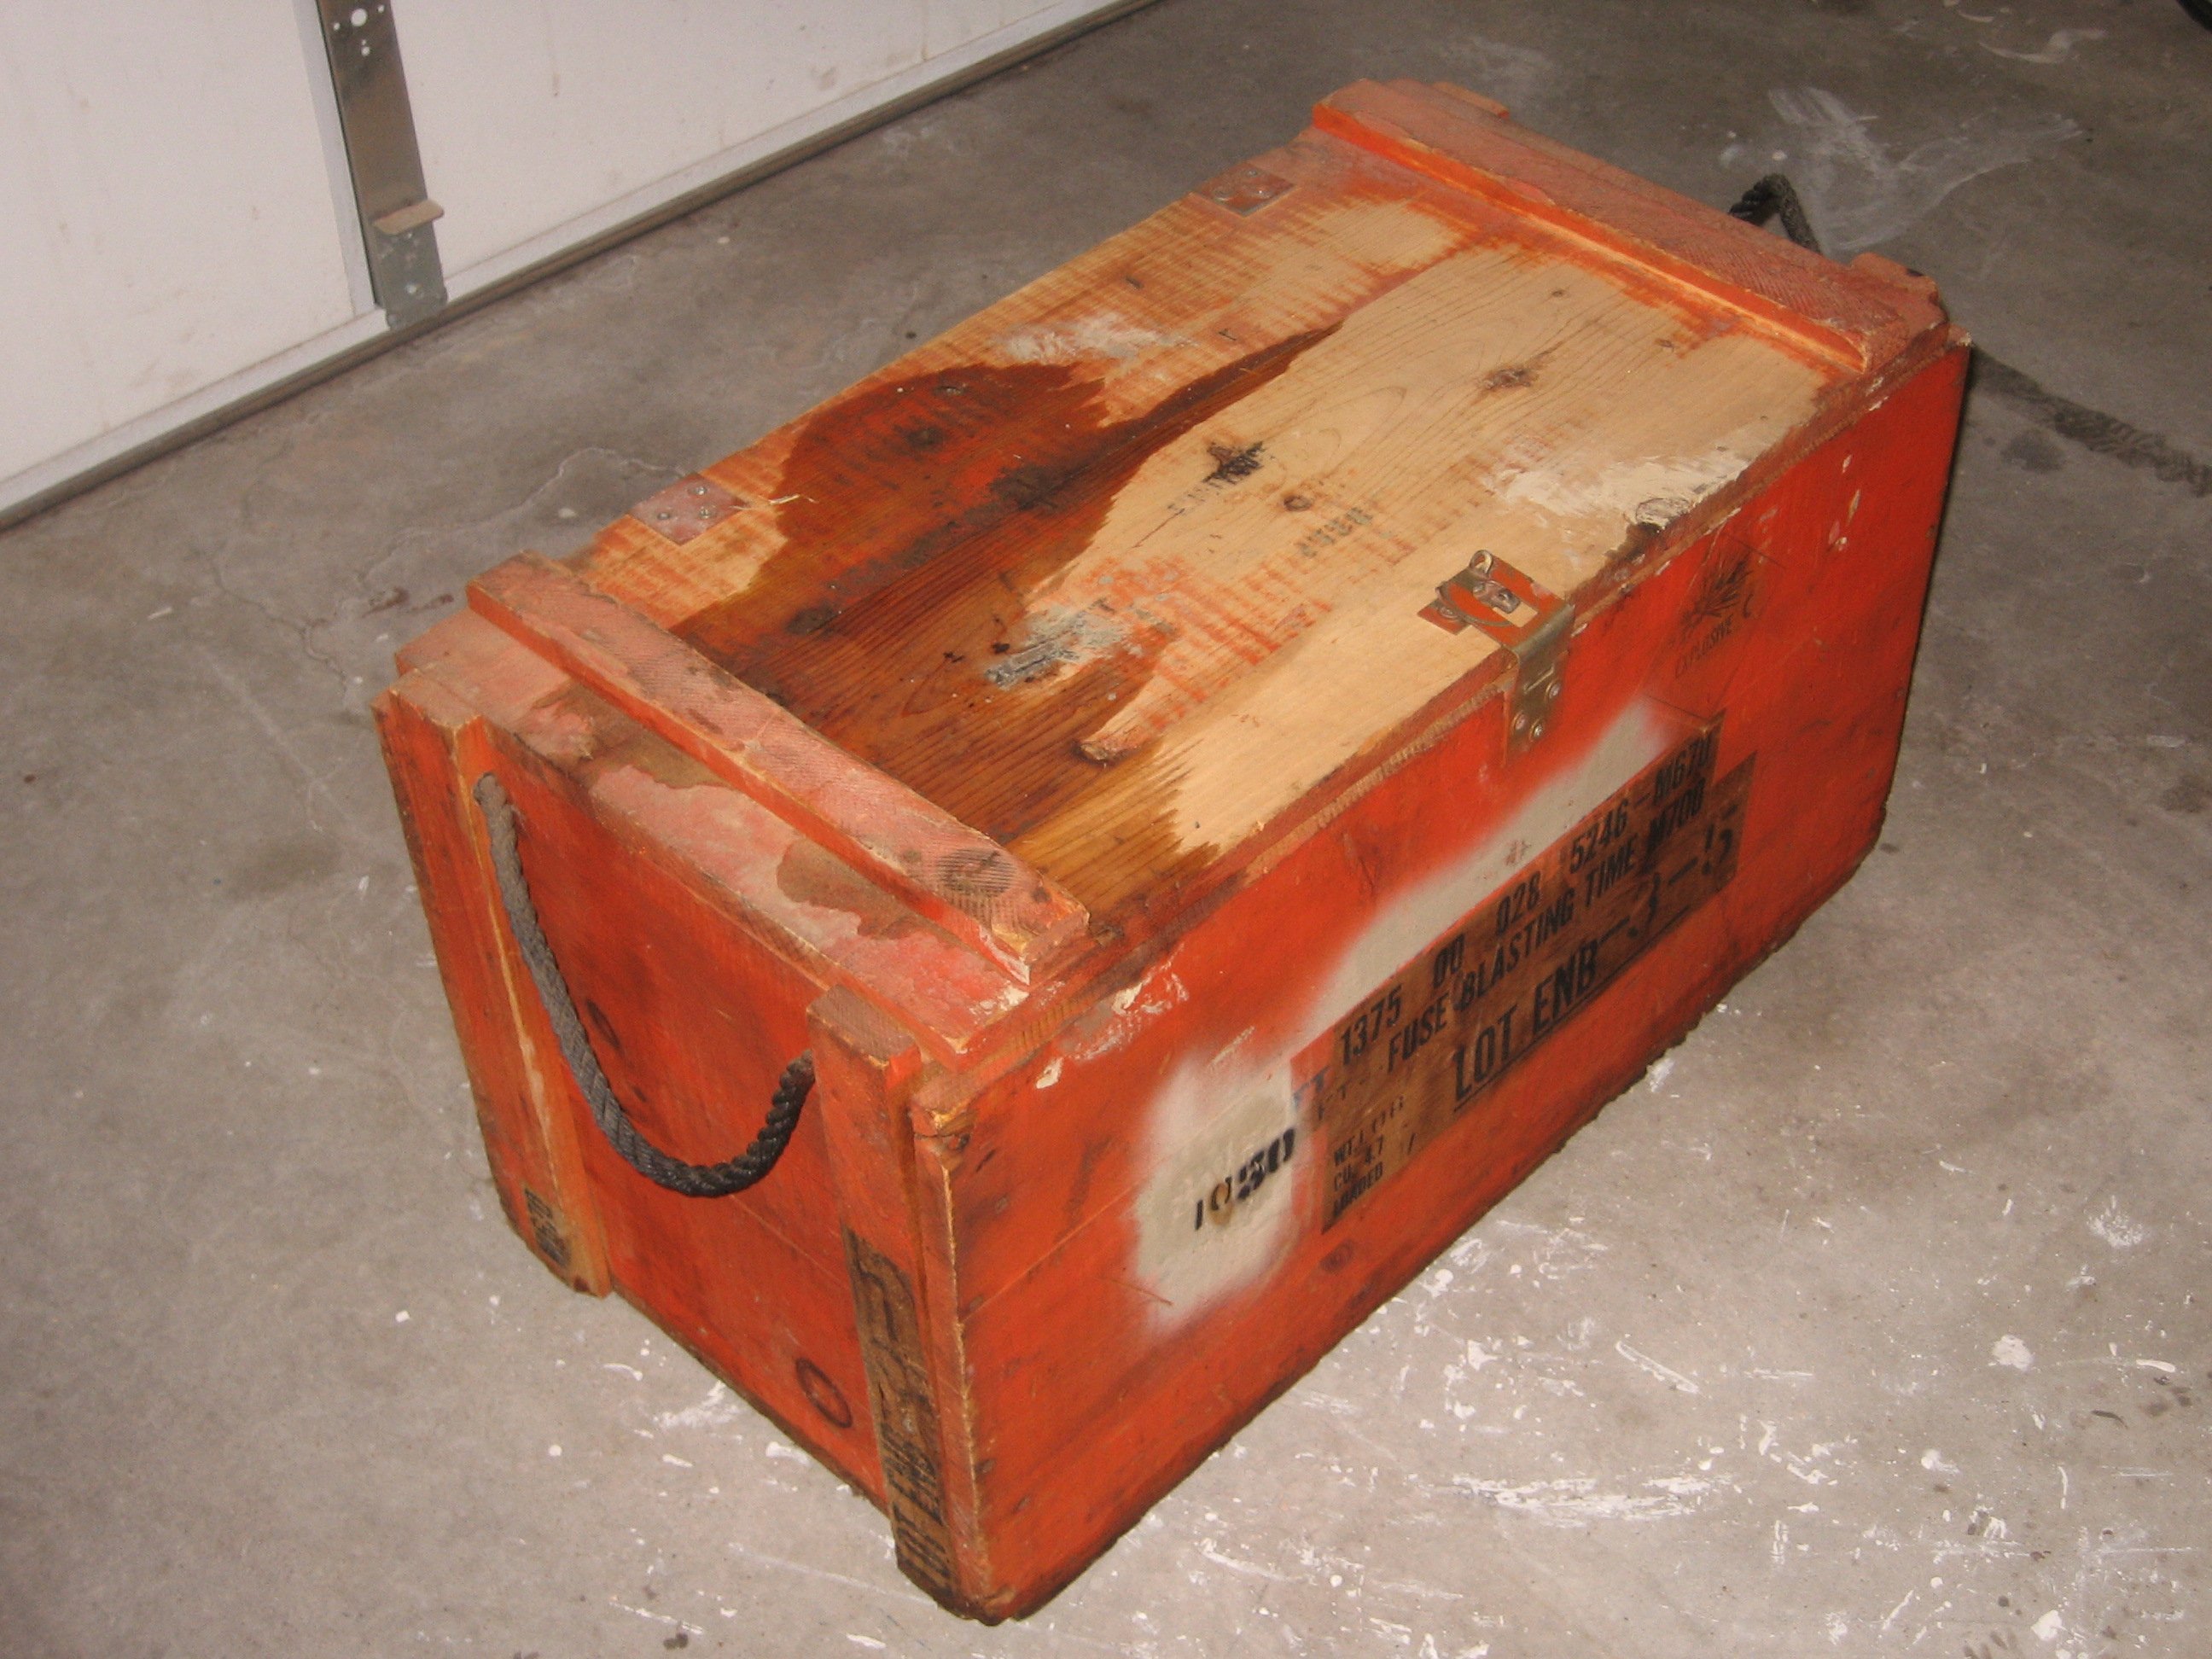
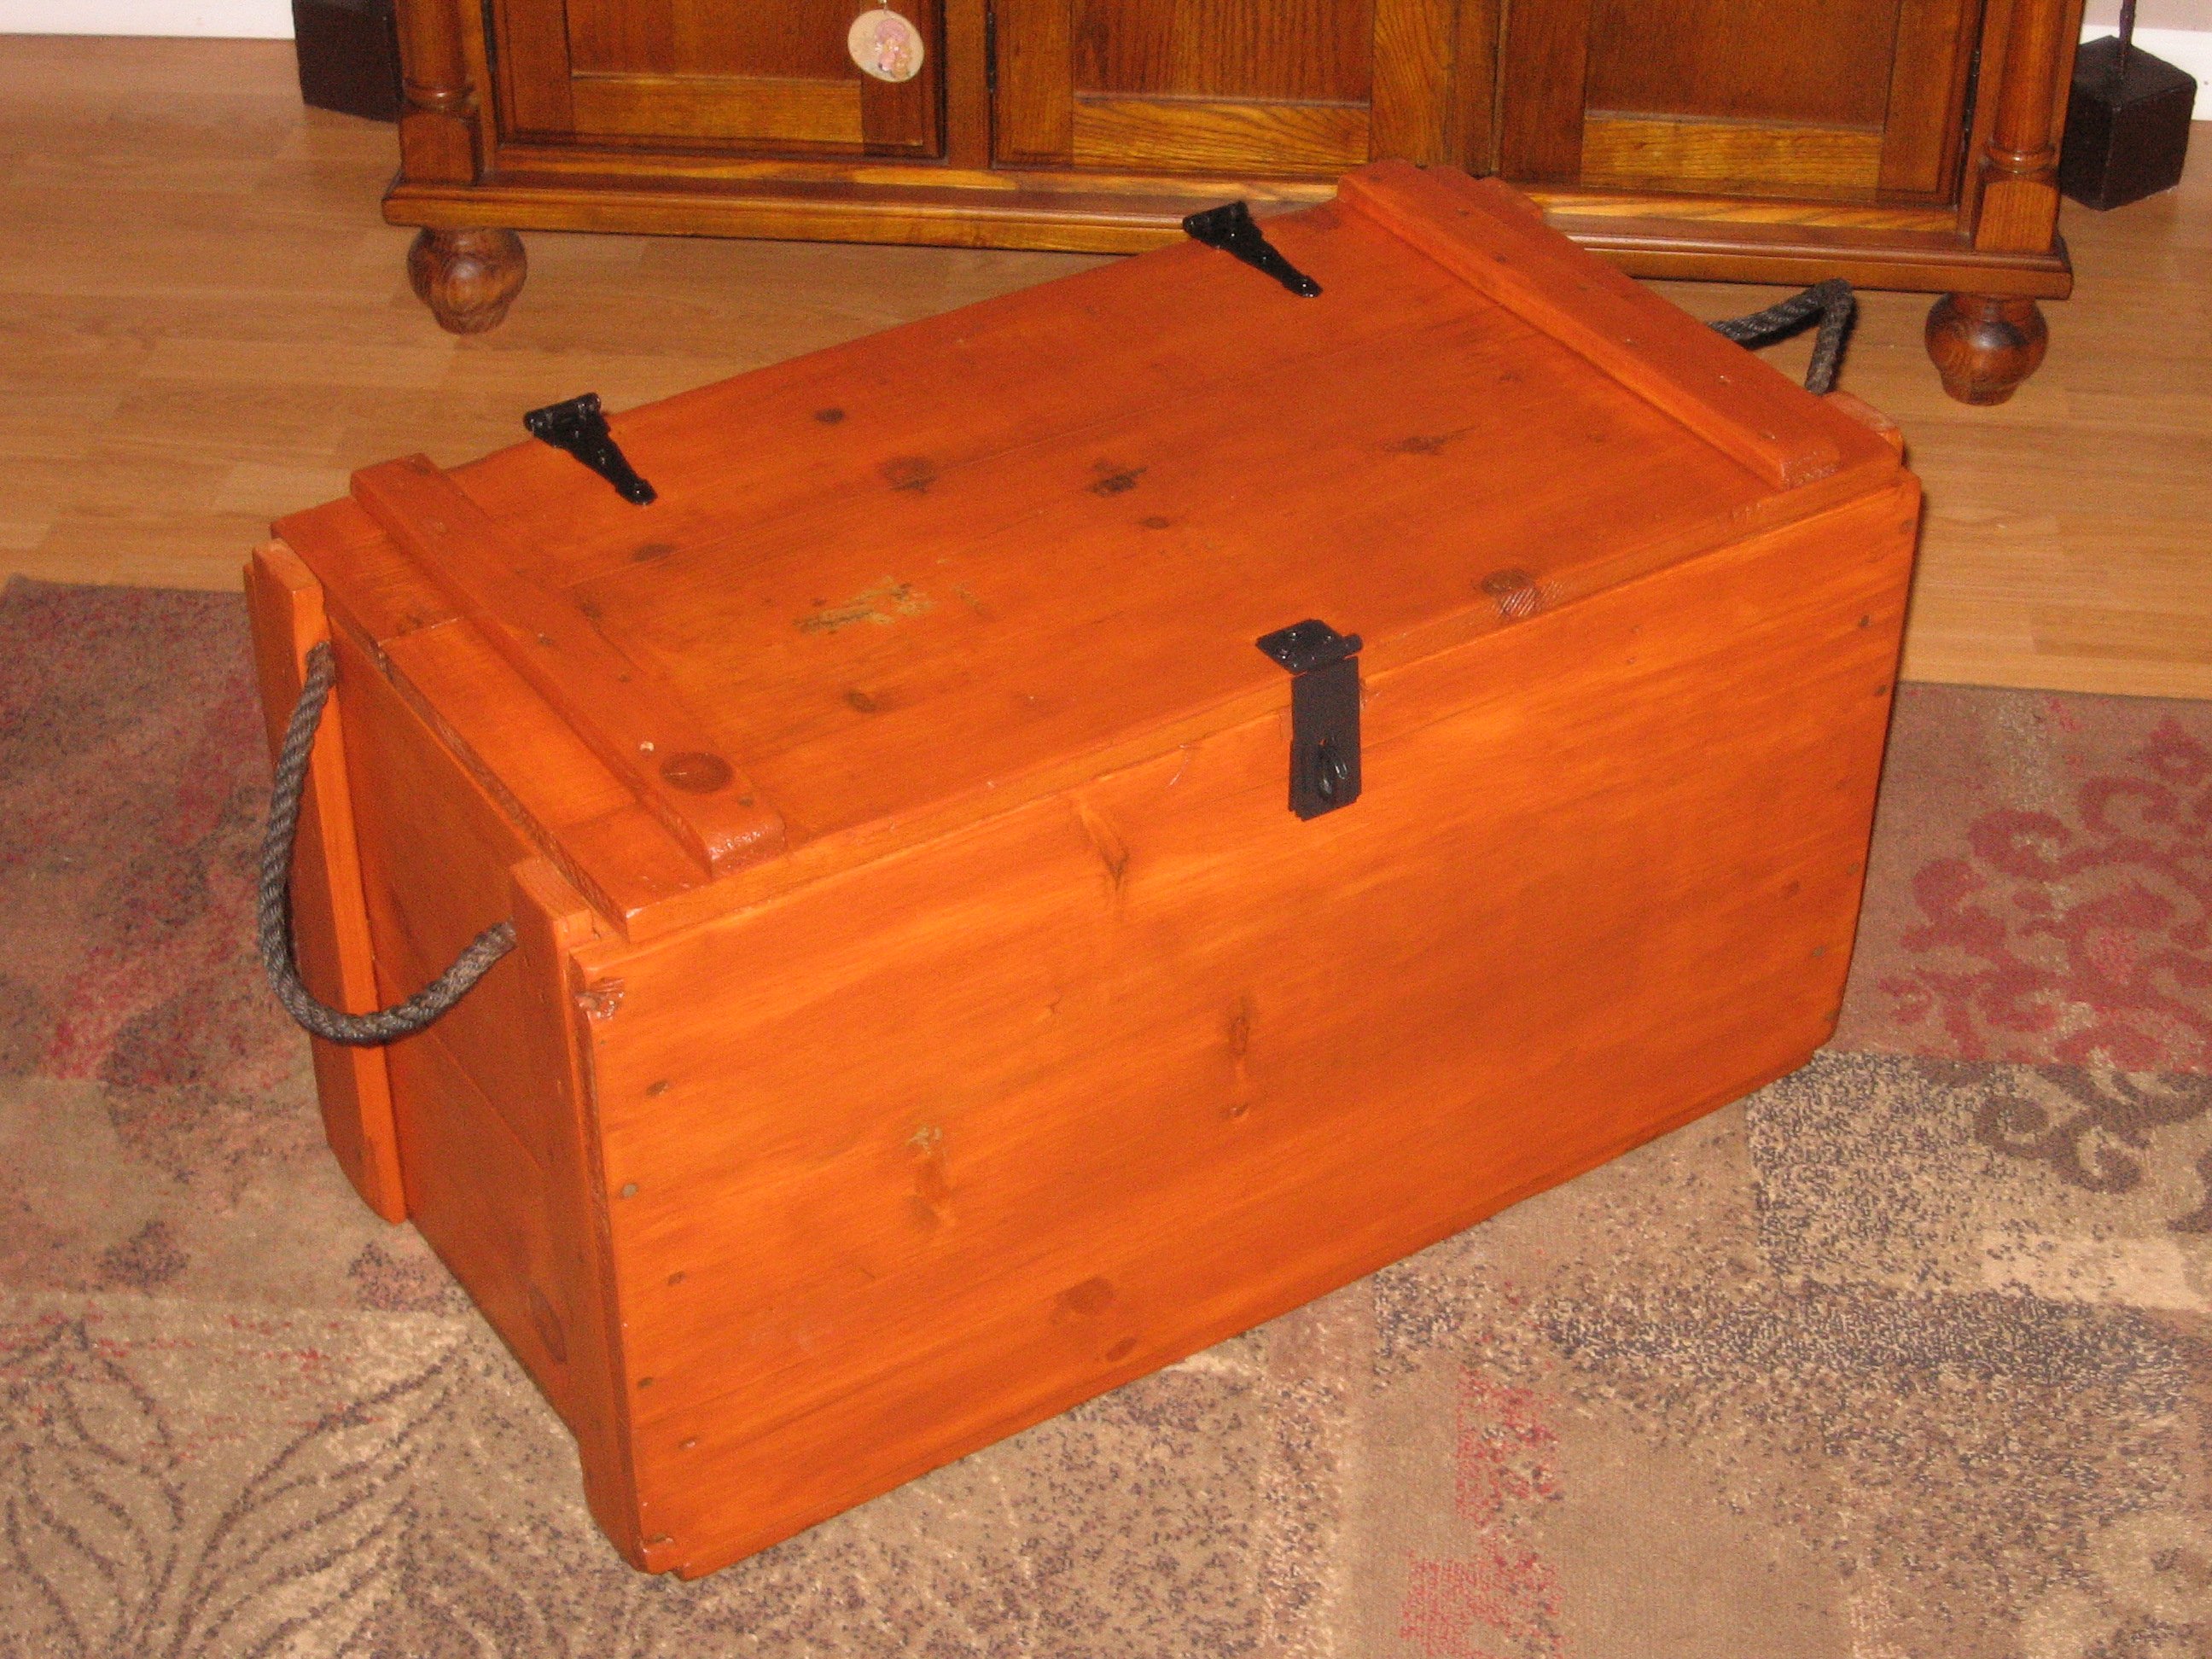
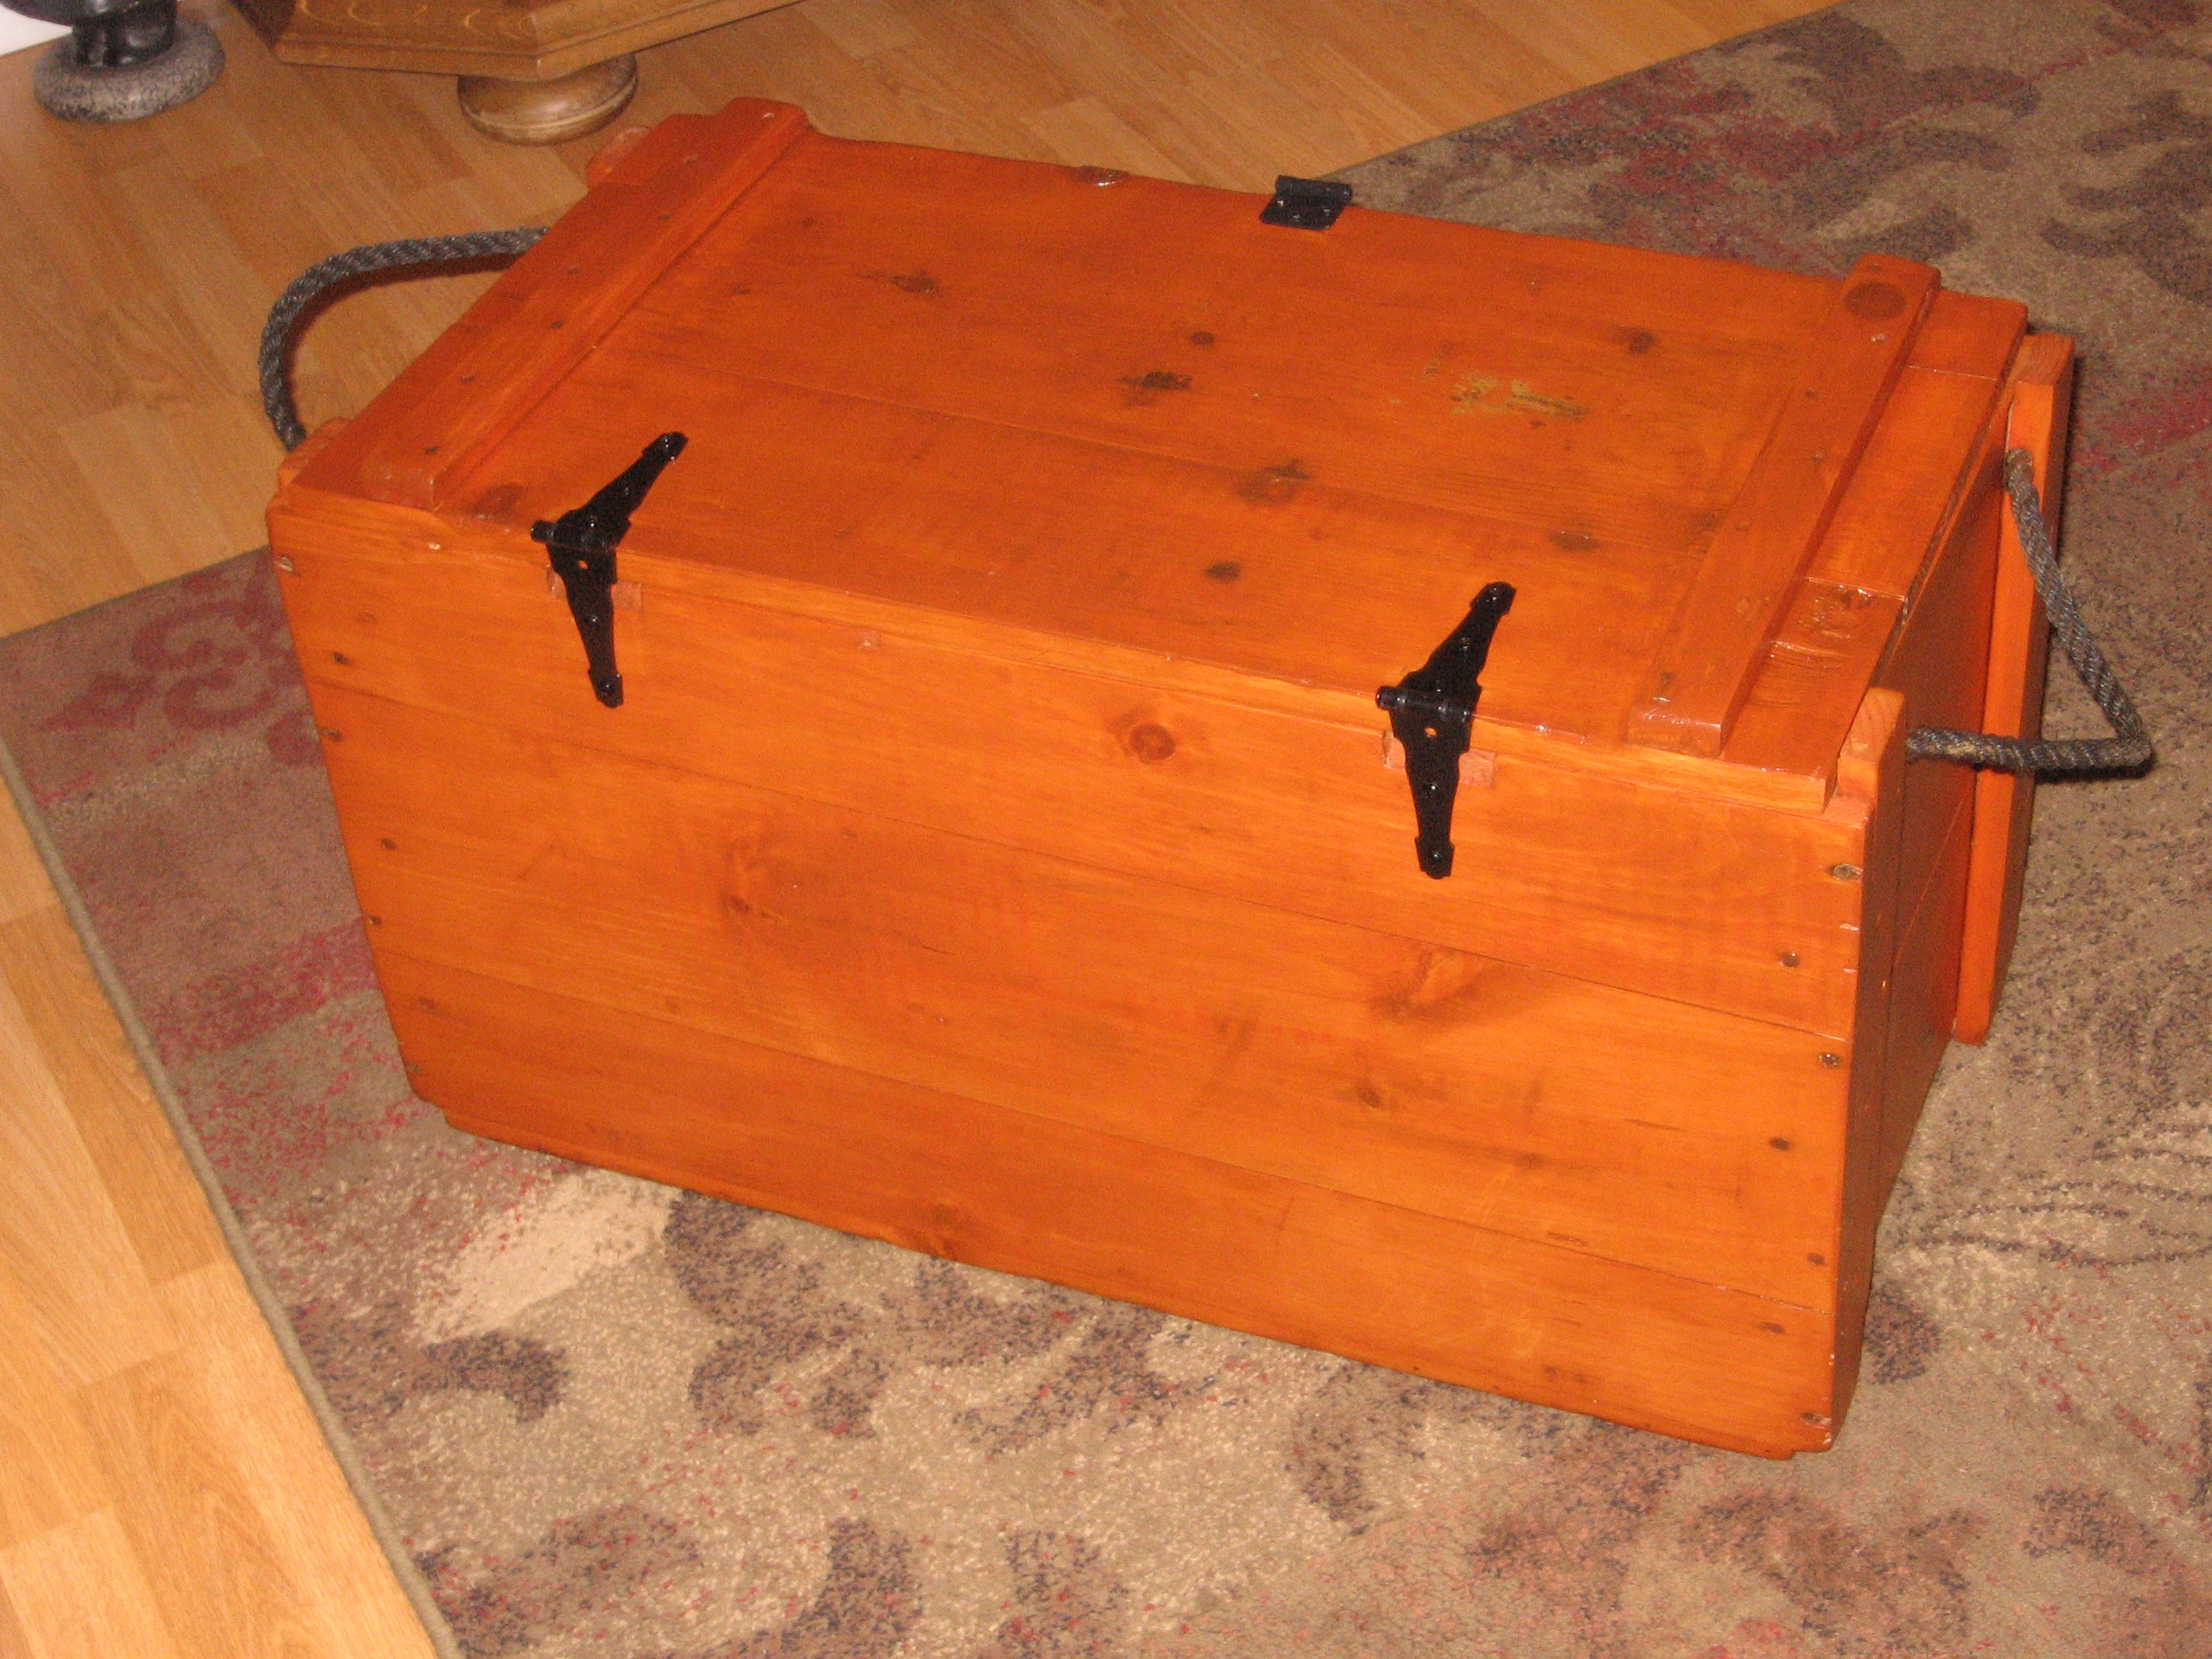
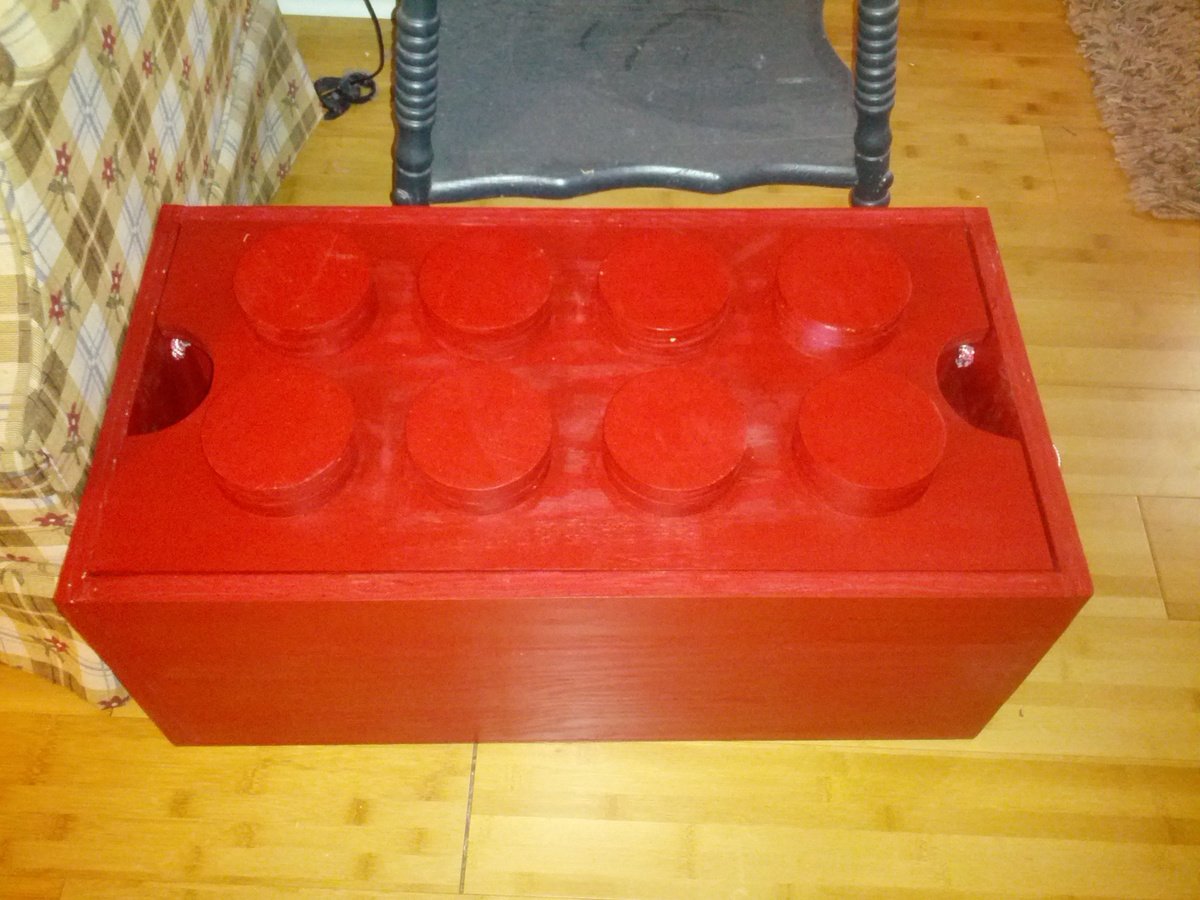
Repurposed Demolition Trunk

I had an old chest I had gotten from the Army many years ago that was used to pack explosives. I had been using it to store some tools until I built a new tool shed. I went ahead and power washed it and then stripped it. I gave it a good sanding and then applied 2 coats of Minwax Antique Maple gel stain. I then top coated it with 2 coats of Minwax fast drying polyurethane. It turned out better than I expected. One of my sons uses it to store his book bags from school.

Estimated Cost
$30
Estimated Time Investment
Weekend Project (10-20 Hours)
Finish Used
2 coats of Minwax Antique Maple stain. 2 coats of Minwax fast drying polyurethane. I applied the stain with a brush. After 15 minutes I wiped it with a cotton cloth. The poly was applied with a brush. I used 320 grit sandpaper between coats. I stripped the old paint off with a cheap paint and varnish remover I purchased at Walmart. I did have to power wash it first because it had quite a bit of oil/grease that was in the wood. I dried the trunk by placing an electric heater next to it over night.
Recommended Skill Level
Starter Project

Comments

missinfwb

Thu, 03/01/2012 - 02:28

Just wondering, I always use 3 coats of Minwax fast drying polyurethane on my furniture builds or refinishes. The trouble that I have is the lingering odor. I recently built my son a bed and then finished it and he cant stand the smell and refuses to sleep in it and it has been about 2 weeks or more. Any ideas on how to get rid of the smell quicker. Everything that I have read says it just takes time but surely there has to be a quicker way!! Any suggestions from anyone would be greatly appreciated.

claydowling

Thu, 03/01/2012 - 06:39

At least, that would be my suggestion for him. The smell will dissipate when the smell dissipates, and that's all you can do. You can speed that if the bed is stored in a very well ventilated space for a while, but it's just a matter of the urethane needing to fully cure. That manufacturer estimates four weeks for full cure.

Urethane has a distinctive smell. You can avoid it by using an acrylic finish instead (the water-borne finishes), but acrylic has its own smell that's probably equally offensive.

windjamer812

Sat, 03/10/2012 - 02:27

It does take a little time to cure and eliminate the odor. Any oil based finish; poly, paint, etc. does have a little stronger smell than water based. Try an open box of baking soda. An open window also works wonders. Ever notice how wonderful sheets smell whenever you dry them outside?

Lego toy box

I built one for my kids and one for a nephew. I ordered the 10" x 10" Lego plates from Amazon. The sides and top are made from 3/4" plywood and the bottom is 1/4" plywood. The overall dimensions are 26 1/4" x 13 5/8" x 11 7/8" (not counting the top circles). I used a 4" hole saw to cut the circles then glued/nailed two together and used wood filler to fill the hole created in the center of the circles by the hole saw.

Other than changing the dimensions, I followed the original plans closely. The images in the original plans have 2 plates that are 15" x 15".

When cutting the circles, I clamped/screwed a scrap piece of wood under the plywood to produce much cleaner cuts.

I did paint the inside bottom white to make it easier to see the bottom and small pieces. I also drilled a pair of holes on each side to add rope handles.

Built from Plan(s)
Estimated Time Investment
Afternoon Project (3-6 Hours)
Finish Used
Valspar paint sample from Lowes
Recommended Skill Level
Beginner

My Potting Table

Submitted by Anonymous (not verified) on Mon, 02/29/2016 - 19:29

Loved making this.  Took less than 2 hours, not including painting, which I haven't done yet.  Plans were easy to follow but I couldn't find a cut list which would have made the trip to the lumber yard a little easier. I used some scrap wood and some new so very reasonable to make.

Estimated Cost
$40
Estimated Time Investment
An Hour or Two (0-2 Hours)
Finish Used
Haven't decided yet
Recommended Skill Level
Beginner

Clara Table

Submitted by WolffA on Fri, 10/11/2019 - 07:51

I stained the top with Dark Walnut stain and used perfect white paint. 

Built from Plan(s)
Estimated Cost
50
Estimated Time Investment
Day Project (6-9 Hours)
Finish Used
Dark Walnut Stain. Ultra White Paint
Recommended Skill Level
Starter Project

Comments

Easy Upholstered bench

Wonderful project! Very fun. Built a bench from scrap 2x4s (left in the garage by our home's previous owner, so they were free!) and a piece of MDF shelving. Perfect for our entryway. The bench itself was incredibly easy to build. The hard part, in my opinion, was finishing it. So many pretty things to choose from! I used a piece of 2-inch foam plus a double layer of batting for the top, some striped upholstery fabric, and 160 nailheads to finish it off. Love it.

Built from Plan(s)
Estimated Time Investment
Day Project (6-9 Hours)
Finish Used
Minwax stain in cognac, and then two coats of minwax poly.
Recommended Skill Level
Beginner

Comments

Guest (not verified)

Sun, 02/19/2012 - 12:54

Love it! Wondering if I could build it and have some type of slipcover on it. (house with three kids under 5 years old does not go well with permanent upholstery! haha)

Guest (not verified)

Fri, 03/09/2012 - 09:06

If you check out Ana's original plans for the Easiest Upholstered Bench, you'll see that she DID use slipcovers! You could make different ones for each season, or for holidays like Christmas or birthdays...

ehahn1

Wed, 10/30/2013 - 08:36

Hi Katie, I am having a difficult time finding fabric (hard to believe)! did you get yours online? How wide are the stripes? most fabric I am finding is not wide enough to cover the top and sides. Thanks for the help! Great build!

Our awesome new table.

Submitted by bigkampe on Tue, 12/24/2013 - 04:59

This was a fun and easy project to do. We really like how it turned out and how it compliments the room. For the bottom shelf I used four 1x6 boards instead of a single 21" wide plywood board. For that worn look, I took a drywall rasp and chewed up the corners and edges. Staining was a two part job. The first coat was called weathered gray. After it dried I lightly sanded it with 180 grit and applied a second coat of dark walnut. The gray subtly shows through the walnut. If I had it to do it over, I may have applied a coat of ebony stain to the corners and edges to make the color less even. I did very little sanding on this piece because I wanted a rough texture, but I did enough to make it sliver-free. The project cost about $80.

Estimated Time Investment
Weekend Project (10-20 Hours)
Finish Used
Varethane Weathered Gray water based with polyurethane.
Varethane Dark Walnut water based with polyurethane.
Recommended Skill Level
Beginner

Big girl bed

Submitted by Anonymous (not verified) on Fri, 03/04/2016 - 18:33

Farm house two toned, rustic twin size bed. 

Estimated Cost
$70-$80
Estimated Time Investment
Day Project (6-9 Hours)
Finish Used
Stain with a top coat of white simi gloss
Recommended Skill Level
Intermediate

American Girl Doll Bed

Submitted by Anonymous (not verified) on Sun, 10/13/2019 - 13:08

My daughter wanted a bed for her dolls. American Girl Doll Bed beds are outrageous, soI decided to make one out of some scrap wood we had laying around. I modified it a bit and added a trundle bed below.

Estimated Cost
0
Estimated Time Investment
Afternoon Project (3-6 Hours)
Finish Used
Stained
Recommended Skill Level
Intermediate

Hudson Dresser

Submitted by ktrinity on Mon, 02/20/2012 - 15:04

Took us about three weeks mostly working on weekends. We could only work when our child was sleeping. A worth while project if you have the time, space and tools needed. It weighs a ton when done. Our higher cost is due to using a higher wood quality and $125 for the eight ball bearing drawer slides. All the plywood is birch, the top is an Aspen panel and the rest is select pine.

Built from Plan(s)
Estimated Cost
$500
Estimated Time Investment
Week Long Project (20 Hours or More)
Finish Used
Latex Paint
Recommended Skill Level
Advanced

Comments

KyleV (not verified)

Thu, 10/25/2012 - 11:44

I'm about to start building this and I was wondering how you installed the drawer slides.

Thanks!

Computer Armoire aka my new office

From these plans: http://ana-white.com/2013/05/plans/toy-or-tv-armoire

For my quilting business, I needed an office for the paperwork, etc. that comes with running a business. With no spare room for an office, I built this armoire to hold my computer, business papers, and the bags that contain my quilting samples, forms, etc.

On the inside, I used pegboard for the backing so the electrical equipment would have ventilation. I also thought I might be able to hang stuff from the pegboard as well. If I had to do it again, I would set up the keyboard slide and side drawers a little differently. I used scrap wood for that part. I should have just gotten another piece of 3/4 inch plywood and fixed it right, with pocket holes. I'd intended to put drawer pulls on the drawers, but the doors hit the drawers when they close. So, I will need to cut some holes in the drawers to use as pulls.

Estimated Time Investment
Week Long Project (20 Hours or More)
Finish Used
Black Rustoleum Painter's Touch Flat Black, distressed and finished with Briwax clear and Mahogany
Recommended Skill Level
Intermediate

Sewing Table

Submitted by cjlaw on Mon, 03/07/2016 - 06:30

Sewing tables are quite expensive, the cheapest I've seen was about $160. I decided to make one myself. I spent about $30 for all the wood, bolts, and nuts that I used to make it.

Estimated Cost
About 30 dollars for all supplies.
Estimated Time Investment
Afternoon Project (3-6 Hours)
Recommended Skill Level
Beginner

Geo Thermal Anna White Greenhouse w/ Aquaponics system coming!

Submitted by Anonymous (not verified) on Fri, 10/18/2019 - 20:08

My Annawhite design with geothermal improvements. It will also have a 1000 gallon Aquaponics system inside!

Built from Plan(s)
Estimated Cost
$7000.00!
Estimated Time Investment
Week Long Project (20 Hours or More)
Finish Used
This thing has taking me all summer to build! :-) Cry
Recommended Skill Level
Intermediate

Propane Tank Storage Table

Submitted by Anonymous (not verified) on Fri, 07/07/2023 - 11:12

I had inquire on your Facebook about you making a new plan... i had wanted a side table to hide my propane tank. I used the planter plans as an inspiration for this table. It is regiment rough looking as I managed to build it using only scrap on hand. I did have one cedar board in my pile that was leftover from another project that I used for the top... pretty happy but know it would have been better with new wood that was the right size and not warped! The space at the top is on purpose to be able to teach in and turn the gas on and off.

Debbie Hertz

Plane Shelf

Submitted by sidman on Fri, 02/24/2012 - 18:25

Had to build this when I saw it. My coworker just had their first newborn baby boy and wanted hanging shelf's so I built one out of some scrap wood.

Estimated Cost
0
Estimated Time Investment
An Hour or Two (0-2 Hours)
Finish Used
Red and black Paint
Recommended Skill Level
Starter Project

Comments

Modified Kids Lounge Bench

Submitted by mdg on Sat, 12/28/2013 - 22:07

In getting my boys (ages 8, 5, and 3) started in woodworking, I decided to try this bench. We had a ton of fun building it together.

As you can see, I beefed it up a lot - using 4x4's for legs and recessing the frame into the legs themselves. The boys did all of the sanding and assembling and 80-90% of the cutting. I was just there as training wheels. It took much longer to build with the 4 of us than if I had done it myself. I estimate I could have done this in 3-4 hours. Group effort made it about 20-22 hours.

My 5 year old was the one who campaigned for the arched backrest. I think that they did a great job, and just wanted to share.

Estimated Cost
$33
Estimated Time Investment
Weekend Project (10-20 Hours)
Finish Used
None yet, plan to paint
Recommended Skill Level
Beginner

Child's Picnic Table

A lot of detail and time spent in painting this, but I am very happy with how it turned out. I used wider boards for the top to accommodate the hand drawn and painted flag. So glad that it is finally done!

Built from Plan(s)
Estimated Time Investment
Week Long Project (20 Hours or More)
Recommended Skill Level
Beginner

Farmhouse Queen Bed - Great Plans!

Submitted by Shirtzy on Tue, 10/22/2019 - 05:50

This was a great set of plans...easy to follow and everything was available from the local home improvement store.  I appreciate the time and effort that you all put in to making the plans easy to follow.

Built from Plan(s)
Estimated Cost
175.00
Estimated Time Investment
Weekend Project (10-20 Hours)
Finish Used
Valspar high gloss
Recommended Skill Level
Intermediate

DIY Bathroom Fan Vent Cover

Submitted by lbrown on Tue, 02/28/2012 - 04:56

The plastic cover that came with the fan looked cheap and flimsy and really didn't fit in with the vintage style of my bathroom. I searched around to try and find something else that would work but was unsuccessful so I decided that I needed to make something myself.

For details on how to build it: http://www.homeandawaywithlisa.com/blog/2012/2/28/diy-bathroom-fan-vent…

Estimated Cost
$5
Estimated Time Investment
An Hour or Two (0-2 Hours)
Finish Used
Spray paint primer followed by two coats of my ceiling paint
Recommended Skill Level
Starter Project

Comments

Steven (not verified)

Tue, 02/28/2012 - 06:38

Thanks lbrown, you just gave me an idea. We are painting our entire upstairs and hate those industrial looking air return vents. This would be a great replacement for them. Thanks for the inspiration.

Back