Community Brag Posts

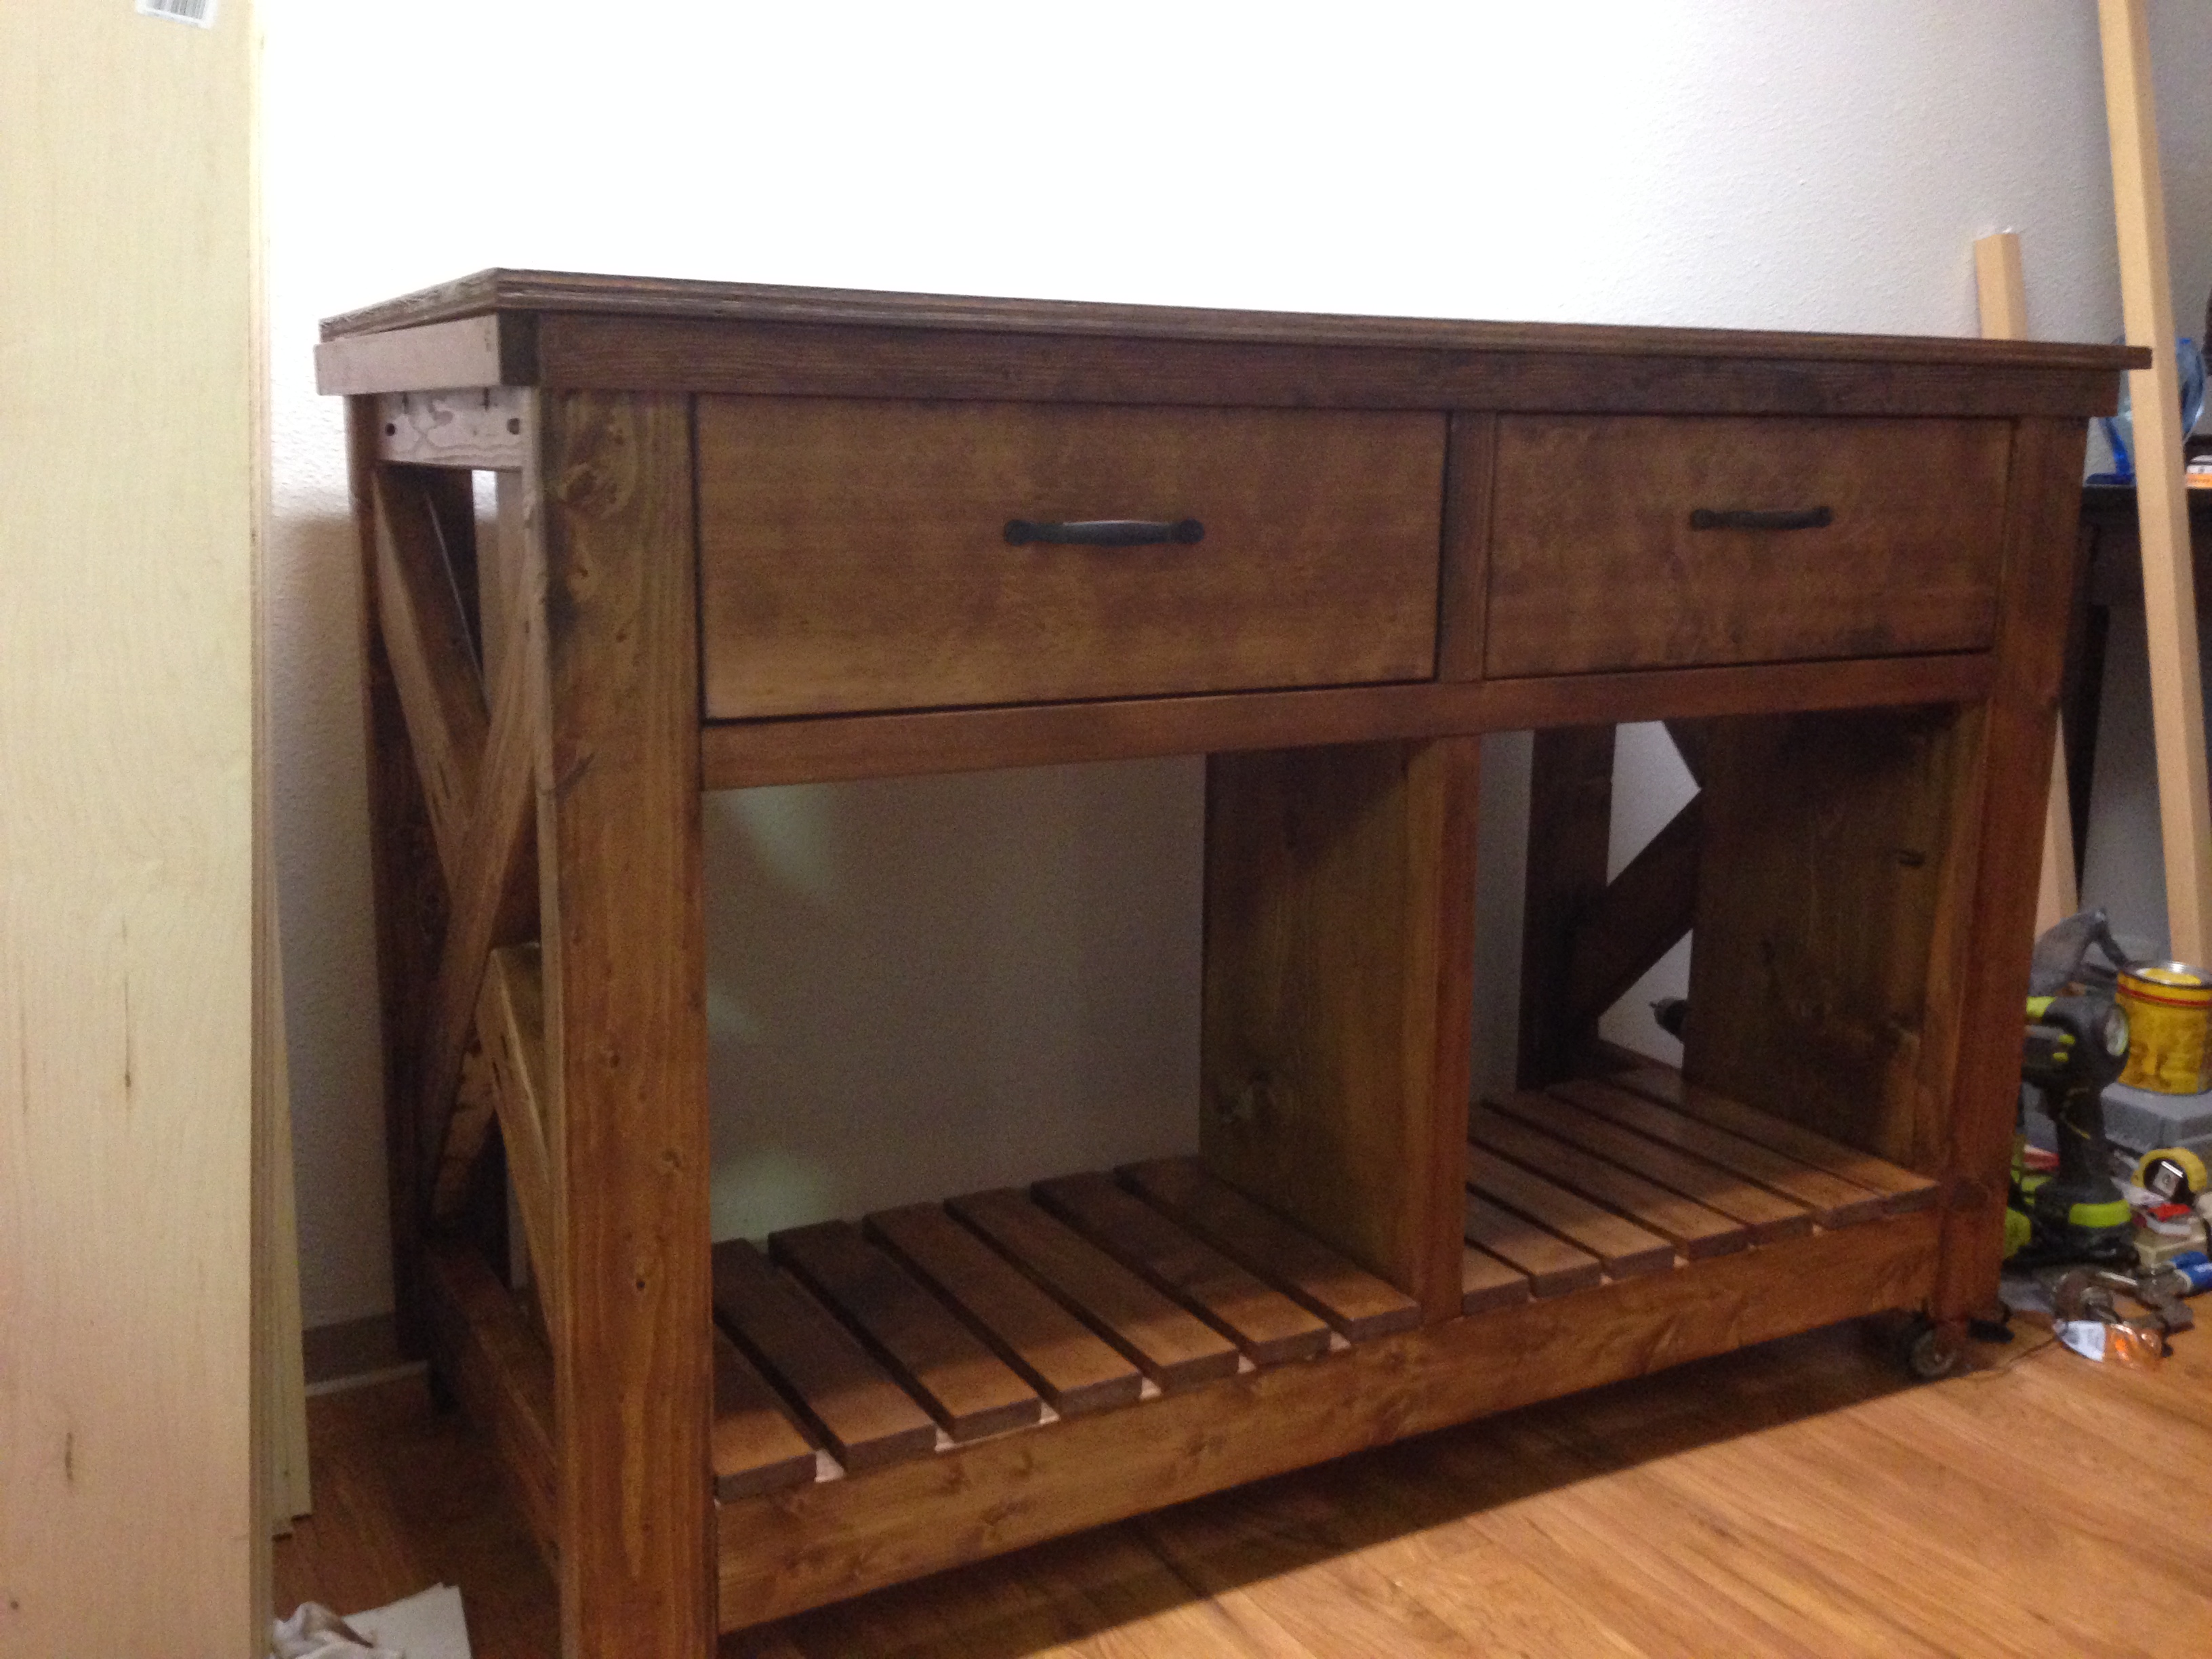
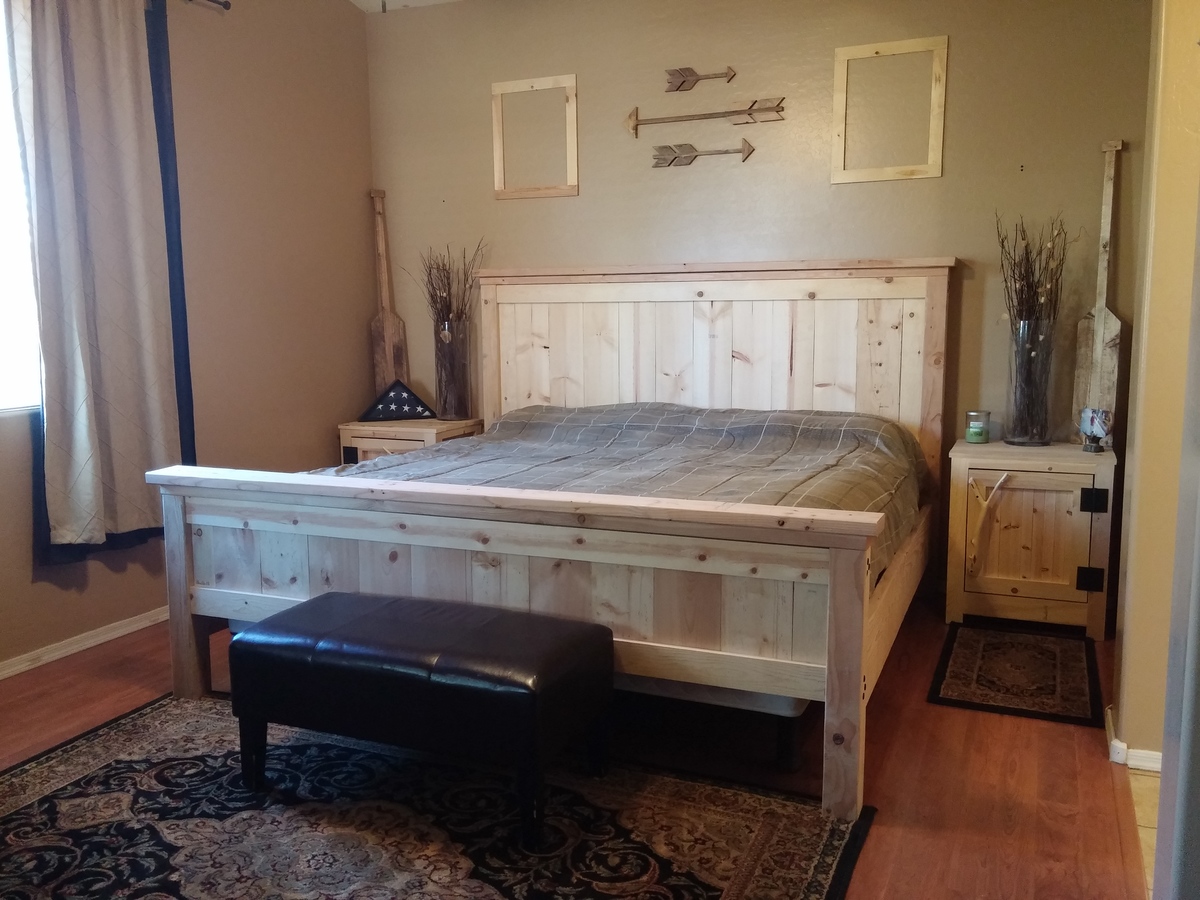
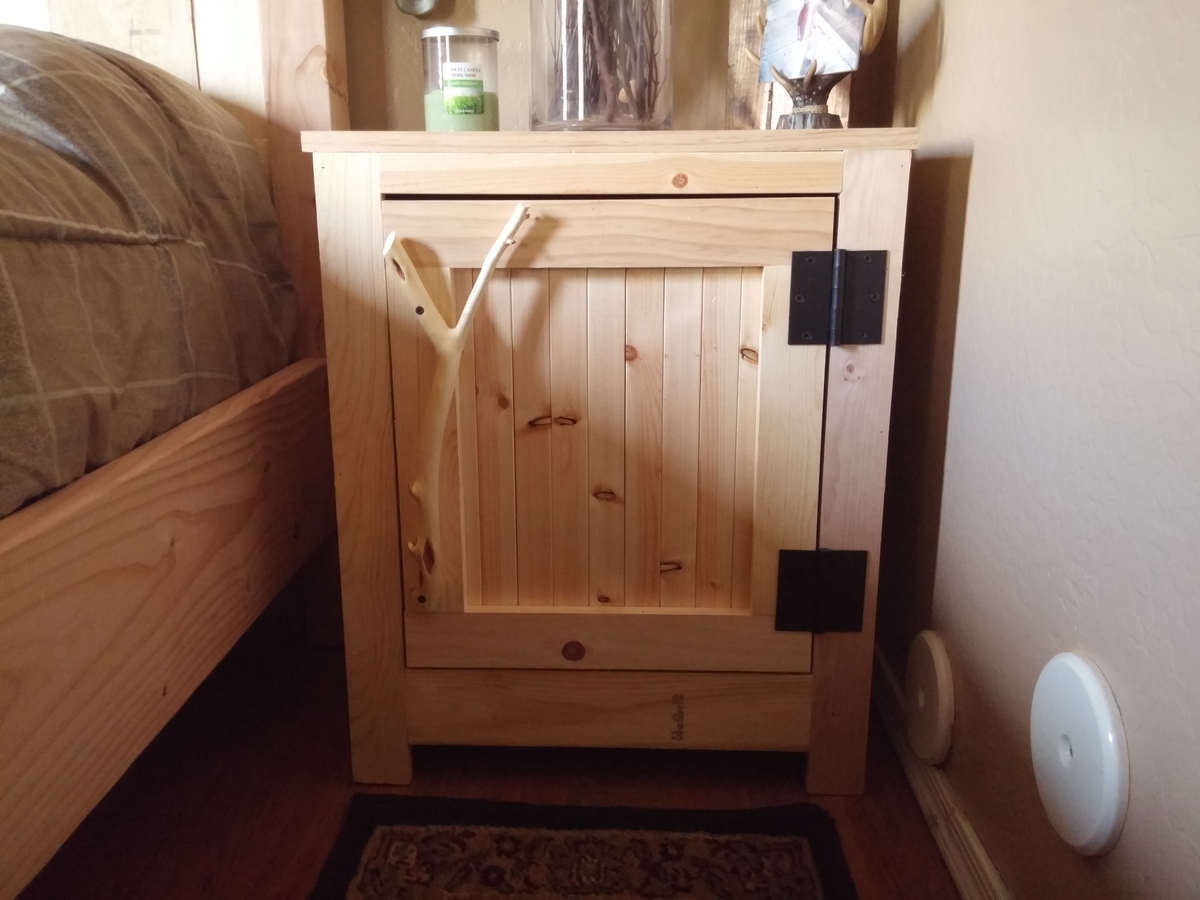
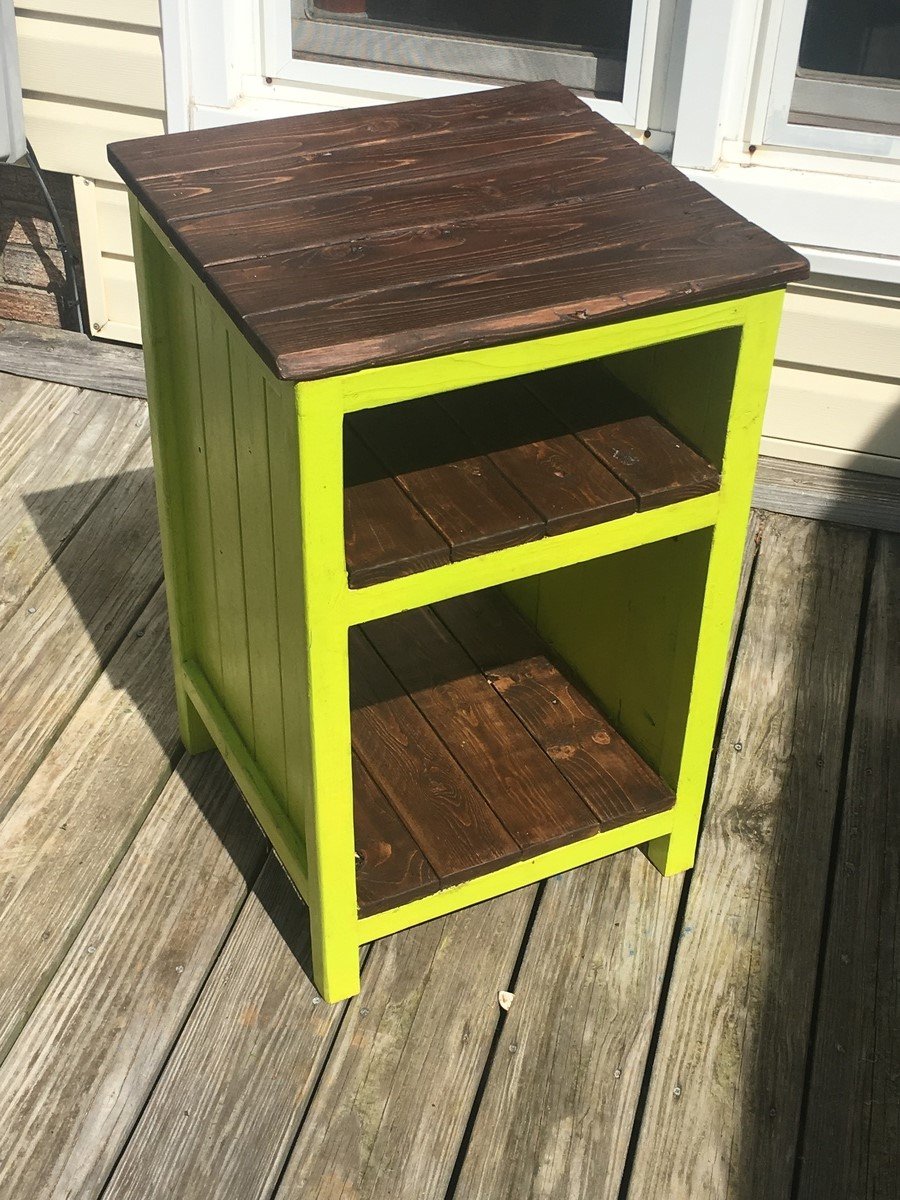
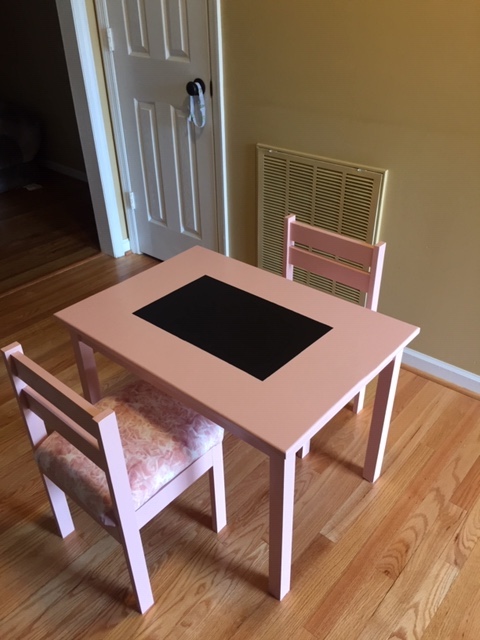
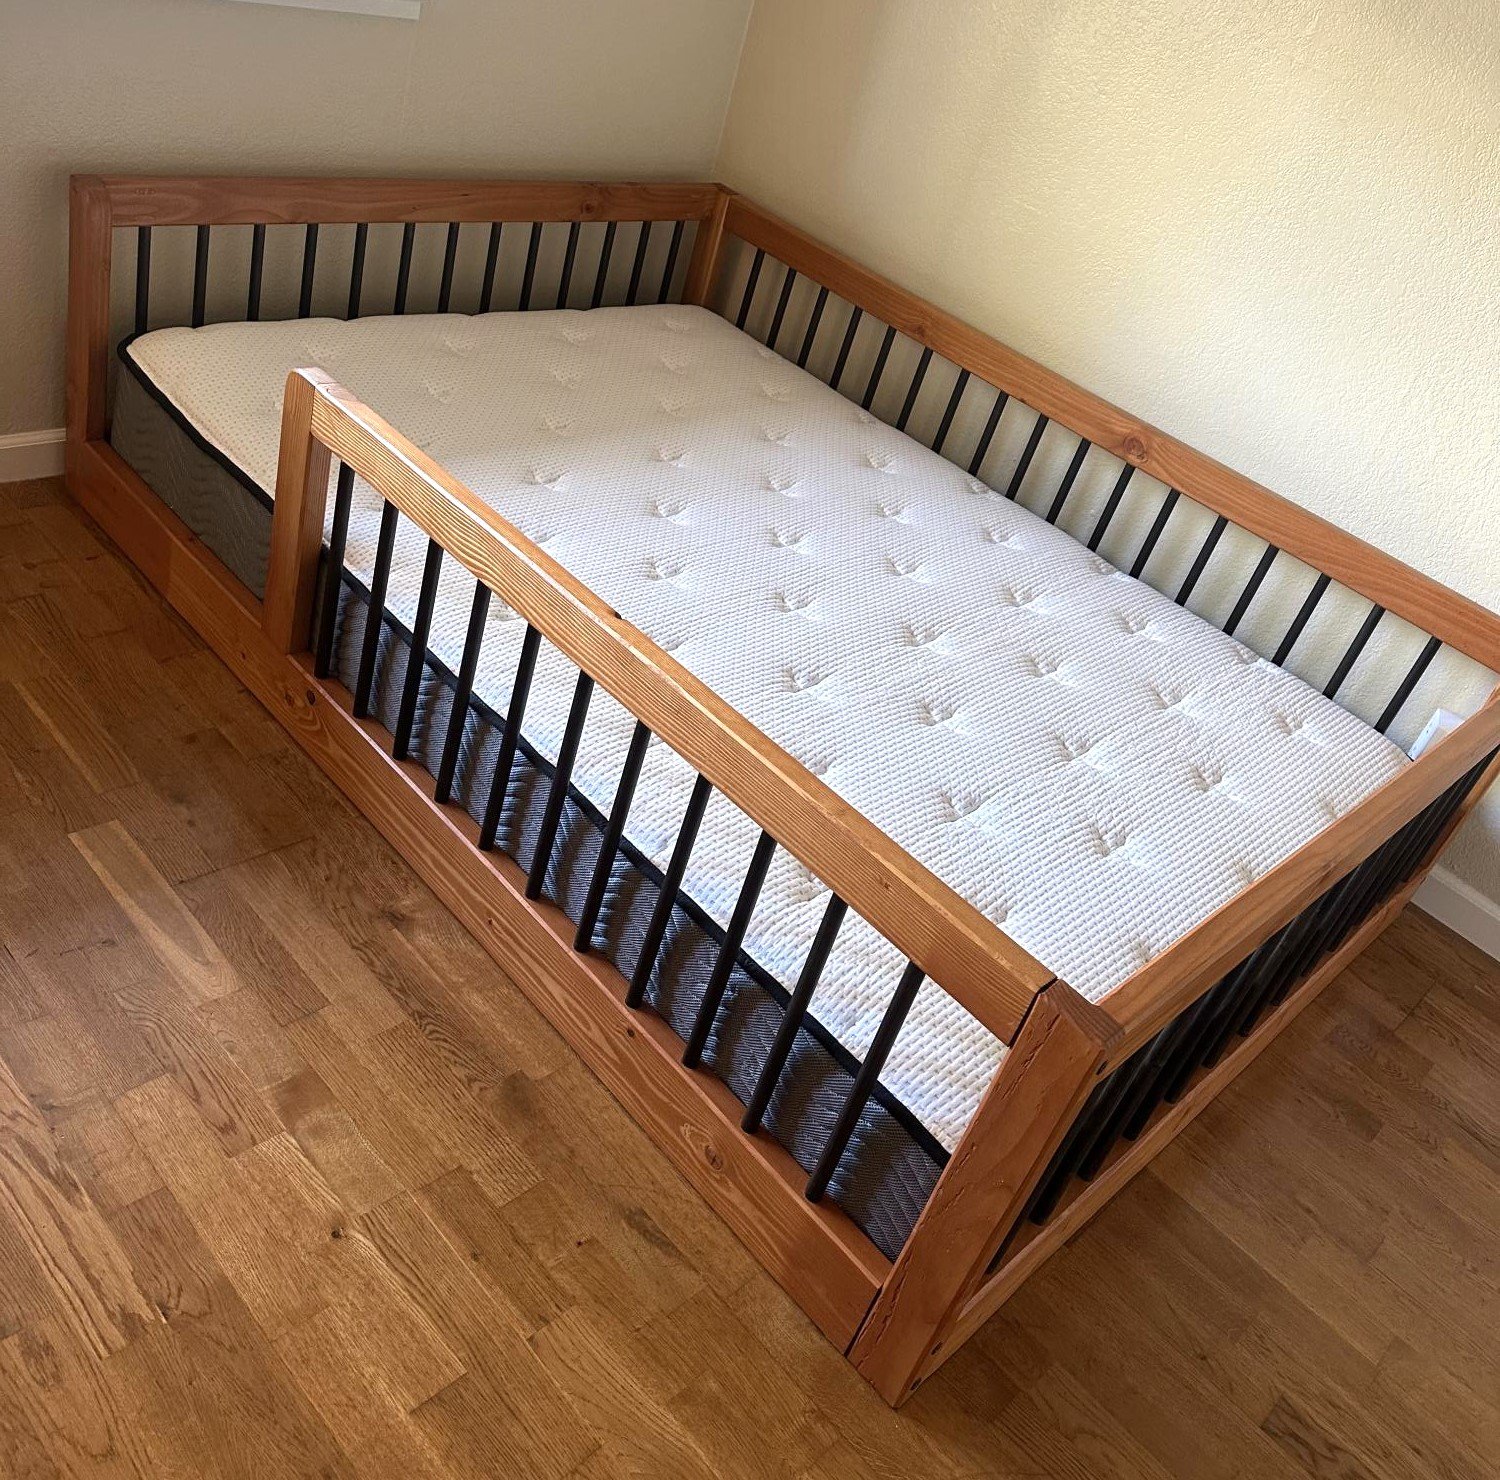
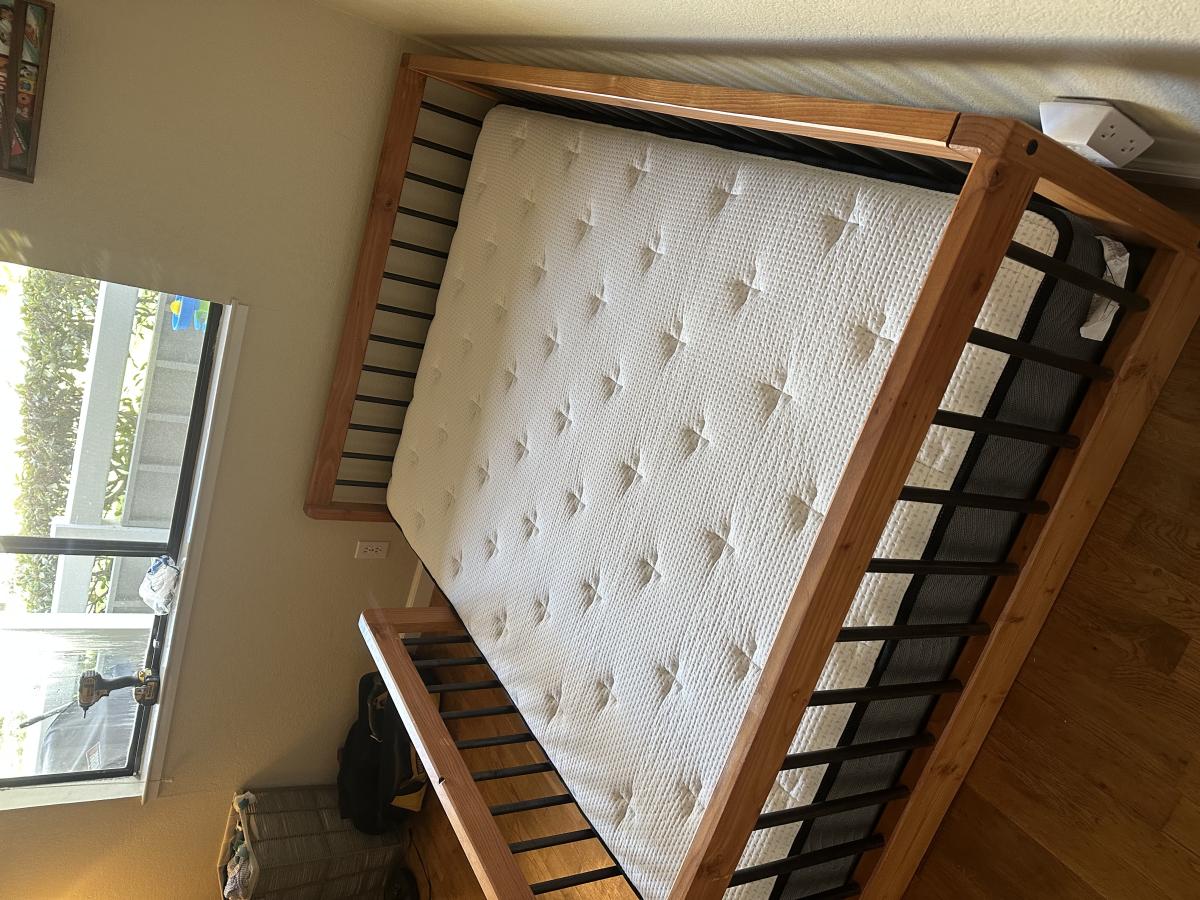
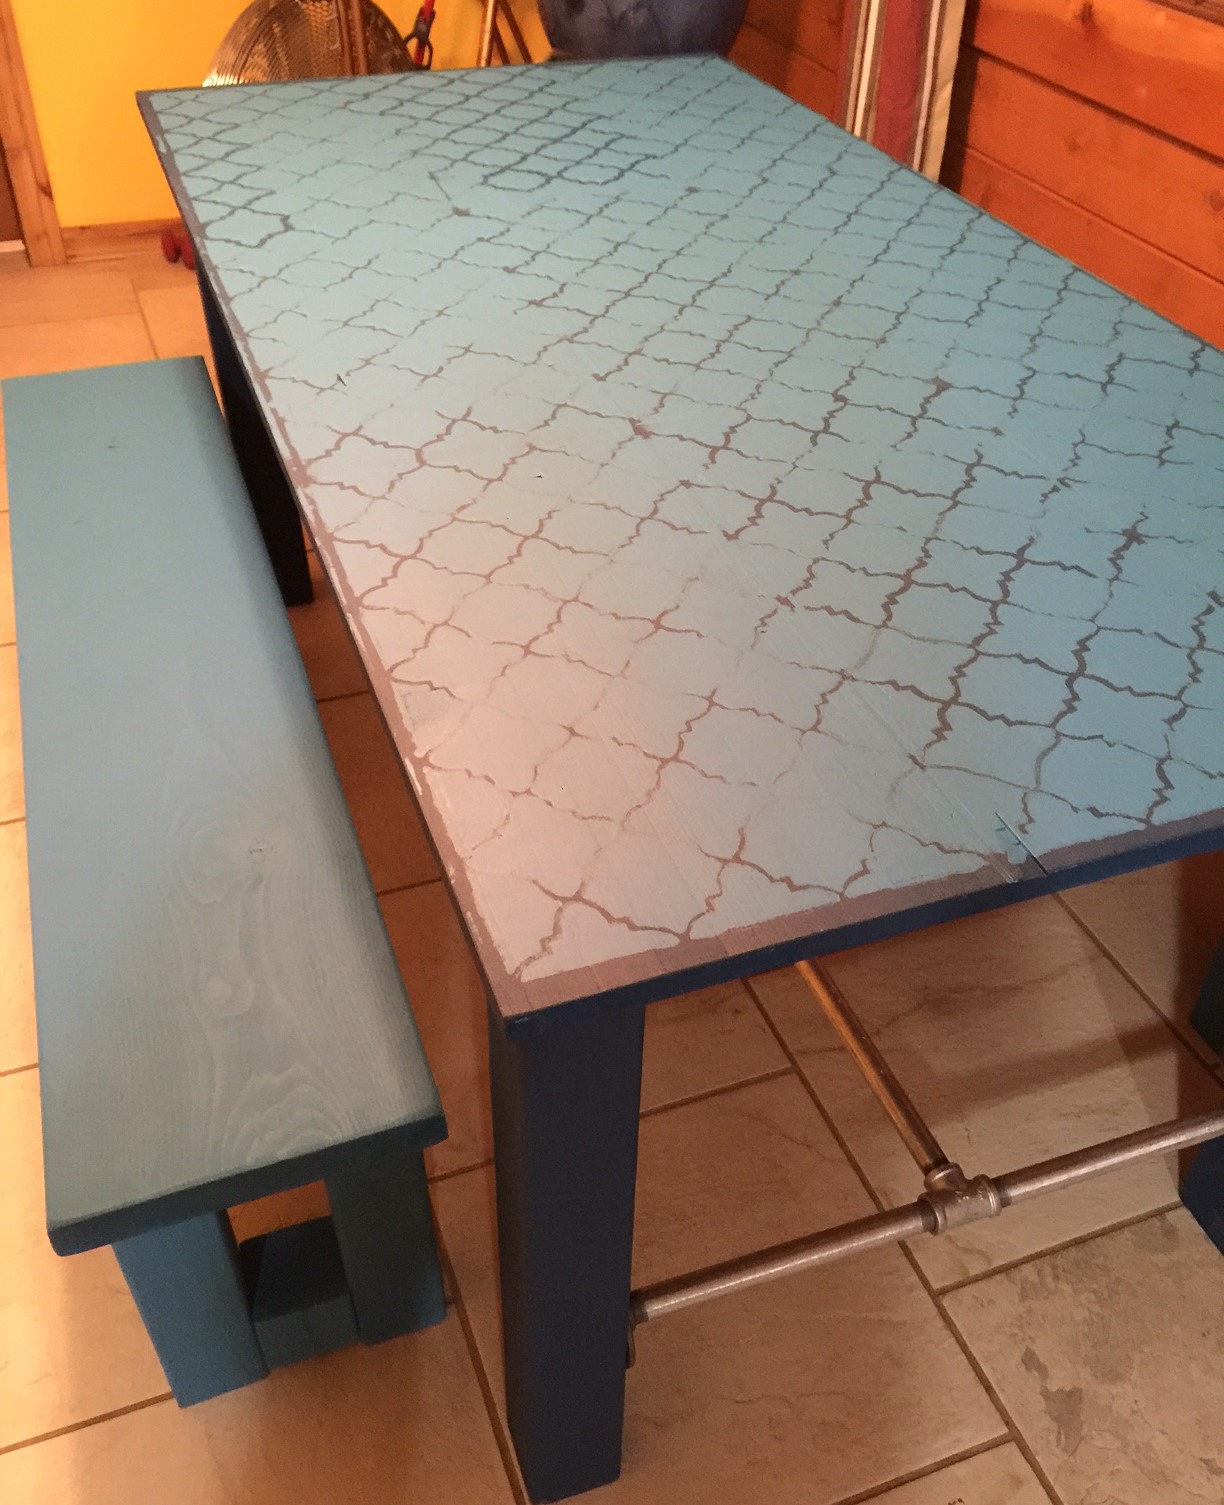
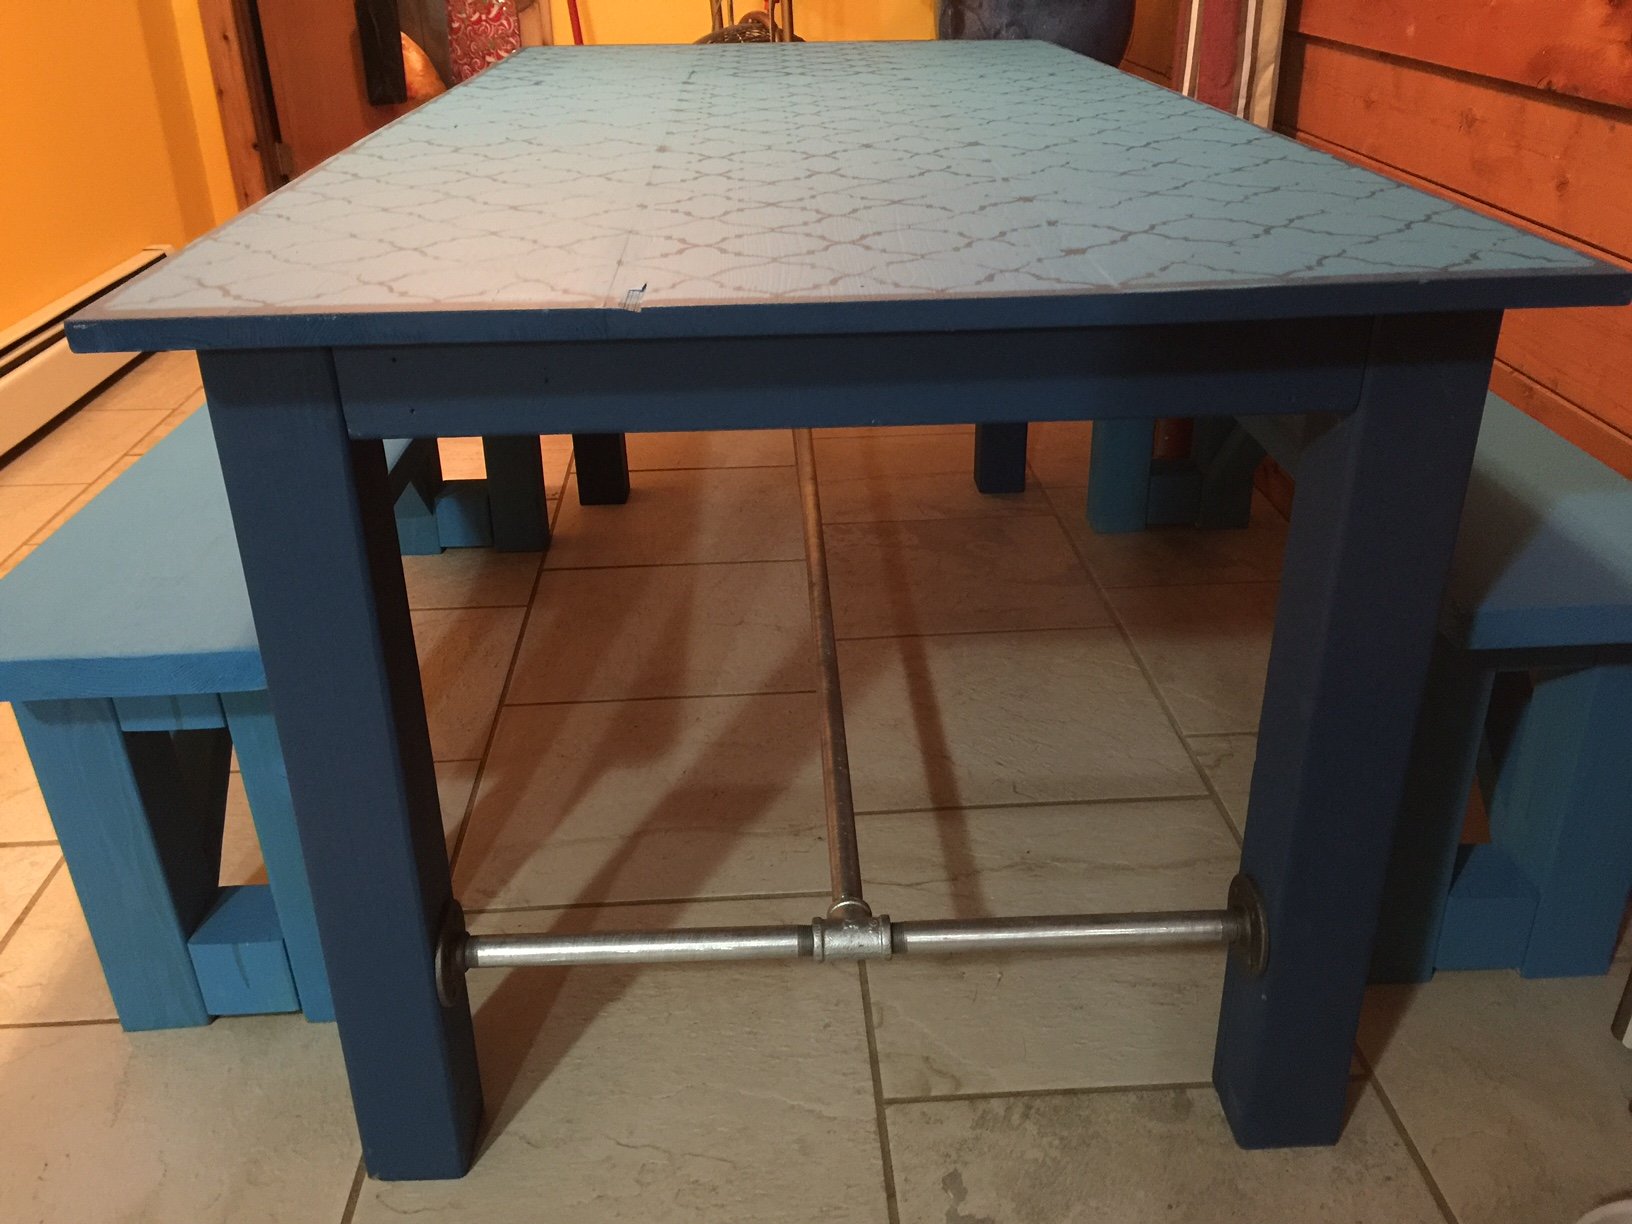
Wedding gift for niece

Submitted by Anonymous (not verified) on Sun, 03/10/2019 - 16:30

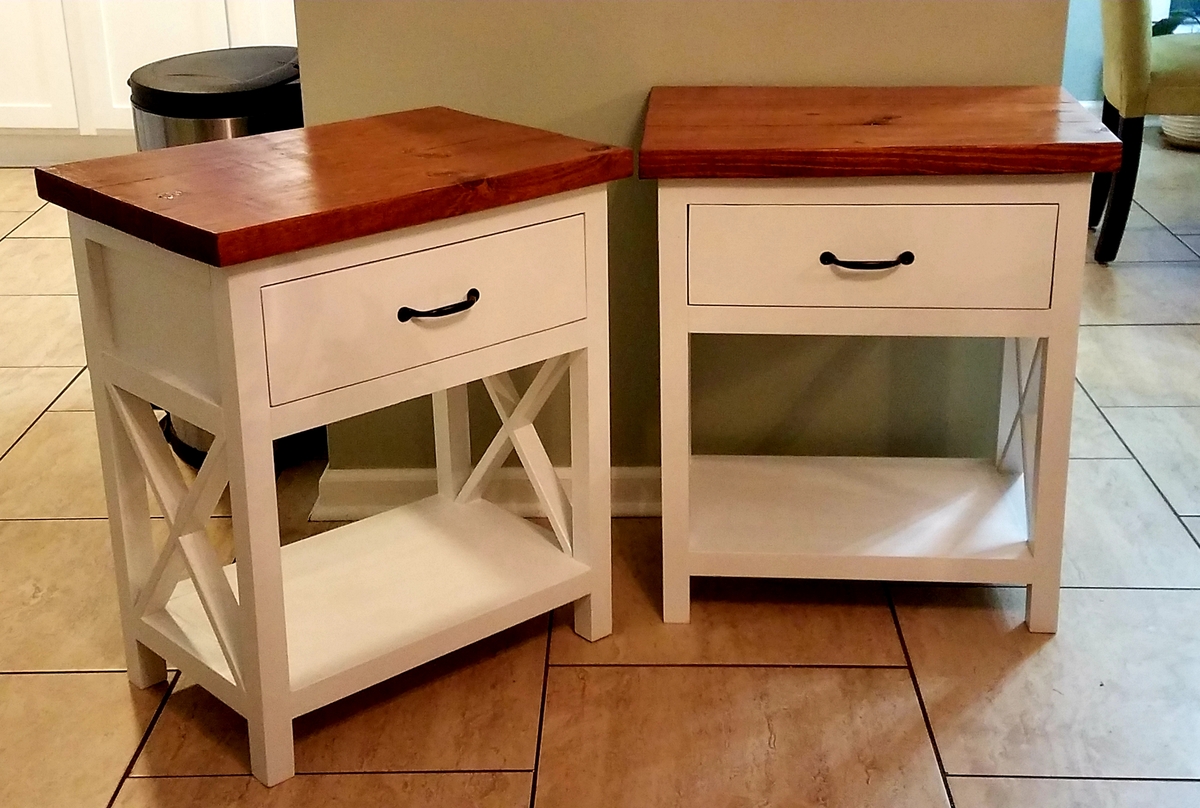
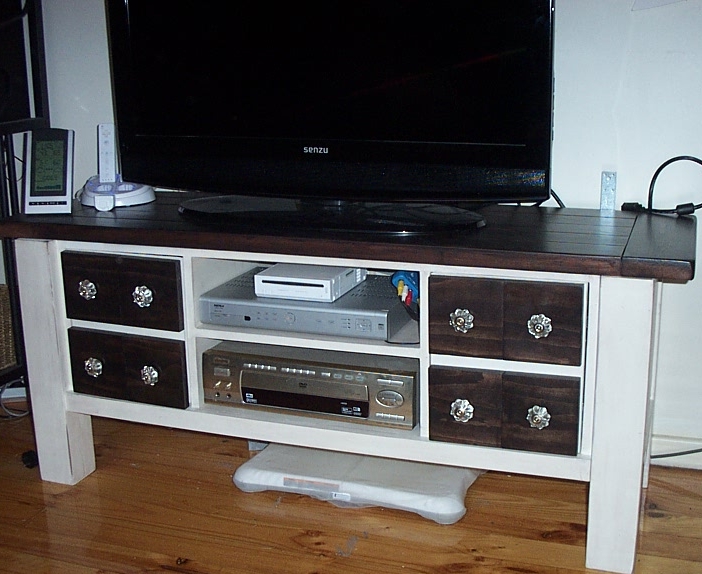
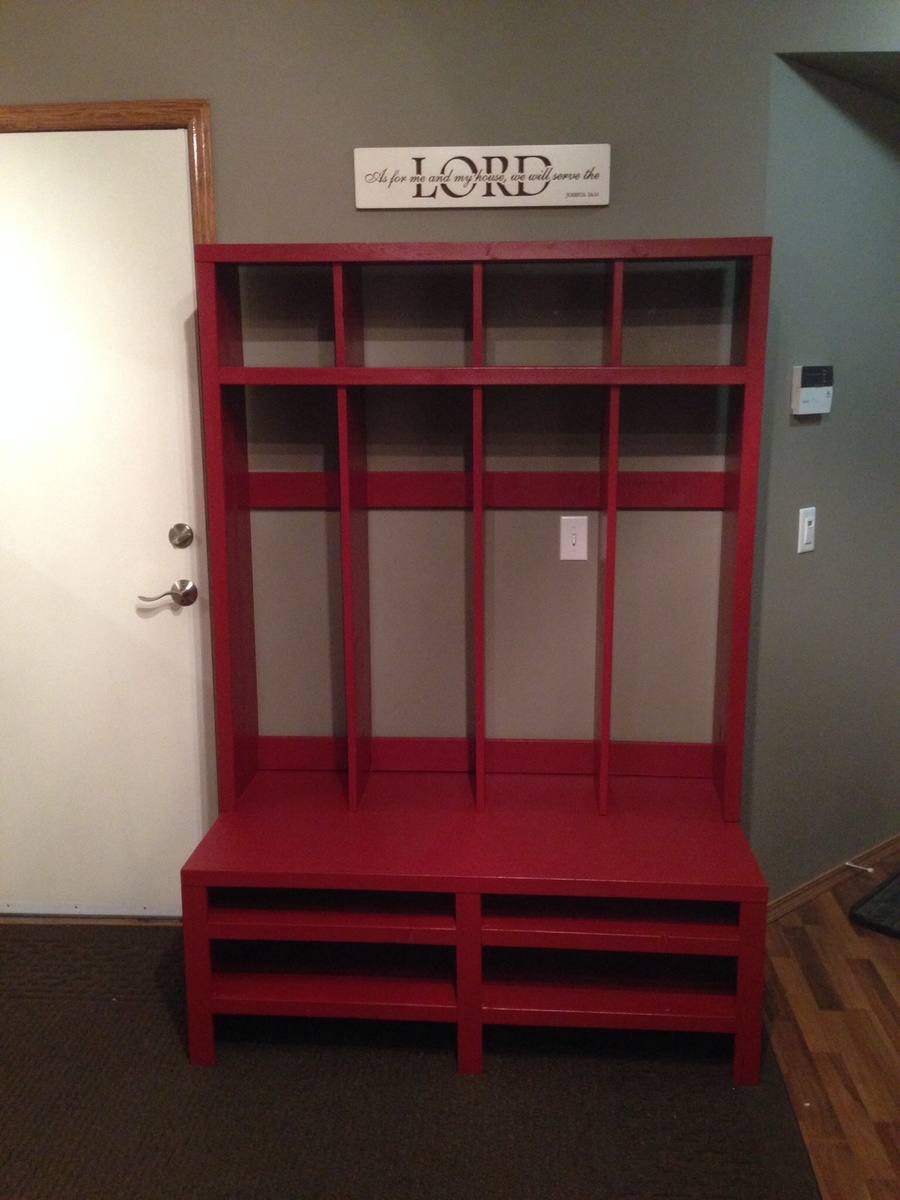
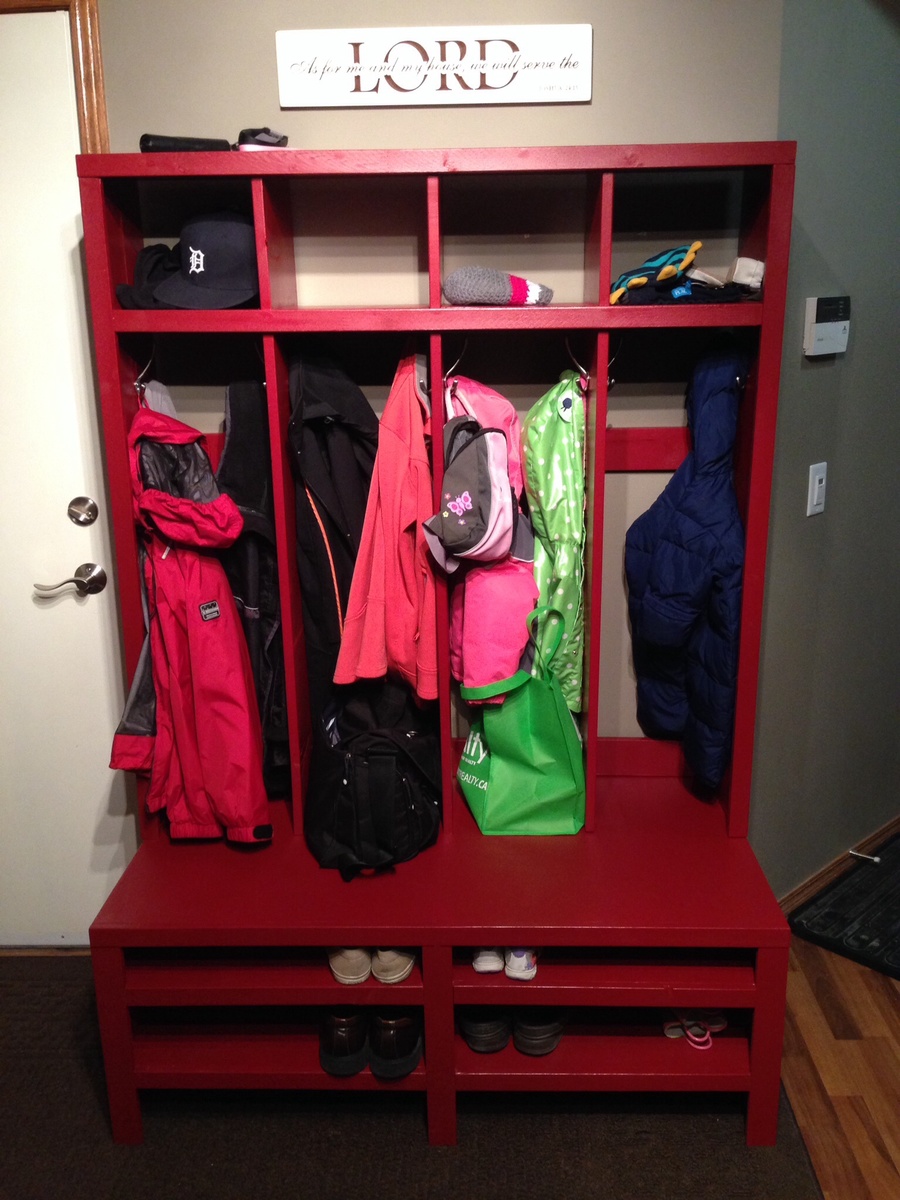
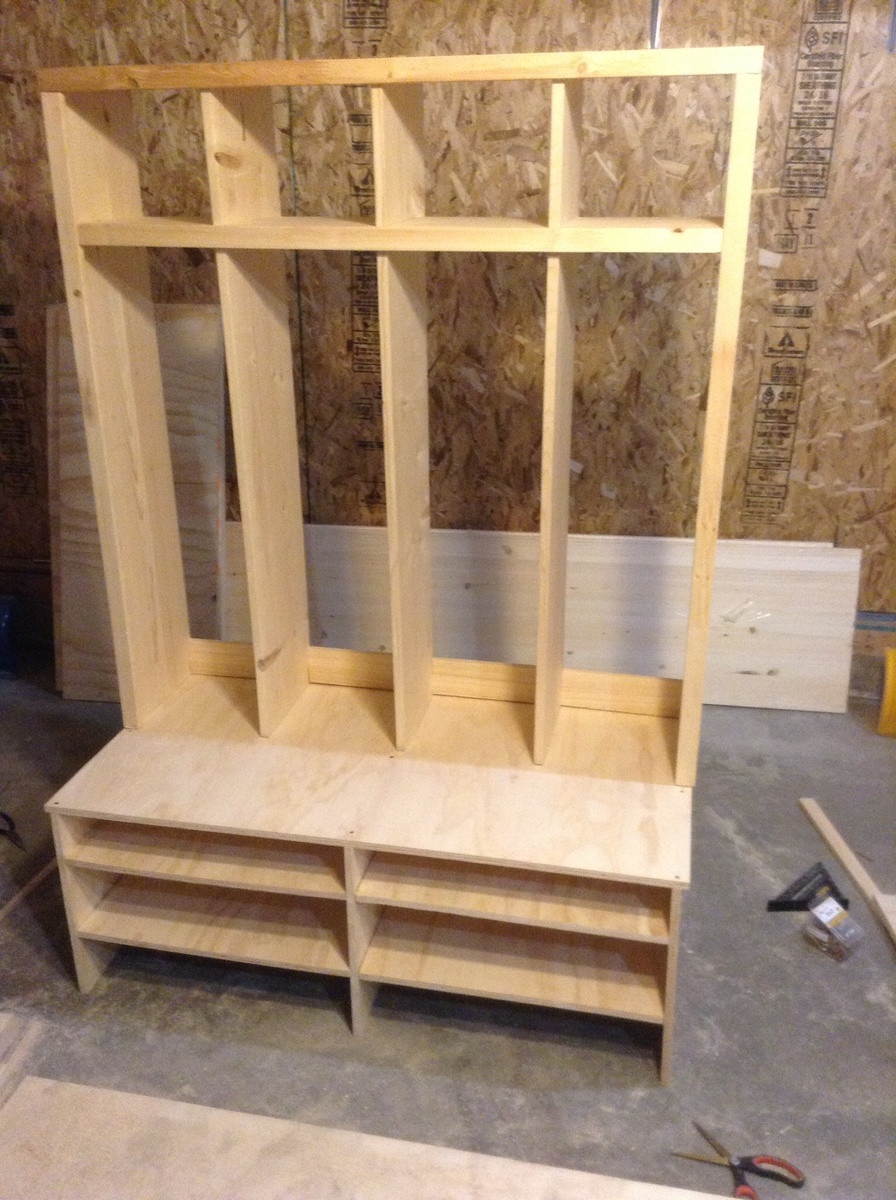
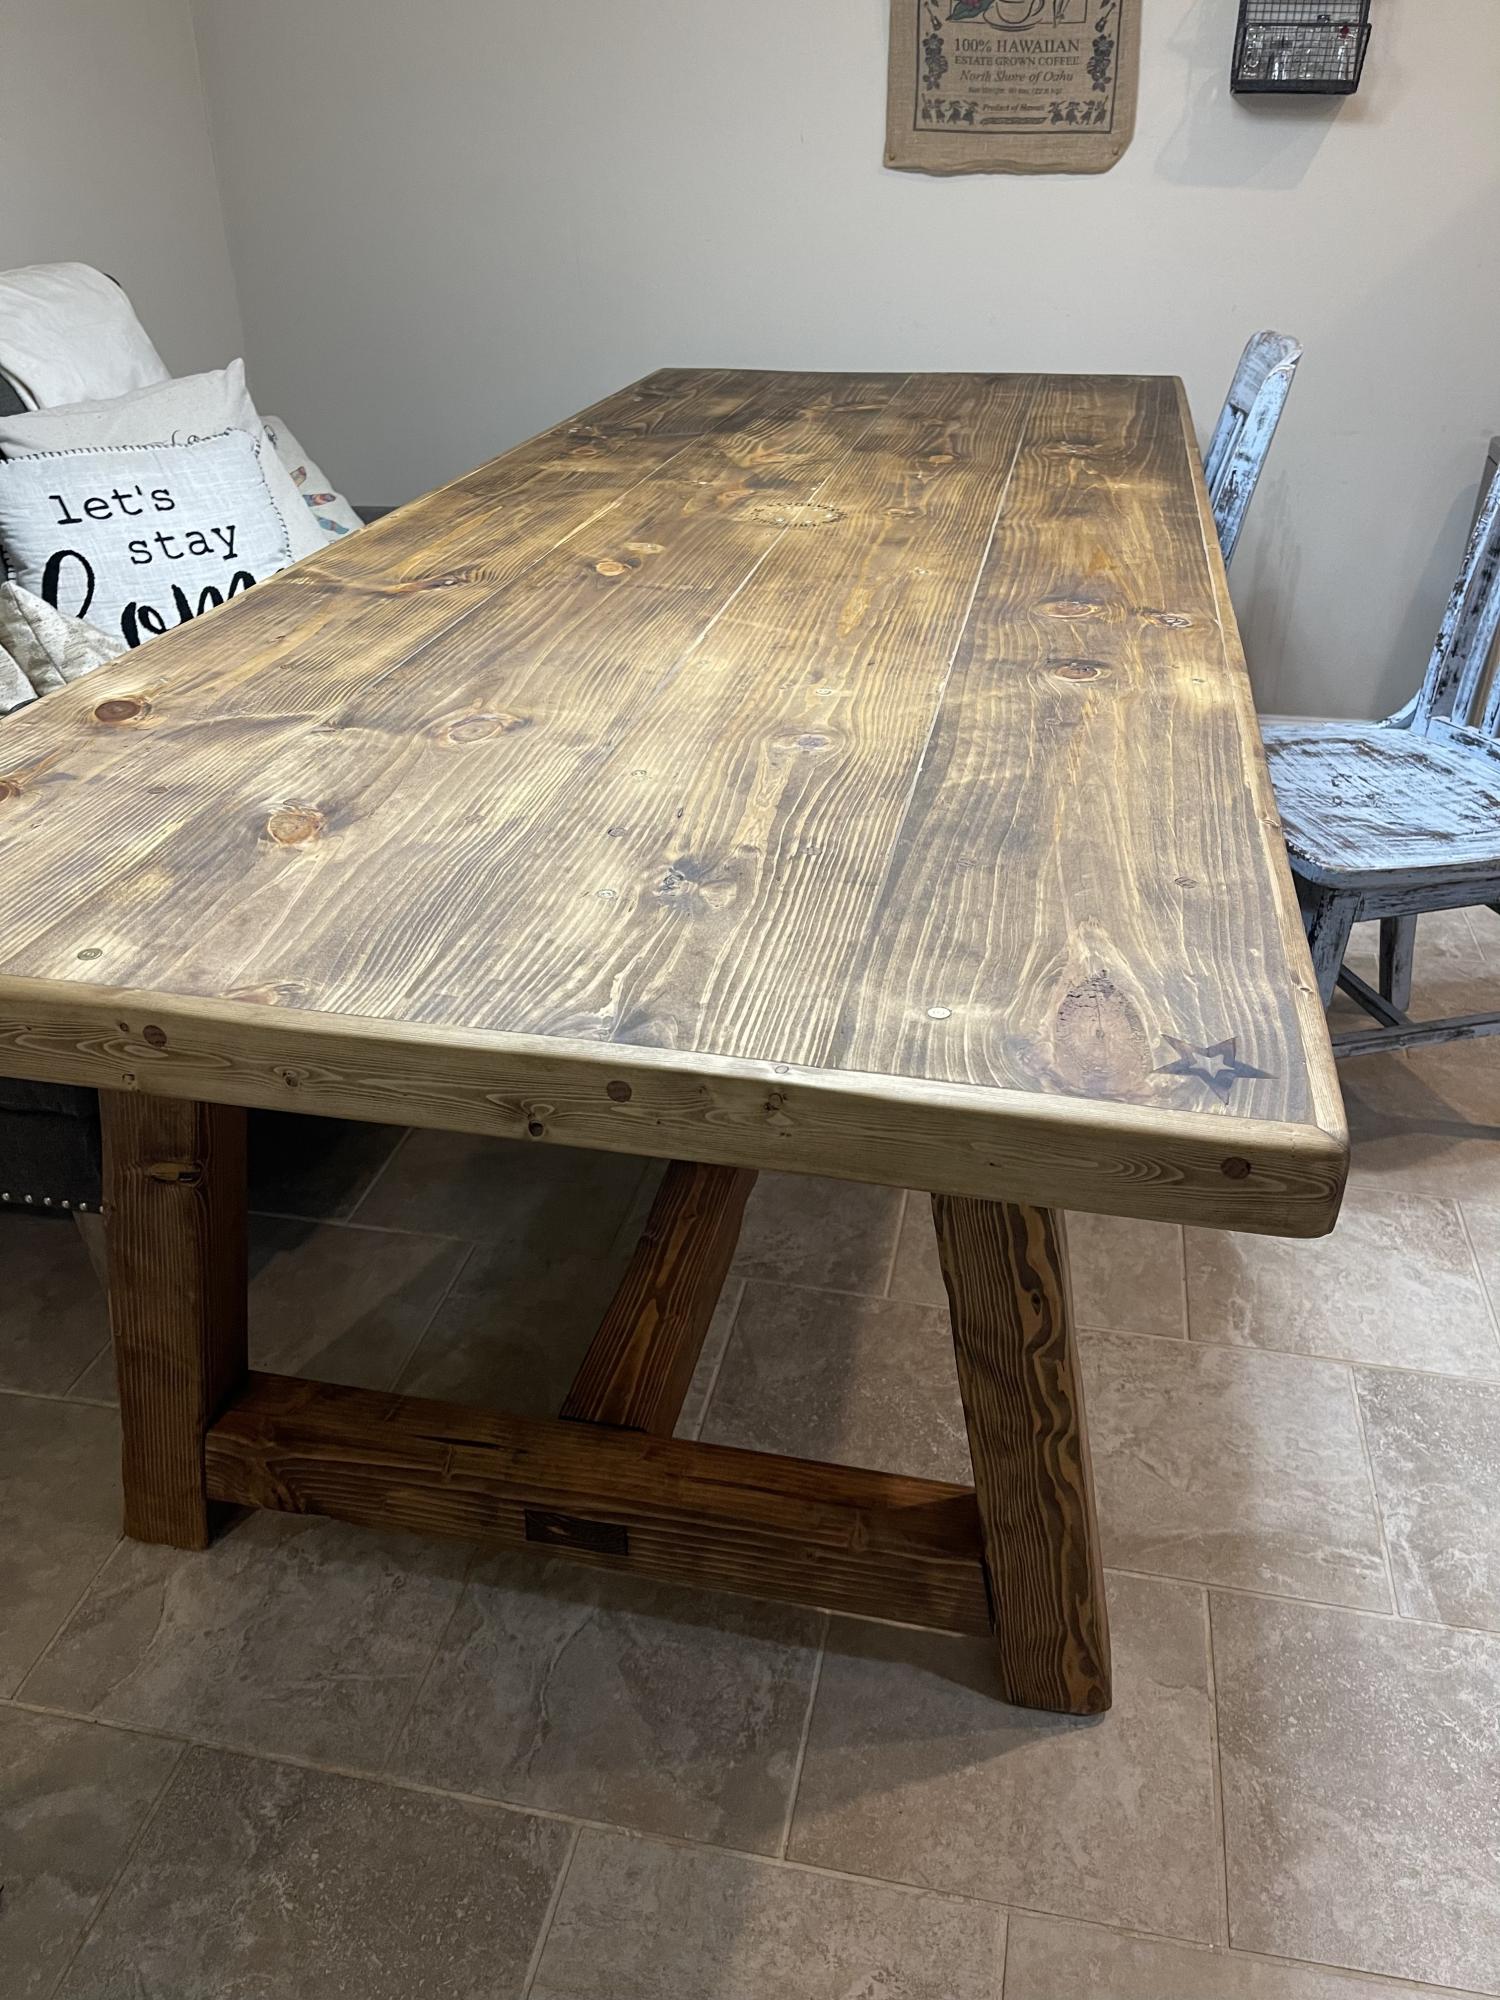
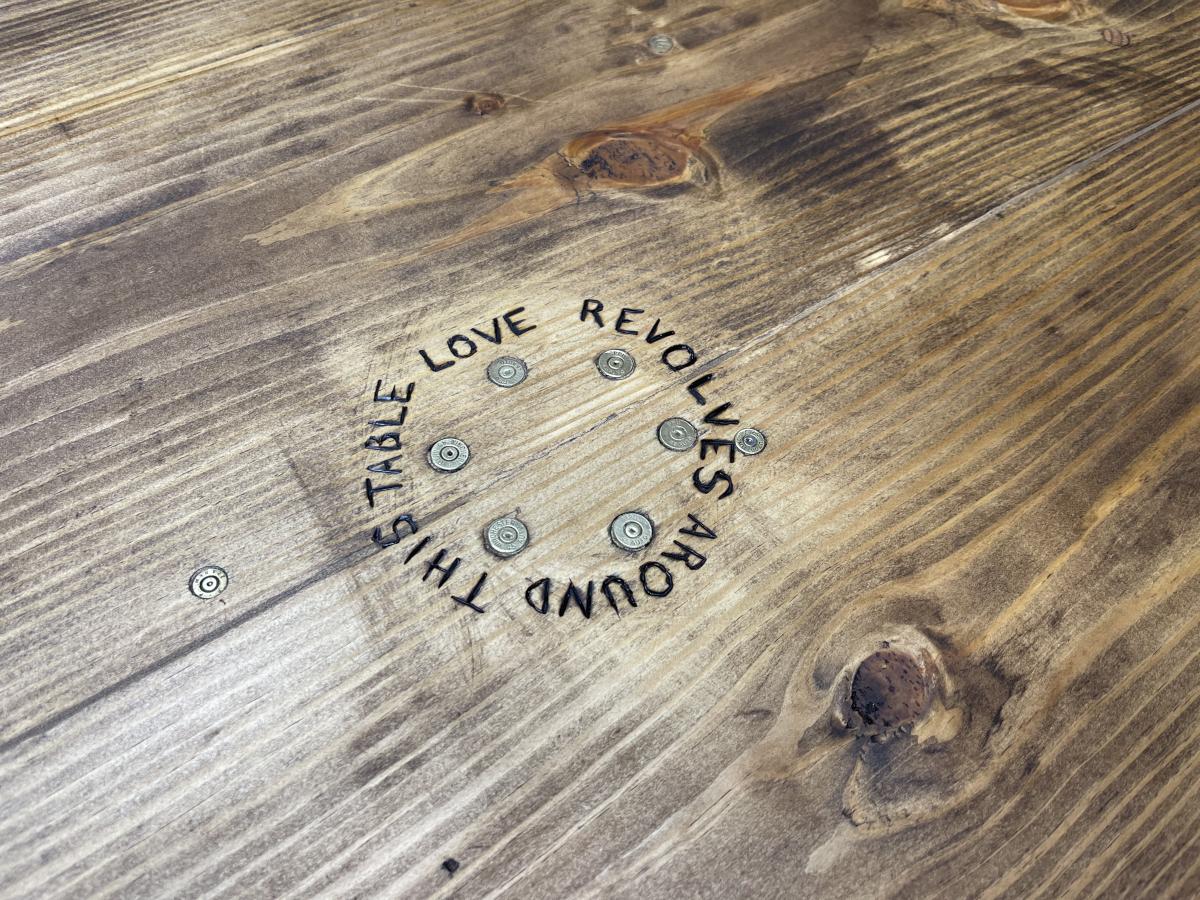
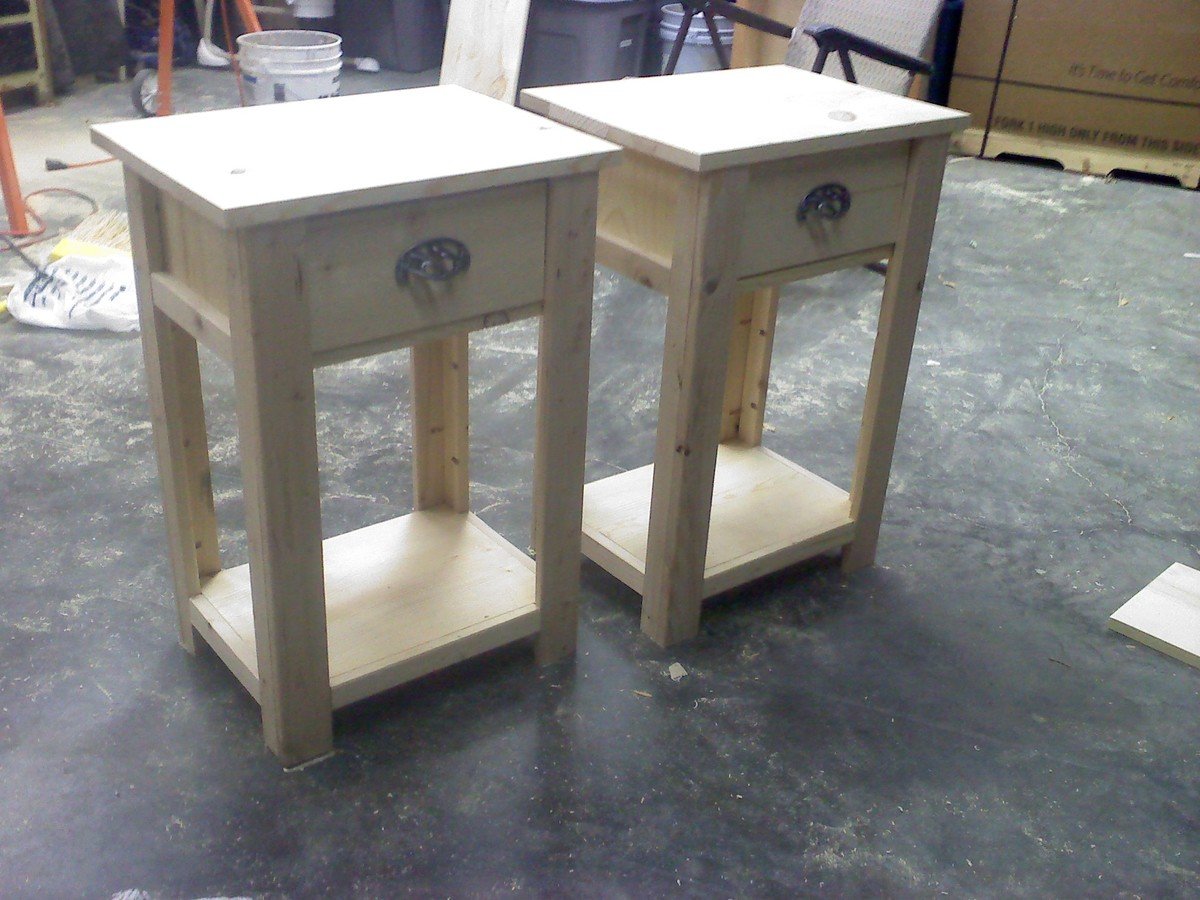
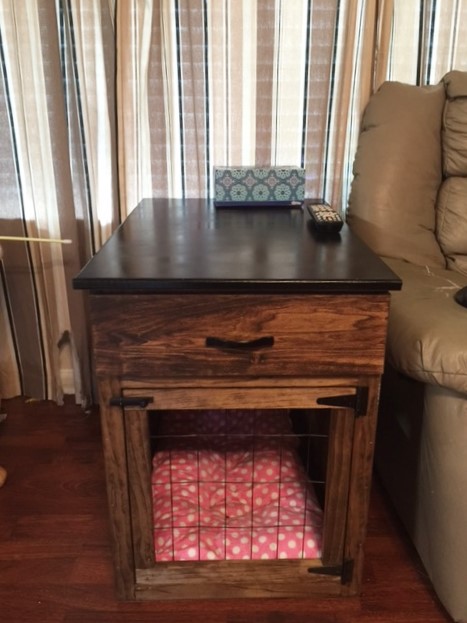
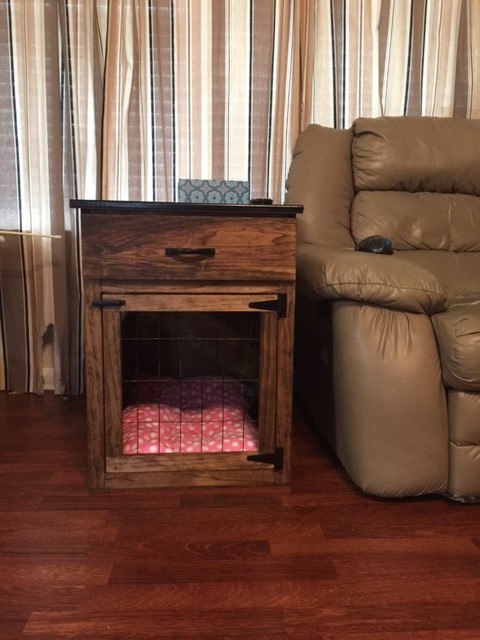
This is the second time i made these tables.  The first time was for my son and his fiance to match the farmhouse bed that i made for them but i did not do the inset drawers.  Tried but couldn't get them to sit right.  My niece liked them and didn't have any tables to go along with the bed her new huband's grandfather had built.  I love the inset drawer look so i tried again.  The first one i had no problem with but the second one had to make the drawer box over a couple of times.  I did differ the pattern a bit and used 2" top instead of 1 inch simply because i had some leftovers.  I also used drawer slides instead of wood slides.

Built from Plan(s)
Estimated Cost
Estimated cost for both tables was about $120. I used good pine 2x2 to have straight legs. Had leftover paint and Varathane gloss finish from cabinet project.
Estimated Time Investment
Weekend Project (10-20 Hours)
Finish Used
Behr white paint with Varathane gloss finish. Top was a mixture of stains to try to match the bed.
Recommended Skill Level
Intermediate

First real project: Tryde Media Console - success!

Tryde Media Console plans, with slight modifications.

This was my first real project after building a very basic woodworking bench. It might look a bit daunting but is actually very simple - build the box and add some legs. Keep your cuts square and accurate and have a lot of wood filler (putty) on hand for mistakes :)

Tricky parts of this project were:

1) building it here in Australia - our wood sizes are different, and untreated 4x4's are not easily available.
2) hinges - I hate them! Still can't use 'em and may never do again.

I began this project sticking pretty much to the plans Ana posted, just making the width of the console a little narrower as my tv is 36" wide only.

Then I saw a post by the Shanty2Chic sisters who made a Apothecary Media Console with stained doors project and I fell in love. To be honest I wasn't crazy about the open sections on each side of the Tryde Console anyway, and I thought adding doors would be easy. Plus the glass knobs used by the S2C sisters were gorgeous! So I guess you could say this is a Tryde/Apothecary Media Console hybrid.

So this project is pretty much as Ana wrote it except it's narrower, and has doors with faux drawer fronts. And as it always goes the longest part of this project was doing the finish.

Please please read about this on my blog - I go into a lot of detail about the build and finish process and I make a lot of mistakes so you don't have to.

I will be posting the matching hutch project soon as I've finished that too.

UPDATE: You can read all about the matching hutch here

Estimated Cost
Approx $100AUD (not incl hardware, paint, stain)
Estimated Time Investment
Week Long Project (20 Hours or More)
Finish Used
Wattyl oil-based indoor stain in 'Wenge'
Taubman's Endure interior paint (satin) in 'Milk Paint'
Custom 'glaze' (see blog posting for details)
Cabot's wood putty in 'Radiata Pine'
Recommended Skill Level
Beginner

Comments

hammertime

Tue, 10/18/2011 - 06:54

This is absolutely beautiful. Thank you for sharing all the details on your blog. :-)

Braden Shoe Shelf Entry Way Locker

I modified the Braden Shoe Shelf plans to fit our entry space. I also wanted 4 cubbies, one for each family member. This was a Huge learning experience for me but I loved every minute.

Estimated Time Investment
Week Long Project (20 Hours or More)
Finish Used
Sanded and then 3 coats of CIL furniture and cabinetry smart paint
Recommended Skill Level
Starter Project

Handmade by Tomas

Submitted by Anonymous (not verified) on Fri, 03/15/2019 - 19:41

This was my first time building furniture. The plans were easy to follow and it was a ton of fun to build!

Estimated Cost
$120
Estimated Time Investment
Day Project (6-9 Hours)
Finish Used
None
Recommended Skill Level
Beginner

4x4 Truss Beam Table

Submitted by Anonymous (not verified) on Tue, 02/07/2023 - 12:39

We stuck with th original plans, but instead of making table ends, we did full 2x10x8 boards and capped it with 1/3’s. We filled in the gaps in the wood with stainable wood filler. We also used a 1/2@ Forstner bit and recessed the screws and used wooden dowels to cover the screw holes. It gives it a beautiful finish. We also enjoy our pew pews, so we recessed .40, .45, .223, and .22 empty shells into the table. My husband wood burnt a message in the center of the table, then we sealed it all with one step minwax finish in mission oak.

Built from Plan(s)

Comments

Ten dollar ledges with reclaimed wood

I love how this project turned out. My neighbor is a collector of of old pallets/fences. Now he is trying to clear his yard. I just had to pull out the old nails, cut and nail. The wood was perfectly weathered.

Built from Plan(s)
Estimated Cost
FREE!
Estimated Time Investment
An Hour or Two (0-2 Hours)
Finish Used
none
Recommended Skill Level
Starter Project

Comments

Rustic X Kitchen Island

Submitted by ichibans13 on Wed, 10/16/2013 - 15:51

This is the first time I've built something. My wife found this site on Pinterest, and made hints about wanting a kitchen island. Our apartment has maybe 3 feet of useable counter space, so I thought this would be nice to have. Ignore the tools in the picture, I literally just finished it and just put stain on it. Overall, I think it came out pretty good, and I really like the design of it. This site is pretty awesome. I've already picked out my next two projects from here. Thanks Ana!

Kyle

Built from Plan(s)
Estimated Cost
$185
Estimated Time Investment
Weekend Project (10-20 Hours)
Finish Used
Miniwax Pre-stain/Miniwax English Chestnut/Miniwax Polyurethane Clear Semi-gloss

I only used one coat for everything except the top, I applied 2 coats of stain on the top. I applied fairly generously and within 2 minutes I used a sock to wipe what I just applied to ensure an even finish. After 2 hours I applied a second coat to the top, and in the same manner I used a sock to remove excess. I applied 1 coat of poly on everything except the top, where again I put on 2 coats.
Recommended Skill Level
Intermediate

Comments

Farmhouse King Bed

Submitted by Wiscogrl on Sun, 01/03/2016 - 10:41

I made this Farmhouse bed frame for my king sized sleep number bed. It is a little wide but overall I am very happy with it. I also made the nightstands from the Kentwood plans. The handles are diamond willow that I picked from the Northwood of Wisconsin.

Finish Used
Have not finished it yet
Recommended Skill Level
Intermediate

Comments

Modern Park Bench

Submitted by Anonymous (not verified) on Fri, 03/22/2019 - 09:48

This was my husbands's 1st Ana White project

Built from Plan(s)
Estimated Time Investment
Afternoon Project (3-6 Hours)
Finish Used
White Chalk Paint
Recommended Skill Level
Beginner

Simple Nightstand

Submitted by hoffer5353 on Mon, 10/24/2011 - 21:54

I was itching to start another project, so when my friend said she was moving to a new house I was excited to make her a custom-made housewarming gift.
She has a beautiful pine bed and to my delight she was in need of nightstands. I looked over many different plans but kept coming back to the simple nightstand plan.
I was concerned about plans that had drawers, and some plans have multiple drawers. Since I haven't made drawers before, I decided I could tackle a 1 drawer nightstand and do the simple night stand.
I was pleased in the end how it turned out! The hardest thing was choosing stain and the perfect drawer pull.
I was pleased when she sent me a picture of it and it matched her bed well.

Built from Plan(s)
Estimated Time Investment
Day Project (6-9 Hours)
Recommended Skill Level
Intermediate

Comments

hoffer5353

Tue, 10/25/2011 - 05:52

I was concerned about the strength while constructing but once I began putting everything in place it was very sturdy.
I wasn't crazy about how my drawers turned out but I wasn't about to take it apart and rework it!
I was tempted to keep it for myself, but I couldn't since my friend was expecting a special gift.

My Big and Small Helper

This was my first real woodworking project and I loved it! I had a big helper (my Dad), who has a full woodworking shop teach me how to use the different tools and assist with building. It took a while longer than the plans say because we did some extras like powersanding and rounding off all the edges on each piece before assembling it. My Dad was very picky about it having a polished look! Plus, I insisted on my Dad teaching me, not doing everything for me. We also predrilled and glued on 16 hinges so it would fold. That definitely took four hands to do and the majority of the time.
My 'small' helper (our last name is Small) and son Dominic is almost two and loves using it. In hindsight, I would have made it a couple inches less wide overall to fit better in our kitchen that has limited counter space. And would have painted it prior to screwing the sides together with the hinges to make it easier to paint. However, I built it at my Dad's over the weekend, then painted it later. I chose the bright green colour so it would be playful and gender neutral to pass on once we no longer need it.
Thanks for the inspiration and great plans! I will be back for more projects!!!!

Built from Plan(s)
Estimated Cost
$40 for wood etc, $52 for paint
Estimated Time Investment
Weekend Project (10-20 Hours)
Finish Used
One coat of Benjamin Moore Multi-Purpose Latex Primer in Paradise Green. And two coats of Benjamin Moore Advance Waterborne Interior Alkyd in Pearl finish in Paradise Green. Both are low VOC and low odour.
Recommended Skill Level
Intermediate

Bedside End Table

Submitted by Ohboi22 on Tue, 03/26/2019 - 07:26

I actually used the “Bedside End Table” brag plans. This is my first project using plans from this site, I’m pretty happy with it:)

Estimated Time Investment
Weekend Project (10-20 Hours)
Finish Used
Varathane stain, wipe on poly, rustoleum paint
Recommended Skill Level
Beginner

Easy Build Wood King Headboard

Submitted by cookbs2 on Sat, 10/29/2011 - 17:52

I am in love with this project. My husband built this for my birthday this afternoon. It was an easy project for his first time. We haven't finished it yet. I would like for him to put a 2x6 on the top to give it some visual weight. The only problem i am having is I don't know how to finish it. What would you suggest? We like the beachy distressed look so I am thinking whitewash. Anyway, I love it! I told my husband that he was in trouble now because now I am going to give hime tons of projects to build for me.

Estimated Cost
135.00
Estimated Time Investment
Afternoon Project (3-6 Hours)
Finish Used
Unfinished at this point. We are undecided on finish. We might dark stain and then whitewash, or a turquoise wash, with Annie Sloan Chalk Paint and then waxing.
Recommended Skill Level
Beginner

Comments

loniwolfe

Sun, 10/30/2011 - 08:48

Looks great! I love the beachy look too. You could also do a yellowish stain (golden pine? it might be called) and then distress it and rub over with a darker stain for a different beach look.

Smaller Dog Crate with a drawer!

Submitted by imalearba4 on Wed, 01/06/2016 - 14:02

You may remember my green stratton day beds that I built a long time ago- finally I have another project to post- I am soo happy I found Ana White's website. We just got back from a 2.5 week vacation in Israel and my dogs were staying with my sister. She told me they had been sleeping in the same kennel together instead of separately. Their kennels are too small so I decided to build them one using wood I already had. But since they are small dogs, I decided to size it down- but I wanted it end table height- so I built a smaller kennel- 20"H x 19"W x 28"D. but... I added a drawer to the top to bring it to the right height. You can read all about it on my blog- link below.

Built from Plan(s)
Estimated Cost
$35 - for drawer pull, stain, drawer slides, and hinge hardware- I had the 2x2s and plywood in my stash
Estimated Time Investment
Weekend Project (10-20 Hours)
Finish Used
Provincial stain
Recommended Skill Level
Intermediate

Comments

KryssQuinn

Sat, 04/11/2020 - 15:17

I really like this idea. We have a repurposed dresser currently housing two crates, but this is cleaner.

clara table

Submitted by jim7sf on Sun, 04/21/2019 - 03:31

Not bad for my first project!!  I decided to upholster the chairs so i used a solid piece of wood for the foundation of my seat and also decided I was going to use chalkboard paint I had left over

Built from Plan(s)
Estimated Time Investment
Weekend Project (10-20 Hours)
Recommended Skill Level
Starter Project

Comments

Montessori bed

Submitted by Anonymous (not verified) on Fri, 02/24/2023 - 07:53

A Montessori (full size) bed made for my grandson Jack’s 1st Birthday.

Comments

Thread Holder and Photo Scrapbook Holder

Submitted by VelvetSky on Fri, 11/04/2011 - 23:06

I love this even though I did not take the time to cut the dowels properly. I needed something for my sewing thread. Just a plain board and some dowels thin enough for the spools. Drill some holes in the board and glue in the dowels. I also made the picture holder for scrapbooking. I got the idea from the Ruler Clip Art Rails on this site. Thanks!

Built from Plan(s)
Estimated Time Investment
An Hour or Two (0-2 Hours)
Recommended Skill Level
Starter Project

Farmhouse Bench

Submitted by pwky on Thu, 10/24/2013 - 15:03

First time building furniture. This turned out much better than I thought. After this I probably could've build the farmhouse table myself instead of paying way too much for my wood dining table. Only if I have found Ana's site sooner. :)

Having a Kreg jig also made the whole process much easier.

Estimated Cost
$40 without the stain
Estimated Time Investment
Day Project (6-9 Hours)
Finish Used
Rustoleum Kona and Minwax pre-stain conditioner and semi-gloss poly
Recommended Skill Level
Beginner

Modern Farm Table with a Twist

Submitted by Anonymous (not verified) on Thu, 01/07/2016 - 18:04

We wanted to build a farm table with benches to accommodate a few more people in the same space. This plan was easy to use. We modified a couple of the supports to metal piping to change the look up. We also painted the table and used a stencil to create a old world feel to it. It was a very fun project!

Built from Plan(s)
Estimated Cost
$200
Estimated Time Investment
Weekend Project (10-20 Hours)
Finish Used
1 Qt Carribean Sea from Glidden
1 Qt Galapagos from Behr
Minwax Polycrylic Semi-Gloss Finish
Tile stencil for table top
Recommended Skill Level
Beginner