Community Brag Posts

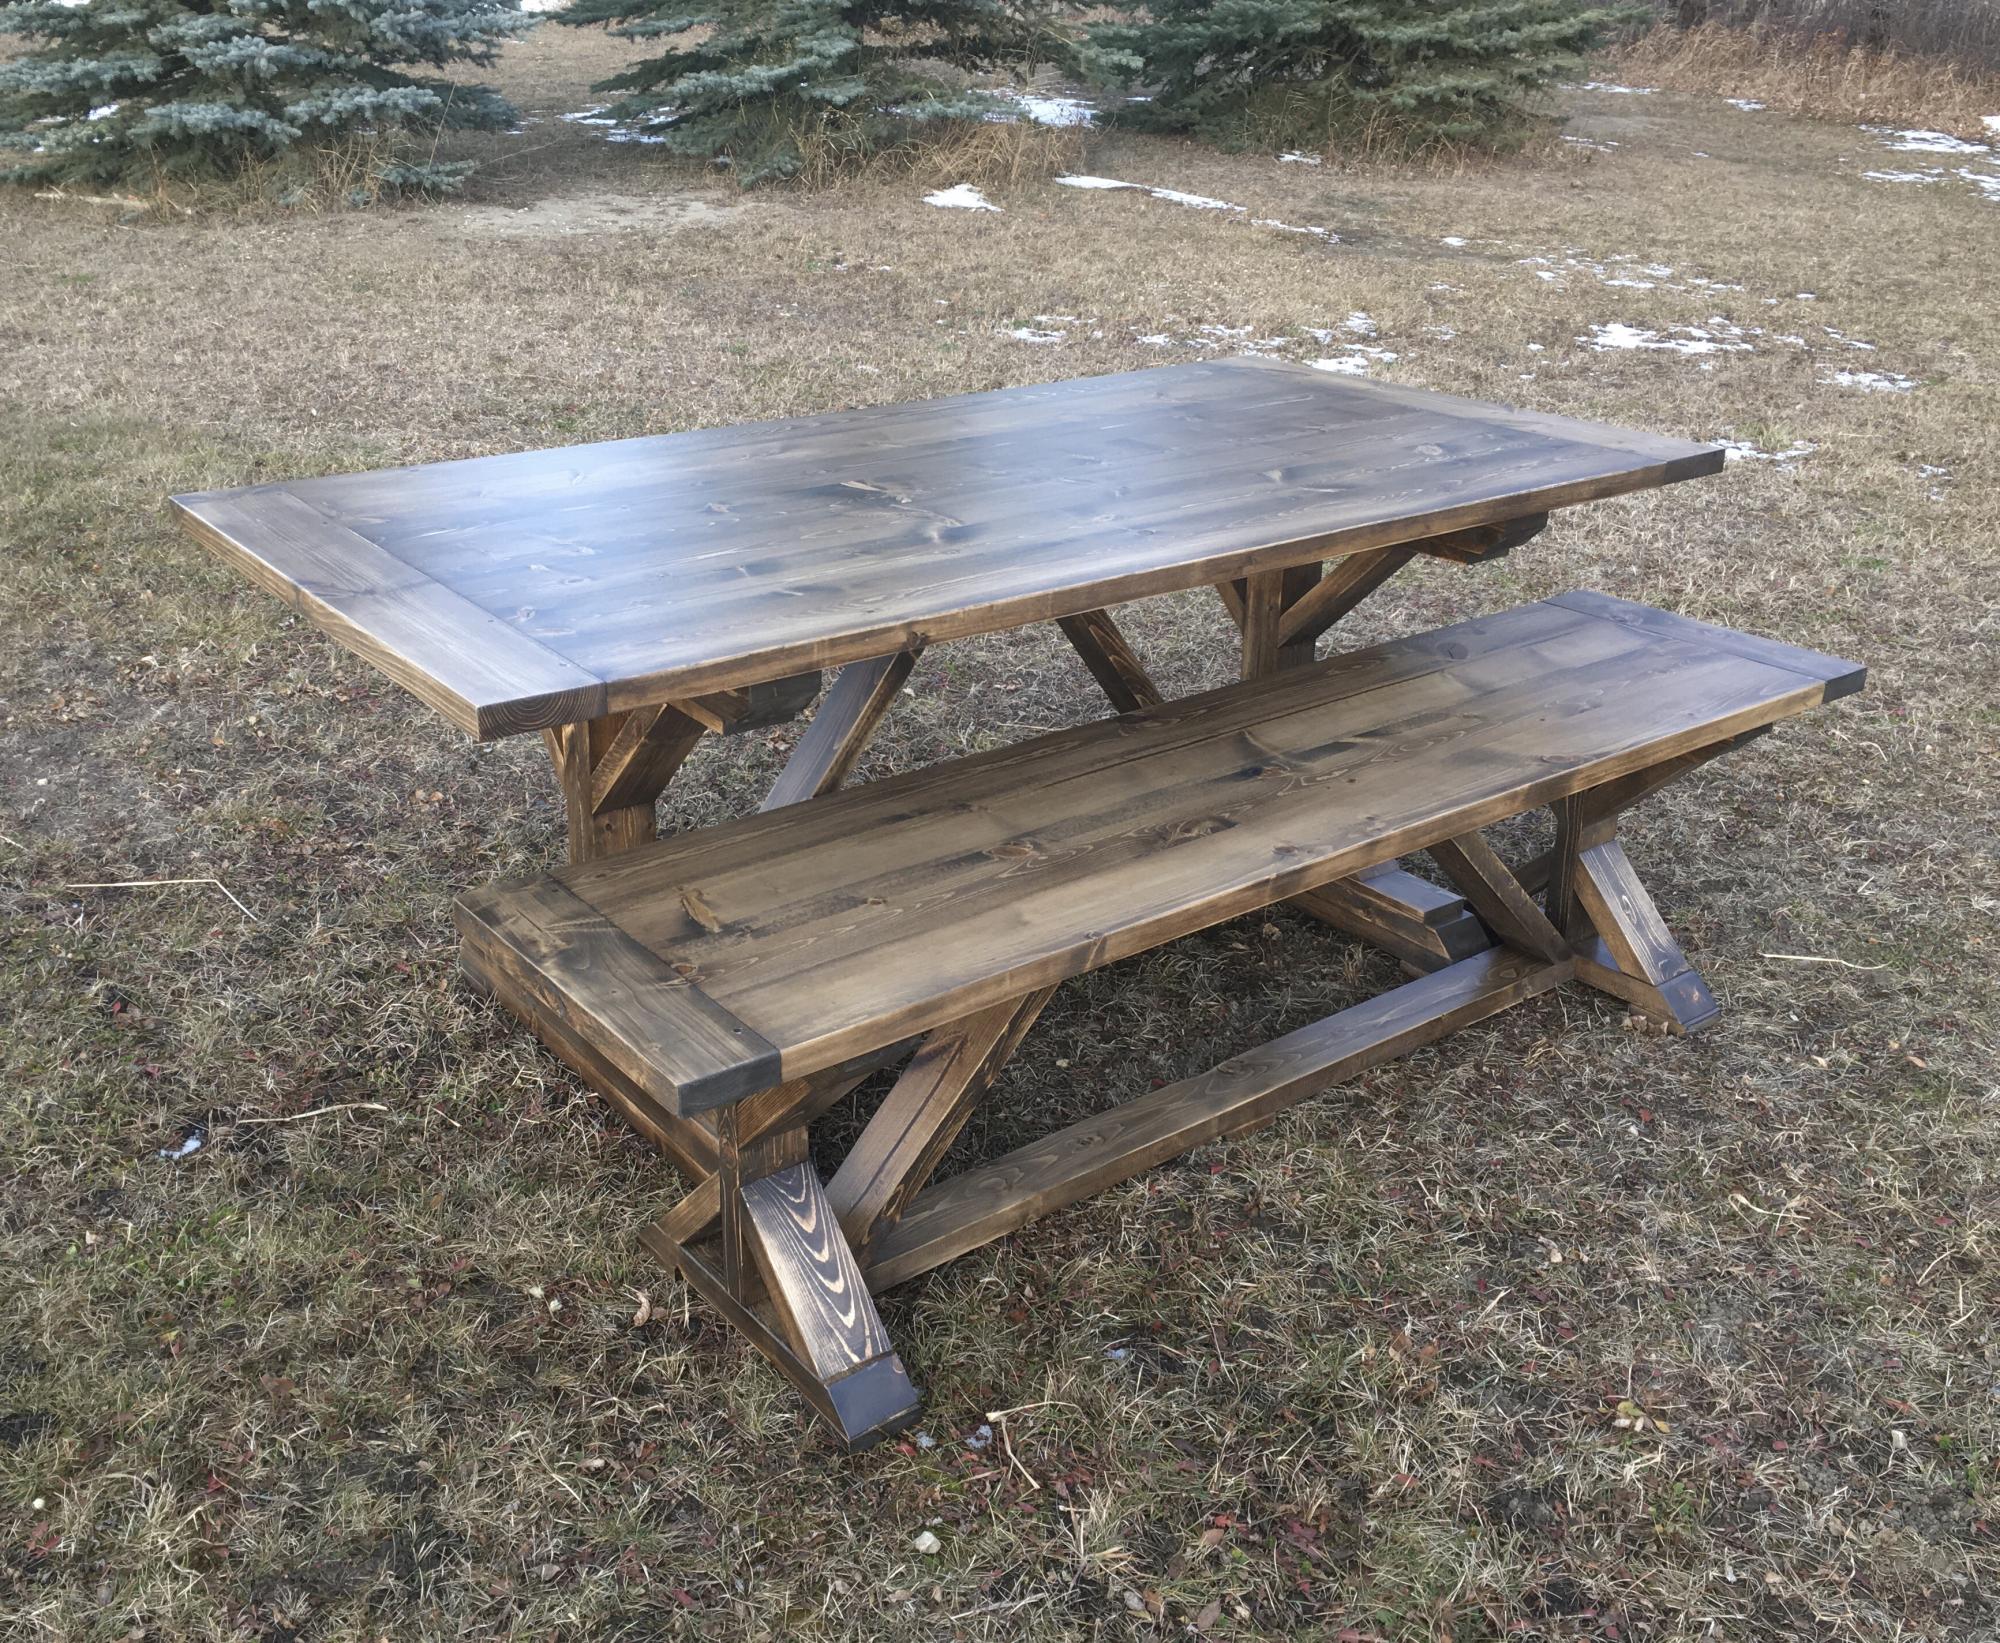
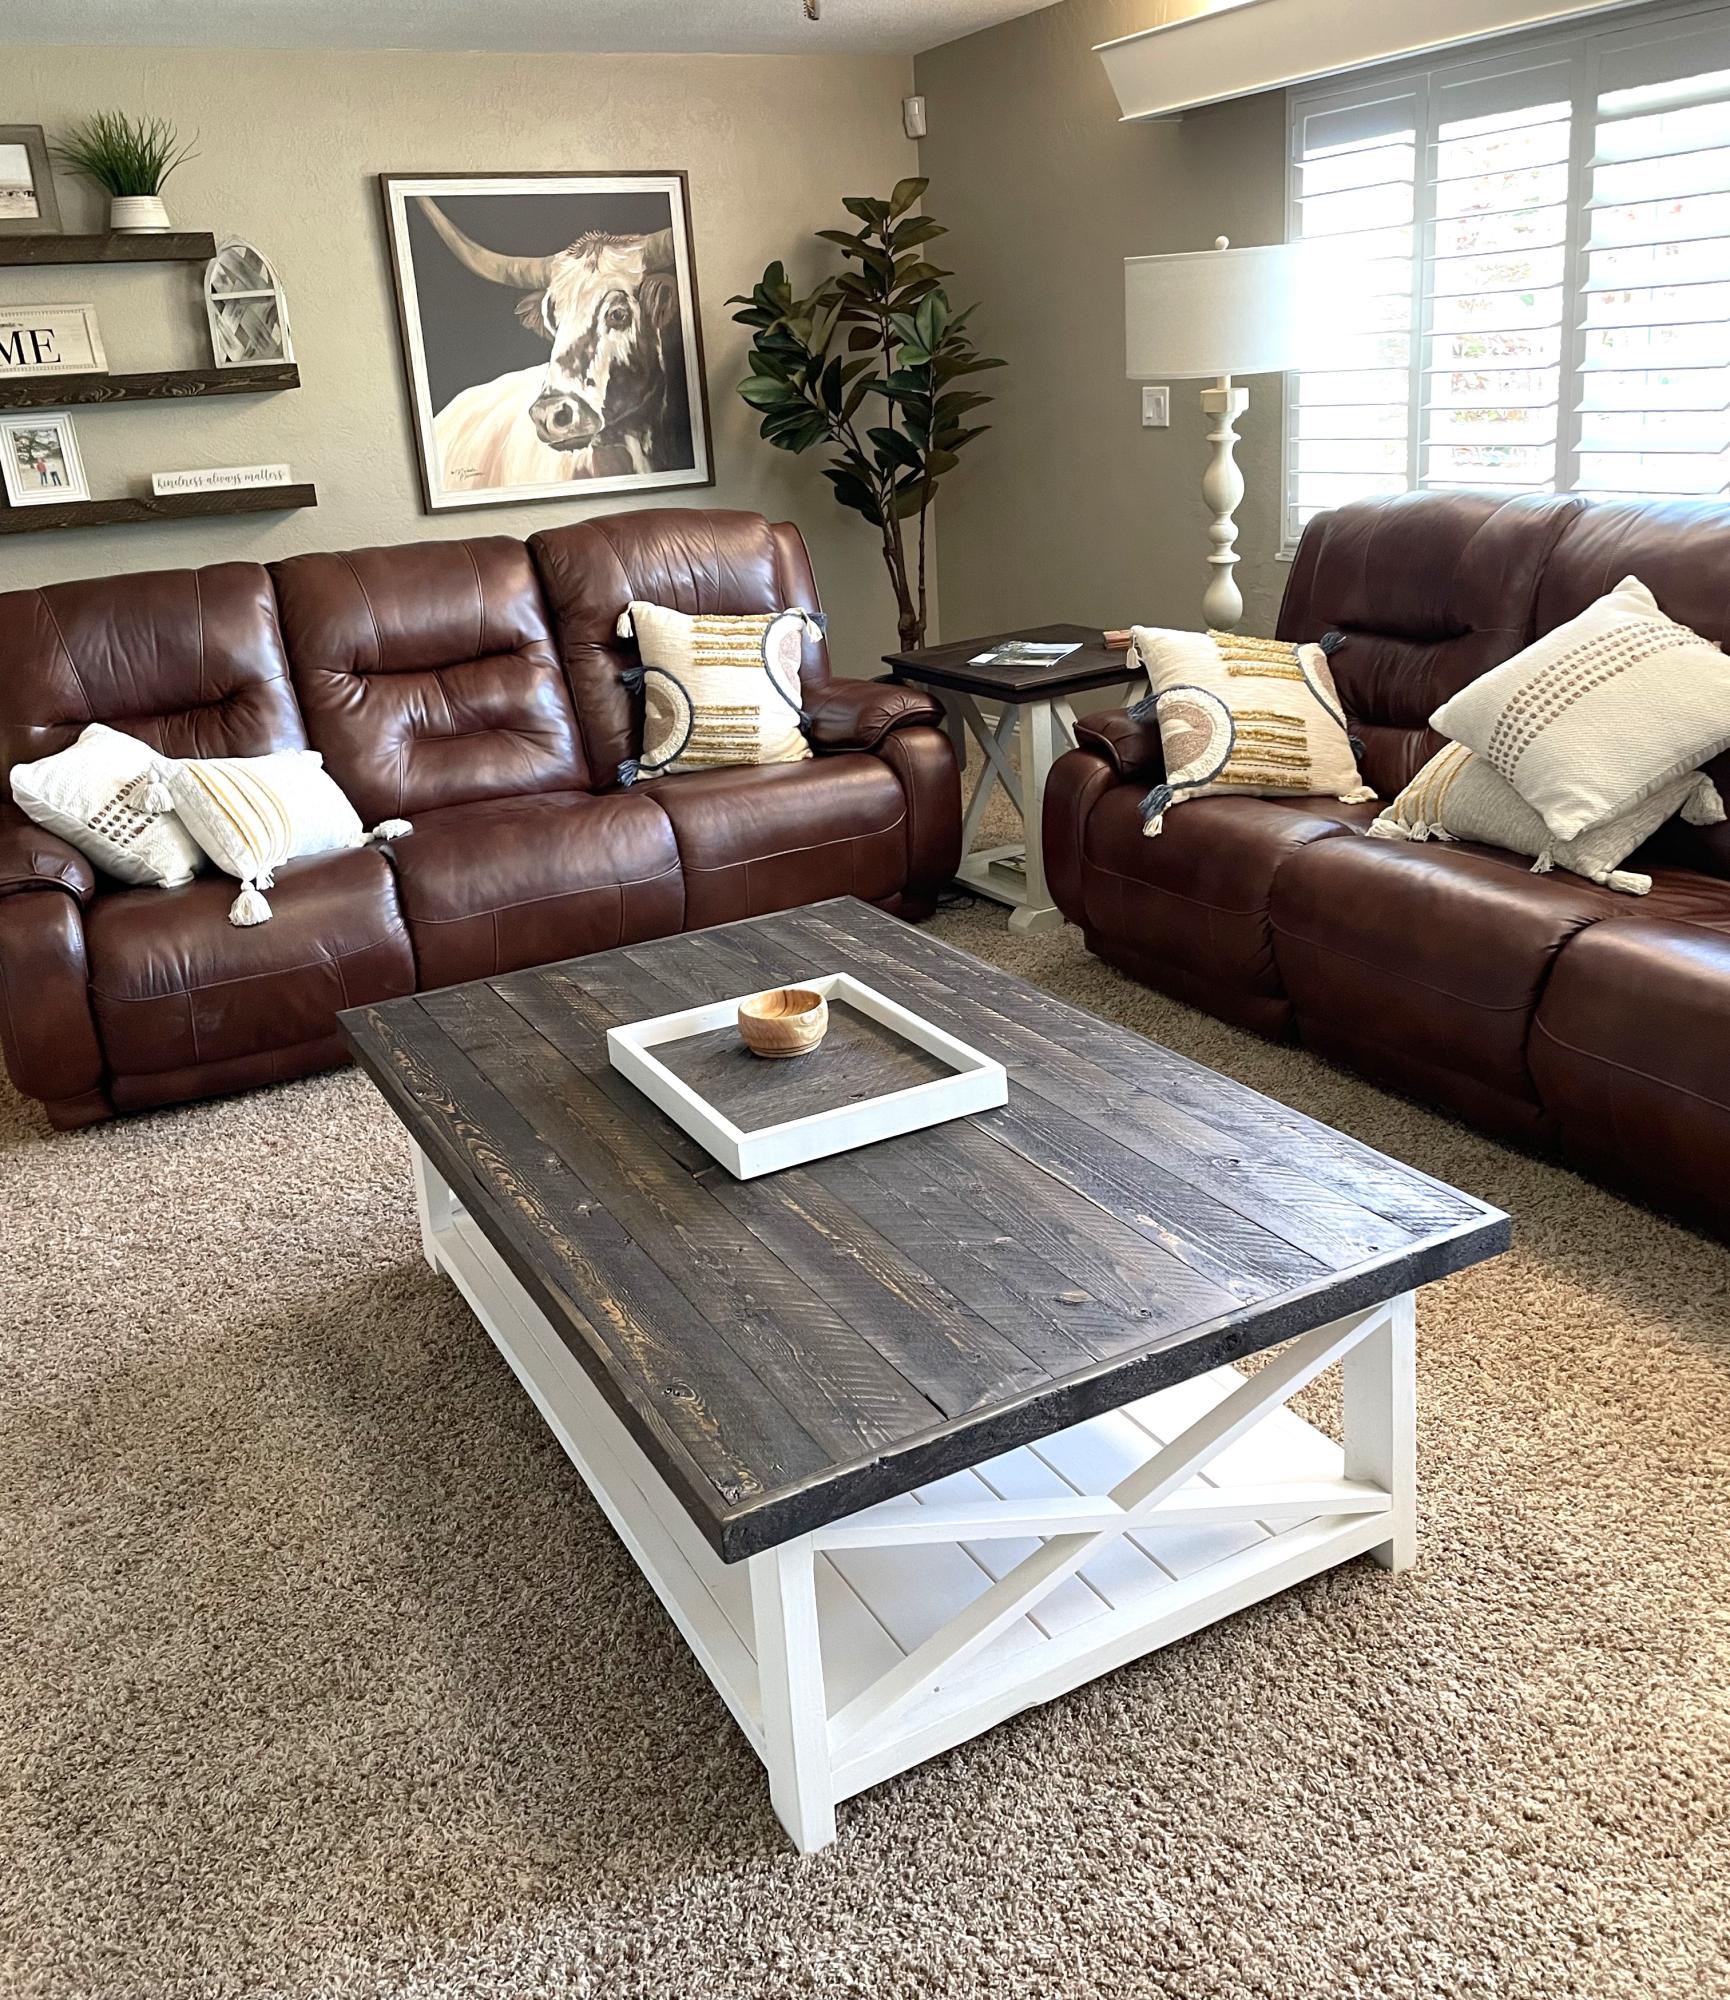
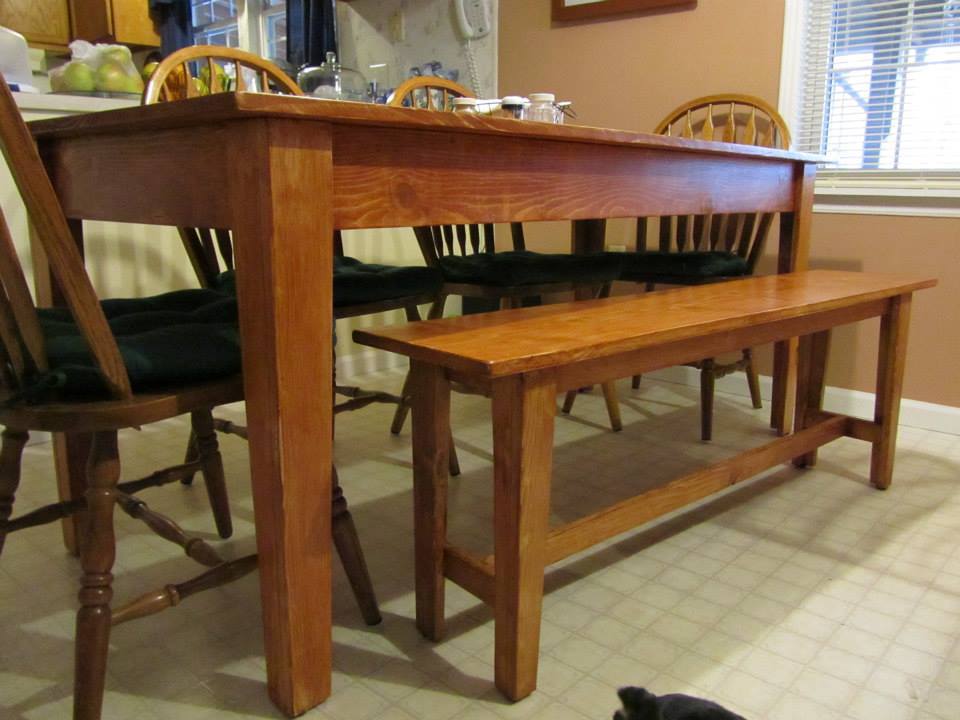
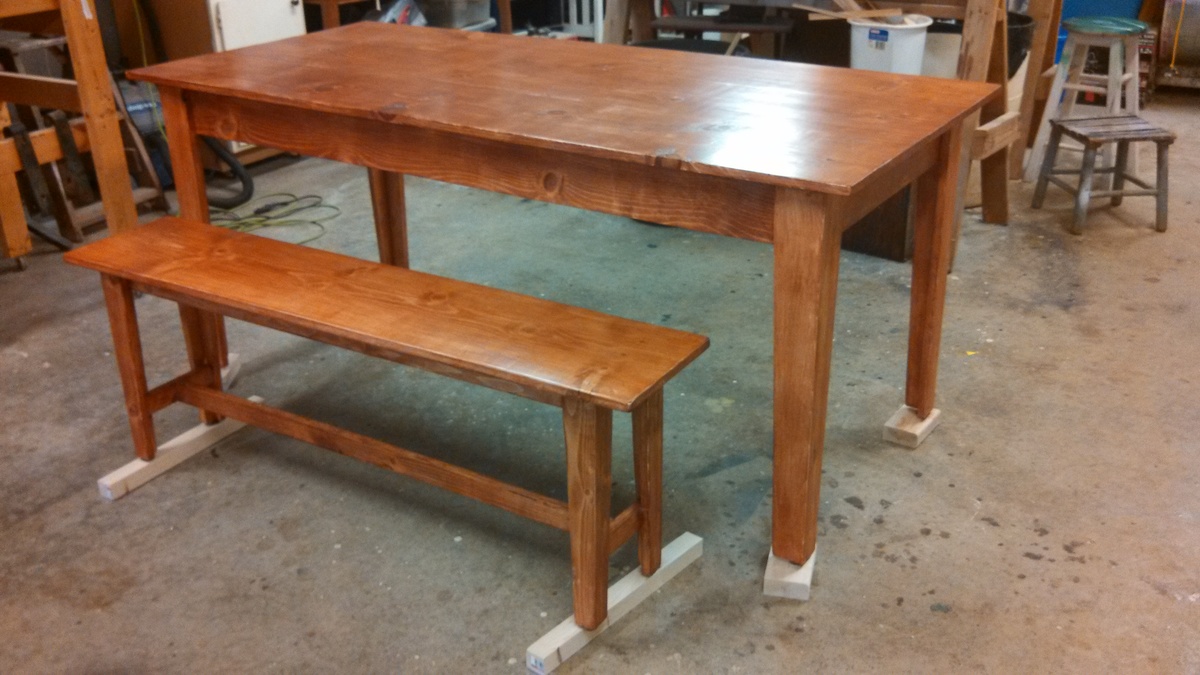
Narrow Farmhouse Table

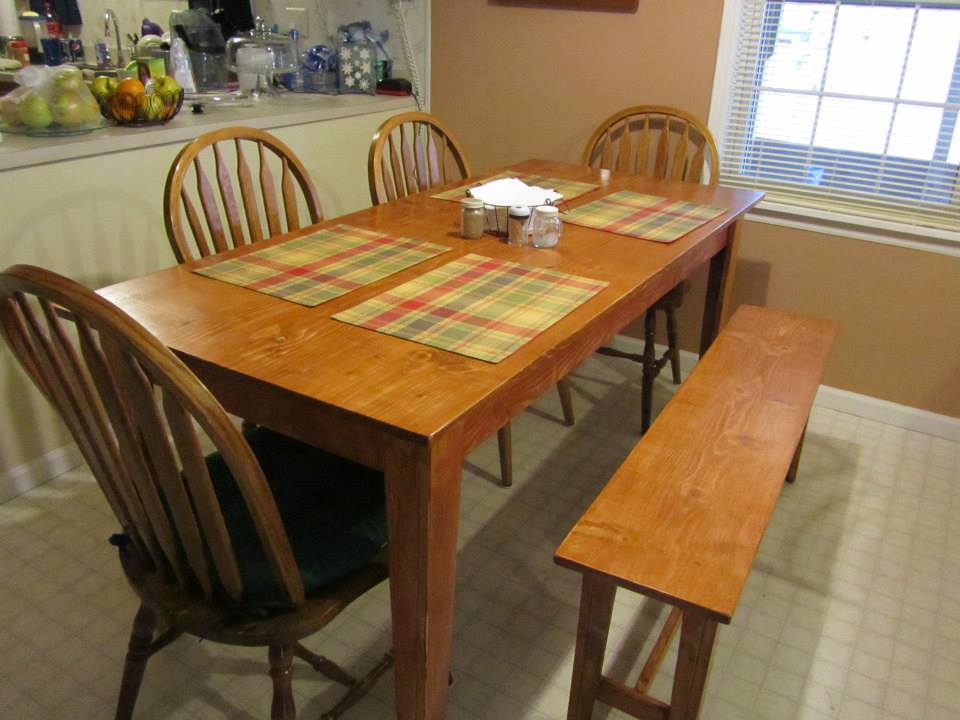
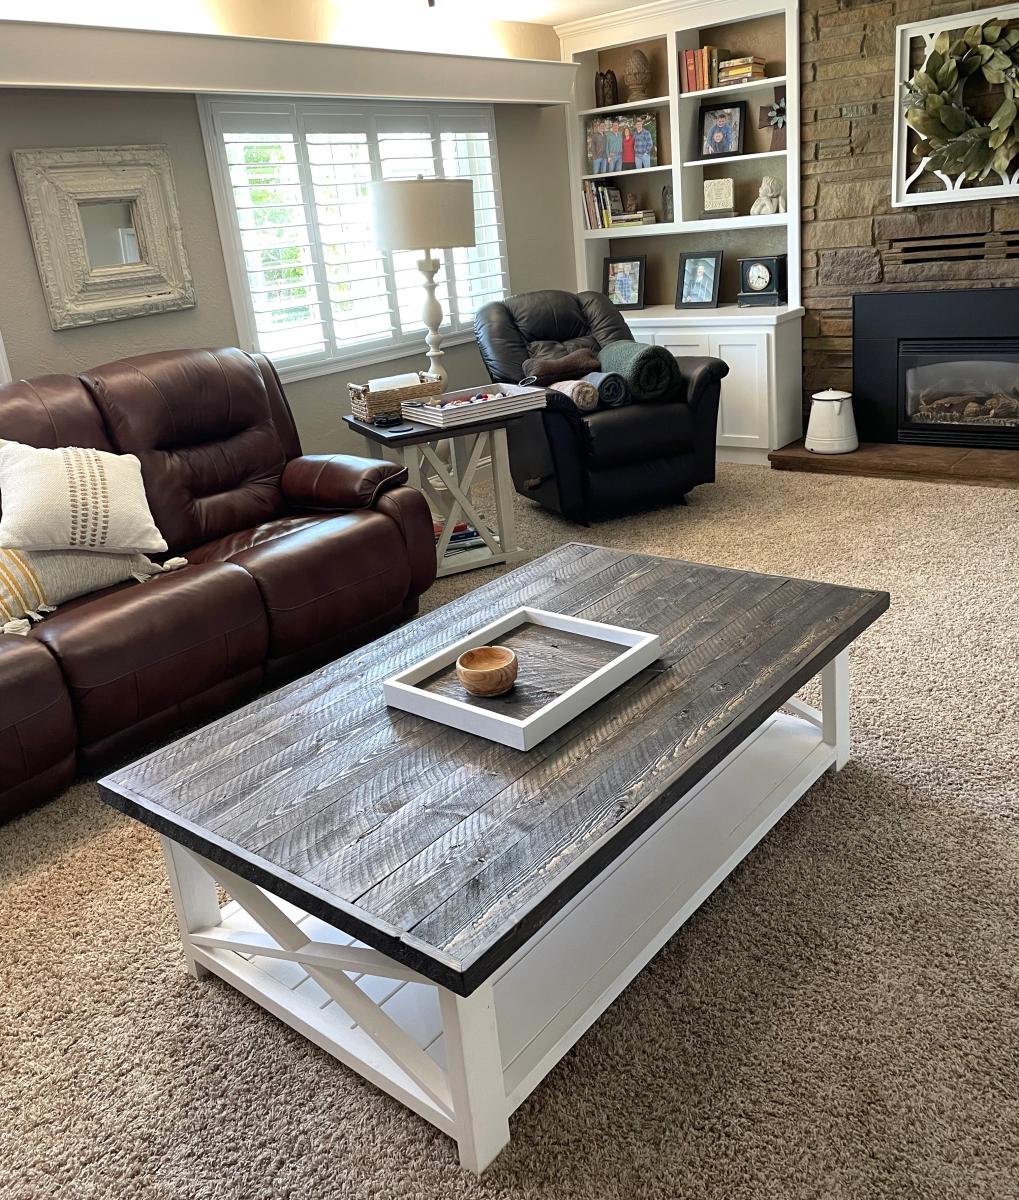
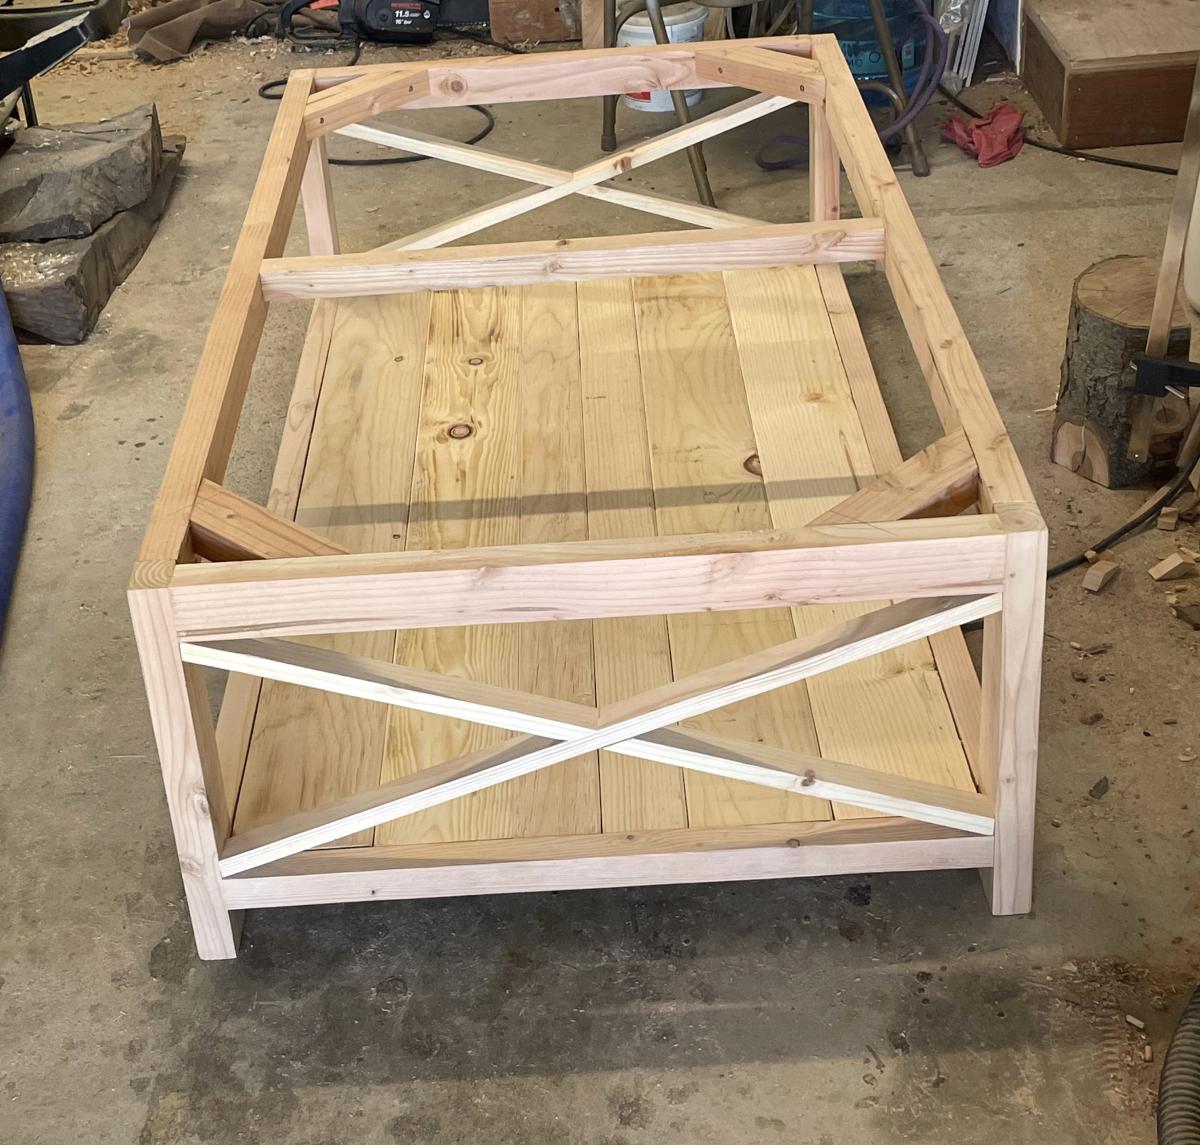
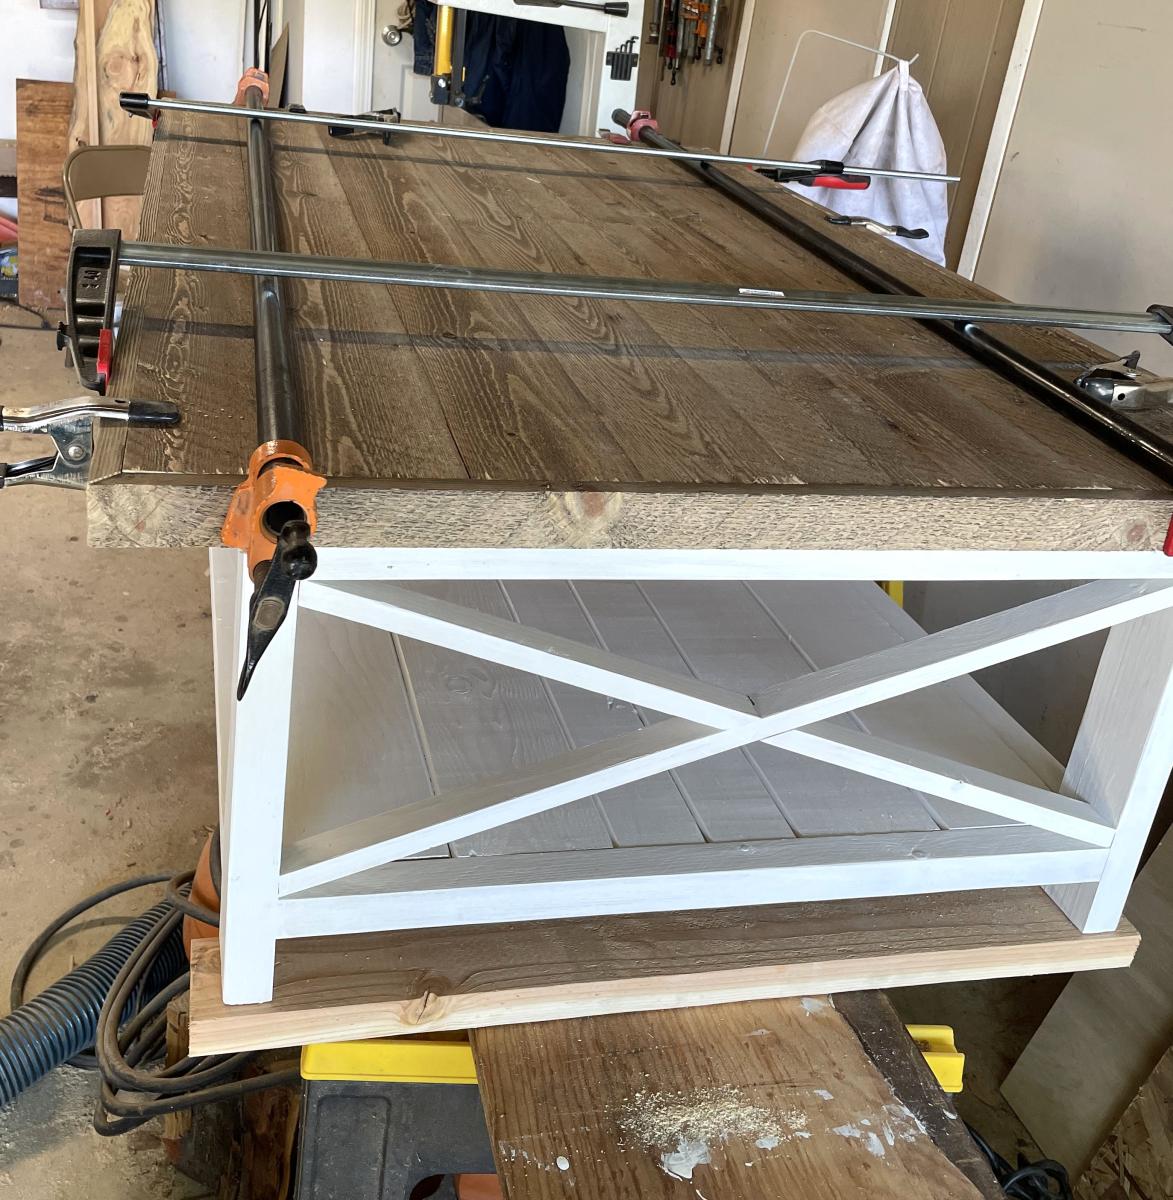
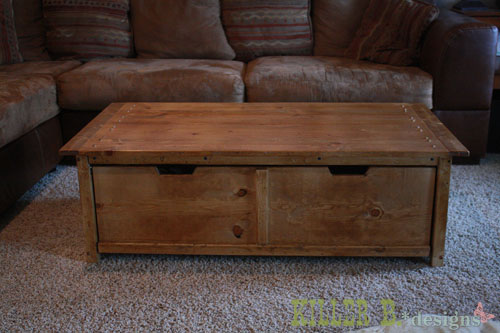
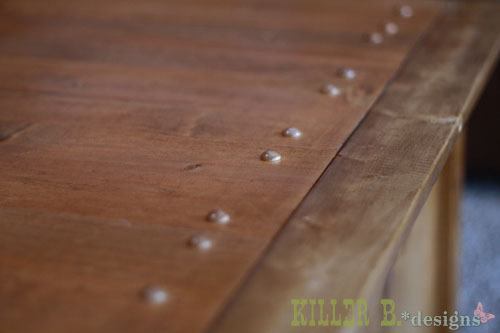
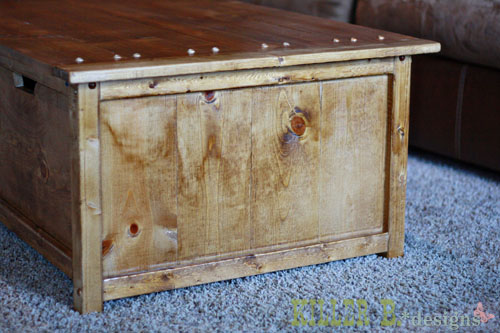
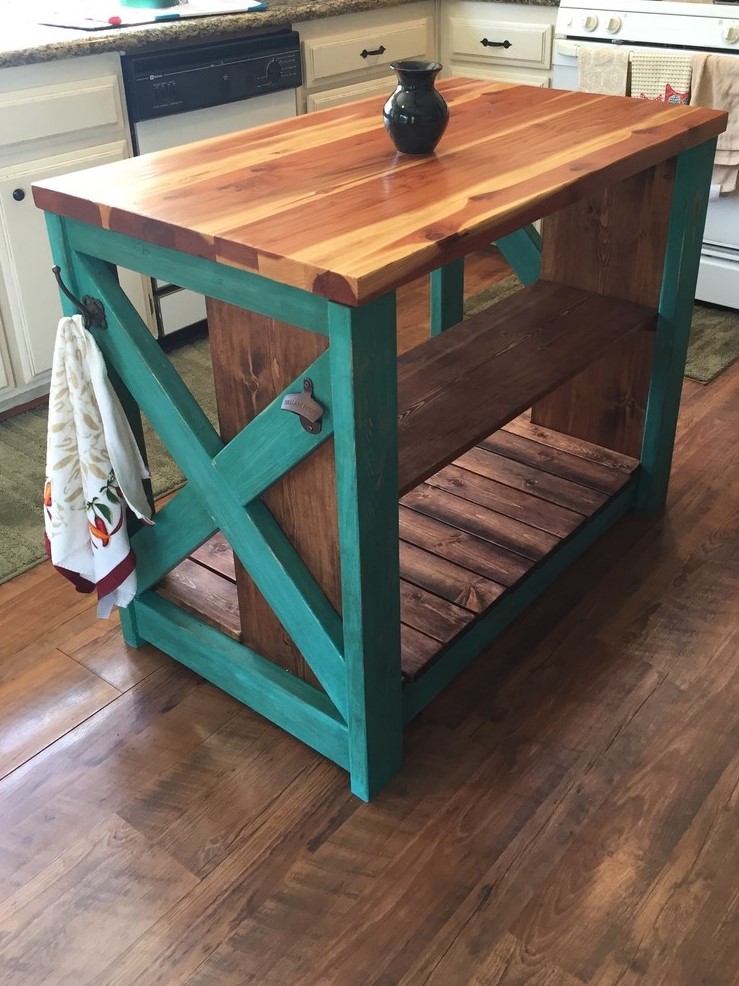
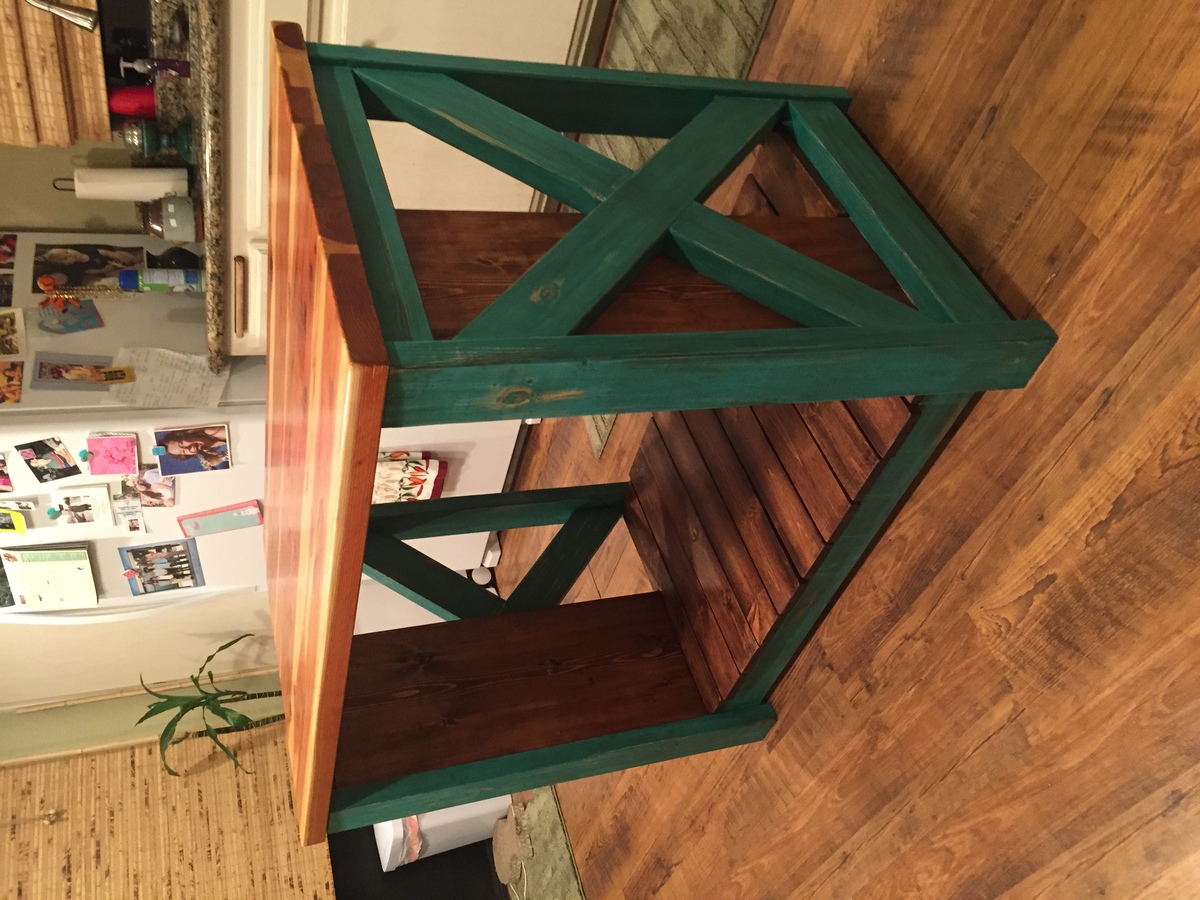
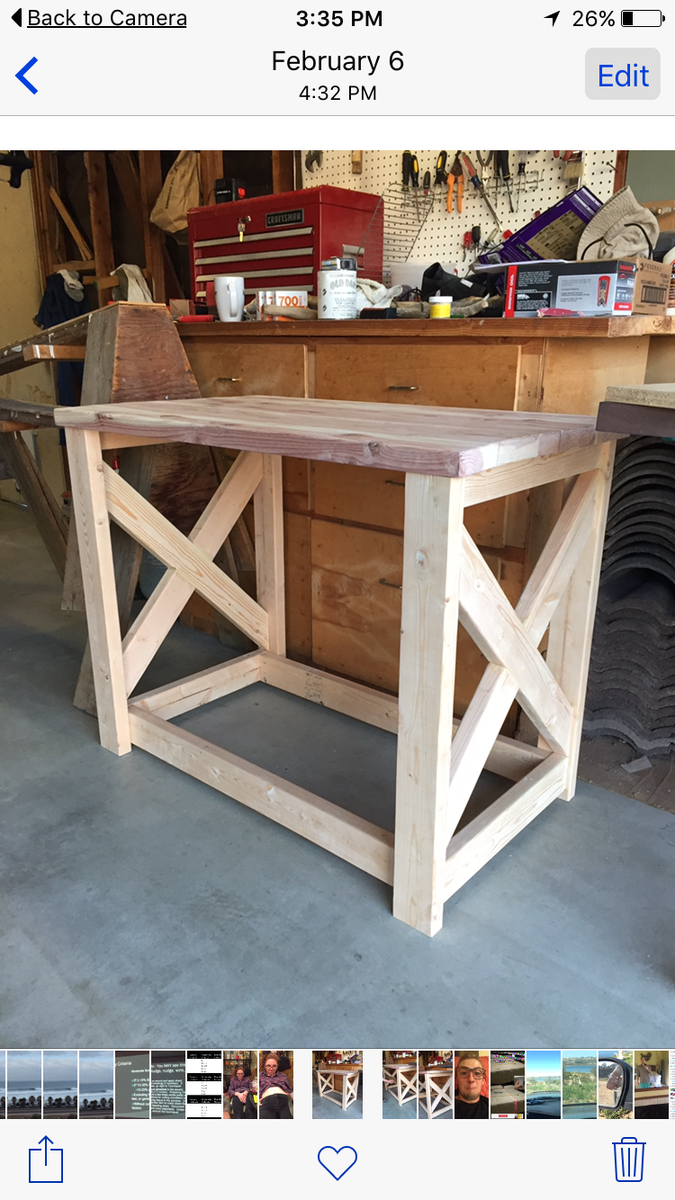
This is a narrow farmhouse table that I was asked to build for my neighbors. The plan was very easy to follow and didn't take long to do at all. I used 1x12x8' shelving board from the local home improvement center for most of the application. When mating the top together, I used a biscuit joiner, (aside to what the plans called for), for added strength. Also, I remember from years back that you should alternate the "rings" in the lumber to prevent bowing. This gave me a smooth, level table top without using a planer. Using the shelving board made this table very light, I love this table!!

Built from Plan(s)
Estimated Cost
less than $100.00
Estimated Time Investment
Weekend Project (10-20 Hours)
Finish Used
Cabot Stain with sealer - gingerbread. Used a brush to put it on, but recommend a foam brush. Do not wipe on with a rag. I sanded, (used 220 grit sandpaper), after drying to give it the distressed look. I applied 2 coats of Minwax Polycrylic for the finish.
Recommended Skill Level
Beginner

Clubhouse Bed

Submitted by Anonymous (not verified) on Thu, 03/17/2016 - 15:47

This is my version of the clubhouse bed that i made for my 4yr old son.

Estimated Time Investment
Week Long Project (20 Hours or More)
Finish Used
400$
Recommended Skill Level
Intermediate

Farmhouse Medicine Cabinet

Submitted by Anonymous (not verified) on Tue, 10/29/2019 - 03:42

Farmhouse Medicine Cabinet with barn door

Estimated Cost
$130
Estimated Time Investment
Afternoon Project (3-6 Hours)
Recommended Skill Level
Intermediate

Garden Bench from Recycled Materials

Submitted by Anonymous (not verified) on Fri, 07/14/2023 - 12:49

Built this garden bench all from recycled fencing materials. I didn't want the wood to go to waste, so I've been reusing all of it on garden and outdoor yard projects.


Kathllen Graham

baby changing station

Submitted by nermin on Mon, 03/05/2012 - 19:34

Thx for the plan Ana. I modified it slightly to make it a bit different but realy loved you plans.

Built from Plan(s)
Estimated Time Investment
Week Long Project (20 Hours or More)
Recommended Skill Level
Beginner

Comments

dama

Tue, 08/14/2012 - 16:29

I would like to know where did you get the instructions for the HUTCH on the Madeline changing table plan I can not find it on Ana Whites plans

Sweet Pea Bunk Beds

After yet another move (this time to Monterey, CA) and with a baby on the way, it was time to build the girls some big-girl beds of their very own. I was going to need to re-convert their double bed back into its original crib form by September, so in June, I started looking for plans. When I stumbled on Jenny's "Sweet Pea" bunk beds, I knew I'd found a winner! She also made it sound so easy, and I'd only assisted my dad on remodeling projects, never built anything from scratch. But I was familiar with the tools and terminology, so six months pregnant and in a serious nesting phase, I got to work. My hubs helped with the heavy lifting and I had some friends assist with sanding and priming -- many hands do indeed make light work! It took just under a month working four to six hours a day (on average), five to six days a week. I used screws for EVERYTHING, as this baby has to come apart easily for future moves (and does it ever -- Jenny's not kidding when she says you can have it up and down in ten minutes!). I'm most proud of the roof -- I had originally planned on finding real cedar shingles, but those babies are expensive! So I came up with idea of using door shims. A pack of 12-15 is only a couple bucks, and it took about 24 packs to cover the entire roof. I found some light wood trim and glued/screwed it to the edges, slathered on some pink paint, and voila! A wood shingle roof! The whole project ended up costing nearly double what I'd originally budgeted, but I'm so happy with it and my girls love it so much that I don't really care. Plus, if I'd had this baby custom made, it would probably have cost quadruple (at least!) what I paid in building materials. Let me know if you have any questions -- I'm happy to share what (little) I know :)!

Estimated Cost
$1100
Estimated Time Investment
Week Long Project (20 Hours or More)
Finish Used
Indoor Latex Paint, Satin Finish (Behr brand) -- I took the original author's advice and bought pint and sample-sized cans, letting my girls choose the color scheme. In order to prevent knots from showing through, I pre-treated everything with a single coat of Killz primer -- this allowed me to only have to use a single coat of paint for some surfaces.
Recommended Skill Level
Beginner

Comments

birdsandsoap

Thu, 01/02/2014 - 01:16

Awww...This is so SWEET! You did such a great job- the roofing is ingenious! I wish I had thought of that! And you are right, wood shingles cost a fortune. You came up with such a clever way around it! Love how your bed turned out, I'm sure your girls feel like little princesses!

thomen

Wed, 04/09/2014 - 15:35

hi do you happen to havea copy of the plans the pdf link is broken and id love to build thr bed for my daughter

Bountiful Acre

Mon, 05/19/2014 - 14:51

This is marvelous! My husband says this is the best he's ever seen and wants to do exactly this. You have a designer's eye. The paint pallette is very pleasant. Can you tell us the specific color names of each paint you used and where you used it?

Did you use stencils to paint the flowers, etc? If so, where did you buy them from?

Also, where did you get the lights and what are they called specifically?

Thank you so much!!!

sarathurgood

Mon, 05/19/2014 - 16:23

Thanks for your kind words! I do not know the exact names of the paint colors I used -- they were sample cans, by Behr. The cream color was actually a very pale yellow, though. I free-handed the green on the drawers, and the flowers are actually made of wood and came from Michael's (in the craft department, where they keep wooden letters and stencils). The lights are oriental paper lights, and I got those at Ace Hardware. Hope this helps!

Fancy X farmhouse table and bench

Submitted by Anonymous (not verified) on Wed, 10/30/2019 - 21:34

These plans were a lot of fun, easy to follow and I love all the layers!! I changed the direction of the bracing under the table and used a thicker beam along the floor. For the bench I decided to use only two legs so I did them in a thicker look to match the table.

Estimated Cost
$170 lumber/stain/clear
Estimated Time Investment
Week Long Project (20 Hours or More)
Finish Used
2:1 ratio minwax dark walnut and weathered oak. I let it dry then sanded in areas and added a coat of weathered oak.
Recommended Skill Level
Intermediate

Simplified Farmhouse Doll Bed

I love Ana's farmhouse doll bed. But I've made a couple beds/cribs, and I know how tedious it can be to make the slats, so I cheated and used a 1x6 across the headboard instead of the slats and a 1x3 (turned lengthwise) for the footboard. :) It was a gift for my daughter's friend who is using it for a stuffed animal, so we made it more narrow as well. Details on the changed dimensions can be found on my blog.

Estimated Cost
$1-6 depending on scraps you have around
Estimated Time Investment
An Hour or Two (0-2 Hours)
Finish Used
Zinsser primer, semi-gloss latex paint, and polyacrilic topcoat.
Recommended Skill Level
Beginner

First Project and PUMPED!!

Submitted by FongerB on Fri, 01/03/2014 - 07:57

This was my first project ever and I'm so excited how well it turned out!! However, I did modify the length and height for my space. The table is 40" long and 33" tall. The finish is Benjamin Moore Tawny Day Lily (awful name) with their high gloss wood finish. Thank you Ana!! You made this project seem easy and now I'm excited to build more!

Estimated Cost
40$
Estimated Time Investment
Afternoon Project (3-6 Hours)
Finish Used
Benjamin Moore Tawny Day Lily (3 coats) + Benjamin Moore High Gloss wood finish (2 coats)
Recommended Skill Level
Beginner

Comments

Washer/Dryer Pedestals with slight modifications

Submitted by Anonymous (not verified) on Tue, 03/22/2016 - 09:35

I similarly was looking for something to store laundry baskets underneath and didn't want to shell out $500+ for pedestals that were less functional. Without being particularly handy, this was a relatively easy DIY project that turned out great. Adding the baseboard trim made a big different in the overall look and the dark paint to match our cabinets helped in pulling it all together. We made the height 12" (instead of 11") for the storage component and cut the width by 2 inches to allow room for the baseboard trim to wrap around the side. Otherwise it was built the same as the original design without the extra trim.

Estimated Cost
~$200
Estimated Time Investment
Weekend Project (10-20 Hours)
Recommended Skill Level
Starter Project

Simple Panel King Bed

Submitted by Bradnag on Sun, 11/03/2019 - 09:43

Needed a quick and simple plan for a new king frame, so I went with the simple panel bed. Stuck mostly to Ana's directions, but used pocket holes on the back of the headboard to get the 1x8's really tightly flush against each other. Since I was assembling it myself I definitely followed Ana's tip about cutting some spacers to prop up the sideboard while securing them to the headboard. Even with as minimal as these plans are, the bed is pretty heavy and very sturdy.

Estimated Cost
75.00
Estimated Time Investment
Weekend Project (10-20 Hours)
Finish Used
Minwax Polyshades
Recommended Skill Level
Intermediate

Tidy Up Coffee Table

Finished our tidy up table! A couple of tweaks: I didn't want to kreg jig the boards together because I have a tendency to split 1x's when using a lot of joins. I tried drilling from below, but the 2x2 furring strips were so soft that I couldn't get my warped 1x6's to suck down without the screws popping through, even when changing to 1 1/4" ones. So, I countersunk two holes on each end of each board, and used 3/8" buttons to fill them to provide a decorative element. I LOVE THEM! Not only are all my boards flush, but the top is now so pretty. I secured the middle by screwing in from below with 2" screws, but since I didn't need to make them so tight to get my boards flush they no longer popped out. I hope that makes sense.

Also, the sides are pretty wobbly without the trundle in there, so my husband suggested adding L brackets to each corner. Success! It's now solid as a rock. We screwed in from the outside and filled with more buttons. For those of you who don't like the raised look, they also have flat button hole plugs. They take stain so much better than wood putty.

Lastly, I chose 1 5/8" casters that move in all directions. Bad idea. It gives the proper 2" height, but makes the trundle difficult to maneuver. Going to try and find some fixed-side one-way casters to replace them. Other than that, it's fantastic!

Estimated Cost
$85 (includes lumber, plugs, brackets and casters)
Estimated Time Investment
Weekend Project (10-20 Hours)
Finish Used
We used my Husky air brushing system for the first time, with Rustoleum Ultimate Stain in Golden Oak. I love this stain because I've never had to wipe it off, and it gives a very even, rich finish. This is the first time I used an air compressor with sprayer for stain, and it was so easy. 10 minutes and I've got an even coat on both the top and trundle. I followed it up with 3 coats of poly on exterior and interior. Will probably add a few more coats on just the top for added protection.
Recommended Skill Level
Beginner

Comments

Bunnie1978

Tue, 03/13/2012 - 13:42

OK, I'm curious... tell me all about it. :)
I love the buttons, they are adorable. The finish does look very natural and charming.

Queen Size Farmhouse Bed

Submitted by Koji on Sun, 01/05/2014 - 12:09

Started off as the rustic farmhouse bed, but I couldn't help adding bits to it - dentil moulding, panels on the headboard and footboard.

Estimated Time Investment
Week Long Project (20 Hours or More)
Finish Used
Minwax Special Walnut over minwax stain base. Helps to keep the staining to a minimum with less soaking in and dark spots.
Recommended Skill Level
Intermediate

Good ol kitchen island

Submitted by Anonymous (not verified) on Sat, 03/26/2016 - 17:22

I saw the plans for this project and decided I wanted to do something of the sort. I tweaked the plans a bit and made it longer and took out the drawer. My favorite part about it is Annie sloans chalk paint. Look into it, it's great stuff. 

Estimated Cost
200$
Estimated Time Investment
Week Long Project (20 Hours or More)
Finish Used
Polyurethane, Annie Sloan waxing paint, cherry stain. To get the rustic color Google Annie Sloan, she has a ton of YouTube videos.
Recommended Skill Level
Intermediate

Recycled pallet crates

Submitted by tull0032 on Sat, 03/17/2012 - 07:18

I had some left over pallets from another project I was doing and decided to make some recycled wood planter boxes to liven up our decking area. The whole project only took a few hours to make both boxes and used entirely reclaimed pallet wood aside from the two end pieces.

Estimated Cost
$3
Estimated Time Investment
An Hour or Two (0-2 Hours)
Finish Used
Sanded back pallet wood
Recommended Skill Level
Starter Project

Comments

Customized Hailey storage bed

I got tired of the aluminum framed bunk beds in my kids room, and wanted to build something they can enjoy for years to come.

My 7 year old didn't have the luxury of one of our dogs jumping up on his bed, as he was on the top bunk, and my wife and I didn't interact with him as much as we would have liked during his reading time prior to bed.

Only one thing to do....build the boys some beds. Although they have a little less room in their bedroom, they have their own individual beds and storage nooks.

In an effort to reduce wasted space, I took a similar page out of birdsandsoap's book by hinging the footboard to create easy access to the void under the slats.

The head and footboards were 'tiled' by simply cutting 1x2 and 1x3 pieces and attaching them with wood glue.

Between the sanding, staining, and poly coats, it took about a week (on and off) to complete the set, but overall am very happy with the finished project.

Only 1 bed is included in the pics, as the other one is identical.

Built from Plan(s)
Estimated Time Investment
Week Long Project (20 Hours or More)
Recommended Skill Level
Beginner

Comments

Knot Good with Wood

Thu, 01/09/2014 - 04:05

I was unsure exactly how I wanted to design and finish, so I just looked through tons of brags on here. I think they are very cool now that they are done, and my kids end up using the hinged footboard to gain access to build small forts.....

Thanks for the great feedback!

handcrafted amish style side table

Submitted by Anonymous (not verified) on Tue, 03/29/2016 - 10:46

Handcrafted amish side table. Easy to do

Estimated Cost
$25.
Estimated Time Investment
Afternoon Project (3-6 Hours)
Finish Used
Provincall stain and black satin paint
Recommended Skill Level
Intermediate

Comments

rburmania

Tue, 03/29/2016 - 11:29

i also do these table completely stained, i would love to do some beautiful stuff for anyone. We do shipping if you would like, please check out our facebook page R&L Custom Creations of West Michigan

Rustic X coffee table

Submitted by LampAtFeet on Fri, 11/22/2019 - 13:57

I built this coffee table for my son's first apartment, along with the rustic X end table. It's a very sturdy table and the plans were easy to follow! It's so much fun being able to build my kids furniture!

Built from Plan(s)
Estimated Cost
$50
Estimated Time Investment
Afternoon Project (3-6 Hours)
Finish Used
Dark Walnut stain, then a coat of satin wipe on polyurethane to seal it.
Recommended Skill Level
Intermediate
Back