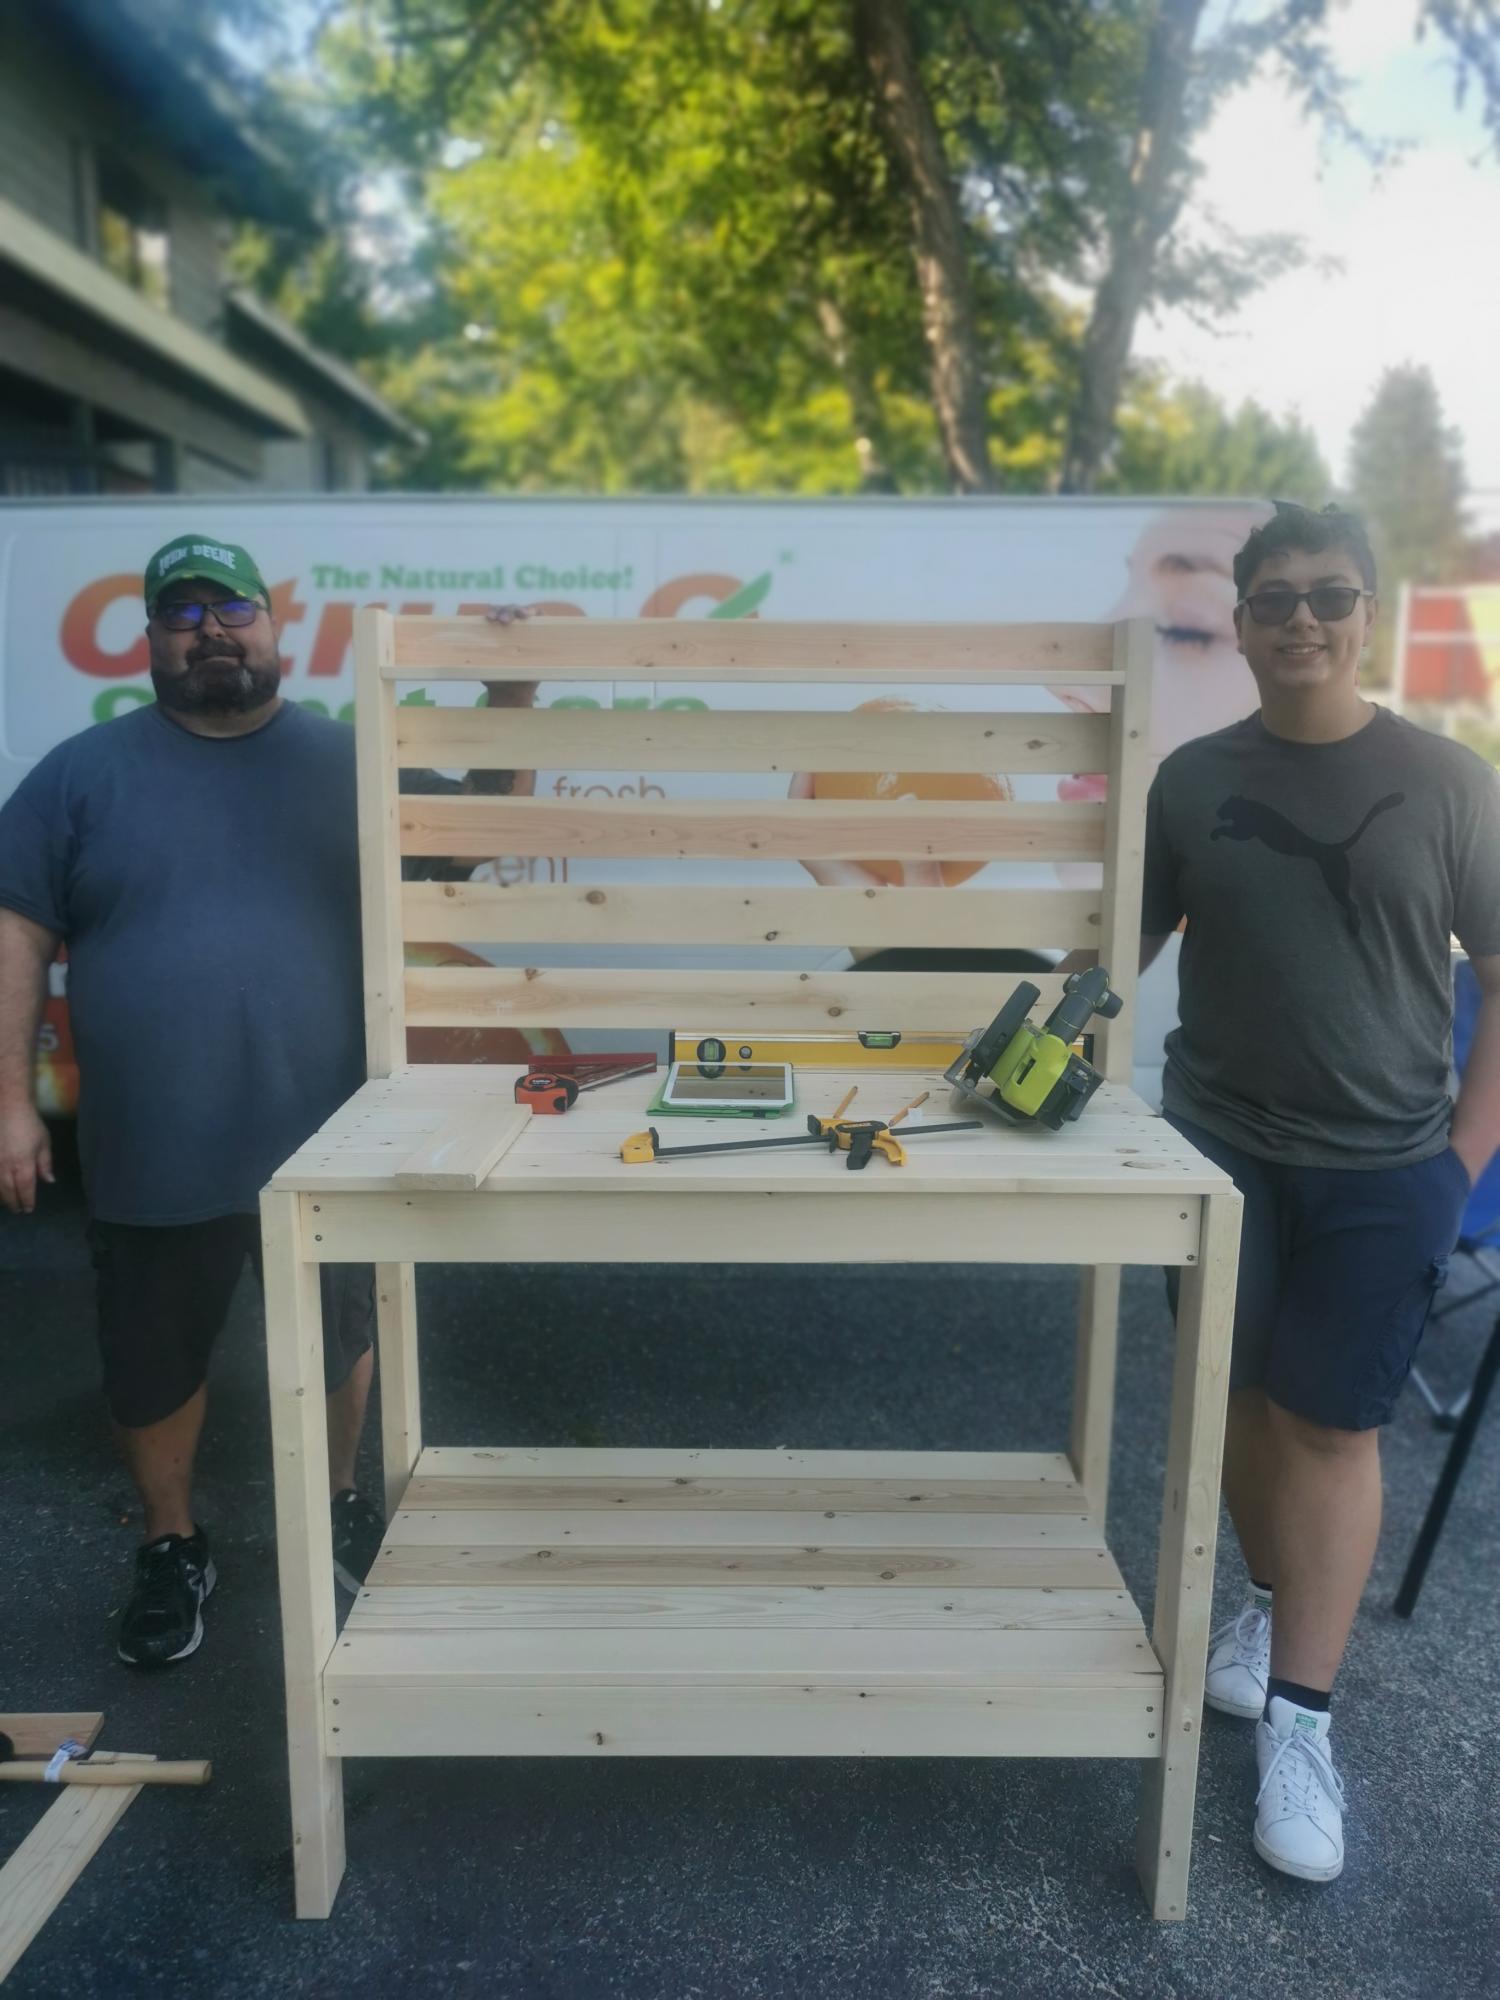
Kids Picnic Table from Scrap Wood
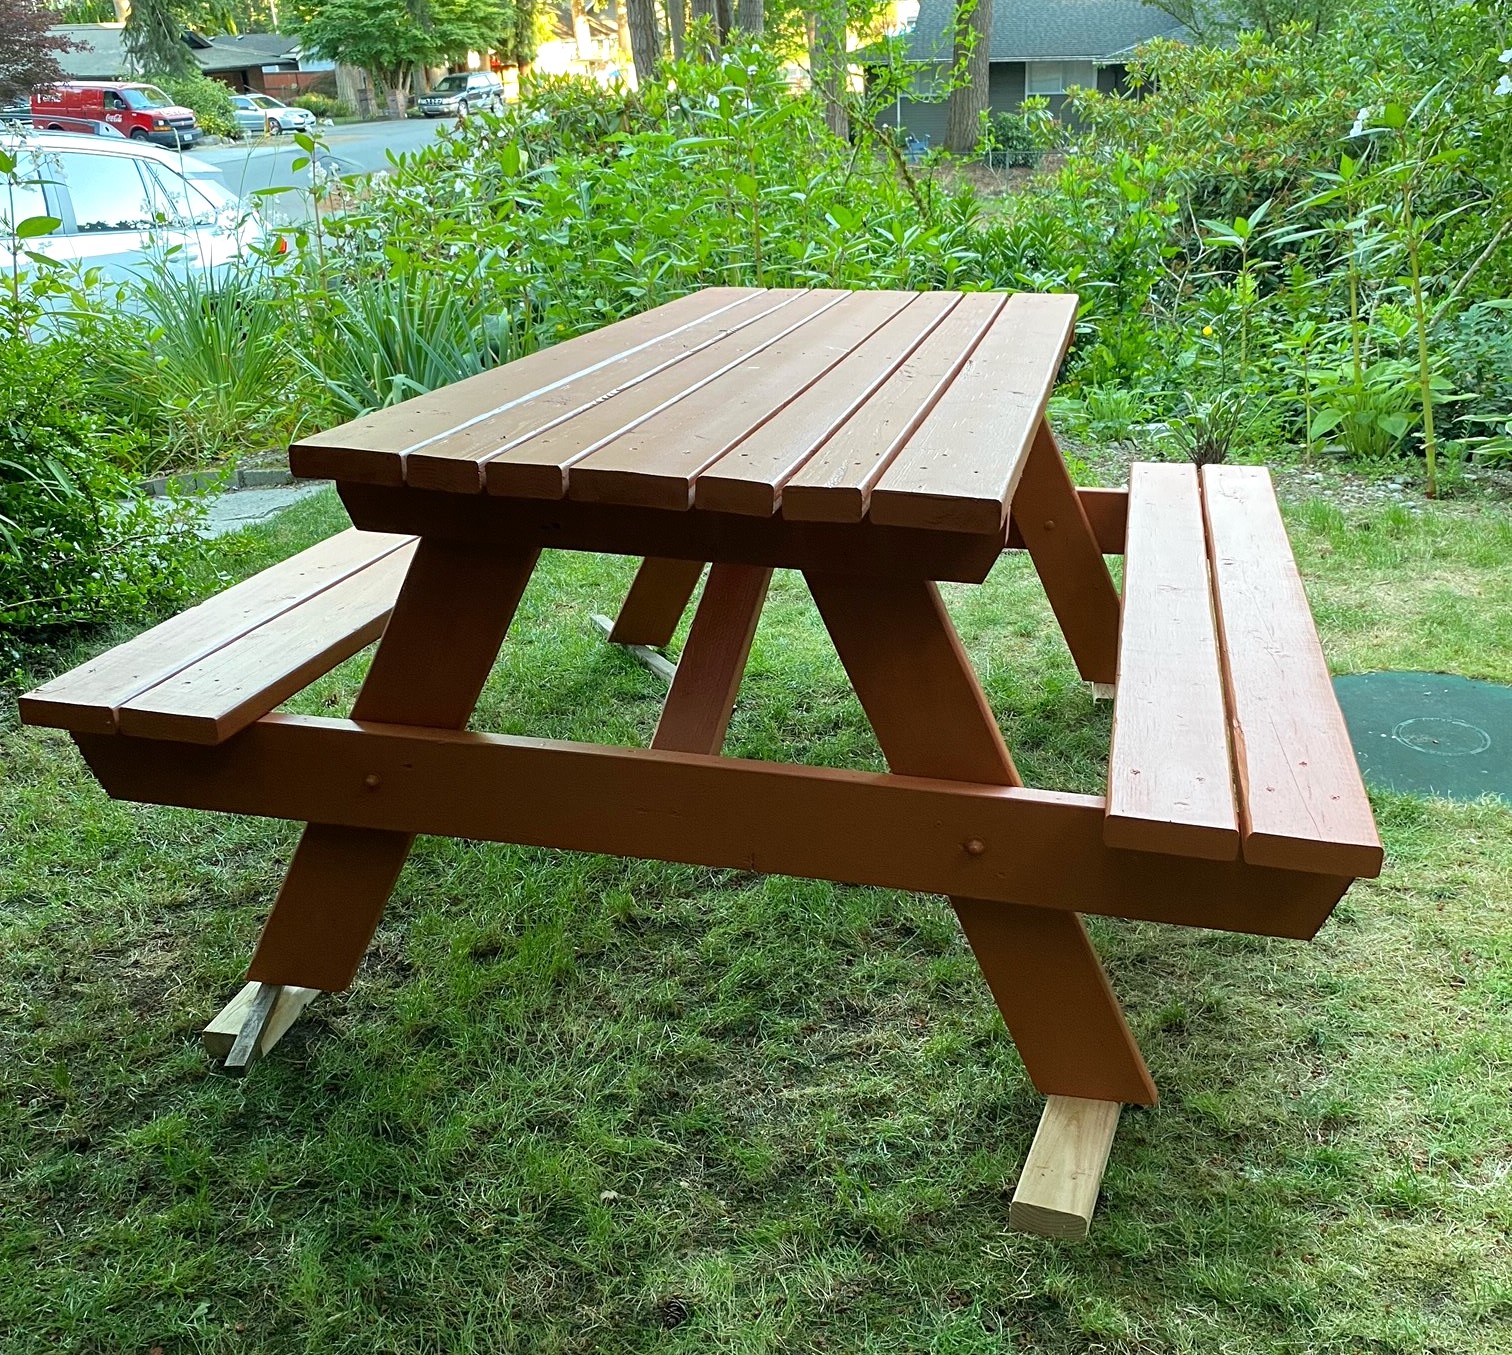
From scrap pile to a fun picnic table. Thanks Ana for the plans.
Built from Plan(s)
From scrap pile to a fun picnic table. Thanks Ana for the plans.
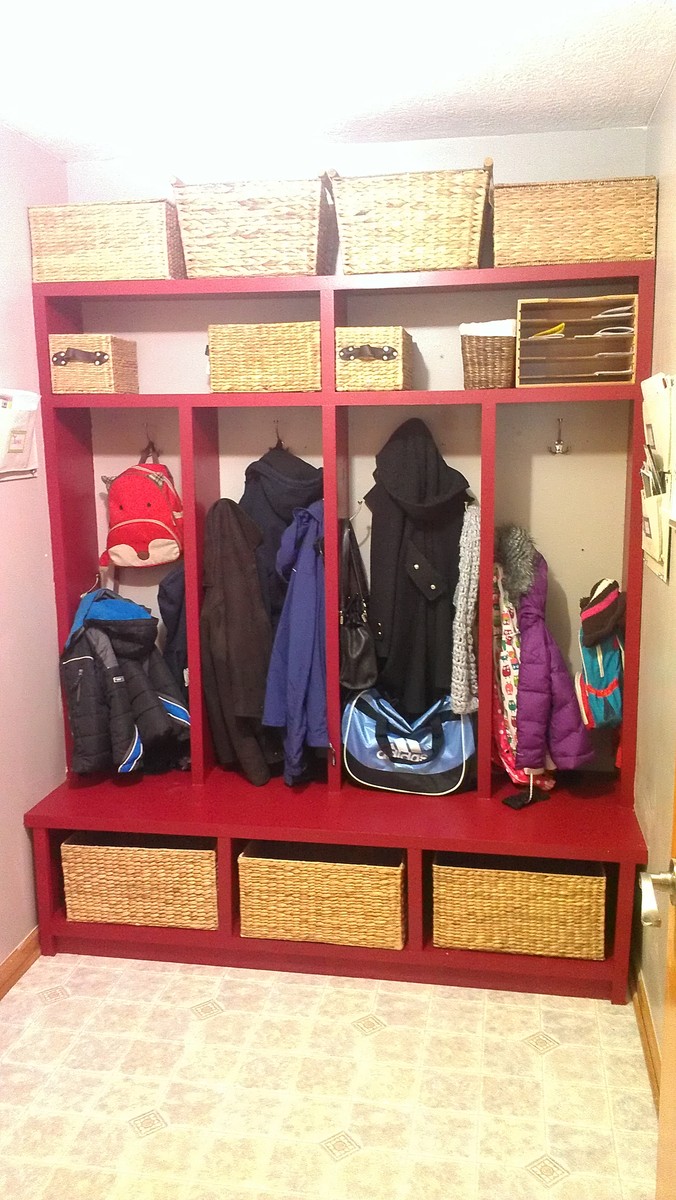
I adapted the Braden Bench plan to make it more of a built-in feature of our mudroom. It's added wonderful organization to our busiest room.
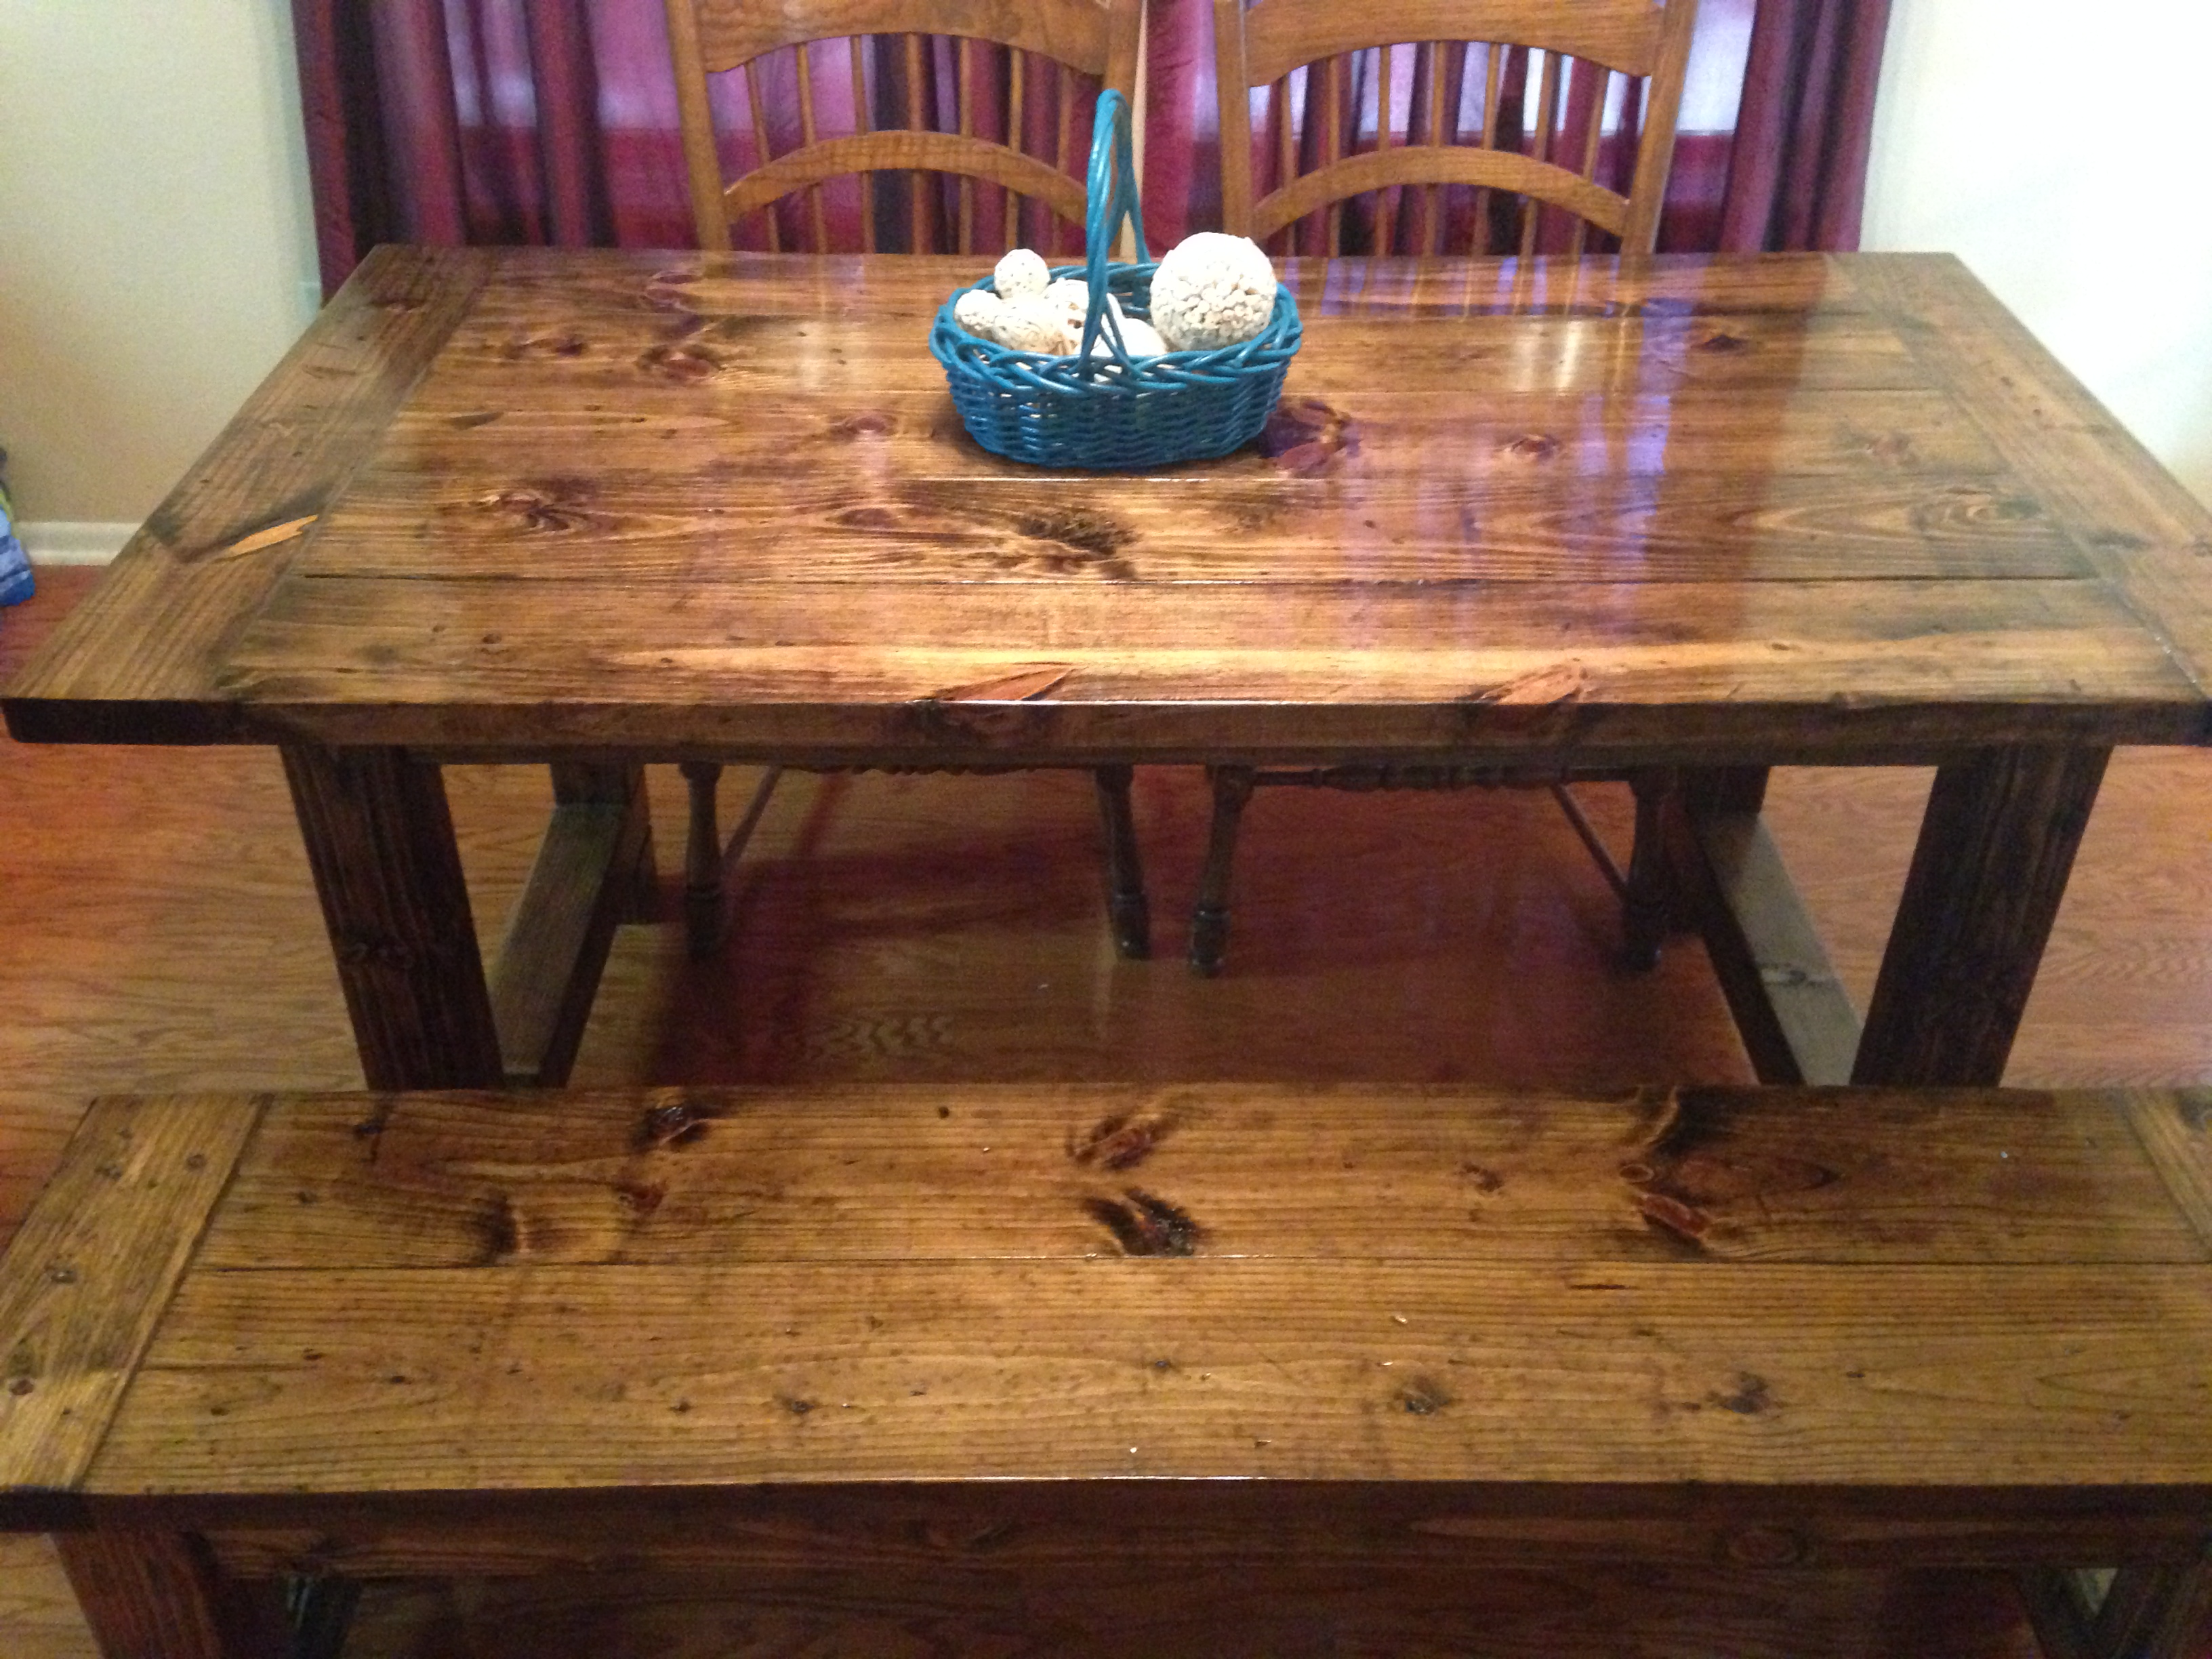
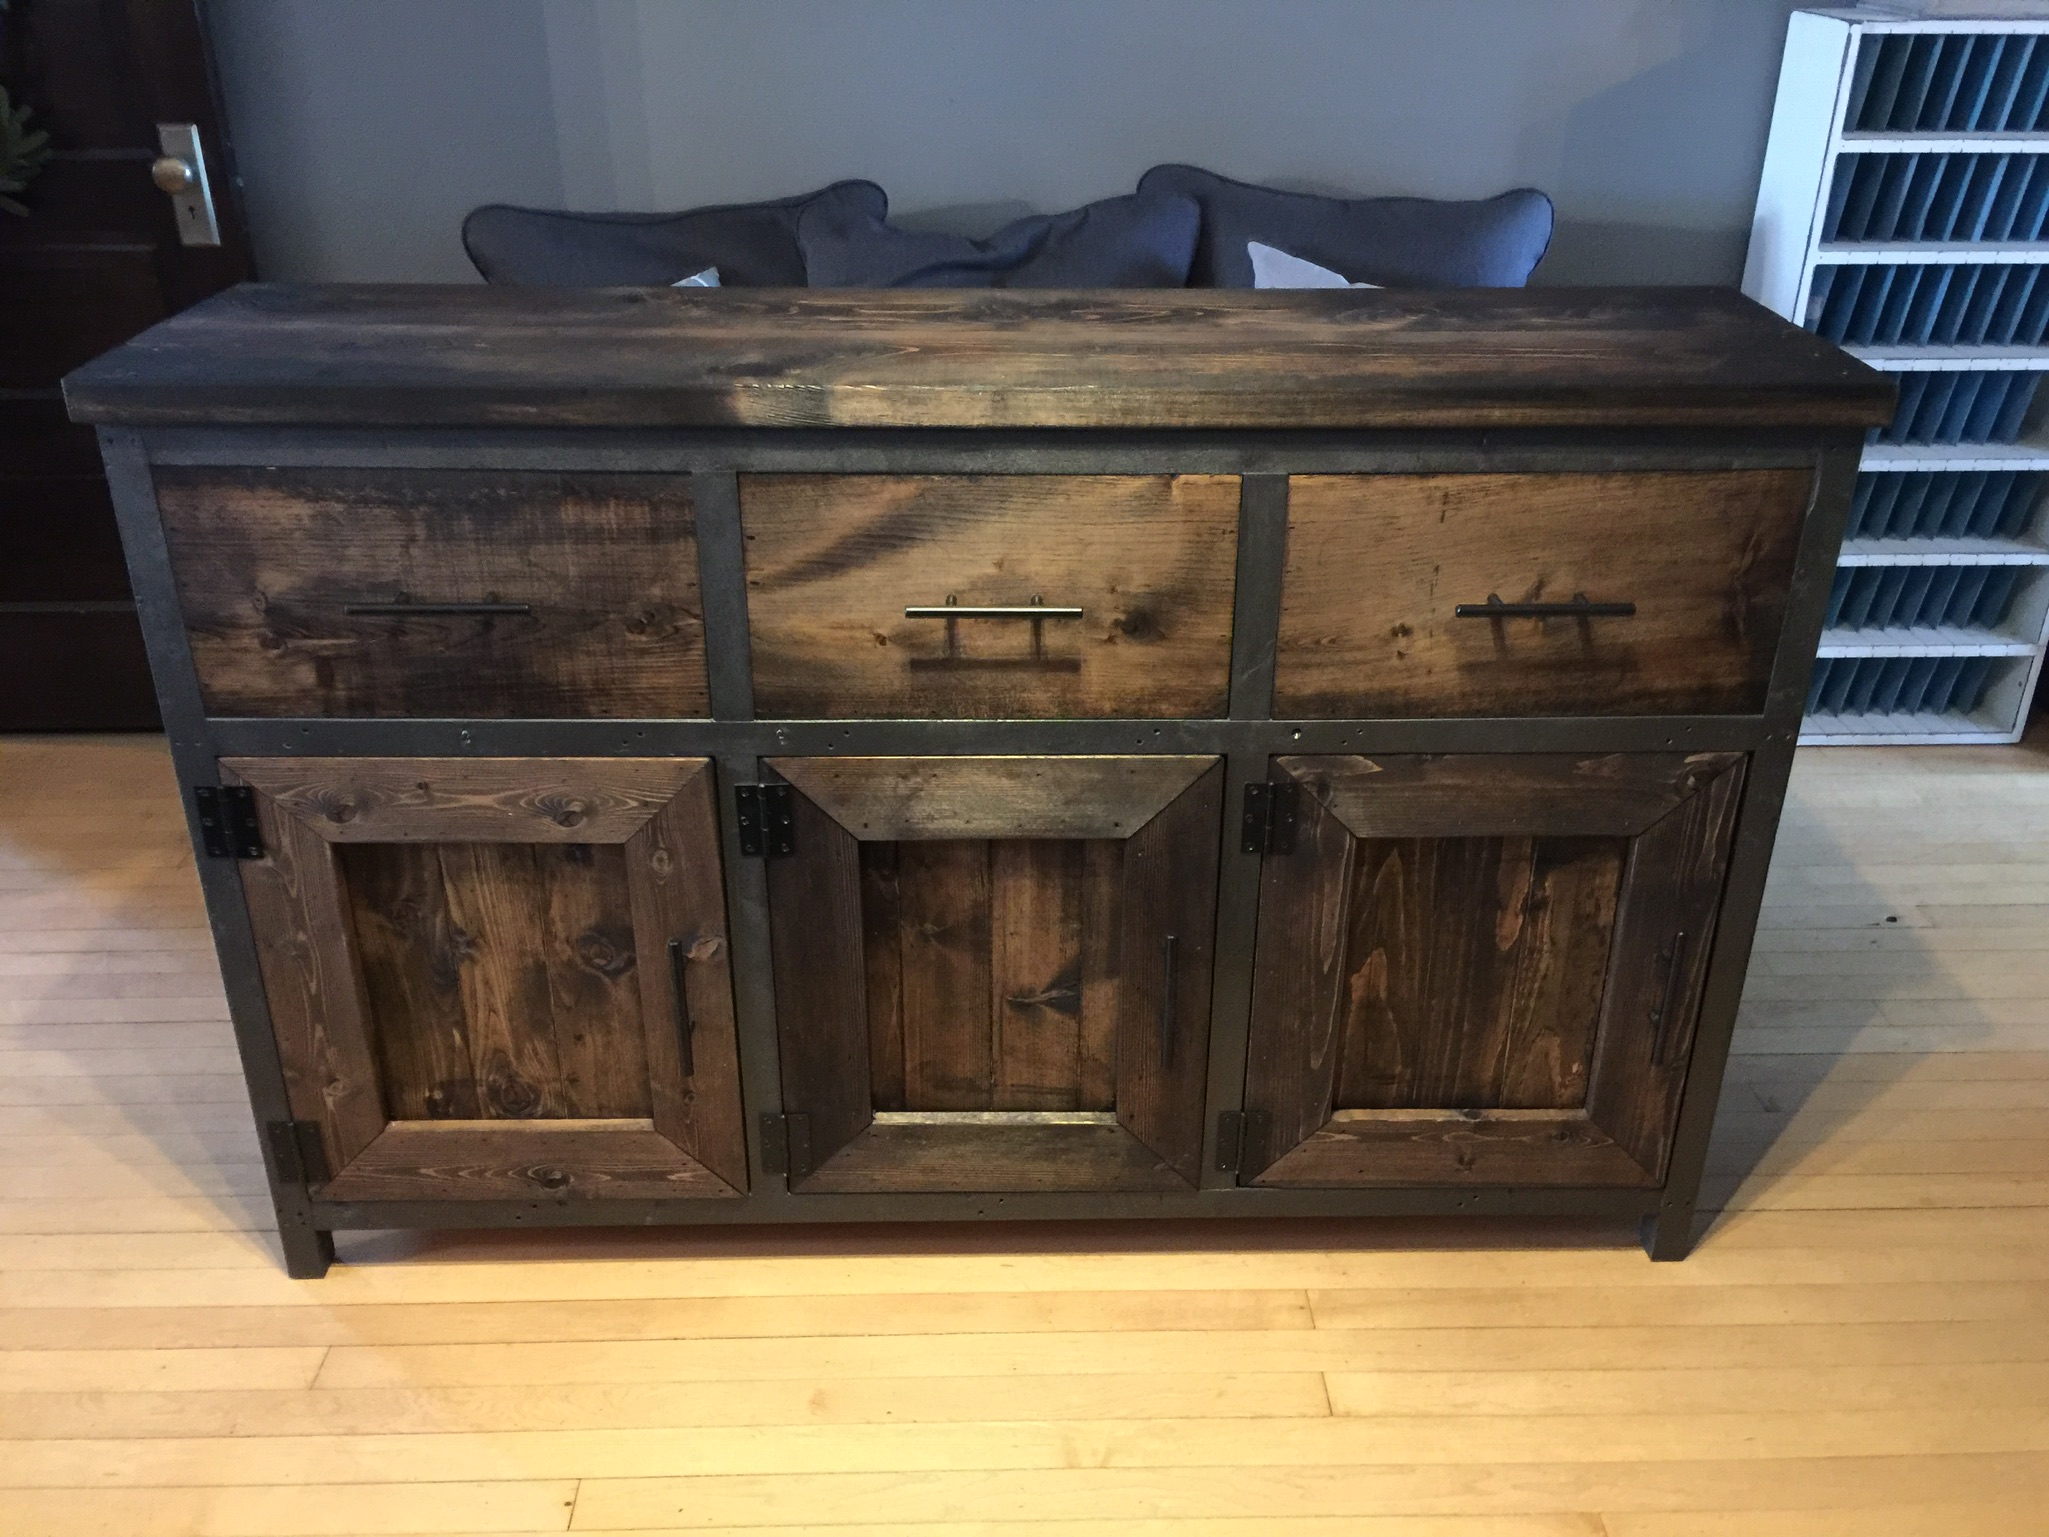
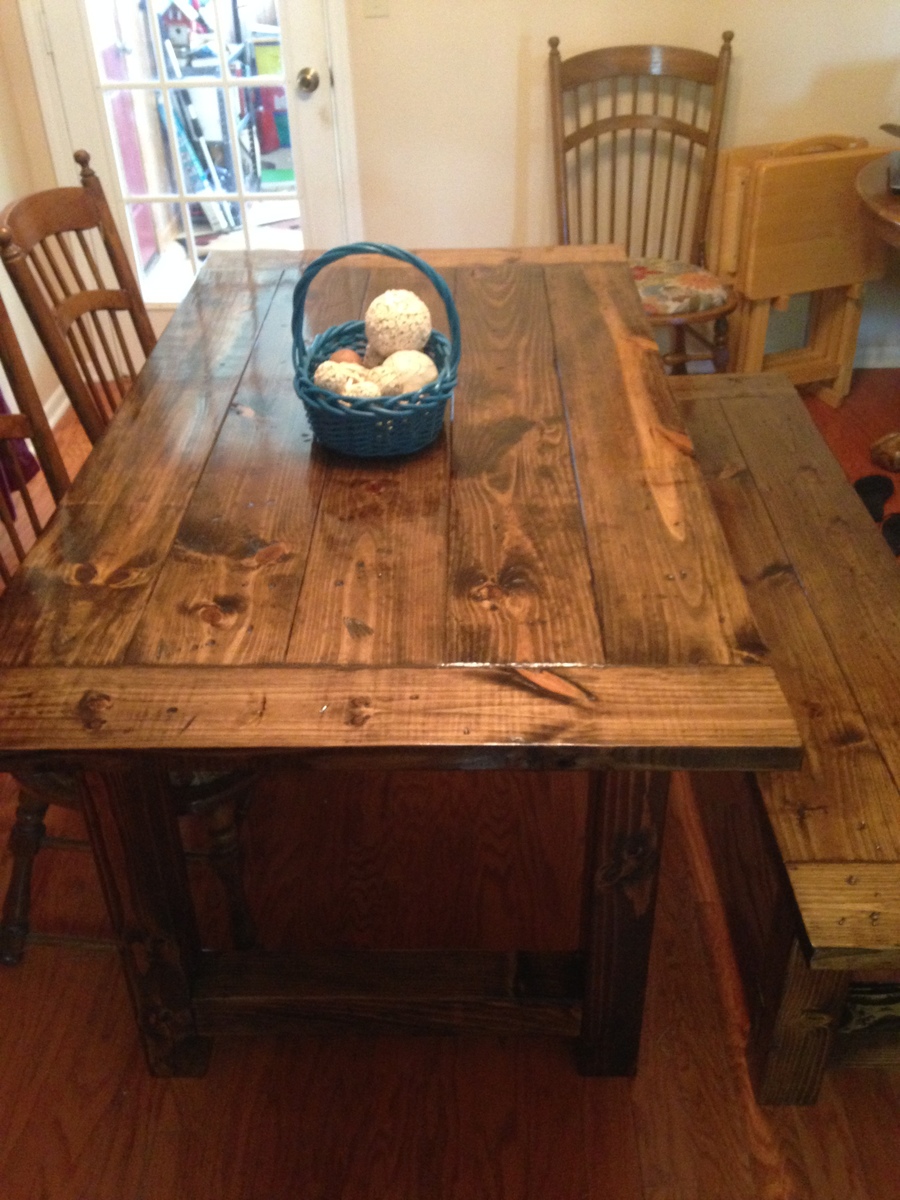
rustic farm table.
Plans are easy to follow.
Motified the legs a bit. I use a 4x4 cross members rather than a 2x4.
Dark walnut stain with semi gloss poly finish.
Hi Ana!
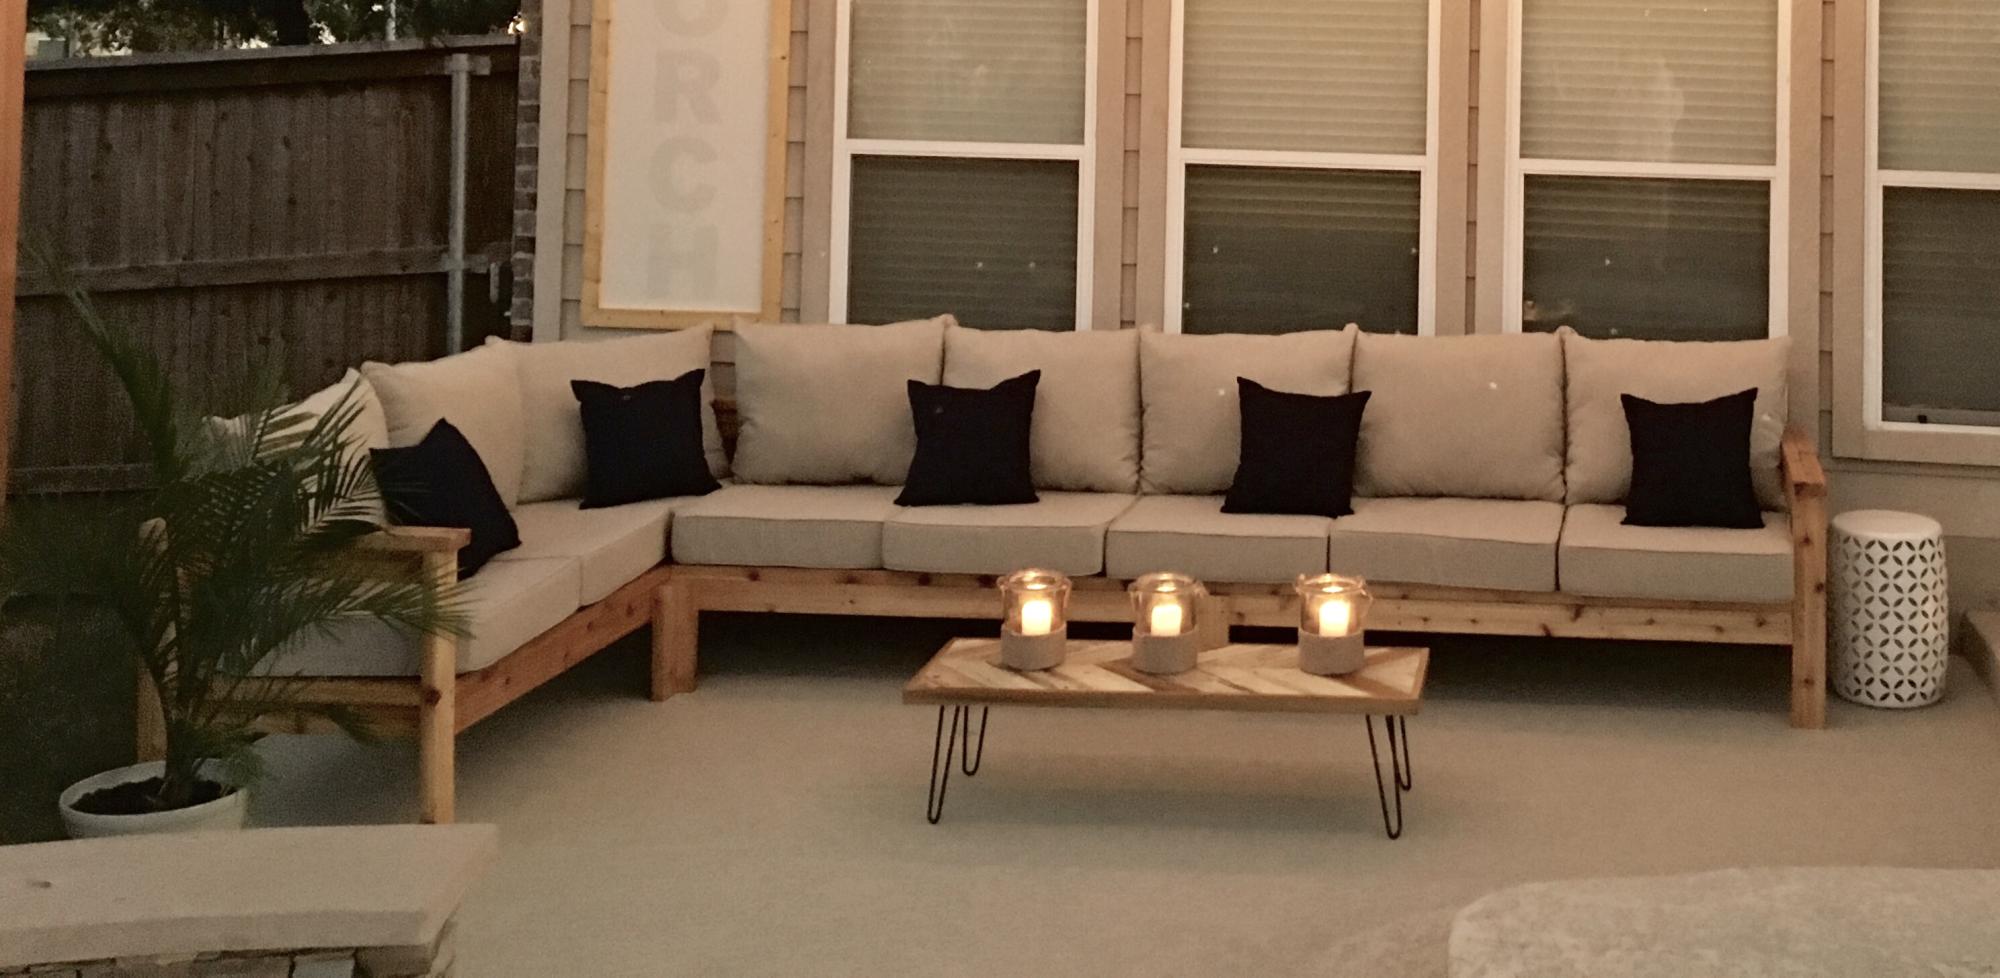
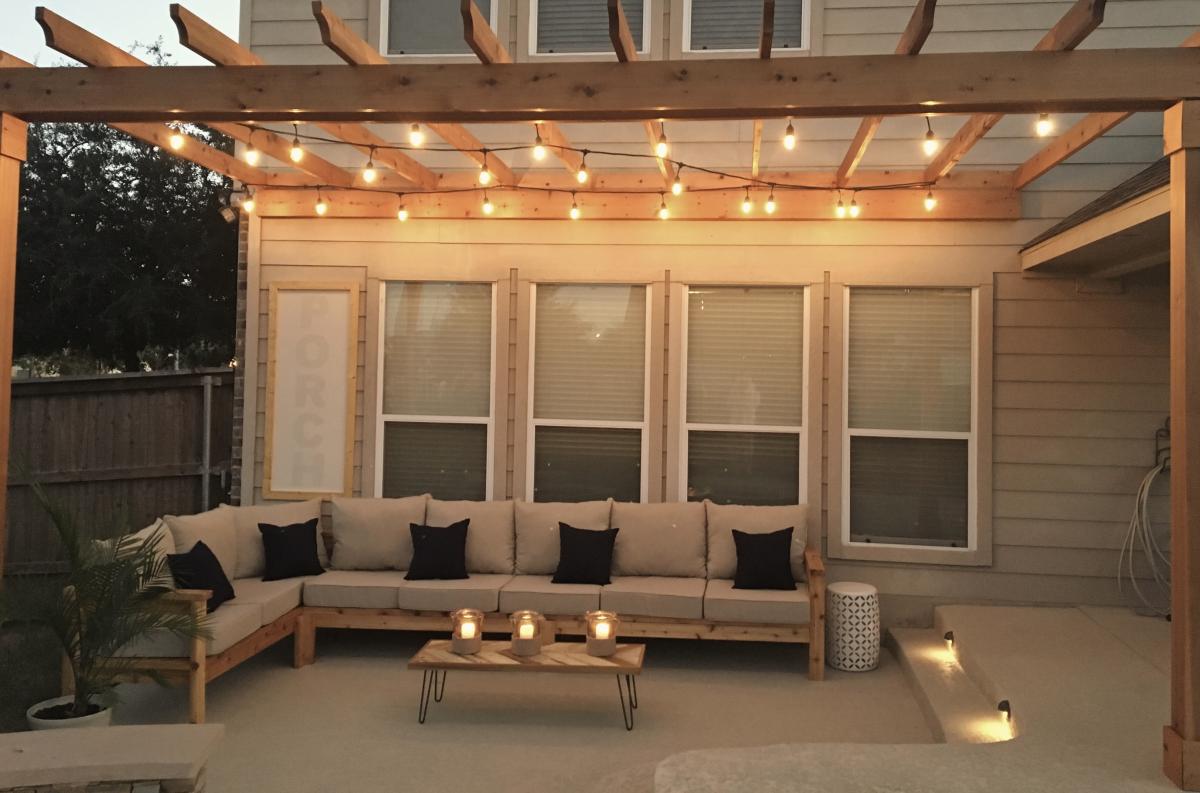
My husband used your plans to build the 2x4 outdoor cedar sectional :) He did it in 1 day and it couldn't have been easier! He even tried first time working with pallets to make a small table and it came out perfectly too! Can't wait to enjoy family time on our new back porch.
Thanks Again & Love From Austin ❤️
Kathleen
Thu, 10/24/2019 - 16:35
Hi, your furniture is beautiful. May I ask: Where did you find your cushions? And what color/ brand stain did you use? Lovely job.
This was an amazing first project for us. Thank you for the plans and the step by step instructions
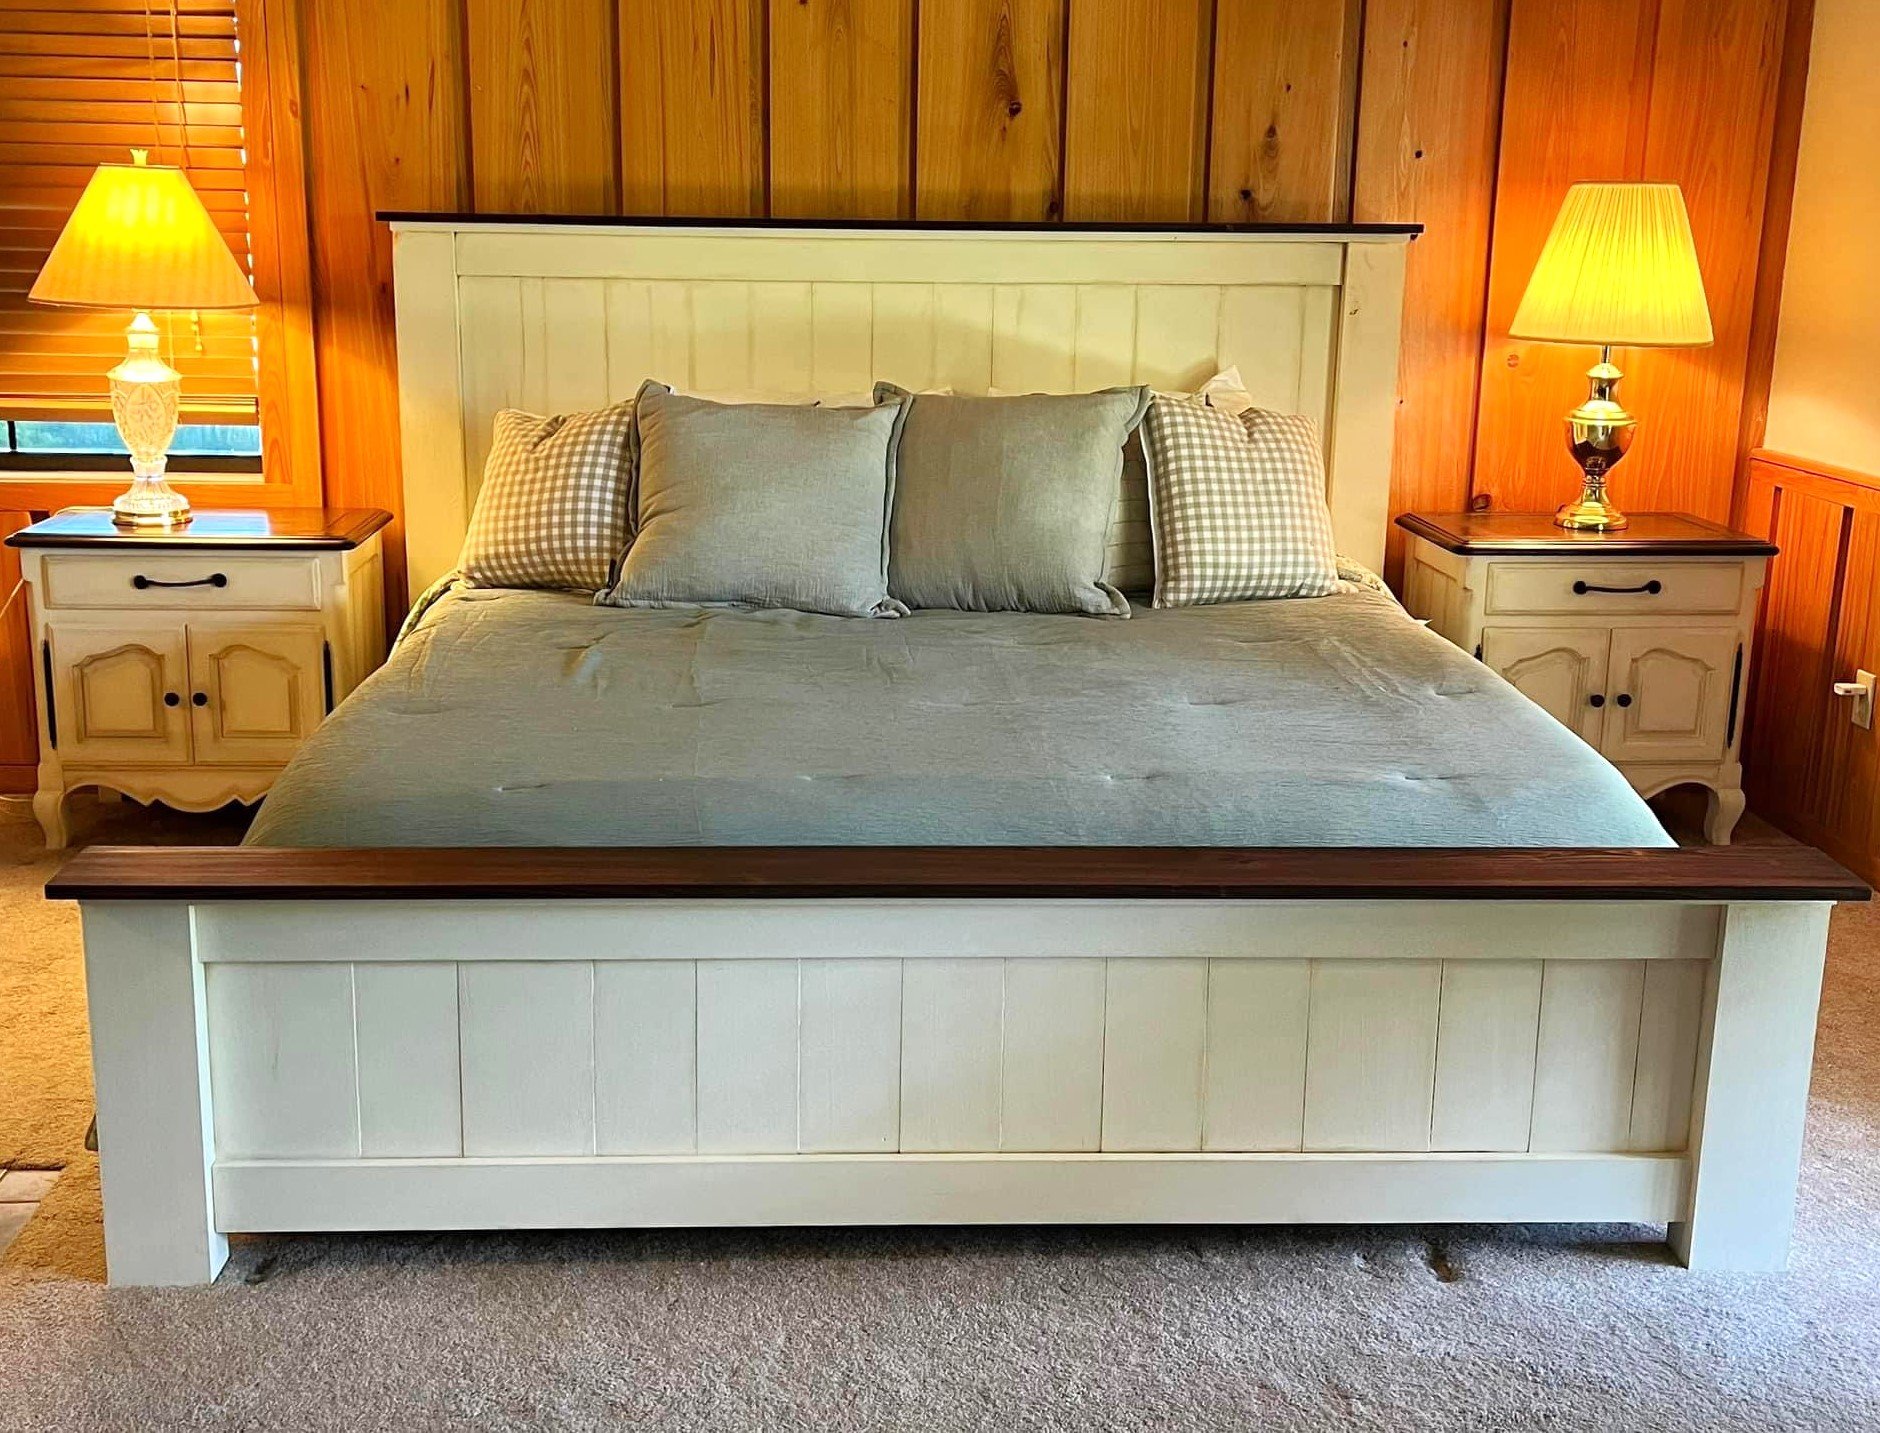
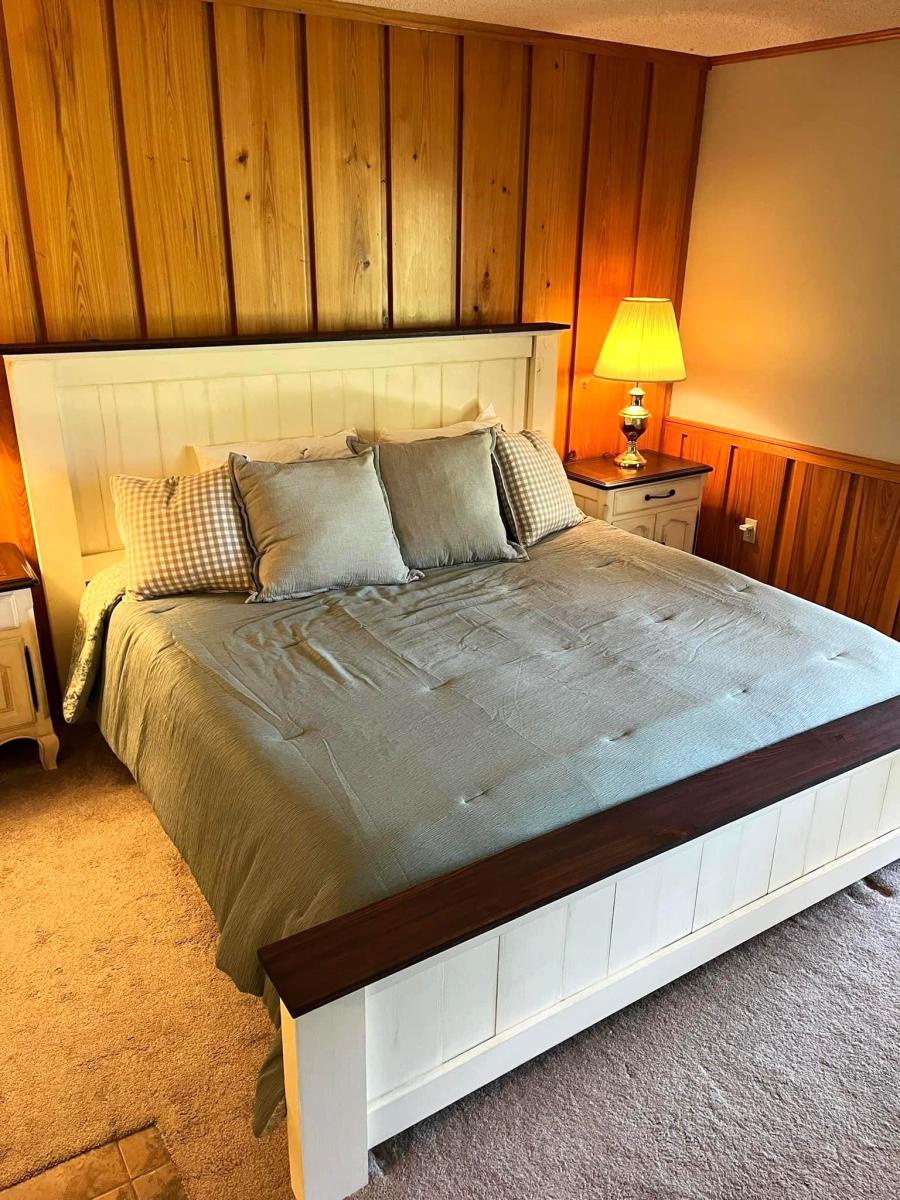
We built this using the Traditional Farm Style Bed plans. We used scrap cypress lumber that was cut and milled from and by family. We had to make some modifications because of differences in the milling sizes but I was so happy with the final outcome.
Ellen Girod
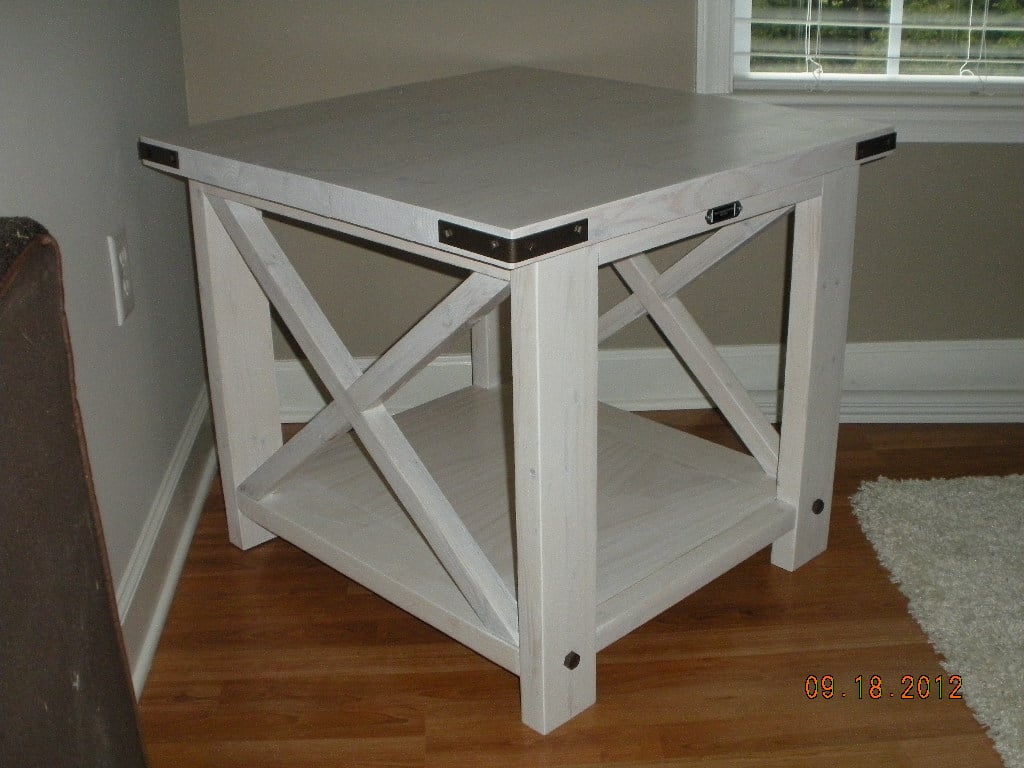
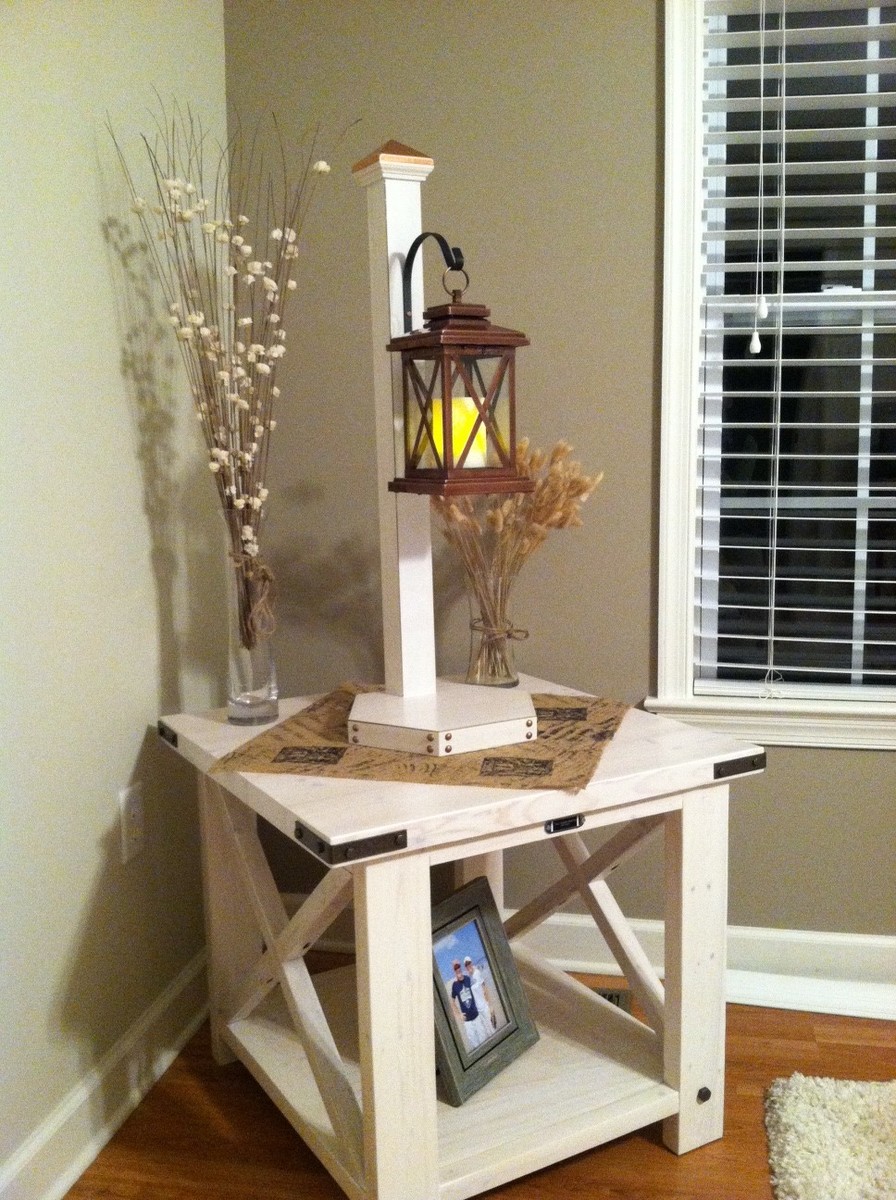
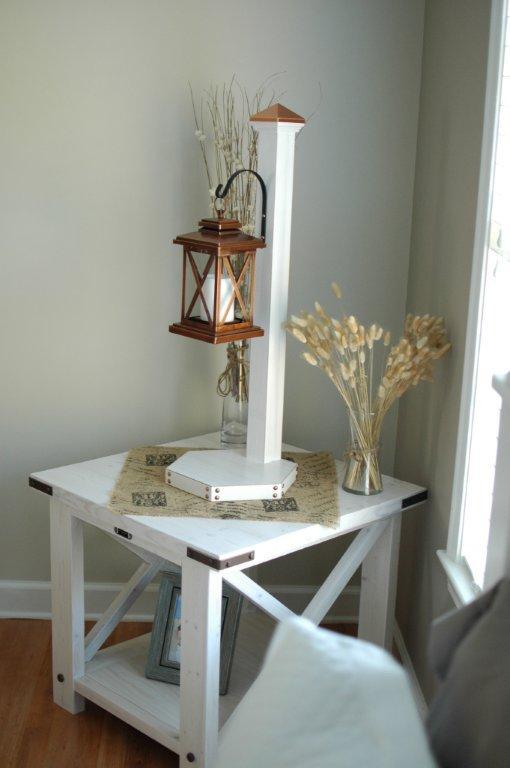
Thank you Hilary for the wonderful design and thank you Anna for the plans. I tend to spend my fall and winter months on woodworking and sewing so this is my first project for the season. We had some left over 2.4's and I saw this table and thought, what a good way to use some of that leftover lumber. I didn't really know where I was going to put the table but once it was finished it made itself a home in our spare bedroom. I then saw a battery operated candle lantern that had the "X" pattern and I thought that would go perfectly with the table. Well, that then led me into another project. I wanted to do something different with the lantern instead sitting in on the table top so with some of the leftover wood from the table shelf, I made a post to hang the lantern from. I also used Anna's technique of distressing the edges with Minwax stain marker. It added just enough detail, what a great use of the stain marker.
The end table was my first project of the rustic "X" family. The second was the "X" console which also sits in the spare room. I'm now working on the Farmhouse Bed and am thinking of incorporating the some "X's" maybe on the headboard and also incorporate the hardware onto the headboard/footboard corners. It's not a traditional set that you would find in a bedroom, but it's a guest room and we don't really feel we need a dresser of drawers for our visitors so this works perfectly. It fits right into our decor and is very welcoming.
I love the stain that Hilary used, thank you for the advise. I have a jar of vinegar and steel wool sitting now. Can't wait to try that stain!
Mon, 10/22/2012 - 07:57
wow this looks really good! your cuts on the X's look perfect too
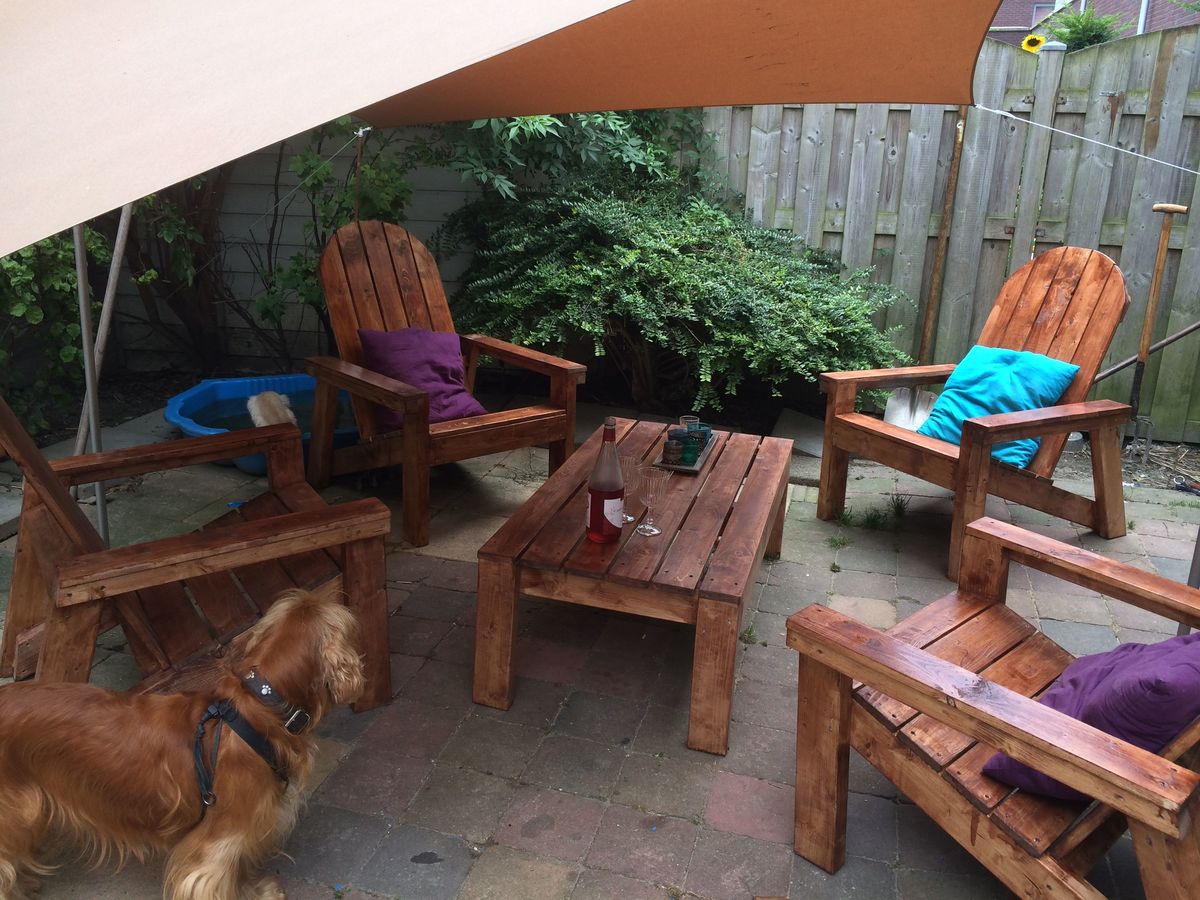
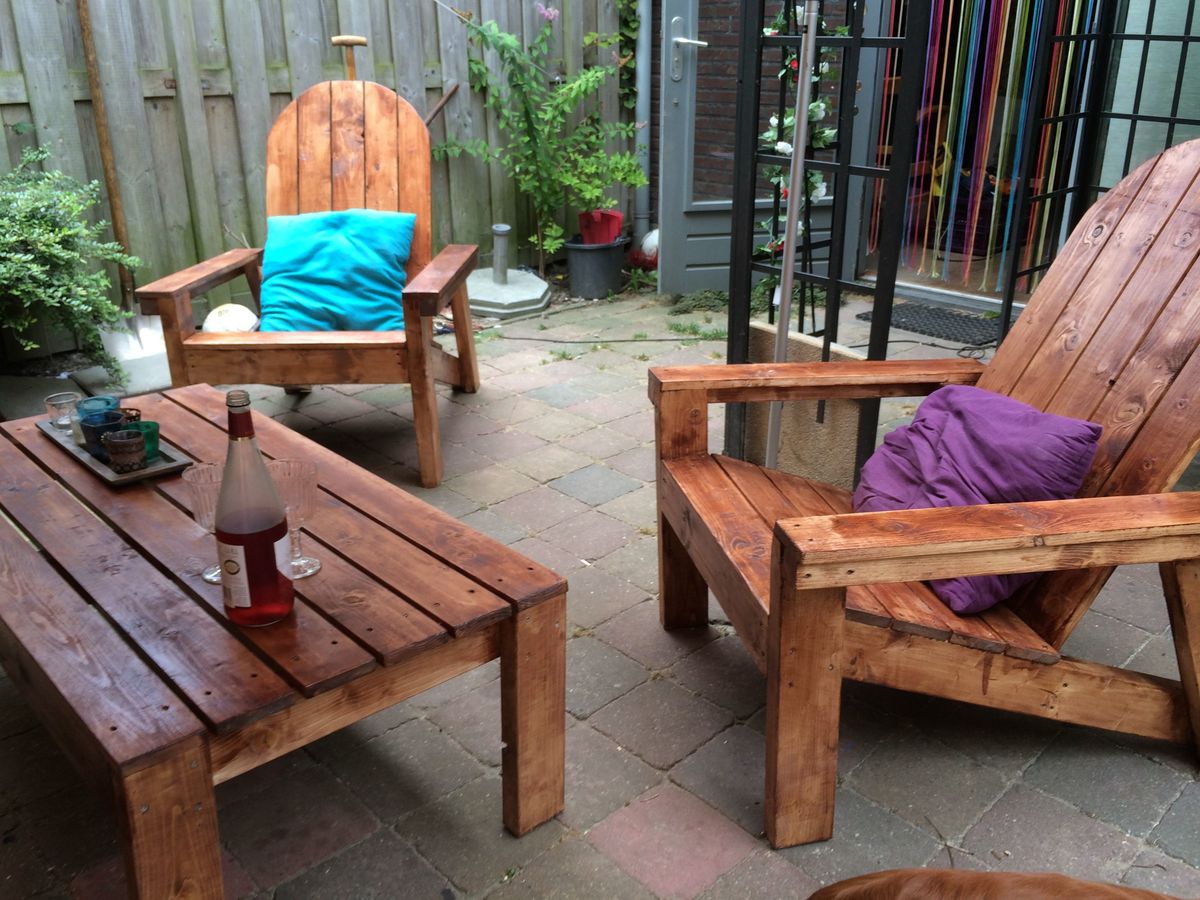
My first project ever... Had a bit trouble convert it all to metric measurements (I'm from the Netherlands), but as you can see it turned out pretty well. I get a lot of compliments, even from the (teenage) friends of my children! They really like to hang out in our back garden all of the sudden ;-)
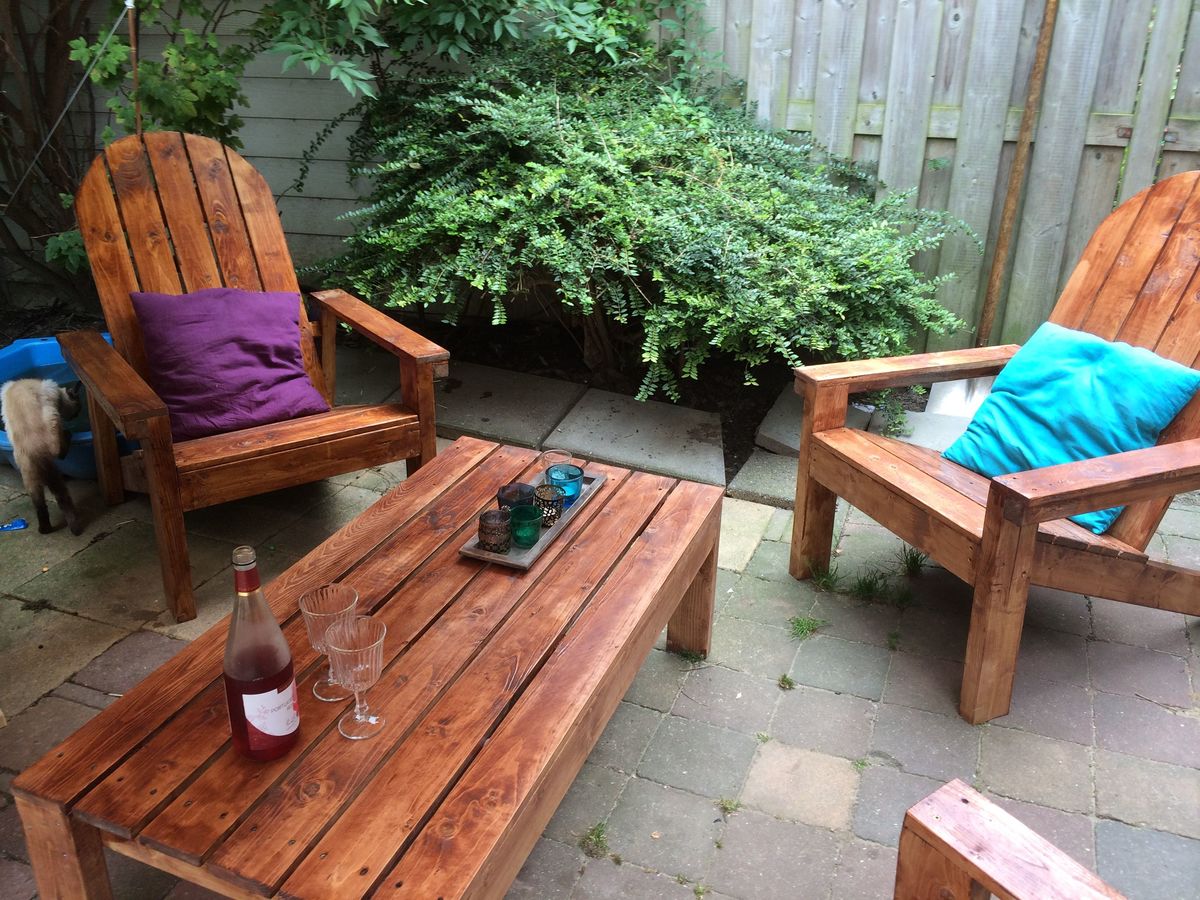

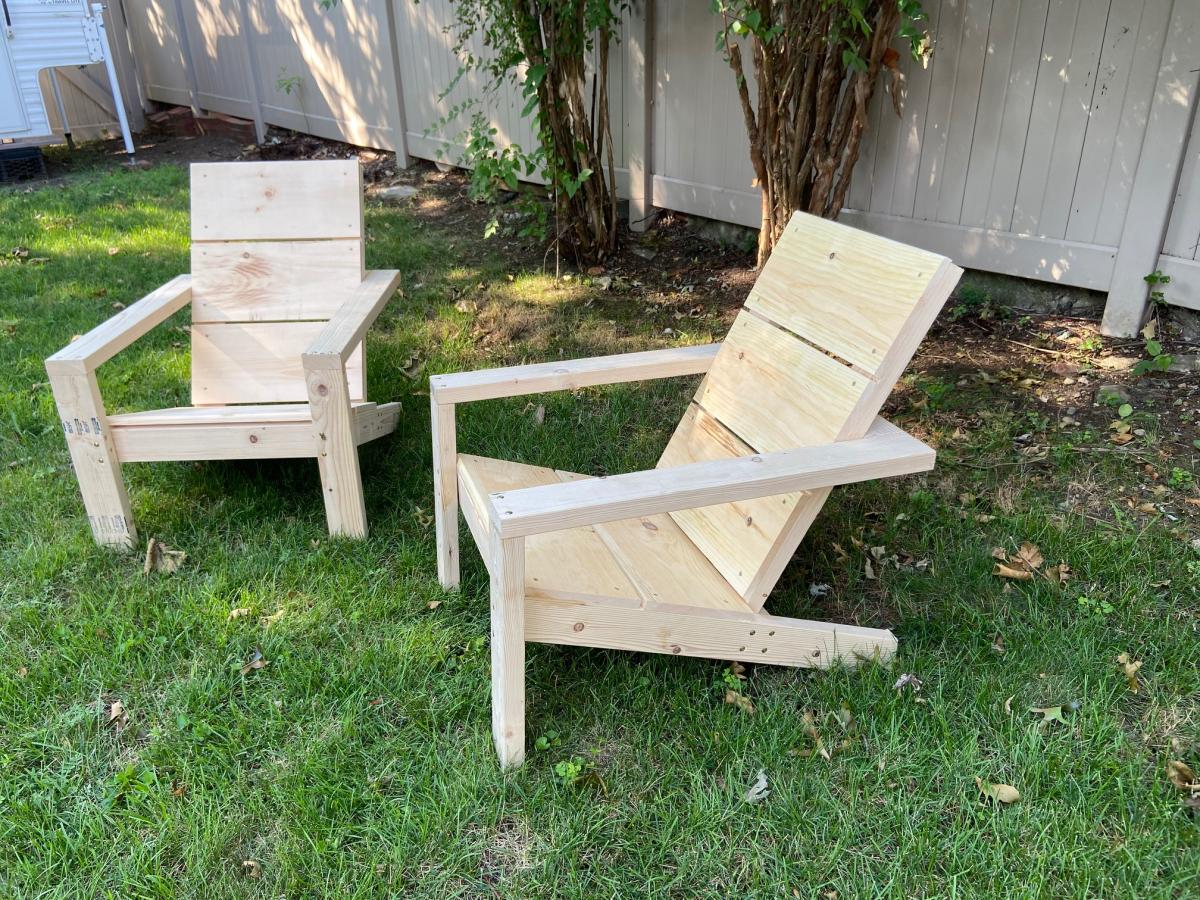
Great plans and cut list, I found the total cost to be closer to $60. per chair just for wood, glue and screws. Very sturdy and comfortable chairs, easy to follow instructions.

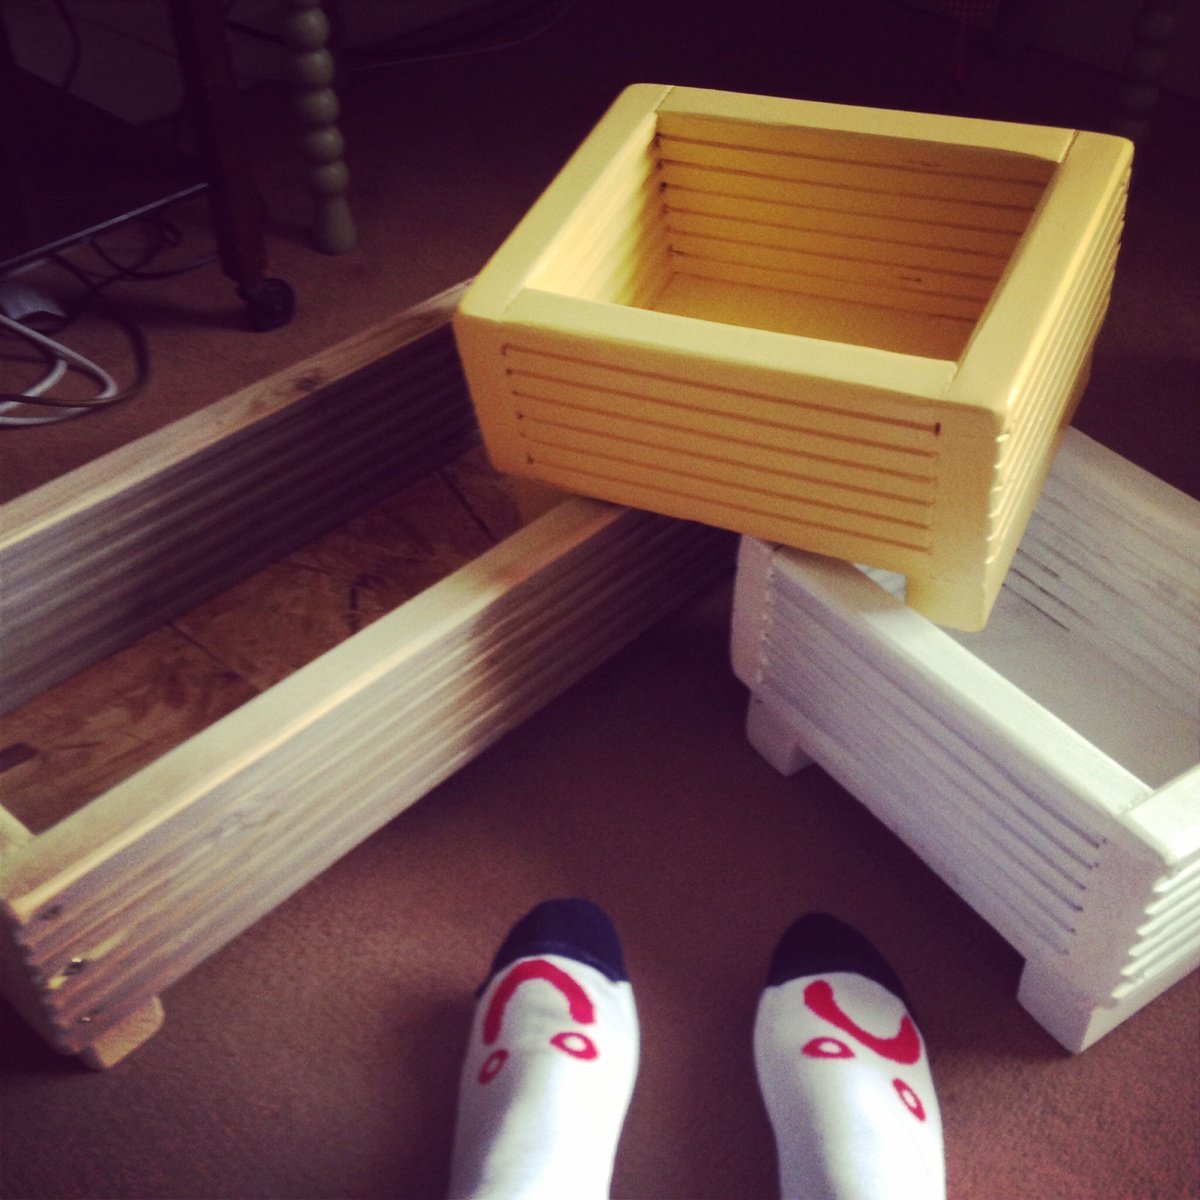
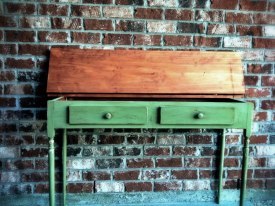
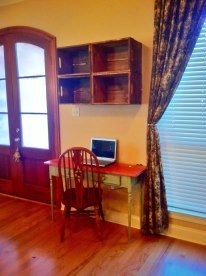
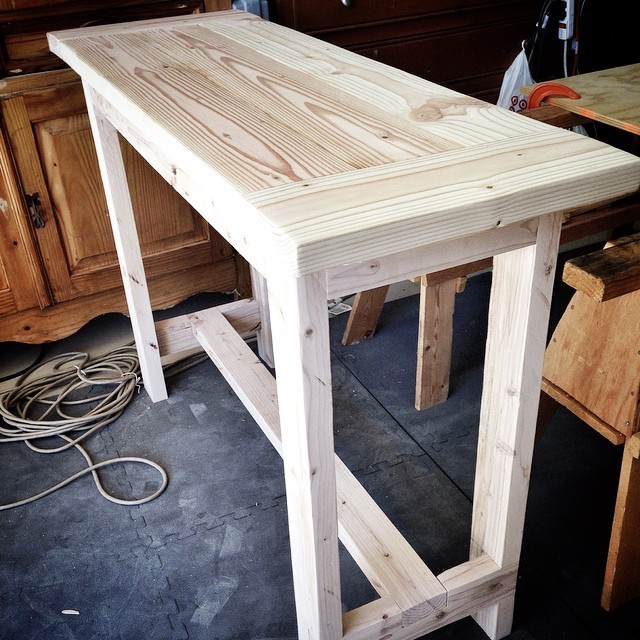
My wife had seen this post by Ana & thought it'd be great for a writing desk that had storage for her laptop so she'd be able to keep an eye out for the kiddo.
So I decided to use Ana's plans for the storage crates (without the casters) & mount those to the wall for cubbie storage.
I used "white wood" from the local Depot for this piece. However using the common boards will prove to be more cost effective for when you leave your Kreg Jig set at 1/2 inch like myself. :-(
The directions are straight forward, but. clamping & placing screws for the pocket holes were a bit more tricky. Make sure you have ample clamps on hand before attempting this.
Now, you can make the legs as Ana suggests, but if you want "fancy" turned legs are another option. $16.00 per at my local Depot., but. I found stair balusters at $3.00 per & used my miter saw to get them to the proper length per the plans & the same method used to knock off the dowel at the top of them in order to keep it flat.
Finially had it cut, assembled & sanded in 3 hours time. Hence me overlooking the Kreg Jig depth. ( nail gun saved me). You may also want to dry fit everything together. I found out I cut my side aprons too long (3/4 inch) & my inner base was off. Easily solved with scrap wood, glue, nail gun & LOTS of wood filler. Which was sanded & I can't even see the mess up.
Finishing was fun & easy. My color had already been decided via my boss (wife) as it was a fun green color from a Hoosier Cabinet & Matching cupboard I repair & refinished for my daughter's room 2 years ago. As well as the balusters came with a coat of white paint on them already. I sanded the whole project (sans the legs) with 120 then 220 grit paper on my mouse sander & my random orbit. The mouse is able to get the interrior as to where my 5 inch random orbit can't fit. But you could hand sand as well, I'm just lazy.
Once it was all sanded I rubbed down with some denaturated alcohol & old t-shirts I cut up long ago & stored in soft drink fridge packs. You can never have enough of either! I like to use the denaturated alcohol because it evaporates quickly. . .and I like the smell.
I painted the aprons down & let dry. Meanwhile I started staining the portions I could as to not mess up the paint. Once It dried I stained the remaining portions & got the sandpaper out again.
I wouldn't recommend using the power sanders but I did only on the legs due to the prefinished paint that was on them. I wanted to get the wood showing but around the edge of that I wanted to see the white paint & then the green. Careful not to hit the stained the areas!
Once that's done I used my same wipe down technique as after sanding & prepair to glaze. USE GLOVES FOR THE NEXT STEP!
Now you can get latex free or latex medical looking gloves. Just stop that. GO GET MEDICAL GLOVES. I've worked in my profession for 16 years, medical exam gloves & the gloves you get at the hardware store tear up. Grab some BarrierMax brand if you can. You'll be able to rebuild a car engine without tearing.
Now you're ready to glaze & Brooke at KillerB was dead on in her posts on the glaze. Must read!
All in all I think it came out perfect & can't wait to do this again.

In reply to Fancy! by brookifer86
Sat, 10/27/2012 - 12:51
Thanks Brooke,
Had a blast doing this project. Thanks for your contribution.
Nailers may be lazy, but it's more fun ;-)
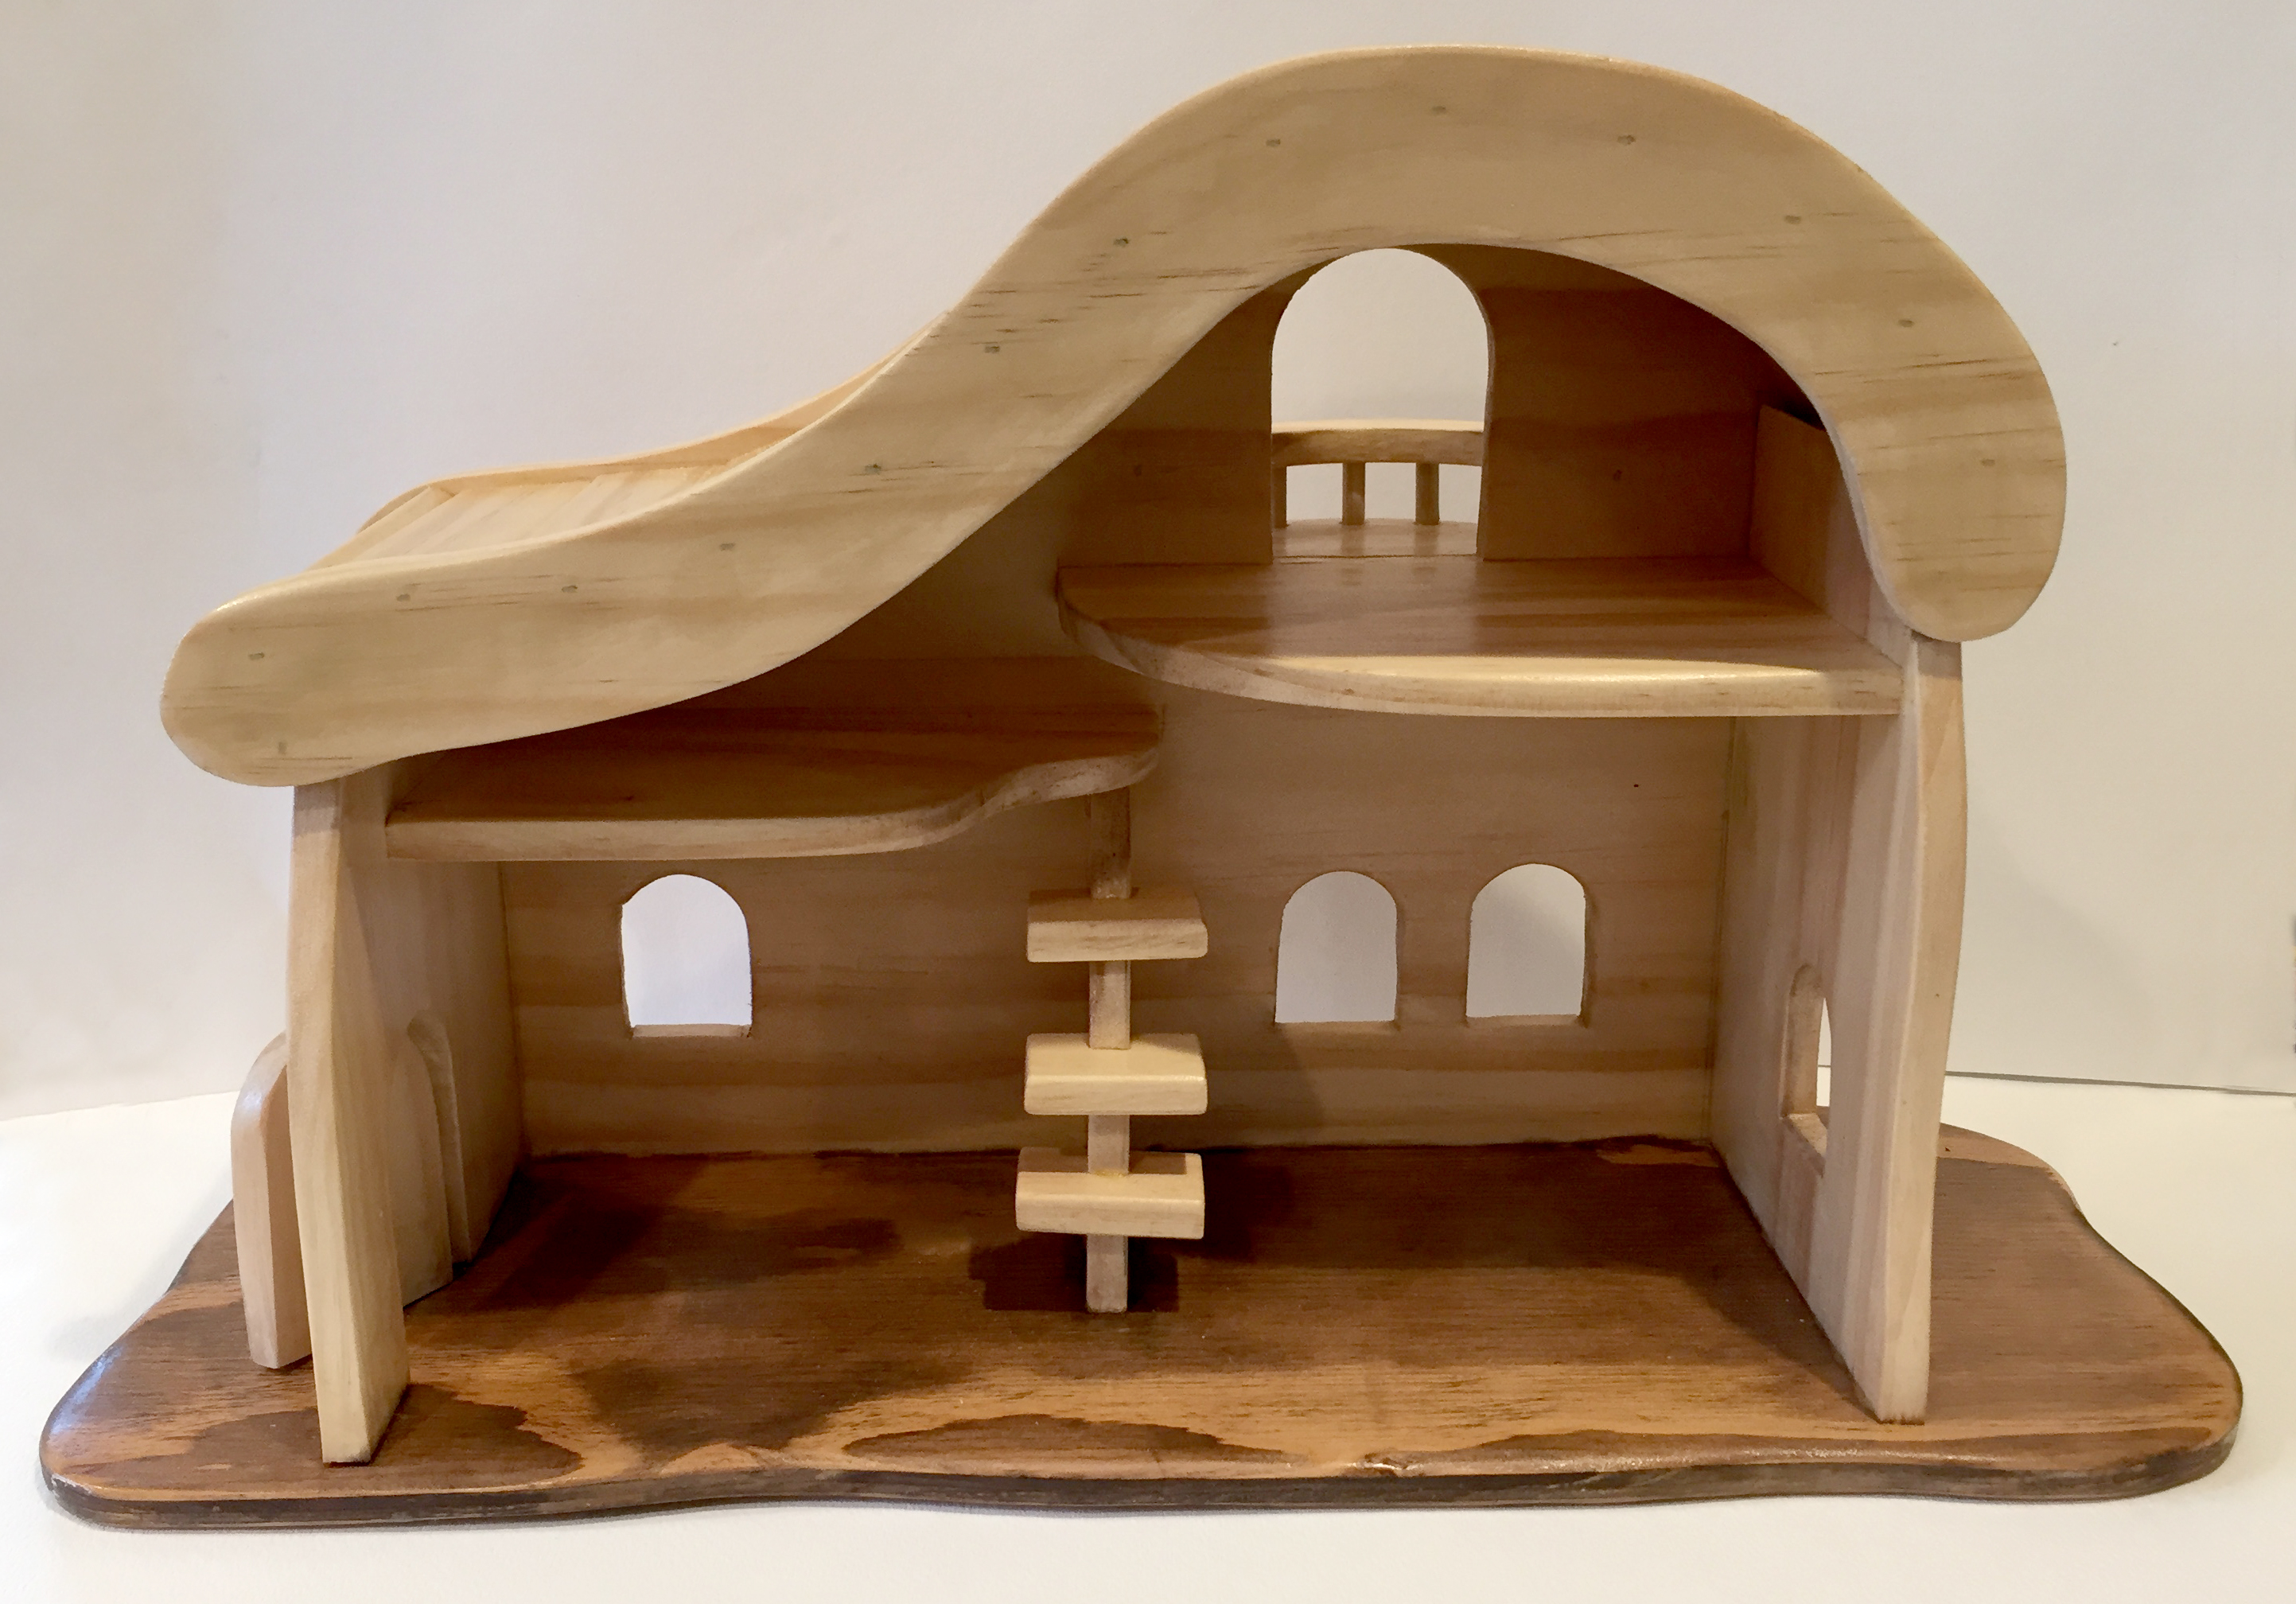
My grandson wanted a set of peg dolls and a house to play with them in. I wanted to build something that was gender-neutral - so many doll houses are pink and feminine! This doll house is sized just right for his peg dolls and playmobil people. It's made from 1/2" poplar, although it could also be cut from a sheet of 1/2" plywood.
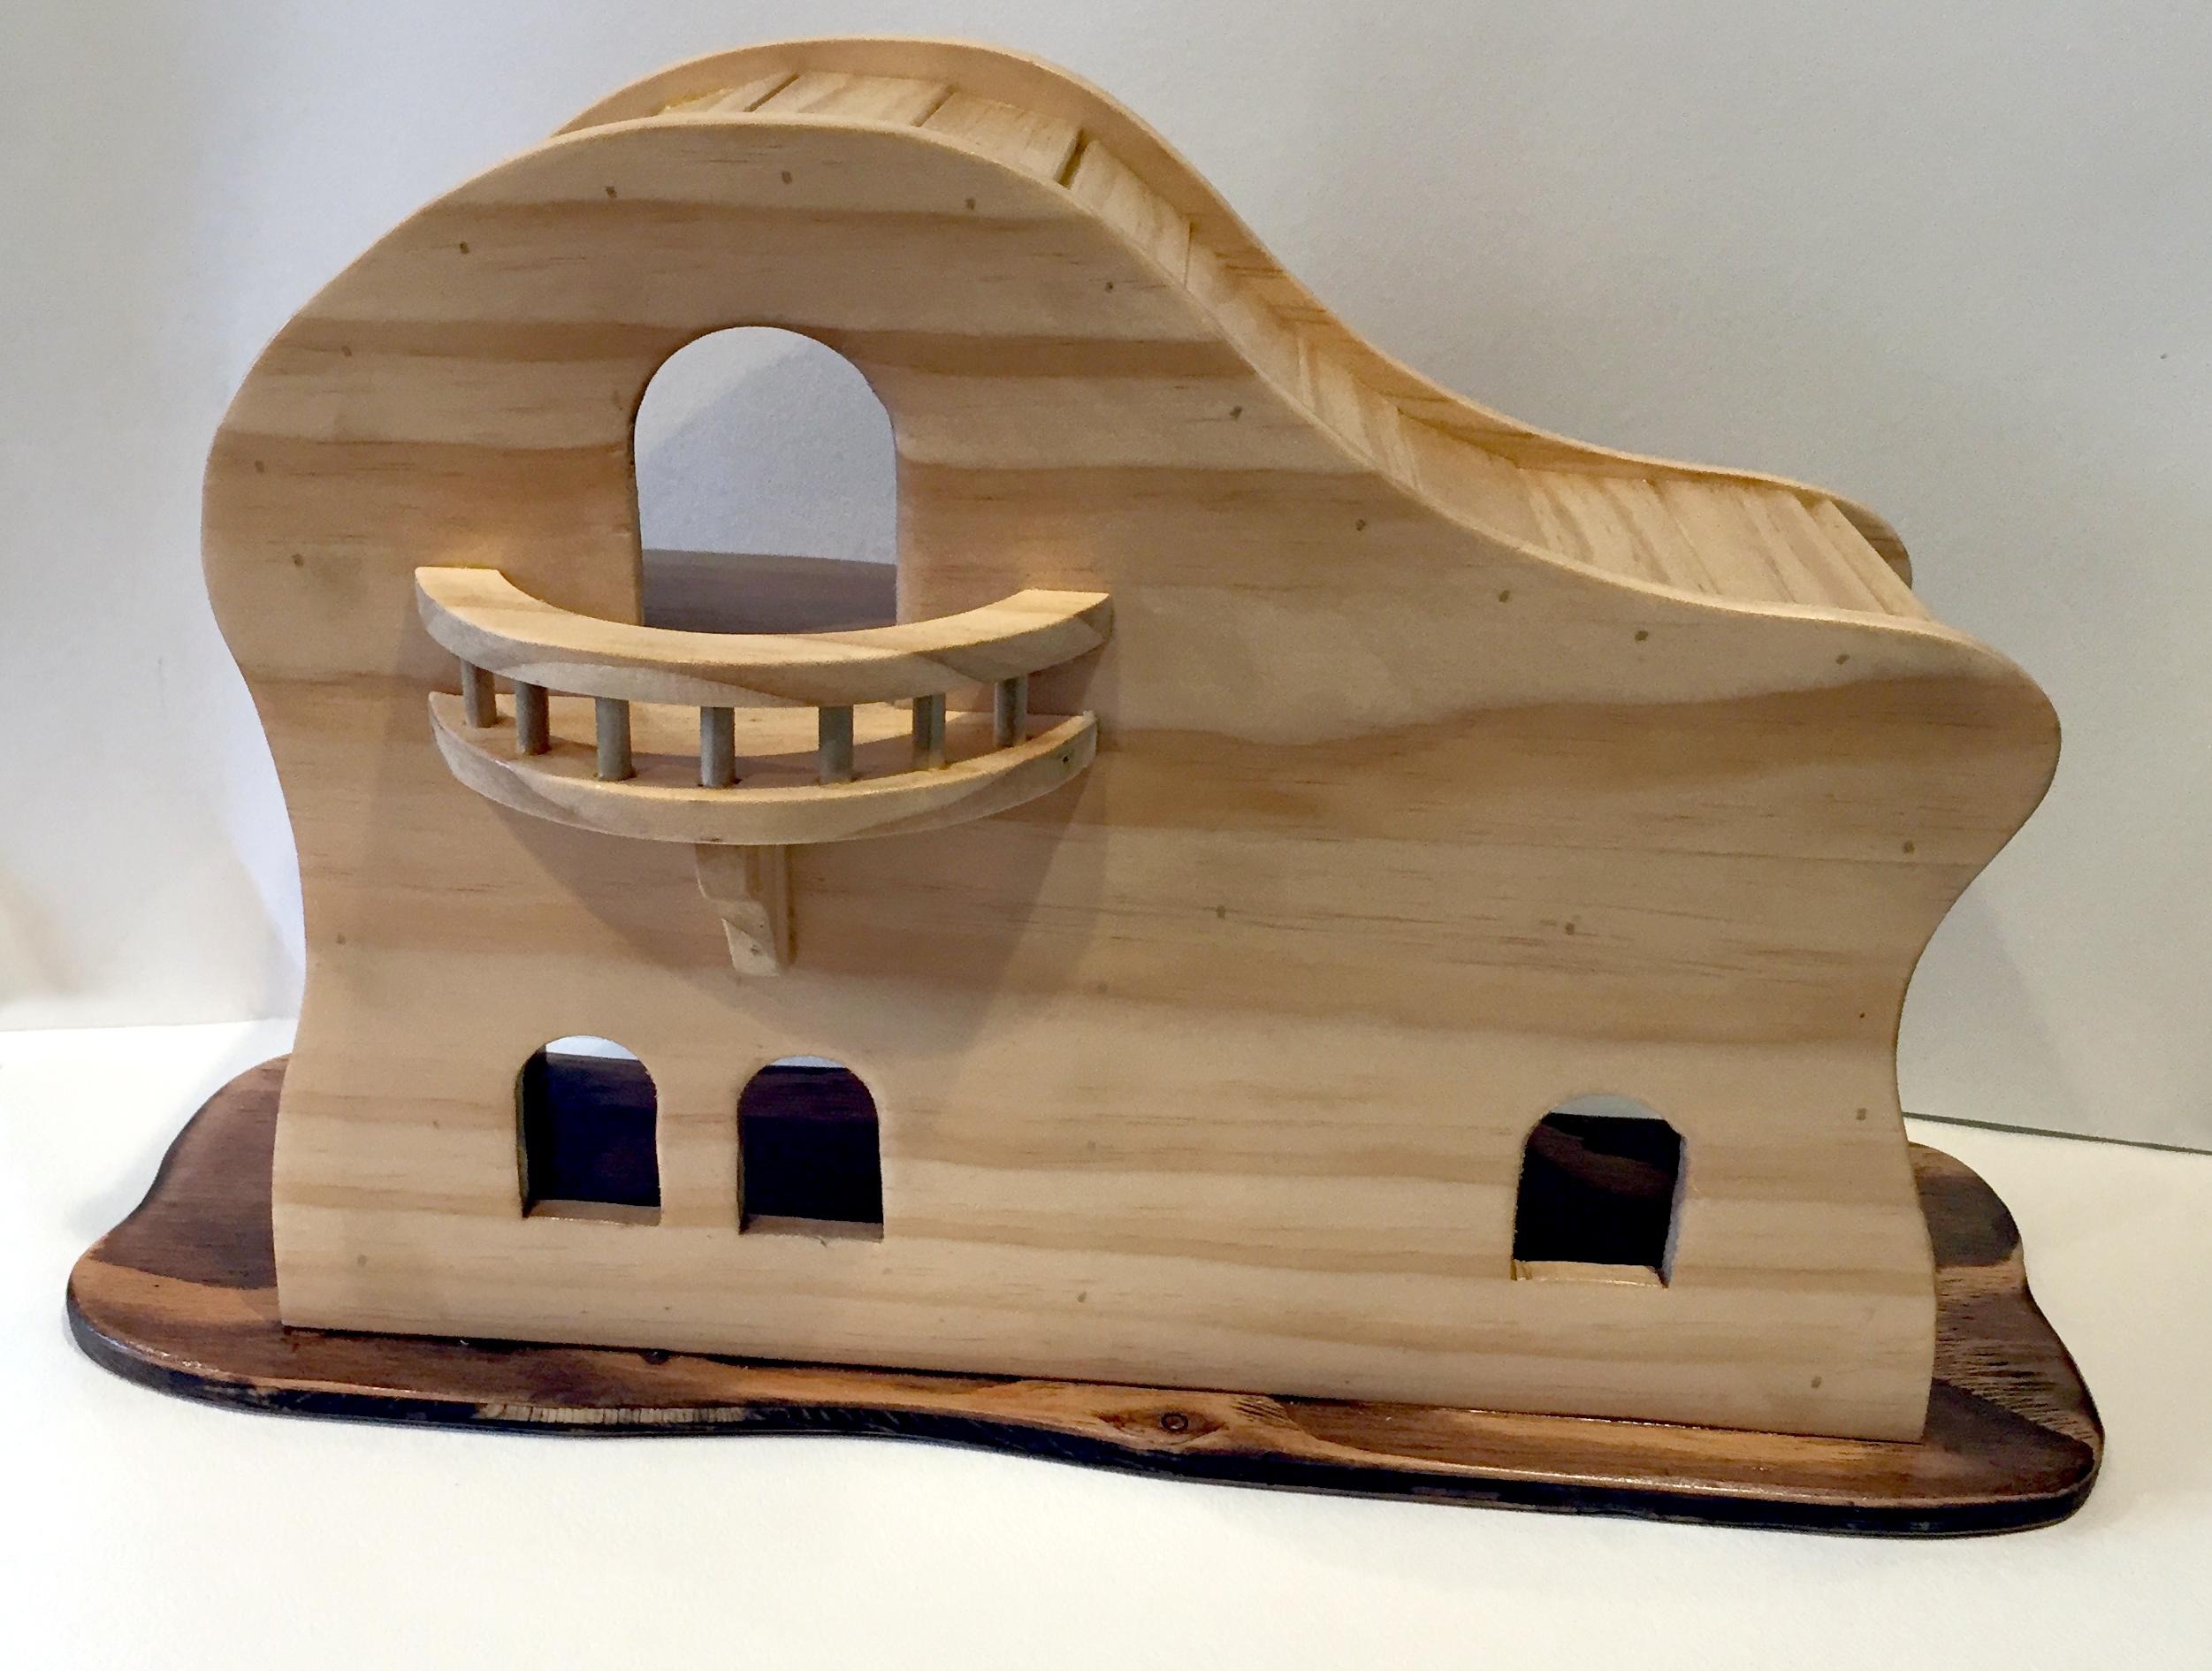
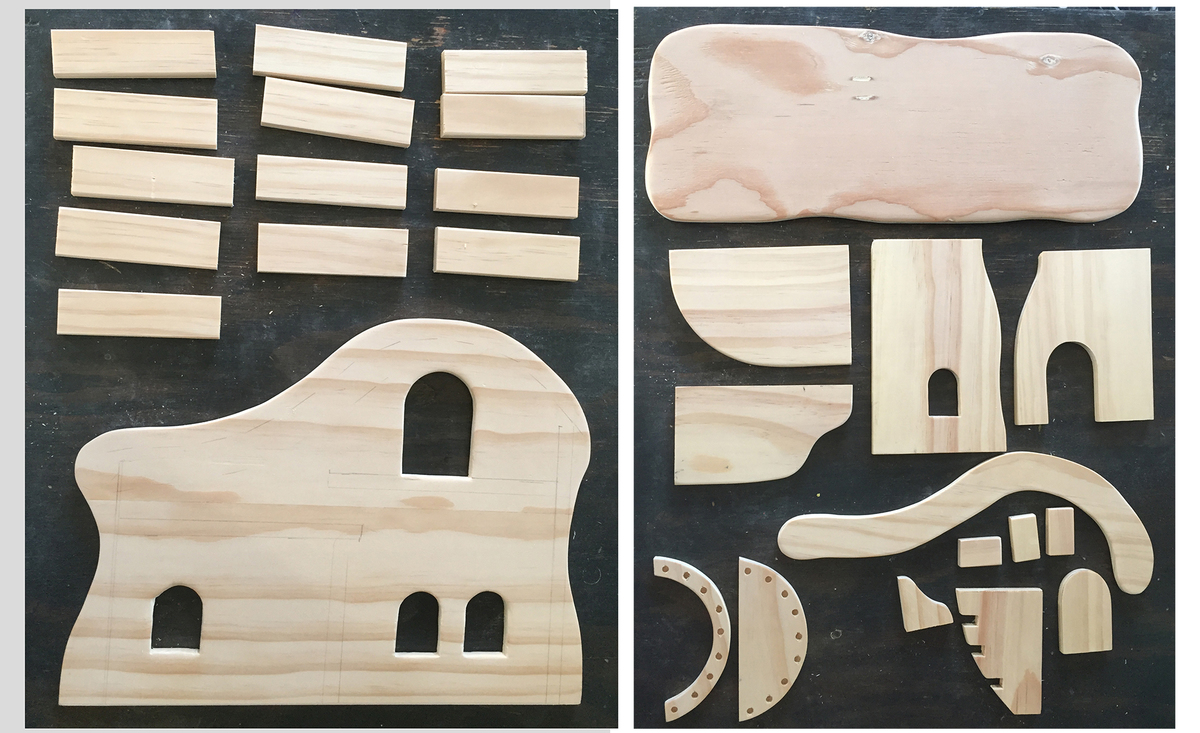
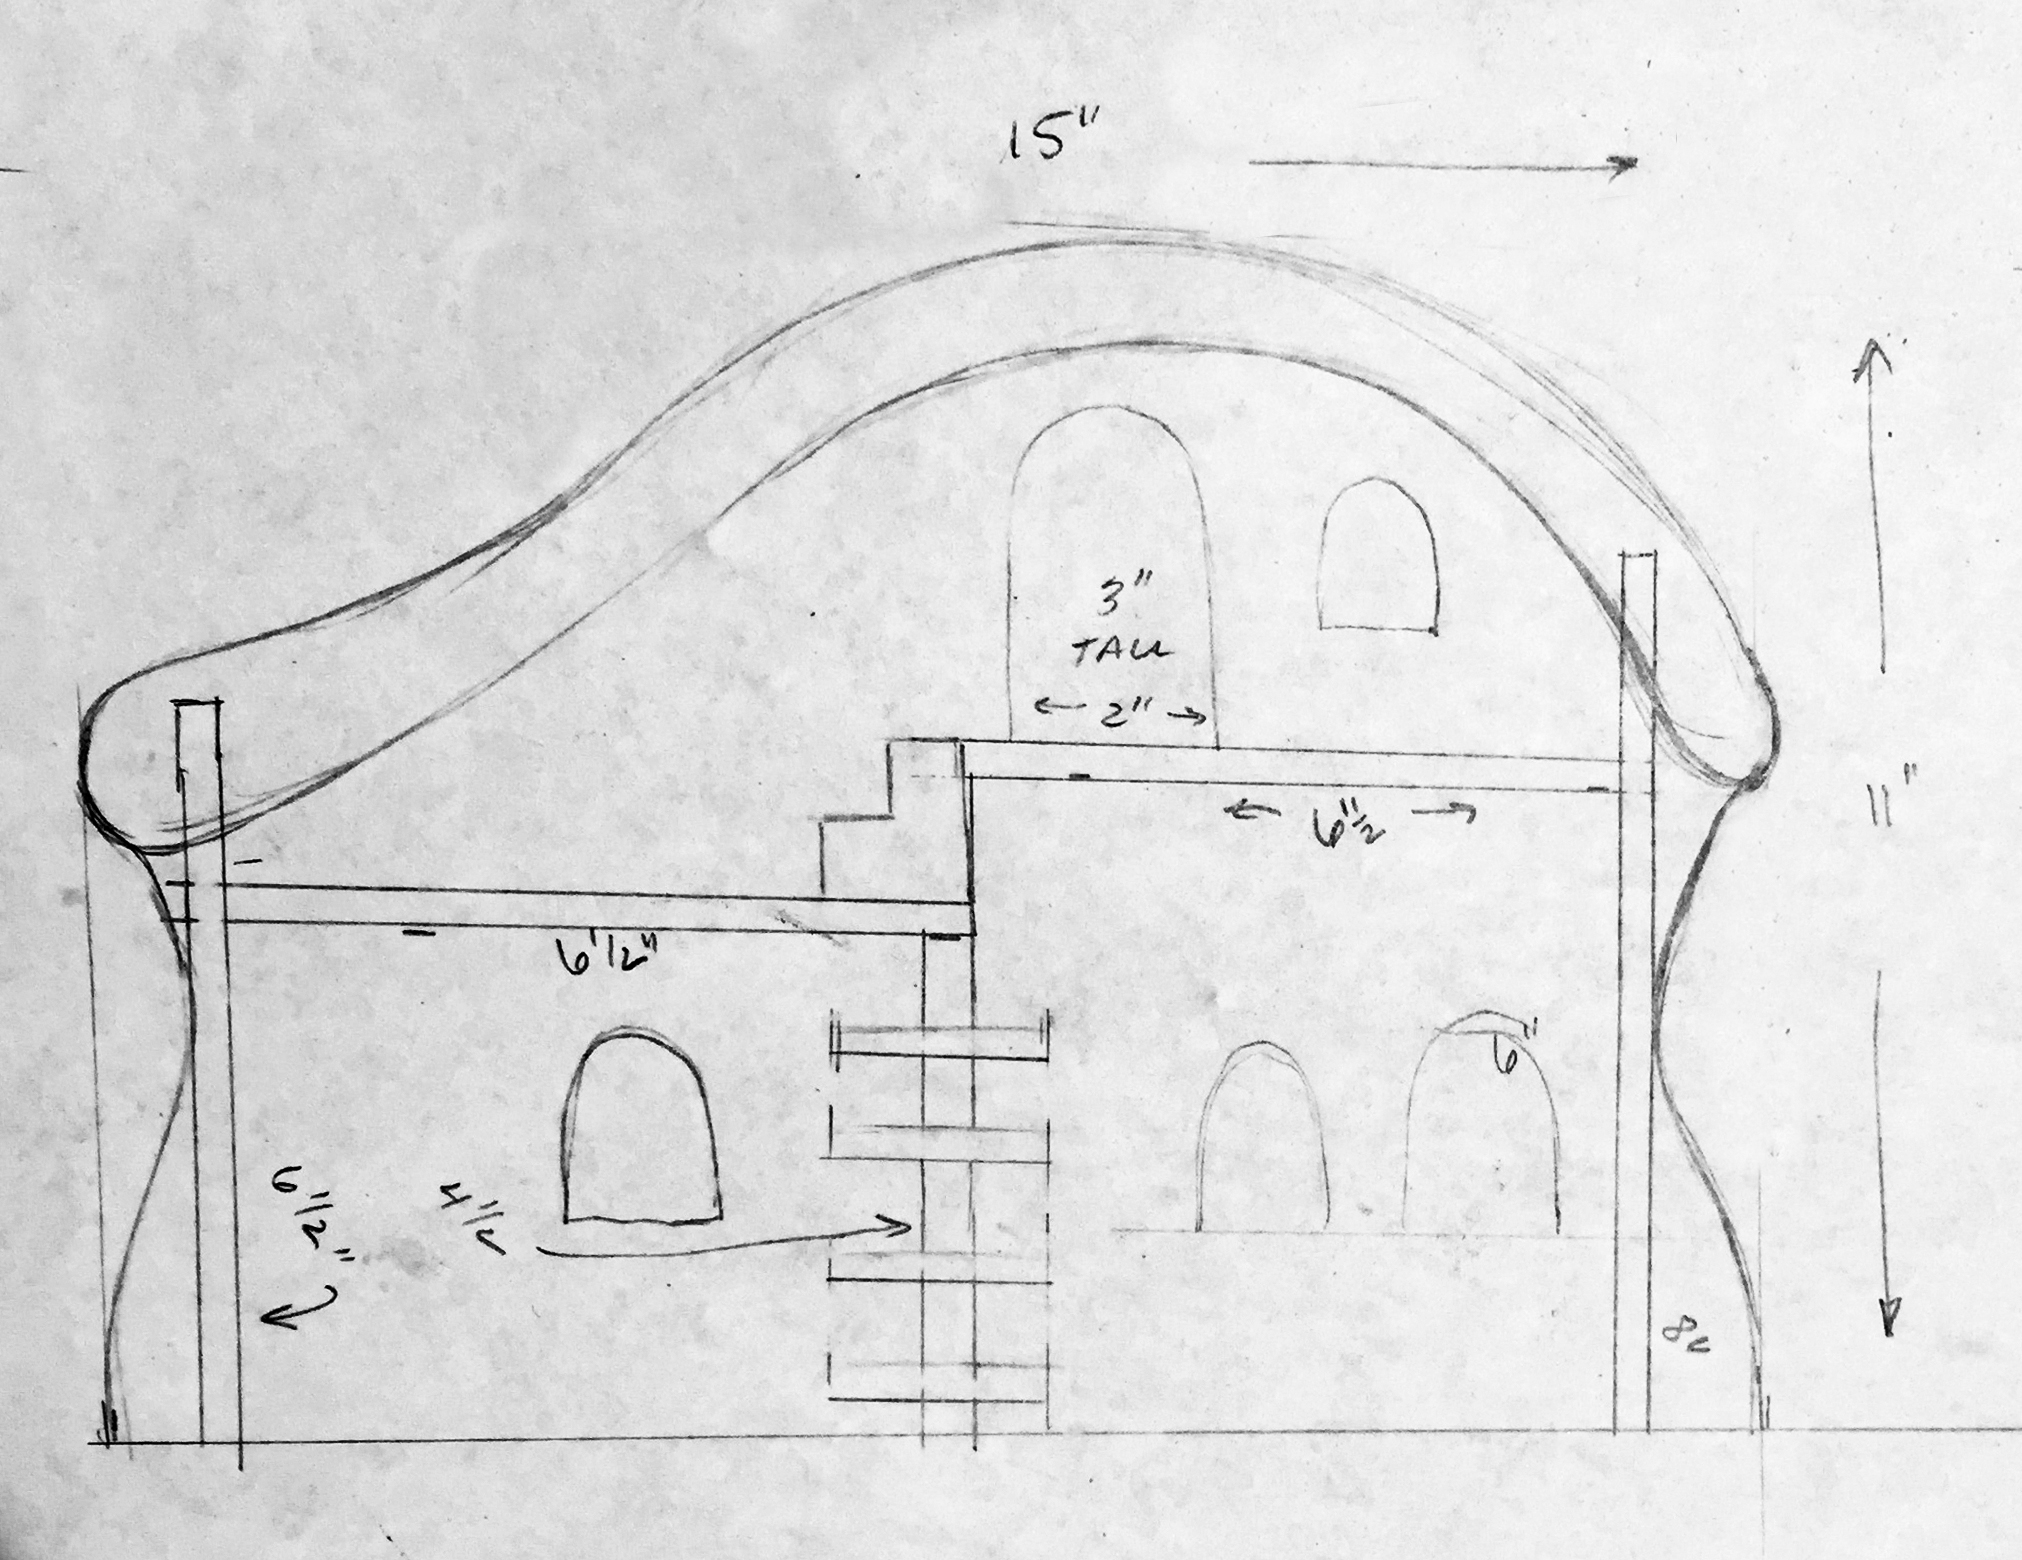

I spent a lot more time on this than I was planning, but wanted to make a couple of enhancements and one thing led to another. I added curves to many of the pieces and there are some mortise and tenons here and there. Note the perpendicular arrangement between the front and the back legs. The front supports the wide arms, while the backs have let ins to support the main weight. All the 2x wood from Lowes was planed down a tad to clean up the faces and sharpen up the corners. We are thrilled with the result!


Sun, 08/16/2020 - 19:59
BRK - Great job on the sofa and chairs. Can you tell me where you found the plans for the sofa and chairs?
Thanks!
Mon, 08/17/2020 - 06:46
Thank you for the kind words.
I actually did my own design using Solidworks. In the shop, I read the measurements I need directly off the model using the e-drawings viewer, so I don't really have "plans" in the traditional sense.
Mon, 09/14/2020 - 10:33
Great Job with the outcome. We are first timers and have built just 1 chair based on Ana White’s original plan. Lot of decisions with cushions & stain type etc but fun & satisfying though.
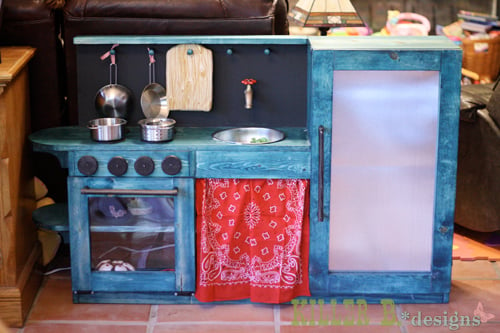
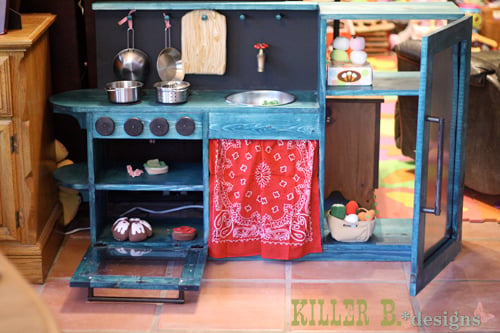
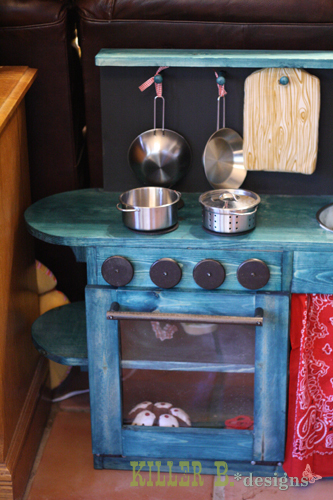
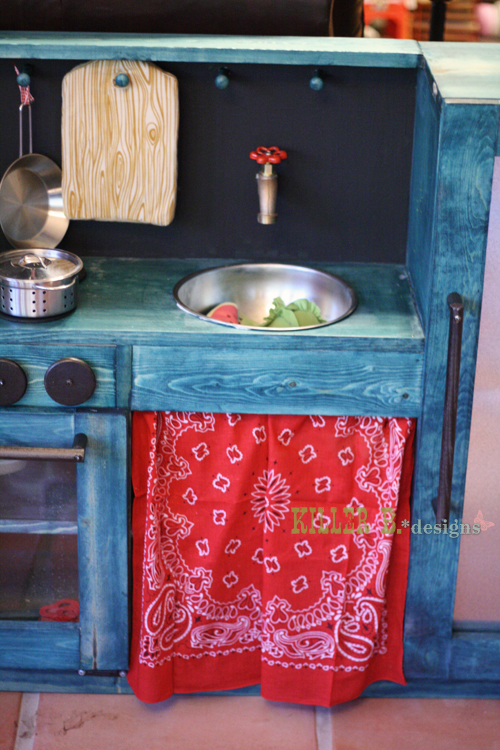
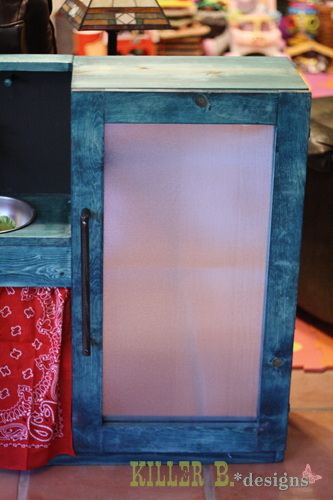
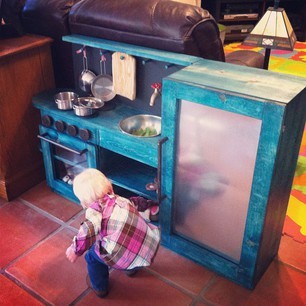
After a trip to IKEA my daughter fell in love with play food and pots/pans. My mom encouraged me that 14 months isn't too little for a play kitchen so I took the plunge! I adapted the plans slightly - making a single door for the refrigerator, measuring both doors so they overlay and aren't inset, putting one shelf in the oven instead of both beneath the sink, and raising the shelf to add room for pegs. I also decided to nix the backing to save on costs since this will eventually be placed up against a wall.
I really wanted to keep the kitchen as chemical free as possible. Paint chips and scratches, and stain has a ton of fumes. So what to do? Take a leaf from the Shanty Sister's book and dye it with RIT dye! I used one liquid bottle of teal and diluted it with a 1/2 cup of water. There was more than enough to do the kitchen, and the wood took the dye so beautifully. For the top coat, I used non-toxic Mod Podge. The backsplash and knobs/handles/burners are painted with chalk board paint.
For all the little details:
- oven knobs are closet dowel rod holders
- shaker pegs are cheap at hobby lobby $1.47 for 5!
- burners are painted cork coasters
- oven "glass" is replacement frame glazing (plexi) from Hobby Lobby
- sink from goodwill
- "wall mounted" faucet is a spigot with a fun red replacement handle since the handles on the spigots were incredibly boring
- fridge backing is roof flashing for a shiny metallic (and magnetic!) look
- curtain is a 99 cent bandana
I totally adore this little kitchen, and my daughter does too! It's a bit on the taller side but she has time to grow into it. Considering the cheap plastic ones are $100+, I was so happy that my cost was just under $97. Not bad for solid wood with a lot of extras!
Mon, 10/29/2012 - 13:34
Your play kitchen is adorable. Charlie is growing...I remember her from the scooter! :-) I somehow missed the idea from Shanty Sisters regarding the RIT dye. Thanks for mentioning that. Since I can't find the Express Color stain from Minwax in my town, this will be a great alternative for colored stain. Can't wait to read more posts from your future builds.
Mon, 10/29/2012 - 14:11
It's so gorgeous & it looks like she loves it!!!
The Tryde Console table was the inspiration piece. Used kreg jig to join the top boards and connect the legs and aprons. The bottom stretchers were similar to the Farmhouse table plans. I plan on using this outside for a grilling table. I am not going to apply a finish - I want to see how the wood changes when exposed to the elements - hopefully it gets a nice Restoration Hardware-type finish.
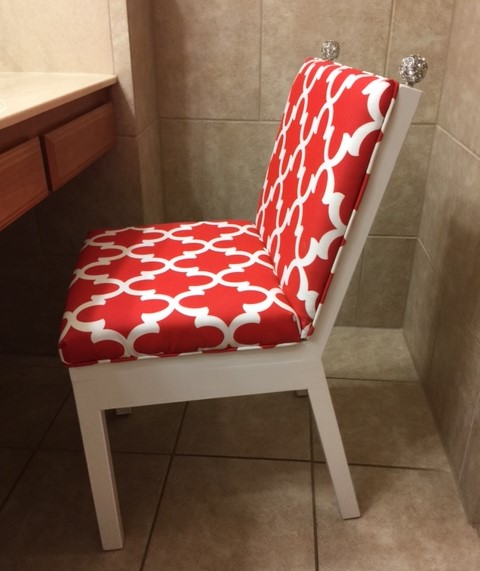
I enjoyed making this chair. It is very difficult to find 2x2's that are straight and not warped. I decided to make cushions that are different than the original one and added bead board to the back because it will match other renovations I am making to the bathroom.
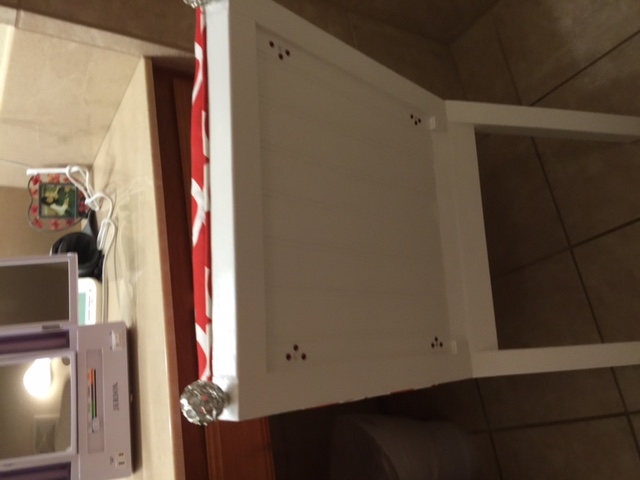
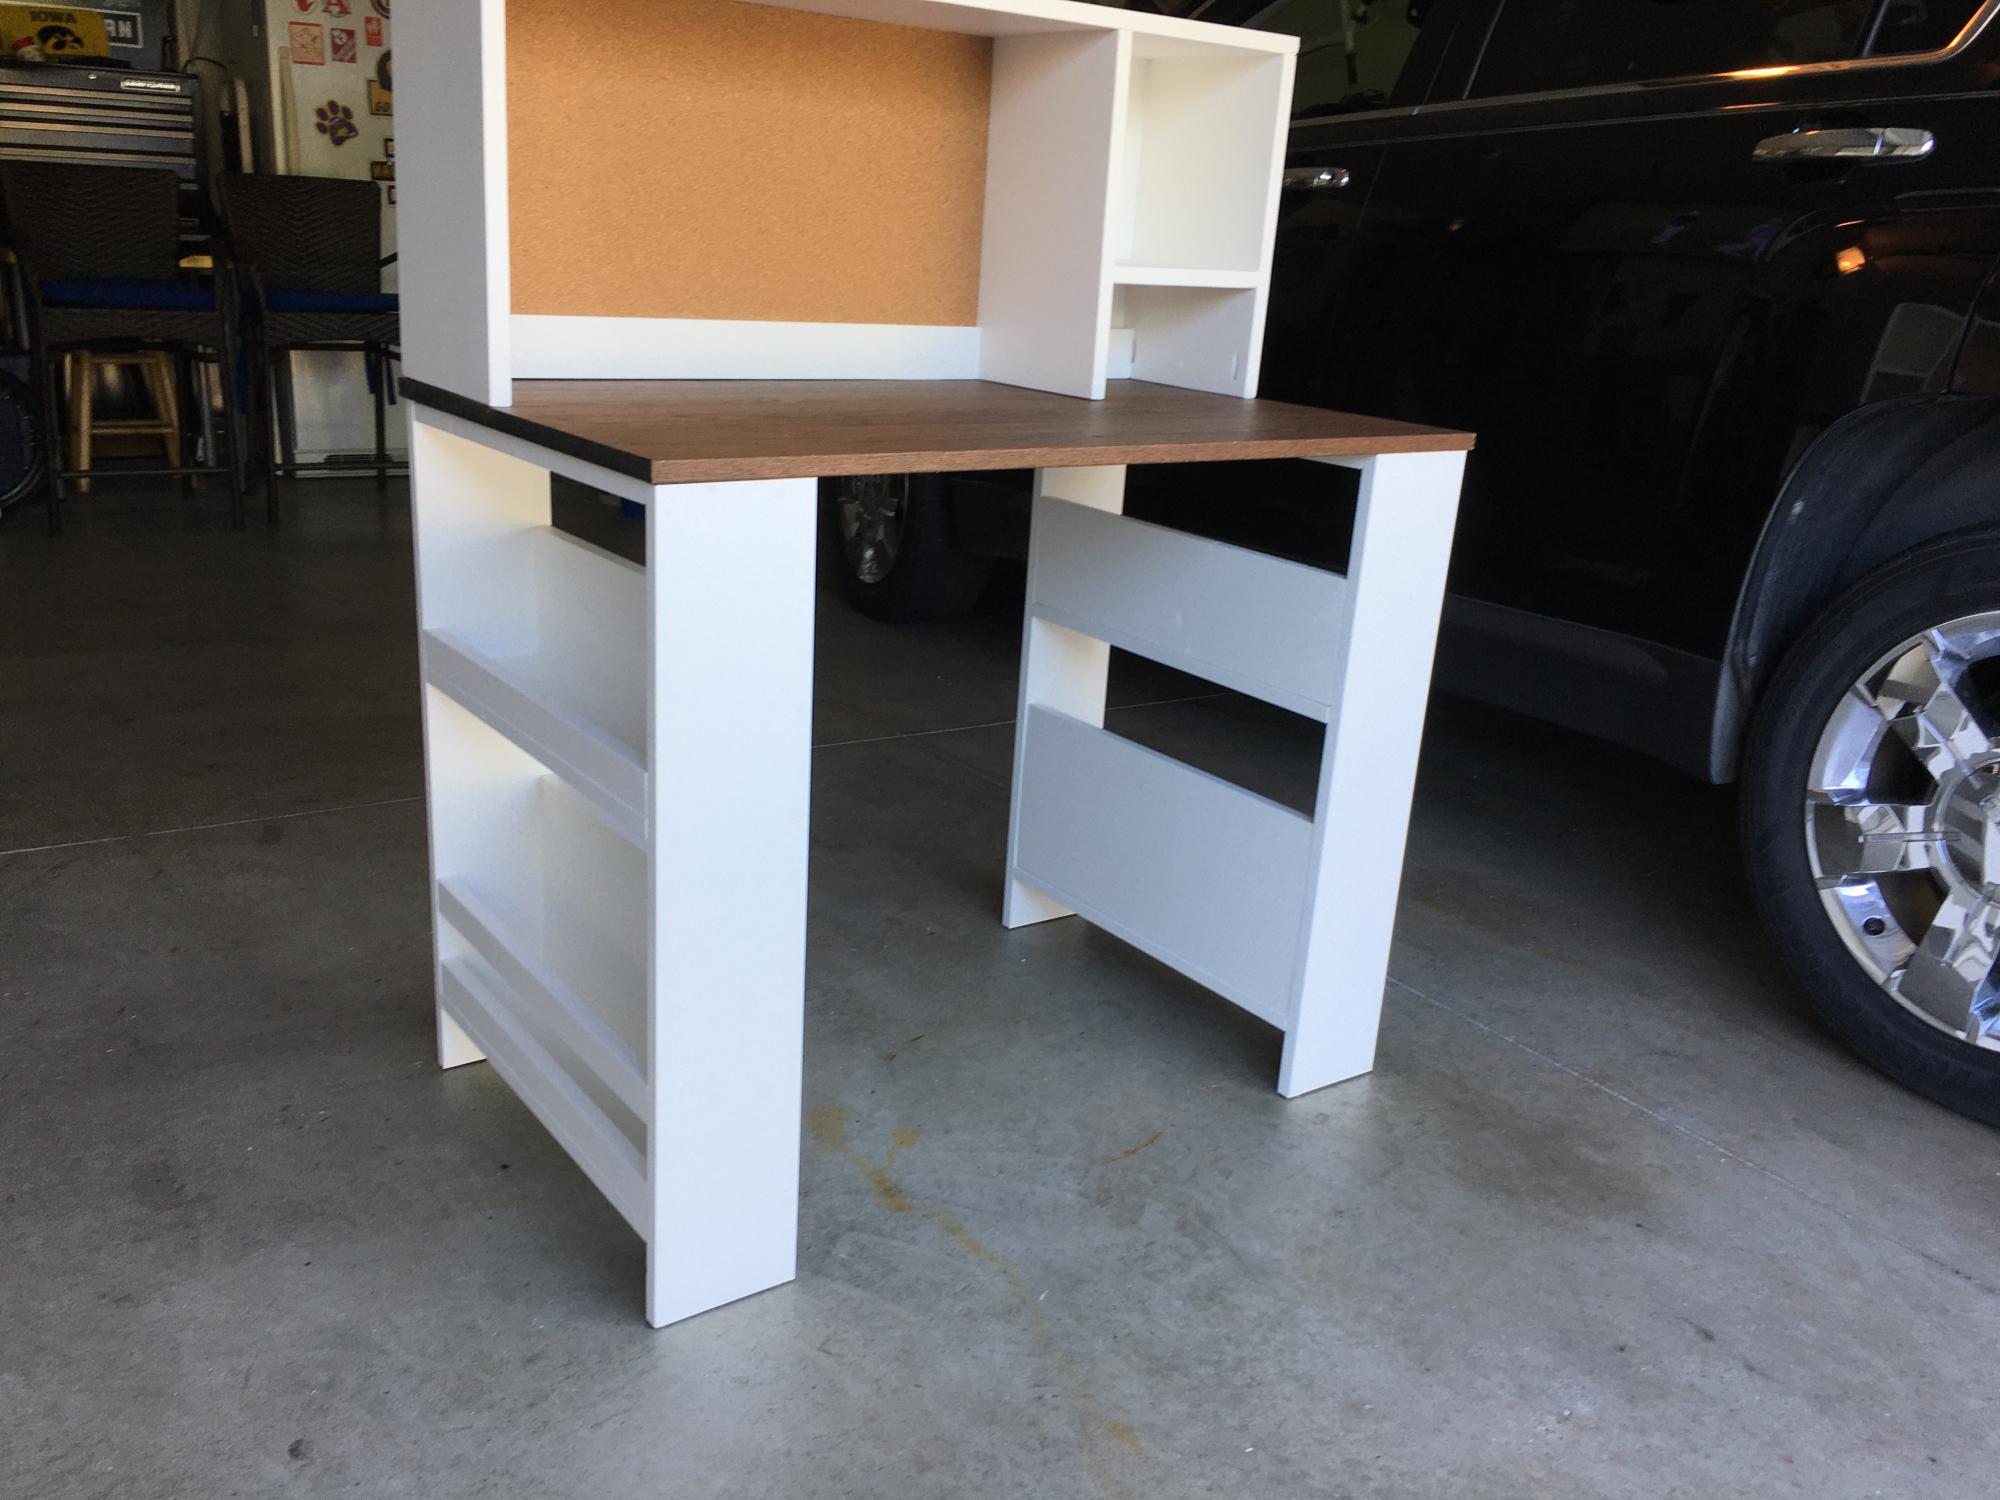
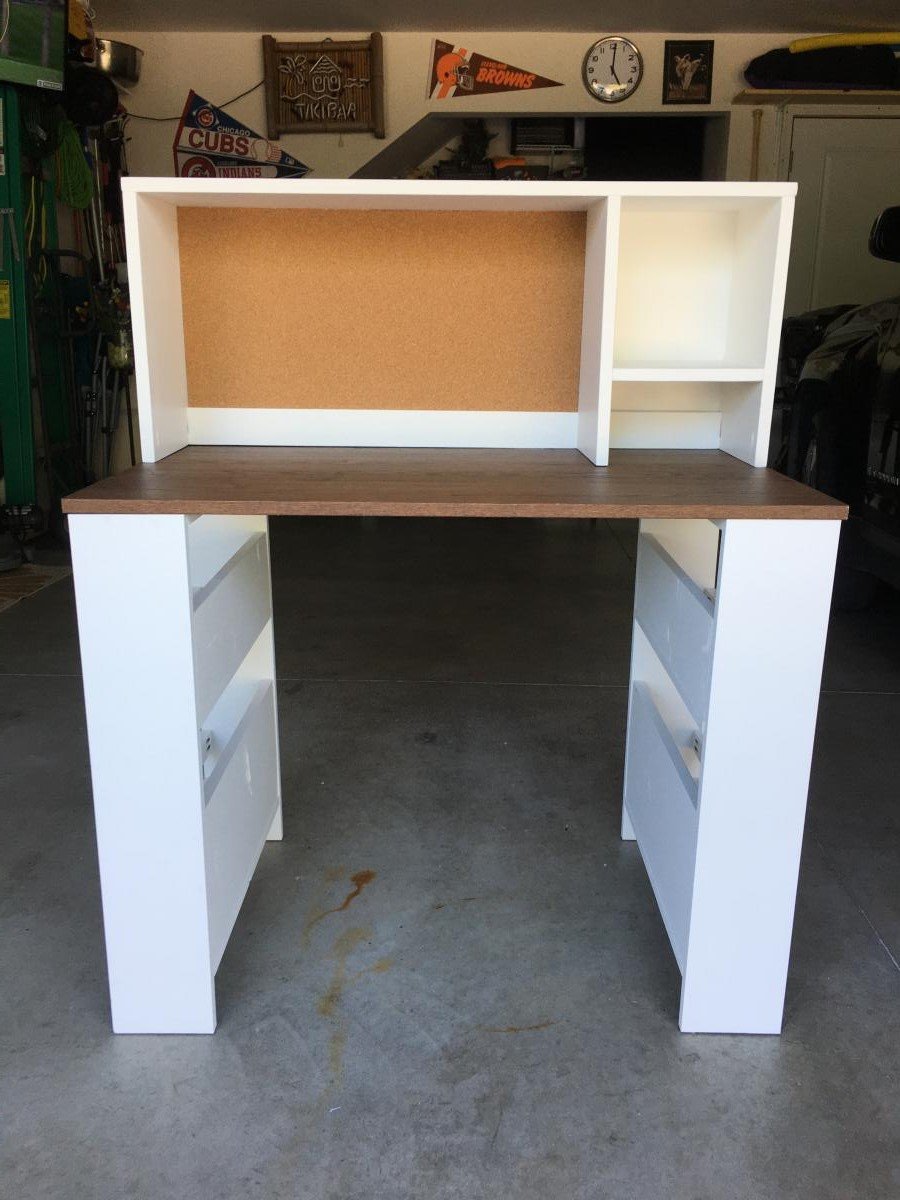
Built this desk/hutch for my 4yr old granddaughter. Combined and adjusted 2 plans to fit a $5 large shelf that I found in the IKEA as-is section. I have the cubby divider cut and painted if they decide to use it. A cork board panel was added to the large hutch space for displaying projects. The best part, the desk can easily be made longer when needed. The bookshelf legs detach from the desktop by removing a few screws. The hutch can also be adjusted with a little more lumber and some creativity.
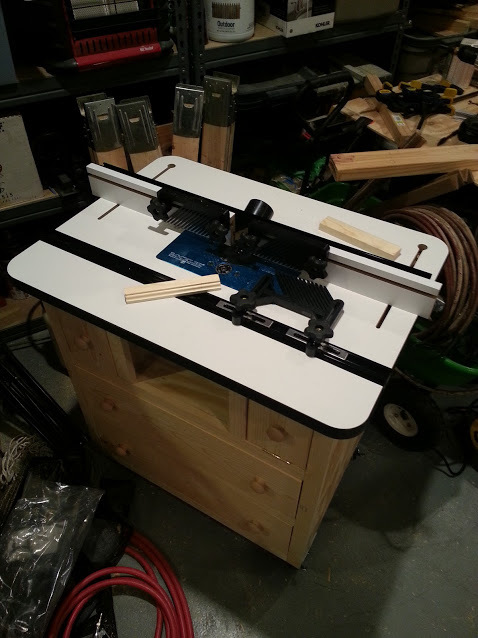
Built Patrick's Router table and added a rockler table, fence, and lift to finish off.
Sat, 11/03/2012 - 19:28
Here's a tip for that 1617 router. Try putting a bandaid over the on/off switch. That thing will get gummed up if left uncovered. It's annoying.
Sun, 03/22/2015 - 05:26
Well, you can read this review http://routertablereviews.com/router-table-lifts-kreg-prs3000-vs-jessem… as well.
Sun, 03/05/2017 - 21:13
My question for Patrick is when he built the top section for 2 small drawers and middle section for the router access..
Did Patrick put on top a 3/4" pc of plywood then the router table top.
Can l attach my router table top to the top pc if 3/4"plywood then my table top is 1 3/4" thick that it would be to thick could you email to let me know please.
Jim
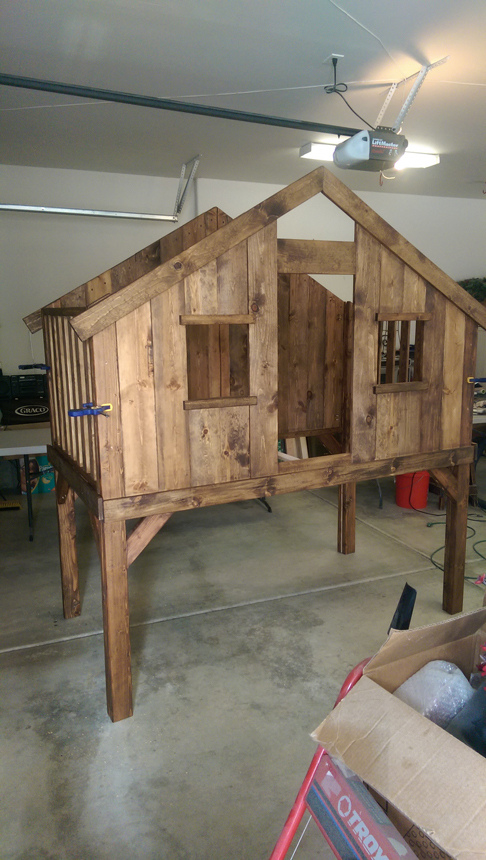
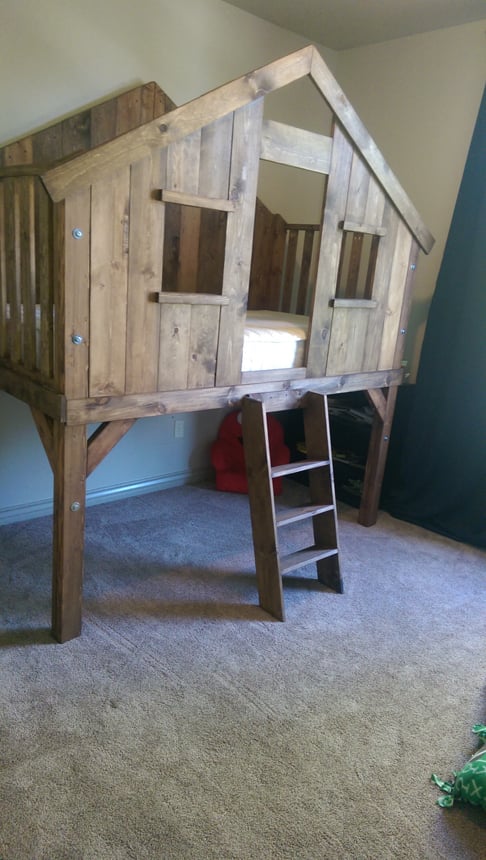
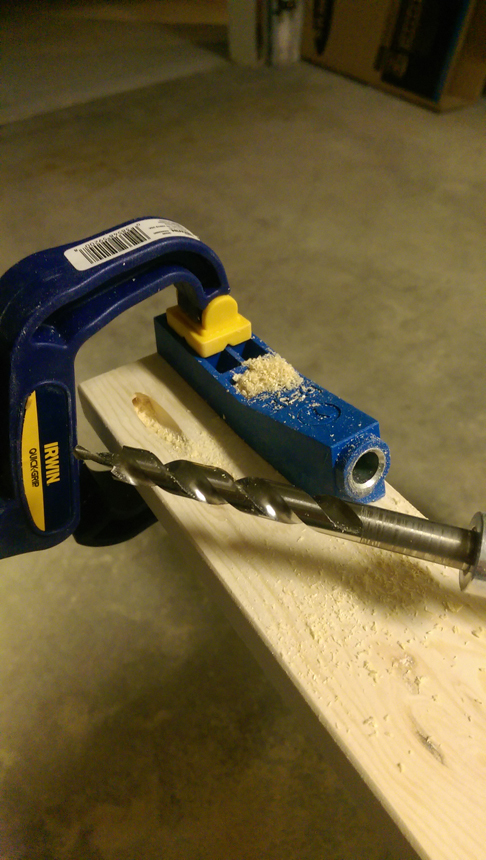
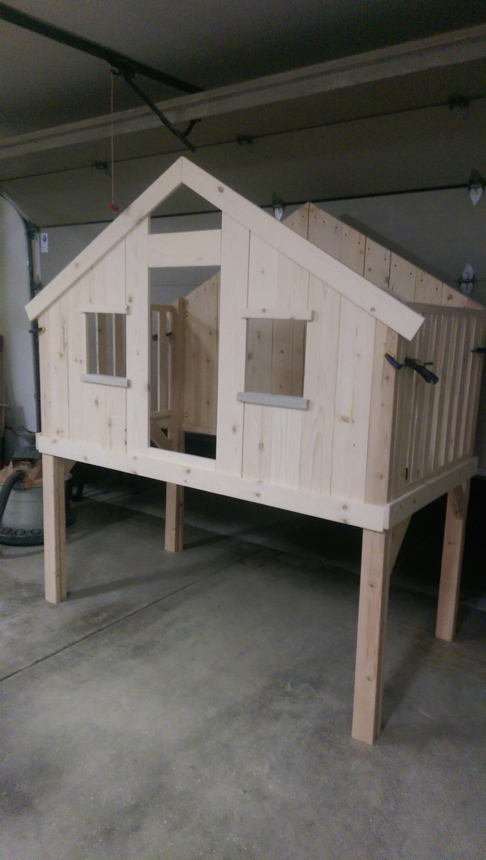
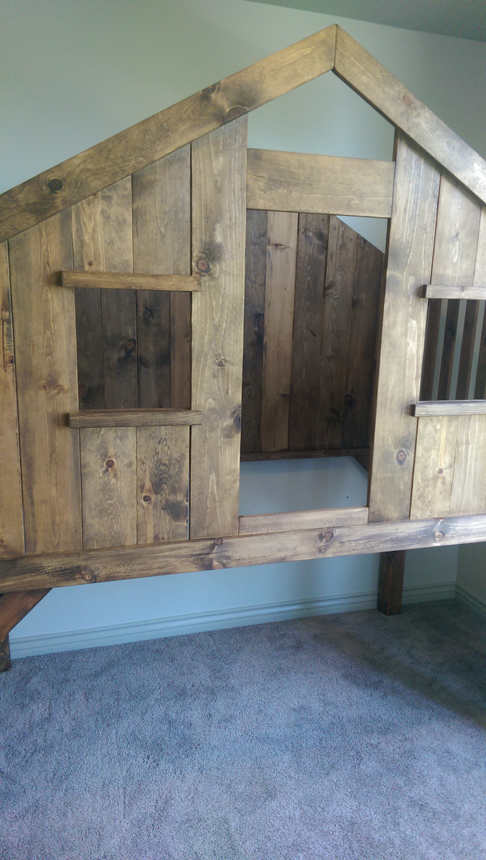
I found this plan after browsing Pinterest for ideas on possibly making a bed for my 2 yr old who had just outgrown his toddler crib. With that, I found this website and the plan for the bed. Instantly, I fell in love with the design, feeling like I was 5 years old all over again. Um, can I just say that this is probably the BEST website on the entire internet??? It's a never-ending candy store for grownups! I haven't built anything with wood since 9th grade shop class. I was a little intimidated at first, but the instructions were very clear and straight forward. I must have read them three times before I read the brag posts three times each, HA! My wife was leaving town for a business trip and I thought this would be the PERFECT surprise for when she got back. And hey, if I messed it up, I figured I could just toss the material and pretend it never happened; no bruised ego if I bombed, complete superhero if it worked out. Win/win. Low and behold, I followed the instructions, took my time, and everything worked out like a dream! This is such a great bed and a great project! As expected, my 4 yr old was CRAZY jealous of the bed, so I built him one as well - I went with a different plan that could accommodate his full size mattress a little better. Again, a no guessing, hassle-free experience using plans from this site. Somehow, I was able to keep this project quiet and my wife was BLOWN away at how well the project turned out. :) One more side note - the Kregg tool is AWESOME! What a great way to easily make pocket holes and beautifully create a project.


Tue, 08/19/2014 - 19:44
First of all, I agree! This is an incredible website. My only issue with it is the bags under my eyes it causes from staying up too late looking through all the fabulous plans and daydreaming about my next build. Lol
You did a fantastic job on the bed. I'd love to know what stain you used as I plan on making this bed as part of a fishing lodge themed room for my youngest when he's a little older and your finish is perfect!
Good luck with any future builds!

I built my granddaughter your doll X picnic table and bench set. My daughter suggested adding a backrest to keep the dolls in place. Painted it the same bubble gum pink as the doll bed I had made her for her birthday.