Community Brag Posts

Moses Basket Rocker

Submitted by bd on Sat, 04/19/2014 - 14:15

Pretty much followed the plan, except I raised the height of the platform. I intended to make the legs longer, but I forgot and cut them to the length on the plan. It looks like the sides of the basket aren't supported as well, but the basket stays in just fine.

I also added little wings on the end to support the ends of the basket. I wanted to be able to remove the basket from the cradle without screwing it in, but also wanted the basket to be secure so I added the little wings. It was easy.

Overall a pretty easy project, except the rockers are time consuming. They're not hard to make, you just need to take your time.

Built from Plan(s)
Estimated Time Investment
Weekend Project (10-20 Hours)
Finish Used
Sample paint on the clearance shelf - can't remember the color name.
Recommended Skill Level
Intermediate

Entertainment Center

Submitted by Dave-Mac on Mon, 07/09/2012 - 13:10

I got the inspiration for this from the entertainment centers that kristenlotz and azca33 (mostly azca33).

I built this over about 5 months in my spare time. It took a lot of wood and a lot of time. I will post plans and a breakdown of supplies if there is any interest.

Estimated Cost
$500
Estimated Time Investment
Week Long Project (20 Hours or More)
Finish Used
I filled all the visible pocket holes with stainable wood filler. After everything was put together, I sanded everything with 150 grit sandpaper. I used a palm sander for the plywood and hand sanded the pine trim and moulding. Then I vacuumed up the dust and wiped it clean with a damp rag. I applied Minwax Mahogany gel stain with white t-shirt rags I bought from Lowe's. If there was any excess of stain I would just wipe it off after about 5 minutes or so. I let that dry for at least 24 hours. Then I applied a coat of Minwax Clear Semi Gloss fast drying Polyurethane. Then I lightly sanded everything with 220 grit sandpaper. Vacuumed and cleaned again. Then another coat of the poly.
Recommended Skill Level
Intermediate

Comments

Misty Tillema

Mon, 07/09/2012 - 15:58

Wow, what a beautiful entertainment center! I love stained wood, and this would match my house perfectly. I'm not ready to take on a project this big yet, but when I am, I want to build it. Great job!

MARGARET (not verified)

Sun, 08/19/2012 - 07:14

This is a beautiful entertainment center. You did a wonderful job. My husband has been looking for plans to build one for us and very much likes this. Is there any way he can find out what material is needed and how you did this?

smbeddard

Sun, 08/19/2012 - 14:08

Dave, this looks great. It is exactly what I want to build for our family. It would be great if you could post the plans. Thanks.

azca33

Mon, 08/27/2012 - 17:49

Great job with the entertainment center, it looks great! Now you can enjoy not only sitting on the coach and watching TV, but sitting back and basking in the greatness of your skills! Good work!

kristenlotz

Mon, 12/31/2012 - 14:26

I love this project Dave-Mac. When I saw it I knew you must have gotten your inspiration from our brag. It is gorgeous. If we were to do our entertainment center again, I think we would incorporate a lot of the things you did with yours. I love that you did a stain instead of paint! Also the thicker stiles and the inset doors are amazing. We created plans for ours on our woodworking blog. Hopefully that helps others get started on their project. It's a lot of work, but it is a fraction of the cost of buying one. Great job! Here is the link to the plans:

http://www.jrlwoodworking.com/2012/12/furniture-plans-custom-entertainm…

kristenlotz

Mon, 12/31/2012 - 14:27

I love this project Dave-Mac. When I saw it I knew you must have gotten your inspiration from our brag. It is gorgeous. If we were to do our entertainment center again, I think we would incorporate a lot of the things you did with yours. I love that you did a stain instead of paint! Also the thicker stiles and the inset doors are amazing. We created plans for ours on our woodworking blog. Hopefully that helps others get started on their project. It's a lot of work, but it is a fraction of the cost of buying one. Great job! Here is the link to the plans:

http://www.jrlwoodworking.com/2012/12/furniture-plans-custom-entertainm…

DMac

Thu, 03/07/2013 - 10:17

It depends on what you are looking for. How complicated of a project are you looking to have built? If it is something on this site then I could build it for you.

This is Dave-Mac by the way. I couldn't figure out how to reset my password so I just made a new account.

Stuffed Animal Zoo

My daughter loves this! And now I have to make one for my youngest! Instead of rope I used 3/8" Bungee Shock Cord. I used one long piece and threaded it through the screw eyes. I put the screw eyes in the top, middle and bottom.

Built from Plan(s)
Estimated Time Investment
An Hour or Two (0-2 Hours)
Recommended Skill Level
Beginner

king size bed with `reclaimed' headboard

It was time for a new mattress - as it so happened, the store had a sale on: any size for the price of a single. So I couldn't resist and got the king rather than the queen size. Rather than buying the the bottom of the ensemble as well I decided to try and build a bed.
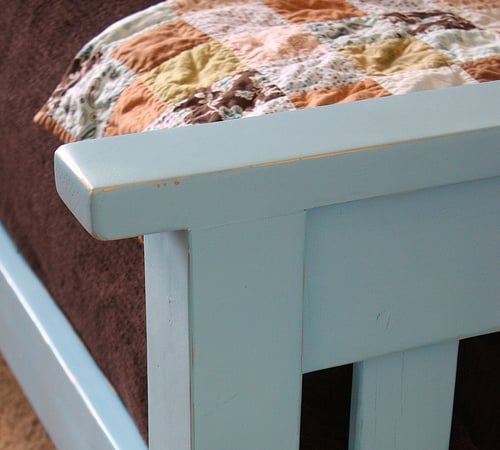
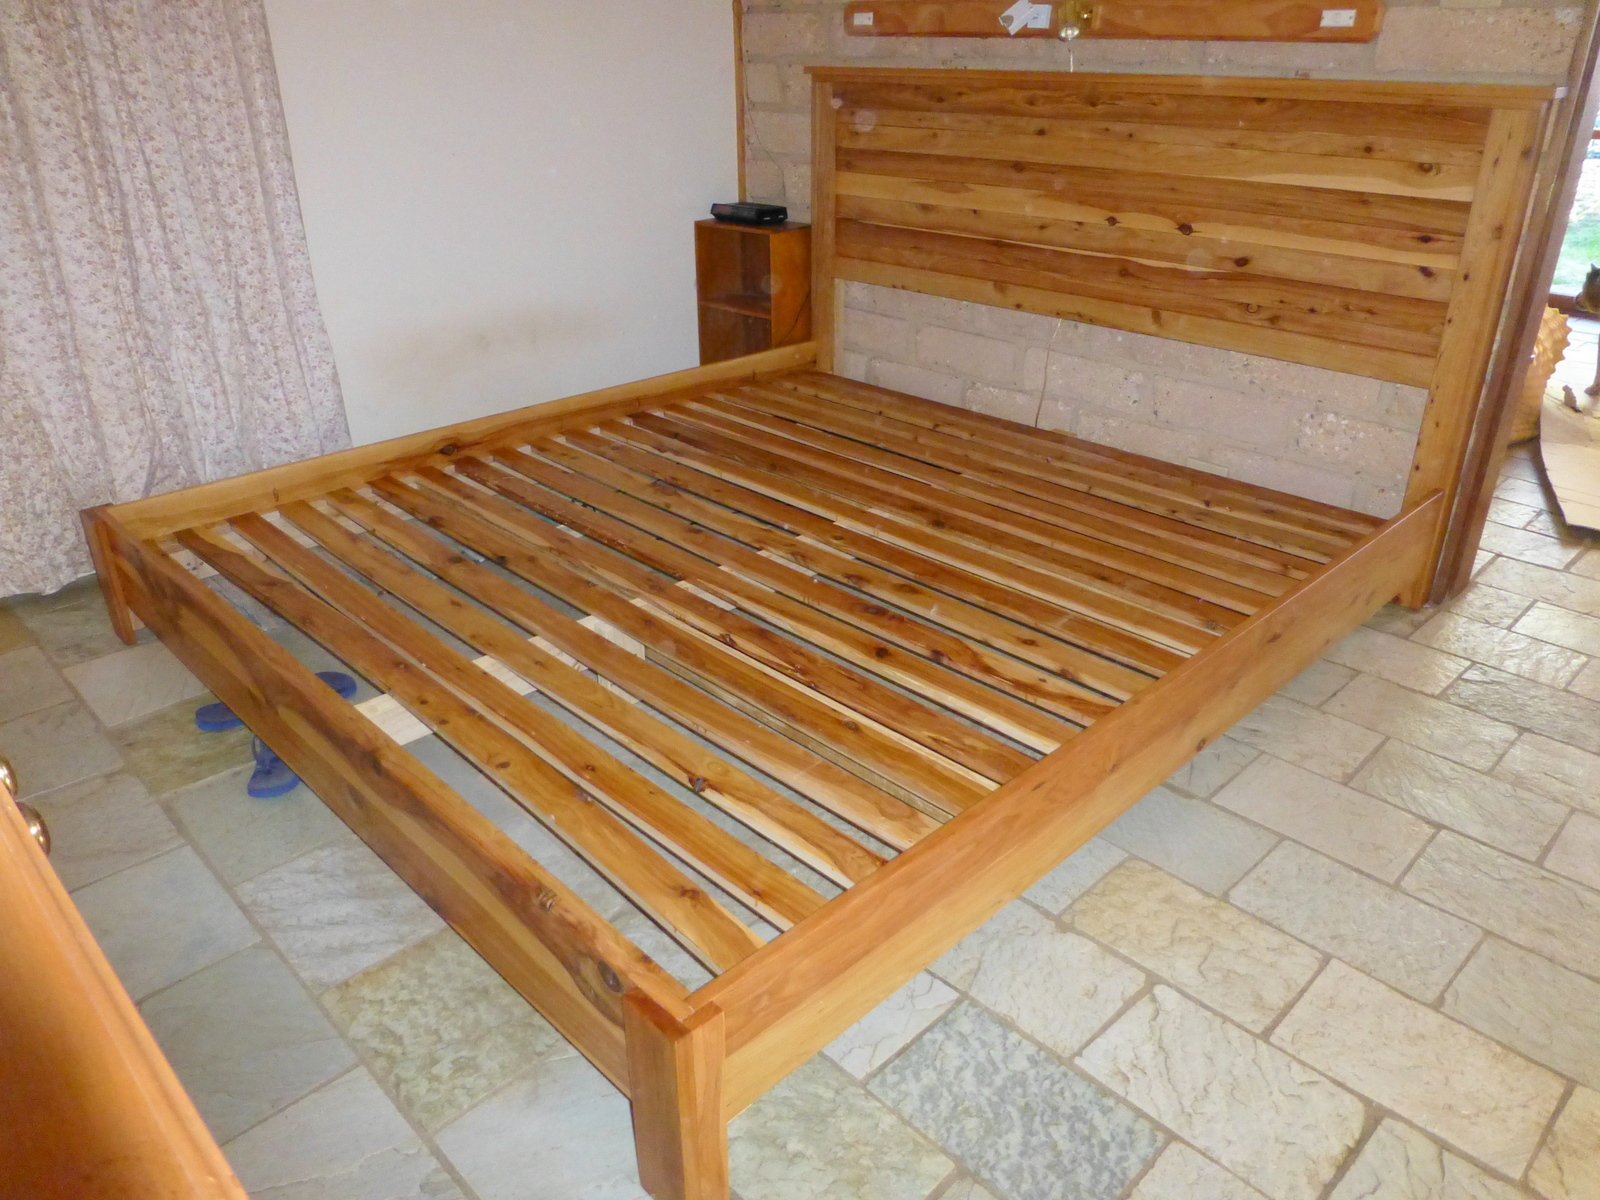
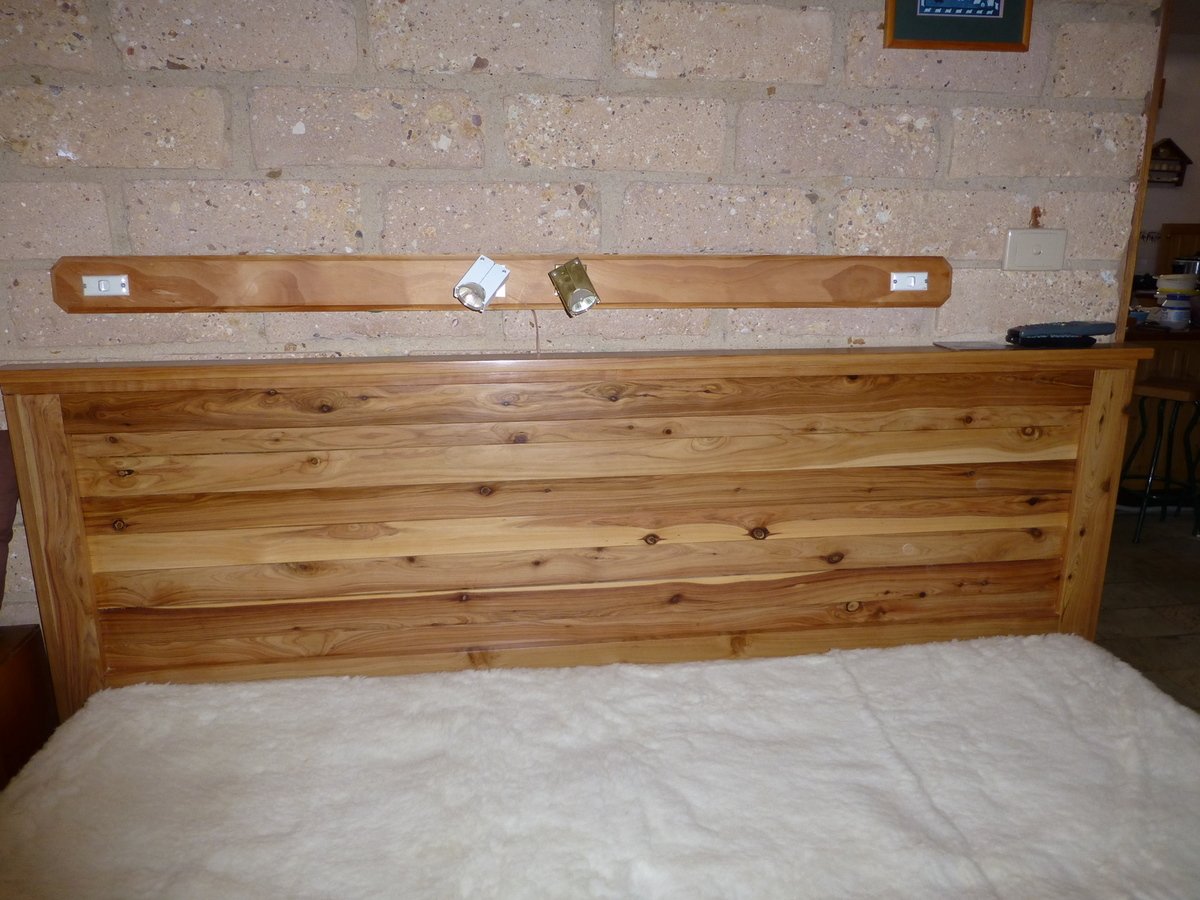
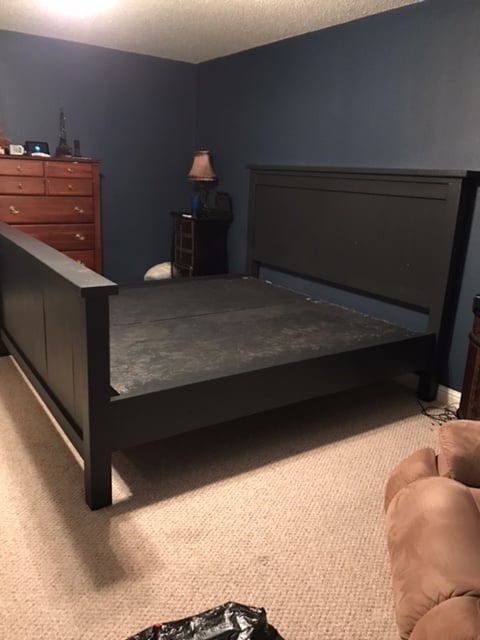
Would have loved a farmhouse bed, but the bedroom is tiny, the king only just fits in, so no foot end or chunky posts. Mom's fine farmhouse bed was the initial choice - but I like my timber `natural' and couldn't get pine mouldings. So ended up building the reclaimed headboard - out of cypress pine fence pickets: these come in 65x19mm (i.e. close to a 1x3 pine board) and up to 1800mm long, but used pine for the bits which are not visible (easier to work with & lighter). I wanted a bed where my feet touch the ground when I sit on the edge and which don't need to climb up to, so shortened everything to make the top of the mattress at 550mm from the floor.
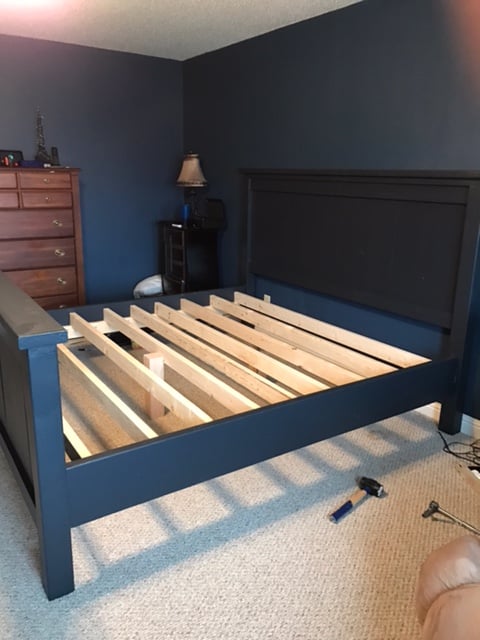
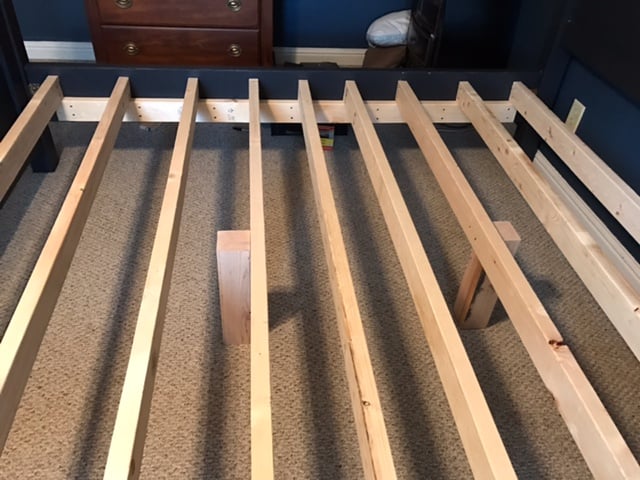
The bed itself is from Mom's farmhouse bed plans, modified for a King (72 inches wide) with a middle rail. The sides are made from two length of cypress tongue and groove floorboards each, joined together with pocket hole screws and with the top tongues ripped off. The slats are fence pickets as well - managed to find enough of the nominally 1800mm ones which were just long enough to fit across after squaring off the ends, the most economical option. To hold them in place, I glued on spacer blocks cut from a 1x2 length of pine - the slats sit between them snugly & making the slats removable makes it much easier to move the bed.
I sealed the timber with a base coat of oil-based polyurethane and the applied furniture wax (carnauba) and buffed it to a soft glow.
This was a big project, it took me the best part of 4 weekends - lack of space & winter weather didn't help (ended up assembling the bed in the lounge room). It cost me almost $300 all up, about $220 for timber, the rest for screws, nails, sandpaper, glue, varnish, woodfiller and wax - half the price of what the commercial base alone would have been.

Estimated Cost
$300
Estimated Time Investment
Week Long Project (20 Hours or More)
Finish Used
one coat oil-based clear polyurethane (satin), followed by carnauba wax
Recommended Skill Level
Beginner

Chairs for a Patio Table Based on the Classic Chair Plans

Submitted by Anonymous (not verified) on Thu, 09/01/2016 - 20:26

The structural elements of the "classic chair" are excellent and so adaptable.  I simply lengthened the leg to produce a conventional 19” seat height and extended the back frame dimensions to provide a higher seat back.  I also substituted 2"x4" framed seat bottoms featuring slat inserts for the plywood seat bottoms. Most of the frame materials are Doug-fir 2"x4"s ripped down to 1.5"x1.5"s.  The slats on the seat-bottom and chair-back are cedar fence boards ripped down to 2.5" wide.  

Built from Plan(s)
Estimated Cost
$50.00
Estimated Time Investment
Week Long Project (20 Hours or More)
Finish Used
Black satin enamel for the frames and spar urethane . . . both water based. Because the chairs are outside the finish is not indoor furniture quality. The purpose of the finish is to protect the chairs from the elements.
Recommended Skill Level
Intermediate

Farmhouse table

Submitted by Anonymous (not verified) on Thu, 06/18/2020 - 19:25

First table build! We modified the plans with no breadboard ends since we live with lots of humidity and wanted to allow the wood movement. We also used 4x4s for the legs. White chalk spray paint legs and custom mix of special walnut and weathered oak stains. We LOVE it!!

Estimated Cost
200
Estimated Time Investment
Weekend Project (10-20 Hours)

Outdoor Comfort Collection and Simple Outdoor Dining Table

Modern Comfort Outdoor Sofa and Loveseat to go with the Simple Outdoor Dining Table and Benches that I made 2 years ago. I love that the "Modern Comfort" plans don't require angles or a miter saw. I used a circular saw for all of it!


New counter height planters in use

Submitted by jrbdmb on Fri, 06/20/2014 - 05:05

Using the counter height planter plans from Janettx. Thanks!

Estimated Time Investment
An Hour or Two (0-2 Hours)
Recommended Skill Level
Beginner

Comments

Janettx

Mon, 09/20/2021 - 13:24

Nice job!!! I'm still using mine. I ended up putting 12"x12" pavers under each leg to extend their life. After the 2nd year now we get bumper crop out of ours each season.

Workbench with pegboard

Submitted by bredbu on Wed, 07/01/2020 - 18:37

I made a workbench for my garage it was pretty easy. I also made an instructional youtube video if you want to learn how to make it. #diy #workbench #bench

Estimated Cost
125
Estimated Time Investment
Afternoon Project (3-6 Hours)
Finish Used
none
Recommended Skill Level
Beginner

8 foot picnic table

Submitted by Abby721 on Sat, 07/18/2020 - 08:40

This picnic table was a quick build and turned out amazing. I modified the center base support by adding an extra table top support and seat support board to the opposite side of the center legs to give the table symmetry to accommodate an umbrella hole. I also shortened both cross supports by an inch to make sure the base wouldn’t be longer than the top boards. The space between the center table support boards and seat support boards is the perfect size to fit a standard umbrella. I used a 1 3/4” hole saw to make the umbrella hole. The build and stain/paint took me about 5 hours but additional time is needed to properly seal the table. I used untreated pine. Treated pine may give the table longevity but it would also add a lot of weight to an already heavy table. This was a relatively easy and quick build and is a great size to fit my whole family plus a couple guests! I’m happy with how it turned out and would recommend this build to anyone looking for a budget friendly and simple patio table.

Built from Plan(s)
Estimated Cost
$75
Estimated Time Investment
Day Project (6-9 Hours)
Finish Used
Varathane Briarsmoke for the top and Rustoleum Canyon Black Satin for the base. Sealed with 2 coats of Varathane Helmsman Spar Urethane
Recommended Skill Level
Beginner

Comments

Seasonal And Holiday

Farmhouse Style Kitchen Island

Submitted by Anonymous (not verified) on Sun, 11/20/2016 - 04:27

Dear Ana, 

Thank you for inspiring my friend Erik to build your farmhouse style table.  I was inspired by him, so I decided to build your farmhouse style kitchen island. It was not an easy DIY project for a first time DIY. However, I'm thankful that your plans are easy to follow and that there are plenty of Kregjig tutorials on YouTube! This project took 15 hours, but in the end- the time spent didn't matter. I love the finished product, finally a space to prep and cook. Thank you for inspiring all of us. Not perfect, but beautiful. Used Minwax Golden Pecan Wood Finish and 2 coats semi gloss.  Thanks again! -Leo C. @1LeoChen Instagram & Twitter 

Estimated Cost
$100 for wood & stain /semi gloss ; $20 screws this is assuming you have all the tools .
Estimated Time Investment
Weekend Project (10-20 Hours)
Finish Used
Minwax Golden Pecan - wipe it on with towel, dispose of towel properly. May be flammable or cause fire.
Recommended Skill Level
Intermediate

Comments

Farmhouse bench

Once I made the farmhouse table, I had to make the bench to go with it! It compliments the table very well. Easy to build only took a couple hours from start to finish. I also used the kreg pocket hole jig on this project as well so no screw holes could been seen. Thank you Ana for the plans!

Estimated Cost
$20
Estimated Time Investment
Afternoon Project (3-6 Hours)
Finish Used
White satin paint, white wash for the seat over the stain, weathered gray stain, fast drying polyurethane 3 coats
Recommended Skill Level
Beginner

Bedside Tables

I used the "Reclaimed Wood Look" bedside table plans but altered them to make it taller to go with our bed and to make them less wide and long. The finished product has top dimensions of 14 1/2" by 14 1/2" to fit in our small room. I also removed the top drawer to make a bookshelf. The first table took about 4 hours to build and sand and the second one went a lot quicker. I stained each with one coat of Minwax Dark Walnut and sealed with 3 light coats of polyacrylic. The pulls are from Lee Valley.

Estimated Cost
$40 per table including screws, glue, stain, lumber and hardware.
Estimated Time Investment
Afternoon Project (3-6 Hours)
Recommended Skill Level
Intermediate

Farmhouse King size bed with taller foot board

Submitted by cktrimble on Sun, 01/22/2017 - 19:34

We ended up making the foot board about 12 inches taller as we prefer a taller foot board.  We opted to make this platform bed as you'll see in the photos.  It turned out great and was fairly simple due to the DIY plans provided here and all the friendly posts by others with their hurdles, etc.  This is an amazing site, THANK YOU Ana!

Estimated Cost
$200
Estimated Time Investment
Weekend Project (10-20 Hours)
Finish Used
Primer then black paint
Recommended Skill Level
Intermediate

Three story doll house for my granddaughter

Here's my version of the Dream Doll House. Three stories, made with birch plywood and pine, featuring realistic stairs, baseboards, crown molding, exterior corner battens, and left in the natural state with just a few coats of water-based poly. Put the whole thing on casters for ease of rolling around the playroom. Fun project and the hugs were all the reward I needed!

Estimated Cost
Maybe around $100.
Estimated Time Investment
Weekend Project (10-20 Hours)
Finish Used
Water-based polyurethane
Recommended Skill Level
Beginner

Comments

Hanging Planter Stand

Submitted by unclebones on Mon, 02/06/2017 - 07:49

Found the old Home Depot plans, and decided to add my hand burned touch to it.
Have seen some that were using vinal or painted letters, but i like the burned effect, and its easier to seal right over the top with the outdoor stain/seal treatment..

Estimated Cost
Less then $20 in materials
Estimated Time Investment
Afternoon Project (3-6 Hours)
Finish Used
Outdoor Stain/seal brushed on when completed.
Recommended Skill Level
Beginner

Comments

Nephew's 2nd Birthday Present

Submitted by shellyward on Sun, 11/09/2014 - 14:40

Wanted to give my great-nephew something handmade for his 2nd birthday and hopefully something he can enjoy for years to come. Spent the weekend with my hubby doing this and loved every minute and thrilled with the final outcome 

Built from Plan(s)
Estimated Cost
$150
Estimated Time Investment
Weekend Project (10-20 Hours)
Finish Used
Paint and polyurethane
Recommended Skill Level
Intermediate
Back