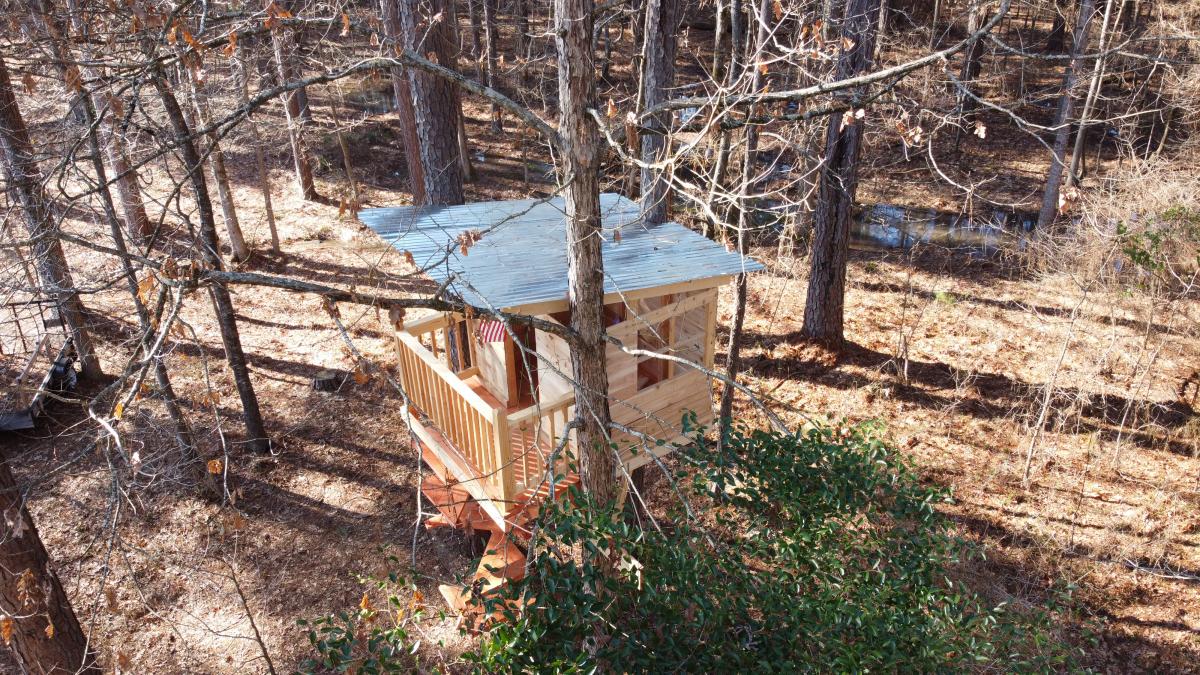
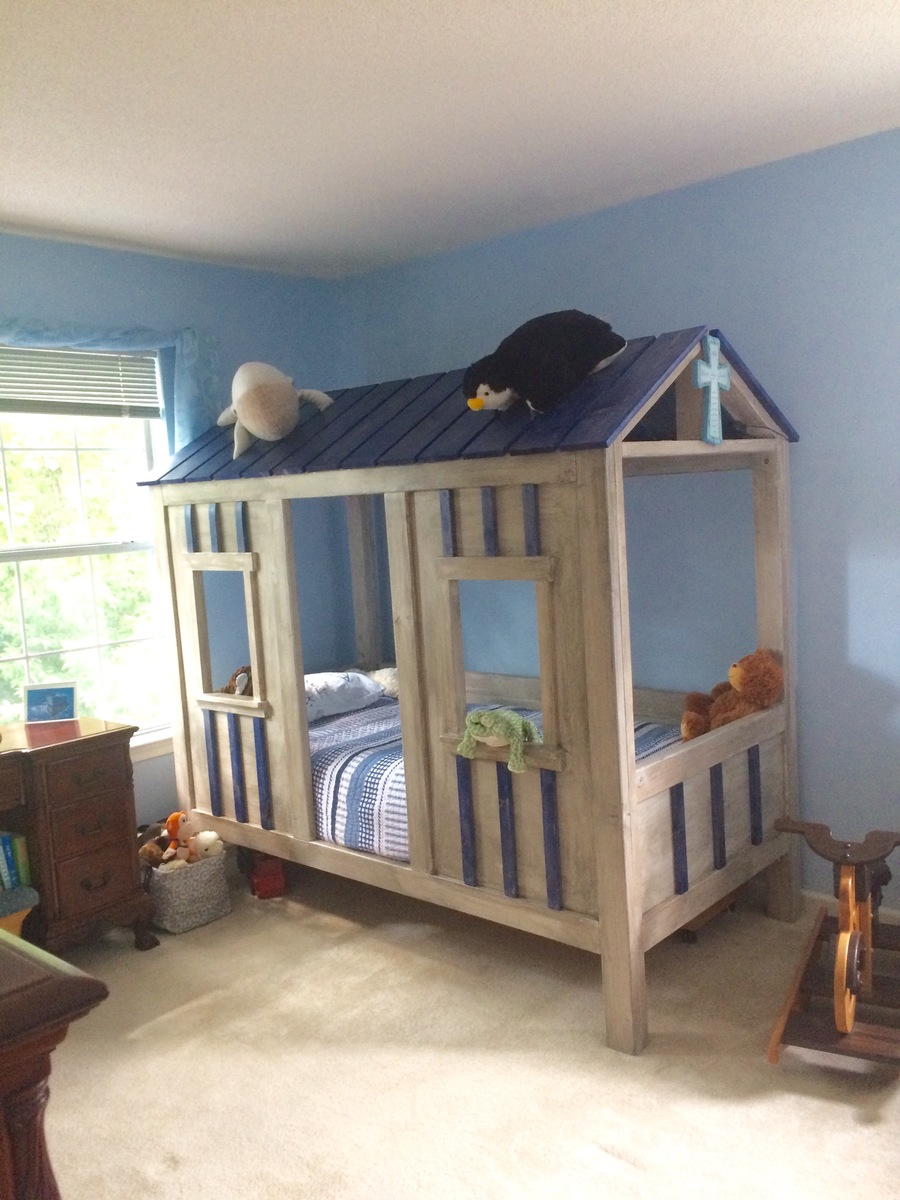
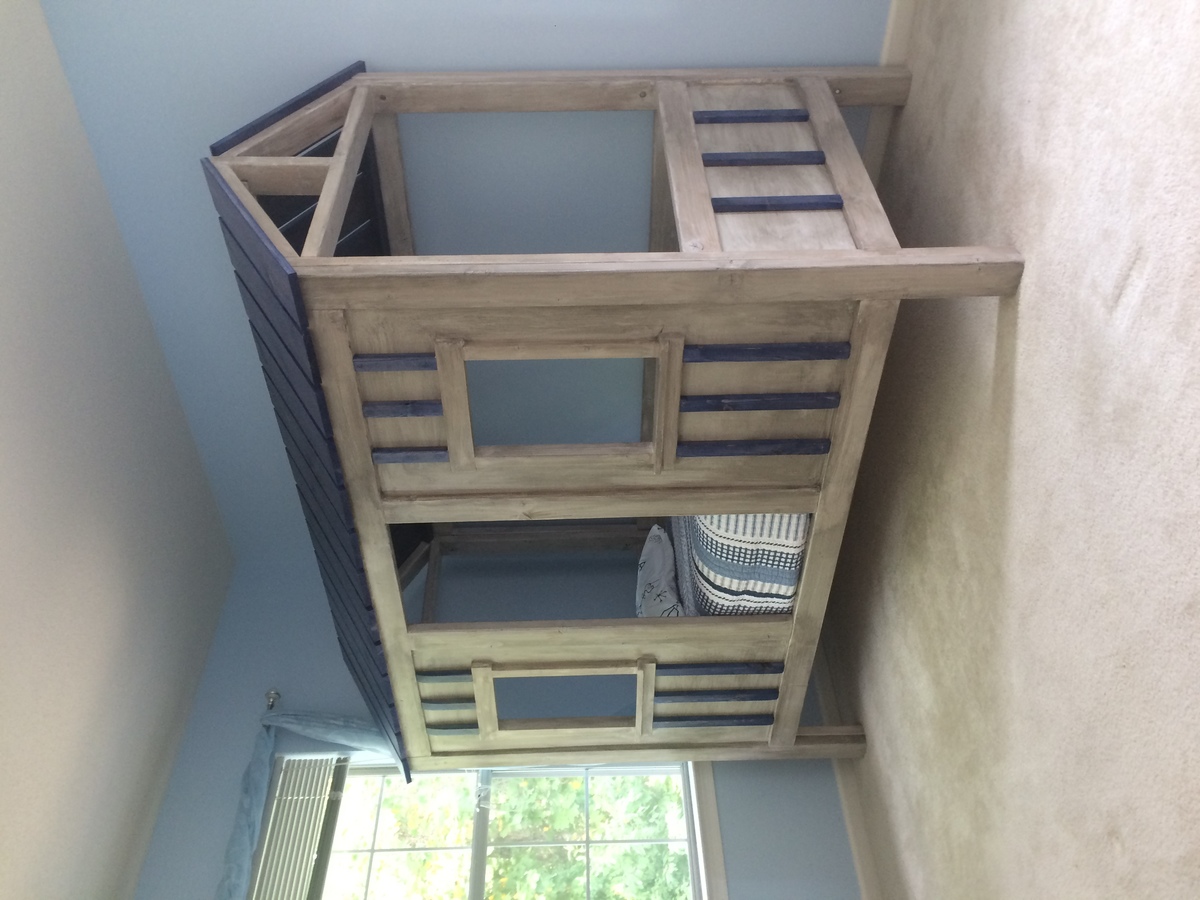
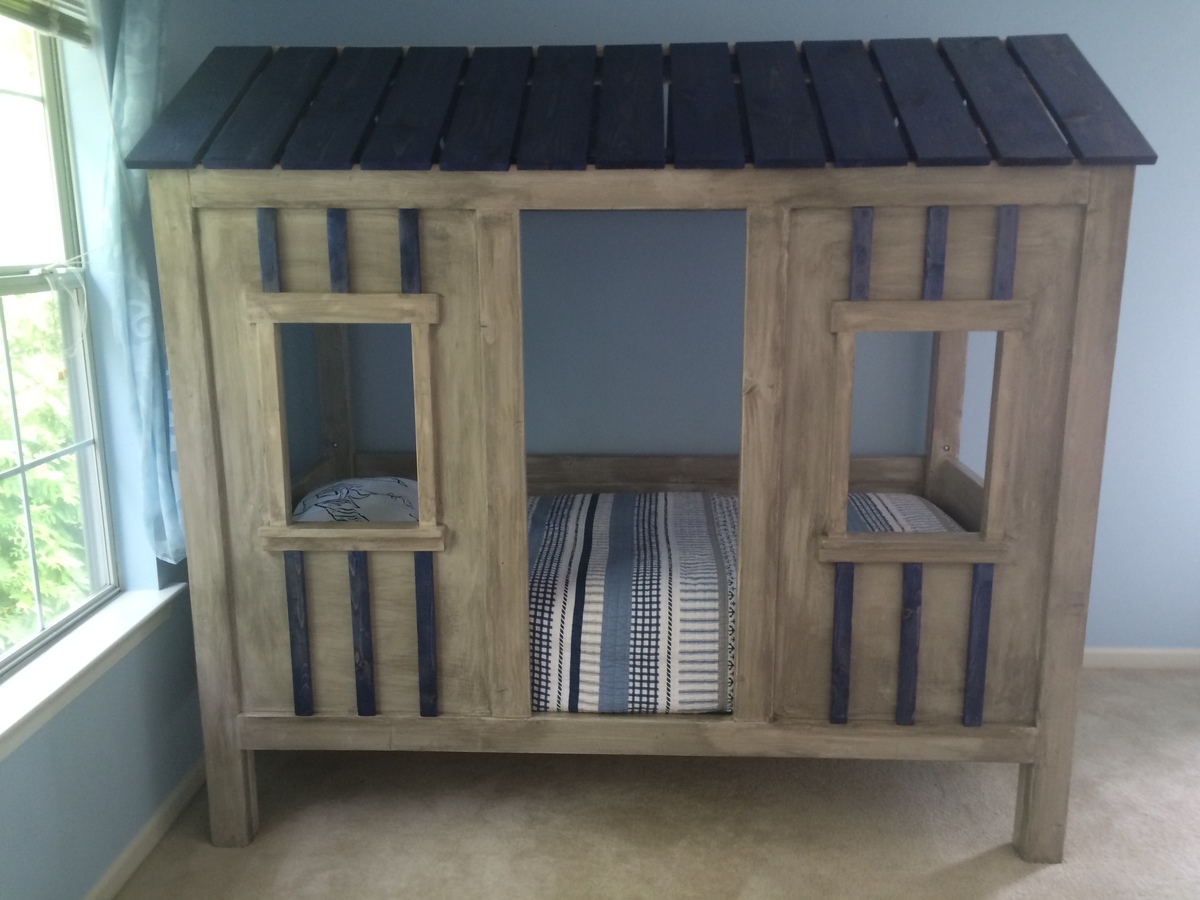
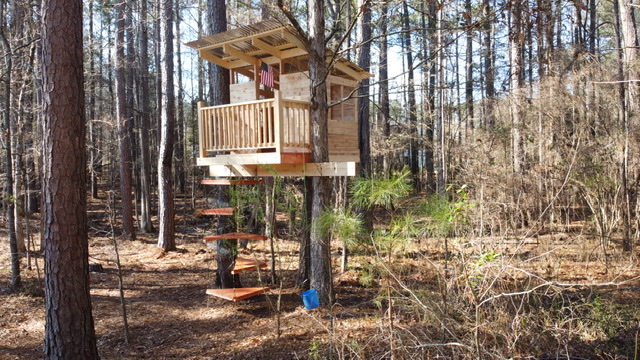
Community Brag Posts
Full size Farmhouse Bed
![](/sites/default/files/3154817598_1352780186.jpg)
This is my first woodworking project. The plans worked out great! However I did make some minor changes. I made the two by four under the two by six top an inch longer on each end. I also did not brad nail the 1x4 trim pieces. I used wooden dowels and wood glue. Also I bought bed rail brackets and mounted the side rails flush to the outside of the head and footboard. This piece was conditioned with Charles Neil's Prestain conditioner and stained with minwax English chestnut. Topcoat is minwax semigloss fast drying poly and rubbed out with minwax paste wax. Can't wait to get to sleep in it tonight!!
![](/sites/default/files/3154817599_1352780186.jpg)
Comments
Tue, 11/13/2012 - 00:14
Creche chairs and tables etc
Good Day Ana! I just started a daycare centre and would like to make my own tables,chairs bookshelves etc. I want to know if you could assist me in this matter
God bless you
Basetsana Maboe
Tardis bench
![](/sites/default/files/image_19.jpg)
I used the woven back bench plans to make this doctor who tardis inspired bench. It will be a memorial bench for a young girl who recently passed in our community. She loved doctor who as do I so I changed the back a bit to represent the Tardis windows and of course painted it tardis blue. I will also give it two coats of polycyclic.
![](/sites/default/files/image_26.jpg)
Comments
Modified Mimi's faux mantle
Added deeper sides to the project so I could fit an electric fireplace into it
$350 in wood and finish supplies
Valspar Antiquing Glaze
Mini Fridge Cabinet
![](/sites/default/files/IMG_20200619_181836.jpg)
I was able to make this cabinet using your plans and it went absolutely flawless! Thank for all that you do!
![](/sites/default/files/IMG_20200620_175326.jpg)
Modified console table
![](/sites/default/files/image_35.jpg)
I'd been looking for a similar table for months but couldn't find one that I liked and that would fit at the bottom of my stairs. I found this pattern and changed the dimensions by removing just one of the top boards so that the final depth is 10.5" deep rather than 14". It's exactly what I wanted and get to brag about it!
Christmas Chalkboard
![](/sites/default/files/Chalkboard%20Craftsman%20%285%29.jpg)
I made this craftsman frame to fit a 16" x 24" chalkboard. I followed the plan, using 1x3's and 1x2's, attached with a Kreg Jig which made it easy. Oh, and glue. I usually buy full sheets of plywood and paint them with chalkboard paint but time was short and I used a 24" x 48" prepainted panel. I cut three 16" x 24" chalkboards from this panel.
I allowed 1/2" all around the inside dimension in order to glue and staple the chalkboard to the back of the frame. I decided to paint them all with a barn red paint sample. Cheap enough and they're going under the tree to three family members!
Tall Wood Planters
Very good plans to work from, and very adaptable! I modified the plan to add a sloping lip, which I think finishes the look. I was using old weathered cedar, so I contrasted that with cabinet style joinery (all mitered joints). I like the difference between the old distressed wood and the more refined joints. I set the skill level at "advanced" due to the compound mitered cuts required. I would be happy to supply the miter and bevel angles if anyone is interested.
One small suggestion: I found the diagram of the cuts for the sides to be confusing because the diagram of the piece of wood, which is rectangular, looks slanted in the perspective view. I would project the rectangle flat (all right angles) so that the angled cuts are clearer, and not confused with the "angles" of the sheet itself.
Thanks for a great idea!
Madeline Changing Table Center Base
![](/sites/default/files/3154817883_1353601006.jpg)
We made some significant changes to the shelves/cupboards. Since we were on a bit of a time constraint with the impending arrival of our little bundle of joy, we decided to nix the drawers all together and instead make three open face shelves. This made the larger cupboard and door face area a little shorter than in Ana's plans. We made most of these changes on the fly while sitting in the garage..
We have a big move coming up and probably won't put the hutch, center base, and side bases together until after the move. We'll post pictures of everything put together once we get settled.
Oh, and for some reason I've been calling this the Madison Changing Table. . When it is actually called the Madeline Changing Table.. whoops!
We wrote up general directions with pictures here: http://thehuth.blogspot.com/2012/11/madison-changing-table-part-3-cente…
![](/sites/default/files/3154817884_1353601006.jpg)
![](/sites/default/files/3154817881_1353601006.jpg)
![](/sites/default/files/3154817885_1353601006.jpg)
![](/sites/default/files/3154817886_1353601006.jpg)
Kids Picnic Table
![](/sites/default/files/big%20kid.jpg)
Excellent plans, fit my 15 month old nephew and 8 year old daughter! Easy to follow plans
Grandy Sliding Door Console
![](/sites/default/files/20161226_111827_0.jpg)
Sliding door console built by Kathryn and Scott Winkler of K & S Coastal Home Furnishings. Kathryn added her own unique chippy finish to set this piece off!
Playhouse for Christmas...almost done!
![](/sites/default/files/3154818044_1353884231.jpg)
My husband and I used our Thanksgiving break to build this playhouse and deck, using Ana's plans. We are NOT builders...this is very doable for beginners with the right tools. Read the plans thoroughly before starting. Total cost (including all lumber, hardware, and paint) was under $600.
We still have door and house trim to complete, a little painting, and a handrail/ladder.
Santa may bring a slide and some other fun accessories!
Thanks Ana!!!!!
Coffee Table
![](/sites/default/files/Coffee%20table_1.jpg)
This was my first project and it turned out way better than I expected. One of the most time consuming parts was finding pieces of wood that were not warped from Home Depot. The Xs really make the table look amazing, and even though mine are not perfectly symmetrical, I think I did pretty well since my compound miter saw will only cut up to 45 degrees. I had to use a jig saw for the 60 degree cuts, which was kind of a nightmare.
Comments
Tue, 09/09/2014 - 09:46
60 degree cuts
MBuckson, nice job on the table, it looks great. A 60 degree cut is the same as a 30 degree cut, cut backwards. Because Miter saws work with a straight line (180 degrees) the middle postion is 0 (90 degrees) depending on which way you flip the board your are working with. So the 45 degree postions are half of the 90 degree (0 postion). If you want a sixty degree cut add fifteen degrees to the 45, which you would actually subtract the 15 to get 30 degrees since you are flipping the board and cutting it backwards. Or atleast that is how I understand it.
Wed, 09/24/2014 - 16:37
I used the 2x2 with the max
I used the 2x2 with the max length of the opening and just scribed it after clamping it down. I then duplicated it 3 more times (which included the half pieces for the X) for for the same length. I then scribed two that would be cut up... found it easier to cut the mini X pieces in half for easier handling on the mitre saw. Jays version works well also.
D
Modified this to fit my bunny!
![](/sites/default/files/15697375_1187143867987605_1937751158368853340_n%20%281%29.jpg)
I used Ana's plans, but switched things around a little as I went. I wanted something fancy for my bunny to hang in when I'm not home. The biggest modification I made for a bunny was the bottom. I wasn't happy with the stability of the chicken wire even though my bunny is just a few pounds. I used a more solid plastic called plaskolite ( you can find it in the lighting section of Lowes) We are planning on adding levels for the bunny as well as a cloroplast tray to fit the bottom since bunny poo can get stinky. We took about 2 weeks to complete this project and it was definitely a learning experience! We also tried to cut costs by getting some of the wook and backing from Habitat for Humanity!
We also made the little bed with the leftover wood from this project :-)
Office Credenza
![](/sites/default/files/C1BD6098-1B20-4119-8233-CCD80AAE2F5C.jpeg)
My husband and I built this credenza using Ana’s Barn Door microwave cabinet as inspiration. Thanks for all your awesome ideas and for sharing the plans!
![](/sites/default/files/C1BE6E06-BBCD-4068-86FF-1F9F67815B9B.jpeg)
Farmhouse Table
![](/sites/default/files/3154818193_1354138471.jpg)
This is a massive Farmhouse Table. It measures 126" x 56" with the extensions on, as show. It is 96" x 56" without. The table top is 2x12's with 2x8 breadboards and it has 4x4 legs and end stretchers. It was modified from the farmhouse plan here on ana-white.com and from tommyandellie.com.
![](/sites/default/files/3154818194_1354138471.jpg)
![](/sites/default/files/3154818195_1354138471.jpg)
![](/sites/default/files/3154818196_1354138471.jpg)
Comments
In reply to Chairs! by brookifer86
Fri, 11/30/2012 - 14:09
We lucked out on those. A
We lucked out on those. A family member's church was giving them away a few years ago and we scooped them up for free. I will get their info so that you might search them out and reply again for you.
In reply to Extensions by rjdavidson
Mon, 05/27/2013 - 17:53
Extensions
The extension idea came from tommieandellie.com. The extensions are each made up of 2 beadboards each cut to the width of the table, 56" here. They also consist of a 2"x2" crossmember of 30" here and 2-2"x2"s 38" in length and cut on a 45 angle on on end. The beadboards are joined by pocket holes. the crossmember is centered on the beadboard that will be closets to the table, it is here to provide support for the last 2 pieces. These last 2 pieces are pieces that will slide into notches cut in the end apron and inside apron. They are placed with the angled edge about an inch from edge of the what will become the most outside end when the extensions are slid into place. The extensions slide into notches cut 1.5"x1.5" end apron and inside apron pieces 30" apart and centered. A lot of words that I am sure didn't explain anything. Mine are just modification of the plans on the referenced site.
Daughter's Loft Bed
This is my first big Ana White project!! I built this bed with the basis of the Camp Style Loft Bed for juniors, but decided against the large stairs and reused some stairs i had built for our pop-up trailer. They were smaller and took up less floor space. I used all reclaimed wood from a house construction site (trash) except for 5 2x4s and the book shelf 1x8. Because of this the project took significantly longer than her 'weekend' plans called for, but it was fun. I spent probably 6-8 hours sanding/cleaning the wood. You can see all the dimples or angles in the boards which give it a pretty cool look in my opinion. I wanted to stain the wood to see all the pretty grain and knots, but my wife wanted a princess castle so she won out.
My mother help sew the super cute castle wall curtains. We used Ikea lighting for under the ledge, and Ikea chandelier, and Ikea curtain rods to keep the project cheap. Hope you like it.
kreg screws $5-10
Ikea accessories were about $60
Curtain - priceless :)
Cassidy king bed
![](/sites/default/files/IMG_20161231_120308563.jpeg)
My first grown up furniture, I didn't start small lol...The picture is not great, but I love it! I took advice from other comments, I sanded and stained each shim individually. Took ages!!!!! But well worth the effort.I used a gel stain and a glossy finish. I made matching nightstands as well using plans from another site.
![](/sites/default/files/IMG_20161231_120114536.jpg)
![](/sites/default/files/IMG_20161231_120308563.jpg)
Glossy varnish
I Built the Dumpster Dresser
![](/sites/default/files/20200825_160239.jpg)
I had fun building this dresser I'm building a second one. I built the second one already
![](/sites/default/files/20200819_192043.jpg)
![](/sites/default/files/20200913_181048_0.jpg)
![](/sites/default/files/20200822_112654_2.jpg)
Current Price$13.94
Minwax Wood Finish, Natural, 1/2 Pint
Current Price$9.85
Doll Daybed with trundle
Created this bed for my niece for Christmas. My son was so excited to put pieces of fabric for the sheets on it so I was able to take a great picture. I didn't make plans since I was winging it as I went, however I did kind of follow the simple day bed plans and doll bed trundle tips.
Comments
Tue, 09/01/2015 - 08:02
Anyone have plans similar to this?
I would love to make this for my friends daughter for her birthday, but I am not skilled enough to "wing it"! Please help! Does anyone have plans for this?