Community Brag Posts

COOLER BOX

Submitted by Anonymous (not verified) on Mon, 01/27/2020 - 10:56

Wanted a place on my porch to put a cooler to hold ice for pool party.

Estimated Cost
100
Estimated Time Investment
Weekend Project (10-20 Hours)
Finish Used
Exterior stain and three coats of exterior poly
Recommended Skill Level
Beginner

Glass Top Display Side Table

Submitted by Anonymous (not verified) on Tue, 09/19/2023 - 10:58

I made two of these side tables for my niece and her new husband as a house warming gift. I dropped the top down 1.25 inch and added a glass top so she could display items. They are going to be a surprise, so I left them bare. She can stain or paint them whatever color she wishes.

Donna Cox

Comments

Large Dog Crates for Rocket Hounds

Submitted by probrwr on Thu, 02/06/2014 - 07:45

Large Dog Crates from the plan. We used reclaimed 1x4 material which I milled down to the correct sizes. The tops are edge jointed 1x4's glued up. These were my first project with a Kreg jig! I have been wood working for MANY years and was amazed at how fast things went together with the Kreg.

The two crates are a little different. I shook up the stain for the second one so it came out alot darker. We like the difference but I may rebuild the lighter one in the future. They are finished with American Walnut stain and 4 coats of tung oil.

Built from Plan(s)
Estimated Cost
HArdware and Finish $15 per crate. Materials were reclaimed and free
Estimated Time Investment
Weekend Project (10-20 Hours)
Finish Used
American Walnut Stain (Shake it up!)
Hand Rubbed Low gloss Tung Oil. (this is the time consuming part) One coat per day and let dry)
Recommended Skill Level
Beginner

Corner Base Cabinet

Submitted by Anonymous (not verified) on Tue, 05/03/2016 - 17:00

This was the first time my husband has build kitchen cabinets.  We have used many wood working plans from this website.  The cabinets are made of two sided prefinished maple wood.

Estimated Time Investment
Week Long Project (20 Hours or More)
Finish Used
Spray Painted Benjamin Moore Knoxville Gray
Recommended Skill Level
Advanced

Chunky Coffee Table

Submitted by Malka on Sat, 02/01/2020 - 15:17

Chamfered the bottoms of some 4x4 douglas fir, and used 2x6 douglas fir for the top. Stained in Minwax Dark Walnut/Special Walnut. 

Estimated Cost
50
Estimated Time Investment
Day Project (6-9 Hours)
Finish Used
MInwax stain and Polyurethane
Recommended Skill Level
Intermediate

DIY Storage Cabinet

Submitted by Anonymous (not verified) on Mon, 09/25/2023 - 11:58

Needed something to hold an antique scale. The sides have pop out drawers to house bags and tags.

Darren

Computer desk

Submitted by Flowerchld on Wed, 04/25/2012 - 15:47

I made this computer desk with just an idea and a picture of my aunt's compter desk I loved! In her desk the middle section goes clear to the floor, but I wanted room for my legs. Her's also was wicker shelves on the bottom sides so I found a general cabinet plan and of course altered that. This was made in 5 separate pieces and put together!
The other picture is the desk in progress and the second pic is the desk I was kinda copying/altering.

Estimated Time Investment
Week Long Project (20 Hours or More)
Finish Used
off white paint, sanded and topped with a glaze mixed with stain for an antique finish.
Recommended Skill Level
Intermediate

Comments

big dreamer 2

Wed, 08/26/2015 - 13:26

This gorgeous desk/bookshelf/cabinet is just what I've been looking for. I'm new to your impressive site & can't access the plans...please help!  Thank you for all the wonderful plans


Shaker Style cabinet doors DIY style

Submitted by ksmith311 on Sun, 02/09/2014 - 21:18

Pleas excuse the mess in the pictures. It is too cold to work in the garage up here in the northwest, so this project took over our entire kitchen and dining room. We built these frame and panel-style doors using Ana's plans from the mom-plex bathroom vanity! We are so excited because we spent about $100 including paint and have plenty of leftover materials for the drawers next week!

These are the original cabinets in our 75 year old house and they were in serious need of rehab. We even contemplated ripping them out and using Ana's cabinet plans to build new ones but after we removed the shelves, the carcass of the cabinets were still in good shape. We filled, sanded, painted and built these new amazing doors that I'm seriously losing my mind over. They are so beautiful and I don't think I could have ordered something better. Maybe better made but how sweet is it to save all that money by building them yourselves?

We'll post drawer pictures after we get those finished up and hopefully have a clean kitchen at that point. :)

Thanks Ana! Our home is becoming truly special with the skills we learned from you!

Built from Plan(s)
Estimated Cost
$60
Estimated Time Investment
Weekend Project (10-20 Hours)
Finish Used
Benjamin Moore's Kendall Charcoal in Semi Gloss
Recommended Skill Level
Intermediate

TV Table, DIY, Rustic, X Console, Console

Submitted by j_macindoe on Sun, 05/08/2016 - 10:58

This was my very first DIY wood working project and I'm very pleased with the final result. I learned a lot along the way and after completing the TV table, felt confident enough to make a matching coffee table and side table. 

This is a great project for a novice DIYer.  

Built from Plan(s)
Estimated Cost
Approx. $150, as I had to purchase some tools.
Estimated Time Investment
Weekend Project (10-20 Hours)
Finish Used
TV Table
Recommended Skill Level
Starter Project

Dress up center

Submitted by jim7sf on Fri, 02/07/2020 - 11:44

 I Purchased Kitchen cabinet handles to use for the ribbon so that the girls could put their bows on there I also got 1 inch wheels 2 of them with breaks on them from amazon. Between the vinyl letters and added bonus I spent about 110$

Estimated Cost
110$
Estimated Time Investment
Afternoon Project (3-6 Hours)
Recommended Skill Level
Beginner

Hall Tree Modified

Submitted by Anonymous (not verified) on Mon, 10/02/2023 - 10:29

My variation of the hall closet. Dark stained bench and top shelf, it is taller (5'6") and skinnier (30") and doesn't include the venerated X's.

Jeffrey Knotts of Black Boots Woodworks

Built from Plan(s)

Pottery Barn's Bailey Console Table

Submitted by tsibiga on Sat, 04/28/2012 - 10:07

I've built two of these based off the Ana-White plans. I tweaked them a little bit to accomodate the wood that I had available as well as the space that the table was going. I built this one for a customer and they needed an exact width...so I cut it back to just 3 drawers.

www.tommyandellie.com

I documented the whole build here;

http://tommyandellie.com/index.php/2012/02/21/bailey-console-table-remi…

My older one with 4 drawers can be found here;

http://tommyandellie.com/index.php/2011/11/02/bailey-console-table/

Built from Plan(s)
Estimated Cost
$100
Estimated Time Investment
Weekend Project (10-20 Hours)
Finish Used
Painted white and distressed the base. Special Walnut stain on the top. Sealed with General Arm-R-Seal and Briwax.
Recommended Skill Level
Beginner

4x4 Truss Beam Table w/Gray Finish

Submitted by Pokeysmom on Thu, 02/13/2014 - 11:32

We followed the 4x4 Truss Beam Table instructions but changed the overall dimensions to account for our narrow space that is a thoroughfare through our house. We made the table 29" x 65". This was our first furniture construction project and we are very pleased with the results.

Estimated Cost
$400 (including the cost of the Kreg Jig)
Estimated Time Investment
Week Long Project (20 Hours or More)
Finish Used
Finished with a custom stain from Sherwin Williams. Started with their Rustic Gray color but had them color match the stain on the fir and pine to create the best match. Applied one coat for one minute and wiped off. Used a satin water-based polyurethane (3 coats).
Recommended Skill Level
Intermediate

Outdoor pation sectional

Submitted by Anonymous (not verified) on Wed, 05/11/2016 - 10:54

Total spend 440 $.

Estimated Cost
440$
Estimated Time Investment
Weekend Project (10-20 Hours)
Recommended Skill Level
Intermediate

2x2 Playhouse Basement Loft Hideaway :)

We loved the idea of making two of the 2x2 playhouses featured on this blog and adding a 17" riser below to add more of a loft feel in our basement.  The riser really adds something special. [We designed the riser ourselves]. 

We resized the houses to accommodate adults as well as children, so the space can be used flexibly as a playhouse, reading space, or just a hideaway for kids and adults alike.  The house as we designed it is 70" tall (5.8 feet).  We also utilized a recessed wall in the basement, so the footprint feels just right for the room.  

After building the frames, we painted them white and custom-designed curtains for them.  We wanted the curtains to feel like walls and define the space. The curtains are attached via buttonholes that we sewed into the finished curtain.  They are looped over small cup hooks screwed into the frame.  

We left the risers in their natural color without stain and simply sealed them using a beeswax and olive oil DIY sealant that I've used on a handful of other projects in the past.

Overall, we feel so happy with this space.  It's just what we imagined it to be.  It feels so special and set apart :).  

Built from Plan(s)
Estimated Cost
~$300-350 for all materials (includes fabric)
Estimated Time Investment
Week Long Project (20 Hours or More)
Finish Used
Beeswax and olive oil sealant on riser, white paint on playhouse frames

Custom Work Bench

I hate the mess of my garage. If there was just one more room for photos, I would show you what I was working with: a piece of plywood propped on two saw horses, with loads of supplies taking up every last inch of space. I was beginning to wonder why I didn't want to go into the garage, what I hoped would be my haven after a crazy day of singing the ABC's with my 3 year old and giving chemo treatments to my 6 year old with leukemia.

Then it dawned on me: I'm not organized!!! I start to get the shakes if things are not in their place. So, I started to dream up my perfect work bench, one place where I can store my main necessities.

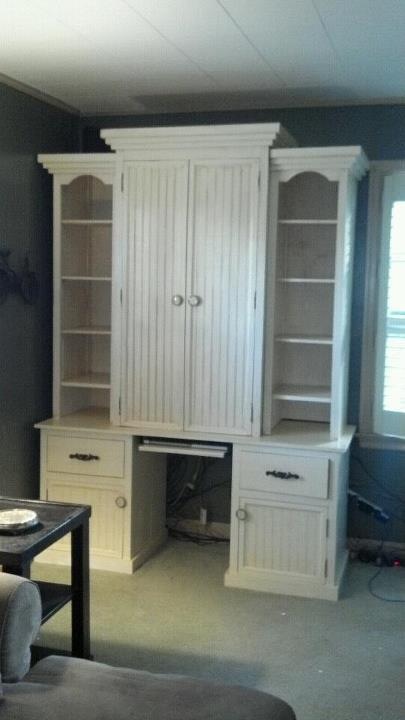
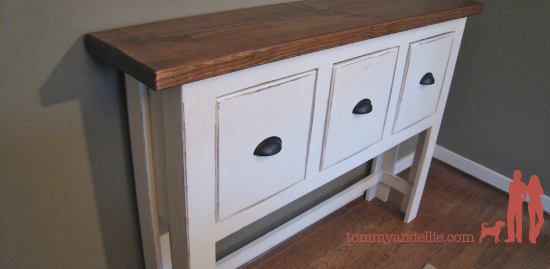
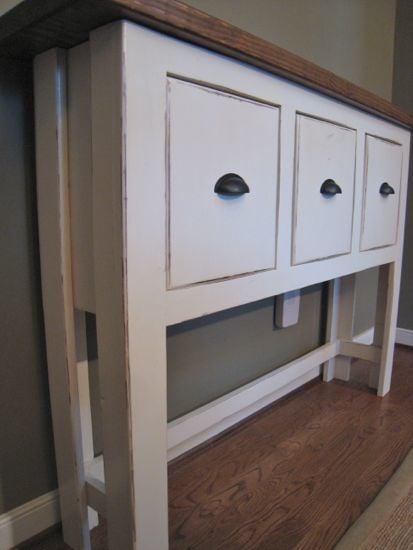
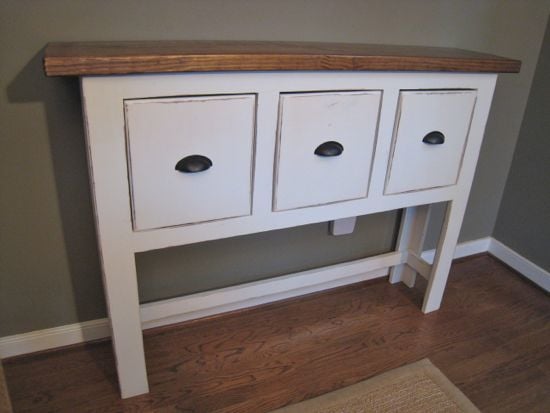
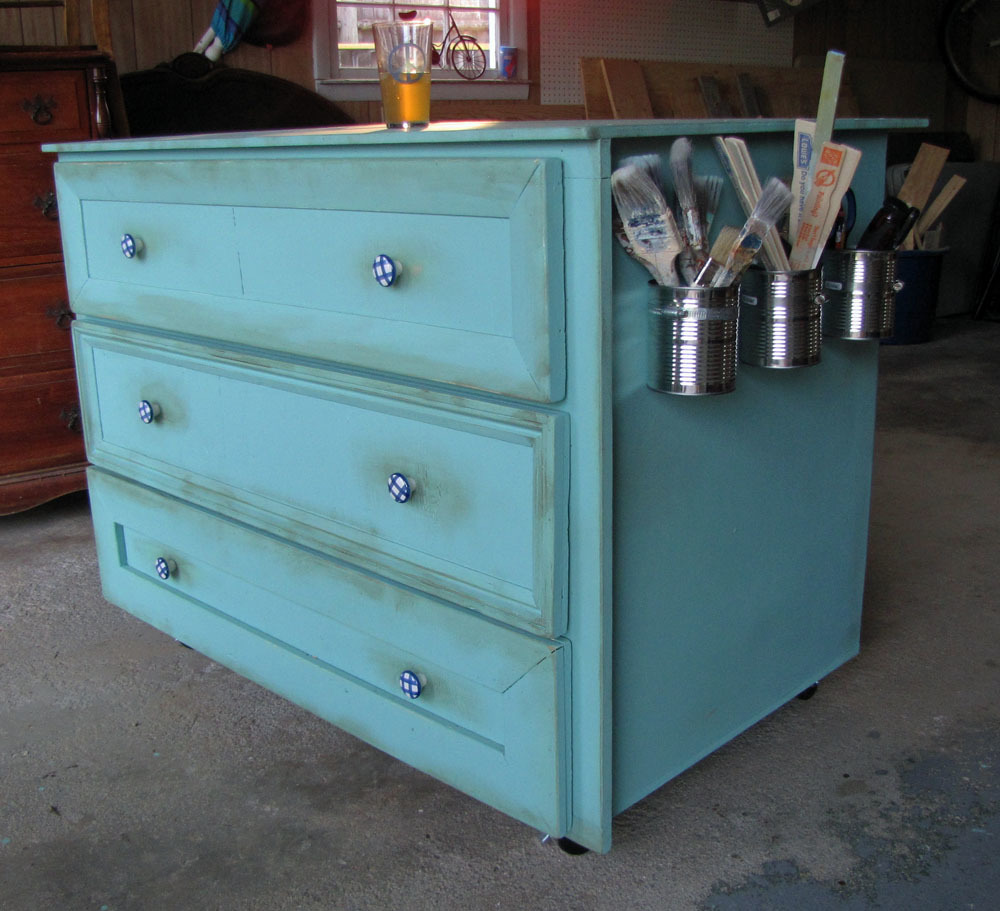
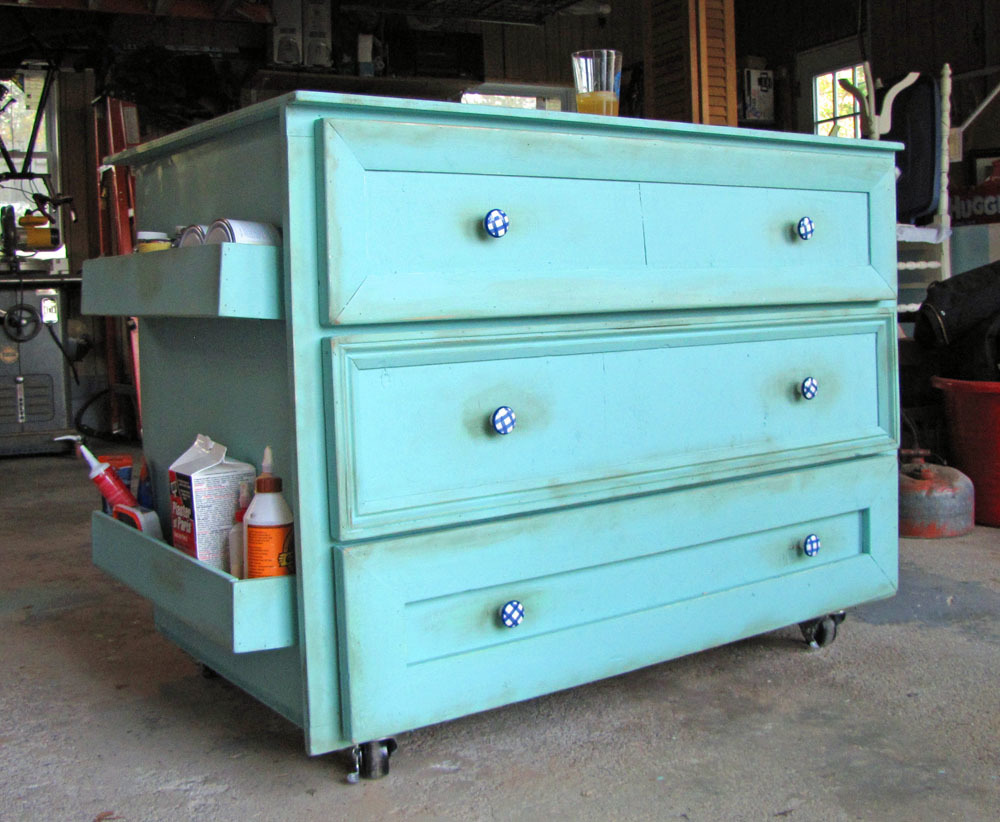
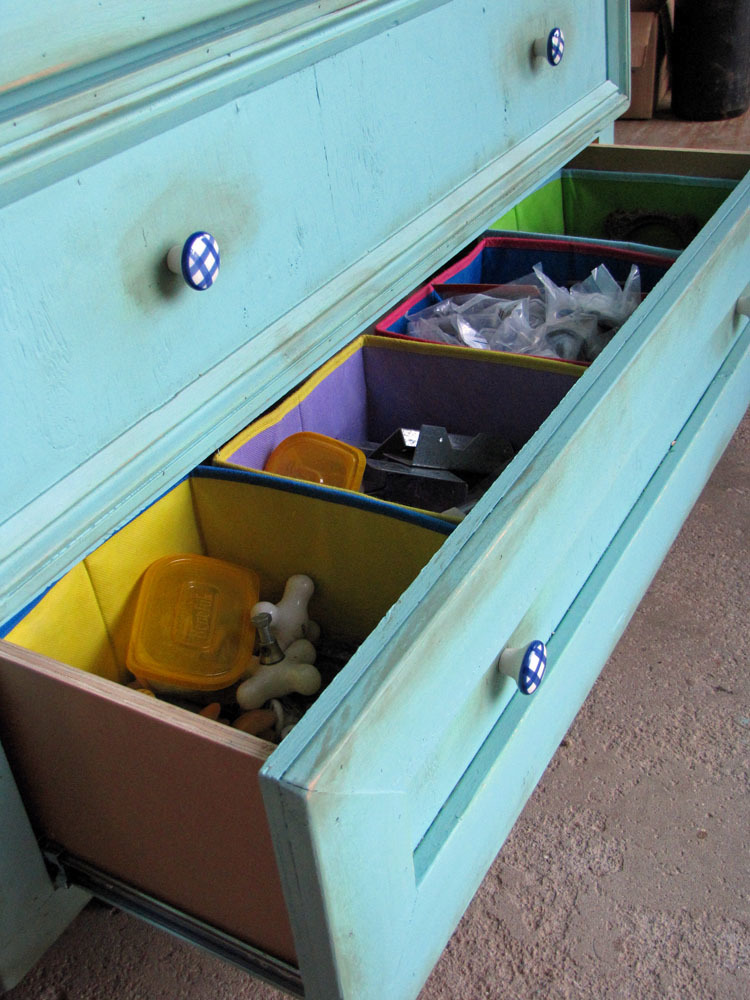
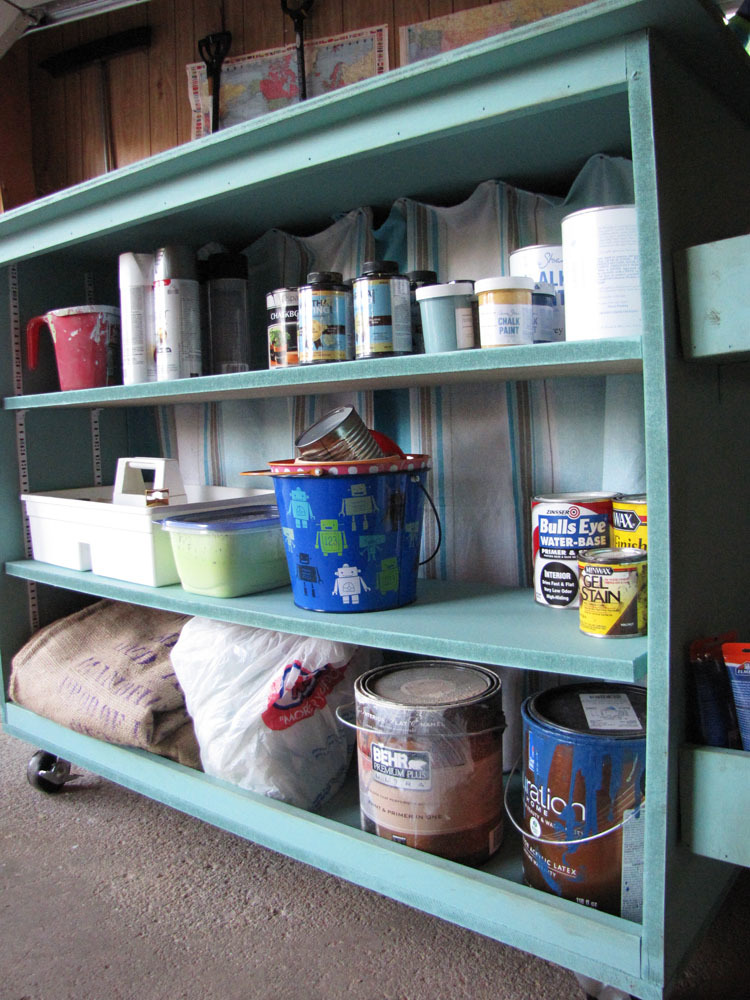
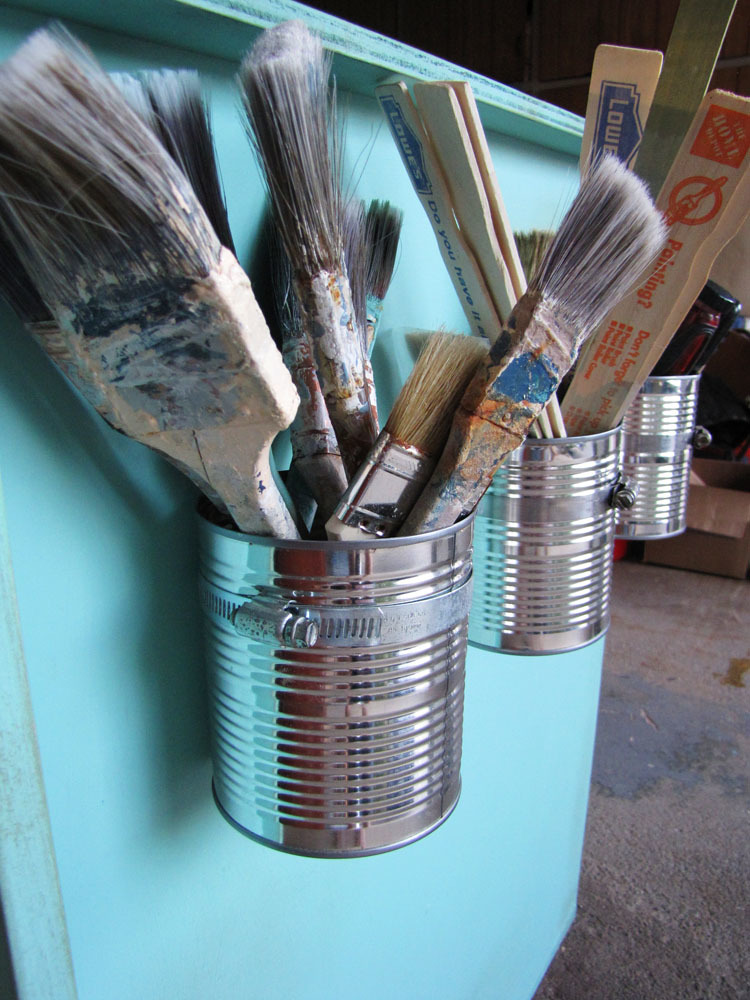
I don't work well without plans. Of course it dawned on me too late to contact Ana herself to help me. But when I thought about it, I realized that it was basically a box. Just start with a box. So I checked out a few of Ana's plans that started out as a box and went from there. By the way, I couldn't have gotten through 1% of this project without Ana and the inspiration and encouragement from her site. Love you!! Anyway, I knew I wanted drawers on one side and shelves on the other. As I went along I decided to add a few contained shelves on the side of the bench to store the wood glue, wax, and other smaller items. On the other side of the bench (because I HAVE to make use of all space), I saved the cans from some crushed tomatoes I had used to make a sauce, and used some hose clamps to keep them in place. I keep all my brushes in these babies. I made the shelves adjustable and decided that looking at the back of the drawers was undesirable, so I purchased a $5 curtain and stapled it in place to hang behind the shelves hiding the drawers -- so girly! Gotta have that little feminine flavor to my work bench (as if the color didn't do it enough).

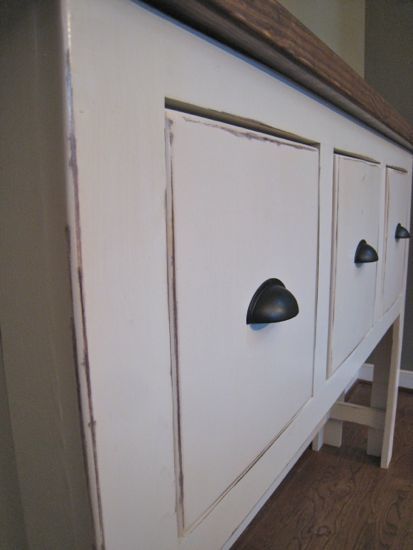
The drawers were the biggest hassle because I made a very bad builder mistake. I rushed them and I don't even think I took out a square once to make them. Bad builder. Bad, bad, BAD BUILDER!! I was tired and was in such a hurry to finish this so I could get organized and the shakes would stop. So, in the end, the drawers don't work perfectly and I'm constantly reminded of my shortcut every time I open them. (And every time my husband reminds me as he helped me with the drawer slides and cursed the whole time.) Each drawer is trimmed out differently as I was just using the different wood and choices I had laying around. The knobs were a great flea market find at 25 cents a pop.

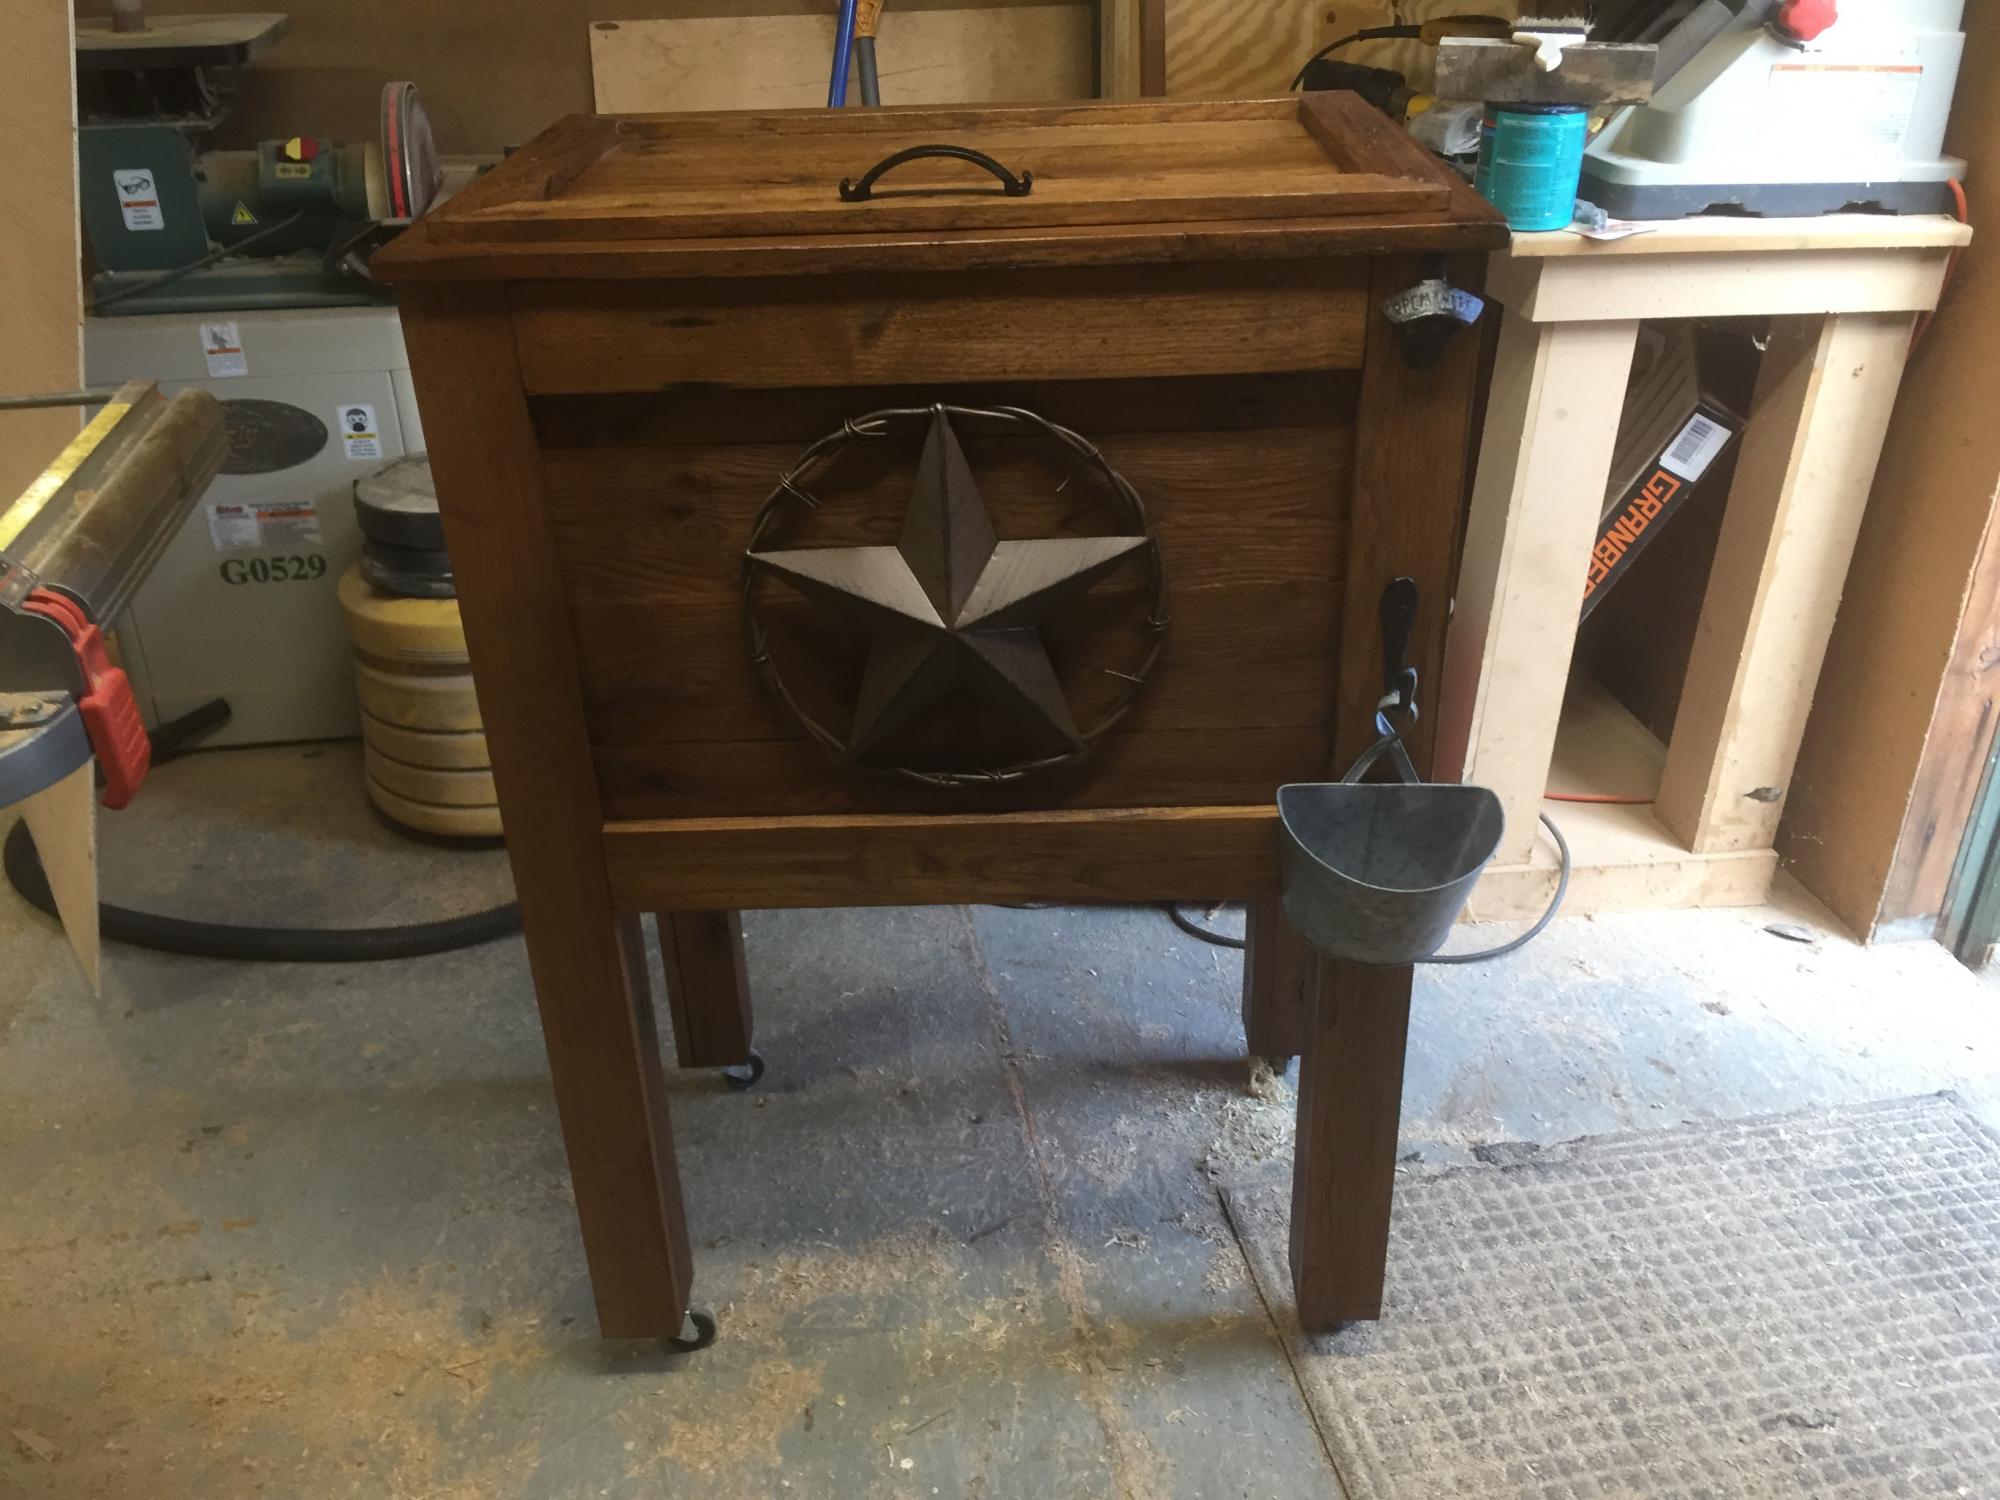
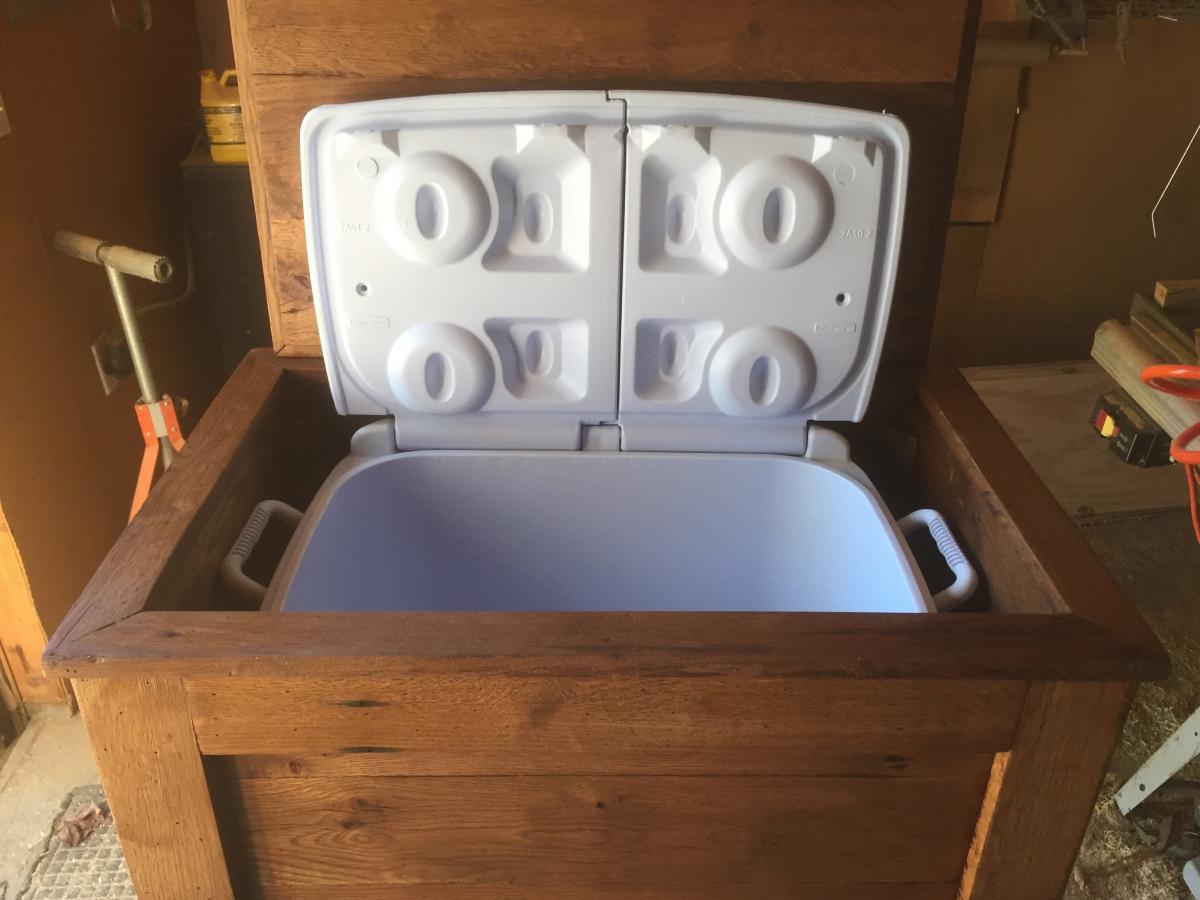
In the end, I love her. I'm organized, or as organized as I can be right now. Besides my power tools, I have everything at my fingertips. And if the garage becomes a mess again, I know it won't be because my stuff doesn't have a home. And with this paint color, I'll be able to find her no problem. :) Oh yea, that is a beer on top. I deserved it.

Built from Plan(s)
Estimated Cost
$150
Estimated Time Investment
Weekend Project (10-20 Hours)
Finish Used
I combined a green and blue paint I had to make this little magical number I'll call "Afternoon Cocktails at the Beach." I actually made it into a chalk paint by adding one part plaster of paris to 4 parts paint. Just thought I would give it a whirl and liked the way it turned out. I distressed in appropriate areas then decided to use some dark wax to create the "dirty, worn" look. It turned out a little darker than I wanted, but that's why I experimented with MY stuff.
Recommended Skill Level
Intermediate

Comments

exuma_momma

Wed, 05/02/2012 - 09:32

Wow, with so much on your plate with the little ones.... my heart goes out to you with the chemo treatments. This workbench is AWESOME!!! I may have to copycat you with it... love all the storage you have and how pretty it turned out. The different scraps and pieces came together Great. At least you have an excuse for your drawers not turning out perfect. I still can't get mine to work properly even when I use a square :) All part of the hobby though right, learning with each one! Great work...keep it up :)

debandtom25

Thu, 05/03/2012 - 18:54

I do love it. It's nice that it's on wheels so I can get it out of the way if need be. No more sawhorses with a piece of cumbersome plywood. Building/up-cycling/refinishing is my therapy. It probably saves us $150/hour with a psych. :)

Sharon W (not verified)

Sat, 06/16/2012 - 09:40

So I am confused on how you used both plans. Could you give a little more detail and instruction? I would love to make this particular piece. What are the measurements of your piece, as well? Thanks for sharing!!!

In reply to by Sharon W (not verified)

debandtom25

Wed, 07/11/2012 - 13:59

Hi Sharon. What I meant by highlighting Ana's plans, is that I learned I just needed to start with a box. As for the size, I made it 48" wide, 31" deep, and 37" tall. Since it was custom, I could make it any size I wanted. I wanted it to be comfortable to work on, so no bending over. Also, it had to be small enough to move around the garage as needed.

gamomma

Sun, 08/05/2012 - 18:34

I need a cutting table for my sewing room and have been looking for something big (have to be able to lay out at least a yard of fabric) with some concealed and some not so concealed storage. This is it!

Farmhouse Bedside Table

Submitted by Radcrafter on Sat, 02/15/2014 - 20:01

Loved this plan from the time Ana posted it long ago, but never had a need to build one until we moved into a new house.

I followed the plan entirely as instructed, except for the faux 2 drawer feature. It went together great. The most difficult part is making sure you keep everything square and you'll definitely want a kreg jig (I have a kreg jig jr and it works great) to keep the assembly as easy as possible.

I built it over the course of one weekend, but it took most of the next week to stain and apply polyurethane. Lots of drying time involved.

I spent around $50 total to build and another $16 for polyurethane and the handle. The stain I already had, but that would be another $10 or so, if you needed to purchase.

The direct link to the plan: http://ana-white.com/2011/01/farmhouse-bedside-table

Great project and plan to do do a second one for the other side of the bed.

Estimated Cost
$50
Estimated Time Investment
Weekend Project (10-20 Hours)
Finish Used
Minwax Ebony & Dark Walnut Mix stain and two coats of poly in semi-gloss
Recommended Skill Level
Beginner

Comments

My Bedside Tables

Submitted by kyle_craig on Fri, 05/13/2016 - 07:55

This was quite the project. It was the most fun and rewarding of the handful I've done so far. It took quite a while but now that it's finished I'm very satified. I would like to eventually build an extra large dresser that matches.


***The one thing that I am not totally happy with on this project are the euro drawer slides. They are loud and they have a cheap chinsy feel to them. When I build drawers in the future, I will either spend more and get fancy slides, or make some simple waxed wood slides for a more premium feel.

Estimated Cost
$220 for two.

I figure I have a total of $110 in to EACH of these tables. That includes all of the lumber (some quality lumber and some standard), cheap euro drawer slides, primer, paint, knobs, and hardware. Not included in the estimated cost is the wood conditioner, stain, and poly for the tops (I already had this stuff from a previous project. ***Compare at $499 each for a comparable bedside dresser from LL Bean.
Estimated Time Investment
Week Long Project (20 Hours or More)
Finish Used
Kilz old based primer, then three coats of Rustoleum blossom white for the base.

Minwax pre-stain wood conditioner, Minwax dark walnut stain, and three coats of Minwax semi-gloss polyurethane for the top.
Recommended Skill Level
Intermediate

Boys' Bathroom Stool

I took shop class for a quarter in eighth grade, but other than that, I have never constructed anything out of wood! I decided to pick a small project first and loved the Kid's Storage Step Stools I saw people making. My husband taught me how to use the circular saw and jigsaw and I finished building this in about 2 hours.

Built from Plan(s)
Estimated Cost
$15
Estimated Time Investment
Afternoon Project (3-6 Hours)
Finish Used
The painting took me a little bit longer. At first I was planning on making three of these, one in each of the boys' assigned colors, but decided we really don't need three of these stools. SInce the boys would all be sharing this one, I went with all three colors (and I do love stripes!) I didn't have any painter's tape, but did have some washi tape on hand! I like the width of the stripes, but the tape doesn't stick to the wood quite as well as painter's tape. I had a lot of touching up to do since some of the tape would seep under the edges and bleed into a different stripe. From now on, I'll be using painter's tape and saving the washi tape for decorating my mail!

Paint colors used: Olympic - Sail Blue, Celery Spring, and Arizona Sunset
Recommended Skill Level
Starter Project

Comments

Back