DIY Barn Style Greenhouse

I’ve built the greenhouse for your plans, but I love it.
Built from Plan(s)
I’ve built the greenhouse for your plans, but I love it.

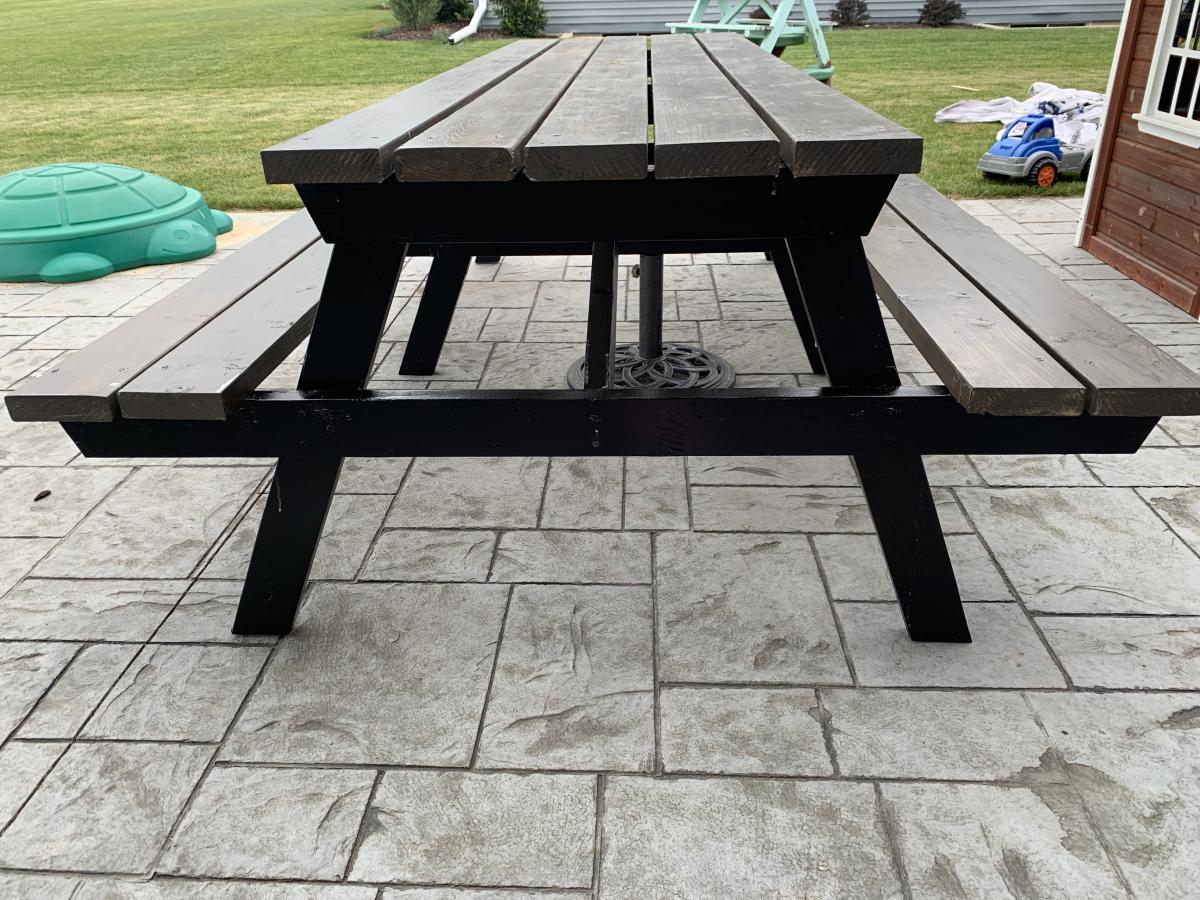
This picnic table was a quick build and turned out amazing. I modified the center base support by adding an extra table top support and seat support board to the opposite side of the center legs to give the table symmetry to accommodate an umbrella hole. I also shortened both cross supports by an inch to make sure the base wouldn’t be longer than the top boards. The space between the center table support boards and seat support boards is the perfect size to fit a standard umbrella. I used a 1 3/4” hole saw to make the umbrella hole. The build and stain/paint took me about 5 hours but additional time is needed to properly seal the table. I used untreated pine. Treated pine may give the table longevity but it would also add a lot of weight to an already heavy table. This was a relatively easy and quick build and is a great size to fit my whole family plus a couple guests! I’m happy with how it turned out and would recommend this build to anyone looking for a budget friendly and simple patio table.


Sat, 07/18/2020 - 13:17
Thank you Abby!!! Your picnic table turned out amazing, I love the added umbrella modification!

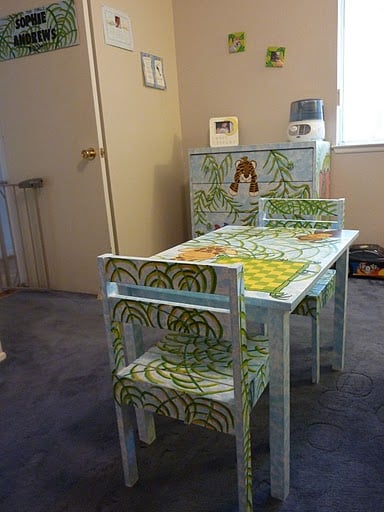
I really liked the Large Wooden Dog crate but wanted the sides to be lower and wanted to make sure there was no easy chew escape. Not sure if you can see from the photo but the cats have taken over... Will need to make a larger one for the dog!
I followed the plan pretty much other than lowering the panel on the side and replacing the wooden bars with rebar. The rebar was a bit of a learning curve getting the holes lined up perfectly but I figured it out and I think it came out pretty good!
Used all pine 1x3 and 1x2s. Picked up a pine panel for the top and the bottom is a 3/4 plywood. Made our own chalk paint for the finish and sealed it with wax.
Oh, forgot, added tongue and groove pine for the back and finished it and the top with Antiguing wax.
Lots of fun and I think I will make a double one next!


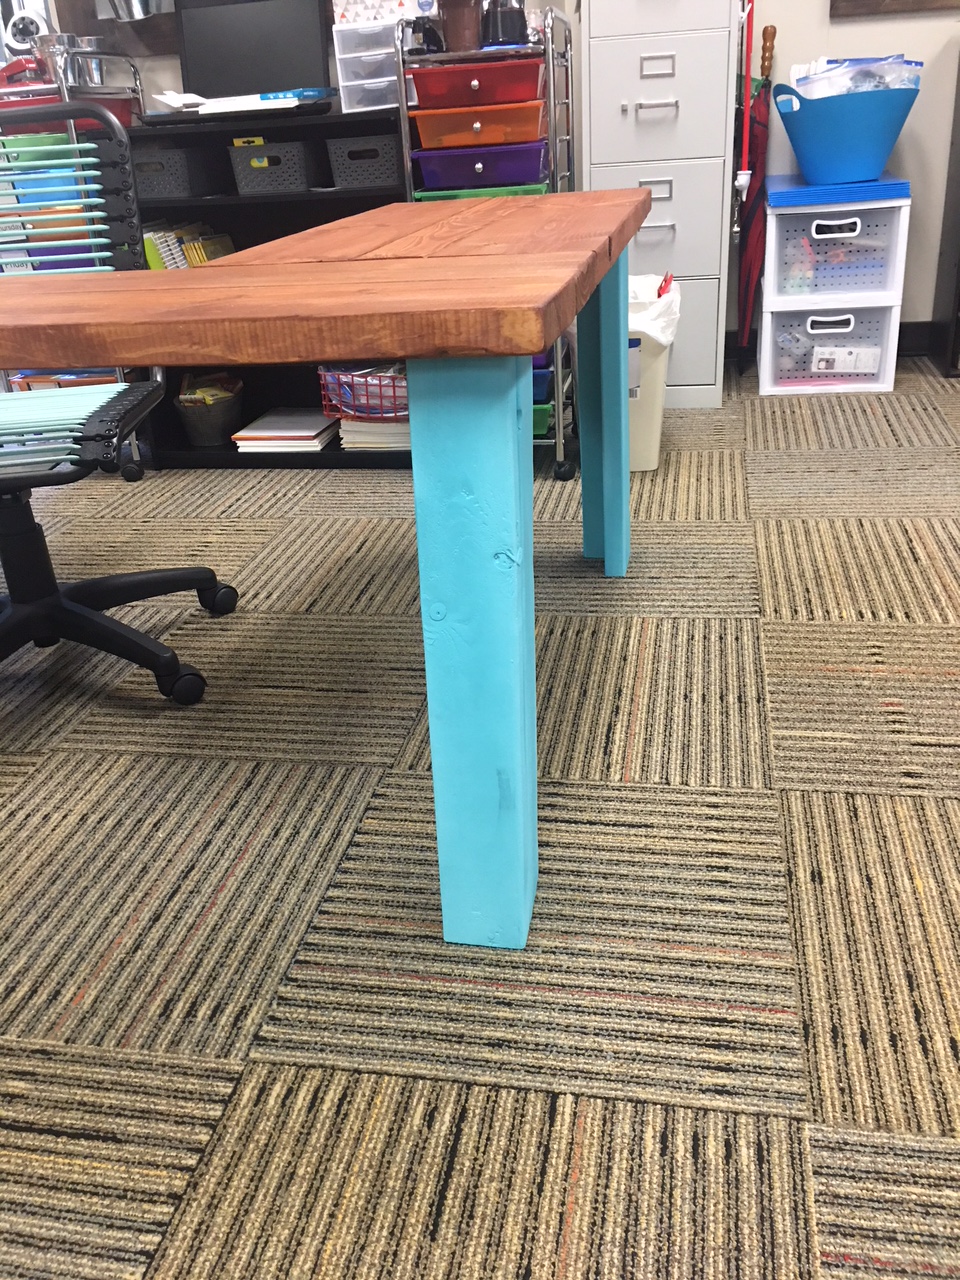
Been a while since I had time to actually build anything worth posting about! My wife wanted some items for her Kindergarten classroom this year, so built several items, most inspired by the Farmhouse family.


Sat, 06/29/2019 - 05:47
I love this! Can you give me the plans and list of materials for constructing it?
Sun, 06/30/2019 - 12:33
I am also a teacher and would love to build this desk for my reading class. Do you have plans?
Mon, 07/01/2019 - 18:05
I love this table for my classroom. Can you share the plans or the dimensions?
-Stephanie
Sun, 07/07/2019 - 09:46
I would love plans/dimensions for this! I was thinking I could also paint the top with wipe off board paint.
Sun, 07/07/2019 - 14:59
I would love to make one for my classroom. Can you share the plans and materials list for this table?? Thanks!!
Mon, 07/08/2019 - 19:11
I am looking to make this for my fourth grade classroom - can you provide the dimensions you used? Thank you so much.
Wed, 07/10/2019 - 11:59
Love this!
I would love this for my classroom! Can you share the plans and materials.
Thank You!
Mon, 07/22/2019 - 18:25
Anyone have any luck with figuring out the dimensions??
Thu, 07/25/2019 - 17:20
Has anyone gotten the plans for this table? I have contacted Ana White and tried other ways also. I would love for someone to share.
Thank you
Teri
Mon, 08/19/2019 - 12:09
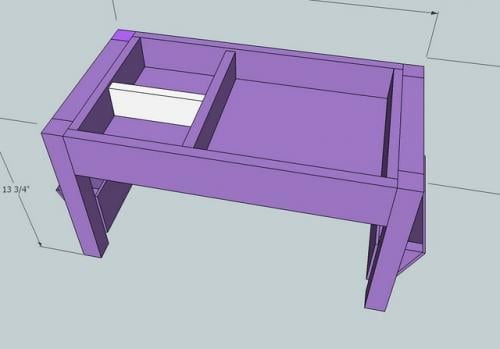
I am guessing the corner posts are 2 x 4s, the top is 2 x 10s. It looks like the width is 6’ (looking at the floor carpet tiles being 24” square). So 2 - 2 x 10s side by side for the main part of the desk top and 2 - 2 x10s perpendicular on each side of the chair. I guess the height is subject to choice and the length of each side would also be subject to choice or to the length of the 2 x 10s to be economical.
an educated guess would be 4 - 8’ 2x10s for the top and 6 - 6’ 2 x 4s for the legs?
Anyone else have any input here? Open to suggestions.....

We loved the idea of making two of the 2x2 playhouses featured on this blog and adding a 17" riser below to add more of a loft feel in our basement. The riser really adds something special. [We designed the riser ourselves].
We resized the houses to accommodate adults as well as children, so the space can be used flexibly as a playhouse, reading space, or just a hideaway for kids and adults alike. The house as we designed it is 70" tall (5.8 feet). We also utilized a recessed wall in the basement, so the footprint feels just right for the room.
After building the frames, we painted them white and custom-designed curtains for them. We wanted the curtains to feel like walls and define the space. The curtains are attached via buttonholes that we sewed into the finished curtain. They are looped over small cup hooks screwed into the frame.
We left the risers in their natural color without stain and simply sealed them using a beeswax and olive oil DIY sealant that I've used on a handful of other projects in the past.
Overall, we feel so happy with this space. It's just what we imagined it to be. It feels so special and set apart :).

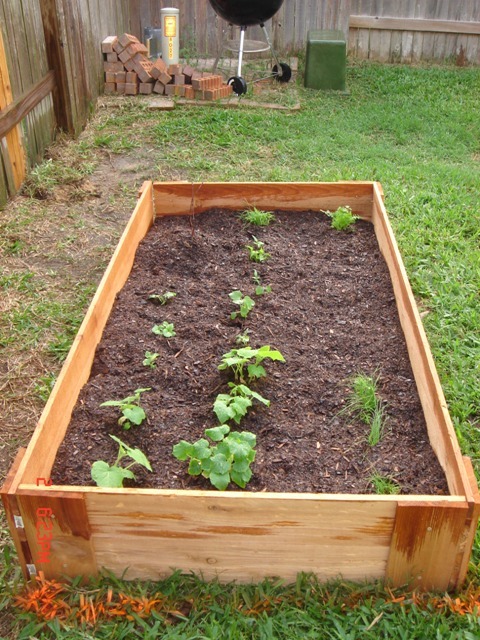
I made a couple changes to the plans to better suit my needs, but Ana's plans were my inspiration! And my veggies that were outgrowing their jiffy pots are happy to have a new home!!!

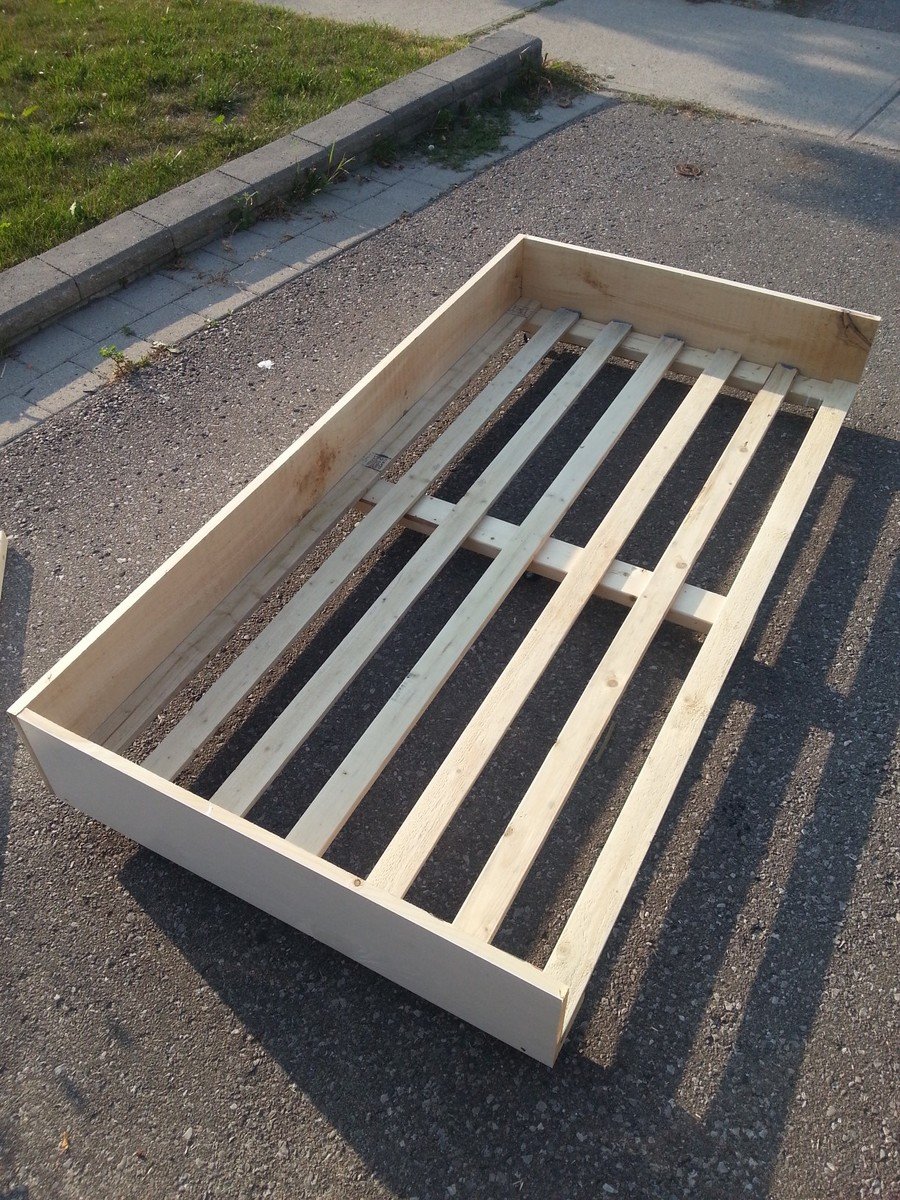
I needed sturdy stairs for my 2 60lb dogs. My bed is 33 inches from floor to top of mattress. So, this is my very first project completed by myself! Custom size pet stairs 24inx24inx24


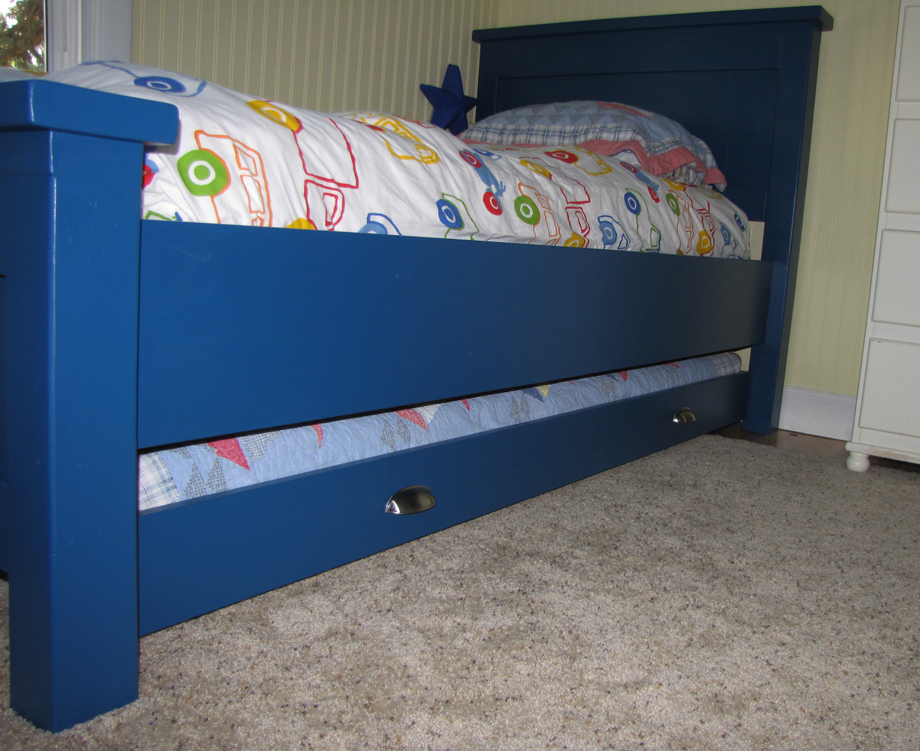
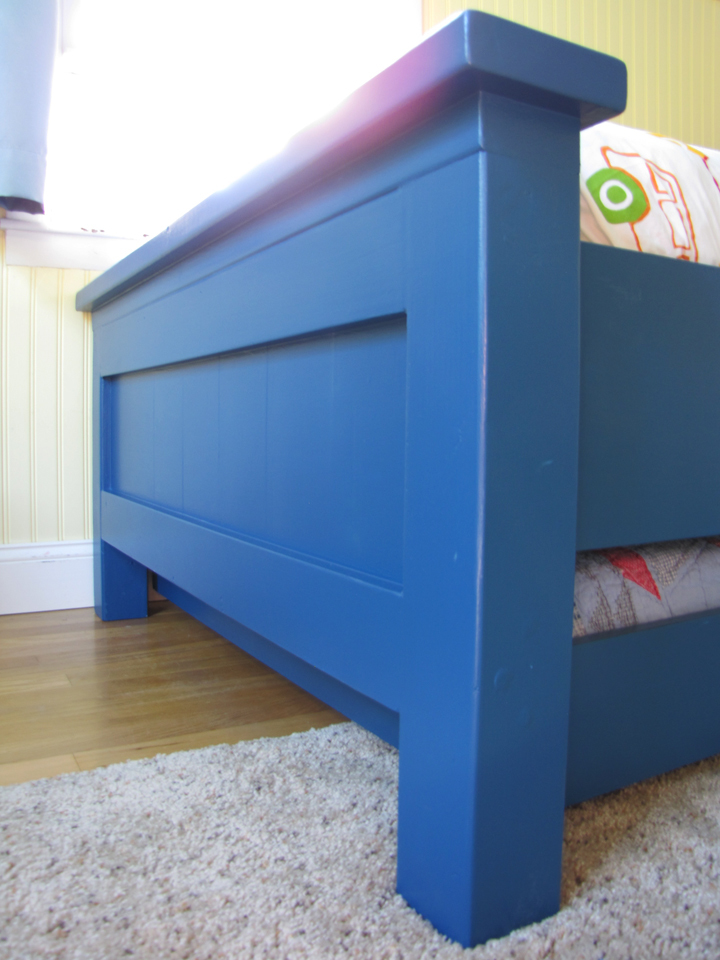
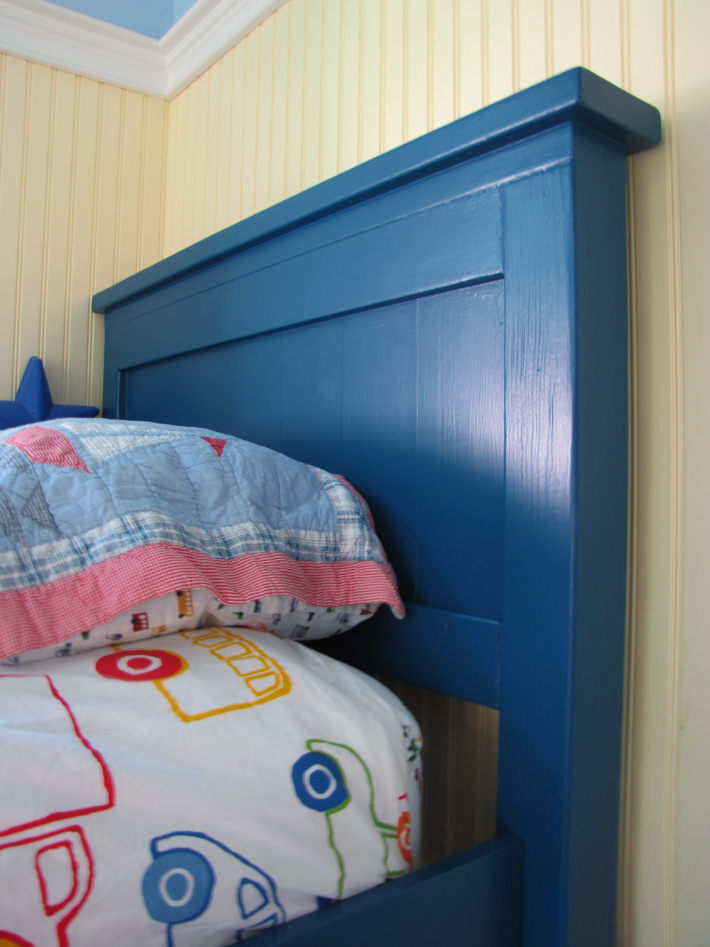
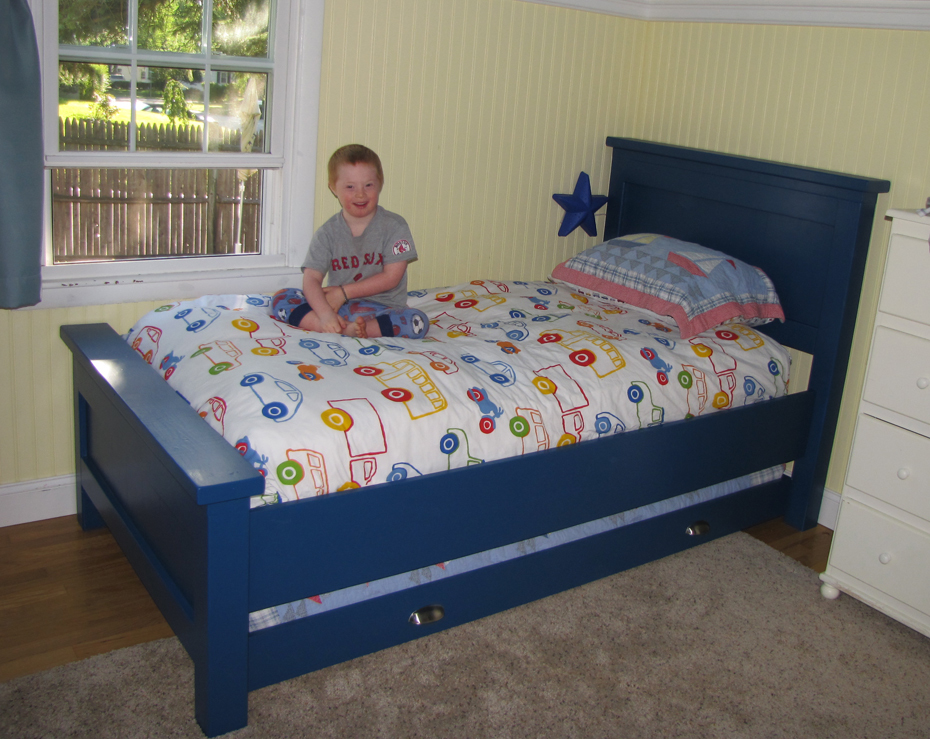
We had the Upside-Down bed from IKEA for our little guy, but my husband continued to complain on how he had to "crawl" into the bed. Okay, scrap that. No problem. I just searched Ana's plans for a nice bed I could make. And add a trundle. There you go.
I did modify the height of the headboard, as I plan on moving Jack to an upstairs bedrooms that has slanted walls. I wanted this bed to fit in any configuration, so I had to take 10" off the headboard. Also, due to the impending moving, I wanted the bed to easily be taken apart. So I attached the side rails with surface mounted keyhold brackets from Rockler Woodworking. They work great.

Sun, 08/21/2011 - 21:36
This looks so incredible! You did a fantastic job and I love love love this bedding. My boys would go crazy over it!
Mon, 08/29/2011 - 07:51
Great job! I am hoping to make two of these for my boys and would love to have the trundles. Could you give the specs on that? Thanks!
Wed, 08/31/2011 - 17:42
The specs will be different depending on the size mattress you have -- what I mean by size is height. I just used a foam mattress that was only 5 inches high. I wanted the mattress to fit bigger than the sides of the trundle, so I might have made it just 4 inches high (not including the wheels underneath). I made sure I had about 1.5" of clearance total between the headboard and footboard to move the trundle in and out.
Just make sure you take into account how thick your mattress is, the widths of your boards and the height of your wheels. Give yourself a little room for bedding and you should be all set.
Mon, 11/21/2011 - 10:06
The bed looks awesome! The hubby and I are gonna attempt to make one just like it (with the shorter headboard as well). I also have a 5 inch mattress for the trundle. The questions I have are: 1) How much space did you leave between the floor and the bottom of the trundle? 2)What is the distance between the floor and the bottom of the side rail? 3) did you use the 1x10 for your side rail? (we are going to be using a 1x8 instead). 4) Did you order your casters from Rockler as well, or find them at a home improvement store?
Thanks so much, in advance!
Wed, 11/23/2011 - 11:58
1. The sides of the trundle are not flush with the bottom. The bottom (that the bed rests on) is about 2" higher than the side rails. This allows room for the wheels and about an 3/4: between the floor and the side rails. This measurement will all depend on the size of the casters you get and how much room you have beneath your bed for the trundle.
2. As mentioned above, there is about 3/4" between side rail and bottom of floor. Like I said before, it's total preference and how much room you have to work with.
3. I did use a 1X10, mainly because I like the look of the wide board.
4. I got the casters from HD or Lowes (can't remember).
Hope this helps!
Sun, 01/29/2012 - 23:15
I love this and am going to make for my sons bed but I didn't see what you used to attach the sides to the base...unless I just didn't see it. :-) Did you use "L" brackets?
Sun, 03/25/2012 - 12:30
Hi, I was just wondering how you adjust the cleats when you are using the rockler brackets? I plan on using 2 x 8 for the siderails so there isn't enough room to fit the bracket and cleat along the edge. Did you have to shorten your cleat by just a little bit?
Fri, 08/17/2012 - 23:32
I was wondering if you could tell me how many inches the gap is from the bed to wall (where you have the bed horizontal against the wall)? Just trying to get an idea; my daughter is young and don't want her falling between the gap at night :) Thanks ahead of time!
In reply to Gap From Bed To Wall... by KAD050209 (not verified)
Wed, 09/05/2012 - 20:16
The gap is about 3.25". I remember one of the first nights that Jack slept in his bed he fell in the gap. I wasn't expecting that at all. We just stuffed the extra bed pillows in there at night. We don't even remember to do it anymore and he's never fallen in again.

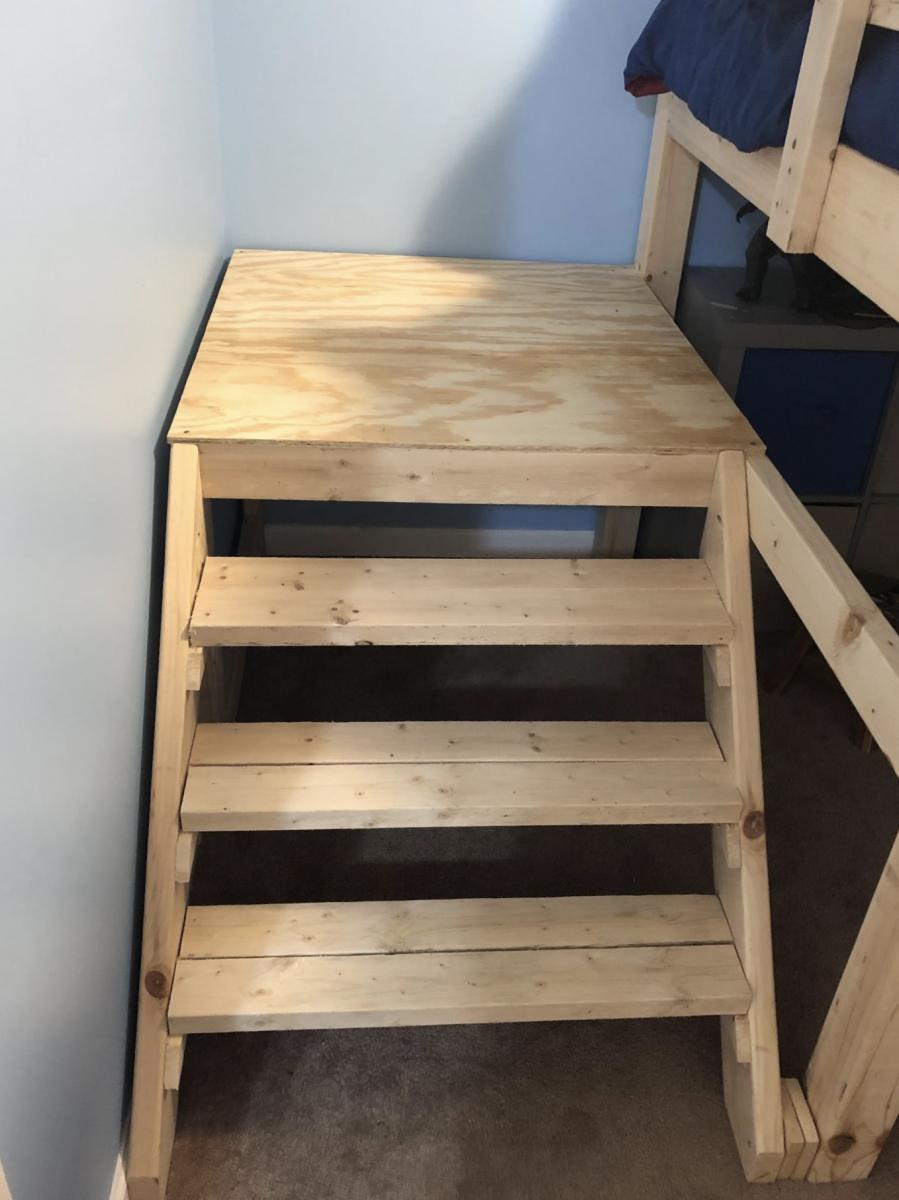
Built a full size loft bed for my kids but wanted something safer than having them climb up and down a ladder so used the Camp Loft Bed plans to add the platform and stairs. It is much easier for the kids. Going to finish by covering the platform and stairs with carpet.

Wed, 10/02/2019 - 09:51
I really like how the platform is only half way so the stairs are inset, this is very smart and good use of space.

This was my first build and I learned A LOT and watched A LOT of youtube diy videos. The main take-away from this project is not to build in the freezing cold if the finished project is for inside. I finished this project in below freezing temperatures and I noticed that the wood expanded (increasing slightly the gap between the finished boards on the top) when it was brought inside.
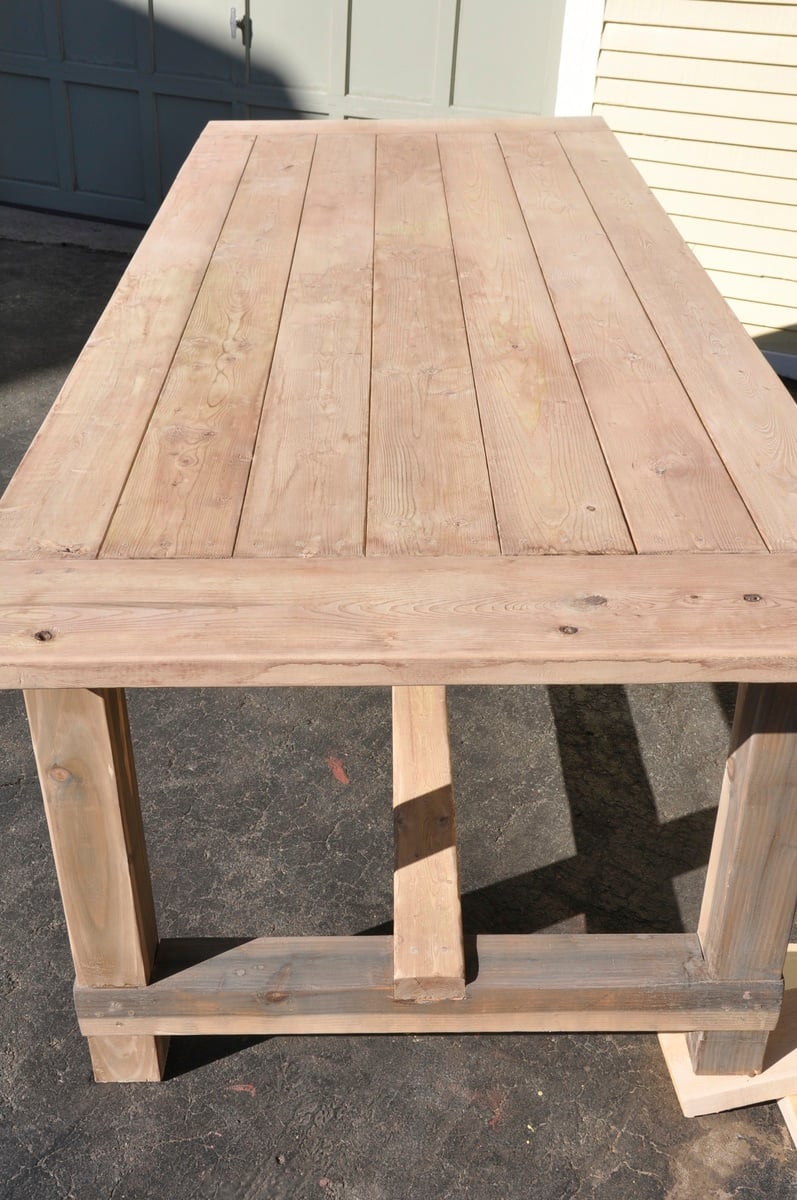
I built this from the original farmhouse table plans with no kreg jig although I did buy and use a pocket kreg jig to make the extensions. The main modifications were using 4x4s such as were used in the Country Living magazine spread that inspired this build and also making modifications to allow the addition of 15" extensions at each end of the table's bread boards.
My first challenge was figuring out how to build with the 4x4 legs instead of the 2 2x4s screwed together. In order to accomplish this i had to use a chisel to create the corner lip that the table top frame would sit on. I added photos of this so I hope it will help someone. Chiseling these 4 corners (one on each post) only took an hour or two and was so worth it for the look of the 4x4s. Just measure carefully and work carefully with a sharp chisel. I actually removed half the wood by sawing off the corner at a 45 degree angle. Remember when cutting your boards for the table ends that a 4x4 has different dimensions than 2 2x4s screwed together. Compensate for this in your cuts.
Another challenge was hiding the screws on the table legs and table top. I was leaving the finish natural so didn't want to use wood fill. I accomplished this by getting a countersink bit and then buying wooden dowels the same diameter. For these screw holes, after finishing screwing, I put a dab of wood glue in the countersink hole, inserted the dowel as far as it would go, used a fine hand saw to cut off the dowel flush with the table and then used a hammer to make sure the dowel was in tight and flush.
I had trouble figuring out how to attach the table top frame to the table legs with the long screws from the plans so I included a picture of this step. Its really easy but I was not able to use three screws as the plan calls for. I used two instead and it has been very solid. I used the long screws as proscribed.
Finally, I wanted to build extensions (2 2x8 boards kreg jigged together) so I could increase seating up to a max. of 12 persons, so I needed to cut out 2x2 gaps on the table ends. I also included a picture of these in place. To make room for the 2 2x2s that extend under the bread boards and table top to brace the extensions, I left out one of the 2x2 cross beams at each end of the underside of the table (the boards that the table top boards screw into).
I hope this is helpful to you!


Mon, 02/10/2014 - 11:55
Great job on the table! I love...I had visions of this table before I saw it. I wanted to use the 4x4's for the legs as well, the same finish. I am concerned now about the 4x4's because I am an amateur and I think that may throw too many wrenches into my plan. I started with the bench, finished in 3 hours I have patted myself on the back. Plotting on a Kreg jig right now.

I made this for my sister the day before her house warming party. It was a pretty easy build. I used wood glue and 2" nails. Using a nail gun, this came together pretty quickly. I do wish that I had wide enough clamps to hold everything in place while it dried, because there were a few gaps due to some imperfect boards. I used 104" stud length boards, so I only need to purchase 7 instead of 9. this was enough to make the cuts for the top and both leg pieces from each board. the price was the same and we had limited space in our van for boards, so this was a better option for us. I used a sprayer hooked up to an air compressor to apply the stain and was able to get in between the slats fine with this method, brushing over it as I sprayed. Luckily I chose the same color as her deck not knowing, so it matches great. Now I need to make one for myself! :)


I built this for my daughter after Christmas sinse she had the living room covered in toys. The dimensions are 37" x 18" x 20"
Tue, 01/09/2018 - 05:51
HI Anna,
Can you provide more pictures or instructions on how you assembled this toy box? i want to make one just like it!
Thanks!
Wed, 03/10/2021 - 16:31
Looking at the wall panels they look like the long edge of each panel has a small bevel cut on it. This gives each panel edge a more pronounced or well-defined edge? Is this true? Was it done with a router?

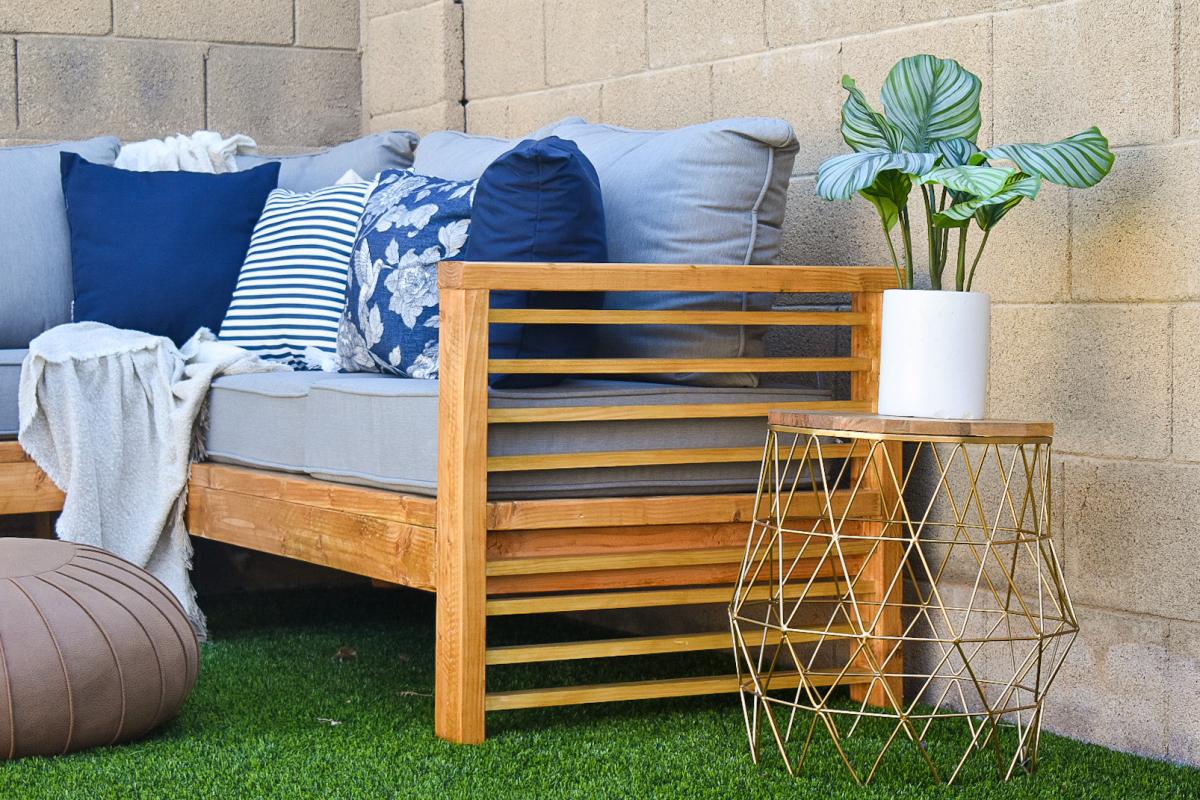
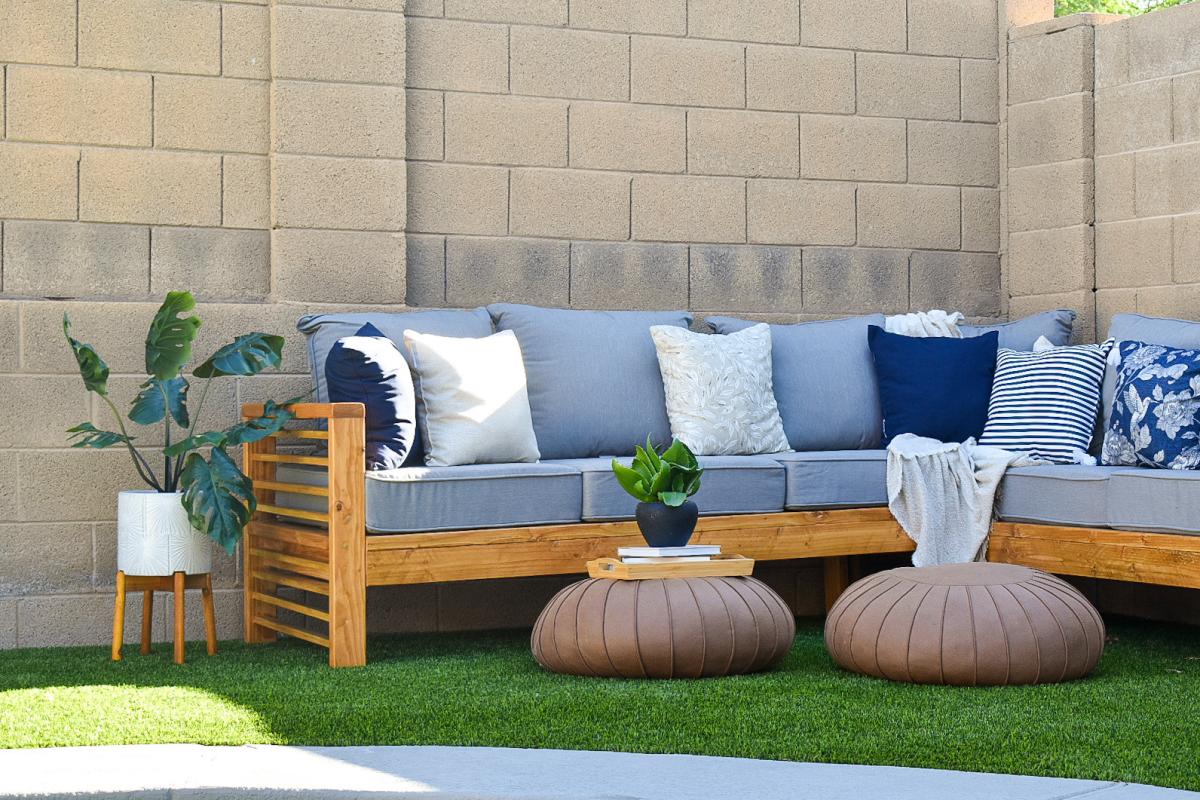
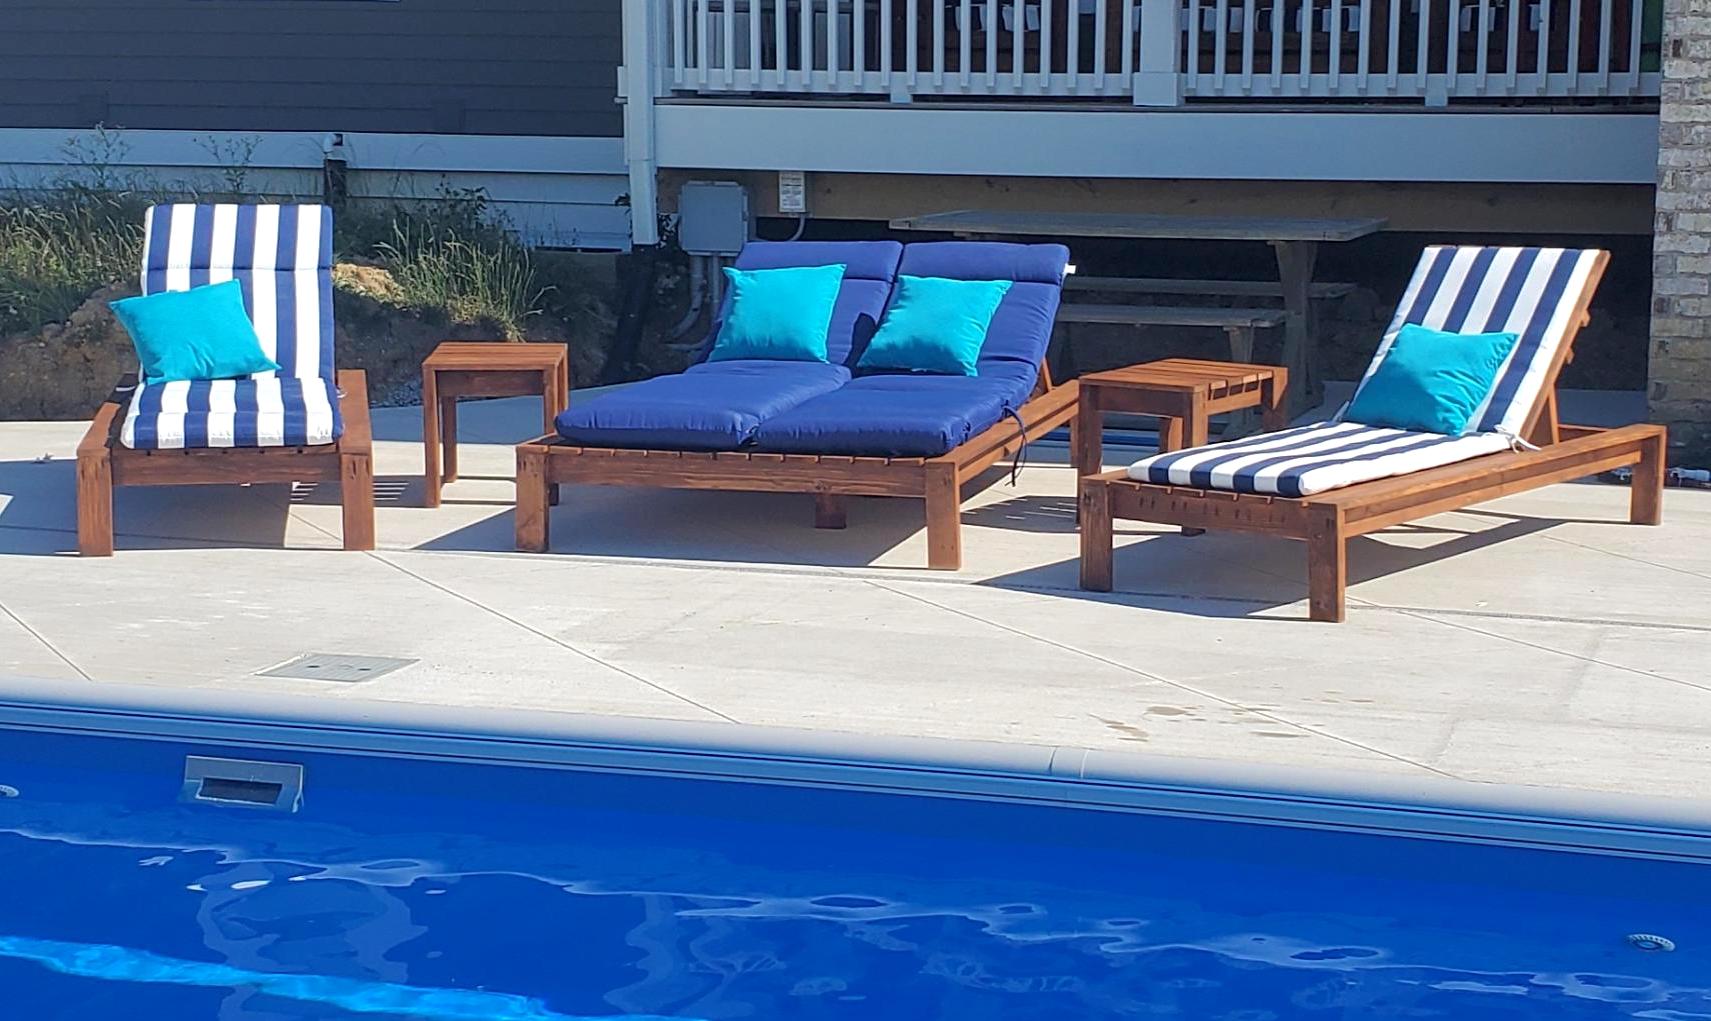
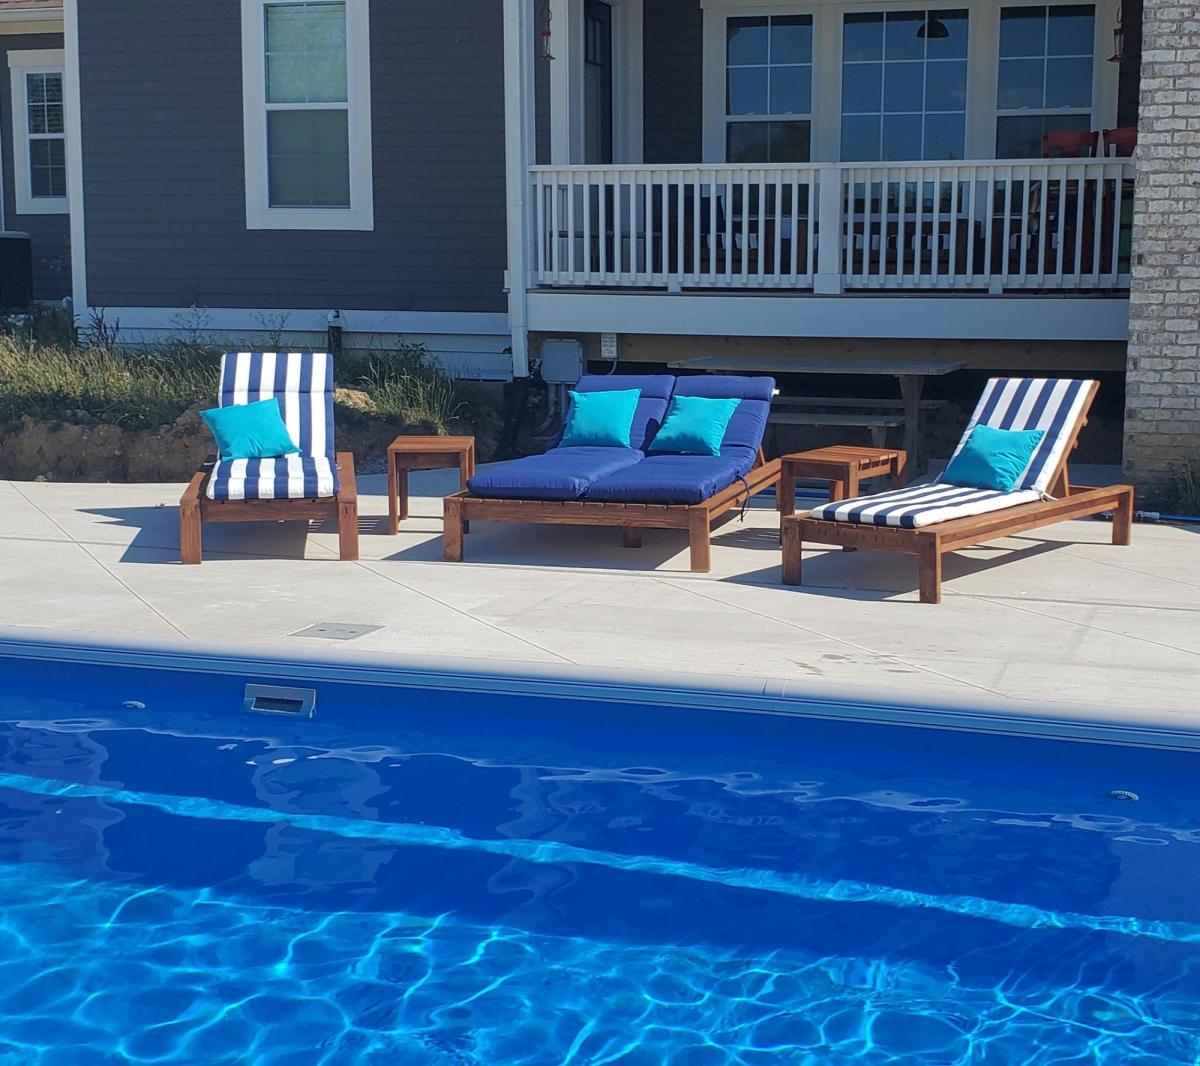
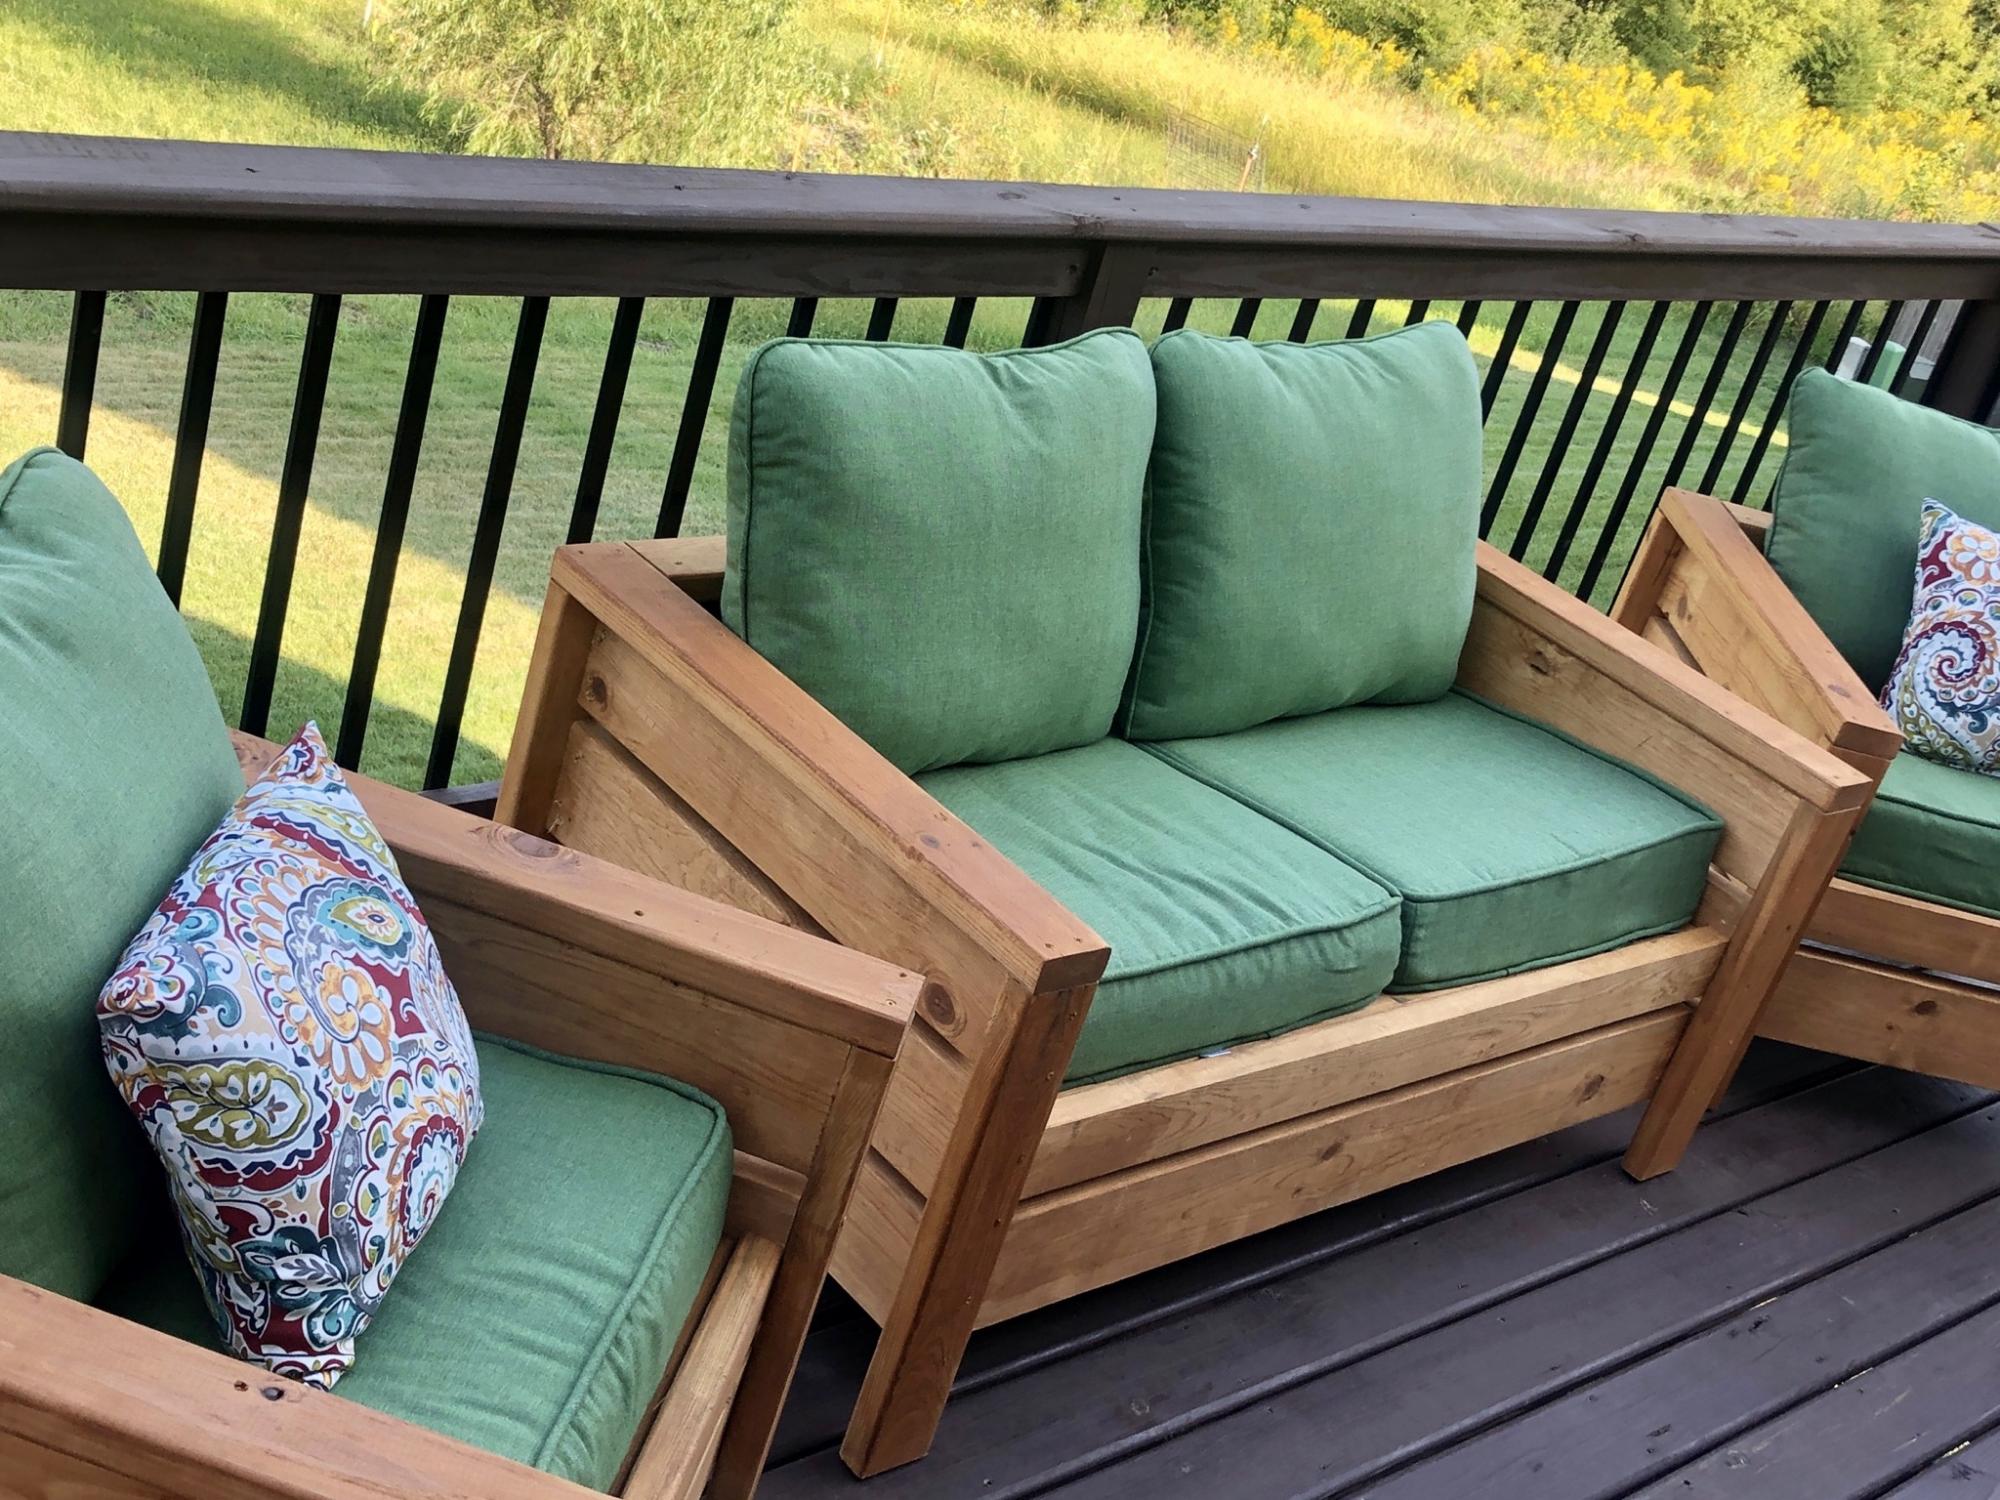
Our outdoor furniture from Costco was falling apart but the cushions were still in great shape so I decided to design the furniture around the existing cushion dimensions. I used all Cedar wood and stained it with Australian Timber Oil Honey Teak stain. The table design was from a picture I saw on another site.
Tue, 06/20/2023 - 12:56
Excellent idea to design the size around the cushions you had! Thanks for sharing ❤️
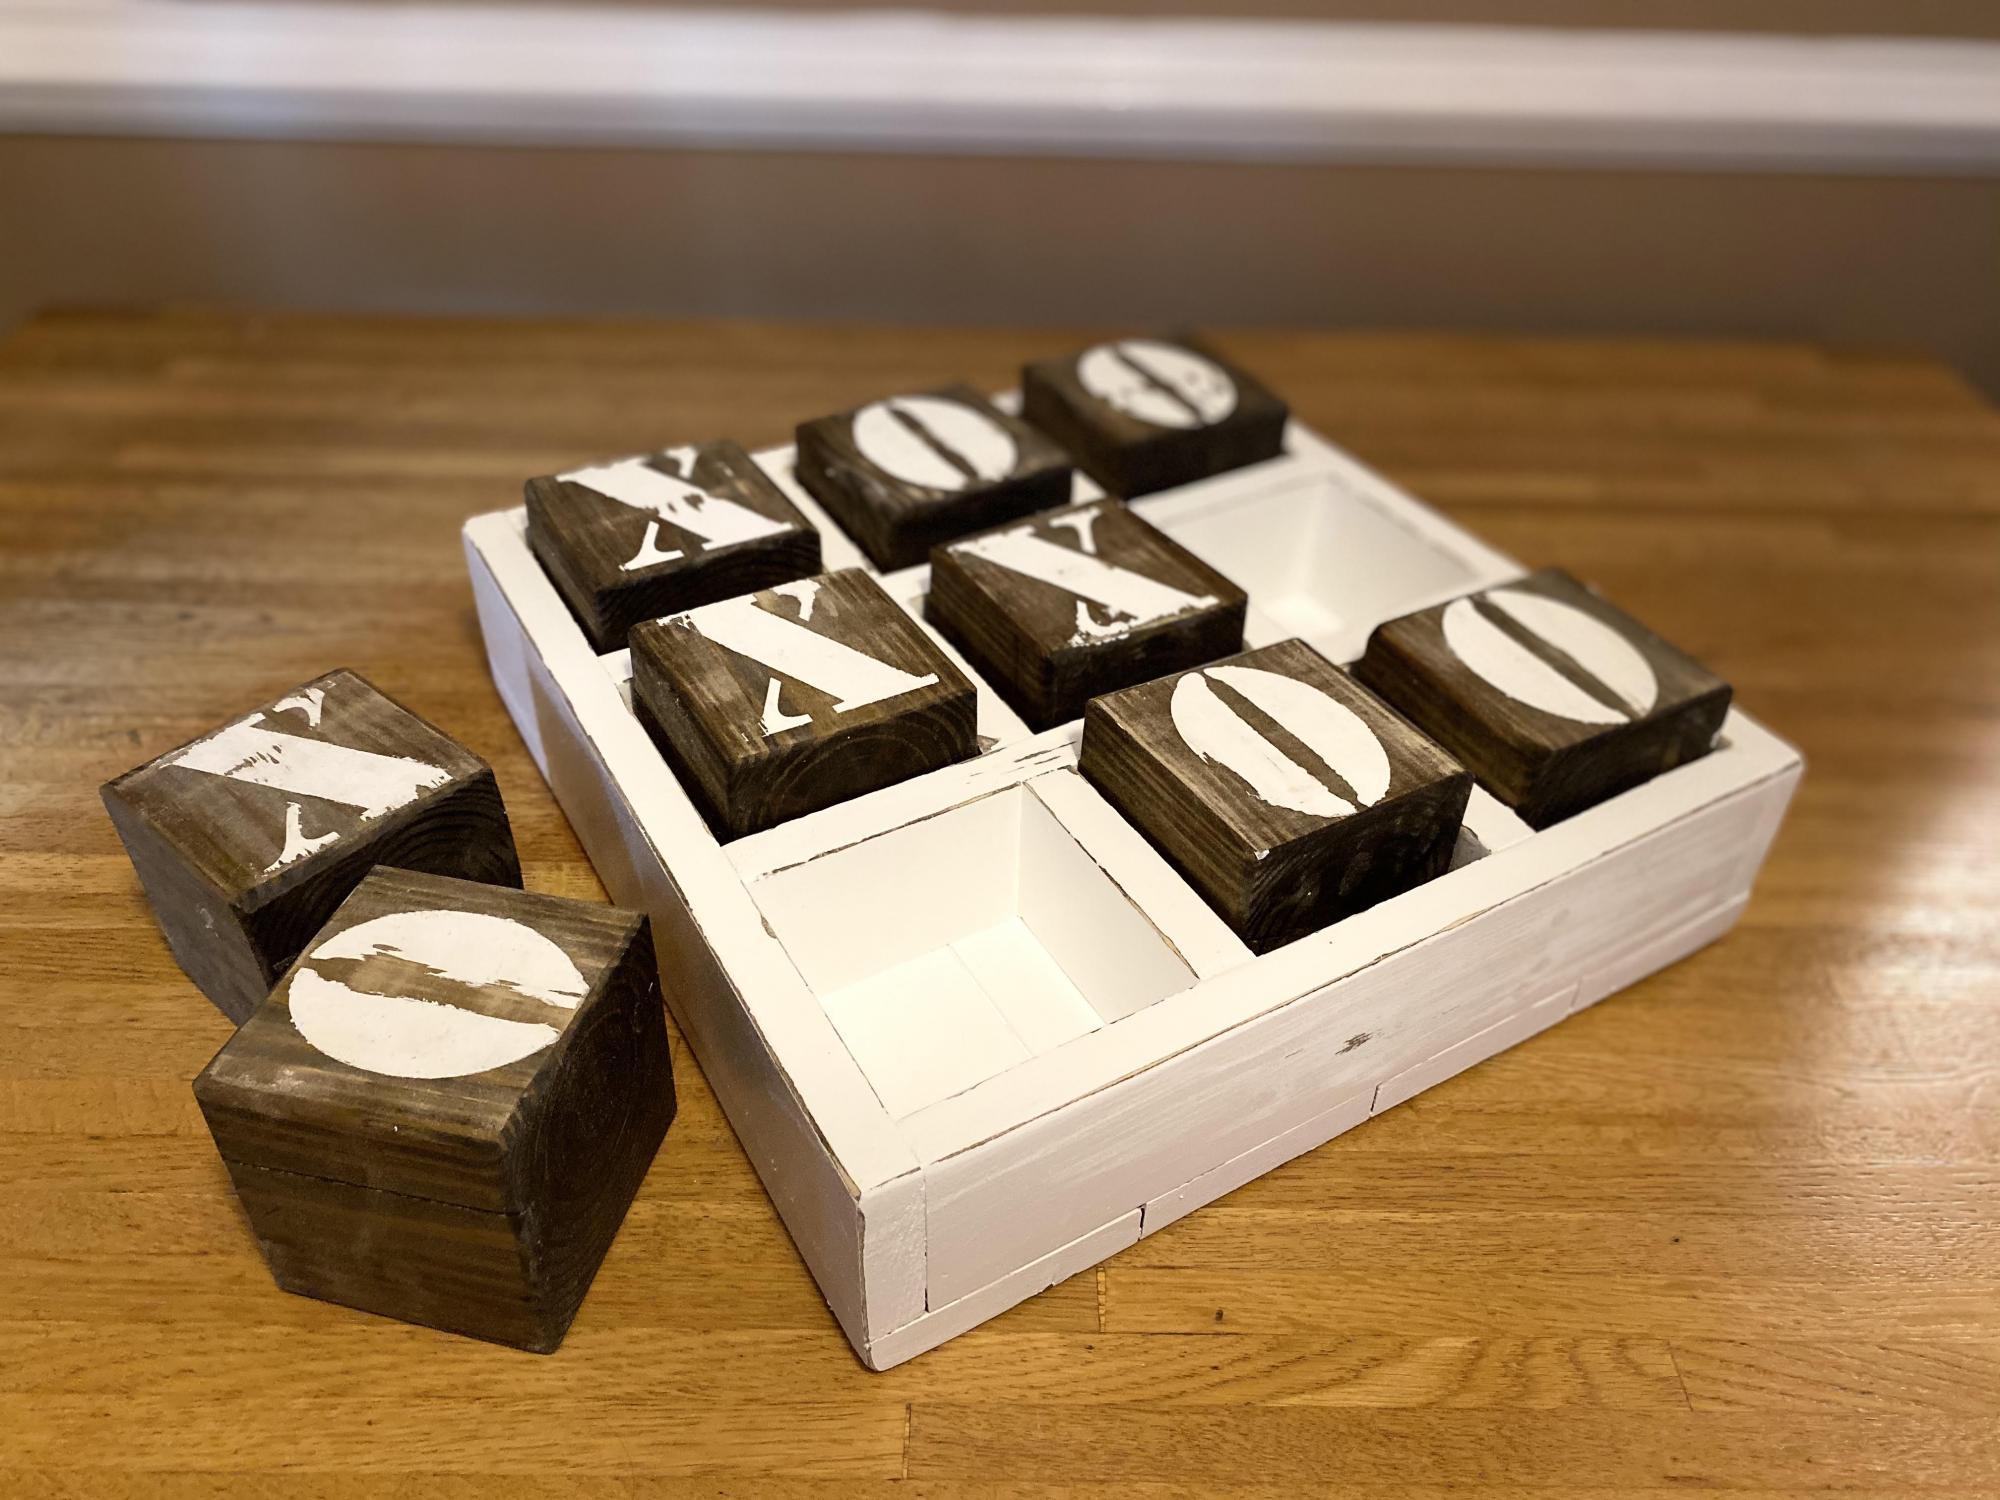
Took some liberties with this one and combined with another plan. My first stencil project.
Wed, 05/27/2020 - 08:28
I love this. Functional but also decorative. Would you mind sharing the plan for your version?
Took the farmhouse plan and added a Trundle. Was initially going to build two farmhouse beds for my two girls, but thought adding the Trundle would free up some much needed floor space. The girls love it!


This is my banquette bench I made over the past few weeks after I saw your pictures and plans on your website. I absolutely love it. I am refinishing a table and chairs to use with it. Now I have room for lots of guest. Thank you for your great ideas.

Part of a huge order I did for outdoor furniture. Love how they turned out! Thank you!

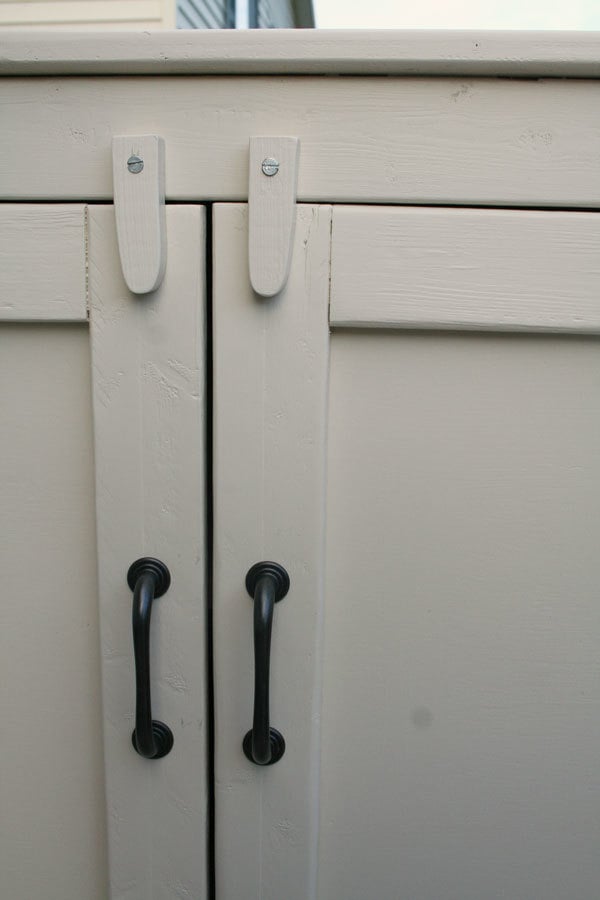
This project was built by my husband, for our daughter who needed some storage for her card-making and scrapbooking supplies. I had the easy part of doing the painting and purchasing the hardware. The hinges and handles are from Home Depot. It is a challenge to find good lumber at our big box stores. That was probably the most difficult part of the build...dealing with warped wood. This piece is suited for the primitive and rustic look so it didn't matter that the wood had some dings and splintering from the edges. Everything was sanded well and these marks just added to the character. He did encounter some problems with drilling the 1 and 1/4" kreg screws into the frame of the door. The wood wanted to split. Also, the plans called for magnetic closures but we could not determine how those would be installed as the shelves do not reach to the doors. So we cut some wooden swinging closures and attached them to the top of the cabinet. They seem to work well. One modification if he builds this again (and our other daughters are now putting in their orders!) would be to add a wooden support down the center front so that the doors would have something to close against. The way it is now, the doors could be pushed inward and put a lot of stress on the hinges. We were very pleased at how this project turned out! Thank you for the plans.


Tue, 10/09/2012 - 13:20
I like the way that came out and I agree its hard to get good wood at the big box stores it took me a while to go through the stacks they had there to find straight pieces. The other thing I had an issue with was the 1 1/4"
Kreg screws as well but if you dont over drive them it generally will not crack the wood. Just be gentle and if it still does turn the clutch down on the drill that will help as well.
Thu, 10/11/2012 - 18:11
Lawson4450,
Thank you for your comment, and for the advice on the Kreg screws!
We are in the process of cleaning up our garage, so that future building projects are easier to do! One thing my husband also built was a small workbench, with a lower shelf to store the Kreg jig, screws, etc on. It comes in handy as we always know where to at least find the Kreg stuff! We should also keep some notes on the shelf, too, to refer to when the wood cracks, etc.
-Ann
Wed, 10/10/2012 - 10:37
You could solve the door not reaching the shelves problem by installing the magnetic closures on the underside of the top piece so it would also act as a stopper for the doors so they don't swing to the inside. I think that's what Ana meant in the plans. Kinda like this:
Thu, 10/11/2012 - 18:04
Aisha,
Thank you for the photo of the magnetic closure. That makes a lot of sense! We could still add those, and also leave the swinging locks in place, too.
-Ann
Sat, 10/13/2012 - 10:43
I am the lucky receiver of this jelly cabinet. It is exactly what I had in mind when I was on the hunt for one. I was so pleasantly surprised when my parents came to visit and showed me my early birthday present in their trunk! :)

Per request of my wife, I opted to add a backrest to the chair. I feel as though my backrest design keeps with the style of the original build. I accomplished this by cutting the 2x4 vertical arms of the backrest at 13 inches with a 10 deg miter cut at the base. This allows you to keep with the 3/4" on the 2x6 backrest slats. I finished it off with a 2x4 top plate. I'd also note that I made slight modifications to the plans to accommodate 24" cushions.

Built this over the weekend for my girlfriends sister. It was a great project and the whole family was able to work together on it, sanding and waterproofing it before assembling. The loveseat plans need a little tweaking. We ran ran the slats the same direction as the chair plans call for so we added a middle support for extra stability. We also pitched the seating down towards the back by 5* to make a more natural sitting position.