Community Brag Posts

Outdoor Patio Deck Chairs

Submitted by nlindauer on Tue, 05/24/2011 - 06:42

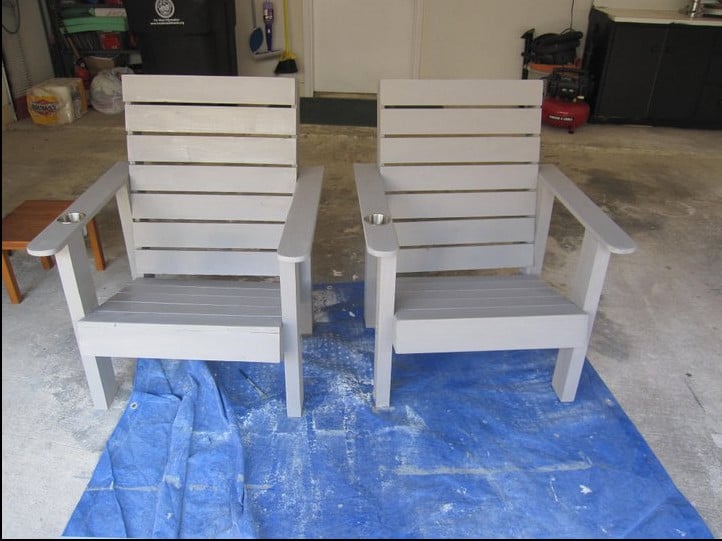
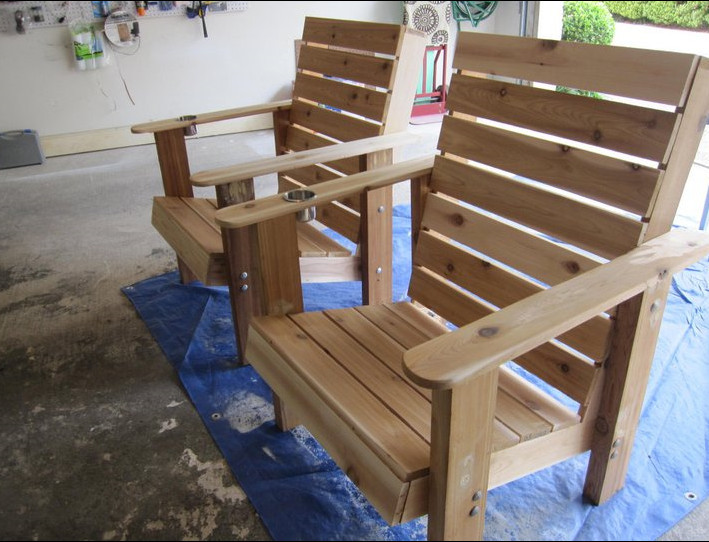
Made these chairs from plans found on the Kerig Jig website. I added the cup holders for convenience and lowered the seats by 2 inches to account for our short legs. Chairs were stained with an outdoor fence treatment that was tinted with a light grey color.

Estimated Time Investment
Day Project (6-9 Hours)
Finish Used
Olympic Maximum Solid - Grey Base
Recommended Skill Level
Beginner

Our First Project: A CA Mudroom

Submitted by jcablopez on Tue, 07/16/2013 - 11:28

I've been looking for a storage solution for the area next to the driveway we use as our main entrance. The area opens to the kitchen, dining, and living rooms. We had a computer desk here, but it just ended up piled with junk all the time and backpacks and jackets ended up on the floor.

I fell in love with the smiling mud room plans as soon as I saw them, but it took a while to convince my husband we should try to build it. I used the Smiling Mud Room plans and modified to add the computer desk section since we couldn't move our internet cable. It didn't have to be really big since we don't use the desktop computer very often.

I still need to find baskets for the shelves and I'm planning to make a fabric skirt to cover the computer and cords. My kids already got out their old backpacks to test it out, so hopefully they'll use it!

We bought the Kreg jig as recommended and now my husband is planning lots of new projects just so he can use it.

Built from Plan(s)
Estimated Time Investment
Weekend Project (10-20 Hours)
Finish Used
I used a tinted primer and Valspar Signature semi-gloss paint in Posh Red. It took 1 coat of primer and 2 coats of paint. The plywood took the paint better than the pine, so some of the trim got 3 coats.
Recommended Skill Level
Intermediate

Rustic X Console, Coffee and End Tables

Submitted by deblynn42 on Thu, 07/16/2015 - 12:29

I modified the Rustic X plans by removing the X's on the sides and using 1x3in slats on the shelf.  They were made for a beach condo so I wanted a more open look.  I wanted a white washed finish and after trying several ideas from the internet I came up with this process:  First, I used rags to rub on Minwax Special Walnut stain as lightly as I could.  Second, I diluted latex satin white paint, at least 50-50, and brushed it on a small area and immediately wiped it off with a clean rag.  I used Minwax Polycrylic as my protective layer.

Estimated Time Investment
Week Long Project (20 Hours or More)
Finish Used
Minwax Special Walnut stain, white latex satin paint, Minwax Polycrylic Clear Satin
Recommended Skill Level
Intermediate

Comments

amati5

Mon, 07/20/2015 - 10:28

What kind of joint did you use?  I don't see any holes or screws and very nice looking finish.

deblynn42

Mon, 07/20/2015 - 14:57

The Rustix X plans use the hidden pocket screws using the Kreg Jig tool.  It really makes a strong joint.  All the hidden pockets are on the underside of the trim pieces.   The top and slats are screwed on with normal wood screws, again from the underside.

Farmhouse table bench no pocket holes or screws on top

Submitted by tjlichat on Wed, 02/23/2022 - 12:55

Liked very much the general design of the farmhouse plans but wanted to avoid buying the pocket hole jig and the puttying of screw holes on top side (exposed) side of boards.

Increased slightly the table top and bench seat board supports (2x2's) which worked well for holding those down and placed the angled wood piece in corner of table leg to support bread board.

Please with the results. We really wanted to avoid attempting to hide the screw holes with putty. Others have posted and we had similar results of blotches on the surface of the top boards resulting from even "stainable" putty. No amount of sanding seemed to help.

Library Cart - Teachers Gift

Submitted by lollypoppy on Fri, 05/27/2011 - 09:32

The moment I saw this I knew it would be a perfect teachers gift for my daughters teacher. She loved it.
This was only my second project, the first being the 10 dollar ledges. I'm glad I tried a smaller project before tackling the farmhouse bed. I think it helped with just knowing how to assemble a project a bit better.
I used my Kreg Jig and it worked marvelous! Also I ended up not having a jigsaw so I just cut the top at a 35 degree angle with the miter saw and rounded the edges a bit with the sander. I was going to add handles but the top goes up enough that it's easy to manuever without. I also wanted her to be able to fit it in anywhere and was worried that the handles sticking out would just get in the way.
Overall I think it turned out great. Her teacher loves it. Thank you Anna for such wonderful plans!!

Krista

Built from Plan(s)
Estimated Cost
35
Estimated Time Investment
Day Project (6-9 Hours)
Finish Used
White gloss paint
Recommended Skill Level
Beginner

Dog Kennell / End Table

Submitted by Lilo7 on Wed, 07/17/2013 - 15:30

This projected turned out great! I admit, it was a bit of a stretch for me. This was the first project where I had to use the Kreg jig. Yikes! That takes some time getting used to! I chose to stain my Kennell/End Table with Minwax Red Elm. And that took the longest! Everyone always makes it look easy to stain something, I still haven't gotten the complete hang of it after project 50, and the waiting between coats is for the birds. But, I am happy with the overall end product! Thanks Mrs. Ana White!

Estimated Cost
I used premium wood, so about $125
Estimated Time Investment
Week Long Project (20 Hours or More)
Finish Used
Minwax Red Elm, two really thick coats!
Recommended Skill Level
Intermediate

Comments

YankeeBelle

Wed, 07/17/2013 - 17:26

It looks so professional and so much nicer than the fatally versions! Great job!! BTW what plan did you use?

Lilo7

Thu, 07/18/2013 - 08:48

Hi YankeeBelle,

I used the plans for the "Large Wood Pet Kennel End Table." If you chose to do this project, beware that the cut sheet does not include all of the plywood cuts. There should be two identical for the sides, and one additional one for the back.

Thanks again!

Pottery Barn Bench Knockoff

Submitted by worrow on Mon, 07/20/2015 - 11:54

My neighbours had noticed the things I build and asked if I could build them a nice bench. I had some very nice pieces laying around that I thought would be amazing to laminate for the top. After completing the top which was alot of elbow grease, I needed to build the base. I cannot for the life of me find the link, but I know it was from Shanty Chic. It is absolutely beautiful, one of my best pieces of work.

Estimated Time Investment
Day Project (6-9 Hours)
Finish Used
Minwax (Walnut)
Recommended Skill Level
Beginner

Comments

worrow

Mon, 02/20/2017 - 08:12

I don't remember which plan I got the base from, but the top is of my own design, and I spend awhile figuring out what kind of base I wanted, but it is suppose to be representative of an old design from Pottery Barn, was built for some friends that needed something heavy duty.

Extended piano bench

Submitted by Lukilla on Thu, 02/15/2018 - 12:13

Got a piano for free that has no bench with it. When I started looking up dimensions, I realized traditional benches are a little short if you want to sit and play with someone else. The size of this plan works perfectly and can store music. Best part is that if we ever get rid of the piano, we will have a nice entryway bench.

Estimated Cost
$50
Estimated Time Investment
An Hour or Two (0-2 Hours)
Finish Used
Kona stain
Recommended Skill Level
Beginner

Added a wall for mounting the tv

Submitted by Anonymous (not verified) on Wed, 03/16/2022 - 10:28

I've gotten tons of comments from friends and family already on this build. I liked the original white but it wouldn't have matched my other furniture in the room already built/stained this color.

Comments

HBWineWoman

Fri, 03/18/2022 - 09:28

Oh my gosh, this looks fantastic! I love that you did the simple framing on the "headboard" portion. Might have to give this a try!

Makings of an Herb Garden

I followed Ana's Raised Planter Box plan exactly. We did purchase a Kreg Jig Jr. recently, which came in handy on this project for sure. It is a very sturdy piece and it only took a couple of hours to assemble.

Estimated Cost
$120
Estimated Time Investment
Afternoon Project (3-6 Hours)
Finish Used
Sherwin Williams Deckscapes in Flagstone with Minwax Whitewash pickling over the stain. Poly over the whitewash
Recommended Skill Level
Beginner

Comments

Loft Playhouse Bed

Submitted by kyounghome on Tue, 02/20/2018 - 06:16

I saw this and new I had to make it for my eight year old daughter.  Followed Ana's plans as directed.  The total cost to include wood, screws and paint brought this to about $315.00.  I am going to make stairs next for this but my other daughter wants a new bed now too, so, the stairs will have to wait.  

Built from Plan(s)
Estimated Cost
$315.00
Estimated Time Investment
Weekend Project (10-20 Hours)
Recommended Skill Level
Intermediate

Rustic Bathroom Vanity

Submitted by khoran66 on Tue, 04/05/2022 - 13:18

This was a great first project for my husband and I. First time doing drawers but was amazed how easy it rally was.

Comments

Perfect Bookshelves

Submitted by BreBuskey on Thu, 06/02/2011 - 08:56

We were searching for the perfect bookshelves for our girls' room. We came across these bookshelves and decided to build them ourselves. In the end it worked out perfect! The book are easy enough for our 6 & 3 year old daughters to put away, they look amazing, and it was special building them with my husband as a gift to our daughters. You can find more info on the room and bookshelves on my blog www.brebuskey.blogspot.com

Built from Plan(s)
Estimated Cost
$100.00
Estimated Time Investment
Day Project (6-9 Hours)
Recommended Skill Level
Beginner

Comments

mamas shelves

Made these shelves for my mom.

Estimated Cost
FREE. I used scrap wood but it would prob cost around $10 for the wood
Estimated Time Investment
An Hour or Two (0-2 Hours)
Finish Used
Minwax espresso stain and semi gloss polyurathane spray
Recommended Skill Level
Starter Project

Rustic Kentwood Bookshelf

Submitted by wthalin on Mon, 07/27/2015 - 13:09

I wanted to build as big of a booshelf as I feasibly could so I altered the sizings in width and height to create this monster. The planks in the back did not fit perfectly in the new sizing so I spaced them a little bit and I think it turned out nice. The spacing gives it more of barn-like look to it. I also alternated stains on the planking between American Walnut and Dark Walnut because this thing took more than a can of stain and I thought the look was neat. The majority of the piece is in American walnut which turned out a little redder than I hoped, but overall I am happy how this turned out.

As always, thanks for the plans!

Estimated Cost
$150
Estimated Time Investment
Week Long Project (20 Hours or More)
Finish Used
Varathane American Walnut stain, Minwax Dark Walnut stain, Vermont Natural Coatings PolyWhey Satin clear coat
Recommended Skill Level
Intermediate

Comments

JoanneS

Mon, 07/27/2015 - 17:09

You did a great job on this bookshelf!  Love the plank back and the barn-like look it gives, and the alternating colors for the back.  Looks beautiful!

itsnikkilyn

Wed, 11/02/2016 - 00:14

Hello, would you be able to provide the exact measurements you used to build this beautiful piece? It would make my life a whole lot easier lol Thank you :)

wthalin

Thu, 01/19/2017 - 10:29

Final dimmensions of the bookshelf ended up being 51"W x 16.5"D x 81.5"H. I would suggest measuring out the space where you would like to put the shelf and see how much room you have.

Fancy Hall Tree

Love this site!  I've made the Facny X Farm Table, and now this piece.  I changed the back to ship lap.  Also cut out the baseboard so it sits up against the drywall then coped the baseboard around the base to look built in.  Thanks!!!

Edit - sorry for the pics being sideways, they're not like that on my phone or computer :(

Built from Plan(s)
Estimated Cost
$50
Estimated Time Investment
Weekend Project (10-20 Hours)
Recommended Skill Level
Beginner

Octagon Picnic Table

Submitted by Anonymous (not verified) on Sat, 04/09/2022 - 10:23

I just finished this octagon picnic table as per your plans
the 2x6 are all clear Western Red Cedar and the skeleton is
Douglas Fir. I think it turned out astonishingly excellent.

Thanks for the inspiration Ana.

Seasonal And Holiday

Queen Size Farm Bed

Submitted by msts on Sun, 06/05/2011 - 12:54

This took about 10 hours, including prime and paint. I raised the side rails 3 1/2 inches to dado the posts to accept a 2x4 siderail on the inside of the post, with 1x8 covering it at the center of the post. The siderails are bolted with 4x5/16" bolts, washers and nuts. We chose to leave it more rustic, showing the siderails at the ends and the bolt holes. It is all pine, bought new and along with a 1" forstner bit to recess the bolts, cost $198. It can be repainted at any time. Tools I used were a compound saw for ease of cutting straight cuts, a cordless and corded drill, 1/2" socket and box wrench, easy square and a circular saw for the 1x8's. We painted it with left over paint. Because its pine, we primed with BIN,

Built from Plan(s)
Estimated Cost
$200
Estimated Time Investment
Weekend Project (10-20 Hours)
Finish Used
BIN Primer Sealer, one coat on knots then another full coat.
Benjamin Moore Pearl Luster "
Butter" Finish Coat, two coats.
I sand all wood with an orbital sander prior to assembly. Then I use a block sander after the primer dries and between the first and final coat of paint. I only sand after the primer and paint to knock off anything that might be sticking up off the surface. I don't go crazy.
Recommended Skill Level
Intermediate

Comments

marlaandwilliam

Sun, 06/05/2011 - 18:27

Looks great! What did you use for the panels in the headboard and footboard? it almost looks like beadboard ?

Mark Shortt (not verified)

Sun, 06/05/2011 - 20:23

It is 1x5 bead board (pine). Some places call it match board. It is v-groove, tongue and groove and has a smooth (flat) side and a two inch flat, bead, two inch flat side. The plans called for a 61" wide panel but I made it 58" with the dadoed posts (1 1/2 inch each cut).
If you want to do the panel using the T&G bead board, make sure to lay your 1x4's out the distance of what ever height you want your panels and center the first piece of T&G bead board on both the top and bottom panel. Then you work your way out fitting the T&G and screwing in each piece. When you come to the two end pieces, they are going to ned to be ripped but by starting at center, they will be even at the end when ripped.
Another tip is when screwing the panel, you will want to get at least halfway into the 3 1/2" post. measure the distance you want to cut on the drill bit and put a piece of tape on the bit. Then drill until you get to the tape.

Ledge Shelves & Modular cabinet

I love this site!  I used the Modular Office- Narrow Open File Base under an old 5 panel door added some old table legs and voila new desk for two!

I thought the perfect thing to go above the desk was the $10 ledge shelf. I actually had the wood and the stain already...so this project was basically free...just my time.


Estimated Time Investment
Day Project (6-9 Hours)
Finish Used
DIY chalk paint on desk. Old Masters Dark Maple on ledge shelf.
Recommended Skill Level
Beginner

Camp loft bed with stairs

Submitted by Kaymich13 on Wed, 02/28/2018 - 19:06

Super easy build, had to make a few adjusments because of the size of the room.  My daughter absolutely loves it. Thanks Ana White for these awesome plans!!

Estimated Cost
$120
Estimated Time Investment
Afternoon Project (3-6 Hours)
Recommended Skill Level
Starter Project