Community Brag Posts

Farmhouse Table

Submitted by kelseyt15 on Mon, 11/25/2019 - 11:11

My first project! I was surprised how much fun and how easy it is to build something that’s beautiful & functional. I’m hooked! I can’t wait to build more!

Estimated Cost
120
Estimated Time Investment
Weekend Project (10-20 Hours)
Finish Used
Special Walnut & Weathered Oak
Recommended Skill Level
Beginner

Wood Nightstand

Submitted by Anonymous (not verified) on Sun, 07/30/2023 - 15:03

I loved the look of the original but went with more of an antique icebox feel. Made from cherry and aged with lye and a danish oil top coat.

reader build

Comments

Composite/Plastic Wood Little Kids Picnic Table

Submitted by katonca on Tue, 03/20/2012 - 15:49

I used some leftover boards from our composite deck for the surface part of this picnic table. I used a lot of Kreg joints to screw up into the boards from underneath, so I didn't have many exposed screw heads. I did have to redesign this plan slightly for me because of my composite board width. Ended up costing $5 for the 1x3 spruce, and I finished it with primer and exterior latex paint leftover from painting our garage doors.

Built from Plan(s)
Estimated Cost
$5
Estimated Time Investment
Afternoon Project (3-6 Hours)
Finish Used
Primer and exterior latex paint.
Recommended Skill Level
Beginner

Comments

ChiclyHandy - Chestwick Bed frame

Built the Chestwick Queen Size platform bed - see my blog for complete details. http://chiclyhandy.blogspot.com/2014/01/chestwick-platform-bed.html

Estimated Cost
$120
Estimated Time Investment
Day Project (6-9 Hours)
Finish Used
Minwax Dark Walnut
Minwax Polycrylic Top Coat
Recommended Skill Level
Beginner

Horse Stable

Submitted by Anonymous (not verified) on Sat, 11/30/2019 - 14:06

Loved creating the Ana White Horse Stable with a few additions! I added planters and twinkle lights for my girl!

Estimated Cost
$55
Estimated Time Investment
Afternoon Project (3-6 Hours)
Finish Used
Fusion Mineral Paint and Minwax Stain
Recommended Skill Level
Beginner

Double Shed Coop

Submitted by Anonymous (not verified) on Sat, 08/05/2023 - 09:31

Our family decided to raise chickens but needed a place to keep them safe at night. We used your shed plan and adapted it to create necessary venting for the chicks.

Since we had 16 chickens we knew one coop would not be enough space so we built two. We created a vented tunnel between the two coops so the hens could go back and forth between them as they wished while still being protected. The girls are very happy in their new space!

Thank you for your great plans.

Holly

Built from Plan(s)

Wrapping Paper Shelf

Submitted by sophie on Fri, 03/23/2012 - 11:42

I made this wrapping paper shelf using spruce wood and painted it the same colour as the wall it hangs on. It was a really simple project. was a bit nervous about cutting the angles for the dowels to slot in but it was actually really simple. A great way for easy access to wrapping paper! I also made some little boxes out of plywood to go on the shelf for ribbons, envelopes etc.

Estimated Time Investment
Afternoon Project (3-6 Hours)
Finish Used
Light blue latex paint to match my walls
Recommended Skill Level
Beginner

Comments

Kandis (not verified)

Wed, 08/08/2012 - 08:42

I love this. I was thinking of making a version of this for the kitchen since I bake a lot. I was going to try this with the parchment and wax paper and maybe the aluminum foil.

Seasonal And Holiday

Hanging Beds Complete!

We decided to make loft beds for our girls room to offer them more space and also give them some individual room. The old room had daybeds that just took up so much of the room.

I saw the hanging beds on this site and thought they would be great. So I got to work.. I used 1x4 s for the platform to lighten the weight of the bed. I had to customize the sizes a bit but that wasn't a big deal. I used the Kreg jig to joint the 2x4s as well as on the rail posts. They are attached below the platform to the front 2x4. We also used chain rather than rope as chain doesn't give.The ladder I made from 2x4's and used the K Jeg to get tight joints underneath the rungs..at 6'2" and 185 lb they are pretty sturdy..

We are really pleased with the results. The girls love them. Each has their own desk space now, they shared one before, and their own storage space. And it has actually help keep their room clean.. ha....

Cost us with all wood, supplies, hardware, paint, about $150-175

Estimated Cost
$150-$175
Estimated Time Investment
Week Long Project (20 Hours or More)
Finish Used
Satin white primer-paint (All in one can)
Recommended Skill Level
Beginner

Hanging Bookshelf for Toddler Bedroom

Submitted by Anonymous (not verified) on Mon, 04/04/2016 - 13:46

this was super easy and a quick project!  used some wood I already had and it worked perfect for my toddler son's bedroom!

Built from Plan(s)
Estimated Time Investment
An Hour or Two (0-2 Hours)
Recommended Skill Level
Beginner

King Bed Frame

Submitted by Anonymous (not verified) on Sun, 12/08/2019 - 21:18

My daughter got a new king mattress. We went shopping for a bed frame, they were all really expensive or junk. Decide to make our own. So far its coming out great. Total build time 5 hours.

Built from Plan(s)
Estimated Cost
220.00
Estimated Time Investment
Day Project (6-9 Hours)
Recommended Skill Level
Intermediate

Modern Bunk Beds

Submitted by Anonymous (not verified) on Sun, 08/13/2023 - 11:56

My latest project - a bunk bed for our grandboys, coming to visit in a few weeks from Germany. The end slats are connected with 36 stopped mortise and tenon joints. The rails are connected with 8 through mortise and pegged tenon joints. The drawer pulls are walnut and large enough for a toddler to operate with both hands. The fences use dowels and are pegged on the ends. The ladder utilizes a french cleat to hold it in place.

https://www.facebook.com/randallgroves

Built from Plan(s)

Sandbox with bench seats

Submitted by Fuchsia on Mon, 03/26/2012 - 18:00

I think this should have been my first project. My kids love it and will spend long periods of time without demanding anything of me - which means that I can work right there on my other projects! I'd have finished that play house I want to make by now if I had just thought of making this first :)

This is a very easy build and it is very rewarding because it works so well and looks so nice. I used 2x8's instead of 1x8s on the sides because I had a bunch laying around. I would definitely recommend doing that as it is very strong this way. If you use 2x8's be sure to make the short sides a bit shorter to make up for the extra width. I had to make it exactly 2 inches shorter. Also, the arm rests are a bit short because it seems that the 1/2 inch spacing was not taken into account when calculating the length in the directions. I wish I had seen that and made them 1/2 inch longer so the bench back could not move forward as much when in the seat position.

If I had had childcare this would have been a very quick project, not counting the staining. As it is, I am embarrassed to say how long it took to build this. I think I was working on it for two weeks.

I spent more then I originally thought I would but it was still reasonable. The sand cost about $36. It is pictured with 7 1/2cu. ft. bags of sand. I bought 10 so I went ahead and added the other three bags but it is definitly too much sand. I have to dig out for the arm rests to shut the lid. So if you go with 8 bags it should be perfect.
Total cost:
Hinges: 8 @ $2.12 = $17
1x4 6 @ $2.42 = $14.50
Handles: 2 @ $2.00 = $4.00
Stain = $17
2x4 = $4.00
2x8 = Free
Total: $56.50

Estimated Cost
$50-60
Estimated Time Investment
Afternoon Project (3-6 Hours)
Finish Used
Cabot Australian Timber Oil Jarrah Brown
Recommended Skill Level
Starter Project

Comments

Lady Goats

Tue, 03/27/2012 - 12:34

I couldn't wait for someone to actually build this! YAY! And I'm sorry about the arm rests. I'll have to check to see why I made them too short :-/ Beautiful build! Great job! And your kiddos are adorable!

Fuchsia

Tue, 03/27/2012 - 17:27

I forgot to say that in my post - THANK YOU so much for these plans! I saw them a while back and loved them. I am so glad I built it. I've had no problem with the extra movement of the seat back so really no worries :)

Floating Truss

Submitted by Bonsai on Wed, 01/15/2014 - 06:47

I love love love this table. I got the inspiration from here, but it is totally original. I made several design change, but I also added handmade iron-forged bolts and washers.Don't forget the floating top!!!!!

Estimated Time Investment
Week Long Project (20 Hours or More)
Recommended Skill Level
Advanced

Comments

$55 Fancy X Desk....with a few alterations.....

Submitted by Anonymous (not verified) on Wed, 04/06/2016 - 11:48

I loved the design of the desk, but needed it to be just a little higher so I could use it as a standing desk in my office. (So I'm not sitting ALL day). The plans were easy to understand and very clear.

Thank you Ana....You are awesome!!!

Estimated Cost
$100 (but that was because I "needed" to buy a couple of new toys......I mean tools).
Estimated Time Investment
Weekend Project (10-20 Hours)
Finish Used
Desk for my office.
Recommended Skill Level
Beginner

Oak Mirror

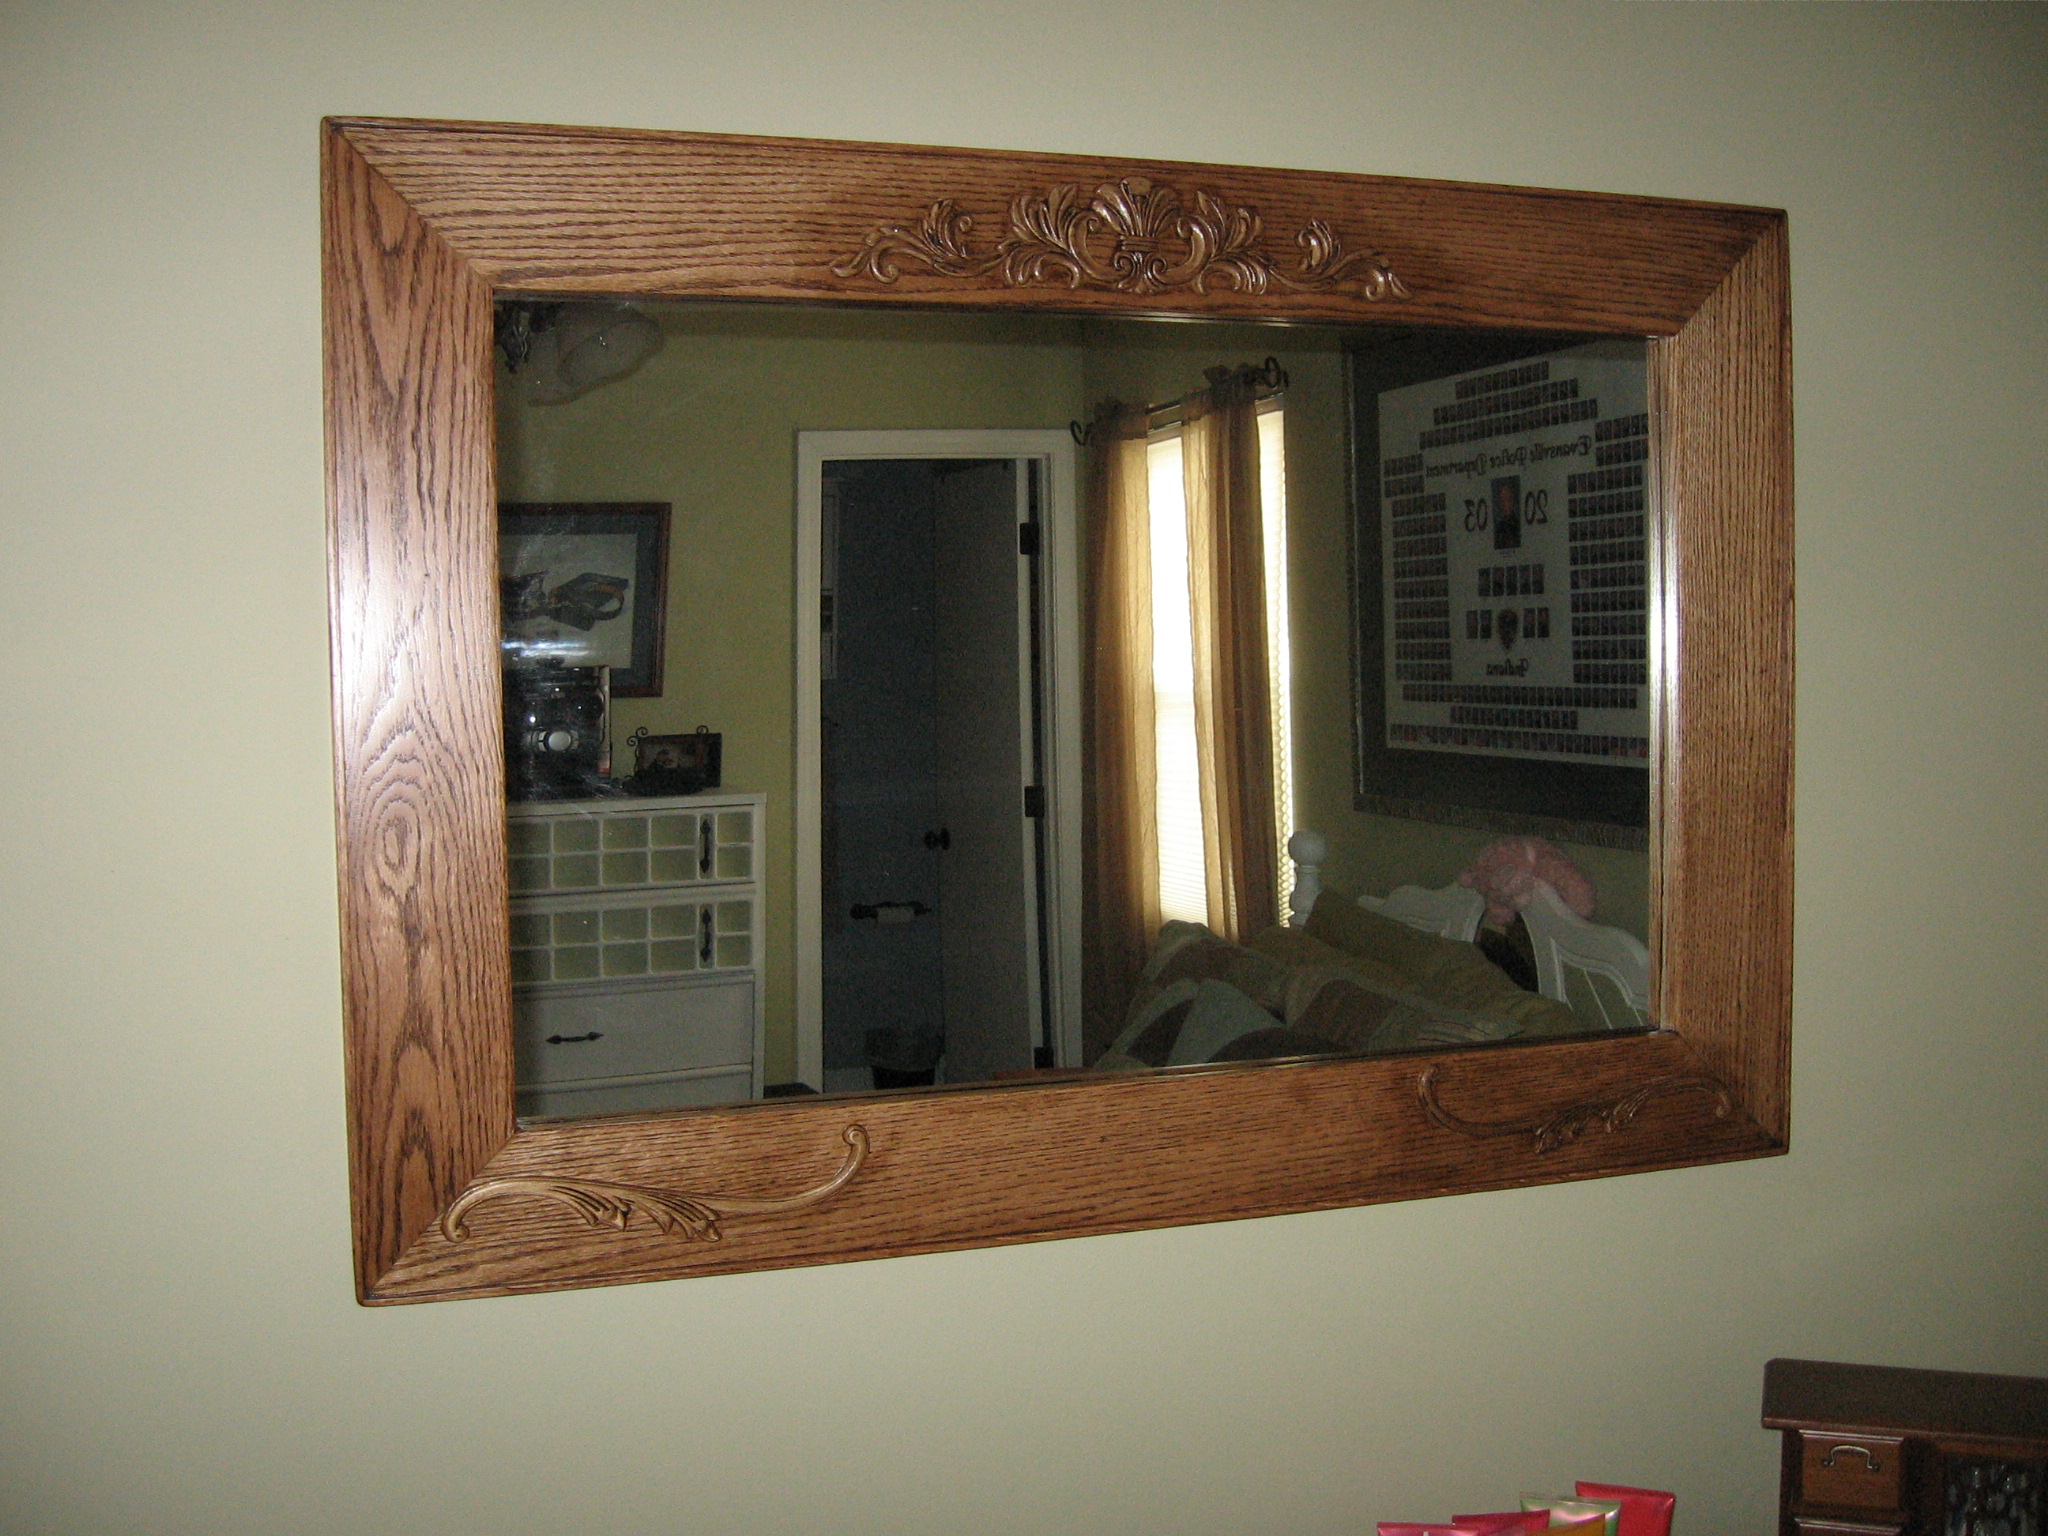
I recently refinished an antique oak dresser. It originally had a mirror attached to it but it was long gone by the time I bought it. My wife asked me to take an old mirror from another dresser and to build a new mirror to hang above the newly refinished dresser. I wanted this new mirror to look as if it came with the dresser which was built in the early 1900s.

The front of the mirror frame was built using red oak 1" x 6" stock. I did rip it to measure 4" wide. The mirror is 38" x 24" so I designed the frame so that a 1" lip was available to adhere the mirror to the mirror frame. The corners of the mirror were mitered at 45 degrees. I attached the corners of the mirror frame together using 1 1/4" pocket hole screws.

My next step was to flip the frame over. I then used red oak 1/2" X 6" stock which I ripped so that a 1" lip was available for the mirror. I did not miter this and I attached this using wood glue and 1" finishing nails.

I then used red oak 1/4" x 2" stock and made a frame for the outside of the mirror. This was mitered. I attached it using wood glue and 1" finishing nails. I did set the nails and fill the holes with stainable wood filler.

I then did all my sanding using 120, 220, 320, and 400 grit sandpapers. I rounded the edges a bit.

The appliques were then attached using wood glue and a few 1" finishing nails. I did set the nails and used stainable wood filler.

My next step was applying two coats of gel stain. I then applied 3 coats of fast drying polyurethane. I did some minor sanding between coats.

I then attached the mirror to the frame using mirror adhesive. Next the backing from the old mirror was cut to fit down covering the mirror within the lip. This was secured using "points". Finally the back was covered using paper and double sided tape. A 200 lb. mirror hanger was then attached. It actually contained a bubble level on the hanger. I purchased this at Hobby Lobby.

Estimated Time Investment
Week Long Project (20 Hours or More)
Finish Used
Minwax aged oak gel stain (2 coats) that I applied with a brush. I wiped it off after a few minutes using a cotton cloth. And three coats of Minwax fast drying polyurethane. It was applied with a brush and I did very minor sanding between coats. I will apply clear Briwax eventually for added protection.

Note: The gel stain was nearly out and I should have added a little mineral spirits or paint thinner to thin it out some. I didn't do this and I ended up with some blotchiness due to this.
Recommended Skill Level
Intermediate

Comments

First Table, first project

Submitted by kmetter on Fri, 01/17/2014 - 13:06

This is my first project. My wife decided I needed a hobby...and she needed a table :)

I used the Triple Pedestal Farmhouse Table plans, but modified it to fit our kitchen.

Had some issues with pocket screws coming through on the 1x boards on the top, so be careful with that.

Built from Plan(s)
Estimated Cost
285
Estimated Time Investment
Weekend Project (10-20 Hours)
Finish Used
Antique Walnut Gel
Recommended Skill Level
Beginner

kitchen prep cart

Submitted by elly61 on Sat, 04/09/2016 - 20:03

Our version of Anas' Kitchen Prep Cart .... We are in Australia which means we pretty much work by metric.. so the handyman of the house converted all measurements and we used what recycled timber, screws, hinges etc that we had on hand. The making of this all came about as handyman of the house brought home a chunk of timber offcut and I was thinking.. what can we do with this?? lol

Estimated Cost
stain $25 handles $4 the rest was recycled timber etc
Recommended Skill Level
Intermediate
Back