Community Brag Posts

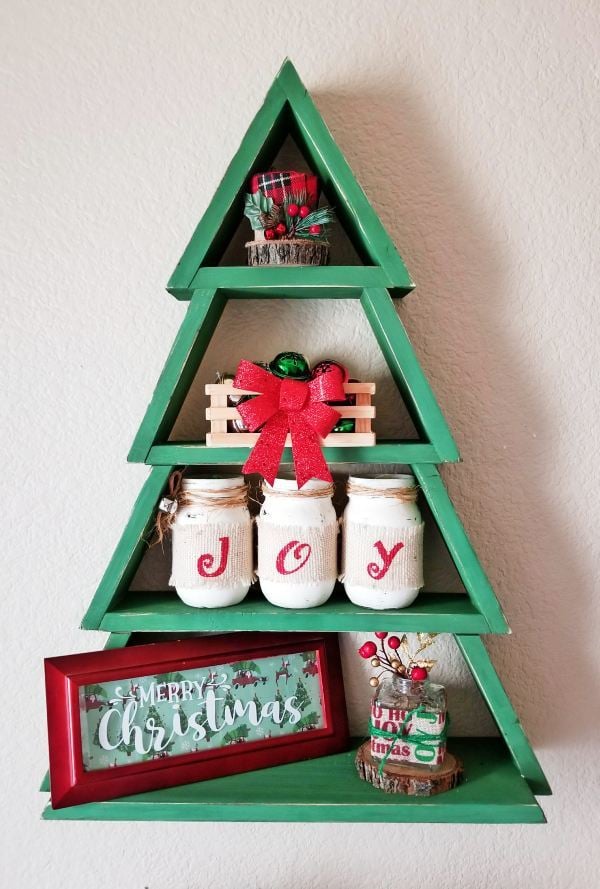
Wooden Christmas Tree Shelf

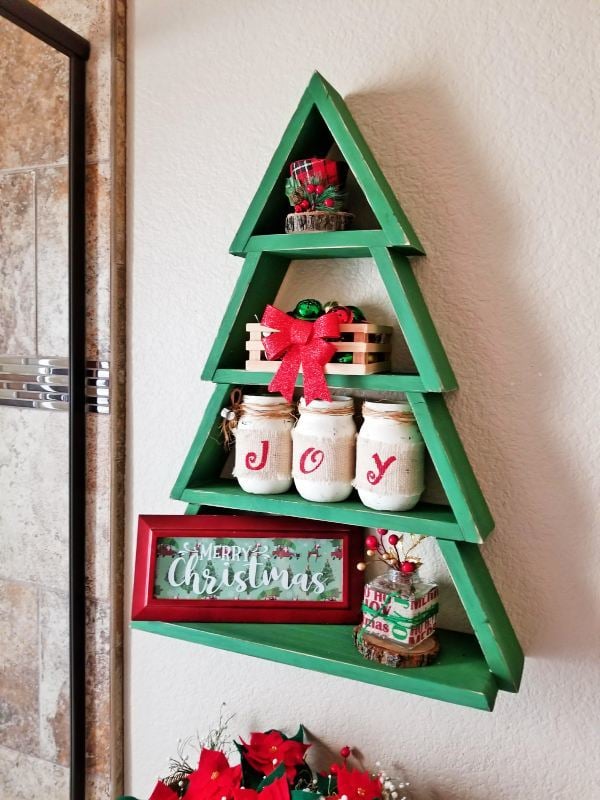
I made this easy and cheap Christmas tree wall shelf to add character to my guest bathroom.  I went through all my wood stash and found enough wood to build this project with! 

Make sure to pay attention to the long and short point directions in Ana's plans.  Since I was hanging this above my toilet, I didn't need the hooks so I just omitted the bottom piece all together.

I ended up using wood glue and a nail gun to put everything together so it went really quickly. 

I painted the whole tree with green chalk paint and distressed the edges with sandpaper.  Hung it up with L brackets in a stud.

Fun and easy project!  Thank you Ana!!

Built from Plan(s)
Estimated Cost
$0 (I used scrap wood I had on hand)
Estimated Time Investment
An Hour or Two (0-2 Hours)
Finish Used
Dark Green Chalk Paint
Recommended Skill Level
Beginner

Comments

Seasonal And Holiday

Cottage End Table based on Ana's design

Submitted by bluejazz on Sat, 08/06/2011 - 10:06

The design is good, it all goes together nicely. Mid-stream, I decided to use some Mahogany I had sitting around to make the face frame.

This was my first experience with drawers and predictably I had all kinds of self-inflicted problems. Most notably placing the bracket backwards and then I foolishly convinced myself I could put the top on before I put the drawer face frame on. (I could have but I would have never aligned it correctly)

I finally came together; it fits well in the intended spot & my wife likes it.

Built from Plan(s)
Estimated Cost
60
Estimated Time Investment
Week Long Project (20 Hours or More)
Finish Used
Black Enamel (primer and paint in one) Face frame was done with General Finishes Gloss Arm-R-Seal wiping varnish.
Recommended Skill Level
Intermediate

Comments

Kitchen Island

Submitted by Kstudinski on Sat, 08/31/2013 - 10:52

I have a small kitchen with no room for a table and no storage space. When I saw the plan for this kitchen island i knew it would fit perfectly in our space and a project my husband and I could work on together. It took several days in total, but we had to work around the kids, so probably could be done faster if need be. It is made out of white pine, including the top and legs. We probably spent around $150, but we looked at several similar islands going for over $600 and not even made with wood. We are so pleased with the outcome. We cannot wait to get started on the bunk beds for our son.

Thanks Ana White!

Built from Plan(s)
Estimated Cost
$150
Estimated Time Investment
Weekend Project (10-20 Hours)
Finish Used
Pine
Recommended Skill Level
Beginner

Channing Desk/1st ever project

Submitted by jodie0100 on Wed, 10/21/2015 - 13:01

My husband and I have never built anything.  We decided to build our teenage boy a desk, as I could not find anything I liked online.  The project was pretty simple for amateurs to follow.  The cutting and assembly was done in a day.  We decided to add the drawer and pull out shelf for the printer.  Really, figuring what color to stain it and the staining process was the most tedious.  We routered the drawer sides and the top of the desk for a nicer look.  So proud of our work and the fact that this will last our son for years to come.  

Built from Plan(s)
Estimated Time Investment
Day Project (6-9 Hours)
Finish Used
Water based Charcoal w/ Black Glaze for the base and water based Vermont Maple with a top coat of water based toffee stain. For both the top and bottom pieces, I brushed on the stain, let it sit for 3 mins and then applied medium pressure to wipe. Let dry for 2 hours and completed process again. For the bottom piece, after the two coats of stain, I applied the black glaze using the same method. However, after wiping off, I then used a damp cloth to wipe down one time. I used a polyacrylic protective finish.
Recommended Skill Level
Beginner

Nightstand-charging table

Submitted by csnezz on Tue, 11/13/2018 - 12:58

This was built as a nightstand/charging cabinet.  I made it a little deeper for more stability. I also replace the 4-5 drilled holes with a corded electrical/usb outlet that allows you to both plug electri cords and usb cords for electronics (about $10 online). I added a center 1 X 2 and magnet closers on the doors. I used unfinished wainscot for the center of the doors.

Estimated Cost
$50
Estimated Time Investment
Weekend Project (10-20 Hours)
Finish Used
Varathane water based pre-stain, Varathane American Walnut quick dry stain, Varathane water based polyurethane.
Recommended Skill Level
Intermediate

Comments

Two Sizes from One Set of Plans

Submitted by Anonymous (not verified) on Wed, 08/10/2022 - 19:45

We followed Ana's plans for the large project bench. We altered the plans to make a bench for our compound miter saw with the saw platform level with the project bench.

Built from Plan(s)

Comments

Simple Outdoor Lounge Chair

Submitted by meikokoda on Tue, 08/09/2011 - 06:15

I made 4 Simple Lounge chairs and 3 Ottoman/Accent tables. They are made out of 1x3 and 1x2 furring strips. I was worried about how sturdy they were going to be but, in the end they turned out PERFECT!! We absolutely LOVE our new set!

Estimated Cost
$15 each including paint
Estimated Time Investment
Weekend Project (10-20 Hours)
Finish Used
Glidden Exterior in Vibrant Day Lily
Recommended Skill Level
Beginner

Comments

Something to hang you hat on

Submitted by sgilly on Mon, 09/02/2013 - 17:45

I built this for a friend of a friend. They had seen a similar hall tree on line that ran between $300-$500. It was made of a mix of materials, including mdf and veneer. It was for newlyweds so I did the finishing (something I really hate) and I made the cushion. I had the mirror cut at a local glass shop, and had it cut a bit shorter than how it appeared in the picture they gave me - I was afraid someone would toss somthing onto the cushion and it would end up hitting the mirror.
They seemed happy with it. I hope to get a picture of it in place so that I can add it to my album titled "Look what Gramma made when she could still do things".

Estimated Time Investment
Weekend Project (10-20 Hours)
Finish Used
I used 3 coats of Minwax Dark Walnut, 2 coats of rub on polyurethane, satin finish, and then applied a coat of wax and buffed that out.
Recommended Skill Level
Intermediate

Comments

CreativeChaos

Tue, 09/03/2013 - 16:45

I was considering making the hall tree for our bathroom and wondering how you stabilized the back without those curvy side supports? I like how yours turned out!

sgilly

Tue, 09/03/2013 - 20:31

It was an easy build and would be really easy to anchor to a wall. I suggested to my clients that they just add anchors to the top piece and screw to the wall there. This is 72" tall. Most people wouldn't even see the anchors. You could also screw through the back from inside the cubbies. It wouldn't budge!

Anniversary wall art

This is my first project! My friend and i were debating what to gift our friends for their anniversary. This was perfect. Good first time beginner project. 

Estimated Cost
$25
Estimated Time Investment
Afternoon Project (3-6 Hours)
Recommended Skill Level
Starter Project

Indoor Daybed without Canopy

Submitted by hfitz1 on Thu, 08/11/2011 - 10:34

We made this for my daughter's bedroom. There was not enough room for a canopy, so we adapted it a bit.

Estimated Time Investment
Afternoon Project (3-6 Hours)
Finish Used
Spray-on primer, then paint
Recommended Skill Level
Beginner

Comments

Fancy X Farmhouse Table

Submitted by buffy0506 on Wed, 09/04/2013 - 07:40

This table is SOOO great, and I get tons of compliments on it. It was easy to build as well.

I did have a problem, in that I made it to use outside and outdoor tables are shorter than indoor tables, depending on the chairs you use. I had to cut apart the legs after I had them built, which was a pain, but was completely my fault. 

For an outdoor table, make your leg uprights 18-1/2" - all other leg cuts are the same.
I made mine 17-1/2" and used 2x4 material for the feet (my 1x4's kept splitting). You will also need to adjust the length of the center angle pieces, which I laid out after the legs were assembled and the horizontal supports were attached.

You can see from the photos that the unfinished legs are according to the original plan. Once the center was cut down to the new length, the angled pieces make more of a true X.

I also flipped the base upside down to attach the top. I used 2 1x1 'stringers' cut at the same angle as the top of the legs, centered the base on the under side of the top, and screwed through the stringers to the top 2x10s. I used nickels to space the top planks for drainage. I then screwed the stringers to the side legs from the side. You won't even see them unless you're sitting on the patio - standing or sitting in a chair, you don't notice them. But then there are no screws showing, nothing to patch, and it's sturdy to pick up and move.

Built from Plan(s)
Estimated Cost
$100, including a new orbital sander
Estimated Time Investment
Weekend Project (10-20 Hours)
Finish Used
I used one coat of Ace WoodRoyal Deck & Siding Stain in Oxford Brown (almost an entire quart)
Finished with 3 coats of Helmsmann Spar Urathane in Semi-Gloss to make it more weatherproof (water just beads off of it now - nice!)
Recommended Skill Level
Beginner

Comments

Codding58

Thu, 05/12/2016 - 07:02

Beautiful table!    you did a great job!   Thanks for sharing your "lessons learned" on the legs.   Not sure exactally what you mean when you refer to stringers, but i definatly appreciate the detatils!    Cheers!

Farmhouse Table

Submitted by Sbarker645 on Wed, 10/28/2015 - 16:55

Built this for our dining room. Added two feet to the length. Neighbors started talking and now I've been commisioned to build a table and bench!

Estimated Time Investment
Week Long Project (20 Hours or More)
Recommended Skill Level
Intermediate

Turned Leg Coffee Table

Submitted by kwildman on Wed, 12/26/2018 - 02:24

Turned leg coffee table from pine.  I also built matching end tables (shown in another post).  :)

Built from Plan(s)
Estimated Cost
200
Estimated Time Investment
Day Project (6-9 Hours)
Finish Used
I coat rustoleum dark walnut. Sand lightly. 1 coat old English varathane.
Recommended Skill Level
Intermediate

Comments

kwildman

Sat, 12/29/2018 - 05:56

Thank you!  I had stained it with varathane dark walnut and I wasn't happy with the color.  I sanded lightly and went back over with the golden oak that I had from another project.  I love how it warmed up.  

Brian Famous

Thu, 12/27/2018 - 09:04

Did you turn the legs yourself, or order them from somewhere?  They look great, as does the entire piece.

Cedar potting bench

Submitted by Anonymous (not verified) on Fri, 09/02/2022 - 06:10

Cedar 4x4 and 2x4 frame, cedar fence wickets for the rest. Added - built around- a plastic planter box from big box store. Untreated, but good for covered outdoor area I think.

Comments

Clara Table

My wife has always been a huge fan of Ana White's website, and we've wanted to start making some of the projects now that our children are a bit older (5 yrs., 3yrs., 5 mos.). Plus, after finishing my Ph.D., I've finally found the time to begin woodworking as a hobby--and I love it!!!

This was our first project together. I did the building, and my wife completed the painting. The kids love the table, which we use as a breakfast and snack table for them.

Ana's plan was wonderfully simple and clear, and the materials were inexpensive and purchased at our local small town lumber store.

My only suggestion for others interested in building this project to be a food table is to consider using a solid piece of wood for the tabletop and perhaps the same for the chairs. We are constantly cleaning food gunk out of the seams between the joined tabletop planks. I imagine that this will require a bit more work for the chairs, but with little kids who make horrible messes with their food.

Blessings,
JB

Built from Plan(s)
Estimated Cost
$35
Estimated Time Investment
Afternoon Project (3-6 Hours)
Finish Used
semi-gloss white paint
Recommended Skill Level
Beginner

My indoor Bristol chair

Submitted by rstieber on Thu, 09/05/2013 - 23:31

I made this chair in pine based on the plan for the Bristol outdoor lounge chair. But I changed the dimensions to fit my pillow (21"x21") and I raised the seat (increased the length of the legs by 3.5"). I modified the armrests so that they don't cover up the pillow since I didn't want to lose 7" from the seat. I plan to use this indoors at our mountain cottage. It still needs to be sanded and stained, but I'm pretty pleased with the result. I may have to make a matching ottoman next.

Estimated Time Investment
Weekend Project (10-20 Hours)
Recommended Skill Level
Beginner

Comments

JoanneS

Fri, 09/06/2013 - 02:54

Great job converting the Bristol Chair for indoor use! I love the mods you made. It looks really comfortable too. Where did you find your cushions? What finish did you choose to go with that beautiful red?

rstieber

Fri, 09/06/2013 - 07:13

Thanks! I found the cushions on Amazon. The bottom one is the Greendale square floor pillow. I haven't picked a stain yet, but maybe something oaky with some gold tones. All the furniture in the room is fairly light so I don't want to go too dark.

Bamboo top buffet

This was a fun project that ended up being a multi-use table! This was originally built as a small island for the kitchen but as the family grew it became a changing table! The top was purchased online at home depot, the base is made of douglas fir 2x4's and the corners accents are Simpson Strong-Tie ZMAX Galvanized 16-Gauge 2X Rigid Tie Connector available at HD for about $2 each. Thanks for looking! See more at my website analogwoodworks.com!


Estimated Cost
$150
Estimated Time Investment
Weekend Project (10-20 Hours)
Finish Used
Glidden Toasted marshmallow in eggshell
Recommended Skill Level
Beginner

From Scrap 2 Useful

Submitted by calcowoods on Tue, 09/06/2022 - 10:09

Diy project with scrap wood laying around the garage. Using a hole saw, cut 1 1/2 inch cookies from several pieces of wood. Glued them into 3 separate towers. Using 1" fostner bit cut recess for tea light candle. A quick sanding and coat of polyurethane. Also, included an example of using plywood cuts into a rectancular shaped candle holder.

They look pretty good for a quick fun project.

Built from Plan(s)

Comments