Community Brag Posts


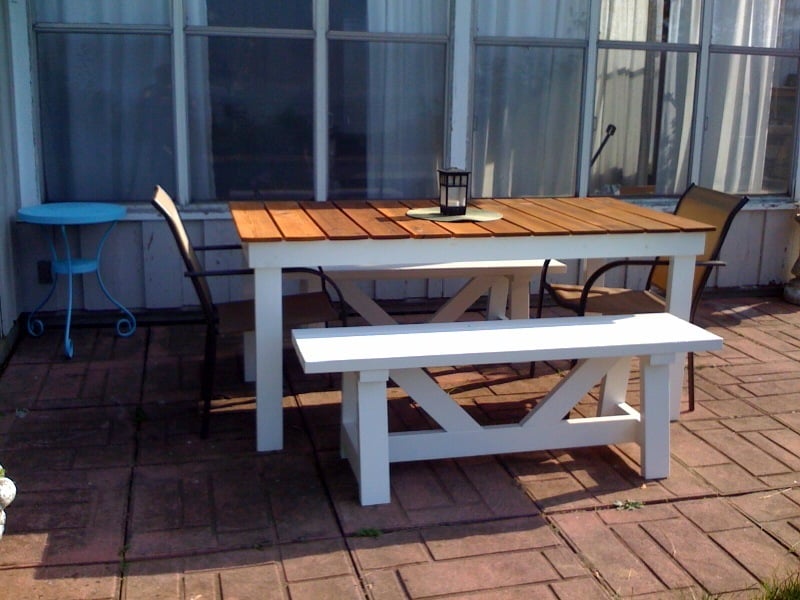
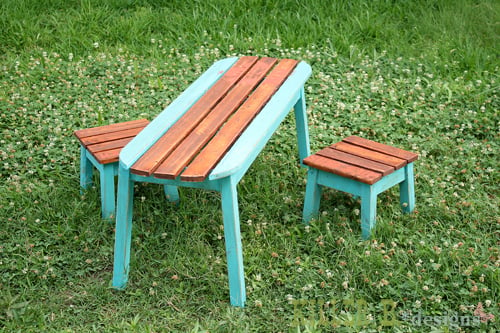
Providence Bench
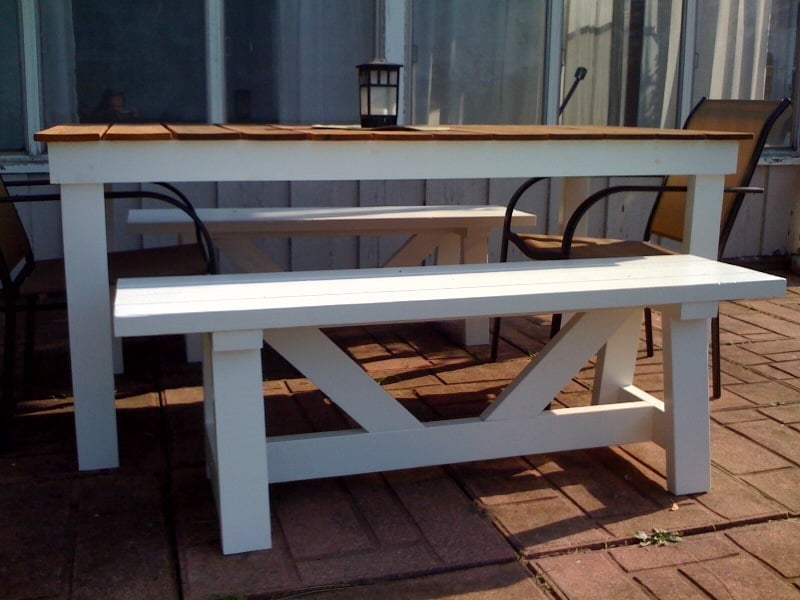
Oh. Em. Gee. The best bench ever. Like, ever, ever. Sturdy as all get out and dude, it's CHEAP. Each bench cost $12.50, man! Of course, this is minus glue, screws, paint, etc.... The second one went up so fast, I could hardly believe it.... I love these benches so hard.
The only thing I wondered about was the 45 degree, angled supports in the middle. In the ones that Brook put together for the plan's photos, they're angled differently than in the actual plans. I put them together according to the plans because I think they look a bit more balanced that way. Thoughts?
Built from Plan(s)
Estimated Cost
15
Estimated Time Investment
An Hour or Two (0-2 Hours)
Finish Used
Zinsser primer, followed by two coats of Valspar exterior semi in Bistro white.
Recommended Skill Level
Beginner
Comments
Mon, 05/21/2012 - 10:48
Your description had me
Your description had me laughing. I think it looks great!
Mirror Conversion

Had some tired old mirrors but needed some new ones for the house. Used some left over 6 by 1s to try out my new router and make some new frames. Also wanted to try out the new Minwax Classic Grey stain on something. I like the look it has given it.
Estimated Cost
$10
Estimated Time Investment
An Hour or Two (0-2 Hours)
Finish Used
Minwax Classic Grey
Recommended Skill Level
Beginner
King size Brandy scrap wood bed
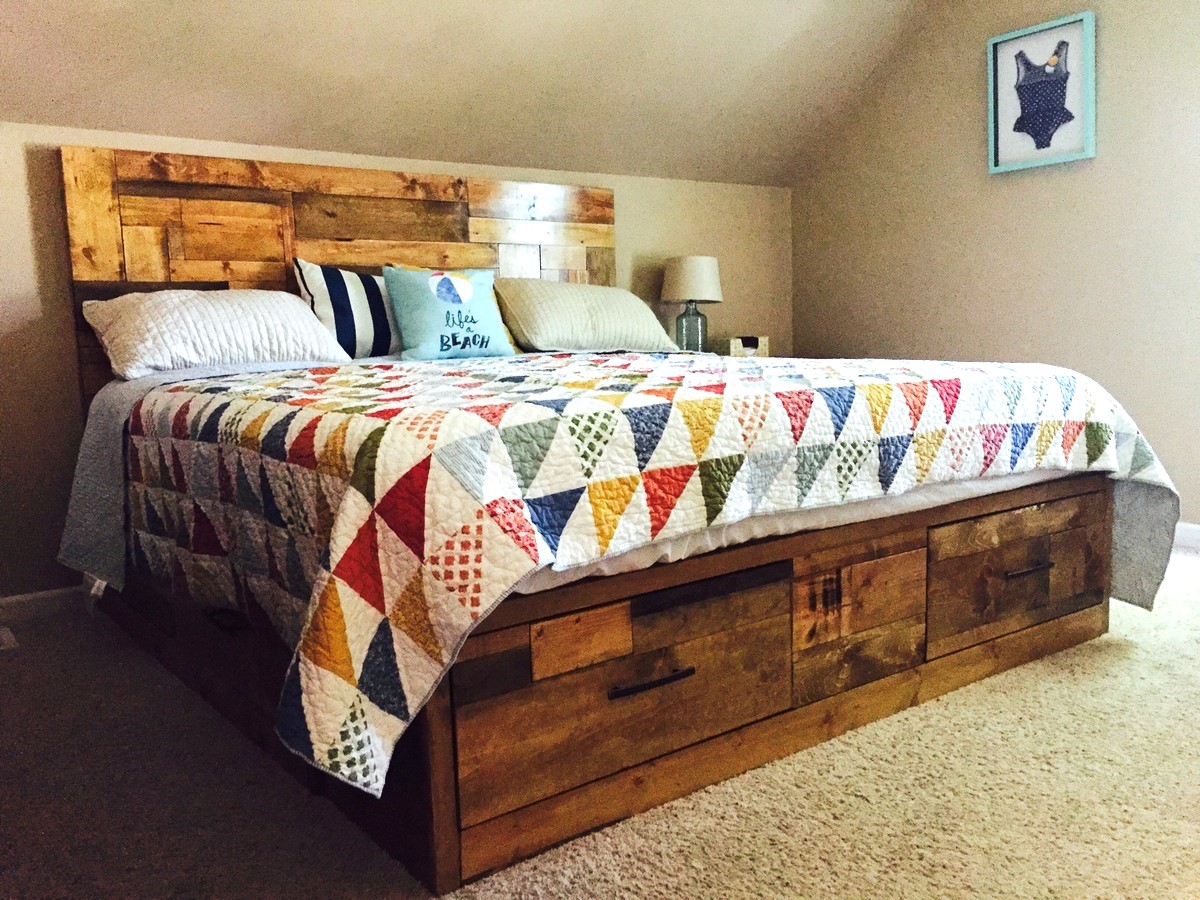
I built this bed for my wife for Mother's Day. I loved the idea of the drawers and I knew she would love the scrap wood look, and lucky for me it just so happened I had a lot of scrap wood. The build was pretty simple other than it was my first time doing drawer slides. I went with the ball bearing slides which were a little tricky to get just perfect, but with a little patience and finding a few tricks along the way I was able to complete this project in a couple days. I also added a simple headboard. I made 1x6 legs connected by (2) 1x4s horizontally with pocket screws. Next I cut a piece of 3/8 plywood the dimension of the headboard wanted so I would have something to nail the 1x scrap pieces to. Finally I trimmed the edges out with 1x2s and stained to match the bed. These are great plans and I loved the fact that I didn't have to be perfect when it came to staining it, all my whoops-a-daisies just turned into character instead of flaws like they normally would!!
Built from Plan(s)
Estimated Cost
$250
Estimated Time Investment
Weekend Project (10-20 Hours)
Finish Used
Golden Oak,
Early American,
Espresso,
Finished with Minwax wipe on poly
Early American,
Espresso,
Finished with Minwax wipe on poly
Recommended Skill Level
Intermediate
Comments
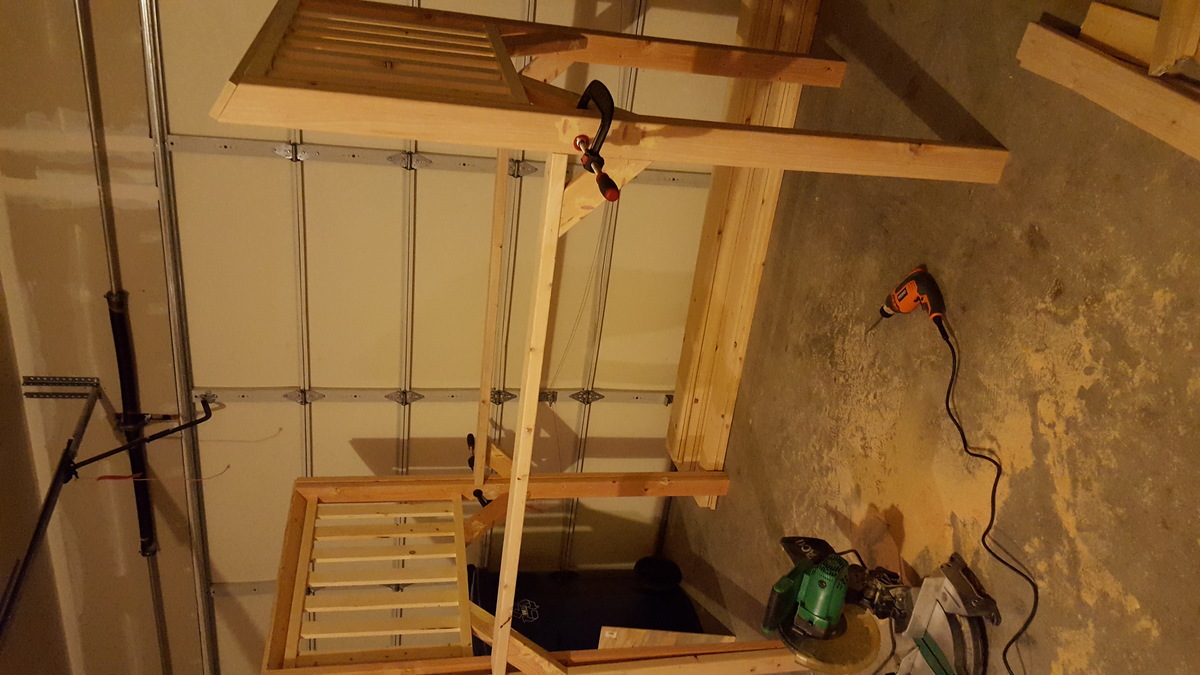
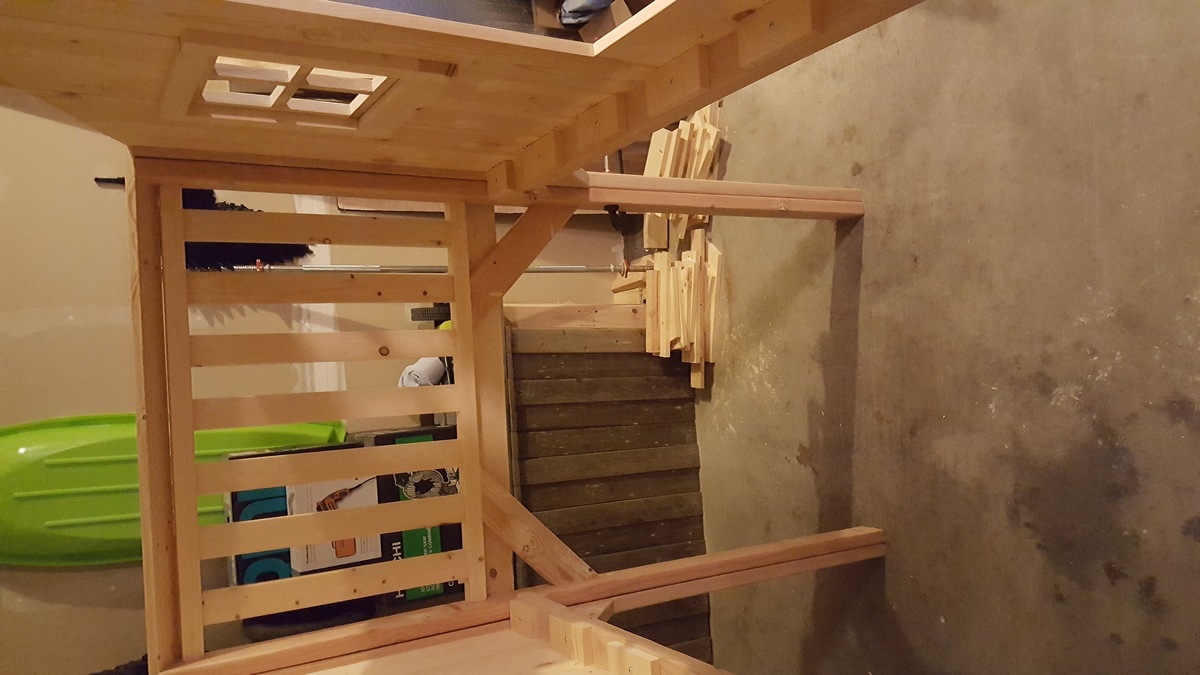
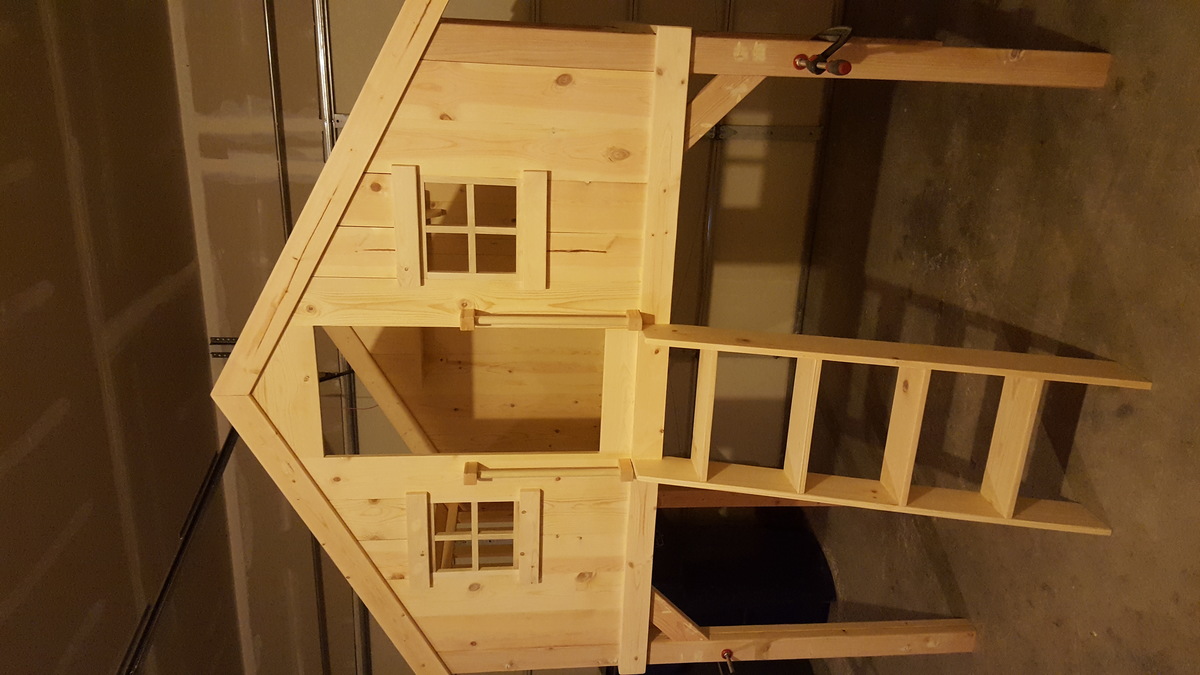
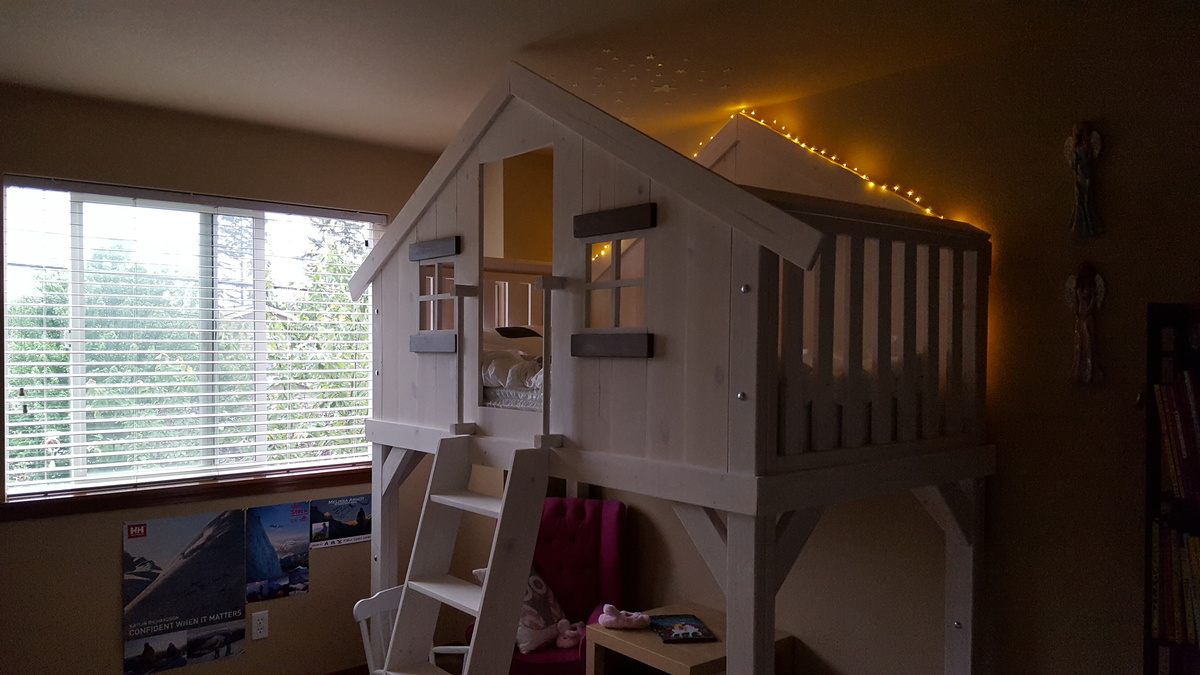
Kids Loft Playhouse Bed
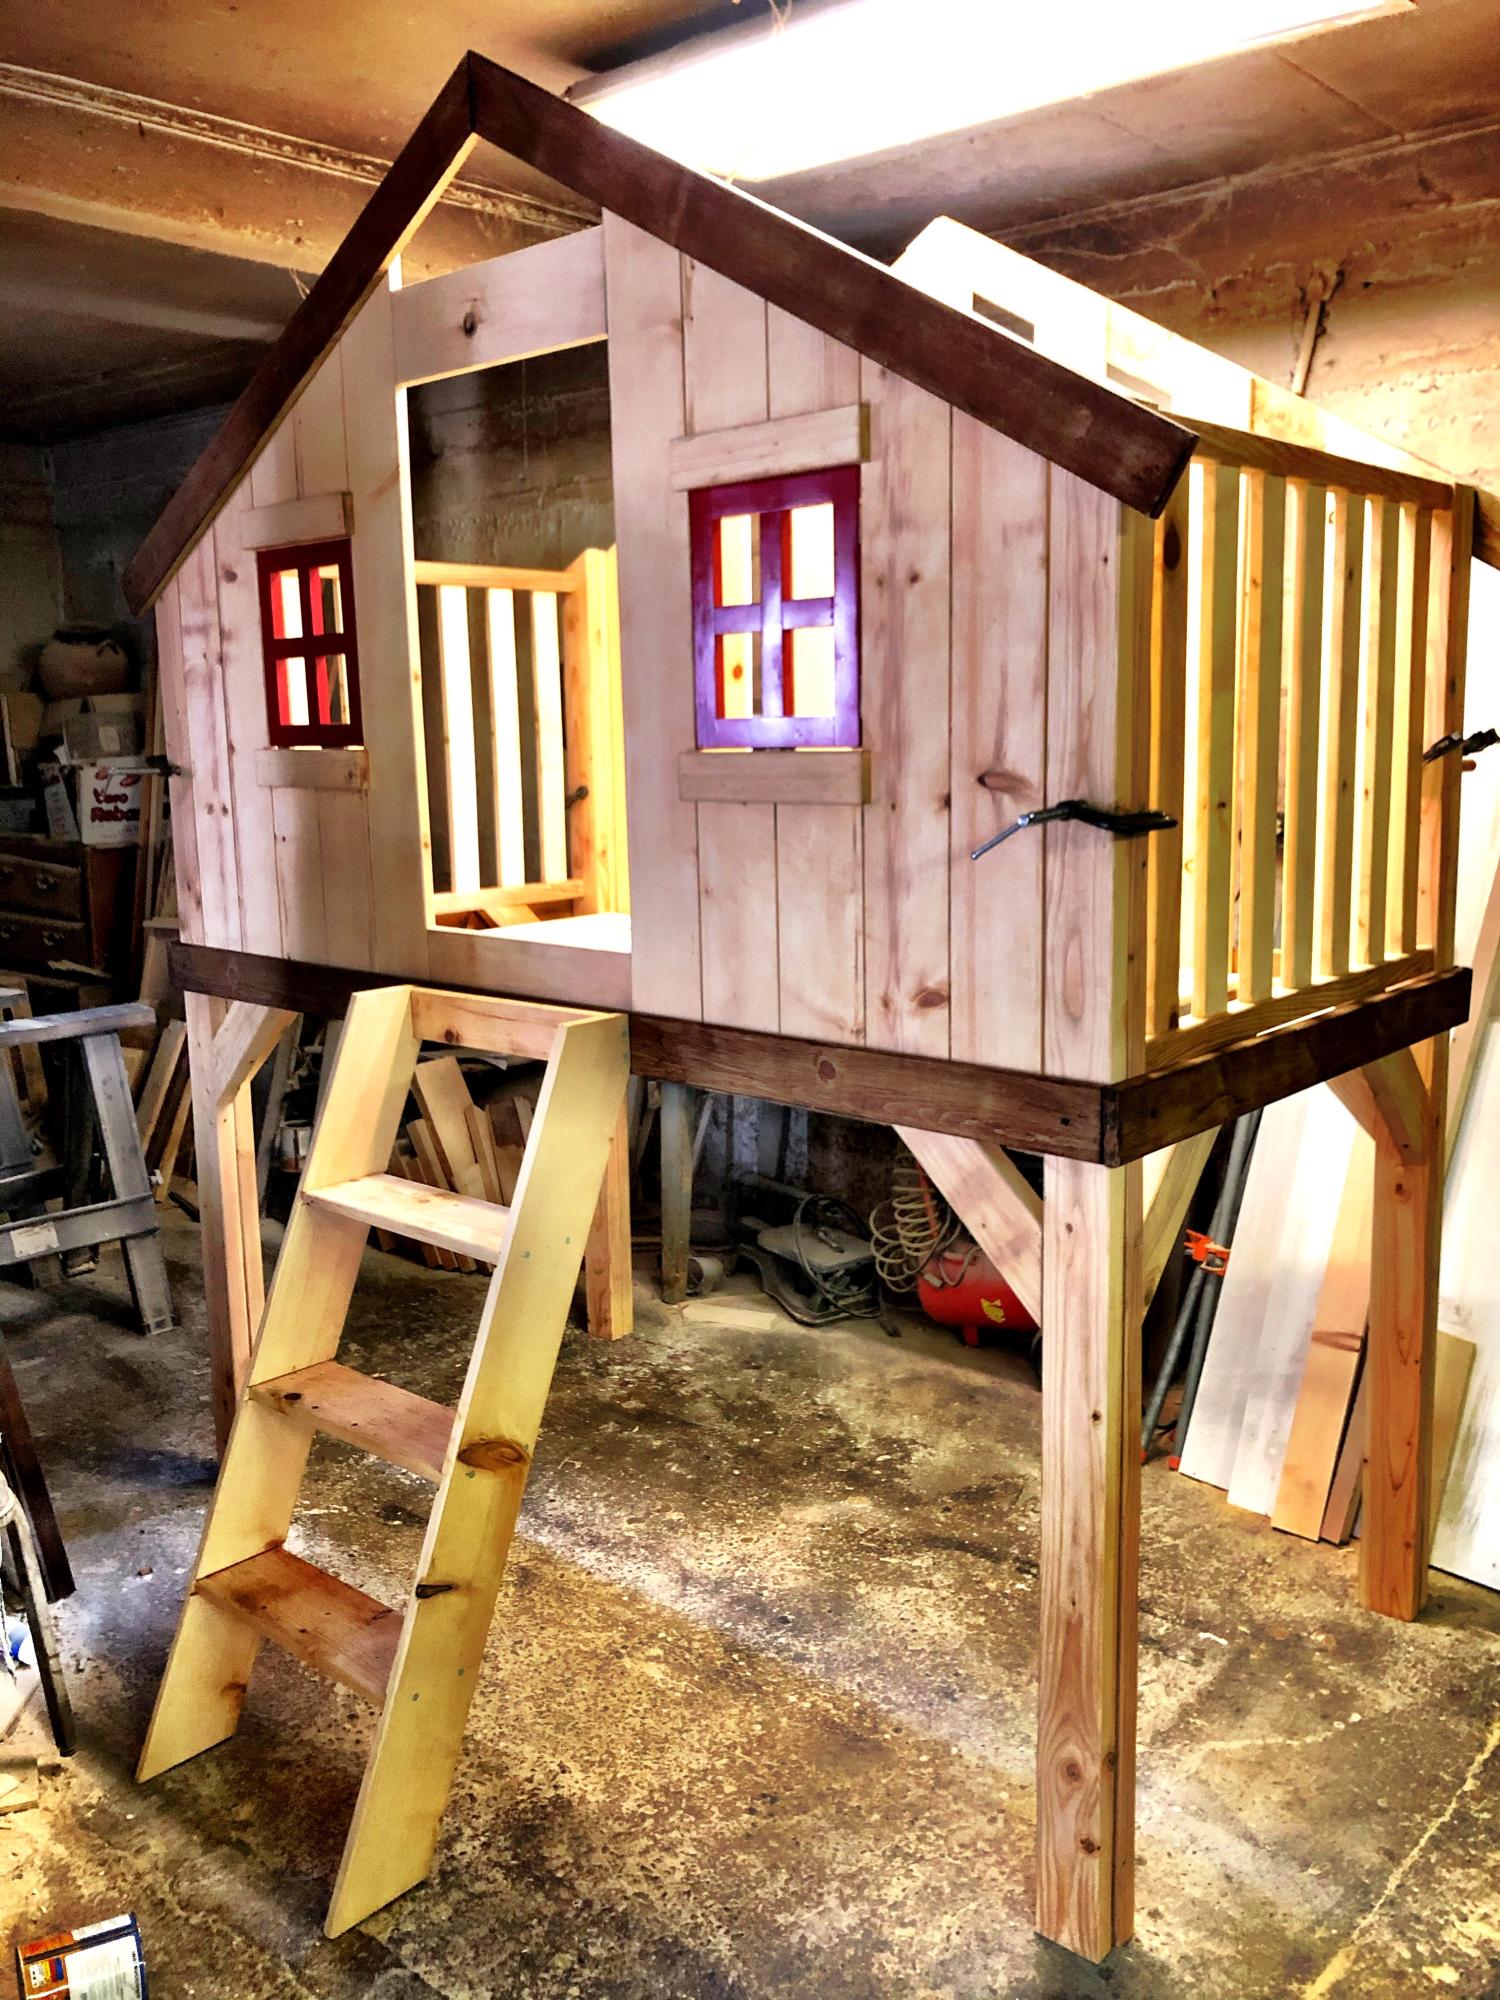
My Kid loved his new bed, I made an extra storage for his toys in the space under the bed so he can play.
Juan Carlos C.
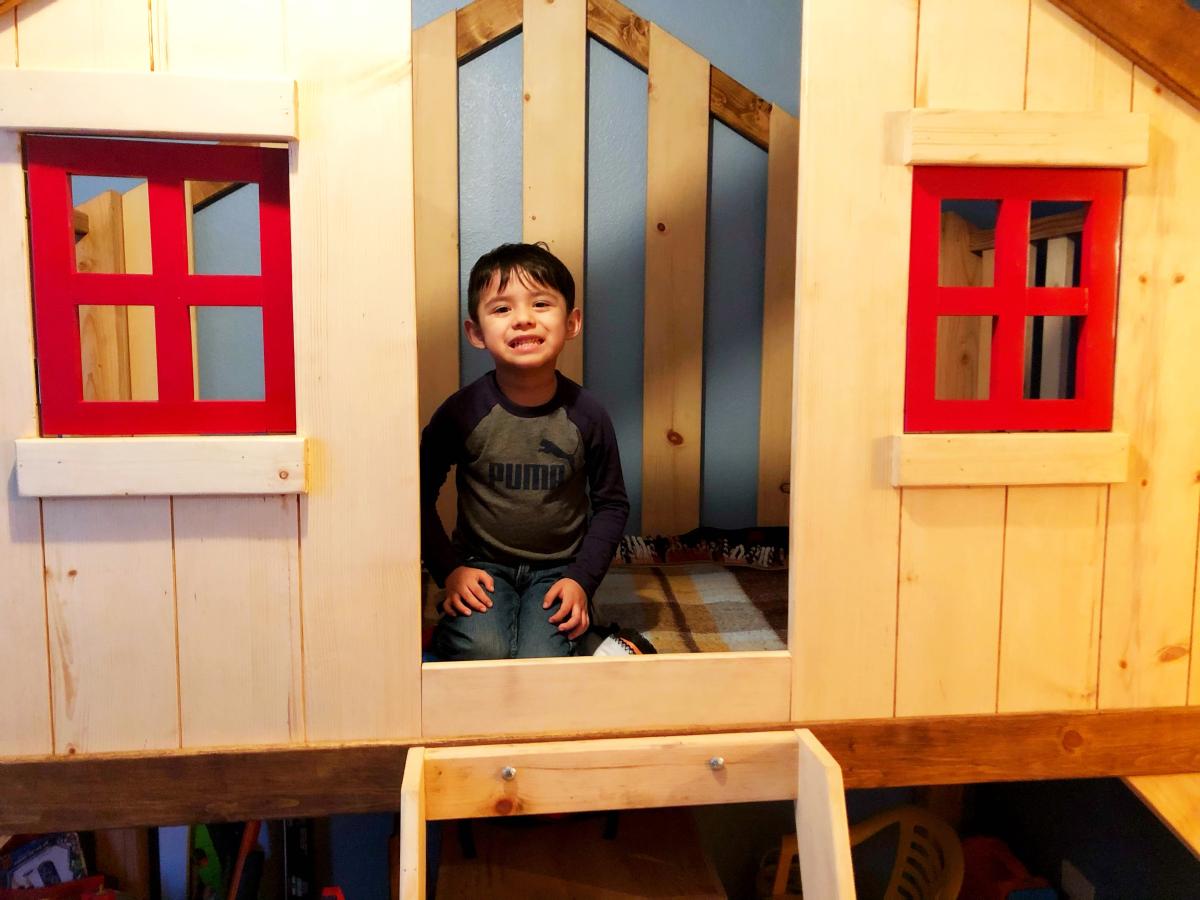
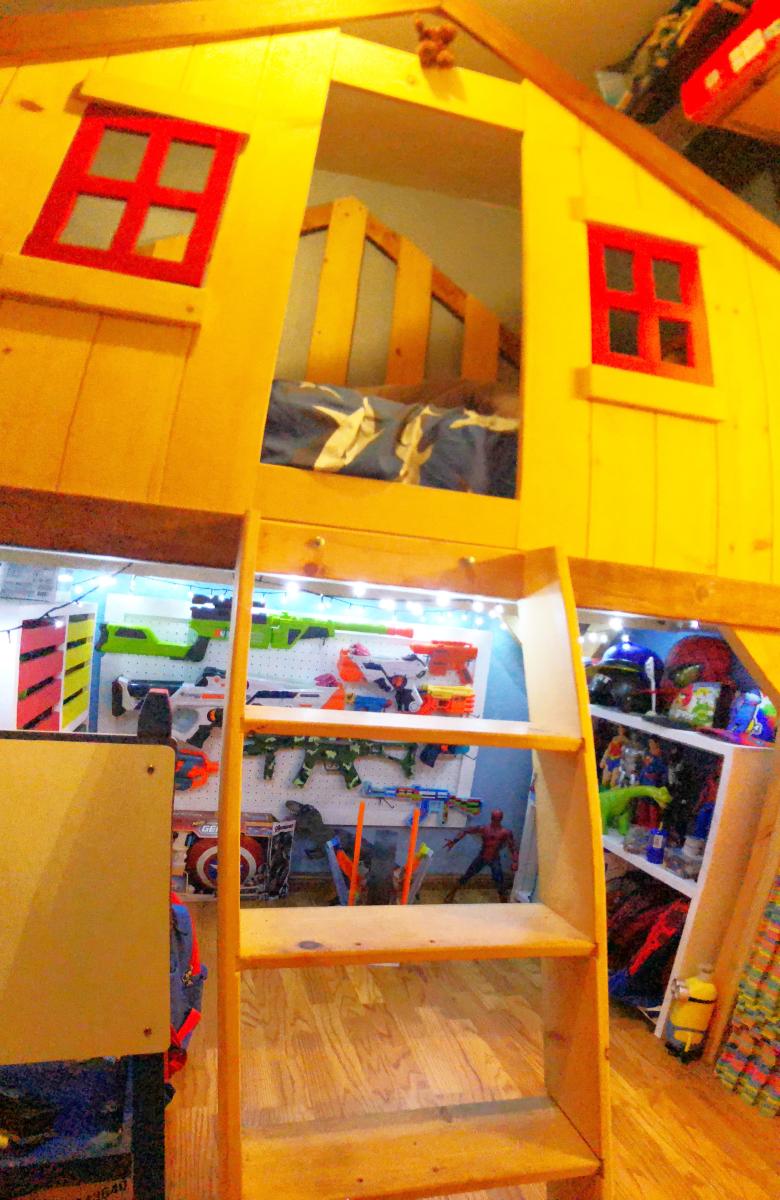
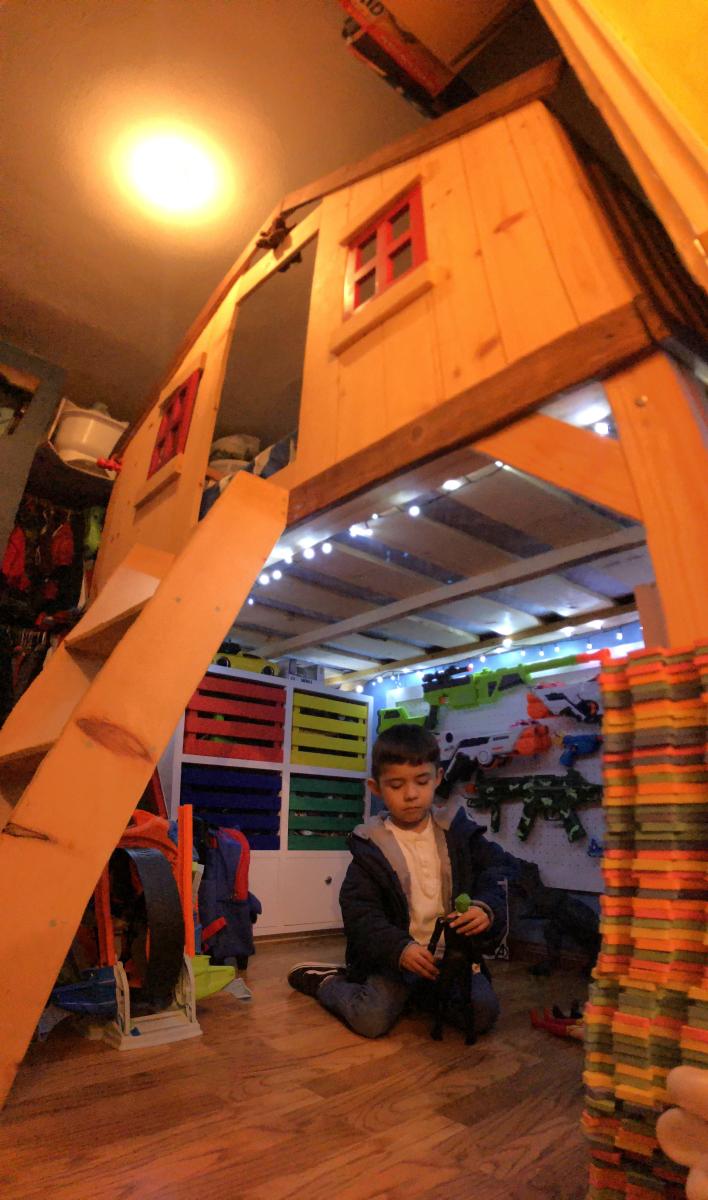
Built from Plan(s)
Birthday see saw

I made this see saw for my baby boy for his 3rd birthday. He loved it! Thanks Ana!
Built from Plan(s)
Estimated Time Investment
An Hour or Two (0-2 Hours)
Finish Used
Flat latex outdoor paint
Recommended Skill Level
Starter Project
Comments

Sat, 05/11/2013 - 02:32
Birthday celebrations
There are several birthday ideas that can help creating mesmerizing moments, if applied correctly. Do not hesitate to explore your unusual side, if you want to surprise others.
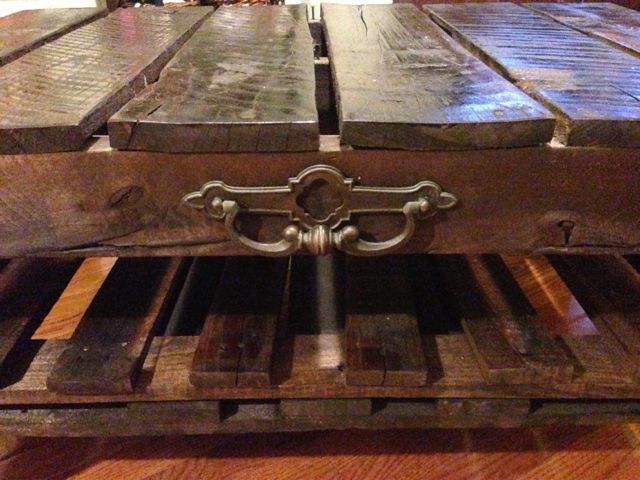
Pallet Rustic Coffee Table with Hinge Top

This is the first piece of furniture I have ever built. I am real happy with how it came out. Spent nearly nothing on it. All the wood is from oak and pine pallets I found on the street. The top piece ended up being the first piece I found and it came exactly as it is, not a typical pallet but was the perfect piece for the top. The brass hinges and lock were found around the house and the front handle is from an old dresser trashed on the curb. The top opens in order to create some easy access storage space. The wheels came off a vintage TV rolling table. Nothing I could afford would have looked this good.


Estimated Time Investment
Weekend Project (10-20 Hours)
Finish Used
Minwax Jacobean
Recommended Skill Level
Starter Project
Bathroom storage shelf
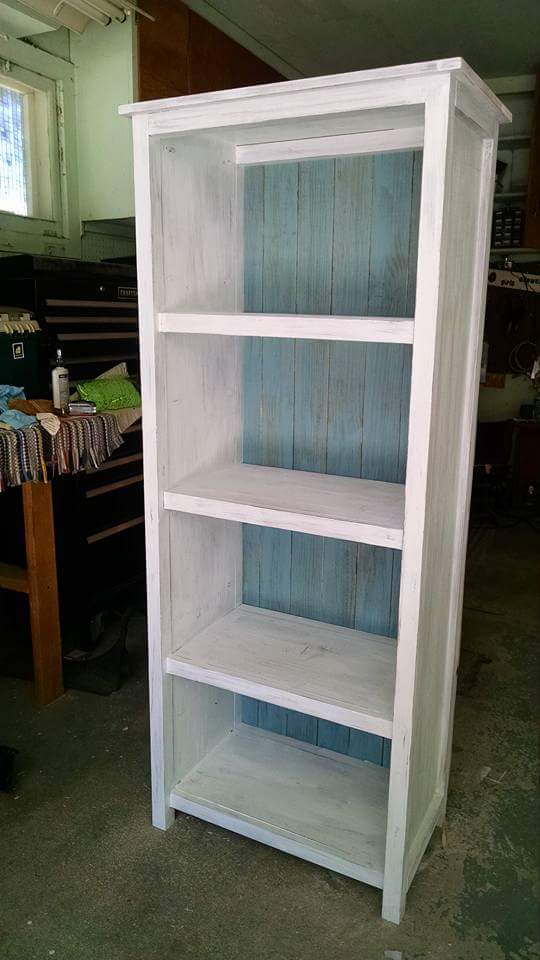
This was an awesome project and very manageable. My only problem (besides filling the pocket holes) was the measurement for the side trim (1x2x11 1/4) - my 1x12 measured a little larger so I had to re-cut those to fit. Should have checked it out earlier. I thought about adding doors to the lower half but then changed my mind because of how nice it looked. Love it!!
Built from Plan(s)
Estimated Cost
$100+
Estimated Time Investment
Weekend Project (10-20 Hours)
Finish Used
Stain and white and blue paint
Recommended Skill Level
Beginner
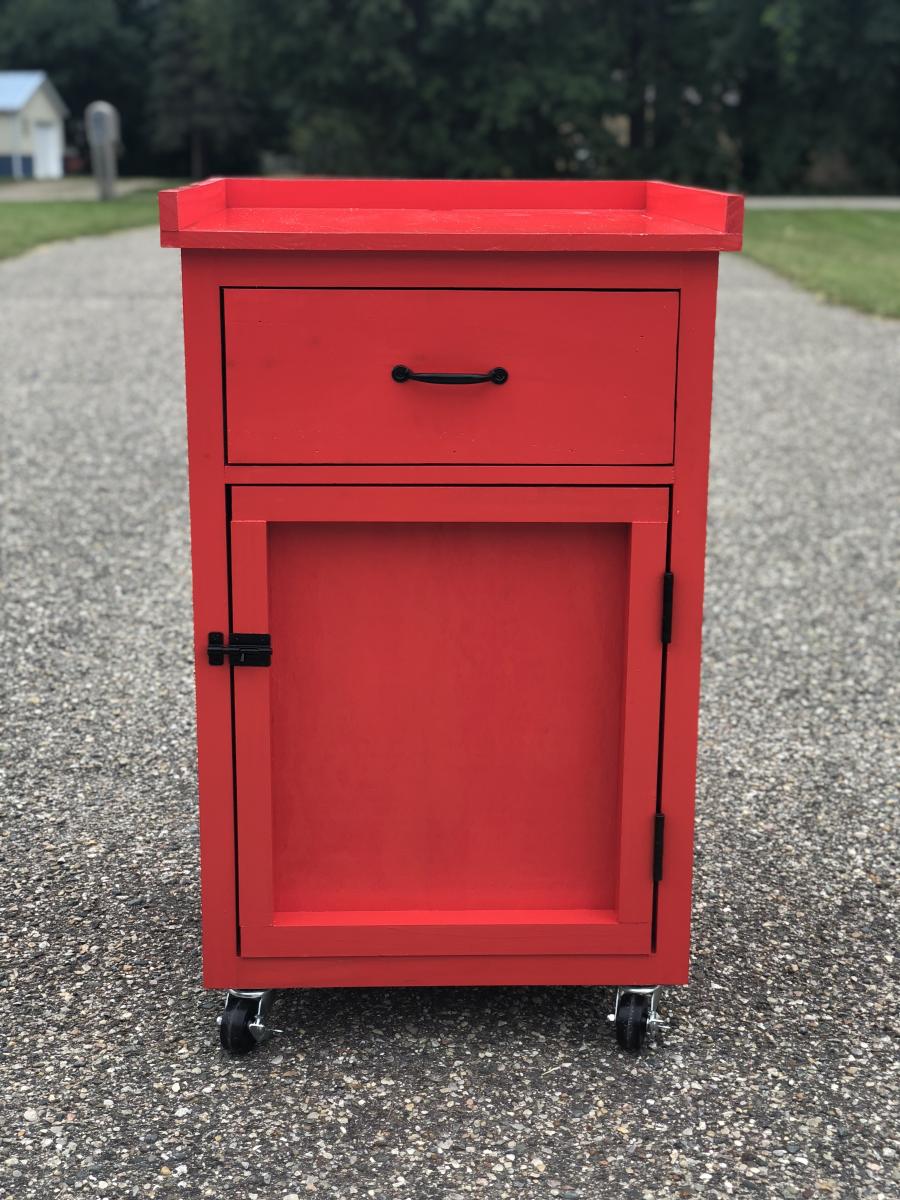
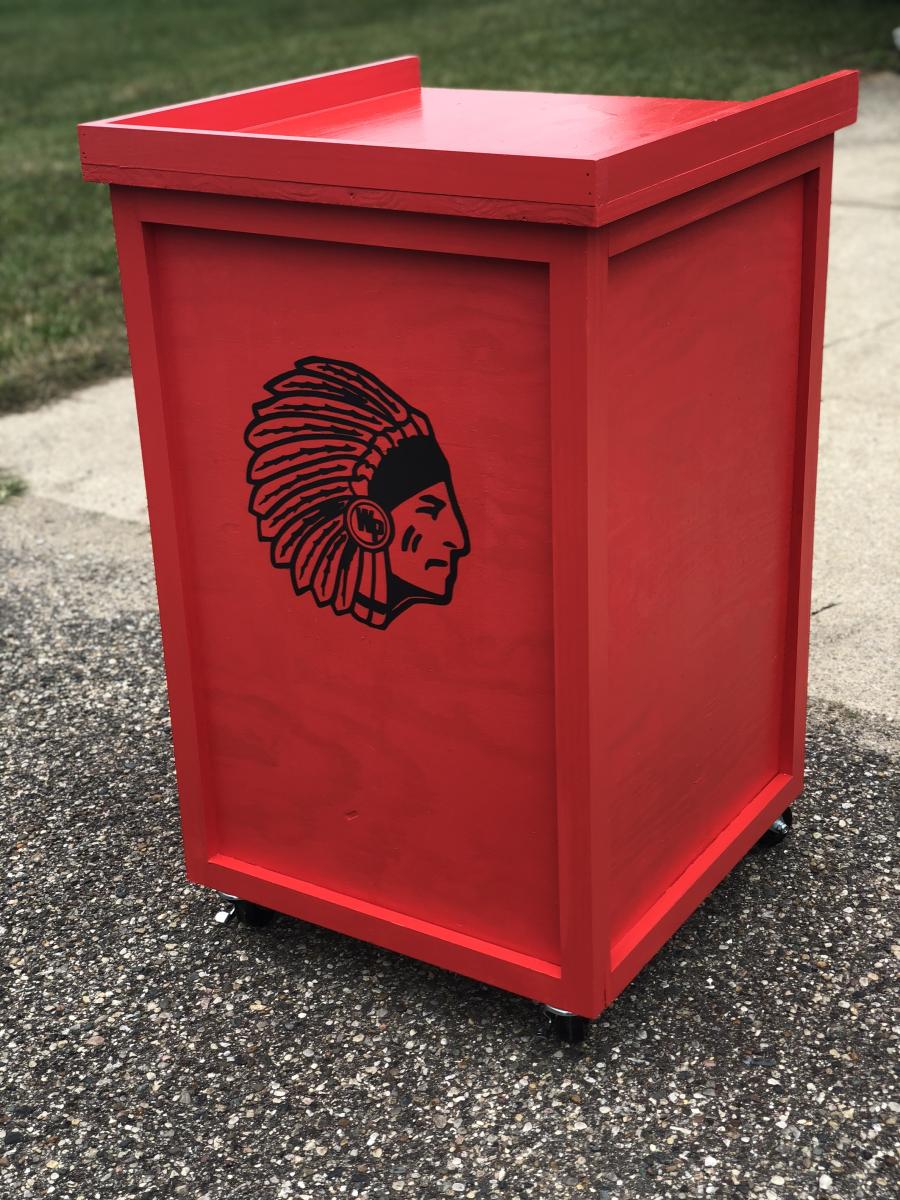
Popcorn Machine Stand and Storage on Wheels
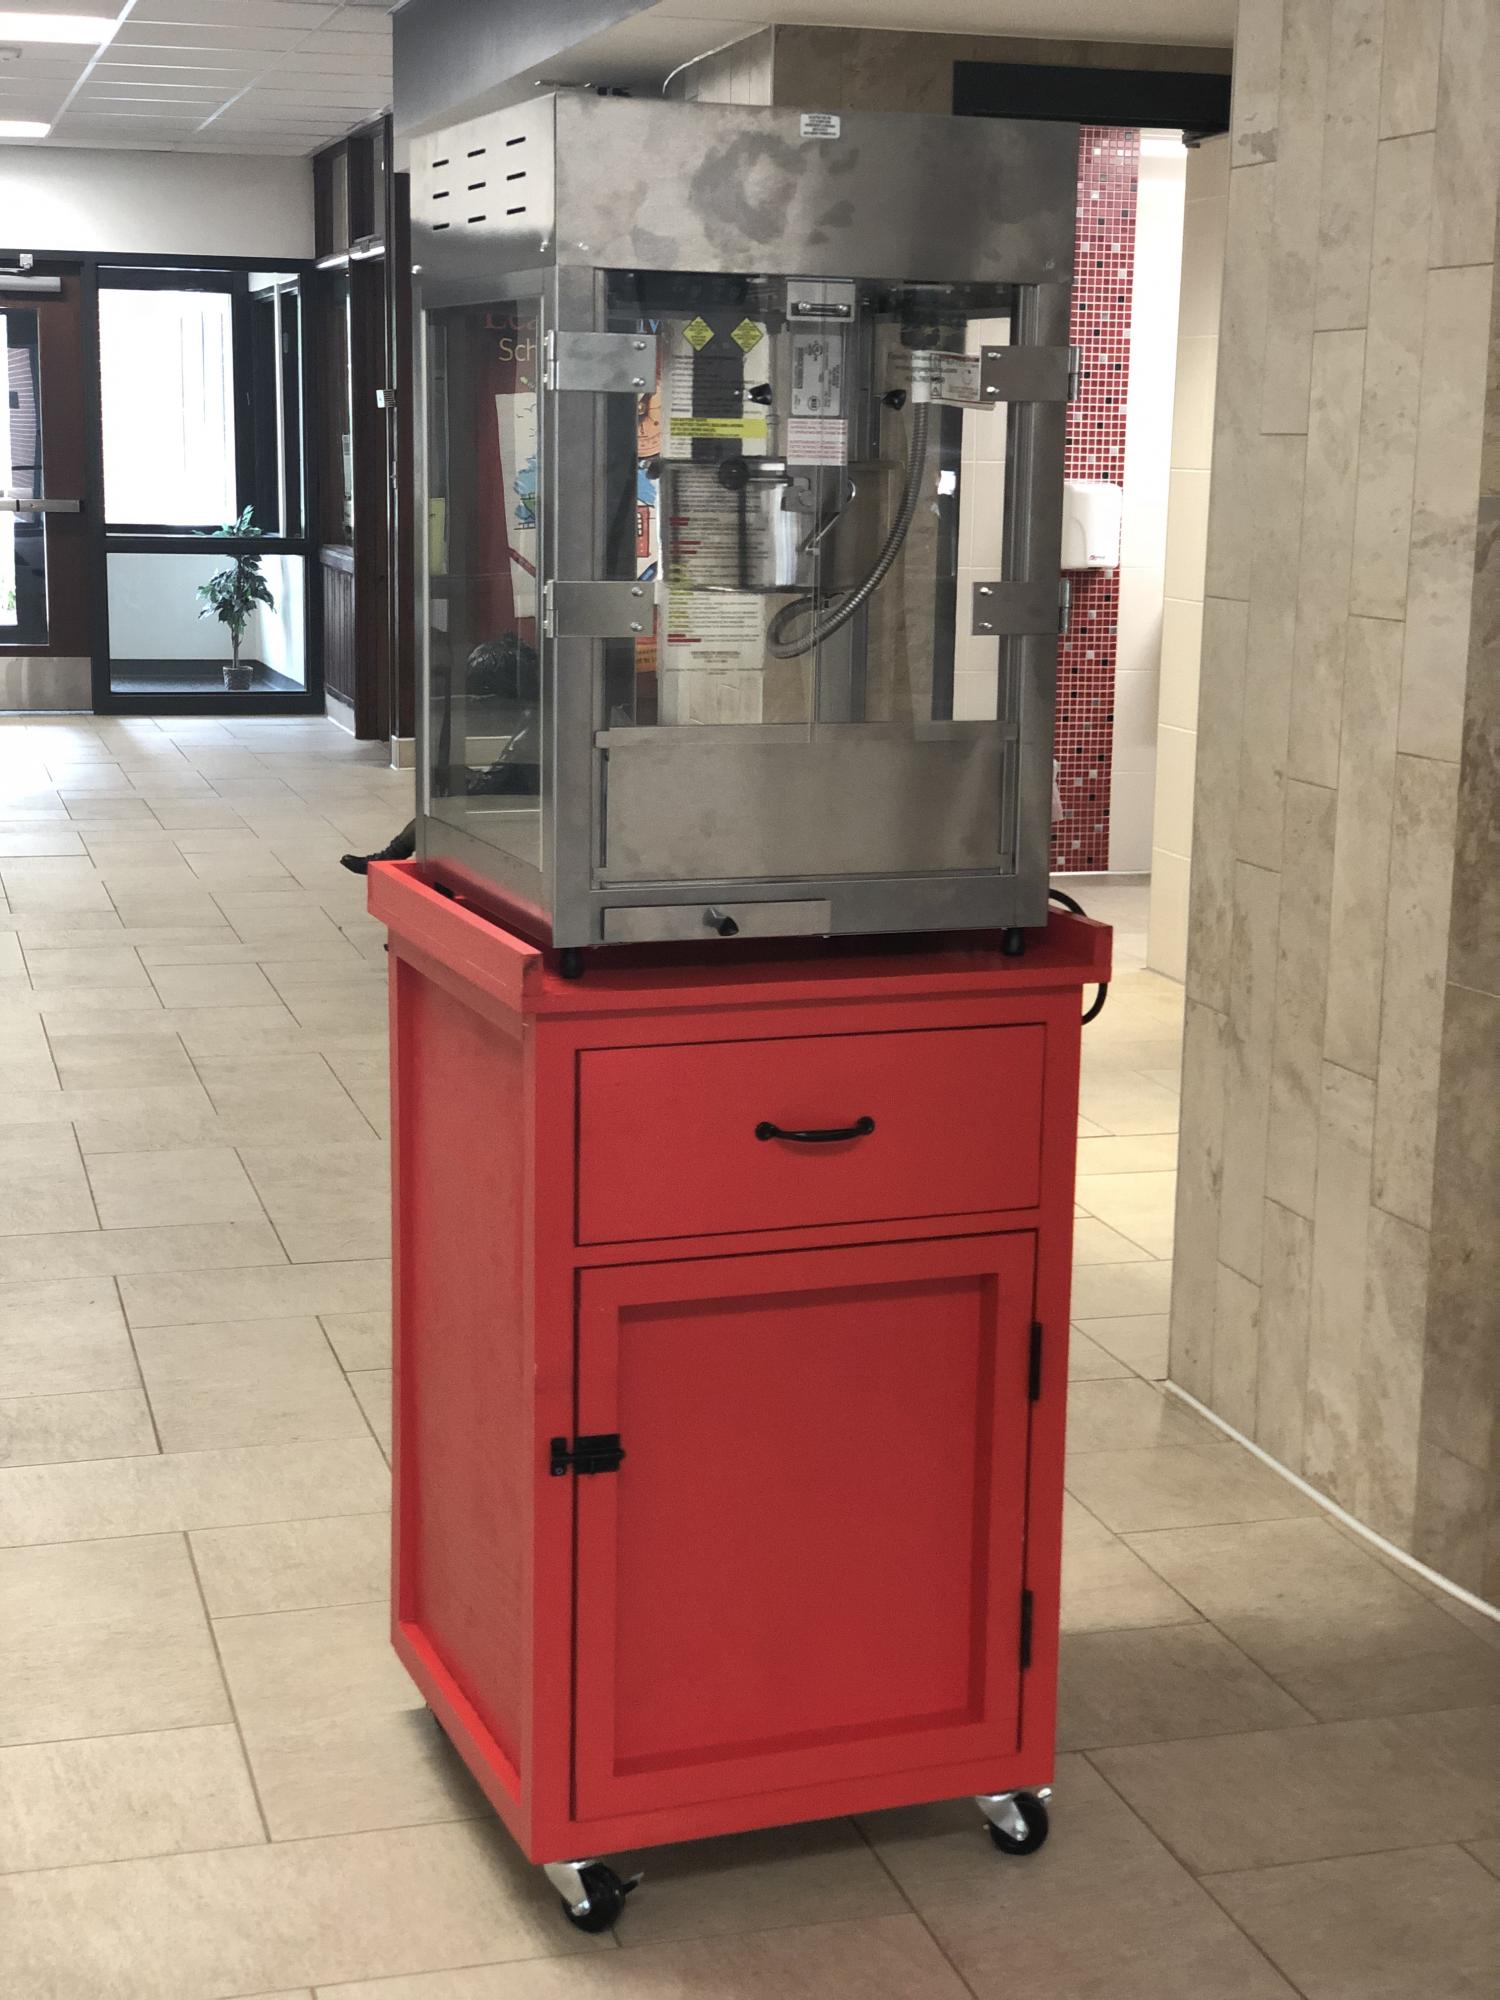
My parent organization at the elementary school had just bought a brand new popcorn machine but had nowhere to store it. So, I offered to try my hand at building a stand with storage. I knew that we needed the stand to be mobile as the idea was to pop the popcorn in different classrooms for incentives, etc. I modified the kitchen prep cart to have a large cabinet underneath to store the popcorn, bags, etc. The pullout drawer was home to the measuring cups, directions, etc. I used my Cricut and cut out our school logo, placed on the popcorn machine and then polyurethaned it to the side. It turned out great!!! I could not be happier :)
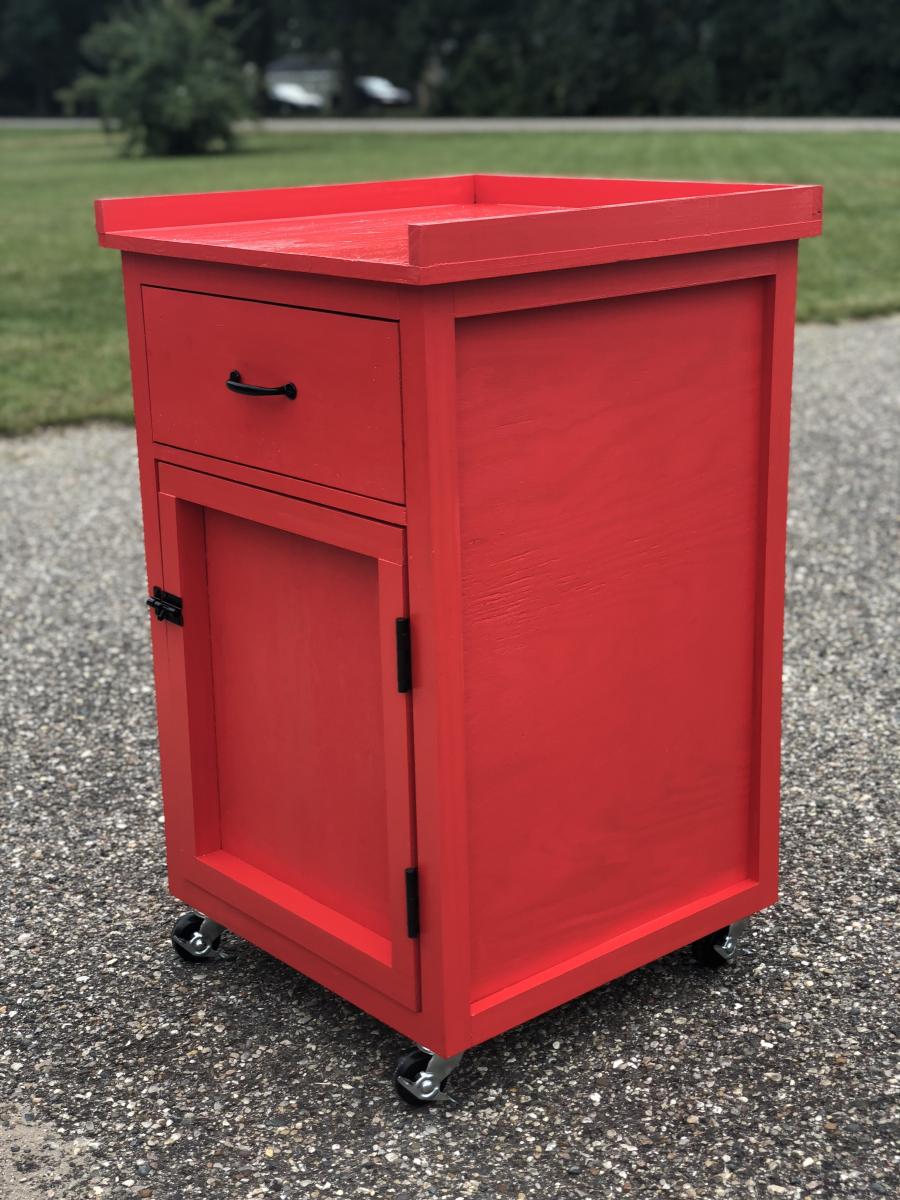
Built from Plan(s)
Estimated Cost
$120
Estimated Time Investment
Weekend Project (10-20 Hours)
Finish Used
Red paint and polyurethane
Floating Wood Table Runner

I made one of these for my dining room table and my family liked it so much I made 2 more. The last one I made from a live edge piece of black locust and made the base out of black limba. The second one my daughter wanted a little wider so I used a 1X10 instead of a 1X8. A lot of fun to make and everyone really likes them.
Keith Ullrich of Windsor Woodworks


Built from Plan(s)
Seasonal And Holiday
Rustic Table

We love this table! We didn't want to have to deal with food getting into the cracks, so we used a solid top instead and we love the way it turned out.
Now we just have to get some new "matching" chairs and we're all set!
Built from Plan(s)
Estimated Time Investment
Afternoon Project (3-6 Hours)
Finish Used
Legs painted black, top stained mahogany
Recommended Skill Level
Intermediate
Farmhouse bed!
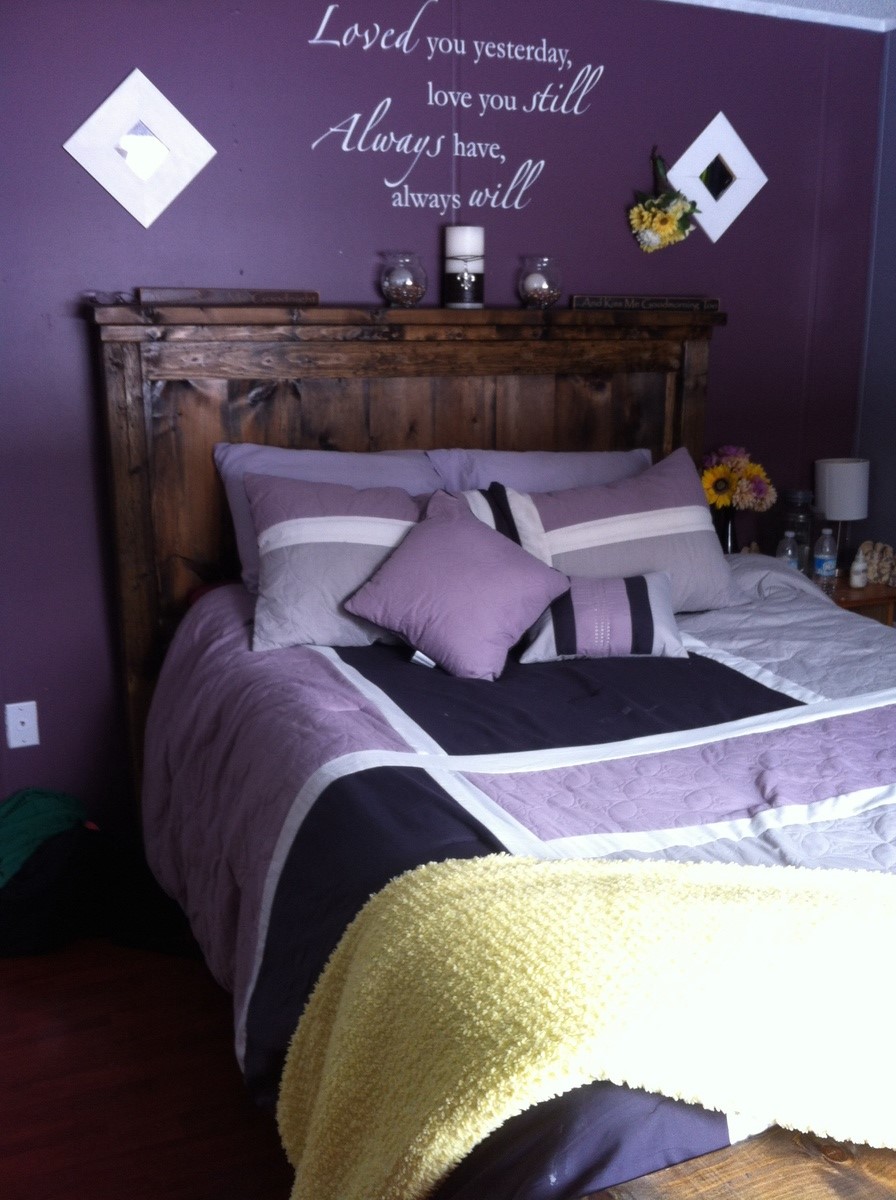
For about a year after I found Ana's site and seen her farmhouse bed plans I finally got the courage to tackle it. It took me only four days to build and finish. But about a week later it was put together in our room. I still get excited when I lay in it at night that I built it myself. With the plans Ana gives makes it super simple!! I chose not to go crazy with the sanding because I like the rustic look!! :)
Built from Plan(s)
Estimated Cost
$200
Estimated Time Investment
Week Long Project (20 Hours or More)
Finish Used
Minwax walnut
Recommended Skill Level
Beginner
Triple Pedestal Table
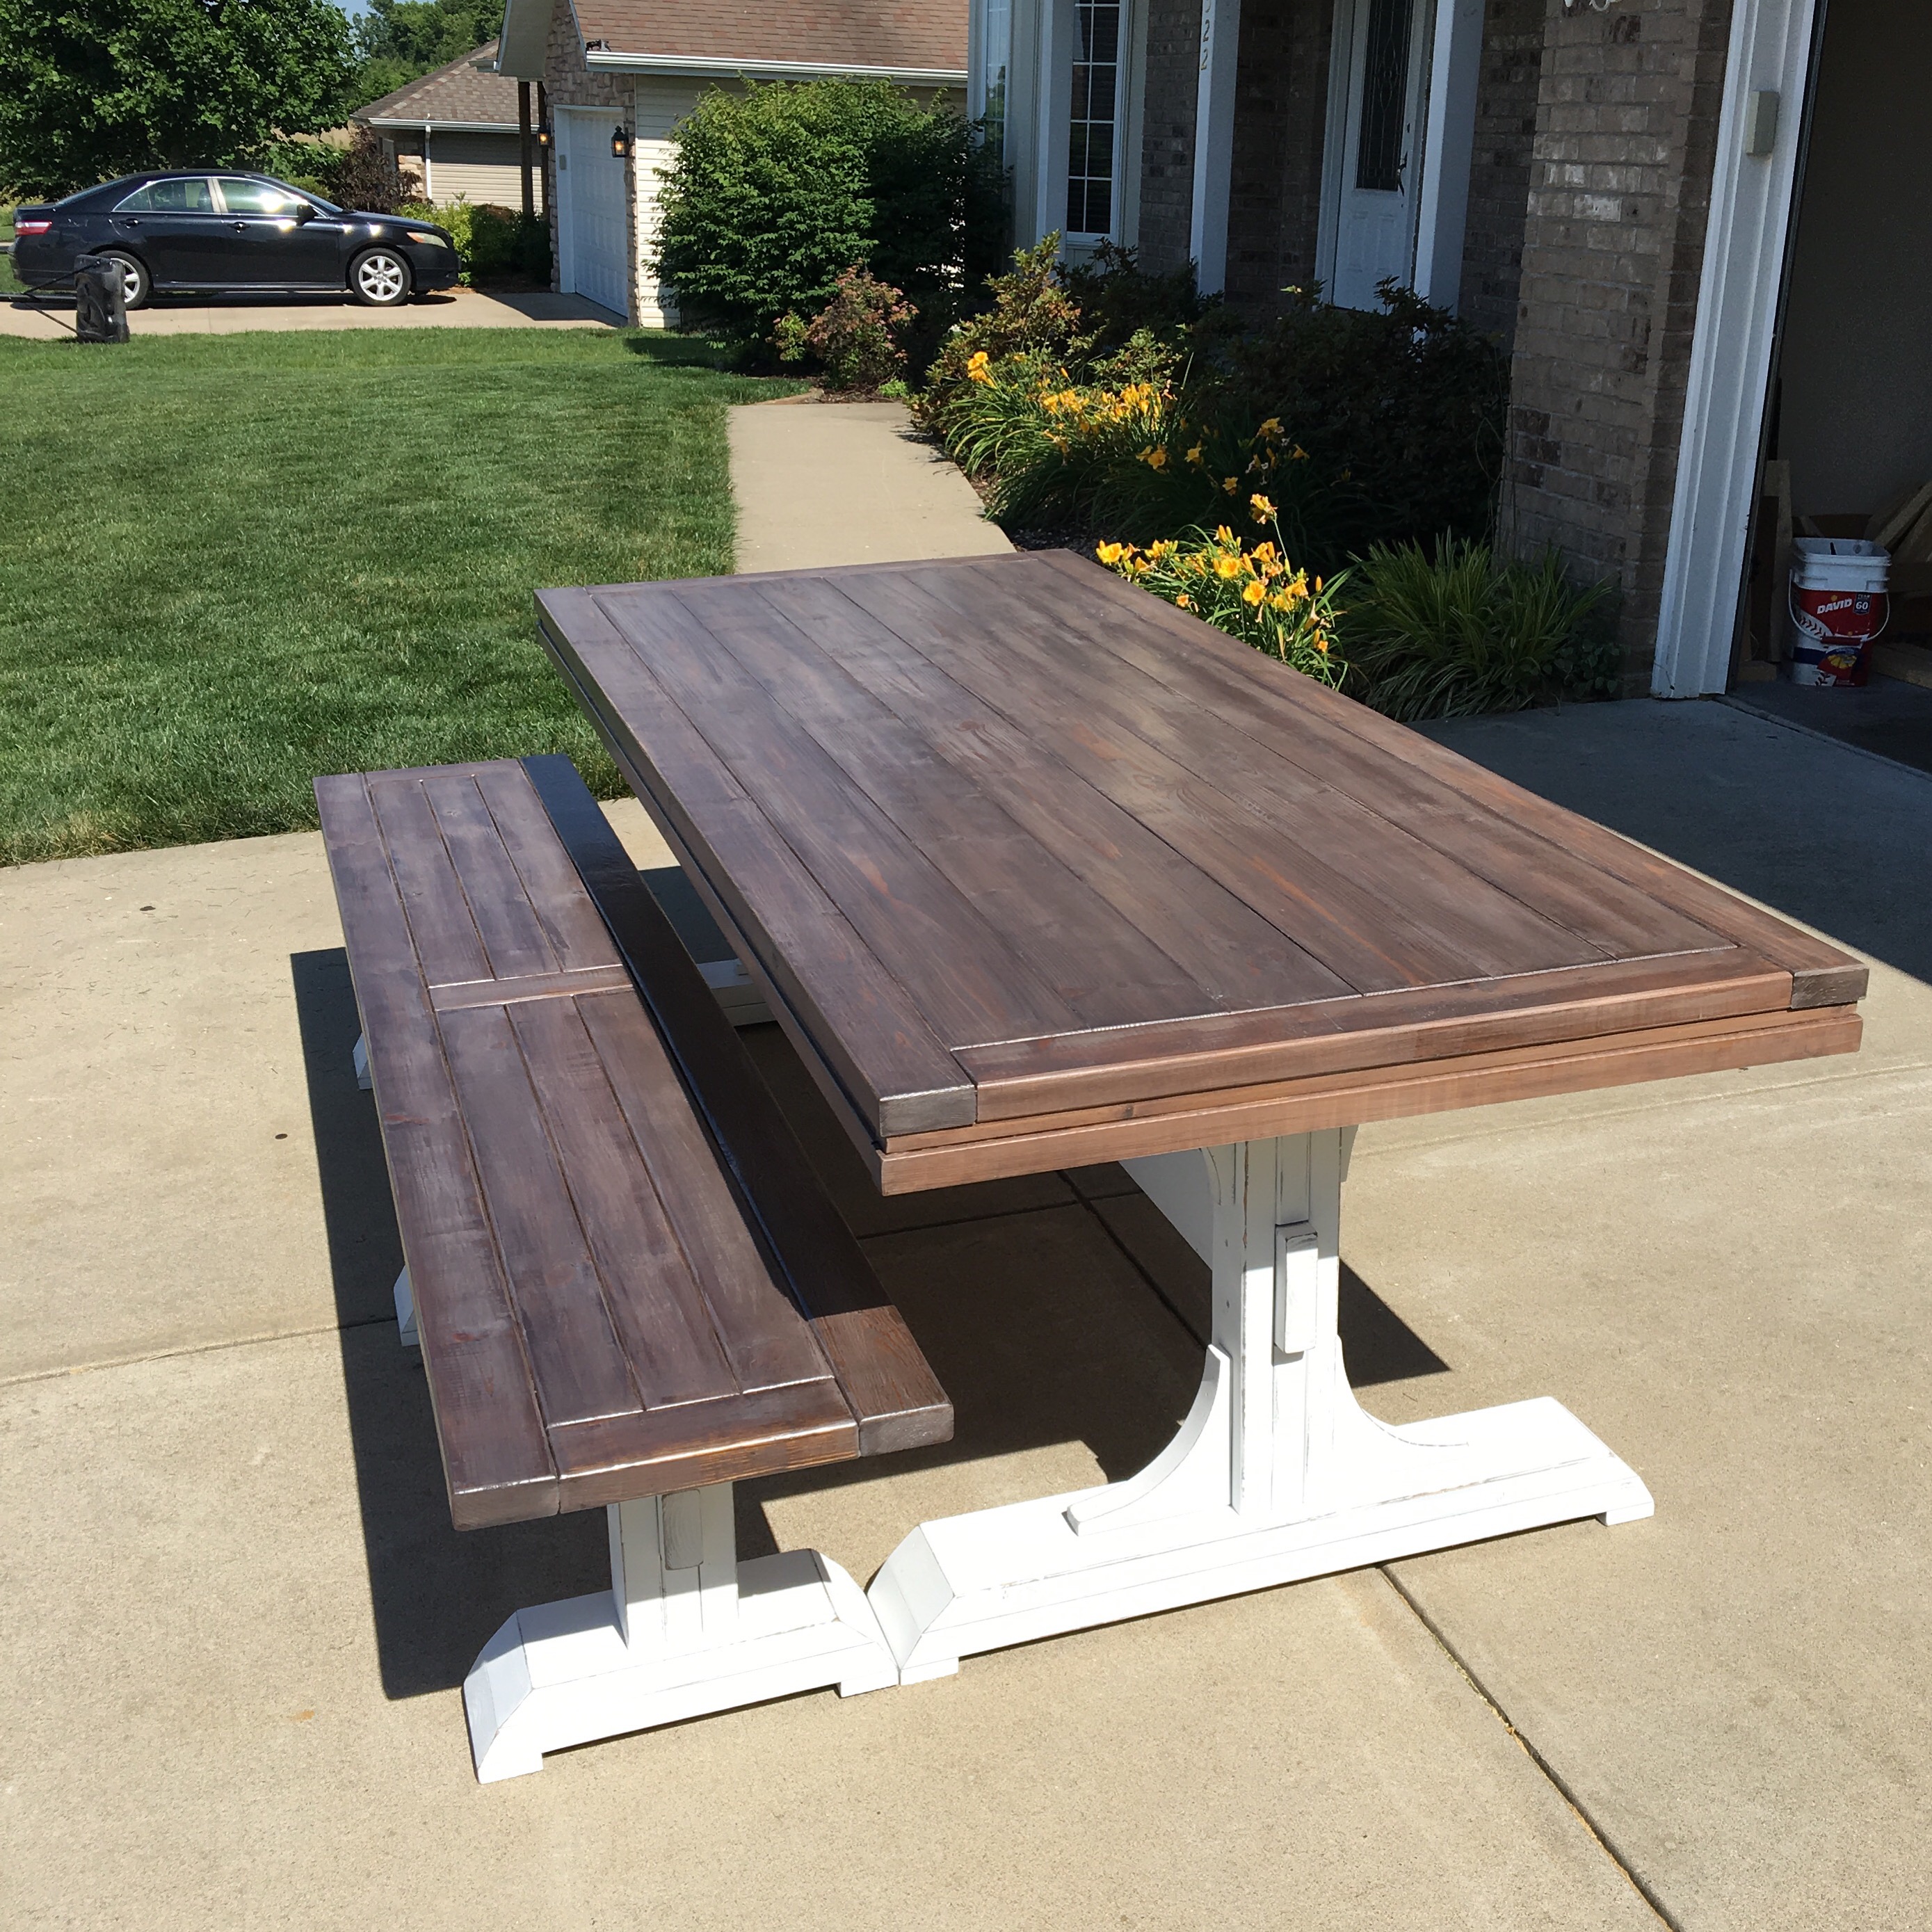
Here's a table I just finished for a friend of mine. I altered the triple pedestal table by making it 96" vs 106" and I only did 2 legs vs 3. I used 2x6 for the table top which gave it the strength to span the 2 legs. We used a Kona Rustoleum stain, then minwax pickleing stain for the white wash effect, then stain over the top of that. 5 coats of clear matte polyacrylic finish.
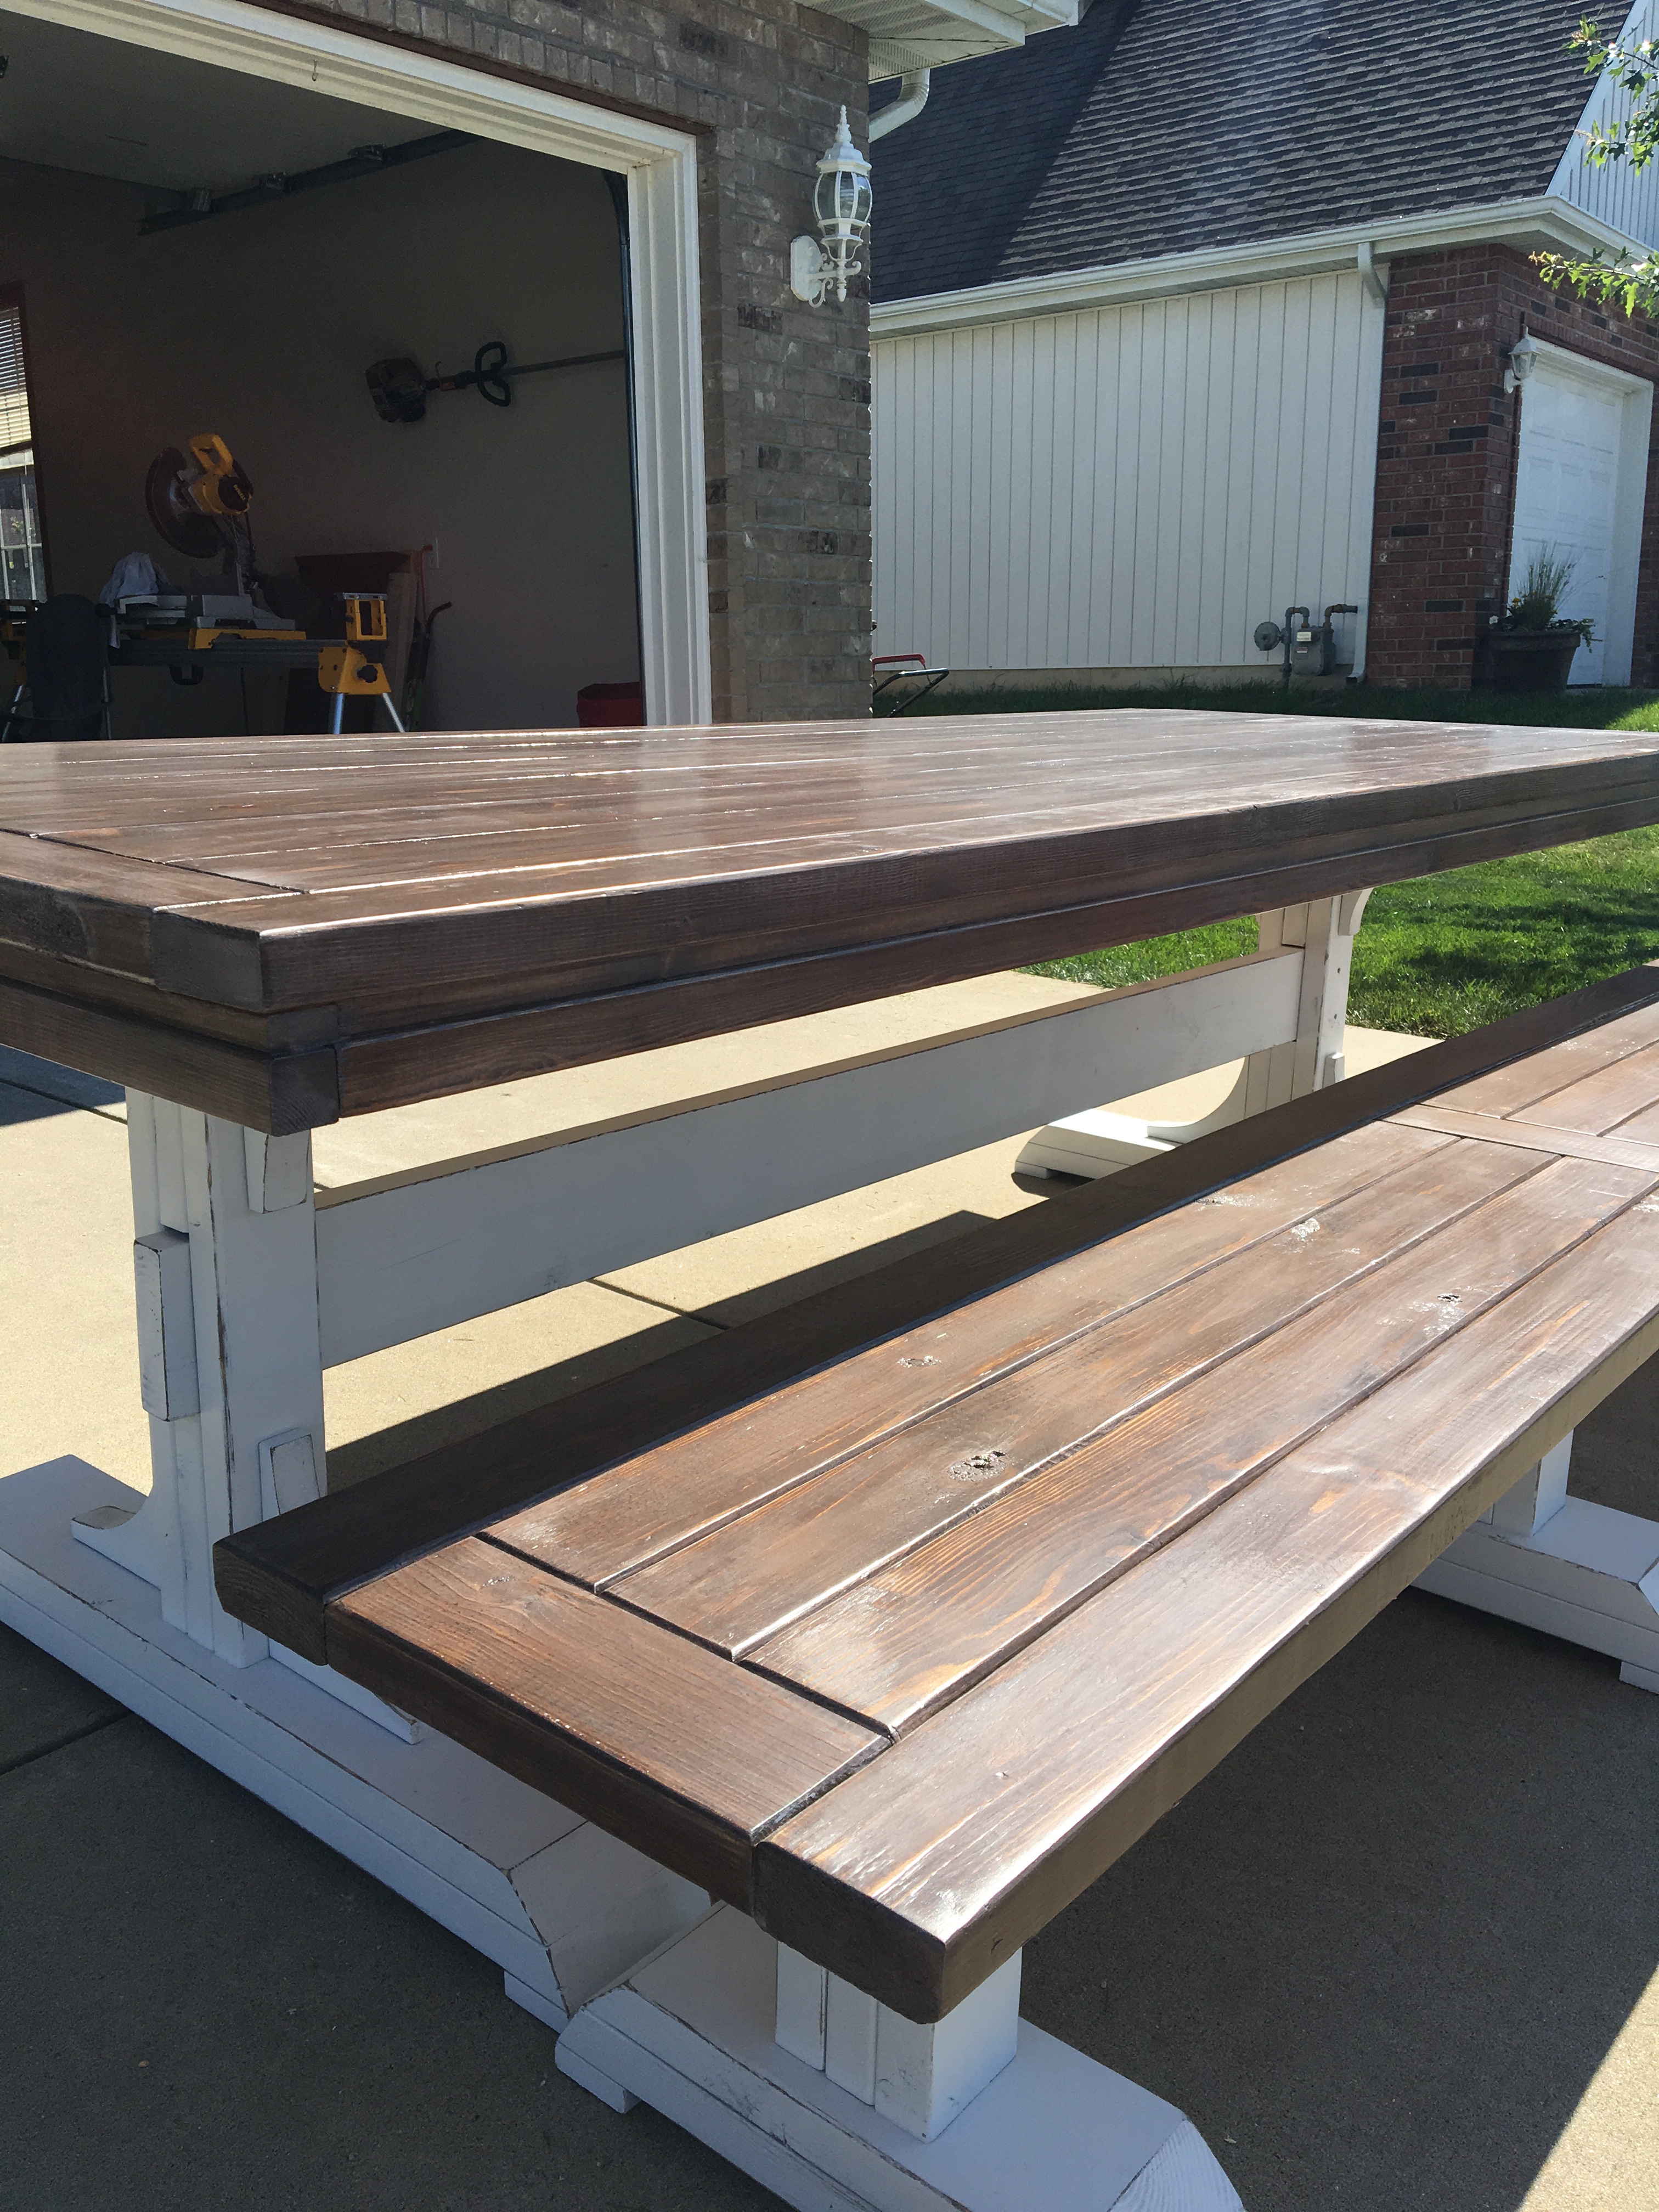
Built from Plan(s)
Estimated Cost
$200
Estimated Time Investment
Weekend Project (10-20 Hours)
Finish Used
Rustoleum Kona stain, Minwax pickleing stain, clear matte polyacrylic minwax finish
Recommended Skill Level
Intermediate
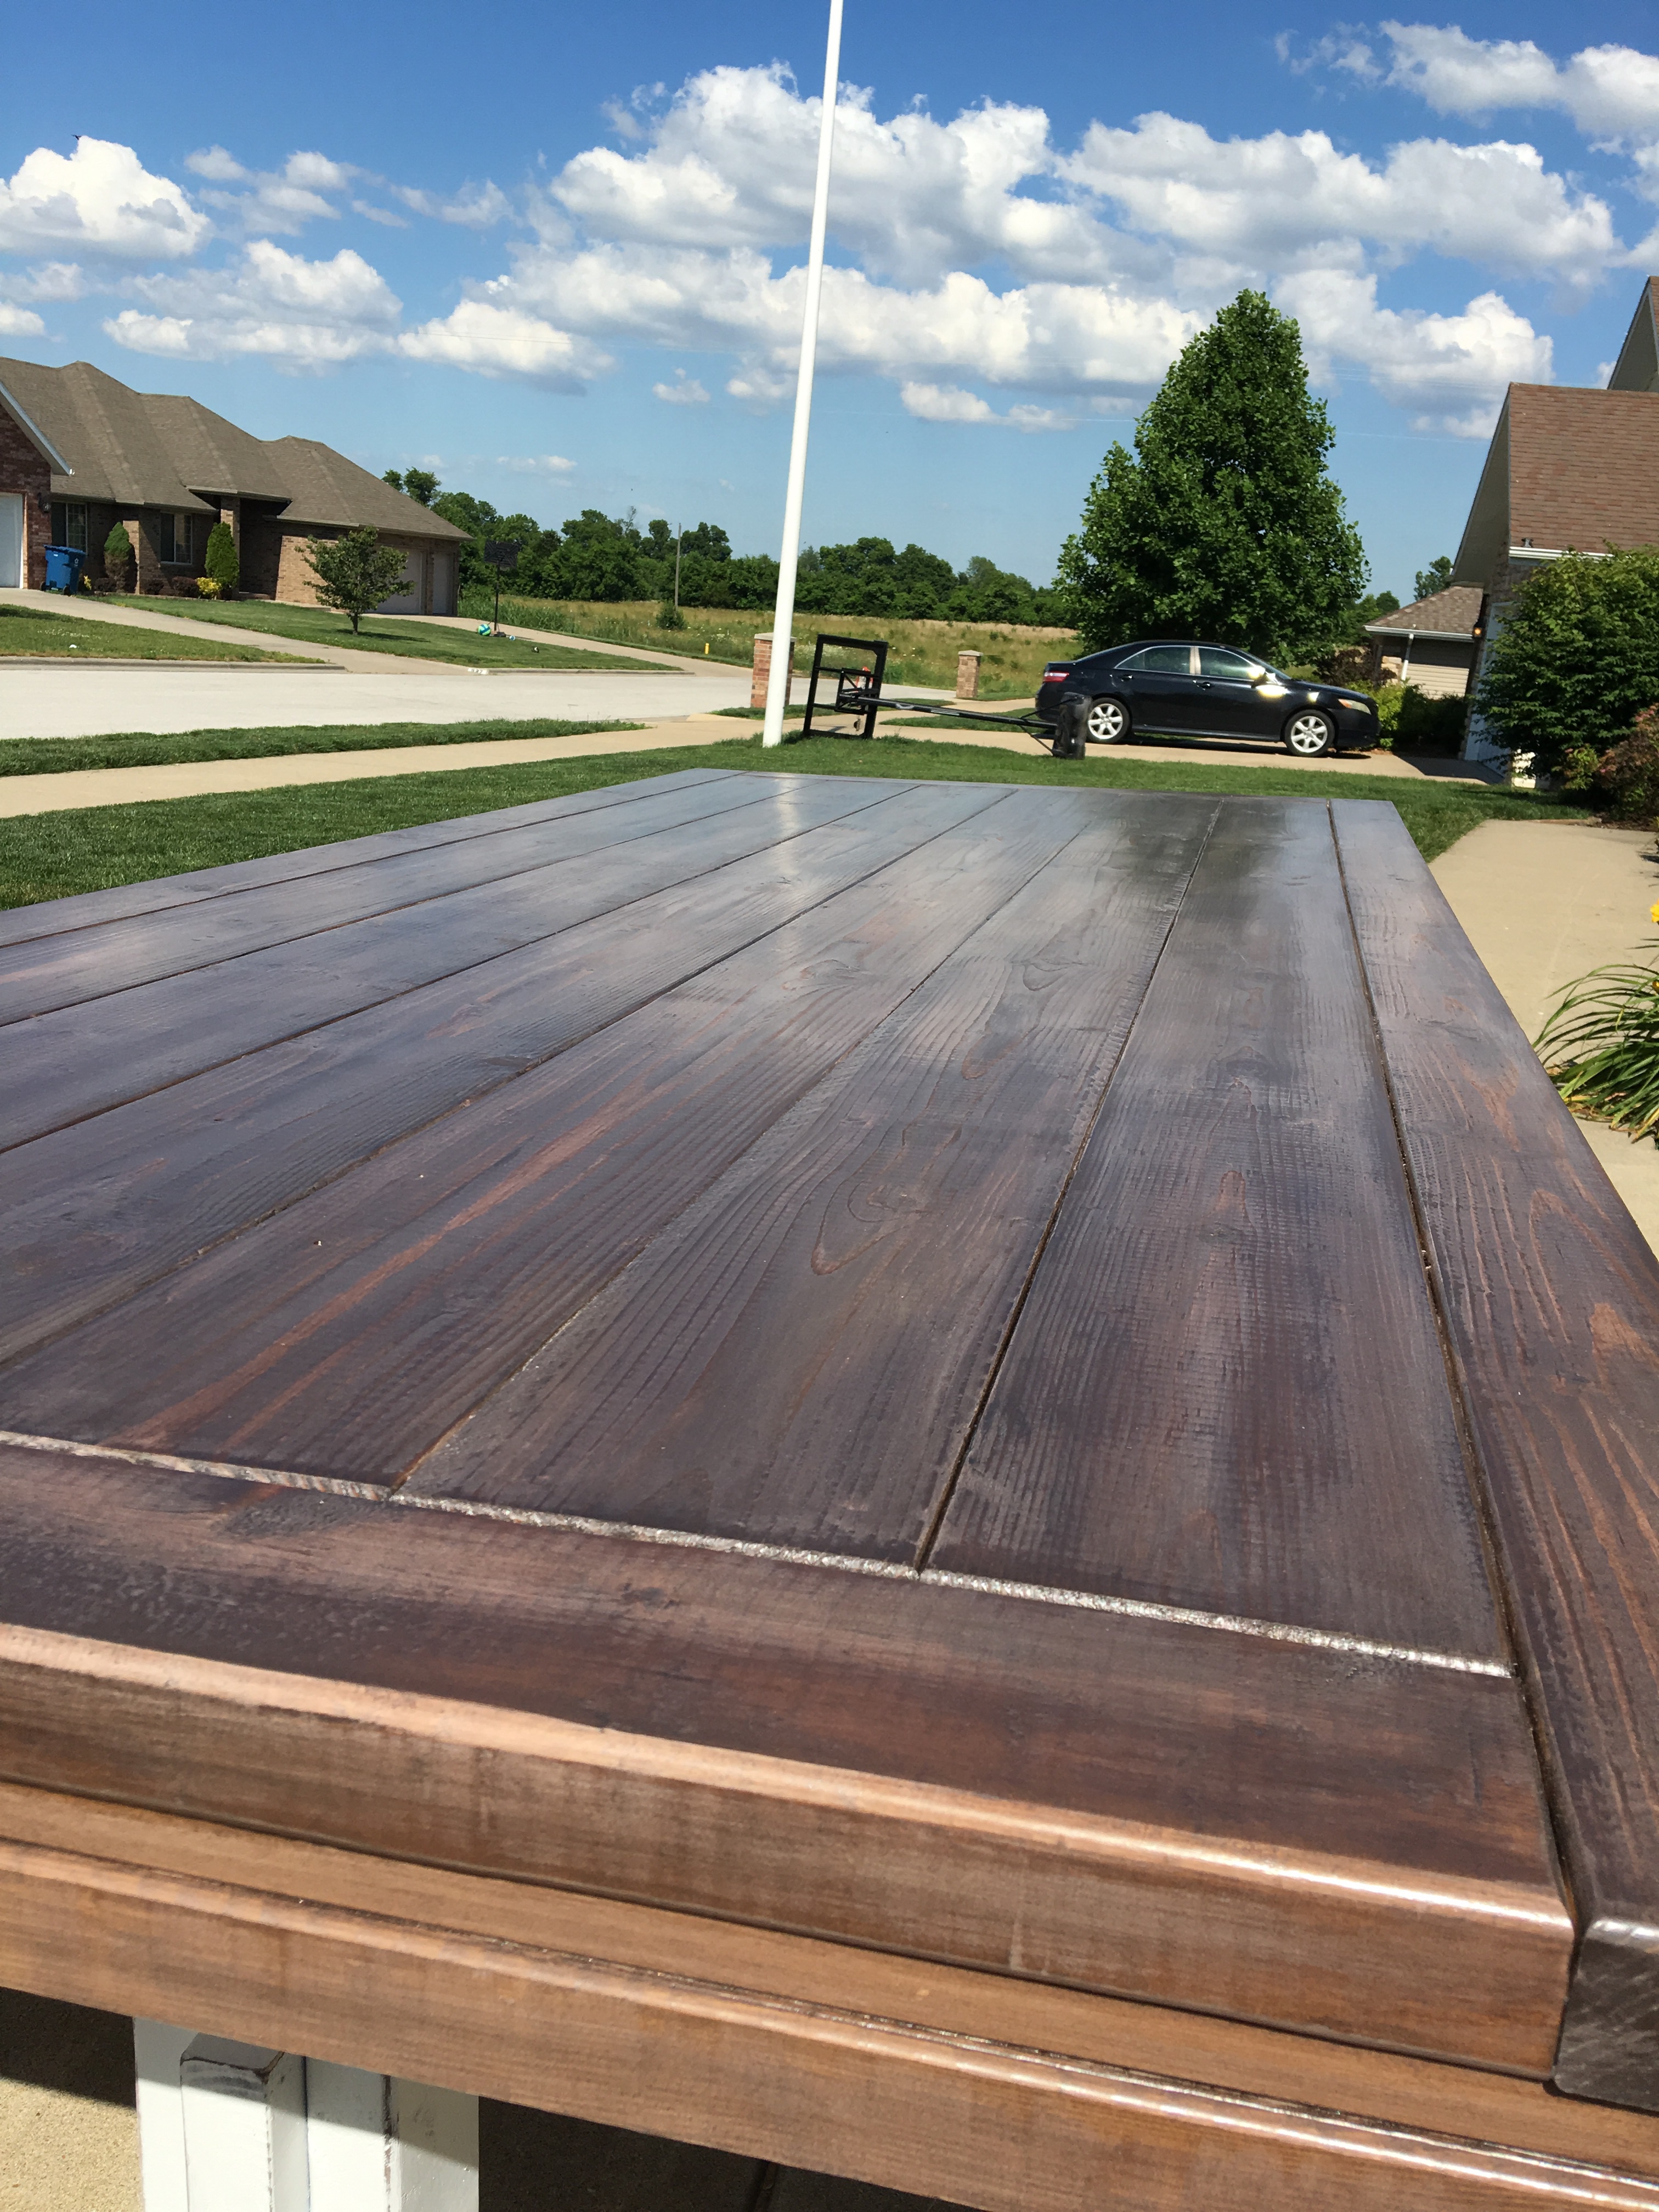
X table, inspired from Ana's plan
Credit goes to Ana for her excellent table plan. Most of my timbers were I found free at the hardware store (Bunnings Warehouse in Melbourne, Australia). Tabletop I made from construction grade hardwood, jointed, glued and biscuit joined, planned, and sanded (40 to 600 grit).
Bunnings has a free timber section where they store all offcuts that are expensive to get rid off than given away for free. I had some 50 odds 70mm by 70mm rough timber pieces that they used for packaging pallets. I then run them through the jointer, thicknesser to bring them down to 65mm by 65mm.
Bunnings dropped the price of construction hardwood nearly half as much as due to defects they have. They were 90mm by 35mm, and 3.6meter long and they cut it half for free.
Tabletop is 1200mm by 900mm. The total height of the table is 750mm including castor wheels. I think I spend more bucks in electricity bills than materials mainly due to running all types of machines forever :) The Shellac is expensive in Australia as much as the hardware was when compared against USA price tag.
Estimated Cost
$45
Estimated Time Investment
Week Long Project (20 Hours or More)
Finish Used
Shellac (Feast and Watson 250 gm). Used less than half in 1 lit of methylated spirit.
Recommended Skill Level
Beginner
A Place for the Christmas Stockings
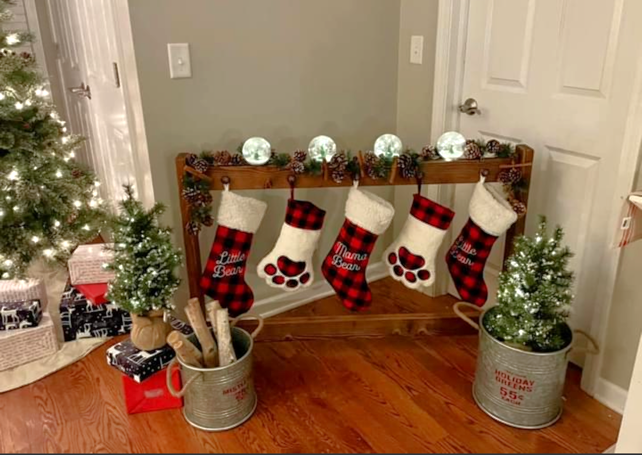
Christmas Stocking Stand by Julie Latham on Facebook.
Built from Plan(s)
Comments
Seasonal And Holiday
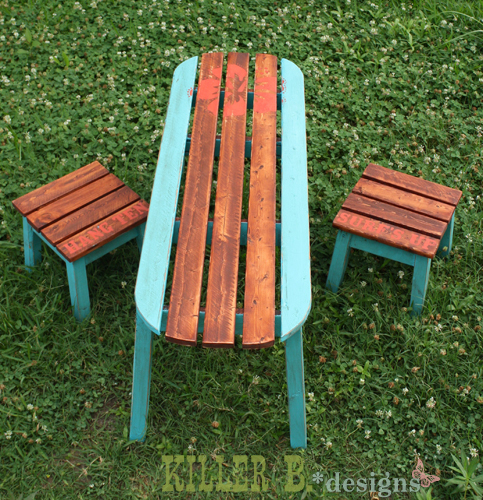
Kids Surfboard Table and Stools
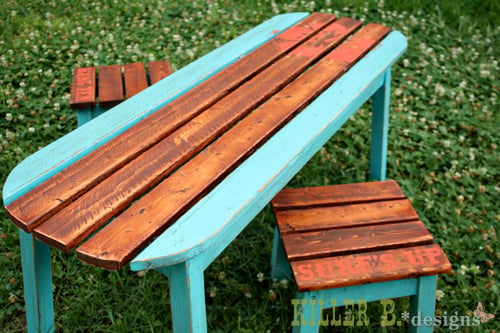
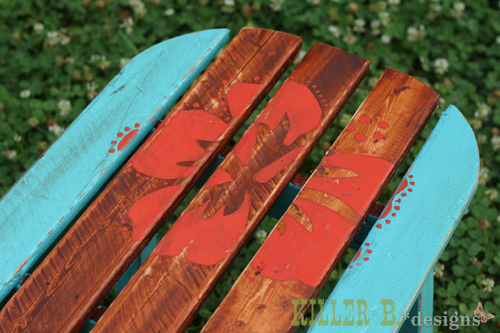
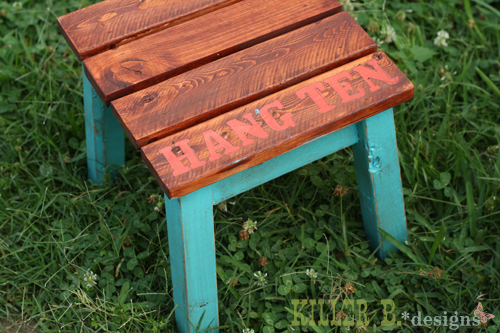
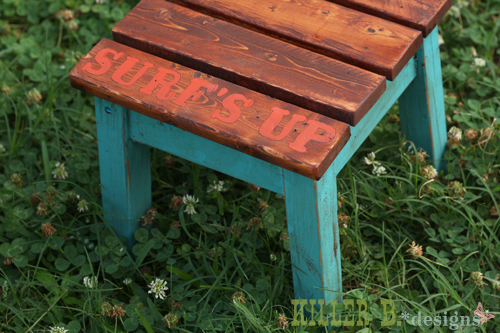
A friend of mine approached me about building something for a silent auction to benefit the Austin Boxer Rescue. After raiding my scrap pile, I found I had everything I needed to build the Kids Surfer Table and Bench Seats. I have to admit the double bevel scared me at first, and I considered ditching it and just building straight legs. I'm really glad I didn't! The splay legs look so cute, and are super solid. Plus it gives the set the added "oomph" of home made to Hand-Built and Awesome. I decided to stain the three center slats instead of white paint, and used Behr's Mermaid Treasure on the legs. The hibiscus and "surfer dude" sayings are from a can of oops! coral paint that I outlined with a fine-tipped Sharpie. I can't be happier with this little set, and am so excited to deliver it! I'm hoping one lucky kid gets to take this set home while saving a few pups in the process.
A few last thoughts, the stools are great as-is, but the surfer table would make a great bench or coffee table. Only the paint sets it aside as a "kids surfer table", the shape and slats lend a great cottage feel.
Built from Plan(s)
Estimated Cost
free, from scraps
Estimated Time Investment
Afternoon Project (3-6 Hours)
Finish Used
Two coats Behr Mermaid Treasure on legs, one coat Minwax Gunstock on slats, 150 grit sandpaper on edges, Valspar Glazing Medium with Gunstock stain to distress. Followed with two coats of spray on Polycrylic
Recommended Skill Level
Intermediate
Comments
Wed, 05/30/2012 - 10:30
Awesome Brooke!
I have a couple questions regarding your finish.... It's beautiful by the way!! Do you mean for this to be an outdoor set? Did you finish the top slats before you attached them to the bottom and did you fill the pocket holes? I'm working on an outdoor set now and would love to stain it instead of paint but am leary since I'm using top choice pine and not cedar or pressure treated... Just wondering how furring strips, stained hold up outside? Thanks
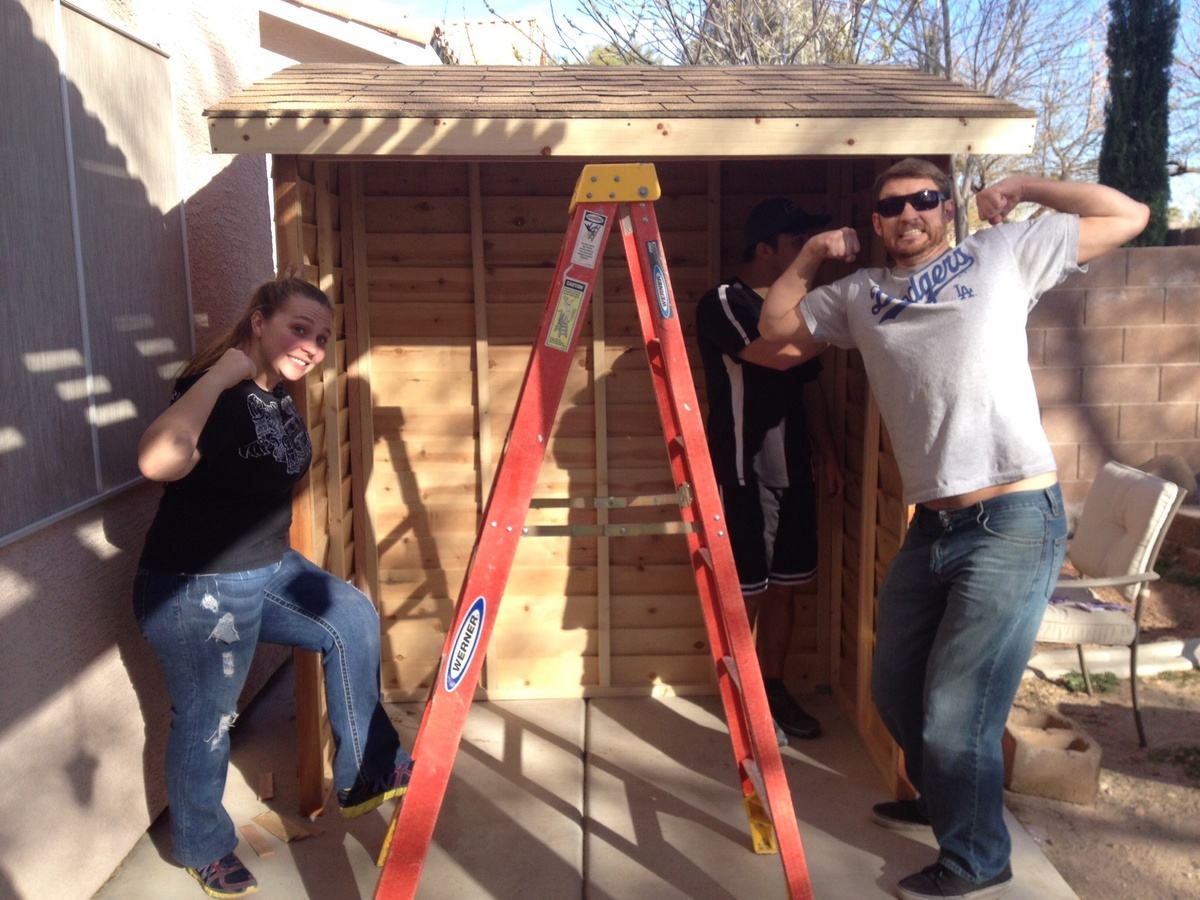
World's smallest man cave
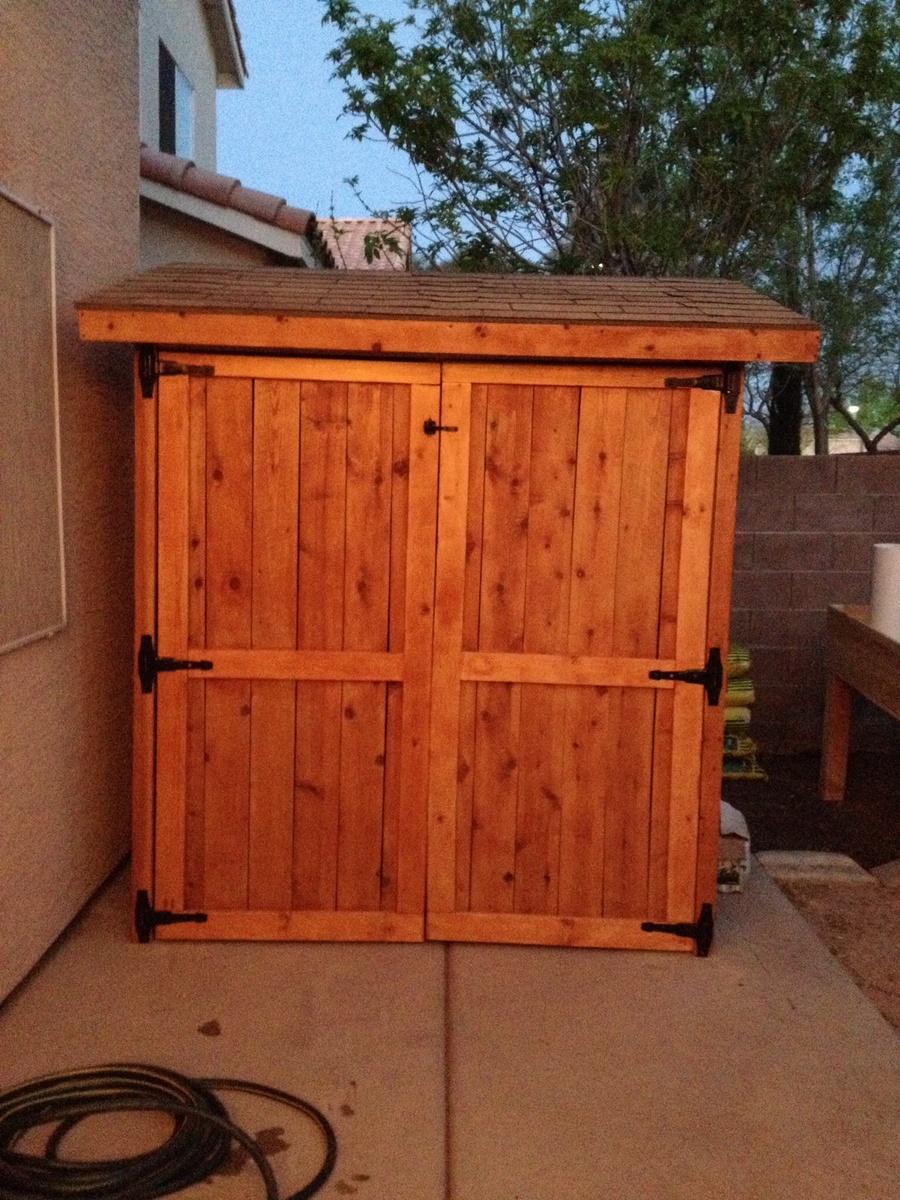
I made this shed in our backyard for my fiancée. We have a smaller house and not much room, so I thought I'd give him a place of his own to store his beer brewing supplies. I added a lot of personal touches, including shelves, a bottle cap wind chime, and a dart board which led to my brother dubbing it the worlds smallest man cave. Overall it has been a tremendous hit! Thank you!
Built from Plan(s)
Estimated Cost
$250
Estimated Time Investment
Weekend Project (10-20 Hours)
Finish Used
Pecan satin
Recommended Skill Level
Intermediate
Comments
Wed, 03/19/2014 - 08:26
Great Job!!!
Better a small man cave,then no man cave. We gotta have some place to play,lol.
Clubhouse Bed
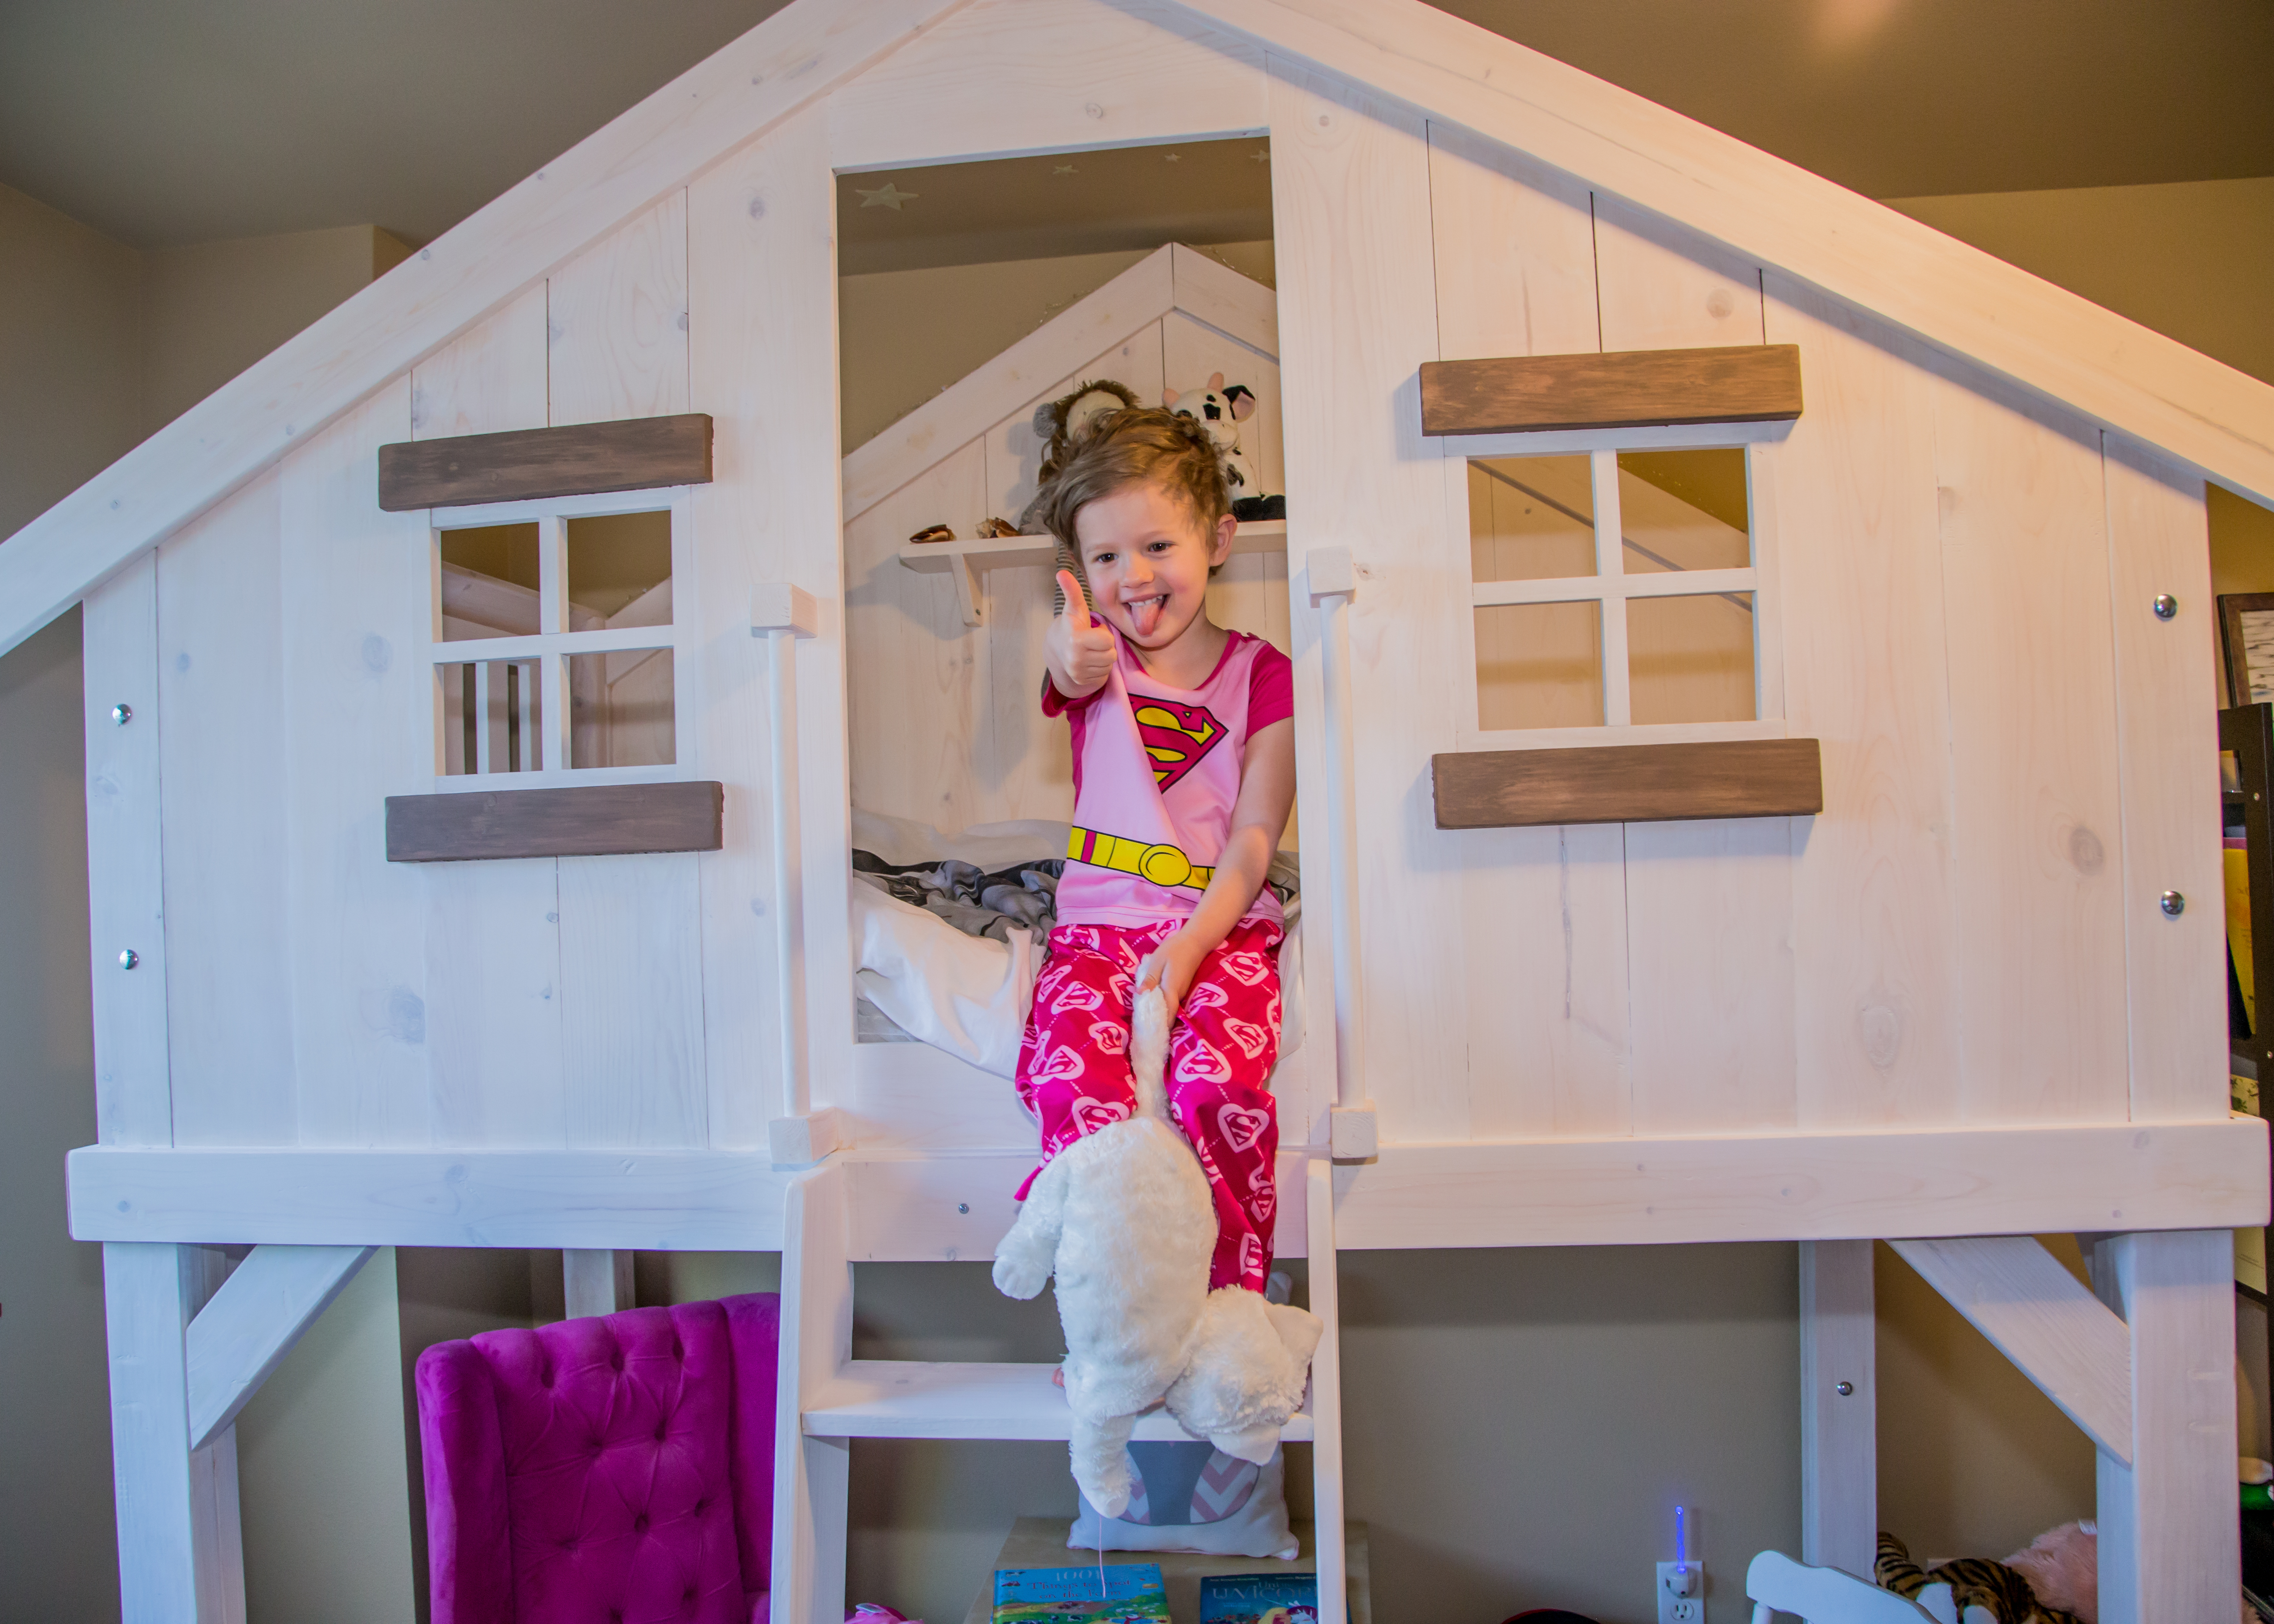
This was our first bigger project. The plan was really really helpful. We made some custom changes to make the bed higher and added some other customizations. Overall, it was a great success and our daughter really loves it. It was all worth it! :)
Built from Plan(s)
Estimated Cost
$400
Estimated Time Investment
Week Long Project (20 Hours or More)
Finish Used
white washed
Recommended Skill Level
Intermediate
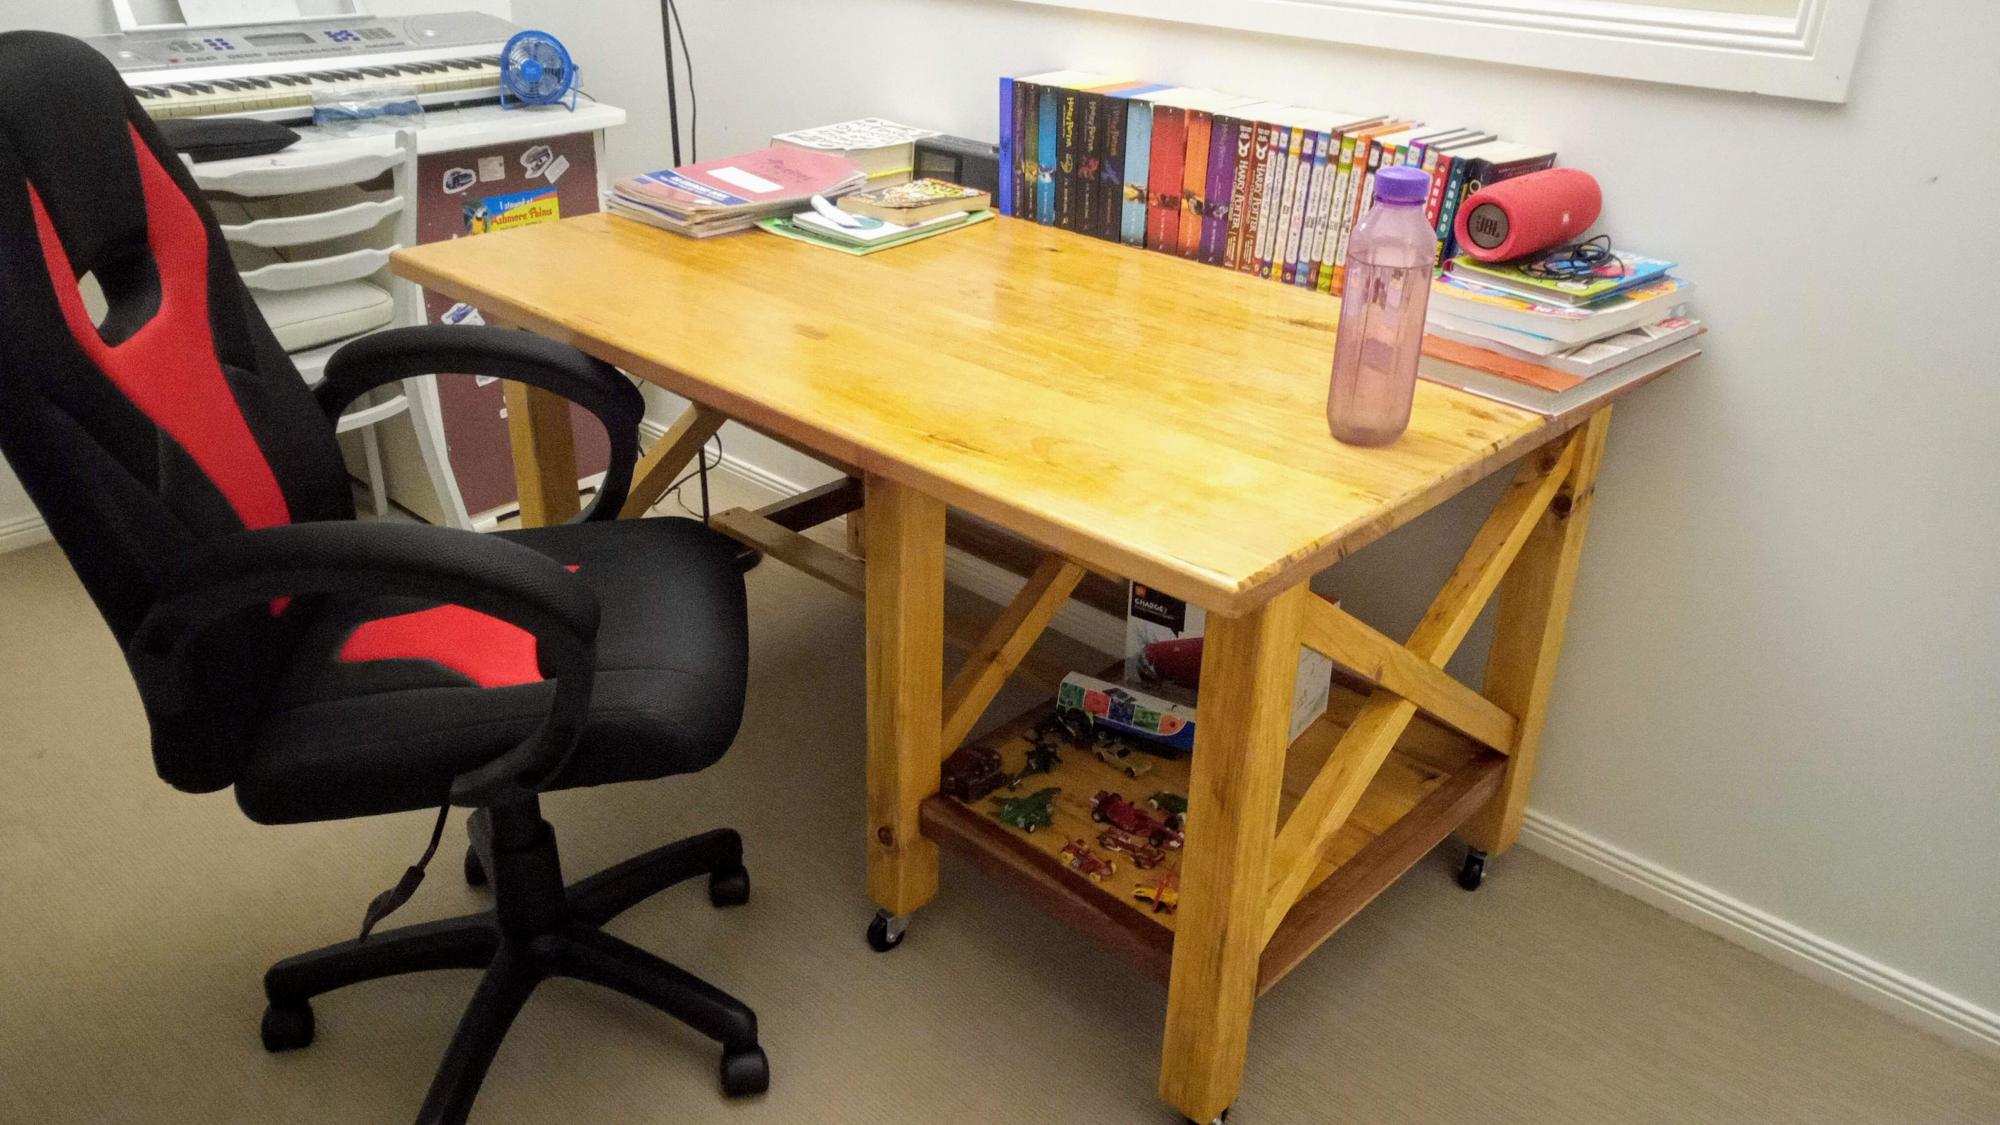
Modified ladder shelf
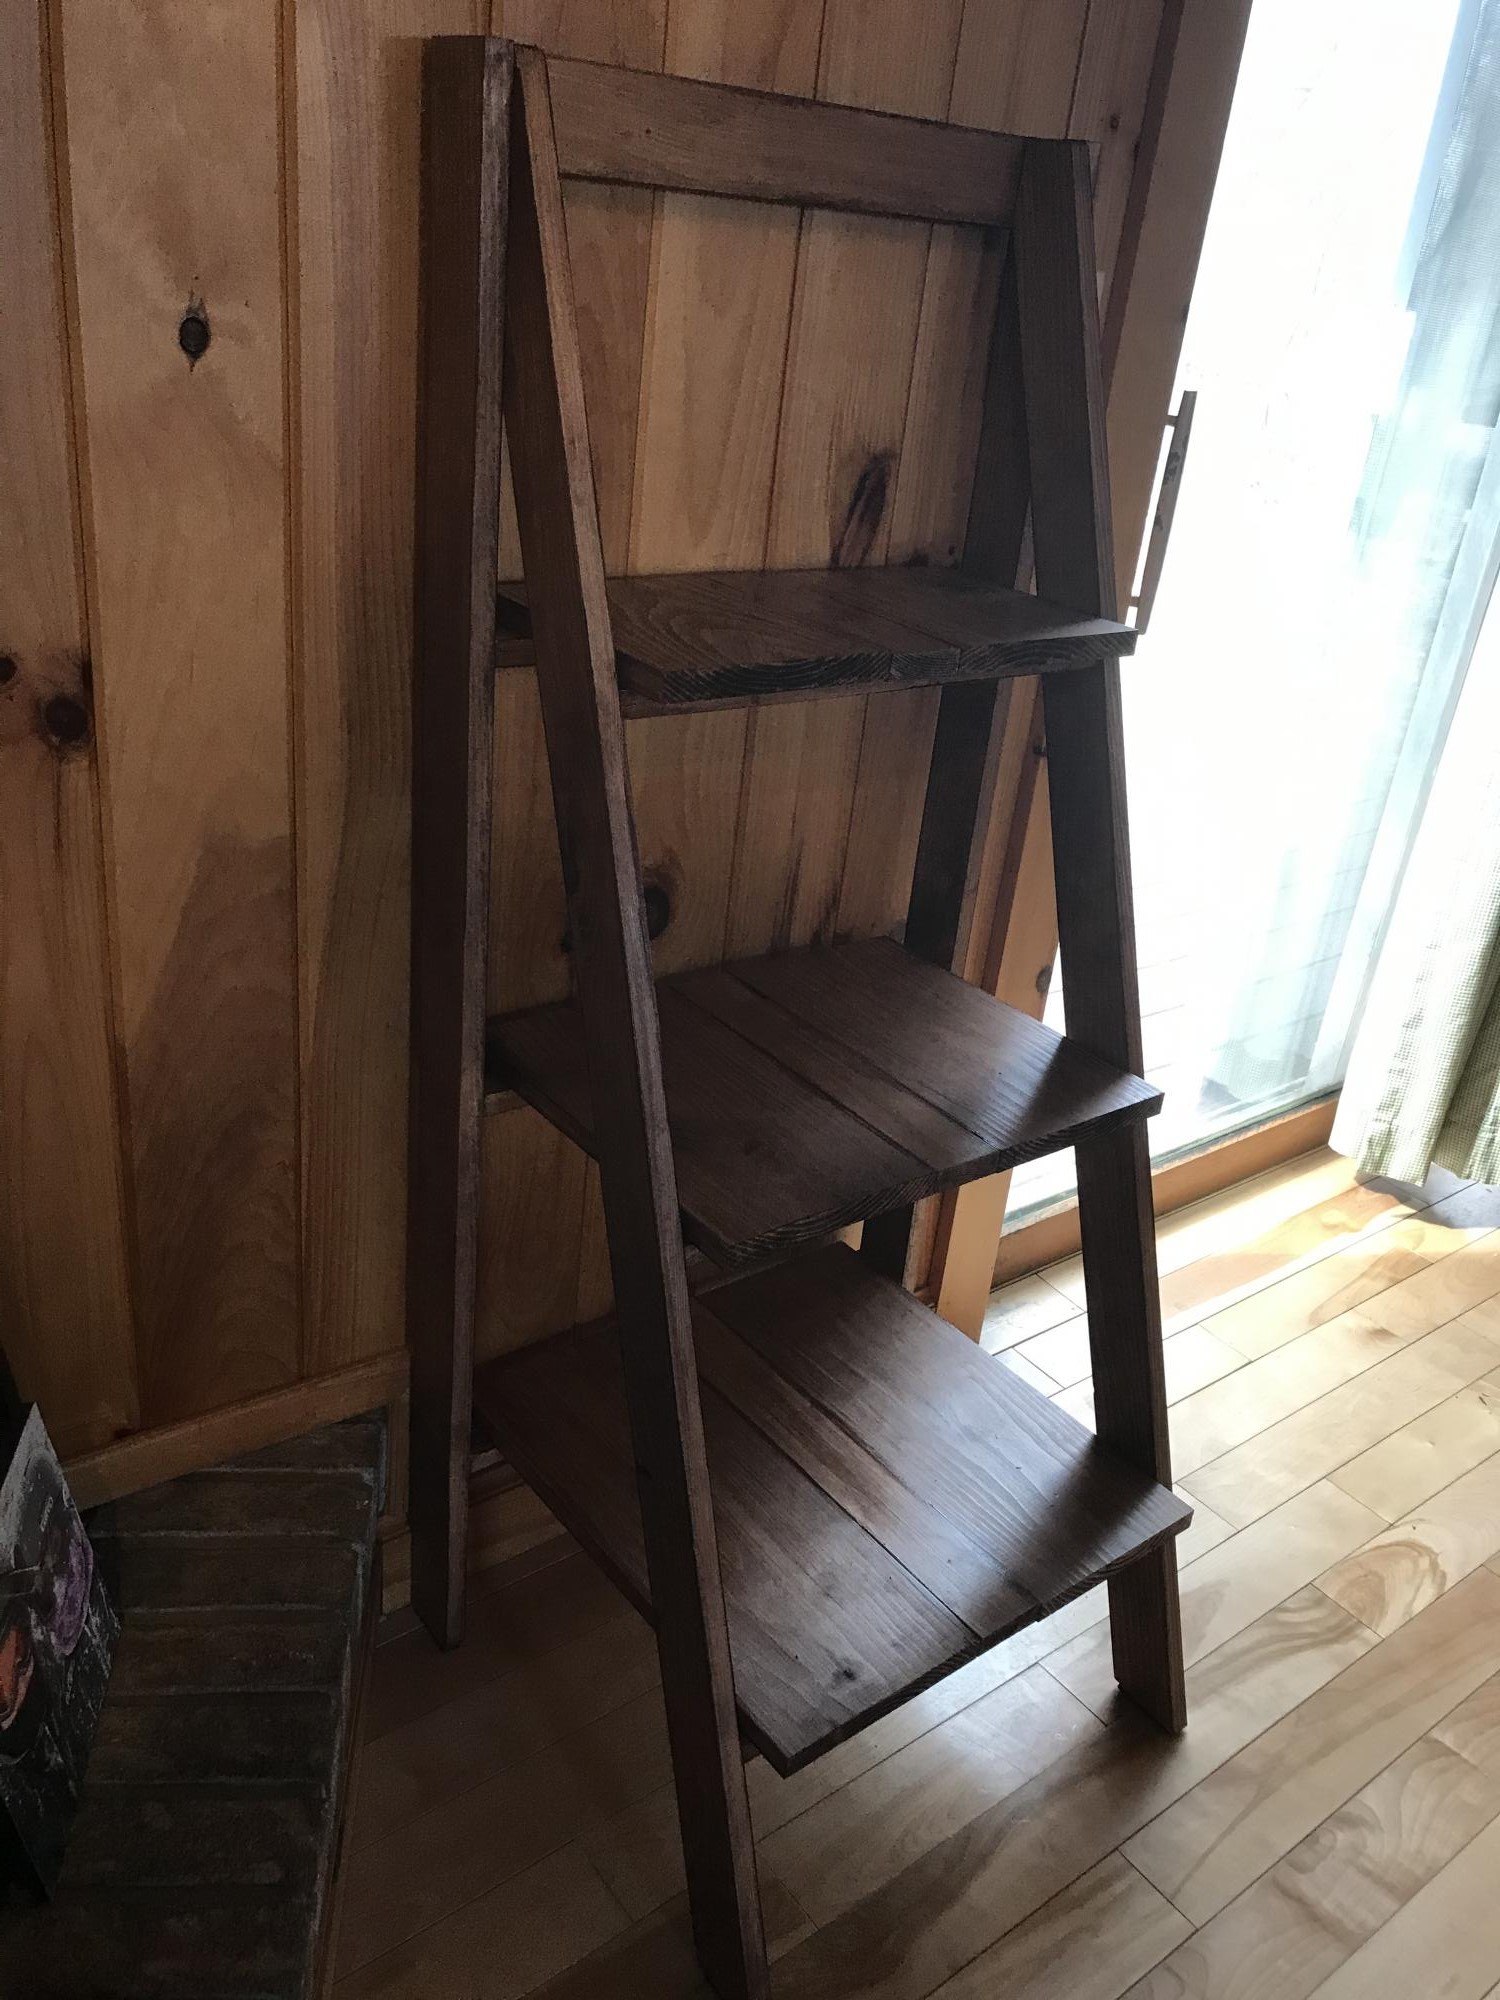
Didn’t want to go 5’ tall for the space we planned to put it, soI dropped it to 48” and reduced to three shelves. To accommodate a wider shelf and give it some additional character, I added a 1x3 between the 1x8s that make the shelves (total width of the shelves is 17.5”).
Built from Plan(s)
Estimated Cost
$45
Estimated Time Investment
Afternoon Project (3-6 Hours)
Finish Used
Rustoleum dark walnut stain and poly
Recommended Skill Level
Beginner
Leaning ladder shelf
This was my first Ana White building project. I was hooked!
I decided to paint it black instead of staining. I feel every room needs one black piece of furniture!
I am slowly getting to know my tools and try to sneak away a few minutes during children napping to cut away!
Estimated Cost
25$
Estimated Time Investment
Afternoon Project (3-6 Hours)
Finish Used
black satin paint
Recommended Skill Level
Starter Project
Comments
Mon, 10/14/2013 - 07:04
I love that you made this
I love that you made this with just the two support legs. Do you mind sharing your measurements on this work?
Super Easy, Super Awesome! Thank you Ana & Ashley

Loved this Coffee Table and wanted to suprise the wife for christmas, so being my first project I got started! had no idea what I was doing but they were great instructions, and the KREG JIG is AMAZING. altered the plans a bit to make it a rectangular coffee table (added 12 inches) instead of square to fit our living room better. Now to tackle the next project!
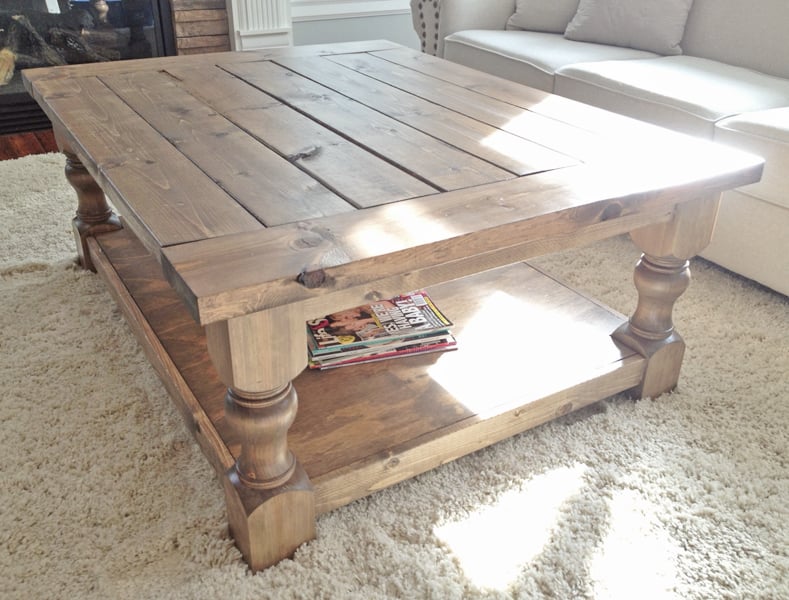
Built from Plan(s)
Estimated Cost
$200
Estimated Time Investment
Weekend Project (10-20 Hours)
Finish Used
Used 2 different stains to get a brown/gray finish. just one coat of each!
Minwax Weathered Oak & Minwax Special Oak.
Minwax Weathered Oak & Minwax Special Oak.
Recommended Skill Level
Beginner
Comments
Wed, 03/19/2014 - 07:39
I absolutely LOVE the finish
I absolutely LOVE the finish on this, thank for sharing!!! For the estimated cost you put $100, is that without including the cost of the turned legs? Did you get the legs through Osborne? I think I NEED to make this coffee table and use that finish!
In reply to I absolutely LOVE the finish by MichelleC
Wed, 03/19/2014 - 09:02
Thanks Michelle!
Now that you brought it to my attention you are absolutely right, I completely forgot about the cost of the legs. including the cost of those, it does come to $200 dollars, ill change that. I also did get the legs from Osbourne. As for the finish yes do it! I am really happy with how it turned out :) thanks again and let me know when your coffee table is done so i can check it out!
Cheers,
Justin
Wed, 03/19/2014 - 09:55
if you dont mind me asking,
if you dont mind me asking, in what order did you apply the stains?
In reply to if you dont mind me asking, by 2nervous2build
Wed, 03/19/2014 - 11:47
Hey 2nervous2build
not at all! here is a link as to what I followed.
http://ana-white.com/2013/05/vintage-graybrown-stain-pine
Ana shows exactly what to do :) mine didnt turn out as dark as her project, but am still lovin the table none the less. :)
Cheers,
Justin
Wed, 03/19/2014 - 09:55
if you dont mind me asking,
if you dont mind me asking, in what order did you apply the stains?
Sat, 04/26/2014 - 17:54
Amazing first build and the finish is TO DIE FOR!
Wow, congrats on your first build! It turned out amazing! And that finish? OMGosh, so incredibly beautiful! I love it! Thanks for sharing!
Tue, 05/20/2014 - 13:32
Hey!
Thank you Jen for checking out the coffee table! thanks for the compliment as well!
Tue, 05/20/2014 - 13:32
Hey!
Thank you Jen for checking out the coffee table! thanks for the compliment as well!
In reply to AWESOME 1st Build by RE
Fri, 01/02/2015 - 09:48
Thank you! Cheers, Justin
Thank you!
Cheers,
Justin
Fri, 01/02/2015 - 09:47
Hey Mandybeck!
Sorry for such a late response! incase you still needed to know, I made a typo and I did mean special walnut.
Thanks!
Cheers,
Justin
Fri, 07/17/2015 - 12:59
stain
Being as yours is much lighter (and i like it more than the darker). Did you use the wood conditioner and how long did you leave the stain on for? it almost looks like once it was on you were wiping it off. Love it well done :)
Also, do any of you guys use the paste wax when finished? I was thinking about following the stain with some poly to seal it. any suggestions?
Wed, 08/19/2015 - 09:47
An excellent finished project
An excellent finished project. Did you use 2x6 for the top as your wood looks a tad thinner?
Wed, 08/19/2015 - 09:47
An excellent finished project
An excellent finished project. Did you use 2x6 for the top as your wood looks a tad thinner?
Wed, 08/19/2015 - 13:58
Table Legs
Can you tell which legs and size you used from osborne?
Project looks amazing!