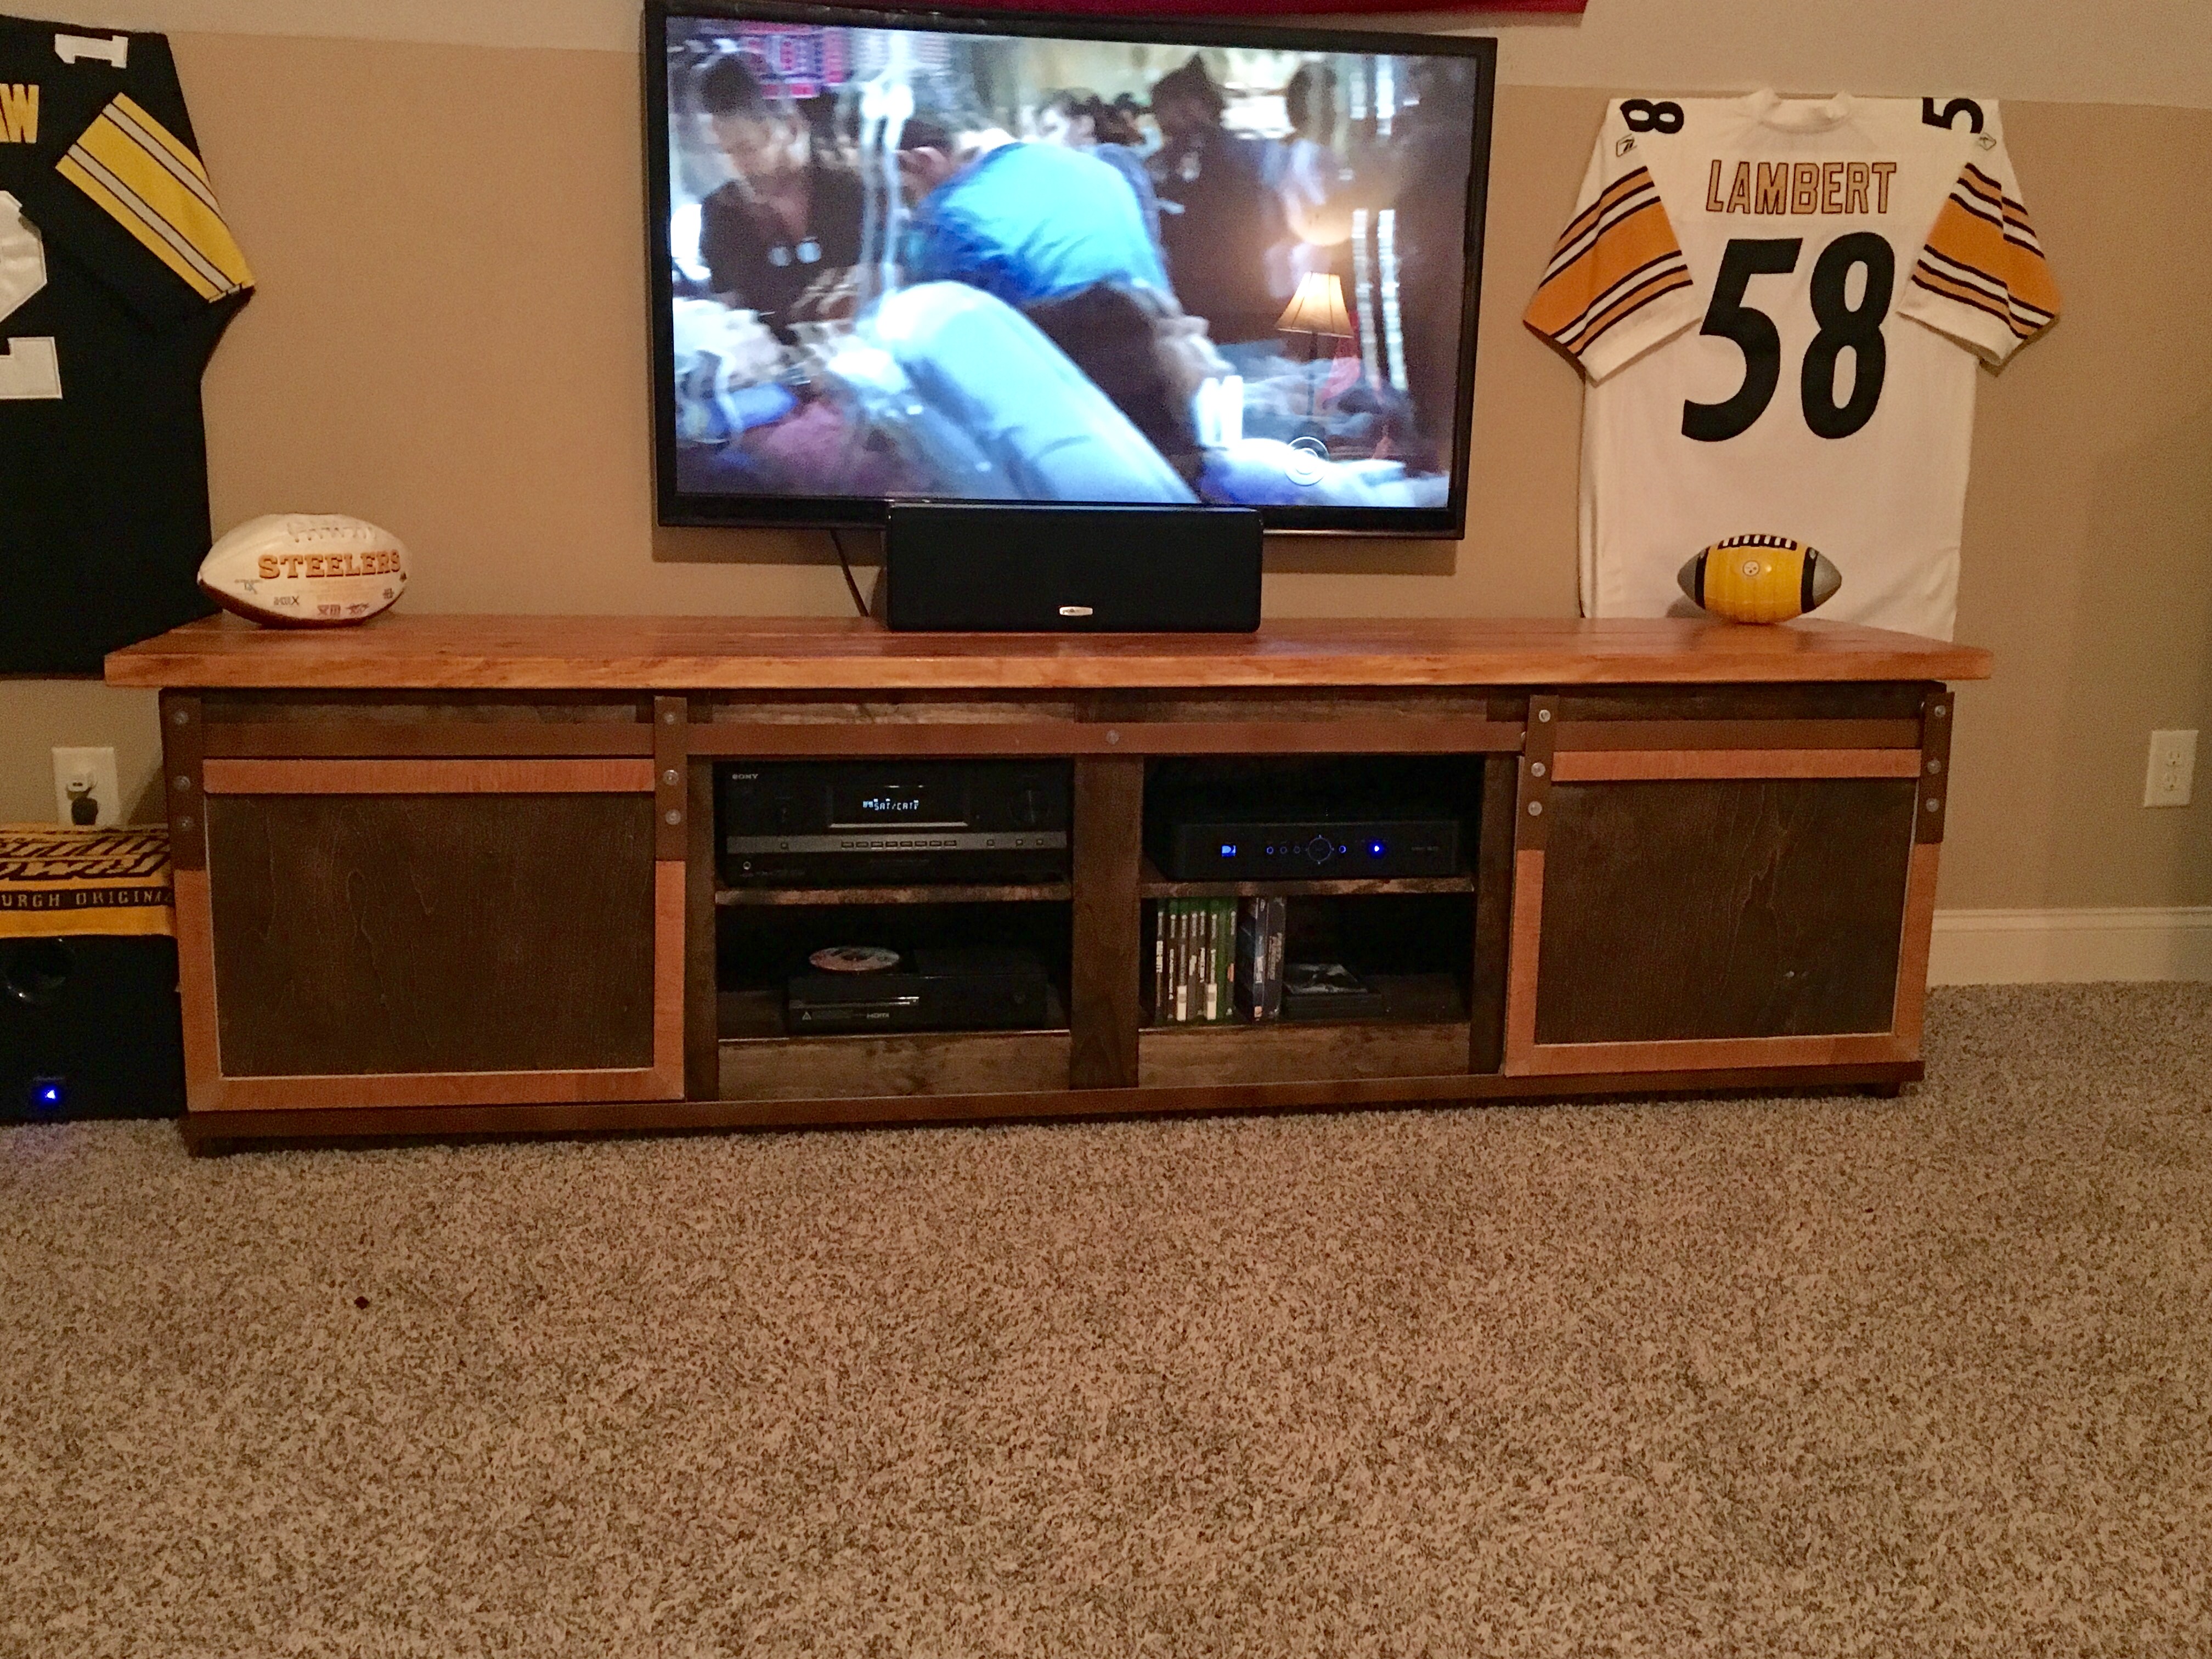
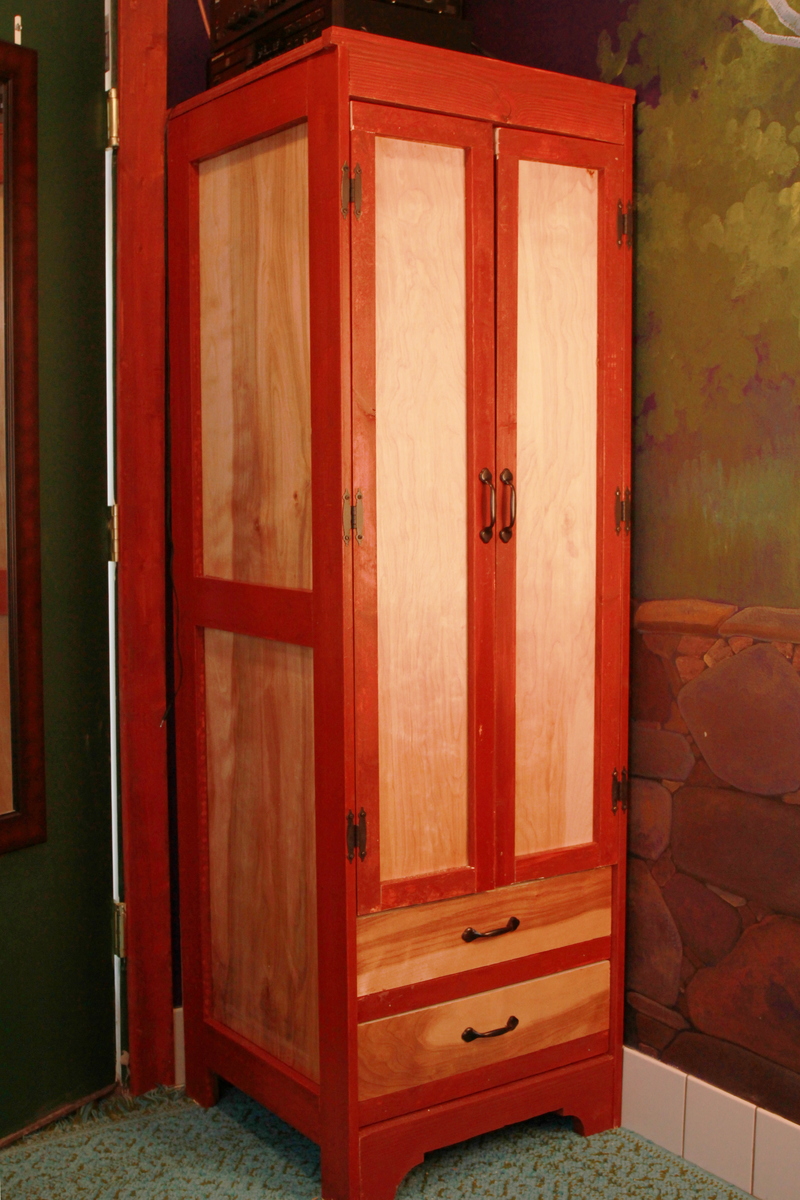
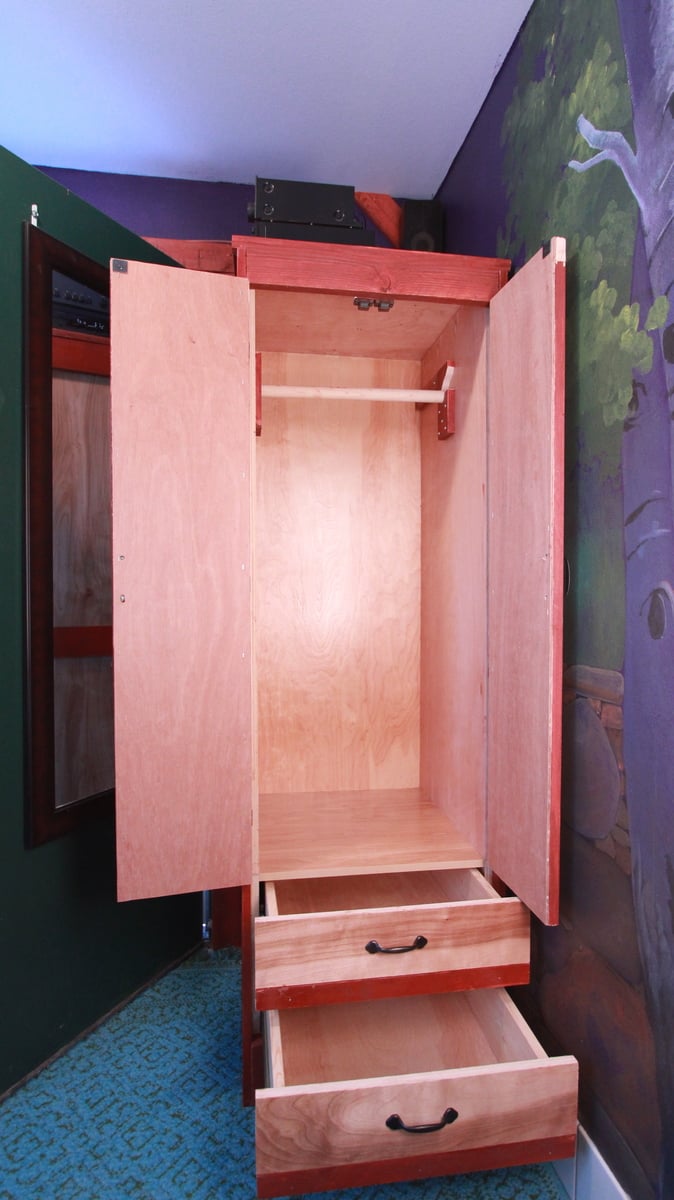
Community Brag Posts

Emersen console

Submitted by news1811 on Sat, 01/18/2014 - 12:19

I altered the plans to fit the space where it would be going. I extended the length and added another side of shelves. I also reduced the size of the doors a little and made the base a little shorter to reduce overall height. This project required and extra sheet of plywood to complete. I used the Purebond birch from Home Depot and whitewood for the face frame and doors. I liked the finish in the original plan so I tried to make it look similar. I used different shades of brown and also scorched some boards of the door and some areas of the face frame with a torch. For the light areas on the door and frame I just taped off and sanded down. I worked on it when I had some spare time but this project could be completed in a weekend including the finish.

Estimated Cost
$200
Estimated Time Investment
Weekend Project (10-20 Hours)
Finish Used
I used Rustoleum American Walnut as a base and used Miniwax Dark Walnut for the darker boards. I also used a hand torch to scorch some boards and other areas. I finished with a few coats of polyurethane.
Recommended Skill Level
Intermediate

Entertainment Center and Bookshelves

Submitted by talvey50 on Sun, 04/10/2016 - 21:08

A combination of the Printers Triple Console Cabinet and the Reclaimed Wood Rolling Shelf (x2). We knew we wanted the bookshelves so I made those first. The plans were really easy to follow and I knocked out both in a weekend. Once I got those where we wanted them, it left a void that only the Printers Console could fill. That took a little longer than anticipated and was about at the extent of my woodworking skill (so far!) but it came together perfectly.

Estimated Cost
Rolling Shelves ($100 each)
Printers Console Cabinet ($250-300)
Estimated Time Investment
Week Long Project (20 Hours or More)
Finish Used
My favorite stain ever....white vinegar and steel wool. Shred up some 0000 steel wool in a jar and pour white distilled vinegar. I usually let it sit for a couple of hours before wiping on the wood.
Recommended Skill Level
Intermediate

Comments

Queen Farmhouse bed with storage and Farmhouse Doll Bed

Submitted by CPeeples on Sun, 12/22/2019 - 06:11

I built this queen size farmhouse bed using Ana's Plan. I wanted hidden under bed storage so I did alter that part of the plans. The box is pretty heavy so i added foot supports to carry the weight. I have access to the storage on both sides of the bed. I have built another version of this bed where i added gas springs to help lift the bed for access but i chose not to do it on this one. As an added feature, i also built a matching doll house bed. I love this bed, and it turned out beautiful. 

Estimated Cost
$400
Estimated Time Investment
Week Long Project (20 Hours or More)
Finish Used
Min-wax Espresso stain and Min-Wax Poly
Recommended Skill Level
Intermediate

Media bench

Submitted by joja on Thu, 04/05/2012 - 06:58

Inspired by Ana!

Estimated Time Investment
Afternoon Project (3-6 Hours)
Finish Used
Stain.
Recommended Skill Level
Beginner

Work bench with 3/4 blonde plywood (2sheets) top

Submitted by tommybo76 on Mon, 01/20/2014 - 16:20

I based my work bench on the "sturdy workbench" plan. I made my top using two sheets of blonde 3/4 inch plywood. I glued/screwed and clamped two 3' x 6' sheets together (had the store cut 4x8 sheet to my dimensions). I didn't stain it but did coat with 3 coats of poly. The legs and supports are 2x4s (i think i used 7 though some was left over scrap) and the shelves were built from scrap MDF I had left over from a previous project. I designed my top to hang over at least two inches (longer in some areas depending on where the supports line up) to make clamping easier and it sits 37" from the floor. I wanted to ensure i had adequate space for my shopvac and air compressor so I lowered the base from the original design to avoid making the workbench too tall. This work bench is a very good size for my needs and extremely sturdy!

Built from Plan(s)
Estimated Cost
100
Estimated Time Investment
Day Project (6-9 Hours)
Finish Used
Polyurethane satin
Recommended Skill Level
Beginner

Famhouse Dining Table

Submitted by kristyzed on Wed, 04/13/2016 - 11:27

I wanted a really long table for my dining room to use at family gatherings so I can host more dinners. This table is 9 feet long and has plenty of space for our needs. I used knotty pine and finished it with Minwax Espresso wood stain. I then added 1 coat of polyurethane as I didn't want the table to appear shiny but still wanted some protection in case of spills.

This project was definitely a labour of love but I'm thrilled with the results.

Built from Plan(s)
Estimated Cost
$200
Estimated Time Investment
Week Long Project (20 Hours or More)
Finish Used
Minwax Espresso stain
Polyurethane
Recommended Skill Level
Intermediate

Live Edge Farmhouse Dining Table

Submitted by Anonymous (not verified) on Thu, 08/31/2023 - 11:23

I was scared to try this project because it is listed as "intermediate" and I don't have that much furniture building experience. I originally wanted to do this with live edge, but when I saw how much it was gonna cost, I thought I would just do planks. Lucky me, I found 5 8ft live edge pieces (1 ft wide, 3 inches thick) for CAN $100. Some 2x4 and 1x4 and I was ready to rock and roll. I decided to make the table 6 ft long, so the legs are 5 ft apart. I made the connection a bit different than in the plans, just because I want to be able to stretch our legs underneath. It is as stable as can be. I love Ana White's plans. Great instructions, great cut list and almost no left overs.

Nicky Peeters https://www.facebook.com/nicky.peeters.70

Built from Plan(s)

my first project

Submitted by metalmx on Sun, 04/08/2012 - 01:03

my best friend has built a couple of projects from this site. i enjoyed helping him a bit so when he decided to build one of these for yes baby that is due this summer, i figured i'd double up and build one for myself while we were at it. i haven't built anything since high school (10 years ago). he had all the tools and had made a lot of mistakes along the way so he brought be up to speed and told me a lot of "don't do this...trust me" tips that are helpful.

we used premium ply wood cut to 1x12s and poplar 1x2's for this. total wood cost was about 30 bucks per shelf. I decided to use a trim router for my framing along the outer edge. I think it gives it a professional look at it took 10 minutes to do.

NOTE: if you want to rout around the entire top and you used pocket holes....DONT DO IT. we found that one out the hard way on the other shelf. if your bit does anything but slightly round the edge it's gonna hit the screws. :(

i made a last second change and went with a vibrant red and a dark dark black to make it up. i couldn't be happier. it doesn't match my room at all but i don't care at this point. my friend did a great job taping off the trim and the lines are just awesome.

This thing is stout. i'm not a small man and would not hesitate to stand on top of this thing all day. can't wait to show it off to anyone i can:)

Built from Plan(s)
Estimated Cost
40-50 dollars with paint included.
Estimated Time Investment
Weekend Project (10-20 Hours)
Finish Used
satin black and ruby red satin for the trim. both paint a brand i forgot from lowes.
Recommended Skill Level
Beginner

Comments

Hut tree house

Submitted by dreamworx on Wed, 01/22/2014 - 10:47

I used all scrap wood that I had laying around. even the 2X4s were old painted wood and looked beautiful when sanded down.

Estimated Cost
if you buy the wood 150.00
Estimated Time Investment
Week Long Project (20 Hours or More)
Recommended Skill Level
Beginner

Outdoor sofa

Submitted by Anonymous (not verified) on Sat, 04/16/2016 - 07:25

I built the sofa and loveseat from 2X4's and used 1X4's for the top of the coffee table. I used standard patio cushions for the sofa and cut the tops off to use at the side for arm rests.

Estimated Cost
$130.00 (I already had the cushions stored)
Estimated Time Investment
Weekend Project (10-20 Hours)
Finish Used
latex wood conditioner followed by exterior CIL woodcare exterior stain by home depot
Recommended Skill Level
Beginner

Family Cabin with Flip up bed

Always wanted an Alpine lodge, we live in London so a Garden cabin for the kids (and Dad) will have to do! 

flip up bed and storage cabinet (for mattress)

sofa bed, foam cushions with leftover curtains  

mini storage boxes from wine boxes

inspired by tiny house (especially the sofa!)

Still more to do. Desk on its way and bulk head lights fitted soon. 
 

no real plans just rough sketches and trial and error

Estimated Cost
£300 for interior
Estimated Time Investment
Week Long Project (20 Hours or More)
Finish Used
Old white paint and fence paint

Sandbox with benches

Submitted by h.abbott on Tue, 04/10/2012 - 05:43

I knew I needed a sandbox for my toddler, and saw the original on pinterest. I was so happy when I came here looking for designs and saw that someone had created a plan for this. I think I'm more excited about it than my little guy is.

The plan was easy to follow, and it went together quickly. Thank you very much for these plans

Built from Plan(s)
Estimated Cost
$50
Estimated Time Investment
Afternoon Project (3-6 Hours)
Finish Used
Exterior paint in light blue.
Recommended Skill Level
Starter Project

Comments

hippyengineer (not verified)

Tue, 10/16/2012 - 19:32

You rock Ana! Your plans are some of the best quick builds with lots of features. I built this sand box in two hours and my son is having the best time. This is a Texas winter replacement for the beach and the backyard pool.

edkeogh

Mon, 05/23/2016 - 19:44

So I just started making this box and it's truly an awesome design but I couldn't get 1x8 lumber instead I got 2x8... For the box base, will this make an difference in the mechanics of the seat and back opening..and the overall size of the box is 1.5" longer at 49" instead of the 47" the plans detail.. I was hoping that it won't but I think it might interfere with the 2x4 support the seat back..

I right in the middle of this project so I need to get on with it as it's nice tomorrow..

THANK YOU
ED

Hall tree from lockers plans

We modified these plans for a customer down to two lockers. We also added a divider for the cubbies on the top per her request. We found the whole thing to be a bit top heavy and easy to get a wobble. Recommend securing it to the wall with a tether or L bracket. Also, it is CRITICAL to not skimp on the quality of wood and getting straight boards for this. We did not and it was seriously skewed for a while until we did a lot of adjusting...and it still has a bow! Also I recommend doing the build all in one day. I think since we broke it up into two days it allowed the wood to warp more than had it all been assembled and fastened/tightened at one time. Message us with any questions! The stain is Minwax Jacobean- one coat. We got the hooks from Home Depot. The customer wanted plenty of storage so per her request we used 8 hooks! Good luck with this build!

Built from Plan(s)
Estimated Time Investment
Day Project (6-9 Hours)
Finish Used
Minwax Jacobean
Recommended Skill Level
Beginner

Our Kitchen Table

Submitted by Anonymous (not verified) on Mon, 04/18/2016 - 15:25

We wanted to build a new kitchen table for the home we moved into. I had just bought a new table saw and needed a project. We searched through a lot of plans and settled on the Benchmark Octagon Table that Ana White had. My 14 y/o son and I built this over a few nights in our garage and my wife did the finishing. We were thrilled how it turned out. It comfortably seats 8 adults (yes we have had 8 adults at it). My wife and I always sit in the bench that is pictured and we easily eat side by side on one end. It is a great project. I would recommend being very careful attaching the table top support to the base column and also reinforcing the joints of the diagonal upper and lower supports to keep the table top from twisting easily. All in all a fantastic project and people are shocked when I tell them my son and I built it, particularly from off the shelf pine.

Estimated Time Investment
Week Long Project (20 Hours or More)
Finish Used
Dark Walnut Stain and about 5-6 coats of Satin Poly
Recommended Skill Level
Intermediate

Lavander Moon Bassinet

Submitted by papamike on Sun, 01/05/2020 - 13:39

My daughter-in-law asked me if I could build a doll crib for my granddaughter. I had no idea how to do that, so of course I said "Absolutely!" Then I immediately came to the Ana White site!!

I found a few options and checked with my daughter-in-law to see what style she wanted.  She chose the "Baby Doll Furniture Moon Bassinet" and said that it needed to be "lavander".  

As usual, Ana's plans made me look like a hero!  My granddaughter liked it so much she insisted on sleeping on the floor next to it during her nap!   

Estimated Time Investment
Afternoon Project (3-6 Hours)
Finish Used
Paint and satin clear coat.
Recommended Skill Level
Beginner

Benchright Farmhouse Table

Submitted by Beano911 on Fri, 04/13/2012 - 10:01

This was our very first project EVER and it came out beautiful! We needed a dinner table and couldn't find anything that came close to the thousand dollar Pottery Barn Benchright table. While searching for used furniture I came across these plans to build my own. After days of begging and convincing, my husband agreed to help me build it. Now he thanks me all the time! It was so fun and easy.

We did have a couple hiccups with the measurements. Ana did say to read through the plans and comments first, but we failed to write down and remember what others suggested. That being said, these plans were very easy. We took our time building this table since it was our first time using a miter saw and our first time building anything. Our table was a little more expensive than other braggers because we didn't use reclaimed wood and since we are beginners, we botched a couple cuts and had to buy a few extra boards :). After sanding, we took some chains and a hammer to the tabletop and legs to make a more distressed and rustic look. We painted the bolts and pipe black with Rustoleum Flat Black. Our pipe was longer than our table, so we had it cut. If you buy your pipe from Lowe's, they will cut and thread it for you. We couldn't find any hardware that look anything similar to the Pottery Barn Benchright. We checked Home Depot and Lowe's, but decided to settle with some plumbing knobs that screwed in the pipe. Once we painted everything and put it all together, we actually loved the pipe knob look more than the Pottery Barn table hardware!

This table is so darn sturdy and will last forever. I can't thank Ana enough, and thank you to everyone that posts these brags, because you helped me convince my husband and myself that we could do this!

Estimated Cost
$250.00
Estimated Time Investment
Weekend Project (10-20 Hours)
Finish Used
One coat of Minwax Wood Conditioner, Two coats of Minwax Wood Finish in Dark Walnut (the first coat will be ugly, but the second coat is money), One coat of Minwax Polyurethane in Clear Satin (we wanted our table to be protected, but not overly shiny.)
Recommended Skill Level
Beginner

Comments

Bunnie1978

Fri, 04/13/2012 - 16:07

It IS beautiful. When I first saw the main photo on the home page, I thought "there's no way they made that, they must have bought it at PB" because it looks JUST like the PB one. Like, exactly.

You did an excellent job!!

mweir

Sat, 04/14/2012 - 08:26

I love the look of your table, it is beautiful. You did a fantastic job for your 1st project. There will be no stopping you now. Love it!!

My version of ten dollar picture ledges/galley shelves.

I think I get more compliments on these galley shelves/picture ledges than anything else I’ve made, and these were probably the easiest things to make!

It cost me about $25 a piece but they were nearly 8 feet long each. I used a paint sprayer to paint them, WAY easier than brushing on the paint! watch for drips though (my first time using a sprayer, treat it like spray paint, light easy coats!)

Built from Plan(s)
Estimated Cost
$100
Estimated Time Investment
Afternoon Project (3-6 Hours)
Finish Used
used a satin white paint. that is the same as our molding in the house.
Recommended Skill Level
Starter Project

First project ever

Submitted by Anonymous (not verified) on Thu, 04/21/2016 - 18:53

I challenged my husband who is new to any woodworking project to make me this table! That he did!!

Estimated Cost
$250 (benches and table)
Estimated Time Investment
Weekend Project (10-20 Hours)
Finish Used
Rustoleum American walnut
Recommended Skill Level
Starter Project

First Ever Woodworking Project - Modified Farmhouse Table

I modified the Farmhouse Table With Pocket Holes plans to make the table counter height for our views of the woods from the dining area. We also have large family gatherings every Sunday evening so made the overall length 95” and the width 46” using 2x10s instead of 2x8s. I also made a little extra foot room on the ends by moving the stretcher support to the inside of the legs. All of the lumber was run through a planer multiple times to get everything nice and even. Large knot holes where left by choice for character, and I filled them with epoxy and sanded smooth.

I started the project with lumber that was not completely dry. As a result, my tabletop width shrunk by nearly 3/4” over the first few weeks after completion. I would recommend bringing your lumber package inside for several weeks before you begin the build to allow it to dry and shrink. Do not bother to glue the table top if your lumber isn’t dry as it will simply pull apart like mine did.

This table is a BEAST, and will definitely be our shelter in the event of an earthquake. Because of the size, I had to build it in the dining area and I wish I had sanded everything to final finish before I built it. There was a lot of creative shopvac help from the kids.

Thank you for the great plans and inspiration to take on my first major woodworking project!

Estimated Cost
$130
Estimated Time Investment
Weekend Project (10-20 Hours)
Finish Used
Minwax Classic Gray and Varathane Triple Thick Water Based Clear Matte Finish Polyurethane. I also chiseled out a few chunks from the edges and sanded them smooth to make a “used” appearance, as well as using a torch to “toast” the long edges and corners of some of the lumber to give it character and dimension.
Recommended Skill Level
Beginner
Back